Auna 10033151 El manual del propietario
- Categoría
- Reproductores multimedia digitales
- Tipo
- El manual del propietario

www.auna-multimedia.com
Karaboom 100 Wifi
Turmlautsprecher mit Internetradio
Tower Speaker with Internet Radio
Enceinte tour avec radio Internet
Torre de sonido con radio de internet
Altoparlante a torre con web radio
10033150 10033151


3
DE
Technische Daten 4
Sicherheitshinweise 5
Lieferumfang 6
Geräteübersicht 7
Inbetriebnahme 11
Menüstruktur 12
Funktionsbeschreibung 16
App-Steuerung über Air Music Control 22
CD-Player 23
FM-Radio (UKW) 23
DAB-Radio 24
Fehlerbehebung 25
Spezielle Entsorgungshinweise für Verbraucher in Deutschland 27
Hinweise zur Entsorgung 29
Konformitätserklärung 29
INHALT
Sehr geehrter Kunde,
wir gratulieren Ihnen zum Erwerb Ihres Gerätes.
Lesen Sie die folgenden Hinweise sorgfältig durch
und befolgen Sie diese, um möglichen Schäden
vorzubeugen. Für Schäden, die durch Missachtung
der Hinweise und unsachgemäßen Gebrauch
entstehen, übernehmen wir keine Haftung.
Scannen Sie den QR-Code, um Zugri auf die
aktuellste Bedienungsanleitung und weitere
Informationen rund um das Produkt zu erhalten.

4
DE
TECHNISCHE DATEN
Artikelnummer 10033150 10033151
Stromversorgung Netzgerät 230 V ~ 50Hz
Audiocodecs
MP3
AAC/AAC+
WMA
Bitrate bis 320 Kbits/s, sample rate biszu 48 KHz
Bitrate bis 320 Kbits/s, sample rate bis zu 48 KHz
Bitrate bis 320 Kbits/s, sample rate bis zu 48 KHz
UPnP/ DLNA kompatibel
WLAN
Netzwerkverschlüsselung
Frequenzbereich
Sendeleistung
IEEE 802.11b/g
WPA/WPA2/WEP (64/128-Bit-Schlüssel)
2412- 2472 MHz
12 dBm
BT
Frequenzbereich
Sendeleistung
2402-2480 MHz
2 dBm
DAB/DAB+ Radio DAB-Band III 174,928 MHz - 239,200 MHz
FM-Radio 87,5 Mhz - 108 MHz
Display TFT-Farbdisplay (240 x 320 Pixel)
Anschlüsse
AUX IN (Eingang) Stereo-Cinch
LAN RJ45 (10/100 Mbit/s)

5
DE
SICHERHEITSHINWEISE
DIE NICHTBEFOLGUNG DIESER HINWEISE KANN ERNSTE
PERSONENVERLETZUNGEN ZUR FOLGE HABEN UND DAS GERÄT
BESCHÄDIGEN
• Das Gerät ist ausschließlich zur privaten Nutzung im Heimbereich
bestimmt. Jeder andere Gebrauch wird als Fehlanwendung betrachet.
• Lesen Sie die Bedienungsanleitung sorfältig und bewahren Sie sie
sicher auf.
• Beachten Sie alle Warnhinweise
• Elektrische Geräte dürfen nie in Regen oder feuchten Umgebungen
aufbewahrt werden.
• Ziehen Sie während eine Gewitters und bei längerem Nichtgebrauch
den Netzstecker.
• Setzen Sie das Gerät nicht der Sonneneinstrahlung aus. Stellen Sie es
nicht in der Nähe von Wärmequellen wie Radioatoren, Heizlüftern, Öfen
oder anderen Geräten auf, die Wärme abstrahlen.
• Schalten Sie das Gerät erst aus, bevor Sie erst den Netzstecker ziehen.
• Setzten Sie das Gerät nicht Wassertropfen oder Spritzwasser aus.
Stellen Sie keine Gegenstände auf das Gerät.
Trennung von der Stromversorgung
Dieses Gerät bezieht im Standby-Betrieb Strom. Um die Stromversorgung
vollständig zu trennen, müssen Sie das Netzgerät aus der Stockdose ziehen.
Kleine Objekte/Verpackungsteile (Plastikbeutel, Karton, etc.):
Bewahren Sie kleine Objekte (z. B. Schrauben und anderes
Montagematerial, Speicherkarten) und Verpackungsteile außerhalb der
Reichweite von Kindern auf, damit sie nicht von diesen verschluckt werden
können. Lassen Sie kleine Kinder nicht mit Folie spielen. Es besteht
Erstickungsgefahr!
Transport des Gerätes:
Bitte bewahren Sie die Originalverpackung auf. Um ausreichenden Schutz
beim Transport des Gerätes zu erreichen, verpacken Sie das Gerät in der
Originalverpackung.
Reinigung der äußeren Oberäche:
Verwenden Sie keine üchtigen Flüssigkeiten, wie Insektensprays. Durch zu
starken Druck beim Abwischen können die Oberächen beschädigt werden.
Gummi- oder Plastikteile sollten nicht über einen längeren Zeitraum mit
dem Gerät in Kontakt sein. Nutzen Sie ein trockenes Tuch.

6
DE
LIEFERUMFANG
Lautsprecherturm
Fernbedienung
Bedienungsanleitung
Cinchkabel

7
DE
t
GERÄTEÜBERSICHT
Anschlüsse und Bedienelemente

8
DE
1 Ablage
2 Tablet-PC-Halterung
3 Lautstärkeregelung
4 Ein/Aus-Schalter
Das Gerät hier ein- oder ausschalten
5 Menü
Anzeige des Menüs
6 Dimmer
7 Modus
8 Eingabe
9 Titel zurück
10 Wiedergabe / Pause
11 Titel vor
12 CD-Lade önen
13 LCD-Anzeige
14 CD-Lade
Legen Sie die hier die CD-Lade ein.
15 USB-Anschluss
16 USB-Ladeanschluss
17 rechter AUX-Eingang
18 linker AUX-Eingang
19 LAN-Verbindung
Anschlussmöglichkeit an ein bestehendes Netzwerk über ein
Netzwerkkabel. Alternativ können Sie das Gerät über WLAN verbinden.
20 VHF/DAB-Antenne
21 Ein/Aus-Schalter
22 Netzkabel

9
DE
Fernbedienung

10
DE
1 Ein/Aus-Taste
Das Gerät einschalten und in den Standby-Betrieb versetzen.
2 Stummschalten
Zum Beenden diese Taste noch einmal drücken
3 Wecker: Einstellen eines Weckers
4 Programm
5 Mischen
6 Soundeekt: Normal, Flach, Jazz, Rock, Soundtracks, Klassik, Pop,
Nachrichten.
7 Timer
8 Schlaftimer
9 Dimmer
Wahl der Hintergrundbeleuchtung
10 Wiederholung
1x drücken: alle Titel wiederholen
2x drücken: einen Titel wiederholen
11 Wiedergabequelle
CD-USB-AUX-DAB-FM-INTERNET RADIO
12 Pfeiltasten
Drücken, um die Einstellung zu wählen, mit ENTER bestätigen
13 ENTER
Eingabebestätigung
14 Menü
15 CD-Lade önen
16 Lautstärke +/-
17 Wiedergabe/Pause
18 Titel vor/weiter
19 Stopp
20 Zahlentasten

11
DE
INBETRIEBNAHME
Einschalten
Schließen Sie das Netzgerät an den Anschluss der Stromversorgung auf
der Rückseite des Gerätes an. Stellen Sie den ON/OFF-Schalter auf die
Position ON. Daraufhin erscheint der Welcome-Bildschirm. Das Radio sucht
in der Zeit automatisch nach einem verfügbaren Zugangspunkt. Verwenden
Sie den Drehknopf, um das Netzwerk zu wählen. Drücken Sie OK, um den
Zugangspunkt auszuwählen.
Bei der ersten Benutzung des Internetradios gehen Sie folgende Schritte
durch:
1. Es erscheint die Meldung: Möchten Sie Ihr Netzwerk jetzt kongurieren?
Drücken Sie den Drehknopf, um JA auszuwählen. Das Radio sucht jetzt
nach verfügbaren Netzwerken.
2. Wählen Sie das Netzwerk aus, mit dem Sie das Radio verbinden wollen,
indem Sie den Drehknopf drehen und anschließend zur Auswahl
drücken.
3. Sie werden aufgefordert, das Passwort einzugeben. Wählen Sie dazu
die Buchstaben mit dem Drehknopf aus und drücken den Drehknopf zur
Eingabe.
4. Dann verbindet sich das Radio mit dem Internet.
Hinweis : Wenn Sie das W-LAN-Passwort eingeben, drücken Sie den
Drehknopf, um die Zeichen auszuwählen. Mit der Taste LINKS können Sie
ein Zeichen zurückgehen und dabei die Zeichen löschen.
Hinweis: Die Zeichen unten können ebenfalls eingegeben werden:
• Zahlen (0-9)
• Lateinische Buchstaben (von A bis Z und von z)
• Sonderzeichen ( DEL ,@,Leerzeichen,!,”,#,$,%,&,*,’,+ und (,).

12
DE
MENÜSTRUKTUR
Hauptmenü
Einstellungen
DAB-Radio
FM-Radio AUX
BT
Einstellungen
Media-Center Informations-Center
Internet-Radio
Zeitanzeige
My mediaU verwalten
Funknetz-Einstellung
Funknetz (WPS PBC)
Manuelle Konguration
Netzwerk prüfen beim Anschalten
Datum und Zeit einstellen
Zeitformat einstellen
Datumsformat einstellen
Netzwerk
Datum & Zeit
Analog
Digital
Drehknopf
drehen und
drücken
um etwas
auszuwählen.
Um einen
Menüpunkt
zurückzugehen
LEFT drücken.

13
DE
Wecker Wecker 1
Wecker 2
Schlummer-Wecker
Wecker-Lautstärke
Timer
Sprache
Dimmer
Anzeige
Energieeinstellungen
Sleep Timer
Zwischenspeicher
Wetter
Energiesparmodus
Einschalten
Lokale Einstellungen
Farbe
Temperatureinheit
Monochrom
Anzeigen bei Standby
Ein
Ein
Aus
Aus
Einstellung

14
DE
Lokale Stationseinstellung
Wiedergabe-Einstellung
Gerät
Equalizer
Fortsetzen der Wiedergabe
Softwareupdate
Auf Werkeinstellungen zurückksetzen
Automatisch (Land)
Umbennen (AirMusic)
Ein
Aus
Manuell (Stadt)
AirMusic Control App
Aus
Alle wiederholen
Automatische Erkennung
Eins wiederholen
zufällig
Einstellung

15
DE
Meine Favoriten
USB
Wetter-Information
Radiosender/Musik
UPnP
Finanz-Information
Lokale Station
Meine Wiedergabeliste
Systeminformation
Zuletzt gehörte Sender
Meine Wiedergabeliste löschen
Radiosender suchen
Radiosender hinzufügen
Service
Internet-Radio
Media -Center
FM-Radio
DAB-Radio
AUX
BT
Informations-Center

16
DE
FUNKTIONSBESCHREIBUNG
AUX (Line input)
Mit AUX wählen Sie eine externe Quelle.
Internetradio
Folgende Menüpunkte erscheinen in der Anzeige:
1 Meine Favoriten
2 Radiosender/Musik
3 Lokale Station
4 Zuletzt gehörte Sender
5 Service
Media-Center
1. USB
Funktionen: Abspielen von Audio-Dateien über USB. Die kompatiblen
Formate sind WMA/MP3/AAC/AAC+/FLAC/WAV.
Kompatibel mit USB 3.0 und niedriger.
Bezüglich Wiedergabeeinstellungen sehen Sie in den Einstellungen nach.
2. UPNP
Funktion: Abspielen von Medien am Computer.
Hinweis: Sie müssen den „Windows Media Player 11” (oder eine neuere
Version) oder den Twonky Media Server auf
Ihrem Computer installiert haben, die für die
Benutzung von UPNP erforderlich sind. Im
„Windows Media Player” können Sie die Titel
Ihrer Wiedergabeliste übertragen. Dazu muss Ihr
PC mit dem Internet verbunden sein. Die Titel
müssen in Ihrer Wiedergabeliste sein. Der PC
muss die Berechtigung haben, sich mit anderen
Geräten zu verbinden. (Sie können dies im Windows Media Player manuell
oder automatisch einstellen.)
3. Meine Wiedergabeliste
MENU drücken, den Navigationsknopf drehen, OK drücken, um ins Menü
zu gelangen. Per Drehen des Navigationskopfes „My playlist“ wählen.
OK drücken.
Hinweis: Drücken Sie während der Wiedergabe im UPNP-Modus die Taste
OK, um den gewählten Titel zu „Meine Wiedergabeliste“ hinzuzufügen.

17
DE
4. Meine Wiedergabeliste leeren
Es erscheint die Frage „Sicher entfernen?“ Anschließend „Ja“ oder „Nein“
drücken.
My media U
Funktion: Schnellzugri auf die Programme des Internetradios über die
persönliche Wiedergabeliste.
Hinweis: Zu Beginn müssen Sie sich auf http://www.mediayou.net
registrieren und die entsprechenden Einstellungen vornehmen, bevor Sie
„My media U“ benutzen. Sonst erscheint in der Anzeige eine Meldung, dass
Sie sich im Internet anmelden müssen.
Hinweis: Dieser Menüpunkt ist werkseitig deaktiviert. Sie müssen die
Funktion bei Bedarf unter Einstellungen „My mediaU verwalten“ aktivieren.
Informations-Center
Funktionen: Erhalten Sie weltweite Wetter- und Börseninformationen und
Informationen zur Systemkonguration.
Wetterinformationen
Durch die Tasten LEFT und RIGHT erhalten Sie Informationen zum Wetter
der nächsten 5 Tage.
Finanzinformationen
Hier erhalten Sie aktuelle Informationen zu den Börsenkursen.
Systeminformation
Funktionen: Anzeige der Softwareversion, der MAC-Adresse, der ID und IP
des WLAN-Zugangspunktes.
Einstellungen
Funktionen: Einstellungen des Netzwerks, des Weckers, des Datums, der
Uhrzeit usw. Mit einem Tastendruck auf LEFT zur übergeordneten Menüstufe
zurückkehren.
Folgende 20 Einstellungen können vorgenommen werden:
Zeitanzeige
Es gibt zwei Anzeigemodi: Analog und Digital
Im Analogmodus besteht die Uhr aus einem Ziernblatt mit Zeigern, im
Digitalmodus wird die Zeit mit Zahlen angezeigt.

18
DE
„My MediaU“ verwalten
„Aktivieren“ wählen, um die „My MediaU“-Funktion zu aktivieren und ins
Menü aufzunehmen. „Deaktieren“ entfernt die Funktion aus dem Menü.
Netzwerk
WLAN-Konguration: Automatische Suche des WLAN und Anzeige der
verfügbaren Netzwerke. OK drücken, um mit dem jeweilig ausgewählten
Netzwerk zu verbinden. Falls das Netzwerk ein Passwort hat, über das
Buchstabenmenü eingeben.
Funknetz (WLAN Netzwerk WPS PBC): Beim Anwählen von WPS PBC,
erscheint „Bitte drücken Sie die WPS-Taste auf Ihrem Router innerhalb von
120 Sekunden“. Folgen Sie dieser Auorderung, so dass der Router sich
automatisch verbindet.
Manuelle Einstellung (Funknetz): Im Menü erscheinen 3 Punkte: (DHCP,
SSID eingeben, Verwalten).
Wenn DHCP auf AN steht, sucht das Gerät automatisch die IP-Adresse des
drahtlosen Netzwerks und verbindet sich damit.
Netzwerk beim Anschalten prüfen
Funktionen: Beim Einschalten „Aktivieren“ drücken, um den Netzwerkstatus
manuell zu überprüfen. „Deaktiveren“ auswählen, um die Überprüfung nicht
vorzunehmen.
Hinweis: Wenn das Netzwerk unter „Aktivieren“ nicht verbunden ist, werden
automatisch die Auswahlpunkte zum Aktivieren des Netzwerks angezeigt.
Datum und Zeit
• Einstellung von Datum und die Uhrzeit
• Manuelle Einrichtung: Datum und Uhrzeit per Hand einstellen.
• Automatisch einstellen (UTC+01:00). 01:00 steht für die Dierenz von
lokaler Zeitzone und GMT (mittlere Greenwich-Zeit).
Zeitformat einstellen (24 Stunden-Format ist die Standardeinstellung)
• 12 Stunden
• 24 Stunden
Datumsformat einstellen (Format DD/MM/YYYY ist voreingestellt)
• YYYY/MM/DD
• DD/MM/YYYY
• MM/DD/YYYY
(Y= Jahr, M=Monat, D=Tag)

19
DE
Wecker
Einstellung von drei Weckern (Wecker 1, Wecker 2, Schlummer-Wecker) und
der Weckerlautstärke.
• Die Zeit des Schlummer-Weckers geht von
5 bis 120 Minuten. Nach der Einstellung des
Weckers beginnt der Countdown. Wenn die
Zeit abgelaufen ist, schaltet das Gerät sich
dann automatisch in den Standby-Modus und
startet den Alarm.
• Wenn der Alarm auslöst, geht die Anzeige
automatisch in den Standby-Betrieb.
• Im Menüpunkt „Weckerlautstärke“ können Sie die Weckerlautstärke
einstellen. (Der Standardwert ist 7.)
• Der Weckton kann mit einer beliebigen Taste beendet werden und eine
5-minütige Weckwiederholung wird aktiv.
• Mit einem Druck auf STANDBY wird die Weckwiederholung beendet.
• Nach der Einstellung des Weckers müssen Sie die Einstellungen
verlassen, damit die Einstellungen aktiviert werden.
• Zwei eingestellte Wecker klingeln nicht zur selben Zeit. Erst, wenn ein
Alarm beendet ist, kann der nächste Alarm einsetzen.
• Menü für Wecker 1:
-Wiederholen: Die Wahlmöglichkeiten für Wiederholen sind „täglich“,
„einmal“, Wahl eines Wochentags (von Mo-So).
-Zeit: Einstellung eines einmaligen Weckers
-Sound: Einstellung das Wecktons („Weckton“ ist Standardeinstellung)
Melodie, Internetradio, USB)
Timer
Zur Bestätigung der Einstellung den Drehknopf drücken. Zum Stoppen des
Timers wieder den Drehknopf drücken.
Sprache
Es werden 17 Sprachen unterstützt: Englisch, Deutsch, Spanisch,
Französisch, Portugiesisch, Niederländisch, Italienisch, Russisch,
Schwedisch, Norwegisch, Dänisch, Ungarisch, Tschechisch, Slowakisch,
Polnisch, Türkisch, Finnisch.
Display
Zwei Modi sind verfügbar: Farbe und Monochrom.
Engergieeinstellungen
Einstellungen für den Standby-Modus:
Abschaltung nach 5, 15 oder 30 Minuten.
Die Energieeinstellung mit AUSSCHALTEN deaktivieren.

20
DE
Sleeptimer
Auschalten des Gerätes durch Ausschalten des Schlaftimers. Die Zeitspanne
berträgt 5,30,60,90,120,150,180 Minuten.
Zwischenspeicher
Einstellbar von 2 bis 8 Sekunden.
Wetter
Anzeige des Wetter der eingestellten Stadt. Die nachfolgenden Punkte
stehen zur Auswahl:
• Lokale Einstellung (Ortseinstellung). Wählen Sie den Kontinent,
das Land und die Region. Mit OK bestätigen. Das Wetter wird nun
angezeigt.
• Einstellung der Temperatur in Celsius oder Fahrenheit.
• Anzeige im Standby ein- und ausschalten.
Lokale-Station-Einstellung
• Automatische Erkennung: Die lokalen Stationen werden automatisch
gesucht.
• Manuelle Einstellung: Sie können nacheinander das Land, die Provinz
und die Stadt einstellen.
Wiedergabe-Einstellung
Einstellung der Wiedergabemodi:
• AUS : Alle Titel werden einmal vom ersten zum letzten abgespielt.
• Alle wiederholen: Alle Titel werden vom ersten zum letzten wiederholt.
• Eins wiederholen: Der gewählte Titel wird wiederholt.
• Zufällig: Die Titel im Verzeichnis werden in zufälliger Reihenfolge
wiedergegeben.
Gerät (DLNA Einstellung)
Umbennen (Air Music)
DNLA funktioniert am PC unter Windows, bei Samsung-Smartphonen mit
eingebautem DLNA. Bei anderen Smarthphones können Sie eine App wie
BubbleUPNP verwenden.
Equalizer
Funktion: Der ‘Equalizer’ verstärkt einzelne Frequenzbereiche. Sie können
zwischen verschiedenen EQ-Prolen wechseln (Normal, Mittig, Jazz, Rock,
Soundtracks, Klassik, POP, Nachrichten).
Fortsetzen nach Einschalten
Ein- oder Ausschalten der Wiederaufnahme des zuletzt aktiven Modus.

21
DE
Wenn die Option ausgeschaltet ist, startet das Radio nach dem Einschalten
ganz regulär mit dem Hauptmenü.
Wenn die Option eingeschaltet ist, fährt das Radio nach dem Einschalten
mit der letzten Aktion fort.
Softwareupdate
Achtung: Bevor Sie ein Softwareupdate starten, achten Sie darauf,
dass das Gerät fest in eine Steckdose eingesteckt ist. Trennen Sie die
Stromversorgung während eines Softwareupdates nicht, da die Firmware
sonst dauerhaft beschädigt werden kann.
Auf Werkseinstellungen zurücksetzen
Die Meldung „Sicher, auf die Werkseinstellung zurückzusetzen?“ erscheint.
• ‘JA’ löscht alle Einstellungen und setzt das Radio auf die
Werkseinstellungen zurück.
• ‘EIN’ behält alle gegenwärtigen Einstellungen und führt in das
vorangehende Menü zurück.
Audioausgang (LINE OUT)
Sie können die Lautsprecher an einen externen Lautsprecher anschließen.
Dann regeln Sie die Lautstärke über die externen Lautsprecher.
BT
Das Gerät kann über BT mit einem externen Gerät (z.B. Smartphone/Tablet)
verbunden werden. Die Medien (gespeicherte MP3-Dateien, Streaming-
Musik, Webradio) auf dem externen Gerät können dann über die BT-
Verbindung über das Radio abgespielt werden.
Der BT-Modus wird empfohlen, wenn keine Netzwerkverbindung vorhanden
ist und Sie sich mit dem zu verbindenden Gerät in unmittelbarer Nähe des
Funkgerätes benden.
Wählen Sie BT im Menü aus.
Es muss eine BT-Verbindung hergestellt werden, um Audiodateien über BT
an das Radio senden zu können.
Eine BT-Verbindung herstellen
Wenn Sie den BT-Modus am Radio auswählen, bendet es sich im Pairing-
Modus und sucht nach BT-Geräten, mit denen eine Verbindung hergestellt
werden kann.
Aktivieren Sie nun die BT-Funktion auf dem anzuschließenden externen
Gerät (Details nden Sie in der Bedienungsanleitung des anzuschließenden
Gerätes). Suchen Sie in der Liste der verfügbaren Geräte nach "Karaboom
100 Wi", wählen Sie es aus und stellen Sie die Verbindung her. In der linken
oberen Ecke des Displays des Radios erscheinen Doppelpfeile. Ein Piepton
ertönt und die Meldung "Connected".

22
DE
Abspielen von Medien über BT
Nachdem Sie eine BT-Verbindung hergestellt haben, können Sie die auf
dem externen Gerät gespeicherten Musikdateien über das Gerät Gerät
wiedergeben.
Gehen Sie dazu wie folgt vor:
Starten Sie die Wiedergabe der Musik auf dem externen Gerät, indem Sie
die entsprechende Wiedergabefunktion (MP3-Player etc.) einschalten oder
einen Titel in der jeweiligen Wiedergabeliste auswählen.
APP-STEUERUNG ÜBER AIR MUSIC CONTROL
Sie können das Internetradio über Ihr Smartphone oder Tablet bedienenen.
Laden Sie dazu die App „Air Music Control“ aus dem „Google Play Store“
oder dem „Apple AppStore“ herunter.
Die Geräte müssen dazu in demselben Netzwerk verbunden sein.

23
DE
FM-RADIO (UKW)
Drücken Sie die Tasten , um die Option FM (UKW) auszuwählen.
In diesem Menü nden Sie alle relevanten Einstellungen, um Radiosender
über das FM-Frequenzband zu empfangen.
FM-Sendersuche
Wenn das Gerät zum ersten Mal in den FM-Modus geschaltet wird,
muss ein Sendersuchlauf durchgeführt werden. Dazu stehen sowohl eine
automatische als auch eine manuelle Scanfunktion zur Auswahl.
Automatische FM-Suche
Wenn Sie auf FM umgeschaltet haben, drücken Sie die Enter-Taste.
Das Radio startet den automatischen Sendersuchlauf und speichert alle
gefundenen Sender.
Das Radio kann bis zu 20 FM-Radiosender speichern.
FM Radio Bedienung
Um die gespeicherten Radiosender aufzurufen, drücken Sie die Taste
bzw. . Alternativ können Sie auch die ersten 5 gespeicherten Sender über
die Stationstasten 1-5 am Radio abrufen.
Wenn Sie die Zuordnung der Senderspeichertasten ändern möchten,
drücken Sie die Senderwahltaste 6, um einen Scan zum nächsten
empfangbaren Sender durchzuführen. Wiederholen Sie gegebenenfalls
iesen Schritt, bis Sie den gewünschten Sender gefunden haben. Drücken
Sie dann die gewünschte Stationswahltaste 1- 10 für ca. 2 Sekunden. Der
Sender wird nun auf dieser Taste gespeichert.
CD-PLAYER
Das Gerät verfügt über ein CD-Laufwerk, das Audio- und MP3-Daten-CDs
abspielen kann. Wählen Sie dazu im Menü CD.
Legen Sie eine CD in das Laufwerk ein. Das Gerät fährt die CD automatisch
ein.
Sie erhalten einen Überblick über die Audiotracks auf der CD. Wählen
Sie mit dem Lautstärkeregler einen Titel aus, den Sie abspielen möchten,
und bestätigen Sie mit dem Drehrad oder der ENTER-Taste auf der
Fernbedienung.
Die Taste springt zum nächsten Lied. Die Taste springt zum
vorherigen Titel.
Die Tastepausiert die Wiedergabe oder setzt die Wiedergabe fort.
Drücken Sie die EJECT-Taste auf der Fernbedienung oder am Gerät, um die
CD auszuwerfen.

24
DE
DAB-RADIO
Drücken Sie die Tasten , um die Option DAB auszuwählen.
DAB Sendersuche
Zusätzlich zu den UKW-Stationen kann das Radio auch DAB+-Radio,
digitales Radio über die terrestrische Antenne empfangen.
Wenn das Radio zum ersten Mal in den DAB-Modus geschaltet wird, startet
es einen automatischen Sendersuchlauf, um nach allen Sendern zu suchen,
die an diesem Ort empfangen werden können.
Der Sendersuchlauf beginnt und auf dem Display erscheint ein
Statusbalken. Sobald der Scan abgeschlossen ist, beginnt das Radio mit der
Wiedergabe des zuletzt gewählten Senders.
Senderauswahl
Verwenden Sie im DAB-Modus die Tasten , um durch die DAB+
Stationen zu scrollen, die empfangen werden können.
Um den Sender zu wechseln, drücken Sie die Enter-Taste.
Das Radio ist mit einem Favoriten-Speicher für 10 Radiosender ausgestattet.
Um einen Sender zu speichern, wechseln Sie wie oben beschrieben zu dem
Sender, den Sie speichern möchten. Drücken Sie nun die Zierntaste 1-10
auf der Fernbedienung oder am Radio und halten Sie sie ca. 2 Sekunden
lang gedrückt, oder drücken Sie die Senderspeichertasten 1-5, auf denen Sie
den Sender speichern möchten.
Auf dem Display erscheint die Meldung, dass der Sender auf dem
ausgewählten Slot gespeichert wurde.
DAB Radio Bedienung
Wenn Sie Sender im Favoriten-Speicher gespeichert haben, können Sie
diese durch das Drücken der gewünschten Zierntaste aufrufen.
Oder drücken Sie im DAB-Modus die Taste Preset, um die Favoritenliste
aufzurufen.
Verwenden Sie die Tasten , um durch die Favoritenliste zu navigieren
und drücken Sie dann die Eingabetaste (Lautstärkeregler), um Ihre Auswahl
zu bestätigen.

25
DE
FEHLERBEHEBUNG
Problem Mögliche Ursache und Lösung
Keine Displayanzeige, Radio reagiert
nicht auf die Bedienung
Keine Steuerung mit der
Fernbedienung möglich
Stromversorgung über das
mitgelieferte Netzteil sicherstellen.
Keine Steuerung mit der
Fernbedienung möglich.
Batterien sind leer oder falsch
eingelegt. Bitte prüfen Sie, ob die
Batterien ordnungsgemäß eingelegt
sind.
Schlechter Empfang im DAB+ Modus Keine Sender gefunden, Sendersuche
durchführen Antenne ist nicht
vollständig ausgefahren.
Standort des Radios ändern (z.B.
näher am Fenster), Sendersuchlauf
wiederholen.
Schlechter Empfang im FM-Modus Antenne ist nicht vollständig
ausgefahren, verlängern Sie die UKW-
Antenne auf ihre volle Länge.
Standort des Radios ändern (z.B.
näher am Fenster), Sendersuchlauf
wiederholen.
AUX-Funktion nicht möglich Turmlausprecher ist in einem falschen
Modus eingestellt.
Wechseln Sie in den Modus
"AUX". Kabel kann fehlerhaft sein.
Kabelverbindung zwischen dem
Turmlautsprecher und dem externen
Gerät prüfen.
Schlechte Audioqualität beim
Abspielen der Musik
Datei mit niedriger Bitrate.
Überprüfen Sie die Audiodatei.
Tipp: Für MP3-Dateien sollte die
Bitrate 192Kbit/s oder höher sein.

26
DE
Problem Mögliche Ursache und Lösung
Lautstärke ist zu gering Lautstärkeeinstellung am Gerät
Gerät überprüfen. Überprüfen
Sie die Lautstärkeeinstellung des
angeschlossenen Geräts, von dem die
Musik abgespielt wird.
Es kann keine Netzwerkverbindung
hergestellt werden.
Überprüfen Sie die Wi-Fi-Funktion.
Aktivieren Sie die DhCP-Funktion
des Routers, mit dem das Funkgerät
verbunden werden soll.
Eine Firewall kann im Netzwerk aktiv
sein.
Wi- (W-LAN) Verbindung kann nicht
hergestellt werden.
Überprüfen Sie die Verfügbarkeit von
Wi-Fi-Netzwerken. Reduzieren Sie
den Abstand zwischen dem WLAN-
Router und dem Radio.
Stellen Sie sicher, dass Sie das
richtige WEP/WPA-Passwort
verwenden, wenn Sie sich an einem
Wi-Fi-Router anmelden.
Keine Internetradio-Stationen sind
verfügbar.
Überprüfen Sie die Zugangspunkte
des Netzwerks. Der Radiosender
kann derzeit nicht erreicht werden.
Möglicherweise wurde die
Senderverbindung geändert, oder der
Sender wird nicht mehr gesendet.

27
DE
SPEZIELLE ENTSORGUNGSHINWEISE FÜR
VERBRAUCHER IN DEUTSCHLAND
Entsorgen Sie Ihre Altgeräte fachgerecht. Dadurch wird gewährleistet,
dass die Altgeräte umweltgerecht verwertet und negative Auswirkungen
auf die Umwelt und menschliche Gesundheit vermieden werden. Bei der
Entsorgung sind folgende Regeln zu beachten:
• Jeder Verbraucher ist gesetzlich verpichtet, Elektro- und
Elektronikaltgeräte (Altgeräte) sowie Batterien und Akkus
getrennt vom Hausmüll zu entsorgen. Sie erkennen die
entsprechenden Altgeräte durch folgendes Symbol der
durchgestrichene Mülltonne (WEEE-Symbol).
• Sie haben Altbatterien und Altakkumulatoren, die nicht vom Altgerät
umschlossen sind, sowie Lampen, die zerstörungsfrei aus dem
Altgerät entnommen werden können, vor der Abgabe an einer
Entsorgungsstelle vom Altgerät zerstörungsfrei zu trennen.
• Bestimmte Lampen und Leuchtmittel fallen ebenso unter das Elektro-
und Elektronikgesetz und sind dementsprechend wie Altgeräte zu
behandeln. Ausgenommen sind Glühbirnen und Halogenlampen.
Entsorgen Sie Glühbirnen und Halogenlampen bitte über den Hausmüll,
sofern sie nicht das WEEE-Symbol tragen.
• Jeder Verbraucher ist für das Löschen von personenbezogenen Daten
auf dem Elektro- bzw. Elektronikgerät selbst verantwortlich.
Rücknahmepicht der Vertreiber
Vertreiber mit einer Verkaufsäche für Elektro- und Elektronikgeräte von
mindestens 400 Quadratmetern sowie Vertreiber von Lebensmitteln mit
einer Gesamtverkaufsäche von mindestens 800 Quadratmetern, die
mehrmals im Kalenderjahr oder dauerhaft Elektro- und Elektronikgeräte
anbieten und auf dem Markt bereitstellen, sind verpichtet,
1. bei der Abgabe eines neuen Elektro- oder Elektronikgerätes an einen
Endnutzer ein Altgerät des Endnutzers der gleichen Geräteart, das
im Wesentlichen die gleichen Funktionen wie das neue Gerät erfüllt,
am Ort der Abgabe oder in unmittelbarer Nähe hierzu unentgeltlich
zurückzunehmen und
2. auf Verlangen des Endnutzers Altgeräte, die in keiner äußeren
Abmessung größer als 25 Zentimeter sind, im Einzelhandelsgeschäft
oder in unmittelbarer Nähe hierzu unentgeltlich zurückzunehmen; die
Rücknahme darf nicht an den Kauf eines Elektro- oder Elektronikgerätes
geknüpft werden und ist auf drei Altgeräte pro Geräteart beschränkt.

28
DE
• Bei einem Vertrieb unter Verwendung von Fernkommunikationsmitteln
ist die unentgeltliche Abholung am Ort der Abgabe auf Elektro- und
Elektronikgeräte der Kategorien 1, 2 und 4 gemäß § 2 Abs. 1 ElektroG,
nämlich „Wärmeüberträger“, „Bildschirmgeräte“ (Oberäche von mehr
als 100 cm²) oder „Großgeräte“ (letztere mit mindestens einer äußeren
Abmessung über 50 Zentimeter) beschränkt. Für andere Elektro- und
Elektronikgeräte (Kategorien 3, 5, 6) ist eine Rückgabemöglichkeit in
zumutbarer Entfernung zum jeweiligen Endnutzer zu gewährleisten.
• Altgeräte dürfen kostenlos auf dem lokalen Wertstohof oder in
folgenden Sammelstellen in Ihrer Nähe abgegeben werden: www.take-
e-back.de
• Für Elektro- und Elektronikgeräte der Kategorien 1, 2 und 4 bieten
wir auch die Möglichkeit einer unentgeltlichen Abholung am Ort der
Abgabe. Beim Kauf eines Neugeräts haben Sie die Möglichkeit, eine
Altgerätabholung über die Webseite auszuwählen.
• Batterien können überall dort kostenfrei zurückgegeben werden, wo sie
verkauft werden (z. B. Super-, Bau-, Drogeriemarkt). Auch Wertsto- und
Recyclinghöfe nehmen Batterien zurück. Sie können Batterien auch per
Post an uns zurücksenden. Altbatterien in haushaltsüblichen Mengen
können Sie direkt bei uns von Montag bis Freitag zwischen 08:00 und
16:00 Uhr unter der folgenden Adresse unentgeltlich zurückgeben:
Chal-Tec Fulllment GmbH
Norddeutschlandstr. 3
47475 Kamp-Lintfort
• Wichtig zu beachten ist, dass Lithiumbatterien aus Sicherheitsgründen
vor der Rückgabe gegen Kurzschluss gesichert werden müssen (z. B.
durch Abkleben der Pole).
• Finden sich unter der durchgestrichenen Mülltonne auf der Batterie
zusätzlich die Zeichen Cd, Hg oder Pb ist das ein Hinweis darauf, dass
die Batterie gefährliche Schadstoe enthält. (»Cd« steht für Cadmium,
»Pb« für Blei und »Hg« für Quecksilber).
Hinweis zur Abfallvermeidung
Indem Sie die Lebensdauer Ihrer Altgeräte verlängern, tragen Sie dazu
bei, Ressourcen eizient zu nutzen und zusätzlichen Müll zu vermeiden.
Die Lebensdauer Ihrer Altgeräte können Sie verlängern, indem Sie defekte
Altgeräte reparieren lassen. Wenn sich Ihr Altgerät in gutem Zustand
bendet, könnten Sie es spenden, verschenken oder verkaufen.

29
DE
HINWEISE ZUR ENTSORGUNG
Wenn es in Ihrem Land eine gesetzliche Regelung
zur Entsorgung von elektrischen und elektronischen
Geräten gibt, weist dieses Symbol auf dem Produkt
oder auf der Verpackung darauf hin, dass dieses
Produkt nicht im Hausmüll entsorgt werden darf.
Stattdessen muss es zu einer Sammelstelle für
das Recycling von elektrischen und elektronischen
Geräten gebracht werden. Durch regelkonforme
Entsorgung schützen Sie die Umwelt und die
Gesundheit Ihrer Mitmenschen vor negativen
Konsequenzen. Informationen zum Recycling
und zur Entsorgung dieses Produkts, erhalten
Sie von Ihrer örtlichen Verwaltung oder Ihrem
Hausmüllentsorgungsdienst.
Dieses Produkt enthält Batterien. Wenn es in Ihrem
Land eine gesetzliche Regelung zur Entsorgung
von Batterien gibt, dürfen die Batterien nicht im
Hausmüll entsorgt werden. Informieren Sie sich
über die örtlichen Bestimmungen zur Entsorgung
von Batterien. Durch regelkonforme Entsorgung
schützen Sie die Umwelt und die Gesundheit Ihrer
Mitmenschen vor negativen Konsequenzen.
KONFORMITÄTSERKLÄRUNG
Hersteller:
Chal-Tec GmbH, Wallstraße 16, 10179 Berlin,
Deutschland.
Importeur für Großbritannien:
Berlin Brands Group UK Limited
PO Box 42
272 Kensington High Street
London, W8 6ND
United Kingdom
Hiermit erklärt Chal-Tec GmbH, dass der
Funkanlagentyp Karaboom Wi der Richtlinie
2014/53/EU entspricht. Der vollständige Text der
EU-Konformitätserklärung ist unter der folgenden
Internetadresse verfügbar: use.berlin/10033150


31
EN
Technical Data 32
Safety Instructions 33
Scope of Supply 34
Device Description 35
Initial Operation 39
Basic Operation 40
Function Operation 44
Control via Air Music Control 51
CD Player 52
FM-Radio (UKW) 52
DAB Radio 53
Troubleshooting 54
Disposal Considerations 56
Declaration of Conformity 56
CONTENTS
Dear Customer,
Congratulations on purchasing this equipment.
Please read this manual carefully and take care
of the following hints to avoid damages. Any
failure caused by ignoring the mentioned items
and cautions mentioned in the instruction manual
are not covered by our warranty and any liability.
Scan the QR code to get access to the latest user
manual and other information about the product.

32
EN
TECHNICAL DATA
Item number 10033150 10033151
Stromversorgung Netzgerät 230 V ~ 50Hz
Audiocodecs
MP3
AAC/AAC+
WMA
Bitrate up to 320 Kbits/s, sample rate up to 48 KHz
Bitrate up to 320 Kbits/s, sample rate up to 48 KHz
Bitrate up to 320 Kbits/s, sample rate up to 48 KHz
UPnP/ DLNA compatible
WLAN
Network encryption
Frequency band
Radio-frequency power
IEEE 802.11b/g
WPA/WPA2/WEP (64/128 bit key)
2412- 2472 MHz
12 dBm
BT
Frequency band
Radio-frequency power
2402-2480 MHz
2 dBm
DAB/DAB+ radio DAB-Band III 174.928 MHz - 239.200 MHz
FM radio 87.5 MHz - 108 MHz
Display TFT color display (240 x 320 pixels)
Connections
AUX IN RCA (Stereo)
LAN RJ45 (10/100 Mbit/s)

33
EN
SAFETY INSTRUCTIONS
FAILURE TO CAREFULLY FOLLOW THESE INSTRUCTIONS MAY LEAD TO
SERIOUS PERSONAL INJURY AND DAMAGE TO YOUR PRODUCT.
General Instructions
• For home and personal use only. Any other usage shall be construed as
a misuse as set forth herein.
• For indoor use only. Outside usage shall be construed as a misuse as set
forth herein.
• Read, keep and follow the instructions carefully.
• Heed all warnings.
• Electrical equipment should never be kept or stored in rain or damp
environments.
• Unplug the product during lightning storms or when unused for long
period of time.
• Do not expose to direct sunlight and do not install near any heat
sources such as radiators, heat registers, stoves, or other apparatus that
produces heat.
• Do not plug in the product unless it is turned o completely.
• Do NOT expose to dripping or splashing water. Do NOT place objects
on top of the product.
Note on disconnecting from mains supply.
• The product draws power even when in standby mode. To completely
disconnect the product from the mains supply, the adapter must be
disconnected from the mains outlet.
Small objects / packaging parts (plastic bags, cardboard, etc.)
Keep small objects (for example, screws and other assembly materials,
memory cards) and packaging parts out of reach of children so that they
cannot be swallowed. Do not let small children play with plastic bags. Risk
of suocation.
Transporting the device
Please keep the original packaging. To ensure adequate protection when
transporting the device, pack the device in its original packaging.
Cleaning the outer surfaces
Do not use volatile uids, such as insect sprays. The surface can be
damaged by excessive pressure during wiping. Rubber or plastic parts
should not be left in contact with the device for an extended period of time.
Use a dry cloth.

34
EN
SCOPE OF SUPPLY
Speaker tower
Remote control
User Manual
RCA cable

35
EN
t
DEVICE DESCRIPTION
Connections and controls

36
EN
1 Free space
2 Tablet PC groove
3 Volume adjust knob
4 Power on / o button
Turn the device on or o here
5 MENU
Displays the menu of the device
6 DIMMER
7 KEY
8 ENTER
9 Skip to the previous track
10 Start or pause play
11 Skip to the next track
12 Ejects the CD in drive
13 LCD display
14 CD slot
Insert audio or data CD here.
15 USB port
16 USB charging port (5 V/2,1 A)
17 AUX in -R
18 AUX in -L
19 LAN connection
Here you connect the device to an existing network with a network
cable to use the internet radio feature. (Alternatively, the device can
also be connected via Wi-Fi)
20 VHF / DAB antenna
21 Power Switch
22 Power cable

37
EN
Remote control

38
EN
1 Power on / o button
Use this button to turn on the device or to standby.
2 Mute the sound
To cancel, press the button again
3 Alarm: Press to set Alarm
4 Programme
5 Shule
6 Sound eects
Normal, at, jazz, rock, soundtracks, classical, pop, news
7 Timer
8 Sleep
9 Dimmer
Select the backlight level
10 Repeat
Press to select to repeat all tracks
Press again to select to repeat one tracks
11 SOURCE
CD-USB-AUX-DAB-FM-INTERNET RADIO
12 Arrow keys
Press to select the setting and then press [ENTER]
13 ENTER
14 Menu
15 Eject
16 Volume +/-
17 Play/Pause
18 PREV/NEXT
19 Stop
20 Number keys

39
EN
INITIAL OPERATION
Switch On or O
Plug the adaptor into the DC in socket (on the rear of the product) and
switch the ON/OFF switch to “ON,” then “Welcome” will be shown on
the screen. Meanwhile, the radio will scan the available access point
automatically. You can use the Volume/Navigator button to choose the
internet, and then press OK to conrm the internet.
The steps are as below for rst use:
1. There will be a prompt: Would you like to congure Network now?
Press Navigator knob to Choose YES. Then the internet radio will scan
available network.
2. Choose the network you want to connect by switching the navigator
knob and press it to conrm.
3. It will remind you to enter your password by switching the navigator
button to input the number, letter or character. After nishing input,
press the navigator knob to conrm your input.
4. Then your internet radio will be connected to your network.
Tips: When you need input the internet password, please press Navigator
button to choose the characters. In this condition, press Left button can turn
left and delete the left characters at the same time:
Note: Below characters are available for the radio:
Numbers (from 0-9)
English letters ( from A to Z and from a to z)
Other characters ( DEL ,@, lank,!,”,#,$,%,&,*,’,+ and (,).

40
EN
BASIC OPERATION
Main Interface
C o n g u r a t i o n
C o n g u r a t i o n
Media Center Information Center
Internet Radio
Time Display
Manage my mediaU
Wireless Network Conguration
Wireless Network(WPS PBC)
Manual Conguration
Check Network when Power On
Set Date and Time
Set Time Format
Set Date Format
Network
Date&Time
Analog
Digital
Rotate button
and press OK
to access a
menu item.
To go back to
the last menu
level press
LEFT.
Local Radio AUX
DAB Radio BT

41
EN
Alarm Alarm 1
Alarm 2
NAP Alarm 1 (turn o)
Alarm Volume
Timer
Language
Dimmer
Display
Power Management
Sleep Timer
Buer
Weather
Power Saving
Turn On
Set Location
Color
Temperature Unit
Monochrome
Show on Standy
Turn on
Turn on
Turn o
Turn o
C o n g u r a t i o n

42
EN
Local Radio Setup
Playback Setup
DLNA Setup
Equaliser
Resume When Power On
Software Update
Reset to Default
Manual Setup (Country)
Rename (AirMusic)
On
O
Manual Setup (City)
AirMusic Control App
O
Repeat all
Auto Detect
Repeat one
Shule
C o n g u r a t i o n

43
EN
My Favorite
USB
Weather Information
Radio Station/Music
UPnP
Financial Information
Local Radio
My Playlist
System Information
History
Clear My Playlist
Search Radio Station
Add New Radio Station
Service
Internet Radio
Media Center
Information Center
FM Radio
DAB Radio
AUX
BT

44
EN
FUNCTION OPERATION
AUX (Line input)
Function: To set up the playing mode of program
with audio play from out source.
Internet Radio
The choices below will be shown on the screen:
1 My Favorite
2 Radio Station/Music
3 Local Radio
4 History
5 Service
Media Center
1. USB
Functions : Play the audio medium by USB, which is compatible with the
les of WMA/MP3/AAC/AAC+/FLAC/WAV.
Compatible with USB3.0 and lower versions.
For the setup of play, please refer to the Playback setup in Conguration.
2. UPNP
Functions: Play the media in computer.
Steps: Press Menu Rotate. Navigate button to
choose “Media Center”. Press OK button to enter
the interface
Choose“UPNP”by rotating Navigate button. Enter
it by press OK Button.
Note: You must install the software of “Windows Media Player 11” ( or
upgrade versions) or Twonky Media on your computer, which is necessary
for the UPNP operation. In “Windows Media Player,” you should get the
media to share in your playlist. Your computer must be connected to the
internet. The media must be put in your playlist. Your computer must be
allowed to be linked with others. (You can set up it in “Windows Media
Player” by hand or automatically)
3.

45
EN
4. My Playlist
Steps: Press Menu. Rotate Navigate button to choose “Media Center” Press
OK button to enter the interface. Choose “My playlist” by rotating Navigate
button. Enter it by OK button.
Note: In the UPNP mode, when playing you can long press OK button to put
the chosen le into your ”My playlist”.
5. Clear My Playlist
Choose“My playlist” by rotating Navigate Button. Enter it by OK button.
My media U
Functions: Fast play the program of internet radio per the personal playlist.
Note: For the rst time, you need to register at http://www.mediayou.net
and set up related data before you use it, otherwise the display will show
info to reminder you not to connect the internet.
Note: This option default is disable. You need to select Enable in Manage
My Media U in Conguration, then you can see My media U in Menu.
Information Center
Functions: check the weather all over the world. Browse the stock status of
main stock exchange globally, show the system info of the unit.
Weather Information
In the interface of city weather, you can check the weather in the past 5 days
by LEFT or RIGHT button.
Financial Information
In the interface of “Financial Information,” you can point at your interested
items by cursor, then the related information will be shown automatically.
System information
Functions: To check the software version, the MAC, ID, and IP of the wireless
internet.
Conguration
Functions: To set up Network, Alarm, Date & Time, Language, Weather,

46
EN
Dimmer and etc.
Note: Press left button can return to the upper menu.
There are 20 items which can be setting as below:
Time Display
There are 2 modes: Analog and Digital
If you select Analog mode, the time will show pointer clock in standby. If
you select Digital, the time will show digital clock.
Manage My MediaU
“Enable” means manage my media; “Disable” means do not manage my
media.
If you select Disable, My Media option of the menu will be concealed. If you
select Enable, you will be able to see My Media U option in menu.
Network
Wireless Network Conguration: It can search the wireless network
automatically and show the list of networks, then press OK to link it.(If the
network has a password, you should input the password.)
Wireless Network (WPS PBC): When choosing WPS PBC, it will show
“Please press the WPS button on your router within 120 Secs”. You must
press the WPS button of Router, hen the network on both sides will be
linked automatically.
Manual Conguration: Three items appear in the list (DHCP, nter SSID,
Manage).
In ON mode ( DHCP), the unit will check the IP address of wireless network
and link the network automatically.
In the OFF mode (DHCP), the network checks are turned o.
Check Network when Power On
Functions: When“ Power On,” choose “Enable” to check the status of
network link automatically; choose “Disable” to not check it.
Note: If the network is not linked in the “Enable” mode, it will automatically
show the choices for you to set up the network.
Date and Time
• Set Date and Time
• Manual Setup: You can manually set the date and time.
• Auto Detect (UTC+00:00) 00:00 means the time dierence between
service and local time.

47
EN
Set Time Format (The 24-hour format is default)
• 12 hour
• 24 hour
Set Date Format (The format of DD/MM/YYYY is default)
• YYYY/MM/DD
• DD/MM/YYYY
• MM/DD/YYYY
Alarm
To set up three alarms (Alarm1, Alarm 2, NAP Alarm) and the Alarm Volume.
• The time of NAP Alarm is from 5 minutes to 120 minutes. After the setup
of the NAP Alarm, it begins to count down the time until the time is
over, then it will ring and switch to the standby mode automatically.
• When alarm rings, it will enter the display of “Standby” automatically.
• You can set up the alarm volume by “Alarm Volume”.(Volume 7 is
default)
• If you press any button when alarm rings, the alarm will be closed and
enter the mode of standby with 5-minute SNOOZE.
• To exit the SNOOZE mode, press Standby button.
• Exit after the alarm is set up. The new alarm will then be activated.
• Two alarms will not ring at the same time. (Only after one alarm stops
ringing can another alarm be used).
• Alarm 1: Turn On, Turn O, Repeat: To set up the Alarm Date
• The choices are: Everyday, Once, Mon, Tue, Wed, Thu, Fri, Sat, Sun
• Time: To set the alarm time

48
EN
Sound :To set the alarm sound
1. Beep
2. Melody
3. Internet Radio
4. USB
Default alarm sound is Melody.
Timer
Press Left and Right to set the time and conrm by pressing the rotary knob.
When in countdown, you can press OK button to stop.
Language
It can support 17 languages: English, German, Spanish, French, Portuguese,
Dutch, Italian, Russian, Swedish, Norwegian, Danish, Hungarian, Czech,
Slovak, Polish, Turkish, Finnish.
Dimmer
Select the item by clicking the Rotate navigation button. Press the OK
button to conrm. Press the Navigate button or the Left and Right buttons
to adjust the brightness.
Tips: There are two items for your choice (Power saving and Turn On).
Display
There are 2 modes you can select : Color and Monochrome
Power management
Congure to go to standby mode automatically while in the menu and / or
without Wi signal.
Minutes: Choose the power management timer (5/15/30 mins) to set the
duration of the radio to switch standby mode automatically when you are
not controlling it. Choose “Turn o” to ignore the power management
function.
Sleep timer
To power o the unit automatically by setting up the sleep timer.
The time range is Turn OFF, 15, 30, 60, 90, 120, 150, 180 minutes.
Buer
Select the buer from 2 seconds to 8 seconds:

49
EN
Weather
To show the current weather of selected city. You may choose from the
items below.
• Set Location: To set up global city weather
• Steps : Choose district, country, city.
• Press OK to conrm it and the weather info will be shown in the display.
• Temperature Unit: To set the Temperature Unit by degrees Celsius or
Fahrenheit
• Show ON Standby: To turn on or turn o the setup
Local Radio Setup
• Manual Setup: Choose district and country to enter the interface. Press
OK (Save as local Radio”) will show on the display.
• Auto Detect: To create the local internet radio station automatically as
per the local and national ID.
Playback Setup
Press OK to choose the play status.
• “O” means play rst track to last track in the folder in one circle then
stop playing.
• “Repeat all’ means play rst track to last track in the folder repeatedly.
• “Repeat one” means play the chosen track repeatly.
• “Shule” means play the tracks in the folder randomly.
Device (DLNA setup)
Rename (Air Music)
If using a PC, Windows will support the DLNA
If using a Samsung smartphone, it will be with build-in DLNA
If using another Samsung smartphone, you can download an app like
BubbleUPnP to use the DLNA.
Equalizer
Function: “Equalizer” can strengthen the musical impact on-site.
To choose dierent musical impact (Normal, Flat, Jazz, Rock, Soundtracks,
Classical, POP, News)
Resume When Power On
When PowerOn, press OK to choose On or O.
“On” means continue the mode automatically when the power was o
“O” means do not continue the mode and just show the main menu when
the power was o.

50
EN
Software Update
Caution : Before starting a software upgrade, ensure that the unit is plugged
into a stable mains power connection. Disconnecting power during a
software may permanently damage the unit.
Reset to Default
When you choose this item, it will show “Are you sure to reset to default
setting?”
• “YES”: it will delete all your present setup and resume to the original
mode
• “NO”: it will keep all your present setup and return to the upper menu.
Line output
You can send the radio’s signal to other speakers by a 1/8” audio line out.
When you do so, you can control the media volume only by other speakers.
BT
The equipment may be connected to an external device (e.g. smart phone/
tablet) via BT. Media (locally stored MP3 les, streaming music, web radio)
on the external device can then be played though the radio via the BT
connection.
The BT mode is recommended for when there is no network connection
available and you are in close vicinity to the radio with the device to be
connected.
Select BT in the menu.
A BT connection must be established, to be able to send audio les to the
radio via BT.
Establish BT connection
When you select the BT mode on the radio, it is in pairing mode and
searches for BT devices to connect to.
Now activate the BT function on the external device to be connected (for
details, refer to the user manual of the device to be connected). Search for
“Karaboom 100 Wi” in the list of available devices, select it and make the
connection. Double arrows will appear in the upper left corner of the radio’s
display. And a beep will sound the announcement “Connected".
Play media via BT
Once you have established a BT connection you can play music les stored
on the external device through the Karaboom 100 Wi.
To do this, proceed as follows:

51
EN
Start playing the music on the external device by switching on the
corresponding playback function (MP3 player, etc.) or selecting a track on
the respective play list start playback.
CONTROL VIA AIR MUSIC CONTROL
You can operate the internet radio via you smartphone or tablet.
Download “Air Music Control“ from the “Google Play Store“ or “Apple
AppStore“.
The devices must be connected to the same network.

52
EN
FM-RADIO (UKW)
Press the Menu key on the remote control or on the radio, and keys to
select FM.
In this menu you will nd all the relevant settings to receive radio stations
via the FM band.
FM station scan
When the Karaboom 100 Wi is switched to the FM mode for the rst time,
a station scan must be performed. To do this, both an automatic and a
manual scan function are available.
Automatic FM scan
When you have switched to FM, press the Enter key. And Yes
The radio will start the automatic station scan and will save all stations
found.
The radio can store up to 20 FM radio stations.
FM radio operation
To call up the radio stations saved, press the or. key. Alternatively,
you can also call up the rst 5 stations saved via the station keys 1-5 on the
radio.
If you wish to change the allocation of the station saving keys, press the
station selection key 6 to perform a scan to the next station that can be
received. If necessary, repeat this step until you have found the desired
station. Then press the desired station selection key 1- 10 for approx. 2
seconds. The station will now be saved on this key.
CD PLAYER
The unit has a CD drive, which can play audio and MP3 data CDs. For this,
select CD in the menu.
Insert a CD in the drive. Device retracts CD automatically.
You will get an overview of audio tracks on the CD. Select a track you want
to play via the volume dial and conrm by pressing the dial or the ENTER
button on the remote.
Button goes to the next track. Button goes to the previous track.
The pbutton pauses playback or resumes play.
Press the EJECT button on the remote or the device (see Chapter 4) to eject
the CD.

53
EN
DAB RADIO
Press the Menu key on the remote control or on the radio, and keys to
select DAB.
DAB station scan
In addition to FM stations, the radio can also receive DAB+ radio, digital
radio broadcast via terrestrial antenna.
When the radio is switched on to DAB mode for the rst time, it will start an
automatic station scan in order to scan for all stations that can be received
at that location.
The station scan will begin, and the display will show a scan progress bar.
As soon as the scan has been completed, the radio will begin playing the
station most recently selected.
Station selection
While in DAB mode, use the , keys to navigate through the
DAB+ stations that can be received.
To change stations, press the Enter key.
The radio is equipped with a favorites memory for 10 radio stations. To save
a station, switch to the station you wish to save as described above. Now
press the numeric key 1-10 on the remote control or on the radio, and keep it
pressed down for approx. 2 seconds, or press the station saving keys 1-5 on
which you wish to save the station.
The display will show a message that the station has been saved un- der the
favorites slot selected.
DAB radio operation
If you have saved stations in the Favorites memory, you can call these up by
pressing the desired numeric key.
Or while in DAB mode press the Preset key to call up the Favorites list.
Use the keys to navigate through the Favorites list, then press the
Enter key (volume control) to conrm your selection.

54
EN
TROUBLESHOOTING
Problem Possible cause and solution
No display indica- tion, radio does
not respond to.
Set up power supply via mains
adapter supplied.
No operation via re- mote control
possible
Batteries discharged or incorrectly
inserted. Please check whether
batteries inserted in correct direction.
DAB+ reception poor No stations found, perform a station
scan (see Chapter 7.6.1.) Antenna not
fully extended. Change the location
of the radio (e.g. closer to window),
Repeat station scan.
AUX function not working. CZT-18013CD is set to incorrect
mode. Switch to “AUX” mode. Cable
may be faulty. Check cable
connection
between CZT-18013CD and external
device.
Poor audio quality
when playing music
File with low bit rate. Check the audio
le.
Tip: For MP3 les, bit rate should be
192Kbit/s or higher.
Volume too low. Check volume setting on CZT-
18013CD. Check volume setting of
attached device from which music is
being played.
Network connection
cannot be established.
Check the wi- function. Activate the
DhCP function of the router on which
the radio is to be logged in.
A rewall may be active in the
network.
Wi- (W-LAN) con- nection cannot be
established
Check the availability of wi-
networks. Reduce distance between
wi- router and radio.
Ensure you use the correct WEP/WPA
password when logging on to a wi-
router.

55
EN
Problem Possible cause and solution
No Internet radio sta- tions available Check the access points of the
network. The radio station may be
currently una- vailable. The station
link may have been changed, or it is
no longer broadcasting.

56
EN
DISPOSAL CONSIDERATIONS
If there is a legal regulation for the disposal of
electrical and electronic devices in your country,
this symbol on the product or on the packaging
indicates that this product must not be disposed of
with household waste. Instead, it must be taken to
a collection point for the recycling of electrical and
electronic equipment. By disposing of it in accordance
with the rules, you are protecting the environment and
the health of your fellow human beings from negative
consequences. For information about the recycling
and disposal of this product, please contact your local
authority or your household waste disposal service.
This product contains batteries. If there is a legal
regulation for the disposal of batteries in your country, the
batteries must not be disposed of with household waste.
Find out about local regulations for disposing of batteries.
By disposing of them in accordance with the rules, you are
protecting the environment and the health of your fellow
human beings from negative consequences.
DECLARATION OF CONFORMITY
Manufacturer:
Chal-Tec GmbH, Wallstrasse 16, 10179 Berlin,
Germany.
Importer for Great Britain:
Berlin Brands Group UK Limited
PO Box 42
272 Kensington High Street
London, W8 6ND
United Kingdom
Hereby, Chal-Tec GmbH declares that the radio
equipment type Karaboom Wi is in compliance with
Directive 2014/53/EU. The full text of the EU declaration
of conformity is available at the following internet
address: use.berlin/10033150
For Great Britain: Hereby, Chal-Tec GmbH declares that
the radio equipment type Karaboom Wi is in compliance
with the relevant statutory requirements. The full text of
the declaration of conformity is available at the following
internet address: use.berlin/10033150

57
FR
Fiche technique 58
Consignes de sécurité 59
Contenu de l'emballage 60
Aperçu de l'appareil 61
Mise en marche 65
Structure du menu 66
Description des fonctions 70
Contrôle par appli avec air music control 76
Lecteur cd 77
Radio fm 77
Radio dab 78
Résolution des problèmes 79
Conseils pour le recyclage 81
Déclaration de conformité 81
SOMMAIRE
Chère cliente, cher client,
Toutes nos félicitations pour l’acquisition de ce
nouvel appareil. Veuillez lire attentivement et
respecter les instructions de ce mode d’emploi an
d’éviter d’éventuels dommages. Nous ne saurions
être tenus pour responsables des dommages dus
au non-respect des consignes et à la mauvaise
utilisation de l’appareil. Scannez le QR-Code pour
obtenir la dernière version du mode d'emploi et
à d'autres informations concernant le produit.

58
FR
FICHE TECHNIQUE
Numéro d'article 10033150 10033151
Alimentation de
l'adaptateur secteur
230 V ~ 50Hz
Codecs audio
MP3
AAC/AAC+
WMA
Bitrate jusqu'à 320 Kbits/s, sample rate jusqu'à 48 KHz
Bitrate jusqu'à 320 Kbits/s, sample rate jusqu'à 48 KHz
Bitrate jusqu'à 320 Kbits/s, sample rate jusqu'à 48 KHz
Compatible UPnP/ DLNA
WLAN
Cryptage du réseau
Bande de fréquence
Puissance d‘émission
IEEE 802.11b/g
WPA/WPA2/WEP (64/128 bit key)
2412- 2472 MHz
12 dBm
BT
Bande de fréquence
Puissance d‘émission
2402-2480 MHz
2 dBm
Radio DAB/DAB+ DAB-Band III 174,928 MHz - 239,200 MHz
Radio FM 87,5 Mhz - 108 MHz
Ecran Ecran TFT couleur (240 x 320 Pixel)
Connexions
AUX IN (entrée) RCA stéréo
LAN RJ45 (10/100 Mbit/s)

59
FR
CONSIGNES DE SÉCURITÉ
LE NON-RESPECT DE CES INSTRUCTIONS PEUT CAUSER DES BLESSURES
GRAVES ET ENDOMMAGER L'APPAREIL
• L'appareil est exclusivement destiné à un usage privé à domicile. Toute
autre utilisation est considérée comme une mauvaise utilisation.
• Lisez attentivement le mode d'emploi et conservez-le en toute sécurité.
• Tenez compte de toutes les mises en garde.
• L'appareil électrique ne doit jamais être stocké dans des
environnements pluvieux ou humides.
• Retirez la che secteur pendant un orage et si vous n'utilisez pas
l'appareil pendant une longue période.
• N'exposez pas l'appareil à la lumière directe du soleil. Ne le placez pas à
proximité de sources de chaleur telles que radios, radiateurs soulants,
fours ou autres appareils émettant de la chaleur.
• Eteignez l'appareil avant de débrancher le cordon d'alimentation.
• N'exposez pas l'appareil à des gouttes d'eau ou à de l'eau pulvérisée.
Ne placez aucun objet sur l'appareil.
Coupure de l'alimentation
Cet appareil consomme de l'énergie en mode veille. Pour couper
complètement l'alimentation, vous devez débrancher le bloc d'alimentation
de la prise.
Petits éléments / éléments d’emballage (sacs en plastique, cartons,
etc.) :
Conservez les petits éléments (par exemple vis, matériel de montage) et
éléments d’emballage hors de portée des enfants pour éviter les risques
d’étouement. Ne pas laisser les enfants jouer avec les emballages
plastiques, il y a risque d'étouement !
Transport de l’appareil :
Veuillez conserver l’emballage d’origine. Pour garantir la meilleure
protection de l’appareil lors de son transport, veuillez le remettre dans son
emballage d’origine.
Nettoyage des surfaces externes :
Ne pas utiliser de liquides volatils tels que le spray insecticide. Une pression
trop forte lors de l’essuyage peut endommager les surfaces. Les matières
en plastique ou en caoutchouc ne doivent pas rester en contact avec
l’appareil pendant une période prolongée. Utilisez un chion sec.

60
FR
CONTENU DE L'EMBALLAGE
Enceinte format
tour
Télécommande
Mode d'emploi
Câble RCA

61
FR
APERÇU DE L'APPAREIL
Connexions et éléments de commande

62
FR
1 Support
2 Support pour tablette PC
3 Réglage du volume
4 Interrupteur de marche /arrêt
Allumez et éteignez l'appareil ici
5 Menu
Aichage du menu
6 Réglage de la luminosité
7 Mode
8 Saisie
9 Titre précédent
10 Lecture / Pause
11 Titre suivant
12 Ouverture du tiroir de CD
13 Ecran LCD
14 Tiroir CD
Insérez un CD ici.
15 Port USB
16 Port d recharge USB
17 Entrée AUX droite
18 Entrée AUX gauche
19 Connexion LAN
Possibilité de connexion à un réseau existant par câble Ethernet.
Vous pouvez également connecter l'appareil par WiFi.
20 Antenne VHF/DAB
21 Interrupteur de marche/arrêt
22 Câble secteur

63
FR
Télécommande

64
FR
1 Touche de marche /arrêt
Pour allumer l'appareil et le mettre en veille.
2 Fonction muet
Pour quitter cette fonction, appuyez à nouveau sur la touche
3 Alarme : réglage d'une alarme
4 Programme
5 Mixage
6 Eet audio : Normal, Neutre, Jazz, Rock, Bande originale de lm, Classique,
Pop, Informations.
7 Minuterie
8 Arrêt automatique programmable
9 Réglage de la luminosité
Choix du rétroéclairage
10 Répétition
1x appui : répéter tous les titres
2x appuis : répéter un titre
11 Source de lecture
CD-USB-AUX-DAB-FM-INTERNET RADIO
12 Touches échées
Appuyez pour choisir u paramètre, conrmez avec ENTER
13 ENTER
Conrmation de saisie
14 Menu
15 Ouverture du lecteur CD
16 Volume +/-
17 Lecture / Pause
18 Titre suivant / avance
19 Stop
20 Touches numériques

65
FR
MISE EN MARCHE
Démarrage
Branchez l'adaptateur secteur à la prise d'alimentation située à l'arrière
de l'appareil. Réglez le commutateur ON/OFF sur la position ON. L'écran
d'accueil apparaît. La radio recherche automatiquement un point d'accès
disponible précédemment. Utilisez le bouton pour sélectionner le réseau.
Appuyez sur OK pour sélectionner le point d'accès.
Lorsque vous utilisez la radio Internet pour la première fois, suivez les
étapes ci-dessous :
1. Le message suivant apparaît : Voulez-vous congurer votre réseau
maintenant ? Appuyez sur le bouton rotatif pour sélectionner OUI. La
radio recherche maintenant les réseaux disponibles.
2. Sélectionnez le réseau auquel vous souhaitez connecter la radio en
tournant le bouton, puis en appuyant sur pour sélectionner.
3. Vous serez invité à entrer le mot de passe. Pour ce faire, sélectionnez
les lettres avec le bouton rotatif et appuyez sur le bouton rotatif pour
conrmer.
4. La radio se connecte alors à Internet.
Remarque : Lorsque vous entrez le mot de passe du réseau local sans l,
appuyez sur le bouton pour sélectionner les caractères. Utilisez le bouton
GAUCHE pour reculer d'un caractère et supprimer les caractères.
Remarque : Les caractères ci-dessous peuvent aussi être entrés :
• Chires (0-9)
• Lettres latines (de A à Z et de a à z)
• Caractères spéciaux (DEL ,@,espace,!,”,#,$,%,&,*,’,+ et (,).

66
FR
STRUCTURE DU MENU
Menu principal
Paramètres
DAB-Radio
FM-Radio AUX
BT
Paramètres
Media-Center Centre d'informations
Internet-Radio
Aichage de
l'heure
Gestion de My
mediaU
Paramètres de réseau sans l
Réseau sans l (WPS PBC)
Conguration manuelle
Vérier le réseau au démarrage
Réglage de la date et de l'heure
Réglage du format d'aichage de
l'heure
Réglage du format d'aichage de
la date
Réseau
Date & heure
Analogique
Numérique
Tournez
le bouton
rotatif et
appuyez pour
sélectionner.
Pour revenir
en arrière d'un
élément de
menu, appuyez
sur GAUCHE.

67
FR
Alarme Alarme 1
Alarme 2
Alarme snooze
Volume de l'alarme
Minuterie
Langue
Réglage
de la
luminosité
Ecran
Paramètres d'énergie
Arrêt programmable
Mémoire tampon
Météo
Mode d'économie
d'énergie
Allumer
Paramètres locaux
Couleur
Unité de température
Monochrome
Aichages en mode
veille
Marche
Marche
Arrêt
Arrêt
Paramètres

68
FR
Paramètres de stations
locales
Paramètres de lecture
Appareil
Egaliseur
Poursuite de le lecture
Mise à jour logicielle
Retour aux paramètres d'usine
Automatique (pays)
Renommer (AirMusic)
Activé
Désactivé
Manuel (ville)
Application AirMusic
Control
Désactivé
Répéter tous
Détection automatique
Répéter un titre
Ordre aléatoire
Paramètre

69
FR
Mes favoris
USB
Informations météo
Station de radio /
musique
UPnP
Informations nancières
Station locale
Ma liste de lecture
Informations système
Dernière station écoutée
Eacer ma liste de lecture
Recherche de station radio
Ajouter une station radio
Service
Radio Internet
Media -Center
FM-Radio
DAB-Radio
AUX
BT
Centre d'informations

70
FR
DESCRIPTION DES FONCTIONS
AUX (Line input)
Choisissez une source externe avec AUX..
Radio Internet
Les éléments de menu suivants apparaissent à
l'écran :
1 Mes favoris
2 Stations e radio / musique
3 Station locale
4 Dernière station écoutée
5 Service
Média Center
1. USB
Fonctions : lecture de chiers audio via USB. Les formats compatibles sont :
WMA/MP3/AAC/AAC+/FLAC/WAV.
Compatible avec USB 3.0 et antérieurs.
Pour les paramètres de lecture, voir les paramètres.
2. UPNP
Fonction : lecture de médias du PC.
Remarque : vous devez avoir "Windows Media
Player 11" (ou une version plus récente) ou Twonky
Media Server installé sur votre ordinateur pour
utiliser UPNP. Dans "Windows Media Player", vous
pouvez transférer les pistes de votre playlist. Cela
nécessite que votre PC soit connecté à Internet.
Les titres doivent gurer dans votre playlist. Le
PC doit être autorisé à se connecter à d'autres
appareils. (Vous pouvez le faire manuellement ou automatiquement dans
Windows Media Player.)
3. Ma liste de lecture
Appuyez sur MENU, tournez le bouton de navigation, appuyez sur
OK pour accéder au menu. Tournez le bouton de navigation pour
sélectionner "Ma playlist". Appuyez sur OK.
Remarque: pendant la lecture en mode UPNP, appuyez sur le bouton OK
pour ajouter la piste sélectionnée à Ma liste de lecture.

71
FR
4. Vider ma liste de lecture
La question suivant apparaît : "Supprimer en toute sécurité ?". Appuyez sur
"Oui" ou "Non".
My media U
Fonction: Accès rapide aux programmes de radio Internet via la liste de
lecture personnelle.
Remarque: Pour commencer, vous devez vous enregistrer sur http://www.
mediayou.net et dénir les paramètres appropriés avant d'utiliser "My
media U". Sinon, l'écran aichera un message indiquant que vous devez
vous connecter à Internet.
Remarque: Cet élément de menu est désactivé en usine. Si nécessaire, vous
devez activer la fonction sous Paramètres "Gérer mes médias".
Centre d'informations
Fonctions : Recevez des informations mondiales sur la météo et la bourse
et des informations sur la conguration du système.
Informations météo
Les boutons GAUCHE et DROIT vous donnent des informations sur la météo
pour les 5 prochains jours.
Informations nancières
Vous recevrez ici des informations actualisées sur les cours boursiers.
Informations système
Fonctions : Aichage de la version du logiciel, de l'adresse MAC, de l'ID et
de l'IP du point d'accès WiFi.
Paramètres
Fonctions : Paramètres du réseau, le réveil, la date, l'heure, etc. Revenez au
niveau de menu supérieur en appuyant sur GAUCHE.
Les 20 réglages suivants peuvent être eectués :
Aichage de l'heure
Il existe deux modes d'aichage: analogique et numérique.
En mode analogique, l’horloge se compose d’un cadran avec aiguilles, en
mode numérique l’heure est aichée avec des chires.

72
FR
Gestion de "My MediaU"
Sélectionnez "Activer" pour activer la fonction "My MediaU" et l'ajouter au
menu. "Désactiver" supprime la fonction du menu.
Réseau
Conguration WiFi : Recherche automatique du WiFi et aichage des
réseaux disponibles. Appuyez sur OK pour vous connecter au réseau
sélectionné. Si le réseau a un mot de passe, entrez-le via le menu
alphabétique.
Réseau sans l (Réseau WiFi WPS PBC) : Lors de la sélection de WPS
PBC, "Veuillez appuyer sur le bouton WPS de votre routeur dans les 120
secondes" apparaît. Suivez cette requête pour que le routeur se connecte
automatiquement.
Paramétrage manuel (réseau sans l): 3 éléments apparaissent dans le
menu: (DHCP, Entrez SSID, Gérer).
Lorsque DHCP est activé, l'appareil recherche et se connecte
automatiquement à l'adresse IP du réseau sans l.
Vérication du réseau au démarrage
Fonctions : Appuyez sur "Activer" pour vérier manuellement l'état du
réseau lors de la mise sous tension. Sélectionnez "Désactiver" pour ne pas
vérier.
Remarque : Si le réseau n'est pas connecté sous "Activer", les possibilités de
sélection pour l'activation du réseau s'aichent automatiquement.
Date et heure
• Réglage de la date et de l'heure
• Conguration manuelle: dénissez manuellement la date et l'heure.
• Dénir automatiquement (UTC + 01: 00). 01:00 est la diérence entre le
fuseau horaire local et l'heure GMT (Greenwich Mean Time)).
Réglage du format de l'heure (le format 24 heures est réglé par défaut)
• 12 heures
• 24 heures
Réglage du format de la date (le format par défaut est DD/MM/YYYY)
• YYYY/MM/DD
• DD/MM/YYYY
• MM/DD/YYYY
(Y= année, M=mois, D=jour)

73
FR
Alarme
Réglage de trois alarmes (alarme 1, alarme 2, alarme snooze) et du volume
de l'alarme.
• Le délai de l'alarme snooze va de 5 à 120
minutes. Après avoir réglé l'alarme, le compte
à rebours commence. Lorsque le temps est
écoulé, l'appareil passe automatiquement en
mode veille et lance l'alarme.
• Lorsque l’alarme est déclenchée, l’écran passe
automatiquement en mode veille.
• Dans le menu "Volume de l’alarme", vous
pouvez régler le volume de l’alarme (la valeur par défaut est 7).
• L'alarme peut être arrêtée avec n'importe quelle touche et une
répétition au bout de 5 minutes est activée.
• Appuyer sur STANDBY arrête la répétition de l’alarme.
• Après avoir conguré l’alarme, vous devez quitter les paramètres pour
les activer.
• Deux alarmes réglées ne sonnent pas en même temps. Ce n'est
que lorsqu'une alarme est terminée que l'alarme suivante peut être
déclenchée.
• Menu de l'alarme 1 :
- répétition : Les options de répétition sont "quotidien", "une fois", choix
du jour de la semaine (du lundi au dimanche).
-durée : réglage d'une alarme unique
-Son : réglage du son de l'alarme ("alarme" est réglé par défaut) :
mélodie, radio Internet, USB)
Minuterie
Pour conrmer le réglage, appuyez sur le bouton. Pour arrêter la minuterie,
appuyez à nouveau sur le bouton.
Langue
17 langues sont prises en charge: anglais, allemand, espagnol, français,
portugais, néerlandais, italien, russe, suédois, norvégien, danois, hongrois,
tchèque, slovaque, polonais, turc, nnois.
Ecran
Deux modes sont disponibles : couleur et monochrome.
Paramètres d'énergie
Paramètres du mode veille:
Arrêt après 5, 15 ou 30 minutes.
Désactiver le réglage de l'alimentation avec POWER OFF.

74
FR
Arrêt programmable
L'appareil s'éteint lorsque la minuterie est écoulée. La durée réglable est de
5,30,60,90,120,150,180 minutes.
Mémoire tampon
Réglable entre 2 et 8 secondes.
Météo
Aichage de la météo de la ville sélectionnée. Les points suivants sont
disponibles :
• Réglage local (lieu). Choisissez le continent, le pays et la région.
Conrmez avec OK. La météo est maintenant aichée.
• Réglage de la température en degrés Celsius ou Fahrenheit.
• Activer et désactiver l'aichage en veille.
Paramètre de station locale
• Détection automatique: les stations locales sont recherchées
automatiquement.
• Réglage manuel: vous pouvez dénir le pays, la province et la ville l'un
après l'autre.
Paramètres de lecture
Réglage des modes de lecture :
• ARRÊT : Tous les titres sont joués une fois du premier au dernier.
• Répéter tout : tous les titres sont répétés du premier au dernier.
• Répéter un titre : le titre sélectionné est répété.
• Aléatoire : Les pistes du répertoire sont lues dans un ordre aléatoire.
Appareil (paramètres DLNA)
Renommer (Air Music)
DNLA fonctionne sur PC sous Windows, sur les smartphones Samsung
avec DLNA intégré. Pour les autres smartphones, vous pouvez utiliser une
application comme BubbleUPNP.
Egaliseur
Fonction : L'égaliseur amplie les plages de fréquences individuelles. Vous
pouvez basculer entre les diérents prols EQ (Normal, Mid, Jazz, Rock,
Bandes son, Classique, POP, Actualités).
Reprise au démarrage
Activer ou désactiver la reprise du dernier mode actif. Si l'option est
désactivée, la radio démarre avec le menu principal après la mise en
marche. Si l'option est activée, la radio reprend la dernière action au

75
FR
démarrage.
Mise à jour logicielle
Avertissement : avant de lancer une mise à jour logicielle, assurez-vous
que le périphérique est correctement branché sur une prise de courant. Ne
débranchez pas l'alimentation pendant une mise à jour logicielle, sinon le
micro logiciel pourrait être endommagé de manière dénitive.
Retour aux paramètres d'usine
Le message suivant s'aiche : "êtes-vous sûr de vouloir retourner aux
paramètres d'usine ?".
• "OUI" eace tous vos réglages et rétablit les paramètres d'usine de la
radio.
• "NON" conserve tous les paramètres actuels et retourne au menu
précédent.
Sortie audio (LINE OUT)
Vous pouvez connecter les enceintes à une enceinte externe. Ajustez
ensuite le volume via les enceintes externes.
BT
L'appareil peut être connecté via BT à un périphérique externe (smartphone
/ tablette, par exemple). Les médias (chiers MP3 enregistrés, musique en
streaming, radio web) sur l'appareil externe peuvent alors être lus via la
radio par connexion BT.
Le mode BT est recommandé s'il n'y a pas de connexion réseau et que vous
êtes à proximité immédiate de la radio lorsque l'appareil est connecté.
Sélectionnez BT dans le menu.
Une connexion BT doit être établie pour envoyer des chiers audio à la
radio via BT.
Etablissement d'une connexion BT
Si vous sélectionnez le mode BT sur la radio, elle se met en mode de
couplage et recherche les appareils BT pouvant s'y connecter.
Activez maintenant la fonction BT sur l'appareil externe à connecter (les
détails peuvent être trouvés dans le manuel d'utilisation de l'appareil à
connecter)
Dans la liste des appareils disponibles, recherchez "Karaboom 100 Wi",
sélectionnez-le et connectez-vous. Les doubles èches apparaissent dans
le coin supérieur gauche de l'écran de la radio. Un bip retentit et le message
"Connecté" apparaît".

76
FR
Lecture de médias via BT
Après avoir établi une connexion BT, vous pouvez lire les chiers musicaux
stockés sur le périphérique externe à partir de l'appareil.
Gehen Sie dazu wie folgt vor:
Commencez à lire de la musique sur le périphérique externe en activant la
fonction de lecture correspondante (lecteur MP3, etc.) ou en sélectionnant
un titre dans la liste de lecture correspondante.
CONTRÔLE PAR APPLI AVEC AIR MUSIC
CONTROL
Vous pouvez utiliser la radio Internet via votre smartphone ou votre
tablette.
Pour ce faire, téléchargez l'application "Air Music Control" depuis "Google
Play Store" ou "Apple AppStore".
Les appareils doivent être connectés au même réseau.

77
FR
RADIO FM
Appuyez sur les touches , pour choisir l'option FM. Dans ce menu, vous
trouverez tous les paramètres pertinents pour recevoir des stations de radio
via la bande FM.
Recherche de station FM
Lorsque l'appareil est passé en mode FM pour la première fois, il doit
eectuer une recherche de station. Une fonction de scan automatique et
manuelle est disponible pour cela.
Recherche automatique de FM
Si vous avez basculé sur FM, appuyez sur la touche Entrée. La radio lance
la recherche automatique des stations et enregistre toutes les stations
trouvées.
La radio peut stocker jusqu'à 20 stations de radio FM.
Utilisation de la radio FM
Pour appeler les stations de radio mémorisées, appuyez sur la touche ou
. Vous pouvez également rappeler les 5 premières stations mémorisées
via les touches de station 1-5 de la radio.
Si vous souhaitez modier l'attribution des boutons de présélection de
station, appuyez sur le bouton de sélection de station 6 pour scanner
jusqu'à la station suivante. Si nécessaire, répétez cette étape jusqu'à ce
que vous trouviez la station souhaitée. Appuyez ensuite sur la touche de
sélection de station désiré 1-10 pendant environ 2 secondes. La station est
maintenant enregistrée sur cette touche.
LECTEUR CD
L'appareil dispose d'un lecteur de CD capable de lire des CD de données
audio et MP3. Sélectionnez CD dans le menu.
Insérez un CD dans le lecteur. L'appareil entre automatiquement dans le CD.
Vous aurez un aperçu des pistes audio du CD. Utilisez le bouton de volume
pour sélectionner la piste que vous souhaitez lire, puis appuyez sur la
molette ou sur la touche ENTER de la télécommande pour conrmer.
La touche passe au titre suivant. La touche revient au titre précédent.
La touchemet la lecture en pause ou la reprend.
Appuyez sur la touche EJECT de la télécommande ou sur l'appareil pour
éjecte le CD.

78
FR
RADIO DAB
Appuyez sur les touches , pour choisir l'option DAB.
Recherche de station DAB
Outre les stations FM, la radio peut également recevoir la radio DAB +, la
radio numérique via l’antenne terrestre.
Lorsque la radio passe en mode DAB pour la première fois, elle lance un
scan automatique des stations pour rechercher toutes les stations pouvant
être reçues à cet endroit.
La recherche de station commence et une barre d'état apparaît à l'écran.
Une fois le scan terminé, la radio commence à lire la dernière station
sélectionnée.
Choix d'une station
En mode DAB, utilisez les touches , pour parcourir les stations DAB+
que vous pouvez recevoir.
Pour changer de station, appuyez sur la touche Entrée.
La radio est équipée d'une mémoire de présélection pour 10 stations de
radio.
Pour mémoriser une station, passez à la station que vous souhaitez
mémoriser comme décrit ci-dessus. Appuyez maintenant sur la touche
numérique 1-10 de la télécommande ou de la radio et maintenez-la pendant
environ 2 secondes, ou appuyez sur les touches de mémoire de la station
1-5 sur lesquelles vous souhaitez mémoriser la station.
L’aicheur indiquera que l’émetteur a été mémorisé à l’emplacement
sélectionné.
Utilisation de la radio DAB
Si vous avez mémorisé des stations dans la mémoire des favoris, vous
pouvez les appeler en appuyant sur la touche numérique souhaitée. En
mode DAB, vous pouvez aussi appuyer sur la touche Preset pour accéder à
la liste des favoris.
Utilisez les touches , pour naviguer dans la liste des favoris puis
appuyer sur la touche de saisie (réglage du volume) pour conrmer votre
choix.

79
FR
RÉSOLUTION DES PROBLÈMES
Problème Cause possible et solution
Pas d'aichage, la radio ne répond
pas aux commandes, pas de contrôle
à distance possible
Assurez l'alimentation électrique via
l'adaptateur secteur fourni.
Télécommande sans eet. Les piles sont vides ou mal insérées.
Veuillez vérier si les piles sont
correctement insérées.
Mauvaise réception en mode DAB+ Aucune station trouvée. L’antenne
n’est pas complètement déployée.
Changez l'emplacement de la radio
(par exemple, plus près de la fenêtre),
refaites la recherche de la station.
Mauvaise réception en mode FM L'antenne n'est pas complètement
déployée, déployez l'antenne FM
sur toute sa longueur. Changez
l'emplacement de la radio (par
exemple, plus près de la fenêtre),
relancez la recherche de la station.
Fonction AUX inopérante L'enceinte tour est réglée sur un
mode incorrect. Passer au mode
"AUX". Le câble est peut-être
défectueux. Vériez la connexion
du câble entre l'enceinte tour et le
périphérique externe.
Mauvaise qualité de son en lecture
de musique
Fichier à faible débit binaire. Vériez
le chier audio. Astuce: pour les
chiers MP3, le débit doit être de 192
Kbits / s ou supérieur.
Volume trop faible Vériez le réglage du volume sur
l'appareil. Vériez le réglage du
volume de l'appareil connecté à partir
duquel la musique est en cours de
lecture.

80
FR
Problème Cause possible et solution
Impossible d'établir une connexion. Vériez la fonction Wi-Fi. Activez la
fonction DhCP du routeur auquel la
radio doit être connectée. Un pare-
feu peut être actif sur le réseau.
Impossible d'établir une connexion
Wi- (W-LAN).
Vériez la disponibilité des réseaux
Wi-Fi. Réduisez la distance entre le
routeur sans l et la radio. Veillez à
utiliser le mot de passe WEP / WPA
correct lorsque vous vous connectez à
un routeur Wi-Fi.
Aucune radio Internet trouvée. Vériez les points d'accès du réseau.
La station de radio peut ne pas être
accessible pour le moment. Il est
possible que la connexion de la
station ait été modiée ou que la
station ne retransmette plus.

81
FR
CONSEILS POUR LE RECYCLAGE
S‘il existe une réglementation pour l‘élimination ou le
recyclage des appareils électriques et électroniques
dans votre pays, ce symbole sur le produit ou sur
l‘emballage indique que cet appareil ne doit pas
être jeté avec les ordures ménagères. Vous devez le
déposer dans un point de collecte pour le recyclage
des équipements électriques et électroniques.
La mise au rebut conforme aux règles protège
l‘environnement et la santé de vos semblables des
conséquences négatives. Pour plus d‘informations
sur le recyclage et l‘élimination de ce produit, veuillez
contacter votre autorité locale ou votre service de
recyclage des déchets ménagers.
Ce produit contient des piles. S‘il existe une
réglementation pour l‘élimination ou le recyclage
des piles dans votre pays, vous ne devez pas les
jeter avec les ordures ménagères. Renseignez-vous
sur les dispositions locales relatives à la collecte
des piles usagées. La mise au rebut conforme aux
règles protège l‘environnement et la santé de vos
semblables des conséquences négatives.
DÉCLARATION DE CONFORMITÉ
Fabricant :
Chal-Tec GmbH, Wallstraße 16, 10179 Berlin,
Allemagne.
Importateur pour la Grande Bretagne :
Berlin Brands Group UK Limited
PO Box 42
272 Kensington High Street
London, W8 6ND
United Kingdom
Le soussigné, Chal-Tec GmbH, déclare que
l’équipement radioélectrique du type Karaboom Wi
est conforme à la directive 2014/53/UE. Le texte
complet de la déclaration UE de conformité est
disponible à l’adresse internet suivante : use.
berlin/10033150


83
ES
Datos técnicos 84
Indicaciones de seguridad 85
Envío 86
Vista general del aparato 87
Puesta en funcionamiento 91
Estructura del menú 92
Descripción de funciones 96
Control mediante la aplicación air music control 102
Unidad lectora de cd 103
Radio fm 103
Radio dab 104
Detección y resolución de anomalías 105
Retirada del aparato 107
Declaración de conformidad 107
ÍNDICE
Estimado cliente:
Le felicitamos por la adquisición de este producto.
Lea atentamente el siguiente manual y siga
cuidadosamente las instrucciones de uso con
el n de evitar posibles daños. La empresa no
se responsabiliza de los daños ocasionados
por un uso indebido del producto o por haber
desatendido las indicaciones de seguridad.

84
ES
DATOS TÉCNICOS
Número de artículo 10033150 10033151
Fuente de alimentación 230 V ~ 50Hz
Valores de tasa de bits
MP3
AAC/AAC+
WMA
Tasa de bits de hasta 320 Kbits/s, frecuencia de
muestreo de hasta 48 KHz
Tasa de bits de hasta 320 Kbits/s, frecuencia de
muestreo de hasta 48 KHz
Tasa de bits de hasta 320 Kbits/s, frecuencia de
muestreo de hasta 48 KHz
Compatible con UPnP/ DLNA
WLAN
Codicación de la red
Banda de frecuencias
Potencia de transmisión
IEEE 802.11b/g
WPA/WPA2/WEP (64/128 bit key)
2412- 2472 MHz
12 dBm
BT
Banda de frecuencias
Potencia de transmisión
2402-2480 MHz
2 dBm
Radio DAB/DAB+ DAB-Band III 174,928 MHz - 239,200 MHz
Radio FM 87,5 Mhz - 108 MHz
Display Display TFT de color (240 x 320 píxeles)
Conexiones
Line Out 3,5 mm stéréo
AUX IN (entrée) RCA stéréo
LAN RJ45 (10/100 Mbit/s)

85
ES
INDICACIONES DE SEGURIDAD
EL INCUMPLIMIENTO DE ESTAS INSTRUCCIONES PUEDE PROVOCAR
LESIONES PERSONALES GRAVES Y DAÑO AL PRODUCTO
• El aparato está diseñado únicamente para uso doméstico y personal.
Cualquier otro uso se interpretará como uso indebido.
• Lea atentamente y guarde este manual de instrucciones.
• Preste atención a todas las advertencias.
• Nunca almacene ni guarde el equipo eléctrico en entornos lluviosos o
húmedos.
• Desenchufe el aparato durante tormentas eléctricas o si no lo va a
utilizar durante periodos largos de tiempo.
• No exponga este aparato al sol. No instale el aparato cerca de fuentes
de calor tales como radiadores, unidades de registro de calor, estufas u
otros aparatos que produzcan calor.
• Apague el aparato antes de desconectarlo del tomacorriente.
• No exponga el aparato a goteos ni salpicaduras de agua. No coloque
objetos encima del aparato.
Desconexión de la red eléctrica
El aparato sigue recibiendo corriente eléctrica incluso cuando están
en modo Standby. Para desconectarlo totalmente de la red eléctrica,
desconéctelo del tomacorriente.
Piezas pequeñas/partes del embalaje (bolsas de plástico, cartón, etc.):
Mantenga las piezas pequeñas (p.ej. tornillos y otro material de montaje,
tarjetas de memoria) y las partes del embalaje fuera del alcance de los
niños para evitar que se atraganten. No permita que los niños pequeños
jueguen con el plástico, puede provocar riesgo de asxia !
Transporte del aparato:
Conserve el embalaje original. Para proteger el aparato durante el
transporte, introdúzcalo en su embalaje original.
Limpieza de la supercie exterior:
No utilice líquidos volátiles, como sprays insecticidas. El exterior del
aparato podría dañarse si se frota demasiado fuerte. Evite que el aparato
esté en contacto continuado con objetos de goma o plástico. Utilice un
paño seco.

86
ES
ENVÍO
Torre de sonido
Mando a
distancia
Manual de
instrucciones
Cable RCA

87
ES
Conexiones y teclas de control
VISTA GENERAL DEL APARATO

88
ES
1 Compartimento
2 Soporte para tabletas
3 Regulador de volumen
4 Botón de encendido/apagado
Enciende/Apaga el aparato.Menu
Muestra el menú.
5 Menú
Muestra el menú.
6 Atenuador
7 Modos
8 Enter
9 Pista anterior
10 Reproducción/Pausa
11 Siguiente pista
12 Abrir la unidad lectora de CD
13 Pantalla LCD
14 Unidad lectora de CD
Inserte aquí el CD.
15 Puerto USB
16 Puerto USB con función de carga
17 Entrada AUX derecha
18 Entrada AUX izquierda
19 Conexión LAN
Puede conectar el altavoz a una red disponible mediante un cable
de red. Como alternativa, puede conectar el aparato mediante wi.
20 Antena VHF/DAB
21 Botón de encendido/apagado
22 Cable de alimentación

89
ES
Mando a distancia

90
ES
1 Botón ON/OFF
Pulse este botón para encender el aparato o cambiarlo al modo Standby.
2 Función Silencio
Pulse de nuevo el botón para desactivar la función Silencio
3 Despertador: Congurar el despertador
4 Programa
5 Modo aleatorio
6 Efectos de sonido: normal, plano, jazz, rock, banda sonora, clásico, pop,
noticias.
7 Temporizador
8 Temporizador de apagado
9 Atenuador
Congurar la retroiluminación
10 Repetición
Pulse 1 vez para repetir todas las pistas
Pulse 2 veces para repetir 1 pista
11 Fuente de reproducción
CD, USB, AUX, DAB, radio FM, radio de internet
12 Botones de echa
Pulse para elegir una conguración y pulse ENTER para conrmar
13 ENTER
Conrmar una selección
14 Menú
15 Abrir la unidad lectora de CD
16 Volumen+/-
17 Reproducción/Pausa
18 Pista anterior/Siguiente pista
19 Stop
20 Teclado numérico

91
ES
PUESTA EN FUNCIONAMIENTO
Encender
Conecte el cable de alimentación situado en la parte posterior del aparato
al tomacorriente. Mueva el interruptor ON/OFF hasta la posición ON.
A continuación, aparecerá la imagen de bienvenida. La radio buscará
automáticamente las emisoras de radio disponibles. Utilice la perilla
para elegir la red. Pulse «OK» para seleccionar la red. Si utiliza la radio de
internet por primera vez, siga estos pasos:
1. Aparecerá el mensaje: «¿Desea congurar la red ahora?»
Pulse la perilla para seleccionar «SÍ». Ahora, la radio buscará las
emisoras disponibles.
2. Gire la perilla para elegir la red a la que desea conectar la radio. Una vez
elegida la red, presione la perilla para seleccionarla.
3. Se le pedirá que introduzca una contraseña. Gire la perilla para
seleccionar las letras. A continuación, presione la perilla para conrmar
la contraseña.
4. La radio se conectará a la red.
Atención: Cuando introduzca la contraseña de WLAN, gire la perilla para
seleccionar los caracteres. Con el botón IZQUIERDA puede volver al
carácter y eliminarlo.
Atención: Se pueden introducir los siguientes caracteres:
• Números (0-9)
• Letras latinas (A-Z y a-z)
• Caracteres especiales (DEL, @, espacio, !, ”, #, $, %, &, *, ’, + y (,).

92
ES
ESTRUCTURA DEL MENÚ
Menú principal
Ajustes
Radio DAB
Radio FM AUX
BT
Ajustes
Centro multim
edia Centro de información
Radio de
internet
Reloj
Gestionar My mediaU
Conguración de la red inalámbrica
Red inalámbrica (WPS PBC)
Conguración manual
Comprobar red al encender el
aparato
Congurar la fecha y hora
Congurar el formato de hora
Congurar el formato de fecha
Red
Fecha y hora
Analógico
Digital
Gire la perilla
y púlsela para
seleccionar.
Pulse
IZQUIERDA
para volver.

93
ES
Despertador Alarma 1
Alarma 2
Alarma de siesta
Volume de l'alarme
Minuterie
Langue
Réglage
de la
luminosité
Ecran
Paramètres d'énergie
Arrêt programmable
Mémoire tampon
Météo
Mode d'économie
d'énergie
Allumer
Paramètres locaux
Couleur
Unité de température
Monochrome
Aichages en mode
veille
Encender
Encender
Apagar
Apagar
Conguración

94
ES
Conguración de radio
local
Conguración de
reproducción
Aparato
Ecualizador
Continuar con la
reproducción
Actualización de software
Restablecer conguración
predeterminada
Automático (país)
Cambiar de nombre
(AirMusic)
Activar
Desactivar
Manual (ciudad)
AirMusic Control App
Desactivar
Repetir todo
Reconocimiento
automático
Repetir pista actual
Aleatorio
Conguración

95
ES
Mis favoritos
USB
Información de
tiempo
Emisoras de radio/
Música
UPnP
Información de nanzas
Radio local
Mi lista de reproducción
Información de
sistema
Última emisora
escuchada
Eliminar Mi lista de reproducción
Buscar emisoras de radio
Añadir emisoras de radio
Servicio
Radio de
internet
Centro multimedia
Radio FM
Radio DAB
AUX
BT
Centro de información

96
ES
DESCRIPCIÓN DE FUNCIONES
AUX (entrada de línea)
A través de la entrada AUX, puede conectarse a
una fuente de audio externa.
Radio de internet
Aparecerán en el display las siguientes opciones
de menú:
1 Mis favoritos
2 Emisoras de radio/Música
3 Radio local
4 Última emisora escuchada
5 Servicio
Centro multimedia
1. USB
Funciones: Reproduce archivos musicales a través del puerto USB. Los
formatos compatibles son WMA/MP3/AAC/AAC+/FLAC/WAV.
Compatible con USB 3.0 y anterior.
Para congurar la reproducción, consulte el apartado «Conguraciones».
2. UPNP
Funciones: Reproduce archivos almacenados en un ordenador.
Atención: Tiene que tener instalado en su
ordenador «Windows Media Player 11» (o una
versión superior) o «Twonky Media Server», pues
son necesarios para utilizar UPnP. «Windows
Media Player» le permite transferir pistas de su
lista de reproducción. Para ello, su ordenador
debe estar conectado a internet y las pistas
deben hallarse en su lista de reproducción. Además, debe permitir que su
ordenador pueda conectarse a otros dispositivos. (Puede congurarlo de
forma manual o automática en «Windows Media Player».)
3. Mi lista de reproducción
Pulse MENU. Gire la perilla hasta «Centro multimedia» y pulse OK. Gire
la perilla para elegir «My playlist». Pulse OK.
Atención: Durante la reproducción en modo UPnP, pulse el botón OK para
añadir la pista actual a Mi lista de reproducción.

97
ES
4. Eliminar Mi lista de reproducción
Aparecerá la pregunta «¿Seguro que desea eliminarla?». A continuación,
pulse «Sí» o «No».
My media U
Funciones: Acceso rápido a los programas de la radio de internet mediante
la lista de reproducción personal.
Atención: Antes de utilizar «My media U», debe registrarse en http://www.
mediayou.net y elegir las conguraciones correspondientes. De lo contrario,
aparecerá un aviso informando de que debe registrarse en internet.
Atención: Esta opción de menú está desactivada en conguración
predeterminada. De ser necesario, active esta opción en «Gestionar My
mediaU».
Centro de información
Funciones: Muestra información acerca del tiempo atmosférico, la bolsa y la
conguración del sistema.
Información de tiempo
Mediante los botones IZQUIERDA y DERECHA, recibe información acerca
del tiempo atmosférico en los próximos 5 días.
Información de nanzas
Recibe información bursátil actual.
Información de sistema
Funciones: Muestra la versión del software, la dirección MAC, el ID y IP del
punto de acceso WLAN.
Ajustes
Funciones: Conguración de red, despertador, fecha, hora, etc. Pulse el
botón IZQUIERDA para ir atrás.
Se pueden realizar las siguientes 20 conguraciones:
Reloj
Existen 2 modos de visualización: analógica y digital.
En modo analógico, aparece una esfera con números; en modo digital, la
hora se muestra en cifras.

98
ES
Gestionar «My mediaU»
Elija «Activar» para activar la función «My MediaU» y añadirla al menú. Elija
«Desactivar» para eliminar la función del menú.
Red
Conguración WLAN: Búsqueda automática de WLAN y visualización de
las redes disponibles Pulse OK para conectarse a la red elegida. Si la red
requiere una contraseña, introdúcela con los botones de letras y cifras.
Red inalámbrica (red WLAN WPS PBC): Al elegir WPS PBC, aparecerá
«Pulse el botón WPS en su router en un intervalo de 120 segundos». Pulse el
botón en su router para que este se conecte automáticamente.
Conguración manual (red inalámbrica): En el menú aparecen 3 puntos:
(DHCP, introducir SSID, administrar). Cuando DHCP está encendido, el
aparato busca y se conecta automáticamente a las direcciones IP de las
redes inalámbricas.
Comprobar red al encender el aparato
Funciones: Al encender el aparato, pulse «Activar» para comprobar el
estado de la red de forma manual. Elija «Desactivar» si no desea realizar la
comprobación.
Atención: Si la red ligada a «Activar» no está conectada, se mostrarán
automáticamente las opciones para activar la red
Fecha y hora
• Conguración de la fecha y hora
• Conguración manual: Conguración manual de la fecha y hora.
• Conguración automática (UTC+01:00). 01:00 representa la diferencia
entre la zona horaria local y GMT (tiempo medio de Greenwich).
Congurar el formato de hora (la conguración estándar es el formato de
24 horas)
• 12 horas
• 24 horas
Congurar el formato de fecha (el formato predeterminado es DD/MM/
AAAA)
• AAAA/MM/DD
• DD/MM/AAAA
• MM/DD/AAAA
(A= año, M= mes, D=día)

99
ES
Despertador
Conguración de las 3 alarmas (alarma 1, alarma 2 y alarma de siesta) y del
volumen de la alarma.
• El tiempo de la alarma de siesta comprende
entre 5 y 120 minutos. Después de congurar
el despertador, se inicia la cuenta atrás. Al
transcurrir el tiempo elegido, el aparato entra
automáticamente en modo Standby y suena
la alarma.
• Cuando la alarma suena, el display entra
automáticamente en modo Standby.
• Puede congurar el volumen de la alarma en la opción de menú
«Volumen de alarma». (El nivel estándar es 7).
• La alarma se detiene al apretar cualquier botón y se activa una
repetición de alarma cada 5 minutos.
• Al pulsar STANDBY, se desactiva la repetición de alarma.
• Después de congurar la alarma, debe abandonar el menú
«Conguraciones» para activar la conguración.
• Dos alarmas no pueden sonar al mismo tiempo. La segunda alarma
empezará a sonar después de que haya dejado de sonar la primera.
• Menú para la Alarma 1:
-Repetición: Las opciones de repetición son «diario», «una vez»,
selección de un día de la semana (Lu-Do).
-Hora: Conguración de la hora de la alarma.
-Sonido: Conguración del tono de la alarma («Tono de alarma» es la
conguración estándar, melodía, radio de internet, USB).
Temporizador
Para conrmar la conguración, pulse la perilla. Para detener el
temporizador, vuelva a pulsar la perilla.
Idioma
El aparato dispone de 17 idiomas: inglés, alemán, español, francés,
portugués, neerlandés, italiano, ruso, sueco, noruego, danés, húngaro,
checo, eslovaco, polaco, turco, nés.
Display
Hay 2 modos disponibles: en color y monocromo.
Conguración de energía
Conguraciones para el modo Standby:
Apagado después de 5, 15 o 30 minutos.
Para desactivar la conguración de energía, pulse «APAGAR».

100
ES
Temporizador de apagado
Apagar el aparato mediante el temporizador de apagado. El intervalo
comprende 5, 30, 60, 90, 120, 150 y 180 minutos.
Búfer
Congurable entre 2 y 8 segundos.
Tiempo
Muestra el tiempo atmosférico de la localidad congurada. Se pueden
elegir las siguientes opciones:
• Congurar ubicación (conguración de la localidad). Elija el continente,
el país y la región. Pulse OK para conrmar. A continuación, se indicará
el tiempo.
• Conguración de la temperatura en grado Celsius o Fahrenheit.
• Encender/Apagar en modo Standby.
Conguración de la emisora local
• Reconocimiento automático: Se buscarán automáticamente las
emisoras locales.
• Conguración manual: Puede congurar el país, la provincia y la ciudad.
Conguración de reproducción
Conguración de los modos de reproducción:
• APAGADO: Se reproducirán 1 vez todas las pistas, desde la primera
hasta la última.
• Repetir todo: Se reproducirán todas las pistas, desde la primera hasta
la última.
• Repetir pista actual: Se repetirá la pista actual.
• Aleatorio: Todas las pistas se reproducirán en orden aleatorio.
Aparato (conguración DLNA)
Cambiar de nombre (Air Music)
DNLA funciona en ordenadores con sistema operativo Windows y
en smartphones Samsung con DLNA incorporada. Si cuenta con otro
smarthphone, puede utilizar la aplicación BubbleUPNP.
Ecualizador
Funciones: El ecualizador refuerza el rango de frecuencia. Puede cambiar
entre los diferentes perles de ecualizador (normal, centrado, jazz, rock,
banda sonora, clásico, pop, noticias).
Continuar reproducción
Activar o desactivar la reanudación del último modo activo.

101
ES
Cuando la opción está desactivada, después de encender la radio, inicia el
menú principal.
Cuando la opción está activada, después de encender la radio, inicia el
último modo activo.
Actualización de software
Advertencia: Antes de iniciar la actualización de software, asegúrese de que
el aparato está conectado a un tomacorriente. No desconecte la radio del
tomacorriente durante la actualización de software, ya que podría dañar el
aparato.
Restablecer las conguraciones por defecto
Aparecerá el mensaje «¿Seguro que desea restablecer las conguraciones
por defecto?».
• «SÍ» elimina todas las conguraciones y restablece las conguraciones
predeterminadas.
• «NO» conserva todas las conguraciones realizadas y vuelve al menú
anterior.
Salida de audio (salida de línea)
Puede conectar un altavoz externo. En este caso, el volumen se regula a
través del altavoz externo.
BT
El altavoz puede conectarse a dispositivos externos (p. ej. smartphones/
tabletas) mediante la interfaz Bluetooth. Los medios (archivos en formato
MP3, retransmisión de música, radio web) almacenados en los dispositivos
externos pueden reproducirse a través del altavoz vía conexión BT.
Se recomienda emplear el modo BT cuando no hay conexión de red y el
altavoz se halla cerca del dispositivo externo.
Elija «BT» en el menú.
Establezca una conexión BT para poder enviar archivos de audio mediante
BT al altavoz.
Establecer conexión Bluetooth
Después de elegir el modo BT, el altavoz se encuentra en modo Paring y
busca dispositivos con BT a los que puede conectarse.
Active la función Bluetooth en su dispositivo externo (puede encontrar más
detalles en las instrucciones de su dispositivo externo). Busque «Karaboom
100 Wi» en la lista de dispositivos disponibles. Elíjalo para establecer la
conexión. En la esquina superior izquierda del display del altavoz aparecerá
una echa doble. Sonará un pitido y aparecerá el mensaje «Connected».

102
ES
Reproducir música a través de Bluetooth
Después de establecer la conexión Bluetooth, puede reproducir los archivos
almacenados en su dispositivo externo a través del altavoz.
Para ello, repita los siguientes pasos:
Inicie la función de reproducción (reproductor de MP3, etc.) o elija la pista
que desea reproducir en su dispositivo externo.
CONTROL MEDIANTE LA APLICACIÓN AIR
MUSIC CONTROL
Puede controlar la radio de internet mediante un smartphone o tablet.
Para ello, descargue la aplicación «Air Music Control» en «Google Play
Store» o «Apple AppStore».
Los dispositivos tienen que estar conectado a la misma red.

103
ES
RADIO FM
Pulse los botones , para elegir la opción FM.
En este menú encontrará las conguraciones relevantes para recibir
emisoras de radio a través de la frecuencia FM.
Búsqueda de emisoras FM
Si es la primera vez que entra en modo FM, debe llevar a cabo una
búsqueda de emisoras. Para ello, puede elegir entre una búsqueda manual
o automática de emisoras.
Búsqueda automática de emisoras FM
Después de elegir el modo FM, pulse el botón Enter. El aparato empieza
una búsqueda automática de emisoras y almacena todas las emisoras
encontradas.
Se pueden guardar hasta 20 emisoras de radio FM.
Utilizar la radio FM
Para acceder a las emisoras de radio almacenadas, pulse el botón o .
De forma alternativa, puede acceder a las 5 primeras emisoras pulsando los
botones numéricos 1-5.
Si desea cambiar el orden de las emisoras almacenadas, pulse el botón
6 para buscar la siguiente emisora disponible. Repita este paso para
encontrar la emisora deseada. A continuación, mantenga pulsado durante
aprox. 2 segundos el botón numérico 1-10 para guardar bajo este número la
emisora.
UNIDAD LECTORA DE CD
El aparato cuenta con una unidad lectora de CD, capaz de reproducir CD de
audio o CD MP3. Elija «CD» en el menú.
Inserte un CD en la unidad lectora. El aparato empieza a leer
automáticamente el CD.
Aparecerá en el display un resumen de las pistas que contiene el CD. Elija
la pista que desea reproducir con el regulador de volumen y conrme la
selección presionando la perilla o pulsando el botón ENTER en el mando a
distancia.
Si pulsa el botón se reproducirá la siguiente canción. Si pulsa el botón
se reproducirá la canción anterior.
Si pulsa el botónpausará o reanudará la reproducción.
Pulse el botón EJECT en el mando a distancia o en el aparato para expulsar
el CD.

104
ES
RADIO DAB
Pulse los botones , para elegir la opción DAB.
Búsqueda de emisoras DAB
Además de las emisoras FM, la radio puede recibir emisoras de radio DAB+,
una radio digital, gracias a la antena terrestre.
Si es la primera vez que entra en modo DAB, la radio iniciará una búsqueda
automática de emisoras para buscar todas las emisoras disponibles en su
localidad.
Cuando se inicie la búsqueda de emisoras, en el display aparecerá una
barra de estado. Una vez nalizada la búsqueda, la radio reproducirá la
última emisora elegida.
Selección de emisoras
Utilice en modo DAB los botones , para navegar entre las emisoras
DAB+ recibidas.
Pulse el botón Enter para cambiar de emisora.
La radio dispone de una memoria donde puede almacenar sus 10
emisoras favoritas. Para guardar una emisora, realice los pasos descritos
anteriormente para elegir la emisora que desea almacenar. A continuación,
mantenga pulsado durante aprox. 2 segundos el botón 1-10 en el mando
a distancia o en la radio, o pulse el botón numérico 1-5 en el que desea
guardar la emisora.
En el display aparecerá un mensaje diciendo que la emisora fue guardada
en el botón numérico elegido.
Utilizar la radio DAB
Si ha almacenado una emisora en la memoria de favoritos, puede acceder a
ella pulsando el botón numérico deseado.
De forma alternativa, pulse el botón Preset en modo DAB para acceder a la
lista de favoritos.
Utilice los botones , para navegar entre la lista de favoritos y pulse el
botón de conrmación (regulador de volumen) para conrmar su selección.

105
ES
DETECCIÓN Y RESOLUCIÓN DE ANOMALÍAS
Anomalía Posible causa y solución
No aparecen mensajes en el display;
la radio no reacciona a las órdenes.
El aparato no reacciona cuando
se pulsa un botón en el mando a
distancia.
Compruebe que el cable de
alimentación está correctamente
conectado.
El aparato no reacciona cuando
se pulsa un botón en el mando a
distancia.
Las pilas están agotadas o mal
puestas. Compruebe que las pilas
están correctamente puestas.
Mala señal en modo DAB+. No se han encontrado emisoras;
realice de nuevo la búsqueda; la
antena no está completamente
extendida.
Cambie el aparato de lugar (p. ej.
más cerca de la ventana), repita la
búsqueda de emisoras.
Mala señal en modo FM. La antena no está completamente
extendida. Extienda por completo la
antena FM.
Cambie el aparato de lugar (p. ej.
más cerca de la ventana), repita la
búsqueda de emisoras.
La entrada AUX no funciona. La torre de sonido se encuentra en el
modo incorrecto.
Elija el modo «AUX».
El cable está defectuoso. Compruebe
el cable entre la torre de sonido y el
dispositivo externo.
Mala calidad de audio durante la
reproducción.
Archivos con baja tasa de bits.
Compruebe los archivos de audio.
Recomendación: La tasa de bits
de los archivos MP3 debe ser de
192Kbit/s o superior.

106
ES
Anomalía Posible causa y solución
El volumen es muy bajo Compruebe el nivel de volumen
congurado en el aparato.
Compruebe el nivel de volumen
congurado en el dispositivo
conectado desde el que reproduce
la música.
No se puede establecer una
conexión.
Compruebe la función wi.
Active la función DhCP en el router al
que desea conectar la radio.
Es posible que haya un rewall
activado en la red.
No se puede establecer una conexión
wi (WLAN).
Compruebe la red wi disponible.
Disminuya la distancia entre el router
WLAN y la radio.
Asegúrese de que la contraseña
WEP/WPA que introduce al
conectarse a un router wi es
correcta.
Las emisoras de la radio de internet
no están disponibles.
Compruebe el punto de acceso de
la red. La emisora de radio puede no
estar disponible en este momento.
Es posible que la conexión de la
emisora haya cambiado o la emisora
ya no emita.

107
ES
RETIRADA DEL APARATO
Si en su país existe una disposición legal relativa a
la eliminación de aparatos eléctricos y electrónicos,
este símbolo estampado en el producto o en
el embalaje advierte que no debe eliminarse
como residuo doméstico. En lugar de ello, debe
depositarse en un punto de recogida de reciclaje
de aparatos eléctricos y electrónicos. Una gestión
adecuada de estos residuos previene consecuencias
potencialmente negativas para el medio ambiente
y la salud de las personas. Puede consultar más
información sobre el reciclaje y la eliminación de este
producto contactando con su administración local o
con su servicio de recogida de residuos.
Este producto contiene baterías. Si en su país existe
una disposición legal relativa a la eliminación de
baterías, estas no deben eliminarse como residuo
doméstico. Infórmese sobre la normativa vigente
relacionada con la eliminación de baterías. Una
gestión adecuada de estos residuos previene
consecuencias potencialmente negativas para el
medio ambiente y la salud de las personas.
DECLARACIÓN DE CONFORMIDAD
Fabricante:
Chal-Tec GmbH, Wallstraße 16, 10179 Berlín, Alemania.
Importador para Gran Bretaña:
Berlin Brands Group UK Limited
PO Box 42
272 Kensington High Street
London, W8 6ND
United Kingdom
Por la presente, Chal-Tec GmbH declara que el tipo
de equipo radioeléctrico Karaboom Wii es conforme
con la Directiva 2014/53/UE. El texto completo de la
declaración UE de conformidad está disponible en la
dirección Internet siguiente: use.berlin/10033150


109
IT
Dati tecnici 110
Avvertenze di sicurezza 111
Volume di consegna 112
Descrizione del dispositivo 113
Messa in funzione 117
Struttura del menu 118
Descrizione delle funzioni 122
Controllo tramite app air music control 128
Lettore cd 129
Radio fm 129
Radio dab 130
Correzione degli errori 131
Smaltimento 133
Dichiarazione di conformità 133
INDICE
Gentile Cliente,
La ringraziamo per aver acquistato il dispositivo.
La preghiamo di leggere attentamente le seguenti
istruzioni per l’uso e di seguirle per evitare
possibili danni tecnici. Non ci assumiamo alcuna
responsabilità per danni scaturiti da una mancata
osservazione delle avvertenze di sicurezza e da un
uso improprio del dispositivo. Scansionare il codice
QR seguente, per accedere al manuale d’uso più
attuale e per ricevere informazioni sul prodotto.

110
IT
DATI TECNICI
Numero articolo 10033150 10033151
Alimentazione
trasformatore
230 V ~ 50Hz
Codec audio
MP3
AAC/AAC+
WMA
Bitrate no a 320 kbits/s, sample rate no a 48 KHz.
Bitrate no a 320 kbits/s, sample rate no a 48 KHz.
Bitrate no a 320 kbits/s, sample rate no a 48 KHz.
Compatibile con UPnP/DLNA.
WLAN
Crittograa di rete
Banda di frequenza
Potenza di trasmissione
IEEE 802.11b/g
WPA/WPA2/WEP (64/128 bit key)
2412- 2472 MHz
12 dBm
BT
Banda di frequenza
Potenza di trasmissione
2402-2480 MHz
2 dBm
Radio DAB/DAB+ DAB-Band III 174,928 MHz - 239,200 MHz
Radio FM 87,5 Mhz - 108 MHz
Display A colori TFT (240 x 320 Pixel)
Connessioni
AUX IN (ingresso) Stereo RCA
LAN RJ45 (10/100 Mbit/s)

111
IT
AVVERTENZE DI SICUREZZA
IL MANCATO RISPETTO DI QUESTE AVVERTENZE PUÒ COMPORTARE
SERIE LESIONI A PERSONE E DANNI AL DISPOSITIVO.
• Il dispositivo è adatto solo all’uso privato in ambienti casalinghi. Ogni
altro utilizzo verrà considerato improprio.
• Leggere attentamente il manuale d’uso e conservarlo con cura.
• Rispettare tutte le avvertenze.
• I dispositivi elettrici non devono essere conservati sotto la pioggia o in
ambienti umidi.
• Staccare la spina durante temporali o se non si utilizza il dispositivo per
tempi prolungati.
• Non esporre il dispositivo a luce solare diretta. Non posizionarlo
vicino a fonti di calore, come termosifoni, stufe a ventola, forni o altri
dispositivo che emettono calore.
• Spegnere il dispositivo prima di staccare la spina.
• Non esporre il dispositivo a gocce o spruzzi d’acqua. Non poggiare
oggetti sopra al dispositivo.
Scollegare l’alimentazione elettrica
Questo dispositivo assorbe energia elettrica in standby. Per scollegare
completamente l’alimentazione, staccare il trasformatore dalla presa
elettrica.
Piccoli oggetti / parti d’imballaggio (sacchetti di plastica, cartone, ecc.)
Tenere piccoli oggetti (ad es. viti e altro materiale di montaggio, schede di
memoria) e parti d’imballaggio fuori dalla portata dei bambini in modo che
non vengano ingeriti. Non permettere ai bambini di giocare con i sacchetti
di plastica. Rischio di soocamento.
Trasporto del dispositivo
Si prega di conservare l’imballaggio originale. Per garantire una protezione
adeguata durante il trasporto del dispositivo, inserirlo nell’imballaggio
originale.
Pulizia delle superci esterne
Non utilizzare liquidi volatili, come spray per insetti. La supercie può essere
danneggiata da pressione eccessiva quando si sfrega. Parti in gomma o
plastica non devono essere lasciate in contatto con il dispositivo per tempi
prolungati. Utilizzare un panno asciutto.

112
IT
VOLUME DI CONSEGNA
Altoparlante a
torre
Telecomando
Manuale d’uso
Cavo RCA

113
IT
Connessioni ed elementi di controllo
DESCRIZIONE DEL DISPOSITIVO

114
IT
1 Ripiano di appoggio
2 Supporto tablet/PC
3 Regolazione volume
4 Interruttore On/O
Per accendere o spegnere il dispositivo
5 Menu
Per mostrare il menu
6 Dimmer
7 Modalità
8 Immissione
9 Titolo precedente
10 Play/Pausa
11 Titolo successivo
12 Aprire vano CD
13 Schermo LCD
14 Vano CD
Inserire qui il CD.
15 Connessione USB
16 Connessione di carica USB
17 Ingresso AUX destro
18 Ingresso AUX sinistro
19 Connessione LAN
Possibilità di connessione a una rete esistente tramite cavo di rete. In
alternativa è possibile collegare il dispositivo tramite WiFi.
20 Antenna VHF/DAB
21 Interruttore On/O
22 Cavo di alimentazione

115
IT
Telecomando

116
IT
1 Tasto On/O
Accendere il dispositivo e passare in modalità standby.
2 Muto
Premere una seconda volta per terminare questa funzione
3 Sveglia: impostare una sveglia
4 Programma
5 Mixare
6 Eetto sonoro: normale, piatto, jazz, rock, colonna sonora, classica, pop,
notizie
7 Timer
8 Timer di autospegnimento
9 Dimmer
Selezionare l’illuminazione di fondo
10 Ripetizione
Premere 1 volta: ripetere tutti i titoli
Premere 2 volte: ripetere un titolo
11 Fonte di riproduzione
CD-USB-AUX-DAB-FM-WEB RADIO
12 Tasti freccia
Premere per selezionare l’impostazione e confermare con ENTER
13 ENTER
Tasto d’immissione
14 Menu
15 Aprire vano CD
16 Volume +/-
17 Play/Pausa
18 Titolo successivo/Avanti
19 Stop
20 Tasti numerici

117
IT
MESSA IN FUNZIONE
Accensione
Collegare il trasformatore alla connessione di alimentazione sul retro del
dispositivo. Posizionare l’interruttore di accensione su ON. Compare la
schermata di benvenuto (Welcome). La radio cerca automaticamente un
punto di accesso. Utilizzare la manopola per selezionare la rete. Premere
OK per selezionare il punto di accesso.
Durante il primo utilizzo della web radio, seguire questi passaggi:
1. Compare il messaggio: Desiderate congurare adesso la rete?
2. Premere la manopola per selezionare Sì. La radio cerca reti disponibili.
3. Selezionare la rete con cui si desidera connettere la radio ruotando la
manopola e premendola per eettuare la scelta.
4. Sarà richiesta l’immissione di una password. Selezionare le lettere con la
manopola e premerla per inserirle.
5. La radio si connette quindi a Internet.
Avvertenza: quando si inserisce la password W-LAN, premere la manopola
per selezionare i caratteri. Con il tasto SINISTRA è possibile retrocedere di
un carattere per cancellarlo.
Avvertenza: possono essere inseriti anche i seguenti caratteri:
• Numeri (0-9)
• Lettere latine (A-Z e a-z)
• Caratteri speciali (DEL, @, Spazio, !, ”, #, $, %, &, *, ’, + e (,).

118
IT
STRUTTURA DEL MENU
Menu principale
Impostazioni
Radio DAB
Radio FM AUX
BT
Impostazioni
Media-Center Centro informazioni
Web radio
Orario
Gestire My mediaU
Impostazione rete radio
Rete radio (WPS PBC)
Congurazione manuale
Controllare rete al momento
dell’accensione
Impostare data e ora
Impostare il formato dell’ora
Impostare il formato della data
Rete
Data & ora
Analagico
Digitale
Ruotare la
manopola e
premerla per
selezionare
qualcosa.
Per tornare
indietro di
un punto
del menu,
premere LEFT
(SINISTRA).

119
IT
Sveglia Sveglia 1
Sveglia 2
Snooze
Volume sveglia
Timer
Lingua
Volume
sveglia
Display
Impostazioni
energetiche
Timer di
autospegnimento
Memoria cache
Meteo
Modalità di risparmio
energetico
Accendere
Impostazioni locali
Colori
Unità della
temperatura
Monocromatico
Indicazione in standby
On
On
O
O
Impostazioni

120
IT
Impostazione stazioni
locali
Impostazione riproduzione
Dispositivo
Equalizzatore
Proseguire con la
riproduzione
Aggiornamento software
Tornare alle impostazioni di fabbrica
Automatica (Paese)
Rinominare (AirMusic)
On
O
Manuale (Città)
App di controllo
AirMusic
O
Ripetere tutti
Rilevamento automatico
Ripetere uno solo
Casuale
Impostazioni

121
IT
I miei preferiti
USB
Informazioni meteo
Emittente radio/
Musica
UPnP
Informazioni nanziarie
Stazione locale
Il mio elenco di riproduzione
Informazioni di
sistema
Emittente ascoltata più di
recente
Cancellare il mio elenco di
riproduzione
Cercare emittente
Inserire emittente
Service
Web radio
Centro multimedia
Radio FM
Radio DAB
AUX
BT
Centro informazioni

122
IT
DESCRIZIONE DELLE FUNZIONI
AUX (Line input)
Con AUX si seleziona una fonte esterna.
Web radio
I seguenti punti del menu compaiono sullo
schermo
1 I miei preferiti
2 Emittente radio/Musica
3 Stazione locale
4 Emittente ascoltata più di recente
5 Service
Media-Center
1. USB
Funzioni: riprodurre le audio tramite USB. I formati compatibili sono WMA/
MP3/AAC/AAC+/FLAC/WAV.
Compatibile con USB 3.0 e inferiori.
In relazione alle impostazioni di riproduzione, consultare le impostazioni.
2. UPNP
Funzione: riproduzione di media sul computer.
Avvertenza: è necessario che sul computer sia
installato “Windows Media Player 11” (o una
versione più recente) o Twonky Media Server, che
sono necessari per l’utilizzo di UPnP. In “Windows
Media Player” è possibile trasportare i titoli
dell’elenco di riproduzione. A tal ne, il computer
deve essere connesso a Internet. I titoli devono
essere nell’elenco di riproduzione. Il PC deve
essere autorizzato al collegamento con altri dispositivo (questo può essere
impostato manualmente o automaticamente in Windows Media Player).
3. Il mio elenco di riproduzione
Pulse MENU. Gire la perilla hasta «Centro multimedia» y pulse OK. Gire
la perilla para elegir «My playlist». Pulse OK.
Nota: premere OK durante la riproduzione in modalità UPnP per aggiungere
il titolo a “Il mio elenco di riproduzione”.

123
IT
4. Svuotare il mio elenco di riproduzione
Compare la domanda “Sicuri di volerlo eliminare?”. Premere quindi “Sì” o
“No”.
My media U
Funzione: accesso rapido ai programmi della web radio tramite l’elenco di
riproduzione personale.
Nota: per iniziare è necessario registrarsi su http://www.mediayou.net e
realizzare le relative impostazioni prima di poter utilizzare “My media U”.
Altrimenti compare un messaggio che indica la necessità di registrarsi in
Internet.
Nota: questo punto del menu è disattivato come da impostazioni di
fabbrica. Se necessario, attivarlo all’impostazione “Gestire My mediaU”.
Centro informazioni
Funzioni: ricevere informazioni meteo e nanziarie da tutto il mondo e
informazioni sulla congurazione del sistema.
Informazioni meteo
Premendo LEFT e RIGHT si ottengono informazioni sul meteo dei 5 giorni
successivi.
Informazioni nanziarie
Si ricevono informazioni sull’andamento della borsa.
Informazioni di sistema
Funzioni: mostrare la versione del software, l’indirizzo MAC, ID e IP del
punto di accesso WLAN.
Impostazioni
Funzioni: impostazioni di rete, sveglia, data, ora, ecc. Premendo LEFT si
torna indietro di un livello nel menu.
Sono possibili le seguenti 20 impostazioni:
Orario
Ci sono due modi di indicazione: analogico e digitale.
In modalità digitale l’ora è indicata con un quadrante con lancette, mentre
in modalità analogica con cifre.

124
IT
Gestire “My mediaU”
Selezionare “Attivare” per attivare la funzione “My mediaU” e inserirla nel
menu. “Disattivare” rimuove la funzione dal menu.
Rete
Congurazione WiFi: ricerca automatica della WLAN e indicazione delle
reti disponibili. Premere OK per collegarsi con la rete selezionata. Se la rete
ha una password, inserirla utilizzando il menu delle lettere.
Rete radio (rete WLAN WPS PBC): selezionando WPS PBC compare
“Premere il tasto WPS sul vostro router entro 120 secondi”. Soddisfare
questa richiesta in modo che il router si connetta automaticamente.
Impostazione manuale (rete radio): nel menu compaiono 3 punti:
(DHCP, inserire SSID, Gestire). Se DHCP è su ON, il dispositivo cerca
automaticamente l’indirizzo IP della rete senza li e ci si connette.
Controllare la rete al momento dell’accensione
Funzioni: premere “Attivare” all’accensione, per controllare manualmente lo
stato della rete. Selezionare “Disattivare” per non controllarla.
Nota: se la rete non è connessa presso “Attivare”, i punti di selezione per
attivare la rete vengono mostrati automaticamente.
Data e ora
• Impostare data e ora
• Impostazione manuale: impostare manualmente data e ora
• Impostazione automatica (UTC+01:00). 01:00 indica la dierenza tra fuso
orario locale e GMT (ora media di Greenwich)
Impostare il formato orario (l’impostazione standard è il formato a 24 ore)
• 12 ore
• 24 ore
Impostare il formato della data (l’impostazione standard è DD/MM/YYYY)
• YYYY/MM/DD
• DD/MM/YYYY
• MM/DD/YYYY
(Y= anno, M= mese, D= giorno)

125
IT
Sveglia
Impostare 3 sveglie (sveglia 1, sveglia 2, snooze) e il loro volume.
• La durata della sveglia snooze è compresa tra 5 e 120 minuti. Dopo
aver impostato la sveglia, inizia il conto
alla rovescia. Quando il tempo è scaduto, il
dispositivo passa in standby e attiva la sveglia.
• Quando la sveglia suona, il display passa
automaticamente in standby.
• Al punto del menu “Volume sveglia” è
possibile regolare il volume (il valore standard
è 7).
• Il suono della sveglia può essere fermato premendo un tasto a piacere e
si attiva una ripetizione della sveglia di 5 minuti.
• Premendo STANDBY si termina la ripetizione della sveglia.
• Dopo aver impostato la sveglia, è necessario lasciare le impostazioni in
modo che queste vengano attivate.
• Due sveglie impostate non suonano alla stessa ora. Solo quando una
svegli ha nito può iniziare la seconda.
• Menu per Sveglia 1:
- Ripetere: le possibilità di ripetizione sono “tutti i giorni”, “una volta”,
selezionare un giorno della settimana (da lunedì a domenica).
- Ora: impostare la sveglia singola.
- Sound: impostare il tipo di audio per la sveglia (l’impostazione
standard è “Segnale acustico”)
Melodia, web radio, USB).
Timer
Premere la manopola per confermare l’impostazione. Premere la manopola
per fermare il timer.
Lingua
Sono supportate 17 lingue: inglese, tedesco, spagnolo, francese,
portoghese, olandese, italiano, russo, svedese, norvegese, danese,
ungherese, ceco, slovacco, polacco, turco e nlandese.
Display
Sono disponibili due modalità: a colori e monocromatico.
Impostazioni energetiche
Impostazioni per la modalità standby:
Spegnimento dopo 5, 15, 30 minuti.
Disattivare le impostazioni energetiche con SPEGNERE.

126
IT
Timer di autospegnimento
Spegnimento del dispositivo utilizzando il timer. Il tempo impostabile è di 5,
30, 60, 90, 120, 150, 180 minuti.
Memoria cache
Impostabile da 2 a 8 secondi.
Meteo
Indicazione del meteo della città impostata. Sono disponibili i seguenti
punti:
• Impostazione locale. Selezionare continente, Paese e regione.
Confermare con OK. Il meteo viene mostrato.
• Impostare la temperatura in Celsius o Fahrenheit.
• Accendere e spegnere indicazione in standby.
Impostazione stazione locale
• Rilevamento automatico: le stazioni locali vengono cercate
automaticamente.
• Impostazione manuale: è possibile impostare Paese, provincia e città.
Impostazione riproduzione
Impostazione delle modalità di riproduzione:
• OFF: tutti i titoli vengono riprodotti una volta dal primo all’ultimo.
• Ripetere tutti: tutti i titoli vengono ripetuti da primo all’ultimo.
• Ripetere uno solo: il titolo selezionato viene ripetuto.
• Casuale: i titoli nell’indice vengono riprodotti in sequenza casuale.
Dispositivo (impostazione DLNA)
Rinominare (Air Music)
DLNA funzione sul computer presso Windows, su smartphone Samsung con
DLNA integrato. Su altri smartphone è possibile utilizzare una app come
BubbleUPNP.
Equalizzatore
Funzione: l’equalizzatore amplica i singoli intervalli di frequenza. Possono
essere selezionati diversi proli EQ (normale, medio, jazz, rock, colonna
sonora, classica, pop, notizie).
Continuare dopo l’accensione
Accendere o spegnere la funzione di mantenimento della modalità attiva
più di recente.
Se l’opzione è spenta, la radio inizia regolarmente con il menu principale
dopo l’accensione.

127
IT
Se l’opzione è accesa, dopo l’accensione la radio continua con l’ultima
modalità impostata.
último modo activo.
Aggiornamento del software
Attenzione: prima di iniziare l’aggiornamento del software, assicurarsi che
il dispositivo sia saldamento collegato alla rete elettrica. Non scollegare
l’alimentazione durante l’aggiornamento, altrimenti potrebbero risultare
danni irreparabili.
Tornare alle impostazioni di fabbrica
Compare il messaggio “Sicuri di voler tornare alle impostazioni di
fabbrica?”.
• “Sì” cancella tutte le impostazioni e riporta la radio a quelle di fabbrica.
• “No” mantiene tutte le impostazioni attuali e riporta al menu.
Uscita audio (LINE OUT)
Gli altoparlanti possono essere collegati a un altoparlante esterno. Il
volume viene poi regolato dagli altoparlanti esterni.
BT
Il dispositivo può essere collegato a un dispositivo esterno (ad es.
smartphone/tablet) tramite BT. I le (MP3 salvati, musica in streaming, web
radio) sul dispositivo esterno possono essere riprodotti dalla radio tramite
connessione BT.
La modalità BT è consigliata se non è disponibile una connessione di rete e
ci si trova nelle immediate vicinanze della radio.
Selezionare BT nel menu.
Deve essere stabilita una connessione BT per poter trasmettere le audio
alla radio tramite BT.
Stabilire una connessione BT
Quando si selezione la modalità BT sulla radio, questa si trova in modalità
di accoppiamento e cerca dispositivo BT con cui è possibile stabilire una
connessione. Attivare la funzione BT sul dispositivo esterno da connettere
(maggiori dettagli si trovano nel manuale d’uso del dispositivo da
connettere). Cercare nell’elenco dei dispositivi disponibili “Karaboom 100
Wi”, selezionarlo e stabilire la connessione. Nell’angolo in alto a sinistra
del display della radio compare una doppia freccia. Viene emesso un
segnale acustico e compare il messaggio “Connected”.

128
IT
Riproduzione di le tramite BT
Dopo aver stabilito una connessione BT, è possibile riprodurre i le musicali
salvati sul dispositivo esterno tramite la radio.
Procedere come segue:
Iniziare la riproduzione sul dispositivo esterno, attivando la relativa funzione
di riproduzione (lettore MP3, ecc.) o selezionare un titolo dall’elenco di
riproduzione.
CONTROLLO TRAMITE APP AIR MUSIC
CONTROL
La web radio può essere gestita tramite smartphone o tablet.
Scaricare la app “Air Music Control” da “Google Play Store” o da “Apple
AppStore”.
I dispositivi devono essere connessi alla stessa rete.

129
IT
RADIO FM
Premere i tasti , per selezionare FM. In questo menu si trovano tutte le
impostazioni rilevanti per ricevere emittenti radio sulla banda di frequenza
FM.
Ricerca emittenti FM
Quando il dispositivo viene messo per la prima volta in modalità FM, deve
essere realizzata una ricerca delle emittenti. Sono disponibili una funzione
si scansione automatica e una manuale.
Ricerca FM automatica
Quando si passa in modalità FM, premere Enter. La radio inizia la ricerca
automatica e salva tutte le emittenti trovate.
La radio può salvare no a 20 emittenti FM.
Utilizzo radio FM
Per aprire le emittenti salvate, premere o . In alternativa è possibile
aprire le prime 5 emittenti salvate con i tasti 1-5 sulla radio.
Se si desidera cambiare l’ordine dei tasti di salvataggio delle emittenti,
premere il tasto di selezione emittenti 6, per realizzare una scansione
no all’emittente disponibile successiva. Se necessario, ripetere questo
passaggio no ad aver trovato l’emittente desiderata. Premere poi per circa
2 secondi il tasto di selezione della stazione desiderato tra 1 e 10.
L’emittente viene salvata in questa posizione.
.
LETTORE CD
Il dispositivo è dotato di lettore CD, in grado di riprodurre CD audio
e con le MP3. Inserire il CD nell’apposito vano. Il dispositivo inizia
automaticamente a riprodurre il CD.
Viene oerta una panoramica delle tracce audio sul CD. Selezionare un
titolo da riprodurre con la manopola per regolare il volume e confermare
con la manopola o con ENTER sul telecomando.
Con si passa al brano successivo. Con si passa al brano precedente.
Consi mette in pausa e si riprende la riproduzione.
Premere EJECT sul telecomando o sul dispositivo per espellere il CD

130
IT
RADIO DAB
Premere i tasti , per selezionare DAB.
Ricerca emittenti DAB
Oltre alle stazioni FM, la radio è in grado di ricevere anche la radio digitale
DAB+, attraverso l’antenna terrestre. Quando si passa per la volta in
modalità DAB, la radio inizia una ricerca automatica per rilevare tutte le
emittenti che possono essere ricevuta in quella località.
La ricerca inizia e sul display compara la barra di stato. Finita la scansione,
la radio inizia la riproduzione dell’emittente selezionata più di recente.
Selezione emittente
Utilizzare i tasti , per scorrere tra le stazioni DAB+ che possono essere
ricevute.
Per cambiare emittente, premere Enter. La radio è dotata di una memoria
delle emittenti preferite con 10 posizioni. Per salvare un’emittente, passare
all’emittente che si desidera salvare come descritto sopra. Tenere premuto
per 2 secondi un tasto numerico da 1 a 10 sulla radio o sul telecomando
o premere i tasti della memoria delle emittenti 1-5, per selezionare la
posizione su cui si desidera salvare l’emittente.
Sul display compare il messaggio che comunica il salvataggio dell’emittente
nella posizione selezionata.
Utilizzo radio DAB
Se sono state salvate emittenti nella memoria dei preferiti, è possibile
aprire queste emittenti premendo il tasto numerico desiderato. In
alternativa, premere Preset in modalità DAB per aprire l’elenco dei preferiti.
Utilizzare , per navigare nell’elenco dei preferiti e premere il tasto
d’immissione (regolazione volume) per confermare la selezione.

131
IT
CORREZIONE DEGLI ERRORI
Problema Possibile causa e soluzione
Nessuna indicazione sul display,
la radio non reagi-sce. Impossibile
controllare il dispositivo con il te-
lecomando.
Assicurare che sia fornita
alimentazione elettrica tramite il
trasformatore incluso.
Impossibile controllare il dispositivo
con il teleco-mando.
Batterie scariche o posizionate male.
Controllare se le batterie sono state
inserite correttamente.
Cattiva ricezione in modalità DAB. Nessuna emittente trovata, realizzare
la ricerca delle emittenti. L’antenna
non è stata estratta completamente.
Cambiare il luogo di posiziona-mento
della radio (ad es. più vicino a una
nestra), ripetere la ricerca delle
emittenti.
Cattiva ricezione in modalità FM. Antenna non estratta completamente.
Estrarre completamente l’antenna
FM. Cambiare il luogo di
posizionamento della radio (ad es.
più vicino a una nestra), ripetere la
ricerca delle emittenti.
Non è possibile utilizzare la funzione
AUX.
L’altoparlante a torre si trova in una
modalità erra-ta. Passare in modalità
“AUX”. Il cavo potrebbe essere
guasto. Controllare il collegamento
via cavo tra altoparlante a torre e
dispositivo esterno.
Cattiva qualità audio durante la
riproduzione musi-cale.
File con bitrate bassa. Controllare il
le audio. Con-siglio: per le MP3,
la bitrate deve essere di 192 Kbit/s o
superiore.
Volume troppo basso. Controllare l’impostazione del
volume sul disposi-tivo. Controllare
l’impostazione del volume sul
dispositivo collegato da cui si
riproduce la musica.

132
IT
Problema Possibile causa e soluzione
Non è possibile stabilire una
connessione alla rete Internet.
Controllare la funzione WiFi. Attivare
la funzione DhCP del router con cui si
vuole collegare il dispo-sitivo radio.
Può essere attivo un Firewall nella
rete.
Non è possibile stabilire una
connessione WiFi (WLAN).
Controllare la disponibilità di reti
WiFi. Ridurre la distanza tra router
WLAN e radio. Assicurarsi di utilizzare
la password WEP/WPA corretta
quando si eettua la registrazione al
router WiFi.
Non ci sono stazioni radio web
disponibili.
Controllare i punti d’accesso
della rete. L’emittente non può
essere raggiunta al momen-to.
Probabilmente è stato cambiato il
collegamen-to all’emittente, oppure
l’emittente non viene più trasmessa.

133
IT
SMALTIMENTO
Se nel proprio paese si applicano le
regolamentazioni inerenti lo smaltimento di
dispositivi elettrici ed elettronici, questo simbolo
sul prodotto o sulla confezione segnala che questi
prodotti non possono essere smaltiti con i riuti
normali e devono essere portati a un punto di
raccolta di dispositivi elettrici ed elettronici. Grazie
al corretto smaltimento dei vecchi dispositivi si
tutela il pianeta e la salute delle persone da possibili
conseguenze negative. Informazioni riguardanti
il riciclo e lo smaltimento di questi prodotti si
ottengono presso l’amministrazione locale oppure il
servizio di gestione dei riuti domestici.
Il prodotto contiene batterie. Se nel proprio
paese si applicano le regolamentazioni inerenti
lo smaltimento di batterie, non possono essere
smaltite con i normali riuti domestici. Preghiamo
di informarvi sulle regolamentazioni vigenti sullo
smaltimento delle batterie. Grazie al corretto
smaltimento dei vecchi dispositivi si tutela l’ambiente
e la salute delle persone da conseguenze negative.
DICHIARAZIONE DI CONFORMITÀ
Produttore:
Chal-Tec GmbH, Wallstraße 16, 10179 Berlino,
Germania.
Importatore per la Gran Bretagna:
Berlin Brands Group UK Limited
PO Box 42
272 Kensington High Street
London, W8 6ND
United Kingdom
Il fabbricante, Chal-Tec GmbH, dichiara che il tipo di
apparecchiatura radio Karaboom Wi è conforme
alla direttiva 2014/53/UE. Il testo completo della
dichiarazione di conformità UE è disponibile al
seguente indirizzo Internet: use.berlin/10033150


-
 1
1
-
 2
2
-
 3
3
-
 4
4
-
 5
5
-
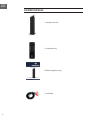 6
6
-
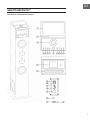 7
7
-
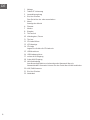 8
8
-
 9
9
-
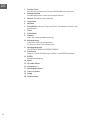 10
10
-
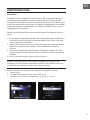 11
11
-
 12
12
-
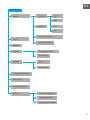 13
13
-
 14
14
-
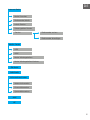 15
15
-
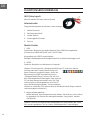 16
16
-
 17
17
-
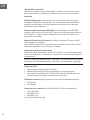 18
18
-
 19
19
-
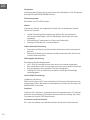 20
20
-
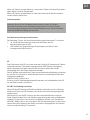 21
21
-
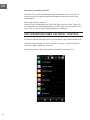 22
22
-
 23
23
-
 24
24
-
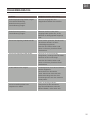 25
25
-
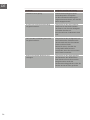 26
26
-
 27
27
-
 28
28
-
 29
29
-
 30
30
-
 31
31
-
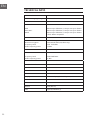 32
32
-
 33
33
-
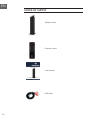 34
34
-
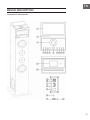 35
35
-
 36
36
-
 37
37
-
 38
38
-
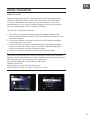 39
39
-
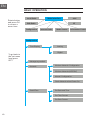 40
40
-
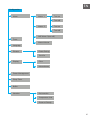 41
41
-
 42
42
-
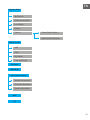 43
43
-
 44
44
-
 45
45
-
 46
46
-
 47
47
-
 48
48
-
 49
49
-
 50
50
-
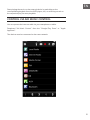 51
51
-
 52
52
-
 53
53
-
 54
54
-
 55
55
-
 56
56
-
 57
57
-
 58
58
-
 59
59
-
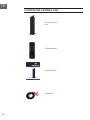 60
60
-
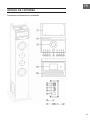 61
61
-
 62
62
-
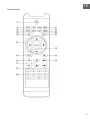 63
63
-
 64
64
-
 65
65
-
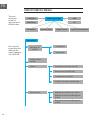 66
66
-
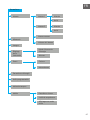 67
67
-
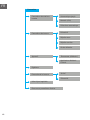 68
68
-
 69
69
-
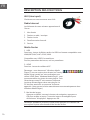 70
70
-
 71
71
-
 72
72
-
 73
73
-
 74
74
-
 75
75
-
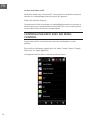 76
76
-
 77
77
-
 78
78
-
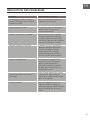 79
79
-
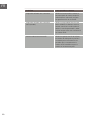 80
80
-
 81
81
-
 82
82
-
 83
83
-
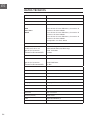 84
84
-
 85
85
-
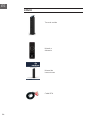 86
86
-
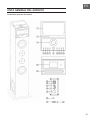 87
87
-
 88
88
-
 89
89
-
 90
90
-
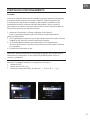 91
91
-
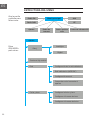 92
92
-
 93
93
-
 94
94
-
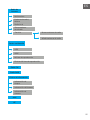 95
95
-
 96
96
-
 97
97
-
 98
98
-
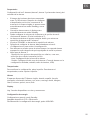 99
99
-
 100
100
-
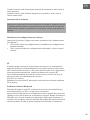 101
101
-
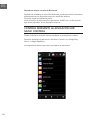 102
102
-
 103
103
-
 104
104
-
 105
105
-
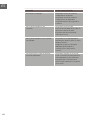 106
106
-
 107
107
-
 108
108
-
 109
109
-
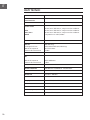 110
110
-
 111
111
-
 112
112
-
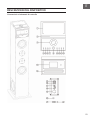 113
113
-
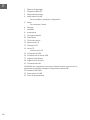 114
114
-
 115
115
-
 116
116
-
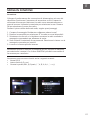 117
117
-
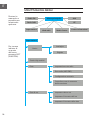 118
118
-
 119
119
-
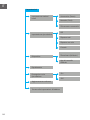 120
120
-
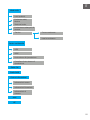 121
121
-
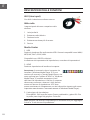 122
122
-
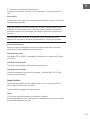 123
123
-
 124
124
-
 125
125
-
 126
126
-
 127
127
-
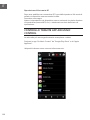 128
128
-
 129
129
-
 130
130
-
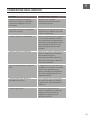 131
131
-
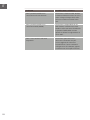 132
132
-
 133
133
-
 134
134
-
 135
135
-
 136
136


Auna 10033151 El manual del propietario
- Categoría
- Reproductores multimedia digitales
- Tipo
- El manual del propietario
en otros idiomas
- français: Auna 10033151 Le manuel du propriétaire
- italiano: Auna 10033151 Manuale del proprietario
- English: Auna 10033151 Owner's manual
- Deutsch: Auna 10033151 Bedienungsanleitung
Artículos relacionados
-
Auna 10045436 El manual del propietario
-
-
-
-
-
-
-
Otros documentos
-
Muse M-50 DBT Manual de usuario
-
Lenco DIR-170 Manual de usuario
-
-
-
-
One Concept Streamo Cube Internet Radio + BT Manual de usuario
-
Lenco DIR-150BK Internetradio El manual del propietario
-
-
-