
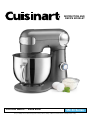
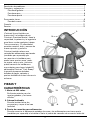
Precision Master™ Stand Mixer
INSTRUCTION AND
RECIPE BOOKLET
For your safety and continued enjoyment of this product, always read the Instruction Book carefully before using.
SM-50 Series

2
IMPORTANT SAFEGUARDS
When using electrical appliances, basic safety precautions should always be taken, including
the following:
1. READ ALL INSTRUCTIONS.
2. Turn dial to the OFF position and unplug from outlet when not in use, before tting or
removing accessories or attachments, after use and before cleaning.
3. Close supervision is necessary when any appliance is used by or near children.
Cuisinart does not recommend the use of this appliance by children.
4. Avoid contact with moving parts and tted attachments. Keep hands, hair, clothing,
as well as spatulas and other utensils away from beaters during operation to reduce the
risk of injury to persons and/or damage to the mixer.
5. The use of accessories or attachments not recommended or sold by Cuisinart may cause
re, electric shock or injury.
6. Do not use more than one accessory or attachment at a time.
7. Do not exceed the maximum capacities listed in this Instruction Book.
8. Do not use the stand mixer if it is damaged or if the cord is damaged. After having been
damaged, have the stand mixer checked and serviced before resuming use.
9. When using an attachment, make sure that you have read the safety instructions that
come with the particular attachment.
10. Do not use outdoors.
11.
Keep stainless steel bowl away from heat sources such as stovetops, ovens or microwaves
.
12.
To protect against the risk of electric shock, do not put the base power unit in water or other
liquids
.
13. Remove all accessories and attachments from stand mixer before washing.
14. Do not let cord hang over edge of table or counter.
15. Do not operate any appliance with a damaged cord or plug or after the appliance
malfunctions, or is dropped or damaged in any manner. Return appliance to the nearest
authorized service facility for examination, repair or electrical or mechanical adjustment.
16. Do not operate your appliance in an appliance garage or under a wall cabinet. When
storing in an appliance garage always unplug the unit from the electrical outlet. Not
doing so could create a risk of re, especially if the appliance touches the walls of the
garage or the door touches the unit as it closes.
SAVE THESE INSTRUCTIONS
FOR HOUSEHOLD USE ONLY
NOTE: The maximum rating is based on the attachment that draws the greatest power. Other
recommended attachments may draw signicantly less power.
WARNING: RISK OF FIRE OR ELECTRIC SHOCK
The lightning ash with arrowhead symbol within an equilateral triangle is intended to
alert the user to the presence of uninsulated, dangerous voltage within the product’s
enclosure that may be of sufcient magnitude to constitute a risk of re or electric

3
shock to persons.
The exclamation point within an equilateral triangle is intended to alert the user to the presence
of important operating and maintenance (servicing) instructions in the literature accompanying
the appliance.
SPECIAL CORD SET INSTRUCTIONS
A short power-supply cord is provided to reduce the risks resulting from becoming entangled
in or tripping over a longer cord. Longer extension cords are available and may be used if care
is exercised in their use. If a long extension cord is used, the marked electrical rating of the
extension cord must be at least as great as the electrical rating of the appliance, and the longer
cord should be arranged so that it will not drape over the countertop or tabletop where it can
be pulled on by children or tripped over.
GROUNDING INSTRUCTIONS
For your protection, the Cuisinart
®
Stand Mixer is equipped with a 3-conductor cord set that has a
molded 3-prong grounding-type plug, and should be used in combination with a properly connected
grounding-type outlet. If a grounding-type outlet is not available, an adapter may be obtained so that a
2-slot wall outlet can be used with a 3-prong plug.
The adapter must be grounded by attaching its grounding lug under the screw of the outlet cover plate.
CAUTION: Before using an adapter, it must be determined that the outlet cover plate screw is properly
grounded. If in doubt, consult a licensed electrician. Never use an adapter unless you are sure it is prop-
erly grounded.
Note: Use of an adapter is not permitted in Canada and Europe.
This appliance is for 120 volts only and should not be used with a converter.
IMPORTANT: Always unplug the Cuisinart
®
Precision Master™ Stand Mixer from outlet when assembling
and disassembling.
CONTENTS
Important Safeguards ..........................................................................................................................2
Features and Components ................................................................................................................. 4
Assembly Instructions .........................................................................................................................5
Operation ............................................................................................................................................ 5
Cleaning and Maintenance ................................................................................................................. 5
Suggested Speed Control Guide ....................................................................................................... 6
Maximum Capacities ...........................................................................................................................7
Troubleshooting .................................................................................................................................. 7
Tips and Hints .................................................................................................................................... 7
Cookie Baking ............................................................................................................................ 8
Bread Baking .............................................................................................................................. 8
Cake Baking ............................................................................................................................... 8
Egg Whites ...................................................................................................................................9
Whipping Cream ........................................................................................................................10
Warranty Information ........................................................................................................................ 11
Recipes ..............................................................................................................................................12

4
INTRODUCTION
Cuisinart just raised the bar on mixing! This Cuisinart
®
Precision Master™ Stand Mixer has the
capacity, power, and precision engineering to handle any job a recipe calls for. The three ac-
cessories
allow you to mix, whip and knead dough, and with 12 speeds, you’ll always do it just right.
Cuisinart offers optional attachments that can be purchased separately. The selected attach-
ment connects to the port on the front of the mixer, so you can make homemade pastas or
grind your own meats. You can even turn your mixer into an ice cream maker! The Cuisinart
®
Fruit Scoop™ Ice Cream and Fresh Fruit Frozen Dessert Maker attachment lets you make all-
fruit frozen desserts, ice cream or frozen yogurt.
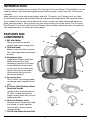
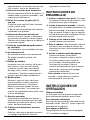
FEATURES AND
COMPONENTS
1. 500 Watt Motor
Plenty of power for double
recipes and heavy mixing tasks.
2. Tilt-Back Head
Makes it easy to attach accesso-
ries and scrape sides and bottom
of bowl.
3. Attachment Port
Large Meat Grinder and Pasta
Maker attachments (sold
separately) connect to the port
located behind the port cover
on the front of the stand mixer
head. A locking screw makes
attachments easy to put on,
secure and take off.
4. Accessory Port
Chef’s whisk, at mixing paddle
and dough hook connect to this
port.
5. 5.5 Quart (5.2L) Stainless Steel
Bowl with Handle
Handle makes the bowl easy to
lift, hold, scrape and remove.
Large capacity bowl lets you mix
larger quantities.
6. Head-Lift Release Lever
Securely locks stand mixer head
into raised, tilt-back position.
Used to return mixer head to
mixing position.
7. On/Off and Speed Control Dial
1.
6.
3.
4.
5.
2.
7, 8
11.
12.
10.
9.

5
12 speeds for precision mixing.
8. Blue Light Ring
Illuminates when mixer is operating. Turns
off in OFF position.
9. Chef’s Whisk
Incorporates air into ingredients/mixtures.
Ideal for whipping eggs, egg whites or
heavy cream. Used in recipes for angel
food cake, chiffon cake, meringue, some
types of candy, such as marshmallows,
and quickly whips potatoes.
10. Flat Mixing Paddle
Used for stirring, mixing and beating
ingredients/mixtures. Best accessory for
mixing cookies, cakes and batters, and for
frostings. Also use for making pie crusts,
biscuits and shortcakes, and combining
ingredients for meatloaf or meatballs.
11. Dough Hook
Used for the mixing and kneading of yeast
dough for breads, rolls, pizza/focaccia,
pasta dough and yeast-raised coffee cakes.
12. Splash Guard with Pour Spout
Prevents splattering when mixing and
adding ingredients. Guides ingredients
into the bowl.
ASSEMBLY INSTRUCTIONS
1. Raise Mixer Head – Push down the head-
lift release lever and raise the stand mixer
head until it locks into place.
2. Attach Accessory – Place at mixing
paddle, chef’s whisk or dough hook into
the accessory port. Push up and turn
counterclockwise until it locks. Turn clock-
wise to remove.
3. Place Bowl on Base – Turn clockwise to
secure.
4. Lower Mixer Head – Holding the stand
mixer head, push down the head-lift lever
again and fully lower the mixer head.
5. To Attach Splash Guard with Pour
Spout – After attaching the accessory
and lowering the stand mixer head, slide
the splash guard onto the bowl. Attach
the pour spout by placing it into the tabs
on the splash guard ring and slide it into
place. The splash guard ring can rotate
in any direction to more easily add
ingredients.
To remove: Remove the pour spout from
the splash guard and slide splash guard off
the bowl.
OPERATION
Position the Stand Mixer
The logo plate that covers the attachment port
should face you.
To Turn Stand Mixer On
Turn control dial to desired speed – 1 through
12 (see Speed Control Guide on page 6).
To Turn Stand Mixer Off
Turn the dial to “0” OFF position. Mixing
process stops and unit shuts off.
CLEANING AND
MAINTENANCE
Unplug your Cuisinart
®
Stand Mixer before
cleaning.
Power Unit
Wipe with a damp cloth and dry. Never use
abrasives or immerse in water.
Bowl
Wash by hand and dry thoroughly or put in
dishwasher. Never use a wire brush, steel
wool or bleach.
Accessories
Mixing paddle and dough hook are top rack
dishwasher safe; can also wash by hand and
dry thoroughly. Chef’s whisk must be washed
by hand.
Attachments
Clean as directed in instructions included with
each attachment you purchase.
Splash Guard with Pour Spout
Top rack dishwasher safe; can also wash by
hand and dry thoroughly.
Maintenance
Any other servicing should be performed by

6
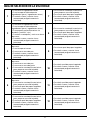
1
• Sifting dry ingredients
• Folding in ingredients, such as mix-ins
• Whipping cream & egg whites (gradually
increasing speed)
7
• “Cutting in” butter to our (for pastry/
pie dough)
• Mashing potatoes/vegetables
• Whipping cream & egg whites (gradually
increasing speed)
2
• Sifting dry ingredients
• Folding in ingredients, such as mix-ins
• Mixing quick breads (mufns, etc.)
• Creaming butter and sugar
• Whipping cream & egg whites (gradually
increasing speed)
8
• “Cutting in” butter to our (for pastry/
pie dough)
• Mashing potatoes/vegetables
• Whipping cream & egg whites (gradually
increasing speed)
3
• Creaming butter and sugar
• Incorporating eggs
• Kneading bread dough
• Whipping cream & egg whites (gradually
increasing speed)
9
• Mashing potatoes/vegetables
• Whipping cream & egg whites (gradually
increasing speed)
4
• Creaming butter and sugar
• Kneading bread dough
• Kneading pasta dough
• “Cutting in” butter to our (for pastry/
pie dough)
• Whipping cream & egg whites (gradually
increasing speed)
10
• Whip potatoes/vegetables
• Whipping cream & egg whites (gradually
increasing speed)
5
• Creaming butter and sugar
• “Cutting in” butter to our (for pastry/
pie dough)
• Mashing potatoes/vegetables
• Whipping cream & egg whites (gradually
increasing speed)
11
• Whip potatoes/vegetables
• Whipping cream & egg whites (gradually
increasing speed)
6
• “Cutting in” butter to our (for pastry/
pie dough)
• Mashing potatoes/vegetables
• Whipping cream & egg whites (gradually
increasing speed)
12
• Whip potatoes/vegetables
• Whipping cream & egg whites (gradually
increasing speed)
SUGGESTED SPEED CONTROL GUIDE

7
an authorized service representative.
MAXIMUM CAPACITIES
• Yeast doughs (most breads, pizza) – 6 cups
white our
• Cookie dough – 5 dozen cookies
• Whipping cream – 6 cups liquid (12 cups
whipped)
• Egg whites – 12 large
TROUBLESHOOTING
If the stand mixer shuts off, the unit may have
overheated. Your stand mixer has an overload
protection device, it will shut down to protect
the motor.
Solution: In the unlikely event that this
happens:
• Turn off and unplug the unit.
• Reduce the load by removing some of
the ingredients, and allow the mixer to
stand for a few minutes.
• Plug in and reset the speed. If the stand
mixer does not start when you turn the
Speed Dial ON, allow the unit to stand
for additional time.
TIPS AND HINTS
• Before preheating your oven, adjust racks
to accommodate your baking task. Most
recipes use the middle rack; pies bake best
in the lower third of the oven.
• Carefully follow each mixing step in a recipe.
Take care not to over- or under-mix.
• Don’t crowd the oven, and avoid opening
the oven door during baking – use the oven
light to help you watch. With certain recipes,
particularly when baking more than one tray
of cookies at a time, rotate halfway through
baking.
• Proper measurements are very important
when baking. To measure our correctly, stir
the our rst, then spoon into the measur-
ing cup. Level off the top with the blunt side
of a knife blade or the handle of a spoon.
Do not press or compact our. It is also
very important not to measure directly from
the bag – while the our is pre-sifted, it has
been pressed/compacted to t into the bag.
Baked goods made from unstirred our are
likely to be heavy and dry because too much
our is used.
• For most baking recipes, refrigerated items
like butter, milk and eggs incorporate better
when they are at room temperature.
• Remove butter from the refrigerator and cut
into ½-inch pieces to help it come to room
temperature faster while you measure out
the remaining ingredients. Do not warm
butter in the microwave; this can change the
structure of the butter if it melts and give the
nished product a different texture.
• To separate eggs for use in any recipe, break
them one at a time into a small bowl. Gently
remove the yolks, then transfer the whites to
a spotlessly clean glass or stainless bowl. If
a yolk breaks into a white, use that egg for
another recipe. Just a drop of egg yolk in
the white prevents the white from whipping
properly.
• Scraping the entire bowl – sides, bottom and
paddle over the course of mixing and adding
new ingredients – ensures even incorpora-
tion of ingredients and overall best results.
The more you scrape the bowl, the better.
• For whipping egg whites, both the mixing
bowl and chef’s whisk must be spotlessly
clean and dry. Any trace of fat/oil will prevent
the egg whites from whipping properly.
• To check the freshness of eggs, place them
in a bowl of warm water – if they oat, they
are not fresh. This is most important when
using for whipping egg whites. The fresher
the eggs, the more stable the foam.
• To melt chocolate for a recipe, put chopped
chocolate in a double boiler insert or larger
bowl over a pan of barely simmering water.
The water should not boil, nor should it
touch the bottom of the double boiler insert
or bowl. If it does, this could cause the
chocolate to “seize” and you will not be able
to use it in your recipe.
• Always test yeast for freshness before us-
ing it in a recipe. Sprinkle a little over warm

8
(105°F–110°F) water and add a pinch of
sugar or our from the recipe. If it does not
become foamy/bubbly in 5 to 10 minutes,
the yeast may be “dead.” Start over with
fresh yeast from a new package.
COOKIE BAKING
• Use an ice cream scoop to measure out
cookie dough – this keeps the cookies
evenly shaped and uniform in size. We rec-
ommend ice cream scoops in several sizes
– #40, #50 and #60, as well as a larger one
(about
1
⁄3 to ½ cup) for jumbo cookies. Ice
cream scoops are also good for lling mufn
tins. Use a #16 ice cream scoop to make
mufns or meatballs.
• To better maintain cookie shapes, put
scoops of cookie dough onto sheets of
waxed paper or plastic wrap on a tray and
chill before baking. Most cookie dough can
be refrigerated for 2 to 3 days prior to baking
– be sure to wrap well.
• Cookie dough may also be frozen. Shape
into individual cookies, double wrap and
freeze for up to 3 months. Thaw before
baking.
•
Line baking sheets with parchment paper for
easy release and easy cleanup.
• Let cookies rest on sheets for 2 to 3 minutes
before removing them to a wire rack to cool.
This keeps cookies from wrinkling, crum-
bling or breaking.
• Cookies must cool completely before being
put into storage containers to ensure they
don’t get soggy or misshapen.
BREAD BAKING
• One ¼-ounce packet of yeast equals 2¼
teaspoons yeast.
• Using milk in place of water will produce a
softer crust.
• After baking, you can soften the crust, if
desired, by rubbing it with unsalted butter
soon after removing it from the oven. This
prevents it from drying out quickly.
• If a recipe calls for a specic type of our,
use the our recommended. If you do not
have bread our, you can substitute un-
bleached, all-purpose our, but your bread
may not rise quite as much.
• Do not use “lite” or tub margarines for bread
baking – they have different structures and
they do not work as well in baking.
• Vital wheat gluten is the dried protein taken
from the our by eliminating the starch. It is
a good dough conditioner or enhancement
for yeast breads, especially for whole-grain
breads or when using all-purpose our. If a
recipe specically calls for vital wheat
gluten, we recommend that it be used for
best results.
• For 100% whole-wheat bread, use 1½
teaspoons vital wheat gluten per cup of our.
• Lite salt can be used if it has both potassium
chloride and sodium.
• Many bread recipes have a “range” amount
of our – start by using the lower end of the
range, then add more our as needed to
produce a smooth, not sticky dough.
• Using too much liquid, or baking on a humid
day, can cause your bread to fall or wrinkle
on top.
• An instant-read thermometer is helpful to
have on hand when making bread. It can
be used to measure the temperature of the
liquid for proong yeast, and for taking the
internal temperature of the baked bread.
• Liquid for proong yeast should be between
105°F and 110°F.
• Finished bread should have an internal tem-
perature of 190°F (enriched breads, those
that normally include eggs, are done at a
higher temperature, closer to 207°F).
CAKE BAKING
• Have all ingredients and mixing bowls at
room temperature. Room temperature ingre-
dients incorporate and blend more easily.
• Fill pans immediately after mixing.
• Bake immediately after lling pans.
• Check for doneness at the beginning of the
time range given.
• Cool cakes in pans until cool to touch, and
remove from pans to completely cool on a
wire rack after baking.
• An offset spatula will make spreading

9
frosting easier than a knife or regular spatula.
EGG WHITES
• Egg whites at room temperature are best for
whipping. Bring to room temperature safely
by placing uncracked eggs in a bowl of
warm water for 10 to 15 minutes.
• Add a small amount of acid such as cream
of tartar, lemon juice or vinegar when whip-
ping egg whites to stabilize them and allow
them to reach their optimum volume and
stiffness. Use
1
⁄
8
teaspoon cream of tartar per
large egg white – or 1 teaspoon cream of
tartar per cup of egg whites (8 to 10 large).
• The time required to whip egg whites will
vary with the temperature of the egg whites,
age of egg whites, and temperature/humid-
ity of the kitchen. Keep a close watch while
whipping egg whites.
• In humid or damp weather, you may not get
the volume of whipped egg whites that you
do in drier, warmer weather.
• Place the room temperature egg whites in
the clean, dry mixing bowl. Attach the clean,
dry chef’s whisk. Start whipping the egg
whites on Speed 1 and gradually increase to
Speed 6 until foamy, and then gradually in-
crease to Speed 12. If egg whites are beaten
too rapidly in the beginning, their structure
will not be as stable and strong, and they will
not reach the volume that they should when
completely beaten. Over-beaten egg whites
will also separate or deate in a meringue
topping.
• Timing when adding sugar to egg whites is
important. Add sugar slowly and gradually
to the whipped egg whites once they start
to foam. Always add sugar in a slow, steady
stream along side of bowl while egg whites
are being whipped – do not add sugar
directly to the center of the bowl on top of
beaten egg whites; doing this may cause
them to deate.
• When whipping egg whites, they will at
rst appear foamy or frothy. Then they will
become stiffer and start to hold their shape.
Next, soft peaks will form – this is when
the tips of the peaks fall when the whisk is
lifted up – soft peaks are often required for
mousses or soufés. The next stage is me-
dium to stiff peaks. This is used for recipes
such as meringues – the whites will appear
dry, the peaks will hold their shape and the
whites will be shiny. The nal stage is stiff
and dry. The whites will not be uniformly
white, but will appear speckled and they will
no longer be shiny in appearance.
• Beaten egg whites should be used imme-
diately after beating them. If they wait for
longer than 5 minutes, they will begin to
deate and lose volume and structure. Egg
whites beaten with sugar or cream of tartar
are more stable and will last a little longer.
SANITIZING EGG WHITES
Take care when adding raw egg whites to
recipes that are not cooked or baked as there
is a chance they may carry harmful bacteria.
If you have a recipe that calls for raw egg
whites, you may wish to use powdered egg
whites or “sanitize” the egg whites by doing
the following:
• Put the egg whites, 2 tablespoons of
the granulated sugar from your recipe, 2
tablespoons water, and a pinch of cream
of tartar into the Cuisinart
®
mixing bowl
and stir until smooth.
• Put over a pan of simmering water and
stir constantly with a spotlessly clean
rubber spatula until the mixture registers
160°F on an instant-read thermometer
– start checking the temperature after
about a minute of stirring.
• When the egg white mixture registers
160°F, dry off the bottom of the bowl and
place it on the Cuisinart
®
stand mixer.
Insert the chef’s whisk. Continue as
directed in your recipe.
WHIPPING CREAM
The difference between heavy cream and
whipping cream is the butterfat content. The
higher the butterfat content, the more stable
the whipped cream. Heavy cream has a higher
butterfat content than whipping cream does.

10
Light cream may also be whipped, but will
not last as long. Creams that are not ultra-
pasteurized are best for whipping.
The yield of cream generally doubles in vol-
ume. To make 2 cups of softly whipped cream,
put 1 cup of heavy/whipping cream into the
well-chilled mixing bowl. Starting on Speed 2
and increasing to Speed 10 or 12, whip until
it just begins to hold its shape. Add about ½
teaspoon pure vanilla or other pure avored
extract and 1 to 4 tablespoons granulated,
superne or confectioners’ sugar. Whip until
the cream holds soft, oppy peaks.
To make whipped cream:
• Start with well-chilled cream, mixing bowl
and chef’s whisk (place bowl and whisk in
freezer for at least 15 minutes before making
whipped cream). The room should not be
too hot.
• Whip cream on low speeds until small
bubbles form – this will take about 30 sec-
onds. Gradually increase to Speed 12 and
continue beating until desired doneness,
being careful not to over-whip. It takes just
seconds for cream to go from smooth and
creamy whipped cream to whipped cream
with grainy bits of butter forming.
• If you are making a sweetened, avored
whipped cream, begin to slowly add the
sugar and avorings as the cream becomes
soft and billowy in appearance.
• Sugars should be sifted before adding to
whipping cream.
• Stop whipping cream when it has doubled
in volume – it should be smooth, creamy
and thick, forming either soft (for garnishing
desserts, folding into desserts) or stiff (for
topping cakes, desserts, piping decoratively)
peaks.
• Unless stabilized, whipped cream should be
served immediately.
STABILIZED WHIPPED CREAM
Stabilized whipped cream will hold longer in
the refrigerator before using, and it can also
be used for decorating, using a pastry bag
and tip. Using gelatin or a purchased stabilizer
will prevent whipped cream from weeping.
To make stabilized whipped cream, soften
powdered gelatin by sprinkling it over water
in a measuring cup. Let stand 5 minutes to
soften. Then place the measuring cup in a pan
of simmering water and stir over low heat until
gelatin is dissolved. Let cool slightly before
adding to cream – but do not allow to get cold
and harden.
• For 1 cup of cream, use ½ teaspoon gelatin
soaked in 1 tablespoon water.
• For 2 cups of cream, use 1 teaspoon gelatin
soaked in 2 tablespoons water.
• For 8 cups of cream, use 1 tablespoon + 1
teaspoon gelatin soaked in 8 tablespoons
water.
Follow basic whipping instructions, adding
cooled gelatin mixture to cream all at once
after it has whipped to a slightly thickened
stage.

11
LIMITED THREE-YEAR
WARRANTY
(U.S. and Canada ONLY)
This warranty is available to consumers only. You are a consumer
if you own a Cuisinart® Precision Master™ Stand Mixer that was
purchased at retail for personal, family or household use. Except as
otherwise required under applicable law, this warranty is not available
to retailers or other commercial purchasers or owners. We warrant
that your Cuisinart® Precision Master™ Stand Mixer will be free of
defects in materials and workmanship under normal home use for 3
years from the date of original purchase.
We recommend that you visit our website, www.cuisinart.com for a
fast, efficient way to complete your product registration. However,
product registration does not eliminate the need for the consumer to
maintain the original proof of purchase in order to obtain the warranty
benefits. In the event that you do not have proof of purchase date,
the purchase date for purposes of this warranty will be the date of
manufacture.
CALIFORNIA RESIDENTS ONLY
California law provides that for In-Warranty Service, California
residents have the option of returning a nonconforming product (A)
to the store where it was purchased or (B) to another retail store
that sells Cuisinart products of the same type. The retail store shall
then, according to its preference, either repair the product, refer the
consumer to an independent repair facility, replace the product, or
refund the purchase price less the amount directly attributable to
the consumer’s prior usage of the product. If neither of the above
two options results in the appropriate relief to the consumer, the
consumer may then take the product to an independent repair facility,
if service or repair can be economically accomplished. Cuisinart and
not the consumer will be responsible for the reasonable cost of such
service, repair, replacement, or refund of nonconforming products
under warranty. California residents may also, according to their
preference, return nonconforming products directly to Cuisinart for
repair or, if necessary, replacement by calling our Consumer Service
Center toll-free at 1-800-726-0190. Cuisinart will be responsible for
the cost of the repair, replacement, and shipping and handling of such
nonconforming products under warranty.
BEFORE RETURNING YOUR CUISINART
PRODUCT
If your Cuisinart® Precision Master™ Stand Mixer should prove
to be defective within the warranty period, we will repair or, if we
think necessary, replace it. To obtain warranty service, please call
our Consumer Service Center toll-free at 1-800-726-0190 or write
to: Cuisinart, 7475 North Glen Harbor Blvd, Glendale, AZ 85307. To
facilitate the speed and accuracy of your return, enclose $10.00
for shipping and handling. (California residents need only supply
a proof of purchase and should call 1-800-726-0190 for shipping
instructions.) Be sure to include your return address, description of
the product’s defect, product serial number, and any other information
pertinent to the return. Please pay by check or money order. NOTE: For
added protection and secure handling of any Cuisinart product that is
being returned, we recommend you use a traceable, insured delivery
service. Cuisinart cannot be held responsible for in-transit damage
or for packages that are not delivered to us. Lost and/or damaged
products are not covered under warranty.
Your Cuisinart® Precision Master™ Stand Mixer has been
manufactured to the strictest specifications and has been designed
for use only in 120 volt outlets and only with authorized accessories
and replacement parts. This warranty expressly excludes any defects
or damages caused by accessories, replacement parts or repair
service other than those authorized by Cuisinart. This warranty does
not cover any damage caused by accident, misuse, shipment or other
than ordinary household use. This warranty excludes all incidental or
consequential damages. Some states do not allow the exclusion or
limitation of these damages, so these exclusions may not apply to you.
You may also have other rights, which vary from state to state.
Important: If the nonconforming product is to be serviced by someone
other than Cuisinart’s Authorized Service Center, please remind the
servicer to call our Consumer Service Center at 1-800-726-0190 to
ensure that the problem is properly diagnosed, the product is serviced
with the correct parts, and to ensure that the product is still under
warranty.

Batidora de pie Precision Master
™
INSTRUCCIONES Y
LIBRO DE RECETAS
Para su seguridad y para disfrutar plenamente de este producto, siempre lea cuidadosamente las instrucciones antes de usarlo.
Serie SM-50

2
MEDIDAS DE SEGURIDAD
IMPORTANTES
Al usar aparatos eléctricos, siempre debe tomar precauciones básicas de seguridad, incluso
las siguientes:
1. LEA TODAS LAS INSTRUCCIONES.
2. Ponga la perilla en la posición de apagado “OFF” y desconecte el aparato cuando no está
en uso, antes de instalar/sacar piezas, después del uso y antes de limpiarlo.
3. Supervise el uso de este aparato cuidadosamente cuando sea usado por o cerca de niños.
Cuisinart no recomienda que los niños usen este aparato.
4. Evite el contacto con las piezas móviles y los accesorios. Para evitar el riesgo de heridas
y/o daños al aparato, mantenga los dedos, cabello, ropa, espátulas y otros utensilios lejos
de los batidores durante el funcionamiento.
5. El uso de accesorios o aditamentos no recomendados o vendidos por Cuisinart presenta
un riesgo de incendio, electrocución o heridas.
6. No use más de un accesorio o aditamento a la vez.
7. No exceda las capacidades máximas indicadas en este manual de instrucciones.
8. No utilice el aparato si el cable estuviera dañado. En caso de daño, regrese el aparato a un
centro de servicio autorizado para que lo revisen y lo reparen.
9. Lea todas las instrucciones de seguridad de cada accesorio antes de usarlo.
10. No lo utilice en exteriores.
11.
Mantenga el bol de acero inoxidable alejado de las fuentes de calor tales como las estufas,
los hornos o los hornos de microondas
.
12.
Para reducir el riesgo de electrocución, no coloque la base del aparato en agua u otro líquido.
13. Saque todos los accesorios y aditamentos de la batidora antes de lavarla.
14. No permita que el cable cuelgue del borde de la mesa o de la encimera.
15. No utilice este aparato si el cable o la clavija estuviesen dañados, si no funcionase
debidamente, si estuviese dañado, o después de que se hubiese caído al piso o al agua;
regréselo a un centro de servicio autorizado para su revisión, reparación o ajuste.
16.
No haga funcionar el aparato debajo o dentro de un armario/gabinete. Siempre desconecte el
aparato antes de guardarlo en un armario/gabinete. Dejar el aparato conectado presenta un riesgo
de incendio, especialmente si este toca las paredes o la puerta del armario/gabinete cuando cierra.
GUARDE ESTAS INSTRUCCIONES
PARA USO DOMÉSTICO
SOLAMENTE
NOTA: la potencia nominal máxima está basada en el accesorio/aditamento que consume más
electricidad. Otros accesorios/aditamentos pueden utilizar menos electricidad.
ADVERTENCIA: RIESGO DE INCENDIO O
ELECTROCUCIÓN
El símbolo representado por un relámpago con punta de flecha dentro de un triángulo

3
equilátero tiene como fin alertar al usuario de la presencia de voltajes peligrosos no aislados
en el interior del aparato, los cuales pueden ser de suficiente magnitud para constituir un
riesgo de incendio o electrocución.
El signo de exclamación dentro de un triángulo equilátero tiene como fin alertar al usuario
de la presencia de instrucciones importantes de operación y mantenimiento (servicio) en la
documentación que acompaña al equipo.
USO DE EXTENSIONES
El cable provisto con este aparato es corto, para reducir el peligro de que alguien se enganche
o tropiece con un cable más largo. Se podrá usar una extensión eléctrica, pero con cuidado.
La clasificación nominal de la extensión debe ser por lo menos igual a la del aparato. Es
importante acomodar el cable más largo de manera que no cuelgue de la encimera/mesa
donde puede ser jalado por niños o puede causar tropiezos.
INSTRUCCIONES DE PUESTA A TIERRA
Para su protección, este aparato está equipado con un cable de puesta a tierra, con clavija de tierra, la
cual debe ser conectada a una toma de corriente debidamente puesta a tierra. Si una toma de corriente
con toma de tierra no está disponible, se podrá usar un adaptador para conectar el aparato a una toma
de corriente sin toma de tierra.
El adaptador debe ser puesto a tierra mediante un tornillo de metal que conecte la lengüeta del
adaptador a la placa de la toma de corriente.
PRECAUCIÓN: antes de conectar el adaptador, asegúrese de que la toma de corriente esté puesta a
tierra. Si no está seguro/a, comuníquese con un electricista. Nunca use un adaptador sin estar seguro
de que la toma de corriente está puesta a tierra.
Nota: está prohibido usar un adaptador en el Canadá y en Europa.
Conecte el cable a una toma de corriente de 120 V solamente; no utilice el aparato con un convertidor
de voltaje.
IMPORTANTE: siempre desconecte el cable de la toma de corriente antes de ensamblar o
desensamblar el aparato.
ADVERTENCIA: RIESGO DE INCENDIO O
ELECTROCUCIÓN
El símbolo representado por un relámpago con punta de flecha dentro de un triángulo
equilátero tiene como fin alertar al usuario de la presencia de voltajes peligrosos no aislados
en el interior del aparato, los cuales pueden ser de suficiente magnitud para constituir un
riesgo de incendio o electrocución.
El signo de exclamación dentro de un triángulo equilátero tiene como fin alertar al usuario
de la presencia de instrucciones importantes de operación y mantenimiento (servicio) en la
documentación que acompaña al equipo.
ÍNDICE
Medidas de seguridad importantes ....................................................................................................2
Piezas y características .......................................................................................................................4
Instrucciones de ensamblaje ...............................................................................................................5
Funcionamiento ...................................................................................................................................5
Limpieza y mantenimiento ................................................................................................................. 5
Guía de selección de la velocidad.......................................................................................................6
Capacidades máximas ........................................................................................................................7

4
Resolución de problemas ................................................................................................................... 7
Consejos y sugerencias ......................................................................................................................7
Para hacer galletas ..................................................................................................................... 8
Para hacer pan ............................................................................................................................ 8
Para hacer pastel .........................................................................................................................9
Para montar claras ..............................................................................................................................9
Para batir crema .........................................................................................................................10
Garantía ............................................................................................................................................ 11
Recetas .............................................................................................................................................12
INTRODUCCIÓN
¡Cuisinart lleva el batido a un
nuevo nivel! La batidora de pie
Cuisinart
®
Precision Master
™
tiene la
capacidad, la potencia y la ingeniería
para llevar a cabo cualquier trabajo.
Tres accesorios y 12 velocidades
permiten mezclar, batir y amasar de
manera precisa y perfecta.
Cuisinart también ofrece una
variedad de aditamentos opcionales
(vendidos por separado) que
se conectan a la batidora para
poder hacer pasta casera, moler
su propia carne y más. ¡Inclusive
puede convertir su batidora en
una máquina para hacer helado! El
aditamento Cuisinart
®
Fruit Scoop
™
le permitirá preparar helados,
helados de yogur, sorbetes y
postres heladas de frutas frescas sin
esfuerzo.
PIEZAS Y
CARACTERÍSTICAS
1. Motor de 500 vatios
Suficiente potente para las
recetas grandes y las tareas
difíciles.
2. Cabezal inclinable
Permite instalar/retirar los
accesorios y raspar el bol con
facilidad.
3. Puerto de conexión para aditamentos
Permite conectar el aditamento moledor de carne y los aditamentos para hacer pasta
(vendidos por separado) a la batidora. Nota: el puerto de conexión se encuentra atrás del
1.
6.
3.
4.
5.
2.
7, 8
11.
12.
10.
9.

5
panel delantero. Un tornillo hace que sea
fácil instalar y retirar los aditamentos.
4. Puerto de conexión para accesorios
Permite conectar el batidor de alambre, el
batidor plano, el gancho amasador y una
cubierta antisalpicaduras.
5. Bol de 5.5 cuartos de galón (5.2 L)
con asa
El asa hace que sea fácil alzar, sostener,
raspar y retirar el bol.
El bol de alta capacidad permite mezclar
cantidades más grandes.
6. Palanca de liberación del cabezal
Permite inclinar el cabezal y mantenerlo
en posición inclinada de manera segura.
También se usa para regresar el cabezal a
su posición original.
7. Perilla de encendido/apagado/control
de velocidad
12 velocidades, para resultados precisos.
8. Aro luminoso azul
Se enciende durante el funcionamiento.
Se apaga cuando el aparato está
apagado.
9. Batidor de alambre
Incorpora aire a las mezclas. Ideal para
batir huevos, claras o crema líquida
y preparar recetas tales como pastel
de ángel, torta “chiffon”, merengue y
malvaviscos. También es perfecto para
preparar puré de papas rápidamente.
10. Batidor plano
Revuelve, mezcla y bate. Ideal para
preparar galletas, pastel, mezclas y
glaseados/coberturas. También es
perfecto para hacer fondos de tarta,
bollos y “shortcakes”, así como para
mezclar los ingredientes del pan de carne
o de las albóndigas.
11. Gancho amasador
Especialmente diseñado para mezclar y
amasar masa de levadura para hacer pan,
panecillos, pizza/focaccia, pasta y “coffee
cakes” de masa fermentada.
12. Cubierta antisalpicaduras con pico
vertedor
Evita las salpicaduras durante la mezcla
y al agregar ingredientes. Guía los
ingredientes hacia el bol.
INSTRUCCIONES DE
ENSAMBLAJE
1. Incline el cabezal hacia atrás – Presione
la palanca de liberación del cabezal y alce
el cabezal hasta que se bloquee.
2. Instale el accesorio deseado – Conecte
el batidor plano, el batidor de alambre o el
gancho amasador al puerto de conexión
para accesorio. Empuje y gire en sentido
anti horario hasta que se bloquee. Gire en
sentido horario para retirarlo.
3. Coloque el bol sobre la base – Gire en
sentido horario para sujetarlo.
4. Baje el cabezal – Sosteniendo el cabezal
con una mano, presione la palanca de
liberación otra vez y baje completamente
el cabezal.
5. Instale la cubierta antisalpicaduras
Después de haber conectado el
accesorio y bajado el cabezal, deslice
la cubierta sobre el bol e instale el
pico vertedor, introduciéndolo entre
las patas de la cubierta. Nota: la
cubierta antisalpicaduras gira en ambas
direcciones, lo que permite agregar
ingredientes fácilmente.
Para retirarla: primero retire el pico
vertedor, y luego deslice la cubierta
antisalpicaduras fuera del bol.
INSTRUCCIONES DE
OPERACIÓN
Ubique la batidora
La placa que cubre el puerto de conexión
para aditamentos debería hacerle frente.
Para encender la batidora
Gire la perilla de control de velocidad al nivel
deseado, desde 1 hasta 12 (véase la guía de
velocidad en la página 6).
Para apagar la batidora
Ponga la perilla en la posición de apagado
“0”; la unidad se apagará.

6
1
• Para tamizar ingredientes secos
• Para incorporar delicadamente
ingredientes (por ej. ingredientes secos)
• Para batir crema y montar claras
(aumentando progresivamente la
velocidad)
7
• Para mezclar mantequilla con harina
(para preparar masa de hojaldre)
• Para hacer puré de papas/vegetales
• Para batir crema y montar claras
(aumentando progresivamente la
velocidad)
2
• Para tamizar ingredientes secos
• Para incorporar delicadamente
ingredientes (por ej. ingredientes secos)
• Para preparar panes/bizcochos sin
levadura (“muffins”, etc.)
• Para batir mantequilla y azúcar en forma
de crema
• Para batir crema y montar claras
(aumentando progresivamente la
velocidad)
8
• Para mezclar mantequilla con harina
(para preparar masa de hojaldre)
• Para hacer puré de papas/vegetales
• Para batir crema y montar claras
(aumentando progresivamente la
velocidad)
3
• Para batir mantequilla y azúcar en forma
de crema
• Para incorporar huevos
• Para amasar masa de pan
• Para batir crema y montar claras
(aumentando progresivamente la
velocidad)
9
• Para hacer puré de papas/vegetales
• Para batir crema y montar claras
(aumentando progresivamente la
velocidad)
4
• Para batir mantequilla y azúcar en forma
de crema
• Para amasar masa de pan
• Para amasar masa de pasta
• Para mezclar mantequilla con harina
(para preparar masa de hojaldre)
• Para batir crema y montar claras
(aumentando progresivamente la
velocidad)
10
• Para batir puré de papas/vegetales
• Para batir crema y montar claras
(aumentando progresivamente la
velocidad)
5
• Para batir mantequilla y azúcar en forma
de crema
• Para mezclar mantequilla con harina
(para preparar masa de hojaldre)
• Para hacer puré de papas/vegetales
• Para batir crema y montar claras
(aumentando progresivamente la
velocidad)
11
• Para batir puré de papas/vegetales
• Para batir crema y montar claras
(aumentando progresivamente la
velocidad)
6
• Para mezclar mantequilla con harina
(para preparar masa de hojaldre)
• Para hacer puré de papas/vegetales
• Para batir crema y montar claras
(aumentando progresivamente la
velocidad)
12
• Para batir puré de papas/vegetales
• Para batir crema y montar claras
(aumentando progresivamente la
velocidad)
GUÍA DE SELECCIÓN DE LA VELOCIDAD

7
LIMPIEZA Y MANTENIMIENTO
Siempre apague y desconecte el aparato
antes de limpiarlo.
Unidad principal
Limpie la carcasa con un paño ligeramente
humedecido, y luego séquela bien. Nunca
utilice limpiadores/materiales abrasivos ni
sumerja el aparato en agua.
Bol
Lave el bol a mano y séquelo bien, o métalo al
lavavajillas. Nunca use cepillos de metal, lana
de acero o cloro para limpiar el bol.
Accesorios
El batidor plano y el gancho amasador
son aptos para lavavajillas (nivel superior
solamente); también pueden lavarse a mano.
El batidor de alambre NO es apto para
lavavajillas y debe lavarse a mano.
Aditamentos
Siga las instrucciones de limpieza proveídas
con cada aditamento.
Cubierta antisalpicaduras con pico vertedor
Apta para lavavajillas (nivel superior
solamente); también puede lavarse a mano.
Mantenimiento
Cualquier otro servicio debe ser realizado por
un técnico autorizado.
CAPACIDADES MÁXIMAS
• Masa de levadura (pan, pizza) – 6 tazas
(750 g) de harina blanca
• Masa de galletas – 5 docenas de galletas
• Crema batida – 6 tazas (1.4 L) de crema
líquida (rinde el doble de crema batida)
• Claras de huevo – 12 claras de huevo
grande
RESOLUCIÓN DE
PROBLEMAS
Si la unidad se apaga de repente, esto puede
significar que el motor ha sobrecalentado.
Su batidora de pie está equipada con un
dispositivo de protección contra sobrecarga
que apaga automáticamente el motor en caso
de sobrecalentamiento.
Si esto ocurriera:
• Apague y desconecte el aparato.
• Vacíe parcialmente el bol y permita que
el aparato descanse por unos minutos.
• Conecte de nuevo el cable y encienda
el aparato. Si no se pone en marcha,
permita que descanse por más tiempo.
CONSEJOS Y
SUGERENCIAS
• Ponga la rejilla del horno en la posición
deseada antes de precalentar el horno. La
mayoría de las recetas requieren que la
rejilla esté en el centro del horno; las tartas
se cuecen mejor en el tercio inferior del
horno.
• Siga las instrucciones al pie de la letra,
teniendo cuidado de no mezclar la mezcla
de menos ni de más.
• No ponga demasiadas fuentes en el horno
a la vez y evite abrir la puerta del horno
durante el horneado; use la luz del horno
para vigilar el horneado. Con algunas
recetas tales como las galletas, cambie las
placas de nivel a la mitad del tiempo de
horneado.
• Es imprescindible medir los ingredientes,
especialmente la harina, con precisión.
Revuelva la harina antes de medirla o
pesarla y use una cuchara para sacarla de
la bolsa. Si usa un vaso medidor, enrase la
harina con un cuchillo o el mango de una
cuchara. No apisone ni compacte la harina.
Recuerda no medir la harina directamente
de la bolsa. A pesar de que esté tamizada,
ha sido comprimida/compactada para
caber en la bolsa. Si prepara productos
de panadería con harina que no ha sido
revuelta, estos resultarán densos y secos.
• Para la mayoría de las recetas, los alimentos
refrigerados tales como la mantequilla, la
leche y los huevos se incorporan mejor a la
mezcla si están a temperatura ambiente.
• Saque la mantequilla del refrigerador antes
de empezar a preparar la receta y córtelo
en pedazos de ½ pulgada (1.5 cm) para
darle tiempo de entibiarse mientras preparar

8
el resto de los ingredientes. No caliente la
mantequilla en el microondas; esto puede
cambiar su estructura y dar una textura
diferente al producto final.
• Separe los huevos uno a la vez, en un
recipiente poco profundo. Coloque las claras
en un bol de vidrio o de acero inoxidable
muy limpio. Si cae yema en la clara, reserve
el huevo para otro uso; el mínimo rastro de
yema puede impedir que las claras monten.
• Raspe el bol (las paredes, el fondo y el
batidor) varias veces durante la mezcla,
especialmente cuando agrega ingredientes,
garantiza que los ingredientes se incorporen
mejor y produce mejores resultados. Cuanto
más frecuentemente raspa el bol, mejor.
• Antes de batir claras de huevo, asegúrese
de que el bol y el batidor de alambre estén
impecablemente limpios y totalmente secos.
Rastros de grasa/aceite pueden impedir que
monten las claras.
• Para averiguar si los huevos están frescos,
póngalos en un bol de agua tibia. Si flotan,
esto significa que no están frescos. Es
imprescindible usar huevos frescos para
montar claras; cuanto más frescos los
huevos, más estables las claras batidas.
• Derrita el chocolate a baño María, encima
de una cacerola de agua hirviendo a fuego
lento. El agua no debe hervir, ni debe tocar
el fondo del bol o de la olla para baño María;
esto podría cocer/endurecer el chocolate y
no lo podrá usar en la receta.
• Siempre averigüe que la levadura está fresca
antes de usarla. Rocíe un poco de levadura
en agua tibia y agregue una pizca de azúcar
o de harina de la receta. Si la levadura no
se pone espumosa dentro de 5–10 minutos,
esto significa que está “muerta”. Empiece
de nuevo con otro paquete de levadura.
PARA HACER GALLETAS
• Utilice una cuchara para helado para medir
la mezcla de galletas; esto formará galletas
de tamaño y forma uniformes. Existen
cucharas de helado de varios tamaños.
Cualquiera (por ej. la n.°40, n.°50 o n.°60)
puede usarse para formar galletas. Las más
grandes, que miden entre
1
⁄3 taza (80 ml) y
½ taza (120 ml) de mezcla, son perfectas
para las galletas gigantes. Las cucharas de
helado también son perfectas para llenar
los moldes para “muffins”. Utilice la cuchara
para helado n.°16 para hacer “muffins” o
albóndigas.
• Para que las galletas conserven su forma
durante el horneado, coloque la masa sobre
placas forradas con papel encerado o papel
film/plástico y refrigérela antes de hornear.
La mayoría de las masas de galletas puede
refrigerase por 2–3 días (cerciórese de
envolver bien la mezcla).
• La masa de galleta también puede
congelarse. Después de formar las galletas,
envuélvalas en doble capa de papel film/
plástico y congélelas por hasta 3 meses.
Descongélelas antes de hornearlas.
•
Para facilitar el desmoldado y la limpieza,
forre las placas con papel sulfurizado.
• Permita que las galletas se enfríen sobre la
placa por 2–3 minutos, y luego termine de
enfriarlas sobre una rejilla; esto evitará que
las galletas se encojan, se desmigajen o se
rompan.
• Permita que las galletas se enfríen por
completo antes de guardarlas, o se pondrán
pastosas y perderán su forma.
PARA HACER PAN
• Un paquete de ¼ onza (8 g) de levadura
equivale a 2¼ cucharaditas de levadura.
• Usar leche en vez de agua producirá una
corteza más suave.
• Para suavizar la corteza después del
horneado, restriéguela con mantequilla sin
sal inmediatamente tras sacar el pan del
horno; esto evitará que se seque.
• Si una receta incluye un tipo especial de
harina, utilice esta harina. Si no tiene harina
para hacer pan, puede usar harina común,
pero el pan no leudará tanto.
• No use margarina ligera para hacer pan;
su estructura hace que no producirá los
mismos resultados.
• El gluten de trigo es la proteína seca que
sobra de la harina de trigo después de haber
eliminado el almidón. El gluten de trigo

9
es un buen acondicionador/potenciador
de masa, especialmente para los panes
integrales o los panes hechos con harina
común. Si una receta incluye gluten de trigo,
recomendamos que lo use para resultados
óptimos.
• Para hacer pan de trigo integral, use 1½
cucharada de gluten de trigo por taza (120
g) de harina de trigo integral.
• Puede usar sustituto de sal, siempre que
contenga sodio y cloruro de potasio.
• Si una receta no incluye una cantidad
determinada de harina, use la cantidad
mínima recomendada, y luego añada harina
poco a poco hasta conseguir una masa
suave pero no pegajosa.
• Usar demasiado líquido o hacer pan cuando
el día es húmedo puede causar que el pan
no leude o que la parte superior se encoja.
• Un termómetro de cocina es una
herramienta muy útil para hacer pan. Puede
usarlo para medir la temperatura del agua
que usa para disolver/fermentar la levadura
y para tomar la temperatura interna del pan
cocido.
• El agua usada para fermentar la levadura
debe estar entre 105°F (40°C) y 110°F
(43°C).
• La temperatura interna del pan cocido debe
estar en 190°F (88°C). Nota: los panes
enriquecidos con huevo deben estar en
207°F (97°C).
PARA HACER PASTEL
• Todos los ingredientes y el bol deben estar
a temperatura ambiente. Los ingredientes a
temperatura ambiente se incorporan mejor y
son más fáciles de mezclar.
• Llene los moldes con la mezcla
inmediatamente después de terminar de
mezclar los ingredientes.
• Meta los moldes al horno inmediatamente
después de llenarlos.
• Averigüe si los pasteles están listos al final
del tiempo de cocción mínimo.
• Deje los pasteles enfriar en los moldes
hasta que estén frescos al tacto, y luego
desmóldelos y permita que se enfríen por
completo sobre una rejilla.
• Es más fácil esparcir el glaseado con una
espátula angulada que con un cuchillo o una
espátula regular.
PARA BATIR HUEVOS
• Las claras se montan mejor cuando están a
temperatura ambiente. Para llevar las claras
a temperatura ambiente de manera segura,
coloque los huevos enteros en un bol de
agua tibia por 10–15 minutos.
• Agregue una pequeña cantidad de crémor
tártaro, jugo de limón o vinagre a las claras;
esto las estabilizará y ayudará a conseguir
claras batidas más voluminosas y firmes.
Utilice
1
⁄
8
cucharadita de crémor tártaro por
clara de huevo grande o 1 cucharadita de
crémor tártaro por taza (235 ml) de claras de
huevo (8–10 huevos grandes).
• El tiempo necesario para montar claras
depende de la temperatura/frescura de los
huevos y de la temperatura/humedad de la
cocina. Esté pendiente de estos factores.
• Cuando el tiempo está húmedo o está
lloviendo, puede que no consiga claras
batidas tan voluminosas como cuando el
tiempo está seco o más caliente.
• Ponga los huevos (a temperatura ambiente)
en el bol limpio y seco. Instale el batidor de
alambre sobre la batidora. Bata las claras,
empezando a velocidad 1 y aumentando
progresivamente la velocidad al nivel 12,
hasta que estén ligeras y espumosas.
Si bate las claras demasiado rápido al
principio, su estructura no será tan estable/
resistente y no alcanzarán su máximo
volumen una vez batidas. Tampoco bata las
claras de más; esto las separará y hará que
los merengues se desinflen.
• Cuando añada azúcar a las claras, haga
esto despacio y gradualmente, justo cuando
las claras empiecen a espumarse. Siempre
rocíe el azúcar lentamente por un lado del
bol mientras bate las claras – no añada
azúcar en el centro del bol o directamente

10
sobre las claras; esto puede desinflarlas.
• Al principio, las claras se pondrán
espumosas. Después de poco tiempo,
se volverán más firmes y empezarán a
tomar cuerpo. Luego, se formarán picos
suaves que se caen al levantar el batidor;
esta es la textura requerida para hacer
“mousses” y “soufflés”. La etapa siguiente
son picos medio-firmes; esta es la textura
requerida para hacer merengues. Las claras
parecerán secas y brillantes y los picos
tendrán cuerpo. La etapa final son picos
firmes y secos. Las claras no parecerán
completamente blancas y estarán opacas.
• Utilice las claras batidas inmediatamente
después de batirlas. Si espera más de 5
minutos, empezarán a desinflarse y perder
volumen y estructura. Las claras batidas con
azúcar o crémor tártaro son más estables y
durarán por más tiempo.
CÓMO “PASTEURIZAR” LAS CLARAS
Las claras crudas pueden contener bacterias
dañinas. Si una receta incluye claras crudas,
le recomendamos que use claras en polvo
o que “pasteurice” las claras de la manera
siguiente:
• Coloque las claras, 2 cucharadas del
azúcar de la receta, 2 cucharadas (30ml)
de agua y una pizca de crémor tártaro
en el bol de la batidora y revuelva hasta
conseguir una mezcla suave.
• Caliente la mezcla a baño María,
revolviendo constantemente con una
espátula de caucho impecablemente
limpia, hasta que la mezcla alcance
160°F (71°C). Nota: empiece a
averiguar la temperatura después de
aproximadamente un minuto.
• Cuando la mezcla alcance 160°F
(71°C), seque la parte inferior del bol y
coloque este sobre la batidora. Instale el
batidor de alambre. Siga con la receta.
PARA BATIR CREMA
La diferencia entre la crema líquida para
batir (“heavy cream”) y la crema para batir
(“whipping cream”) es su contenido de grasa
butírica. Cuanta más grasa butírica, más
estable la crema batida. La crema líquida para
batir (“heavy cream”) tiene más grasa butírica
que la crema para batir (“whipping cream”),
por lo tanto es mejor para hacer crema batida.
También puede usar crema líquida regular
(“light cream”), pero esto tomará más tiempo.
Las mejores cremas para batir son cremas
que no sean ultrapasteurizadas.
Por lo general, la crema rinde el doble de
su volumen de crema batida. Para preparar
2 tazas (475 ml) de crema batida, coloque
1 taza (235 ml) de crema líquida para batir
o de crema para batir en el bol enfriado.
Empiece a batir a velocidad 2 y siga batiendo,
incrementando progresivamente la velocidad
al nivel 10 o 12, hasta que la crema empiece
a tomar cuerpo. Agregue aproximadamente
½ cucharadita de extracto de vainilla u otro
extracto puro y 1–4 cucharadas (10–50 g)
de azúcar granulada, súperfina o glasé. Siga
batiendo hasta que se formen picos suaves.
Para preparar crema batida:
• Congele el bol y el batidor de alambre
por15 minutos o más antes de empezar.
Cerciórese de que el cuarto no esté muy
caliente.
• Bata la crema a velocidad baja por
aproximadamente 30 segundos, hasta que
aparezcan burbujas pequeñas. Aumente
progresivamente la velocidad al nivel 12
y siga batiendo hasta conseguir la textura
deseada, pero teniendo cuidado de no
batir de más ya que la crema batida puede
empezar a convertirse en mantequilla en
solo segundos.
• Si desea endulzar la crema batida, agregue
lentamente el azúcar y los saborizantes
cuando la crema empiece a tomar cuerpo.
• Cerciórese de tamizar el azúcar antes de
añadirlo a la crema.
• Deje de batir cuando la crema haya
alcanzado el doble de su volumen. La crema
debe estar suave, cremosa y espesa, con
picos suaves (por ej. para servir con postre
o incorporar en postres) o picos firmes (por
ej. para decorar pasteles).

11
• A menos que haya sido estabilizada, sirva la
crema batida inmediatamente.
CREMA BATIDA ESTABILIZADA
La crema batida estabilizada se conservará
por más tiempo en el refrigerador y puede
usarse para decorar postres con una manga
pastelera. Para estabilizar la crema batida, se
necesita gelatina o un estabilizador comprado.
Para estabilizar la crema batida: coloque un
poco de agua en una taza medidora y rocíe
un poco gelatina en polvo. Deje reposar por 5
minutos para suavizar. Luego, coloque la taza
medidora en una cacerola de agua hirviendo
a fuego lento y revuelva hasta que la gelatina
esté disuelta. Deje enfriar ligeramente la
gelatina antes de agregarla a la crema, pero
no permita que se enfríe por completo ni que
endurezca.
• Para 1 taza (235 ml) de crema, utilice ½
cucharadita de gelatina + 1 cucharada
(10ml) de agua.
• Para 2 tazas (475 ml) de crema, utilice 1
cucharadita de gelatina + 2 cucharadas
(25ml) de agua.
• Para 8 tazas (1.9L) de crema, utilice 1
cucharada + 1 cucharadita de gelatina + 8
cucharadas (100ml) de agua.
Bata la crema como de costumbre, añadiendo
la gelatina después de que la crema empiece
a tomar cuerpo y empiece a espesarse.
GARANTÍA LIMITADA DE
TRES AÑOS
(válida en los EE.UU. y en Canadá solamente)
Esta garantía es para los consumidores solamente. Usted es un
consumidor si ha comprado su aparato Cuisinart® en una tienda,
para uso personal o casero. A excepción de los estados donde la ley lo
permita, esta garantía no es para los detallistas u otros comerciantes.
Cuisinart garantiza este aparato contra todo defecto de materiales o
fabricación durante 3 años después de la fecha de compra original,
siempre que el aparato haya sido utilizado para uso doméstico y
según las instrucciones.
Le aconsejamos que llene el formulario de registro disponible en
www.cuisinart.com a fin de facilitar la verificación de la fecha de
compra original. Sin embargo, registrar el producto no es necesario
para recibir servicio bajo esta garantía. En ausencia del recibo de
compra, el período de garantía será calculado a partir de la fecha de
fabricación.
RESIDENTES DE CALIFORNIA
La ley del estado de California ofrece dos opciones bajo el período de
garantía. Los residentes del estado de California pueden (A) regresar
el producto defectuoso a la tienda donde lo compraron o (B) a otra
tienda que venda productos Cuisinart® de este tipo. La tienda, a
su opción, reparará el producto, referirá el consumidor a un centro
de servicio independiente, cambiará el producto o reembolsará el
consumidor por el precio original del producto, menos la cantidad
imputable al uso del producto por el consumidor hasta que éste se
dañe. Si estas dos opciones no satisfacen al consumidor, podrá llevar
el aparato a un centro de servicio independiente, siempre que se
pueda ajustar o reparar el aparato de manera económica. Cuisinart
será responsable por los gastos de servicio, reparación, reemplazo
o reembolso de los productos defectuosos durante el período de
garantía. Los residentes de California también pueden, si lo desean,
mandar el aparato defectuoso directamente a Cuisinart para que lo
reparen o lo cambien. Para esto, se debe llamar a nuestro servicio
posventa al 1-800-726-0190. Cuisinart será responsable por los
gastos de reparación, reemplazo, manejo y envío de los productos
defectuosos durante el período de garantía.
ANTES DE HACER REPARAR SU APARATO
Si este aparato presentara algún defecto de materiales o fabricación
durante el período de garantía, la reparemos o reemplazaremos (a
nuestra opción). Para obtener servicio bajo esta garantía, llame a
nuestra línea directa gratuita al 1-800-726-0190 o regrese el aparato
defectuoso a: Cuisinart, 7475 North Glen Harbor Blvd, Glendale, AZ
85307. Regrese el aparato defectuoso, junto con su recibo de compra
y un cheque o giro postal de US$10.00 por gastos de manejo y envío.
Los residentes de California sólo necesitan dar una prueba de compra
y deben llamar al 1-800-726-0190 para recibir instrucciones de
envío. Recuerde incluir su nombre, dirección y teléfono, la descripción
del problema, así como cualquier información pertinente. Sentimos no
poder aceptar otras formas de pago. NOTA: Para mayor seguridad, le
aconsejamos que mande su paquete por un método de entrega con
seguro y seguimiento. Cuisinart no será responsable por los daños
ocurridos durante el transporte o por los paquetes mandados a una
dirección equivocada. Los productos perdidos y/o lastimados durante
el envío no serán cubiertos bajo esta garantía.
Este aparato satisface las más altas exigencias de fabricación
y ha sido diseñado para uso sobre corriente de 120V, usando
accesorios y piezas de repuesto autorizados solamente. Esta
garantía excluye expresamente los daños causados por accesorios,
piezas o reparaciones no autorizados por Cuisinart. Esta garantía no
cubre el uso institucional o comercial del producto, y no es válida
en caso de daños causados por mal uso, negligencia o accidente.
Esta garantía excluye expresamente todos los daños incidentales o
consecuentes. Algunos Estados no permiten la exclusión o limitación
de daños incidentales o consecuentes, de modo que las limitaciones
mencionadas pueden no regir para usted. Usted puede tener otros
derechos que varían de un Estado a otro.
Importante: si debe llevar el aparato defectuoso a un centro de
servicio no autorizado, por favor informe al personal del centro de
servicio que deberían llamar al servicio posventa de Cuisinart al
1-800-726-0190 a fin de diagnosticar el problema correctamente,
usar las piezas correctas para repararlo y asegurarse de que el
producto esté bajo garantía.
-
 1
1
-
 2
2
-
 3
3
-
 4
4
-
 5
5
-
 6
6
-
 7
7
-
 8
8
-
 9
9
-
 10
10
-
 11
11
-
 12
12
-
 13
13
-
 14
14
-
 15
15
-
 16
16
-
 17
17
-
 18
18
-
 19
19
-
 20
20
-
 21
21
-
 22
22


Cuisinart SM-50TQ Guía del usuario
- Categoría
- Mezcladores
- Tipo
- Guía del usuario
En otros idiomas
- English: Cuisinart SM-50TQ User guide
Documentos relacionados
Otros documentos
-
Hamilton Beach 63232 Manual de usuario
-
Waring WSM7L Manual de usuario
-
Kenmore 100.49090 Manual de usuario
-
KitchenAid KSM152 Manual de usuario
-
Hamilton Beach 63326 Guía del usuario
-
-
Hamilton Beach 63396 Guía del usuario
-
Electrolux SMC10 Manual de usuario
-
-
Premier ED-4482 Manual de usuario