Shark IR420 El manual del propietario
- Categoría
- Hierros
- Tipo
- El manual del propietario
La página se está cargando...
La página se está cargando...

Complete y devuelva dentro de diez (10) días de la compra. El registro nos permitirá ponernos en
contacto con usted en caso de que se descubra un defecto en el producto. Al devolver esta
tarjeta usted reconoce haber leído y comprendido las instrucciones de uso y las advertencias que
se establecen en las instrucciones adjuntas.
ENVIAR A: EURO-PRO Operating LLC, 4400 Bois Franc, St. Laurent, Quebec H4S 1A7
COMPRADOR: ……………………………………………………………………………………………
DIRECCIÓN: ……………………………………………………………………………………………….
FECHA DE COMPRA: ………………….. MODELO: ………………... Nº DE SERIE: .…………….
NOMBRE Y DIRECCIÓN DE LA TIENDA: .……………………………………………………………..
TARJETA DE REGISTRO DE PRODUCTO
SÓLO PARA CONSUMIDORES CANADIENSES
Modelo GI420
GARANTÍA LIMITADA POR UN (1) AÑO
EURO-PRO Operating LLC garantiza que este producto no presentará defectos de materiales
ni mano de obra durante un período de un (1) año a partir de la fecha de la compra original,
siempre que se utilice para uso doméstico normal, sujeto a las siguientes condiciones, exclusiones
y excepciones.
Si el artefacto no funcionara correctamente al usarlo en condiciones domésticas normales
dentro del período de garantía, devuélvalo completo y sus accesorios, con flete pagado por
adelantado a
En los EE.UU.: EURO-PRO Operating LLC, 94 Main Mill Street, Door 16, Plattsburgh, N.Y., 12901
En Canadá: EURO-PRO Operating LLC, 4400 Bois Franc, St. Laurent, Quebec H4S 1A7
Si EURO-PRO considera que el artefacto presenta defectos de materiales o mano de obra,
EURO-PRO lo reparará o cambiará en forma gratuita. Deben incluirse el documento que
compruebe la fecha de compra y US$9.95 para cubrir el costo del envío y manipulación. *
La responsabilidad de EURO-PRO Operating LLC se limita exclusivamente al costo de
la reparación o cambio de la unidad, según su criterio. Esta garantía no cubre el desgaste normal
de las piezas y no se aplica a ninguna unidad que haya sido alterada o utilizada para propósitos
comerciales. Esta garantía limitada no cubre los daños causados por mal uso, abuso, manejo
negligente o los daños debidos a defectos en el embalaje o maltratos en el tránsito. Esta garantía
no cubre los daños o defectos causados o que resulten de daños por envío o reparación, servicio o
alteraciones al producto o a cualquiera de sus piezas, realizados por un técnico no autorizado por
EURO-PRO.
Esta garantía se extiende al comprador original de la unidad y excluye toda otra garantía legal y/o
convencional. La responsabilidad de EURO-PRO Operating LLC, de haberla, se limita a las
obligaciones específicas que asume expresamente según los términos de la garantía limitada. En
caso alguno EURO-PRO Operating LLC es responsable de daños incidentales o indirectos de
ninguna naturaleza. Algunos estados no permiten la exclusión o limitación de daños incidentales o
indirectos, por lo que lo anterior podría no aplicarse a usted.
Esta garantía le otorga derechos legales específicos y usted también podría tener otros derechos,
que varían de un estado a otro.
*Importante: Embale cuidadosamente el artículo para evitar que se dañe durante el envío.
Asegúrese de incluir el documento que demuestre la fecha de compra y una etiqueta con su
nombre, dirección completa y número de teléfono con una nota con los datos de la compra,
número de modelo y una explicación de lo que piensa que es el problema. Recomendamos
asegurar el paquete (ya que los daños producidos durante el envío no los cubre la garantía).
En el exterior del paquete, coloque “ATTENTION CUSTOMER SERVICE”. Nos esforzamos
constantemente por mejorar nuestros productos, de modo que las especificaciones aquí
contenidas están sujetas a cambio sin aviso previo.
Modelo GI420
IMPORTANT SAFETY INSTRUCTIONS
When using your iron, basic safety precautions should always be followed, including
the following:
8. Close supervision is necessary for
any appliance being used by or near
children. Do not leave iron
unattended while connected or on an
ironing board.
9. Burns can occur from touching hot
metal parts, hot water or steam. Use
caution when you turn a steam iron
upside down; there may be hot
water in the reservoir.
10.This appliance is for household
use only.
WARNING: The power cord on this
product contains lead, a chemical
known to the State of California to
cause birth defects or other
reproductive harm. Wash hands
after handling.
1. Read all instructions carefully.
2. Use iron only for its intended use.
3. To protect against risk of electrical
shock, do not immerse the iron in
water or other liquids. Always turn
the iron to “MIN” before plugging in
or unplugging from outlet.
4. Never yank cord to disconnect from
outlet. Grasp plug and pull to
disconnect.
5. Do not allow cord to touch hot
surfaces. Let iron cool completely
before putting away.
6. Always disconnect iron from
electrical outlet when filling with
water, emptying, or when not in use.
7. Do not operate iron with a damaged
cord, or after the iron has been
dropped or damaged in any manner.
To avoid the risk of electric shock,
do not disassemble the iron. Return
the iron to EURO-PRO Operating
LLC for examination and repair.
Incorrect reassembly can cause the
risk of electric shock when the iron is
used.
SPECIAL INSTRUCTIONS
1. To avoid a circuit overload, do not
operate another high-wattage
appliance on the same circuit.
2. If an extension cord is absolutely
necessary, use a 13-ampere cord.
Cords rated for less amperage may
overheat. Use care to arrange the
cord so that it cannot be pulled or
tripped over.
SAVE THESE INSTRUCTIONS
For Household Use Only
POLARIZED PLUG: This appliance has a polarized plug (one blade is
wider than the other). As a safety feature, this plug
will fit into a polarized outlet only one way. If the
plug does not fit fully into the outlet, reverse the
plug. If it still does not fit, contact a qualified
electrician. Do no attempt to defeat this safety
feature.
Rev. 08/05A
Impreso en China
20 1

ADDITIONAL IMPORTANT SAFEGUARDS
SOLUCIÓN DE PROBLEMAS
PROBLEMA POSIBLES MOTIVOS Y SOLUCIONES
La plancha no calienta
La luz de la temperatura
se prende y apaga
Por las aberturas
para el vapor de
una plancha nueva
emanan olores o
pequeñas partículas
La plancha no
emite vapor
Salen gotas de agua
de las aberturas para
el vapor
• La plancha se debe conectar únicamente a un
tomacorriente eléctrico de 120V CA.
Asegúrese de que el enchufe esté firmemente
conectado en el tomacorriente.
• El ajuste de temperatura es demasiado bajo.
Lleve a un ajuste más alto.
• Esto es normal.
La luz se prende y apaga cuando el termostato
está encendiendo y apagando el calefactor para
mantener la temperatura seleccionada.
• Esto es normal.
Siga las instrucciones para el primer uso y deje que la
plancha emita vapor durante 2 ó 3 llenados y presione
de vez en cuando el botón de escape de vapor para
eliminar las pequeñas partículas blancas.
• El tanque de agua puede estar vacío o el nivel de agua
es muy bajo. Agregue agua.
• Asegúrese de que el regulador de temperatura y
el selector de vapor variable estén correctamente
ajustados. Para conseguir el máximo de vapor,
(coloque “Max” en el selector de vapor),
el regulador de temperatura debe ajustarse en “•••”.
• El selector de vapor ajustable está en “0”.
Siempre deje que la plancha alcance la temperatura
seleccionada con el ajuste del selector de vapor
ajustable en “0”. Asegúrese de que el regulador de
temperatura esté ajustado en el área de vapor
correcta, por ejemplo “•” y que el selector de vapor no
esté en “0”. Para obtener más vapor, gire el regulador
de temperatura a un ajuste superior, por ejemplo “•••”
y el selector de vapor a “Max”.
• Si el ajuste de temperatura y el ajuste del selector de
vapor son correctos y no hay vapor, golpee
suavemente
la base en la tabla de planchar unas
cuantas veces. Lleve el selector de vapor variable de
“0” a “Max” unas cuantas veces.
• Puede que la plancha no esté suficientemente
caliente. Ajuste el termostato en la posición
“Max”. Siempre dé tiempo suficiente a la plancha para
calentarse (la luz del termostato se apaga) antes de
activar el selector de vapor variable.
• Uso excesivo del escape de vapor. Deje pasar más
tiempo entre un escape y otro.
• La plancha puede estar llena en exceso. Apague la
plancha, vacíe el agua y siga las instrucciones de
llenado.
• El rendimiento del vapor puede ser bajo si la plancha
requiere mantenimiento. Para realizar el
mantenimiento, utilice agua de la llave corriente y
llene 1 ó 2 tanques hasta que mejore el rendimiento
del vapor.
19
11. Always store your iron in the upright
position, not on the soleplate. If
stored face down, even the
smallest amount of moisture will
cause the soleplate to corrode and
stain.
12. DANGER!
Never use the iron if it
is damaged or dropped. Using
the iron when it is damaged
could create the risks of fire,
electric shock, injury or death.
1. Do not rest iron on soleplate.
2. Never use or rest iron on an
unstable surface.
3. While the iron is hot, never set iron
on an unprotected surface - even if it
is on its heel rest.
4. WARNING!
TO PREVENT
ELECTRIC SHOCK OR OTHER
INJURY, before filling the iron
with water, make sure that the
plug is removed from the outlet.
5. CAUTION
: Never fill the iron with
fabric conditioner, starches or any
other solution, as these will
damage the steam mechanism. Do
not use contaminated water.
6. WARNING!
TO AVOID FIRE, never
leave iron unattended while it is
plugged in.
7. WARNING! TO PREVENT
ELECTRIC SHOCK, never
immerse the iron in water or other
liquid.
8. WARNING! TO PREVENT
ELECTRIC SHOCK, never
use the
iron in a location where it can fall
or be pulled into water or any
other liquid. If the iron falls into
water or any other liquid, unplug it
immediately. DO NOT reach into
the water or liquid.
9. CAUTION: Never use scouring
pads, abrasive or chemical
cleaners, or solvents to clean the
exterior or soleplate of your iron.
Doing so will scratch and/or
damage the surface.
10.WARNING! DO NOT aim iron at
face, towards yourself, or anyone
else while using or adjusting
steam. Burns or serious injury
may occur.
2
La página se está cargando...

INSTRUCCIONES DE MANTENIMIENTO POR PARTE
DEL USUARIO
OPERATING INSTRUCTIONS
This appliance is for HOUSEHOLD USE
ONLY and may be plugged into any
120V AC polarized electrical outlet. Do
not use any other type of outlet.
WARNING! TO PREVENT THE RISK
OF BURNS, use caution when filling
iron with water. Burns can occur
from touching hot metal parts, hot
water, or steam.
NOTE
: Because of the soleplate design,
ordinary tap water may be used with this
iron. However, in very hard water areas,
we recommend using distilled or
demineralized water.
CAUTION: Never fill the iron with
fabric conditioner, starches or any
other liquid, as these will damage the
steam mechanism. Do not use
contaminated water.
1. Open the water filling inlet cover.
Holding the iron at a slight angle,
pour water slowly into the water
filling inlet. (Fig. 2) Fill tank to
desired level or to the “MAX” water
level marking using the water filling
flask. (When the iron is upright, see-
through water tank allows you to
gauge the amount of water.) DO
NOT overfill the tank.
2. Plug the cord into a polarized, 120V
AC electrical outlet.
3. Turn temperature dial to “••” or “•••”
and slide the variable steam selector
down to the desired steam setting.
Fig. 2
VACIADO DE LA PLANCHA
1. Siempre vacíe la plancha después
de cada uso.
2. Cuando termine de usar la plancha,
gire el selector de vapor variable a “0”
y el regulador de temperatura a “MIN”.
3. Desconecte la plancha del
tomacorriente eléctrico.
4. Ajuste el selector de vapor variable
en “MAX”.
5. Invierta la plancha sobre el fregadero
con la punta hacia abajo y deje que
el agua fluya por la abertura.
6. Ajuste el selector de vapor variable
en “0”.
7. Deje que la plancha se enfríe en
posición vertical antes de guardarla.
ALMACENAMIENTO
1. Siempre gire el selector de vapor
variable a “0” después de vaciar el
tanque de agua.
2. Deje que la plancha se enfríe.
3. Siempre guarde la plancha en
posición vertical para proteger
la base.
4. De vez en cuando, limpie el exterior
de la plancha con un paño húmedo
y seque.
5. Si utiliza almidón rociado, limpie la
base de vez en cuando con un paño
suave húmedo para evitar la
acumulación de depósitos.
6. Si la plancha no se ha utilizado
durante algunas semanas,
sosténgala horizontalmente y deje
que salga vapor durante 2 minutos
antes de planchar.
• Llene el frasco de llenado que viene con
el artefacto hasta la marca de llenado
medio y luego vierta en el depósito
de agua.
• Ajuste el selector de vapor variable
en la posición sin vapor.
• Inserte el enchufe eléctrico en el
tomacorriente.
• Ajuste el regulador de temperatura en
el máximo.
• Espere hasta que se apague la luz de
temperatura y que la plancha de vapor
alcance el nivel deseado.
• Saque el enchufe del tomacorriente.
• Sostenga la plancha de vapor
horizontalmente sobre un fregadero.
• Ajuste el selector de vapor variable en
la posición “Self-Clean” (Autolimpieza).
Saldrá agua caliente y vapor por la base.
Balancee suavemente la plancha de vapor
de un lado a otro para que salgan las
partículas de cal y polvo.
AUTOLIMPIEZA
¡ADVERTENCIA! Tenga
cuidado al vaciar la plancha.
Pueden ocurrir quemaduras al
contacto con superficies metálicas
calientes, agua caliente o vapor.
• Cuando el depósito de agua esté
vacío, cambie el selector de vapor
variable de la posición “Self-Clean”
a“0”.
• Sostenga la plancha vertical e inserte
el enchufe en el tomacorriente para
que la plancha se caliente de nuevo.
• Mueva la plancha sobre un paño de
algodón limpio para limpiar la base
y permitir que se evapore el agua
restante.
Para eliminar el calcio y las partículas
acumuladas, el sistema de autolimpieza
debe hacerse funcionar por lo menos una
vez por mes.
WARNING! Before filling the iron
with water, be sure the iron is not
plugged into the electrical outlet. The
iron may be filled with water while it
is hot.
DRY IRONING
All marked settings on the temperature
dial can be used for dry ironing. Slide
the variable steam selector all the way
up as shown in Fig. 1. This will cut off
the steam flow if water is in the tank.
1. Turn temperature dial to “MIN” and
move the variable steam selector
all the way up to “0”.
2. Plug the cord into a polarized, 120V
AC electrical outlet. The temperature
ready light will come on, indicating
that the iron is heating up.
3. Turn the temperature dial to the
desired setting. (See “Ironing Guide”
for a guide to temperature selection.)
4. Place iron on its heel (on a stable,
protected surface) while iron is
warming to desired temperature.
When the desired temperature
setting is reached, the temperature
ready light will go off.
Fig. 1
For Dry Ironing:
0
STEAM IRONING
WARNING! DO NOT aim iron at face,
towards yourself, or anyone else
while using or adjusting steam.
Burns or serious injury may occur.
17
4

INSTRUCCIONES DE USO
OPERATING INSTRUCTIONS
Fig. 6
• Clasifique las prendas que va a planchar
conforme al tipo de tejido. Esto reducirá
la necesidad de ajustar la temperatura
para los diferentes tipos de prendas.
• Si no está seguro del contenido de
fibra de una prenda, pruebe un área
pequeña como una costura o sección
de dobladillo interior antes de planchar
un área visible. Comience con un
ajuste de temperatura bajo y aumente
gradualmente para encontrar el
mejor nivel.
• Cuando reduzca la temperatura para
planchar tejidos delicados, deje que
la plancha se enfríe durante
aproximadamente 2 minutos en
el nuevo ajuste de temperatura.
• Los tejidos como terciopelo, lana, lino
y seda se planchan mejor con un paño
de planchado, para evitar las marcas
de brillo.
NOTA: Antes de empezar a planchar
tejidos delicados, es mejor probar
primero la temperatura de la plancha
en un dobladillo o una costura interior.
APAGADO AUTOMÁTICO
1) Levante la plancha del pedestal.
2) Sosteniendo la plancha
horizontalmente frente a usted,
balancéela suavemente hacia
adelante y hacia atrás varias veces.
Este movimiento restablecerá el
interruptor de seguridad dentro de
la plancha. No sacuda la plancha
.
Selector de vapor variable
Fig. 7
La función de seguridad de apagado
automático de esta plancha liviana está
diseñada para activarse después de
aprox. 7 minutos sin uso. La luz
indicadora de apagado automático
destellará cuando se active el apagado
automático. Para restablecer la plancha
y continuar planchando, siga estos
pasos.
¡ADVERTENCIA! Para evitar
incendios, no deje la plancha
desatendida mientras esté conectada.
SELECCIÓN DE TEMPERATURA
DE LA PLANCHA
2. Set the temperature dial to
maximum. Place the iron on the
stand (on a stable, protected
surface) and allow it to heat for
approximately 2 minutes.
3. With the iron in a horizontal position,
press the burst of steam button
several times to prime the pump.
(Fig. 4)
4. Turn the temperature dial to any of
the temperatures within the steam
band and allow the iron to heat for
approximately 2 minutes before
ironing. Place iron on its heel (on a
stable, protected surface) while the
iron is warming to desired
temperature.
5. Slide the variable steam selector
down to increase the amount of
steam. (Fig. 4) When using extra
steam, the iron uses more water and
it may be necessary to fill the tank
more often. See page 4.
Siemprelealasetiquetasdelas
prendas y siga las instrucciones de
planchado del fabricante. Para ver
recomendaciones de temperatura,
consulte la “Tabla de Planchado”
en la página 18:
• Utilice ajustes bajos para los tejidos
sintéticos.
•• Utilice ajustes moderados para lana,
sedas y combinaciones.
••• Utilice ajustes altos para algodones
y linos.
Fig. 4
Fig. 3
For Steam Ironing:
0
Regulador de control de temperatura
La luz de temperatura lista se encenderá
cuando el sistema de apagado automático
se haya reiniciado. Deje que la plancha se
vuelva a calentar. La luz indicadora de
temperatura se apagará cuando la
plancha esté lista para usarse.
NOTE
: If the tank runs dry, remove the
plug from wall outlet. Then, fill the iron
with water and re-prime the pump. The
iron may be filled with water while it is
hot.
CONSEJOS DE PLANCHADO
6. Steam is produced as soon as the
iron is held in the horizontal position.
Steam will stop coming out when the
iron is put on its heel in a vertical
position or by turning the steam
control dial to “0”.
WATER SPRAY
The water spray is useful on fabrics with
stubborn wrinkles. Press the spray
button and a jet of water will spray onto
the fabric being ironed. (Fig. 5) The
water spray can be used with dry or
steam ironing as desired.
BURST OF STEAM
WARNING! DO NOT aim iron at face,
towards yourself, or anyone else
while using or adjusting steam.
Burns or serious injury may occur.
The burst-of-steam button is useful
when ironing denim, cotton, and linens.
It provides extra, sudden blasts of
steam which aid in removing stubborn
wrinkles.
The burst-of-steam feature can be used
with Dry or Steam ironing as desired.
1. Make sure the water tank is at least
1/2 filled with water.
Fig. 5
16
5

INSTRUCCIONES DE USO
OPERATING INSTRUCTIONS
4. Gire el regulador de temperatura a
cualesquiera de los niveles dentro de la
banda de vapor y deje que la plancha
se caliente durante aproximadamente
2 minutos antes de planchar. Coloque
la plancha sobre su talón (en una
superficie estable y protegida) mientras
se alcanza la temperatura deseada.
5. Deslice el selector de vapor variable
hacia abajo para aumentar la cantidad
de vapor. (Fig. 4) Al utilizar más vapor,
la plancha utiliza más agua y puede ser
necesario llenar el tanque con mayor
frecuencia. Consulte la página 14.
SELECTING IRON
TEMPERATURES
IRONING HINTS
WARNING! To prevent fire, do not
leave iron unattended while
connected.
• Sort articles to be ironed according
to the type of fabric. This will reduce
the need to adjust the temperature
for different types of garments.
• If you are not sure of the fiber
content of a garment, test a small
area such as a seam or inside hem
section before ironing a visible area.
Start with a low temperature setting
and gradually increase to find the
best setting.
• When reducing the temperature to
iron sensitive fabrics, allow
approximately 2 minutes for the iron
to cool to the new temperature
setting.
• Fabrics such as velour, wool, linen
and silk are best ironed with an
ironing cloth to prevent shine marks.
NOTE: Before starting to iron delicate
fabrics, it is best to first test the
temperature of the iron on a hem or an
inside seam.
Temperature Control Dial
Variable Steam Selector
Fig. 6
The auto shut -off safety function of your
Lightweight Iron is designed to engage
after approx. 7 minutes of non-use. The
auto shut-off indicator light will flash
when the auto shut-off has activated. To
reset your iron and continue ironing
follow these steps.
1) Lift iron from stand.
2) Holding the iron horizontally in front of
you, gently rock the iron back and
forth several times. This motion will
reset the safety switch inside the iron.
DO NOT shake the iron
.
The temperature ready light will go on
when the auto shut-off system has been
reset. Allow time for the iron to re-heat.
The temperature indicator light will go out
when the iron is ready for use.
Fig. 7
Always read garment labels and
follow the manufacturer’s ironing
instructions. Refer to the “Ironing
Chart” on page 8 for temperature
recommendations:
• Use low settings for synthetics.
•• Use moderate settings for wool,
silks, and blends.
••• Use high settings for cottons and
linens.
AUTOMATIC SHUT-OFF
2. Ajuste el regulador de temperatura
en el máximo. Coloque la plancha
sobre el pedestal (en una superficie
estable y protegida) y deje que se
caliente durante aproximadamente
2 minutos.
3. Con la plancha en posición
horizontal, presione el botón de
escape de vapor varias veces
para cebar la bomba. (Fig. 4)
Fig. 4
Fig. 3
Para Planchado al Vapor:
0
NOTA
: Si el tanque se seca, saque el
enchufe del tomacorriente. Luego, llene
la plancha con agua y vuelva a cebar la
bomba. La plancha puede llenarse con
agua mientras está caliente.
6. El vapor se produce en cuanto la
plancha se sostiene en posición
horizontal. El vapor dejará de salir
cuando la plancha se deje sobre su
talónenposiciónverticaloalgirar
el regulador de vapor a “0”.
ROCÍO DE AGUA
El rocío de agua es útil en tejidos con
arrugas rebeldes. Presione el botón de
rocío y caerá un chorro de agua en el
tejido que se está planchando. (Fig. 5)
El rocío de agua puede utilizarse con
planchado en seco o al vapor, como lo
prefiera.
ESCAPE DE VAPOR
¡ADVERTENCIA! NO apunte la
plancha hacia el rostro, hacia usted
mismo ni hacia ninguna otra persona
mientras utiliza o ajusta el vapor.
Pueden ocurrir quemaduras o
lesiones graves.
El botón de escape de vapor es útil al
planchar mezclilla, algodón y linos.
Proporciona ráfagas súbitas adicionales
de vapor que ayudan a eliminar las
arrugas rebeldes.
La función de escape de vapor puede
utilizarse con planchado en seco o al
vapor, como se prefiera.
Fig. 5
1. Asegúrese de que el tanque de
agua esté lleno de agua por lo
menos hasta la mitad.
6 15

EMPTYING THE IRON
1. Always empty iron after each use.
2. When finished using the iron, turn
the variable steam selector to “0”
and the temperature control dial to
“MIN”.
3. Unplug the iron from the electrical
outlet.
4. Set variable steam selector to
“MAX”.
5. Turn the iron upside down over the
sink with the tip pointing downward
and allow the water to flow from the
opening.
6. Set variable steam selector to “0”.
7. Allow iron to cool in an upright
position before storing.
STORAGE
1. Always turn the variable steam
selector to “0” after you have
emptied the water tank.
2. Allow the iron to cool down.
3. Always store the iron in the upright
position to protect the soleplate.
4. From time to time, clean the exterior
of the iron with a damp cloth and
wipe dry.
5. If you use spray starch, wipe the
soleplate occasionally with a soft
damp cloth to prevent the build-up of
deposits.
6. If the iron has not been used for a
few weeks, hold the iron horizontally
and allow to steam for 2 minutes
before ironing.
In order to remove calcium and built-up
particles, the self-cleaning system should be
run at least once a month.
• Fill the filling flask provided to the
half-full mark and then pour into the water
reservoir.
• Set the variable steam selector to the no
steam position.
• Insert the electrical plug into the wall
socket.
• Set the temperature control dial to the
maximum temperature.
• Wait until the temperature light goes off
and steam iron has reached the
temperature.
• Remove the plug from the wall socket.
• Hold the steam iron horizontally over a
sink.
• Hold the variable steam selector to “Self-
Clean” position. Hot water and steam will
be emitted from the soleplate. Swing the
steam iron lightly back and forth gently to
allow lime and dust particles to come out.
SELF CLEANING
• When the water reservoir is empty,
shift the variable steam selector from
“Self-Clean” position to “0”.
• Stand the iron upright and insert the
plug into the wall socket to let the iron
heat up again.
• Move the iron over a clean cotton
cloth to clean the soleplate and let the
remaining water on the soleplate
evaporate.
INSTRUCCIONES DE USO
Este artefacto es SÓLO PARA USO
DOMÉSTICO y puede conectarse a
cualquier tomacorriente eléctrico
polarizado de 120V CA. No utilice
ningún otro tipo de tomacorriente.
PLANCHADO EN SECO
Todos los ajustes marcados en el
regulador de temperatura pueden
utilizarse para planchado en seco.
Deslice el selector de vapor variable
hasta el tope superior como se muestra
en la Figura 1. Esto cortará el flujo de
vapor si hay agua en el tanque.
1. Gire el regulador de temperatura a
“MIN” y mueva el selector de vapor
variable hasta que llegue a “0”.
2. Conecte el cable a un tomacorriente
eléctrico polarizado de 120V CA. Se
encenderá la luz de temperatura
lista, indicando que la plancha se
está calentando.
3. Gire el regulador de temperatura al
ajuste deseado. (Para ver una guía
de selección de temperatura,
consulte la “Guía de Planchado”).
4. Coloque la plancha sobre su talón
(en una superficie estable y
protegida) mientras se alcanza la
temperatura deseada. Cuando se
alcance la temperatura deseada, se
apagará la luz de temperatura lista.
2. Conecte el cable a un tomacorriente
eléctrico polarizado de 120V CA.
3. Gire el regulador de temperatura a
“••” o “•••” y deslice el selector de
vapor variable hacia abajo hasta el
ajuste de vapor deseado.
¡ADVERTENCIA! Antes de llenar la
plancha con agua, asegúrese de que
no esté conectada al tomacorriente
eléctrico. La plancha puede llenarse
con agua mientras está caliente.
¡ADVERTENCIA! PARA EVITAR
RIESGOS DE QUEMADURAS, tenga
cuidado al llenar plancha con agua.
Pueden ocurrir quemaduras al
contacto con piezas metálicas
calientes, agua caliente o vapor.
NOTA
: Debido al diseño de la base, se
puede utilizar agua de la llave corriente
con esta plancha. Sin embargo, en las
áreas de agua muy dura,
recomendamos utilizar agua destilada o
desmineralizada.
PRECAUCIÓN: Nunca llene la
plancha con acondicionador para
telas, almidones ni ningún otro
líquido, ya que éstos dañarán el
mecanismo del vapor. No use agua
contaminada.
Fig. 1
Para Planchado en Seco:
0
1. Abra la cubierta de la entrada de llenado
de agua. Sosteniendo la plancha con un
leve ángulo, vierta agua lentamente en la
entrada de llenado de agua. (Fig. 2) Llene
el tanque hasta el nivel deseado o hasta
la marca de nivel de agua “MAX”,
utilizando el frasco para llenado de agua.
(Cuando la plancha está vertical, el
tanque de agua azul transparente permite
medir la cantidad de agua.) NO llene en
exceso el tanque.
WARNING! Use caution when
emptying the iron. Burns may
occur from touching hot metal
surfaces, hot water or steam.
Fig. 2
USER MAINTENANCE INSTRUCTIONS
PLANCHADO AL VAPOR
¡ADVERTENCIA! NO apunte la
plancha hacia el rostro, hacia usted
mismo ni hacia ninguna otra persona
mientras utiliza o ajusta el vapor.
Pueden ocurrir quemaduras o
lesiones graves.
14
7

CONOZCA LA PLANCHA
IRONING CHART
Antes de utilizar la plancha Gentle
Glide Shark, quite cualquier etiqueta,
adhesivo o rótulo que pueda estar
adherido al cuerpooalabasede
la plancha.
Cuando se enciende por primera vez,
la plancha nueva puede emitir olor
durante un máximo de 10 minutos.
Esto se debe al calentamiento inicial
de los materiales usados en la
fabricación. El olor es inocuo y no
debería volver a presentarse
después del calentamiento inicial.
1. Regulador de temperatura
2. Luz de temperatura lista
3. Botón de rociado
4. Botón de escape de vapor
5. Selector de vapor variable
6. Entrada de agua con cubierta
7. Boquilla de rociado
8. Base
9. Indicador de nivel de agua
10.Frasco de llenado
Además, antes de planchar con vapor
por primera vez, deje que la plancha
se caliente, manténgala en posición
horizontal y presione el botón de
escape de vapor varias veces. La
plancha puede emitir algunas partículas
pequeñas desde los orificios de vapor.
Esto es normal y dejará de ocurrir al
presionar el botón de escape de
vapor varias veces.
10
NOTE: Before starting to iron delicate
fabrics, it is best to first test the
temperature of the iron on a hem or an
inside seam.
To select iron temperature, align
temperature selected on dial with
the indicator on the water tank.
DIRECTIONS
ON LABEL
FABRIC
TEMP.
CONTROL
STEAM
CONTROL
BURST OF
STEAM
SPRAY
P
l
e
a
s
e
n
o
t
e
t
h
a
t
o
n
t
h
e
l
a
b
e
l
m
e
a
n
s
‘
T
H
I
S
A
R
T
I
C
L
E
C
A
N
N
O
T
B
E
I
R
O
N
E
D
!
”
COTTON
LINEN
SYNTHETIC
FIBERS, e.g.
acrylic, nylon
polyester
SILK
WOOL
MIN
•
•• •• •
MAX
0
MAXIMUM
STEAM
MINIMUM
STEAM
Las ilustraciones pueden diferir ligeramente del producto real.
Especificaciones Técnicas
Voltaje: 120V., 60Hz.
Potencia: 1400 Watts
8 13

OTRAS PRECAUCIONES IMPORTANTES
TROUBLESHOOTING
PROBLEM POSSIBLE REASONS & SOLUTIONS
Iron does not heat
Temperature ready light
goes On and Off
Some odor or small
particles come out of
steam vents of new
iron
Iron does not steam
Water droplets coming
from steam vents
• Iron should be plugged into a 120V AC electrical
outlet only.
Make sure that the plug is securely in the socket.
• Temperature setting too low.
Turn to higher setting.
• This is normal.
The light goes On and Off as the thermostat is
switching the heating element On and Off to
maintain the selected temperature.
• This is normal.
Follow instructions for first use and allow iron to steam
through 2-3 fillings & press the steam burst button
occasionally to eliminate small white particles.
• Water tank may be empty or water level is very low.
Add water.
• Make sure that the temperature control dial and
the variable steam selector are correctly set. For
maximum steam, (setting ‘Max’ on steam selector),
temperature control dial should be set on ‘•••’.
• Adjustable steam selector is set on “0”.
Always allow the iron to reach the selected
temperature with the variable steam selector setting
at ‘0’. Make sure the temperature control dial is set in
the correct steam area, e.g. ‘•’, and the steam selector
is not
on ‘0’. For more steam, turn temperature dial to
higher setting, e.g. ‘•••’, and the steam selector to
‘Max’.
• If temperature setting and steam selector setting are
correct and there is no steam, gently
tap the
soleplate on the ironing board a few times. Move
the variable steam selector from ‘0’ to ‘Max’ a few
times.
• Iron may not be hot enough. Set thermostat to the
‘Max’ position. Always allow iron sufficient time to
heat up (thermostat light goes off) before activating
the variable steam selector.
• Overuse of steam burst. Allow more time between
each burst.
• Iron may have been overfilled. Turn iron off,empty
water and follow instructions for filling.
• Steam performance may be low if iron requires
seasoning. To season, use regular tap water for 1or 2
tanks until steam performance improves.
11. Siempre guarde la plancha en
posición vertical, no sobre la base.
Si la guarda boca abajo, incluso la
menor cantidad de humedad hará
que la base se corroa y manche.
12. ¡PELIGRO!
Nunca utilice la
plancha si está dañada o ha
sufrido caídas. El uso de la
plancha cuando está dañada
puede crear riesgos de incendio,
descargas eléctricas, lesiones o
incluso la muerte.
1. No apoye la plancha en la base.
2. Nunca utilice ni apoye la plancha
en una superficie inestable.
3. Mientras la plancha esté caliente,
nunca la coloque en una superficie
sin protección, aun cuando
descanse sobre el talón de apoyo.
4. ¡ADVERTENCIA!
PARA EVITAR
DESCARGAS ELÉCTRICAS O
LESIONES, antes de llenar la
plancha con agua, asegúrese de
que el enchufe esté desconectado
del tomacorriente.
5. PRECAUCIÓN: Nunca llene la
plancha con acondicionador para
telas, almidones ni ninguna otra
solución, ya que éstas dañarán el
mecanismo del vapor. No
use
agua contaminada.
6. ¡ADVERTENCIA! PARA EVITAR
INCENDIOS, nunca
deje la
plancha desatendida mientras
esté conectada.
7. ¡ADVERTENCIA!
PARA EVITAR
DESCARGAS ELÉCTRICAS,
nunca
sumerja la plancha en
agua u otro líquido.
8. ¡ADVERTENCIA!
PARA EVITAR
DESCARGAS ELÉCTRICAS,
nunca use la plancha en un lugar
donde pueda caerse o sumergirse
en agua o cualquier otro líquido.
Si la plancha cae en agua o
cualquier otro líquido,
desconéctela inmediatamente.
NO
introduzca la mano en el agua
o el líquido.
9. PRECAUCIÓN: Nunca utilice
esponjas de alambre, limpiadores
abrasivos o químicos o solventes
para limpiar el exterior o la base
de la plancha. Si lo hace, arañará
y/o dañará la superficie.
10.¡ADVERTENCIA! No apunte la
plancha hacia el rostro, hacia
usted mismo ni hacia ninguna
otra persona mientras utiliza o
ajusta el vapor. Se pueden
producir quemaduras o
esiones graves.
9
12

ONE (1) YEAR LIMITED WARRANTY
EURO-PRO Operating LLC warrants this product to be free from defects in material and
workmanship for a period of one (1) year from the date of the original purchase, when utilized for
normal household use, subject to the following conditions, exclusions and exceptions.
If your appliance fails to operate properly while in use under normal household conditions within
the warranty period, return the complete appliance and accessories, freight prepaid to
In U.S.: EURO-PRO Operating LLC, 94 Main Mill Street, Door 16, Plattsburgh, N.Y., 12901
In Canada: EURO-PRO Operating LLC, 4400 Bois Franc, St. Laurent, Quebec H4S 1A7
If the appliance is found by EURO-PRO to be defective in material or workmanship, EURO-PRO
will repair or replace it free of charge. Proof of purchase date and $ 9.95 to cover the cost of return
shipping and handling must be included. *
The liability of EURO-PRO Operating LLC is limited solely to the cost of the repair or replacement
of the unit at our option. This warranty does not cover normal wear of parts and does not apply to
any unit that has been tampered with or used for commercial purposes. This limited warranty does
not cover damage caused by misuse, abuse, negligent handling or damage due to faulty
packaging or mishandling in transit. This warranty does not cover damage or defects caused by
or resulting from damages from shipping or repairs, service or alterations to the product or any of
its parts, which have been performed by a repair person not authorized by EURO-PRO.
This warranty is extended to the original purchaser of the unit and excludes all other legal and/or
conventional warranties. The responsibility of EURO-PRO Operating LLC if any, is limited to the
specific obligations expressly assumed by it under the terms of the limited warranty. In no event is
EURO-PRO Operating LLC liable for incidental or consequential damages of any nature
whatsoever. Some states do not permit the exclusion or limitation of incidental or consequential
damages, so the above may not apply to you.
This warranty gives you specific legal rights, and you may also have other rights which vary from
state to state or province to province.
*Important: Carefully pack item to avoid damage in shipping. Be sure to include proof of
purchase date and to attach tag to item before packing with your name, complete address
and phone number with a note giving purchase information, model number and what you
believe is the problem with item. We recommend you insure the package (as damage in
shipping is not covered by your warranty). Mark the outside of your package “ATTENTION
CUSTOMER SERVICE”. We are constantly striving to improve our products, therefore the
specifications contained herein are subject to change without notice.
INSTRUCCIONES DE SEGURIDAD IMPORTANTES
Al utilizar la plancha, siempre se deben considerar las siguientes precauciones
básicas de seguridad:
Model GI420
1. Lea atentamente todas las
instrucciones.
2. Sólo use la plancha para el uso que
está destinada.
3. Para protegerse contra el riesgo de
descarga eléctrica, no sumerja la
plancha en agua u otros líquidos.
Siempre coloque la plancha en “MIN”
antes de conectarla o desconectarla
del tomacorriente.
4. Nunca tironee el cable para
desconectarlo del tomacorriente.
Para desconectar la plancha, tome
el enchufe y jale de él.
5. No deje que el cable toque superficies
calientes. Deje que la plancha se enfríe
completamente antes de guardarla.
6. Siempre desconecte la plancha del
tomacorriente eléctrico al llenarla de
agua, vaciarla o cuando no esté en uso.
7. No haga funcionar la plancha si el cable
o el enchufe están dañados o después
de que haya sufrido caídas o cualquier
daño. Para evitar el riesgo de descarga
eléctrica, no desmonte la plancha.
Devuelva la plancha a EURO-PRO
Operating LLC para que la examinen y
la reparen. Si no la arma como
corresponde, se puede producir un
riesgo de descarga eléctrica al utilizarla.
8. Es importante poner mucha
atención cuando el artefacto sea
utilizado por niños cerca de éstos.
No deje la plancha desatendida
mientras está conectada o en una
tabla de planchar.
9. Pueden ocurrir quemaduras al
contacto con piezas metálicas
calientes, agua caliente o vapor.
Tenga cuidado al dar vuelta una
plancha de vapor; puede haber
agua caliente en el depósito.
10. Este artefacto es sólo para
uso doméstico.
ADVERTENCIA: El cable de
alimentación de este producto
contiene plomo, un producto
químico que de acuerdo con el
Estado de California produce
defectos de nacimiento u otros
daños reproductivos. Lávese las
manos luego de usarlo.
INSTRUCCIONES ESPECIALES
1. Para evitar sobrecargar el circuito,
no haga funcionar otro artefacto de
alto vataje en el mismo circuito.
2. Si un alargador es absolutamente
necesario, utilice uno de 13
amperes. Los cables de menor
amperaje pueden recalentarse.
Tenga cuidado al colocar el cable,
de tal modo que no sea posible
jalarlo o tropezar con él.
Please complete and return within ten (10) days of purchase. The registration will enable us to
contact you in the event a product defect is discovered. By returning this card you acknowledge
to have read and understood the instructions for use, and warnings set forth in the accompanying
instructions.
RETURN TO: EURO-PRO Operating LLC, 4400 Bois Franc, St. Laurent, Quebec H4S 1A7
PURCHASER: ……………………………………………………………………………………………
ADDRESS: ……………………………………………………………………………………………….
DATE OF PURCHASE: …………………….. MODEL: ………………. SERIAL NO: .…………….
NAME AND ADDRESS OF STORE: …………………………………………………………………..
PRODUCT REGISTRATION CARD
Model GI420
FOR CANADIAN CONSUMERS ONLY
GUARDE ESTAS INSTRUCCIONES
Sólo Para Uso Doméstico
ENCHUFE POLARIZADO: Este artefacto tiene un enchufe polarizado (una
clavija es más ancha que la otra). A modo de
seguridad, este enchufe encaja de una sola
manera en un tomacorriente polarizado. Si el
enchufe no entra totalmente en el tomacorriente,
inviértalo. Si aún así no entra, póngase en
contacto con un electricista calificado. No intente
anular esta función de seguridad.
Rev. 08/05A
Printed in China
10 11
Transcripción de documentos
Modelo GI420 IMPORTANT SAFETY INSTRUCTIONS GARANTÍA LIMITADA POR UN (1) AÑO EURO-PRO Operating LLC garantiza que este producto no presentará defectos de materiales ni mano de obra durante un período de un (1) año a partir de la fecha de la compra original, siempre que se utilice para uso doméstico normal, sujeto a las siguientes condiciones, exclusiones y excepciones. Si el artefacto no funcionara correctamente al usarlo en condiciones domésticas normales dentro del período de garantía, devuélvalo completo y sus accesorios, con flete pagado por adelantado a En los EE.UU.: EURO-PRO Operating LLC, 94 Main Mill Street, Door 16, Plattsburgh, N.Y., 12901 En Canadá: EURO-PRO Operating LLC, 4400 Bois Franc, St. Laurent, Quebec H4S 1A7 Si EURO-PRO considera que el artefacto presenta defectos de materiales o mano de obra, EURO-PRO lo reparará o cambiará en forma gratuita. Deben incluirse el documento que compruebe la fecha de compra y US$9.95 para cubrir el costo del envío y manipulación. * La responsabilidad de EURO-PRO Operating LLC se limita exclusivamente al costo de la reparación o cambio de la unidad, según su criterio. Esta garantía no cubre el desgaste normal de las piezas y no se aplica a ninguna unidad que haya sido alterada o utilizada para propósitos comerciales. Esta garantía limitada no cubre los daños causados por mal uso, abuso, manejo negligente o los daños debidos a defectos en el embalaje o maltratos en el tránsito. Esta garantía no cubre los daños o defectos causados o que resulten de daños por envío o reparación, servicio o alteraciones al producto o a cualquiera de sus piezas, realizados por un técnico no autorizado por EURO-PRO. Esta garantía se extiende al comprador original de la unidad y excluye toda otra garantía legal y/o convencional. La responsabilidad de EURO-PRO Operating LLC, de haberla, se limita a las obligaciones específicas que asume expresamente según los términos de la garantía limitada. En caso alguno EURO-PRO Operating LLC es responsable de daños incidentales o indirectos de ninguna naturaleza. Algunos estados no permiten la exclusión o limitación de daños incidentales o indirectos, por lo que lo anterior podría no aplicarse a usted. Esta garantía le otorga derechos legales específicos y usted también podría tener otros derechos, que varían de un estado a otro. *Importante: Embale cuidadosamente el artículo para evitar que se dañe durante el envío. Asegúrese de incluir el documento que demuestre la fecha de compra y una etiqueta con su nombre, dirección completa y número de teléfono con una nota con los datos de la compra, número de modelo y una explicación de lo que piensa que es el problema. Recomendamos asegurar el paquete (ya que los daños producidos durante el envío no los cubre la garantía). En el exterior del paquete, coloque “ATTENTION CUSTOMER SERVICE”. Nos esforzamos constantemente por mejorar nuestros productos, de modo que las especificaciones aquí contenidas están sujetas a cambio sin aviso previo. TARJETA DE REGISTRO DE PRODUCTO SÓLO PARA CONSUMIDORES CANADIENSES Complete y devuelva dentro de diez (10) días de la compra. El registro nos permitirá ponernos en contacto con usted en caso de que se descubra un defecto en el producto. Al devolver esta tarjeta usted reconoce haber leído y comprendido las instrucciones de uso y las advertencias que se establecen en las instrucciones adjuntas. ENVIAR A: EURO-PRO Operating LLC, 4400 Bois Franc, St. Laurent, Quebec H4S 1A7 COMPRADOR: …………………………………………………………………………………………… When using your iron, basic safety precautions should always be followed, including the following: 8. Close supervision is necessary for any appliance being used by or near children. Do not leave iron unattended while connected or on an ironing board. 9. Burns can occur from touching hot metal parts, hot water or steam. Use caution when you turn a steam iron upside down; there may be hot water in the reservoir. 10. This appliance is for household use only. 1. Read all instructions carefully. 2. Use iron only for its intended use. 3. To protect against risk of electrical shock, do not immerse the iron in water or other liquids. Always turn the iron to “MIN” before plugging in or unplugging from outlet. 4. Never yank cord to disconnect from outlet. Grasp plug and pull to disconnect. 5. Do not allow cord to touch hot surfaces. Let iron cool completely before putting away. 6. Always disconnect iron from electrical outlet when filling with water, emptying, or when not in use. 7. Do not operate iron with a damaged cord, or after the iron has been dropped or damaged in any manner. To avoid the risk of electric shock, do not disassemble the iron. Return the iron to EURO-PRO Operating LLC for examination and repair. Incorrect reassembly can cause the risk of electric shock when the iron is used. WARNING: The power cord on this product contains lead, a chemical known to the State of California to cause birth defects or other reproductive harm. Wash hands after handling. SPECIAL INSTRUCTIONS 1. To avoid a circuit overload, do not operate another high-wattage appliance on the same circuit. 2. If an extension cord is absolutely necessary, use a 13-ampere cord. Cords rated for less amperage may overheat. Use care to arrange the cord so that it cannot be pulled or tripped over. SAVE THESE INSTRUCTIONS For Household Use Only POLARIZED PLUG: This appliance has a polarized plug (one blade is wider than the other). As a safety feature, this plug will fit into a polarized outlet only one way. If the plug does not fit fully into the outlet, reverse the plug. If it still does not fit, contact a qualified electrician. Do no attempt to defeat this safety feature. DIRECCIÓN: ………………………………………………………………………………………………. Modelo GI420 Nº DE SERIE: .……………. FECHA DE COMPRA: ………………….. MODELO: ………………... NOMBRE Y DIRECCIÓN DE LA TIENDA: .…………………………………………………………….. Impreso en China 20 1 Rev. 08/05A ADDITIONAL IMPORTANT SAFEGUARDS 11. Always store your iron in the upright position, not on the soleplate. If stored face down, even the smallest amount of moisture will cause the soleplate to corrode and stain. 12. DANGER! Never use the iron if it is damaged or dropped. Using the iron when it is damaged could create the risks of fire, electric shock, injury or death. 1. Do not rest iron on soleplate. 2. Never use or rest iron on an unstable surface. 3. While the iron is hot, never set iron on an unprotected surface - even if it is on its heel rest. 4. WARNING! TO PREVENT ELECTRIC SHOCK OR OTHER INJURY, before filling the iron with water, make sure that the plug is removed from the outlet. 5. CAUTION: Never fill the iron with fabric conditioner, starches or any other solution, as these will damage the steam mechanism. Do not use contaminated water. 6. WARNING! TO AVOID FIRE, never leave iron unattended while it is plugged in. 7. WARNING! TO PREVENT ELECTRIC SHOCK, never immerse the iron in water or other liquid. 8. WARNING! TO PREVENT ELECTRIC SHOCK, never use the iron in a location where it can fall or be pulled into water or any other liquid. If the iron falls into water or any other liquid, unplug it immediately. DO NOT reach into the water or liquid. SOLUCIÓN DE PROBLEMAS PROBLEMA La plancha no calienta La luz de la temperatura se prende y apaga • Esto es normal. La luz se prende y apaga cuando el termostato está encendiendo y apagando el calefactor para mantener la temperatura seleccionada. Por las aberturas para el vapor de una plancha nueva emanan olores o pequeñas partículas • Esto es normal. Siga las instrucciones para el primer uso y deje que la plancha emita vapor durante 2 ó 3 llenados y presione de vez en cuando el botón de escape de vapor para eliminar las pequeñas partículas blancas. La plancha no emite vapor 9. CAUTION: Never use scouring pads, abrasive or chemical cleaners, or solvents to clean the exterior or soleplate of your iron. Doing so will scratch and/or damage the surface. 10. WARNING! DO NOT aim iron at face, towards yourself, or anyone else while using or adjusting steam. Burns or serious injury may occur. Salen gotas de agua de las aberturas para el vapor 2 POSIBLES MOTIVOS Y SOLUCIONES • La plancha se debe conectar únicamente a un tomacorriente eléctrico de 120V CA. Asegúrese de que el enchufe esté firmemente conectado en el tomacorriente. • El ajuste de temperatura es demasiado bajo. Lleve a un ajuste más alto. • El tanque de agua puede estar vacío o el nivel de agua es muy bajo. Agregue agua. • Asegúrese de que el regulador de temperatura y el selector de vapor variable estén correctamente ajustados. Para conseguir el máximo de vapor, (coloque “Max” en el selector de vapor), el regulador de temperatura debe ajustarse en “•••”. • El selector de vapor ajustable está en “0”. Siempre deje que la plancha alcance la temperatura seleccionada con el ajuste del selector de vapor ajustable en “0”. Asegúrese de que el regulador de temperatura esté ajustado en el área de vapor correcta, por ejemplo “•” y que el selector de vapor no esté en “0”. Para obtener más vapor, gire el regulador de temperatura a un ajuste superior, por ejemplo “•••” y el selector de vapor a “Max”. • Si el ajuste de temperatura y el ajuste del selector de vapor son correctos y no hay vapor, golpee suavemente la base en la tabla de planchar unas cuantas veces. Lleve el selector de vapor variable de “0” a “Max” unas cuantas veces. • Puede que la plancha no esté suficientemente caliente. Ajuste el termostato en la posición “Max”. Siempre dé tiempo suficiente a la plancha para calentarse (la luz del termostato se apaga) antes de activar el selector de vapor variable. • Uso excesivo del escape de vapor. Deje pasar más tiempo entre un escape y otro. • La plancha puede estar llena en exceso. Apague la plancha, vacíe el agua y siga las instrucciones de llenado. • El rendimiento del vapor puede ser bajo si la plancha requiere mantenimiento. Para realizar el mantenimiento, utilice agua de la llave corriente y llene 1 ó 2 tanques hasta que mejore el rendimiento del vapor. 19 INSTRUCCIONES DE MANTENIMIENTO POR PARTE DEL USUARIO OPERATING INSTRUCTIONS WARNING! Before filling the iron with water, be sure the iron is not plugged into the electrical outlet. The iron may be filled with water while it is hot. This appliance is for HOUSEHOLD USE ONLY and may be plugged into any 120V AC polarized electrical outlet. Do not use any other type of outlet. DRY IRONING All marked settings on the temperature dial can be used for dry ironing. Slide the variable steam selector all the way up as shown in Fig. 1. This will cut off the steam flow if water is in the tank. WARNING! TO PREVENT THE RISK OF BURNS, use caution when filling iron with water. Burns can occur from touching hot metal parts, hot water, or steam. NOTE: Because of the soleplate design, ordinary tap water may be used with this iron. However, in very hard water areas, we recommend using distilled or demineralized water. For Dry Ironing: CAUTION: Never fill the iron with 0 fabric conditioner, starches or any other liquid, as these will damage the steam mechanism. Do not use contaminated water. Fig. 1 1. Turn temperature dial to “MIN” and move the variable steam selector all the way up to “0”. 2. Plug the cord into a polarized, 120V AC electrical outlet. The temperature ready light will come on, indicating that the iron is heating up. 3. Turn the temperature dial to the desired setting. (See “Ironing Guide” for a guide to temperature selection.) 4. Place iron on its heel (on a stable, protected surface) while iron is warming to desired temperature. When the desired temperature setting is reached, the temperature ready light will go off. 1. Open the water filling inlet cover. Holding the iron at a slight angle, pour water slowly into the water filling inlet. (Fig. 2) Fill tank to desired level or to the “MAX” water level marking using the water filling flask. (When the iron is upright, seethrough water tank allows you to gauge the amount of water.) DO NOT overfill the tank. STEAM IRONING WARNING! DO NOT aim iron at face, Fig. 2 towards yourself, or anyone else while using or adjusting steam. Burns or serious injury may occur. 2. Plug the cord into a polarized, 120V AC electrical outlet. 3. Turn temperature dial to “••” or “•••” and slide the variable steam selector down to the desired steam setting. 4 VACIADO DE LA PLANCHA 1. Siempre vacíe la plancha después de cada uso. 2. Cuando termine de usar la plancha, gire el selector de vapor variable a “0” y el regulador de temperatura a “MIN”. 3. Desconecte la plancha del tomacorriente eléctrico. 4. Ajuste el selector de vapor variable en “MAX”. 5. Invierta la plancha sobre el fregadero con la punta hacia abajo y deje que el agua fluya por la abertura. 6. Ajuste el selector de vapor variable en “0”. 7. Deje que la plancha se enfríe en posición vertical antes de guardarla. • Cuando el depósito de agua esté vacío, cambie el selector de vapor variable de la posición “Self-Clean” a “0”. • Sostenga la plancha vertical e inserte el enchufe en el tomacorriente para que la plancha se caliente de nuevo. • Mueva la plancha sobre un paño de algodón limpio para limpiar la base y permitir que se evapore el agua restante. ALMACENAMIENTO ¡ADVERTENCIA! Tenga cuidado al vaciar la plancha. Pueden ocurrir quemaduras al contacto con superficies metálicas calientes, agua caliente o vapor. AUTOLIMPIEZA Para eliminar el calcio y las partículas acumuladas, el sistema de autolimpieza debe hacerse funcionar por lo menos una vez por mes. • Llene el frasco de llenado que viene con el artefacto hasta la marca de llenado medio y luego vierta en el depósito de agua. • Ajuste el selector de vapor variable en la posición sin vapor. • Inserte el enchufe eléctrico en el tomacorriente. • Ajuste el regulador de temperatura en el máximo. • Espere hasta que se apague la luz de temperatura y que la plancha de vapor alcance el nivel deseado. • Saque el enchufe del tomacorriente. • Sostenga la plancha de vapor horizontalmente sobre un fregadero. • Ajuste el selector de vapor variable en la posición “Self-Clean” (Autolimpieza). Saldrá agua caliente y vapor por la base. Balancee suavemente la plancha de vapor de un lado a otro para que salgan las partículas de cal y polvo. 17 1. Siempre gire el selector de vapor variable a “0” después de vaciar el tanque de agua. 2. Deje que la plancha se enfríe. 3. Siempre guarde la plancha en posición vertical para proteger la base. 4. De vez en cuando, limpie el exterior de la plancha con un paño húmedo y seque. 5. Si utiliza almidón rociado, limpie la base de vez en cuando con un paño suave húmedo para evitar la acumulación de depósitos. 6. Si la plancha no se ha utilizado durante algunas semanas, sosténgala horizontalmente y deje que salga vapor durante 2 minutos antes de planchar. INSTRUCCIONES DE USO APAGADO AUTOMÁTICO SELECCIÓN DE TEMPERATURA DE LA PLANCHA La función de seguridad de apagado automático de esta plancha liviana está diseñada para activarse después de aprox. 7 minutos sin uso. La luz indicadora de apagado automático destellará cuando se active el apagado automático. Para restablecer la plancha y continuar planchando, siga estos pasos. 1) Levante la plancha del pedestal. 2) Sosteniendo la plancha horizontalmente frente a usted, balancéela suavemente hacia adelante y hacia atrás varias veces. Este movimiento restablecerá el interruptor de seguridad dentro de la plancha. No sacuda la plancha. Siempre lea las etiquetas de las prendas y siga las instrucciones de planchado del fabricante. Para ver recomendaciones de temperatura, consulte la “Tabla de Planchado” en la página 18: • Utilice ajustes bajos para los tejidos sintéticos. •• Utilice ajustes moderados para lana, sedas y combinaciones. ••• Utilice ajustes altos para algodones y linos. Regulador de control de temperatura CONSEJOS DE PLANCHADO ¡ADVERTENCIA! Para evitar incendios, no deje la plancha desatendida mientras esté conectada. Selector de vapor variable • • Fig. 7 • • 16 Clasifique las prendas que va a planchar conforme al tipo de tejido. Esto reducirá la necesidad de ajustar la temperatura para los diferentes tipos de prendas. Si no está seguro del contenido de fibra de una prenda, pruebe un área pequeña como una costura o sección de dobladillo interior antes de planchar un área visible. Comience con un ajuste de temperatura bajo y aumente gradualmente para encontrar el mejor nivel. Cuando reduzca la temperatura para planchar tejidos delicados, deje que la plancha se enfríe durante aproximadamente 2 minutos en el nuevo ajuste de temperatura. Los tejidos como terciopelo, lana, lino y seda se planchan mejor con un paño de planchado, para evitar las marcas de brillo. 2. Set the temperature dial to maximum. Place the iron on the stand (on a stable, protected surface) and allow it to heat for approximately 2 minutes. 4. Turn the temperature dial to any of the temperatures within the steam band and allow the iron to heat for approximately 2 minutes before ironing. Place iron on its heel (on a stable, protected surface) while the iron is warming to desired temperature. 3. With the iron in a horizontal position, press the burst of steam button several times to prime the pump. (Fig. 4) 5. Slide the variable steam selector down to increase the amount of steam. (Fig. 4) When using extra steam, the iron uses more water and it may be necessary to fill the tank more often. See page 4. For Steam Ironing: La luz de temperatura lista se encenderá cuando el sistema de apagado automático se haya reiniciado. Deje que la plancha se vuelva a calentar. La luz indicadora de temperatura se apagará cuando la plancha esté lista para usarse. Fig. 6 NOTA: Antes de empezar a planchar tejidos delicados, es mejor probar primero la temperatura de la plancha en un dobladillo o una costura interior. OPERATING INSTRUCTIONS Fig. 4 0 Fig. 3 NOTE: If the tank runs dry, remove the plug from wall outlet. Then, fill the iron with water and re-prime the pump. The iron may be filled with water while it is hot. 6. Steam is produced as soon as the iron is held in the horizontal position. Steam will stop coming out when the iron is put on its heel in a vertical position or by turning the steam control dial to “0”. WATER SPRAY The water spray is useful on fabrics with stubborn wrinkles. Press the spray button and a jet of water will spray onto the fabric being ironed. (Fig. 5) The water spray can be used with dry or steam ironing as desired. BURST OF STEAM WARNING! DO NOT aim iron at face, towards yourself, or anyone else while using or adjusting steam. Burns or serious injury may occur. The burst-of-steam button is useful when ironing denim, cotton, and linens. It provides extra, sudden blasts of steam which aid in removing stubborn wrinkles. The burst-of-steam feature can be used with Dry or Steam ironing as desired. 1. Make sure the water tank is at least 1/2 filled with water. Fig. 5 5 OPERATING INSTRUCTIONS SELECTING IRON TEMPERATURES AUTOMATIC SHUT-OFF The auto shut -off safety function of your Lightweight Iron is designed to engage after approx. 7 minutes of non-use. The auto shut-off indicator light will flash when the auto shut-off has activated. To reset your iron and continue ironing follow these steps. 1) Lift iron from stand. 2) Holding the iron horizontally in front of you, gently rock the iron back and forth several times. This motion will reset the safety switch inside the iron. DO NOT shake the iron. The temperature ready light will go on when the auto shut-off system has been reset. Allow time for the iron to re-heat. The temperature indicator light will go out when the iron is ready for use. Always read garment labels and follow the manufacturer’s ironing instructions. Refer to the “Ironing Chart” on page 8 for temperature recommendations: • Use low settings for synthetics. •• Use moderate settings for wool, silks, and blends. ••• Use high settings for cottons and linens. Temperature Control Dial IRONING HINTS WARNING! To prevent fire, do not leave iron unattended while connected. • Sort articles to be ironed according to the type of fabric. This will reduce the need to adjust the temperature for different types of garments. • If you are not sure of the fiber content of a garment, test a small area such as a seam or inside hem section before ironing a visible area. Start with a low temperature setting and gradually increase to find the best setting. • When reducing the temperature to iron sensitive fabrics, allow approximately 2 minutes for the iron to cool to the new temperature setting. • Fabrics such as velour, wool, linen and silk are best ironed with an ironing cloth to prevent shine marks. Fig. 6 Variable Steam Selector Fig. 7 NOTE: Before starting to iron delicate fabrics, it is best to first test the temperature of the iron on a hem or an inside seam. INSTRUCCIONES DE USO 4. Gire el regulador de temperatura a cualesquiera de los niveles dentro de la banda de vapor y deje que la plancha se caliente durante aproximadamente 2 minutos antes de planchar. Coloque la plancha sobre su talón (en una superficie estable y protegida) mientras se alcanza la temperatura deseada. 5. Deslice el selector de vapor variable hacia abajo para aumentar la cantidad de vapor. (Fig. 4) Al utilizar más vapor, la plancha utiliza más agua y puede ser necesario llenar el tanque con mayor frecuencia. Consulte la página 14. Para Planchado al Vapor: 0 Fig. 3 Fig. 4 6. El vapor se produce en cuanto la plancha se sostiene en posición horizontal. El vapor dejará de salir cuando la plancha se deje sobre su talón en posición vertical o al girar el regulador de vapor a “0”. NOTA: Si el tanque se seca, saque el enchufe del tomacorriente. Luego, llene la plancha con agua y vuelva a cebar la bomba. La plancha puede llenarse con agua mientras está caliente. ROCÍO DE AGUA El rocío de agua es útil en tejidos con arrugas rebeldes. Presione el botón de rocío y caerá un chorro de agua en el tejido que se está planchando. (Fig. 5) El rocío de agua puede utilizarse con planchado en seco o al vapor, como lo prefiera. ESCAPE DE VAPOR ¡ADVERTENCIA! NO apunte la plancha hacia el rostro, hacia usted mismo ni hacia ninguna otra persona mientras utiliza o ajusta el vapor. Pueden ocurrir quemaduras o lesiones graves. El botón de escape de vapor es útil al planchar mezclilla, algodón y linos. Proporciona ráfagas súbitas adicionales de vapor que ayudan a eliminar las arrugas rebeldes. La función de escape de vapor puede utilizarse con planchado en seco o al vapor, como se prefiera. Fig. 5 1. Asegúrese de que el tanque de agua esté lleno de agua por lo menos hasta la mitad. 6 2. Ajuste el regulador de temperatura en el máximo. Coloque la plancha sobre el pedestal (en una superficie estable y protegida) y deje que se caliente durante aproximadamente 2 minutos. 3. Con la plancha en posición horizontal, presione el botón de escape de vapor varias veces para cebar la bomba. (Fig. 4) 15 INSTRUCCIONES DE USO ¡ADVERTENCIA! Antes de llenar la plancha con agua, asegúrese de que no esté conectada al tomacorriente eléctrico. La plancha puede llenarse con agua mientras está caliente. Este artefacto es SÓLO PARA USO DOMÉSTICO y puede conectarse a cualquier tomacorriente eléctrico polarizado de 120V CA. No utilice ningún otro tipo de tomacorriente. ¡ADVERTENCIA! PARA EVITAR RIESGOS DE QUEMADURAS, tenga cuidado al llenar plancha con agua. Pueden ocurrir quemaduras al contacto con piezas metálicas calientes, agua caliente o vapor. PLANCHADO EN SECO Todos los ajustes marcados en el regulador de temperatura pueden utilizarse para planchado en seco. Deslice el selector de vapor variable hasta el tope superior como se muestra en la Figura 1. Esto cortará el flujo de vapor si hay agua en el tanque. NOTA: Debido al diseño de la base, se puede utilizar agua de la llave corriente con esta plancha. Sin embargo, en las áreas de agua muy dura, recomendamos utilizar agua destilada o desmineralizada. Para Planchado en Seco: PRECAUCIÓN: Nunca llene la plancha con acondicionador para telas, almidones ni ningún otro líquido, ya que éstos dañarán el mecanismo del vapor. No use agua contaminada. 1. Abra la cubierta de la entrada de llenado de agua. Sosteniendo la plancha con un leve ángulo, vierta agua lentamente en la entrada de llenado de agua. (Fig. 2) Llene el tanque hasta el nivel deseado o hasta la marca de nivel de agua “MAX”, utilizando el frasco para llenado de agua. (Cuando la plancha está vertical, el tanque de agua azul transparente permite medir la cantidad de agua.) NO llene en exceso el tanque. 0 Fig. 1 1. Gire el regulador de temperatura a “MIN” y mueva el selector de vapor variable hasta que llegue a “0”. 2. Conecte el cable a un tomacorriente eléctrico polarizado de 120V CA. Se encenderá la luz de temperatura lista, indicando que la plancha se está calentando. 3. Gire el regulador de temperatura al ajuste deseado. (Para ver una guía de selección de temperatura, consulte la “Guía de Planchado”). 4. Coloque la plancha sobre su talón (en una superficie estable y protegida) mientras se alcanza la temperatura deseada. Cuando se alcance la temperatura deseada, se apagará la luz de temperatura lista. Fig. 2 PLANCHADO AL VAPOR 2. Conecte el cable a un tomacorriente eléctrico polarizado de 120V CA. ¡ADVERTENCIA! NO apunte la plancha hacia el rostro, hacia usted mismo ni hacia ninguna otra persona mientras utiliza o ajusta el vapor. Pueden ocurrir quemaduras o lesiones graves. 3. Gire el regulador de temperatura a “••” o “•••” y deslice el selector de vapor variable hacia abajo hasta el ajuste de vapor deseado. 14 USER MAINTENANCE INSTRUCTIONS • When the water reservoir is empty, shift the variable steam selector from “Self-Clean” position to “0”. • Stand the iron upright and insert the plug into the wall socket to let the iron heat up again. • Move the iron over a clean cotton cloth to clean the soleplate and let the remaining water on the soleplate evaporate. EMPTYING THE IRON 1. Always empty iron after each use. 2. When finished using the iron, turn the variable steam selector to “0” and the temperature control dial to “MIN”. 3. Unplug the iron from the electrical outlet. 4. Set variable steam selector to “MAX”. 5. Turn the iron upside down over the sink with the tip pointing downward and allow the water to flow from the opening. 6. Set variable steam selector to “0”. 7. Allow iron to cool in an upright position before storing. STORAGE WARNING! Use caution when emptying the iron. Burns may occur from touching hot metal surfaces, hot water or steam. SELF CLEANING In order to remove calcium and built-up particles, the self-cleaning system should be run at least once a month. • Fill the filling flask provided to the half-full mark and then pour into the water reservoir. • Set the variable steam selector to the no steam position. • Insert the electrical plug into the wall socket. • Set the temperature control dial to the maximum temperature. • Wait until the temperature light goes off and steam iron has reached the temperature. • Remove the plug from the wall socket. • Hold the steam iron horizontally over a sink. • Hold the variable steam selector to “SelfClean” position. Hot water and steam will be emitted from the soleplate. Swing the steam iron lightly back and forth gently to allow lime and dust particles to come out. 7 1. Always turn the variable steam selector to “0” after you have emptied the water tank. 2. Allow the iron to cool down. 3. Always store the iron in the upright position to protect the soleplate. 4. From time to time, clean the exterior of the iron with a damp cloth and wipe dry. 5. If you use spray starch, wipe the soleplate occasionally with a soft damp cloth to prevent the build-up of deposits. 6. If the iron has not been used for a few weeks, hold the iron horizontally and allow to steam for 2 minutes before ironing. CONOZCA LA PLANCHA IRONING CHART NOTE: Before starting to iron delicate To select iron temperature, align temperature selected on dial with the indicator on the water tank. fabrics, it is best to first test the temperature of the iron on a hem or an inside seam. DIRECTIONS ON LABEL MIN STEAM CONTROL 0 COTTON WOOL LINEN Cuando se enciende por primera vez, la plancha nueva puede emitir olor durante un máximo de 10 minutos. Esto se debe al calentamiento inicial de los materiales usados en la fabricación. El olor es inocuo y no debería volver a presentarse después del calentamiento inicial. 10 MAX •• ••• • MINIMUM STEAM BURST OF STEAM SPRAY MAXIMUM STEAM on the label means ‘THIS ARTICLE CANNOT BE IRONED!” TEMP. CONTROL SILK Please note that FABRIC SYNTHETIC FIBERS, e.g. acrylic, nylon polyester Además, antes de planchar con vapor por primera vez, deje que la plancha se caliente, manténgala en posición horizontal y presione el botón de escape de vapor varias veces. La plancha puede emitir algunas partículas pequeñas desde los orificios de vapor. Esto es normal y dejará de ocurrir al presionar el botón de escape de vapor varias veces. Antes de utilizar la plancha Gentle Glide Shark, quite cualquier etiqueta, adhesivo o rótulo que pueda estar adherido al cuerpo o a la base de la plancha. 1. 2. 3. 4. 5. 6. Entrada de agua con cubierta 7. Boquilla de rociado 8. Base 9. Indicador de nivel de agua 10. Frasco de llenado Regulador de temperatura Luz de temperatura lista Botón de rociado Botón de escape de vapor Selector de vapor variable Las ilustraciones pueden diferir ligeramente del producto real. Especificaciones Técnicas Voltaje: Potencia: 8 120V., 60Hz. 1400 Watts 13 OTRAS PRECAUCIONES IMPORTANTES 11. Siempre guarde la plancha en posición vertical, no sobre la base. Si la guarda boca abajo, incluso la menor cantidad de humedad hará que la base se corroa y manche. 12. ¡PELIGRO! Nunca utilice la plancha si está dañada o ha sufrido caídas. El uso de la plancha cuando está dañada puede crear riesgos de incendio, descargas eléctricas, lesiones o incluso la muerte. 1. No apoye la plancha en la base. 2. Nunca utilice ni apoye la plancha en una superficie inestable. 3. Mientras la plancha esté caliente, nunca la coloque en una superficie sin protección, aun cuando descanse sobre el talón de apoyo. 4. ¡ADVERTENCIA! PARA EVITAR DESCARGAS ELÉCTRICAS O LESIONES, antes de llenar la plancha con agua, asegúrese de que el enchufe esté desconectado del tomacorriente. 5. PRECAUCIÓN: Nunca llene la plancha con acondicionador para telas, almidones ni ninguna otra solución, ya que éstas dañarán el mecanismo del vapor. No use agua contaminada. 6. ¡ADVERTENCIA! PARA EVITAR INCENDIOS, nunca deje la plancha desatendida mientras esté conectada. 7. ¡ADVERTENCIA! PARA EVITAR DESCARGAS ELÉCTRICAS, nunca sumerja la plancha en agua u otro líquido. 8. ¡ADVERTENCIA! PARA EVITAR DESCARGAS ELÉCTRICAS, nunca use la plancha en un lugar donde pueda caerse o sumergirse en agua o cualquier otro líquido. Si la plancha cae en agua o cualquier otro líquido, desconéctela inmediatamente. NO introduzca la mano en el agua o el líquido. 9. PRECAUCIÓN: Nunca utilice esponjas de alambre, limpiadores abrasivos o químicos o solventes para limpiar el exterior o la base de la plancha. Si lo hace, arañará y/o dañará la superficie. 10. ¡ADVERTENCIA! No apunte la plancha hacia el rostro, hacia usted mismo ni hacia ninguna otra persona mientras utiliza o ajusta el vapor. Se pueden producir quemaduras o esiones graves. TROUBLESHOOTING PROBLEM Iron does not heat • Iron should be plugged into a 120V AC electrical outlet only. Make sure that the plug is securely in the socket. • Temperature setting too low. Turn to higher setting. Temperature ready light goes On and Off • This is normal. The light goes On and Off as the thermostat is switching the heating element On and Off to maintain the selected temperature. Some odor or small particles come out of steam vents of new iron • This is normal. Follow instructions for first use and allow iron to steam through 2-3 fillings & press the steam burst button occasionally to eliminate small white particles. Iron does not steam • Water tank may be empty or water level is very low. Add water. • Make sure that the temperature control dial and the variable steam selector are correctly set. For maximum steam, (setting ‘Max’ on steam selector), temperature control dial should be set on ‘•••’. • Adjustable steam selector is set on “0”. Always allow the iron to reach the selected temperature with the variable steam selector setting at ‘0’. Make sure the temperature control dial is set in the correct steam area, e.g. ‘•’, and the steam selector is not on ‘0’. For more steam, turn temperature dial to higher setting, e.g. ‘•••’, and the steam selector to ‘Max’. • If temperature setting and steam selector setting are correct and there is no steam, gently tap the soleplate on the ironing board a few times. Move the variable steam selector from ‘0’ to ‘Max’ a few times. Water droplets coming from steam vents 12 POSSIBLE REASONS & SOLUTIONS • Iron may not be hot enough. Set thermostat to the ‘Max’ position. Always allow iron sufficient time to heat up (thermostat light goes off) before activating the variable steam selector. • Overuse of steam burst. Allow more time between each burst. • Iron may have been overfilled. Turn iron off,empty water and follow instructions for filling. • Steam performance may be low if iron requires seasoning. To season, use regular tap water for 1or 2 tanks until steam performance improves. 9 Model GI420 INSTRUCCIONES DE SEGURIDAD IMPORTANTES ONE (1) YEAR LIMITED WARRANTY EURO-PRO Operating LLC warrants this product to be free from defects in material and workmanship for a period of one (1) year from the date of the original purchase, when utilized for normal household use, subject to the following conditions, exclusions and exceptions. If your appliance fails to operate properly while in use under normal household conditions within the warranty period, return the complete appliance and accessories, freight prepaid to In U.S.: In Canada: EURO-PRO Operating LLC, 94 Main Mill Street, Door 16, Plattsburgh, N.Y., 12901 EURO-PRO Operating LLC, 4400 Bois Franc, St. Laurent, Quebec H4S 1A7 If the appliance is found by EURO-PRO to be defective in material or workmanship, EURO-PRO will repair or replace it free of charge. Proof of purchase date and $ 9.95 to cover the cost of return shipping and handling must be included. * The liability of EURO-PRO Operating LLC is limited solely to the cost of the repair or replacement of the unit at our option. This warranty does not cover normal wear of parts and does not apply to any unit that has been tampered with or used for commercial purposes. This limited warranty does not cover damage caused by misuse, abuse, negligent handling or damage due to faulty packaging or mishandling in transit. This warranty does not cover damage or defects caused by or resulting from damages from shipping or repairs, service or alterations to the product or any of its parts, which have been performed by a repair person not authorized by EURO-PRO. This warranty is extended to the original purchaser of the unit and excludes all other legal and/or conventional warranties. The responsibility of EURO-PRO Operating LLC if any, is limited to the specific obligations expressly assumed by it under the terms of the limited warranty. In no event is EURO-PRO Operating LLC liable for incidental or consequential damages of any nature whatsoever. Some states do not permit the exclusion or limitation of incidental or consequential damages, so the above may not apply to you. This warranty gives you specific legal rights, and you may also have other rights which vary from state to state or province to province. *Important: Carefully pack item to avoid damage in shipping. Be sure to include proof of purchase date and to attach tag to item before packing with your name, complete address and phone number with a note giving purchase information, model number and what you believe is the problem with item. We recommend you insure the package (as damage in shipping is not covered by your warranty). Mark the outside of your package “ATTENTION CUSTOMER SERVICE”. We are constantly striving to improve our products, therefore the specifications contained herein are subject to change without notice. PRODUCT REGISTRATION CARD FOR CANADIAN CONSUMERS ONLY Please complete and return within ten (10) days of purchase. The registration will enable us to contact you in the event a product defect is discovered. By returning this card you acknowledge to have read and understood the instructions for use, and warnings set forth in the accompanying instructions. RETURN TO: EURO-PRO Operating LLC, 4400 Bois Franc, St. Laurent, Quebec H4S 1A7 PURCHASER: …………………………………………………………………………………………… ADDRESS: ………………………………………………………………………………………………. Model GI420 SERIAL NO: .……………. DATE OF PURCHASE: …………………….. MODEL: ………………. NAME AND ADDRESS OF STORE: ………………………………………………………………….. Printed in China 10 Al utilizar la plancha, siempre se deben considerar las siguientes precauciones básicas de seguridad: 1. Lea atentamente todas las 8. Es importante poner mucha instrucciones. atención cuando el artefacto sea 2. Sólo use la plancha para el uso que utilizado por niños cerca de éstos. está destinada. No deje la plancha desatendida 3. Para protegerse contra el riesgo de mientras está conectada o en una descarga eléctrica, no sumerja la tabla de planchar. plancha en agua u otros líquidos. 9. Pueden ocurrir quemaduras al Siempre coloque la plancha en “MIN” contacto con piezas metálicas antes de conectarla o desconectarla calientes, agua caliente o vapor. del tomacorriente. Tenga cuidado al dar vuelta una plancha de vapor; puede haber 4. Nunca tironee el cable para desconectarlo del tomacorriente. agua caliente en el depósito. Para desconectar la plancha, tome 10. Este artefacto es sólo para uso doméstico. el enchufe y jale de él. 5. No deje que el cable toque superficies ADVERTENCIA: El cable de calientes. Deje que la plancha se enfríe alimentación de este producto completamente antes de guardarla. contiene plomo, un producto 6. Siempre desconecte la plancha del químico que de acuerdo con el tomacorriente eléctrico al llenarla de Estado de California produce agua, vaciarla o cuando no esté en uso. defectos de nacimiento u otros 7. No haga funcionar la plancha si el cable daños reproductivos. Lávese las o el enchufe están dañados o después manos luego de usarlo. de que haya sufrido caídas o cualquier daño. Para evitar el riesgo de descarga INSTRUCCIONES ESPECIALES eléctrica, no desmonte la plancha. 1. Para evitar sobrecargar el circuito, Devuelva la plancha a EURO-PRO no haga funcionar otro artefacto de Operating LLC para que la examinen y alto vataje en el mismo circuito. la reparen. Si no la arma como 2. Si un alargador es absolutamente corresponde, se puede producir un necesario, utilice uno de 13 riesgo de descarga eléctrica al utilizarla. amperes. Los cables de menor amperaje pueden recalentarse. Tenga cuidado al colocar el cable, de tal modo que no sea posible jalarlo o tropezar con él. GUARDE ESTAS INSTRUCCIONES Sólo Para Uso Doméstico ENCHUFE POLARIZADO: Este artefacto tiene un enchufe polarizado (una clavija es más ancha que la otra). A modo de seguridad, este enchufe encaja de una sola manera en un tomacorriente polarizado. Si el enchufe no entra totalmente en el tomacorriente, inviértalo. Si aún así no entra, póngase en contacto con un electricista calificado. No intente anular esta función de seguridad. 11 Rev. 08/05A-
 1
1
-
 2
2
-
 3
3
-
 4
4
-
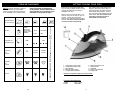 5
5
-
 6
6
-
 7
7
-
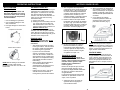 8
8
-
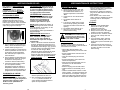 9
9
-
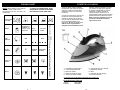 10
10
-
 11
11
-
 12
12


Shark IR420 El manual del propietario
- Categoría
- Hierros
- Tipo
- El manual del propietario
en otros idiomas
- English: Shark IR420 Owner's manual
Artículos relacionados
-
Shark GI465 Manual de usuario
-
 Euro-Pro GI468C Manual de usuario
-
Shark Iron GI408Z 12 Manual de usuario
-
Shark GI300 Manual de usuario
-
-
-
Shark GI490 Manual de usuario
-
Shark GI510 Series Manual de usuario
-
Shark GI435N Manual de usuario
-

Otros documentos
-
 Euro-Pro GI490KM El manual del propietario
-
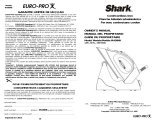 Euro-Pro Shark IR436 El manual del propietario
-
Emerson EM83141 Manual de usuario
-
Maytag M400 Manual de usuario
-
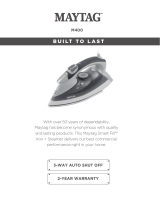 StoreBound M400 Manual de usuario
-
Panasonic NI-W910CMXA El manual del propietario
-
Sears KENMORE 1700 El manual del propietario
-
Rival 16173 El manual del propietario


