La página se está cargando...

Before installing and using the product, please
read the following instructions.
Please read this guide carefully, we recommend that you follow
the steps and perform the installation properly, as this will
ensure that the warranty will be valid if required.
Installation:
Installation may require scissors, solder, wire and insulating
tape.
1. Preparation: Make sure that the surface where you are
going to adhere the LED strip is smooth, dry, free of dust and
grease.
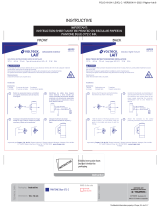
2. Cut: Cut the strip according to the desired length, taking into
account that you must do it only by the marks every 5 cm as
shown in the following gure.
3. Connection: After cutting,
reconnect the LED strip lengths
by soldering the ends and joining
with wire as shown in the gure
below. Note that they must be
connected according to polarity
and color.
4. Finally connect the LED strip to the adapter and controller as
shown below. The adapter should be placed in a dry place.
The LED strip must only be used with the power
supply unit provided. It must only be powered at extra-low safety
voltage corresponding to the one marked on the device (12 V )
Keep out of reach of children. Do not use this product if the cable or
connection elements are damaged. Do not expose the system to re
or high temperatures. The appliance is not intended for use by
persons (including children) with reduced physical, sensory or
mental capabilities, or by persons without experience or
knowledge, unless they have been given supervision or instruction
concerning use of the appliance by a person responsible for their
safety. Children should be supervised to ensure that they do not play
with the appliance. Close supervision is necessary when
handicapped persons or children use or are near any appliance.
BACK
INSTRUCTIVE
TECHNICAL DATA
IMAGES / LINKS
SOFTWARE: Illustrator CC
MAC & PC Platform compatible
14 x 21.5 cm
INSTRUCTIVE
INKS & die cuts
Packaging:
Dimensions:
CUT-LINE
(Do not print)
PANTONE Blue 072 C
General Recommendations
Before powering the LED strip, make sure that it is properly
connected to the adapter and the controller to avoid a short
circuit. Do not use the same adapter to connect another type of
LED strip. Make sure to connect the LED strip sections correctly
without short circuits. Thermot is recommended to protect the
wires. Make sure that the LED strip is operating correctly before
installation.
ADAPTER CONTROLLER
IR RECEIVER
LED Strip
Connect the strip so that the
arrow matches the black color.
The strip changes between 3 colors
The strip changes intermittently between 7 colors
The strip changes gradually between 7 colors
The strip changes between 7 colors
FLASH
STROBE
FADE
SMOOTH
ON
OFF
CONTROL FUNCTIONS
Power button
Off button
Brightness +
Increases the luminous intensity and speed by one level
each time the button is pressed.
Brightness -
Decreases the light intensity and speed by one level
each time the button is pressed.
ATTENTION
ATTENTION
Instructions
Remove the protective plastic battery cover from the remote
control before use. Press the desired color once to have a static
color on the strip.
The control includes four modes of operation:
1. FLASH, when pressing the button, the strip will change
between 3 different colors.
2. STROBE, when the button is pressed, the strip will change
intermittently between 7 different colors.
3. FADE, when pressing the button, the strip will change
gradually between 7 different colors.
4. SMOOTH, by pressing the button, the strip will change
between 7 different colors.
Pressing Brightness + or Brightness - the selected static
color will increase or decrease its intensity accordingly, if any of
the four modes are being used, the speed of the sequence will be
increased or decreased.
“Condential Information property of Truper, S.A. de C.V."
For proper operation of the remote control, make sure that it is
pointing and that there is no barrier or obstacle between the
control and the infrared detector.
IMPORTANT:
WARRANTY MUST BE PRINTED
ON REGULAR PAPER
Instructive
Fold the instructive
sheet and put it inside
the packaging.
WARRANTY
46370
TIR-010L
Light strip
Instructive
Imported by Truper, S.A. de C.V. Parque Industrial 1, Parque Industrial Jilotepec, Jilotepec, Edo. de Méx. C.P. 54257
Made in China, Tel.: 76 1782 9100. www.truper.com 01-2023
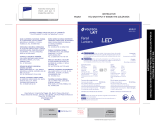
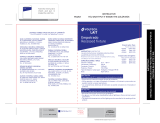
Specications
12 V 60 leds/m 40 W / 5 m 5 m / roll IP44
White light: 550 lm
Operating temperature: -20 °C to 50 °C
Power consumption: 960 Wh/day
Standby power consumption: Not applicable
Based on 24 hours continuous usage
12 V 40 W
12 V 2 A
70 W max.
Adapter
Input
Voltage:
Frequency:
Power:
Output
Voltage:
Current:
Control
Input:
Output:
Power:
100 V~ - 240 V~
60 Hz
40 W
12 V
3 A
Remote control
Uses 1 CR2025 3V lithium battery
3 V (Included)
Maintenance
Make sure that the system is switched off before cleaning. Use
a dry cloth for cleaning. Do not use chemical solvents, alcohol or
abrasive liquids for cleaning. Avoid using sharp tools or hitting
the product with hammers or other items.
Antes de instalar y usar el producto, lea las
siguientes instrucciones.
Por favor lea cuidadosamente esta guía, le recomendamos seguir
los pasos y realizar la instalación de manera adecuada, pues de
esto depende que la garantía tenga validez en caso de
requerirse.
Instalación:
Para realizar la instalación puede requerir tijeras, soldadura,
cable y cinta de aislar.
1. Preparación: Asegúrese que la supercie donde va a adherir
la tira de LEDs sea suave, esté seca, libre de polvo y grasa.
2. Corte: Corte la cinta según la longitud deseada, teniendo en
cuenta que debe hacerlo únicamente por las marcas cada 5 cm
como se muestra en la siguiente gura.
3. Conexión: Luego de cortar,
reconecte los tramos de tira de
LEDs soldando los extremos y
uniendo con cable tal como se
muestra en la siguiente gura.
Tenga en cuenta que se debe
conectar de acuerdo con la
polaridad y el color.
4. Finalmente conecte la tira de LEDs al adaptador y al
controlador, como se muestra a continuación. El adaptador
debe colocarse en un lugar seco.
La tira de led solo tiene que usarse con la unidad
de alimentación que se proporciona. Sólo debe alimentarse a
tensión extra-baja de seguridad correspondiente a la que se marca
en el aparato (12 V ) Manténgase fuera del alcance de los niños.
No use este producto si el cable o los elementos de conexión están
dañados. No exponga el sistema al fuego o altas temperaturas. El
aparato no está previsto para ser utilizado por personas (incluidos
los niños) cuyas capacidades físicas, sensoriales o mentales son
reducidas, o por personas sin experiencia o conocimientos, salvo si
éstas se encuentran vigiladas por una persona responsable de su
seguridad o han recibido instrucciones previas sobre el uso del
aparato. Los niños deberán estar bajo supervisión para cerciorarse
de que no jueguen con el aparato. Se requiere estricta supervisión
cuando las personas discapacitadas o los niños utilicen cualquier
aparato electrodoméstico o estén cerca de él.
FRONT
Recomendaciones Generales
Antes de energizar la tira de LEDs, asegúrese que se encuentra
correctamente conectada al adaptador y al controlador para
evitar un cortocircuito. No use el mismo adaptador para conectar
otro tipo de tira de LEDs. Asegúrese de conectar correctamente
las secciones de la tira de LEDs sin que se presenten
cortocircuitos. Para proteger los cables se recomienda usar
Thermot. Asegúrese de que la tira de LEDs opera
correctamente antes de instalar.
ADAPTADOR CONTROLADOR
RECEPTOR IR
Tira de LEDs
Conecte la tira de modo que la
echa coincida con el color negro.
La tira cambia entre 3 colores
La tira cambia intermitentemente entre 7 colores
La tira cambia gradualmente entre 7 colores
La tira cambia entre 7 colores
FLASH
STROBE
FADE
SMOOTH
ON
OFF
FUNCIONES DEL CONTROL
Botón de Encendido
Botón de Apagado
Brillo +
Incrementa la intensidad luminosa y la velocidad un nivel
cada que se presione el botón
Brillo -
Decrece la intensidad luminosa y la velocidad un nivel
cada que se presione el botón
ATENCIÓN
ATENCIÓN
Instrucciones
Retire el plástico protector de la batería del control remoto
antes de utilizarlo. Presione una vez el color deseado para tener
un color estático en la tira.
El control incluye cuatro modos de funcionamiento:
1. FLASH, al presionar el botón, la tira cambiará entre 3 colores
diferentes.
2. STROBE, al presionar el botón, la tira cambiará
intermitentemente entre 7 colores diferentes.
3. FADE, al presionar el botón, la tira cambiará gradualmente
entre 7 colores diferentes.
4. SMOOTH, al presionar el botón, la tira cambiará entre 7
colores diferentes.
Al presionar Brillo + o Brillo - el color estático seleccionado
aumentará o disminuirá su intensidad según sea el caso, si se
está utilizando alguno de los cuatro modos, se aumentarán o
disminuirán la velocidad de la secuencia.
Para obtener un buen funcionamiento del control remoto,
asegúrese que está señalando y no hay ninguna barrera u
obstáculo entre el control y el detector infrarrojo.
46370
TIR-010L
Tira de LED
Instructivo
Importado por Truper, S.A. de C.V. Parque Industrial 1, Parque Industrial Jilotepec, Jilotepec, Edo. de Méx. C.P. 54257
Hecho en China, Tel.: 76 1782 9100. www.truper.com 01-2023
Especicaciones
12 V 60 leds/m 40 W / 5 m 5 m / rollo IP44
Luz blanca: 550 lm
Temperatura de operación: -20 °C a 50 °C
Consumo de energía: 960 Wh/día
Consumo de energía en espera: No aplica
Con base en 24 horas de uso continuo
12 V 40 W
12 V 2 A
70 W máx.
Adaptador
Entrada
Tensión:
Frecuencia:
Potencia:
Salida
Tensión:
Corriente:
Control
Entrada:
Salida:
Potencia:
100 V~ - 240 V~
60 Hz
40 W
12 V
3 A
Control remoto
Emplea 1 batería de Litio CR2025
3 V (Incluida)
Mantenimiento
Asegúrese que el sistema se encuentra desconectado antes de
limpiarlo. Use un paño seco para limpiar. No use disolventes,
químicos, alcohol o líquidos abrasivos para limpiar. Evite usar
herramientas cortantes o golpear el producto con martillos u
otros elementos.
/