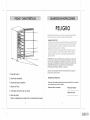
Kenmore 255.99279 El manual del propietario
- Categoría
- Enfriadores de bebidas
- Tipo
- El manual del propietario
Este manual también es adecuado para

For repair - in your home - of all major brand appliances,
lawn and garden equipment, or heating and cooling systems,
no matter who made it, no matter who sold itt
For the replacement parts, accessories and
owner's manuals that you need to dodt-yourself.
For Sears professional installation of home appliances
and items like garage door openers and water heaters.
1-800_-MY-HOME ® Calt anytime, day or night
(1-800_469_4663) (U.S.A. and Canada)
www.sears.com www.sears.ca
For repair of carrydn items like vacuums, lawn equipmenL
and electronics, call anytime for the location of the nearest
Sears Parts & Repair Service Center
1-800_88-1222 (USA) 1-800-469-4663 (Canada)
wwvv.sea_.corn w',_w.sears.ca
To purchase a protection agreement on a product serviced by Sears:
1-800-827-6655 (U.SA) 1-800-361-6665 (Canada)
® Registered Trademark/ Trademark of KCD _P LLC in the United States, or Sears Brands, LLC in other countries
® Mama Registrada t "r_*_Merca de Fabrica de KCD IP, LLC en Estado8 Unidos, o Sears Brands, LLC in otros paises
_<;Marque de commeroe i '_ Marque depos@e de Sears Brands, LLC
Use & Care Guide
Manual de Usa y Cuidado
F@
/*-)
®
P es c b c o >,
_4t@:_,s/;¢_;_<,e<s ; 25t.99279
@
COT@ ,,,J,._
P/N 134779000B (0807)
Sears Brands Management Corporation
Hoffrnan Estates_ IL 60179 U.S.A.
www.kenrnore.com
www;sears.com
6/8/10

When installS, operated and maintainedaccording to all suppliedinstructions,if thisappIiance
fails d_ to a defect inmaterial or workmanshipwithinoneyear fromthe date of purchase,
cd! 1400-4-MY-HOME to arrange for free repair
Thiswarranty app@s for onty 90 days from the purchasedate ifthis appliance isever used for
other than private household purposes.
This warranty covers only defecfs in material and workmanship. Sears will NOT pay for:
t. Expendable itemsthat can wear out from normal use,including but not limited to filters,
belts, lightbulbs, and bags.
2. A service technician to instructthe userincorrect product instaibtion, operation or
maintenance_
3. A service technician to clean or maintain thisproduct,
,4.Damage to or failure of thisproduct if it isnot installed,operated or maintained
according to the all instructionssupplied with the product
5. Damage to or failure of thisproduct resultingfrom accident, abuse,misuseor usefor
other than itsintended purpose.
6. Damage to or failure of thisproduct caused by the useof detergents,cleaners, chemicals
or utensilsother thanthose recommended in all instructionssupplied with the product_
Z Damage to or failure of parts or systemsresulting from unauthorized modifications made
to thisproduct,
Disclaimer of implied warranties; limitation of remedies
CustomeYssole and exclusive remedy under thislimited warranty shall be product repair as
provided herein_implied warranties, including warranties of merchantability or fitnessfor a
particular purpose,are limited to one year or the shortest period allowed by law. Sears shall
not be liable for incidental or consequential damages, Some states and provinces do not allow
the exclusionor limitation of incidental or consequential damages, or limitation on the duration
of implied warranties of merchantability or fitness,sotheseexclusions or limitations may not
apply to you_
Thiswarranty applies only while thisappliance isused in the United States
Thiswarranty givesyou specific legal rights,and you may also have other rightswhich vary
from stateto state.
Sears Brands Management Corporation, Hoffman Estates, IL 60179
Congratulations on making a smart purchase. Yournew Kenmord_product isdesigned and
manufactured for years of dependable operation. But Jikeall products, it may require
preventive maintenance orrepair from time to time. Thds when having a Master
Pr:atectionAgreement can save you money and aggravation The Master Protection
Agreement also helps extend the iife of your new product.
Her?s what the Agreement includes
Parts and Jabot needed to help keep products operating properly under normal
use, not just defects_Our coverage goes weii b_nd the product warranty No
deductibles, nofunctional failure exduded from coverage--real protection.
Expert service by a force of more than 10,OO0 authorized Sears service
technicians, which means someone you cantrust will be working on your product.
Unlimited service calls and nationwide service, asdten asyou want us,
whenever you want us
[] "Nodemon'guarantee - replacement of your covered product if four or
more product failures occur within twelve months.
Product replacement if your covered p_oduct can't be fixed.
[] Annual Preventive Maintenance Check at your request - no extra charge.
[] Fast help by phone _ we call it Rapid Resdution - phone support from a
Sears representative on aHproducts_Thinkof usas a _tatking owner's manual _'
Power surge protection against electrical damage due to power fiuctuations_
[] $250 Food Loss Protection annualiy for any food spoilage that is the result of
mechanical faiiure d an,i covered refrigerator or freezer.
Rental reimbursement if repair of your covered product takes longer than
promised
[] 25% discount off the regular price of any non covered repair service and rdated
installed parts.
Once you purchase the Agreement, a simple phone cati isatl that ittakes for you to schedule
service. You can call anytime day or night,orschedule a service appointment online.
The Mas_er Protection Agreement isa risk free purchase_If you cancd for any reason
during the product warranty period, we wili provideafuH refund, or a prorated refund
anytime after the product warranty period expires Purchaseyour Master Protection
Agreement today!
Some limitations and exclusions opply_ For prices and additional
information in the U.S.A. call 1-800_827o6655.
Sears Installation Service
ForSears professional installation of home apptiances, garage door openers, water
heaters, and other major home items,in the US.A or Canada call lo800-4-MY-HOME$:_.
6/8/10

®
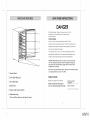
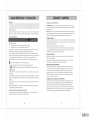
1. Control Panel
2. Wire Shelf Racks (5)
3. Wire Base Rack
4. Glass Door
5. interior Light Control Switch
6. Adjustment Legs
(Turn to left to raise; turn to right to lower)
4
DANGER
Riskof child entrapment, Before you throw away your old wine chiller,
take off the doors. Leavethe shelvesin place sothat children may
not easily climb inside_
Youro_dwine chiller mayhave acoolingsystemthatusedCFCsor HCFCs
(chtorofluorocarbonsor hydrochlorofluorocarbonsl.CFCsand HCFCsarebelieved toharm
stratosphericozoneif reteasedto theatmosphere.Other refrigerantsmayalsocause harm
to theenvironmentif releasedto theatmosphere,
Ifyouarethrowing away yourold wine chitter, makesurethe refrigerantisremovedfor
proper disposalbya quatifiedtechnician.Ifyou intentionallyreleaserefrigerant,you may
besubjectto finesand imprisonmentunderprovisionsofenvironmentallegislation.
WARNING_ NEVER store food items of any type in this wine chiller. Because
wine chiller temperature settings are warmer than refrigerator settings, food
items stored in wine chiller are liable to spoilage, which can result in serious
foodborne illness if consumed.
Thank you for using this Kenmore product. This easy-to-use manual will guide
you in getting the best use of your wine chiller.
PRODUCT RECORD
Staple your receipt to your manual.
Record the model and serial number of
your unit in the spaces provided to the right.
Model number:
255.99279
Serial number:
6/8/10

Unpacking Your Wine Chiller
!. Removeall packaging material Thisinctudesthe foam and the adhesive tape
from all outside and insidesurfaces,as weft asaccessories and racks,Slide
out and removethe plastic or foam guard usedto protect the compressor from
shippingdamage caused by vibration and shock.
2, inspectand removeany remaining packaging,tape or printed materials
before powering on the wine chiller
3. Checkto be sureyou haveall accessoriesand parts listed inthe Partsand
Featuressection.
Proper Air Circulation
Toensurethat your wine chiller works at the maximumefficiency it was
designedfor,you shouldinstallit ina location where there isproper air
circulation, plumbingand electrical connections.
Thefollowing are recommended clearances around the wine chiller:
Sides..................3/'4 inches (19mm)
Top......................2 inches (50mm)
Back....................2 inches (50mm}
Electrical Requirements
Make sure there isa suitable power outlet (1t5volts,t5 amps) with
proper groundingto power thewine chiller.
WARNING: NEVERcut off the third grounding prong from the power cord
plug to accommodate a two prong outlet, Removalof the prong provides no
effective grounding for the appliance, which can result in seriousinjury or death
from electrical shock.
Installation
'Four winechHer isdesignedfor freestanding installationonly.Itshouldnot be
recesseaor built-in. Placethe wine chiller on afloor strong enoughto support it fully
loaded. When movingme J._mesn,le_ nevertilt it bymore thana 45 degrees angle. This
could damage the compressorand the sealed system.
Fthe wne ch ller hasbeentilted more than 45 degrees, Jetit stand inan upright
positionfor at least 1hour prior to plugging it into thepower source. This
will allow the refrigerant to settle and reduce the possibilityof amaffunction in
the cooling system.
Piugthe wine cnmer into anexclusive,properly installedgrounded wall outlet.
Do not unaer any circumstancescutor removethe third (grounding) prong from
the power cord. Seethe WARNING in Electrica_ Reau_rementson me previous
page. Any questionsconcerning power and/or groundingshouldbedirected
toward a certified electrician or aSearsor other qualified servicedealer.
After 0Juggingthe appliance into a wafl outlet,allow the unitto runfor 2-3
hourssomat rneinterior issufficiently cool before opening the door to p_ace
softies into the corn 9arrmem.
Installation Limitations
Do not install your wine cooler in any location not properly insulated or heated,
such as m a garage. Your wine chiller is not designed to operate in fern peralure
settings below 55 ° Fahrenheit
Select a suitable location for the wine chiller on a hard even surface away from
direct sunlight or heat sources such as radiators, baseboard heaters or cooking
aopliances.
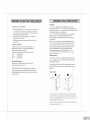
Handle Installation
[] []
1.Set the attacnmem shafts of the handle over me aTTacnmem posts protruding from
the door, To avoid turning unit over, attach handles with set screws facing uo if un_ s
_urnea over to faciDate attaching handle so that screws wi nOTbe seer, ,¢nu must Wa_T
" hour before p_ugging unit into eower source.
2. Use a 3 mm hex ke'y ro secure_y'hgmen me set screws in the r_anaie attachment shafts
to the attacnmem posts of the aoor.
7
6/8/10

Initial Use
Toreach the set coldnesslevel when operating the wine chiller for the first time, runit without wine
load untilyou hear the compressor stop. Thisusually takes 2 to 3 hours Once the settemperature is
reached, ioad wine into the wine chiller.
Note: If the winechilter has been placed in a horizontal or more than 45°
tilted position for any period of time,wait 1 hour before plugging it in.
Temperature Control
Temperature Adiustment
A : Pressths pad once and the temperature will increase 1° F/C.
V : Pressthispad once and the temperature wi]i decrease 1° F/C
Thewine chiller can be operated by adjusting the temperature control buttons (up arrow
anddown arrow) to varioussettings.
Thenew desired temperature will flash on the display for a few secondsand then switch
back to the actual temperature which will graduatb' change untiisetpoint isreached
Thetemperature range MIN and MAX is41°` 65°F (5° - 18°C} which isideal for wine storage.
41° is best for white wine,and64° isidea/for reds.
_LED !ight pad; pressto turnlight on or off.
POWEROn/Off: Pressthispad to power the unitonor off.
and POWER_ogetherfor 2 seconds to convert between Fahrenheit
Press
temperature and CeJsiustemperatu re.
Failure Codes
If"E"and "F"disptay,contact Searsor another quatified service center for unitrepair.
Ifthe temperature inthe chiller istoo tow, it wil! disptay 'LtL ,_djustthe temperature
controf to a warmer setting
Ifthe temperature in the chilier istoo high, the control will flash "H", and an alarm will sound
for 30 seconds.One minute tate_ thealarm win continue to soundfor another 30 seconds
After three times,the alarm witl not soundany more You can pressany keyto cancel the sound
atarrn_
Storing too manycans or bottles in the chiNermay cause the temperature inthe chilIer to
rise temporarily.
Normal Operating Sounds You May Hear
At times you may hear boiling water, gurgling sounds,etc. that are the resultof the
refrigerant circulating through the cooling coils
Cleaning and Maintenance
V_ARI'--tlNG:To avoid electric shock,always unplugyour wine chiiler before
cleaning ignoring thiswarning may resultin death or injury
CAUTION:Beforeusingcleaning products, always read andunderstandthe cleaning processes
explained in thismanual Foliow cleaning product manufacturers%instructionsand warnings to avoid
personal injury or product damage:
General Cleaning
Prepare a cleaning solutionof _to 2 tablespoons of bakingsoda mixed with "warmwater_ Usea
sponge or soft cloth, dampened with the cleaning solution,to wipe down your wine chilter.
Rinsewith dean warm water and dry with a soft cloth.
Do not use harshchemicals,abrasives, ammonia, chlorine bleach, concentrated detergents,
solventsor metal scouring pads. Some of thesechemicals may dissolve,damage and/or discotor your
wine chiller.
Door Gaskets
Clean door gasketsevery three monthsaccording to the instructionsdescribed above in General
Cleaning.
Apply a light coating of petroleum jelly to the hingeside of the door gasketsto
keepthe gasketspliable and ensurea good seal.
Power Interruptions
Occasionally there may be power interruptionsdueto thunderstormsor other causes:Removethe
power cord plug from the AC outlet when a power outage occurs. Keep the wine chiller door
dosed to preserve compartmen_coolnessfor as tongas possible_After a prolonged power outage,
you should clean the insideof the chiller compartment before reuse.
Vacation and Moving Care
Forlongvacationsor absences,unplug the unit,remove wine bottles from wine chiller, turn
the temperature dialto the OFF positionand cleanthedoor gasketsaccordingto the General
Cleaning section.Propdoor open,soair cancirculateinside.Jfmoving the wine chiiier, always
keep it in a vertical position. Donot moveunitwhenina horizontalposition,aspossibledamageta
the sealedsystemcould occur_
9
618110

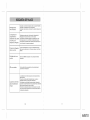
Wine Chiller does
not operate
Compartment temperature
is noticeably warmer or
colder than set temperature,
Check if the temperature control is in the Off postion,
Check if wine chiller is plugged in,
Check if there is power at the AC outlet by checking the circuitbreakero
The problem con be resolved if you just turn Off power
of the wine chiller for 5 minutes and then restart it.
If the temperature )s too worm, check it several hours lat>er to see (f it has
cooled down to the set temperature.
Ifthe temperature is too cold, check the next day to see ifit has wormed to
the set temperature,
The insideof wine
chillerisnot cold
The wine chiller
doesn't c_l down
The -wine ChiHer door is opened too often. Leave door shut for 4 - 5 hours
to restore de,red coolness level
Press POVVER button; check ifpower supply isconnected.
LED does not light
Glass door has water
condensation droplets
Take unit to a Sears or other qualified service deater for
LED lamp repair.
Condensation on the door gloss is normal when the weather is hot or humtd.
If the door is kept open too long or opened too frequently, condensation can
Occur_
If the chiller is not level, the door can become misaligned, allowing a small air
gap which can cause condensation, Usethe Adjustment Legs to level the unit,
To remove condensation, wipe the door glass with a soft cloth, and leave the
door closed for ,4 -5 hours to reduce further condensation occurrence,
10
11
6/8/10

12 13
6/8/10

Cuando seinstala, maneja y mantiene seg0ntodas las instruccionessuministradas,si
este aparato fa!la debido a undefecto del material o per la mane de obra dentro de
una_o desde la fecha de compra, tJameai "1o800-4_MY-HOME® para acordar una
reparaci6n gratuita Estagaranfia se apaica s6b durante 90 dlas desde Jafecha de
compra si este producto jam6s se ha utilizado de otra manera que para prop6sitos
privados del hogar.
Esta garantla cubre s61odefectos en el material o pot la mano
de obra. Sears no pagar6:
1 Arficulos sujetos a desgaste que pueden desgastarse per el usenormal, inclusive
pero no limitado a fiitros, correas, bombii/as y bolsas.
2, Unt6cnico de servicio para instruiral usuario sobre la correcta insta]aci6n,
operaci6n o mantenimiento del producto,
3. Unt_cnico de servicio para limpiar o mantener este producto.
4. Da_os a o falios de este producto si no seinstala,manejao manfienesegOn
las todas las instruccionessuministradascon el producto,
5. Da_oso failos de este producto resultantesde unaccidente, abuse,maltrato
o use para unafinafidad distinta a fa que est6 destinado.
6. Da_osa o ratios de este producto causados per el usede detergentes,
_impiadores,sustanciasquimicaso 0tilesdistin_osde tosrecomendados en las
instruccionessuministradascon el producto.
7.Da_os o fat/osde piezas o sistemasresultantesde modificaciones no
autorizadas hechasa este producto.
Denegaci6n de garantJas impffcltas; limitaci6n de reparaciones
La_nica ,/excfusiva reparaci6n para el cliente bale esta garanfia iimitada set6
la reparaci6n dei producto segOnsedispone en este documento. LasgarantSas
impllcitas, inciuyendo garanfias de comerciatizaci6n o salud para unprop6sito
en particular, se/imitan a una_o o el per$odom6s corto permitido per la ley.
Searsne ser_ responsable de da_os casualesni consecuentes_A[gunosestados
y provincias no permiten/a exclusi6n ni la limitaci6n de daF_oscasualeso
consecuentes,o la limitaci6n en la duraci6n de garanffas impilcitas de
comercializaci6n o salud, asl que estas exclusioneso limitaclones pueden noser
aplicabtes a usted.
Estagaranfia s61oseaplica cuando este aparato se utiliza en EstadosUnidoso
Canad& Estagarant_ale da derechos legales espedficos, y ustedtambi_n puede
tener otros derechos que vat,an dependiendo del estado.
FeJicdades par hacer unacompra inteJigente.Sunuevoproduc:_oKenmore® est6 diseBado y
fabricado para a_os de funcionamiento fiabIe Pete comotodos los productos, puede necesitar
mantenirnientepreventive o reparaciones de vez en cuando_Que escuando tener unAcuerdo
de Protecci6n Maestra ie puede ahorrar dinero y evitar irritaciones. ElAcuerdo de Protecci6n
Maestra tambi6n ie ayuda a extender Ia vida de sunuevo producto_Aqui est6 io que incJuyeel
Acuerdo_
Piezas y meno dieobra necesarias para ayudar a mantener Iosproductos funcionando
apropiadamente bole use normal, no s6/o Josdefectos, Nuestra cobertura va m_s all_ de la
garanJia deJ producto_ Sinfranquicias, sinfaitos funcionaiesexduidos de ia cobertura--protecci6n
verdadera_
[] Asistencia de expertos per una fuerza de m6s de I0,000 t_cn_ces de serv_cioagter_zades
per $ears_ Ioque significa que aJguienen queconfia traba]ar6 en suproducto_
[] LJam_s ilimita_s _e _siste_d_ _ _sistenci_ p_r te_ eJp_is, tan a menudo come to
desee y siempreque ustedlo desee
[] @_r_ntia p_r repetici6n de f_JJos _ sustituci6nde suproducto cubierto siseproducen
cuatro o m6sfaHosdel producto dentro de doce meses,
[] $_stit_ci6n d_| prod_cto sisuproducto cubierto no puede repararse_
[] _@_pr@b_¢J6_ _nu_! _e M_nteni_ien_o Preve_tivo seg6nsupetici6n - sin recargo.
[] ;_/ud_ r_pid_ p@_tel_f_n_ oJa/iamamos Re_oluci6_ R6pida oapoyo per tei_fono de un
representante de Searsentodos los productosoPienseen nosotroscome un'°manuaJde usuario pariante'.
[] Protecci6_ per subidas de te_si6n centra da_os eJ@ctricosdebidos a fluctuaciones de energla.
[] $250 de Protecci6n per ia P@dlda de AJimentos anudmente per cuatquier putrefacci6n
de alimentos que sea e/resuJtado de faJiosmec6nicos de cuatquier frigor_fico o congelador cubierto
[] Re_mboJso de _Jq_ffer siJareparaci6n de su produc_ocubierto tarda m6sde Io prometido_
[] 258"ode descuento de! precie regular de cuaJquierservicio de una reparaci6n no cubierta
y las piezas instatadas reJacionadas_
Unavez que ustedcompra eJAcuerdo, una simpie Ilamada teief6nica esredo lo necesarie para
planificar/a asistencia, PuedeHamaren cualquier memento,dk_o noche,o pianificar online una
cita de asistenca.
ElAcuerdo de Protecci6n Maestra es unacompra sin riesgo_Si Jacancela per
cua!quier raz6n durante eJper_odode garantia del producto, le preporcionamos
unreemboJsototat, o unreemboiso prorrateado en cua!quier memento despu_s
de que termine e! per_odo de garanfia del producto iCompre suAcuerdo de
Se apJican algunas |irnit_ciones y excJusiones. P_r_ obtener precJosy adlcion_J
inforrnaci6n en los EEoUU.llame al 1o800_827-6655.
Servtcto de Jnstalaci6n de Sears
Parauna instalaci6n profesionaJde Searsde aparatos del hegar,sistemasde
apertura de puertas de garaie, cafentadores de agua y otros articulos prk_cipaJes
deJhogan en EEUUo @had6 ltamea 1-800_4_M¥-HOME®,
6/8/10

1. Panel de Control
2. Estante de alambre(5)
3. Estante de base de alambre
4. Puerta de Vidrio
5. Interruptor de Control de Luz Interior
6. Patas de Ajuste
(Gire a la izquierda para subir; Gire a la derecha para bajar )
4
PELIGRO
Riesgode atrapar ni_os Antes de tirar sunevera de v nosv eja, qu te Jaspuertas, Deje tas
batdas en su sitio de manera que los ni_osno puedan subirf6cilmente adentro,
ELIMINACIONDECFC/HCFC
Sunevera de vinosvieja puede tenet unsistemade refrigeraci6n que utitiz6 CFCso HCFCs
(dorofiurocarbonos o hidroctoroflurocarbonos) Secree que los CFCsy HCFCsdo,an ta
capa de ozono estratos_@ricesiseliberan a la atm6sfera Otros refrigerantes tambi6n
puedenda_iar et ambiente sisellberan a la atm6sfera+
Siest6 tirando sunevera de vinos vieja, aseg(sresede que el refrigeranle sequite para
unadisposici6n apropiada per parte de unt6cnico caNficado Si Jiberaa prop6sito el
refdgerante, puede estar sujeto a multasy encarcelamiento ba}o esfiputadones de la
ADVERTENCIA: NO conserve NUNCA alimentos de cualquier tipo en esta nevera
de vinos.Es que los configuraciones de temperatura de la nevera de vinos son m6s
calientes que las del refrigerador, los alimentos conservados en la nevera de vinos
pueden f6cilmente deteriorarse, que puede tenet como consultado graves
enfermedades transmitidas por aiimentos si se consumen.
Gracias por usar este producto Kenmore. Este manual f6cil de usar le guiar6 en
el mejor uso de sunevera de vinos,
REGISTRO DEL PRODUCTO
Gracias pot utilizar nuestro producto de Kenmore. Este manual de f6cil usa le indicar6
c6mo conseguir el mejor uso de su frigorifico.
Grape su recJbo a su manual.
NOmero de Modelo:
NOmero de Serie:
6/8/10

Desempaque de Su Nevera de Vinos
1,Quite todo et materiai de embataje. Estoinduye ta espumay Jacinta adhesiva en todas
las superficies externas e internas,ad coma accesodos y estantes_Destice hada fuera y
quite el protector de pt6sfico o espumautilizado para proteger d compresor de da_os
durante e]transporte causadospar vibrad6n y choque
2. lnspecdone y quite cualquier embalaje, cinta o materiates impresosque quedan antesde
enchufar ta nevera de vinos.
3.AsegOresede que tenga todos les accesorios y piezas listados en la secci6n de Rezas y
Caraderfsficas.
Circulaci6n Apropiada del Aire
Paragarantizar que suneverade vinostrabaie con ta m6xima efidenda para ta
que ruedise_ado tiene que instalarta en unlugar donde hay circutaci6n apropiada
de_aire, conexiones de tuber_asy e_ctdcas_
Losespados !ibresrecomendados alrededor de la nevera de vinos son lossiguientes:
tados: 3/4 pulgadas (19ram}
Partesuperion 2 pulgadas (50 ram}
Partede atr6s: 2pulgadas (50 ram/
Requisitos El_ctricos
Aseg@esede que haya una toma de cordente adecuada (!15voltios, 15amperios}
con conexi6n a fierra apropiada para enchufar la nevera de vinos,
ADVERTENCIA:NO carte NUNCA la tercera punta con conexi6n a tierra dei enchde
del cable de alimentaci6n para adaptarse aunatoma de corriente de dos puntas. La
etiminaci6n de ta punta no proporciona una conexi6n a tierra efectiva para el aparato,
que puede tener coma resultado una herida grave oincbso la muede par la descarga
et@ctrica
Instalaci6n
Sunevera de vinos est6 dise_ada s61or_arauna nstalaci6n de tipo mdependiente. No debe
serem_otrada. Coloaue a neverade vinos en unsuelo suficientemente fuerte coma eara
sooortada como_eTamemecargaaa, Ai mover Ia nevera de vinos no incr_nelanuncacon
unangu_om6sde 45 grados. Estopodria dai'iar el comoresor -te sistemade seuado
Sia nevera ae vinossena indinado m6sde 45 crados,d@ie_aestar en una posici6n
vertical oar a fomenos ] hora antesde enchufado en _afuente de alimentaci6n. Esto
oermifir6 al rekige_nte asentarse v reduor a oosibd_dadde unratio en el s_stemaae
refrigerac_on,
Enchufe to nevera de vinos en _JnaToma ae corriente n÷ oared exdusiva y a propiadamente
nstatada con conexion a tierra_ No carte ni auite bajo ninguna circunstoncia a tercera auma
(conconexi@na tierra} :let cable de atimentaci6n. V&aseta ADVERTENCIAen Reauisitos
El&ctricos en la D6 gmaanterior. Cua]quier preguma con respecToa ta aJimentaci6n v 'o la
conexi6n a tierra aeDe serdirigida a une_ectricista certificado o unSearsu afro Droveedor
ca]ificado ae servicios. Desr_u6s de enchufar ef aoararo en una roma de cordente de oarea
oermita cue ia unidad funcione pnr 2-3 horasde manera que el interior sea suficientemente
fdo antesde abrir ta DuerTaoara Darter boteflas en el cam gartimienta
Limitaciones de la InstataciBn
No instatesunevera ae vinosen cualauier ugar no apropiadarneme aislado o
dimatizado coma en ungarage.Suneverade vinosno est6 disefiada oara tuncionar
arein _eratura aeoajo de 55o Fahrenheit.
Seleccione un,ogar aaecuaac para que ia neverade vinosseencuemre en una
sur_erficieaurn v olana y este le]os del sotdirecto o fuentesde ca_ortales coma
radiadores ca_emaaores de z6cab o aoaratos de cocina.
Montaje de manija
[] []
1,Aiuste as eies oara fiiaci6n ne maniia satire los PasTesde fiiaci6n cue sooresacen de ta
ouerta_ Para evitar aue la _nidad se vuelaue conecte las man jas con tc>rni]los ae fiiaci6n
hacia arriba. Si la unidad se vuetca a facilitar a fiiaci6n de maniia ae moao aue los tornitlos
no se rgueaen /er, hay cue es_erar ] hora antes de conecTar ia unidad a a fuente de energia.
2. Utilice una ltave nexagona_ de 3 mm Data aDretar bten los tornillos de fiiaci6n en los ejes
ae fiiaci6r ae manila a as r_ostes de fiiaci6n de ta ouer_a.
7
6/8/i0

Uso initial
Paraatcanzar el niveide [riatdad configurado cuando opera et refrigerador de vino par primera
vez, op@elo sincarga de vino hastaque escuche !a parada det compresor_Estopar Io generaJ
tarda de 2 a 3 horas Unavez quese aicanza Jatemperatura configurada, cargue et vino enel
Nora: Siel refrigerador del vino sehacat.ado en unaposici6n horizontal o inc
E1Refrigerador de
Vino no funciona.
La temperatura del
comparfimiento es
notoblemente m6s callente
o m6s ffio que Io
temperotura configurada
El interior del refdgerador
del vino no es frio.
El enfriodor de vino no
se enfr_a.
LED no se enciende.
Compruebe si e} ¢onfrol de _a temperaturo est6 en la pos_ci6n APAGADO.
Compruebe si el refr_gerador de vino est6 enchufado
Compruebe si haya corriente en la toma de CA rev_sando el _nterruptor de
clrcuito.
E| prob{ema se puede resoiver _ s61o desacf_va |a allmenta¢i6n del
refrigerado de vino durante 5 minufos y rue{re o iniciarlo,
S| |a femperotura es clema._ado caliente_ |o comprobamos par vat,as
horos despu_ pQro vet s_ se ha enfriado a la tempera_ura de a_uste,
Sila temperofura es demasiQdo frla, ¢ompruebe at d_a sigu_ente para vet
s_ se ha ¢olentado a |a temperat_.Jra progromadc_,
La _erta del refrigerador de v[no se abre con demas_ada frecuenc{a,
Deje _a puerto cerrada duranfe 4 a 5 horas para restaurar el nivel fres¢or
deseado,
Pulse el bot6n ENERGiA, compruebe si se ha conectado la fuente de
alimentaci6n.
La puerto de cristo! tiene
gotos de condensaci6n
de agua
Lleve la unidad a _ars o proveedor de servido autorlzado para la
reparaci6n de la 16mpara LED.
La condensac_6n en el crisfQI de _apuerto es normal cuQndo e| cl_ma es
c6l_do o hOmedo_
Sila puerto se mant_ene ablerta demas_ado tiempo o _ abre can
demos/ado frecuencia, se puede produclr condensaci6n.
Si e_reffigerador no esf_ hive|ado0 la puerto se p_erda _a a_ineac_6n, 1o
que produce un pequeSo espaclo de aire que puede provocar condensoc_6n,
Ufil_ce |as paras de a._uste para nlve_ar Ja un_dad,
Para eliminar la candensaci6n, !impie et crisfal de la _erta con un pa_o
suave y deje la puerto cerrada durante 4 a 5 horas para reducir agn m6s
la incldencia de condensaci6n,
10
11
618110

12 13
6/8/10
-
 1
1
-
 2
2
-
 3
3
-
 4
4
-
 5
5
-
 6
6
-
 7
7
-
 8
8
-
 9
9
-
 10
10
-
 11
11
-
 12
12
-
 13
13


Kenmore 255.99279 El manual del propietario
- Categoría
- Enfriadores de bebidas
- Tipo
- El manual del propietario
- Este manual también es adecuado para
en otros idiomas
- English: Kenmore 255.99279 Owner's manual