Kichler Lighting 43185AUB Manual de usuario
- Tipo
- Manual de usuario

1) Passwirefromxturethroughstemandscrewstemtotopofcoupling.
NOTE: Threadlockingcompoundmustbeappliedtoallstemthreads
asnotedwithsymbol(3)topreventaccidentalrotationofxtureduring
cleaning,relamping,etc.
2) Passxturewirethroughremainingstemsandscrewstemstogether.
3) If using swivel for sloped ceilings,passxturewirethroughswivel
andthreadswivelontotopoflaststem.
4) Threadsmallthreadedpipeintoendofswivel.
5) Passthreadedpipeonendofswivelupthroughholeincanopy.
6) Sliplockwasheroverendofthreadedpipeprotrudingfrominsidecanopy.
7) Slipendofsafetycablethenremaininglockwasheroverendofthreaded
pipe.Screwhexnutontothreadedpipe.
NOTE DIRECTION OF SWIVEL IN ACCORDANCE WITH CEILING.
8) If not using swivel,threadsmallthreadedpipeintoendoflaststem.
9) Passthreadedpipeonendofstemupthroughholeincanopy.
10)Sliplockwasheroverendofthreadedpipeprotrudingfrominsidecanopy.
11)Slipendofsafetycablethenremaininglockwasheroverendofthreaded
pipe.Screwhexnutontothreadedpipe.
12) TURN OFF POWER.
IMPORTANT:Beforeyoustart,NEVERattemptanyworkwithout
shuttingofftheelectricityuntiltheworkisdone.
a) Gotothemainfuse,orcircuitbreaker,boxinyourhome.Place
themainpowerswitchinthe“OFF”position.
b) Unscrewthefuse(s),orswitch“OFF”thecircuitbreakerswitch(s),
thatcontrolthepowertothextureorroomthatyouareworking
on.
c) Placethewallswitchinthe“OFF”position.Ifthexturetobe
replacedhasaswitchorpullchain,placethoseinthe“OFF”
position.
13)Findtheappropriatethreadedholesonmountingstrap.Assemble
mountingscrewsintothreadedholes.
14)Attachmountingstraptooutletbox.(Screwsnotprovided).Mounting
strapcanbeadjustedtosuitpositionofxture.
15)Attachsafetycabletoslotinmountingstrap.
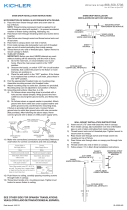
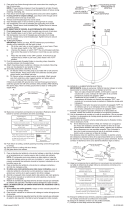
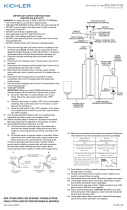
16)Groundinginstructions:(SeeIllus.AorB).
A) Onxtureswheremountingstrapisprovidedwithaholeandtwo
raisedimples.Wrapgroundwirefromoutletboxaroundgreen
groundscrew,andthreadintohole.
B) Onxtureswhereacuppedwasherisprovided.Putgroundwire
fromoutletboxundercuppedwasherandgreengroundscrewand
threadscrewintoholeinmountingstrap.
Ifxtureisprovidedwithgroundwire.Connectxturegroundwiretooutlet
boxgroundwirewithwireconnector,(notprovided)afterfollowingthe
abovesteps.Neverconnectgroundwiretoblackorwhitepowersupplywires.
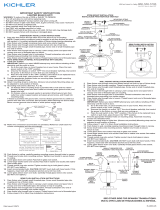
17)Makewireconnections(connectorsnotprovided.)Referencechartbelow
forcorrectconnectionsandwireaccordingly.
18)Pushxturetoceiling,carefullypassingmountingscrewsthroughholes
incanopy.
19)Securexturetoceilingwithknurlknobs.
20)Setglassdownoversockets.
GREEN GROUND
SCREW
CUPPED
WASHER
A
B
OUTLET BOX
GROUND
FIXTURE
GROUND
DIMPLES
WIRE CONNECTOR
(NOT PROVIDED)
OUTLET BOX
GROUND
GREEN GROUND
SCREW
FIXTURE
GROUND
Connect Black or
Red Supply Wire to:
Connect
White Supply Wire to:
Black White
*Parallel cord (round & smooth) *Parallel cord (square & ridged)
Clear, Brown, Gold or Black
without tracer
Clear, Brown, Gold or Black
with tracer
Insulated wire (other than green)
with copper conductor
Insulated wire (other than green)
with silver conductor
*Note: When parallel wires (SPT I & SPT II)
are used. The neutral wire is square shaped
or ridged and the other wire will be round in
shape or smooth (see illus.)
Neutral Wire
IS-43185-US
DateIssued:6/29/12
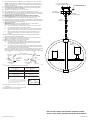
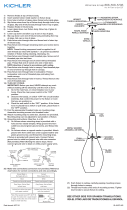
MOUNTINGSTRAP
PLANCHAPARAMONTAR
CANOPY
ESCUDETE
STEM
VARILLA
4
3
SAFETYCABLE
CABLEDESEGURIDAD
SWIVEL
UNIÓNGIRATORIA
3
3
3
GLASS
VIDRIO
SEE OTHER SIDE FOR SPANISH TRANSLATIONS.
VEA EL OTRO LADO DE TRADUCCIONES AL ESPAÑOL.

1) Paseelalambredelartefactoatravésdelvástagoyatornilleelvástago
altopedelartefacto.NOTA:Elcompuestopararoscaestancasedebe
aplicaratodaslasroscasdelvástagocomosenotóconelsímbolo(3)
paraimpedirlarotaciónaccidentaldelartefactodurantelalimpieza,
instalacióndeunabombillanueva,etc.
2) Paseelalambredelartefactoatravésdelosvástagosrestantesy
atornillelosvástagosjuntos.
3) Si utiliza una unión giratoria para cielo rasos inclinados,paseel
cabledelartefactoatravésdelaunióngiratoriayrosquelaunión
giratoriaporencimadelapartesuperiordelúltimovástago.
4) Atornilleunpequeñotuboroscadodentrodelextremodelunióngiratoria.
5) Paseeltuboroscadoenelextremodelunióngiratoriaatravésdel
agujeroenelescudete.
6) Desliceunaarandeladeseguridadsobreelextremodeltuboroscadoque
sobresalgadelinteriordelescudete.
7) Desliceelextremodelcabledeseguridadyluegolaarandeladeseguridad
restantesobreelextremodeltuboroscado.Atornillelatuercahexagonal
sobreeltuboroscado.
NOTE LA DIRECCIÓN DE LA UNIÓN GIRATORIA DE ACUERDO CON EL
CIELO RASO.
8) Si no utiliza una unión giratoria,rosqueuntuboroscadopequeñoen
elextremodelvástagoúltima.
9) Paseeltuboroscadoenelextremodelvástagoatravésdelagujeroen
elescudete.
10)Desliceunaarandeladeseguridadsobreelextremodeltuboroscadoque
sobresalgadelinteriordelescudete.
11) Desliceelextremodelcabledeseguridadyluegolaarandeladeseguridad
restantesobreelextremodeltuboroscado.Atornillelatuercahexagonal
sobreeltuboroscado.
12) APAQUEELSUMINITRODEPOTENCIA.
IMPORTANTE:Antesdecomenzar,NUNCAtratedetrabajarsinantes
desconectarlacorrientehastaqueeltrabajosetermine.
a) Vayaalacajaprincipaldefusibles,ointerruptorocajade
circuitosdesucasa.Coloqueelinterruptordelacorriente
principalenposicióndeapagado“OFF”.
b) Desatornilleel(los)fusible(s),ocoloqueelinterruptoro
interruptoresdelbreakerenposicióndeapagado“OFF”,que
controla(n)lacorrientehaciaelartefactoohabitacióndondeestá
trabajando.
c) Coloqueelinterruptordeparedenposicióndeapagado“OFF”.Si
elartefactoquesevaareemplazartieneuninterruptorocadena
quesejala,colóquelosenlaposicióndeapagado“OFF”.
13)Enrosquelatuercahexagonaleneltuboroscadodetalformaque5
roscasestéexpuestassobrelatuercahexagonal.Enrosqueeseextremo
deltuboroscadoenlabarrademontajeyaprietelatuercahexagonal
contralabarrademontaje.Atornillelasegundatuercahexagonalenel
extremodeltuboroscadoquesobresaledeatrásdelaabrazaderade
montaje.
14)Encontrarlosagujerosroscadoscorrectosenlaabrazaderade
montaje.Instalarlostornillosdemontajeenlosagujerosroscados.
15)Unirlaabrazaderademontajealacajadeconexiones.(Noseproveen
tornillos).Laabrazaderademontajepuedeajustarseparaacomodarla
posicióndelartefacto.
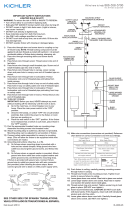
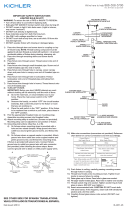
16)Instruccionesdepuestaatierra:(VealailustraciónAoB)
A) Enlosartefactosdondeseproporcionalaabrazaderademontaje
conunagujeroydosdepresioneselevadas.Envuelvaelalambrea
tierradelacajadesalidaalrededordeltornilloatierraverdey
rosqueeltornilloenelagujero.
B) Enlosartefactordondeseproporcionaunaarandelacóncava.
Pongaelalambreatierradelacajadesalidaentrelaarandela
cóncavayeltornilloatierraverdeyrosqueeltornilloenelagujero,
enlaabrazaderademontaje.
Siseproporcionaelartefactoconalambreatierra,conecteelalambrea
tierradelartefactoalalambreaatierradelacajadesalida,conelconector
dealambre(noproporcionado),despuésdeseguirlospasosdearriba.
Nuncaconecteelalambreatierraalosalambresblancoonegrodela
alimentacióneléctrica.
IS-43185-US
DateIssued:6/29/12
17)Hacerlasconexionesdelosalambres(conectoresnoincluidos.)Verel
cuadromásabajoparalasconexionescorrectasyalambrardeacuerdoa
esto.
18)Empujeelartefactohaciaeltecho,pasandocuidadosamentelostornillos
demontajeatravésdelosoriciosenelescudete.
19)Asegureelartefactoaltechoconlasperillasestriadas.
20)Coloquelavidrioabajoencimadelcasquillo.
Conectar el alambre de
suministro negro o rojo al
Conectar el alambre de
suministro blanco al
Negro Blanco
*Cordon paralelo (redondo y liso)
*Cordon paralelo (cuadrado y estriado)
Claro, marrón, amarillio o negro
sin hebra identificadora
Claro, marrón, amarillio o negro
con hebra identificadora
Alambre aislado (diferente del verde)
con conductor de cobre
Alambre aislado (diferente del
verde) con conductor de plata
*Nota: Cuando se utiliza alambre paralelo
(SPT I y SPT II). El alambre neutro es de forma
cuadrada o estriada y el otro alambre será de
forma redonda o lisa. (Vea la ilustracíón).
Hilo Neutral
ARANDELA
CONCAVA
A
B
TIERRA DE LA
CAJA DE SALIDA
TORNILLO DE TIERRA,
VERDE
DEPRESIONES
TIERRA
ARTEFACTO
CONECTOR DE ALAMBRE
(NO SE PROVEE)
TIERRA DE LA
CAJA DE SALIDA
TORNILLO DE TIERRA,
VERDE
TIERRA
ARTEFACTO
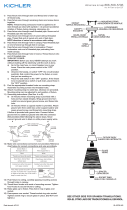
SEE OTHER SIDE FOR ENGLISH TRANSLATIONS.
VEA EL OTRO LADO DE TRADUCCIONES AL INGLÉS.
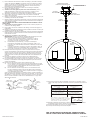
MOUNTINGSTRAP
PLANCHAPARAMONTAR
CANOPY
ESCUDETE
STEM
VARILLA
4
3
SAFETYCABLE
CABLEDESEGURIDAD
SWIVEL
UNIÓNGIRATORIA
3
3
3
GLASS
VIDRIO
-
 1
1
-
 2
2


Kichler Lighting 43185AUB Manual de usuario
- Tipo
- Manual de usuario
en otros idiomas
Artículos relacionados
-
 Kichler Lighting 43688NI Manual de usuario
-
 Kichler Lighting 43328DAG Manual de usuario
-
 Kichler Lighting 44003NI Manual de usuario
-
 Kichler Lighting 42475OZMER Manual de usuario
-
 Kichler Lighting 43190AUB Manual de usuario
-
 Kichler Lighting 44008MIZ Manual de usuario
-
 Kichler Lighting 43792NI Manual de usuario
-
 Kichler Lighting 44010MIZ Manual de usuario
-
 Kichler Lighting 44011MIZ Manual de usuario
-
Kichler Lighting 9022OB Manual de usuario


