Tascam CD-BT1MKII El manual del propietario
- Categoría
- Reproductores de CD
- Tipo
- El manual del propietario

»
CD-BT1 @#
Portable CD Bass
Trainer
OWNERʼS MANUAL (EN / F / D / I / E)
EnglishFrançais
Deutsch
Español
Italiano
D00851400B

2 — TASCAM CD-BT1MKII
English
Important safety precautions
Y
CAUTION: TO REDUCE THE RISK OF ELECTRIC
SHOCK, DO NOT REMOVE COVER (OR BACK).
NO USER-SERVICABLE PARTS INSIDE. REFER
SERVICING TO QUALIFIED SERVICE PERSON-
NEL.
E
The lightning flash with arrowhead symbol,
within an equilateral trinagle, is intended to
alert the user to the presence of uninsulated
“dangerous voltage” within the product’s en
-
closure that may be of sufficient magnitude to
constitute a risk of electric shock to persons.
R
WARNING: TO PREVENT FIRE OR SHOCK
HAZARD, DO NOT EXPOSE THIS APPLIANCE TO
RAIN OR MOISTURE.
FOR U.S.A.
TO THE USER
This equipment has been tested and found to
comply with the limits for a Class B digital de-
vice, pursuant to Part 15 of the FCC Rules. These
limits are designed to provide reasonable pro-
tection against harmful interference when the
equipment is operated in a commercial environ-
ment. This equipment generates, uses, and can
radiate radio frequency energy and, if not in-
stalled and used in accordance with the instruc-
tion manual, may cause harmful interference to
radio communications.. However, there is no
guarantee that interference will not occur in a
particular installation. If this equipment does
cause harmful interference to radio or television
reception, which can be determined by turning
the equipment off and on, the user is encour-
aged to try to correct the interference by one or
more of the following countermeasures.
a) Reorient or relocate the receiving antenna
b) Increase the separation between the
equipment and receiver.
c) Connect the equipment into an outlet on a
circuit other from that to which the receiver
is connected.
d) Consult the dealer or an experienced radio/
TV technician for help.
CAUTION
Changes or modifications to this equipment not
expressly approved by TEAC CORPORATION for
compliance could void the user’s authority to
operate this equipment.

TASCAM CD-BT1MKII — 3
English
Important Safety Instructions
1 Read these instructions.
2 Keep these instructions.
3 Heed all warnings.
4 Follow all instructions.
5 Do not use this apparatus near water.
6 Clean only with dry cloth.
7 Do not block any ventilation openings. Install
in accordance with the manufacturer’s instructions.
8 Do not install near any heat sources such as
radiators, heat registers, stoves, or other apparatus
(including amplifiers) that produce heat.
9 Do not defeat the safety purpose of the po-
larized or grounding-type plug. A polarized plug
has two blades with one wider than the other. A
grounding type plug has two blades and a third
grounding prong. The wide blade or the third prong
are provided for your safety. If the provided plug
does not fit into your outlet, consult an electrician
for replacement of the obsolete outlet.
10 Protect the power cord from being walked on
or pinched particularly at plugs, convenience recep-
tacles, and the point where they exit from the ap-
paratus.
11 Only use attachments/accessories specified by
the manufacturer.
12 Use only with the cart, stand, tripod, bracket,
or table specified by the manufacturer, or sold with
the apparatus. When a cart is used, use caution
when moving the cart/apparatus combination to
avoid injury from tip-over.
13 Unplug this apparatus during lightning storms
or when unused for long periods of time.
14 Refer all servicing to qualified service person-
nel. Servicing is required when the apparatus has
been damaged in any way, such as power-supply
cord or plug is damaged, liquid has been spilled or
objects have fallen into the apparatus, the appara-
tus has been exposed to rain or moisture, does not
operate normally, or has been dropped.
• Do not expose this apparatus to drips or
splashes.
• Do not place any objects filled with liquids,
such as vases, on the apparatus.
• Do not install this apparatus in a confined
space such as a book case or similar unit.
• The apparatus draws nominal non-operating
power from the AC outlet with its POWER switch in
the off position.

4 — TASCAM CD-BT1MKII
English
Safety Information
This product has been designed and manu-
factured according to FDA regulations “title
21, CFR, chapter1, subchapter J, based on the
Radiation Control for Health and Safety Act
of 1968”, and is classified as a class 1 laser
product. There is no hazardous invisible laser
radiation during operation because invisible
laser radiation emitted inside of this product is
completely confined in the protective housings.
The label required in this regulation is shown
here.
CAUTION
• DO NOT REMOVE THE PROTECTIVE HOUSING
USING A SCREWDRIVER.
• USE OF CONTROLS OR ADJUSTMENTS OR
PERFORMANCE OF PROCEDURES OTHER
THAN THOSE SPECIFIED HEREIN MAY RESULT
IN HAZARDOUS RADIATION EXPOSURE.
• IF THIS PRODUCT DEVELOPS TROUBLE, CON
-
TACT YOUR NEAREST QUALIFIED SERVICE
PERSONNEL, AND DO NOT USE THE PROD-
UCT IN ITS DAMAGED STATE.
Optical pickup: Type KSM-900AAA
Manufacturer: SONY CORPORATION
Laser output: <1 mW play on the objec-
tive lens
Wavelength: 775—816 nm
Important Safety Instructions

TASCAM CD-BT1MKII — 5
English
Table of contents
About this Manual:
PLAY
MENU
Handling of compact discs ....................................................6
About the power supply ........................................................7
Part names and functions ......................................................
9
Making connections ............................................................12
Using the menu system .......................................................14
Using the CD player .............................................................16
Pitch and tempo changes ....................................................17
Using CD effects ..................................................................18
Using built-in effects ...........................................................19
Equalizer ..............................................................................21
Using the metronome ..........................................................
22
Using the tuner ....................................................................23
Changing your preferences for the CD-BT1MKII .................
24
Facts and figures (specifications) ........................................
25

6 — TASCAM CD-BT1MKII
English
Handling of compact discs

TASCAM CD-BT1MKII — 7
English
About the power supply
Operation using batteries
CAUTION
We strongly recommend the use of recharge-
able Ni-MH batteries (alkaline batteries may
also be used). Your CD-BT1MKII may not op-
erate properly with batteries of other types.
WARNING
Misuse of batteries may cause leaks and ex-
plosions. Please carefully read and follow the
instructions below:
Notes on batteries
Remaining battery charge level
display
Length of battery life
Auto power-save
CD OFF

8 — TASCAM CD-BT1MKII
English
About the power supply (Continued)
PLAY
CAUTION
Because the CD-BT1MKII is equipped with
special functions such as key change and
effects, the battery life is shorter compared
with standard portable CD players.
The length of battery life in CD-BT1MKII is
affected by both the environment and the
number of functions in use. Factors that af-
fect battery life include temperature, humid
-
ity, the number of special functions used, and
so on.
Under some circumstances, there may not be
enough power in the batteries to power the
CD-BT1MKII, despite the battery power indi-
cation on the display. If this happens, change
the batteries, or use an AC adapter.
Always dispose of used batteries as recom
-
mended by your local authorities.
Operation using an AC
adapter
DC IN
PS-PS5
DC plug
Wall outlet
WARNING
Use only a PS-PS5 AC adapter with your CD-
BT1MKII. Using another type of AC adapter
may damage your CD-BT1MKII.
CAUTION
Remove the batteries before operating the
CD-BT1MKII with an AC adapter. There is a
possibility of slight noise if you use the unit
with an AC adapter while the batteries are
inside. If you plug in an AC adapter but have
forgotten to take out the batteries, turn the
power off using the
POWER
switch, and
take out the batteries. Likewise, turn the
power off before you change between using
the batteries and using the AC adapter.
Unplug the AC adapter from the domestic
AC power outlet when you are not using the
CD-BT1MKII.
Settings may not be properly saved if you
turn the power off immediately after insert
-
ing a CD or changing settings. If settings are
not saved properly, the system may not start
with the last settings and instead will start
using the default values.
Switching the unit on and off
POWER

TASCAM CD-BT1MKII — 9
English
Part names and functions
TUNER
SETUP
TUNER/
SETUP

10 — TASCAM CD-BT1MKII
English
Part names and functions (Continued)
1) DC IN Jack
2) Battery Compartment
3) CD Drive Cover
4) Display
5) TIME/ESC Key
6) PREV, NEXT, UP, DOWN Keys
UP
DOWN
7) LOOP Key
8) I/O Key
9) TUNER/SETUP Key
10) TMP/KEY / CD EFF Key
11) EQ/EDIT Key
12) EFFECT/EDIT Key
13) Track Skip/Search Keys
[
m
/
. /
\
,
]
PLAY

TASCAM CD-BT1MKII — 11
English
Part names and functions (Continued)
14) STOP/MTRO Key [H]
15) PLAY/PAUSE Key [G/J]
16) CUE Key
CUE
17) PHONES Jack
18) LINE OUT Jack
19) OUTPUT Control
PHONES
LINE
OUT
20) INPUT Control
BASS IN
21) LINE IN Jack
22) BASS IN Jack
BASS
IN
23) FOOT Jack
24) POWER Switch
25) CD EFF Switch
26) BASS IN Switch (PASSIVE/
ACTIVE)

12 — TASCAM CD-BT1MKII
English
Making connections
Connecting a bass guitar (BASS
IN)
BASS GUITAR
BASS
IN
BASS IN
PASSIVE
ACTIVE
BASS IN
Adjusting the input level
INPUT
BASS
IN
Inputting signals from external
devices (
LINE IN
)
LINE IN
LINE IN
LINE OUT OF EXTERNAL DEVICE
WARNING
NEVER connect a bass guitar amplifier to the
CD-BT1MKII’s
BASS IN
jack, as you will
damage your equipment if you do this.
Adjusting the output level after
adding built-in effects
EFFECT/
EDIT
NEXT
PREV
LVL
UP
DOWN
Adjusting mix balance between
bass guitar and CD
TUNER/
SETUP
NEXT
PREV
MIX

TASCAM CD-BT1MKII — 13
English
Output to headphones and
external devices
PHONES
LINE OUT
Adjusting the output level
LINE OUT
PHONES
OUTPUT
NOTE
The levels from both the
LINE OUT
and
PHONES
jacks are controlled together by
the
OUTPUT
control and cannot be adjust-
ed independently.
When you have a recording device connect
-
ed to the
LINE OUT
jack, remember that
the
OUTPUT
control affects the recording
level.
Connecting a footswitch
RC-30P
FOOTSWITCH
FOOT
POL
CAUTION
To avoid problems with your CD-BT1MKII,
use only a footswitch such as the TASCAM
RC-30P (sold separately) that has a standard
phone (tip and sleeve) plug.
Making Connections (Continued)

14 — TASCAM CD-BT1MKII
English
Entering the menu system
EFFECT/EDIT
EQ/EDIT
TUNER/SETUP
TUNER/
SETUP
TMP/KEY / CD EFF
TMP/
KEY / CD EFF
STOP
Menu
Category
Menu
Item
Values (default values
are underlined)
Notes
EFFECT EFF ON/OFF turns effect on or off
LIB 1 – 4, c1 – c7, d1 – d5 preset number
Parameter
– depends on effect type
LVL
0 to 64 effect output level
EQ EQ L/ EQLM/
EQ M/
EQMH/ EQ H
-15 – 0 – +15
adjusts the gain of the
equalizer band (low, mid-
low, mid, mid-high, high)
MID ON/OFF
turns mid shaping function
on or off
TUNER
TUNE MODE=BAS: 5B, 4E, 3A, 2D, 1G
sets string number in Bass
Mode
MODE CHR/BAS selects tuner mode
OSC OFF, _C – _B, C – A, B,
_
C –
_
B,
(3 octaves)
sets pitch of the oscillator
CAL 435–440–445
sets base frequency (A4,
unit: Hz)
SETUP
MIX B10 – B1, 0, C1 – C10
sets mix balance between
CD and input
PLAY
ALL/SGL
selects all or single play
CUE CUE/FLS
selects action of
CUE
Using the menu system

TASCAM CD-BT1MKII — 15
English
Menu
Category
Menu
Item
Values (default values
are underlined)
Notes
SETUP
UPDN MIX, TMP, KEY, FIN
sets function of
UP/DOWN
key in the home display mode
FOOT
EQ+, FX+, FX-, CUE. FLS,
REW, FF
sets function of the footswitch
POL NOR/INV
sets polarity of the footswitch
TEMPO
KEY
TMP
VSA=OFF: -50 to +16
VSA=ON: -50, -32, -16,-12,
-8, -4,
0, +4, +8, +12, +16
sets the speed of CD playback
in %
VSA ON/OFF
turns VSA on or off
KEY
I6 – 0 – O6
sets key control in semitones
FINE -50 – 0 – +50
sets fine tuning (cent)
CD EFF
BEE OFF, BST, ENH, CUT
selects between boost,
enhance, or cut function for
CD playback
MONO OFF (stereo), L+R, L, R
selects mono monitor mode
SPLT
OFF (mix), C-B, B-C
selects split monitor mode
METRONOME
MTRO (OFF), 40 – 120 – 220
sets tempo of metronome in
BPM (Beats Per Minute)
BEAT
OFF, 2 – 6
selects number of beats of the
metronome
Using the menu system (Continued)
Choosing menu items
PREV
NEXT
Changing the setting values
UP
DOWN
Exiting the menu system
TIME/ESC

16 — TASCAM CD-BT1MKII
English
Playback
PLAY/PAUSE
G
/
J
STOP
H
Skipping between tracks and
searching within tracks
m
/
.
/
/
,
Looping (track/disc)
LOOP
PLAY
SGL
LOOP 1
ALL
LOOP
Looping (In/Out points)
I/O
I/O
I/O
I-O
I/O
LOOP
I-O
LOOP
LOOP
LOOP
Using the CD player
I/O
The CUE key
CUE
CUE
FLS
CUE
FOOT
CUE
FLS
Display
TIME/ESC

TASCAM CD-BT1MKII — 17
English
TMP
VSA
KEY
FINE
Tempo control
TMP/KEY / CD EFF
TMP
PREV
NEXT
TEMPO
UP
DOWN
UP
DOWN
TEMPO
VSA
TMP/KEY / CD EFF
VSA
PREV
NEXT
UP
DOWN
ON
OFF.
TEMPO
VSA
NOTE
If the tempo control value is not set to 0 and
you change VSA from OFF to ON, the tempo
value will be automatically reset to a “VSA
ON value.” For example, if the value is [-33]
when VSA is OFF, it will automatically be ad
-
justed to [-50] when you turn VSA ON.
Key control
TMP/KEY / CD EFF
KEY
PREV
NEXT
KEY
UP
DOWN
IO
KEY
Fine tuning
TMP/KEY / CD EFF
FINE
PREV
NEXT
KEY
UP
DOWN
O
I
KEY
Pitch and tempo changes

18 — TASCAM CD-BT1MKII
English
CAUTION
If you set the key control to O6 while the fine
tuning value is greater than 0, the fine tuning
value is automatically reset to 0. Similarly, if
you set the key control to
I6 while the fine
tuning value is less than 0, the fine tuning
value is automatically reset to 0.
Also note that when key control or VSA is
ON, you may find that the music played back
has a “vibrato” feel. This is not a fault of the
CD player – it is a natural result of the special
effects.
Using CD effects
Turning CD effects on and off
CD EFF
CD EFF
CD EFF
BEE (Bass Enhancement Effect)
TMP/KEY / CD EFF
PREV
NEXT
BEE
UP
DOWN
OFF
BST
ENH
CUT
Mono monitor
TMP/KEY / CD
EFF
MONO
PREV
NEXT
UP
DOWN
L+R
L
R
OFF
Split monitor
TMP/KEY / CD EFF
SPLT
PREV
NEXT
UP
DOWN
C-B
B-C
OFF
Using CD effects

TASCAM CD-BT1MKII — 19
English
Components
DLY
FLA
CHO
WAH
COMPL
COMPH
OCT
TECH
DIST
HCUT
Storing your own effect settings
in an effect slot
EFFECT/
EDIT
EFFECT/EDIT
EFFECT/EDIT
Effect
EFF
PREV
NEXT
UP
DOWN
EFF
LIB
PREV
NEXT
LIB:d3
UP
DOWN
–
– –
UP
DOWN
TIP
See the Effect Library chart to determine the
content of a selected library number.
CAUTION
If there are any settings in the selected ef-
fect slot to start with, you will overwrite them
when you recall a preset effect.
PREV
NEXT
“
“
LIB:c5
COMPL
COMPH
WAH
DLY
Using built-in effects

20 — TASCAM CD-BT1MKII
English
UP
DOWN
WAH
DLY
MIX1
WAH
MIX2
DLY
UP
DOWN
WAH
DLY
DLY
MIX2.
PREV
NEXT
UP
DOWN
LVL
UP
DOWN
TIME/ESC
Adjusting the mix
MIX1
FLA
,
CHO
,
WAH
,
OCT
TECH
MIX2
DLY
Recalling an effect with your
settings
EFFECT/EDIT
TIP
If you have connected a footswitch such as
TASCAM RC-30P (sold separately), you can
step through the bank slots by pressing the
footswitch. Make sure that FOOT in the Setup
menu is set to either FX+ or FX-.
EFFECT LIBRARY CHART
1 DLY
2 FLA-DLY
3 CHO-DLY
4 WAH-DLY
c1 COMPL-COMPH
c2 COMPL-COMPH-DLY
c3 COMPL-COMPH-FLA-DLY
c4 COMPL-COMPH-CHO-DLY
c5 COMPL-COMPH-WAH-DLY
c6 COMPL-COMPH-OCT-DLY
c7 COMPL-COMPH-TECH-DLY
d1 DIST-HCUT
d2 DIST-HCUT-DLY
d3 DIST-HCUT-FLA-DLY
d4 DIST-HCUT-CHO-DLY
d5 DIST-HCUT-WAH-DLY
Using built-in effects (Continued)

TASCAM CD-BT1MKII — 21
English
Setting the equalizer
EQ/EDIT
EQ/EDIT
EQ/EDIT
EQ
PREV
NEXT
EQ L
EQLM
EQ M
EQHM
EQ H
MID
UP
DOWN
TIME/ESC
EQ
EQ
Recalling equalizer settings
EQ/EDIT
TIP
If you have connected a footswitch such as
TASCAM RC-30P (sold separately), you can
step through the bank slots by pressing the
footswitch. Make sure that FOOT in the Setup
menu is set to EQ+.
Equalizer

22 — TASCAM CD-BT1MKII
English
STOP
Choosing the metronome tempo
PREV
NEXT
MTRO
UP
DOWN
UP
DOWN
Choosing the beats
PREV
NEXT
BEAT
UP
DOWN
NOTE
The metronome functions only when a CD is
not being played back. If you start playing a
CD while using the metronome, the metro-
nome function stops automatically.
Using the metronome

TASCAM CD-BT1MKII — 23
English
Chromatic mode (CHR):
Bass guitar mode (BAS):
TUNER/SETUP
MODE
PREV
NEXT
BAS
CHR
UP
DOWN
TUNE:---
Flat
I
SharpO
On-key
TUNE: XX
TUNE: XX
Using the oscillator
CAL
TIP
This is a convenient feature to use when tun-
ing, as you can listen to both the sound of
the oscillator and your instrument. It is also
useful if you are tuning an acoustic instru
-
ment not connected to the CD-BT1MKII.
TUNER/SETUP
OSC
PREV
NEXT
UP
DOWN
Calibration
TUNER/SETUP
CAL
PREV
NEXT
UP
DOWN
Using the tuner

24 — TASCAM CD-BT1MKII
English
TUNER/SETUP
PREV
NEXT
UP
DOWN
Mix balance
MIX
CD playback mode
PLAY
ALL
SGL
CUE key function
CUE
CUE
CUE
FLS
CUE:
FLS:
UP
key and
DOWN
key function
UP
DOWN
UPDN
UP
DOWN
MIX
TMP
KEY:
FIN:
Footswitch function
FOOT
EQ+:
FX+, FX-:
CUE, FLS:
REW, FF:
Changing your preferences for the CD-BT1MKII

TASCAM CD-BT1MKII — 25
English
Footswitch polarity
POL
NOR
INV
UP
DOWN
Facts and figures (specifications)
Disc types 8 cm single, 12 cm
CD
AD/DA 16-bit
Nominal output level
(LINE OUT)
–10 dBV
Maximum output level
(LINE OUT) without
distortion
0 dBV (1 Vrms)
Output impedance 1 kΩ
Maximum output level
(PHONES)
> 18mW (into 32$)
Nominal input levels
LINE IN
BASS IN
–10 dBV
–15 dBV (Passive)
–10 dBV (Active)
Voltage requirements DC 9V (PS-PS5 AC
adapter)
AA batteries x 4
(NiMH or alkaline)
Power consumption 4 W (PS-PS5 AC
adapter)
Dimensions (w x d x h)
including feet
232 x 138 x 40
(mm) / 9.1 x 5.4 x
1.6 (in)
Weight (excluding
batteries)
620g / 1 lb, 6 oz.
CD playback characteristics
Frequency response 20 Hz to 20 kHz
±1.0 dB
Dynamic range > 88 dB
S/N ratio > 88 dB
THD < 0.01%
Digital signal processing
32-bit

Français
CONSIGNES DE SÉCURITÉ IMPORTANTES
1 Lisez ces instructions.
2 Gardez ces instructions en lieu sûr, pour
référence ultérieure.
3 Tenez compte de tous les avertissements.
4 Suivez toutes les instructions.
5 N’utilisez pas cet appareil près de l’eau.
6 Ne nettoyez l’appareil qu’avec un chiffon
sec.
7 N’obstruez pas les ouïes de ventilation. Ins-
tallez l’appareil conformément aux instructions
du constructeur.
8 N’installez pas l’appareil à proximité de
sources de chaleur, telles que radiateur, four
ou tout autre appareil dissipant des calories
(amplificateur de puissance, par exemple).
9 Ne désactivez pas les dispositifs de
sécurité (détrompeurs) des prises polarisées
ou avec mise à la terre. Une prise polarisée
possède un contact plus grand que l’autre ; une
prise avec mise à la terre possède une troisième
broche, prévue pour votre sécurité. Si la prise se
trouvant à l’extrémité du cordon secteur fourni
avec votre appareil ne correspond pas à votre
prise murale, consultez un électricien pour son
remplacement.
10 Évitez de marcher sur le cordon secteur, de
le coincer ou de le pincer, ainsi que de couder
le cordon au niveau de l’appareil ou de la prise
secteur.
11 N’utilisez que les dispositifs optionnels ou
les accessoires recommandés par le construc
-
teur.
12 N’utilisez l’appareil qu’avec des
supports ou dispositifs de fixation four
-
nis ou recommandés par le constructeur.
13 Débranchez le cordon d’alimentation de
l’appareil en cas d’orage ou s’il doit rester
inutilisé pendant une longue période.
14) Pour toute maintenance, adressez-vous à
des techniciens professionnels qualifiés. Un re
-
tour en SAV est indispensable dès que l’appareil
a été endommagé d’une façon ou d’une autre
: cordon secteur ou alimentation défaillante,
pénétration de liquide ou introduction d’objets
dans l’appareil, exposition à la pluie ou à l’hu-
midité, et bien sûr dès qu’il ne fonctionne pas
normalement, suite à une chute ou à un choc
par exemple.
• N’exposez pas l’appareil à des éclaboussu
-
res ou à des gouttes d’eau.
• Ne posez pas d’objets contenant du liquide
(vase, tasse, cannette...) sur l’appareil.
• N’installez pas cet appareil dans un espace
confiné, dépourvu de ventilation , comme par
exemple une bibliothèque.
• Même si son interrupteur se trouve en
position OFF, l’appareil consomme du courant
électrique, par l’intermédiaire de son adapta
-
teur secteur.
26 — TASCAM CD-BT1MKII

TASCAM CD-BT1MKII — 27
Français
Table des matières
A propos de ce manuel:
PLAY
MENU
Manipulation des Compact-Discs .....................................................28
A propos de l’alimentation secteur ..................................................29
Noms et fonctions des parties .........................................................31
Faire les connexions ........................................................................
34
Emploi du système de menus ...........................................................36
Emploi du lecteur de CD ................................................................... 38
Changements de hauteur et de tempo ............................................39
Emploi des effets de CD ................................................................... 40
Emploi des effets intégrés ...............................................................41
Egaliseur (EQ) ...................................................................................43
Emploi du métronome ......................................................................
44
Emploi de l’accordeur .......................................................................
45
Changement de vos préférences pour le CD-BT1MKII .....................
46
Faits et chiffres (caractéristiques) ....................................................
47

28 — TASCAM CD-BT1MKII
Français
Manipulation des Compact-Discs

TASCAM CD-BT1MKII — 29
Français
A propos de l’alimentation secteur
Fonctionnement sur piles
PRECAUTION
Nous vous recommandons d’utiliser des
batteries Ni-MH rechargeables (des piles
alcalines peuvent aussi être utilisées). Votre CD-
BT1MKII peut ne pas fonctionner normalement
avec des batteries d’un autre type.
AVERTISSEMENT
Le mauvais emploi des piles peut entraîner
des coulures et explosions. Veuillez lire
soigneusement et suivre les instructions ci-
dessous:
Notes sur les piles
Affichage de la charge restante
Autonomie des piles
Economiseur d’énergie
CD OFF

30 — TASCAM CD-BT1MKII
Français
A propos de l’alimentation secteur (suite)
PLAY
PRECAUTION
Comme le CD-BT1MKII est équipé de
fonctions spéciales comme le changement
de tonalité et des effets, l’autonomie des
piles est inférieure à celle de lecteurs de CD
portables standards.
L’autonomie des piles du CD-BT1MKII est
affectée à la fois par l’environnement et le
nombre de fonctions utilisées. Les facteurs
qui affectent l’autonomie comprennent
la température, l’humidité, le nombre de
fonctions spéciales utilisées et ainsi de suite.
Dans certaines circonstances, il peut ne pas
y avoir suffisamment d’énergie dans les
piles pour alimenter le CD-BT1MKII, malgré
l’indication de charge dans l’afficheur. Si cela
se produit, changez les piles ou utilisez un
adaptateur secteur.
Jetez toujours les piles usagées conformément
à la législation en vigueur.
Fonctionnement sur
adaptateur secteur
DC IN
Prise secteur
FICHE CC
PS-PS5
AVERTISSEMENT
N’utilisez qu’un adaptateur PS-PS5 avec
votre CD-BT1MKII. L’emploi d’un autre type
d’adaptateur secteur pourrait endommager
votre CD-BT1MKII.
Retirez les piles avant d’utiliser le CD-BT1MKII
avec un adaptateur secteur. Il y a un risque
de léger bruit si vous utilisez l’unité sur ad
-
aptateur secteur alors que les piles sont à
l’intérieur. Si vous branchez un adaptateur
secteur et que vous avez oublié de retirer les
piles, éteignez l’appareil avec l’interrupteur
POWER
et retirez les piles. De même,
éteignez l’appareil avant de basculer des piles
vers l’adaptateur secteur.
Débranchez l'adaptateur secteur de la prise
lorsque vous n’utilisez pas le CD-BT1MKII.
Les réglages peuvent ne pas être
correctement sauvegardés si vous éteignez
immédiatement après avoir inséré un CD ou
changé des réglages. Si les réglages ne sont
pas correctement sauvegardés, le système
peut ne pas démarrer avec les derniers
réglages et à la place démarrer avec les
valeurs par défaut.
Mise sous/hors tension
POWER

TASCAM CD-BT1MKII — 31
Français
Noms et fonctions des parties
TUNER
SETUP
TUNER/SETUP

32 — TASCAM CD-BT1MKII
Français
Noms et fonctions des parties (suite)
1) Prise DC IN
2) Compartiment des piles
3) Capot du lecteur de CD
4) Afficheur
5) Touche TIME/ESC
6) Touches PREV, NEXT, UP, DOWN
UP
DOWN
7) Touche LOOP
8) Touche I/O
9) Touche TUNER/SETUP
10) Touche TMP/KEY / CD EFF
11) Touche EQ/EDIT
12) Touche EFFECT/EDIT
13) Touches Track Skip/Search
[
m
/
.
/
\
,
]

TASCAM CD-BT1MKII — 33
Français
Noms et fonctions des parties (suite)
PLAY
14) Touche STOP/MTRO [H]
15) Touche PLAY/PAUSE [G/J]
16) Touche CUE
CUE
17) Prise PHONES
18) Prise LINE OUT
19) Commande OUTPUT
PHONES
LINE
OUT
20) Commande INPUT
BASS IN
21) Prise LINE IN
22) Prise BASS IN
BASS IN
23) Prise FOOT
24) Interrupteur POWER
25) Commutateur CD EFF
26) Sélecteur BASS IN (PASSIVE/
ACTIVE)

34 — TASCAM CD-BT1MKII
Français
Faire les connexions
Connexion d’une guitare basse
(BASS IN)
GUITARE BASSE
BASS IN.
BASS IN
PASSIVE
ACTIVE
BASS IN
Réglage du niveau d’entrée
INPUT
BASS IN
Entrée de signaux d’appareils
externes (
LINE IN
)
SORTIE LIGNE D’UN APPAREIL EXTERNE
LINE IN
LINE
IN
AVERTISSEMENT
Ne connectez JAMAIS un amplificateur de
guitare basse à la prise
BASS IN
du CD-
BT1MKII car vous endommageriez votre
équipement.
Réglage du niveau de sortie après
ajout des effets intégrés
EFFECT/EDIT
NEXT
PREV
LVL
UP
DOWN
Réglage de la balance de mixage
entre guitare basse et CD
TUNER/SETUP
NEXT
PREV
MIX

TASCAM CD-BT1MKII — 35
Français
Sortie vers un casque et des
appareils externes
PHONES
LINE OUT
Réglage du niveau de sortie
LINE OUT
PHONES
OUTPUT
NOTE
Les niveaux des sorties
LINE OUT
et
PHONES
sont pilotés conjointement par
la commande
OUTPUT
et ne peuvent pas
être réglés indépendamment.
Si vous avez un appareil d'enregistrement
connecté en prise
LINE OUT
, rappelez-
vous que la commande
OUTPUT
affecte le
niveau d'enregistrement.
Branchement d’une pédale
PEDALE COMMUTATEUR
RC-30P
FOOT
POL
PRECAUTION
Pour éviter des problèmes avec votre
CD-BT1MKII, n'utilisez qu'une pédale
commutateur comme la RC-30P TASCAM
(vendue séparément) qui a une fiche jack
standard (extrémité et manchon).
Faire les connexions

36 — TASCAM CD-BT1MKII
Français
Entrée dans le système de
menus
EFFECT/EDIT
EQ/EDIT
TUNER/SETUP.
TUNER/SETUP
TMP/KEY / CD EFF
TMP/KEY /
CD EFF
STOP
Catégorie
de menu
Elément
de menu
Valeurs (les valeurs par
défaut sont soulignées)
Notes
EFFECT EFF ON/OFF commute l'effet on/off
LIB 1–4, c1–c7, d1–d5 numéro de preset
Parameter
– dépend du type d’effet
LVL
0 à 64 niveau de sortie d’effet
EQ EQ L/ EQLM/
EQ M/
EQMH/ EQ H
-15 – 0 – +15
gain de la bande de
correction (L (graves),
LM (bas médiums), M
(médiums), MH (hauts
médiums), H (aigus).
MID ON/OFF
commute on/off la mise
en forme des médiums
TUNER
TUNE MODE=BAS: 5B, 4E, 3A, 2D, 1G
numéro de corde en mode
basse
MODE CHR/BAS mode d’accordeur
OSC (OFF), _C–_B, C–A, B,
_
C–
_
B,
(3 octaves)
hauteur de l’oscillateur
CAL 435–440–445
fréquence de base (la4,
unité: Hz)
SETUP
MIX B10 – B1, 0, C1 – C10
balance de mixage entre
CD et entrée
PLAY
ALL/SGL
lecture totale ou unique
CUE CUE/FLS
action de
CUE
Emploi du système de menus

TASCAM CD-BT1MKII — 37
Français
Catégorie
de menu
Elément
de menu
Valeurs (les valeurs par
défaut sont soulignées)
Notes
SETUP
UPDN MIX, TMP, KEY, FIN
fonction de
UP/DOWN
en
mode d’affichage de base
FOOT
EQ+, FX+, FX-, CUE. FLS,
REW, FF
fonction de la pédale
commutateur
POL NOR/INV
polarité de la pédale
commutateur
TEMPO
KEY
TMP
VSA=OFF: -50 à +16
VSA=ON: -50, -32, -16,-12,
-8, -4,
0, +4, +8, +12, +16
vitesse de lecture du CD en %
VSA ON/OFF
commute on/off la VSA
KEY
I6 – 0 – O6
commande de tonalité en
demi-tons
FINE -50 – 0 – +50
hauteur fine (centièmes)
CD EFF
BEE OFF, BST, ENH, CUT
sélectionne la fonction boost,
enhance ou cut pour la lecture
de CD
MONO OFF (stéréo), L+R, L, R
mode d’écoute mono
SPLT OFF (mix), C-B, B-C
mode d’écoute séparée
METRONOME
MTRO (OFF), 40 – 120 – 220
tempo du métronome en BPM
(battements par minute)
BEAT
OFF, 2 – 6
nombre de battements du
métronome
Emploi du système de menus
Choix des éléments de menu
PREV
NEXT
Changement des valeurs de
réglage
UP
DOWN
Sortie du système de menus
TIME/ESC

38 — TASCAM CD-BT1MKII
Français
Lecture
PLAY/PAUSE
G
/
J
STOP
H
Saut entre plages et recherche
dans les plages
m
/
./
/
,
Mise en boucle (plage/disque)
LOOP
PLAY
SGL
LOOP 1
ALL
LOOP
Bouclage (points In/Out)
I/O
I/O
I-O
I/O
LOOP
I-O
LOOP
LOOP
LOOP
Emploi du lecteur de CD
I/O
La touche CUE
CUE
CUE
FLS
CUE
FOOT
CUE
FLS
Affichage
TIME/ESC

TASCAM CD-BT1MKII — 39
Français
TMP
VSA
KEY
FINE
Commande de tempo
TMP/KEY/CD EFF
TMP
PREV
NEXT
TEMPO
UP
DOWN
UP
DOWN
TEMPO
VSA (écoute à vitesse variable)
TMP/KEY/CD EFF
VSA
PREV
NEXT
UP
DOWN
ON
OFF.
TEMPO
VSA
NOTE
Si la valeur de commande de tempo n'est pas
à 0 et si vous changez VSA de OFF en ON,
la valeur de tempo sera automatiquement
ramenée à une “valeur VSA ON”. Par
exemple, si la valeur est [-33] quand VSA est
sur OFF, elle sera automatiquement ramenée
à [-50] lorsque vous réglerez VSA sur ON.
Commande de tonalité
TMP/KEY/CD EFF
KEY
PREV
NEXT
KEY
UP
DOWN
IO
KEY
Accord fin
TMP/KEY/CD EFF
FINE
PREV
NEXT
KEY
UP
DOWN
O
I
KEY
Changements de hauteur et de tempo

40 — TASCAM CD-BT1MKII
Français
PRECAUTION
Si vous réglez la tonalité sur O6 alors que la
valeur d'accord fin est supérieure à 0, celle-ci
est automatiquement ramenée à 0. De même,
si vous réglez la tonalité sur
I6 alors que la
valeur d'accord fin est négative (inférieure à 0),
cette dernière revient automatiquement à 0.
Notez aussi que lorsque la commande de
tonalité ou la VSA est sur ON, vous pouvez
ressentir un "vibrato" sur la musique reproduite.
Cela n'est pas un défaut du lecteur de CD –
c'est le résultat naturel des effets spéciaux.
Emploi des effets de CD
Activer/désactiver les effets de CD
CD EFF
CD EFF
CD EFF
BEE (Bass Enhancement Effect)
TMP/KEY
/ CD EFF
PREV
NEXT
BEE
UP
DOWN
OFF
BST
ENH
CUT
Ecoute mono
TMP/KEY/
CD EFF
MONO
PREV
NEXT
UP
DOWN
L+R
L
R
OFF
Ecoute répartie
TMP/KEY/CD EFF
SPLT
PREV
NEXT
UP
DOWN
C-B
B-C
OFF
Emploi des effets de CD

TASCAM CD-BT1MKII — 41
Français
Composants
DLY
FLA
CHO
WAH
COMPL
COMPH
OCT
TECH
DIST
HCUT
Mémorisation de vos propres
réglages d’effet
EFFECT/EDIT
EFFECT/
EDIT
EFFECT/EDIT
Effect
EFF
PREV
NEXT
UP
DOWN
EFF
LIB
PREV
NEXT
LIB:d3
UP
DOWN
– –
–
UP
DOWN
ASTUCE
Voir le tableau Bibliothèque d’effets
pour déterminer le contenu du numéro
sélectionné.
PRECAUTION
S’il y a déjà des réglages dans la mémoire
d’effet sélectionnée dont vous partez, vous
les remplacerez si vous rappelez un effet
preset.
PREV
NEXT
Emploi des effets intégrés

42 — TASCAM CD-BT1MKII
Français
“ “,
LIB:c5
COMPL
COMPH
WAH
DLY
UP
DOWN
“ “,
WAH
DLY
MIX1
WAH
MIX2
DLY
UP
DOWN
WAH
DLY
DLY
MIX2.
PREV
NEXT
UP
DOWN
LVL
UP
DOWN
TIME/ESC
FLA
,
CHO
,
WAH
,
OCT
TECH
DLY
Rappel d’un effet avec vos réglages
EFFECT/EDIT
ASTUCE
Si vous avez connecté une pédale
commutateur telle qu’une RC-30P
TASCAM (vendue séparément), vous pouvez
changer de mémoire en pressant la pédale
commutateur. Assurez-vous que FOOT est
réglé sur FX+ ou FX- dans le menu Setup.
BIBLIOTHEQUE D'EFFETS
1 DLY
2 FLA-DLY
3 CHO-DLY
4 WAH-DLY
c1 COMPL-COMPH
c2 COMPL-COMPH-DLY
c3 COMPL-COMPH-FLA-DLY
c4 COMPL-COMPH-CHO-DLY
c5 COMPL-COMPH-WAH-DLY
c6 COMPL-COMPH-OCT-DLY
c7 COMPL-COMPH-TECH-DLY
d1 DIST-HCUT
d2 DIST-HCUT-DLY
d3 DIST-HCUT-FLA-DLY
d4 DIST-HCUT-CHO-DLY
d5 DIST-HCUT-WAH-DLY
Emploi des effets intégrés (suite)

TASCAM CD-BT1MKII — 43
Français
Réglage de l’égaliseur
EQ/EDIT
EQ/
EDIT
EQ/EDIT
EQ
PREV
NEXT
EQ L
EQLM
EQ M
EQHM
EQ H
MID
UP
DOWN
TIME/ESC
EQ
EQ
Rappel des réglages d’égaliseur
EQ/EDIT
ASTUCE
Si vous avez connecté une pédale
commutateur telle qu’une RC-30P
TASCAM (vendue séparément), vous pouvez
changer de mémoire en pressant la pédale
commutateur. Assurez-vous que FOOT est
réglé sur EQ+ ou dans le menu Setup.
Egaliseur (EQ)

44 — TASCAM CD-BT1MKII
Français
STOP
Choix du tempo du métronome
PREV
NEXT
MTRO
UP
DOWN
UP
DOWN
Choix des battements
PREV
NEXT
BEAT
UP
DOWN
NOTE
Le métronome ne fonctionne que
lorsqu'un CD n'est pas reproduit. Si vous
commencez à lire un CD pendant que
vous utilisez le métronome, celui-ci s'arrête
automatiquement.
Emploi du métronome

TASCAM CD-BT1MKII — 45
Français
Mode chromatique (CHR):
Mode guitare basse (BAS):
TUNER/SETUP
MODE
PREV
NEXT
BAS
CHR
UP
DOWN
TUNE:---
Bémol
I
DièseO
Juste
TUNE: XX
TUNE: XX
Emploi de l’oscillateur
CAL
ASTUCE
C'est une fonction pratique à utiliser lors
de l'accord, car vous pouvez écouter à la
fois le son de l'oscillateur et celui de votre
instrument. C'est aussi utile si vous accordez
un instrument acoustique, non connecté au
CD-BT1MKII.
TUNER/SETUP
OSC
PREV
NEXT
UP
DOWN
Calibrage du diapason
TUNER/SETUP
CAL
PREV
NEXT
UP
DOWN
Emploi de l’accordeur

46 — TASCAM CD-BT1MKII
Français
TUNER/
SETUP
PREV
NEXT
UP
DOWN
Balance de mixage
MIX
Mode de lecture de CD
PLAY
ALL
SGL
Fonction de la touche CUE
CUE
CUE
CUE
FLS
CUE:
FLS:
Fonction des touches
UP
et
DOWN
UP
DOWN
UPDN
UP
DOWN
MIX
TMP
KEY:
FIN:
Fonction de la pédale
FOOT
EQ+:
FX+, FX-:
CUE, FLS
Changement de vos préférences pour le CD-BT1MKII

TASCAM CD-BT1MKII — 47
Français
REW, FF:
Polarité de la pédale
POL
NOR
INV
UP
DOWN
Faits et chiffres (caractéristiques)
Types de disque CD single 8 cm,
12 cm
AN/NA 16 bits
Niveau de sortie
nominal (LINE OUT)
–10 dBV
Niveau de sortie
maximal (LINE OUT)
sans distortion
0 dBV (1 Vrms)
Impédance de sortie
1 k
$
Niveau de sortie
maximal (PHONES)
> 18mW
(sous 32$)
Niveaux d’entrée
nominaux
LINE IN
BASS IN
–10 dBV
–15 dBV (Passive)
–10 dBV (Active)
Tension requise
CC 9V (adaptateur
secteur PS-PS5)
Piles AA x 4
(NiMH ou alcalines)
Consommation
électrique
4 W (adaptateur
secteur PS-PS5)
Dimensions (L x P x H)
avec les pieds
232 x 138 x 40
(mm)
Poids (sans les piles) 620g
Caractéristiques de lecture du CD
Bande passante 20 Hz à 20 kHz
±1,0 dB
Plage dynamique > 88 dB
Rapport S/B > 88 dB
DHT <0,01%
Traitement du signal
numérique
32 bits

48 — TASCAM CD-BT1MKII
DeutschDeutsch
Wichtige Sicherheitshinweise
Bitte lesen Sie die Folgenden Sicher-
heitshinweise sorgfältig durch!
1 Bedienungsanleitung sorgfältig
durchlesen – Bitte lesen Sie vor Inbetriebnah
-
me alle Sicherheits- und Bedienungsanweisun
-
gen durch.
2 Bedienungsanleitung aufbewahren
– So können Sie bei später auftretenden Fragen
nachschlagen.
3 Alle Warnhinweise beachten – Dies
gilt sowohl für alle Angaben am Gerät als auch
in dieser Bedienungsanleitung.
4 Bestimmungsgemäßer Gebrauch
– Benutzen Sie das Gerät nur zu dem Zweck
und auf die Weise, wie in dieser Bedienungsan
-
leitung beschrieben. Geben Sie das Gerät nie
-
mals ohne diese Bedienungsanleitung weiter.
5 Reinigung – Vor der Reinigung das Netz
-
kabel abziehen. Keine Nass- oder Sprühreiniger
verwenden. Mit einem trockenen Tuch reinigen.
6 Zusatzgeräte – Zusatzgeräte, die nicht
mit den Herstellerempfehlungen übereinstim
-
men, können Schäden verursachen.
7 Aufstellung
a. Untersatz – Niemals einen instabilen
Untersatz (fahrbares oder stationäres Gestell,
Regal, Halterung, Tisch) verwenden. Andernfalls
kann das Gerät herabfallen und hierdurch
ernsthaft beschädigt werden sowie ernsthafte
Verletzungen hervorrufen. Ausschließlich
einen geeigneten und stabilen Untersatz
(mitgeliefert oder vom Hersteller empfohlen)
benutzen. Zur Befestigung unbedingt die
Herstellerangaben beachten und ausschließ
-
lich empfohlenes Zubehör verwenden.
b. Fahrbare Gestelle – Plötzliche Rich-
tungswechsel und zu rasches Beschleunigen/
Bremsen sowie unebenen Untergrund vermei-
den, da andernfalls Gestell und/oder Gerät
umfallen können.
c. Hitzeeinwirkung – Das Gerät in aus
-
reichender Entfernung zu Hitze abstrahlenden
Vorrichtungen (Heizung, Ofen etc.) und anderen
Geräten (Verstärker etc.) aufstellen.
d. Belüftung – Die Belüftungsöffnungen
des Geräts dürfen niemals blockiert werden.
Andernfalls können Überhitzung und Betriebs
-
störungen auftreten. Das Gerät daher niemals
auf einer weichen Unterlage (Kissen, Sofa, Tep
-
pich etc.) aufstellen. Bei Einbau in einem Regal,
Gestell- oder Einbauschrank unbedingt auf
einwandfreien Temperaturausgleich achten. Die
diesbezüglichen Herstellerangaben beachten.
e. Nässe und Feuchtigkeit – Gerät
nicht in unmittelbarer Nähe zu Wasserbehältern
(Badewanne, Küchenspüle, Schwimmbecken
etc.) oder in Räumen betreiben, in denen hohe
Luftfeuchtigkeit auftreten kann.
f. Wand- und Deckenbefestigung
– Hierzu unbedingt die Vorschriften und Emp
-
fehlungen des Herstellers beachten.
g. Außenantennen – Beim Montieren ei
-
ner Außenantenne besteht Lebensgefahr, wenn
Netz- und Starkstromleitungen berührt werden.
Außenantenne und zugehörige Kabel stets in
ausreichendem Abstand zu Hochspannungs-,
Licht- und anderen Stromleitungen montieren,
so dass kein Kontakt möglich ist.
8 Spannungsversorgung – Sicherstellen,
dass die örtliche Netzspannung mit der auf
dem Gerät angegebenen Netzspannung über
-
einstimmt (Aufkleber auf der Unterseite des
Geräts) Im Zweifelsfall den Fachhändler oder
den verantwortlichen Energieversorger vor Ort
befragen. Bei Geräten, die für Batteriebetrieb
oder eine andere Spannungsquelle geeignet
sind, die zugehörigen Bedienungshinweise
beachten.

TASCAM CD-BT1MKII — 49
Deutsch
9 Netzkabel – Das Netzkabel so verlegen,
dass es nicht gedehnt, gequetscht oder geknickt
werden kann. Insbesonders darauf achten, dass
keine Schäden am Stecker, an der Steckdose
ode am Netzkabelausgang des Geräts auftreten
können. Netzkabel niemals eigenmächtig um-
bauen, insbesondere die Schutzkontakte des
Netzsteckers niemals abkleben.
10 Netzüberlastung – Netzsteckdosen,
Verlängerungskabel oder Steckdosenverteiler
niemals überlasten, da andernfalls Stromschlag-
und Brandgefahr besteht.
11 Gewitter und Nichtgebrauch – Bei
Gewittern und längerem Nichtgebrauch des
Geräts den Netzstecker und das Antennenkabel
herausziehen, um Schäden durch Blitzschlag
und/oder Spannungsstöße zu vermeiden.
12 Eindringen von Fremdkörpern und
Flüssigkeit – Niemals Gegenstände in
die Geräteöffnungen einführen, es besteht
Stromschlag- und Brandgefahr. Niemals offene
Behälter mit Flüssigkeit auf das Gerät stellen,
und sicherstellen, dass keine Flüssigkeit in das
Geräteinnere eindringen kann.
13 Kundendienst – Niemals selbst War
-
tungsarbeiten vornehmen. Bei geöffnetem Ge
-
häuse besteht Stromschlag- und Verletzungs-
gefahr. Wartungsarbeiten stets qualifiziertem
Wichtige Sicherheitshinweise
Fachpersonal überlassen.
14 Schadensbehebung in Fachwerkstät
-
ten – In den folgenden Fällen müssen Prüf-
und/oder Wartungsarbeiten von qualifiziertem
Fachpersonal durchgeführt werden:
a. Bei beschädigtem Netzkabel oder Netz-
stecker.
b. Wenn sich Flüssigkeit oder Fremdkörper
im Geräteinneren befinden.
c. Wenn das Gerät Nässe oder Feuchtigkeit
ausgesetzt war.
d. Wenn bei vorschriftsgemäßer Hand-
habung Betriebsstörungen auftreten. Bei
Störungen nur Gegenmaßnahmen ergreifen, die
in der Bedienungsanleitung beschrieben sind.
Andernfalls keine weiteren Schritte vornehmen,
da hierdurch Schäden verursacht werden kön-
nen, die Reparaturarbeiten durch Fachpersonal
erfordern.
e. Wenn das Gerät einer heftigen Er
-
schütterung ausgesetzt war oder anderweitig
beschädigt wurde.
f. Bei Leistungsbeeinträchtigungen jeder
Art.
15 Teiletausch – Wenn ein Teiletausch erfor
-
derlich wird, die Einhaltung der vom Hersteller
vorgeschriebenen Ausführungen und techni
-
schen Kenndaten beachten. Nicht zulässige
Teile können Brand, Stromschlag sowie andere
ernsthafte Störungen verursachen.
16. Sicherheitsüberprüfung – Nach Kun
-
dendienst- und Reparaturarbeiten stets eine
Sicherheitsüberprüfung vom Fachpersonal
vornehmen lassen, um einwandfreien Betrieb
zu gewährleisten.

50 — TASCAM CD-BT1MKII
Deutsch
Inhalt
Was Sie über dieses Handbuch wissen sollten:
PLAY
MENU
Was Sie beim Umgang mit CDs beachten müssen ....................... 51
Wichtige Hinweise zur Stromversorgung .....................................
52
Was ist dran am
CD-BT1MKII? ....................................................... 55
Verbindungen herstellen ..............................................................
58
Das Menü nutzen .......................................................................... 61
Den CD-Player nutzen ................................................................... 63
Tonhöhe und/oder Tempo der CD-Wiedergabe ändern ................
65
CD-Effekte einsetzen .................................................................... 66
Die eingebauten Effekte verwenden ........................................... 68
Klangeinstellung mit dem Equalizer ............................................ 71
Das Metronom nutze
n .................................................................. 72
Das Stimmgerät nutzen ................................................................ 73
Die Voreinstellungen ändern ........................................................
75
Fakten und Zahlen (Technische Daten) .........................................
76

TASCAM CD-BT1MKII — 51
Deutsch
Was Sie beim Umgang mit CDs beachten müssen

52 — TASCAM CD-BT1MKII
Deutsch
Wichtige Hinweise zur Stromversorgung
Batterie-/Akkubetrieb
WICHTIG
Wir empfehlen Ihnen, sich wieder auflad-
bare Ni-MH-Akkus und ein Ladegerät zu
beschaffen, Sie können aber auch Alkaline-
Batterien verwenden. Mit anderen Batterien
funktioniert der CD-BT1MKII möglicherweise
nicht richtig.
VORSICHT
Falsche Handhabung kann dazu führen, dass
Batterien/Akkus auslaufen oder explodie-
ren. Halten Sie sich genau an die folgenden
Anweisungen.
Vorsichtsmaßnahmen im Umgang
mit Batterien und Akkus
Woran erkenne ich den Lade-
zustand der Batterien/Akkus?

TASCAM CD-BT1MKII — 53
Deutsch
Wichtige Hinweise zur Stromversorgung
Wie lange läuft der CD-BT1MKII
mit Batterien/Akkus?
Automatisches Stromsparen
CD OFF
PLAY
WICHTIG
Der CD-BT1MKII ist mit speziellen Funktionen
ausgestattet, die mehr Strom verbrauchen
als übliche tragbare CD-Player. Deshalb
ist die Batterielebensdauer kürzer als bei
solchen Geräten.
Die Batterielebensdauer beim CD-BT1MKII
ist sowohl von der Umgebung (Temperatur,
Luftfeuchte) als auch von der Anzahl der
benutzten Funktionen abhängig.
Unter Umständen kann es vorkommen, dass
trotz positiver Anzeige der Batteriestrom
nicht ausreicht, den CD-BT1MKII zu versor-
gen. Wechseln Sie in einem solchen Fall die
Batterien/Akkus aus, oder verwenden Sie
einen Wechselstromadapter.
Werfen Sie niemals alte Batterien/Akkus in
den Hausmüll. In Deutschland ist der Handel
verpflichtet, alte Batterien zur Entsorgung
kostenlos zurückzunehmen. Zudem können
alte Batterien meist beim örtlichen Wert
-
stoffhof abgegeben werden.
Einen Wechselstromadapter
verwenden
DC IN
Steckdose
DC-Stecker
PS-PS5
VORSICHT
Verwenden Sie mit dem CD-BT1MKII keinen
anderen Wechselstromadapter als einen
PS-PS5. Andere Adapter könnten Ihren CD-
BT1MKII beschädigen.
WICHTIG
Nehmen Sie die Batterien/Akkus heraus,
bevor Sie den CD-BT1MKII mit dem Adapter
betreiben. Wenn Batterien/Akkus eingelegt
sind, während Sie das Gerät mit dem
Wechselstromadapter betreiben, können
leise Geräusche auftreten. Wenn der
Wechselstromadapter bereits angeschlossen

54 — TASCAM CD-BT1MKII
Deutsch
ist, schalten Sie den CD-BT1MKII mit dem
POWER
-Schalter aus, und nehmen Sie dann
die Batterien/Akkus heraus.
Schalten Sie das Gerät auch immer aus,
wenn Sie zwischen Batterie-/Akkubetrieb
und dem Betrieb mit Adapter wechseln.
Trennen Sie den Adapter vom Stromnetz,
wenn Sie den CD-BT1MKII nicht benutzten.
Schalten Sie den CD-BT1MKII nicht sofort
aus, nachdem Sie eine CD eingelegt oder
Einstellungen geändert haben. Dabei könn-
ten Informationen verloren gehen, und der
CD-BT1MKII würde beim nächsten Einschal-
ten mit den Werkseinstellungen starten.
Das Gerät ein- und ausschalten
POWER
Wichtige Hinweise zur Stromversorgung

TASCAM CD-BT1MKII — 55
Deutsch
Was ist dran am CD-BT1MKII?
TUNERSETUP
TUNERSETUP

56 — TASCAM CD-BT1MKII
Deutsch
Was ist dran am CD-BT1MKII?
1) DC IN-Anschluss
2) Batteriefach
3) CD-Fach
4) Display
5) TIME/ESC-Taste
6) Tasten PREV, NEXT, UP, DOWN
7) LOOP-Taste
8) I/O-Taste
9) TUNER/SETUP-Taste
10) TMP/KEY / CD EFF-Taste
11) EQ/EDIT-Taste
A
B
OFF
12) EFFECT/EDIT-Taste
13) Sprung- und Suchtasten
[m/./\,]

TASCAM CD-BT1MKII — 57
Deutsch
Was ist dran am CD-BT1MKII?
PLAY
14) STOP/MTRO-Taste [H]
15) PLAY/PAUSE-Taste [G/J]
16) CUE-Taste
17) PHONES-Anschluss
18) LINE OUT-Anschluss
19) OUTPUT-Regler
PHONESLINE OUT
20) INPUT-Regler
BASS
IN
21) LINE IN-Anschluss
22) BASS IN-Anschluss
BASS
IN
23) FOOT-Anschluss

58 — TASCAM CD-BT1MKII
Deutsch
Verbindungen herstellen
24) Ein-/Ausschalter (POWER)
25) CD EFF-Schalter
26) Schalter BASS IN (PASSIVE/
ACTIVE)
Eine Bassgitarre anschließen
(BASS IN)
BASS
BASS IN
BASS IN
PASSIVE
ACTIVE
Den Eingangspegel anpassen
INPUT
BASS IN
Signale von anderen Geräten
einspeisen (LINE IN)
LINE OUT eines externen Geräts
LINE IN

TASCAM CD-BT1MKII — 59
Deutsch
VORSICHT
Verbinden Sie NIEMALS einen Bass- oder Gi-
tarrenverstärker mit dem
BASS IN
-Anschluss
des CD-BT1MKII. Sie beschädigen sonst mit
ziemlicher Sicherheit Ihre Geräte.
Den Ausgangspegel nach dem
Hinzufügen eingebauter Effekte
anpassen
EFFECT/EDIT
PREV
NEXT
LVL
UPDOWN
0
64
Das Mischungsverhältnis
zwischen Bassgitarre und CD
anpassen
TUNER/SETUP
PREV
NEXT
MIX
B10–B1
0
C1– C10
B10
0
C10
Ausgangssignal über Kopfhörer
und an andere Geräte ausgeben
PHONES
LINE OUT
Den Ausgangspegel anpassen
LINE
OUTPHONES
OUTPUT
WICHTIG
Der
OUTPUT
-Regler wirkt auf beide Ausgän-
ge (
LINE OUT
und
PHONES
) zugleich. Die
Pegel lassen sich nicht unabhängig vonein-
ander einstellen.
Bedenken Sie, dass Sie mit dem
OUTPUT
-
Regler den Aufnahmepegel beeinflussen,
wenn ein Aufnahmegerät am Ausgang
LINE
OUT
angeschlossen ist.
Verbindungen herstellen

60 — TASCAM CD-BT1MKII
Deutsch
Einen Fußschalter anschließen
Fußschalter RC-30P
FOOT
POL
VORSICHT
Um Probleme mit Ihrem CD-BT1MKII zu ver-
meiden, verwenden Sie nur Fußschalter mit
einem zweipoligen (Mono-) Klinkenstecker
wie den Tascam RC-30P. Dieser ist als Zube
-
hör erhältlich.
Verbindungen herstellen

TASCAM CD-BT1MKII — 61
Deutsch
Das Menüsystem aufrufen
EFFECT/EDIT
EQ/EDIT
A
B
TUNER/SETUP
TUNER/SETUP
TMP/KEY / CD EFF
TMP/KEY / CD
EFF
STOP
Menü Menü-
punkt
Einstellungen (Standard-
werte unterstrichen)
Bemerkungen
EFFECT EFF ON/OFF Effekt ein oder aus
LIB 1–4, c1–c7, d1–d5 Nummer der Voreinstellung
Parameter
– abhängig vom Effekttyp
LVL
0 bis 64 Ausgangspegel des Effekts
EQ EQ L / EQLM/
EQ M /
EQMH / EQ H
-15 bis -1, 0, +1 bis +15
Anhebung/Absenkung des
Frequenzbereichs (Tiefen,
mittlere Tiefen, Mitten,
mittlere Höhen, Höhen)
MID ON/OFF Mittenformer ein oder aus
TUNER
TUNE MODE=BAS: 5B, 4E, 3A, 2D, 1G
Nummer und Grundton der
Saite (Bassgit.-Stimmgerät)
MODE CHR/BAS Chromatisches oder Bass-
Stimmgerät
OSC (OFF), _C–_B, C–A, B,
_
C–
_
B,
(3 Oktaven)
Tonhöhe des Stimmtons
(Oszillator)
CAL 435–440–445
Kalibrierung des
Kammertons A (in Hertz)
SETUP
MIX B10–B1, 0, C1–C10
Mischungsverhältnis
zwischen CD- und
Eingangssignal
PLAY
ALL/SGL
Wiedergabe aller Titel oder
einzelner Titel
CUE CUE/FLS
Aktion nach Aufsuchen des
Cue-Punkts
Das Menü nutzen

62 — TASCAM CD-BT1MKII
Deutsch
Menü Menü-
punkt
Einstellungen (Standard-
werte unterstrichen)
Bemerkungen
SETUP
UPDN MIX, TMP, KEY, FIN
Funktion der UP/DOWN-Taste
außerhalb des Menüs (Balance,
Tempo, Tonhöhe, Feinabstimmung)
FOOT
EQ+, FX+, FX-, CUE. FLS, REW,
FF
Auswirkung des Fußschalters
POL NOR/INV
Polarität des Fußschalters
TEMPO
KEY TMP
VSA=OFF: -50 bis +16
VSA=ON: -50, -32, -16,-12,
-8, -4, 0, +4, +8, +12, +16
Tempo der CD-Wiedergabe in %
VSA ON/OFF VSA-Funktion ein oder aus
KEY
I6 – 0 – O6
Tonartänderung in Halbtonschritten
FINE -50 bis -1, 0, +1 bis +50
Feineinstellung der Tonart
(Hundertstel eines Halbtons)
CD EFF
BEE OFF, BST, ENH, CUT
Bass-Hervorhebung (aus,
verstärken, verstärken und
hervorheben, dämpfen)
MONO OFF (stereo), L+R, L, R Ausgangssignal in Mono
SPLT
OFF (mix), C-B, B-C
Ausgangssignal aufgeteilt (CD und
Bass jeweils links oder rechts)
METRONOME
MTRO (OFF), 40 – 120 – 220 Tempo des Metronoms in BPM
BEAT OFF, 2–6 Anzahl der Schläge je Takt
Das Menü nutzen
Menüpunkte auswählen
PREV
NEXT
Einstellungen ändern
UP
DOWN
Das Menü verlassen
TIME/ESC

TASCAM CD-BT1MKII — 63
Deutsch
Wiedergabe
PLAY/PAUSEG/J
H
Zum nächsten/vorherigen Titel
springen und Suchen
m/.
//,
Einzelne Titel oder gesamte CD
wiederholt abspielen
LOOP
PLAY
Einstell. Auswirkung
SGL
Der aktuelle Titel wird wiederholt.
Auf dem Display erscheint
LOOP 1
.
ALL
Die gesamte CD wird wiederholt.
Auf dem Display erscheint
LOOP
.
Den CD-Player nutzen
Abschnitt wiederholt abspielen
I/O
I/O
I-O
I/O
LOOP
I-O
LOOP
LOOP
LOOP
I/O

64 — TASCAM CD-BT1MKII
Deutsch
Die CUE-Taste nutzen
CUE
Einstell. Auswirkung
CUE
Das Laufwerk sucht die Stelle auf,
an der die Wiedergabe zuletzt
begonnen hat, und schaltet dort
auf Pause.
FLS
Die Wiedergabe wird direkt an der
Stelle fortgesetzt, an der sie
zuletzt begonnen hat (Flash-Start).
CUE
FOOT
CUE
FLS
Spielzeit auf dem Display
anzeigen
TIME/ESC
Den CD-Player nutzen

TASCAM CD-BT1MKII — 65
Deutsch
TMP
VSA
KEY
FINE
Das Tempo ändern
TMP/KEY / CD EFF
PREV
NEXT
TMP
TEMPO
UP
DOWN
ON
-50, -32, -16, -12, -8, -4, 0
+4, +8, +12 und +16%
OFF
TEMPO
Tempo ändern, ohne die Tonhöhe
zu beeinflussen
TMP/KEY / CD EFF
PREV
NEXT
VSA
UP
DOWN
ON
OFF
TEMPO
VSA
WICHTIG
Wenn für das Tempo ein anderer Wert als
0 eingestellt ist, wird dieser auf einen VSA-
verträglichen Wert geändert, sobald Sie VSA
einschalten.
Beispiel: -33 ist eingestellt, während VSA aus
ist. Wenn Sie nun VSA einschalten, springt
der Tempowert automatisch auf -50.
Tonart ändern
TMP/KEY / CD EFF
PREV
NEXT
KEY
KEY
UP
DOWN
IIOO
Tonhöhe und/oder Tempo der CD-Wiedergabe ändern

66 — TASCAM CD-BT1MKII
Deutsch
KEY
Feineinstellung der Tonart
TMP/KEY / CD EFF
PREV
NEXTFINE
KEY
UP
DOWN
-50
-1
0
+1
+50
KEY
O
–50
0
KEY
I
0
+50
KEY
WICHTIG
Wenn Sie KEY auf O6 stellen (maximale An-
hebung), während die Feineinstellung grö-
ßer als Null ist, stellt sich die Feineinstellung
automatisch zurück auf 0. Entsprechend
gilt: Wenn Sie KEY auf
I6 stellen (maximale
Absenkung), während die Feineinstellung
kleiner als Null ist, stellt sich die Feineinstel-
lung ebenfalls zurück auf 0.
Bedenken Sie außerdem: Wenn KEY
oder VSA eingeschaltet ist, hören Sie im
abgespielten Material möglicherweise ein
Vibrato. Dabei handelt es sich nicht um ei
-
nen Defekt des CD-Players, sondern um eine
normale Auswirkung der Spezialfunktionen.
CD-Effekte ein- oder ausschalten
CD EFF
CD EFF
Die Bass-Hervorhebung (BEE)
nutzen
TMP/KEY / CD EFF
PREV
NEXT
BEE
UP
DOWN
CD-Effekte einsetzen

TASCAM CD-BT1MKII — 67
Deutsch
OFF
BST
ENH
CUT
Ausgangssignal mono hören
TMP/KEY / CD EFF
PREV
NEXT
MONO
UP
DOWN
L+R
L
R
OFF
Ausgangssignal getrennt hören
TMP/KEY / CD EFF
PREV
NEXT
SPLT
UP
DOWN
C-B
B-C
OFF
CD-Effekte einsetzen

68 — TASCAM CD-BT1MKII
Deutsch
Effekt-Bestandteile
DLY
FLA
CHO
WAH
COMPL
COMPH
OCT
TECH
DIST
HCUT
Eine eigene Effekteinstellung
speichern
1
5
EFFECT/EDIT
EFFECT/EDIT
EFFECT
PREVNEXT
EFF
UP
DOWN
ON
PREV
NEXT
LIB
LIB:d3
UP
DOWN
TIPP
Sehen Sie in der Liste der Effekte nach,
welcher Inhalt sich hinter den Speicherplatz-
nummern verbirgt.
Fortsetzung auf der nächsten Seite
Die eingebauten Effekte verwenden

TASCAM CD-BT1MKII — 69
Deutsch
VORSICHT
Wenn der gewählte Speicherplatz bereits
Daten enthält, werden diese überschrieben,
sobald Sie eine Voreinstellung abrufen.
PREVNEXT
LIB:c5
COMPL, COMPH, WAH, DLY
UPDOWN
WAH
DLY
MIX1
MIX2
UP
DOWN
DLY
MIX2
PREVNEXT
UPDOWN
LVL
0
64
UPDOWN
TIME/ESC
Effektvoreinstellungen
1 DLY
2 FLA-DLY
3 CHO-DLY
4 WAH-DLY
c1 COMPL-COMPH
c2 COMPL-COMPH-DLY
c3 COMPL-COMPH-FLA-DLY
c4 COMPL-COMPH-CHO-DLY
c5 COMPL-COMPH-WAH-DLY
c6 COMPL-COMPH-OCT-DLY
c7 COMPL-COMPH-TECH-DLY
d1 DIST-HCUT
d2 DIST-HCUT-DLY
d3 DIST-HCUT-FLA-DLY
d4 DIST-HCUT-CHO-DLY
d5 DIST-HCUT-WAH-DLY
MIX1
FLACHOWAHOCT
TECH
Die eingebauten Effekte verwenden

70 — TASCAM CD-BT1MKII
Deutsch
MIX2
DLY
Eine eigene Effekteinstellung
abrufen
EFFECT/EDIT
TIPP
Zwischen den Effekt-Speicherplätzen kön-
nen Sie auch per Fußschalter (z. B. mit dem
als Zubehör erhältlichen Tascam RC-30P)
wechseln.
Wählen Sie dazu im Einrichtungsmenü FOOT
und dann FX+ (vorwärts) oder FX- (rück-
wärts).
Die eingebauten Effekte verwenden

TASCAM CD-BT1MKII — 71
Deutsch
Den Equalizer einstellen
EQ/
EDIT
A
B
OFF
EQ/
EDIT
PREV
NEXT
EQ L
(Tiefen: 80 Hz)
EQLM
tiefe Mitten: 200 Hz)
EQ M
(Mitten: 500 Hz)
EQHM
(hohe Mitten: 1,25 kHz)
EQ H
(Höhen: 3,15 kHz)
MID
Mittenformung ON/OFF
UP
DOWN
-15
+15
TIME/ESC
Gespeicherte EQ-Einstellungen
abrufen
EQ/EDIT
TIPP
Zwischen den Effekt-Speicherplätzen kön-
nen Sie auch per Fußschalter (z. B. mit dem
als Zubehör erhältlichen Tascam RC-30P)
wechseln. Wählen Sie dazu im Einrichtungs-
menü FOOT und dann EQ+.
Klangeinstellung mit dem Equalizer

72 — TASCAM CD-BT1MKII
Deutsch
Das Metronom nutzen
Tempo für das Metronom wählen
PREV
NEXT
MTRO
UPDOWN
UP
DOWN
Das Metronom nutzen
40
220
Taktart wählen
PREV
NEXT
BEAT
UP
DOWN
2
6
OFF
OFF
WICHTIG
Das Metronom funktioniert nur, wenn
gerade keine CD abgespielt wird. Wenn Sie
die CD-Wiedergabe starten, während das
Metronom läuft, stoppt es automatisch.

TASCAM CD-BT1MKII — 73
Deutsch
CHR
BAS
So stimmen Sie mit einer der
beiden Grundeinstellungen:
TUNER/SETUP
PREV
NEXT
MODE
UP
DOWN
BAS
CHR
Wenn Sie das chromatische
Stimmgerät gewählt haben:
TUNE:---
zu tief
I
zu hoch O
in Stimmung
Wenn Sie das Bassgitarren-
Stimmgerät gewählt haben:
TUNE: XX
XX
5B
4E
3A
2D
1G
Den Stimmton nutzen
CAL
TIPP
Der Tonerzeuger ist eine praktische Hilfe
beim Stimmen, weil Sie den Ton zusammen
mit Ihrem Instrument hören. Manche Mu-
siker stimmen auf diese Weise schneller als
mit einem Stimmgerät.
TUNER/SETUP
PREV
NEXT
OSC
Das Stimmgerät nutzen

74 — TASCAM CD-BT1MKII
Deutsch
UP
DOWN
Kalibrierung für Kammerton A
TUNER/SETUP
PREV
NEXT
CAL
UP
DOWN
435
445
Das Stimmgerät nutzen

TASCAM CD-BT1MKII — 75
Deutsch
TUNER/SETUP
PREV
NEXT
UPDOWN
Mischungsverhältnis CD-/
Eingangssignal
MIX
B10–B1
0
C1– C10
B10
0
C10
Die Voreinstellungen ändern
Modus der CD-Wiedergabe
PLAY
ALL
SGL
Wirkungsweise der CUE-Taste
CUE
CUE
CUE
FLS
CUE:
FLS:
Direktzugriff mit den Tasten UP
und DOWN
UPDOWN
UPDN
UPDOWN
MIX
TMP
KEY:
FIN:
Auswirkung des Fußschalters

76 — TASCAM CD-BT1MKII
Deutsch
nutzbare CD-Typen 8-cm-Single- oder
12-cm-CD
AD/DA 16 Bit
nominaler Ausgangs-
pegel (Lineausgang)
–10 dBV
max. Ausgangspegel
ohne Verzerrung
(Lineausgang)
0 dBV (1 V
rms
)
Ausgangsimpedanz 1 kOhm
max. Ausgangsleistung
(Kopfhörerausgang)
>18 mW
(an 32 Ohm)
nominale Eingangspegel
Line
Bass
–10 dBV
–15 dBV (passiv)
–10 dBV (aktiv)
Stromversorgung 9 V DC (über
Wechselstrom-
adapter PS-PS5)
4 Batterien/Akkus
der Größe AA
(NiMH-Akkus oder
Alkaline-Batterien)
Leistungsaufnahme 4 W (über
Wechselstrom-
adapter PS-PS5)
Abmessungen (B x H x T,
einschließlich Füße)
232 mm x
138 mm x 40 mm
Gewicht
(ohne Batterien/Akkus)
0,62 kg
CD-Wiedergabe
Frequenzbereich 20 Hz bis 20 kHz,
±1,0 dB
Dynamikbereich >88 dB
Fremdspannungsabstand
>88 dB
Verzerrung (THD)
<0,01%
Signalverarbeitung
32 Bit
Fakten und Zahlen (Technische Daten)
FOOT
EQ+:
FX+, FX-:
CUE, FLS:
REW, FF:
Polarität des Fußschalters
POL
NOR
INV

TASCAM CD-BT1MKII — 77
Italiano
Importanti Istruzioni di Sicurezza
1 Leggere le istruzioni — Prima di mettere in funzio-
ne l’apparecchio, leggere tutte le istruzioni di sicurezza ed
azionamento.
2 Conservare le istruzioni — Conservare in luogo si-
curo le istruzioni di sicurezza ed azionamento, per agevolare
future consultazioni.
3 Avvertenze precauzionali — Attenersi a tutte le
avvertenze, sia contrassegnate sull’apparecchio che conte
-
nute nel manuale d’istruzioni.
4 Seguire le istruzioni — Seguire tutte le istruzioni
d’azionamento ed utilizzo.
5 Acqua ed umidità — Non utilizzare l’apparecchio in
vicinanza dell’acqua: per esempio, vicino a vasche da bagno,
lavabi, lavelli da cucina, lavabiancheria, in scantinati umidi,
ai bordi di una piscina, eccetera.
6 Pulizia — Prima di pulire l’apparecchio togliere
sempre l’alimentazione, staccando la spina. Non utilizzare
prodotti specifici liquidi o aerosol: basta un semplice panno
inumidito
7 Ventilazione — Per garantire un funzionamento
affidabile e per proteggere contro il riscaldamento eccessivo,
sul mobile sono praticate apposite fessure ed aperture di
ventilazione che non devono assolutamente essere otturate
o coperte appoggiando l’apparecchio, per esempio, su un
letto, un divano, un tappeto o superfici analoghe.
8 Calore — L’apparecchio non deve essere collocato
vicino a sorgenti di calore, come stufe, radiatori, aerotermi
o altre apparecchiature che producono calore, amplificatori
compresi.
9 Accessori — Per non correre inutili rischi, non uti
-
lizzare accessori diversi da quelli consigliati dal fabbricante
dell’apparecchio.
10 Installazione — Non installare quest’apparecchio su
un qualsiasi appoggio instabile: potrebbe cadere, riportando
gravi danni o coinvolgendo anche eventuali persone vicine.
11Messa a terra o polarizzazione — Quest’apparecchio
potrebbe essere munito di una spina di linea polarizzata a
corrente alternata (che ha una lama più larga dell’altra). Tale
spina entra nella presa di rete soltanto in una direzione: si
tratta di una misura di sicurezza. Se risultasse impossibile
inserire la spina a fondo, provare a voltarla nell’altra dire
-
zione. Se anche così la spina si rifiuta di entrare, chiamare
un elettricista e far sostituire la presa, evidentemente di tipo
sorpassato: meglio una piccola spesa, che rinunciare alla
sicurezza offerta dalla spina polarizzata.
12 Protezione del cavo di rete — Stendere i cavi
d’alimentazione dove abbiano scarse probabilità di essere
calpestati o pinzati da oggetti posti sopra o vicino ad essi; at
-
tenzione soprattutto alle sezioni di cavo vicino ai connettori
(prese o spine), agli appositi contenitori, nonché al punto in
cui il cavo esce dall’apparecchio.
13 Accessori — Usare solo gli accesssori forniti in
dotazione e/o quelli consigliati dal costruttore.
14 Spostamenti — Quando l’apparecchio è
appoggiato su un carrello, spostare il tutto con pre
-
cauzione: brusche fermate, spinte eccessive e superfici
accidentate possono infatti provocare il ribaltamento.
Non bisogna nemmeno inserire l’apparecchio nel vano
di un mobile, come una libreria o un armadietto, a meno
che sia stato previsto un adatto sistema di ventilazione.
15 Fulmini — Per proteggere ulteriormente l’apparec-
chio nel corso di un temporale, oppure quando rimane senza
sorveglianza e non viene utilizzato per un periodo prolunga-
to, staccarlo dalla presa di rete e scollegare l’antenna o il si
-
stema via cavo. Questa precauzione eviterà che l’apparecchio
venga danneggiato da un fulmine o da un picco transitorio di
tensione.
16 Assistenza — Non tentare mai di riparare l’apparec
-
chio da soli: smontando il coperchio o il pannello posteriore
si può rimanere esposti a tensioni pericolose o correre altri
rischi. Ogni intervento d’assistenza dovrà essere effettuato
da personale tecnico qualificato, in special modo se si verifi
-
cano danni come: Il cavo o la spina di alimentazione risultano
danneggiati, o sono caduti oggetti o sono colati liquidi all’in-
terno dell’apparecchio, se l’apparecchio è rimasto esposto
alla pioggia o si è comunque bagnato, se l’apparecchio non
si comporta correttamente seguendo le normali istruzioni.
Effettuare soltanto le regolazioni contemplate nel manuale
d’utente; modificare altri comandi potrebbe comportare un
ulteriore danno e richiedere poi un lavoro supplementare da
parte del tecnico per ripristinare le condizioni originali, se
l’apparecchio è caduto oppure l’involucro ha subito danni, e
se si nota un notevole calo nelle prestazioni
• Utilizzare soltanto un elemento (carrello, piano d’appog
-
gio, treppiede, staffa, tavolo) consigliato dal fabbricante o
venduto insieme all’apparecchio stesso. Per qualsiasi tipo
d’installazione, seguire le istruzioni del fabbricante ed usare
accessori consigliati dallo stesso.
• Non piazzare oggetti contenenti liquidi, come vasi,
bicchieri, bottiglie o altro, nelle immediate vicinanze
dell’apparecchio
• Non installare l’apparecchio in spazi angusti e non ventila
-
ti, come librerie o altro.
• Questo apparecchio assorbe un limitato quantitativo di
corrente dall’impianto elettrico anche se spento.

78 — TASCAM CD-BT1MKII
Italiano
Indice dei contenuti
Informazioni su questo manuale:
PLAY
MENU
Utilizzo dei compact disc ....................................................................79
Alimentazione del CD-BT1MKII ..........................................................80
Nomi delle parti del CD-BT1MKII e delle funzioni .............................82
Collegamenti ......................................................................................85
Utilizzare il menu System ...................................................................
87
Cambi di intonazione e tempo di esecuzione ....................................89
Utilizzare gli effetti
CD .......................................................................91
Equalizzatore ......................................................................................
94
Utilizzare il metronomo ......................................................................
95
Utilizzare l’accordatore ......................................................................
96
Cambiare le preferenze del CD-BT1MKII ............................................
97
Caratterist
iche tecniche .....................................................................98

TASCAM CD-BT1MKII — 79
Italiano
Utilizzo dei compact disc

80 — TASCAM CD-BT1MKII
Italiano
Alimentazione del CD-BT1MKII
Operazioni con le batterie
ATTENZIONE
Un cattivo utilizzo delle batterie può provoca-
re malfunzionamenti ed esplosioni. Leggere
accuratamente le seguenti istruzioni:
Note sulle batterie
Livello di carica delle batterie
Durata delle batterie
Risparmio automatico di energia
CD OFF

TASCAM CD-BT1MKII — 81
Italiano
Alimentazione del CD-BT1MKII
PLAY
ATTENZIONE
A causa di funzioni speciali disponibili sul CD-
BT1MKII, quali cambi di tonaltà o effetti, la
durata delle batterie è più breve che sui co
-
muni lettori CD portatili.
Nel CD-BT1MKII la durata delle batterie è
influenzata dal numero delle funzioni utiliz
-
zate e da altri fattori quali: temperatura e
umidità.
In alcune situazioni operative, le batterie non
hanno carica sufficiente per alimentare il CD-
BT1MKII sebbene l’indicatore di carica sul di-
splay mostri il contrario. Se questo accade,
utilizzate un alimentatore di rete.
Smaltite sempre le batterie secondo le norme
dettate sulla differenziazione dei rifiuti.
Operazioni con l’alimenta-
tore
DC IN
Presa di
corrente a
muro
Presa DC IN
PS-PS5
ATTENZIONE
Utilizzare solo l’alimentatore Tascam PS-PS5
con il vostro CD-BT1MKII. L’utilizzo di un
modello diverso, potrebbe danneggiare il
l’unità.
Prima di utilizzare il CD-BT1MKII con un ali-
mentatore, rimuovere le batterie per evitare
la possibilità di un leggero rumore di fondo.
Spegnere sempre prima il CD-BT1MKII per
collegarlo ad un alimentatore e se per caso
è stato acceso con ancora le batterie inserite,
spegnerlo prima di rimuoverle.
Scollegare l’alimentatore dalla presa di cor
-
rente quando non si utilizza il CD-BT1MKII.
Per conservare le impostazioni, non spegnere
il CD-BT1MKII subito dopo che queste sono
state salvate o appena inserito un CD. Se le
impostazioni non vengono salvate in modo
appropriato, il sistema al riavvio successivo
non potrà caricarle correttamente e ripartirà
con quelle di default.
Spegnere e accendere l’unità
POWER

82 — TASCAM CD-BT1MKII
Italiano
Nomi delle parti del CD-BT1MKII e delle funzioni
TUNER
SETUP
TUNER/
SETUP

TASCAM CD-BT1MKII — 83
Italiano
Nomi delle parti del CD-BT1MKII e delle funzioni
1) Jack DC IN
2) Compartimento batterie
3) Coperchio del drive CD
4) Display
5) Tasto TIME/ESC
6) Tasti PREV, NEXT, UP, DOWN
7) Tasto LOOP
8) Tasto I/O
9) Tasto TUNER/SETUP
10) Tasto TMP/KEY / CD EFF
11) Tasto EQ/EDIT
12) Tasto EFFECT/EDIT
13) Tasti Track Skip/Search
[
m
/
. /
\
,
]
PLAY

84 — TASCAM CD-BT1MKII
Italiano
Nomi delle parti del CD-BT1MKII e delle funzioni
14) Tasto STOP/MTRO [H]
15) Tasto PLAY/PAUSE [G/J]
16) Tasto CUE
CUE
17) Jack PHONES
18) Jack LINE OUT
19) Controllo OUTPUT
PHONES
LINE OUT
20) Controllo INPUT
BASS IN
21) Jack LINE IN
22) Jack BASS IN
BASS IN
23) Jack FOOT
24) Interruttore POWER
25) Interruttore CD EFF
26) Interruttore BASS IN
(PASSIVE/ACTIVE)

TASCAM CD-BT1MKII — 85
Italiano
Collegamenti
Collegare un basso (BASS IN)
BASSO
BASS
IN
BASS IN
PASSIVE
ACTIVE
BASS IN
Regolare il livello di ingresso
INPUT
BASS IN
Ricevere segnali da unità esterne
(
LINE IN
)
Presa LINE OUT
(unità esterne)
LINE IN
LINE IN
ATTENZIONE
Non collegare MAI un amplificatore per bas-
so nella presa
BASS IN
del CD-BT1MKII per
non danneggiare il vostro equipaggiamento.
Regolare il livello di uscita dopo
l’attivazione degli effetti interni
EFFECT/
EDIT
NEXT
PREV
LVL
UP
DOWN
Regolare il bilanciamento tra
basso e CD
TUNER/
SETUP
NEXT
PREV
MIX
Uscite per le cuffie e per
dispositivi esterni

86 — TASCAM CD-BT1MKII
Italiano
PHONES
LINE OUT
Regolare il livello di uscita
LINE OUT
PHONES
OUTPUT
NOTA
Il livello delle prese
LINE OUT
e
PHONES
sono regolati insieme dal controllo
OUTPUT
e non possono essere impostati in modo in
-
dipendente.
Si ricorda che quando c’è un registratore col
-
legato alla presa jack
LINE OUT
, il control-
lo
OUTPUT
regola il livello di registrazione.
Collegare un pedale
Pedale
RC-30P
FOOT
POL
ATTENZIONE
Per evitare problemi con il CD-BT1MKII, utiliz-
zare solo il pedale TASCAM RC-30P (venduto
separatamente).
Collegamenti

TASCAM CD-BT1MKII — 87
Italiano
Attivare il menu System
EFFECT
EFFECT /EDIT
EQ
EQ/EDIT
TUNER
TUNER/SETUP
SETUP
TUNER/SETUP
TEMPO/KEY
TMP/KEY/CD
EFF
CD EFF
TMP/
KEY/CD EFF
METRONOME
STOP
Categorie
Menu
Voci Menu Valori (i valori di default
sono sottolineati)
Note
EFFECT EFF ON/OFF attiva e disattiva gli effetti
LIB 1–4, c1–c7, d1–d5 numero preset
PARAMETER
– dipende dal tipo di effetto
LVL da 0 a 64 livello uscita effetto
EQ EQ L/ EQLM/
EQ M/
EQMH/ EQ H
-15 – 0 – +15
regola il guadagno della
banda di equalizzazione
(low, mid-low, mid, mid-
high, high
MID ON/OFF
attiva e disattiva la
funzione MID
TUNER TUNE
MODE=BAS: 5B, 4E, 3A, 2D, 1G
imposta il numero delle
corde in Bass Mode
MODE CHR/BAS seleziona l’accordatura
OSC (OFF), _C–_B, C–A, B,
_
C–
_
B,
(3 ottave)
imposta l’intonazione
dell’oscillatore
CAL
435–440–445
imposta la frequenza
base (A4, unità: Hz)
SETUP MIX
B10 – B1, 0, C1 – C10
imposta il bilanciamento
tra CD e ingresso
PLAY
ALL/SGL
seleziona l’esecuzione
completa o singola
CUE
CUE/FLS
seleziona azione di
CUE
Utilizzare il menu System

88 — TASCAM CD-BT1MKII
Italiano
Categorie
Menu
Voci
Menu
Valori (i valori di default
sono sottolineati)
Note
SETUP UPDN MIX, TMP, KEY, FIN imposta la funzione del
tasto
UP/DOWN
FOOT
EQ+, FX+, FX-, CUE. FLS,
REW, FF
imposta la funzione del
pedale
POL NOR/INV imposta la polarità del
pedale
TEMPO KEY TMP VSA=OFF: da -50 a +16
VSA= ON: -50, -32, -16, -12,
-8, -4,
0, +4, +8, +12, +16
imposta la velocità di
esecuzione del CD in %
VSA ON/OFF attiva/disattiva VSA
KEY
I6 – 0 – O6
imposta la tonalità in
semitoni
FINE -50 – 0 – +50 accordatura fine (cent)
CD EFF
BEE OFF, BST, ENH, CUT
seleziona le funzioni, boost,
enhance e cut
MONO OFF (stereo), L+R, L, R
seleziona la modalità
monitor mono
SPLT
OFF (mix), C-B, B-C
seleziona la modalità
monitor split
METRONOME MTRO (OFF), 40 – 120 – 220 imposta il tempo di
metronomo in BPM (Beat
Per Minute)
BEAT OFF, 2 – 6 seleziona il numero di tempi
del metronomo
Scegliere le voci di menu
PREV
NEXT
Cambiare le impostazioni dei
valori
UP
DOWN
Uscire dal menu System
TIME/ESC
Utilizzare il menu System

TASCAM CD-BT1MKII — 89
Italiano
Riproduzione
PLAY/PAUSE
G
/
J
STOP
H
Spostarsi tra le tracce o
posizionarsi all’interno
m
/
.
/
/
,
Ripetizione (track/disc)
LOOP
PLAY
SGL
LOOP 1
ALL
LOOP
Ripetizione (punti In/Out)
I/O
I/O
I/O
I-O
I/O
LOOP
I-O
LOOP
LOOP
LOOP
Cambi di intonazione e tempo di esecuzione
I/O
Tasto CUE
CUE
CUE
FLS
CUE
FOOT
CUE
FLS
Display
TIME/
ESC

90 — TASCAM CD-BT1MKII
Italiano
TMP
VSA
KEY
FINE
Controllo Tempo
TMP/KEY / CD EFF
TMP
PREV
NEXT
TEMPO
UP
DOWN
UP
DOWN
TEMPO
VSA
TMP/KEY / CD EFF
VSA
PREV
NEXT
UP
DOWN
ON
OFF.
TEMPO
VSA
NOTA
Se il valore del controllo tempo non è diverso
da 0 e si cambia VSA da OFF a ON, il valore
del tempo verrà automaticamente impostato
a “VSA ON value.” Per esempio, se il valore è
[-33] quando VSA è OFF, verrà automatica
-
mente impostato a [-50] quando si imposta
VSA su ON.
Controllo Key
TMP/KEY / CD EFF
KEY
PREV
NEXT
KEY
UP
DOWN
IO
KEY
Fine tuning (accordatura fine)
TMP/KEY / CD EFF
FINE
PREV
NEXT
KEY
UP
DOWN
O
I
KEY
Cambi di intonazione e tempo di esecuzione

TASCAM CD-BT1MKII — 91
Italiano
Se si imposta il controllo key a O6 mentre il
valore del fine tuning è maggiore di 0, il valo
-
re del fine tuning viene impostato automati
-
camente a 0. Allo stesso modo, Se si imposta
il controllo key a
I6 mentre il valore del fine
tuning è maggiore di 0, il valore del fine tu
-
ning viene impostato automaticamente a 0.
Si noti che mentre il controllo key o VSA è ON,
la riproduzione potrebbe avere un effetto di
“vibrato”. Questo non è un problema del let
-
tore ma il risultato di un effetto speciale.
Utilizzare gli effetti CD
Attivare e disattivare gli effetti CD
CD EFF
CD EFF
CD EFF
BEE (Bass Enhancement Effect)
TMP/KEY
/ CD EFF
PREV
NEXT
BEE
UP
DOWN
OFF
BST
ENH
CUT
Mono monitor
TMP/KEY
/ CD EFF
CD EFF
MONO
PREV
NEXT
UP
DOWN
L+R
L
R
OFF
Split monitor
TMP/KEY
/ CD EFF
CD EFF
SPLT
PREV
NEXT
UP
DOWN
C-B
B-C
OFF
Utilizzare gli effetti CD

92 — TASCAM CD-BT1MKII
Italiano
Componenti
DLY
FLA
CHO
WAH
COMPL
COMPH
OCT
TECH
DIST
HCUT
Memorizzare le proprie
impostazioni degli effetti in uno
slot
EFFECT/EDIT
EFFECT/EDIT
EFFECT/EDIT
Effect
EFF
PREV
NEXT
UP
DOWN
EFF
LIB
PREV
NEXT
LIB:d3
UP
DOWN
–
– –
UP
DOWN
SUGGERIMENTO
L’elenco deipreset effetti disponibili nella li-
breria è mostrato nella pagina seguente. .
ATTENZIONE
Se esiste qualche impostazione nello slot
del banco selezionato da cui partire, sarà
sovrascritta quando si richiama un preset di
libreria.
PREV
NEXT
LIB:c5
COMPL
Utilizzare gli effetti interni

TASCAM CD-BT1MKII — 93
Italiano
COMPH
WAH
DLY
UP
DOWN
WAH
DLY
MIX 1
WAH
MIX 2
DLY
UP
DOWN
WAH
DLY
DLY
MIX 2
PREV
NEXT
UP
DOWN
LVL
UP
DOWN
TIME/ESC
FLA
,
CHO
,
WAH
,
OCT
TECH
DLY
Richiamare un effetto con le
proprie impostazioni
EFFECT/EDIT
SUGGERIMENTO
Se avete collegato un pedale tipo TASCAM
RC-30P (venduto separatamente), si può pas-
sare da uno slot all’altro del banco premendo
il pedale. Assicuratevi che la funzione FOOT
nel menu
SETUP
sia impostata su FX+ o
FX-.
TABELLA LIBRERIA EFFETTI
1 DLY
2 FLA-DLY
3 CHO-DLY
4 WAH-DLY
c1 COMPL-COMPH
c2 COMPL-COMPH-DLY
c3 COMPL-COMPH-FLA-DLY
c4 COMPL-COMPH-CHO-DLY
c5 COMPL-COMPH-WAH-DLY
c6 COMPL-COMPH-OCT-DLY
c7 COMPL-COMPH-TECH-DLY
d1 DIST-HCUT
d2 DIST-HCUT-DLY
d3 DIST-HCUT-FLA-DLY
d4 DIST-HCUT-CHO-DLY
d5 DIST-HCUT-WAH-DLY
Utilizzare gli effetti interni

94 — TASCAM CD-BT1MKII
Italiano
Impostare l’equalizzatore
EQ/EDIT
EQ/EDIT
EQ/
EDIT
EQ
PREV
NEXT
EQ L
EQLM
EQ M
EQHM
EQ H
MID
UP
DOWN
TIME/ESC
EQ
EQ
Richiamare le impostazioni
di equalizzazione
EQ/EDIT
SUGGERIMENTO
Se è collegato un pedale tipo TASCAM RC-
30P (venduto separatamente), si può passare
da uno slot EQ all’altro premendo appunto il
pedale. Assicuratevi che la funzione FOOT nel
menu Setup si impostata su EQ+.
Equalizzatore

TASCAM CD-BT1MKII — 95
Italiano
STOP
Scegliere il tempo del
metronomo
PREV
NEXT
MTRO
UP
DOWN
UP
DOWN,
Scegliere i beat
PREV
NEXT
BEAT
UP
DOWN
NOTA
Il metronomo funziona solo fino a quando
un CD non viene riprodotto nuovamente. Se
si avvia la riproduzione di un CD mentre si
sta utilizzando il metronomo questo si arresta
automaticamente.
Utilizzare il metronomo

96 — TASCAM CD-BT1MKII
Italiano
Modalità Chromatic (CHR):
Modalità Bass (BAS):
TUNER/SETUP
MODE
PREV
NEXT
BAS
CHR
UP
DOWN
TUNE:---
Bassa
I
AltaO
Corretta
TUNE: XX
TUNE: XX
Utilizzare l’oscillatore
CAL
SUGGERIMENTO
Questa utile caratteristica consente di ascol-
tare sia il suono emesso dallo strumento che
quello dell’oscillatore, ed è particolarmente
vantaggiosa quando si accorda uno strumen-
to acustico non collegato al CD-BT1MKII.
TUNER/SETUP
OSC
PREV
NEXT
UP
DOWN
Calibrazione
TUNER/SETUP
CAL
PREV
NEXT
UP
DOWN
Utilizzare l’accordatore

TASCAM CD-BT1MKII — 97
Italiano
TUNER/SETUP
PREV
NEXT
UP
DOWN
Mix balance
MIX
Modalità riproduzione CD
PLAY
ALL
SGL
Funzione CUE
CUE
CUE
CUE
FLS
CUE:
FLS:
Funzione dei tasti UP
e
DOWN
UP
DOWN
UPDN
UP
DOWN
MIX
TMP
KEY:
FIN:
Funzione Pedale (Footswitch)
FOOT
EQ+:
FX+, FX-:
CUE, FLS
REW, FF:
Cambiare le preferenze del CD-BT1MKII

98 — TASCAM CD-BT1MKII
Italiano
Polarità del pedale
POL
NOR
INV
UP
DOWN
Caratteristiche tecniche
Tipo di disco CD singolo da 8 e
12 cm
AD/DA 16-bit
Livello uscita nominale
(LINE OUT)
–10 dBV
Massimo livello di
uscita (LINE OUT)
senza distorsione
0 dBV (1 vrms)
Impedenza di uscita
1 K$
Massimo livello di
uscita (PHONES)
> 18mW (a 32$)
Livello ingresso nominale
LINE IN
BASS IN
–10 dBV
–15 dBV (passivo)
–10 dBV (attivo)
Voltaggio
DC 9V (PS-PS5
alimentatore)
Batterie AA x 4
(NiMH o alcaline)
Consumo 4 W (PS-PS5
alimentatore)
Dimensioni (a x l x p)
compresi i piedini di
appoggio
232 x 138 x 40
(mm)
Peso (batterie incluse) 620g
Caratteristiche della riproduzione CD
Risposta in frequenza da 20 Hz a 20 kHz
±1.0 dB
Gamma dinamica > 88 dB
Rapporto S/N > 88 dB
THD <0.01%
Elaborazione segnale
digitale
32-bit

TASCAM CD-BT1MKII — 99
Español
Instrucciones importantes de seguridad
1 Lea estas instrucciones.
2 Conserve estas instrucciones.
3 Observe todas las advertencias.
4 Cumpla con lo indicado en las instrucciones.
5 No use este aparato cerca del agua.
6 Límpielo solo con un trapo seco.
7 No bloquee ninguna de las aberturas de venti-
lación. Instale este aparato de acuerdo a las instruc-
ciones del fabricante.
8 No instale este aparato cerca de fuentes de
calor como radiadores, hornos, calentadores u otros
aparatos (incluyendo amplificadores) que produz-
can calor.
9 No anule nunca el sistema de seguridad de un
enchufe polarizado o con toma de tierra. Un en-
chufe polarizado tiene dos bornes, uno más ancho
que el otro, mientras que uno con toma de tierra
tiene dos bornes normales y un tercero para la
toma de tierra. El borne ancho de los polarizados o
el tercero de los de toma de tierra han sido instala-
dos para su seguridad. Si el enchufe que venga con
su aparato no encaja en su salida de corriente, haga
que un electricista le sustituya esa toma de salida
anticuada.
10 Evite que el cable de alimentación pueda que-
dar aplastado o pinzado, especialmente en los en-
chufes, receptáculos y en el punto en el que salen
de los aparatos.
11 Use solo los accesorios/complementos indica-
dos por el fabricante.
12 Utilice esta unidad solo con un soporte, mesa
o trípode especificado por el fabricante, o que le
haya sido vendido con el propio aparato. Cuando
use un soporte o carrito, tenga mucho cuidado al
desplazar el bloque carrito/aparato para evitar po-
sibles daños en caso de que vuelque.
13 Desenchufe este aparato durante las tormen-
tas eléctricas o cuando no lo vaya a utilizar durante
periodos de tiempo largos.
14 Consulte cualquier posible reparación con
el servicio técnico oficial. Este aparato deberá ser
reparado cuando esté dañado en alguna forma,
como por ejemplo si se ha roto el cable de aliment-
ación o el enchufe, si se ha derramado algún líquido
o se ha introducido cualquier tipo de objeto dentro
de la unidad, si el aparato ha quedado expuesto a
la lluvia o la humedad, si no funciona normalmente
o si ha caído al suelo.
• No permita que este aparato quede expuesto
a goteras o salpicaduras.
• No coloque sobre este aparato ningún objeto
lleno de líquido, como puede ser un jarrón.
• No instale esta unidad en ningún espacio re-
ducido o confinado, como podría ser empo-
tradro en una librería o similar.
• Este aparato recibe un voltaje nominal no-
operativo de la salida de corriente alterna
aun cuando su interruptor POWER esté en la
posición off (apagado).

100 — TASCAM CD-BT1MKII
Español
Indice
Acerca de este Manual:
PLAY
MENU
Manejo de los CDs ..........................................................................101
Acerca de la fuente de alimentación ..............................................
102
Nombre de las partes y
funciones ..................................................104
Conexiones .....................................................................................107
Uso del sistema de menús ..............................................................109
Manejo del reproductor de C
Ds .....................................................111
Modificaciones de tono y tempo ....................................................
112
Uso de los efectos de CD ................................................................113
Uso de los efectos internos ............................................................114
Ecualizador .....................................................................................116
Uso del metrónomo ........................................................................117
Uso del afinador .............................................................................
118
Modificación de preferencias para el
CD-BT1MKII .........................119
Datos y números (especificaciones
) ...............................................120

TASCAM CD-BT1MKII — 101
Español
Manejo de los CDs

102 — TASCAM CD-BT1MKII
Español
Acerca de la fuente de alimentación
Funcionamiento a pilas
CUIDADO
. Su CD-BT1MKII puede que no
funcione correctamente con otros tipos de
pilas.
AVISO
Un uso incorrecto de las pilas puede producir
una fuga del electrolito e incluso puede que
lleguen a explotar. Lea y siga las instrucciones
que aparecen a continuación:
Notas sobre las pilas
Indicación del nivel de carga de
las pilas
Duración de las pilas
Sistema de ahorro de energía
CD OFF

TASCAM CD-BT1MKII — 103
Español
Acerca de la fuente de alimentación (continuación)
PLAY
CUIDADO
En este aparato la duración de las pilas es más
corta que en los reproductores de CD portátiles
debido a que el CD-BT1MKII dispone de
funciones especiales como el cambio de clave
y efectos.
La duración de las pilas en el CD-BT1MKII
se ve afectada tanto por las condiciones
ambientales como por el número de funciones
en uso. Entre los factores que afectan a la
duración de las pilas está la temperatura,
humedad, el número de funciones especiales
utilizadas, etc.
Teniendo en cuenta esto, puede que las pilas
no sean capaces de hacer que funcione el
CD-BT1 MKII, a pesar de la indicación de
carga de las pilas que aparezca en pantalla.
Si ocurre esto, cambie las pilas o utilice un
adaptador CA.
Deshágase de las pilas usadas de acuerdo a
las normativas de su país.
Funcionamiento utilizando
un adaptador CA
DC IN
PS-PS5
Salida de corriente
Conector DC
AVISO
Use solo un adaptador CA TASCAM PS-PS5
con su CD-BT1MKII. El uso de otro tipo de
adaptador puede producir daños en su CD-
BT1MKII.
CAUTION
Antes de utilizar el CD-BT1MKII con un
adaptador CA, saque las pilas. Esto evita que
pueda aparecer un ligero ruido si utiliza la
unidad con un adaptador CA pero mantiene
las pilas dentro. Si conecta el adaptador
CA y se da cuenta de que todavía tiene
las pilas dentro de la unidad, apague la
unidad utilizando el interruptor
POWER
y saque las pilas. En cualquier caso, apague
la unidad siempre que vaya a cambiar entre
el funcionamiento a pilas y el uso de un
adaptador CA.
Cuando no vaya a utilizar el CD-BT1MKII,
desenchúfelo.
Puede que los ajustes no se graben
correctamente si apaga la unidad justo
después de introducir un CD o modificar los
ajustes. Si no se han grabado correctamente
los ajustes, el sistema no arrancará con los
últimos ajustes sino con los valores por
defecto.
Encendido y apagado de la
unidad
POWER

104 — TASCAM CD-BT1MKII
Español
Nombre de las partes y funciones
TUNER
SETUP
TUNER/SETUP

TASCAM CD-BT1MKII — 105
Español
Nombre de las partes y funciones (continuación)
1) Toma DC IN
2) Compartimento para pilas
3) Tapa de la unidad CD
4) Pantalla
5) Tecla TIME/ESC
6) Teclas PREV, NEXT, UP, DOWN
UP
DOWN
7) Tecla LOOP
8) Tecla I/O
9) Tecla TUNER/SETUP
10) Tecla TMP/KEY / CD EFF
11) Tecla EQ/EDIT
12) Tecla EFFECT/EDIT
13) Teclas salto de pista/
búsqueda
[
m
/
. /
\
,
]
PLAY

106 — TASCAM CD-BT1MKII
Español
Nombre de las partes y funciones (continuación)
14) Tecla STOP/MTRO [H]
15) Tecla PLAY/PAUSE [G/J]
16) Tecla CUE
CUE
17) Toma PHONES
18) Toma LINE OUT
19) Control OUTPUT
PHONES
LINE OUT
20) Control INPUT
BASS IN
21) Toma LINE IN
22) Toma BASS IN
BASS IN
23) Toma FOOT
24) Interruptor POWER
25) Interruptor CD EFF
26) Interruptor BASS IN (PASSIVE/
ACTIVE)

TASCAM CD-BT1MKII — 107
Español
Conexiones
Conexión de un bajo (BASS IN)
BAJO
BASS IN
BASS IN
PASSIVE
ACTIVE
BASS IN
Ajuste del nivel de entrada
INPUT
BASS IN
Entrada de señales de
dispositivos externos (
LINE IN
)
SALIDA DE LINEA DE
DISPOSITIVO EXTERIOR
LINE IN
LINE IN
CUIDADO
No conecte NUNCA un amplificador de bajo
a la toma
BASS IN
del CD-BT1MKII; el
hacerlo dañaría su equipo.
Ajuste del nivel de salida después
de añadir efectos internos
EFFECT/
EDIT
NEXT
PREV
LVL
UP
DOWN
Ajuste del balance de mezcla
entre el bajo y CD
TUNER/
SETUP
NEXT
PREV
MIX

108 — TASCAM CD-BT1MKII
Español
Salida a los auriculares y a
dispositivos externos
PHONES
LINE OUT
Ajuste del nivel de salida
LINE OUT
PHONES
OUTPUT
NOTA
Los niveles de las salidas
LINE OUT
y
PHONES
son controlados globalmente
por el control
OUTPUT
y no es posible
ajustarlos por separado.
Si tiene un dispositivo de grabación conectado
a la toma
LINE OUT
recuede que el control
OUTPUT
afectará al nivel de grabación.
Conexión de un pedal de disparo
PEDAL DE
DISPARO RC-30P
FOOT
POL
CUIDADO
Para evitar problemas con su CD-BT1MKII,
utilice solo un pedal de disparo como el
TASCAM RC-30P (vendido por separado) que
tenga un conector de auriculares standard
(punta y lateral).
Conexiones (continuación)

TASCAM CD-BT1MKII — 109
Español
Acceso al sistema de menús
EFFECT/EDIT
EQ/EDIT
TUNER/SETUP
TUNER/SETUP
TMP/KEY / CD EFF
TMP/
KEY / CD EFF
STOP
Categoría
Menú
Elemento
Menú
Valores (los valores
por defecto están
subrayados)
Notas
EFFECT EFF ON/OFF On/off del efecto
LIB 1–4, c1–c7, d1–d5 Número de preset
Parameter
– depende de tipo efecto
LVL
0 to 64 Nivel salida efecto
EQ EQ L/ EQLM/
EQ M/
EQMH/ EQ H
-15 – 0 – +15
ajusta la ganancia de la
banda del EQ (low, mid-
low, mid, mid-high, high)
MID ON/OFF
activa o desactiva la
función de modelado
TUNER
TUNE MODE=BAS: 5B, 4E, 3A, 2D, 1G
ajusta el número de
cuerdas en el modo Bass
MODE CHR/BAS elige modo afinador
OSC (OFF), _C–_B, C–A, B,
_
C–
_
B,
(3 octaves)
ajusta el tono del oscilador
CAL 435–440–445
fija frecuencia base (A4,
unidad: Hz)
SETUP
MIX B10 – B1, 0, C1 – C10
ajusta el balance de mezcla
entre CD y entrada
PLAY
ALL/SGL
elige reproducción total
(all) o única (single)
CUE CUE/FLS
elige acción de
CUE
Uso del sistema de menús

110 — TASCAM CD-BT1MKII
Español
Categoría
Menú
Elemento
Menú
Valores (los valores
por defecto están
subrayados)
Notas
SETUP
UPDN MIX, TMP, KEY, FIN
ajusta la función de
UP/
DOWN
en pantalla inicial
FOOT
EQ+, FX+, FX-, CUE. FLS,
REW, FF
fija la función del pedal
POL NOR/INV
fija la polaridad del pedal
TEMPO
KEY
TMP
VSA=OFF: -50 to +16
VSA=ON: -50, -32, -16,-12,
-8, -4,
0, +4, +8, +12, +16
ajusta la velocidad de la
reproducción del CD en %
VSA ON/OFF
On/off del VSA
KEY
I6 – 0 – O6
control de clave en semitonos
FINE -50 – 0 – +50
afinación precisa (cent)
CD EFF
BEE OFF, BST, ENH, CUT
elige entre función boost,
enhance o cut para
reproducción del CD
MONO OFF (stereo), L+R, L, R
modo de monitor mono
SPLT
OFF (mix), C-B, B-C
modo de monitor dividido
METRONOME
MTRO (OFF), 40 – 120 – 220
tempo del metrónomo en
BPM (Beats Per Minute)
BEAT
OFF, 2 – 6
elige el número de tiempos
musicales para el metrónomo
Uso del sistema de menús (continuación)
Elección de elementos de menú
PREV
NEXT.
Modificación de los valores
ajustados
UP
DOWN
Salida del sistema de menús
TIME/ESC

TASCAM CD-BT1MKII — 111
Español
Reproducción
PLAY/PAUSE
G
/
J
STOP
H
Salto de pista y busqueda dentro
de las pistas
m
/
. /
/
,
Bucle (pista/disco)
LOOP
PLAY
SGL
LOOP 1
ALL
LOOP
Bucles (puntos de entrada/salida)
I/O
I/O
I-O
I/O
LOOP
I-O
LOOP
LOOP
LOOP
Manejo del reproductor de CDs
I/O
La tecla CUE
CUE
CUE
FLS
CUE
FOOT
CUE
FLS
Pantalla
TIME/ESC

112 — TASCAM CD-BT1MKII
Español
TMP
VSA
KEY
FINE
Control de tempo
TMP/KEY / CD EFF
TMP
PREV
NEXT
TEMPO
UP
DOWN
UP
DOWN
TEMPO
VSA
TMP/KEY / CD EFF
VSA
PREV
NEXT
UP
DOWN
ON
OFF.
TEMPO
VSA
NOTA
Si el valor del control de tempo no está ajusta-
do a 0 y cambia el ajuste [VSA] de OFF a ON,
el valor de tempo será automáticamente reini
-
cializado a un “valor VSA”. Por ejemplo, si el
valor es [-33] cuando el VSA está desactivado,
será ajustado automáticamente a [-50] cuando
active el VSA.
Control de clave
TMP/KEY / CD EFF
KEY
PREV
NEXT
UP
DOWN
I
O
KEY
Afinación precisa
TMP/KEY / CD EFF
FINE
PREV
NEXT
KEY
UP
DOWN
O
I
KEY
Modificaciones de tono y tempo

TASCAM CD-BT1MKII — 113
Español
Si ha ajustado el control de clave a O6 cuando el
valor de afinación precisa esté por encima de 0,
éste último será reiniciado automáticamente a
0. Igualmente, si ajusta el control de clave a
I6
cuando el valor de la afinación precisa sea infe
-
rior a 0, éste último también será reiniciado a 0.
Además, tenga en cuenta que cuando el con
-
trol de clave o el VSA esté ajustado a ON,
puede que la música reproducida tenga un
cierto toque de “vibrato”. Esto no es un fa
-
llo del reproductor de CDs – es el comporta-
miento normal de los efectos especiales.
Uso de los efectos de CD
Activación y desactivación de los
efectos de CD
CD EFF
CD EFF
CD EFF
BEE (intensificación de bajo)
TMP/KEY /
CD EFF
PREV
NEXT
BEE
UP
DOWN
OFF
BST
ENH
CUT
Monitor mono
TMP/KEY /
CD EFF
CD EFF
MONO
PREV
NEXT
UP
DOWN
L+R
L
R
OFF
División de monitor
TMP/KEY
/ CD EFF
SPLT
PREV
NEXT
UP
DOWN
C-B
B-C
OFF
Uso de los efectos de CD

114 — TASCAM CD-BT1MKII
Español
Componentes
DLY
FLA
CHO
WAH
COMPL
COMPH
OCT
TECH
DIST
HCUT
Almacenamiento de sus propios
ajustes de efectos en un espacio
EFFECT/
EDIT
EFFECT/EDIT
EFFECT/EDIT
Effect
EFF
PREV
NEXT
UP
DOWN
EFF
PREV
NEXT
LIB
LIB:d3
UP
DOWN
– –
–
UP
DOWN
CONSEJO
Vea la tabla de biblioteca de efectos para
determinar el contenido del preset elegido.
CUIDADO
Si hubiese algún valor en el espacio del
banco elegido sobre el que va a trabajar, será
sobregrabado cuando cargue una entrada.
PREV
NEXT
“ “
LIB:c5
COMPL
COMPH
WAH
DLY
UP
Uso de los efectos internos

TASCAM CD-BT1MKII — 115
Español
DOWN
““
WAH
DLY
MIX1
WAH
MIX2
DLY
UP
DOWN
WAH
DLY
DLY
MIX2.
PREV
NEXT
UP
DOWN
LVL
UP
DOWN
TIME/ESC
TABLA BIBLIOTECA EFECTOS
1 DLY
2 FLA-DLY
3 CHO-DLY
4 WAH-DLY
c1 COMPL-COMPH
c2 COMPL-COMPH-DLY
c3 COMPL-COMPH-FLA-DLY
c4 COMPL-COMPH-CHO-DLY
c5 COMPL-COMPH-WAH-DLY
c6 COMPL-COMPH-OCT-DLY
c7 COMPL-COMPH-TECH-DLY
d1 DIST-HCUT
d2 DIST-HCUT-DLY
d3 DIST-HCUT-FLA-DLY
d4 DIST-HCUT-CHO-DLY
d5 DIST-HCUT-WAH-DLY
FLA
,
CHO
,
WAH
,
OCT
TECH
DLY
Uso de los efectos internos (continuación)

116 — TASCAM CD-BT1MKII
Español
Ajuste del ecualizador
EQ/EDIT
EQ/EDIT
EQ/
EDIT
EQ
PREV
NEXT
EQ L
EQLM
EQ M
EQHM
EQ H
MID
Carga de un efecto con sus
ajustes
EFFECT/EDIT
CONSEJO
Si tiene un pedal de disparo conectado
como el TASCAM RC-30P (que se vende por
separado), podrá ir pasando por los distintos
espacios de efectos con cada pulsación del
pedal. Compruebe que FOOT en el menú
SETUP
esté ajustado a FX+ o FX-.
Ecualizador
UP
DOWN
TIME/ESC
EQ
EQ
Carga de ajustes de ecualizador
EQ/EDIT
CONSEJO
Si tiene un pedal de disparo conectado
como el TASCAM RC-30P (que se vende por
separado), podrá ir pasando por los distintos
espacios de EQ con cada pulsación del pedal.
Compruebe que FOOT en el menú
SETUP
esté ajustado a EQ+.
Ecualizador

TASCAM CD-BT1MKII — 117
Español
STOP
Elección del tempo del
metrónomo
PREV
NEXT
MTRO
UP
DOWN
UP
DOWN
Selección de los tiempos
musicales
PREV
NEXT
BEAT
UP
DOWN
NOTA
El metrónomo funciona solo cuando no esté
siendo reproducido ningún CD. Si empieza
a reproducir un CD mientras esté utilizando
el metrónomo, la función de metrónomo se
detendrá automáticamente.
Uso del metrónomo

118 — TASCAM CD-BT1MKII
Español
Modo cromático (CHR):
Modo de bajo (BAS):
TUNER/SETUP
MODE
PREV
NEXT
CHR
BAS
UP
DOWN
TUNE:---
Bemol
I
SostenidoO
En su tono
TUNE: XX
TUNE: XX
Uso del oscilador
CAL
CONSEJO
Es una función que le resultará útil durante
la afinación, ya que podrá escuchar tanto el
sonido del oscilador como el de su instrumento.
También le será de utilidad cuando esté afinando
un instrumento acústico, no conectado al CD-
BT1MKII.
TUNER/SETUP
OSC
PREV
NEXT
UP
DOWN
Calibración
TUNER/SETUP
CAL
PREV
NEXT
UP
DOWN
Uso del afinador

TASCAM CD-BT1MKII — 119
Español
TUNER/SETUP
PREV
NEXT
UP
DOWN
Balance de mezcla
MIX
Modo de reproducción de CD
PLAY
ALL
SGL
Función de la tecla CUE
CUE
CUE
CUE
FLS
CUE:
FLS:
Función de las teclas UP y DOWN
UP
DOWN
UPDN
UP
DOWN
MIX
TMP
KEY:
FIN:
Función del pedal de disparo
FOOT
EQ+:
FX+, FX-:
CUE, FLS:
REW, FF:
Polaridad del pedal de disparo
Modificación de preferencias para el CD-BT1MKII

120 — TASCAM CD-BT1MKII
Español
POL
NOR
INV
UP
DOWN
Datos y números (especificaciones)
Tipos de disco 8 cm single, 12 cm
CD
AD/DA 16 bits
Nivel nominal salida
(LINE OUT)
–10 dBV
Nivel salida máximo
(LINE OUT) sin
distorsión
0 dBV (1 Vrms)
Impedancia salida 1 kΩ
Nivel salida máximo
(PHONES)
> 18mW (a 32$)
Niveles de entrada
nominales
LINE IN
BASS IN
–10 dBV
–15 dBV (Pasivo)
–10 dBV (Activo)
Alimentación DC 9V (adaptador
PS-PS5 AC)
Pilas AA x 4
(NiMH o alcalinas)
Consumo 4 W (adaptador PS-
PS5 AC)
Dimensiones (l x p x a)
incluyendo las patas
232 x 138 x 40
(mm) / 9.1 x 5.4 x
1.6 (pulgadas)
Peso (sin pilas) 620 g / 1 libra, 6
onzas.
Características de reproducción de CD
Respuesta de
frecuencia
20 Hz a 20 kHz
±1.0 dB
Rango dinámico > 88 dB
Relación señal-ruido > 88 dB
THD <0.01%
Procesado señal digital
32 bits

Notes
TASCAM CD-BT1MKII — 121

Notes
122 — TASCAM CD-BT1MKII

Notes
TASCAM CD-BT1MKII — 123

EspañolEnglish Français
Deutsch
Italiano
Printed in China
TEAC CORPORATION
3-7-3 Nakacho Musashino-shi Tokyo 180-8550 JAPAN
+81-422-52-5082 www.tascam.com
TEAC AMERICA, INC
7733 Telegraph Road Montebello CA 90640 USA
+1-323-726-0303 www.tascam.com
TEAC CANADA LTD.
5939 Wallace Street Mississauga Ontario L4Z 1Z8 CANADA
+1-905-890-8008 www.tascam.com
TEAC MEXICO, S.A de C.V
Campesinos No. 184 Colonia Granjas Esmeralda, Delegacion Iztapalapa CP 09810 Mexico DF MEXICO
+52-555-581-5500 www.tascam.com
TEAC UK LIMITED
5 Marlin House, Croxley Business Park Watford Hertfordshire WD18 8TE UNITED KINGDOM
+44-1923-438880 www.tascam.co.uk
TEAC EUROPE GmbH
Bahnstrasse 12 65205 Wiesbaden-Erbenheim GERMANY
+49-611-71580 www.tascam.de
TEAC FRANCE SA
17 Rue Alexis-de-Tocqueville CE 005 92182 Antony Cedex FRANCE
+33-1-42-37-01-02 www.tascam.fr
TEAC ITALIANA S.p.A.
Via C Cantu 11 20092 Cinisello Balsamo Milano ITALY
+39-02-66010500 www.teac.it
TEAC AUSTRALIA PTY., LTD.
280 William St Melbourne Victoria 3000 AUSTRALIA
+61-3-9672-2400 www.teac.com.au
» CD-BT1@#
Transcripción de documentos
English » CD-BT1 @# OWNERʼS MANUAL (EN / F / D / I / E) D00851400B Español This appliance has a serial number located on the rear panel. Please record the model number and serial number and retain them for your records. Model number _____________ Serial number _____________ Italiano Deutsch Français Portable CD Bass Trainer Important safety precautions English Y CAUTION: TO REDUCE THE RISK OF ELECTRIC SHOCK, DO NOT REMOVE COVER (OR BACK). NO USER-SERVICABLE PARTS INSIDE. REFER SERVICING TO QUALIFIED SERVICE PERSONNEL. E The lightning flash with arrowhead symbol, within an equilateral trinagle, is intended to alert the user to the presence of uninsulated “dangerous voltage” within the product’s enclosure that may be of sufficient magnitude to constitute a risk of electric shock to persons. R WARNING: TO PREVENT FIRE OR SHOCK HAZARD, DO NOT EXPOSE THIS APPLIANCE TO RAIN OR MOISTURE. FOR U.S.A. TO THE USER This equipment has been tested and found to comply with the limits for a Class B digital device, pursuant to Part 15 of the FCC Rules. These limits are designed to provide reasonable protection against harmful interference when the equipment is operated in a commercial environment. This equipment generates, uses, and can radiate radio frequency energy and, if not installed and used in accordance with the instruction manual, may cause harmful interference to radio communications.. However, there is no guarantee that interference will not occur in a particular installation. If this equipment does cause harmful interference to radio or television reception, which can be determined by turning the equipment off and on, the user is encouraged to try to correct the interference by one or more of the following countermeasures. a) Reorient or relocate the receiving antenna b) Increase the separation between the equipment and receiver. c) Connect the equipment into an outlet on a circuit other from that to which the receiver is connected. d) Consult the dealer or an experienced radio/ TV technician for help. CAUTION Changes or modifications to this equipment not expressly approved by TEAC CORPORATION for compliance could void the user’s authority to operate this equipment. 2 — TASCAM CD-BT1MKII Important Safety Instructions 13 Unplug this apparatus during lightning storms or when unused for long periods of time. 14 Refer all servicing to qualified service personnel. Servicing is required when the apparatus has been damaged in any way, such as power-supply cord or plug is damaged, liquid has been spilled or objects have fallen into the apparatus, the apparatus has been exposed to rain or moisture, does not operate normally, or has been dropped. • Do not expose this apparatus to drips or splashes. • Do not place any objects filled with liquids, such as vases, on the apparatus. • Do not install this apparatus in a confined space such as a book case or similar unit. • The apparatus draws nominal non-operating power from the AC outlet with its POWER switch in the off position. English 1 Read these instructions. 2 Keep these instructions. 3 Heed all warnings. 4 Follow all instructions. 5 Do not use this apparatus near water. 6 Clean only with dry cloth. 7 Do not block any ventilation openings. Install in accordance with the manufacturer’s instructions. 8 Do not install near any heat sources such as radiators, heat registers, stoves, or other apparatus (including amplifiers) that produce heat. 9 Do not defeat the safety purpose of the polarized or grounding-type plug. A polarized plug has two blades with one wider than the other. A grounding type plug has two blades and a third grounding prong. The wide blade or the third prong are provided for your safety. If the provided plug does not fit into your outlet, consult an electrician for replacement of the obsolete outlet. 10 Protect the power cord from being walked on or pinched particularly at plugs, convenience receptacles, and the point where they exit from the apparatus. 11 Only use attachments/accessories specified by the manufacturer. 12 Use only with the cart, stand, tripod, bracket, or table specified by the manufacturer, or sold with the apparatus. When a cart is used, use caution when moving the cart/apparatus combination to avoid injury from tip-over. TASCAM CD-BT1MKII — 3 Important Safety Instructions English Safety Information This product has been designed and manufactured according to FDA regulations “title 21, CFR, chapter1, subchapter J, based on the Radiation Control for Health and Safety Act of 1968”, and is classified as a class 1 laser product. There is no hazardous invisible laser radiation during operation because invisible laser radiation emitted inside of this product is completely confined in the protective housings. The label required in this regulation is shown here. CAUTION • DO NOT REMOVE THE PROTECTIVE HOUSING USING A SCREWDRIVER. • USE OF CONTROLS OR ADJUSTMENTS OR PERFORMANCE OF PROCEDURES OTHER THAN THOSE SPECIFIED HEREIN MAY RESULT IN HAZARDOUS RADIATION EXPOSURE. • IF THIS PRODUCT DEVELOPS TROUBLE, CONTACT YOUR NEAREST QUALIFIED SERVICE PERSONNEL, AND DO NOT USE THE PRODUCT IN ITS DAMAGED STATE. Optical pickup: Type KSM-900AAA Manufacturer: SONY CORPORATION Laser output: <1 mW play on the objective lens Wavelength: 775—816 nm 4 — TASCAM CD-BT1MKII Table of contents English Handling of compact discs ....................................................6 About the power supply ........................................................7 Part names and functions ......................................................9 Making connections ............................................................12 Using the menu system .......................................................14 Using the CD player .............................................................16 Pitch and tempo changes ....................................................17 Using CD effects ..................................................................18 Using built-in effects ...........................................................19 Equalizer ..............................................................................21 Using the metronome ..........................................................22 Using the tuner ....................................................................23 Changing your preferences for the CD-BT1MKII .................24 Facts and figures (specifications) ........................................25 About this Manual: When we refer to a key or connector or control on the CD-BT1MKII, the typeface looks like this: PLAY. When we refer to items shown on the display, the typeface looks like this: MENU. TASCAM CD-BT1MKII — 5 Handling of compact discs English disc. Small dust particles and light stains will have absolutely no effect on reproduction quality. Observe the following: Always place compact discs in the tray with their label facing upward (compact discs can only be played on one side). To remove a disc from its storage case, press down on the center of the case, and lift the disc out, holding it carefully by the edges. Finger marks and dust should be carefully wiped off the disc’s recorded surface with a soft cloth. Unlike conventional records, the compact disc has no grooves to collect dust and microscopic debris, so gently wiping with a soft cloth should remove most particles. Wipe in a straight motion from the inside to the outside of the 6 — TASCAM CD-BT1MKII Never use such chemicals as record sprays, antistatic sprays or fluid, benzine or thinner to clean compact discs. Such chemicals will do irreparable damage to the disc’s plastic surface. Discs should be returned to their cases after use to avoid serious scratches that could cause the laser pickup to “skip”. Don’t expose discs to direct sunlight or high humidity and temperature for extended periods. Long exposure to high temperature can warp the disc. Only use circular compact discs. Avoid using noncircular promotional, etc. discs. To keep the laser pickups clean, do not touch them. For the same reason, do not leave the disc tray open unnecessarily. The CD-BT1MKII cannot play unfinalized CD-R/RW discs. In addition, some finalized CD-R/ RW discs may be unplayable on the CD-BT1MKII. About the power supply Remove the cover of the battery compartment at the back of the CDBT1MKII and insert four AA (SUM3) batteries (not supplied) following the + and – markings inside the battery compartment. CAUTION We strongly recommend the use of rechargeable Ni-MH batteries (alkaline batteries may also be used). Your CD-BT1MKII may not operate properly with batteries of other types. WARNING Misuse of batteries may cause leaks and explosions. Please carefully read and follow the instructions below: Notes on batteries When you are using the CDBT1MKII with batteries, unplug the AC adapter. Make sure the batteries are inserted in the correct direction, according to the markings inside the battery compartment. Always use batteries of the same type, and replace all batteries together. Do not attempt to recharge batteries that are not rechargeable. If you are not going to use the CD-BT1MKII for longer than one month, remove the batteries. Do not throw batteries into water or fire. Do not disassemble batteries. If a battery leaks in the compartment, wipe the liquid away completely with a disposable cloth. Make certain no residue remains before inserting new batteries. Remaining battery charge level display When the CD-BT1MKII is running on batteries, a rough indication of the remaining battery charge is displayed as as the battery symbol as follows: English Operation using batteries 3 parts are lit There is plenty of battery charge left. 2 parts are lit Battery charge is approximately half. 1 part is lit Not much battery charge is left. 3 parts blink Battery charge is nearly gone. Replace with fully charged batteries. Length of battery life Ni-MH batteries: Approx. 4.5 hours Alkaline batteries: Approx. 1.5 hours Auto power-save While using battery power, the CD player and CD functions of the CDBT1MKII shut down automatically if any of the following conditions lasts more than 5 minutes: (the CD part of the display shows CD OFF). (continued on the next page) TASCAM CD-BT1MKII — 7 About the power supply (Continued) English To Being in Stop mode CD drive cover is open No CD is loaded turn the CD player on, press the PLAY key. CAUTION Because the CD-BT1MKII is equipped with special functions such as key change and effects, the battery life is shorter compared with standard portable CD players. The length of battery life in CD-BT1MKII is affected by both the environment and the number of functions in use. Factors that affect battery life include temperature, humidity, the number of special functions used, and so on. Under some circumstances, there may not be enough power in the batteries to power the CD-BT1MKII, despite the battery power indication on the display. If this happens, change the batteries, or use an AC adapter. Always dispose of used batteries as recommended by your local authorities. 8 — TASCAM CD-BT1MKII Operation using an AC adapter Connect a TASCAM PS-PS5 AC adapter (sold separately) to the DC IN jack at the back of the CD-BT1MKII. Insert the plug of the AC adapter into a domestic AC power outlet. Make sure that the voltage of the outlet corresponds to that marked on the adapter. PS-PS5 Wall outlet DC plug with an AC adapter while the batteries are inside. If you plug in an AC adapter but have forgotten to take out the batteries, turn the power off using the POWER switch, and take out the batteries. Likewise, turn the power off before you change between using the batteries and using the AC adapter. Unplug the AC adapter from the domestic AC power outlet when you are not using the CD-BT1MKII. Settings may not be properly saved if you turn the power off immediately after inserting a CD or changing settings. If settings are not saved properly, the system may not start with the last settings and instead will start using the default values. Switching the unit on and off WARNING Use only a PS-PS5 AC adapter with your CDBT1MKII. Using another type of AC adapter may damage your CD-BT1MKII. CAUTION Remove the batteries before operating the CD-BT1MKII with an AC adapter. There is a possibility of slight noise if you use the unit Use the POWER switch to turn the power to the whole unit on and off. When there are two different words above and below the same key (e.g. TUNER and SETUP), you use the key like this: To activate the function written above the key: Tap the key once To activate the function written below the key: Press and hold down the key For example, in the case of the TUNER/ SETUP key, the Tuner menu is activated when you tap the key lightly, and if you press and hold it down the key activates the Setup menu. TASCAM CD-BT1MKII — 9 English Part names and functions Part names and functions (Continued) English 1) DC IN Jack 2) Battery Compartment modify the setting values while in menu mode (See Using the menu system). You can also set the functions of the UP and DOWN keys in the home display mode (See Changing your preferences). Remove the battery compartment cover at the back of the CD-BT1MKII in order to insert 4 AA (SUM-3) batteries. Use this key to start the repeat (loop) mode. Use this jack to connect the DC plug of a TASCAM PS-PS5 AC adapter (sold separately). 7) LOOP Key 3) CD Drive Cover 8) I/O Key To open, pull up the unlocking lever. Push down the cover and it will latch automatically. Use this key to set the “IN point” and “OUT point” of the section of music that you want repeated (See Using the CD player). 4) Display The CD-BT1MKII status is seen here. 5) TIME/ESC Key Use this key in the home display mode to change the way CD and track time is displayed. Use this key when you are in a menu mode in order to escape and return to the home display mode. 6) PREV, NEXT, UP, DOWN Keys Use these keys to select menu items or 10 — TASCAM CD-BT1MKII 9) TUNER/SETUP Key Use this key to enter the Tuner menu and the Setup menu (See Using the menu system). 10) TMP/KEY / CD EFF Key Use this key to enter the Tempo/Key menu and the CD Effect menu (See Using the menu system). 11) EQ/EDIT Key Use this key to switch the EQ between A, B and OFF (See Equalizer). Press and hold this key down to go to the EQ menu (See Using the menu system). 12) EFFECT/EDIT Key Use this key to move consecutively between effects slots (See Using built-in effects). Press and hold this key down to go to the Effect menu (See Using the menu system). 13) Track Skip/Search Keys [m/. /\,] Track Skip: Use these keys to skip to the previous track or the next track. Press these keys while playing a CD to skip to the previous track or the next track. Pressing these keys while the CD is not playing allows you to choose the track you want to start. (To play, press the PLAY key.) Search: Fast forward/Fast rewind Keep one of these keys pressed down while playing a CD to fast forward or fast rewind. The speed of the search increases if you continue to hold either of these keys pressed down. 14) STOP/MTRO Key [H] Press this key to stop playback. Pressing and holding this key down activates the metronome menu (See Using the metronome). 15) PLAY/PAUSE Key [G/J] Use this key to start playing a CD. While a CD is playing, you can pause playback by pressing this key. Press again to resume playing. 16) CUE Key Use this key to return to the cue point (the point where playback last started). Use the Setup menu to choose a mode that the CUE key can perform (See Changing your preferences). 17) PHONES Jack Connect your headphones here. 18) LINE OUT Jack Use this port to connect the CD- BT1MKII to devices such as speakers with a built-in amplifier, a stereo system AUX input jack, a cassette tape recorder, or a CD recorder. You can hear the results of the effects and key changes through devices connected here. 19) OUTPUT Control 22) BASS IN Jack Connect a bass guitar to this jack. Set the BASS IN switch (see 26) according to the type of bass guitar you are using, whether passive or active. 23) FOOT Jack Use this control to adjust the output level of the PHONES jack and the LINE OUT jack. This control adjusts the level of the two jacks together (the two jack levels cannot be adjusted separately). Connect a standard footswitch to this jack, such as the recommended TASCAM RC-30P (sold separately). You can choose from variety of functions to use with a footswitch. (See Changing your preferences). 20) INPUT Control 24) POWER Switch Use this control to change the input level of the BASS IN jack. This switch turns the power to the whole unit on and off. 21) LINE IN Jack 25) CD EFF Switch Use this stereo jack to connect external devices such as a synthesizer, guitar preamplifier, cassette tape recorder, rack-mount effects unit, etc., to the CD-BT1MKII. This jack has no level control, so you must adjust the output level at the source device. This switch turns CD effects on and off. 26) BASS IN Switch (PASSIVE/ ACTIVE) You can use both passive and active bass guitars with CD-BT1MKII. Set this switch according to whether your bass guitar is passive or active. TASCAM CD-BT1MKII — 11 English Part names and functions (Continued) Making connections English Connecting a bass guitar (BASS IN) BASS GUITAR Connect a bass guitar to the BASS IN jack. Set the BASS IN switch to either PASSIVE or ACTIVE at the side of the unit according to the type of your bass guitar. The BASS IN jack of the CDBT1MKII accepts unbalanced input signals. Use a ¼ inch mono phone plug. Adjusting the input level Use the INPUT control to adjust the level of the input signal from the BASS IN jack. 12 — TASCAM CD-BT1MKII Inputting signals from external devices (LINE IN) Adjusting the output level after adding built-in effects Press and hold down the EFFECT/ EDIT key to open the Effect menu, and press the NEXT or PREV key to choose LVL and use the UP and DOWN keys to set the output level between 0 and 64. The LINE IN jack accepts a stereo mini-jack plug (3.5mm). The input level at the LINE IN jack cannot be adjusted on the CDBT1MKII, so adjust the output level on the external device you have connected. LINE OUT OF EXTERNAL DEVICE WARNING NEVER connect a bass guitar amplifier to the CD-BT1MKII’s BASS IN jack, as you will damage your equipment if you do this. Adjusting mix balance between bass guitar and CD Press and hold down the TUNER/ SETUP key to open the Setup menu, and press either the NEXT or PREV key to choose MIX. You can set the mix balance using values between B (Bass) 10 – B1, 0, C (CD) 1 – C10. Making Connections (Continued) Adjusting the output level Connecting a footswitch English Output to headphones and external devices You can adjust the output level of LINE OUT and PHONES by using the OUTPUT control. NOTE Connect headphones to the PHONES jack. Use the stereo LINE OUT jack to connect the CD-BT1MKII to external devices, such as speakers with a built-in amplifier, AUX input jacks of a stereo system, cassette tape recorders, or CD recorders. The levels from both the LINE OUT and PHONES jacks are controlled together by the OUTPUT control and cannot be adjusted independently. When you have a recording device connected to the LINE OUT jack, remember that the OUTPUT control affects the recording level. RC-30P FOOTSWITCH Connect a TASCAM RC-30P (sold separately) to the FOOT jack. You can set the polarity (pushto-make / push-to-break) of the footswitch using the POL item in the Setup menu. CAUTION To avoid problems with your CD-BT1MKII, use only a footswitch such as the TASCAM RC-30P (sold separately) that has a standard phone (tip and sleeve) plug. TASCAM CD-BT1MKII — 13 Using the menu system English Entering the menu system To enter the menu category of your choice, do the following: Effect menu (bass guitar effects) After selecting an effect slot, press and hold the EFFECT/EDIT key EQ menu (equalizer) After selecting an EQ slot (A or B), press and hold the EQ/EDIT key Tuner menu (bass guitar tuner) Tap the TUNER/SETUP key Setup menu (system setup) Press and hold down the TUNER/ SETUP key Tempo/Key menu (changing tempo and pitch of CD) Tap the TMP/KEY / CD EFF key CD Effect menu (CD playback effects) Press and hold down the TMP/ KEY / CD EFF key Metronome menu Press and hold down the STOP key. The menu then shows the menu category you select, reversed and blinking. 14 — TASCAM CD-BT1MKII Menu Category EFFECT EQ TUNER SETUP Menu Item EFF LIB Parameter LVL EQ L/ EQLM/ EQ M/ EQMH/ EQ H Values (default values are underlined) ON/OFF 1 – 4, c1 – c7, d1 – d5 – 0 to 64 MID ON/OFF TUNE MODE=BAS: 5B, 4E, 3A, 2D, 1G MODE OSC CHR/BAS _ _ OFF, _C – _B, C – A, B, C – B, (3 octaves) CAL 435–440–445 MIX B10 – B1, 0, C1 – C10 PLAY ALL/SGL sets base frequency (A4, unit: Hz) sets mix balance between CD and input selects all or single play CUE CUE/FLS selects action of CUE -15 – 0 – +15 Notes turns effect on or off preset number depends on effect type effect output level adjusts the gain of the equalizer band (low, midlow, mid, mid-high, high) turns mid shaping function on or off sets string number in Bass Mode selects tuner mode sets pitch of the oscillator Menu Category SETUP TEMPO KEY Menu Item Values (default values are underlined) UPDN MIX, TMP, KEY, FIN FOOT EQ+, FX+, FX-, CUE. FLS, REW, FF POL NOR/INV sets function of UP/DOWN key in the home display mode sets function of the footswitch sets polarity of the footswitch Choosing menu items Choose menu items in the selected menu category using the PREV and NEXT keys. Changing the setting values sets the speed of CD playback in % Change the setting values using the UP and DOWN keys. Exiting the menu system VSA KEY FINE VSA=OFF: -50 to +16 VSA=ON: -50, -32, -16,-12, -8, -4, 0, +4, +8, +12, +16 ON/OFF I6 – 0 – O6 -50 – 0 – +50 BEE OFF, BST, ENH, CUT MONO OFF (stereo), L+R, L, R turns VSA on or off sets key control in semitones sets fine tuning (cent) selects between boost, enhance, or cut function for CD playback selects mono monitor mode SPLT OFF (mix), C-B, B-C selects split monitor mode MTRO (OFF), 40 – 120 – 220 sets tempo of metronome in BPM (Beats Per Minute) BEAT OFF, 2 – 6 selects number of beats of the metronome TMP CD EFF METRONOME Notes Press the TIME/ESC key to exit the menu system and go back to the home display mode. TASCAM CD-BT1MKII — 15 English Using the menu system (Continued) Using the CD player English The CD player in CD-BT1MKII works in much the same way as other CD players, with a few minor differences and special features. Playback Press the PLAY/PAUSE key (G/J) to start playback and to pause playback. Press the STOP key (H) to stop playback. Skipping between tracks and searching within tracks Use the skip/search keys (m/. and //,) to move back and forward one track at a time. Use these keys to search within the CD by pressing and holding the key for the direction that you want to search. By continuing to press, the search will speed up. Looping (track/disc) Press the LOOP key to repeat a single track, or all tracks, according to the PLAY item in the Setup menu. 16 — TASCAM CD-BT1MKII Setting SGL ALL Repeat Mode repeats a single current track. LOOP 1 appears on the display. repeats the whole disc. LOOP appears on the display. Looping (In/Out points) To repeat a particular section of a track, use the I/O key to set the start (IN) point of the loop, then use the I/O key to set the end (OUT) point. Pressing the I/O key during playback or paused playback sets the IN point. The I-O symbol blinks on the display. Pressing the I/O key again during playback or paused playback sets the OUT point. LOOP and I-O appear on the display. The section between the two points repeats seamlessly. To cancel an I/O loop, press the LOOP key. LOOP disappears from the display and the loop mode is canceled. Pressing the LOOP key again will restart the previously determined loop. Pressing the I/O key again clears the loop points. The CUE key The CUE key has two functions that can be set in the Setup menu: Setting Function CUE playback pauses at the point where playback last started. FLS playback “flashes” automatically back to the last pointwhere playback started. With a TASCAM RC-30P footswitch (sold separately) connected, you can use it instead of the CUE key for handsfree operation. Set the FOOT item in the Setup menu to CUE or FLS (flash). Display In the home display mode press the TIME/ESC key to change the time display between track elapsed time, track remaining time, and total remaining time of the CD. There are four ways to change the way a CD is played back, using menu items in the Tempo Key menu: Tempo control (TMP), VSA (Variable Speed Audition) setup (VSA), Key control (KEY), and Fine tuning (FINE) Tempo control Tempo control allows you to change the tempo of a track. Tap the TMP/KEY / CD EFF key to enter the Tempo Key menu, and select TMP by pressing either the PREV or NEXT key. TEMPO blinks on the display. When VSA is ON (see below), the settings you can choose are: -50, -32, -16, -12, -8, -4, 0 (off), +4, +8, +12, and +16%. Press the UP or DOWN keys to set the value. When VSA is OFF you can change the setting between –50 and +16% in 1% steps. Press either the UP or DOWN key to set the tempo.When the tempo is set to a value other than zero, TEMPO shows in the home display mode. VSA When VSA is ON, you can change the tempo without changing the key. Tap the TMP/KEY / CD EFF key to enter the Tempo Key menu, select VSA by pressing either the PREV or NEXT key. Press either the UP or DOWN key to choose either ON or OFF. TEMPO blinks on the display. When the VSA is set to ON, the letters VSA are shown in the display. NOTE If the tempo control value is not set to 0 and you change VSA from OFF to ON, the tempo value will be automatically reset to a “VSA ON value.” For example, if the value is [-33] when VSA is OFF, it will automatically be adjusted to [-50] when you turn VSA ON. Key control Key control changes the key of the music up or down by six semitones. Tap the TMP/KEY / CD EFF key to enter the Tempo Key menu, and select KEY by pressing either the PREV or NEXT key. KEY blinks on the display. Press either the UP or DOWN key to set the value for the key. The range is ± 6 semitones (I6 – 0 (off) – O6). When the key is set to a value other than zero, KEY shows in the home display mode. Fine tuning Fine tuning changes the key of the music by cents (100 cents = 1 semitone). This allows you to make fine adjustments and allow for slight tuning differences between your instruments and the CD. Tap the TMP/KEY / CD EFF key to enter the Tempo Key menu, and select FINE by pressing either the PREV or NEXT key. KEY blinks on the display. Press either the UP or DOWN key to set the fine tuning value. The range for adjustment is ±50 cents (-50 – 0 (off) – +50). If the key control is set to O6, however, the available range of fine tuning is between -50 – 0, and when it is set to I6, the fine tuning range is between 0 – +50. When the fine tuning is set to a value other than zero, KEY shows in the home display mode. (continued on the next page) TASCAM CD-BT1MKII — 17 English Pitch and tempo changes Using CD effects English (continued from the previous page) CAUTION If you set the key control to O6 while the fine tuning value is greater than 0, the fine tuning value is automatically reset to 0. Similarly, if you set the key control to I6 while the fine tuning value is less than 0, the fine tuning value is automatically reset to 0. Also note that when key control or VSA is ON, you may find that the music played back has a “vibrato” feel. This is not a fault of the CD player – it is a natural result of the special effects. Using CD effects Turning CD effects on and off Pressing the CD EFF switch at the side of the CD-BT1MKII turns on the preset CD effects: BEE (Bass Enhancement Effect), mono monitor, split monitor. These three CD effect components can be used simultaneously. The CD EFF symbol is shown on the display. Press the CD EFF switch again to turn off the CD effects. BEE (Bass Enhancement Effect) BEE reduces or enhances the bass com- 18 — TASCAM CD-BT1MKII ponent of the CD playback. Press and hold the TMP/KEY / CD EFF key to enter the CD Effect menu. Press either the PREV or NEXT key to choose BEE. Press either the UP or DOWN key to select from the choices listed below: OFF: normal playback (the sound is not affected in any way) BST: the bass component of the sound will be boosted ENH: the bass component of the sound will be boosted and the definition of the bass part of the music will be enhanced CUT: bass component of the sound will be cut out Mono monitor Setting the monitor mode allows you to control the output signal between mono and stereo with alternate options for both. Press and hold the TMP/KEY / CD EFF key to enter the CD Effect menu, and select MONO by pressing either the PREV or NEXT key. Press either the UP or DOWN key to select from the following: L+R: outputs a mono signal, mixing the L (left) and R (right) channels. L: outputs the L channel signal only. R: outputs the R channel signal only. OFF: outputs normal stereo signal. Split monitor Setting the split monitor mode allows you to split the CD output and the bass guitar into left and right outputs. Press and hold the TMP/KEY / CD EFF key to enter the CD Effect menu, and select SPLT by pressing either the PREV or NEXT key. Press the UP or DOWN key to select from the following: C-B: outputs the sound of the CD from the left, and the sound of the bass guitar from the right. B-C: outputs the sound of the bass guitar from the left, and the CD sound from the right. OFF: outputs stereo mixed sound of CD and bass guitar from left and right. CD-BT1MKII has five effect slots, numbered from 1 through 5, where you can store your own effect settings that you create from the 16 available preset effects. When an effect slot is selected, if a preset effect is recalled and edited, the edited effect is automatically stored in the selected effect slot. Components DLY FLA CHO WAH COMPL COMPH OCT TECH DIST HCUT Delay setting Flanger setting Chorus setting Auto-wah setting Low compressor High compressor Octave setting Techno filter setting Distortion gain High cut filter Storing your own effect settings in an effect slot 1. The display shows the effect slot numbers 1 through 5 in the upper right corner. Press the EFFECT/ EDIT key to select a slot. Each time you press the EFFECT/EDIT key, the selection indicator (black dot) moves between the slot numbers. 2. Press and hold the EFFECT/EDIT key to open the Effect menu. The word Effect blinks on the display. gether (such as LIB:d3), which represents a set of effect presets. 6. As you scroll through the effect presets using either the UP or DOWN key, the effect presets appear in this order: numbers 1– 4, compressor c1– c7, distortion d1– d5. Press either the UP or DOWN key to select a library preset effect number. TIP See the Effect Library chart to determine the content of a selected library number. CAUTION 3. Select EFF by pressing either the PREV or NEXT key. 4. Press either the UP or DOWN key to turn EFF ON. 5. Select LIB (effect preset library) by pressing either the PREV or NEXT key. The CD-BT1MKII display shows the effect presets as a number, or a letter and a number to- If there are any settings in the selected effect slot to start with, you will overwrite them when you recall a preset effect. 7. Press either the PREV or NEXT key to move between the components of the effect preset. For example, if you choose “compressor 5,“ the display shows LIB:c5. The components displayed are COMPL, COMPH, WAH, DLY. All four compo(continued on the next page) TASCAM CD-BT1MKII — 19 English Using built-in effects Using built-in effects (Continued) English (continued from the previous page) nents can be adjusted by pressing either the UP or DOWN key. Components shown in bold in the Effect Library Chart are mixable. In the example of “compressor 5,“ the WAH and DLY components are followed by their own mix parameters in the display, with MIX1 following WAH and MIX2 following DLY. Use either the UP and DOWN keys to mix the WAH and DLY components in this effect. DLY is always mixed using MIX2. 8. Continue selecting the components to edit by pressing either the PREV or NEXT key. Select values for the components by pressing either the UP or DOWN key. 9. The last parameter of the sequence for each library effect preset is LVL (the output level from the effect unit). Set the output level from 0 to 64 by pressing either the UP or DOWN key. Note that the output 20 — TASCAM CD-BT1MKII level is only available when the effect is turned on and is bypassed when the effect is off. 10. Press the TIME/ESC key to exit the effect settings. The effect settings you have made are automatically stored in the effect slot you first chose in steps 1 and 2. Adjusting the mix You can adjust the mix level of the effects of the components shown in bold in the Effect Library Chart. In MIX1 mode the components FLA, CHO, WAH, OCT and TECH can be mixed. In MIX2 mode the component DLY can be mixed. Recalling an effect with your settings When you have stored the effect settings in an effect slot as described above, you can recall them simply by pressing the EFFECT/EDIT key to select the appropriate effect slot. TIP If you have connected a footswitch such as TASCAM RC-30P (sold separately), you can step through the bank slots by pressing the footswitch. Make sure that FOOT in the Setup menu is set to either FX+ or FX-. 1 2 3 4 c1 c2 c3 c4 c5 c6 c7 d1 d2 d3 d4 d5 EFFECT LIBRARY CHART DLY FLA-DLY CHO-DLY WAH-DLY COMPL-COMPH COMPL-COMPH-DLY COMPL-COMPH-FLA-DLY COMPL-COMPH-CHO-DLY COMPL-COMPH-WAH-DLY COMPL-COMPH-OCT-DLY COMPL-COMPH-TECH-DLY DIST-HCUT DIST-HCUT-DLY DIST-HCUT-FLA-DLY DIST-HCUT-CHO-DLY DIST-HCUT-WAH-DLY The CD-BT1MKII has a 5-band equalizer for bass guitar input and two EQ slots (A and B) for the equalizer. After an EQ slot is selected and you edit the equalizer settings, the edited EQ settings will automatically be stored in the selected EQ slot. Setting the equalizer 1. Tap the EQ/EDIT key to select either EQ slot A or B (pressing the EQ/EDIT key cycles through EQ slot A, B, and OFF). 2. Press and hold the EQ/EDIT key to enter the EQ menu. 3. Select a parameter from the choices below by pressing either the PREV or NEXT key: EQ L EQLM EQ M EQHM EQ H MID (Lo : 80 Hz) (Lo-Mid : 200 Hz) (Mid : 500 Hz) (Hi-Mid : 1.25 kHz) (Treble : 3.15 kHz) Mid Shape (EQ adjust ment) ON/OFF 4. When the selected parameter appears on the display, use either the UP or DOWN key to adjust the level of gain. The available range of values for adjustment is between -15 – +15. 5. Press the TIME/ESC key to exit the EQ menu and return to the home display mode. The parameters set in the EQ menu are automatically saved in the EQ slot selected in step 1. Recalling equalizer settings Press the EQ/EDIT key to select the EQ slot you want to recall. TIP If you have connected a footswitch such as TASCAM RC-30P (sold separately), you can step through the bank slots by pressing the footswitch. Make sure that FOOT in the Setup menu is set to EQ+. TASCAM CD-BT1MKII — 21 English Equalizer Using the metronome English The CD-BT1MKII has a built-in metronome. To use the metronome, press and hold the STOP key to open the Metronome menu. Choosing the metronome tempo 1. Press either the PREV or NEXT key to select MTRO. 2. When the menu is first opened, the metronome sound is off. The metronome will begin generating the sound of beats at the previously set tempo when you press either the UP key or the DOWN key to set the tempo. Press once to change by one beat per minute; press and hold either the UP or DOWN key to fast forward or backward through the tempos. You can set the value between 40 and 220 BPM (beats per minute) and you will hear the sound of 22 — TASCAM CD-BT1MKII metronome beats as soon as you set the value. Choosing the beats 1. Press either the PREV or NEXT key to select BEAT. 2. Select the rhythm (2 through 6 or OFF) by pressing either the UP or DOWN key. When you choose a rhythm you will notice that the first beat is a higher pitch and volume than the other beats. In the OFF setting, all beats are the same pitch and volume. NOTE The metronome functions only when a CD is not being played back. If you start playing a CD while using the metronome, the metronome function stops automatically. CD-BT1MKII includes a guitar tuner that operates in two modes, chromatic (CHR) and bass guitar (BAS). Chromatic mode (CHR): The pitch of the incoming signal is detected and displayed automatically. Bass guitar mode (BAS): You choose the string you want to tune before you start tuning. To select the tuner mode: 1. Tap the TUNER/SETUP key and enter the Tuner menu. 2. Select MODE by pressing either the PREV or NEXT key. 3. Set the mode to either BAS or CHR by pressing either the UP or DOWN key. In chromatic mode, TUNE:--- is shown on the display. When you play a single note on your bass guitar when it is connected to the CD-BT1MKII, the tuner “guesses” the closest note, and the note name appears on the display. Tune the string so that it is close to the note you want, and so that the right note appears in the display, and then fine-tune the guitar until the display shows a large center “blob” and the string is tuned. Repeat for all strings. by the setting in the CAL (calibration) function. On-key Tap the TUNER/SETUP key to enter the Tuner menu, and select the OSC (oscillator) by pressing either the PREV or NEXT key. Press either the UP or DOWN key to set the note tuning you want. Flat I SharpO If the tuner is in the bass guitar mode, use the TUNE: XX item in the Tuner menu to set the note on the display, and then tune as above. You can choose the note from 5B, 4E, 3A, 2D, and 1G, (the names of the bass guitar strings in standard tuning). The selected note is shown on the display as TUNE: XX. Using the oscillator The CD-BT1MKII can output notes (sine waves) in the standard Western musical scale between C and B in a three octave range. Standard tuning frequency in this case is determined TIP This is a convenient feature to use when tuning, as you can listen to both the sound of the oscillator and your instrument. It is also useful if you are tuning an acoustic instrument not connected to the CD-BT1MKII. Calibration Usually, A4 (A above Middle C = standard tuning frequency) is tuned to 440 Hz. The CD-BT1MKII allows you to set A4 between 435Hz and 445Hz. Tap the TUNER/SETUP key to enter the Tuner menu, and select the CAL function by pressing either the PREV or NEXT key. Press either the UP or DOWN key to set a value between 435 and 445 (Hz). TASCAM CD-BT1MKII — 23 English Using the tuner Changing your preferences for the CD-BT1MKII English Use the Setup menu to make changes to the setup of the CD-BT1MKII. To open the Setup menu, press and hold down the TUNER/SETUP key. CUE key function This function allows you to set the function of the CUE key. Select CUE in the Setup menu, and set it to either CUE or FLS (FLASH). Mix balance This function allows you to adjust the mix balance between the bass guitar sound and the CD sound. Select MIX in the Setup menu, and select a value between B (Bass) 10 – B1, 0, C (CD) 1 – C10. CD playback mode This function allows you to set the CD playback mode. Select PLAY in the Setup menu, and set it to either ALL (plays all tracks) or SGL (plays a single track). 24 — TASCAM CD-BT1MKII FIN: key control (See Pitch and tempo changes) fine tuning (See Pitch and tempo changes) Footswitch function UP key and DOWN key function The function of the UP and DOWN This function allows you to use a footswitch such as the recommended TASCAM RC-30P (sold separately), to change the effect slot, cue, or CD rewind/fast forward. Select FOOT in the Setup menu, and select the function from the following: MIX: mix balance (See Changing your preferences) selects the EQ slot FX+, FX-: selects the effect slot CUE, FLS: CUE function REW, FF: selects CD rewind or fast forward of the CD Once you select a function the footswitch can be used to operate the function. (continued on the next page) TMP: CD playback tempo (See Pitch and tempo changes) CUE: Press either the PREV or NEXT key to select between menu items, and press either the UP or DOWN key to select values. KEY: FLS: playback is paused at the last point where playback started. playback starts automatically from the last point where playback started. keys when you are in the home display mode can be set so that they change the value of the menu item that you select. This can be a useful shortcut. Select UPDN in the Setup menu, and select one of the four functions by pressing either the UP or DOWN key. Choose from the following list: EQ+: Facts and figures (specifications) Footswitch polarity This function allows you to set a polarity suitable for the footswitch that you are using. Select POL in the Setup menu, and set it to either NOR (NORMAL) or INV (INVERT) by pressing either the UP or DOWN key. Disc types AD/DA Nominal output level (LINE OUT) Maximum output level (LINE OUT) without distortion Output impedance Maximum output level (PHONES) Nominal input levels LINE IN BASS IN 8 cm single, 12 cm CD 16-bit –10 dBV 0 dBV (1 Vrms) Weight (excluding batteries) CD playback characteristics Frequency response 20 Hz to 20 kHz ±1.0 dB 1 kΩ > 18mW (into 32$) –10 dBV –15 dBV (Passive) –10 dBV (Active) Voltage requirements DC 9V (PS-PS5 AC adapter) AA batteries x 4 (NiMH or alkaline) Power consumption 4 W (PS-PS5 AC adapter) Dimensions (w x d x h) 232 x 138 x 40 including feet (mm) / 9.1 x 5.4 x 1.6 (in) 620g / 1 lb, 6 oz. English (continued from the previous page) Dynamic range > 88 dB S/N ratio > 88 dB THD < 0.01% Digital signal processing 32-bit Specifications and the appearance of the CD-BT1MKII may change without notice for improvement reasons. The illustrations in this manual may differ slightly from the actual product. TASCAM CD-BT1MKII — 25 CONSIGNES DE SÉCURITÉ IMPORTANTES Français 1 Lisez ces instructions. 2 Gardez ces instructions en lieu sûr, pour référence ultérieure. 3 Tenez compte de tous les avertissements. 4 Suivez toutes les instructions. 5 N’utilisez pas cet appareil près de l’eau. 6 Ne nettoyez l’appareil qu’avec un chiffon sec. 7 N’obstruez pas les ouïes de ventilation. Installez l’appareil conformément aux instructions du constructeur. 8 N’installez pas l’appareil à proximité de sources de chaleur, telles que radiateur, four ou tout autre appareil dissipant des calories (amplificateur de puissance, par exemple). 9 Ne désactivez pas les dispositifs de sécurité (détrompeurs) des prises polarisées ou avec mise à la terre. Une prise polarisée possède un contact plus grand que l’autre ; une prise avec mise à la terre possède une troisième broche, prévue pour votre sécurité. Si la prise se trouvant à l’extrémité du cordon secteur fourni avec votre appareil ne correspond pas à votre prise murale, consultez un électricien pour son remplacement. 10 Évitez de marcher sur le cordon secteur, de le coincer ou de le pincer, ainsi que de couder le cordon au niveau de l’appareil ou de la prise secteur. 26 — TASCAM CD-BT1MKII 11 N’utilisez que les dispositifs optionnels ou les accessoires recommandés par le constructeur. 12 N’utilisez l’appareil qu’avec des supports ou dispositifs de fixation fournis ou recommandés par le constructeur. 13 Débranchez le cordon d’alimentation de l’appareil en cas d’orage ou s’il doit rester inutilisé pendant une longue période. 14) Pour toute maintenance, adressez-vous à des techniciens professionnels qualifiés. Un retour en SAV est indispensable dès que l’appareil a été endommagé d’une façon ou d’une autre : cordon secteur ou alimentation défaillante, pénétration de liquide ou introduction d’objets dans l’appareil, exposition à la pluie ou à l’humidité, et bien sûr dès qu’il ne fonctionne pas normalement, suite à une chute ou à un choc par exemple. • N’exposez pas l’appareil à des éclaboussures ou à des gouttes d’eau. • Ne posez pas d’objets contenant du liquide (vase, tasse, cannette...) sur l’appareil. • N’installez pas cet appareil dans un espace confiné, dépourvu de ventilation , comme par exemple une bibliothèque. • Même si son interrupteur se trouve en position OFF, l’appareil consomme du courant électrique, par l’intermédiaire de son adaptateur secteur. Manipulation des Compact-Discs ..................................................... 28 A propos de l’alimentation secteur .................................................. 29 Noms et fonctions des parties ......................................................... 31 Faire les connexions ........................................................................ 34 Emploi du système de menus ........................................................... 36 Emploi du lecteur de CD ................................................................... 38 Changements de hauteur et de tempo ............................................ 39 Emploi des effets de CD ................................................................... 40 Emploi des effets intégrés ............................................................... 41 Egaliseur (EQ) ................................................................................... 43 Emploi du métronome ...................................................................... 44 Emploi de l’accordeur....................................................................... 45 Changement de vos préférences pour le CD-BT1MKII ..................... 46 Faits et chiffres (caractéristiques) .................................................... 47 A propos de ce manuel: Quand nous citons une touche, un connecteur ou bien encore une commande du CD-BT1MKII, les caractères sont du type: PLAY. Quand nous citons des éléments de l’afficheur, les caractères sont du type: MENU. TASCAM CD-BT1MKII — 27 Français Table des matières Manipulation des Compact-Discs Français Observez les conseils suivants: Placez toujours les CD dans le tiroir avec leur inscription vers le haut (les CD ne peuvent être lus que d’un côté). Pour retirer un disque de son boîtier, appuyez sur le centre de celui-ci et soulevez le disque soigneusement par les bords. Les empreintes de doigt et la poussière doivent être soigneusement essuyées de la surface enregistrée du disque avec un chiffon doux. Contrairement aux disques conventionnels, le CD n’a pas de rainures pour accumuler poussières et débris microscopiques, aussi un passage délicat d’un chiffon doux doit enlever la plupart des particules. 28 — TASCAM CD-BT1MKII Effectuez un mouvement rectiligne de l’intérieur vers l’extérieur du disque. Les petites particules de poussière et les légères taches n’ont absolument aucun effet sur la qualité de reproduction. N’utilisez jamais de produits chimiques tels que des bombes pour disque, des bombes ou fluides antistatiques, de l’essence ou du diluant pour nettoyer les CD. De tels produits causent des dommages irréparables à la surface plastique du disque. Les disques doivent être rangés dans leur boîtier après usage pour éviter les rayures sérieuses qui pourraient entraîner des "sauts" du capteur laser. N’exposez pas les disques directement au soleil ou à des températures et humidité excessives durant des périodes prolongées. Une longue exposition à haute température peut gondoler le disque. N’utilisez que des CD circulaires. Evitez les CD promotionnels de formes diverses. Pour garder le capteur laser propre, ne le touchez pas. Pour la même raison, ne laissez pas le tiroir de disque inutilement ouvert. Le CD-BT1MKII ne peut pas lire de CD-R/RW non finalisés. De plus, certains CD-R/RW finalisés peuvent être illisibles sur le CD-BT1MKII. A propos de l’alimentation secteur Retirez le capot du compartiment des piles à l’arrière du CD-BT1MKII et insérez quatre piles AA (SUM-3) (non fournies) en respectant les marquages + et – dans le compartiment de piles. PRECAUTION Nous vous recommandons d’utiliser des batteries Ni-MH rechargeables (des piles alcalines peuvent aussi être utilisées). Votre CDBT1MKII peut ne pas fonctionner normalement avec des batteries d’un autre type. AVERTISSEMENT Le mauvais emploi des piles peut entraîner des coulures et explosions. Veuillez lire soigneusement et suivre les instructions cidessous: Notes sur les piles Quand vous utilisez le CDBT1MKII avec des piles, débranchez l’adaptateur secteur. Assurez-vous que les piles sont insérées dans le bon sens, selon les repères du compartiment des piles. Utilisez toujours des piles de même type, et remplacez toutes les piles d’un coup. N’essayez pas de recharger des piles non rechargeables. Si vous ne devez pas utiliser le CD-BT1MKII pendant plus d’un mois, retirez les piles. Ne jetez pas les piles dans l’eau ou dans un feu. Ne les démontez pas. Si une pile coule dans le compartiment, enlevez totalement le liquide avec un chiffon jetable. Assurez-vous qu’aucun résidu ne reste avant d’insérer de nouvelles piles. Affichage de la charge restante Quand le CD-BT1MKII fonctionne sur piles, une indication grossière de la charge restante est affichée sous forme de symbole de pile comme suit: 3 parties allumées La pile est totalement chargée. 2 parties allumées La pile est environ à moitié chargée. 1 partie allumée La pile n’est plus beaucoup chargée. 3 parties clignotantes Les piles sont quasiment épuisées. Remplacez-les par des pleines. Autonomie des piles Batteries Ni-MH: environ 4,5 heures Piles alcalines: environ 1,5 heure Economiseur d’énergie Quand vous utilisez des piles, le lecteur de CD et les fonctions CD du CDBT1MKII se coupent automatiquement si une des conditions suivantes perdure plus de 5 minutes (la partie CD de l’afficheur indique CD OFF). (voir page suivante) TASCAM CD-BT1MKII — 29 Français Fonctionnement sur piles A propos de l’alimentation secteur (suite) Français Station en mode d’arrêt Couvercle du CD ouvert Pas de CD chargé Pour réactiver le lecteur de CD, pressez la touche PLAY. PRECAUTION Comme le CD-BT1MKII est équipé de fonctions spéciales comme le changement de tonalité et des effets, l’autonomie des piles est inférieure à celle de lecteurs de CD portables standards. L’autonomie des piles du CD-BT1MKII est affectée à la fois par l’environnement et le nombre de fonctions utilisées. Les facteurs qui affectent l’autonomie comprennent la température, l’humidité, le nombre de fonctions spéciales utilisées et ainsi de suite. Dans certaines circonstances, il peut ne pas y avoir suffisamment d’énergie dans les piles pour alimenter le CD-BT1MKII, malgré l’indication de charge dans l’afficheur. Si cela se produit, changez les piles ou utilisez un adaptateur secteur. Jetez toujours les piles usagées conformément à la législation en vigueur. 30 — TASCAM CD-BT1MKII Fonctionnement sur adaptateur secteur Connectez un adaptateur secteur PSPS5 TASCAM (vendu séparément) à la prise DC IN à l’arrière du CDBT1MKII. Insérez l’adaptateur secteur dans une prise secteur. Assurez-vous que la tension de celle-ci correspond à celle marquée sur l’adaptateur. PS-PS5 Débranchez l'adaptateur secteur de la prise lorsque vous n’utilisez pas le CD-BT1MKII. Prise secteur Les FICHE CC AVERTISSEMENT Retirez les piles avant d’utiliser le CD-BT1MKII avec un adaptateur secteur. Il y a un risque de léger bruit si vous utilisez l’unité sur adaptateur secteur alors que les piles sont à l’intérieur. Si vous branchez un adaptateur secteur et que vous avez oublié de retirer les piles, éteignez l’appareil avec l’interrupteur POWER et retirez les piles. De même, éteignez l’appareil avant de basculer des piles vers l’adaptateur secteur. N’utilisez qu’un adaptateur PS-PS5 avec votre CD-BT1MKII. L’emploi d’un autre type d’adaptateur secteur pourrait endommager votre CD-BT1MKII. réglages peuvent ne pas être correctement sauvegardés si vous éteignez immédiatement après avoir inséré un CD ou changé des réglages. Si les réglages ne sont pas correctement sauvegardés, le système peut ne pas démarrer avec les derniers réglages et à la place démarrer avec les valeurs par défaut. Mise sous/hors tension Utilisez l’interrupteur POWER pour commuter on ou off l’alimentation. Lorsqu’il y a deux mots différents audessus et en dessous de la même touche (par exemple TUNER et SETUP), la touche s’utilise comme suit: Pour activer la fonction inscrite audessus de la touche: Pressez une fois la touche Pour activer la fonction inscrite sous la touche: Pressez la touche et gardez-la enfoncée Par exemple, dans le cas de la touche TUNER/SETUP, le menu Tuner (accordeur) est activé quand vous pressez brièvement la touche et si vous la maintenez enfoncée, cela active le menu Setup (configuration). TASCAM CD-BT1MKII — 31 Français Noms et fonctions des parties Noms et fonctions des parties (suite) Français 1) Prise DC IN 6) Touches PREV, NEXT, UP, DOWN système de menus). Utilisez cette prise pour brancher la fiche CC d’un adaptateur secteur PSPS5 TASCAM (vendu séparément). Utilisez ces touches pour sélectionner les éléments de menu ou modifier les réglages dans un mode menu (voir Emploi du système de menus). Vous pouvez aussi régler les fonctions des touches UP et DOWN en mode d’affichage de base (voir Changement de vos préférences). 11) Touche EQ/EDIT 2) Compartiment des piles Retirez le capot du compartiment des piles à l’arrière du CD-BT1MKII pour insérer 4 piles AA (SUM-3). 3) Capot du lecteur de CD Pour l'ouvrir, soulevez la languette de déverrouillage. Rabaissez le couvercle et il se verrouillera automatiquement. 4) Afficheur Donne le statut du CD-BT1MKII. 5) Touche TIME/ESC Utilisez cette touche en mode d’affichage de base pour changer la façon dont sont affichées les durées de CD et de plage. Utilisez cette touche si vous êtes dans un mode de menu afin d’en sortir et de retourner au mode d’affichage de base. 32 — TASCAM CD-BT1MKII 7) Touche LOOP Lance le mode de répétition (lecture en boucle). 8) Touche I/O Règle les points "IN" (début) et "OUT" (fin) de la section de musique à lire en boucle (voir Emploi du lecteur de CD). 9) Touche TUNER/SETUP Donne accès à la fonction accordeur et au menu de configuration (voir Emploi du système de menus). 10) Touche TMP/KEY / CD EFF Donne accès au menu Tempo/Key et au menu CD Effect (voir Emploi du Sert à commuter l’égaliseur entre A, B et OFF (voir Egaliseur). Pressez et tenez cette touche enfoncée pour accéder au menu EQ (voir Emploi du système de menus). 12) Touche EFFECT/EDIT Sert à se déplacer entre mémoires d’effet consécutives (voir Emploi des effets intégrés). Pressez et tenez cette touche pour accéder au menu Effect (voir Emploi du système de menus). 13) Touches Track Skip/Search [m/. /\,] Saut de plage: Utilisez ces touches pour sauter à la plage précédente ou suivante. Pressez ces touches pendant la lecture d'un CD pour sauter à la plage précédente ou suivante. Presser ces touches quand le CD n'est pas lu vous permet de choisir Noms et fonctions des parties (suite) 14) Touche STOP/MTRO [H] Pressez-la pour arrêter la lecture. La maintenir enfoncée active le mode métronome (voir Emploi du métronome). 15) Touche PLAY/PAUSE [G/J] Lance la lecture d'un CD. Quand un CD est lu, vous pouvez mettre la lecture en pause en pressant cette touche. Pressez-la à nouveau pour reprendre la lecture. 16) Touche CUE Ramène au point de repérage (point du dernier démarrage de lecture). Utilisez le menu Setup pour choisir un mode que la touche CUE peut accomplir (voir Changement de vos préférences). 17) Prise PHONES Connectez ici votre casque. 18) Prise LINE OUT Pour brancher le CD-BT1MKII à des appareils comme des enceintes amplifiées, l'entrée AUX d'un système stéréo, un enregistreur de cassette ou de CD. Vous pouvez entendre le résultat des effets et des changements de tonalité via les appareils connectés ici. 19) Commande OUTPUT Règle le niveau de sortie à la fois pour la prise PHONES et pour la prise LINE OUT (les deux prises ne peuvent pas être réglées séparément). 20) Commande INPUT Change le niveau d’entrée de la prise BASS IN. prise n'a pas de commande de niveau, aussi devez-vous régler le niveau de sortie de l'appareil source. 22) Prise BASS IN Pour brancher une guitare basse. Réglez le sélecteur BASS IN (voir 26) selon le type de la basse que vous utilisez, passif ou actif. 23) Prise FOOT Pour brancher une pédale commutateur standard, telle que la RC-30P TASCAM (vendue séparément). Vous pouvez choisir parmi une variété de fonctions pour la pédale commutateur (voir Changement de vos préférences). 24) Interrupteur POWER Met la totalité de l'unité sous/hors tension. 21) Prise LINE IN 25) Commutateur CD EFF Sert à brancher des appareils externes du type synthétiseur, amplificateur de guitare, lecteur de cassette, unité d'effet en rack, etc au CD-BT1MKII. Cette 26) Sélecteur BASS IN (PASSIVE/ ACTIVE) Active et désactive les effets de CD. Vous pouvez utiliser aussi bien des TASCAM CD-BT1MKII — 33 Français la plage d'où démarrer (pour lire, pressez la touche PLAY ). Recherche: avance rapide/retour rapide Gardez enfoncée une de ces touches durant la lecture de CD pour avancer ou reculer rapidement. La vitesse de la recherche augmente quand vous tenez enfoncée l'une de ces touches. Faire les connexions Français basses passives qu’actives avec le CDBT1MKII. Réglez ce sélecteur selon que votre basse est passive ou active. Réglage du niveau d’entrée Connexion d’une guitare basse (BASS IN) Entrée de signaux d’appareils externes (LINE IN) La commande INPUT règle le niveau du signal entrant en prise BASS IN. GUITARE BASSE SORTIE LIGNE D’UN APPAREIL EXTERNE Connectez une guitare basse à la prise BASS IN. Réglez le sélecteur BASS IN sur PASSIVE ou ACTIVE sur le côté de l’unité en fonction du type de votre basse. La prise BASS IN du CDBT1MKII accepte les signaux d’entrée asymétriques. Utilisez une fiche jack 6,35 mm mono. 34 — TASCAM CD-BT1MKII La prise LINE IN accepte une fiche mini-jack stéréo (3,5mm). Le niveau d'entrée en prise LINE IN ne peut être réglé sur le CDBT1MKII, aussi devez-vous régler le niveau de sortie sur l'appareil externe connecté. AVERTISSEMENT Ne connectez JAMAIS un amplificateur de guitare basse à la prise BASS IN du CDBT1MKII car vous endommageriez votre équipement. Réglage du niveau de sortie après ajout des effets intégrés Pressez et tenez enfoncée la touche EFFECT/EDIT pour ouvrir le menu Effect, pressez la touche NEXT ou PREV pour choisir LVL et réglez le niveau de sortie entre 0 et 64 avec les touches UP et DOWN. Réglage de la balance de mixage entre guitare basse et CD Pressez et tenez enfoncée la touche TUNER/SETUP pour ouvrir le menu de configuration Setup, et pressez la touche NEXT ou PREV pour choisir MIX. Vous pouvez régler la balance de mixage à l'aide de valeurs entre B (Basse) 10 – B1, 0, C (CD) 1 – C10. Faire les connexions NOTE Les niveaux des sorties LINE OUT et PHONES sont pilotés conjointement par la commande OUTPUT et ne peuvent pas être réglés indépendamment. Si vous avez un appareil d'enregistrement connecté en prise LINE OUT, rappelezvous que la commande OUTPUT affecte le niveau d'enregistrement. Branchez un casque en prise PHONES. Utilisez la prise LINE OUT stéréo pour brancher le CD-BT1MKII à des appareils externes, comme des enceintes amplifiées, les prises d'entrée AUX d'un système stéréo, un enregistreur de cassette ou de CD. Réglage du niveau de sortie Vous pouvez régler le niveau de sortie en LINE OUT et PHONES à l'aide de la commande OUTPUT. PRECAUTION Pour éviter des problèmes avec votre CD-BT1MKII, n'utilisez qu'une pédale commutateur comme la RC-30P TASCAM (vendue séparément) qui a une fiche jack standard (extrémité et manchon). Branchement d’une pédale PEDALE COMMUTATEUR RC-30P Branchez une RC-30P TASCAM (vendue séparément) en prise FOOT. Vous pouvez régler sa polarité (action à l'enfoncement ou action au relâchement) à l'aide de l'élément POL du menu Setup. TASCAM CD-BT1MKII — 35 Français Sortie vers un casque et des appareils externes Emploi du système de menus Entrée dans le système de menus Français Pour accéder à la catégorie de menu de votre choix, faites ce qui suit: Menu Effect (effets pour basse) Après avoir sélectionné une mémoire d’effet, maintenez la touche EFFECT/EDIT. Menu EQ (égaliseur) Après avoir sélectionné une mémoire d’égalisation (A ou B), maintenez la touche EQ/EDIT. Menu Tuner (accordeur basse) Pressez la touche TUNER/SETUP. Menu Setup (configuration du système) Maintenez TUNER/SETUP Menu Tempo/Key (changement du tempo et de la hauteur du CD) Pressez TMP/KEY / CD EFF. Menu CD Effect (effets de CD) Maintenez la touche TMP/KEY / CD EFF. Menu Metronome Maintenez la touche STOP. 36 — TASCAM CD-BT1MKII Le menu affiche la catégorie de menu sélectionnée, en négatif et clignotant. Catégorie de menu EFFECT EQ TUNER SETUP Elément de menu EFF LIB Parameter LVL EQ L/ EQLM/ EQ M/ EQMH/ EQ H Valeurs (les valeurs par défaut sont soulignées) ON/OFF 1–4, c1–c7, d1–d5 – 0 à 64 MID ON/OFF TUNE MODE=BAS: 5B, 4E, 3A, 2D, 1G MODE OSC CHR/BAS _ _ (OFF), _C–_B, C–A, B, C– B, (3 octaves) CAL 435–440–445 MIX B10 – B1, 0, C1 – C10 PLAY ALL/SGL fréquence de base (la4, unité: Hz) balance de mixage entre CD et entrée lecture totale ou unique CUE CUE/FLS action de CUE -15 – 0 – +15 Notes commute l'effet on/off numéro de preset dépend du type d’effet niveau de sortie d’effet gain de la bande de correction (L (graves), LM (bas médiums), M (médiums), MH (hauts médiums), H (aigus). commute on/off la mise en forme des médiums numéro de corde en mode basse mode d’accordeur hauteur de l’oscillateur Emploi du système de menus TEMPO KEY Elément de menu Valeurs (les valeurs par défaut sont soulignées) UPDN MIX, TMP, KEY, FIN FOOT EQ+, FX+, FX-, CUE. FLS, REW, FF POL NOR/INV fonction de UP/DOWN en mode d’affichage de base fonction de la pédale commutateur polarité de la pédale commutateur vitesse de lecture du CD en % VSA VSA=OFF: -50 à +16 VSA=ON: -50, -32, -16,-12, -8, -4, 0, +4, +8, +12, +16 ON/OFF KEY I6 – 0 – O6 FINE -50 – 0 – +50 BEE OFF, BST, ENH, CUT MONO OFF (stéréo), L+R, L, R commute on/off la VSA commande de tonalité en demi-tons hauteur fine (centièmes) sélectionne la fonction boost, enhance ou cut pour la lecture de CD mode d’écoute mono SPLT OFF (mix), C-B, B-C mode d’écoute séparée MTRO (OFF), 40 – 120 – 220 tempo du métronome en BPM (battements par minute) BEAT OFF, 2 – 6 nombre de battements du métronome TMP CD EFF METRONOME Notes Choix des éléments de menu Choisissez les éléments de menu dans la catégorie de menu sélectionnée avec les touches PREV et NEXT. Changement réglage des valeurs de Changez les valeurs des réglages avec les touches UP et DOWN. Sortie du système de menus Pressez la touche TIME/ESC pour quitter le système de menus et revenir au mode d'affichage de base. TASCAM CD-BT1MKII — 37 Français Catégorie de menu SETUP Emploi du lecteur de CD Le lecteur de CD du CD-BT1MKII fonctionne comme les autres lecteurs de CD avec quelques différences mineures et fonctions spéciales. Français Lecture Pressez la touche PLAY/PAUSE (G/J) pour lancer et mettre en pause la lecture. Pressez la touche STOP (H) pour la stopper. Saut entre plages et recherche dans les plages Utilisez les touches de saut/recherche (m/. et //,) pour sauter à la plage adjacente. Utilisez ces touches pour chercher dans le CD en pressant et en tenant la touche de la direction dans laquelle vous voulez chercher. En la gardant enfoncée, la recherche s'accélérera. Mise en boucle (plage/disque) Pressez la touche LOOP pour répéter une seule ou toutes les plages, selon l'élément PLAY du menu Setup. 38 — TASCAM CD-BT1MKII Réglage Mode de répétition SGL répète seulement la plage actuelle. LOOP 1 s’affiche. ALL répète tout le disque. LOOP s’affiche. Bouclage (points In/Out) Pour répéter une zone de plage, utilisez la touche I/O afin de déterminer le point de début (IN) de la boucle, puis le point de fin (OUT). Presser la touche I/O en lecture ou en pause détermine le point IN. I-O clignote dans l'afficheur. Presser à nouveau la touche I/O en lecture ou en pause détermine le point OUT. LOOP et I-O s'affichent. La zone entre les deux points est répétée indéfiniment. Pour annuler une boucle I/O, pressez la touche LOOP. LOOP disparaît de l'afficheur et le mode de bouclage est annulé. Presser à nouveau la touche LOOP fait redémarrer la boucle précédemment déterminée. Presser à nouveau la touche I/O efface les points de bouclage. La touche CUE La touche CUE a deux fonctions qui peuvent être réglées en menu Setup: Réglage Fonction CUE FLS la lecture se met en pause au point de dernier démarrage de lecture. la lecture repart automatiquement du dernier point de démarrage. Si une pédale commutateur RC-30P TASCAM (vendue séparément) est connectée, vous pouvez vous en servir à la place de la touche CUE pour garder vos mains libres. Réglez l'élément FOOT du menu Setup sur CUE ou FLS. Affichage En mode d'affichage de base, pressez la touche TIME/ESC pour changer l'affichage temporel entre temps écoulé sur la plage, temps restant sur la plage et temps total restant sur le CD. Changements de hauteur et de tempo Commande de tempo La commande de tempo vous permet de changer le tempo d'une plage. Pressez la touche TMP/KEY/CD EFF pour entrer dans le menu Tempo Key et sélectionnez TMP avec PREV ou NEXT. TEMPO clignote dans l'afficheur. Si VSA est sur ON (voir ci-dessous), les réglages que vous pouvez choisir sont: -50, -32, -16, -12, -8, -4, 0 (off), +4, +8, +12 et +16%. Pressez les touches UP ou DOWN pour régler la valeur. Quand VSA est sur OFF, vous pouvez changer le réglage entre –50 et +16%, par pas de 1%. Pressez la touche UP ou DOWN pour régler le tempo. Quand le tempo est réglé sur une valeur autre que 0, TEMPO apparaît dans l'affichage de base. VSA (écoute à vitesse variable) Si VSA est sur ON, vous pouvez changer le tempo sans changer la tonalité. Pressez la touche TMP/KEY/CD EFF pour entrer dans le menu Tempo Key et sélectionnez VSA avec PREV ou NEXT. Pressez UP ou DOWN pour choisir ON ou OFF. TEMPO clignote dans l'afficheur. Si VSA est sur ON, VSA s'affiche. NOTE Si la valeur de commande de tempo n'est pas à 0 et si vous changez VSA de OFF en ON, la valeur de tempo sera automatiquement ramenée à une “valeur VSA ON”. Par exemple, si la valeur est [-33] quand VSA est sur OFF, elle sera automatiquement ramenée à [-50] lorsque vous réglerez VSA sur ON. Commande de tonalité Cette commande change la tonalité de la musique de ± 6 demi-tons. Pressez la touche TMP/KEY/CD EFF pour entrer dans le menu Tempo Key et sélectionnez KEY avec PREV ou NEXT. KEY clignote dans l'afficheur. Pressez UP ou DOWN pour régler la valeur de tonalité. La plage de réglage est de ± 6 demi-tons (I6 – 0 (off) – O6). Quand la tonalité est réglée sur une valeur autre que 0, KEY apparaît dans l'affichage de base. Accord fin L'accord fin change la tonalité de la musique par centièmes (100 centièmes = 1 demi-ton). Cela autorise des réglages fins et permet également de faire de légères différences d'accord entre vos instruments et le CD. Pressez la touche TMP/KEY/CD EFF pour entrer dans le menu Tempo Key et sélectionnez FINE avec PREV ou NEXT. KEY clignote dans l'afficheur. Pressez la touche UP ou DOWN pour régler la valeur d'accord fin. La plage de réglage est de ± 50 centièmes (-50 – 0 (off) – +50). Si la commande de tonalité est réglée sur O6, toutefois, la plage d'accord fin disponible va de –50 à 0, et avec un réglage de I6, elle va de 0 – +50. Quand l'accord fin est réglé sur une valeur autre que 0, KEY apparaît dans l'affichage de base. (voir page suivante) TASCAM CD-BT1MKII — 39 Français Il y a quatre façons de changer la méthode de lecture d'un CD à l'aide des éléments du menu Tempo Key: commande de tempo (TMP), écoute à vitesse variable (VSA), commande de tonalité (KEY) et accord fin (FINE). Emploi des effets de CD (suite de la page précédente) PRECAUTION Français Si vous réglez la tonalité sur O6 alors que la valeur d'accord fin est supérieure à 0, celle-ci est automatiquement ramenée à 0. De même, si vous réglez la tonalité sur I6 alors que la valeur d'accord fin est négative (inférieure à 0), cette dernière revient automatiquement à 0. Notez aussi que lorsque la commande de tonalité ou la VSA est sur ON, vous pouvez ressentir un "vibrato" sur la musique reproduite. Cela n'est pas un défaut du lecteur de CD – c'est le résultat naturel des effets spéciaux. Emploi des effets de CD Activer/désactiver les effets de CD Presser le commutateur CD EFF sur le côté du CD-BT1MKII active les effets de CD préréglés: BEE (Bass Enhancement Effect), écoute mono, écoute répartie. Ces trois effets de CD peuvent être utilisés simultanément. CD EFF s'affiche. Pressez à nouveau le commutateur CD EFF pour désactiver les effets de CD. BEE (Bass Enhancement Effect) Le BEE réduit ou accentue 40 — TASCAM CD-BT1MKII la composante de graves en reproduction de CD. Pressez et tenez enfoncée TMP/KEY / CD EFF pour accéder au menu CD Effect. Pressez PREV ou NEXT pour choisir BEE. Pressez UP ou DOWN pour choisir parmi ci-dessous: OFF: lecture normale (le son n’est pas du tout affecté). BST: la composante de graves du son est accentuée. ENH: la composante de graves du son sera accentuée et la définition améliorée pour la partie grave de la musique. CUT: la composante de graves du son sera atténuée. Ecoute mono Régler le mode d'écoute permet de régler le signal de sortie en mono ou en stéréo avec des alternatives pour les deux. Pressez et tenez enfoncée TMP/KEY/ CD EFF pour entrer dans le menu CD EFF, puis sélectionnez MONO en pressant soit PREV soit NEXT. Pressez UP ou DOWN pour choisir entre: L+R: produit un signal mono, mélangeant les signaux L (left ou gauche) et R (right ou droite). L: ne produit que le signal du canal gauche. R: ne produit que le signal du canal droit. OFF: produit un signal stéréo normal. Ecoute répartie Le mode d'écoute répartie permet d'affecter les sorties du CD et de la guitare basse aux sorties gauche et droite. Pressez et tenez enfoncée la touche TMP/KEY/CD EFF pour entrer dans le menu CD EFF, puis sélectionnez SPLT en pressant soit PREV soit NEXT. Pressez UP ou DOWN pour choisir entre: C-B: produit le son du CD à gauche et le son de guitare basse à droite. B-C: produit le son de la guitare basse à gauche et le son du CD à droite. OFF: produit le son stéréo mixé du CD et de la guitare basse à gauche et à droite. Emploi des effets intégrés supérieur droit. Pressez la touche EFFECT/EDIT pour sélectionner une mémoire. Chaque fois que vous pressez la touche EFFECT/ EDIT, l’indicateur de sélection (point noir) change de numéro de mémoire. Composants DLY FLA CHO WAH COMPL COMPH OCT TECH DIST HCUT Réglage de delay Réglage de flanger Réglage de chorus Réglage de wah-wah automatique Compresseur de graves Compresseur d’aigus Réglage d’octave Réglage de filtreTechno Gain de distorsion Filtre coupe-haut Mémorisation de vos propres réglages d’effet 1. L’écran affiche les numéros de mémoire d’effet 1 à 5 dans le coin 2. Pressez et tenez EFFECT/EDIT pour ouvrir le menu Effect. Effect clignote dans l’afficheur. d’effets presets) en pressant PREV ou NEXT. L’écran du CD- BT1MKII affiche les presets d’effet comme des numéros ou comme un ensemble lettre et numéro (comme LIB:d3), qui représente un jeu d’effets presets. 6. Quand vous faites défiler les effets presets avec UP ou DOWN, ils apparaissent dans cet ordre: numéros 1– 4, compresseur c1– c7, distorsion d1– d5. Pressez UP ou DOWN pour sélectionner un numéro d’effet preset dans la bibliothèque. ASTUCE Voir le tableau Bibliothèque d’effets pour déterminer le contenu du numéro sélectionné. 3. Sélectionnez EFF en pressant la touche PREV ou NEXT. 4. Utilisez UP ou DOWN pour régler EFF sur ON. 5. Sélectionnez LIB (bibliothèque PRECAUTION S’il y a déjà des réglages dans la mémoire d’effet sélectionnée dont vous partez, vous les remplacerez si vous rappelez un effet preset. 7. Pressez PREV ou NEXT pour vous déplacer dans les composants de TASCAM CD-BT1MKII — 41 Français Le CD-BT1MKII a cinq mémoires d’effet, numérotées de 1 à 5, où vous pouvez enregistrer vos propres réglages d’effet créés à partir des 16 effets presets disponibles. Quand une mémoire est sélectionnée, si un effet preset est rappelé et édité, l’effet édité est automatiquement enregistré dans la mémoire d’effet sélectionnée. Emploi des effets intégrés (suite) Français l’effet preset. Par exemple, si vous choisissez “compressor 5“, LIB:c5 s’affiche. Les composants affichés sont COMPL, COMPH, WAH, DLY. Ces quatre composants peuvent être réglés en pressant UP ou DOWN. Les composants affichés en gras dans le tableau de bibliothèque d’effets sont mélangeables. Dans l’exemple de “compressor 5“, les composants WAH et DLY sont suivis par leurs propres paramètres de mixage dans l’afficheur, MIX1 suivant WAH et MIX2 suivant DLY. Utilisez UP et DOWN pour mélanger les composants WAH et DLY dans cet effet. DLY est toujours mixé à l’aide de MIX2. 8. Continuez de sélectionner les composants à éditer en pressant PREV ou NEXT. Sélectionnez une valeur pour les composants en pressant UP ou DOWN. 9. Le dernier paramètre de la séquence pour chaque preset d’effet de la bibliothèque est LVL (le 42 — TASCAM CD-BT1MKII niveau de sortie de l’effet. Réglezle entre 0 et 64 en pressant UP ou DOWN. Notez que le niveau de sortie n’est disponible que lorsque l’effet est activé et qu’il est courtcircuité quand l’effet est sur off. 10. Pressez TIME/ESC pour quitter les réglages d’effet. Les réglages d’effet effectués sont automatiquement enregistrés dans la mémoire d’effet choisie aux étapes 1 et 2. Vous pouvez régler le niveau de mixage des effets des composants représentés en gras dans le tableau de bibliothèque d’effets. En mode MIX1, les composants FLA, CHO, WAH, OCT et TECH peuvent être mixés. En mode MIX2, le composant DLY peut être mixé. Rappel d’un effet avec vos réglages Quand vous avez enregistré vos réglages d’effet dans une mémoire d’effet comme décrit ci-dessus, vous pouvez les rappeler simplement en pressant EFFECT/EDIT pour sélectionner la mémoire d’effet appropriée. ASTUCE Si vous avez connecté une pédale commutateur telle qu’une RC-30P TASCAM (vendue séparément), vous pouvez changer de mémoire en pressant la pédale commutateur. Assurez-vous que FOOT est réglé sur FX+ ou FX- dans le menu Setup. 1 2 3 4 c1 c2 c3 c4 c5 c6 c7 d1 d2 d3 d4 d5 BIBLIOTHEQUE D'EFFETS DLY FLA-DLY CHO-DLY WAH-DLY COMPL-COMPH COMPL-COMPH-DLY COMPL-COMPH-FLA-DLY COMPL-COMPH-CHO-DLY COMPL-COMPH-WAH-DLY COMPL-COMPH-OCT-DLY COMPL-COMPH-TECH-DLY DIST-HCUT DIST-HCUT-DLY DIST-HCUT-FLA-DLY DIST-HCUT-CHO-DLY DIST-HCUT-WAH-DLY Egaliseur (EQ) Réglage de l’égaliseur 1. Pressez la touche EQ/EDIT pour sélectionner la mémoire EQ A ou B (presser la touche EQ/ EDIT sélectionne tour à tour les mémoires A, B et le réglage OFF). 2. Pressez et tenez la touche EQ/EDIT pour accéder au menu EQ. 3. Sélectionnez un paramètre parmi les suivants en pressant la touche PREV ou NEXT: EQ L EQLM EQ M EQHM (graves : 80 Hz) (bas médiums : 200 Hz) (médiums : 500 Hz) (hauts médiums : 1,25 kHz) EQ H (aigus : 3,15 kHz) MID mise en forme des médiums (réglage d’égaliseur) ON/OFF 4. Quand le paramètre sélectionné s’affiche, utilisez la touche UP ou DOWN pour régler le niveau de gain. La plage de valeurs disponibles pour le réglage se situe entre -15 et +15. 5. Pressez la touche TIME/ESC pour quitter le menu EQ et retourner à l’affichage de base. Les paramètres réglés en menu EQ sont automatiquement sauvegardés dans la mémoire EQ sélectionnée à l’étape 1. Rappel des réglages d’égaliseur Pressez la touche EQ/EDIT pour sélectionner la mémoire EQ que vous désirez rappeler. ASTUCE Si vous avez connecté une pédale commutateur telle qu’une RC-30P TASCAM (vendue séparément), vous pouvez changer de mémoire en pressant la pédale commutateur. Assurez-vous que FOOT est réglé sur EQ+ ou dans le menu Setup. TASCAM CD-BT1MKII — 43 Français Le CD-BT1MKII a un égaliseur 5 bandes pour l’entrée guitare basse et deux mémoires EQ (A et B) pour l’égaliseur. Après qu’une mémoire EQ ait été sélectionnée et que ayez édité les réglages d’égaliseur, ces derniers sont automatiquement enregistrés dans la mémoire EQ sélectionnée. Emploi du métronome Français Le CD-BT1MKII a un métronome intégré. Afin d'utiliser le métronome, pressez et tenez enfoncée la touche STOP pour ouvrir le menu métronome. ou le bas le défilement des tempos. Vous pouvez régler la valeur entre 40 et 220 BPM (battements par minute) et vous entendrez le son des battements du métronome dès que vous réglerez la valeur. Choix des battements Choix du tempo du métronome 1. Pressez la touche PREV ou la touche NEXT pour sélectionner MTRO. 2. Quand le menu est ouvert pour la première fois, le son du métronome est coupé. Le métronome commencera à produire le son des temps au tempo préalablement réglé quand vous presserez la touche UP ou DOWN pour régler le tempo. Pressez une fois pour changer d'un battement par minute; pressez et tenez enfoncée la touche UP ou DOWN pour accélérer vers le haut 44 — TASCAM CD-BT1MKII 1. Pressez la touche PREV ou NEXT pour sélectionner BEAT. 2. Sélectionnez le rythme (2 à 6 ou OFF) en pressant la touche UP ou DOWN. Quand vous choisissez un rythme, vous notez que le premier temps est à un volume et à une hauteur supérieurs par rapport aux autres. Avec le réglage OFF, tous les temps ont la même hauteur et le même volume. NOTE Le métronome ne fonctionne que lorsqu'un CD n'est pas reproduit. Si vous commencez à lire un CD pendant que vous utilisez le métronome, celui-ci s'arrête automatiquement. Emploi de l’accordeur Mode chromatique (CHR): La hauteur du signal entrant est détectée et automatiquement affichée. Mode guitare basse (BAS): Vous choisissez la corde que vous désirez accorder avant de commencer. Pour choisir le mode de l’accordeur: 1. Pressez la touche TUNER/SETUP pour entrer dans le menu Tuner. 2. Sélectionnez MODE en pressant la touche PREV ou NEXT. 3. Réglez le mode sur BAS ou CHR en pressant la touche UP ou DOWN. En mode chromatique, TUNE:--- s'affiche. Quand vous jouez une note isolée sur votre guitare basse connectée au CDBT1MKII, l'accordeur "identifie" la note la plus proche et son nom s'affiche. Accordez la corde pour qu'elle soit proche de la note voulue et afin que la bonne note apparaisse dans l'afficheur, puis affinez l'accord jusqu'à ce que s'affiche un grand point central, signifiant que l'accord est bon. Répétez cela pour toutes les cordes. Bémol I Juste DièseO Si l'accordeur est en mode guitare basse, utilisez l'élément TUNE: XX dans le menu Tuner pour régler la note à l'écran, puis accordez vous comme ci-dessus. Vous pouvez choisir la note entre 5B, 4E, 3A, 2D, et 1G (le nom des cordes de guitare basse en accord standard). La note sélectionnée s'affiche comme TUNE: XX. Emploi de l’oscillateur Le CD-BT1MKII peut produire des notes (ondes sinusoïdales) dans une gamme musicale occidentale standard entre C (do) et B (si) sur 3 octaves. La fréquence d'accord standard est déterminée par le réglage de la fonction CAL (calibrage du diapason). ASTUCE C'est une fonction pratique à utiliser lors de l'accord, car vous pouvez écouter à la fois le son de l'oscillateur et celui de votre instrument. C'est aussi utile si vous accordez un instrument acoustique, non connecté au CD-BT1MKII. Pressez la touche TUNER/SETUP, entrez dans le menu Tuner et sélectionnez OSC (oscillateur) en pressant la touche PREV ou NEXT. Pressez UP ou DOWN pour régler la hauteur de note voulue. Calibrage du diapason Le la4 (la médian = fréquence d'accord standard) est habituellement à 440 Hz. Le CD-BT1MKII vous permet de régler le la4 entre 435Hz et 445Hz. Pressez la touche TUNER/SETUP pour entrer dans le menu Tuner et sélectionnez la fonction CAL en pressant PREV ou NEXT. Pressez UP ou DOWN pour régler une valeur entre 435 et 445 (Hz). TASCAM CD-BT1MKII — 45 Français Le CD-BT1MKII comprend un accordeur pour guitare à deux modes: chromatique (CHR) et guitare basse (BAS). Changement de vos préférences pour le CD-BT1MKII Français Utilisez le menu Setup pour changer la configuration du CD-BT1MKII. Pour ouvrir le menu Setup, pressez et tenez enfoncée la touche TUNER/ SETUP. Fonction de la touche CUE Ce paramètre permet de déterminer la fonction de la touche CUE. Sélectionnez CUE dans le menu Setup et réglez-le sur CUE ou FLS (FLASH). CUE: la lecture est mise en pause au dernier point de démarrage de lecture. la lecture reprend automatiquement du dernier point de démarrage de celle-ci. Pressez PREV ou NEXT pour choisir un élément de menu et pressez UP ou DOWN pour sélectionner les valeurs. FLS: Balance de mixage Fonction des touches UP et DOWN Cette fonction vous permet de régler la balance de mixage entre le son de guitare basse et le son du CD. Sélectionnez MIX dans le menu Setup et sélectionnez une valeur entre B (Basse) 10 – B1, 0, C (CD) 1 – C10. Mode de lecture de CD Cette fonction vous permet de régler le mode de lecture de CD. Sélectionnez PLAY dans le menu Setup et réglez-le sur ALL (lecture de toutes les plages) ou SGL (lecture d'une seule plage). 46 — TASCAM CD-BT1MKII La fonction des touches UP et DOWN quand vous êtes en affichage de base peut être réglée pour donner un changement de valeur de l'élément de menu sélectionné. Cela peut être un raccourci utile. Sélectionnez UPDN dans le menu Setup, et choisissez une des quatre fonctions en pressant la touche UP ou DOWN. Choisissez parmi la liste suivante: MIX: balance de mixage (voir Changement de vos préférences) TMP: tempo de lecture du CD (voir Changements de hauteur et tempo) commande de tonalité (voir Changements de hauteur et tempo) accord fin (voir Changements de hauteur et tempo) KEY: FIN: Fonction de la pédale Cette fonction vous permet d'utiliser une pédale commutateur telle que la RC-30P TASCAM (vendue séparément) pour changer de mémoire d'effet, de point de repérage ou faire une avance/retour rapide sur le CD. Sélectionnez FOOT dans le menu Setup et choisissez la fonction parmi: EQ+: sélectionne la mémoire EQ FX+, FX-: sélectionne la mémoire d’effet CUE, FLS: fonction CUE (voir page suivante) Faits et chiffres (caractéristiques) Polarité de la pédale Cette fonction vous permet de régler la polarité correspondant à la pédale que vous utilisez. Sélectionnez POL dans le menu Setup et réglez-la sur NOR (NORMAL) ou INV (INVERT ou inversée) en pressant la touche UP ou DOWN. Types de disque AN/NA Niveau de sortie nominal (LINE OUT) Niveau de sortie maximal (LINE OUT) sans distortion Impédance de sortie Niveau de sortie maximal (PHONES) Niveaux d’entrée nominaux LINE IN BASS IN CD single 8 cm, 12 cm 16 bits –10 dBV 0 dBV (1 Vrms) Poids (sans les piles) Caractéristiques de lecture du CD Bande passante 20 Hz à 20 kHz ±1,0 dB 1 k$ > 18mW (sous 32$) –10 dBV –15 dBV (Passive) –10 dBV (Active) CC 9V (adaptateur Tension requise secteur PS-PS5) Piles AA x 4 (NiMH ou alcalines) 4 W (adaptateur Consommation électrique secteur PS-PS5) Dimensions (L x P x H) 232 x 138 x 40 avec les pieds (mm) 620g Plage dynamique > 88 dB Rapport S/B > 88 dB DHT <0,01% Traitement du signal numérique 32 bits Français (suite de la page précédente) REW, FF: sélectionne l'avance ou le retour rapide du CD Une fois que vous avez sélectionné une fonction, la pédale commutateur peut être utilisée pour la piloter. Les caractéristiques et l’apparence du CD-BT1MKII peuvent changer sans préavis en vue d’améliorations. Les illustrations de ce manuel peuvent légèrement différer du produit réel. TASCAM CD-BT1MKII — 47 Wichtige Sicherheitshinweise Bitte lesen Sie die Folgenden Sicherheitshinweise sorgfältig durch! Deutsch 1 Bedienungsanleitung sorgfältig durchlesen – Bitte lesen Sie vor Inbetriebnahme alle Sicherheits- und Bedienungsanweisungen durch. 2 Bedienungsanleitung aufbewahren – So können Sie bei später auftretenden Fragen nachschlagen. 3 Alle Warnhinweise beachten – Dies gilt sowohl für alle Angaben am Gerät als auch in dieser Bedienungsanleitung. 4 Bestimmungsgemäßer Gebrauch – Benutzen Sie das Gerät nur zu dem Zweck und auf die Weise, wie in dieser Bedienungsanleitung beschrieben. Geben Sie das Gerät niemals ohne diese Bedienungsanleitung weiter. 5 Reinigung – Vor der Reinigung das Netzkabel abziehen. Keine Nass- oder Sprühreiniger verwenden. Mit einem trockenen Tuch reinigen. 6 Zusatzgeräte – Zusatzgeräte, die nicht mit den Herstellerempfehlungen übereinstimmen, können Schäden verursachen. 7 Aufstellung a. Untersatz – Niemals einen instabilen Untersatz (fahrbares oder stationäres Gestell, Regal, Halterung, Tisch) verwenden. Andernfalls 48 — TASCAM CD-BT1MKII kann das Gerät herabfallen und hierdurch ernsthaft beschädigt werden sowie ernsthafte Verletzungen hervorrufen. Ausschließlich einen geeigneten und stabilen Untersatz (mitgeliefert oder vom Hersteller empfohlen) benutzen. Zur Befestigung unbedingt die Herstellerangaben beachten und ausschließlich empfohlenes Zubehör verwenden. b. Fahrbare Gestelle – Plötzliche Richtungswechsel und zu rasches Beschleunigen/ Bremsen sowie unebenen Untergrund vermeiden, da andernfalls Gestell und/oder Gerät umfallen können. c. Hitzeeinwirkung – Das Gerät in ausreichender Entfernung zu Hitze abstrahlenden Vorrichtungen (Heizung, Ofen etc.) und anderen Geräten (Verstärker etc.) aufstellen. d. Belüftung – Die Belüftungsöffnungen des Geräts dürfen niemals blockiert werden. Andernfalls können Überhitzung und Betriebsstörungen auftreten. Das Gerät daher niemals auf einer weichen Unterlage (Kissen, Sofa, Teppich etc.) aufstellen. Bei Einbau in einem Regal, Gestell- oder Einbauschrank unbedingt auf einwandfreien Temperaturausgleich achten. Die diesbezüglichen Herstellerangaben beachten. e. Nässe und Feuchtigkeit – Gerät nicht in unmittelbarer Nähe zu Wasserbehältern (Badewanne, Küchenspüle, Schwimmbecken etc.) oder in Räumen betreiben, in denen hohe Luftfeuchtigkeit auftreten kann. f. Wand- und Deckenbefestigung – Hierzu unbedingt die Vorschriften und Empfehlungen des Herstellers beachten. g. Außenantennen – Beim Montieren einer Außenantenne besteht Lebensgefahr, wenn Netz- und Starkstromleitungen berührt werden. Außenantenne und zugehörige Kabel stets in ausreichendem Abstand zu Hochspannungs-, Licht- und anderen Stromleitungen montieren, so dass kein Kontakt möglich ist. 8 Spannungsversorgung – Sicherstellen, dass die örtliche Netzspannung mit der auf dem Gerät angegebenen Netzspannung übereinstimmt (Aufkleber auf der Unterseite des Geräts) Im Zweifelsfall den Fachhändler oder den verantwortlichen Energieversorger vor Ort befragen. Bei Geräten, die für Batteriebetrieb oder eine andere Spannungsquelle geeignet sind, die zugehörigen Bedienungshinweise beachten. Wichtige Sicherheitshinweise Fachpersonal überlassen. 14 Schadensbehebung in Fachwerkstätten – In den folgenden Fällen müssen Prüfund/oder Wartungsarbeiten von qualifiziertem Fachpersonal durchgeführt werden: a. Bei beschädigtem Netzkabel oder Netzstecker. b. Wenn sich Flüssigkeit oder Fremdkörper im Geräteinneren befinden. c. Wenn das Gerät Nässe oder Feuchtigkeit ausgesetzt war. d. Wenn bei vorschriftsgemäßer Handhabung Betriebsstörungen auftreten. Bei Störungen nur Gegenmaßnahmen ergreifen, die in der Bedienungsanleitung beschrieben sind. Andernfalls keine weiteren Schritte vornehmen, da hierdurch Schäden verursacht werden können, die Reparaturarbeiten durch Fachpersonal erfordern. e. Wenn das Gerät einer heftigen Erschütterung ausgesetzt war oder anderweitig beschädigt wurde. f. Bei Leistungsbeeinträchtigungen jeder Art. 15 Teiletausch – Wenn ein Teiletausch erforderlich wird, die Einhaltung der vom Hersteller vorgeschriebenen Ausführungen und technischen Kenndaten beachten. Nicht zulässige Teile können Brand, Stromschlag sowie andere ernsthafte Störungen verursachen. 16. Sicherheitsüberprüfung – Nach Kundendienst- und Reparaturarbeiten stets eine Sicherheitsüberprüfung vom Fachpersonal vornehmen lassen, um einwandfreien Betrieb zu gewährleisten. Deutsch 9 Netzkabel – Das Netzkabel so verlegen, dass es nicht gedehnt, gequetscht oder geknickt werden kann. Insbesonders darauf achten, dass keine Schäden am Stecker, an der Steckdose ode am Netzkabelausgang des Geräts auftreten können. Netzkabel niemals eigenmächtig umbauen, insbesondere die Schutzkontakte des Netzsteckers niemals abkleben. 10 Netzüberlastung – Netzsteckdosen, Verlängerungskabel oder Steckdosenverteiler niemals überlasten, da andernfalls Stromschlagund Brandgefahr besteht. 11 Gewitter und Nichtgebrauch – Bei Gewittern und längerem Nichtgebrauch des Geräts den Netzstecker und das Antennenkabel herausziehen, um Schäden durch Blitzschlag und/oder Spannungsstöße zu vermeiden. 12 Eindringen von Fremdkörpern und Flüssigkeit – Niemals Gegenstände in die Geräteöffnungen einführen, es besteht Stromschlag- und Brandgefahr. Niemals offene Behälter mit Flüssigkeit auf das Gerät stellen, und sicherstellen, dass keine Flüssigkeit in das Geräteinnere eindringen kann. 13 Kundendienst – Niemals selbst Wartungsarbeiten vornehmen. Bei geöffnetem Gehäuse besteht Stromschlag- und Verletzungsgefahr. Wartungsarbeiten stets qualifiziertem TASCAM CD-BT1MKII — 49 Inhalt Was Sie beim Umgang mit CDs beachten müssen ....................... 51 Wichtige Hinweise zur Stromversorgung ..................................... 52 Was ist dran am CD-BT1MKII? ....................................................... 55 Verbindungen herstellen .............................................................. 58 Das Menü nutzen .......................................................................... 61 Den CD-Player nutzen................................................................... 63 Deutsch Tonhöhe und/oder Tempo der CD-Wiedergabe ändern ................ 65 CD-Effekte einsetzen .................................................................... 66 Die eingebauten Effekte verwenden ........................................... 68 Klangeinstellung mit dem Equalizer ............................................ 71 Das Metronom nutzen .................................................................. 72 Das Stimmgerät nutzen ................................................................ 73 Die Voreinstellungen ändern ........................................................ 75 Fakten und Zahlen (Technische Daten) ......................................... 76 Was Sie über dieses Handbuch wissen sollten: Wenn wir uns auf eine Taste, einen Anschluss oder einen Regler am CD-BT1MKII beziehen, verwenden wir dieses Schriftbild: PLAY. Wenn wir uns auf ein Menü oder einen Hinweis auf dem Display beziehen, verwenden wir dieses Schriftbild: MENU. 50 — TASCAM CD-BT1MKII Was Sie beim Umgang mit CDs beachten müssen Entfernen Sie eventuell vorhandene Fingerabdrücke und Staub auf der Unterseite der CD mit einem weichen, trockenen Tuch. Im Gegensatz zu Vinyl-Schallplatten haben CDs keine Rillen, in denen sich Staub und mikroskopische Partikel festsetzen können, so dass sich die meisten Rückstände durch sanftes Wischen mit einem weichen, trockenen Tuch entfernen lassen sollten. Wischen Sie von der Mitte zum Rand hin. Kleine Staubpartikel und leichte Flecken haben keinen Einfluss auf die Wiedergabequalität. Benutzen Sie niemals Schallplattensprays, Anti-Statik-Mittel, Benzin, Verdünnung oder andere Chemikalien zur Reinigung einer CD. Sie zerstören damit die schützende Kunststoffoberfläche. Legen Sie eine CD nach Gebrauch wieder in ihre Box bzw. Schutzhülle zurück, um das Verschmutzen und Verkratzen zu verhindern. Setzen Sie eine CD niemals für längere Zeit direktem Sonnenlicht, hoher Luftfeuchtigkeit oder hoher Temperatur aus. Bei hoher Temperatur kann sich die CD verformen. Verwenden Sie nur kreisförmige CDs. Verwenden Sie keine unrunden Werbe-CDs usw. Zum Schutz vor Verschmutzung: Berühren Sie nicht den Laser und lassen Sie das CD-Fach nicht für längere Zeit offen stehen. Der CD-BT1MKII kann generell nur abgeschlossene (finalisierte) CDRs/CD-RWs abspielen. Dennoch kann es vorkommen, dass sich auch manche abgeschlossenen CDs auf dem CD-BT1MKII nicht abspielen lassen. TASCAM CD-BT1MKII — 51 Deutsch Beachten Sie Folgendes bei der Handhabung von CDs: Legen Sie CDs immer mit der beschrifteten Seite nach oben in die CD-Lade. Sie können nur diese eine Seite einer CD abspielen. Um eine CD aus ihrer Box zu nehmen, drücken Sie den Halter in der Mitte herunter, und heben Sie die CD, wie unten gezeigt, vorsichtig heraus. Wichtige Hinweise zur Stromversorgung Batterie-/Akkubetrieb Entfernen Sie die Abdeckung des Batteriefachs auf der Rückseite des CD-BT1MKII. Legen Sie vier Batterien/Akkus der Größe AA (nicht im Lieferumfang) so ein, dass die Plusund Minuspole mit den Plus- und Minusmarkierungen im Batteriefach übereinstimmen. Deutsch WICHTIG Wir empfehlen Ihnen, sich wieder aufladbare Ni-MH-Akkus und ein Ladegerät zu beschaffen, Sie können aber auch AlkalineBatterien verwenden. Mit anderen Batterien funktioniert der CD - BT1MKII möglicherweise nicht richtig. VORSICHT Falsche Handhabung kann dazu führen, dass Batterien/Akkus auslaufen oder explodieren. Halten Sie sich genau an die folgenden Anweisungen. 52 — TASCAM CD-BT1MKII Vorsichtsmaßnahmen im Umgang mit Batterien und Akkus Ziehen Sie den Wechselstromadapter heraus, wenn Sie den CD-BT1MKII mit Batterien/Akkus betreiben. Vergewissern Sie sich, dass die Batterien/Akkus richtig eingelegt sind. Die Plus- und Minuspole müssen mit den Plus- und Minusmarkierungen im Batteriefach übereinstimmen. Verwenden Sie nur Batterien/Akkus des gleichen Typs, und ersetzen Sie immer den gesamten Satz. Versuchen Sie nicht Batterien aufzuladen, die nicht aufladbar sind. Nehmen Sie die Batterien/Akkus heraus, wenn Sie den CD-BT1MKII längere Zeit nicht benutzen. Werfen Sie niemals Batterien/Akkus ins Wasser oder in offenes Feuer. Öffnen oder zerlegen Sie Batterien/ Akkus nicht. Sollten eingelegte Batterien/Akkus ausgelaufen sein, wischen Sie mit einem Papiertuch das Batteriefach gründlich aus. Vergewisseren Sie sich, dass alle Rückstände beseitigt sind, bevor Sie neue Batterien/Akkus einlegen. Woran erkenne ich den Ladezustand der Batterien/Akkus? Im Batterie-/Akkubetrieb zeigt das Display mit einem Batteriesymbol den Ladezustand der Batterien/Akkus grob an: 3 Teile leuchten Die Batterien/Akkus sind voll oder fast voll. 2 Teile leuchten Die Batterien/Akkus sind etwa zur Hälfte entladen. 1 Teil leuchtet Nur noch wenig Batterieladung ist vorhanden. 3 Teile blinken Die Batterien/Akkus sind praktisch Wichtige Hinweise zur Stromversorgung Wie lange läuft der CD-BT1MKII mit Batterien/Akkus? Ni-MH-Akkus: ungefähr 4 ½ Std. Alkaline-Batterien: ungefähr 1 ½ Std. Automatisches Stromsparen Im Batterie-/Akkubetrieb schalten sich CD-Player und CD-Funktionen des CD-BT1MKII automatisch aus (im CDTeil des Displays erscheint CD OFF), wenn eine der folgenden Bedingungen länger als 5 Minuten anhält: Das Laufwerk ist gestoppt Das CD-Fach ist offen Keine CD ist eingelegt Um den CD-Player einzuschalten, drücken Sie die PLAY-Taste. WICHTIG Der CD-BT1MKII ist mit speziellen Funktionen ausgestattet, die mehr Strom verbrauchen als übliche tragbare CD-Player. Deshalb ist die Batterielebensdauer kürzer als bei solchen Geräten. Die Batterielebensdauer beim CD-BT1MKII ist sowohl von der Umgebung (Temperatur, Luftfeuchte) als auch von der Anzahl der benutzten Funktionen abhängig. Unter Umständen kann es vorkommen, dass trotz positiver Anzeige der Batteriestrom nicht ausreicht, den CD-BT1MKII zu versorgen. Wechseln Sie in einem solchen Fall die Batterien/Akkus aus, oder verwenden Sie einen Wechselstromadapter. Werfen Sie niemals alte Batterien/Akkus in den Hausmüll. In Deutschland ist der Handel verpflichtet, alte Batterien zur Entsorgung kostenlos zurückzunehmen. Zudem können alte Batterien meist beim örtlichen Wertstoffhof abgegeben werden. Einen Wechselstromadapter verwenden Verbinden Sie einen Wechselstromadapter vom Typ Tascam PS-PS5 (als Zubehör erhältlich) mit dem Anschluss DC IN auf der Rückseite des CD-BT1MKII. Vergewissern Sie sich, dass die auf dem Adapter angegebene Spannung mit Ihrer örtlichen Netzspannung übereinstimmt. Stecken Sie dann den Wechselstromadapter in eine Steckdose. Steckdose PS-PS5 DC-Stecker Deutsch leer. Legen Sie jetzt frische Batterien oder geladene Akkus ein. VORSICHT Verwenden Sie mit dem CD-BT1MKII keinen anderen Wechselstromadapter als einen PS-PS5. Andere Adapter könnten Ihren CDBT1MKII beschädigen. WICHTIG Nehmen Sie die Batterien/Akkus heraus, bevor Sie den CD-BT1MKII mit dem Adapter betreiben. Wenn Batterien/Akkus eingelegt sind, während Sie das Gerät mit dem Wechselstromadapter betreiben, können leise Geräusche auftreten. Wenn der Wechselstromadapter bereits angeschlossen TASCAM CD-BT1MKII — 53 Wichtige Hinweise zur Stromversorgung ist, schalten Sie den CD-BT1MKII mit dem POWER-Schalter aus, und nehmen Sie dann die Batterien/Akkus heraus. Schalten Sie das Gerät auch immer aus, wenn Sie zwischen Batterie-/Akkubetrieb und dem Betrieb mit Adapter wechseln. Trennen Sie den Adapter vom Stromnetz, wenn Sie den CD-BT1MKII nicht benutzten. Deutsch Schalten Sie den CD-BT1MKII nicht sofort aus, nachdem Sie eine CD eingelegt oder Einstellungen geändert haben. Dabei könnten Informationen verloren gehen, und der CD-BT1MKII würde beim nächsten Einschalten mit den Werkseinstellungen starten. Das Gerät ein- und ausschalten Mit dem POWER-Schalter schalten Sie die Stromversorgung für das gesamte Gerät ein oder aus. 54 — TASCAM CD-BT1MKII Manche Tasten haben zwei Funktionen (etwa TUNER und SETUP), auf die Sie folgendermaßen zugreifen: Um die über der Taste aufgeführte Funktion zu nutzen: Drücken Sie kurz auf die Taste. Um auf die unter der Taste aufgeführte Funktion zuzugreifen: Drücken Sie etwas länger auf die Taste. Mit der Taste TUNER/SETUP rufen Sie also das Stimmgerät auf, indem Sie die Taste einmal antippen. Das Einrichtungsmenü hingegen erscheint, wenn Sie die Taste länger gedrückt halten. TASCAM CD-BT1MKII — 55 Deutsch Was ist dran am CD-BT1MKII? Was ist dran am CD-BT1MKII? 1) DC IN-Anschluss 6) Tasten PREV, NEXT, UP, DOWN 10) TMP/KEY / CD EFF-Taste Schließen Sie hier den Wechselstromadapter Tascam PS-PS5 an, der als Zubehör erhältlich ist. Im Menümodus bewegen Sie sich mit diesen Tasten durch das Menü und nehmen Einstellungen vor (siehe Das Menü nutzen). Welche Funktion diese Tasten außerhalb des Menüs haben, können Sie selbst festlegen (siehe Die Voreinstellungen ändern). Mit dieser Taste öffnen Sie das Menü für Tempo/Tonart oder für CD-Effekte (siehe Das Menü nutzen). 2) Batteriefach Deutsch Das Batteriefach befindet sich auf der Rückseite. Entfernen Sie die Abdeckung, um vier Batterien oder Akkus der Größe AA (SUM-3) einzulegen. 3) CD-Fach Um eine CD einzulegen, ziehen Sie den Entriegelungshebel nach oben. Um das CD-Fach zu schließen, drücken Sie die Abdeckung einfach nach unten. Sie rastet automatisch ein. 4) Display Das Display informiert Sie über den Zustand des CD-BT1MKII. 5) TIME/ESC-Taste Normalerweise wechseln Sie mit dieser Taste zwischen verschiedenen Zeitdarstellungen. Im Menümodus verlassen Sie mit dieser Taste das Menü. 56 — TASCAM CD-BT1MKII 11) EQ/EDIT-Taste Hiermit aktivieren Sie die Wiederholfunktion. Mit dieser Taste wechseln Sie zwischen den EQ-Einstellungen A, B und OFF (siehe Klangeinstellung mit dem Equalizer). Wenn Sie die Taste länger drücken, öffnet sich das EQ-Menü (siehe Das Menü nutzen). 8) I/O-Taste 12) EFFECT/EDIT-Taste 7) LOOP-Taste Mit dieser Taste setzen Sie den „INPunkt“ und den „OUT-Punkt“ des Loops (siehe Den CD-Player nutzen). 9) TUNER/SETUP-Taste Mit dieser Taste aktivieren Sie das Stimmgerät oder rufen das Einrichtungsmenü auf (siehe Das Menü nutzen). Mit dieser Taste wechseln Sie zwischen den einzelnen Effekten (siehe Die eingebauten Effekte verwenden). Wenn Sie die Taste länger drücken, öffnet sich das Effektmenü (siehe Das Menü nutzen). 13) Sprung- und Suchtasten [m/. /\,] Titel auswählen: Während der Wiedergabe springen Sie mit diesen Was ist dran am CD-BT1MKII? 14) STOP/MTRO-Taste [H] Mit dieser Taste halten Sie das Laufwerk an. Durch längeres Drücken dieser Taste rufen Sie das Metronom auf (siehe Das Metronom nutzen). 15) PLAY/PAUSE-Taste [G/J] Mit dieser Taste starten Sie die Wiedergabe der CD. Während der Wiedergabe schaltet diese Taste das Laufwerk auf Pause. Um die Wiedergabe fortzusetzen: Taste noch einmal drücken. 16) CUE-Taste Mit dieser Taste kehren Sie zum so genannten Cue-Punkt zurück (das ist die Stelle, an der die letzte Wiedergabe begonnen hat). Was anschließend geschieht, können Sie im Einrichtungsmenü festlegen (siehe Die Voreinstellungen ändern). 17) PHONES-Anschluss Verbinden Sie Ihren Kopfhörer mit dieser Klinkenbuchse. 18) LINE OUT-Anschluss Hierüber können Sie das Ausgangssignal des CD-BT1MKII an Aktivlautsprecher, den Aux-Eingang einer Stereoanlage oder den Eingang eines Kassettenoder CD-Recorders weiterleiten. Über die angeschlossenen Geräte hören Sie auch Effekte und Tonartänderung. 19) OUTPUT-Regler Mit diesem Regler bestimmen Sie den Ausgangspegel am Kopfhöreranschluss (PHONES) und Lineausgang (LINE OUT). Der Pegel ist nur für beide Anschlüsse gemeinsam einstellbar. 20) INPUT-Regler Mit diesem Regler passen Sie den Eingangspegel am Basseingang (BASS IN) an. 21) LINE IN-Anschluss Diese Stereobuchse können Sie verwenden, um ein anderes Gerät in den CD-BT1MKII einzuspeisen (Synthesizer, Gitarren-Vorverstärker, Kassettendeck, Effektgerät usw.). Der Anschluss hat keinen Pegelregler. Den Pegel müssen Sie also am Ausgang des anderen Geräts einstellen. 22) BASS IN-Anschluss Verbinden Sie einen E-Bass mit dieser Klinkenbuchse. Stellen Sie den BASS IN-Wahlschalter (siehe 26) in die Position, die Ihrem Typ Bassgitarre entspricht. 23) FOOT-Anschluss Wenn Sie hier einen handelsüblichen Fußschalter wie den Tascam RC-30P TASCAM CD-BT1MKII — 57 Deutsch Tasten zum vorherigen oder nächsten Titel auf der CD. Bei angehaltener CD wählen Sie damit den Titel, den Sie abspielen wollen (Wiedergabe starten: PLAY-Taste drücken). Suchen (Schneller Vorlauf/Rücklauf): Halten Sie die Tasten während der Wiedergabe länger gedrückt, um die CD rückwärts und vorwärts durchsuchen. Die Geschwindigkeit nimmt zu, wenn Sie die jeweilige Taste länger drücken. Verbindungen herstellen anschließen, können Sie eine von mehreren Funktionen darüber steuern (siehe Die Voreinstellungen ändern). Eine Bassgitarre anschließen (BASS IN) 24) Ein-/Ausschalter (POWER) Hiermit schalten Sie die Stromversorgung für das gesamte Gerät ein und aus. BASS 25) CD EFF-Schalter Deutsch Hiermit schalten Sie CD-Effekte wie etwa die Gitarrenunterdrückung ein und aus. 26) Schalter BASS IN (PASSIVE/ ACTIVE) Sie können den CD-BT1MKII mit passiven genauso wie mit aktiven Bassgitarren verwenden (aktive Bässe haben haben einen Vorverstärker eingebaut). Stellen Sie den Schalter in die Position, die dem Typ der angeschlossenen Bassgitarre entspricht. 58 — TASCAM CD-BT1MKII Verbinden Sie Ihre Bassgitarre mit dem Anschluss BASS IN. Stellen Sie den Schalter BASS IN auf PASSIVE, wenn Ihre Bassgitarre passiv ist, oder auf ACTIVE, wenn Sie einen aktiven Bass (mit eingebautem Vorverstärker) benutzen. Der Anschluss lässt nur unsymmetrische Eingangsverbindungen zu. Verwenden Sie deshalb ein Kabel mit Mono-Klinkenstecker. Den Eingangspegel anpassen Stellen Sie mit dem INPUT-Regler den Signalpegel am Eingang BASS IN so ein, dass gerade keine Verzerrungen zu hören sind. Signale von anderen Geräten einspeisen (LINE IN) LINE OUT eines externen Geräts Über den Anschluss LINE IN können Sie Signale externer Geräte in den CD-BT1MKII einspeisen. Verwenden Sie dazu ein Kabel mit Stereo-Miniklinkenstecker (3,5 mm). Der Eingangspegel an diesem Anschluss des CD-BT1MKII ist nicht einstellbar. Falls erforderlich, Verbindungen herstellen VORSICHT Verbinden Sie NIEMALS einen Bass- oder Gitarrenverstärker mit dem BASS IN-Anschluss des CD-BT1MKII. Sie beschädigen sonst mit ziemlicher Sicherheit Ihre Geräte. Den Ausgangspegel nach dem Hinzufügen eingebauter Effekte anpassen Drücken Sie etwas länger auf die Taste EFFECT/EDIT, um das Effektmenü zu öffnen. Gehen Sie mit den Tasten PREV oder NEXT zum Menüpunkt LVL. Mit den Tasten UP und DOWN können Sie jetzt einen Wert zwischen 0 und 64 einstellen. Das Mischungsverhältnis zwischen Bassgitarre und CD anpassen Drücken Sie etwas länger auf die Taste TUNER/SETUP, um das Einrichtungsmenü zu öffnen. Gehen Sie mit den Tasten PREV oder NEXT zum Menüpunkt MIX. Wählen Sie eine Einstellung zwischen B10–B1, 0, C1– C10 (B10: nur die Bassgitarre ist zu hören, 0: Bass und CD sind etwa gleich laut, C10: nur CD ist zu hören). Ausgangssignal über Kopfhörer und an andere Geräte ausgeben Den Ausgangspegel anpassen Den Pegel an den Ausgängen LINE OUT und PHONES können Sie mit dem OUTPUT-Regler anpassen. WICHTIG Der OUTPUT-Regler wirkt auf beide Ausgänge (LINE OUT und PHONES) zugleich. Die Pegel lassen sich nicht unabhängig voneinander einstellen. Bedenken Sie, dass Sie mit dem OUTPUTRegler den Aufnahmepegel beeinflussen, wenn ein Aufnahmegerät am Ausgang LINE OUT angeschlossen ist. Verbinden Sie Ihren Kopfhörer mit dem Anschluss PHONES. An den Ausgang LINE OUT des CD-BT1MKII können Sie Aktivlautsprecher, den Aux-Eingang einer Stereoanlage oder den Eingang eines Kassetten- oder CD-Recorders anschließen. TASCAM CD-BT1MKII — 59 Deutsch ändern Sie den Ausgangspegel an Ihrem externen Gerät. Verbindungen herstellen Einen Fußschalter anschließen Fußschalter RC-30P Deutsch Verbinden Sie einen Fußschalter des Typs Tascam RC-30P (als Zubehör erhältlich) mit dem Anschluss FOOT. Die Polarität des Fußschalters (Kontakt im Ruhezustand geöffnet oder geschlossen) können Sie im Einrichtungsmenü unter POL festlegen. VORSICHT Um Probleme mit Ihrem CD-BT1MKII zu vermeiden, verwenden Sie nur Fußschalter mit einem zweipoligen (Mono-) Klinkenstecker wie den Tascam RC-30P. Dieser ist als Zubehör erhältlich. 60 — TASCAM CD-BT1MKII Das Menüsystem aufrufen Den gewünschten Menübereich rufen Sie folgendermaßen auf: Effektmenü (Bassgitarreneffekte): EFFECT/EDIT-Taste länger drücken (zuvor müssen Sie einen EffektSpeicherplatz gewählt haben, siehe weiter unten) EQ-Menü (Equalizer): EQ/EDITTaste länger drücken (zuvor müssen Sie EQ-Speicherplatz A oder B gewählt haben, siehe weiter unten) Stimmgerätemenü: TUNER/SETUPTaste kurz drücken Einrichtungsmenü: TUNER/SETUPTaste länger drücken Tempo-/Tonartmenü (Tempo und Tonart bei der CD-Wiedergabe): TMP/KEY / CD EFF-Taste kurz drücken CD-Effektemenü (Effekte für die CD-Wiedergabe): TMP/KEY / CD EFF-Taste länger drücken Metronom-Menü. STOP-Taste länger drücken Der gewählte Menübereich erscheint blinkend auf dem Display. Menü Menüpunkt Einstellungen (Standard- Bemerkungen EFFECT EFF LIB Parameter LVL EQ L / EQLM/ EQ M / EQMH / EQ H ON/OFF 1–4, c1–c7, d1–d5 – 0 bis 64 Effekt ein oder aus Nummer der Voreinstellung abhängig vom Effekttyp Ausgangspegel des Effekts Anhebung/Absenkung des Frequenzbereichs (Tiefen, mittlere Tiefen, Mitten, mittlere Höhen, Höhen) MID ON/OFF TUNE MODE=BAS: 5B, 4E, 3A, 2D, 1G MODE CHR/BAS OSC _ _ (OFF), _C–_B, C–A, B, C– B, (3 Oktaven) CAL 435–440–445 MIX B10–B1, 0, C1–C10 PLAY ALL/SGL CUE CUE/FLS EQ TUNER werte unterstrichen) -15 bis -1, 0, +1 bis +15 SETUP Mittenformer ein oder aus Nummer und Grundton der Saite (Bassgit.-Stimmgerät) Chromatisches oder BassStimmgerät Tonhöhe des Stimmtons (Oszillator) Kalibrierung des Kammertons A (in Hertz) Mischungsverhältnis zwischen CD- und Eingangssignal Wiedergabe aller Titel oder einzelner Titel Aktion nach Aufsuchen des Cue-Punkts TASCAM CD-BT1MKII — 61 Deutsch Das Menü nutzen Das Menü nutzen Menü Menüpunkt Einstellungen (Standardwerte unterstrichen) SETUP Deutsch TEMPO KEY Funktion der UP/DOWN-Taste außerhalb des Menüs (Balance, Tempo, Tonhöhe, Feinabstimmung) Auswirkung des Fußschalters UPDN MIX, TMP, KEY, FIN FOOT EQ+, FX+, FX-, CUE. FLS, REW, FF POL NOR/INV Polarität des Fußschalters Tempo der CD-Wiedergabe in % TMP VSA=OFF: -50 bis +16 VSA=ON: -50, -32, -16,-12, -8, -4, 0, +4, +8, +12, +16 VSA ON/OFF VSA-Funktion ein oder aus KEY I6 – 0 – O6 Tonartänderung in Halbtonschritten FINE -50 bis -1, 0, +1 bis +50 BEE OFF, BST, ENH, CUT MONO OFF (stereo), L+R, L, R Ausgangssignal in Mono SPLT OFF (mix), C-B, B-C Ausgangssignal aufgeteilt (CD und Bass jeweils links oder rechts) MTRO (OFF), 40 – 120 – 220 Tempo des Metronoms in BPM BEAT OFF, 2–6 Anzahl der Schläge je Takt CD EFF METRONOME Bemerkungen 62 — TASCAM CD-BT1MKII Feineinstellung der Tonart (Hundertstel eines Halbtons) Bass-Hervorhebung (aus, verstärken, verstärken und hervorheben, dämpfen) Menüpunkte auswählen Innerhalb des jeweiligen Menübereichs wählen Sie den gewünschten Menüpunkt mit den Tasten PREV oder NEXT aus. Einstellungen ändern Die Einstellung für einen Menüpunkt ändern Sie mit den Tasten UP oder DOWN. Das Menü verlassen Um das Menü zu verlassen und das Statusfenster auf dem Display wieder anzuzeigen, drücken Sie die Taste TIME/ESC. Den CD-Player nutzen Wiedergabe Um die Wiedergabe zu starten oder vorübergehend anzuhalten, drücken Sie die Taste PLAY/PAUSE (G/J). Um die Wiedergabe zu beenden, drücken Sie die Stopptaste (H). Zum nächsten/vorherigen Titel springen und Suchen Um zum nächsten oder zum vorherigen Titel zu springen, drücken Sie einmal kurz die Taste m/. oder //,. Um nach einer bestimmten Stelle auf der CD rückwärts oder vorwärts zu suchen, halten Sie die entsprechende Taste länger gedrückt. Je länger Sie die Taste drücken, desto schneller läuft die Suche. Einzelne Titel oder gesamte CD wiederholt abspielen Mit der LOOP-Taste veranlassen Sie den CD-BT1MKII, den aktuellen Titel oder alle Titel wiederholt abzuspielen – je nach Einstellung im Einrichtungsmenü unter PLAY. Einstell. Auswirkung SGL ALL Der aktuelle Titel wird wiederholt. Auf dem Display erscheint LOOP 1. Die gesamte CD wird wiederholt. Auf dem Display erscheint LOOP. Abschnitt wiederholt abspielen Wenn Sie einen bestimmten Abschnitt auf der CD wiederholt hören wollen, können Sie mit der I/O-Taste Anfang und Ende des Abschnitts (IN-Punkt und OUT-Punkt) festlegen. Drücken Sie die I/O -Taste während der Wiedergabe oder Pause, um den IN-Punkt zu setzen. Auf dem Display beginnt I-O zu blinken. Drücken Sie die I/O -Taste noch einmal während der Wiedergabe oder Pause, um den OUT-Punkt zu setzen. Auf dem Display leuchten LOOP und I-O. Der CD-BT1MKII spielt den Abschnitt nahtlos ab. Um die Wiederholung zu beenden, drücken Sie die LOOP-Taste. Der Hinweis LOOP erlischt. Wenn Sie die LOOP-Taste jetzt noch einmal drücken, startet die zuvor festgelegte Wiederholung erneut. Um den Anfangs- und Endpunkt zu löschen, drücken Sie noch einmal die I/O -Taste. TASCAM CD-BT1MKII — 63 Deutsch Der CD-Player des CD-BT1MKII funktioniert grundsätzlich genauso wie jeder andere CD-Player. Er verfügt jedoch über einige Besonderheiten und spezielle Funktionen. Den CD-Player nutzen Die CUE-Taste nutzen Die Auswirkung der CUE-Taste können Sie im Einrichtungsmenü festlegen: Einstell. Auswirkung CUE Deutsch FLS Das Laufwerk sucht die Stelle auf, an der die Wiedergabe zuletzt begonnen hat, und schaltet dort auf Pause. Die Wiedergabe wird direkt an der Stelle fortgesetzt, an der sie zuletzt begonnen hat (Flash-Start). Die CUE-Funktion können Sie auch mit einem Fußschalter wie dem Tascam RC-30P (als Zubehör erhältlich) auslösen. Gehen Sie dazu im Einrichtungsmenü zu FOOT, und wählen Sie dort CUE oder FLS. 64 — TASCAM CD-BT1MKII Spielzeit auf dem Display anzeigen Beginnend auf der Statusseite des Displays: Drücken Sie die Taste TIME/ESC, um zwischen verstrichener Spielzeit des Titels, verbleibender Spielzeit des Titels und gesamt verbleibender Spielzeit zu wählen. Tonhöhe und/oder Tempo der CD-Wiedergabe ändern Das Tempo ändern So beeinflussen Sie das Tempo (die Wiedergabegeschwindigkeit) eines Titels: 1. Drücken Sie kurz auf die Taste TMP/KEY / CD EFF, um das Tempo/Tonartmenü zu öffnen. 2. Gehen Sie mit der Taste PREV oder NEXT zum Menüpunkt TMP. Auf dem Display blinkt TEMPO. 3. Wählen Sie mit der UP- oder DOWN -Taste einen Wert. Wenn VSA (siehe unten) eingeschaltet ist (ON), stehen folgende Einstellungen zur Auswahl: -50, -32, -16, -12, -8, -4, 0 (aus), +4, +8, +12 und +16%. Wenn VSA ausgeschaltet ist (OFF), können Sie einen Wert zwischen –50% und +16% in 1-%-Schritten einstellen. Wenn etwas anderes als Null eingestellt ist, erscheint TEMPO auf der Statusseite des Displays. Tempo ändern, ohne die Tonhöhe zu beeinflussen Mit der VSA-Funktion (Variable Speed Audition) können Sie das Tempo ändern, ohne dass sich gleichzeitig die Tonhöhe ändert. 1. Drücken Sie kurz auf die Taste TMP/KEY / CD EFF, um das Tempo/Tonartmenü zu öffnen. 2. Gehen Sie mit der Taste PREV oder NEXT zum Menüpunkt VSA . 3. Wählen Sie mit der UP- oder DOWN -Taste entweder ON (an) oder OFF (aus). Auf dem Display blinkt TEMPO. Wenn VSA eingeschaltet ist, erscheint außerdem VSA auf dem Display. WICHTIG Wenn für das Tempo ein anderer Wert als 0 eingestellt ist, wird dieser auf einen VSAverträglichen Wert geändert, sobald Sie VSA einschalten. Beispiel: -33 ist eingestellt, während VSA aus ist. Wenn Sie nun VSA einschalten, springt der Tempowert automatisch auf -50. Tonart ändern Mit dem CD-BT1MKII können Sie die Tonart der abgespielten CD-Titel um sechs Halbtöne nach oben oder unten verschieben. 1. Drücken Sie kurz auf die Taste TMP/KEY / CD EFF, um das Tempo/Tonartmenü zu öffnen. 2. Gehen Sie mit der Taste PREV oder NEXT zum Menüpunkt KEY. Auf dem Display blinkt KEY. 3. Wählen Sie mit den Tasten UP oder DOWN eine Einstellung. Zur Auswahl steht ein Bereich von ±6 Halbtönen (I6–I1, 0 (aus) O1–O6). TASCAM CD-BT1MKII — 65 Deutsch Die Wiedergabe einer CD können Sie auf vier verschiedene Weisen beeinflussen. Die Einstellungen dazu finden Sie im Tempo-/Tonartmenü. Sie können das Tempo ändern (TMP), die Geschwindigkeit ändern, ohne die Tonhöhe zu beeinflussen (Variable Speed Audition, VSA), die Tonart ändern (KEY) und die Tonart fein einstellen (FINE). CD-Effekte einsetzen Wenn etwas anderes als Null eingestellt ist, erscheint KEY auf der Statusseite des Displays. Feineinstellung der Tonart Deutsch Mit der Feineinstellung ändern Sie die Tonart in Hundertsteln eines Halbtons. Dadurch können Sie selbst feinste Unterschiede in der Stimmung zwischen der CD und Ihrem Instrument ausgleichen. 1. Drücken Sie kurz auf die Taste TMP/KEY / CD EFF, um das Tempo/Tonartmenü zu öffnen. 2. Gehen Sie mit der Taste PREV oder NEXT zum Menüpunkt FINE . Auf dem Display blinkt KEY. 3. Wählen Sie mit den Tasten UP oder DOWN eine Einstellung. Zur Auswahl stehen: -50 bis -1, (1 bis 50 Hundertstel tiefer), 0 (aus), +1 bis +50 (1 bis 50 Hundertstel höher). Wenn KEY auf den Wert O6 eingestellt ist (maximale Anhebung), können Sie hier nur absenken (–50 bis 0). Umgekehrt 66 — TASCAM CD-BT1MKII gilt: Wenn für KEY I 6 gewählt ist, ist hier nur eine Anhebung möglich (0 bis +50). Wenn etwas anderes als Null eingestellt ist, erscheint KEY auf der Statusseite des Displays. WICHTIG Wenn Sie KEY auf O6 stellen (maximale Anhebung), während die Feineinstellung größer als Null ist, stellt sich die Feineinstellung automatisch zurück auf 0. Entsprechend gilt: Wenn Sie KEY auf I6 stellen (maximale Absenkung), während die Feineinstellung kleiner als Null ist, stellt sich die Feineinstellung ebenfalls zurück auf 0. Bedenken Sie außerdem: Wenn KEY oder VSA eingeschaltet ist, hören Sie im abgespielten Material möglicherweise ein Vibrato. Dabei handelt es sich nicht um einen Defekt des CD-Players, sondern um eine normale Auswirkung der Spezialfunktionen. CD-Effekte ein- oder ausschalten Mit dem Schalter CD EFF an der Seite des CD-BT1MKII schalten Sie die eingebauten CD-Effekte ein oder aus: BEE (Bass-Hervorhebung), Ausgangssignal in Mono, Ausgangssignal aufgeteilt. Diese drei CD-Effekte können Sie zeitgleich verwenden. Wenn die CDEffekte eingeschaltet sind, leuchtet auf dem Display CD EFF. Die Bass-Hervorhebung (BEE) nutzen BEE hebt den Bassanteil (die tiefen Frequenzen) bei der CD-Wiedergabe an oder senkt sie ab. 1. Drücken Sie etwas länger auf die Taste TMP/KEY / CD EFF, um das Menü für die CD-Effekte zu öffnen. 2. Gehen Sie mit der Taste PREV oder NEXT zum Menüpunkt BEE. 3. Wählen Sie mit den Tasten UP oder DOWN eine Einstellung: CD-Effekte einsetzen Ausgangssignal mono hören Sie haben verschiedene Möglichkeiten, die CD mono zu hören. 1. Drücken Sie etwas länger auf die Taste TMP/KEY / CD EFF, um das Menü für die CD-Effekte zu öffnen. 2. Gehen Sie mit der Taste PREV oder NEXT zum Menüpunkt MONO. 3. Wählen Sie mit den Tasten UP oder DOWN eine Einstellung: L+R: das Monosignal ist eine Mischung aus dem linken (L) und rechten Kanal (R) L: nur das Signal des linken Kanals ist zu hören R: nur das Signal des rechten Kanals ist zu hören OFF: Das normale Stereosignal ist zu hören. Ausgangssignal getrennt hören Sie haben die Möglichkeit, CD- und Eingangssignal auf dem linken und rechten Kanal getrennt zu hören. 1. Drücken Sie etwas länger auf die Taste TMP/KEY / CD EFF, um das Menü für die CD-Effekte zu öffnen. 2. Gehen Sie mit der Taste PREV oder NEXT zum Menüpunkt SPLT. 3. Wählen Sie mit den Tasten UP oder DOWN eine Einstellung: C-B: die CD ist auf dem linken Kanal, die Bassgitarre auf dem rechten Kanal zu hören B-C: die CD ist auf dem linken Kanal, die Bassgitarre auf dem rechten Kanal zu hören OFF: CD und Bassgitarre sind gemischt auf dem linken und rechten Kanal zu hören Deutsch OFF: normale Wiedergabe (der Klang bleibt unbeeinflusst) BST: der Bassanteil auf der CD wird verstärkt ENH: der Bassanteil auf der CD wird verstärkt und klanglich hervorgehoben CUT: der Bassanteil auf der CD wird gedämpft TASCAM CD-BT1MKII — 67 Die eingebauten Effekte verwenden Deutsch Der CD-BT1MKII bietet Ihnen 16 Effekt-Voreinstellungen an. Diese können Sie ändern und auf 5 Speicherplätzen als eigene Einstellungen ablegen. Grundsätzliche Vorgehensweise: Zunächst wählen Sie einen der Speicherplätze für Ihre eigene Einstellung. Anschließend rufen Sie eine Voreinstellung ab und ändern sie nach Ihren Wünschen. Diese geänderte Einstellung wird auf dem gewählten Speicherplatz automatisch gespeichert. Eine eigene Effekteinstellung speichern Das Display zeigt die fünf Speicherplätze mit den Ziffern 1 bis 5 rechts oben an. 1. Drücken Sie die Taste EFFECT/EDITTaste, um einen Speicherplatz zu wählen. Mit jedem Drücken der Taste schalten Sie um einen Speicherplatz weiter. Diese Auswahl können Sie immer dann treffen, wenn die Ziffern auf dem Display zu sehen sind. Effekt-Bestandteile DLY FLA CHO WAH COMPL COMPH OCT TECH DIST HCUT Delay (Echo) Flanger Chorus Auto-wah Kompression Tiefen Kompression Höhen Oktav-Verschiebung Technofilter Verzerrung Höhendämpfung (Tiefpassfilter) 68 — TASCAM CD-BT1MKII 2. Drücken Sie etwas länger auf EFFECT/EDIT, um das Effektmenü zu öffnen. Auf dem Display beginnt EFFECT zu blinken. 3. Gehen Sie mit der Taste PREV oder NEXT zum Menüpunkt EFF. 4. Wählen Sie mit der Taste UP oder DOWN die Option ON, um den eingebauten Effektprozessor einzuschalten. 5. Gehen Sie mit der Taste PREV oder NEXT zum Menüpunkt LIB. Auf dem Display erscheint eine Bezeichnung (wie LIB:d3), die einer Voreinstellung innerhalb einer Effektgruppe entspricht. 6. Beim Scrollen mit der Taste UP oder DOWN erscheinen die Effektgruppen in dieser Reihenfolge: 1–4, compressor c1–c7, distortion d1–d5. Wählen Sie eine Voreinstellung. TIPP Sehen Sie in der Liste der Effekte nach, welcher Inhalt sich hinter den Speicherplatznummern verbirgt. Fortsetzung auf der nächsten Seite Die eingebauten Effekte verwenden Wenn der gewählte Speicherplatz bereits Daten enthält, werden diese überschrieben, sobald Sie eine Voreinstellung abrufen. 7. Mit den Tasten PREV oder NEXT wechseln Sie zwischen den Bestandteilen einer Voreinstellung. Beispiel: Die Voreinstellung „compressor 5“ (angezeigt als LIB:c5) hat folgende Bestandteile: COMPL, COMPH, WAH, DLY. Alle vier Bestandteile lassen sich mithilfe der Tasten UP oder DOWN verändern. Die mit Fettschrift markierten Bestandteile in der Tabelle der Effektvoreinstellungen können Sie miteinander kombinieren. Im Beispiel „compressor 5“ können Sie für die Bestandteile WAH und DLY jeweils das Mischungsverhältnis (MIX1 und MIX2) einstellen. Verwenden Sie dazu die Tasten UP oder DOWN. Das Mischungsverhältnis von DLY bestimmen Sie immer mit MIX2. 8. Wählen Sie alle weiteren Bestandteile, die Sie ändern möchten, auf die gleiche Weise mit den Tasten PREV oder NEXT. Mit UP oder DOWN ändern Sie die Werte des gewählten Bestandteils. 9. Die letzte Einstellung, die Sie für jeden Effekt verändern können, ist der Ausgangspegel (die Lautstärke) des Effekts LVL. Wählen Sie einen Wert zwischen 0 und 64 (Tasten UP / DOWN). Wenn der Effektprozessor ausgeschaltet ist, hat diese Einstellung keine Auswirkung. 10. Um die Effekteinstellungen zu verlassen, drücken Sie die Taste TIME/ESC . Die neue Effekteinstellung wird automatisch auf dem Speicherplatz gespeichert, den Sie mit den Schritten 1 und 2 gewählt haben. 1 2 3 4 c1 c2 c3 c4 c5 c6 c7 d1 d2 d3 d4 d5 Effektvoreinstellungen DLY FLA-DLY CHO-DLY WAH-DLY COMPL-COMPH COMPL-COMPH-DLY COMPL-COMPH-FLA-DLY COMPL-COMPH-CHO-DLY COMPL-COMPH-WAH-DLY COMPL-COMPH-OCT-DLY COMPL-COMPH-TECH-DLY DIST-HCUT DIST-HCUT-DLY DIST-HCUT-FLA-DLY DIST-HCUT-CHO-DLY DIST-HCUT-WAH-DLY Deutsch VORSICHT Bei den mit Fettschrift markierten Bestandteilen in der Tabelle der Effekteinstellungen lässt sich zudem das Mischungsverhältnis der Effekte beeinflussen. Mit MIX1 können Sie den Anteil von FLA, CHO, WAH, OCT und TECH festlegen. TASCAM CD-BT1MKII — 69 Die eingebauten Effekte verwenden Mit MIX2 legen Sie den Anteil von DLY fest. Eine eigene Effekteinstellung abrufen Deutsch Eine Effekteinstellung, die Sie wie oben beschrieben gespeichert haben, können Sie ganz einfach mithilfe der Taste EFFECT/EDIT wieder abrufen. Drücken Sie die Taste so oft, bis die Nummer des gewünschten Speicherplatzes auf dem Display erscheint. TIPP Zwischen den Effekt-Speicherplätzen können Sie auch per Fußschalter (z. B. mit dem als Zubehör erhältlichen Tascam RC-30P) wechseln. Wählen Sie dazu im Einrichtungsmenü FOOT und dann FX+ (vorwärts) oder FX- (rückwärts). 70 — TASCAM CD-BT1MKII Klangeinstellung mit dem Equalizer Den Equalizer einstellen 1. Drücken Sie kurz auf die Taste EQ/ EDIT, um Speicherplatz A , B oder die Option OFF (EQ ausgeschaltet) zu wählen. 2. Drücken Sie etwas länger auf EQ/ EDIT, um das EQ-Menü zu öffnen. 3. Wählen Sie mit der Taste PREV oder NEXT einen der folgenden Parameter: (Tiefen: 80 Hz) EQ L EQLM tiefe Mitten: 200 Hz) (Mitten: 500 Hz) EQ M EQHM (hohe Mitten: 1,25 kHz) (Höhen: 3,15 kHz) EQ H Mittenformung ON/OFF MID 4. Verwenden Sie die Taste UP oder DOWN, um einen Wert für die Anhebung/Absenkung des gewählten Frequenzbereichs einzustellen. Zur Auswahl stehen: -15 bis +15 (dB). 5. Um das Menü zu verlassen und das Statusfenster auf dem Display wieder anzuzeigen, drücken Sie die Taste TIME/ESC. Die Einstellung ist nun auf dem in Schritt 1 gewählten Platz gespeichert. TIPP Zwischen den Effekt-Speicherplätzen können Sie auch per Fußschalter (z. B. mit dem als Zubehör erhältlichen Tascam RC-30P) wechseln. Wählen Sie dazu im Einrichtungsmenü FOOT und dann EQ+. Deutsch Der CD-BT1MKII ist mit einem 5Band-Equalizer (EQ) für das Bassgitarrensignal ausgestattet. Bevorzugte Einstellungen können Sie auf zwei Speicherplätzen (A und B) ablegen. Wie bei den Effekten wählen Sie zuerst einen Speicherplatz. Die Änderungen, die Sie anschließend am EQ vornehmen, werden dann automatisch auf dem gewählten Speicherplatz abgelegt. Gespeicherte EQ-Einstellungen abrufen Wählen Sie mit der Taste EQ/EDIT den gewünschten Speicherplatz. TASCAM CD-BT1MKII — 71 Das Metronom nutzen Das Metronom nutzen Der CD-BT1MKII ist mit einem Metronom ausgestattet. Um das Metronom nutzen zu können, drücken Sie etwas länger auf die Stopptaste, so dass sich das Metronom-Menü öffnet. Deutsch Tempo für das Metronom wählen 1. Gehen Sie mit der Taste PREV oder NEXT zum Menüpunkt MTRO. Wenn Sie das Menü zum ersten Mal öffnen, ist vom Metronom nichts zu hören. Sobald Sie jedoch die UP- oder DOWN -Taste drücken, um das Tempo einzustellen, beginnt das Metronom zu laufen. 2. Drücken Sie kurz auf UP oder DOWN, um das Tempo in Einzelschritten zu verstellen, oder halten Sie die Taste länger gedrückt, 72 — TASCAM CD-BT1MKII wenn sich der Wert schneller ändern soll. Einstellbar ist ein Wert zwischen 40 und 220 BPM (beats per minute – Schläge pro Minute). Taktart wählen 1. Gehen Sie mit der Taste PREV oder NEXT zum Menüpunkt BEAT. 2. Wählen Sie mit der Taste UP oder DOWN die Anzahl der Schläge je Takt zwischen 2 und 6 oder OFF (aus). Das Metronom betont den ersten Schlag eines Takts – er ist höher und lauter als die folgenden. Wenn Sie OFF wählen, sind alle Schläge in der gleichen Tonhöhe und Lautstärke zu hören. WICHTIG Das Metronom funktioniert nur, wenn gerade keine CD abgespielt wird. Wenn Sie die CD-Wiedergabe starten, während das Metronom läuft, stoppt es automatisch. Das Stimmgerät nutzen So stimmen Sie mit einer der beiden Grundeinstellungen: 1. Drücken Sie kurz auf die Taste TUNER/SETUP, um das Stimmgerätemenü zu öffnen. 2. Gehen Sie mit der Taste PREV oder NEXT zum Menüpunkt MODE. 3. Wählen Sie mit der Taste UP oder DOWN entweder BAS oder CHR. Wenn Sie das chromatische Stimmgerät gewählt haben: Auf dem Display erscheint TUNE:---. Sobald Sie nun auf dem Bass (der mit dem CD-BT1MKII verbunden ist) eine Saite anspielen, sucht das Stimmgerät die nächstgelegene Note und zeigt sie auf dem Display an. 4. Stimmen Sie die Saite zunächst grob, so dass die richtige Note angezeigt wird. 5. Nehmen Sie dann die Feinstimmung vor, bis auf dem Display das größere Segment in der Mitte erscheint. Jetzt ist die Saite exakt gestimmt. 6. Verfahren Sie genauso mit allen weiteren Saiten. Für XX stehen die üblichen Noten auf einem normal gestimmten Bass zur Auswahl: 5B, 4E, 3A, 2D und 1G. 5. Stimmen Sie dann wie oben beschrieben. Den Stimmton nutzen Der Tonerzeuger im CD-BT1MKII kann einzelne Noten als Stimmton ausgeben. Der Tonumfang entspricht der westlichen Tonleiter zwischen C und H über drei Oktaven. Die Frequenz des Kammertons (Normaltons) legen Sie unter CAL (Kalibrierung) fest (siehe unten). TIPP O Der Tonerzeuger ist eine praktische Hilfe beim Stimmen, weil Sie den Ton zusammen mit Ihrem Instrument hören. Manche Musiker stimmen auf diese Weise schneller als mit einem Stimmgerät. Wenn Sie das BassgitarrenStimmgerät gewählt haben: 4. Wählen Sie für TUNE: XX eine Note. 1. Drücken Sie kurz auf die Taste TUNER/SETUP, um das Stimmgeräte-Menü aufzurufen. 2. Gehen Sie mit der Taste PREV oder NEXT zum Menüpunkt OSC. zu tief I in Stimmung zu hoch TASCAM CD-BT1MKII — 73 Deutsch Das Stimmgerät im CD-BT1MKII können Sie auf zwei Arten benutzen: 1. Chromatisches Stimmgerät (CHR): Die Tonhöhe des eingehenden Signals wird automatisch erkannt und angezeigt. 2. Gitarren-Stimmgerät (BAS): In dieser Einstellung wählen Sie zuerst, welche Saite Sie stimmen wollen. Das Stimmgerät nutzen 3. Wählen Sie mit den Tasten UP oder DOWN die Note, die als Stimmton zu hören sein soll. Kalibrierung für Kammerton A Deutsch Das A über dem mittleren C hat in der westlichen Musik normalerweise eine Frequenz von 440 Hz (Kammerton A). Auf dem CD-BT1MKII können Sie den Kammerton A auf eine Frequenz zwischen 435 Hz und 445 Hz einstellen. 1. Drücken Sie kurz auf die Taste TUNER/SETUP, um das Stimmgeräte-Menü aufzurufen. 2. Gehen Sie mit der Taste PREV oder NEXT zum Menüpunkt CAL. 3. Wählen Sie mit den Tasten UP oder DOWN einen Wert zwischen 435 und 445 (Hz). 74 — TASCAM CD-BT1MKII Im Einrichtungsmenü können Sie verschiedene Einstellungen des CD-BT1MKII an Ihre Bedürfnisse anpassen. Um das Einrichtungsmenü zu öffnen, drücken Sie etwas länger auf die Taste TUNER/SETUP. Modus der CD-Wiedergabe Sie können wählen, wie der CD-BT1MKII CDs abspielen soll. Gehen Sie im Einrichtungsmenü zu PLAY, und wählen Sie entweder ALL (alle Titel nacheinander) oder SGL (nur einen einzelnen Titel). Wirkungsweise der CUE-Taste Gehen Sie mit der Taste PREV oder NEXT zum gewünschten Menüpunkt, und ändern Sie die Einstellung mit der Taste UP oder DOWN. Mischungsverhältnis CD-/ Eingangssignal Das Mischungsverhältnis zwischen Bassgitarre und CD können Sie anpassen. Gehen Sie im Einrichtungsmenü zu MIX, und wählen Sie eine Einstellung zwischen B10–B1, 0, C1– C10 (B10: nur die Bassgitarre ist zu hören, 0: Bass und CD sind etwa gleich laut, C10: nur CD ist zu hören). Sie können wählen, wie die CUE-Taste wirkt. Gehen Sie im Einrichtungsmenü zu CUE, und wählen Sie entweder CUE oder FLS. CUE: Das Laufwerk sucht die Stelle auf, an der die Wiedergabe zuletzt begonnen hat, und schaltet dort auf Pause. FLS: Die Wiedergabe wird an der Stelle fortgesetzt, an der sie zuletzt begonnen hat (Flash-Start). Direktzugriff mit den Tasten UP und DOWN Im Normalbetrieb (außerhalb des Menüs) ist es möglich, eine von mehreren möglichen Einstellungen mit den Tas- ten UP und DOWN direkt zu verändern. Sie sparen sich dadurch den Umweg über das Menü. Gehen Sie im Einrichtungsmenü zu UPDN, und wählen Sie mit den Tasten UP oder DOWN eine Einstellung: MIX: Mischungsverhältnis (siehe oben) TMP: Tempo der CD-Wiedergabe (siehe Tonhöhe und/oder Tempo der CD-Wiedergabe ändern) KEY: Tonart ändern (siehe Tonhöhe und/oder Tempo der CD-Wiedergabe ändern) FIN: Feineinstellung (siehe Tonhöhe und/oder Tempo der CD-Wiedergabe ändern) Auswirkung des Fußschalters Wenn Sie hier einen handelsüblichen Fußschalter wie den als Zubehör erhältlichen Tascam RC-30P anschließen, können Sie darüber zwischen den EQ- und Effekt-Speicherplätzen umschalten, die Cue-Funktion auslösen TASCAM CD-BT1MKII — 75 Deutsch Die Voreinstellungen ändern Fakten und Zahlen (Technische Daten) oder die CD rückwärts oder vorwärts durchsuchen. Gehen Sie im Einrichtungsmenü zu FOOT, und wählen Sie eine Einstellung: EQ+: EQ-Speicherplatz wechseln FX+, FX-: nächsten/vorherigen Effekt- Deutsch Speicherplatz wählen CUE, FLS: Cue-Funktion auslösen REW, FF: CD rückwärts/vorwärts durchsuchen Sobald Sie eine der Optionen gewählt haben, ist die entsprechende Funktion auf dem Fußschalter verfügbar. Polarität des Fußschalters Hier wählen Sie, welche Art Fußschalter Sie angeschlossen haben. Gehen Sie im Einrichtungsmenü zu POL, und wählen Sie entweder NOR (normal, Kontakt im Ruhezustand offen) oder INV (invertiert, Kontakt im Ruhezustand geschlossen). 76 — TASCAM CD-BT1MKII nutzbare CD-Typen AD/DA nominaler Ausgangspegel (Lineausgang) max. Ausgangspegel ohne Verzerrung (Lineausgang) Ausgangsimpedanz max. Ausgangsleistung (Kopfhörerausgang) nominale Eingangspegel Line Bass Stromversorgung Leistungsaufnahme 8-cm-Single- oder 12-cm-CD 16 Bit –10 dBV 0 dBV (1 Vrms) 1 kOhm >18 mW (an 32 Ohm) –10 dBV –15 dBV (passiv) –10 dBV (aktiv) 9 V DC (über Wechselstromadapter PS-PS5) 4 Batterien/Akkus der Größe AA (NiMH-Akkus oder Alkaline-Batterien) 4 W (über Wechselstromadapter PS-PS5) Abmessungen (B x H x T, 232 mm x einschließlich Füße) 138 mm x 40 mm Gewicht (ohne Batterien/Akkus) CD-Wiedergabe Frequenzbereich 0,62 kg 20 Hz bis 20 kHz, ±1,0 dB Dynamikbereich >88 dB Fremdspannungsabstand >88 dB Verzerrung (THD) <0,01% Signalverarbeitung 32 Bit Änderungen an Konstruktion und Technischen Daten, die dem Fortschritt dienen, vorbehalten. Die Abbildungen in diesem Handbuch weichen möglicherweise vom tatsächlichen Aussehen des Produkts ab. 1 Leggere le istruzioni — Prima di mettere in funzione l’apparecchio, leggere tutte le istruzioni di sicurezza ed azionamento. 2 Conservare le istruzioni — Conservare in luogo sicuro le istruzioni di sicurezza ed azionamento, per agevolare future consultazioni. 3 Avvertenze precauzionali — Attenersi a tutte le avvertenze, sia contrassegnate sull’apparecchio che contenute nel manuale d’istruzioni. 4 Seguire le istruzioni — Seguire tutte le istruzioni d’azionamento ed utilizzo. 5 Acqua ed umidità — Non utilizzare l’apparecchio in vicinanza dell’acqua: per esempio, vicino a vasche da bagno, lavabi, lavelli da cucina, lavabiancheria, in scantinati umidi, ai bordi di una piscina, eccetera. 6 Pulizia — Prima di pulire l’apparecchio togliere sempre l’alimentazione, staccando la spina. Non utilizzare prodotti specifici liquidi o aerosol: basta un semplice panno inumidito 7 Ventilazione — Per garantire un funzionamento affidabile e per proteggere contro il riscaldamento eccessivo, sul mobile sono praticate apposite fessure ed aperture di ventilazione che non devono assolutamente essere otturate o coperte appoggiando l’apparecchio, per esempio, su un letto, un divano, un tappeto o superfici analoghe. 8 Calore — L’apparecchio non deve essere collocato vicino a sorgenti di calore, come stufe, radiatori, aerotermi o altre apparecchiature che producono calore, amplificatori compresi. 9 Accessori — Per non correre inutili rischi, non utilizzare accessori diversi da quelli consigliati dal fabbricante dell’apparecchio. 10 Installazione — Non installare quest’apparecchio su un qualsiasi appoggio instabile: potrebbe cadere, riportando gravi danni o coinvolgendo anche eventuali persone vicine. 11Messa a terra o polarizzazione — Quest’apparecchio potrebbe essere munito di una spina di linea polarizzata a corrente alternata (che ha una lama più larga dell’altra). Tale spina entra nella presa di rete soltanto in una direzione: si tratta di una misura di sicurezza. Se risultasse impossibile inserire la spina a fondo, provare a voltarla nell’altra direzione. Se anche così la spina si rifiuta di entrare, chiamare un elettricista e far sostituire la presa, evidentemente di tipo sorpassato: meglio una piccola spesa, che rinunciare alla sicurezza offerta dalla spina polarizzata. 12 Protezione del cavo di rete — Stendere i cavi d’alimentazione dove abbiano scarse probabilità di essere calpestati o pinzati da oggetti posti sopra o vicino ad essi; attenzione soprattutto alle sezioni di cavo vicino ai connettori (prese o spine), agli appositi contenitori, nonché al punto in cui il cavo esce dall’apparecchio. 13 Accessori — Usare solo gli accesssori forniti in dotazione e/o quelli consigliati dal costruttore. 14 Spostamenti — Quando l’apparecchio è appoggiato su un carrello, spostare il tutto con precauzione: brusche fermate, spinte eccessive e superfici accidentate possono infatti provocare il ribaltamento. Non bisogna nemmeno inserire l’apparecchio nel vano di un mobile, come una libreria o un armadietto, a meno che sia stato previsto un adatto sistema di ventilazione. chio da soli: smontando il coperchio o il pannello posteriore si può rimanere esposti a tensioni pericolose o correre altri rischi. Ogni intervento d’assistenza dovrà essere effettuato da personale tecnico qualificato, in special modo se si verificano danni come: Il cavo o la spina di alimentazione risultano danneggiati, o sono caduti oggetti o sono colati liquidi all’interno dell’apparecchio, se l’apparecchio è rimasto esposto alla pioggia o si è comunque bagnato, se l’apparecchio non si comporta correttamente seguendo le normali istruzioni. Effettuare soltanto le regolazioni contemplate nel manuale d’utente; modificare altri comandi potrebbe comportare un ulteriore danno e richiedere poi un lavoro supplementare da parte del tecnico per ripristinare le condizioni originali, se l’apparecchio è caduto oppure l’involucro ha subito danni, e se si nota un notevole calo nelle prestazioni • Utilizzare soltanto un elemento (carrello, piano d’appoggio, treppiede, staffa, tavolo) consigliato dal fabbricante o venduto insieme all’apparecchio stesso. Per qualsiasi tipo d’installazione, seguire le istruzioni del fabbricante ed usare accessori consigliati dallo stesso. • Non piazzare oggetti contenenti liquidi, come vasi, bicchieri, bottiglie o altro, nelle immediate vicinanze dell’apparecchio • Non installare l’apparecchio in spazi angusti e non ventilati, come librerie o altro. • Questo apparecchio assorbe un limitato quantitativo di corrente dall’impianto elettrico anche se spento. 15 Fulmini — Per proteggere ulteriormente l’apparecchio nel corso di un temporale, oppure quando rimane senza sorveglianza e non viene utilizzato per un periodo prolungato, staccarlo dalla presa di rete e scollegare l’antenna o il sistema via cavo. Questa precauzione eviterà che l’apparecchio venga danneggiato da un fulmine o da un picco transitorio di tensione. 16 Assistenza — Non tentare mai di riparare l’apparec- TASCAM CD-BT1MKII — 77 Italiano Importanti Istruzioni di Sicurezza Indice dei contenuti Italiano Utilizzo dei compact disc ....................................................................79 Alimentazione del CD-BT1MKII ..........................................................80 Nomi delle parti del CD-BT1MKII e delle funzioni .............................82 Collegamenti ......................................................................................85 Utilizzare il menu System ...................................................................87 Cambi di intonazione e tempo di esecuzione ....................................89 Utilizzare gli effetti CD .......................................................................91 Equalizzatore ......................................................................................94 Utilizzare il metronomo ......................................................................95 Utilizzare l’accordatore ......................................................................96 Cambiare le preferenze del CD-BT1MKII ............................................97 Caratteristiche tecniche .....................................................................98 Informazioni su questo manuale: Quando si fa riferimento ad un tasto, un connettore o un controllo sull’CDBT1MKII, viene utilizzato questo carattere: PLAY. Quando si fa riferimento ad una voce di menu, viene utilizzato questo carattere: MENU. 78 — TASCAM CD-BT1MKII Osservare le seguenti precauzioni: Posizionare i compact disc nel drive sempre con l’etichetta rivolta verso l’alto (i CD possono essere registrati solo su di un lato). Per rimuovere un compact disc, premere al centro dell’alloggiamento e sfilare il CD delicamente. Impronte di dita e polvere devono essere accuratamente ripulite dalla superficie del disco con un panno morbido. Utilizzare il panno con movimenti dall’interno verso l’esterno. Piccoli granelli di polvere non hanno nessun effetto sulla qualità di riproduzione del disco. Non utilizzare mai sulla superficie del disco agenti chimici quali spray antistatici o fluidi, o prodotti simili per non danneggiare irreparabilmente la protezione di policarbonato del compact disc. Riporre accuratamente i dischi nelle loro custodie dopo il loro utilizzo, per evitare di graffiarli o sporcarli e provocare errori di riproduzione in fase di lettura. Non lasciare i dischi esposti ad alte temperature o umidità costante per lunghi periodi di tempo. Utilizzare solo CD circolari e mai quelli promozionali con forme irregolari. Non toccare mai il pickup del laser per non danneggiarlo, e, sempre per la stessa ragione, non lasciare aperto lo sportello del CD più del necessario. Il CD-BT1MKII non è in grado di riprodurre dischi CD-R/RW non finalizzati e in alcuni rari casi, anche CD-R/RW finalizzati. TASCAM CD-BT1MKII — 79 Italiano Utilizzo dei compact disc Alimentazione del CD-BT1MKII Operazioni con le batterie Aprire il coperchio del compartimento delle batterie posto nel retro del CDBT1MKII e inserire quattro batterie AA (SUM-3) (non fornite), rispettando la polarità + e –. Si raccomanda di utilizzare batterie ricaricabili Ni-MH (anche se è consentito utilizzare anche batterie alcaline), perché il CDBT1MKII non funziona correttamente con batterie di altri tipo Italiano ATTENZIONE Un cattivo utilizzo delle batterie può provocare malfunzionamenti ed esplosioni. Leggere accuratamente le seguenti istruzioni: Note sulle batterie Quando si utilizza il CDBT1MKII con le batterie, scollegare l’alimentatore. 80 — TASCAM CD-BT1MKII Assicurarsi di aver inserito le batterie secondo il loro verso giusto, facendo combaciare i segni + e – del compartimento. Utilizzare sempre batterie dello stesso tipo e sostituirle sempre tutte insieme. Non tentare di ricaricare batterie non ricaricabili. Se non si utilizza l’unità per più di un mese, rimuovere le batterie. Non gettare le batterie nell’acqua o nel fuoco. Non cercare di smontare le batterie. Se una batteria perde del liquido nel compartimento, asciugare accuratamente con un panno e accertarsi che non ci siano residui prima di inserire batterie nuove. Livello di carica delle batterie Quando si utilizza il CD-BT1MKII con le batterie, viene visualizzato sul display un indicatore del livello della carica ancora disponibile: 3 segmenti illuminati La carica delle batterie è al massimo. 2 segmenti illuminati La carica delle batterie è circa la metà. 1 segmento illuminato La carica delle batterie è quasi esaurita. 3 segmenti lampeggianti La carica delle batterie è esaurita. Sostituire le batterie scariche con batterie nuove o ricaricate completamente. Durata delle batterie Batterie Ni-MH Batterie Alcaline Circa 4,5 ore Circa 1,5 ore Risparmio automatico di energia Se si stanno utilizzando le batterie, il lettore CD e le varie funzioni del CDBT1MKII, si spengono automaticamente se per almeno cinque minuti si verifica una delle seguenti condizioni: (il display mostra CD OFF). L’unità è in stop Il coperchio del CD è aperto Nessun CD è caricato Alimentazione del CD-BT1MKII ATTENZIONE A causa di funzioni speciali disponibili sul CDBT1MKII, quali cambi di tonaltà o effetti, la durata delle batterie è più breve che sui comuni lettori CD portatili. Dopo aver verificato il voltaggio dell’alimentatore, inserine la presa dell’alimentatore in una presa di corrente a muro. PS-PS5 Nel CD-BT1MKII la durata delle batterie è influenzata dal numero delle funzioni utilizzate e da altri fattori quali: temperatura e umidità. In alcune situazioni operative, le batterie non hanno carica sufficiente per alimentare il CDBT1MKII sebbene l’indicatore di carica sul display mostri il contrario. Se questo accade, utilizzate un alimentatore di rete. Smaltite sempre le batterie secondo le norme dettate sulla differenziazione dei rifiuti. Operazioni con l’alimentatore Collegare un alimentatore di rete TASCAM PS-PS5 (non fornito) alla presa DC IN posta nel retro del CDBT1MKII. Presa di corrente a muro Scollegare l’alimentatore dalla presa di corrente quando non si utilizza il CD-BT1MKII. Per conservare le impostazioni, non spegnere il CD-BT1MKII subito dopo che queste sono state salvate o appena inserito un CD. Se le impostazioni non vengono salvate in modo appropriato, il sistema al riavvio successivo non potrà caricarle correttamente e ripartirà con quelle di default. Spegnere e accendere l’unità Presa DC IN Utilizzare l’interruttore POWER per accendere e spegnere completamente l’unità. ATTENZIONE Italiano Per riattivare il lettore CD premere il tasto PLAY. Utilizzare solo l’alimentatore Tascam PS-PS5 con il vostro CD-BT1MKII. L’utilizzo di un modello diverso, potrebbe danneggiare il l’unità. Prima di utilizzare il CD-BT1MKII con un alimentatore, rimuovere le batterie per evitare la possibilità di un leggero rumore di fondo. Spegnere sempre prima il CD-BT1MKII per collegarlo ad un alimentatore e se per caso è stato acceso con ancora le batterie inserite, spegnerlo prima di rimuoverle. TASCAM CD-BT1MKII — 81 Nomi delle parti del CD-BT1MKII e delle funzioni Italiano Quando sono indicate due parole, una sotto e una sopra un tasto (per esempio TUNER e SETUP), utilizzarlo nel seguente modo: Per attivare la funzione indicata sopra il tasto: - premere brevemente il tasto una volta Per attivare la funzione indicata sotto il tasto: -Premere e trattenere il tasto Per esempio, nel caso del tasto TUNER/ SETUP, il menu Tuner si attiva quando si preme brevemente il tasto, se invece si preme e trattiene il tasto, si attiva il menu Setup. 82 — TASCAM CD-BT1MKII Nomi delle parti del CD-BT1MKII e delle funzioni ni di valori. (Vedere Utilizzare il menu System). Si possono anche impostare le funzioni di questi tasti (Vedere Cambiare le preferenze). Premere e trattenere questo tasto per aprire il menu EQ (Vedere Utilizzare il menu System) 2) Compartimento batterie 7) Tasto LOOP Rimuovere il coperchio del compartimento batterie posto sul retro per inserire 4 batterie AA (SUM-3). Utilizzare questo tasto per avviare la modalità ripetizione brano (loop). 8) Tasto I/O 3) Coperchio del drive CD Utilizzare questo tasto per impostare i punti “IN” e “OUT ”della sezione che si vuole ripetere (Vedere Utilizzare il lettore CD). Utilizzare questo tasto per passare consecutivamente da uno slot effetti all’altro (Vedere Utilizzare gli effetti interni). Premere e trattenere questo tasto per attivare il menu Effect (Vedere Utilizzare il menu System). Utilizzare questo jack per collegare la presa DC dell’alimentatore TASCAM PS-PS5 (venduto separatamente). Per aprire agire sulla levetta di sblocco e premere sul coperchio. 4) Display Lo stato di funzionamento del CDBT1MKII viene mostrato qui. 5) Tasto TIME/ESC Utilizzare questo tasto per cambiare la visualizzazione del contenuto del CD da tracce a tempo. Utilizzare questo tasto per ritornare alla modalità display home. 9) Tasto TUNER/SETUP Utilizzare questo tasto per avviare la funzione Tuner e il menu Setup (Vedere Utilizzare il menu System). 10) Tasto TMP/KEY / CD EFF Utilizzare questo tasto per attivare i menu Tempo/Key e CD Effect (Vedere Utilizzare il menu System). 6) Tasti PREV, NEXT, UP, DOWN 11) Tasto EQ/EDIT Utilizzare questi tasti per selezionare voci di menu o modificare impostazio- Utilizzare questo tasto per passare da EQ A, B e OFF (Vedere Equalizzatore). 12) Tasto EFFECT/EDIT 13) Tasti Track Skip/Search [m/. /\,] Navigazione tra le tracce: Utilizzare questo tasto per passare alla traccia precedente o successiva. Premere questo tasto durante la riproduzione di un CD per passare alla traccia precedente o successiva. Premere questo tasto mentre il lettore CD è in stop per selezionare la traccia da eseguire (premere il tasto PLAY.) TASCAM CD-BT1MKII — 83 Italiano 1) Jack DC IN Nomi delle parti del CD-BT1MKII e delle funzioni Ricerca: Fast forward/Fast rewind Tenere premuto uno di questi tasti durante l’esecuzione di un CD per ottenere un avanzamento o un arretramento veloce del brano. La velocità di questa operazione aumenta se si continua a tenere premuto uno di questi tasti. 14) Tasto STOP/MTRO [H] Premere questo tasto per arrestare la riproduzione. Premere e trattenere questo tasto per attivare il metronomo (Vedere Utilizzare il metronomo). Italiano 15) Tasto PLAY/PAUSE [G/J] Utilizzare questo tasto per avviare la riproduzione di un CD; premerlo nuovamente per attivare la pausa; ripremerlo per riavviare la riproduzione. 16) Tasto CUE Utilizzare questo tasto per ritornare al punto di cue (il punto da dove è iniziata l’esecuzione). Utilizzare il menu Setup per selezionare la modalità operativa del tasto CUE (Vedere Cambiare 84 — TASCAM CD-BT1MKII le preferenze). di regolato sul dispositivo sorgente. 17) Jack PHONES 22) Jack BASS IN Connettere a questo jack la cuffia. Collegare a questo jack un basso e impostare l’interruttore BASS IN in funzione che sia di tipo attivo o passivo. 18) Jack LINE OUT Utilizzare questa porta per collegare il CD-BT1MKII a dispositivi quali casse amplificate, impianti stereo, registratori a cassette o registratori CD. 19) Controllo OUTPUT Utilizzare questo controllo per regolare il livello dell’uscita PHONES e quello dell’uscita LINE OUT. Questo controllo regola il livello di uscita comune e non può essere impostato separatamente. 20) Controllo INPUT Utilizzare questo controllo per cambiare il livello di ingresso del jack BASS IN. 21) Jack LINE IN Utilizzare questo jack stereo per collegare dispositivi esterni quali: sintetizzatori, preamplificatori per chitarra, processori di effetti, registratori a cassette, ecc., al CD-BT1MKII. Questo jack non ha controllo di livello che va quin- 23) Jack FOOT Collegare un pedale standard a questo jack (si raccomanda il TASCAM RC-30P, venduto separatamente). Il pedale può essere utilizzato per pilotare funzioni diverse. (Vedere Cambiare le preferenze). 24) Interruttore POWER Questo interruttore viene utilizzato per accendere o spegnere completamente l’unità. 25) Interruttore CD EFF Questo interruttore attiva o disattiva gli effetti CD. 26) Interruttore BASS IN (PASSIVE/ACTIVE) Si possono utilizzare sia bassi attivi che passivi. Impostare questo interruttore in funzione del tipo si basso utilizzato. Collegamenti Ricevere segnali da unità esterne (LINE IN) BASSO Presa LINE OUT (unità esterne) Impostare l’interruttore BASS IN su PASSIVE o ACTIVE in funzione del tipo di basso che state utilizzando Il jack BASS IN accetta in ingresso segnali sbilanciati. Utilizzare prese mono da ¼ di pollice. Regolare il livello di ingresso Utilizzare il controllo INPUT per regolare il livello del segnale in ingresso dal jack BASS IN. Premere e trattenere il tasto EFFECT/ EDIT per aprire il menu Effect, premere i tasti NEXT o PREV per selezionare LVL e utilizzare i tasti UP e DOWN per regolare il livello di uscita tra 0 e 64. Regolare il bilanciamento tra basso e CD Connettere un basso al jack BASS IN. Regolare il livello di uscita dopo l’attivazione degli effetti interni La presa LINE IN accetta minijack (3.5mm). Il livello di ingresso alla presa LINE IN non può essere regolato dal CD-BT1MKII ma direttamente sulla sorgente esterna collegata. ATTENZIONE Premere e trattenere il tasto TUNER/ SETUP per aprire il menu Setup, e premere i tasti NEXT o PREV per scegliere MIX. Si può regolare il bilanciamento impostando valori tra B (Basso) 10 – B1, 0, C (CD) 1– C10. Uscite per le cuffie e per dispositivi esterni Non collegare MAI un amplificatore per basso nella presa BASS IN del CD-BT1MKII per non danneggiare il vostro equipaggiamento. TASCAM CD-BT1MKII — 85 Italiano Collegare un basso (BASS IN) Collegamenti Collegare una cuffia alla presa PHONES. Utilizzare la presa jack stereo LINE OUT per collegare al CDBT1MKII unità esterne quali: casse amplificate, impianti stereo, registratori a cassette o registratori CD. Collegare un pedale Pedale RC-30P Regolare il livello di uscita Si può regolare il livello di uscita di LINE OUT e PHONES utilizzando il controllo OUTPUT. Italiano NOTA Il livello delle prese LINE OUT e PHONES sono regolati insieme dal controllo OUTPUT e non possono essere impostati in modo indipendente. Si ricorda che quando c’è un registratore collegato alla presa jack LINE OUT, il controllo OUTPUT regola il livello di registrazione. 86 — TASCAM CD-BT1MKII Collegare un pedale alla presa jack FOOT. Si può impostare la polarità del pedale utilizzando la voce POL dal menu Setup. ATTENZIONE Per evitare problemi con il CD-BT1MKII, utilizzare solo il pedale TASCAM RC-30P (venduto separatamente). Utilizzare il menu System menu EFFECT (effetti basso) Dopo aver selezionato uno slot effetti, premere e trattenere il tasto Categorie Menu EFFECT EFFECT /EDIT menu EQ equalizzatore) Dopo aver selezionato uno slot EQ (A o B), premere e trattenere il tasto EQ/EDIT per aprire il menu EQ. menu TUNER (accordatore basso) premere il tasto TUNER/SETUP menu SETUP (impostazioni system) Premere e trattenere il tasto EQ menu TEMPO/KEY (cambio tempo di esecuzione e intonazione CD) Premere il tasto TMP/KEY/CD EFF menu CD EFF (effetti di riproduzione del CD) Premere e trattenere il tasto TMP/ KEY/CD EFF EFF LIB PARAMETER LVL EQ L/ EQLM/ EQ M/ EQMH/ EQ H MID TUNER TUNE MODE OSC TUNER/SETUP Voci Menu CAL SETUP MIX PLAY CUE Valori (i valori di default sono sottolineati) ON/OFF 1–4, c1–c7, d1–d5 – da 0 a 64 -15 – 0 – +15 ON/OFF MODE=BAS: 5B, 4E, 3A, 2D, 1G CHR/BAS _ _ (OFF), _C–_B, C–A, B, C– B, (3 ottave) 435–440–445 B10 – B1, 0, C1 – C10 ALL/SGL CUE/FLS Note attiva e disattiva gli effetti numero preset dipende dal tipo di effetto livello uscita effetto regola il guadagno della banda di equalizzazione (low, mid-low, mid, midhigh, high attiva e disattiva la funzione MID imposta il numero delle corde in Bass Mode seleziona l’accordatura imposta l’intonazione dell’oscillatore imposta la frequenza base (A4, unità: Hz) imposta il bilanciamento tra CD e ingresso seleziona l’esecuzione completa o singola seleziona azione di CUE menu METRONOME Premere e trattenere il tasto STOP. TASCAM CD-BT1MKII — 87 Italiano Attivare il menu System Utilizzare il menu System Categorie Menu SETUP Voci Menu UPDN Valori (i valori di default sono sottolineati) MIX, TMP, KEY, FIN FOOT EQ+, FX+, FX-, CUE. FLS, REW, FF NOR/INV POL TEMPO KEY Italiano CD EFF METRONOME TMP VSA KEY VSA=OFF: da -50 a +16 VSA= ON: -50, -32, -16, -12, -8, -4, 0, +4, +8, +12, +16 ON/OFF I6 – 0 – O6 FINE -50 – 0 – +50 BEE OFF, BST, ENH, CUT MONO OFF (stereo), L+R, L, R SPLT OFF (mix), C-B, B-C MTRO (OFF), 40 – 120 – 220 BEAT OFF, 2 – 6 88 — TASCAM CD-BT1MKII Note imposta la funzione del tasto UP/DOWN imposta la funzione del pedale imposta la polarità del pedale imposta la velocità di esecuzione del CD in % attiva/disattiva VSA imposta la tonalità in semitoni accordatura fine (cent) seleziona le funzioni, boost, enhance e cut seleziona la modalità monitor mono seleziona la modalità monitor split imposta il tempo di metronomo in BPM (Beat Per Minute) seleziona il numero di tempi del metronomo Scegliere le voci di menu Scegliere le voci di menu nel menu selezionato tramite i tasti PREV e NEXT. Cambiare le impostazioni dei valori Cambiare le impostazioni dei valori utilizzando i tasti UP e DOWN. Uscire dal menu System Premere il tasto TIME/ESC per uscire dal menu System e ritornare alla modalità home display. Cambi di intonazione e tempo di esecuzione Riproduzione Premere il tasto PLAY/PAUSE (G/J) per avviare la riproduzione e il tasto pausa per sospenderla. Premere il tasto STOP (H) per fermare la riproduzione. Spostarsi tra le tracce o posizionarsi all’interno Utilizzare i tasti skip/search (m/. e //,) per spostarsi da un traccia all’altra. Utilizzare questi tasti (trattenendoli premuti), per spostarsi in un punto avanti o indietro nella traccia selezionata. La pressione continua del tasto, aumenta la velocità di ricerca. Ripetizione (track/disc) Premere il tasto LOOP per ripetere una traccia o tutto il CD in funzione del parametro selezionato alla voce PLAY del menu Setup. Impostazione Modalità Repetizione SGL ripete solo la traccia selezionata. LOOP 1 appare sul display. ALL repete tutto il CD. LOOP appare sul display. Ripetizione (punti In/Out) Per repetere una particolare sezione della traccia, utilizzare il tasto I/O per impostare il punto di inizio (IN) del loop, e poi di nuovo il tasto I/O per impostare il punto di fine (OUT) del loop. Premere il tasto I/O durante la riproduzione o la pausa e impostare il punto IN. Il simbolo I-O lampeggia sul display. Premere di nuovo il tasto I/O durante la riproduzione o la pausa e impostare il punto OUT. LOOP e I-O appaiono sul display. La sezione tra i due punti viene ripetuta. Per cancellare un loop I/O, premere il tasto LOOP. LOOP sparisce dal display e la modalità loop cancellata. Premere di nuovo il tasto LOOP per ripristinare il loop impostato precedentemente. Premere di nuovo il tasto I/O cancella i punti di loop. Tasto CUE Il tasto CUE espleta due funzioni impostabili nel menu Setup: Impostazioni Funzioni CUE FLS la riproduzione va in pausa sull’ultimo punto in cui è iniziata. la riproduzione va automaticamente all’ultimo punto in cui è iniziata. In sostituzione del tasto CUE, si può utilizzare il pedale TASCAM RC-30P collegato. Impostare la voce FOOT nel menu Setup a CUE o FLS (flash). Display In modalità home premere il tasto TIME/ ESC per cambiare la visualizzazione del tempo tra: tempo trascorso della traccia, tempo rimanente della traccia o tempo totale rimanente del CD. TASCAM CD-BT1MKII — 89 Italiano Il lettore CD del CD-BT1MKII funziona generalmente come tutti i comuni lettori CD, con alcune piccole differenze e funzioni speciali. Cambi di intonazione e tempo di esecuzione Ci sono quattro modi per cambiare la riproduzione di un CD utilizzando le voci del menu Tempo Key: Controllo Tempo (TMP), funzione VSA (Variable Speed Audition) (VSA), controllo Key (KEY), e Fine tuning (FINE) Controllo Tempo Italiano Il controllo Tempo permette di regolare il tempo di esecuzione di una traccia. Premere il tasto TMP/KEY / CD EFF per attivare il menu Tempo Key, e selezionare TMP premendo i tasti PREV o NEXT. TEMPO lampeggia sul display. Quando VSA è attiva (ON), le impostazioni tra cui scegliere sono: -50, -32, -16, -12, -8, -4, 0 (off), +4, +8, +12, e +16%. Premere i tasti UP o DOWN per impostarne il valore. Quando VSA è disattiva (OFF), si può scegliere il valore tra –50 e +16%, in incrementi di 1%. Quando VSA è sia ON o OFF, premere il tasto UP o DOWN per impostare il tempo. Quando il tempo è impostato ad un valore diverso da zero, TEMPO è mostrato nel display home. 90 — TASCAM CD-BT1MKII VSA Quando VSA è attiva (ON), si può cambiare il tempo di esecuzione senza cambiarne anche la tonalità. Premere il tasto TMP/KEY / CD EFF per attivare il menu Tempo, selezionare VSA premendo i tasti PREV o NEXT. Premere i tasti UP o DOWN per selezionare ON o OFF. TEMPO lampeggia sul display. Quando VSA è ON, la voce VSA appare sul display. NOTA Se il valore del controllo tempo non è diverso da 0 e si cambia VSA da OFF a ON, il valore del tempo verrà automaticamente impostato a “VSA ON value.” Per esempio, se il valore è [-33] quando VSA è OFF, verrà automaticamente impostato a [-50] quando si imposta VSA su ON. Controllo Key Il controllo Key cambia la tonalità della musica di + o - sei semitoni. Premere il tasto TMP/KEY / CD EFF per attivare il menu Tempo Key, e selezionare KEY premendo i tasti PREV o NEXT. KEY lampeggia sul display. Pre- mere i tasti UP o DOWN per impostare la tonalità. L’intervallo è ± 6 semitoni (I6 ~ 0 (off) ~ O6). Quando la tonalità è impostata ad un valore diverso da zero, KEY viene mostrato sul display. Fine tuning (accordatura fine) La funzione Fine tuning cambia la tonalità della musica in cent (100 cent = 1 semitono). Questo permette aggiustamenti fini e di regolare l’intonazione degli strumenti con quella del CD. Premere il tasto TMP/KEY / CD EFF per attivare il menu Tempo Key, e selezionare FINE premendo i tasti PREV o NEXT. KEY lampeggia sul display. Premere i tasti UP o DOWN per impostare il valore del fine tuning. L’intervallo di regolazione è ±cent (-50 – 0 (off) – +50). Se il controllo key è impostato a O6, l’intervallo di regolazione del fine tuning è tra –50 – 0, e quando è impostato a I6, l’intervallo di regolazione del fine tuning è tra 0 – +50. Quando il valore del fine tuning è diverso da zero, KEY viene mostrato sul display home. Utilizzare gli effetti CD Si noti che mentre il controllo key o VSA è ON, la riproduzione potrebbe avere un effetto di “vibrato”. Questo non è un problema del lettore ma il risultato di un effetto speciale. Utilizzare gli effetti CD Attivare e disattivare gli effetti CD Premere l’interruttore CD EFF a lato del CD-BT1MKII attiva i preset degli effetti CD: BEE (Bass Enhancement Effect), mono monitor, split monitor. Questi tre effetti CD possono essere utilizzati simultaneamente. Il simbolo CD EFF viene mostrato sul display. Premere di nuovo l’interruttore CD EFF per disattivare gli effetti CD. BEE (Bass Enhancement Effect) BEE riduce o enfatizza la componente bassa nella riproduzione CD. Premere e tratternere il tasto TMP/KEY / CD EFF per attivare il menu CD Effect. Premere i tasti PREV o NEXT per selezionare BEE. Premere i tasti UP o DOWN per selezionare un’opzione: OFF: riproduzione normale (the sound is not affected in any way) BST: la componente bassa del suono viene incrementata ENH: la componente bassa del suono viene incrementata e le parti basse del brano vengono enfatizzate CUT: la componente bassa del suono viene limitata Mono monitor Impostando la modalità monitor permette di controllare il segnale in uscita tra mono e stereo con l’opzione alternativa di entrambi. Premere e trattenere il tasto TMP/KEY / CD EFF per attivare il menu CD EFF, e selezionare MONO premendo sia il tasto PREV che NEXT. Premere i tasti UP o DOWN per selezionare un’opzione: L+R: trasmette un segnale mono, mixando i canali L (sinistro) e R (destro). L: trasmette solo il segnale del canale L (sinistro). R: trasmette solo il segnale del canale D (destro). OFF: trasmette il normale segnale stereo. Split monitor Questa modalità permette di direzionare separatamente i segnali provenienti dal CD e dal basso ai canali destro e sinistro. Premere e trattenere il tasto TMP/KEY / CD EFF per attivare il menu CD EFF, e selezionare SPLT premendo sia il tasto PREV che NEXT. Premere i tasti UP o DOWN per selezionare un’opzione: C-B: trasmette il suono del CD sul canale sinistro e quello del basso sul canale destro. B-C: trasmette il suono del basso sul canale sinistro e quello del CD su quello destro. OFF: trasmette un segnale stereo del CD e del basso. TASCAM CD-BT1MKII — 91 Italiano Se si imposta il controllo key a O6 mentre il valore del fine tuning è maggiore di 0, il valore del fine tuning viene impostato automaticamente a 0. Allo stesso modo, Se si imposta il controllo key a I6 mentre il valore del fine tuning è maggiore di 0, il valore del fine tuning viene impostato automaticamente a 0. Utilizzare gli effetti interni Il CD-BT1MKII integra 5 slot effetti numerati da 1 a 5, dive si possono memorizzare le impostazioni degli effetti creati da 16 preset di partenza. Quando uno slot effetto viene selezionato, se un preset è richiamato ed editato, l’effetto così modificato viene automaticamente memorizzato nello slot effetti. superiore destro. Premere il tasto EFFECT/EDIT per selezionare uno slot. Ogni volta che si preme il tasto EFFECT/EDIT, l’indicatore della selezione (un puntino nero) si muove tra i numeri degli slot. Componenti Italiano DLY FLA CHO WAH COMPL COMPH OCT TECH DIST HCUT Impostazioni Delay Impostazioni Flanger Impostazioni Chorus Impostazioni Auto-wah Low compressor High compressor Impostazioni Octave Impostazioni Techno filter Guadagno Distortion High cut filter Memorizzare le proprie impostazioni degli effetti in uno slot 1. Il display mostra gli slot effetti numerati da 1 a 5 nell’angolo 92 — TASCAM CD-BT1MKII 2. Premere e trattenere il tasto EFFECT/EDIT per aprire il menu Effect. La parola Effect lampeggia sul display. brary) premendo i tasti PREV o NEXT. Il display del CDBT1MKII mostra il preset dell’effetto come un numero o come una lettera e un numero (per esempio LIB:d3), che rappresenta un set di effetti. 6. Navigando tra i preset con i tasti UP e DOWN, gli effetti appaiono in quest’ordine: numeri 1– 4, compressor c1– c7, distortion d1– d5. Selezionare una libreria di effetti premendo i tasti UP e DOWN. SUGGERIMENTO L’elenco deipreset effetti disponibili nella libreria è mostrato nella pagina seguente. . ATTENZIONE 3. Selezionare EFF premendo i tasti PREV o NEXT. Se esiste qualche impostazione nello slot del banco selezionato da cui partire, sarà sovrascritta quando si richiama un preset di libreria. 4. Utilizzare i tasti UP o DOWN per attivare EFF . 5. Selezionare LIB (effect preset li- 7. Utilizzare i tasti PREV o NEXT per spostarsi tra i componenti del preset. Per esempio, se si seleziona “comprssor 5,” mostrata come LIB:c5, i componenti sono: COMPL, Utilizzare gli effetti interni l’effetto è attivo e non modificabile quando l’effetto è disattivo. 10. Premere il tasto TIME/ESC per uscire dall’impostazione effetti. Le modifiche apportate vengono memorizzate automaticamente nello slot del banco scelto ai punti 1 e 2 di questa procedura. Si può regolare il livello di mix degli effetti dei componenti mstrati in carattere grassetto nella tabella degli effetti. In MIX1 possono essere mixati i componenti FLA, CHO, WAH, OCT e TECH. In MIX2 può essere mixato il componente DLY. Richiamare un effetto con le proprie impostazioni Quando si memorizzano le impostazioni in uno slot di un banco come sopra descritto, possono essere richiamate semplicemente premendo il tasto EFFECT/EDIT per selezionare lo slot appropriato. SUGGERIMENTO Se avete collegato un pedale tipo TASCAM RC-30P (venduto separatamente), si può passare da uno slot all’altro del banco premendo il pedale. Assicuratevi che la funzione FOOT nel menu SETUP sia impostata su FX+ o FX-. 1 2 3 4 c1 c2 c3 c4 c5 c6 c7 d1 d2 d3 d4 d5 TABELLA LIBRERIA EFFETTI DLY FLA-DLY CHO-DLY WAH-DLY COMPL-COMPH COMPL-COMPH-DLY COMPL-COMPH-FLA-DLY COMPL-COMPH-CHO-DLY COMPL-COMPH-WAH-DLY COMPL-COMPH-OCT-DLY COMPL-COMPH-TECH-DLY DIST-HCUT DIST-HCUT-DLY DIST-HCUT-FLA-DLY DIST-HCUT-CHO-DLY DIST-HCUT-WAH-DLY TASCAM CD-BT1MKII — Italiano COMPH, WAH, DLY. Tutti e quattro possono essere impostati premendo i tasti UP o DOWN. I componenti mostrati in carattere grassetto nella tabella, sono editabili. Nell’esempio di “compressor 5,” ciascun componente WAH e DLY è seguito dai propri parametri di mixaggio, con MIX 1 che segue WAH e MIX 2 che segue DLY. Utilizzare i tasti UP o DOWN per mixare i componenti WAH e DLY nell’effetto. DLY è sempre mixato utilizzando MIX 2. 8. Continuare a selezionare i componenti da editare premendo i tasti PREV o NEXT, poi impostare i valori per il componente selezionato premendo i tasti UP o DOWN. 9. L’ultimo parametro per la sequenza per ciascun preset della libreria effetti è LVL (il livello di uscita dall’unità effetti). Impostare il livello di uscita da 0 a 64 premendo i tasti UP o DOWN. Si noti che il livello di uscita è disponibile solo quando 93 Equalizzatore Il CD-BT1MKII ha integrato un equalizzatore a 5-bande e due slot EQ (A e B) per l’equalizzazione. Dopo aver selezionato uno slot EQ ed averne editato i parametri, le nuove impostazioni verranno memorizzate automaticamente. Impostare l’equalizzatore Italiano 1. Premere il tasto EQ/EDIT per selezionare gli slot EQ A o B (premendo in successione il tasto EQ/EDIT si passa da EQ A, a EQ B, a OFF). 2. Premere e trattenere il tasto EQ/ EDIT per aprire il menu EQ. EQHM EQ H MID (Hi-Mid : 1.25 kHz) (Treble : 3.15 kHz) Mid Shape (EQ adjust ment) ON/OFF 4. Quando il parametro selezionato appare sul display, utilizzare i tasti UP o DOWN per regolarne i livelli. L’intervallo dei valori disponibili è: -15 – +15. 5. Premere il tasto TIME/ESC per uscire dal menu EQ e ritornare al diplay home. I parametri modificati nel menu EQ vengono salvati automaticamente nello slot EQ selezionato al punto 1. Richiamare le impostazioni di equalizzazione 3. Selezionare un parametro tra quelli disponibili premendo i tasti PREV o NEXT: EQ L EQLM EQ M (Lo : 80 Hz) (Lo-Mid : 200 Hz) (Mid : 500 Hz) 94 — TASCAM CD-BT1MKII Premere il tasto EQ/EDIT per selezionare lo slot EQ da caricare in memoria. SUGGERIMENTO Se è collegato un pedale tipo TASCAM RC30P (venduto separatamente), si può passare da uno slot EQ all’altro premendo appunto il pedale. Assicuratevi che la funzione FOOT nel menu Setup si impostata su EQ+. Utilizzare il metronomo Scegliere il tempo del metronomo 1. Premere i tasti PREV o NEXT per selezionare MTRO. 2. Quando il menu viene aperto per la prima volta, il suono del metronomo è disattivato. Il metronomo inizia a funzionare utilizzando il tempo di esecuzione impostato in precedenza quando si premono i tasti UP o DOWN per impostare il tempo. Premere una volta per cambiare di un beat per minuto; premere e trattenere i tasti UP o DOWN, per accelerare o rallentare il tempo di esecuzione. Si possono impostare valori tra 40 e 220 BPM (beat per minuto). Scegliere i beat 1. Premere i tasti PREV o NEXT per selezionare BEAT. 2. Selezionare il ritmo (da 2 a 6 oppure OFF) premendo sia il tasto UP che DOWN. Quando si sceglie un ritmo si noterà che il primo beat ha un’intonazione diversa e un volume più alto degli altri. Se si sceglie il valore OFF, tutti i beat hanno la stessa intonazione e lo stesso volume. Italiano Il CD-BT1MKII ha integrato anche un metronomo interno. Per usare il metronomo, premere e trattenere il tasto STOP per aprire il menu relativo. NOTA Il metronomo funziona solo fino a quando un CD non viene riprodotto nuovamente. Se si avvia la riproduzione di un CD mentre si sta utilizzando il metronomo questo si arresta automaticamente. TASCAM CD-BT1MKII — 95 Utilizzare l’accordatore I’accordatore per chitarra integrato nel CD-BT1MKII funziona in due modalita: chromatic (CHR) e bass (BAS). Modalità Chromatic (CHR): L’intonazione del segnale in arrivo viene rilevata e visualizzata automaticamente. Modalità Bass (BAS): Italiano Si predispone una nota “di riferimento” sulla quale accordare una corda del basso. Per selezionare la modalità: 1. Premere il tasto TUNER/SETUP per avviare il menu Tuner. 2. Selezionare MODE premendo i tasti PREV o NEXT. 3. Impostare la modalità su BAS o CHR premendo i tasti UP o DOWN. In modalità chromatic, TUNE:--- viene mostrato sul display. Quando si esegue una nota sul basso collegato al CDBT1MKII, l’accordatore determina la 96 — TASCAM CD-BT1MKII nota più vicina e la mostra sul display. Regolare la corda grossolanamente fino a far comparire la nota corretta e poi accordare con precisione finché compare al centro del display un simbolo circolare. Ripetere questa operazione per tutte le altre corde. Bassa I Corretta AltaO Se l’accordatore è in modalità Bass, utilizzare la voce TUNE: XX nel menu Tuner, per impostare la nota sul display, e procedere come indicato sopra. Si possono selezionare le note: 5B, 4E, 3A, 2D, e 1G. Le note selezionate vengono mostrate sul display come TUNE: XX. Utilizzare l’oscillatore Il CD-BT1MKII può trasmettere note secondo le scale standard della musica occidentale tra le note C (do) e B (si) in un intervallo di tre ottave. La frequenza standard, in questo caso, è determinata impostando la funzione CAL (calibra- tion). SUGGERIMENTO Questa utile caratteristica consente di ascoltare sia il suono emesso dallo strumento che quello dell’oscillatore, ed è particolarmente vantaggiosa quando si accorda uno strumento acustico non collegato al CD-BT1MKII. Premere il tasto TUNER/SETUP, per attivare il menu Tuner, e selezionare OSC (oscillator) premendo i tasti PREV o NEXT. Premere i tasti UP o DOWN per impostare la nota da accordare. Calibrazione Di solito, il La che precede il Do centrale è accordato a 440 Hz. Il CDBT1MKII permette di tarare il “La” su una frequenza compresa fra 435 e 445 Hz. Premere il tasto TUNER/SETUP per attivare il menu Tuner, e selezionare la funzione CAL premendo i tasti PREV o NEXT. Premere i tasti UP o DOWN per impostare il valore tra 435 e 445 (Hz). Utilizzare il menu Setup per cambiare le impostazioni del CD-BT1MKII. Cambiare le preferenze del CD-BT1MKII Premere i tasti PREV o NEXT per selezionare le voci del menu e premere i tasti UP o DOWN per selezionare il valore. Mix balance Questa funzione permette di regolare il bilanciamento tra il suono del basso e quello del CD. Selezionare MIX nel menu Setup, e selezionare un valore tra B (Bass) 10 – 1, 0, C (CD) 1 – 10. Modalità riproduzione CD Questa funzione permette di impostare la modalità di riproduzione del CD. Selezionare PLAY nel menu Setup, e impostare l’opzione ALL (esegui tutte le tracce) o SGL (esegui una sola traccia). Funzione CUE Questa opzione permette di assegnare una funzione al tasto CUE. Selezionare CUE nel menu Setup, e impostare CUE o FLS (FLASH). CUE: la riproduzione va in pausa sul l’ultimo punto in cui è iniziata. FLS: la riproduzione va automaticamente all’ultimo punto in cui è iniziata Funzione dei tasti UP e DOWN La funzione dei tasti UP e DOWN in modalità home display può essere impostata affinché cambi il valore delle voci di menu selezionate. Selezionare UPDN nel menu Setup, e selezionare una delle quattro funzioni premendo i tasti UP o DOWN. Scegliere una delle seguenti opzioni: MIX: mix balance (Vedere Cambiare le preferenze) TMP: CD playback tempo (Vedere Cambi di intonazione e tempo) KEY: Controllo key (Vedere Cambi di intonazione e tempo) Fine tuning (Vedere Cambi di intonazione e tempo) FIN: Funzione Pedale (Footswitch) Questa funzione permette di usare un pedale, come TASCAM RC-30P (venduto separatamente), per cambiare gli slot effetti, la cue, o l’avanzamento/arretramento veloce del CD. Selezionare FOOT nel menu Setup, e selezionare una funzione tra quelle disponibili: EQ+: seleziona lo slot EQ FX+, FX-: seleziona lo slot effetti CUE, FLS: selezionare la funzione CUE REW, FF: selezionare l’avanzamento/arretramento veloce del CD Una volta selezionata una funzione, il pedale può essere utilizzato per attivare quella funzione. TASCAM CD-BT1MKII — 97 Italiano Per aprire il menu Setup, premere e trattenere il tasto TUNER/SETUP. Caratteristiche tecniche Polarità del pedale Questa funzione permette di impostare la polarità per il pedale che si sta utilizzando. Selezionare POL nel menu Setup, e selezionare l’opzione NOR (NORMAL) o INV (INVERT) premendo i tasti UP o DOWN. Italiano 98 — TASCAM CD-BT1MKII Tipo di disco CD singolo da 8 e 12 cm AD/DA 16-bit Livello uscita nominale –10 dBV (LINE OUT) Massimo livello di 0 dBV (1 vrms) uscita (LINE OUT) senza distorsione Impedenza di uscita 1 K$ Massimo livello di > 18mW (a 32$) uscita (PHONES) Livello ingresso nominale LINE IN –10 dBV BASS IN –15 dBV (passivo) –10 dBV (attivo) DC 9V (PS-PS5 Voltaggio alimentatore) Batterie AA x 4 (NiMH o alcaline) Consumo 4 W (PS-PS5 alimentatore) Dimensioni (a x l x p) 232 x 138 x 40 compresi i piedini di (mm) appoggio Peso (batterie incluse) 620g Caratteristiche della riproduzione CD Risposta in frequenza da 20 Hz a 20 kHz ±1.0 dB Gamma dinamica > 88 dB Rapporto S/N > 88 dB THD <0.01% Elaborazione segnale digitale 32-bit Instrucciones importantes de seguridad 12 Utilice esta unidad solo con un soporte, mesa o trípode especificado por el fabricante, o que le haya sido vendido con el propio aparato. Cuando use un soporte o carrito, tenga mucho cuidado al desplazar el bloque carrito/aparato para evitar posibles daños en caso de que vuelque. 13 Desenchufe este aparato durante las tormentas eléctricas o cuando no lo vaya a utilizar durante periodos de tiempo largos. 14 Consulte cualquier posible reparación con el servicio técnico oficial. Este aparato deberá ser reparado cuando esté dañado en alguna forma, como por ejemplo si se ha roto el cable de alimentación o el enchufe, si se ha derramado algún líquido o se ha introducido cualquier tipo de objeto dentro de la unidad, si el aparato ha quedado expuesto a la lluvia o la humedad, si no funciona normalmente o si ha caído al suelo. • No permita que este aparato quede expuesto a goteras o salpicaduras. • No coloque sobre este aparato ningún objeto lleno de líquido, como puede ser un jarrón. • No instale esta unidad en ningún espacio reducido o confinado, como podría ser empotradro en una librería o similar. • Este aparato recibe un voltaje nominal nooperativo de la salida de corriente alterna aun cuando su interruptor POWER esté en la posición off (apagado). Español 1 Lea estas instrucciones. 2 Conserve estas instrucciones. 3 Observe todas las advertencias. 4 Cumpla con lo indicado en las instrucciones. 5 No use este aparato cerca del agua. 6 Límpielo solo con un trapo seco. 7 No bloquee ninguna de las aberturas de ventilación. Instale este aparato de acuerdo a las instrucciones del fabricante. 8 No instale este aparato cerca de fuentes de calor como radiadores, hornos, calentadores u otros aparatos (incluyendo amplificadores) que produzcan calor. 9 No anule nunca el sistema de seguridad de un enchufe polarizado o con toma de tierra. Un enchufe polarizado tiene dos bornes, uno más ancho que el otro, mientras que uno con toma de tierra tiene dos bornes normales y un tercero para la toma de tierra. El borne ancho de los polarizados o el tercero de los de toma de tierra han sido instalados para su seguridad. Si el enchufe que venga con su aparato no encaja en su salida de corriente, haga que un electricista le sustituya esa toma de salida anticuada. 10 Evite que el cable de alimentación pueda quedar aplastado o pinzado, especialmente en los enchufes, receptáculos y en el punto en el que salen de los aparatos. 11 Use solo los accesorios/complementos indicados por el fabricante. TASCAM CD-BT1MKII — 99 Indice Manejo de los CDs ..........................................................................101 Acerca de la fuente de alimentación..............................................102 Nombre de las partes y funciones ..................................................104 Conexiones .....................................................................................107 Uso del sistema de menús ..............................................................109 Manejo del reproductor de CDs .....................................................111 Modificaciones de tono y tempo ....................................................112 Uso de los efectos de CD................................................................113 Uso de los efectos internos ............................................................114 Ecualizador .....................................................................................116 Uso del metrónomo ........................................................................117 Uso del afinador .............................................................................118 Modificación de preferencias para el CD-BT1MKII.........................119 Datos y números (especificaciones) ...............................................120 Español Acerca de este Manual: Cuando nos refiramos a una tecla, control o conector del CD-BT1MKII, lo marcaremos así: PLAY. Cuando hagamos referencia a un elemento que vea en la pantalla, lo indicaremos así: MENU. 100 — TASCAM CD-BT1MKII Manejo de los CDs Con un paño suave elimine con cuidado cualquier marca de dedos y el polvo de la superficie grabada del disco. Al contrario de lo que ocurre en los discos convencionales, los CD no tienen surcos que recojan polvo y restos microscópicos, por lo que la limpieza con un paño suave debería eliminar la mayoría de partículas. Limpie el disco con movimientos rectos de dentro hacia fuera. Las partículas de polvo y manchas no tendrán ningún efecto sobre la calidad de la reproducción. Nunca use productos químicos como sprays antiestáticos u otros líquidos como aguarrás para limpiar los discos. Esos productos producirán daños irreparables en la superficie del disco. Guarde los discos en sus cajas después de usarlos para evitar que se hagan rayas que podrían hacer que el cabezal láser “saltase”. No exponga los discos a la luz solar directa o a altos niveles de humedad o temperatura durante periodos largos. La exposición continuada a altas temperaturas puede hacer que el disco se doble. Use sólo discos circulares. Evite el uso de discos promocionales, etc. que no sean circulares. Para mantener limpios los cabezales láser, no los toque. Por esa misma razón, no deje abierta la bandeja para discos cuando no sea necesario. El CD-BT1MKII no puede reproducir discos CD-R/RW no finalizados. Además, es possible que algunos discos CD-R/RW finalizados no puedan ser reproducidos en el CD-BT1MKII. Español Tenga en cuenta lo siguiente: Coloque siempre los discos en la bandeja con su etiqueta hacia arriba (los discos compactos sólo se pueden reproducir por una cara). Para sacar un disco de su caja, pulse en el centro de la caja y tire del disco, sujetándolo con cuidado por los bordes. TASCAM CD-BT1MKII — 101 Acerca de la fuente de alimentación Funcionamiento a pilas Abra la tapa del compartimento para pilas que hay en la parte trasera del CDBT1MKII e introduzca cuatro pilas AA (SUM-3, no incluidas), respetando las indicaciones + y – que verá en el compartimento. CUIDADO Le recomendamos que use pilas Ni-MH recargables (también puede usar pilas alcalinas). Su CD-BT1MKII puede que no funcione correctamente con otros tipos de pilas. Español AVISO Un uso incorrecto de las pilas puede producir una fuga del electrolito e incluso puede que lleguen a explotar. Lea y siga las instrucciones que aparecen a continuación: Notas sobre las pilas Cuando vaya a utilizar el CDBT1MKII a pilas, desenchufe el 102 — TASCAM CD-BT1MKII adaptador CA. Compruebe que ha introducido las pilas en la dirección correcta, respetando las indicaciones de polaridad que hay dentro del compartimento para pilas. Utilice siempre pilas del mismo tipo y cambie siempre todas las pilas a la vez. No intente recargar pilas que no sean recargables. Si no va a utilizar el CD-BT1MKII durante un periodo de tiempo largo, saque las pilas. No tire las pilas al fuego o al agua. No trate de desmontar las pilas Si se produce una fuga del electrolito en el compartimento para pilas, límpielo con un pañuelo de papel. Asegúrese de que no queden restos del electrolito antes de colocar las nuevas pilas. Indicación del nivel de carga de las pilas Cuando esté usando el CD-BT1MKII a pilas, el nivel de carga de las pilas será indicado de la siguiente manera: 3 partes encendidas Las pilas están cargadas a tope. 2 partes encendidas La carga de las pilas está a la mitad. 1 parte encendida No le queda mucha carga a las pilas. 3 partes parpadeando Las pilas están a punto de agotarse. Cámbielas por otras nuevas. Duración de las pilas Pilas de Ni-MH : Aprox. 4.5 horas Pilas alcalinas: Aprox. 1.5 horas Sistema de ahorro de energía Cuando esté utilizando la alimentación a pilas, el reproductor y las funciones de CD del CD-BT1MKII se desconectarán automáticamente si se da una de estas circunstancias durante más de 5 minutos (en la parte de la pantalla de la unidad CD aparecerá la indicación CD OFF). (continúa en la página siguiente) Acerca de la fuente de alimentación (continuación) CUIDADO En este aparato la duración de las pilas es más corta que en los reproductores de CD portátiles debido a que el CD-BT1MKII dispone de funciones especiales como el cambio de clave y efectos. La duración de las pilas en el CD-BT1MKII se ve afectada tanto por las condiciones ambientales como por el número de funciones en uso. Entre los factores que afectan a la duración de las pilas está la temperatura, humedad, el número de funciones especiales utilizadas, etc. Funcionamiento utilizando un adaptador CA Conecte un adaptador CA TASCAM PSPS5 AC (no incluido) a la toma DC IN que hay en la parte trasera del CD-BT1MKII. Conecte el adaptador CA a un enchufe. Asegúrese siempre de que el voltaje de alterna sea el mismo que el marcado en el adaptador. PS-PS5 Salida de corriente Conector DC AVISO Teniendo en cuenta esto, puede que las pilas no sean capaces de hacer que funcione el CD-BT1 MKII, a pesar de la indicación de carga de las pilas que aparezca en pantalla. Si ocurre esto, cambie las pilas o utilice un adaptador CA. Use solo un adaptador CA TASCAM PS-PS5 con su CD-BT1MKII. El uso de otro tipo de adaptador puede producir daños en su CDBT1MKII. Deshágase de las pilas usadas de acuerdo a las normativas de su país. Antes de utilizar el CD-BT1MKII con un adaptador CA, saque las pilas. Esto evita que pueda aparecer un ligero ruido si utiliza la unidad con un adaptador CA pero mantiene las pilas dentro. Si conecta el adaptador CA y se da cuenta de que todavía tiene las pilas dentro de la unidad, apague la unidad utilizando el interruptor POWER y saque las pilas. En cualquier caso, apague la unidad siempre que vaya a cambiar entre el funcionamiento a pilas y el uso de un adaptador CA. Cuando no vaya a utilizar el CD-BT1MKII, desenchúfelo. Puede que los ajustes no se graben correctamente si apaga la unidad justo después de introducir un CD o modificar los ajustes. Si no se han grabado correctamente los ajustes, el sistema no arrancará con los últimos ajustes sino con los valores por defecto. Encendido y apagado de la unidad Utilice el interruptor POWER para encender o apagar toda la unidad. CAUTION TASCAM CD-BT1MKII — 103 Español La unidad está en el modo de parada La tapa de la unidad de CD está abierta No hay cargado ningún CD Para poner en marcha el reproductor de CDs, pulse la tecla PLAY. Nombre de las partes y funciones Cuando haya dos palabras diferentes encima y debajo de la misma tecla (por ejemplo TUNER y SETUP), tendrá que utilizar la tecla de la siguiente manera: Para activar la función que viene indicada encima de la tecla: Pulse la tecla una vez Para activar la función que viene indicada debajo de la tecla: Mantenga pulsada la tecla Por ejemplo, en el caso de la tecla TUNER/SETUP, cuando pulse esta tecla se activará el menú Tuner mientras que si la mantiene pulsada se activará menú Setup. Español 104 — TASCAM CD-BT1MKII Nombre de las partes y funciones (continuación) de menú o modificar los valores ajustados en el modo de menú (Vea Uso del sisIntroduzca en esta toma el conector tema de menús). También puede ajustar DC de un adaptador TASCAM PSlas funciones de las teclas UP y DOWN PS5 CA que se vende por separado. en el modo de pantalla inicial (Vea Mo2) Compartimento para pilas dificación de sus preferencias). Quite la tapa del compartimento para pilas que hay en la parte trasera del 7) Tecla LOOP CD-BT1MKII para introducir en él Utilice esta tecla para entrar en el modo de repetición (bucle). cuatro pilas AA (SUM-3). 3) Tapa de la unidad CD 8) Tecla I/O Esta tecla sirve para ajustar el “punto de Para abrirla para introducir un CD, tire entrada” y el “punto de salida” de la parte de la palanca de apertura y abra la tapa. de música que quiera que se repita (Vea Para cerrarla, empuje hacia abajo la tapa Manejo del reproductor CD). hasta que se bloquee automáticamente. 4) Pantalla 9) Tecla TUNER/SETUP 10) Tecla TMP/KEY / CD EFF En ella podrá ver el estado del CD- Utilice esta tecla para acceder a la función Tuner y al menú Setup (Vea BT1MKII. Uso del sistema de menús). 5) Tecla TIME/ESC Utilice esta tecla en el modo de pantalla inicial para cambiar la forma en la que viene indicado el tiempo. Utilice esta tecla en el modo de menú para volver al modo de pantalla inicial. Esta tecla le permite entrar en el menú Tempo/Key y en el menú CD Effect (Vea Uso del sistema de menús). 11) Tecla EQ/EDIT Use esta tecla para cambiar el EQ entre A, B y OFF (Vea Ecualizador). Mantenga Estas teclas sirven para elegir elementos pulsada esta tecla para ir al menú EQ 6) Teclas PREV, NEXT, UP, DOWN (Vea Uso del sistema de menús). 12) Tecla EFFECT/EDIT Use esta tecla para ir avanzando a través de los distintos efectos (Vea Uso de los efectos internos). Manténgala pulsada para acceder directamente al menú de efectos (Vea Uso del sistema de menús). 13) Teclas salto de pista/ búsqueda [m/. /\,] Salto de pista: Utilice estas teclas para saltar a la pista anterior o a la siguiente. Pulse estas teclas mientras se esté reproduciendo un CD para saltar a la pista anterior o a la siguiente. El pulsar estas teclas cuando no se esté reproduciendo ningún CD le permite elegir la pista que quiera reproducir. (Para reproducirla, pulse la tecla PLAY ). Búsqueda: Avance/rebobinado rápido Mantenga pulsada una de estas teclas mientras reproduce un CD para realizar un avance/ rebobinado rápido. TASCAM CD-BT1MKII — 105 Español 1) Toma DC IN Nombre de las partes y funciones (continuación) La velocidad de la operación de búsqueda irá aumentando si mantiene pulsada la tecla. 14) Tecla STOP/MTRO [H] Pulse esta tecla para detener la reproducción. Si mantiene pulsada esta tecla activará el modo de metrónomo (Vea Uso del metrónomo). 15) Tecla PLAY/PAUSE [G/J] Utilice esta tecla para poner en marcha la reproducción de un CD. Mientras se esté reproduciendo un CD, si pulsa esta tecla la reproducción entrará en el modo de pausa. Púlsela de nuevo para que continúe la reproducción. 16) Tecla CUE Español Esta tecla sirve para volver al punto CUE (el punto en el que empezó la reproducción por última vez). Hay dos modos Cue. Utilice el menu Setup para elegir la acción que realizará la tecla CUE (Vea Modificación de sus preferencias). 17) Toma PHONES Conecte aquí los auriculares. 18) Toma LINE OUT Utilice este puerto para conectar el 106 — TASCAM CD-BT1MKII CD-BT1MKII a dispositivos como altavoces autoamplificados, la toma de entrada AUX de un sistema stereo, una pletina de cassette o una grabadora de CDs. Puede escuchar el resultado de los efectos y del cambio de clave a través de los dispositivos conectados aquí. 19) Control OUTPUT Este control sirve para ajustar el nivel de salida de la toma PHONES y de la toma LINE OUT. Este control ajusta el nivel de las dos salidas a la vez (los niveles de los dos puertos no pueden ser ajustados por separado). 20) Control INPUT 22) Toma BASS IN Conecte un bajo a esta toma. Ajuste el interruptor BASS IN (vea 26) de acuerdo al tipo de bajo que use, activo o pasivo. 23) Toma FOOT Conecte aquí un pedal de disparo standard. Puede asignar distintas funciones a este pedal. Puede elegir entre una amplia gama de funciones a usar con un pedal de disparo. (Vea Modificación de preferencias). 24) Interruptor POWER Sirve para encender o apagar toda la unidad. Este control le permite modificar el nivel de entrada de la toma BASS IN. 25) Interruptor CD EFF Utilice esta toma stereo para conectar al CD-BT1MKII dispositivos externos como un sintetizador, un preamplificador de guitarra, una pletina de cassette, una unidad de efectos, etc. Esta toma no tiene ningún control de nivel por lo que tendrá que ajustar el nivel de salida mediante el dispositivo fuente. 26) Interruptor BASS IN (PASSIVE/ ACTIVE) 21) Toma LINE IN Activa y desactiva los efectos de la pletina de CD. Puede usar bajos tanto activos como pasivos con el CD-BT1MKII. Ajuste este interruptor de acuerdo al tipo de bajo que utilice. Conexiones Entrada de señales de dispositivos externos (LINE IN) BAJO SALIDA DE LINEA DE DISPOSITIVO EXTERIOR Conecte un bajo a la entrada BASS IN. Ajuste el interruptor BASS IN a PASSIVE o ACTIVE que está en un lateral de la unidad de acuerdo al tipo de bajo que use. La toma BASS IN del CDBT1MKII acepta señales de entrada no balanceadas. Utilice un conector de auriculares mono de 6,3 mm. Ajuste del nivel de entrada Utilice el control INPUT para ajustar el nivel de la señal de entrada procedente de la toma BASS IN. La toma LINE IN acepta un conector stereo mini (3,5 mm). El nivel de entrada en la toma LINE IN no puede ser ajustado en el CD-BT1MKII, por lo que tendrá que ajustar el nivel de salida en el dispositivo externo que haya conectado. Ajuste del nivel de salida después de añadir efectos internos Mantenga pulsada la tecla EFFECT/ EDIT para abrir el menú de efectos y pulse la tecla NEXT o PREV para elegir LVL y utilice las teclas UP y DOWN para ajustar el nivel de salida entre 0 y 64. Ajuste del balance de mezcla entre el bajo y CD Mantenga pulsada la tecla TUNER/ SETUP para abrir el menú Setup y pulse la tecla NEXT o PREV para elegir MIX. Puede ajustar el balance de la mezcla utilizando uno de los siguientes valores: (Bajo) B10 – B1, 0, (CD) C1 – C10. CUIDADO Español Conexión de un bajo (BASS IN) No conecte NUNCA un amplificador de bajo a la toma BASS IN del CD-BT1MKII; el hacerlo dañaría su equipo. TASCAM CD-BT1MKII — 107 Conexiones (continuación) Salida a los auriculares y a dispositivos externos NOTA Los niveles de las salidas LINE OUT y PHONES son controlados globalmente por el control OUTPUT y no es posible ajustarlos por separado. Si tiene un dispositivo de grabación conectado a la toma LINE OUT recuede que el control OUTPUT afectará al nivel de grabación. Conexión de un pedal de disparo Conecte los auriculares a la toma PHONES. Utilice la toma stereo LINE OUT para conectar el CD-BT1MKII a dispositivos externos como altavoces autoamplificados, tomas de entrada AUX de un sistema stereo, pletinas de cassette o grabadoras de CDs. Español Ajuste del nivel de salida Puede ajustar el nivel de salida de la toma LINE OUT y PHONES utilizando el control OUTPUT. 108 — TASCAM CD-BT1MKII PEDAL DE DISPARO RC-30P Conecte un TASCAM RC-30P (se vende por separado) a la entrada FOOT. Puede ajustar la polaridad del pedal utilizando el elemento POL del menú Setup. CUIDADO Para evitar problemas con su CD-BT1MKII, utilice solo un pedal de disparo como el TASCAM RC-30P (vendido por separado) que tenga un conector de auriculares standard (punta y lateral). Uso del sistema de menús Para acceder a la categoría de menús que quiera, haga lo siguiente: Menú Effect (efectos de bajo) Tras elegir un espacio de efecto, mantenga pulsado EFFECT/EDIT Menú EQ (ecualizador) Tras elegir un espacio de EQ (A o B), mantenga pulsado EQ/EDIT Menú Tuner (afinador de bajo) Pulse la tecla TUNER/SETUP Menú Setup (configuración) Mantenga pulsada la tecla Categoría Menú Elemento Menú EFFECT EFF LIB Parameter LVL EQ L/ EQLM/ EQ M/ EQMH/ EQ H EQ TUNER TUNER/SETUP Menú Tempo/Key (cambio del tempo y el tono del CD) Pulse TMP/KEY / CD EFF Menú CD Effect (efectos de reproducción del CD) Mantenga pulsada la tecla TMP/ KEY / CD EFF Menú Metronome Mantenga pulsado STOP. Podrá ver la categoría de menú elegida, en vídeo inverso y parpadeando. SETUP Notas Valores (los valores por defecto están subrayados) ON/OFF 1–4, c1–c7, d1–d5 – 0 to 64 On/off del efecto Número de preset depende de tipo efecto Nivel salida efecto ajusta la ganancia de la banda del EQ (low, midlow, mid, mid-high, high) activa o desactiva la función de modelado -15 – 0 – +15 MID ON/OFF TUNE MODE=BAS: 5B, 4E, 3A, 2D, 1G MODE OSC CHR/BAS _ _ (OFF), _C–_B, C–A, B, C– B, (3 octaves) CAL 435–440–445 MIX B10 – B1, 0, C1 – C10 PLAY ALL/SGL CUE CUE/FLS ajusta el número de cuerdas en el modo Bass elige modo afinador ajusta el tono del oscilador fija frecuencia base (A4, unidad: Hz) ajusta el balance de mezcla entre CD y entrada elige reproducción total (all) o única (single) elige acción de CUE TASCAM CD-BT1MKII — 109 Español Acceso al sistema de menús Uso del sistema de menús (continuación) Categoría Menú SETUP TEMPO KEY Elemento Menú Valores (los valores por defecto están subrayados) UPDN MIX, TMP, KEY, FIN FOOT EQ+, FX+, FX-, CUE. FLS, REW, FF POL NOR/INV ajusta la función de UP/ DOWN en pantalla inicial fija la polaridad del pedal VSA KEY FINE BEE OFF, BST, ENH, CUT MONO OFF (stereo), L+R, L, R On/off del VSA control de clave en semitonos afinación precisa (cent) elige entre función boost, enhance o cut para reproducción del CD modo de monitor mono SPLT OFF (mix), C-B, B-C modo de monitor dividido MTRO (OFF), 40 – 120 – 220 tempo del metrónomo en BPM (Beats Per Minute) BEAT OFF, 2 – 6 elige el número de tiempos musicales para el metrónomo TMP Español 110 — TASCAM CD-BT1MKII Elección de elementos de menú Para escoger elementos de menú de la categoría de menús seleccionada, utilice las teclas PREV y NEXT. fija la función del pedal VSA=OFF: -50 to +16 VSA=ON: -50, -32, -16,-12, -8, -4, 0, +4, +8, +12, +16 ON/OFF I6 – 0 – O6 -50 – 0 – +50 CD EFF METRONOME Notas ajusta la velocidad de la reproducción del CD en % Modificación de los valores ajustados Para ello, use las teclas UP y DOWN. Salida del sistema de menús Pulse la tecla TIME/ESC para salir del sistema de menús y volver al modo de pantalla inicial. Manejo del reproductor de CDs Reproducción Pulse la tecla PLAY/PAUSE (G/J) para poner en marcha la reproducción y para activar la pausa. Pulse la tecla STOP (H) para detener la reproducción. Salto de pista y busqueda dentro de las pistas Utilice las dos teclas de salto/búsqueda (m/. y //,) para retroceder o avanzar una pista con cada pulsación de la tecla adecuada. Estas teclas le permiten realizar una búsqueda dentro del CD, para lo cual tendrá que mantener pulsada la tecla correspondiente a la dirección en la que quiera que se efectúe la búsqueda. Bucle (pista/disco) Pulse la tecla LOOP para que se repita una sola pista, o todas las pistas, de acuerdo al valor de PLAY elegido en el menú Setup. Ajuste SGL ALL Modo de repetición se repite una sola pista (la activa). En pantalla aparecerá LOOP 1. se repite todo el disco. En pantalla aparecerá LOOP. Bucles (puntos de entrada/salida) Para que se repita una determinada sección de una pista, utilice la tecla I/O para ajustar el punto de inicio del bucle (IN) y después utilice esa misma tecla para ajustar el punto de salida (OUT). El pulsar I/O durante la reproducción o cuando esté en el modo de pausa ajusta el el punto de inicio (IN). Empezará a parpadear en pantalla el símbolo I-O. El pulsar de nuevo la tecla I/O durante la reproducción o esté en pausa ajusta el punto de salida (OUT). En pantalla aparecerá LOOP e I-O . La sección entre los dos puntos se repetirá sin cortes bruscos. Para cancelar un bucle de E/S, pulse la tecla LOOP. Despararecerá de la pantalla la indicación LOOP y se anulará el modo de bucle. Si pulsa de nuevo la tecla LOOP pondrá en marcha el bucle definido previamente. El pulsar de nuevo la tecla I/O para borrar los puntos del bucle. La tecla CUE La tecla CUE tiene dos funciones que puede ajustar en el menú Setup: Ajuste Función la reproducción entra en pausa en el punto en el que comenzó la reproducción por última vez. FLS la reproducción “salta” automáticamente al punto en el que comenzó la reproducción por última vez. Si tiene conectado un pedal de disparo como el TASCAM RC-30P, para un “manejo manos libres” puede utilizar éste en vez de la tecla CUE. Ajuste el elemento FOOT del menú Setup a CUE o FLS (flash). CUE Pantalla En el modo de pantalla inicial, pulse la tecla TIME/ESC para cambiar entre las siguientes indicaciones de tiempo: tiempo de pista transcurrido, tiempo de pista restante y el tiempo total restante. TASCAM CD-BT1MKII — 111 Español El reproductor de CDs del CD-BT1MKII funciona como la mayoría de reproductores de CDs, con alguna pequeña diferencia y característica especial. Modificaciones de tono y tempo Hay cuatro formas de modificar la manera en la que será reproducido un CD, a través de los elementos de menú del menú Tempo Key: control de tempo (TMP), ajuste VSA (escucha de velocidad variable) (VSA), control de clave (KEY) y afinación precisa (FINE) Control de tempo Español El control de tempo le permite modificar el tempo de una pista. Pulse la tecla TMP/KEY / CD EFF para entrar en el menú Tempo y elija TMP pulsando la tecla PREV o NEXT. En pantalla parpadeará TEMPO. Cuando el VSA esté activado (vea abajo), podrá elegir uno de los siguientes ajustes: -50, -32, -16, -12, -8, -4, 0 (off), +4, +8, +12 y +16%. Pulse la tecla UP o DOWN para ajustar el valor. Cuando el VSA esté desactivado, podrá ajustar el valor entre –50 y +16%, a intervalos de un 1%. Tanto si el VSA está en ON o en OFF, pulse la tecla UP o DOWN para ajustar el tempo. Cuando el tempo esté ajustado a valor distinto a cero, en la pantalla inicial aparecerá la indicación TEMPO. 112 — TASCAM CD-BT1MKII VSA Cuando el VSA (escucha de velocidad variable) esté activado, podrá modificar el tempo (vea arriba) sin cambiar la clave. Pulse la tecla TMP/KEY / CD EFF para entrar en el menú Tempo Key, elija VSA pulsando la tecla PREV o NEXT. Pulse la tecla UP o DOWN para elegir entre ON u OFF. En pantalla parpadeará TEMPO. Cuando el VSA esté en ON, en pantalla aparecerán las letras VSA. NOTA Si el valor del control de tempo no está ajustado a 0 y cambia el ajuste [VSA] de OFF a ON, el valor de tempo será automáticamente reinicializado a un “valor VSA”. Por ejemplo, si el valor es [-33] cuando el VSA está desactivado, será ajustado automáticamente a [-50] cuando active el VSA. Control de clave El control de clave desplaza la clave seis semitonos hacia arriba o hacia abajo. Pulse la tecla TMP/KEY / CD EFF para entrar en el menú Tempo Key y elija KEY pulsando la tecla PREV o NEXT. En pantalla parpadeará la indicación. Pulse la tecla UP o DOWN para ajustar la clave. El rango es ± 6 semitonos (I6 ~ 0 (off) ~ O6). Cuando haya ajustado la clave a un valor distinto de cero, en la pantalla inicial aparecerá la indicación KEY. Afinación precisa Ajusta la clave en centésimas (100 cent. = 1 semitono). Esto le permite realizar ajustes precisos y conseguir ligeras diferencias de afinación entre sus intrumentos y el CD. Pulse la tecla TMP/KEY / CD EFF para entrar en el menú Tempo Key y elija FINE pulsando la tecla PREV o NEXT. En pantalla parpadeará la indicación KEY. Pulse la tecla UP o DOWN para ajustar el valor de la afinación precisa. El rango para este ajuste es ± 50 centésimas (-50 – 0 (off) – +50). Sin embargo, si el control de clave está ajustado a O6, el rango disponible de afinación precisa es –50 – 0, y si está ajustado a I6, este rango está comprendido entre 0 y +50. Cuando haya ajustado la afinación precisa a un valor distinto de cero, en la pantalla inicial aparecerá la indicación KEY . (continua en la página siguiente) Uso de los efectos de CD BEE (intensificación de bajo) Si ha ajustado el control de clave a O6 cuando el valor de afinación precisa esté por encima de 0, éste último será reiniciado automáticamente a 0. Igualmente, si ajusta el control de clave a I6 cuando el valor de la afinación precisa sea inferior a 0, éste último también será reiniciado a 0. Además, tenga en cuenta que cuando el control de clave o el VSA esté ajustado a ON, puede que la música reproducida tenga un cierto toque de “vibrato”. Esto no es un fallo del reproductor de CDs – es el comportamiento normal de los efectos especiales. Este efecto reduce o intensifica el componente de graves del CD. Mantenga pulsada la tecla TMP/KEY / CD EFF para acceder al menú de efectos de CD. Pulse PREV o NEXT hasta escoger BEE. Pulse después UP o DOWN para elegir entre estas opciones: OFF: reproducción normal (el sonido no se ve afectado) BST: el componente de graves del sonido es realzado ENH: los graves son realzados y la definición de la parte grave de la música será también intensificada CUT: los graves del sonido son cortados Uso de los efectos de CD Activación y desactivación de los efectos de CD Al pulsar el interruptor CD EFF que hay en el lateral del CD-BT1MKII activará los efectos CD prefijados: BEE, monitor mono y división de monitor. Puede utilizar estos tres efectos CD simultáneamente. En pantalla aparecerá el símbolo CD EFF Para desactivar los efectos CD, pulse de nuevo el interruptor CD EFF. Monitor mono El ajuste del modo de monitor le permite configurar la señal de salida a mono o stereo, con distintas opciones. Mantenga pulsada la tecla TMP/KEY / CD EFF para entrar en el menú CD EFF y elija MONO pulsando la tecla PREV o NEXT. Pulse la tecla UP o DOWN para elegir entre las siguientes opciones: L+R: da salida a una señal mono, mezclando los canales L (izquierdo) y R (derecho). L: da salida solo a la señal del canal L. R: da salida solo a la señal del canal R. OFF: Da salida a la señal stereo. División de monitor El ajuste del modo de división de monitor le permite dividir la salida del CD y el bajo en salidas izquierda y derecha. Mantenga pulsada la tecla TMP/KEY / CD EFF para entrar en el menú de efectos de CD y elija SPLT pulsando la tecla PREV o NEXT. Pulse la tecla UP o DOWN para escoger una de las siguientes opciones: C-B: da salida al sonido de CD en la parte izquierda y al sonido del bajo en la parte derecha. B-C: da salida al sonido del bajo en la parte izquierda y al sonido de CD en la parte derecha. OFF: Da salida a la señal stereo mezcla del CD y bajo procedentes de la parte izquierda y derecha. TASCAM CD-BT1MKII — 113 Español (viene de la página anterior) Uso de los efectos internos El CD-BT1MKII tiene cinco espacios de efectos, numeradas de la 1 a la 5, en las que puede almacenar sus propios ajustes de efectos que puede crear a partir de los 16 efectos prefijados disponibles. Cuando elija un espacio de efectos, si carga y edita un efecto prefijado, el efecto editado será almacenado de forma automática en el espacio elegido. Componentes Español DLY FLA CHO WAH COMPL COMPH OCT TECH DIST HCUT Ajuste de retardo Ajuste de Flanger Ajuste de Chorus Ajuste de Auto-wah Compresor graves Compresor agudos Ajuste de octava Ajuste de filtro techno Ganancia de distorsión Filtro de corte de agudos Almacenamiento de sus propios ajustes de efectos en un espacio 1. La pantalla le muestra el número del espacio en la esquina superior 114 — TASCAM CD-BT1MKII derecha. Pulse la tecla EFFECT/ EDIT para elegir un espacio. Cada vez que pulse EFFECT/EDIT, el indicador de selección (punto negro) irá cambiando de número de espacio. 2. Mantenga pulsada la tecla EFFECT/EDIT para ir al menú Effect . En pantalla parpadeará la palabra Effect. de efectos). La pantalla del CDBT1MKII le indicará los efectos prefijados como un número o una letra y un número juntos (como LIB:d3), que representan un grupo de efectos prefijados. 6. Al usar las teclas UP o DOWN para ir pasando por los efectos, los presets aparecerán en este orden: números 1– 4, compresor c1– c7, distorsión d1– d5. Pulse UP o DOWN para elegir un número de efecto prefijado de la biblioteca. CONSEJO Vea la tabla de biblioteca de efectos para determinar el contenido del preset elegido. CUIDADO Si hubiese algún valor en el espacio del banco elegido sobre el que va a trabajar, será sobregrabado cuando cargue una entrada. 3. Elija EFF usando la tecla PREV o NEXT. 4. Use UP o DOWN para activar EFF a ON. 5. Pulse la tecla PREV o NEXT pera elegir LIB: (biblioteca de presets 7. Use la tecla PREV o NEXT para moverse entre los componentes del preset de efectos. Por ejemplo, si elige “compressor 5,“ la pantalla le mostrará LIB:c5. Los componentes visualizados son COMPL, COMPH, WAH, DLY. Puede ajustar los cuatro componentes pulsando la tecla UP Uso de los efectos internos (continuación) 10. Pulse la tecla TIME/ESC para salir del ajuste de efectos. Los ajustes de efectos que haya realizado serán grabados automáticamente en el espacio que haya elegido en los pasos 1 y 2. 1 2 3 4 c1 c2 c3 c4 c5 c6 c7 d1 d2 d3 d4 d5 TABLA BIBLIOTECA EFECTOS DLY FLA-DLY CHO-DLY WAH-DLY COMPL-COMPH COMPL-COMPH-DLY COMPL-COMPH-FLA-DLY COMPL-COMPH-CHO-DLY COMPL-COMPH-WAH-DLY COMPL-COMPH-OCT-DLY COMPL-COMPH-TECH-DLY DIST-HCUT DIST-HCUT-DLY DIST-HCUT-FLA-DLY DIST-HCUT-CHO-DLY DIST-HCUT-WAH-DLY Puede ajustar el nivel de mezcla de los efectos de los componentes en negrita de la tabla anterior. En el modo MIX1 puede mezclar los componentes FLA, CHO, WAH, OCT y TECH. En MIX2 puede mezclar el componente DLY. TASCAM CD-BT1MKII — 115 Español o DOWN. Los componentes en negrita en la tabla de la biblioteca de efectos son mezclables. En el ejemplo de “compressor 5,“ los componentes WAH y DLY van seguidos de sus propios parámetros de mezcla en la pantalla, con MIX1 detrás de WAH y MIX2 detrás de DLY. Use las teclas UP y DOWN para mezclar los componentes WAH y DLY de este efecto. DLY siempre es mezclado usando MIX2. 8. Siga eligiendo los componentes que quiera editar pulsando la tecla PREV o NEXT y después escoja el valor para los elementos seleccionados con UP o DOWN. 9. El último parámetro de la secuencia para cada presets de efectos de la biblioteca es LVL (el nivel de salida de la unidad de efectos). Ajuste el nivel de salida entre 0 y 64 pulsando la tecla UP o DOWN. Tenga en cuenta que el nivel de salida está solo disponible cuando el efecto esté activado y estará anulado cuando el efecto esté desactivado. Ecualizador Carga de un efecto con sus ajustes Cuando haya guardado unos ajustes en un espacio de efecto como hemos descrito antes, podrá cargarlo con solo pulsar EFFECT/EDIT para elegir el espacio adecuado. CONSEJO Si tiene un pedal de disparo conectado como el TASCAM RC-30P (que se vende por separado), podrá ir pasando por los distintos espacios de efectos con cada pulsación del pedal. Compruebe que FOOT en el menú SETUP esté ajustado a FX+ o FX-. Ecualizador Español El CD-BT1MKII tiene un ecualizador de 5 bandas para la entrada de bajo y dos espacios EQ (A y B) para el almacenamiento de datos de ecualización. Una vez que haya elegido un espacio EQ y haya editado los ajustes del ecualizador, los valores EQ editados serán almacenados de forma automática en el espacio EQ elegido. Ajuste del ecualizador 1. Pulse la tecla EQ/EDIT para elegir el espacio EQ A o B (el pulsar la tecla EQ/EDIT hará que vaya pasando entre el espacio EQ A, B, y el valor OFF de forma cíclica). 2. Mantenga pulsada la tecla EQ/ EDIT para acceder al menú EQ. de ganancia. El rango de valores disponibles para su ajuste está entre -15 – +15. 5. Pulse la tecla TIME/ESC para salir del menú EQ y volver al modo de pantalla inicial. Los parámetros ajustados en el menú EQ serán grabados automáticamente en el espacio EQ elegido en el paso 1. Carga de ajustes de ecualizador Pulse la tecla EQ/EDIT para elegir el 3. Elija un parámetro de entre las espacio EQ que quiera cargar. opciones siguientes pulsando la CONSEJO tecla PREV o NEXT: Si tiene un pedal de disparo conectado EQ L (graves : 80 Hz) como el TASCAM RC-30P (que se vende por EQLM (medio-gr. : 200 Hz) separado), podrá ir pasando por los distintos espacios de EQ con cada pulsación del pedal. EQ M (Medios : 500 Hz) EQHM (medio-ag. : 1.25 kHz) Compruebe que FOOT en el menú SETUP esté ajustado a EQ+. EQ H (Agudos : 3.15 kHz) MID Modelado medios (ajuste EQ) ON/OFF 4. Cuando tenga en pantalla el parámetro que quiera, use la tecla 116 — TASCAM CD-BT1MKII UP o DOWN para ajustar el nivel Uso del metrónomo Elección del tempo del metrónomo 1. Pulse la tecla PREV o NEXT para seleccionar MTRO. 2. Cuando abra el menú por primera vez, el sonido del metrónomo estará desactivado. El metrónomo comenzará a generar el sonido para cada tiempo musical con el tempo fijado previamente cuando pulse la tecla UP o DOWN para modificarlo. Pulse la tecla que corresponda una vez para aumentar o disminuir un beat por minuto; mantenga pulsada la tecla UP o DOWN para aumentar o disminuir el tempo rápidamente. Puede ajustar el valor entre 40 y 220 BPM (tiempos musicales por minuto) y en cuanto lo haga oirá el sonido del metrónomo. Selección de los tiempos musicales 1. Pulse la tecla PREV o NEXT para elegir BEAT. 2. Seleccione el ritmo (de 2 a 6 u OFF) pulsando la tecla UP o DOWN. Cuando elija un ritmo observará que el primer tiempo musical tiene un tono y volumen superior al de los otros tiempos musicales. Con el ajuste OFF, todos los tiempos musicales tienen el mismo tono y volumen. NOTA El metrónomo funciona solo cuando no esté siendo reproducido ningún CD. Si empieza a reproducir un CD mientras esté utilizando el metrónomo, la función de metrónomo se detendrá automáticamente. Español El CD-BT1MKII tiene un metrónomo interno. Para utilizar el metrónomo, mantenga pulsada la tecla STOP para abrir el menú del metrónomo. TASCAM CD-BT1MKII — 117 Uso del afinador El CD-BT1MKII incluye un afinador de guitarra que funciona en dos modos diferentes, cromático (CHR) y de bajo (BAS). Modo cromático (CHR): El tono de la señal entrante es detectado y visualizado de forma automática. Modo de bajo (BAS): En este modo antes de empezar con la afinación debe elegir la cuerda a afinar. Para seleccionar el modo de afinador: 1. Pulse la tecla TUNER/SETUP y entre en el menú del afinador. Español 2. Elija MODE pulsando la tecla PREV o NEXT. 3. Ajuste el modo a CHR o BAS pulsando la tecla UP o DOWN. En el modo cromático,en pantalla aparecerá TUNE:--- . Cuando toque una nota con su guitarra cuando esté conectada al CD-BT1MKII, el afinador buscará la nota más cercana y se la mostrará en pan- 118 — TASCAM CD-BT1MKII talla. Afine la cuerda rápidamente hasta que aparezca la nota correcta y después ajuste la afinación suavemente hasta que la pantalla le muestre una gran “marca” central, que es cuando la cuerda estará afinada. Repita este mismo proceso para todas las cuerdas. Bemol I En su tono caso viene determinada por el ajuste de la función CAL (calibración). CONSEJO Es una función que le resultará útil durante la afinación, ya que podrá escuchar tanto el sonido del oscilador como el de su instrumento. También le será de utilidad cuando esté afinando un instrumento acústico, no conectado al CDBT1MKII. SostenidoO Pulse la tecla TUNER/SETUP, entre en Si el afinador está en el modo de bajo, use el elemento TUNE: XX del menú del afinador para fijar la nota que quiera en la pantalla y después prosiga el proceso de afinación como antes. Puede elegir entre las siguientes notas 5B, 4E, 3A, 2D y 1G (los nombres de las cuerdas del bajo en la afinación standard). La nota elegida vendrá indicada en pantalla como TUNE: XX. Uso del oscilador El CD-BT1MKII puede dar salida a notas (ondas sinusoidales) en la escala de musical occidental standard entre C y B en un rango de tres octavas. La frecuencia de afinación standard en este el menú del afinador y elija OSC (oscilador) pulsando la tecla PREV o NEXT. Pulse la tecla UP o DOWN para ajustar la clave de afinación. Calibración Habitualmente, la nota A4 (La por encima del do central = frecuencia de afinación standard) está afinada a 440 Hz. El CD-BT1MKII le permite ajustar este A4 entre 435Hz y 445Hz. Pulse la tecla TUNER/SETUP para entrar en el menú del afinador y elija la función CAL pulsando la tecla PREV o NEXT. Pulse la tecla UP o DOWN para ajustar un valor comprendido entre 435 y 445 (Hz). Use el menú Setup para realizar cambios Modificación de preferencias para el CD-BT1MKII Pulse la tecla PREV o NEXT para elegir el elemento de menú adecuado y pulse la tecla UP o DOWN para seleccionar valores. Balance de mezcla Esta función le permite ajustar el balance de mezcla entre el sonido de bajo y el de CD. Elija MIX en el menú Setup y escoja un valor entre B (bajo) 10 – B1, 0, C (CD) 1 – C10. Modo de reproducción de CD Esta función le permite ajustar el modo de reproducción de CD. Elija PLAY en el menú Setup y ajústelo a ALL (reproducción de todas las pistas) o SGL (reproducción de una sola pista). Función de la tecla CUE Le permite ajustar la función de la tecla CUE. KEY: Elija CUE en el menú Setup y ajústela a CUE o FLS (FLASH). CUE: la reproducción es colocada en pausa en el último punto en el que se inició la reproducción. FLS: la reproducción empezará automáticamente desde el último punto en el que se inició la reproducción. Función de las teclas UP y DOWN Puede ajustar la función de las teclas UP o DOWN cuando esté en el modo de pantalla para que modifiquen el valor del elemento de menú que elija. Esto puede resultarle un atajo muy útil. Elija UPDN en el menú Setup y seleccione una de las cuatro funciones pulsando la tecla UP o DOWN. Estas funciones son las siguientes: MIX: balance de mezcla (vea Modificación de preferencias) TMP: tempo de reproducción de CD (vea Modificaciones de tempo y tono) FIN: Control de clave (vea Modificaciones de tempo y tono) afinación precisa (vea Modificaciones de tempo y tono) Función del pedal de disparo Esta función le permite utilizar un pedal de disparo como el TASCAM RC-30P (se vende por separado), para cambiar de espacio de efectos o de EQ, realizar una escucha o un avance/rebobinado rápido del CD. Elija FOOT en el menú Setup y escoja una de las siguientes funciones: elige el espacio EQ elige el espacio de efectos CUE, FLS: función CUE o de escucha REW, FF: elige el rebobinado o avance rápido del CD Una vez que elija una función para el pedal de disparo podrá utilizarlo para que realice esa función. EQ+: FX+, FX-: Polaridad del pedal de disparo Esta función le permite ajustar la polaridad adecuada para el pedal de TASCAM CD-BT1MKII — 119 Español en el ajuste del CD-BT1MKII. Para abrir el menú Setup, mantenga pulsada la tecla TUNER/SETUP. Datos y números (especificaciones) disparo que esté utilizando. Elija POL en el menú Setup y ajústelo a NOR (NORMAL) o INV (INVERT) pulsando la tecla UP o DOWN. Tipos de disco AD/DA Nivel nominal salida (LINE OUT) Nivel salida máximo (LINE OUT) sin distorsión Impedancia salida Nivel salida máximo (PHONES) Niveles de entrada nominales LINE IN BASS IN 8 cm single, 12 cm CD 16 bits –10 dBV 0 dBV (1 Vrms) 620 g / 1 libra, 6 onzas. Características de reproducción de CD Respuesta de 20 Hz a 20 kHz frecuencia ±1.0 dB 1 kΩ > 18mW (a 32$) Español –10 dBV –15 dBV (Pasivo) –10 dBV (Activo) Alimentación DC 9V (adaptador PS-PS5 AC) Pilas AA x 4 (NiMH o alcalinas) Consumo 4 W (adaptador PSPS5 AC) Dimensiones (l x p x a) 232 x 138 x 40 incluyendo las patas (mm) / 9.1 x 5.4 x 1.6 (pulgadas) 120 — TASCAM CD-BT1MKII Peso (sin pilas) Rango dinámico > 88 dB Relación señal-ruido > 88 dB THD <0.01% Procesado señal digital 32 bits Las especificaciones técnicas y el aspecto exterior del CD-BT1MKII pueden variar sin previo aviso de cara a mejoras en el aparato. Las ilustraciones de este manual pueden ser ligeramente distintas de las que aparezcan en el aparato real. Notes TASCAM CD-BT1MKII — 121 Notes 122 — TASCAM CD-BT1MKII Notes TASCAM CD-BT1MKII — 123 » CD-BT1@# English Français TEAC CORPORATION 3-7-3 Nakacho Musashino-shi Tokyo 180-8550 JAPAN +81-422-52-5082 www.tascam.com TEAC AMERICA, INC 7733 Telegraph Road Montebello CA 90640 USA +1-323-726-0303 www.tascam.com TEAC CANADA LTD. 5939 Wallace Street Mississauga Ontario L4Z 1Z8 CANADA +1-905-890-8008 www.tascam.com Deutsch TEAC MEXICO, S.A de C.V Campesinos No. 184 Colonia Granjas Esmeralda, Delegacion Iztapalapa CP 09810 Mexico DF MEXICO +52-555-581-5500 www.tascam.com Italiano TEAC UK LIMITED 5 Marlin House, Croxley Business Park Watford Hertfordshire WD18 8TE UNITED KINGDOM +44-1923-438880 www.tascam.co.uk TEAC EUROPE GmbH Bahnstrasse 12 65205 Wiesbaden-Erbenheim GERMANY +49-611-71580 Español TEAC FRANCE SA 17 Rue Alexis-de-Tocqueville CE 005 92182 Antony Cedex FRANCE +33-1-42-37-01-02 TEAC ITALIANA S.p.A. Via C Cantu 11 20092 Cinisello Balsamo Milano ITALY +39-02-66010500 TEAC AUSTRALIA PTY., LTD. 280 William St Melbourne Victoria 3000 AUSTRALIA +61-3-9672-2400 www.tascam.de www.tascam.fr www.teac.it www.teac.com.au Printed in China-
 1
1
-
 2
2
-
 3
3
-
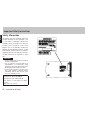 4
4
-
 5
5
-
 6
6
-
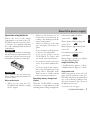 7
7
-
 8
8
-
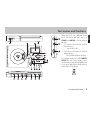 9
9
-
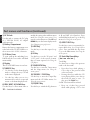 10
10
-
 11
11
-
 12
12
-
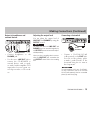 13
13
-
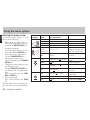 14
14
-
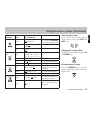 15
15
-
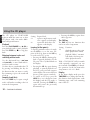 16
16
-
 17
17
-
 18
18
-
 19
19
-
 20
20
-
 21
21
-
 22
22
-
 23
23
-
 24
24
-
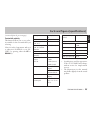 25
25
-
 26
26
-
 27
27
-
 28
28
-
 29
29
-
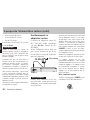 30
30
-
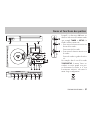 31
31
-
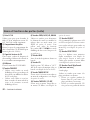 32
32
-
 33
33
-
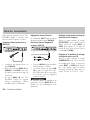 34
34
-
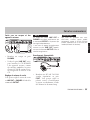 35
35
-
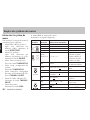 36
36
-
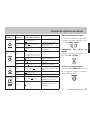 37
37
-
 38
38
-
 39
39
-
 40
40
-
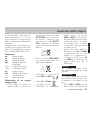 41
41
-
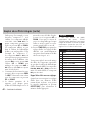 42
42
-
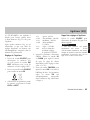 43
43
-
 44
44
-
 45
45
-
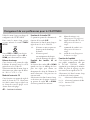 46
46
-
 47
47
-
 48
48
-
 49
49
-
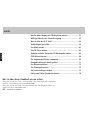 50
50
-
 51
51
-
 52
52
-
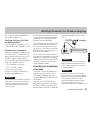 53
53
-
 54
54
-
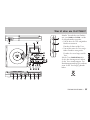 55
55
-
 56
56
-
 57
57
-
 58
58
-
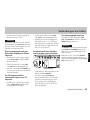 59
59
-
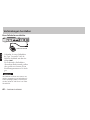 60
60
-
 61
61
-
 62
62
-
 63
63
-
 64
64
-
 65
65
-
 66
66
-
 67
67
-
 68
68
-
 69
69
-
 70
70
-
 71
71
-
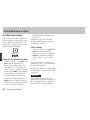 72
72
-
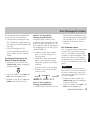 73
73
-
 74
74
-
 75
75
-
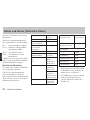 76
76
-
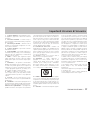 77
77
-
 78
78
-
 79
79
-
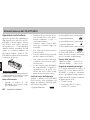 80
80
-
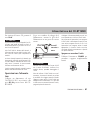 81
81
-
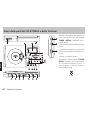 82
82
-
 83
83
-
 84
84
-
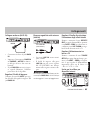 85
85
-
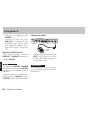 86
86
-
 87
87
-
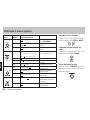 88
88
-
 89
89
-
 90
90
-
 91
91
-
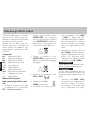 92
92
-
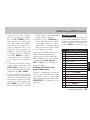 93
93
-
 94
94
-
 95
95
-
 96
96
-
 97
97
-
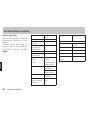 98
98
-
 99
99
-
 100
100
-
 101
101
-
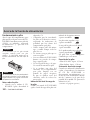 102
102
-
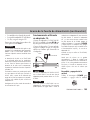 103
103
-
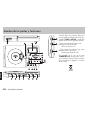 104
104
-
 105
105
-
 106
106
-
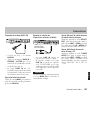 107
107
-
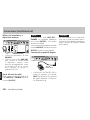 108
108
-
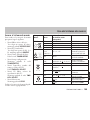 109
109
-
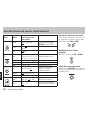 110
110
-
 111
111
-
 112
112
-
 113
113
-
 114
114
-
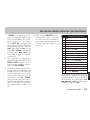 115
115
-
 116
116
-
 117
117
-
 118
118
-
 119
119
-
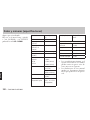 120
120
-
 121
121
-
 122
122
-
 123
123
-
 124
124


Tascam CD-BT1MKII El manual del propietario
- Categoría
- Reproductores de CD
- Tipo
- El manual del propietario
En otros idiomas
- français: Tascam CD-BT1MKII Le manuel du propriétaire
- italiano: Tascam CD-BT1MKII Manuale del proprietario
- English: Tascam CD-BT1MKII Owner's manual
- Deutsch: Tascam CD-BT1MKII Bedienungsanleitung
Documentos relacionados
-
Tascam CD-GT1 El manual del propietario
-
Tascam CD-A630 El manual del propietario
-
-
Tascam CD-X1700 Manual de usuario
-
-
Sony CD-X1500 Manual de usuario
-
-
Tascam DR-22WL Manual de usuario
-
Tascam 24 El manual del propietario