
IP30 and SR61
Multibay Battery Charger
多插座充电器
多槽式電池充電器
chargeur à multiples logements
Ladegeräte mit mehreren Steckplätzen
멀티 베이 충천기
carregador de vários compartimentos
эксплуатации многогнездового зарядного
устройства
cargador de varios compartimientos
Instructions
说明
說明
Instructions
Anleitung
안내서
Instruções
Инструкции
Instrucciones

ii
Intermec Technologies Corporation
Worldwide Headquarters
6001 36th Ave.W.
Everett, WA 98203
U.S.A.
www.intermec.com
The information contained herein is provided solely for the purpose of allowing
customers to operate and service Intermec-manufactured equipment and is not
to be released, reproduced, or used for any other purpose without written
permission of Intermec Technolgies Corporation.
Information and specifications contained in this document are subject to
change without prior noticed and do not represent a commitment on the part of
Intermec Technologies Corporation.
© 2006-2008 by Intermec Technologies Corporation. All rights reserved.
The word Intermec, the Intermec logo, Norand, ArciTech, Beverage
Routebook, CrossBar, dcBrowser, Duratherm, EasyADC, EasyCoder, EasySet,
Fingerprint, INCA (under license), i-gistics, Intellitag, Intellitag Gen2, JANUS,
LabelShop, MobileLAN, Picolink, Ready-to-Work, RoutePower, Sabre,
ScanPlus, ShopScan, Smart Mobile Computing, SmartSystems, TE 2000,
Trakker Antares, and Vista Powered are either trademarks or registered
trademarks of Intermec Technologies Corporation.
There are U.S. and foreign patents as well as U.S. and foreign patents pending.
Microsoft, Windows, and the Windows logo are registered trademarks of
Microsoft Corporation in the United States and/or other countries.
Bluetooth is a trademark of Bluetooth SIG, Inc., U.S.A.

iii
Multibay Battery Charger Instructions . . . . . . . . . . . . . . . . .5
多插座充电器说明 . . . . . . . . . . . . . . . 8
多槽式電池充電器說明. . . . . . . . . . . . . . . . . . . . . . . . . .11
Instructions de chargeur à multiples logements . . . . . . . . . .14
Anleitung für Ladegeräte mit mehreren Steckplätzen. . . . . .17
멀티 베이 충천기 안내서 . . . . . . . . . . . . . . . . . . . . . . . .21
Instruções para instalação e uso do carregador de vários com-
partimentos . . . . . . . . . . . . . . . . . . . . . . . . . . . . . . . . . .24
Инструкции по эксплуатации многогнездового
зарядного устройства . . . . . . . . . . . . . . . . . . . . . . .28
Instrucciones del cargador de varios compartimientos . . . . .32

iv

5
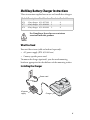
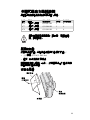
Multibay Battery Charger Instructions
These instructions explain how to use and install these chargers:
What You Need
You need these items (sold and ordered separately):
• AC power supply (P/N 851-082-xxx)
• Country-specific power cord
To mount the charger (optional), you also need mounting
hardware appropriate for the thickness of the mounting surface.
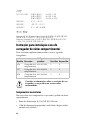
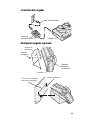
Installing the Charger
Model Description Part Number Brackets Bracket Screws
AC6 2-bay charger 852-907-001 1 4
AC7 4-bay charger 852-908-001 1 4
AC8 8-bay charger 852-902-001 2 8
See Compliance Insert for use restrictions
associated with this product.
AC power
supply
Power cord
Charger

6
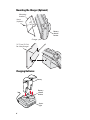
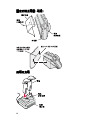
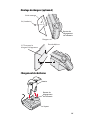
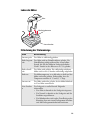
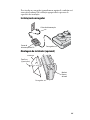
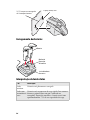
Mounting the Charger (Optional)
Charging Batteries
Charger
Mounting
bracket
Screw
(4 places)
Battery
release
button
31.75 cm (12.5 in)
for 8-bay charger
Battery
release
button
Status
light
Battery

7
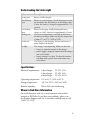
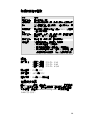
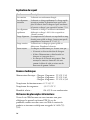
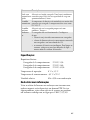
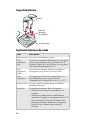
Understanding the Status Light
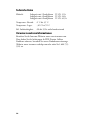
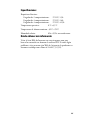
Specifications
Electrical requirements: 2-bay charger x 12V, 1.5A
4-bay charger x 12V, 2.4A
8-bay charger x 12V, 4.15A
Operating temperature: 0°C to 35°C (32°F to 95°F)
Storage temperature: -30°C to 70°C (-22°F to 158°F)
Relative humidity: 0% to 95% non-condensing
Where to Find More Information
Go to the Intermec web site at www.intermec.com to find
manuals as PDF files. If you have any problems, please visit
our Product Support web site at intermec.custhelp.com or call
1-800-755-5505.
Color Description
Steady green Battery is fully charged.
Slow flashing
green
Battery is quick charging. Quick charging occurs for
the first hour that the battery is in the charger. After
1 hour, the battery is charged to approximately 75%
capacity.
Fast flashing
green
Battery is charging. A fully discharged battery
charges to 100% capacity in approximately 3 hours.
Flashing red The battery temperature is too cold or too hot for
the battery to charge. Make sure that the temperature
is from 0°C to
35°C (32°F to 95°F).
Steady red The battery is not charging, because the battery is
faulty. Replace the battery.
No light The charger is not operating. Make sure that the:
• battery is correctly inserted in the charger.
• power supply is properly connected to the charger
and an AC outlet.
• battery contacts are clean. To clean the contacts,
rub them with a pencil eraser and remove any
eraser debris.

8
多插座充电器说明
些说明介绍如何使用和安装 SR61 多插座充电器:
所需元件
需要如下元件 (些元件均单独出售,需另行订购):
• 交流电源 (P/N 851-082-xxx)
• 特定国家 / 地区专用的电源线
若要固定充电器 (可选),还需要与固定面的厚度相匹配的固定五金
器件。
安装充电器
型号 说明 部件号 支架 支架固定螺丝
AC6 2 插座充电器 852-907-001 1 4
AC7 4 插座充电器 852-908-001 1 4
AC8 8 插座充电器 852-902-001 2 8
有关本产品相关的使用限制,请参阅 “符合性插页”。

9
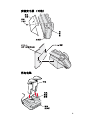
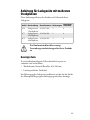
安装充电器 (可选)
充电电池

10
了解状态指示灯
规格
电气要求: 2 插座充电器 x 12V,1.5A
4 插座充电器 x 12V,2.4A
8 插座充电器 x 12V,4.15A
工作温度: 0 鸆 到 35 鸆
存储温度: -30 鸆 到 70 鸆
相对湿度: 0% 到 95% 无冷凝
有关详细信息
请登录 Intermec 网 www.intermec.com 查阅 PDF 格式的手册。如有
任何问题,请访问我们的产品支持网 intermec.custhelp.com 或致电
1-800-755-5505。
颜色 说明
持续的绿色 电池完全充满电。
缓慢闪烁的绿色 电池在快速充电。快速充电发生在电池充电
过程的最初 1 个小时。1 个小时之后,电池
的充电量将达到约 75%。
快速闪烁的绿色 电池在充电。电池完全充满 100% 的电量大
约需要 3 小时。
闪烁的红色 电池温度过高或过低,无法充电。请确保电
池温度处于 0 鸆 到
35 鸆之间。
持续的红色 电池故,无法充电。请更换电池。
指示灯不亮 充电器没有工作。请确保:
• 电池确安装到充电器中。
• 充电器确连接到交流电源插座。
• 电池触点清洁。要清洁电池触点,请使用
铅笔橡皮擦拭,之后将橡皮屑清理干净。

11
多槽式電池充電器說明
這些說明解釋如何使用和安裝這些充電器:
需要的物品
您需要這些物品 ( 包括已售和需另外訂購的物品 ):
• AC 電源 (P/N 851-082-xxx)
• 國家 / 地區特定的電源線
若要固定安裝充電器 ( 可選 ),您還需要適合於固定安裝
表面厚度的固定硬體。
安裝充電器
型號 描述 零件編號 托架 托架螺絲
AC6 2 槽式充電器 852-907-001 1 4
AC7 4 槽式充電器 852-908-001 1 4
AC8 8 槽式充電器 852-902-001 2 8
關於此產品的使用限制,請參見 「相容性插
頁」中的說明。

12
固定安裝充電器 ( 可選 )
為電池充電

13
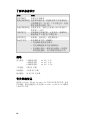
瞭解狀態指示燈號
規格
電力要求: 2 槽式充電器 x 12V,1.5A
4 槽式充電器 x 12V,2.4A
8 槽式充電器 x 12V,4.15A
操作溫度: 0
°C 到 35°C
存放溫度: -30
°C 到 70°C
相對濕度: 0% 到 95% 非凝結
如需更多資訊
請至 Intermec 網站,網址為 www.intermec.com,該處提供
有 PDF 格式的手冊。如有任何問題,請造訪我們的產品
支援網站,網址為 intermec.custhelp.com,或撥打電話
1-800-755-5505。
顏色 描述
穩定的綠色 電池已完全充電。
緩慢閃爍的
綠色
電池在進行快速充電。快速充電發生在電池放
入充電器的第一個小時內。一個小時以後,電
池大約可充滿至 75%。
快速閃爍的
綠色
電池正在充電。電池完全充滿至 100% 大約需要
3 個小時的時間。
閃爍的紅色 電池溫度太低或太高,無法充電。請確認溫度
是在 0°C 到
35°C 的範圍內。
穩定的紅色 電池故障,無法充電。請更換電池。
沒有燈號 充電器並未運作。請確認下列事項:
• 電池已正確插入充電器中。
• 電源正確連接到充電器和 AC 電源插座。
• 電池接觸點是乾淨的。若要清潔接觸點,請
使用橡皮擦進行擦拭,然後清除橡皮擦殘屑。

14
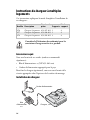
Instructions de chargeur à multiples
logements
Ces instructions expliquent le mode d’emploi et l’installation de
ces chargeurs :
Accessoires requis
Vous avez besoin de ces articles (vendus et commandés
séparément) :
• Bloc d’alimentation c.a. (N/P 851-082-xxx)
• Cordon d’alimentation approprié pour le pays
Pour fixer le chargeur (optionnel), vous avez aussi besoin de la
visserie appropriée selon l’épaisseur de la surface de montage.
Installation du chargeur
Modèle Description
Numéro de
pièce
Supports
Vis de
support
AC6
Chargeur 2 logements 852-907-001 1 4
AC7 Chargeur 4 logements 852-908-001 1 4
AC8
Chargeur 8 logements 852-902-001 2 8
Consultez la Déclaration de conformité pour les
restrictions d'usage associées à ce produit.
Bloc
d’alimentation
c.a.
Cordon d’alimentation
Chargeur

15
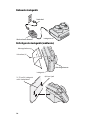
Montage du chargeur (optionnel)
Chargement des batteries
Chargeur
Vis de montage
Vis (4 endroits)
Bouton de
dégagement
de la batterie
31,75 cm pour le
chargeur à 8 logements
Écart de 0,64 cm
Bouton de
dégagement
de la batterie
Voyant
Batterie

16
Explication du voyant
Données techniques
Alimentation électrique : Chargeur 2 logements x 12V, 1.5A
Chargeur 4 logements x 12V, 2,4A
Chargeur 8 logements x 12V, 4,15A
Température de fonctionnement :0 °C à 35 °C
Température de rangement : -30 °C à 70 °C
Humidité relative : 0% à 95 % sans condensation
Où trouver de plus amples informations
Visitez le site Web Intermec au www.intermec.com pour
télécharger les manuels en format PDF. En cas de
problèmes,veuillez consulter notre site Web de soutien des
produits au intermec.custhelp.com ou appeler le 1-800-755-
5505.
Couleur Description
Vert continu La batterie est entièrement chargée.
Vert clignotant
lentement
La batterie se charge rapidement. La charge rapide
intervient pendant la première heure après avoir
placé la batterie dans le chargeur. Après une heure,
la batterie se charge à une capacité d’environ 75 %.
Vert clignotant
rapidement
La batterie se charge. Une batterie entièrement
déchargée se charge à 100 % de sa capacité en
3 heures environ.
Rouge clignotant La température de la batterie est trop froide ou trop
chaude pour qu’elle se charge. Assurez-vous que la
température se situe entre 0 °C à 35 °C.
Rouge continu La batterie ne se charge pas parce qu’elle est
défectueuse. Remplacez la batterie.
Aucun voyant Le chargeur ne fonctionne pas. Assurez-vous que :
• la batterie est bien insérée dans le chargeur.
• le bloc d’alimentation est bien branché au
chargeur et à une prise de c.a.
• les contacts de la batterie sont propres. Pour
nettoyer les contacts, frottez-les avec une
gomme à effacer de stylo et retirez tous les
morceaux de gomme à effacer.

17
Anleitung für Ladegeräte mit mehreren
Steckplätzen
Diese Anleitung erläutert den Einbau und Gebrauch dieser
Ladegeräte.
Benötigte Teile
Es sind außerdem folgende Teile erforderlich (separat zu
verkaufen und zu bestellen):
•Wechselstrom-Netzteil (Bestellnr. 851-082-xxx)
• Landesspezifisches Netzkabel
Zur Befestigung des Ladegeräts (wahlweise) werden für die Stärke
der Montagefläche geeignete Befestigungsschrauben benötigt.
Modell Beschreibung Bestellnummer Halterungen
Halterungs-
schrauben
AC6 Ladegerät mit
2 Steckplätzen
852-907-001 1 4
AC7 Ladegerät mit
4 Steckplätzen
852-908-001 1 4
AC8 Ladegerät mit
8 Steckplätzen
852-902-001 2 8
Das Konformitätsblatt führt etwaige
Verwendungseinschränkungen für dieses Produkt
an.
Vorsicht

18
Einbau des Ladegeräts
Befestigen des Ladegeräts (wahlweise)
Wechselstrom-Netzteil
Netzkabel
Ladegerät
Ladegerät
Montagehalterung
Schrauben (4)
Akkufreigabetaste
31,75 cm für Ladegerät
mit 8 Steckplätzen
0,64 cm Spalt

19
Laden der Akkus
Erläuterung der Statusanzeige
Farbe Beschreibung
Konstant grün Der Akku ist vollständig geladen.
Blinkt langsam
grün
Der Akku wird im Schnellverfahren geladen. Die
Schnellladung erfolgt während der ersten halben
Stunde, die sich der Akku im Ladegerät befindet.
Nach 1 Stunde ist der Akku etwa zu 75% geladen.
Blinkt schnell
grün
Der Akku wird geladen. Ein vollständig entladener
Akku wird in etwa 3 Stunden vollständig aufgeladen.
Blinkt rot Die Akkutemperatur ist zu kalt oder zu heiß und der
Akku wird nicht geladen. Sicherstellen, dass die
Temperatur zwischen 0° C und 35° C liegt.
Konstant rot Der Akku wird nicht geladen, da der Akku fehlerhaft
ist. Den Akku auswechseln.
Keine Leuchte
an
Das Ladegerät ist außer Betrieb. Folgendes
sicherstellen:
• Der Akku ist korrekt in das Ladegerät eingesetzt.
• Das Netzteil ist korrekt an das Ladegerät und die
Steckdose angeschlossen.
• Die Akkukontakte sind sauber. Zum Reinigen der
Kontakte diese mit einem Radiergummi abreiben
und alle Radiergummirückstände entfernen.
Akkufreigabetaste
Statusleuchte
Akku

20
Technische Daten
Elektrik: Ladegerät mit 2 Steckplätzen x 12V, 1.5A
Ladegerät mit 4 Steckplätzen x 12V, 2,4A
Ladegerät mit 8 Steckplätzen x 12V, 4,15A
Temperatur - Betrieb: 0° C bis 35° C
Temperatur - Lager: -30° C bis 70° C
Rel. Luftfeuchtigkeit: 0% bis 95%, nicht kondensierend
Verweise zu weiteren Informationen
Besuchen Sie die Intermec-Webseite unter www.intermec.com.
Dort finden Sie die Anleitungen als PDF-Dateien. Sollten
Probleme auftreten, besuchen Sie unsere Produktunterstützungs-
Webseite unter intermec.custhelp.com oder rufen Sie 1-800-755-
5505 an.

21
멀티 베이 충천기 안내서
본 안내서는 SR61 멀티 베이 충천기의 사용 및 설치 방법에 대해 설명
합니다 .
준비 사항
다음과 같은 항목이 필요합니다 ( 별도 판매 및 주문 ).
• AC 전원 공급기 (P/N 851-082-xxx)
• 해당 국가의 전원 코드
충전기를 장착하려면 ( 선택 ), 장착 표면의 두께에 적합한 장착 하드
웨어가 필요합니다 .
충전기 설치
모델 설명 부품 번호 브래킷 브래킷 나사
AC6 2 베이 충전기 852-907-001 1 4
AC7 4 베이 충전기 852-908-001 1 4
AC8 8 베이 충전기 852-902-001 2 8
본 제품과 관련된 사용 제한에 대한 자세한 내용은 준수
규정을 참조하십시오 .
㧩㡅

22
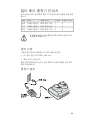
충전기 장착 ( 선택 )
배터리 충전

23
상태 라이트 이해
°
°
•
•
•

24
사양
전기 요구 사항 : 2 베이 충전기 x 12V, 1.5A
4 베이 충전기 x 12V, 2.4A
8 베이 충전기 x 12V, 4.15A
작동 온도 : 0 ? C ~ 35 ? C
보관 온도 : -30 ? C ~ 70 ? C
상대 습도 : 0% ~ 95% 비응축
추가 정보
Intermec 웹 사이트 www.intermec.com 을 방문하시면 설명서를 PDF
파일로 보실 수 있습니다 . 문의 사항이 있으시면
intermec.custhelp.com 사이트의 제품 지원 정보를 확인하시거나
1-800-755-5505 로 전화 주십시오 .
Instruções para instalação e uso do
carregador de vários compartimentos
Estas instruções explicam como instalar e usar os seguintes
carregadores:
Componentes necessários
São necessários estes componentes, cuja venda e pedido são feitos
separadamente:
• Fonte de alimentação de CA (N/P 851-082-xxx)
• Cabo de alimentação apropriado à rede elétrica do país onde a
unidade será utilizada
Modelo Descrição
Código do
produto
Presilhas
Parafusos
da presilha
AC6 Carregador de 2
compartimentos
852-907-001 1 4
AC7 Carregador de 4
compartimentos
852-908-001 1 4
AC8 Carregador de 8
compartimentos
852-902-001 2 8
Consulte as informações sobre as restrições de uso
associadas a este produto no encarte sobre
conformidade.
Cuidado

25
Para instalar o carregador (procedimento opcional), também será
necessário hardware de instalação apropriado à espessura da
superfície de instalação.
Instalação do carregador
Montagem do instalador (opcional)
Fonte de
alimentação de CA
Cabo de alimentação
Carregador
Carregador
montage
Parafuso
(4 posições)
Botão d
liberaç
da bate

26
Carregamento das baterias
Interpretação da luz de status
Cor Descrição
Verde
contínuo
A bateria está plenamente carregada.
Verde com
intermitência
lenta
A bateria está no processo de carga rápida. Isto acontece
durante a primeira hora em que é colocada no
carregador. Depois de uma hora, a bateria estará com
aproximadamente 75% de sua capacidade de carga.
31,75 cm para o carregador
de 8 compartimentos
Espaço de 6,4 mm
Botão de
liberação
da bateria
Luz indicadora
de status
Bateria

27
Especificações
Requisitos elétricos:
Carregador de 2 compartimentos x 12V, 1.5A
Carregador de 4 compartimentos x 12V, 2,4A
Carregador de 8 compartimentos x 12V, 4,15A
Temperatura de operação: 0° C a 35° C
Temperatura de armazenamento: -30° C a 70° C
Umidade relativa: 0% a 95% sem condensação
Onde obter mais informações
Visite o website da Intermec no endereço www.intermec.com,
onde os manuais estão disponíveis em formato PDF. Se tiver
algum problema, visite nosso web site de suporte aos produtos
em intermec.custhelp.com, ou ligue para 1-800-755-5505.
Verde com
intermitência
rápida
A bateria está sendo carregada. Uma bateria totalmente
exaurida atinge 100% de sua capacidade de carga em
aproximadamente 3 horas.
Vermelho
intermitente
A temperatura da bateria está muito baixa ou muito alta
para que seja carregada. A temperatura deve estar entre
0°C e 35°C.
Vermelho
contínuo
A bateria não está carregando porque está com
problema. Troque-a.
Nenhuma
luz
O carregador não está funcionando. Certifique-se
de que:
• a bateria esteja inserida corretamente no carregador.
• a fonte de alimentação esteja corretamente conectada
no carregador e em uma tomada de CA.
• os contatos da bateria estejam limpos. Para limpar os
contatos, esfregue-os com uma borracha de lápis e
remova todos os resíduos de borracha.
Cor Descrição

28
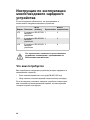
Инструкции по эксплуатации
многогнездового зарядного
устройства
В этих инструкциях объясняется, как устанавливать и
использовать следующие зарядные устройства:
Что вам потребуется
Вам потребуются следующие устройства (которые продаются и
заказываются отдельно):
• Блок питания переменного тока (
изд. № 851-082-xxx)
• Шнур питания, соответствующий национальному стандарту
Если вы захотите установить зарядное устройство стационарно,
вам понадобятся также крепежные изделия, соответствующие
толщине опорной конструкции.
Модель Описание
№ по
каталогу Кронштейны
Винты
кронштейнов
AC6 2-гнездовое
зарядное
устройство
852-907-001 1 4
AC7 4-гнездовое
зарядное
устройство
852-908-001 1 4
AC8 8-гнездовое
зарядное
устройство
852-902-001 2 8
См. ограничения, связанные с использованием
устройства, на вкладыше с требованиями по
обеспечению соответствия.
Осторожно

29
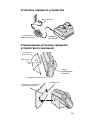
Установка зарядного устройства
Стационарная установка зарядного
устройства (по желанию)
Блок питания
переменного тока
Шнур питания
Зарядное
устройство
Зарядное устройство
Установочный
кронштейн
Винт (4 шт.)
Кнопка
освобождения
батарейки
31,75 см для 8-гнездового
зарядного устройства
Зазор 0,64 см

30
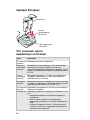
Зарядка батареек
Что означают цвета
индикатора состояния
Цвет Описание
Постоянный
зеленый
Батарейка полностью заряжена.
Медленно
мигающий
зеленый
Батарейка быстро заряжается. Быстрая зарядка
происходит в течение первого часа после
установки батарейки в зарядное устройство. После
первого часа батарейка заряжена приблизительно
на 75%.
Быстро
мигающий
зеленый
Батарейка заряжается. Полностью разряженная
батарейка заряжается до 100% своей емкости
приблизительно за 3 часа.
Мигающий
красный
Батарейка слишком холодная или слишком горячая
и потому не заряжается. Проследите за тем, чтобы
температура составляла от 0°C до 35°C.
Постоянный
красный
Батарейка не заряжается, так как она неисправна.
Замените батарейку.
Не светится Зарядное устройство не работает. Убедитесь в том,
что:
• батарейка правильно вставлена в зарядное
устройство.
• блок питания правильно подсоединен к
зарядному устройству и к розетке переменного
тока.
• контакты батарейки чистые. Чтобы почистить
контакты, потрите их карандашной резинкой и
удалите остатки резинки.
Кнопка
освобождения
батарейки
Цвет индикатора
состояния
Батарейка

31
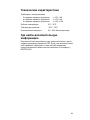
Технические характеристики
Требования к электропитанию:
2-гнездовое зарядное устройство x 12V, 1.5A
4-гнездовое зарядное устройство x 12V, 2,4A
8-гнездовое зарядное устройство x 12V, 4,15A
Рабочая температура: 0°C - 35°C
Температура хранения: -30°C - 70°C
Относительная влажность: 0% - 95% без конденсации
Где найти дополнительную
информацию
Посетите веб-сайт www.intermec.com компании Intermec, где вы
найдете руководства в формате PDF. Если у вас возникнут какие-
либо проблемы, обратитесь на наш веб-сайт поддержки
продуктов intermec.custhelp.com или позвоните по телефону 1-
800-755-5505.

Instrucciones del cargador de varios
compartimientos
Estas instrucciones explican cómo usar e instalar estos cargadores:
Lo que necesita
Necesita estos artículos (los cuales se venden y piden por
separado):
• Fuente de alimentación de CA (P/N 851-082-xxx)
• Cable eléctrico específico del país
Para montar el cargador (opcional), también debe montar herraje
adecuado para el espesor de la superficie de montaje.
Modelo Descripción
Número de
pieza
Soportes
Tornillos de
soportes
AC6 Cargador de 2
compartimientos
852-907-001 1 4
AC7 Cargador de 4
compartimientos
852-908-001 1 4
AC8 Cargador de 8
compartimientos
852-902-001 2 8
Consulte el Inserto de cumplimiento para ver las
restricciones de uso asociadas con este producto.

33
Instalación del cargador
Montaje del cargador (opcional)
Fuente de
alimentación de CA
Cable de alimentación
Cargador
Cargador
Soporte de
montaje
Tornillo
(4 lugares)
Botón de
liberación
de la batería
31.75 cm para cargador
de 8 compartimientos
Espacio de 0.64 cm

34
Carga de las baterías
Explicación de las luces de estado
Color Descripción
Verde constante La batería está totalmente cargada.
Verde
parpadeante
lento
La batería está cargando rápidamente. La carga rápida
ocurre en la primera hora que está la batería en el
cargador. Después de 1 hora, la batería se carga hasta
una capacidad aproximada del 75%.
Verde
parpadeante
rápido
La batería está cargando. Una batería totalmente
descargada se carga al 100% en unas 3 horas.
Rojo
parpadeante
La temperatura de la batería es demasiado baja o
demasiado alta para que cargue la batería.
Compruebe que la temperatura sea de 0°C a 35°C.
Rojo constante La batería no está cargando porque está fallada.
Reemplace la batería.
No hay luz El cargador no funciona. Revise lo siguiente:
• ola batería esté insertada correctamente en el
cargador.
• ola fuente de alimentación está debidamente
conectada al cargador y a un tomacorriente de CA.
• olos contactos de la batería están limpios. Para
limpiar los contactos, frótelos con una goma de
borrar de lápiz y elimine todo residuo del
borrador.
Botón de
liberación
de la batería
Luz de estado
Batería

35
Especificaciones
Requisitos eléctricos:
Cargador de 2 compartimientos: x 12V, 1.5A
Cargador de 4 compartimientos: x 12V, 2.4A
Cargador de 4 compartimientos: x 12V, 4.15A
Temperatura operativa: 0°C a 35°C
Temperatura de almacenamiento: -30°C a 70°C
Humedad relativa: 0% a 95%, no condensante
Dónde obtener más información
Visite el sitio Web de Intermec en www.intermec.com para
buscar los manuales en formato de archivo PDF. Si tiene algún
problema, visite nuestro sitio Web de Asistencia de productos en
intermec.custhelp.com o llame al 1-800-755-5505

Worldwide Headquarters
6001 36th Avenue West
Everett, Washington 98203
U.S.A.
tel 425.348.2600
fax 425.355.9551
www.intermec.com
IP30 and SR61 Multibay Battery Charger Instructions
*943-020-002*
P/N 943-020-002
Transcripción de documentos
Instructions 说明 說明 Instructions Anleitung 안내서 Instruções Инструкции Instrucciones IP30 and SR61 Multibay Battery Charger 多插座充电器 多槽式電池充電器 chargeur à multiples logements Ladegeräte mit mehreren Steckplätzen 멀티 베이 충천기 carregador de vários compartimentos эксплуатации многогнездового зарядного устройства cargador de varios compartimientos Intermec Technologies Corporation Worldwide Headquarters 6001 36th Ave.W. Everett, WA 98203 U.S.A. www.intermec.com The information contained herein is provided solely for the purpose of allowing customers to operate and service Intermec-manufactured equipment and is not to be released, reproduced, or used for any other purpose without written permission of Intermec Technolgies Corporation. Information and specifications contained in this document are subject to change without prior noticed and do not represent a commitment on the part of Intermec Technologies Corporation. © 2006-2008 by Intermec Technologies Corporation. All rights reserved. The word Intermec, the Intermec logo, Norand, ArciTech, Beverage Routebook, CrossBar, dcBrowser, Duratherm, EasyADC, EasyCoder, EasySet, Fingerprint, INCA (under license), i-gistics, Intellitag, Intellitag Gen2, JANUS, LabelShop, MobileLAN, Picolink, Ready-to-Work, RoutePower, Sabre, ScanPlus, ShopScan, Smart Mobile Computing, SmartSystems, TE 2000, Trakker Antares, and Vista Powered are either trademarks or registered trademarks of Intermec Technologies Corporation. There are U.S. and foreign patents as well as U.S. and foreign patents pending. Microsoft, Windows, and the Windows logo are registered trademarks of Microsoft Corporation in the United States and/or other countries. Bluetooth is a trademark of Bluetooth SIG, Inc., U.S.A. ii Multibay Battery Charger Instructions . . . . . . . . . . . . . . . . .5 多插座充电器说明 . . . . . . . . . . . . . . . 8 多槽式電池充電器說明 . . . . . . . . . . . . . . . . . . . . . . . . . .11 Instructions de chargeur à multiples logements . . . . . . . . . .14 Anleitung für Ladegeräte mit mehreren Steckplätzen. . . . . .17 멀티 베이 충천기 안내서 . . . . . . . . . . . . . . . . . . . . . . . .21 Instruções para instalação e uso do carregador de vários compartimentos . . . . . . . . . . . . . . . . . . . . . . . . . . . . . . . . . .24 Инструкции по эксплуатации многогнездового зарядного устройства . . . . . . . . . . . . . . . . . . . . . . .28 Instrucciones del cargador de varios compartimientos . . . . .32 iii iv Multibay Battery Charger Instructions These instructions explain how to use and install these chargers: Model Description Part Number Brackets Bracket Screws AC6 AC7 AC8 2-bay charger 852-907-001 4-bay charger 852-908-001 8-bay charger 852-902-001 1 1 2 4 4 8 See Compliance Insert for use restrictions associated with this product. What You Need You need these items (sold and ordered separately): • AC power supply (P/N 851-082-xxx) • Country-specific power cord To mount the charger (optional), you also need mounting hardware appropriate for the thickness of the mounting surface. Installing the Charger Power cord AC power supply Charger 5 Mounting the Charger (Optional) Mounting bracket Screw (4 places) Battery release button Charger 31.75 cm (12.5 in) for 8-bay charger Charging Batteries Battery Battery release button Status light 6 Understanding the Status Light Color Description Steady green Slow flashing green Battery is fully charged. Battery is quick charging. Quick charging occurs for the first hour that the battery is in the charger. After 1 hour, the battery is charged to approximately 75% capacity. Battery is charging. A fully discharged battery charges to 100% capacity in approximately 3 hours. The battery temperature is too cold or too hot for the battery to charge. Make sure that the temperature is from 0°C to 35°C (32°F to 95°F). The battery is not charging, because the battery is faulty. Replace the battery. The charger is not operating. Make sure that the: • battery is correctly inserted in the charger. • power supply is properly connected to the charger and an AC outlet. • battery contacts are clean. To clean the contacts, rub them with a pencil eraser and remove any eraser debris. Fast flashing green Flashing red Steady red No light Specifications Electrical requirements: 2-bay charger 4-bay charger 8-bay charger x 12V, 1.5A x 12V, 2.4A x 12V, 4.15A Operating temperature: 0°C to 35°C (32°F to 95°F) Storage temperature: -30°C to 70°C (-22°F to 158°F) Relative humidity: 0% to 95% non-condensing Where to Find More Information Go to the Intermec web site at www.intermec.com to find manuals as PDF files. If you have any problems, please visit our Product Support web site at intermec.custhelp.com or call 1-800-755-5505. 7 多插座充电器说明 些说明介绍如何使用和安装 SR61 多插座充电器: 型号 说明 部件号 支架 支架固定螺丝 AC6 AC7 AC8 2 插座充电器 4 插座充电器 8 插座充电器 852-907-001 852-908-001 852-902-001 1 1 2 4 4 8 有关本产品相关的使用限制,请参阅 “符合性插页”。 所需元件 需要如下元件 (些元件均单独出售,需另行订购): • 交流电源 (P/N 851-082-xxx) • 特定国家 / 地区专用的电源线 若要固定充电器 (可选),还需要与固定面的厚度相匹配的固定五金 器件。 安装充电器 8 安装充电器 (可选) 充电电池 9 了解状态指示灯 颜色 说明 持续的绿色 电池完全充满电。 缓慢闪烁的绿色 电池在快速充电。快速充电发生在电池充电 过程的最初 1 个小时。1 个小时之后,电池 的充电量将达到约 75%。 快速闪烁的绿色 电池在充电。电池完全充满 100% 的电量大 约需要 3 小时。 闪烁的红色 电池温度过高或过低,无法充电。请确保电 池温度处于 0 鸆 到 35 鸆之间。 持续的红色 电池故,无法充电。请更换电池。 指示灯不亮 充电器没有工作。请确保: • 电池确安装到充电器中。 • 充电器确连接到交流电源插座。 • 电池触点清洁。要清洁电池触点,请使用 铅笔橡皮擦拭,之后将橡皮屑清理干净。 规格 电气要求: 2 插座充电器 4 插座充电器 8 插座充电器 工作温度: 0 鸆 到 35 鸆 存储温度: -30 鸆 到 70 鸆 相对湿度: 0% 到 95% 无冷凝 x 12V,1.5A x 12V,2.4A x 12V,4.15A 有关详细信息 请登录 Intermec 网 www.intermec.com 查阅 PDF 格式的手册。如有 任何问题,请访问我们的产品支持网 intermec.custhelp.com 或致电 1-800-755-5505。 10 多槽式電池充電器說明 這些說明解釋如何使用和安裝這些充電器: 型號 AC6 AC7 AC8 描述 2 槽式充電器 4 槽式充電器 8 槽式充電器 零件編號 852-907-001 852-908-001 852-902-001 托架 1 1 2 托架螺絲 4 4 8 關於此產品的使用限制,請參見 「相容性插 頁」中的說明。 需要的物品 您需要這些物品 ( 包括已售和需另外訂購的物品 ): • AC 電源 (P/N 851-082-xxx) • 國家 / 地區特定的電源線 若要固定安裝充電器 ( 可選 ),您還需要適合於固定安裝 表面厚度的固定硬體。 安裝充電器 11 固定安裝充電器 ( 可選 ) 為電池充電 12 瞭解狀態指示燈號 顏色 描述 穩定的綠色 緩慢閃爍的 綠色 電池已完全充電。 電池在進行快速充電。快速充電發生在電池放 入充電器的第一個小時內。一個小時以後,電 池大約可充滿至 75%。 電池正在充電。電池完全充滿至 100% 大約需要 3 個小時的時間。 快速閃爍的 綠色 閃爍的紅色 穩定的紅色 沒有燈號 電池溫度太低或太高,無法充電。請確認溫度 是在 0°C 到 35°C 的範圍內。 電池故障,無法充電。請更換電池。 充電器並未運作。請確認下列事項: • 電池已正確插入充電器中。 • 電源正確連接到充電器和 AC 電源插座。 • 電池接觸點是乾淨的。若要清潔接觸點,請 使用橡皮擦進行擦拭,然後清除橡皮擦殘屑。 規格 電力要求: 2 槽式充電器 x 12V,1.5A 4 槽式充電器 x 12V,2.4A 8 槽式充電器 x 12V,4.15A 操作溫度: 0°C 到 35°C 存放溫度: -30°C 到 70°C 相對濕度: 0% 到 95% 非凝結 如需更多資訊 請至 Intermec 網站,網址為 www.intermec.com,該處提供 有 PDF 格式的手冊。如有任何問題,請造訪我們的產品 支援網站,網址為 intermec.custhelp.com,或撥打電話 1-800-755-5505。 13 Instructions de chargeur à multiples logements Ces instructions expliquent le mode d’emploi et l’installation de ces chargeurs : Numéro de Vis de pièce Supports support Modèle Description AC6 AC7 AC8 Chargeur 2 logements 852-907-001 1 Chargeur 4 logements 852-908-001 1 Chargeur 8 logements 852-902-001 2 4 4 8 Consultez la Déclaration de conformité pour les restrictions d'usage associées à ce produit. Accessoires requis Vous avez besoin de ces articles (vendus et commandés séparément) : • Bloc d’alimentation c.a. (N/P 851-082-xxx) • Cordon d’alimentation approprié pour le pays Pour fixer le chargeur (optionnel), vous avez aussi besoin de la visserie appropriée selon l’épaisseur de la surface de montage. Installation du chargeur Cordon d’alimentation Bloc d’alimentation c.a. 14 Chargeur Montage du chargeur (optionnel) Vis de montage Vis (4 endroits) Bouton de dégagement de la batterie Chargeur Écart de 0,64 cm 31,75 cm pour le chargeur à 8 logements Chargement des batteries Batterie Bouton de dégagement de la batterie Voyant 15 Explication du voyant Couleur Description Vert continu Vert clignotant lentement La batterie est entièrement chargée. La batterie se charge rapidement. La charge rapide intervient pendant la première heure après avoir placé la batterie dans le chargeur. Après une heure, la batterie se charge à une capacité d’environ 75 %. Vert clignotant La batterie se charge. Une batterie entièrement rapidement déchargée se charge à 100 % de sa capacité en 3 heures environ. Rouge clignotant La température de la batterie est trop froide ou trop chaude pour qu’elle se charge. Assurez-vous que la température se situe entre 0 °C à 35 °C. Rouge continu La batterie ne se charge pas parce qu’elle est défectueuse. Remplacez la batterie. Aucun voyant Le chargeur ne fonctionne pas. Assurez-vous que : • la batterie est bien insérée dans le chargeur. • le bloc d’alimentation est bien branché au chargeur et à une prise de c.a. • les contacts de la batterie sont propres. Pour nettoyer les contacts, frottez-les avec une gomme à effacer de stylo et retirez tous les morceaux de gomme à effacer. Données techniques Alimentation électrique : Chargeur 2 logements x 12V, 1.5A Chargeur 4 logements x 12V, 2,4A Chargeur 8 logements x 12V, 4,15A Température de fonctionnement :0 °C à 35 °C Température de rangement : -30 °C à 70 °C Humidité relative : 0% à 95 % sans condensation Où trouver de plus amples informations Visitez le site Web Intermec au www.intermec.com pour télécharger les manuels en format PDF. En cas de problèmes,veuillez consulter notre site Web de soutien des produits au intermec.custhelp.com ou appeler le 1-800-7555505. 16 Anleitung für Ladegeräte mit mehreren Steckplätzen Diese Anleitung erläutert den Einbau und Gebrauch dieser Ladegeräte. HalterungsModell Beschreibung Bestellnummer Halterungen schrauben AC6 AC7 AC8 Vorsicht Ladegerät mit 852-907-001 2 Steckplätzen Ladegerät mit 852-908-001 4 Steckplätzen Ladegerät mit 852-902-001 8 Steckplätzen 1 4 1 4 2 8 Das Konformitätsblatt führt etwaige Verwendungseinschränkungen für dieses Produkt an. Benötigte Teile Es sind außerdem folgende Teile erforderlich (separat zu verkaufen und zu bestellen): • Wechselstrom-Netzteil (Bestellnr. 851-082-xxx) • Landesspezifisches Netzkabel Zur Befestigung des Ladegeräts (wahlweise) werden für die Stärke der Montagefläche geeignete Befestigungsschrauben benötigt. 17 Einbau des Ladegeräts Netzkabel Wechselstrom-Netzteil Ladegerät Befestigen des Ladegeräts (wahlweise) Montagehalterung Schrauben (4) Akkufreigabetaste Ladegerät 31,75 cm für Ladegerät mit 8 Steckplätzen 18 0,64 cm Spalt Laden der Akkus Akku Akkufreigabetaste Statusleuchte Erläuterung der Statusanzeige Farbe Beschreibung Konstant grün Der Akku ist vollständig geladen. Blinkt langsam Der Akku wird im Schnellverfahren geladen. Die grün Schnellladung erfolgt während der ersten halben Stunde, die sich der Akku im Ladegerät befindet. Nach 1 Stunde ist der Akku etwa zu 75% geladen. Blinkt schnell Der Akku wird geladen. Ein vollständig entladener grün Akku wird in etwa 3 Stunden vollständig aufgeladen. Blinkt rot Die Akkutemperatur ist zu kalt oder zu heiß und der Akku wird nicht geladen. Sicherstellen, dass die Temperatur zwischen 0° C und 35° C liegt. Konstant rot Der Akku wird nicht geladen, da der Akku fehlerhaft ist. Den Akku auswechseln. Keine Leuchte Das Ladegerät ist außer Betrieb. Folgendes an sicherstellen: • Der Akku ist korrekt in das Ladegerät eingesetzt. • Das Netzteil ist korrekt an das Ladegerät und die Steckdose angeschlossen. • Die Akkukontakte sind sauber. Zum Reinigen der Kontakte diese mit einem Radiergummi abreiben und alle Radiergummirückstände entfernen. 19 Technische Daten Elektrik: Ladegerät mit 2 Steckplätzen x 12V, 1.5A Ladegerät mit 4 Steckplätzen x 12V, 2,4A Ladegerät mit 8 Steckplätzen x 12V, 4,15A Temperatur - Betrieb: 0° C bis 35° C Temperatur - Lager: -30° C bis 70° C Rel. Luftfeuchtigkeit: 0% bis 95%, nicht kondensierend Verweise zu weiteren Informationen Besuchen Sie die Intermec-Webseite unter www.intermec.com. Dort finden Sie die Anleitungen als PDF-Dateien. Sollten Probleme auftreten, besuchen Sie unsere ProduktunterstützungsWebseite unter intermec.custhelp.com oder rufen Sie 1-800-7555505 an. 20 멀티 베이 충천기 안내서 본 안내서는 SR61 멀티 베이 충천기의 사용 및 설치 방법에 대해 설명 합니다 . 모델 설명 부품 번호 AC6 AC7 AC8 2 베이 충전기 852-907-001 4 베이 충전기 852-908-001 8 베이 충전기 852-902-001 브래킷 브래킷 나사 1 1 2 4 4 8 본 제품과 관련된 사용 제한에 대한 자세한 내용은 준수 규정을 참조하십시오 . 㧩㡅 준비 사항 다음과 같은 항목이 필요합니다 ( 별도 판매 및 주문 ). • AC 전원 공급기 (P/N 851-082-xxx) • 해당 국가의 전원 코드 충전기를 장착하려면 ( 선택 ), 장착 표면의 두께에 적합한 장착 하드 웨어가 필요합니다 . 충전기 설치 21 충전기 장착 ( 선택 ) 배터리 충전 22 상태 라이트 이해 색상 설명 지속적인 녹색 느리게 깜박이 는 녹색 배터리 충전이 완료되었습니다 . 배터리 충전이 빠르게 진행되고 있습니다 . 빠른 충전은 배터리가 충전되기 시작한 후 1 시간 동안 계속됩니다 .1 시간 후 배터리는 약 75% 정도 충전이 완료됩니다 . 배터리가 충전되고 있습니다 . 완전히 방전된 배터리는 약 3 시간 후 100% 충전이 완료됩 니다 . 배터리 온도가 너무 낮거나 너무 높아서 충 전할 수 없습니다 . 배터리 온도는 0°C 에서 35°C 사이 여야 합니다 . 배터리 결함으로 인해 배터리가 충전되지 않 고 있습니다 . 배터리를 교체하십시오 . 충전기가 작동되지 않고 있습니다 . 다음을 확인하십시오 . • 배터리가 충전기에 올바르게 삽입되어 있 습니다 . • 전원 공급기가 충전기와 AC 코드에 제대 로 연결되어 있습니다 . • 배터리 연결 부위가 깨끗합니다.배터리 연 결 부위를 지우개로 문지르면 해당 부위를 깨끗하게 할 수 있습니다 . 빠르게 깜박이 는 녹색 깜박이는 적색 지속적인 적색 라이트 없음 23 사양 전기 요구 사항 : 2 베이 충전기 4 베이 충전기 8 베이 충전기 작동 온도 : 0 ? C ~ 35 ? C 보관 온도 : -30 ? C ~ 70 ? C 상대 습도 : 0% ~ 95% 비응축 x 12V, 1.5A x 12V, 2.4A x 12V, 4.15A 추가 정보 Intermec 웹 사이트 www.intermec.com 을 방문하시면 설명서를 PDF 파일로 보실 수 있습니다 . 문의 사항이 있으시면 intermec.custhelp.com 사이트의 제품 지원 정보를 확인하시거나 1-800-755-5505 로 전화 주십시오 . Instruções para instalação e uso do carregador de vários compartimentos Estas instruções explicam como instalar e usar os seguintes carregadores: Modelo Descrição AC6 AC7 AC8 Cuidado Código do produto Carregador de 2 852-907-001 compartimentos Carregador de 4 852-908-001 compartimentos Carregador de 8 852-902-001 compartimentos Parafusos Presilhas da presilha 1 4 1 4 2 8 Consulte as informações sobre as restrições de uso associadas a este produto no encarte sobre conformidade. Componentes necessários São necessários estes componentes, cuja venda e pedido são feitos separadamente: • Fonte de alimentação de CA (N/P 851-082-xxx) • Cabo de alimentação apropriado à rede elétrica do país onde a unidade será utilizada 24 Para instalar o carregador (procedimento opcional), também será necessário hardware de instalação apropriado à espessura da superfície de instalação. Instalação do carregador Cabo de alimentação Fonte de alimentação de CA Carregador Montagem do instalador (opcional) montage Parafuso (4 posições) Botão d liberaç da bate Carregador 25 Espaço de 6,4 mm 31,75 cm para o carregador de 8 compartimentos Carregamento das baterias Bateria Botão de liberação da bateria Luz indicadora de status Interpretação da luz de status Cor Descrição Verde contínuo Verde com intermitência lenta A bateria está plenamente carregada. 26 A bateria está no processo de carga rápida. Isto acontece durante a primeira hora em que é colocada no carregador. Depois de uma hora, a bateria estará com aproximadamente 75% de sua capacidade de carga. Cor Descrição Verde com intermitência rápida Vermelho intermitente A bateria está sendo carregada. Uma bateria totalmente exaurida atinge 100% de sua capacidade de carga em aproximadamente 3 horas. A temperatura da bateria está muito baixa ou muito alta para que seja carregada. A temperatura deve estar entre 0°C e 35°C. A bateria não está carregando porque está com problema. Troque-a. O carregador não está funcionando. Certifique-se de que: • a bateria esteja inserida corretamente no carregador. • a fonte de alimentação esteja corretamente conectada no carregador e em uma tomada de CA. • os contatos da bateria estejam limpos. Para limpar os contatos, esfregue-os com uma borracha de lápis e remova todos os resíduos de borracha. Vermelho contínuo Nenhuma luz Especificações Requisitos elétricos: Carregador de 2 compartimentos Carregador de 4 compartimentos Carregador de 8 compartimentos Temperatura de operação: x 12V, 1.5A x 12V, 2,4A x 12V, 4,15A 0° C a 35° C Temperatura de armazenamento: -30° C a 70° C Umidade relativa: 0% a 95% sem condensação Onde obter mais informações Visite o website da Intermec no endereço www.intermec.com, onde os manuais estão disponíveis em formato PDF. Se tiver algum problema, visite nosso web site de suporte aos produtos em intermec.custhelp.com, ou ligue para 1-800-755-5505. 27 Инструкции по эксплуатации многогнездового зарядного устройства В этих инструкциях объясняется, как устанавливать и использовать следующие зарядные устройства: Модель Описание AC6 AC7 AC8 № по каталогу Винты Кронштейны кронштейнов 2-гнездовое 852-907-001 1 зарядное устройство 4-гнездовое 852-908-001 1 зарядное устройство 8-гнездовое 852-902-001 2 зарядное устройство 4 4 8 См. ограничения, связанные с использованием устройства, на вкладыше с требованиями по обеспечению соответствия. Осторожно Что вам потребуется Вам потребуются следующие устройства (которые продаются и заказываются отдельно): • Блок питания переменного тока (изд. № 851-082-xxx) • Шнур питания, соответствующий национальному стандарту Если вы захотите установить зарядное устройство стационарно, вам понадобятся также крепежные изделия, соответствующие толщине опорной конструкции. 28 Установка зарядного устройства Шнур питания Блок питания переменного тока Зарядное устройство Стационарная установка зарядного устройства (по желанию) Установочный кронштейн Винт (4 шт.) Кнопка освобождения батарейки Зарядное устройство 31,75 см для 8-гнездового зарядного устройства Зазор 0,64 см 29 Зарядка батареек Батарейка Кнопка освобождения батарейки Цвет индикатора состояния Что означают цвета индикатора состояния Цвет Описание Постоянный зеленый Медленно мигающий зеленый Батарейка полностью заряжена. Батарейка быстро заряжается. Быстрая зарядка происходит в течение первого часа после установки батарейки в зарядное устройство. После первого часа батарейка заряжена приблизительно на 75%. Быстро Батарейка заряжается. Полностью разряженная мигающий батарейка заряжается до 100% своей емкости зеленый приблизительно за 3 часа. Мигающий Батарейка слишком холодная или слишком горячая красный и потому не заряжается. Проследите за тем, чтобы температура составляла от 0°C до 35°C. Постоянный Батарейка не заряжается, так как она неисправна. красный Замените батарейку. Не светится Зарядное устройство не работает. Убедитесь в том, что: • батарейка правильно вставлена в зарядное устройство. • блок питания правильно подсоединен к зарядному устройству и к розетке переменного тока. • контакты батарейки чистые. Чтобы почистить контакты, потрите их карандашной резинкой и удалите остатки резинки. 30 Технические характеристики Требования к электропитанию: 2-гнездовое зарядное устройство 4-гнездовое зарядное устройство 8-гнездовое зарядное устройство x 12V, 1.5A x 12V, 2,4A x 12V, 4,15A Рабочая температура: 0°C - 35°C Температура хранения: -30°C - 70°C Относительная влажность: 0% - 95% без конденсации Где найти дополнительную информацию Посетите веб-сайт www.intermec.com компании Intermec, где вы найдете руководства в формате PDF. Если у вас возникнут какиелибо проблемы, обратитесь на наш веб-сайт поддержки продуктов intermec.custhelp.com или позвоните по телефону 1800-755-5505. 31 Instrucciones del cargador de varios compartimientos Estas instrucciones explican cómo usar e instalar estos cargadores: Modelo Descripción AC6 AC7 AC8 Número de Tornillos de pieza Soportes soportes Cargador de 2 852-907-001 1 compartimientos Cargador de 4 852-908-001 1 compartimientos Cargador de 8 852-902-001 2 compartimientos 4 4 8 Consulte el Inserto de cumplimiento para ver las restricciones de uso asociadas con este producto. Lo que necesita Necesita estos artículos (los cuales se venden y piden por separado): • Fuente de alimentación de CA (P/N 851-082-xxx) • Cable eléctrico específico del país Para montar el cargador (opcional), también debe montar herraje adecuado para el espesor de la superficie de montaje. Instalación del cargador Cable de alimentación Fuente de alimentación de CA Cargador Montaje del cargador (opcional) Soporte de montaje Tornillo (4 lugares) Botón de liberación de la batería Cargador 31.75 cm para cargador de 8 compartimientos Espacio de 0.64 cm 33 Carga de las baterías Batería Botón de liberación de la batería Luz de estado Explicación de las luces de estado Color Descripción Verde constante Verde parpadeante lento La batería está totalmente cargada. La batería está cargando rápidamente. La carga rápida ocurre en la primera hora que está la batería en el cargador. Después de 1 hora, la batería se carga hasta una capacidad aproximada del 75%. La batería está cargando. Una batería totalmente descargada se carga al 100% en unas 3 horas. Verde parpadeante rápido Rojo parpadeante La temperatura de la batería es demasiado baja o demasiado alta para que cargue la batería. Compruebe que la temperatura sea de 0°C a 35°C. Rojo constante La batería no está cargando porque está fallada. Reemplace la batería. No hay luz El cargador no funciona. Revise lo siguiente: • ola batería esté insertada correctamente en el cargador. • ola fuente de alimentación está debidamente conectada al cargador y a un tomacorriente de CA. • olos contactos de la batería están limpios. Para limpiar los contactos, frótelos con una goma de borrar de lápiz y elimine todo residuo del borrador. 34 Especificaciones Requisitos eléctricos: Cargador de 2 compartimientos: Cargador de 4 compartimientos: Cargador de 4 compartimientos: Temperatura operativa: x 12V, 1.5A x 12V, 2.4A x 12V, 4.15A 0°C a 35°C Temperatura de almacenamiento: -30°C a 70°C Humedad relativa: 0% a 95%, no condensante Dónde obtener más información Visite el sitio Web de Intermec en www.intermec.com para buscar los manuales en formato de archivo PDF. Si tiene algún problema, visite nuestro sitio Web de Asistencia de productos en intermec.custhelp.com o llame al 1-800-755-5505 35 Worldwide Headquarters 6001 36th Avenue West Everett, Washington 98203 U.S.A. tel 425.348.2600 fax 425.355.9551 www.intermec.com IP30 and SR61 Multibay Battery Charger Instructions *943-020-002* P/N 943-020-002-
 1
1
-
 2
2
-
 3
3
-
 4
4
-
 5
5
-
 6
6
-
 7
7
-
 8
8
-
 9
9
-
 10
10
-
 11
11
-
 12
12
-
 13
13
-
 14
14
-
 15
15
-
 16
16
-
 17
17
-
 18
18
-
 19
19
-
 20
20
-
 21
21
-
 22
22
-
 23
23
-
 24
24
-
 25
25
-
 26
26
-
 27
27
-
 28
28
-
 29
29
-
 30
30
-
 31
31
-
 32
32
-
 33
33
-
 34
34
-
 35
35
-
 36
36


Intermec AC6 Instructions Manual
- Tipo
- Instructions Manual
en otros idiomas
- français: Intermec AC6
- English: Intermec AC6
- Deutsch: Intermec AC6
- русский: Intermec AC6
- português: Intermec AC6
Artículos relacionados
-
Intermec AC6 Manual de usuario
-
Intermec AC6 Instructions Manual
-
-
-
-
-
-
Intermec SF61 Guía de inicio rápido
-
-