Brinks 7166 Instrucciones de operación
- Categoría
- Detectores de movimiento
- Tipo
- Instrucciones de operación
Este manual también es adecuado para

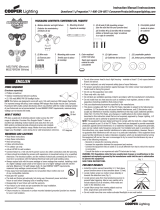
FIGURE 3
THUMBSCREW
C
D
E
C
Motion Sensor
A
B
FIGURE 2
FIGURE 1
FIGURE 4
INSTALLATION INSTRUCTIONS
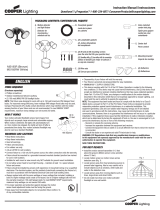
1. Attach Fixture Mounting Plate (C) at desired location using two Mounting Screws (D). - FIGURE 1
NOTE: Depending on the mounting surface of choice, it may be necessary to use the Wall Anchors (E) with
the Mounting Screws (D).
2. Install the Lamp Hood (B) onto the lampholder.
3. Install two PAR 38 outdoor oodlight bulbs (120 watts max). Position lamp holders downward at a minimum
45º and away from xture housing a minimum of 2 inches.
4. Place Security Light Fixture (A) onto Fixture Mounting Plate (C). - FIGURE 2
5. Plug xture into grounded outlet.
FIXTURE ADJUSTMENT - FIGURE 3
• To rotate lamp head up or down, carefully turn thumbscrew counter-clockwise to release ratchet and allow lamp
head arm to rotate
• Set lamp head to desire location.
• Re-tighten thumbscrew by turning clockwise. Do not over-tighten
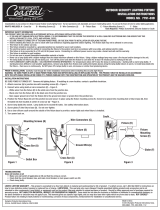
MOTION SENSOR CONTROLS - FIGURE 4
Observe the two controls on the bottom of the sensor. The RANGE (sensor sensitivity) control is located on the bottom left.
The ON-TIME (duration) switch is located on the bottom center.
• RANGE (Sensor Sensitivity) - Sets the sensitivity of the motion sensor. Turn the dial clockwise to increase the sensitivity
(range). Turn the dial counter-clockwise to decrease the sensitivity (range). The RANGE control should – in most cases, be set at
the maximum setting. However, the sensitivity (range) may need to be set lower to avoid false triggering (small animals, cars, or
nearby lighting) may require range setting to be dialed down.
• ON-TIME (Duration) - Sets how long the light will stay on after motion is detected (1, 5, or 10 minutes). Slide the ON TIME switch to
the desired time duration. The TEST mode allows the motion sensor to activate during daylight.
SETTING THE MOTION SENSOR CONTROLS
1. Turn the power OFF to the oodlight.
2. Aim the motion sensor to the approximate center of the desired detection range. Caution: Do not aim the sensor above the horizon as
direct sunlight may cause damage to the sensor circuitry.
3. Slide the ON TIME switch to the TEST position.
4. Turn the RANGE control (sensitivity dial) to the full clockwise rotation.
5. Turn the power back ON to the oodlight.
6. Set the RANGE of the motion sensor.
a. Have a person move around at the furthest distance of the desired detection area.
b. If the RANGE dial is at the maximum clockwise rotation and the light still has not turned on, it may be necessary to re-aim the motion
sensor or the desired detection zone may be too far away. The sensor range is designed for up to 70 feet.
c. When the lights do turn on, have the person stand still until the light goes off. Once the lights are off, have the person move again to
conrm the settings.
d. To reduce false triggerings, decrease the RANGE (sensitivity).
7. Slide the ON TIME switch to increase or decrease the time the light stays ON after motion is detected. The setting choices are 1, 5, or
10 minutes. NOTE: When making this adjustment during daylight in test mode, the light will remain ON for the set time duration you
have selected and then turn OFF. Once the light is OFF, it will not turn ON again until motion is detected.
MANUAL OVERRIDE FEATURE
If the security oodlight is connected to an outlet controlled by a wall switch, the Manual Override Feature is available.The Manual
Override Feature allows the unit to be turned ON or OFF manually during the night,bypassing the motion sensor.
MANUAL OPERATION
To manually turn the oodlight ON,turn the wall switch OFF and then ON again immediately within 2 seconds.The oodlights will turn
ON and remain ON until the wall switch is turned OFF.If the wall switch was previously turned OFF for a period of time,turn the wall
switch ON for at least 5 seconds and then use the OFF- ON procedure above to turn the oodlight ON manually.To manually turn the
oodlight OFF, simply turn the wall switch OFF.The unit will not activate as long as the wall switch is in the OFF position.
RESETTING TO AUTOMATIC OPERATION
To return the security oodlight to automatic operation,turn the wall switch OFF for at least 5 seconds and then turn the swith back
ON.The security oodlight will come ONfor the time duration set and then turn OFF.The oodlight will now activate according to the
settings on the motion sensor.Leave the wall switch in the ON position to operate the oodlight in automatic mode.
Brink's trademark & copyright work are used with permission.
INSTALLATION INSTRUCTIONS
MODEL 7166
CORDED 240º MOTION SECURITY LIGHT
TROUBLESHOOTING
SYMPTOM
Does not function at all.
Floodlight cycles ON and OFF.
Floodlight is continuously ON.
REMEDY
Make sure wall switch (if installed), is ON. Check that the circuit breaker, fuse and main circuit breaker or main power switch are on. Be sure sensor head is pointed downward
towards the target area. Check the bulb(s) for damage.
Redirect security floodlight away from heat sources such as a street, active sidewalk, barbecue grill, etc. Direct floodlight in a slightly different direction than sensor. Turn RANGE
(Sensor sensitivity) control more counterclockwise.
Turn wall switch OFF for at least 5 seconds and then turn switch to ON again. This will reset the fixture to normal (automatic) operations. If there is no wall switch, set circuit
breaker OFF for at least 5 seconds and then turn circuit breaker ON again.
RANGE
MAXMIN
ON-TIME
10 5
1
TEST
MINUTES
RANGE
MAXMIN
ON-TIME
10 5
1
TEST
MINUTES
CDS
Hampton Products International Corp.
50 Icon, Foothill Ranch, CA 92610-3000 USA
www.hamptonproducts.com • 1-800-562-5625
Made in China
© 2015 Hampton Products International Corp.
999-61140_7166_REVC 06/15
LIMITED LIFETIME WARRANTY – This product is warranted to be free from defects in material and workmanship for life of product. If a defect occurs, call 1-800-562-5625 for instructions on how to have defective
product repaired or replaced free of charge. LIMITATIONS - This warranty only covers the assembled lighting products and accessories and is not extended to other components, or equipment used on the product.
Warranty extends to original purchaser of product. Receipt or other approved proof of purchase required for warranty service. NOT LIABLE FOR INCIDENTAL, INDIRECT, OR CONSEQUENTIAL DAMAGES. Some states do
not allow the exclusion or limitation of incidental or consequential damages, so the above limitation or exclusion may not apply to you. This warranty gives you specic legal rights, and you may also have other rights
which vary from state to state. NOT COVERED - Product failure not relating to faulty material or workmanship, corrosion of brass components, reimbursement for installation or unauthorized service.
QUESTIONS: For further assistance or more information,please call 1-800-562-5625,8 am – 5 pm (Pacic Time),Monday – Friday.
IMPORTANT SAFETY INFORMATION
THIS PRODUCT MUST BE INSTALLED IN ACCORDANCE WITH ALL APPLICABLE INSTALLATION CODES.
• Before installing this xture, be sure to check with local ordinances regarding approved outdoor lighting.
This xture style may not be allowed in some areas.
• This xture is for outdoor use only.
• This xture is to be connected to a 120 volt, 60 Hz power source. Connecting to a different power source
may create a hazard and will void the warranty.
• Do not use near or around ammable/combustible material or liquids.
• The bulb and xture can get extremely hot during use. Turn off the power and allow the xture to cool
down for at least 20 minutes before working on the unit.
• When replacing the lamp (bulb), use only PAR 38 outdoor oodlight lamp (bulb) - 120 watts maximum in
each lampholder. Lamp holder may say 150W. Never use a lamp (bulb) with a higher wattage than the
stated maximum allowed on the xture. Using a higher wattage lamp (bulb) may cause a re hazard
and/or damage to the unit. Lamps (bulbs) are not included.
• Do not attempt to open the xture housing. There are no serviceable parts inside.
• Always use safety precautions. Safety glasses and gloves should be worn during installation.
• Motion Sensor performance may be affected by temperature.
SAVE THESE INSTRUCTIONS
WHAT'S INCLUDED:
- Lamp HoodB- Light FixtureA
- Mounting Screws (2)D
- Fixture Mounting PlateC
- Wall Anchors (2)E
WARNING: FIXTURE MUST BE PLUGGED INTO A GROUNDED, OUTDOOR RATED OUTLET THAT MEETS LOCAL, STATE, AND NATIONAL SAFETY CODES. IF YOU ARE NOT FAMILIAR WITH THE SAFETY RATING OF YOUR
OUTLET, IT IS RECOMMENDED THAT YOU SECURE THE SERVICES OF A WELL QUALIFIED ELECTRICIAN WHO CAN ASSURE THE OUTLET MEETS THE LOCAL, STATE, AND NATIONAL SAFETY REGULATIONS REQUIRED.
NOTE: IF FOR ANY REASON YOUR PURCHASE OF THIS PRODUCT HAS NOT BEEN A POSITIVE
EXPERIENCE, PLEASE CALL OUR CUSTOMER CARE HOTLINE AT 1-800-562-5625 BEFORE
RETURNING YOUR PRODUCT. WE WANT YOUR FEEDBACK AND AN OPPORTUNITY TO PROVIDE
YOU THE CUSTOMER SERVICE YOU ARE ENTITLED TO WITH OUR PRODUCTS.
Congratulations on your purchase of a Brink’s™ Portable Security Lighting xture. You have purchased a safe, dependable, easy-to-install security
lighting system. You can use this xture at home for outdoor lighting applications.
TOOLS REQUIRED:
Screwdriver, Power Drill, 3/16” Drill Bit
PRIOR TO INSTALLATION
Carefully read through the entire installation instructions before installing this security light xture.
THIS PRODUCT MUST BE INSTALLED IN ACCORDANCE WITH THE APPLICABLE INSTALLATION CODES BY A PERSON FAMILIAR WITH THE CONSTRUCTION AND OPERATION OF THE PRODUCT AND THE HAZARDS INVOLVED.
FIXTURE SHOULD BE MOUNTED ON A WALL AT LEAST 8 FEET
ABOVE THE GROUND FOR OPTIMAL PERFORMANCE.

Detector de
Movimiento
B
FIGURA 3
FIGURA 4
TORNILLO MARIPOSA
C
D
E
C
A
FIGURA 2
FIGURA 1
Se utilizan con autorización la marca registrada y los trabajos con derechos reservados de Brink’s.
INSTRUCCIONES DE INSTALACIÓN
1. Fije la Placa de montaje del dispositivo (C) en el sitio deseado mediante el uso de dos Tornillos de montaje (D). - FIGURA 1
NOTA: Dependiendo de la supercie de montaje seleccionada, podrá ser necesario el uso de los anclajes de pared con los tornillos de montaje.
2. Instale la Campana de la lámpara (B) sobre el portarreector.
3. Instale dos reectores para exteriores tipo PAR 38 (120 watts máximo). Dirija los portalámparas hacia abajo a un ángulo mínimo de 45º y
alejados un mínimo de 5.1 cm (2 pulgadas) de la carcasa del dispositivo.
4. Coloque el dispositivo de la Lámpara de seguridad (A) sobre la Placa de montaje del dispositivo (C). - FIGURA 2
5. Enchufe el dispositivo en un tomacorriente conectado a tierra.
AJUSTE DEL DISPOSITIVO - FIGURA 3
• Para girar el cabezal de la lámpara hacia arriba o hacia abajo, gire cuidadosamente el tornillo mariposa en el sentido opuesto a las manecillas
del reloj para soltar el trinquete y permitir que el brazo del cabezal de la lámpara gire.
• Fije el cabezal en el sitio deseado.
• Vuelva a apretar el tornillo mariposa girándolo en el sentido de las manecillas del reloj. No lo apriete demasiado..
CONTROLES DEL DETECTOR DE MOVIMIENTO - FIGURA 4
Tome nota de los dos controles en la parte inferior del detector. El control de GAMA o “RANGE” (sensibilidad del detector) se localiza en la parte
inferior izquierda. El conmutador de TIEMPO DE ENCENDIDO (ON TIME) se localiza en la parte inferior central.
• GAMA (“RANGE”) (Sensibilidad del detector) - Fija la sensibilidad del detector de movimiento. Gire el dial en el sentido de las manecillas del reloj para
incrementar la sensibilidad (gama). Gire el dial en el sentido opuesto a las manecillas del reloj para reducir la sensibilidad (gama). Sin embargo, puede
ser necesario ajustar la sensibilidad (gama) a un nivel más bajo para evitar los disparos falsos (animales pequeños, vehículos o iluminación cercana).
• TIEMPO DE ENCENDIDO (“ON TIME”) (Duración) - Fija el tiempo que la lámpara permanecerá encendida después de haber detectado un movimiento
(1, 5 ó 10 minutos). Deslice el conmutador de TIEMPO DE ENCENDIDO (“ON TIME”) a la duración de tiempo deseada. La modalidad de PRUEBA (“TEST”)
permite que el detector de movimiento se mantenga activado durante las horas de luz del día.
CÓMO FIJAR LOS CONTROLES DEL DETECTOR DE MOVIMIENTO
1. Desconecte la alimentación eléctrica (en “OFF”) a la lámpara con reflectores.
2. Apunte el detector de movimiento al centro aproximado de la gama deseada de detección. Precaución: No apunte el detector por arriba del horizonte ya
que la luz solar directa puede causarle daños a los circuitos del detector.
3. Deslice el conmutador de TIEMPO DE ENCENDIDO (“ON TIME”) a la posición de PRUEBA (“TEST”)
4. Gire el control de GAMA o “RANGE” (dial de sensibilidad) a la posición girada totalmente en el sentido de las manecillas del reloj.
5. Vuelva a conectar la alimentación eléctrica (en “ON”) de la lámpara con reflectores.
6. Ajuste la GAMA o “RANGE” del detector de movimiento.
a. Haga que una persona se mueva alrededor de la mayor distancia dentro del área de detección deseada.
b. Si el dial de GAMA o “RANGE” esta colocado en el giro máximo en el sentido de las manecillas del reloj, y la lámpara aún no se ha encendido, podrá
ser necesario volver a apuntar el detector de movimiento, o la zona de detección deseada podrá estar situada muy lejos. La gama del detector para
este dispositivo es de hasta 21.34 metros (70 pies).
c. Cuando los reflectores se enciendan (en “ON”), haga que la persona permanezca parada sin desplazarse hasta que los reflectores se apaguen
(en “OFF”). Una vez que los reflectores se hayan apagado, ordene que la persona se desplace para confirmar los ajustes.
7. Deslice el conmutador de TIEMPO DE ENCENDIDO (“ON TIME”) para incrementar o reducir el tiempo que los reflectores permanecen encendidos
(en “ON”) después de detectarse un movimiento. La selección de tiempos es de 1, 5 ó 10 minutos. NOTA: Cuando se hace este ajuste durante las horas
de luz del día en la modalidad de prueba, la lámpara permanecerá encendida (en “ON”) por el período de tiempo de encendido seleccionado y luego se
apagará (en “OFF”). Una vez que la lámpara se apaga, no volverá a encenderse hasta que se detecta movimiento.
FUNCIÓN DE CANCELACIÓN MANUAL
Si se tiene conectada la lámpara de reflectores a un tomacorriente controlada por un interruptor de pared, entonces se dispone de la función de
Cancelación manual. La función de Cancelación manual permite ENCENDER (en “ON”) o apagar (en “OFF”) manualmente la unidad durante la noche,
con lo cual se sobrepasa o deriva el detector de movimiento.
FUNCIONAMIENTO MANUAL
Para encender (en “ON”) la lámpara con reflectores, apague (en “OFF”) y luego encienda (en “ON”) otra vez inmediatamente dentro de dos (2)
segundos. Los reflectores se encenderán y permanecerán encendidos hasta que el interruptor sea accionado a apagado (en “OFF”). So el interruptor
de pared había sido apagado por un período de tiempo, accione el interruptor de pared a encendido (en “ON”) durante cuando menos cinco (5)
segundos y luego utilice el procedimiento de apagado-encendido descrito arriba para encender manualmente los reflectores. Para apagar
manualmente los reflectores (en “OFF”), sólo tiene que accionar el interruptor de pared a apagado (en “OFF”). La unidad no se activará mientras el
interruptor se encuentre en la posición de apagado (en “OFF”).
CÓMO RESTAURAR EL FUNCIONAMIENTO AUTOMÁTICO
Para volver a colocar la lámpara con reflectores de seguridad en funcionamiento automático, accione el interruptor de pared a apagado (en “OFF”)
durante cuando menos cinco (5) segundos y luego vuelva a colocar el interruptor en encendido (en “ON”). Los reflectores de seguridad se
encenderán durante el tiempo fijado y luego se apagarán (en “OFF”). La lámpara con reflectores ahora se activará de acuerdo con los ajustes en el
detector de movimiento. Deje el interruptor de pared en la posición de encendido (en “ON”) para hacer funcionar la lámpara con reflectores en
modalidad automática.
INSTRUCCIONES DE INSTALACIÓN
ARTÍCULO 7166
LÁMPARA DE SEGURIDAD DE CORDON CON DETECCIÓN DE MOVIMIENTO DE 240º
LOCALIZACIÓN DE AVERÍAS
SÍNTOMA
No funciona.
La lámpara con reflectores cicla de encendido (en “ON”) a apagado (en “OFF”).
La lámpara con reflectores permanece encendida (en “ON”) todo el tiempo.
REMEDIO
Asegúrese que el interruptor de pared (si se tiene instalado) está en la posición de encendido (en “ON”). Verifique que el disyuntor de circuito o el interruptor principal de
alimentación están conectados. Asegúrese que el cabezal del detector está apuntando hacia abajo hacia el área de detección deseada. Revise si los reflectores están dañados.
Cambie la dirección de la lámpara con reflector para alejarla de las fuentes de calor tales como la calle, una acera activa, un asador de carnes, etc. Dirija los reflectores en una
dirección algo diferente de la dirección del detector. Gire el control de GAMA o “RANGE” (sensibilidad del detector) más en dirección opuesta a las manecillas del reloj.
Coloque el interruptor de pared en apagado (en “OFF”) durante cuando menos cinco (5) segundos y luego vuelva a colocarlo en encendido (en “ON”). Esto restaurará el dispositivo a funcionamiento normal
(automático). Si no se tiene un interruptor de pared, desconecte el disyuntor de circuito (en “OFF”) durante cuando menos cinco (5) segundos y luego vuelva a conectar el disyuntor de circuito (en “ON”).
RANGE
MAXMIN
ON-TIME
10 5
1
TEST
MINUTES
RANGE
MAXMIN
ON-TIME
10 5
1
TEST
MINUTES
CDS
Hampton Products International Corp.
50 Icon, Foothill Ranch, CA 92610-3000 USA
www.hamptonproducts.com • 1-800-562-5625
Hecho en China
© 2015 Hampton Products International Corp.
999-61140_7166_REVC 06/15
GARANTÍA LIMITADA DE POR VIDA - Se garantiza que este producto está libre de defectos en materiales y mano de obra durante la vida de servicio del producto. Si se encuentra un defecto en los materiales o en la mano de obra, llame al
1-800-562-5625 para recibir instrucciones sobre cómo repararlo o reemplazarlo sin cargo alguno. LIMITACIONES - Esta garantía únicamente cubre productos y accesorios de iluminación ensamblados y no se extiende a otros componentes, o
equipos utilizados en este producto. Se requiere la presentación de un recibo de compra u otra prueba de compra aprobada antes de la prestación del servicio bajo la garantía. NO HAY RESPONSABILIDAD ALGUNA POR DAÑOS INCIDENTALES
O INDIRECTOS. Algunos estados o provincias no permiten la exclusión de daños indirectos o emergentes, por lo que la anterior limitación o exclusión puede no ser aplicable. Esta garantía le otorga derechos especícos, y usted podrá tener
otros derechos que varían de estado a estado. SIN COBERTURA - La falla del producto no relacionada con materiales o mano de obra defectuosos; el reembolso por la instalación o servicio no autorizado.
PREGUNTAS;
Para mayor atención o más información, sírvase llamar al teléfono 1-800-562-5625, de lunes a viernes de las 8:00 a las 17:00 horas (8:00 a.m. a 5:00 p.m.) (Hora del Pacíco).
IMPORTANTE INFORMACIÓN DE SEGURIDAD
ESTE PRODUCTO DEBE SER INSTALADO DE CONFORMIDAD CON TODOS LOS CÓDIGOS DE INSTALACIÓN APLICABLES.
• Asegúrese de vericar los reglamentos locales en cuanto a iluminación exterior aprobada antes de
instalar este dispositivo. Este estilo de dispositivo puede no ser permitido en algunas áreas.
• Este dispositivo es para uso exteriores únicamente.
• Este dispositivo se debe conectar a una fuente de alimentación de 120 volts, 60 Hz. El hecho de conectar
a una fuente de alimentación diferente puede constituir un peligro y anulará la garantía.
• No use en sitios cercanos o alrededor de materiales o líquidos inamables o combustibles.
• Los reectores y el dispositivo pueden calentarse de manera extrema durante el uso. Desconecte la
alimentación eléctrica y permita que el dispositivo se enfríe durante cuando menos veinte (20) minutos
antes de trabajar en la unidad.
• Al reemplazar la lámpara (el foco) use únicamente un reector para exteriores PAR 38 de 120 watts
máximo en cada portarreector. El portarreector puede indicar 150 W. Nunca use un foco o reector
con una capacidad en watts superior a la máxima permitida para el dispositivo. El uso de reectores con
mayor capacidad en watts puede constituir un peligro de incendio y/o dañar la unidad. No se incluyen los
focos o reectores.
• No intente abrir la carcasa del dispositivo. No hay piezas en su interior a las que se les pueda dar servicio.
• Siga siempre las precauciones de seguridad. Durante la instalación se deben usar gafas de seguridad y
guantes.
• La temperatura puede afectar el rendimiento del Detector de movimiento.
GUARDE ESTAS INSTRUCCIONES
-
Campana de la lámpara
B -
Placa de montaje de dispositivo
C-
Dispositivo de iluminación
A
-
Tornillos de montaje (2)
D -
Anclas de pared (2)
E
QUÉ INCLUYE:
Felicitaciones en su compra de un dispositivo de “Iluminación de Seguridad Portátil ” de Brink’s™. Usted ha comprado un sistema de iluminación de
seguridad seguro, conable y fácil de instalar. Usted puede utilizar este dispositivo en su hogar para iluminar áreas exteriores.
NOTA: SI POR CUALQUIER RAZÓN SU COMPRA DE ESTA PRODUCTO NO HA SIDO SATISFACTORIA,
SÍRVASE LLAMAR A NUESTRA LÍNEA DIRECTA DE ATENCIÓN AL CLIENTE 1-800-562-5625 ANTES DE
DEVOLVER SU PRODUCTO. QUEREMOS SUS COMENTARIOS Y LA OPORTUNIDAD DE PROPORCIONARLE
EL SERVICIO AL CLIENTE QUE USTED SE MERECE CON RESPECTO A NUESTROS PRODUCTOS.
HERRAMIENTAS NECESARIAS:
Desarmador, taladro, broca para taladro de 4.7 mm (3/16”)
ANTES DE LA INSTALACIÓN
Lea cuidadosamente todas las instrucciones de instalación antes de instalar este dispositivo de iluminación de seguridad.
ESTE PRODUCTO DEBE SER INSTALADO DE CONFORMIDAD CON TODOS LOS CÓDIGOS DE INSTALACIÓN APLICABLES POR UNA PERSONA FAMILIARIZADA CON EL DISEÑO Y FUNCIONAMIENTO DEL PRODUCTO Y DE LOS
PELIGROS QUE CONLLEVA.
ADVERTENCIA: EL DISPOSITIVO DEBE SER ENCHUFADO EN UN TOMACORRIENTE PARA EXTERIORES CONECTADO A
TIERRA QUE CUMPLE CON LOS CÓDIGOS DE SEGURIDAD LOCALES, ESTATALES Y NACIONALES. SI USTED NO ESTÁ
FAMILIARIZADO CON LA CAPACIDAD DE SEGURIDAD DE SU TOMACORRIENTE, SE LE RECOMIENDA QUE USTED
CONTRATE LOS SERVICIOS DE UN ELECTRICISTA EXPERIMENTADO QUE PUEDA ASEGURAR QUE EL TOMACORRIENTE
CUMPLE CON LOS CÓDIGOS DE SEGURIDAD LOCALES, ESTATALES Y NACIONALES CORRESPONDIENTES.
EL DISPOSITIVO DEBE SER MONTADO EN UNA PARED A UNA
ALTURA DE CUANDO MENOS 2.44 METROS (8 PIES) POR
ARRIBA DEL SUELO PARA OBTENER UN RENDIMIENTO ÓPTIMO.
-
 1
1
-
 2
2


Brinks 7166 Instrucciones de operación
- Categoría
- Detectores de movimiento
- Tipo
- Instrucciones de operación
- Este manual también es adecuado para
en otros idiomas
- English: Brinks 7166 Operating instructions
Artículos relacionados
Otros documentos
-
 All-Pro MS185R Instrucciones de operación
-
 Newport Coastal 7791-03B Guía de instalación
-
Defiant 2100W Guía de instalación
-
Cooper Lighting MS188 Manual de usuario
-
Heath Zenith 2LBN1 Manual de usuario
-
-
-
-
 All-Pro MS276RDW Instrucciones de operación


