INSTRUCTIONS PERTAINING TO A RISK OF FIRE,OR INJURY TO PERSONS
IMPORTANT SAFETY INSTRUCTIONS
Lighted lamp is HOT!
WARNING — To reduce the risk of FIRE OR INJURY TO PERSONS.
1) Turno/unplugandallowtocoolbeforereplacinglamp.
2) LampgetsHOTquickly!Contactonlyswitch/plugwhenturningon.
3) Donottouchhotlensorcowl.
4) Donottouchlamporxtureifwarm
5) Donotlookdirectlyatlampwhenon.
6) Keeplampawayfromcombustiblematerials.
7) Useonlywithwattageandlampmarkedonxture.
8) Donottouchtheinnerglassenvelopeofthelampatanytime.Useasoftcloth.Oil
fromskinmaydamagelamp.
9) Donotoperatethexturewithadamagedormissinglens.
SAFETY INSTRUCTIONS
READ THIS FIRST
KEEP THESE INSTRUCTIONS
CAUTION – RISK OF SHOCK –
Disconnect Power at the main circuit breaker panel or main fusebox before
starting and during the installation.
This xture is intended for installation in accordance with the National Electric
Code (NEC) and Local code specications. Failure to adhere to these codes and
instructions may result in serious injury and/or property damage and will void the
warranty. If you are not familiar with code requirements, installation by a certied
electrician is recommended.
1) WARNING: Thisxtureisnottobeinstalledwithin10feet(3M)ofapool,spa
orfountain.
2) Thisxtureistobeusedonlywithapowerunit(transformer)ratedamaximum
of300W(25AMPS)15volts.
3) The#18ga.xturewireisnotintendedfordirectburialorconnectedtoa
transformer.
4) Directburialratedwireistobeburiedaminimumof6”(152mm)beneaththe
surfaceoftheground.
NOTE:IfadditionalDirectBurialwireisneeded,contactyourlocalKichler
®
landscapedistributor.
•8GAwirecanbepurchasedinlengthof250’(76M),15503-BK.
• 10GAwirecanbepurchasedinlengthof250’(76M),15504-BK.
• 12GAwirecanbepurchasedinlengthsof100’(30M),15501-BK;250’(76M),
15502-BK;500’(152M),15505-BK;and1000’(304M),15506-BK.
5) Fixtureshallnotuseatungstenhalogenlampunlessthextureismarkedfor
usewithsuchlamps.
6) Wiringconnectionsmustbemadewithapproved/listedwireconnection
device(s)suitablefortheapplication.Donotexceedmanufacturers’wiring
combinationspecicationsforsizeandquantityofconductors.
CAUTION
WHEN INSTALLING KICHLER LANDSCAPE LIGHTING (LINE VOLTAGE OR LOW VOLTAGE),
CARE SHOULD BE TAKEN TO KEEP CLEAR OF POTENTIALLY COMBUSTIBLE MATERIALS.
WHEN MAINTAINING THE FIXTURES, BE SURE TO REMOVE LEAVES, PINE NEEDLES, GRASS
CLIPPINGS, MULCH, OR ANY DEBRIS THAT HAS ACCUMULATED ON THE LIGHT BULB, LENS,
OR BODY OF THE FIXTURE.
ASSEMBLY AND INSTALLATION
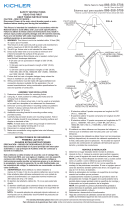
1) Determinedesiredlocationtoinstallxture.Checkareaforobstructionssuchas
sprinklers,plantmaterial,etc.Assesssoilconditions.
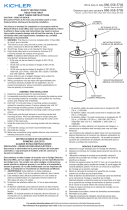
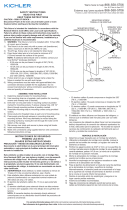
2) Digaholeapproximately12”deep,and3”widerthanthein-groundlight.This
allowsapproximately3”ofpeagravelorsandtosurroundtheABShousing.
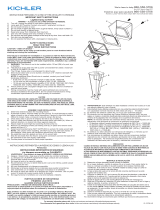
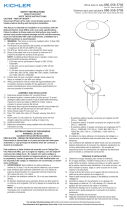
3) Pullouterringandcoverfromthexture.Loosenthethumbscrewstoswivelthe
mainbody.Un-installthecanopyandinsertrecommendedlightbulb.Re-install
thecanopy.Adjustthelighttothedesiredangleandtightendownthethumb
screws.
4) ReturnthemainbodyintotheABShousing,withwireshangingoutfromunder
thehousing.
5) Installxtureinholeandllholeafterinstallationwithpeagravelorsand.
6) Stripthetwoleadsfromxture.Usingwireconnectors,connecttheleadsfrom
theluminairetothemainsupplycableleads.
7) Providepowertoluminairetocheckproperoperation.
INSTRUCCIONES PERTINENTES A UN RIESGO DE ICENDIO O LESION A LAS
PERSONAS
INSTRUCCIONES IMPORTANTES DE SEGURIDAD
¡La lámpara encendida es CALIENTE!
ADVERTENCIA — Para disminuir el riesgo de INCENDIO O LESION A LAS PERSONAS.
1) Apague/desenchufeydejequeseenfríeantesdecambiarlalámpara.
2) ¡LalámparaseCALIENTArápidamente!Hagacontactodelconmutador/
enchufesólocuandoencienda.
3) Notoquelalenteolacapuchacaliente.
4) Notoquelalámparaoelartefactosiestácaliente.
5) Nomiredirectamentealalámparacuandoestéencendida.
6) Mantengalalámparalejosdematerialesinamables.
7) Usesolamenteconelvatiajeylalámparamarcadosenelartefacto.
8) Notoqueelvidriodelinteriordelalámparaenningúnmomento.Useunpaño
suave.Elaceitedelcuerpopuededañarlalámpara.
9) Nohagafuncionarelartefactoconunalentedañadaofaltante.
INSTRUCCIONES DE SEGURIDAD
PRIMERO LEA ESTO
GUARDE ESTAS INSTRUCCIONES
PRECAUCIÓN – RIESGO DE DESCARGA ELÉCTRICA –
Desconecte la electricidad en el panel principal del interruptor automático o
caja principal de fusibles antes de comenzar y durante la instalación.
Este artefacto se debe instalar de acuerdo con el Código Eléctrico Nacional
(NEC, por sus siglas en inglés) y con las especicaciones del código local. No
cumplir con estos códigos e instrucciones puede resultar en lesiones graves y/
o en daños a la propiedad y anulará la garantía. Si no está familiarizado con los
requisitos del código, la instalación se recomienda un electricista certicado.
IS-15788-US
1) ADVERTENCIA:Esteartefactonodebeinstalarseamenosde10pies(3m)de
unapiscina(alberca),spaofuente.
2) Esteartefactodebeutilizarsesolamenteconunaunidaddepotencia(tranformador)
concapacidadnominalmáximade300vatios(25amp.)15voltios.
3) Elcabledelartefactode18ganoestádestinadoparausosubterráneodirectoni
paraserconectadoaltransformador.
4) DeacuerdoconlosrequisitosdelCódigoEléctricoNacional(NECporsus
siglaseninglés),elalambreclasicadoparasoterradodirectosedebeenterrarun
mínimode6pulgadas[152mm.]debajodelasuperciedelterreno.
NOTA:Siserequiereuncableparausosubterráneodirecto,contácteseconsu
distribuidordepaisajismolocaldeKichler®.
• Elalambrecalibre8puedecomprarseenlongitudde250’(76m.),15503-BK
• Elalambrecalibre10puedecomprarseenlongitudde250’(76m.),15504-BK.
• Elalambrecalibre12puedecomprarseenlongitudesde75’(22m.),15550-BK;
100’(30m.),15501-BK;250’(76m.),15502-BK;500’(152m.),15505-BK;y
1000’(304m.),15506-BK.
5) Elartefactonodebeutilizarseconlámparasdehalógeno,amenossqueel
artefactoestémarcadoparausarcontaleslámparas.
6) Lasconexionesdecableadosedebenhacerconlasconexionesdel(los)
dispositivos)deconexióndecableadoaprobados/delalista,adecuados
paralaaplicación.Noexcedalasespecicacionesdecombinaciónde
cableadodelfabricanteparaeltamañoycantidaddeconductores.
PRECAUCION
CUANDO SE INSTALE SISTEMAS DE ALUMBRADO KICHLER PARA JARDINES (YA SEA DE
VOLTAJE DE LINEA O CON VOLTAJE BAJO) SE DEBE TENER CUIDADO DE MAINTNERLOS
ALEJADOS DE MATERIALES QUE PUEDAN SER COMBUSTIBLES EN POTENCIA.
AL DAR SERVICIO DE MANTENIMIENTO A ESTOS SISTEMAS, ASEGURESE DE DESPEJAR LAS
HOJAS, CONOS DE PINO, RECORTES DEL PASTO, CUBIERTA DE PAJA O CUALQUIER BASURA
QUE SE HAYA ACUMULADO EN LA BOMBILLA DE LUZ, EL LENTE O EL SOPORTE DE LA
BOMBILLA.
MONTAJE E INSTALACIÓN
1) Determinelaubicacióndeseadaparainstalarelartefacto.Veriqueeláreapara
observarsihayobstrucciones,comoaspersores,materialvegetal,etc.Evalúelas
condicionesdelsuelo.
2) Hagaunoriciodeaproximadamente12”deprofundidady3”másanchoquela
lámparabajotierra.Estopermitecolocaraproximadamente3”degravillaoarena
alrededordelacarcasadeacrilonitrilobutadienoestireno(ABS).
3) Jaleelanilloexternoylacubiertadelartefacto.Aojelostornillosdemariposa
paragirarelcuerpoprincipal.Desinstaleelescudeteeinsertelabombilla
recomendada.Reinstaleelescudete.Ajustelaluzalángulodeseadoyajustelos
tornillosdemariposa.
4) ColoquenuevamenteelcuerpoprincipalenlacarcasaABS,conloscables
colgandopordebajodelacarcasa.
5) Instaleelartefactoeneloricioylleneeloriciocongravillaoarenadespuésde
lainstalación.
6) Pelelosdoscablesdelartefacto.Conlosconectoresdecable,conéctelosdesde
elartefactohastaloscablesdelaalimentacióneléctrica.
7) Suministreenergíaalartefactoparavericarquefuncionaadecuadamente.
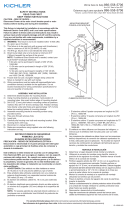
COVER
CUBIERTA
We’reheretohelp866-558-5706
Hrs:M-F9amto5pmEST
Estamosaquíparaayudarle866-558-5706
Horario:Lunes-Viernes9ama5pmEST(horaocialdeleste)
CANOPY
ESCUDETE
MAINBODY
CUERPOPRINCIPAL
OUTERRING
ANILLO
ABSHOUSING
CARCASAABS
THUMBSCREWS
TORNILLOSDEMARIPOSA
For warranty information please visit: kichler.com/customer-care/warranty-information/landscape-warranty
Para informacion de la garantia por favor visite: kichler.com/customer-care/warranty-information/landscape-warranty