Kichler Lighting 15495CBR Manual de usuario
- Tipo
- Manual de usuario

For warranty information please visit: kichler.com/warranty
Para informacion de la garantia por favor visite: kichler.com/warranty
INSTRUCTIONS PERTAINING TO A RISK OF FIRE,OR INJURY TO PERSONS
IMPORTANT SAFETY INSTRUCTIONS
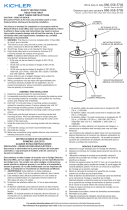
Lighted lamp is HOT!
WARNING — To reduce the risk of FIRE OR INJURY TO PERSONS.
1) Turn off / unplug and allow to cool before replacing lamp.
2) Lamp gets HOT quickly! Contact only switch / plug when turning on.
3) Do not touch hot lens or cowl.
4) Donottouchlamporxtureifwarm
5) Do not look directly at lamp when on.
6) Keep lamp away from combustible materials.
7) Useonlywithwattageandlampmarkedonxture.
8) Do not touch the inner glass envelope of the lamp at any time.
Use a soft cloth. Oil from skin may damage lamp.
9) Donotoperatethexturewithadamagedormissinglens.
SAFETY INSTRUCTIONS READ THIS FIRST
KEEP THESE INSTRUCTIONS
CAUTION – RISK OF SHOCK –
Disconnect Power at the main circuit breaker panel or main fusebox before starting and during
the installation.
This xture is intended for installation in accordance with the National Electric Code (NEC) and
Local code specications. Failure to adhere to these codes and instructions may result in serious
injury and/or property damage and will void the warranty. If you are not familiar with code require-
ments, installation by a certied electrician is recommended.
1) WARNING:Thisxtureisnottobeinstalledwithin10feet(3M)ofapool,spaorfountain.
2) Thisxtureistobeusedonlywithalistedpowerunit(transformer)ratedamaximumof300W(25
AMPS)15volts.
3) The#18ga.xturewireisnotintendedfordirectburialorconnectedtoatransformer.
4) Directburialratedwireistobeburiedaminimumof6"(152mm)beneaththesurfaceoftheground.
NOTE: IfadditionalDirectBurialwireisneeded,contactyourlocalKichler
®
landscape distributor.
• 8GAwirecanbepurchasedinlengthof250'(76M),15503-BK.
• 10GAwirecanbepurchasedinlengthof250'(76M),15504-BK.
• 12GAwirecanbepurchasedinlengthsof100'(30M),15501-BK;250'(76M),15502-BK;
500'(152M),15505-BK;and1000'(304M),15506-BK.
5) Fixtureshallnotuseatungstenhalogenlampunlessthextureismarkedforusewithsuchlamps.
6) Wiringconnectionsmustbemadewithapproved/listedwireconnectiondevice(s)suitableforthe
application.Donotexceedmanufacturers’wiringcombinationspecicationsforsizeandquantityof
conductors.
CAUTION
WHEN INSTALLING KICHLER LANDSCAPE LIGHTING (LINE VOLTAGE OR LOW VOLTAGE),
CARE SHOULD BE TAKEN TO KEEP CLEAR OF POTENTIALLY COMBUSTIBLE MATERIALS.
WHEN MAINTAINING THE FIXTURES, BE SURE TO REMOVE LEAVES, PINE NEEDLES, GRASS
CLIPPINGS, MULCH, OR ANY DEBRIS THAT HAS ACCUMULATED ON THE LIGHT BULB, LENS,
OR BODY OF THE FIXTURE.
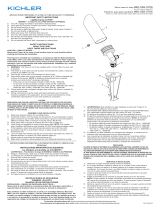
ASSEMBLY AND INSTALLATION
1) TURN OFF POWER.
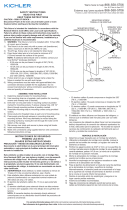
2) Determinedesiredlocationforinstallation.Checkareaforobstructionssuchassprinklers,plant
material,etc.Assesssoilconditions.
3) Digaholeapproximately12”deepby3”widerthanthewelllight.Thisallowsapproximately3”of
peagravelorsandtosurroundABShousing(Forconcreteapplications,usea51/4”coredrill,
12”deep).
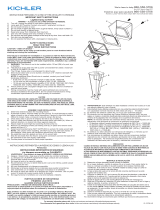
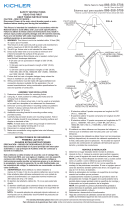
4) Withascrewdriver,loosencoverscrewsandinstalllampintosocket.
5) Returnthecoverbackon,aligntheholesandtightenscrewsaccordingtothestarpattern
shown in Fig. 1.
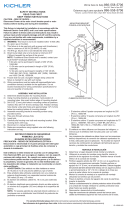
6) Stripthetwoleadwiresfromxturepigtailwire.Usingwireconnectors(notincluded),connectthe
leadsfromtheluminairetothemainsupplycableleads.Allow12-18”ofextrawire(coiledinside
the bottom of the well light) to allow for lamp removal / replacement.
7) Placextureatnalheightleaving1-2”ofthextureabovegradetominimizedebriscollection(in
lawnareastheyshouldbeushwithgrade).
8) Installluminaireinholeandllholeafterinstallationwithpeagravelorsand.Backllandcompact
thesoilaroundthexturethussecuringitintheground.
9) Restorepowertoxturetocheckforproperoperation.
Call Factory for additional installation options.
INSTRUCCIONES PERTINENTES A UN RIESGO DE ICENDIO
O LESION A LAS PERSONAS
INSTRUCCIONES IMPORTANTES DE SEGURIDAD
¡La lámpara encendida es CALIENTE!
ADVERTENCIA — Para disminuir el riesgo de INCENDIO O LESION A LAS PERSONAS.
1) Apague / desenchufe y deje que se enfríe antes de cambiar la lámpara.
2) ¡La lámpara se CALIENTA rápidamente! Haga contacto del conmutador/enchufe sólo cuando encienda.
3) No toque la lente o la capucha caliente.
4) No toque la lámpara o el artefacto si está caliente.
5) No mire directamente a la lámpara cuando esté encendida.
6) Mantengalalámparalejosdematerialesinamables.
7) Use solamente con el vatiaje y la lámpara marcados en el artefacto.
8) No toque el vidrio del interior de la lámpara en ningún momento. Use un paño suave. El aceite del
cuerpo puede dañar la lámpara.
9) No haga funcionar el artefacto con una lente dañada o faltante.
INSTRUCCIONES DE SEGURIDA PRIMERO LEA ESTO
GUARDE ESTAS INSTRUCCIONES
PRECAUCIÓN – RIESGO DE DESCARGA ELÉCTRICA –
Desconecte la electricidad en el panel principal del interruptor automático o caja principal de
fusibles antes de comenzar y durante la instalación.
Este artefacto se debe instalar de acuerdo con el Código Eléctrico Nacional (NEC, por sus siglas
en inglés) y con las especicaciones del código local. No cumplir con estos códigos e instruc-
ciones puede resultar en lesiones graves y/ o en daños a la propiedad y anulará la garantía. Si no
está familiarizado con los requisitos del código, la instalación se recomienda un electricista
certicado.
1) ADVERTENCIA:Esteartefactonodebeinstalarseamenosde10pies(3m)deunapiscina(alberca),
spa o fuente.
2) Esteartefactodebeutilizarsesolamenteconunaunidaddepotencia(tranformador)aprobadacon
capacidadnominalmáximade300vatios(25amp.)15voltios.
3) El cable del artefacto de 18 ga no está destinado para uso subterráneo directo ni para ser
conectado al transformador.
IS-15495-15496-15497-15498-15499-US
4) DeacuerdoconlosrequisitosdelCódigoEléctricoNacional(NECporsussiglaseninglés),el
alambreclasicadoparasoterradodirectosedebeenterrarunmínimode6pulgadas[152mm]debajode
lasuperciedelterreno.
NOTA: Siserequiereuncableparausosubterráneodirecto,contácteseconsudistribuidorde
paisajismo local de Kichler®.
• Elalambrecalibre8puedecomprarseenlongitudde250’(76m.),15503-BK
• Elalambrecalibre10puedecomprarseenlongitudde250’(76m.),15504-BK.
• Elalambrecalibre12puedecomprarseenlongitudesde75’(22m.),15550-BK;100’(30m.),
15501-BK;250’(76m.),15502-BK;500’(152m.),15505-BK;y1000’(304m.),15506-BK.
5) Elartefactonodebeutilizarseconlámparasdehalógeno,amenossqueelartefactoestémarcado
para usar con tales lámparas.
6) Lasconexionesdecableadosedebenhacerconlasconexionesdel(los)dispositivos)deconexión
decableadoaprobados/delalista,adecuadosparalaaplicación.Noexcedalasespecicaciones
de combinación de cableado del fabricante para el tamaño y cantidad de conductores.
PRECAUCION
CUANDO SE INSTALE SISTEMAS DE ALUMBRADO KICHLER PARA JARDINES (YA SEA DE
VOLTAJE DE LINEA O CON VOLTAJE BAJO) SE DEBE TENER CUIDADO DE MAINTNERLOS
ALEJADOS DE MATERIALES QUE PUEDAN SER COMBUSTIBLES EN POTENCIA.
AL DAR SERVICIO DE MANTENIMIENTO A ESTOS SISTEMAS, ASEGURESE DE DESPEJAR LAS
HOJAS, CONOS DE PINO, RECORTES DEL PASTO, CUBIERTA DE PAJA O CUALQUIER BASURA
QUE SE HAYA ACUMULADO EN LA BOMBILLA DE LUZ, EL LENTE O EL SOPORTE DE LA
BOMBILLA.
MONTAJE E INSTALACIÓN
1) DESCONECTE EL SUMINISTRO DE ENERGÍA ELÉCTRICA.
2) Determinelaubicacióndeseadaparalainstalación.Veriquequenohayaobstruccionesenla
zona,comoporejemploaspersores,materialvegetal,etc.Evalúelascondicionesdelsuelo.
3) Caveunpozodeaproximadamente12”deprofundidadquesea3”másanchoquelaluzdelpozo.
Estopermitecolocaraproximadamente3”degravillaoarenaporalrededordelacubiertaABS
(Parainstalacionesenconcreto,utiliceunabrocahuecade51/4”,12”deprofundidad).
4) Conayudadeundestornillador,aojelostornillosdelatapaeinstalelalámpara
en el portalámparas.
5) Vuelvaacolocarlatapaensulugar,alineandolosoriciosyajustandolostornillosconformeal
diseño de estrella que se muestra en la Fig. 1.
6) Pelelosdosconductoresprincipalesdelcableexibledelartefacto.Utilizandoconectoresdecable
(noproporcionados),conectelosconductoresdelaluminariaalosconductoresdelcablede
suministroeléctricoprincipal.Deje12-18”decableextra(enrolladodentrodelabasedelaluzdel
pozo)parapermitirelretiro/reemplazodelalámpara.
7) Coloqueelartefactoalaalturanaldejando1-2”delartefactoporencimadelniveldelterrenopara
minimizarlaacumulacióndesuciedad(enáreasdecésped,debencolocarseaniveldelsuelo).
8) Instalelaluminariaenelpozoyrelleneelpozocongravillaoarenaunaveznalizadalainstalación.
Vuela a rellenar y compacte el suelo alrededor del artefacto para asegurarlo en su lugar.
9) Vuelvaaconectarlaenergíaalartefactoparavericarsufuncionamientoadecuado.
Llame a la fábrica para obtener información sobre opciones de instalación adicionales.
We’re here to help 844-542-4537
Hrs: M-F 8am to 6:30pm EST
Estamos aquí para ayudarle 844-542-4537
Horario: Lunes-Viernes 8am a 6:30pm EST (hora ocial del este)
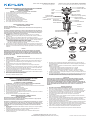
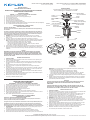
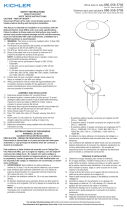
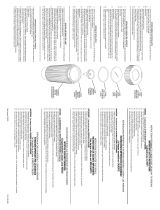
COVERSCREW
TORNILLODETAPA
COVER
TAPA
GLASS
VIDRIO
GASKET
JUNTA
LAMP(soldseparately)
LÁMPARA(sevendeporseparado)
SOCKETSCREW
TORNILLODELPORTALÁMPARAS
BRACKETSCREW
TORNILLODELSOPORTE
SOCKETCLIP
ABRAZADERA DEL
PORTALÁMPARAS
BRACKET
BRACKETSOPORTE
HOUSING
CUBIERTA
CORDGRIP
SUJECIÓNDELCORDÓN
WIRE
CABLE
Fig. 1
1
2
3
4
5
15495
Flat Glass Cover
TapadeVidrioPlana
15497
Rockguard Cover
TapadelaProtección
ContraPiedras
15498
Indicator Cover
Tapa del Indicador
15496
Cowl Cover
Tapa de la Capucha
15499
Side-FireCover
Tapa Contra Incendios
SOCKET
PORTALÁMPARAS
La página se está cargando...
Transcripción de documentos
We’re here to help 844-542-4537 Estamos aquí para ayudarle Hrs: M-F 8am to 6:30pm EST INSTRUCTIONS PERTAINING TO A RISK OF FIRE,OR INJURY TO PERSONS IMPORTANT SAFETY INSTRUCTIONS Lighted lamp is HOT! 1) 2) 3) 4) 5) 6) 7) 8) 9) WARNING — To reduce the risk of FIRE OR INJURY TO PERSONS. Turn off / unplug and allow to cool before replacing lamp. Lamp gets HOT quickly! Contact only switch / plug when turning on. Do not touch hot lens or cowl. Do not touch lamp or fixture if warm Do not look directly at lamp when on. Keep lamp away from combustible materials. Use only with wattage and lamp marked on fixture. Do not touch the inner glass envelope of the lamp at any time. Use a soft cloth. Oil from skin may damage lamp. Do not operate the fixture with a damaged or missing lens. 844-542-4537 Horario: Lunes-Viernes 8am a 6:30pm EST (hora oficial del este) COVER SCREW TORNILLO DE TAPA COVER TAPA GLASS VIDRIO GASKET JUNTA LAMP (sold separately) LÁMPARA (se vende por separado) SOCKET SCREW TORNILLO DEL PORTALÁMPARAS SOCKET PORTALÁMPARAS SOCKET CLIP ABRAZADERA DEL PORTALÁMPARAS BRACKET SCREW TORNILLO DEL SOPORTE BRACKET BRACKET SOPORTE SAFETY INSTRUCTIONS READ THIS FIRST KEEP THESE INSTRUCTIONS HOUSING CUBIERTA CAUTION – RISK OF SHOCK – Disconnect Power at the main circuit breaker panel or main fusebox before starting and during the installation. This fixture is intended for installation in accordance with the National Electric Code (NEC) and Local code specifications. Failure to adhere to these codes and instructions may result in serious injury and/or property damage and will void the warranty. If you are not familiar with code requirements, installation by a certified electrician is recommended. 1) WARNING: This fixture is not to be installed within 10 feet (3M) of a pool, spa or fountain. 2) This fixture is to be used only with a listed power unit (transformer) rated a maximum of 300 W (25 AMPS) 15 volts. 3) The #18 ga. fixture wire is not intended for direct burial or connected to a transformer. 4) Direct burial rated wire is to be buried a minimum of 6" (152mm) beneath the surface of the ground. NOTE: If additional Direct Burial wire is needed, contact your local Kichler® landscape distributor. • 8 GA wire can be purchased in length of 250' (76 M), 15503-BK. • 10 GA wire can be purchased in length of 250' (76 M), 15504-BK. • 12 GA wire can be purchased in lengths of 100' (30 M), 15501-BK; 250' (76 M), 15502-BK; 500' (152M), 15505-BK; and 1000' (304 M), 15506-BK. 5) Fixture shall not use a tungsten halogen lamp unless the fixture is marked for use with such lamps. 6) Wiring connections must be made with approved/listed wire connection device(s) suitable for the application. Do not exceed manufacturers’ wiring combination specifications for size and quantity of conductors. CORD GRIP SUJECIÓN DEL CORDÓN 1 3) 4) 5) 6) 7) 8) 9) ASSEMBLY AND INSTALLATION TURN OFF POWER. Determine desired location for installation. Check area for obstructions such as sprinklers, plant material, etc. Assess soil conditions. Dig a hole approximately 12” deep by 3” wider than the well light. This allows approximately 3” of pea gravel or sand to surround ABS housing (For concrete applications, use a 5 1/4” core drill, 12” deep). With a screwdriver, loosen cover screws and install lamp into socket. Return the cover back on, align the holes and tighten screws according to the star pattern shown in Fig. 1. Strip the two lead wires from fixture pigtail wire. Using wire connectors (not included), connect the leads from the luminaire to the main supply cable leads. Allow 12-18” of extra wire (coiled inside the bottom of the well light) to allow for lamp removal / replacement. Place fixture at final height leaving 1-2” of the fixture above grade to minimize debris collection (in lawn areas they should be flush with grade). Install luminaire in hole and fill hole after installation with pea gravel or sand. Backfill and compact the soil around the fixture thus securing it in the ground. Restore power to fixture to check for proper operation. 2 1) 2) 3) 4) 5) 6) 7) 8) 9) ADVERTENCIA — Para disminuir el riesgo de INCENDIO O LESION A LAS PERSONAS. Apague / desenchufe y deje que se enfríe antes de cambiar la lámpara. ¡La lámpara se CALIENTA rápidamente! Haga contacto del conmutador/enchufe sólo cuando encienda. No toque la lente o la capucha caliente. No toque la lámpara o el artefacto si está caliente. No mire directamente a la lámpara cuando esté encendida. Mantenga la lámpara lejos de materiales inflamables. Use solamente con el vatiaje y la lámpara marcados en el artefacto. No toque el vidrio del interior de la lámpara en ningún momento. Use un paño suave. El aceite del cuerpo puede dañar la lámpara. No haga funcionar el artefacto con una lente dañada o faltante. 15495 Flat Glass Cover Tapa de Vidrio Plana 15496 Cowl Cover Tapa de la Capucha 15497 Rockguard Cover Tapa de la Protección Contra Piedras 15498 Indicator Cover Tapa del Indicador 5 Fig. 1 15499 Side-Fire Cover Tapa Contra Incendios 4) 5) 6) Call Factory for additional installation options. INSTRUCCIONES PERTINENTES A UN RIESGO DE ICENDIO O LESION A LAS PERSONAS INSTRUCCIONES IMPORTANTES DE SEGURIDAD ¡La lámpara encendida es CALIENTE! 3 4 CAUTION WHEN INSTALLING KICHLER LANDSCAPE LIGHTING (LINE VOLTAGE OR LOW VOLTAGE), CARE SHOULD BE TAKEN TO KEEP CLEAR OF POTENTIALLY COMBUSTIBLE MATERIALS. WHEN MAINTAINING THE FIXTURES, BE SURE TO REMOVE LEAVES, PINE NEEDLES, GRASS CLIPPINGS, MULCH, OR ANY DEBRIS THAT HAS ACCUMULATED ON THE LIGHT BULB, LENS, OR BODY OF THE FIXTURE. 1) 2) WIRE CABLE De acuerdo con los requisitos del Código Eléctrico Nacional (NEC por sus siglas en inglés), el alambre clasificado para soterrado directo se debe enterrar un mínimo de 6 pulgadas [152 mm] debajo de la superficie del terreno. NOTA: Si se requiere un cable para uso subterráneo directo, contáctese con su distribuidor de paisajismo local de Kichler®. • El alambre calibre 8 puede comprarse en longitud de 250’ (76 m.), 15503-BK • El alambre calibre 10 puede comprarse en longitud de 250’ (76 m.), 15504-BK. • El alambre calibre 12 puede comprarse en longitudes de 75’ (22 m.), 15550-BK; 100’ (30 m.), 15501-BK; 250’ (76 m.), 15502-BK; 500’ (152 m.), 15505-BK; y 1000’ (304 m.), 15506-BK. El artefacto no debe utilizarse con lámparas de halógeno, a menoss que el artefacto esté marcado para usar con tales lámparas. Las conexiones de cableado se deben hacer con las conexiones del(los) dispositivos) de conexión de cableado aprobados/ de la lista, adecuados para la aplicación. No exceda las especificaciones de combinación de cableado del fabricante para el tamaño y cantidad de conductores. PRECAUCION CUANDO SE INSTALE SISTEMAS DE ALUMBRADO KICHLER PARA JARDINES (YA SEA DE VOLTAJE DE LINEA O CON VOLTAJE BAJO) SE DEBE TENER CUIDADO DE MAINTNERLOS ALEJADOS DE MATERIALES QUE PUEDAN SER COMBUSTIBLES EN POTENCIA. AL DAR SERVICIO DE MANTENIMIENTO A ESTOS SISTEMAS, ASEGURESE DE DESPEJAR LAS HOJAS, CONOS DE PINO, RECORTES DEL PASTO, CUBIERTA DE PAJA O CUALQUIER BASURA QUE SE HAYA ACUMULADO EN LA BOMBILLA DE LUZ, EL LENTE O EL SOPORTE DE LA BOMBILLA. 1) 2) 3) 4) INSTRUCCIONES DE SEGURIDA PRIMERO LEA ESTO GUARDE ESTAS INSTRUCCIONES 5) PRECAUCIÓN – RIESGO DE DESCARGA ELÉCTRICA – Desconecte la electricidad en el panel principal del interruptor automático o caja principal de fusibles antes de comenzar y durante la instalación. 6) Este artefacto se debe instalar de acuerdo con el Código Eléctrico Nacional (NEC, por sus siglas en inglés) y con las especificaciones del código local. No cumplir con estos códigos e instrucciones puede resultar en lesiones graves y/ o en daños a la propiedad y anulará la garantía. Si no está familiarizado con los requisitos del código, la instalación se recomienda un electricista certificado. 1) ADVERTENCIA: Este artefacto no debe instalarse a menos de 10 pies (3 m) de una piscina (alberca), spa o fuente. 2) Este artefacto debe utilizarse solamente con una unidad de potencia (tranformador) aprobada con capacidad nominal máxima de 300 vatios (25 amp.) 15 voltios. 3) El cable del artefacto de 18 ga no está destinado para uso subterráneo directo ni para ser conectado al transformador. 7) 8) 9) MONTAJE E INSTALACIÓN DESCONECTE EL SUMINISTRO DE ENERGÍA ELÉCTRICA. Determine la ubicación deseada para la instalación. Verifique que no haya obstrucciones en la zona, como por ejemplo aspersores, material vegetal, etc. Evalúe las condiciones del suelo. Cave un pozo de aproximadamente 12” de profundidad que sea 3” más ancho que la luz del pozo. Esto permite colocar aproximadamente 3” de gravilla o arena por alrededor de la cubierta ABS (Para instalaciones en concreto, utilice una broca hueca de 5 1/4”, 12” de profundidad). Con ayuda de un destornillador, afloje los tornillos de la tapa e instale la lámpara en el portalámparas. Vuelva a colocar la tapa en su lugar, alineando los orificios y ajustando los tornillos conforme al diseño de estrella que se muestra en la Fig. 1. Pele los dos conductores principales del cable flexible del artefacto. Utilizando conectores de cable (no proporcionados), conecte los conductores de la luminaria a los conductores del cable de suministro eléctrico principal. Deje 12-18” de cable extra (enrollado dentro de la base de la luz del pozo) para permitir el retiro/reemplazo de la lámpara. Coloque el artefacto a la altura final dejando 1-2” del artefacto por encima del nivel del terreno para minimizar la acumulación de suciedad (en áreas de césped, deben colocarse a nivel del suelo). Instale la luminaria en el pozo y rellene el pozo con gravilla o arena una vez finalizada la instalación. Vuela a rellenar y compacte el suelo alrededor del artefacto para asegurarlo en su lugar. Vuelva a conectar la energía al artefacto para verificar su funcionamiento adecuado. Llame a la fábrica para obtener información sobre opciones de instalación adicionales. For warranty information please visit: kichler.com/warranty Para informacion de la garantia por favor visite: kichler.com/warranty IS-15495-15496-15497-15498-15499-US-
 1
1
-
 2
2


Kichler Lighting 15495CBR Manual de usuario
- Tipo
- Manual de usuario
en otros idiomas
Artículos relacionados
-
Kichler Lighting 15788CBR Manual de usuario
-
 Kichler Lighting 15786CBR Manual de usuario
-
 Kichler Lighting 15785CO Manual de usuario
-
 Kichler Lighting 15310AZT Manual de usuario
-
 Kichler Lighting 15079AZT Manual de usuario
-
 Kichler Lighting 15066AZT Manual de usuario
-
 Kichler Lighting 15065AZT Manual de usuario
-
 Kichler Lighting 15783CBR Manual de usuario
-
 Kichler Lighting 15190BK Manual de usuario
-
 Kichler Lighting 16027SS30 Manual de usuario


