Samsung DV42H5600GW/A3-00 El manual del propietario
- Categoría
- Secadoras
- Tipo
- El manual del propietario
Este manual también es adecuado para

and Electric
Usermanual
Dryer
Imaginethepossibilities
Tha_ _] 2,',Ju _or pur _h]_lrl-1 thl_ J__lli_,arl_lprOdu,_t

I Content
Safety instructions
What you need to know about safety instructions ..................................................... 4
Important safety symbols and precautions .............................................................. 4
Important safety instructions ......................................................................... 6
Installing your dryer
Unpacking your dryer ................................................................................ 8
What's included ...................................................................................... 8
Accessories ............................................................................................. 8
Important to installer ................................................................................. g
Basic requirements ................................................................................... 9
Grounding ........................................................................................... 9
Gas models ............................................................................................. 9
Electric models .......................................................................................... 9
Location considerations ............................................................................. 10
Alcove or closet installations ......................................................................... 10
Ducting requirements ............................................................................... 12
Exhausting ............................................................................................ 13
Dryer exhaust tips ..................................................................................... 14
Gas requirements .................................................................................... 15
Commonwealth of massachusetts installation instructions ............................................ 15
Electrical requirements .............................................................................. 16
Electrical connections ................................................................................. 16
Connecting the inlet hose ........................................................................... 18
Replacement parts and accessories .................................................................. 19
Installation .......................................................................................... 19
Door reversal ........................................................................................ 20
Final installation checklist ............................................................................ 21
Operating instructions, tips / /
Overview of the control panel ........................................................................ 22
Load the dryer properly ............................................................................... 26
Getting started ........................................................................................ 26
Rack dry .............................................................................................. 28
Child Lock............................................................................................. 29
Drum Light ........................................................................................... 29
English _2

SoundOff.............................................................................................29
MyCycle..............................................................................................30
SmartCare............................................................................................30
VentSensor...........................................................................................31
Care and cleaning
Control panel ......................................................................................... 32
Tumbler ............................................................................................... 32
Stainless steel tumbler ................................................................................ 32
Dryer exterior ......................................................................................... 32
Dryer exhaust system ................................................................................. 32
Clean the lint filter .................................................................................... 32
Special laundry tips
Special laundry tips .................................................................................. 33
Troubleshooting
Check these points if your dryer ...................................................................... 34
Information codes ................................................................................... 35
Appendix
Fabric care chart ..................................................................................... 36
Protecting the environment .......................................................................... 37
Declaration of conformity ............................................................................ 37
Specifications ....................................................................................... 37
English _3

I Safety instructions
Congratulations on your new Samsung Dryer.This manual contains important information on the installation, use,
and care of your appliance. Please take the time to read this manual to take full advantage of your dryer's many
benefits and features.
What gou need to know about safetg instructions
Please read this manual thoroughly to ensure that you know how to operate the extensive features and functions
of your new appliance safely and efficiently. Retain the manual in a safe place near the appliance for future
reference. Use this appliance only for its intended purpose as described in this instruction manuakThe Warnings
and Important Safety Instructions in this manual do not cover all possible conditions and situations that may
occur. It is your responsibility to use common sense, caution, and care when installing, maintaining, or operating
your dryer.
Always contact your manufacturer about problems or conditions you do not understand.
Important safety SLJmbOIsand precautions
WARNING: Hazards or unsafe practices that may result in severe physical injury, death and/or
_ property damage.
Follow the information in this manual to minimize the risk of fire or explosion or to preverst property
damage, personal in]ury, or death.
i t
A CAUTION: Hazards or unsafe practices that may result in physical injury and/or property damage.
NOTE
These warning signs are here to prevent injury to you and others.
Please follow them explicitly.
After reading this section, keep it in a safe place for future reference.
SAVETHESE INSTRUCTIONS
English _4

i •
i" _ y r" I" p rf y q a" " ta .
i " install the clothes dryer according to the manufacturer's instructions and local codes.
i " Do not install a clothes dryer with flexible plastic venting materials. If flexible metal (foil type) duct is
i installed, it must be of a specific type identified by the appliance manufacturer as suitable for use with
i clothes dryers. Flexible venting materials are known to collapse, be easily crushed, and trap lint.These
i conditions will obstruct clothes dryer airflow and increase the risk of fire.
i " To reduce the risk of severe injury or death, follow all installation instructions.
,A TO REDUCE THE RISK OF FIRE OR EXPLOSION:
Do not dry items that have been previously cleaned, washed, soaked, or spotted with gasoline, dry cleaning
solvents, or other flammable or explosive substances.They emit vapors that could ignite or explode. Any
material that has been in contact with a cleaning solvent or flammable liquids or solids should not be placed
in the dryer until all traces of these flammable liquids or solids and their fumes have been removed.
There are many highly flammable items used in homes, such as acetone, denatured alcohol, gasoline,
kerosene, some liquid household cleaners, some spot removers, turpentine, waxes, and wax removers.
Do not dry items containing foam rubber (may be labeled latex foam) or similarly textured rubberqike
materials on a heat setting. Heated foam rubber materials can, under certain circumstances, produce fire by
spontaneous combustion.
A WHATTODOIF YOUSMELL GAS:
Do not try to light any appliance.
Do not turn on the appliance.
Do not touch any electrical switch.
Do not use any phone in your building.
Clear the room, building or area of all occupants.
immediately call your gas supplier from a neighbor's phone. Follow the gas supplier's instructions.
If you cannot reach your gas supplier, call the fire department.
Installation and service must be performed by a qualified installer, service agency, or the gas supplier.
SAVETHESEINSTRUCTIONS
English _5

Important safety instructions
WARNING
To reduce the risk of fire, electric shock, or injury to persons when using your appmiance, follow basic
precautions, including the following:
1. Read all instructions before using this appliance.
2. Do not use the dryer to dry clothes which have traces of any flammable substance, such as vegetable oil,
cooking oil, machine oil, flammable chemicals, thinner, etc., or anything containing wax or chemicals, such as
mops and cleaning cloths. Flammable substances may cause the fabric to catch fire by itself.
3. Do not store or use gasoline or other flammable vapors and liquids near this or any other appliance.
4. Do not allow children or pets to play on, in, or in front of the appliance. Close supervision is necessary when
the appliance is used near children and pets.
5. Before the appliance is removed from service or discarded, remove the door to the drying compartment to
prevent children or animals from becoming trapped inside.
6. Do not reach into the appliance when the drum is moving.
7. Do not install or store this appliance where it will be exposed to the weather.
8. Do not tamper with the internal controls.
9. Do not repair or replace any part of the appliance or attempt any servicing unless specifically recommended
in the user-maintenance instructions or published in the user-repair instructions that you understand and
have the skills to carry out.
10. Do not use fabric softeners or products to eliminate static unless recommended by the manufacturer of the
fabric softener or product.
11. Clean the lint screen before or after each load.
12. Do not use heat to dry articles containing foam rubber or similarly textured rubberqike materials.
13. Keep the area around the exhaust opening and surrounding areas free from lint, dust, and dirt.
14. The interior of the dryer and exhaust duct should be cleaned periodically by qualified service personnel.
15. Do not place items exposed to cooking oils in your dryer. Items contaminated with cooking oils may
contribute to a chemical reaction that could cause a load to catch fire.
16. This appliance must be grounded. See"Electrical requirements" and "Grounding"in the"lnstalling your dryer"
section.
17. This appliance must be properly grounded. Never plug the power cord into a receptacle that is not grounded
adequately and in accordance with local and national codes. Refer to installation instructions for grounding
this appliance.
18. Ensure pockets are free from small irregularly shaped hard objects and foreign material, i.e.coins, knives, pins,
etc.These objects could damage your dryer.
19, Gas leaks may occur in your system, resulting in a dangerous situation.
20. Gas leaks may not be detected by smell alone.
21. Gas suppliers recommend you purchase and install a Ubapproved gas detector.
22. Control board and inlet valve are intentionally not grounded and may present a risk of electric shock only
during servicing. Service personnel - do not contact this part while appliance is energized.
SAVETHESEINSTRUCTIONS
English _6

WARNING
GasAppliances:
WARNING: This product contains chemicals known to the State of California to cause cancer and reproductive
toxicity.
Gas appliances can cause low-level exposure to Proposition 65 listed substances, including but not limited to,
benzene, carbon monoxide, formaldehyde and soot, substances resulting from the incomplete combustion of
natural gas or LPfuels.
A CAUTION
1. Do not sit on top of the dryer.
2. Because of continuing product improvements, Samsung reserves the right to change specifications without
notice. For complete details, see the Installation Instructions packed with your product before selecting
cabinetry, making cutouts, or beginning installation.
B. Do not wash clothing with large buckles, buttons, or other heavy metal or solid things.
4. Install and use in accordance with the manufacturer's instructions.
5. All washed and unwashed fabrics that contain vegetable oil or cooking oil can be dangerous. Washing these
items in hot water with extra detergent will reduce, but not eliminate, the hazard. Always use the Cool Down
cycle for these items to reduce their temperature. Never remove these items from the dryer hot or interrupt
the drying cycle until the items have run through the Cool Down cycle. Never pile or stack these items when
they are hot.
6. Take care that children's fingers are not caught in the door when closing it. This may result in injury.
SAVETHESEINSTRUCTIONS
English _7

I Installing your dryer
Unpacking your dryer
Unpack your [)rye, and inspect it for shipping damage. Make sure you have received all the items shown below. If
your Dryer was damaged during shipping, or you do not have all the items, contact 1-800-SAMSUNG (726-7864).
,_ WARNING
The packing r-hate,laB cart be dangerous to children. Keep all packaging material (plastic bags,
polystyrene, etc.) well out of the reach of children.
To prevent personal injury or strain, wear protective gloves whenever lifting or carrying the unit.
What's included
(_ \
\\\
......................................./'
I Accessories
/ ,<
"Y"<onnector Rubber Washer
English-8

Important to installer
Please read the following instructions carefully before installing the dryer.These instructions should be kept for
future reference.
_1_ ARNING: Remove the door from all discarded appliances to avoid the danger of a child being trapped
and suffocating.
Basic requirements
Make sure you have everything necessary for the proper installation
A GROUNDED ELECTRICALOUTLET is required.
A POWER CORD eEectric dryer (except for Canada).
GAS LINES(ira gas dryer) must meet national and local codes.
The EXHAUST SYSTEM must be made of rigid metal or flexible stiff-walled metal exhaust ducting.
Grounding
This dryer must be grounded, in the event of a malfunction or breakdown, grounding the product will reduce the
risk of electrical shock by providing a path of least resistance for the electrical current.
Gas models
Your dryer has a cord with an equipment-grounding conductor and a grounding plug.
The plug must be plugged into an appropriate outlet that is properly installed and grounded in accordance
with aleEocaEcodes and ordinances.
Do not modify the plug provided with your dryer if it doesn't fit the outlet, have a proper outlet installed by
a qualified electrician.
Never connect the ground wire to the plastic plumbing lines, gas lines, or hot water pipes.
Electricmodels
Your dryer has an optional cord with an equipment-grounding conductor and a grounding plug, which is sold
separately.
The plug must be plugged into an appropriate outlet that is properly installed and grounded in accordance
with aleEocaEcodes and ordinances.
Do not modify the plug provided with your dryer if it doesn't fit the outlet, have a proper outlet instalEed by
a qualified electrician.
Ira power cord is not used and the electric dryer is to be permanently wired, the dryer must be connected to
a permanently grounded metal wiring system, or an equipment grounding conductor must be run with the
circuit conductors and connected to the equipment grounding terminal or lead on the dryer.
English-9

Location considePations
The dryer should be located where there is enough space at the front for loading the dryer, and enough space
behind for the exhaust system. This dryer is factory-ready for the rear exhaust option. To exhaust out the bottom,
right or the left, usethe accessory exhaust kit. Instructions are included with the kit. Make sure the room in which
the dryer is located has enough fresh air.The dryer must be located where there are no air-now obstructions.
For gas dryers, adequate clearance must be maintained as noted on the data plate to ensure adequate air for
combustion and the proper dryer operation.
The dryer must not be installed or stored in an area where it will be exposed to water and/or weather.The dryer
area must be kept clear of combustible materials, gasoline, and other flammable vapors and liquids. A dryer
produces combustible lint.The area around the dryer should be kept lint-free.
Alcove or closet installations
_lk WARNING
The dryer must be exhausted to the outside to reduce the risk of fire when installed in an alcove or
closet.
No other fuePbuming appliance should be installed in the same closet as the dryer.
Minimum clearances between the dryer and adjacent walls or other surfaces:
i Sides ! n!25mm! iRear-- 1.59 n!!5Omm!
jmon i ] Closet l:roni 2 !n !57 ra!! j
A 1in. (25 mm)
_1 _A B 27 in. (686 ram)
C 17 in. (432 mr-n)
D 2 in. (50 mr-n)
E 32.4 in. (823 mm)
F 5 in.(127 ram)
Recessedarea
Sideview
(closetorconfined area)
English _10

Installation with pedesta!
A
D
/
E "1T
A 38.7 in. (984 ram)
B 53.3in.(1355mm)
C 27 in.(686mm)
53 in. (]345ram) to
D
clearopen door
E 32.4 in. (823 mm)
F 5 in.(127 mm)
Installation with stacked washing machineand drger
i< L
A
IB
v
E
i
H _I_K
A 3 in.(76 ram)
B 48 in} (3100 mm 2)
C 24in}(]SS0mm 2)
D 3 in. (76 ram)
E 6 in.(152 mm) _
F 77.5 in. (1968 mm)
i i
G 1in. (25 ram)
H 27 in. (686 ram)
I 5 in.(127 mm)
i J 1in.(25 mm)
j t
i K 32.4 in. (82.3 mm)
i '
i L , 8in.(203 mm)
The front of the closet must have two unobstructed air openings (B, C) for a combined minimum total
area of 72 in2(46.5 cm 2)with a minimum clearance of 3 in. (7.6 cm) at the top (A) and bottom (D).
External exhaust elbow requires additional space (L).
Stacking (MODEL NO: SK-SA)
Samsung's Washer and Dryer carl be stacked to maximize usable space.
The dryer legs need to be removed to stack the Washer and Dryer. You can purchase an optional stacking
kit from your Samsung retailer.
English _11

Ducting pequipements
4"(10.16 cm) _ 2.5"(6.35 cm)
i Recom{nended Use only for sho(t-run insta%tion
j Rigid Metallic Flexible _ Rigid Metallic Flexible _
J 0 24.4 m (80 ft.) 12.4 m (4] ft.) 22.6 m (74 ft.) 10.] m (33 ft.)
i
i
i ] 20.7 m (68 ft.) 1].2 m (37 ft.) ]8.9 m (62 ft.) 8.8 m (29 ft.)
j ]7.4 m (57 ft.) . 10.] m (33 ft.) ]5.5 m (51 ft.) . 7.6 m (25 ft.) ,
i
l 3 ] 4.3 m (47 ft.) 9.0 m (29 ft.) ] 2.5 m (41 ft.) 6.5 m (21 ft.)
Do not use non-metallic flexible ducts.
Use a 4 inch (10.2 cm) diameter rigid aluminum or rigid galvanized steel duct.
Do not use a smaller duct.
Ducts larger than 4 inches (10.2 cm) in diameter can result in increased accumulation of lint.
Lint should be removed regularly.
if a flexible metal duct must be used, use the type with a stiff sheet metal wall. Do not use a flexible duct with
a thin foil wall. A serious blockage can result ifthe flexible metal duct is bent too sharply.
Never install any type of flexible duct in walls, ceilings, or other concealed spaces.
Keep the exhaust duct as straight and short as possible.
Securejoints with duct tape. Do not use screws.
Plastic flexible ducts can kink, sag, be punctured, reduce airflow, extend drying times, and affect the dryer
operation.
Exhaust systems longer than recommended can extend drying times, affect machine operations, and collect
lint.
The exhaust duct should end with an exhaust hood with a swing-out damper to prevent back drafts and
entry of wildlife. Never use an exhaust hood with a magnetic damper.
The hood should have at least 12 inches (30.5 cm) of clearance between the bottom of the hood and the
ground or other obstruction. The hood opening should point down.
Never install a screen over the exhaust outlet.
To avoid lint buildup, do not exhaust the dryer directly into a window well. Do not exhaust under a house or
porch.
If the exhaust duct must run through an unheated area, the duct should be insulated and slope slightly down
towards the exhaust hood to reduce condensation and lint buildup.
Inspect and clean the interior of the exhaust system at least once a year. Unplug the power cord before
cleaning.
Check frequently to make sure the exhaust hood damper opens and closes freely.
Check once per month, and clean at least once per year. Note: If your clothes are not getting dry, then check
the duct for obstructions.
Do not exhaust the dryer into a wall, ceiling, crawl space, or concealed space of a building, gas vent, or any
other common duct or chimney.This could create a fire hazard from the lint expelled by the dryer.
English- 12

If the new dryer is installed into an existing exhaust system you must make sure:
The exhaust system meets all local, state, and national codes.
That a flexible plastic duct is not used.
To inspect and clean all lint buildup from inside the existing duct.
The duct is not dented or crushed.
The exhaust hood damper opens and closes freely.
The static pressure in any exhaust system must not exceed 0.83 inches of water column, or be less than 0.
This can be measured with the dryer running with a manometer at the point where the exhaust duct
connects to the dryer. A no-heat setting should be used.The dryer tumbler should be empty and the lint filter
clean.
Exhausting
The dryer shall not be exhausted into a chimney, a wall, a ceiling, an attic, a crawl space, or a concealed space of a
building.
Exhausting the dryer to the outside will prevent large amounts of lint and moisture from being blown into the
room.
• All dryers must be exhausted to the outside.
Do not assemble the duct with screws or other fastening means that extend into the duct and catch
lint.
The exhaust duct should be 4 inches (102 ram) in diameter.
The total length of flexible metal duct shall not exceed 2.4 m (7.8 ft.).
Znthe United States:
Use only those foiPtype flexible ducts, if any, specifically identified for use with the appliance by the manufacturer
and that comply with the Outline for Clothes Dryer Iransition Ducts, Subject 2158A.
ZnCanada:
Use only those foiPtype flexible ducts, if any, specifically identified for use with the appliance by the manufacturer.
Outside the U,Sand Canada:
Refer to the local codes.
,_ WARNING
The dryer must be exhausted to the outside to reduce the risk of fire when installed in an alcove or
closet.
NEVERUSE A PLASTICOR NON-METAL FLEXIBLEDUCT.
If your existing ductwork is plastic, non-metal, or combustible, replace it with metal.
Use only a metal exhaust duct that is non-flammabb to ensure containment of the exhaust air, heat,
and lint.
English _13

DrLjer exhaust tips
WARNING: A plastic or non-metal flexible duct presents a potential fire hazard.
Make sure your dryer is installed properly so it exhausts air easily.
Use a 4" diameter rigid metal duct. Tape all joints, including at the dryer. 4"
Tape
Never use lint-trapping screws.
Keep ducts as straight as possible.
Clean all old ducts before installing your new dryer.
Be sure the vent flap opens and closes freely.
Inspect and clean the exhaust system annually .....
Don't let a poor exhaust sgstem slow the drging process bg:
Restricting your dryer with a poor exhaust system.
Using a plastic, thin foil, or non-metal flexible duct.
Unnecessarily using long ducts that have many elbows.
Allowing dented or clogged ducts and vent.
English _14

Gas pequipements
THE INSTALLATION MUST CONFORM WITH LOCAL CODES, OR INTHE ABSENCE OF LOCAL CODES, WITH
THE NATIONAL FUEL GAS CODE ANSI/Z223.1, LATEST REVISION (FOR THE UNITED STATES),OR WITH THE
CAN/CGA-B149 INSTALLATION CODES (FOR CANADA).
Use only natural or LP (liquid propane) gases.
This dryer designed for use with natural gas. If you plan to use your dryer with LP gas (liquid propane), the
conversion must be done by a qualified service technician in order to achieve safe and proper performance.
A 1/2 inch (1.27 cm) gas supply line is recommended and must be reduced to connect to the 3/8 inch (1 cm)
gas line on your dryer.The National Fuel Gas Code requires that an accessible, approved manual gas shut-off
valve be installed within 6 inches of your dryer.
Gas dryers installed in residential garages must be raised 18 inches (46 cm) above the floor.
Additionally, a 1/8 inch (0.3 cm) N.RT.(National PipeThread) plugged tapping, accessible for test gauge
connection, must be installed immediately upstream of your dryer's gas supply connection.
Your dryer must be disconnected from the gas supply pipe system during any pressure testing of the system.
DO NOT reuse old flexible metal gas lines. Flexible gas lines must be design certified by the American Gas
Association (CGA in Canada).
• Any pipe joint compound used must be resistant to the action of any liquefied petroleum gas.
As a courtesy, most local gas utilities will inspect a gas appliance installation.
GAS IGNITION -Your dryer uses an automatic ignition system to ignite the burner.There is no constant
burning pilot.
Commonwealth of massachusetts installati0n instructions
Your dryer must be installed by a licensed plumber or gas fitter. A'T" handle manual gas valve must be installed in
the gas supply line to your dryer. If a flexible gas connector is used to install your dryer, the connector may not be
longer than 3 feet (36 inches).
WARNING
Gas leaks may occur in your system, creating a dangerous situation.
Gas leaks may not be detected by smell alone.
Gas suppliers recommend that you purchase and install a Ubapproved gas detector.
Install and use it in accordance with the manufacturer's instructions.
English- 15

Electrical requirements
The wiring diagram is located on the plate below the control panel.
_k WARNING
The improper connection of the equipment grounding conductor carl result in a risk of electric
shock. Check with a qualified eEectrician or serviceman ifyou are in doubt as to whether your dryer is
propedy grounded. Do not modify the plug provided with your dryer - if it doesn't fit the outlet, have
a proper outlet installed by a qualified electrician.
To prevent unnecessary risk of fire, electrical shock, or personal injury, all wiring and grounding must
be done in accordance with local codes, or in the absence of local codes, with the National Electrical
Code, ANSI/NFPA No. 70-Latest Revision (for the U.S.)or the Canadian Electrical Code CSA C22.1 -
Latest Revisions and local codes and ordinances. It isyour responsibility to provide adequate electrical
services for your dryer.
All gas installations must be done in accordance with the national Fuel Code ANSI/Z2231 - Latest
Revision (for the U.S.) or CAN/CGA - B149 Installation Codes - Latest Revision (for Canada) and local
codes and ordinances.
Electrical c0nnecti0ns
Before operating or testing, follow all grounding instructions in the "Grounding" section on page 13.
An individual branch (or separate) circuit serving only your dryer is recommended. DO NOT USEAN EXTENSION
CORD.
6as models = U,S,and Canada
A 120 volt, 60 Hz AC approved electrical service, with a 15-ampere fuse or circuit breaker is required.
Electric models = U.S.0nlg
Most U.S.dryers require a 120/240 volt, 60 Hz AC approved electrical service. Some require 120/208 volt, 60 Hz
approved electrical service.The electric service requirements can be found on the data label located behind the
door. A 30-ampere fuse or circuit breaker on both sides of the line is required.
Ira power cord is used, the cord should be plugged into a 30-ampere receptacle.
The power cord is NOT provided with U.S.electric model dryers.
WARNING - RISK OF ELECTRIC SHOCK
When local codes allow, the electrical supply of the dryer may be connected by means of a new power
supply cord kit, marked for use with a dryer, that is U.L listed and rated at a minimum of 120/240 volts,
30-ampere with three No. 10copper wire conductors terminated with closed loop terminals, open-end
spade lugs with turned up ends, or with tinned leads.
Do not reuse a power supply cord from an old dryer.The power cord electric supply wiring must be
retained at the dryer cabinet with a suitable ULqisted strain relief.
Grounding through the neutral conductor is prohibited for (1) new branch-circuit installations, (2)
mobile homes, (3) recreational vehicles, and (4) areas where local codes prohibit grounding through
the neutral conductor. (Use a 4-prong plug for 4 wire receptacles, NEMA type 14-30R.)
Electric models = Canada0nlg
A 120/240 volt, 60 Hz AC approved electrical service fused through a 30-ampere fuse or circuit breaker on
both sides of the line is required.
All Canadian models are shipped with the power cord attached.The power cord should be plugged into a
30-ampere receptacle.
In Canada, you may not convert a dryer to 208
volts.
English _16

3_WIREsystem connections
1. Loosen or remove the center terminal block screw.
2. Connect the neutral wire (white or center wire) of the power cord to the center, silver-colored terminal screw
of the terminal block.Tighten the screw.
3. Connect the other wires to the outer terminal block screws. Tighten the screws.
4. Tighten the strain relief screws.
5. Insert the tab of the terminal block cover into your dryer's rear panel slot.
6. Secure the cover with a hold-down screw.
If converting from a 4-wire electrical system to a 3-wire, the ground strap must be reconnected to the
terminal block support to ground the dryer frame to the neutral conductor.
4-WIREsgstem connections
1. Remove the center terminal block screw.
2. Connect the ground wire (green or unwrapped) of the power cord to the external ground conductor screw.
3. Connect the neutral wire (white or center wire) of the power cord and the appliance ground wire (white or
green/yellow stripes) under the central screw of the terminal block.
4. Connect the other wires to the outer terminal block screws. Tighten the screws.
5. Tighten the strain relief screws.
6. Insert the tab of the terminal block cover into your dryer's rear panel slot.
7. Secure the cover with a hold-down screw.
iT
, External ground connector
i B Greenorbarecopperwireofthepowercord
iF 3/4 in. (1.9 cm) Ublisted strain relief
i
i D Center silver-colored terminal blockscrew
i
iF Neutral grounding wire (white or green/yellow)
i
i F Neutral wire (white or center wire)
a_ ..................
C F
8. With a level, check your dryer and make the necessary adjustments to the leveling legs.
9. At this time, make sure all gas connections (on gas models), exhaust and electrical connections are complete.
Plug in your dryer, and check its operation by using the checklist below.
10. (GAS MODELS ONLY)
The burner may not ignite initially due to air in the gas line. Allowing your dryer to operate on a heat setting
will purge the line. If the gas does not ignite within 5 minutes, turn your dryer offand wait Sminutes. Be sure
the gas supply to your dryer has been turned on. In order to confirm the gas ignition, check the exhaust for
heat.
English- 17

Connecting the inlet hose
The dryer must be connected to the cold water faucet using the new inlet hoses. Do not use old hoses.
1. Turn the cold water faucet of[.
2. Attach the brass female end of the Y connector (A) to the cold water
faucet.
3, Attach the straight end of long hose (B) to the Y connector.
4, Using pliers, tighten the coupling with an additional two-thirds turn.
If the Y connector cannot be attached directly to the cold water
faucet, the short hose must be used.
(If space permits, please skip steps Sto 8,and go directly to step 9.)
5. Attach the short inlet hose (C) to the cold water faucet.
Screw on the coupling by hand until it is seated on the faucet.
6. Using the pliers, tighten the coupling with an additional two4hirds
turn.
7. Attach the Y connector (A) to the brass male end of the small hose.
Screw on the coupling by hand until it is seated on the connector.
8. Using the pliers, tighten the coupling with an additional two4hirds
turn.
g. Attach the angled end of long hoses to the fill valve at the bottom of
the dryer rear frame. Screw on the coupling by hand until it is seated
on the fill valve connector.
10. Using pliers, tighten the coupling with an additional two-thirds turn.
/' i
/ i
11. Attach the washer hose (D) to the other side of the Y connector CA).
Screw on the hose coupling until it istight. Using pliers, tighten the
coupling with an additional two thirds turn.
12. Check that the water faucets are on.
13, Check for leaks around the Yconnecter, faucets and hoses.
,_ When you tighten the coupling with pliers, do not overtighten.This may damage the coupling.
English _18

Replacement papts and accessories
If your dryer requires replacement parts or accessories, contact the dealer where you purchased your dryer or the
SAMSUNG customer care center at 1-800-SAMSUNG (726-7864).
Installation
For the proper installation, we recommend that you hire a qualified installer.
1. Move your dryer to an appropriate location for the insta%tion.
Consider installing the dryer and washer side-by-side, to allow access
to the gas, electrical, and exhaust connections. Place two of the carton
cushion4ops on the floor.Tip your dryer on its side so it lies across
both cushion-tops.
2. Set your dryer back in an upright position.
3. To ensure that the dryer provides the optimal drying performance, it
must be level.To minimize vibrations, noise, and unwanted movement,
the floor must be a perfectly level, solid surface.
To set the dryer to the same height as the washer, fully retract the
leveling feet CA)by turning them counterclockwise, then loosen the
legs by turning them clockwise.
Adjust the leveling feet only as much as necessary to level the
dryer. Extending the leveling feet more than necessary can
cause the dryer to vibrate.
4.
Review the "Exhausting" section on page 13 before installing the exhaust system.
Install the ductwork from your dryer to the exhaust hood.The crimped end of the duct sections must point
away from your dryer.
DO NOT use sheet metal screws when assembling the dueLing.These joints should be taped.
Never use plastic flexible exhaust material.
Tip for tight installations: install a section of the exhaust system onto your dryer before putting it in place.
Use duct tape to secure this section to your dryer, but do not cover the ventilation slots at the back of
the unit in dryer cabinet.
Review the "Electrical requirements" section on page 16.
BEFOREOPERATING ORTESTING, follow the grounding instructions in the"Grounding" section on page 9.
,_ WARNING - U.S. MODELS
RISK OF ELECTRIC SHOCK - All U.S.models are produced for a 3-WIRE SYSTEM CONNECTION.
The dryer frame is grounded to the neutral conductor at the terminal block.
A 4-WIRE SYSTEM CONNECTION is required for new or remodeled construction, mobile homes, or if
local codes do not permit grounding through the neutral conductor. If the 4-wire system is used, the
dryer frame cannot be grounded to the neutral conductor at the terminal block.
Refer to the following instructions for"Electrical connections" on page 16.
Remove the terminal block cover plate.
insert the power cord with a Ublisted strain relief through the hole provided in the cabinet near the terminal
block.
A strain must
relief be used.
Do not loosen the nuts already installed on the terminal block. Be sure they are tight.
Use a 3/8 in. (1 cm) deep well socket.
English _19

6,
Review the "Gas requirements"section on page 15.
Remove the pipe thread protective cap. Apply a pipe ioint compound or about ] V7wraps of Teflon tape over
all threaded connections.
The pipe joint compound must be resistant to the actions of any liquefied petroleum gas.
Connect the gas supply to your dryer. An additional fitting is required to connect the 3/4"(1.9 cm) female
thread end of a flexible connector to the 3/8"(1 cm) male threaded end on the dryer.
Securely tighten the gas line fitting over the threads.
Turn on the gas supply.
Check all gas connections for leaks using a soap solution.
if bubbles appear, tighten the connections and recheck. DO NOT usean open flame to check for gas leaks.
Doop peversaJ
1, Unplug the power cord.
2. Remove two door hinge screws.
3. Lift the door and remove it.
4. Remove two screws from the frame front.
5. Remove the two screws from the opposite side of the door hinge.
6. Remove the two screws from the holder lever.
7. Reassemble the two screws on the inside holes.
\
\
\
\
\
English _20

8. Remove a screw from the door hinge.
The screw is for pre-flxing the door to the frame front.
9. Reassemble the screw in the other hole.
10. Place the door on the other side and reattach it to the dryer.
11. Reattach the holder lever.
12. Reattach the screws in the remaining holes.
Final installation checklist
The dryer is plugged into an electrical outlet and is properly grounded.
The exhaust ductwork is hooked up and the joints are taped.
A plastic flexible duct is NOTused.
Use rigid or stiff-walled flexible metal vent material.
The dryer is level and is sitting firmly on the floor.
Gas models the gas is turned on with no gas leaks.
Start your dryer to confirm that it runs, heats, and shuts off.
English _21

I Operating instructions, tips
To reduce the risk of fire, electric shock, or injury to persons,read the IMPORTANT SAFETYINSTRUCTIONS
beforeoperating this appliance.
Oveeview of the control panel
Electric model
HEAVY DUTY NORMAL ECO NORMAL f_l
BEDDING QUICK DRY
.....
PERM AIR FLUFF
DELIC KLE AWAY
, J
Gasmodel
ManuaJ Dry []
HEAVY DUTY NORMAL ECO NORMAL
BEDDING QUICK DRY
SANITIZ_ TIME DRY
PERM AIR FLUFF
DELIC KLE AWAY
[] Sensor Dry Steam Bydes []
English _22

Cycle selector
To select a cycle, rotate the Cycle selector dial to the desired cycle.
The indicator light by the cycle name will illuminate.The ECO NORMAL, NORMAL, HEAVY DUTY, BEDDING,
SANITIZE, PERM PRESS,WOOL and DELICATEScycles are Sensor Dry cycles.
Sensor Dry automatically senses the moisture in the load and shuts the dryer offwhen the selected dryness
level (Very Dry to Damp Dry) is reached.
J For reducing energy usage,This cycle adjusts the cycle
JECONORMAL Cottons, Work clothes, Linen
j tirne and ternperature for increased efficiency.
+ ,
The NORMAL cycle isfor most fabrics including cotton,
underwear and linen.
Cottons, Work clothes, Linen,
i NORMAL (if this cycle is selected, the Eco Dry funotion isenabled
J Mixed loads by default. Formore information, please refer to the
descriptions about the'Eco Dry"option on next page.)
' HEAVY DUTY Heavyfabrics such asjean, Use this cycle to get high heat for heavy fabrics such as
Corduroys, Heavywork clothes jeans, corduroys, or work clothes.
Ji_BEDDING Bulky iterns such asblankets, For bulky items such as blankets, sheets, and comforters.
l Sheets, Comforters, Pillows
i Sanitize garments by infusing high temperature heat deep
i Bedding, Curtains, Children's
JSANITIZE into the fabric during the drying cycle. Use this course to
clothing keep your bedding and curtains clean through sanitization.
Shirts, Synthetic fabrics, Dry wrinkle-free cottons, synthetic fabrics, knits, and
j PERM PRESS Knits,Wrinkle-free cottons,
i permanent pressfabrics automatically.
j Permanent
J Formachine washable and '
JWOOL tumble dryable wool only For machine washable and tumble dryable wod only.
i Maximurn arnount: 31b)
l *
i
i DELICATES Underwear, Blouses, Lingerie iThe DELICATEScycle isdesigned to dry heat-sensitive
j , iterns at a low drying temperature.
j QUICK DRY Small loads Provides a 30 minutes drying cycle.
i iThe TIME DRY cycle allows you to select a cycle time in
jminutes
iTIME DRY Any load i (If this cycle is selected, the Eco Dry function is enabled
i by default. Forrnore information, please refer to the
i
idescr pt onsaboutthe"EcoDU'opt ononnextpage
t
iThe AIRFLUFFcycle turnbles the load in room temperature
JAIRFLUFF Foam,%bber, Plastic
i !air. ,
jThis cycle is best for smoothing out wrinkles and reducing
Shirts,Trouser, Comforter, j odors frorn loads consisting of one to four dry items. In
j Pillows j this cycle a small amount of water is sprayed into the dryer
j j drum after several minutes of tumbling with heat.
-- + ,
iThe WRINKLEAWAYcycle removes wrinkles from clothes
i stored inclosets, etc. It provides wrinkle releasevia
Joptimized steam care.
j WRINKLE AWAY Shirts,Trouser, Blouses
i You can change the drying time.
J
i i (Minimum time : 20 minutes)
J i _Forbest results, load no more than 3 items. ,
English _23

2,
3,
Cycle options
--- Toreducestat,csbycloth,ngfr,ct,onandspraysteamatthelaterper,odofdry,ngcycle
[ Anti Static It is only available with: NORMAL, HEAVYDUTY,PERMPRESS,DELICATES(Dry level of every
, course exceeds Normal) and TIME DRYcourse,
ii In order to reduce statics, the drurn can be paused during operation,
jRaCkDry RackDryisavailableintheTIMEDRYcycle.TernperaturewillbesettoExtraLowonly.
(Refer to the "Rack dry"section on page 28.)
[
The rnixed load bell that notifies you when the average dry level in a load isdamp dry (80
% dried). This lets you take garments that you don't want fully dried or that dry quickly out
[ Mi×ed Load Bell of the dryer early while letting others continue to dry.
[ You can select this function in all Sensor Dry cycles except WOOL, SANITIZE.Thedry level
selections are limited to Normal Dry, More Dry, and Very Dry,
l WrinklePreventprovidesapproximatelyminutesofintermittenttumblingin '
unheated air at the end of the cycle to reduce wrinkling, Pressthe Wrinkle Prevent button
j Wrinkle Prevent to activate this feature.
J The indicator light above the pad will illuminate when Wrinkle Prevent is selected.
i
j The load isdry, and can be rernoved at any time during the Wrinkle Prevent cycle.
Choose your favorite cycle including cycle, temp, dry level option, etc, (Referto the"My
, My Cycle Cycle"section on page 30)
i Time can be added or subtracted from the automatically set times in the Manual Dry
i
j Adjust Tim e ...... cycles (TIME DRY,QUICK DRY,or AIRFLUFFcycles) and WRINKLEAWAYcycle.
Toadd or subtract time from the cycle, pressthe Adjust Time arrow pad up or down until
j the desired time isdisplayed,
i
Tocontrol operation rate for drying a small loads at Sensor Dry course.
[ Small Load Care'_ It is only available with: NORMAL, HEAW DUTY,PERMPRESSand DELICATEScourse,
j(Ga s mode ! only ) it can't be selected/cancelled when the drying course is running.
In order to irnprove drying effect and control operation rate, the drum can be paused
i
j during operation,
[ This function is available inthe NORMAL,and TIME DRYcycles, When the Eco Dry function
jEce Dry is activated, drying takes longer but the power consurnptior_ isreduced,
[ (Electric model (When the Eco Dry function is enabled, the drying time can be extended up to 3 times
[ Only) depending on the specified temperature and the amount of laundry to be dried. When
[ the product is shipped, the Eco Dry function is setto On by default,)
Dry Level
To select the dry level in the NORMAL, HEAVY DUTY,or other Sensor Dry cycles, press the Dry Level button. An
indicator light will illuminate next to the desired dryness level.
Press the button repeatedly to scroll through the settings. Larger or bulkier loads may require the Very Dry or
More Dry setting for complete dryness.
The Less Dry setting is best suited for lightweight fabrics or for leaving some moisture in the clothing at the
end of the cycle. Damp Dry is designed to partially dry items. Use for items that lay fiat or hang to dry.
English _24

4.
6.
7.
8.
9.
Temp.
To select the correct temperature for the load, press theTemp, button. An indicator light will illuminate next
to the desired temperature. Pressthe button repeatedly to scroll through the settings.
j High For sturdy cottons or those labeled Tumble Dry.
J Forpermanentpress, synthetics, lightweightcottons, oritemslabeledTumbleDry
Medium Medium.
[ Med Low For lower heat than Medium to dry synthetic or washable knit fabrics. .
JLow For heat sensitive items labeled Tumble Dry Low orTumble Dry Warm. ,
i
JExtra Low Provides the lowest heated dry temperature possible.
Time
When using Manual Dry cycles, you can adjust the drying time by pressing theTime selection button.
During the Sensor Dry cycle, the time light indicator is off because exact drying times are determined by
fluctuating humidity levels.
LED Display
The display window shows the estimated time remaining in the cycle after the Start/Pause button is pressed.
The estimated time remaining may fluctuate as the cycle progresses.
The Drying light will illuminate and remain lit until the cycle is complete.
When your dryer is in the cool-down phase, the Cooling light will illuminate.
When your dryer is in the wrinkle prevent phase, the Wrinkle Prevent light will illuminate.
When the cycle is complete,"End" will appear in the display panel until the dryer door is opened or the Power
button is pushed.
If your dryer is paused during a cycle, the indicator lights will blink until the Start/Pause button is pressed.
Power
Press once to turn your dryer on. Press again to turn it off. If your dryer is left on for more than 10 minutes
without any buttons being touched, the power automatically turns off.
Start/Pause
Press to pause and restart programs.
Indicators
- Filter Check Sound Off
..... Jr-,. I VentSensor(TheVentSensorisonlyonthe [
._. _rum Light J _ I _ i
%,: i AS DV45H6300 model.) [
English _25

Load the dryer properly
Place only one washload in your dryer at a time.
Mixed loads of heavy and lightweight fabrics will dry differently, which may result in lightweight fabrics being
dry while heavy fabrics remain damp at the end of a drying cycle.
Add one or more similar items to your dryer when only one or two articles of clothing need drying.
This improves the tumbling action and drying efficiency.
Overloading restricts tumbling action, resulting in uneven drying as well as excessive wrinkling of some
fabrics.
If you insert laundry into your dryer while it is extremely tangled immediately after your washer has
finished a wash or spin cycle, it may degrade the drying efficiency or cause the door to open. We
recommend that you untangle your laundry appropriately before inserting it.
Getting started
1. Load your dryer loosely (DO NOT overload).
2, Close the door.
B, Select the appropriate cycle and options for the load. (For detail, refer to the"Cyde overview"on next page.)
4, Press the Start/Pause button.
5, The dryer indicator light will illuminate.
6, The estimated cycle time will appear in the display.
The time may fluctuate as humidity levels fluctuate in the dryer.
• When the cycle is complete,"End"will appear in the display.
Pressing Power cancels the cycle and stops your dryer.
The Drying, Cooling, and Wrinkle Prevent indicator lights will illuminate during those portions of the
cycle.
Do not place anything on top of your dryer while it is running.
English _26

Cycle overview
Predefined
ii ECONORMAL + Medium + Normal Dry , o Extra Low
NORMAL_ Large, Norma_Dry+o , Nigh, o ,
NEAVYDUT_, Large, Norma_Dry,o Nigh,
BEDDING Large Normal Dry o Nigh
Medium
PERM PRESS Medium Normal Dry o
i WOOL Small , NormalDry _ , Low , ,
j DELICATES Medium Normal Dry o Extra Low
J QUICK DRY Small ' ' _ Nigh '
i Manual Dry TiME DRY La:ge [ : i : i High o ,
AIR FLUFF Small
i ---- REFRESH _ Small High
i Steam Cycles
Load size recommendations
For best results, follow the load size recommendations for each drying cycle.
iLarge i
JSma, I [!!!!h£d:umw!!h3ZS!!£m_:no[mo2!h22,/,_[2!!: ]
Options
ECONORMAL, o , - , - - , o
i }}}{i ¸NORMALo o o o o
HEAW DUTY , o , _ , o _ o , o ,
BEDDING o o
woo[ , o: i, : i_ : i, o: i o i oi_: ' o '
i f
i DELICATES o o o o
_ QUICK DRY o o
i
i ' ....
i Manual Dry TIME DRY - o o - o o+ + + + +
AIRFLUFF
0 0
j ÷ , ....
i
REFRESH 0
SteamCw_e_ , _
WRINKLEAWAY - o o
English- 27

Rack dry
Znsta!ling the dpging pack
1. Open the dryerdoor.
2. Position the drying rack in the tumbler, placing the front lip of the
drying rack (A) on the top of the lint filter.
3. Place the rear legs in the two recessed areas of the dryer's back wall,
and then push down the middle of the drying rack to fix in place.
4. Place the items to be dried on the rack, leaving space between them
so air can circulate.
5. Close the dryer door.
6. Press the Rack Dry button in theTIME DRY cycle and then select the
time according to the amount of moisture and the weight of the items.
The drying rack can be also used at AIR FLUFF cycle.
Washable sweaters
blOCKro snaDe and la / fiat or rack
Stuffed to s
Lcot_on or Dowester fiberfilled'
Stuffed to s
Bam or rubber-filled
Foam rubber oillows
Extra Low (TIME DRY cycle)
Extra Low (TIME DRY cycle)
AIR FLUFF
AIR FLUFF
Sneakers AIR FLUFF
Drying foam rubber, plastic, or rubber on a heat setting may cause damage to the items and lead to a fire
hazard.
English _28

Child Lock
Prevents children from pBying with your dryer.
Setting/Releasing
To turn dMd Lock on or off, press both the Temp. and Time buttons simultaneously for 3 seconds.
ChildLock Details
1. You can turn Child Lock on while your dryer is running.
2. Once you set the Child Lock function, no button, except for the Power button, will respond until you turn off
the Child Lock function.
3. The"Child Lockl_"indicator will be lit.
• If the dryer is powered on again, the Child Lock function stays on.
To turn off Child Lock, follow the instructions above.
When other buttons, except for the Power button, do not respond, check the Child Lock indicator. If Child
Lock is on, follow the instructions above to turn Child Lock oE
Drum Light
Lights the dryer drum while the dryer is running.
Turning Onand Off
To turn on or turn off the Drum Light, press and hole the WrinMe Prevent button for 3 seconds.
You can turn the Drum Light on and off while your dryer is running and when it is stopped.
If you do not turn the Drum Light off S minutes after turning it on, the Drum Light is automatically turned
of.
Sound Off
Use this function to mute the button and operating sounds.
Setting and Releasing
To turn the Sound Off function on or off, press the Dry Level button for 3 seconds.
SoundOff Details:
1. You can set Sound OFFwhile your dryer is running.
2. Once you have activated Sound Off, the button and operating sounds are muted until you deactivate it.
3. The"Sound Off_;;_"indicator will be lit.
If you do not turn the Sound Off function off before you turn your dryer off, It will still be on when you turn
your dryer on again. To turn Sound Off off, follow the instructions above.
English- 29

My Cycle
Load
Press the My Cycle button for lessthan 3 seconds to activate My Cycle mode where all course settings and
selected options are loaded.
The My Cycle indicator turns on when the mode is active.
If you have not configured any My Cycle settings, the default course settings are loaded.
# Save
You can add and save preferred options to My Cycle.
I. Turn the course dial to select a course.
2, Set necessary options for the selected course. For details on each course and options, see page 27.
3, Press and hold the My Cycle button for more than 3 seconds to save the course options. The My Cycle
indicator blinks while the options are being saved.
Prevent option is not My Cycle
The Wrinkb available for the function.
Smart Care
This function enables you to check the status of the dryer using a srnartphone.
1. Press and hold the Eco Dry (Electric model) or Small Load Care (Gas model) buttons for 3 seconds when an
error occurs or if you haven't pressed any buttons on the dryer after you turned the power on.
2. When the Smart Care function is activated, the LED on the window display rotates for 2 or 3 seconds and then
the error code will appear in the display panel.
3. Run the Smart Care app on your smart phone.
The Smart Care function has been optimized for: Galaxy & iPhone series (cannot be supported for
some models).
4. if the smart phone's camera isfocused on the display panel of the dryer, the panel and error message is
automatically recognized and the error type and countermeasures are displayed on the smart phone.
S. If the smartphone fails to recognize the error code more than twice, please enter the error code displayed on
the display panel of the dryer manually into the Smart Care app.
# Downloadingthe Smart Care app
Download the Samsung Laundry App into your mobile phone from the Android market or Apple App store.
(Search word : Samsung Smart Washer/Drye0
# Precautions when using Smart Care
If light from a light bulb, fluorescent bulb, or lamp is reflected on the display panel of the washing machine,
the smartphone may not be able to recognize the panel or error message easily.
If you hold the smartphone at too large an angle relative to the front of the display panel, it may not be able
to recognize the error code. For best results, hold the smartphone so that the front of the panel and the
smartphone are parallel or nearly parallel.
English- 30

Vent SensoP
TheVent Sensor is only on the DV45H6300 _ model.
Your Samsung dryer is equipped with a Vent Sensor, which detects and notifies ,ou when it is time to clean the
ductwork. Keep your dryer safe and efficient by cleaning the ducts when prompted.
The Vent SensoPdetects ang duct blockages
You can figure out whether there is a duct blockage from the"Vent Sensor _" lamp of the digital display.
J The'VentSensor_'Bmpis The ductwork isfree from i -
0 turned offi blockages, i
i
The'Vent Sensor _" lamp When a part of the duct or the Check the duct connection
illuminates, lint filter is blocked by lint or a and shorten the duct and
foreign object, straighten it if necessary.
l When the resistance is high Check the lint filter or the duct
l orbecausethe duct is too longbent. and clean it if necessary.
+ + ,
The'Vent Sensor _" Bmp When the duct is blocked by Check the duct connectioni blinks, lint or a foreign object, and shorten the duct and
J When the resistance is very straighten it if necessary.
j 2
high because the duct istoo Check the lint filter or the
long or bent excessively, duct and clean it as soon as
possible.
In the LEVEL 2 state, this lamp blinks for 3 hours after the completion of the cycle. (If the wrinkle prevention
function is activated, this message is displayed for up to 3 hours.)
If the Power button is pressed or the door is opened, the power is immediately turned off.
For more information about the duct installation, please refer to the'Ducting requirements"section on
page 12.
Although the dryer is available even if the blockage message is displayed, the drying time may be
extended.
If the LEVEL 1 message is displayed the first time the dryer is run after the installation, check the
connection and clean the duct. If the LEVEL1 message appears even after you have checked and
cleaned the ducts, this may indicate that there are some restrictions of the duct due to the length,
condition, etc.
If this occurs, you can use the dryer normally and no countermeasures need to be taken. However, the
drying time may be extended or the drying performance may be degraded.
English- Sl

I Cape and cleaning
Control panel
Clean with a soft, damp cloth. Do not use abrasive substances.
Do not spray cleaners directly on the panel.
The control panel finish may be damaged by some laundry pre-treatment soil and stain remover products.
Apply such products away from your dryer and wipe up any spills or overspray immediately.
Tumbler
Remove any stains caused by crayon, ink, or fabric dye (from new items such as towels or jeans) with an all-
purpose cleaner.
Tumble old towels or rags to remove any remaining stain or cleaning substance.
Once these steps are followed, stains may still be visible, but should not transfer to subsequent loads.
Stainless steel tumbler
To clean the stainless steel tumbler, use a damp cloth with a mild, non-abrasive cleaner suitable for stainless steel
surfaces.
Remove the cleaner residue and dry with a clean cloth.
DrLjer exterior
Clean with a soft, damp cloth. Do not use abrasive substances.
Protect the surface from sharp objects.
Do not place any heavy or sharp objects or a detergent box on the dryer: Keep them on the purchased pedestal or
in a separate storage box. This may scratch or damage the top cover of the dryer:
Since the entire dryer has a high-gloss finish, the surface can be scratched or damaged.
Avoid scratching or damaging the surface when using the dryer.
DPLjePexhaust system
Should be inspected and cleaned yearly to maintain optimum performance.
The outside exhaust hood should be cleaned more frequently to ensure proper operation.
Clean the lint filter
After each load.
To shorten drying time.
To operate more energy efficiently.
Do not operate your dryer without the lint filter in place.
io
English _32

I Special laundry tips
Special laundry tips
Please follow the care label or manufacturer's instructions for drying special items. Efcare label instructions are not
available, use the following information as a guide.
EoEIowthe care label instructions or dry on the BEDDING cycEe.
Bedspreads & Comforters Make sure the item is thoroughly dry before using or storing.
May require repositioning to ensure even drying.
Use NORMAL cycle and dry only one blanket at a time for best tumbling
Blankets action.
Make sure the item is thoroughEy dry before using or storing.
Use the PEBM PRESScycEeand Medium temperature to help minimize
Curtains & Dra peries wrinkling.
Dry these in small loads for best results and remove as soon as possible.
Use the NORMAL cycle and the High temperature settings for soft, fluffy
Cloth Diapers diapers.
Down-filled Items (jackets, Use the NORMAL cycle and the Medium temperature setting.
sleeping bags, comforters, etc.) Adding a couple of dry towels shortens drying time and absorbs moisture.
DO NOT dry on a heat setting. Use the AIR FLUFF cycle (no heat).
Foam Rubber (rug backs,
stuffed toys, shoulder pads, etc.) WARNING Drying a rubber item with heat may damage it or be a fire
hazard.
Add a couple of dry towels and a pair of clean sneakers to help the
Pillows
tumbling action and to fluffthe item.
DO NOT dry kapok or foam pillows in dryer. Use the AIR FLUFF cycle.
Plastics (shower curtains, Usethe AIR FLUFF cycle or theTIME DRYcycle and the Low or Extra Low
outdoor furniture covers, etc.) temperature settings depending on the care label instructions. •
THINGS TO AVOID PUTTING INTHE DRYER:
Fiberglass items (curtains, draperies, etc.).
Woolens, unless recommended on the label.
Vegetable oil- or cooking oil-soaked, or gasoline-soaked items.
English _33

@Troubleshooting
Check these points if your dryer°°°
Make sure the door is latched shut.
Be sure the power cord is plugged into a JivedectricaJ outlet.
Doesn't run,
- Check the home's circuit breaker and fuses.
- Press the Start/Pause button again if the door is opened during the cycle.
Check the home's circuit breaker and fuses.
Select a heat setting other than Air Fluff.
Doesn't heat. On a gas dryer, check that the gas supply is on.
Clean the lint filter and exhaust duct.
- Dryer may have moved into the cooPdown phase of the cycle.
Check all of the above, plus...
Be sure the exhaust hood outside the home can open and close fredy.
Check exhaust system for lint buildup. Ducting should be inspected and
cleaned annually.
Use a 4"rigid metal exhaust duct.
- Do not overload. 1 wash load - 1 dryer load.
Doesn't d ry.
- Sort heavy items from lightweight items.
Large, bulky items like blankets or comforters may require repositioning to
ensure even drying.
Check that the dryer is draining properly to extract adequate water from the
load.
- Load may be too small to tumble properly. Add afew towels.
Check the load for objects such as coins, loose buttons, nails, etc. Remove
promptly.
It is normal to hear the dryer gas valve or heating element cycle on and off
Is noisy, during the drying cycle.
Be sure the dryer is leveled properly as outlined in the installation instruction.
it is normal for the dryer to hum due to the high velocity of air moving
through the dryer drum and exhaust system.
Seams, pockets, and other similarly heavy areas may not be completely dry
when the rest of the load has reached the selected dryness bvekThis is
normal. Select theVery Dry setting if desired.
Dries unevenly. If one heavy item is dried with a lightweight load, such as one towel with
sheets, it is possible that the heavy item will not be completely dry when the
rest of the load has reached the selected dryness level. Sort heavy items from
lightweight items for best drying results.
Household odors from painting, varnishing, strong cleaners, etc. may enter the
dryer with the surrounding room air.This is normal as the dryer draws the air
Has an odor. from the room, heats it, pulls it through the tumbler, and exhausts it outside.
When these odors linger in the air, ventilate the room completely before using
the dryer.
Shuts off before load Dryer load istoo small. Add more items or a few towels and restart the cycle.
is dry Dryer load istoo large. Remove some items and restart the dryer. •
English _S4

Make sure the lint filter is cleaned before every load. With some loads that
produce high amounts of lint, it may be necessary to clean the filter during the
cycle.
Lint on clothes Some fabrics are lint producers (for example, a fuzzy white cotton towel)
and they should be dried separately from clothes that are lint trappers (for
example, a pair of lack linen pants.)
Divide larger loads into smaller loads for drying.
Check pockets thoroughly before washing and drying clothes.
Garments still wrinkled Small loads of I to 4 items work best.
afterWrinkle-Care Load fewer garments. Load similar-type garments.
Odors remain in Fabrics containing strong odors should be washed in a normal cycle.
clothing after Refresh.
Water drips from This is steam condensation.The dripping water will stop after a short time.
nozzle when Steam-
Care starts
Sprayed water is not Sprayed water is difficult to see when the door is closed.
visible during Steam-
Care
Extended time Verify correct loading (clothes)/cyde selection (see page 23).
Znformadon codes
information codes may be displayed to help you better understand what is occurring with your Dryer.
i The thermistor resistance isvery low Clean the screen or vent.
tE
[ or high. If the problem continues, call for service.
[ -- Invalid heating Temp when the dryer Call for service.
liE
is running.
i ------ Running the dryer with door open. Clean the door and then restart.
If the problem continues, call for service.
Make sure a button is NOT being pressed
i bE2 continuously.Try restarting the cycle.
j
If the problem continue, call for service.
i
I I
i invalid power source frequency. Try restarting the cycle.
If the problem continues, call for service.
i Electronic Control Problem Call for service.
(Over Voltage Error.)
[ _1 t
i
i Electronic Control Problem Call for service.
[
(Communication Error.)
[ EEE Invalid state of Eeprom Call for service.
communication.
i I i
[ Invalid door. . Call for service. •
For any codes not listed above, call 1-800-SAIViSUNG (726-7864)
English _35

I Appendix
Fabric cape chart
The following symbols provide garment care direction.The Clothing care labels include symbols for washing,
bleaching, drying, and ironing, or dry cleaning when necessary.The use of symbols ensures consistency among
garment manufacturers of domestic and imported items. Follow care label directions to maximize garment life
and reduce laundering problems.
i _ Normal i E_] I Line Dry/ Hang to Dry DoNotWash
PermanentPress/Wr nkle/Dr pDry DoNotWr ngi
_ CSentie/Delicates i [] DryFlat _ DoNotBleach
[] Any Bleach (when needed)
Only Non-Chlorine (color-safe)
Bleach (when needed)
_ Tumble DryCycle
Permanent Press/Wrinkle
Resistant/Wrinkle Control
J'_ Gentle/Delicates
High
Medium
Low
Do Not Dry Clean
Line Dry/Hang to Dry
Drip Dry
i []
j [] Dry Flat
i
J
_The dot symbols represent appropriate wash water temperatures for various items.The temperature range for
Hotisl05 1ZS°F(41 52 °C), for Warm S5 ]05°F(29 41°C) and for Cold 60 85°F(]6 29°C). (Wash water
temperature must be a minimum of 60 °F(16 °C)for detergent activation and effective cleaning.)
English _36

Protecting the environment
This appliance is manufactured from recydable materials. Ifyou decide to dispose of this appliance, please
observe local waste disposal regulations. Cut of[the power cord so that the appliance cannot be connected to a
power source. Remove the door so that animals and small children cannot get trapped inside the appliance.
Declaration of conformity
This appliance complies with UL2158.
j WEIGHT 125.6 Ib (57 Kg)
J _-- 5300 W (Elec.)
HEATER RATING 22000 BTU/hr (Gas)
j EXTRA LARGECAPACIT¥ 7.5 cu.ft, i
English- S'7

I Warranty (USoA}
SAMSUN6 DRYER
LIMITEDWARRANTYTO ORIGINAL PURCHASER
This SAMSUNG brand product, as supplied and distributed by SAMSUNG ELECTRONICSAMERICA, INC. (SAMSUNG)
and delivered new, in the original carton to the original consumer purchaser, is warranted by SAMSUNG against
manufacturing defects in materials and workmanship Br a limited warranty period of:
One (1) Year All Parts and Labor
Two (2) Years Control Board Parts
This limited warranty begins on the original date of purchase, and is valid only on products purchased and used in
the United States.
To receive warranty service, the purchaser must contact SAMSUNG for problem determination and service
procedures.
Warranty service can only be performed by a SAMSUNG authorized service center.
The original dated bill of sale must be presented upon request as proof of purchase to SAMSUNG or SAMSUNG's
authorized service center.
SAMSUNG will provide in-home service during the warranty period at no charge, subject to availability within the
contiguous United States.
In-home service is not available in all areas.
To receive in-home service, product must be unobstructed and accessible to the service agent.
If service is not available, SAMSUNG may elect to provide transportation of the product to and from an authorized
service center.
SAMSUNG will repair, replace, or refund this product at our option and at no charge as stipulated herein, with new
or reconditioned parts or products if found to be defective during the limited warranty period specified above.
All replaced parts and products become the property of SAMSUNG and must be returned to SAMSUNG.
Replacement parts and products assume the remaining original warranty, or ninety (90) days, whichever is longer.
This limited warranty covers manufacturing defects in materials and workmanship encountered in normal,
noncommercial use of this product and shall not apply to the following: damage that occurs in shipment; delivery
and installation; applications and uses for which this product was not intended; altered product or serial numbers;
cosmetic damage or exterior finish; accidents, abuse, neglect, fire, water, lightning, or other acts of nature or God;
use of products, equipment, systems, utilities, services, parts, supplies, accessories, applications, installations,
repairs, external wiring or connectors not supplied or authorized by SAMSUNG that damage this product or result
in service problems; incorrect electrical line voltage, fluctuations and surges; customer adjustments and failure to
follow operating instructions, maintenance and environmental instructions that are covered and prescribed in the
instruction book; product removal and reinstallation; problems caused by pest infestations.
This limited warranty does not cover problems resulting from incorrect electric current, voltage or supply, light
bulbs, house fuses, house wiring, cost of a service call for instructions, or fixing installation errors.
SAMSUNG does not warrant uninterrupted or error-free operation of the product.
English _38

Except as set forth herein, there are no warranties on this product either express or implied, and samsung
disclaims all warranties including, but not limited to, any implied warranties of merchantability, infringement or
fitness for a particular purpose.
No warranty or guarantee given by any person, firm, or corporation with respect to this product shaEIbe binding
On samsung.
Samsung shall not be liable for loss of revenue or profits, failure to realize savings or thter benefits, or any other
special, incidental or consequential damages caused by the use, misuse, or inability to use this product, regardless
of the legal theory on which the claim is based, and even if samsung has been advised of the possibility of such
damages.
Nor shall recovery of any kind against samsung be greater in amount than the purchase price of the product sold
by samsung and causing the alleged damage.
Without limiting the foregoing, purchaser assumes all risk and liability for loss, damage, or injury to purchaser
and purchaser's property and to others and their property arising out of the use, misuse, or inability to use this
product.This limited warranty shall not extend to anyone other than the original purchaser of this product, is
nontransferable and states your exclusive remedy.
Some states do not allow limitations on how long an implied warranty lasts, or the exclusion or limitation of
incidental or consequential damages, so the above limitations or exclusions may not apply to you.This warranty
gives you specific rights, and you may also have other rights, which vary from state to state.
To obtain warranty service, please contact SAMSUNG at:
Samsung Bectronks America, Inc.
85 Challenger Road Ridge_eld Park, NJ 07660
1-800-SAMSU NG(726-7864)
www.samsung.com/us/su pport
English- 39

@ Warranty (CANADA}
SAMSUN6 DRYER
LIMITEDWARRANTYTO ORIGINAL PURCHASER
This SAMSUNG brand product, as supplied and distributed by SAMSUNG ELECTRONICSCANADA, INC.(SAMSUNG)
and delivered new, in the original carton to the original consumer purchaser, is warranted by SAMSUNG against
manufacturing defects in materials and workmanship for a limited warranty period of:
One (1) year part and labor
This limited warranty begins on the original date of purchase, and is valid only on products purchased and used in
the Canada.
To receive warranty service, the purchaser must contact SAMSUNG for problem determination and service
procedures.
Warranty service can only be performed by a SAMSUNG authorized service center.
The original dated bill of sale must be presented upon request as proof of purchase to SAMSUNG or SAMSUNG's
authorized service center.
SAMSUNG will provide in-home service during the warranty period at no charge, subiect to availability within the
Canada.
In-home service is not available in all areas.
To receive in-home service, product must be unobstructed and accessible to the service agent.
If service is not available, SAMSUNG may elect to provide transportation of the product to and from an authorized
service center.
SAMSUNG will repair, replace, or refund this product at our option and at no charge as stipulated herein, with new
or reconditioned parts or products if found to be defective during the limited warranty period specified above.
All replaced parts and products become the property of SAMSUNG and must be returned to SAMSUNG.
Replacement parts and products assume the remaining original warranty, or ninety (90) days, whichever is longer.
This limited warranty covers manufacturing defects in materials and workmanship encountered in normal,
noncommercial use of this product and shall not apply to the following: damage that occurs in shipment; delivery
and installation; applications and uses for which this product was not intended; altered product or serial numbers;
cosmetic damage or exterior finish; accidents, abuse, neglect, fire, water, lightning, or other acts of nature or God;
use of products, equipment, systems, utilities, services, parts, supplies, accessories, applications, installations,
repairs, external wiring or connectors not supplied or authorized by SAMSUNG that damage this product or result
in service problems; incorrect electrical line voltage, fluctuations and surges; customer adjustments and failure to
follow operating instructions, maintenance and environmental instructions that are covered and prescribed in the
instruction book; product removal and reinstallation; problems caused by pest infestations.
This limited warranty does not cover problems resulting from incorrect electric current, voltage or supply, light
bulbs, house fuses, house wiring, cost of a service call for instructions, or fixing installation errors.
SAMSUNG does not warrant uninterrupted or error-free operation of the product.
English _40

EXCEPTASSETFORTHHEREIN,THEREARENOWARRANTIESONTHiSPRODUCTEITHEREXPRESSORiMPLiED,
ANDSAMSUNGDiSCLAiMSALLWARRANTIESiNCLUDiNG,BUTNOTLIMITEDTO,ANYIMPLIEDWARRANTIESOF
MERCHANTABILIT4INFRINGEMENTORFITNESSFORA PARTICULARPURPOSE.
NOWARRANTYORGUARANTEEGIVENBYANYPERSON,FIRM,ORCORPORATIONWiTHRESPECTTOTHISPRODUCT
SHALLBEBiNDiNGON SAMSUNG.
SAMSUNGSHALLNOTBELIABLEFORLOSSOFREVENUEORPROFITS,FAILURETOREALIZESAVINGSOROTHER
BENEFITS,ORANYOTHERSPECIAL,INCIDENTALORCONSEQUENTIALDAMAGESCAUSEDBYTHEUSE,MISUSE,OR
INABILITYTOUSETHISPRODUC1,REGARDLESSOFTHELEGALTHEORYON WHICHTHECLAIMISBASED,AND EVEN
IFSAMSUNGHASBEENADVISEDOFTHEPOSSIBILITYOFSUCHDAMAGES.
NORSHALLRECOVERYOFANYKINDAGAINSTSAMSUNGBEGREATERINAMOUNTTHANTHEPURCHASEPRICEOF
THEPRODUCTSOLDBYSAMSUNGANDCAUSINGTHEALLEGEDDAMAGE.
WITHOUT LIMITING THE FOREGOING, PURCHASER ASSUMES ALL RISKAND LIABILITY FORLOSS, DAMAGE, OR
INJURYTO PURCHASERAND PURCHASER'SPROPERTYANDTO OTHERSANDTHEIR PROPERTYARISING OUT OF
THE USE,MISUSE, OR INABILITYTO USETHIS PRODUCT.
THIS LIMITED WARRANTY SHALL NOT EXTENDTO ANYONE OTHERTHAN THE ORIGINAL PURCHASEROFTHIS
PRODUCT, IS NONTRANSFERABLE AND STATESYOUR EXCLUSIVEREMEDY.
Some provinces do not allow limitations on how long an implied warranty lasts, or the exclusion or limitation of
incidental or consequential damages, so the above limitations or exclusions may not apply to you.This warranty
gives you specific rights, and you may also have other rights, which vary from province to province.
To obtain warranty service, please contact SAMSUNG at:
Samsung Electronics Canada Inc.
2050 Derry Road West, Mississauga, Ontario LSN 089 Canada
1-800-SAMSU NG(726-7864)
www.samsung.com/ca/su pport (English)
www.samsung.com/ca fr/support (French)
English _41

N Memo

N Memo

Scan this with your smarthphone
Scan the QRcode* or visit
www.samsung.com/spsn
to view our he[pfu[
How-to Videos and Live Shows
*Requires reader to be installed on your smartphone
QUESTIONSORCOMMENTS?
DC68-03380A-04

Secadoraagasy el6ctrica
Manualdel usuario
Imagine las posibilidades
"_r,_,:LL"F:Dr_,JqLII;I]e_,zeF',,_,djtrc ;,_Jn:un:l

I Contenido
Instrucdones de seguridad
Lo que necesita saber sobre [as instrucciones de seguridad ............................................ 4
Simbolos y precauciones de seguridad importantes ............................................................. 4
Instrucciones de seguridad importantes ............................................................... 6
Instalaci6n de la secadora
Desempaque de la secadora .......................................................................... 8
Partes de la secadora ................................................................................. 8
Accesorios .................................................................................................... 8
Importante para el instalador ......................................................................... g
Requisitos b_isicos .................................................................................... 9
Conexi6n a tierra ..................................................................................... 9
Modelos a gas................................................................................................. 9
Modelos el_ctricos ............................................................................................ 9
Consideraciones acerca de la ubicaci6n .............................................................. 10
Instalaciones del electrodom6stico en un gabinete o en un hueco .................................... 10
Requisitos para el tendicto de conctuctos ............................................................. 12
Drenaje ...................................................................................................... 13
Sugerencias acercadel drenaje de lasecadora ................................................................. 14
Requisitos en cuanto al gas .......................................................................... 15
Instrucciones de instalaci6n de laMancomunidad de Massachusetts ........................................... 15
Requisitos electricos ................................................................................. 16
Conexiones el_ctricas......................................................................................... 16
Conexi6n de la manguera de entrada ................................................................ 18
Reemplazo de las piezas y los accesorios ............................................................. 19
Instalaci6n .......................................................................................... 19
Inversi6n de la puerta ................................................................................ 20
Lista de verificaci6n final de la instalaci6n ............................................................ 21
Manual de instrucciones, sugerendas " "
Descripci6n general del panel de control ............................................................. 22
Cargue lasecadora de manera adecuada ...................................................................... 26
C6mo comenzar ............................................................................................. 26
Secado en estante ............................................................................................ 29
Seguro paranifios ............................................................................................ 30
Luzde Eatina ................................................................................................. 30
Espaf_o__2

Sin sonido ................................................................................................... 30
My Cycle(Mi cido) ........................................................................................... 31
Smart Care................................................................................................... 31
Sensorde ventiJaci6n......................................................................................... 32
CuJdado y limpieza
Panel de contrd .............................................................................................. 33
Tambor ...................................................................................................... 33
Tambor deacero inoxidab]e ................................................................................... 33
Exterior deJasecadora ........................................................................................ 33
Sistema de drenaje de ]asecadora............................................................................. 33
Limpie el filtro para pelusas ................................................................................... 33
Sugerendas para prendas espedales
Sugerencias para prendas especiales ................................................................. 34
Solud6n de problemas
Controle estos puntos si su secadora .................................................................. 35
C6digos de informaci6n ............................................................................. 37
Ap_ndJce
Tabla de indicaciones sobre la tela ................................................................... 38
Protecci6n del medio ambiente ...................................................................... 39
Declaraci6n de conformidad ......................................................................... 39
Especificaciones ..................................................................................... 39
Espaf_o[ _3

I Instrucciones de seguridad
Felicitaciones por ]acompra de lanueva secadora Samsung. Estemanual contiene informaci6n importante acercade la
instaBci6n, e[ uso ye[ cuidado de] electrodom6stico. Leadetenidamente estas instrucciones a fin de aprovechar al m_ximo
los mqtiples beneficios y funciones de la secadora.
Lo que necesita saber sobpe las instpucdones de
seguridad
Leaeste manual detenidamente para @render a uti[izar con seguridad yeficacia todas ]ascaracterFsticasy funciones de
su nuevo ebctrodomdstico. Conserve el manual en [ugarseguro cerca de] aparato paraconsu[tas futuras. Utilice este
electrodomdstico solo parael prop6sito parae[ que fue destinado como sedescribe eneste manual. Lasadvertencias y [as
instrucciones de seguridad importantes de este manual no cubren todas las posibles condiciones y situaciones que pueden
ocurrL Essu responsabi[idad actuar con sentido comOn, precauci6n y cuidado cuando instale, realice el mantenimiento o
ponga en funcionamiento ]asecadora.
Comur%uese siempre conel fabricante si surgen problemas o situaciones que usted no comprende.
S[mbolos g precauciones de seguridad importantes
ADVERTENCIA: Peligroso pr_icticasinsegurasque podrian causar lesiones fisicas graves o la muerte o
dafios materiales.
Siga la informaci6n contenida en este manual paraminimizar el riesgo de incendio o explosi6n o paraevitar
da_ios materiales, [esionesfisicas o [amuerte.
, + +
A pe[igros o pr&cticas insegurasque podrian causarlesiones fisicas o da_os materiales.
PRECAUCION:
NOTA
Estas se_ales de advertencia est_in aqui para evitar que usted u otras personas sufran da6os.
Siga las instrucciones completamente.
Despu_s de leer esta secci6n, gu_rdema en un lugar seguro para consultas futuras.
CONSERVEESTASINSTRUCCIONES
EspaSo_ _4

r
ADVERTENCIA =RIESGO DE
i" ' .... ° _ p ' p ' " p' i ' . ' '
[ de metal flexible (ripe I_iminamet_lica), debe set de un ripe especff_coidentificado per elBbricante del
[ dectredomd__sticocome adecuado parautilizar con secaderasde ropa. Losmateriales para ventilaci6n flexibles suelen
[ hundirse, aplastarse f_cilmente yatrapar pelusa. Estascondiciones obstruir4n elflujo de airede la secadora de ropay
[ aumentar_n el riesgo de incendio.
[ • Parareducir el riesgo de lesionesgraveso muerte, sigatedas las instrucciones de instalaci6n.
,_ PARADISMINUIR EL RIESGODEINCENDIO 0 EXPLOSION:
No seque prendas que hayan side previamente Iimpiadas, lavadas,remojadas o salpicadas con gaselina, soJventesde
limpieza en seco u otras sustancias inflamables o explosivas. Emiten vapores que pueden prenderse fuego o explotar. No
debe colocarse en ]asecadora ningt_n material que hayaestado en contacto con un solvente de ]impieza o liquidos o
s6JidosinflamabJeshasta que sehayaeliminado rode vestigio de tales [iquidos o s61idosinflamables y susvapores.
Existen touches articuJosaltamente inflamables en los hogares,tales come acetona, alcohol desnaturalizado, gasolina,
kerosene,aJgunos [impiadores [iquidos de use dom4stico, algunos quitamanchas, aguarr4s, cerasy removedores de cera.
No seque articulos que contengan goma espuma (puede estar catalogada come espuma de 14tex)o materiales
semejantes a la goma y con textura similar en laopci6n de secadocon taler. Losmateriales degoma espuma que
reciben taler pueden, en ciertas circunstancias, provocar incendios per combusti6n espont_nea.
,A QUEHACER$I PERCIBEOLORA GAS:
No intente encender ning@_eJectredomd_stice.
No encienda este electrodomd_stico.
No toque ningt_n interrupter dd_ctrico.
No utilice ning_]ntel4fono de su edi_cio.
Haga que redes los ocupantes se retiren de] cuarto, edificio o 4tea.
Comuniquese inmediatamente con el proveedor de gas desde el trial_lonede un vecino. Sigalas instrucciones del
proveedor de gas.
Si no puede comunicarse con el proveedor de gas,IJameal departamento de bomberos.
La instaJaci6nyel servicio t4cnico deber4n estara cargo de un instaJadorcaJificado,una agencia de reparaciones o el
proveedor de gas.
CONSERVEESTASINSTRUCCIONES
Espa_o_ _5

Znstrucc[ones de segur[dad [mportantes
ADVERTENCIA
Para reducir el riesgo de incendio, choque el_ctrico o lesiones fisicas cuando usa este electrodom_stico,
siga las instrucdones de seguridad b_sicas que figuran a continuad6n:
1. Leatodas [asinstrucciones antes deusar este eJectrodom6stico.
2, No uti[ice [asecadora para secar ropaque tenga restosde sustancias inflamables, como aceitesvegetales, de cocci6n
o de m4quina, productos quimicos inflamab[es, disolventes, etc.,o que contengan cera o productos quimicos, como
trapeadores y patios de limpieza. Lassustancias int]amab[es pueden ocasionar que [atela se prenda fuego.
3, No almacene ni uti[ice gasolina u otros vapores o [iquidos inflamab[es cerca deeste o cualquier otro aparato eld_ctrico.
4, No permita que los nifios o lasmascotas jueguen sobreel eJectrodomd_stico,dentro de_1o frente a d_l.Serequiere de
supervisi6n cuando el e[ectrodom6stico esutilizado cercade niflos y mascotas.
5, Antes de retirar o descartar ]asecadora, retire [a puerta del compartimiento de secado paraevitar que los niflos y [as
mascotas queden atrapados dentro de la secadora.
6, No introduzca ]a mano en ele[ectrodom6stico cuando [atina estd_en movimiento.
7. No insta[eo guarde este electrodom6stico donde quede expuesto a losfactores climBticos.
8, No modiflque Ioscontroles internos.
9, No repare,reemplace ni intente rea[izare[ mantenimiento de cua[quier pieza del e[ectrodomd_sticosalvoque est#
recomendado especificamente en [asinstrucciones de mantenimiento de[ usuario o en ]asinstrucciones de reparaci6n
para el usuario publicadas y que, a sujuicio, usted tenga [ahabilidad para IJevarJasa cabo.
1O, No use suavizante para ropa o productos paraevitar [aest4tica salvoque el fabricante del suavizante para ropao de]
producto 1orecomiende.
11. Limpie el filtro para peJusasanteso despud_sde cada carga.
12, No aplique calor parasecar prendas que contengan goma espuma o materiales semejantes a [agoma con textura
similar.
13, Mantenga el 4reaalrededor de lasalida del drenaje y [as4reascircundantes [ibres de peJusa,polvo y suciedad.
14, Elpersonal t6cnico califlcado debe efectuar una [impieza peri6dica de[ interior de lasecadora y de[ conducto de drenaje.
15, No coloque elementos expuestos aaceites de cocina en [asecadora.Los e[ementos contaminados con aceitesde cocina
pueden contribuir a que seproduzca una reacci6n quimica que ocasione queen [acargade ropase prenda fuego.
16, Estee[ectrodomd_sticodebe conectarse atierra. Consulte"Requisitos el6ctricos"y"Conexi6n a tierra"en [asecci6n
"lnstaJaci6nde [asecadora'(
17, Estee[ectrodom6stico debe conectarse atierra correctamente. Nunca enchufe elcable de a[imentaci6n a un recept4cu]o
que no est6 conectado atierra correctamente ni guarde conformidad con losc6digos locales y naciona[es. Consu[te [as
instrucciones de insta[aci6n paraconectar este electrodomd_sticoa tierra.
18, Aseg@esede que los bolsil[os no contengan objetos pequeflos, s6lidosy de forma irregular,material extraflo, etc., por
ejemplo: monedas, cuchilJos,aJflleres,etc.Talesobjetos podrian daflar la secadora.
19, Sepueden producir p6rdidas de gas en susistema que generen una situaci6n peJigrosa.
20. Las pd_rdidasde gas pueden no ser detectadas Qnicamente por el olor.
21. Los proveedores de gas recomiendan que compre e instale undetector de gasaprobado por UL
22, Elparle[ de control y [avdvula de entrada no est4n conectados a tierra intencionalmente y pueden presentar riesgo de
descarga e[d_ctricaiJnicamente durante e[servicio t#cnico. Personalde] servicio td_cnico- no toque esta parte mientras el
electrodomd_stico est_ recibiendo electricidad.
CONSERVEESTASINSTRUCCIONES
Espa_o__5

ADVERTENCIA
Aparatos a gas
ADVERTENCIA: estos productos contienen sustanciasqufmicas conocidas en el estado de California como causantes de
c_ncery daflos reproductivos.
Losaparatos a gas pueden provocar una [igera exposici6n a alguna de lassustandas de B [istade ladisposici6n 65, incluidos,
entre otros, benceno, mon6xido de carbono, formaldehido y hol% causada pot [aposible combusti6n incompleta de gas
natural o combustibles PL
A PRECAUCION
1. No se siente encima de [asecadora.
2. Debido a [asconstantes mejoras a los productos, Samsung sereservael derecho demodificar Bs especiflcaciones sin
previo aviso. Paraconocer detalles completos, consulte las instrucciones de instalaci6n incluidas con suproducto antes
de seleccionar los gabinetes, hater aberturas o comenzar [ainstaBci6n.
3. No laveropa que contenga hebillas grandes, botones u otros objetos de metal pesado o s61ido.
4. Instale y utilice de acuerdo con las instrucciones del fabricante.
5. Todas lasprendas limpias y suciasque contengan aceite vegetal o aceite de cocina pueden resultar peligrosas.Lavar
dichas prendas enagua caliente con una dosisadicional dedetergente reducir4 el peligro, aunque no IoeliminarA.
Siempre useel cic]o (.oo1Down (Enfriamiento) para estasprendas con el fin de reducir ]atemperatura. Nunca retire estas
prendas cuando la secadora seencuentre caliente ni interrumpa elciclo de secado hastaque las prendas hayan pasado
por elcic]o Cool Down (Enfriamiento). Nunca amontone o @ile estas prendas cuando est6n calientes.
6. AI cerrar lapuerta tenga cuidado de no atrapar losdedos de los niflos. Puede provocar lesionespersonales.
CONSERVEESTASINSTRUCCIONES
Espa_o_ _7

I Instalaci6n de la secadera
Desempaque de la secadora
Desempaque ]asecadora e inspecci6nela paracontrolar que no se hayan producido daf/os durante el transporte. AsegOrese
de que ha recibido todos loselementos que se muestran a contirluaci6n. Si la secadora sufri6 daFiosdurante el transporte, o si
falta algOrlelemento, comur%uese con el 1-800 SAMSUNG(726 7864).
ADVERTENCIA
Los materiales de empaque pueden set peligrosos paralos ni_ios.Manter/ga todos los materiales de empaque
(bolsasde pl_stico, poliestirerlo, etc.) bjos del alcance de los ni_ios.
Paraevitar lesionesffsicaso drones, use guantes protectores cadavez que levante o transporte la unidad.
Partes de la secadopa
[_ \
\\\
......................................./'
Arandela de goma
Espa_iol- 8

Zmportante para el instalador
Lea]assiguientes instrucciones con detenimiento antes de instalar la secadora. Estasinstrucciones sedeben conservar para
consultas futuras.
ADVERTENCIA: Retirela puerta de todos loselectrodomd_sticosdesechados paraevitar el peligro de que unniflo
quede atrapado y seasfixie.
Requisitos basicos
AsegOresede tenet todo Io necesario para realizaruna instalaci6n adecuada
Serequiere un TOMA(.ORRIENTECON(.ONEXIONATERRA.
Un CABLEDEALIMENTACIONpara secadoras el6_ctricas(excepto Canada).
Los CONDUCTOSDEGAS (sise trata de unasecadora a gas)deben cumplir con losc6digos localesy nacionales.
ElSISTEMADEDRENAJEdebe set un conducto de drenaje de metal rfgido o flexible con un recubrimiento de metal
resistente.
Conexi6n atierpa
Estasecadora debe conectarse atierra. Encaso de que el electrodomd_stico funcione real o sedescomponga, ]aconexi6n a
tierra del producto reducir4 el riesgo de descarga eld_ctricaal ofrecer una via de menos resistencia a lacorriente el6ctrica.
Modelos a gas
Susecadora tiene un cable con un conductor de conexi6n a tierra del equipo y un enchufe de conexi6n a tierra.
Elenchufe debe conectarse a un tomacorriente adecuado que estd correctamente instalado y conectado a tierra en
conformidad con todos los c6digos y ordenanzas locales.
No modiflque el enchufe provisto con lasecadora; sino entra en el tomacorriente, solicite a un electricista calificado que
insta]e el tomacorriente adecuado.
Nunca conecte el cable atierra alas tuberias de pl4stico, alas tuberias de gaso alas caflerias de agua caliente.
Modelosel@ctpicos
La secadora requiere un cable optional con un conductor de conexi6n a tierradel equipo yun enchufe de conexi6n atierra
que sevende pot separado.
Elenchufe debe conectarse a un tomacorriente adecuado que estd correctamente instalado y conectado a tierra en
conformidad con todos los c6digos y ordenanzas locales.
No modiflque el enchufe provisto con lasecadora; sino entra en el tomacorriente, solicite a un electricista calificado que
insta]e el tomacorriente adecuado.
Si no se utiliza un cable de alimentaci6n y la secadorael4ctrica debe estar permanentemente conectada, sela debe
conectar a un sistema de cableado de metal con conexi6n atierra permanente, o se debe conectar un conductor con
conexi6n a tierra del equipo a losconductores del circuito y a la terminal con conexi6n a tierra del equipo o al cable de
la secadora.
Espa_io[ _9

Considepadones acepca de Jaubicad6n
La secadora debe estar ubicada donde hayasuflciente espacio adelante para cargarla y suficiente espacioatr_isparael
sistema de drenaje. Estasecadora viene preparada de f_brica con la opci6n dedrena]e posterior. Paraque drene por laparte
inferior, hacia la derecha o izquierda, uti[ice el kit de drenaje accesorio.El kit viene acompaF/ado de instrucciones. Asegtirese
de queen el cuarto circule suficiente aire fresco.La secadoradebe estar ubicada don@ el aire pueda fluir sin obstrucciones.
Paralas secadorasa gas,se debe mantener el espacio [ibresuflciente ta[ como figura en [apBca de informaci6n para
garantizar que hayaaire suficiente para la combusti6n y el funcionamiento adecuado de lasecadora.
No se debe instalar o guardar lasecadora en un 4readon@ quede expuesta alagua y/o a los factores clim4ticos. El4reade
la secadora debe mantenerse libre de materiales combustibles, gasolina yotros vapores y liquidos inflamabbs. Unasecadora
produce pelusacombustible. No debe haber pdusas en el _reacircundante de lasecadora.
InstaBciones del electpodom@stico en un gabinete o en un
hueco
A
ADVERTENCIA
La secadora debe tener undrenaje con salidahacia el exterior para reducir el riesgo de incendio cuando se
instaB en un gabinete o en un hueco.
No se debe instaBr ning@l otro electrodom6_stico que queme combustible en el mismo gabinete de la
secadora.
Espacios libres mlnimos entre la secadora y las paredes adyacentes u otras superficies:
Zaterales ! pu!g:!25 ra!! Posterior 519pu!gi!!SO mm!
J JFrente de J
lArriba 17pulg. 432mm l i. : 2pulg. 51mm l
B B
!
A 1pulg.(25 ram)
B 27 pulg. (686 mm)
C 17pulg. (432 mm)
D 2 pulg.(50mm)
E 32.4 pulg. (823 ram)
F 5 pulg.(127 mm)
/_reaempotrada
VistaBteral
(gabinete o _rea reducida)
Espa_o_-lO

Insta[aci6n con pedestal
A
D
/
E "1T
A 38.7 pulg.(984mm)
B 53.3 pulg.(1355 ram)
C 27 pulg.(686mm)
53 pulg. (1345 ram)
D para poderabrirla
puerta
E 32.4 pu[g. (823 mm)
F 5 pu[g.(127 ram)
Insta[ad6n api[adade la lavadopag la secadopa
i ¸ L
A
IB
v
E
[
H _I_K
A 3 pulg.(76 ram)
B 48 pulg.2(3100 mm2)
C 24 pulg.2 (1550 mm2)
D 3 pulg.(76mm)
E 6 pulg.(152 mm) _
F 7X5 pulg. ( 1968mm)
i i
G 1pulg. (25 ram)
H 27 pulg.(686mm)
I 5 pulg.(127 mm)
j J I puJg.(25 ram)
[
i K 32.4pulg.(823mm)
[ '
[ L . 8pulg.(203mm) .
Elfrente del gabinete debe contar condos aberturas sin obstrucciones para que ingrese el aire (B, C), para ocupar
un _rea total combinada minima de 72 pulg2(465cm2),con 3 pulg. (7.6cm) de abertura mfnima en la parte superior
(A) yen [aparte inferior (D}.
Elcodo del drenaje externo requiere espacio adicional (L).
Apilamiento (MODELO N,°: SK-5A)
La Bvadora y [asecadora Samsung pueden apiBrse paramaximizar el espacio utilizable.
Deben retirarse lasparasde lasecadora paraapilar la lavadora y la secadora. Puedeadquirir un kit de apilamiento
optional en sucomercio minorista de productos Samsung.
Espa_iol- 11

Requisitos para el tendido de conductos
_%comendado Utlhcesobparains_alaclondedmtanclacor_a
i 0 24.4m (80 pies) 12.4m (41 pies) 22.6m (74pies) 10.1m (33 pies)
i .....
i 1 20# m (68 pies) 11.2m (37 pies) 18.9m (62 pies) 8.8m (29pies)
j 2 17.4m(57pies) , 10.1m(33pies) , 15.5m(51pies) , 7.6m(25pies)
J_ 3 14.3m(47pies) 9.0 m(29pies) 12.5m(41pies) 6.5m(21pies)
Noutiliceconductosflexiblesdeunmaterialquenoseael metal.
Utiliceunconductodealuminiorigidoodeacerogabanizadorigidode4pulgadas(10.2cm)dedi4metro.
Noutiliceunconductode menortamaflo.
Losconductosdem4sde4 pulgadas(10.2cm)dedi_imetropuedenocasionarunamayoracumulaci6ndepdusa.
Debeextraer]ape]usaregu]armente.
Siesprecisoutilizarunconductodemetalflexibb, utiliceeltipoquevieneconunrecubrimientodemetalresistente.
NoutiliceunconductoflexibleconunrecubrimientodeJgado.Sepuedepro@@unaobstrucci6nimportantesise
doblaelconductoflexibleenformademasiadomarcada.
NuncainstaJeningSntipo deconductoflexibleenparadestechosuotrosespaciosquequedenocultos.
HagaqueeJconductodedmnajesemantengaJom4srectoy cortoposibJe.
AsegumJasunionesconcintaparaconductos.NoutilicetomiJlos.
Losconductosflexiblesdepl_sticosepuedenenroscar,combat,pinchar,puedenreducirelflujodeaim,prolongarel
tiempodesecadoy afectarelfuncionamientodeJasecadora.
LossistemasdedrenajedemayorIongitudquelarecomendadapuedenprolongarel tiempodesecado,afectarel
funcionamientodd equipoyacumularpelusa.
Elconductodedmnajedebefinalizarenunatapadedrenajeconunreguladordetiroquegim haciaafueraparaevitarel
reflujodeaimy eJingresodeinsectosopJantas.NuncautiliceunatapadedrenajeconunreguJadordetiromagnd_dco.
Latapadebetenet 12puJgadas(30.5cm)deespacioJibrecomomff_imoentrela parteinferiordeJatapayeJsudou
otraobstrucci6n.LaaberturadeJatapadebeapuntarhaciaabajo.
Nuncainstaleunflltrosobmlasalidadd dmnaje.
ParaevitarlaacumuJaci6ndepdusa,nopermitaquelasecadoradronedimctamenteenel huecodeunaventana.
Nopermitaquedronedebajodelacasao deunagaleria.
Silareddeconductosdd dmnajedebepasarpotun_reaque norecibecalor,sedebeaislarelconductoy seIodebe
colocarlevementeen@divehacialatapadedmnajeparareducirlacondensaci6ny laacumulaci6ndepdusa.
Inspeccioney limpied interiordd sistemadedrenajepotIomenosunavezpotaflo.Desenchufed cablede
aJimentaci6nantesde[impian
ControleconfrecuenciaparaasegurarsedequeelreguBdordetirodelatapade[drenajeseabraysecierresin
inconvenientes.
Controleunavezporruesy[impiea]menosunaveza[aflo.Nora:5i [asprendasnosesecan,entoncesverifiquequelos
conductosnopresentenobstrucciones.
Nohagaque[asecadoradrenehacianingunapared,techo,s6tanodepequeflaalturaoespacioocultodeunedificio,
[ineadedescargadegasesocuaJquierotroconductocomQno chimenea.Estopodriagenerarunpeligrodeincendio
comoconsecuenciadela pdusaexpuJsadapot[asecadora.
Espa_o[_12

Si la nueva secadora se instala dentro de un sistema de drenaje existente, debe asegurarse de que:
Elsistema dedrenaje cumpB con todos los c6digos locales,estatalesy nacionales.
No se utilice un conducto flexible de plBstico.
Becontrole y limpie toda la pelusa acumuBda del interior del conducto existente.
Elconducto no est# enroscado o aplastado.
El regulador de tiro de latapa de drenaje se abray secierre sin inconvenientes.
La presi6n est4tica de cualquier sistemade drenaje no debe superar las 0.83 pulgadas de lacolumna de agua ni set
inferior a O.
Estose puede medir cuando la secadora estBen funcionamiento con un man6metro en el punto donde el conducto de
drenaje se conecta a la secadora. Bedebe utilizar laopci6n sin calor. Latina de la secadoradebe estarvacfa y el flltro para
pelusas Iimpio.
Drenaje
La secadora no debe drenarse hacia una chimenea, pared, techo, altillo, s6tano de pequeFiaaltura o espacio oculto de un
edificio.
Sila secadora tiene un drenaje con salidahacia el exterior seevitar4 que ingrese una gran cantidad de pelusa y humedad a la
habitad6n.
• Todaslassecadoras deben tener un drenaje con salida hacia el exterior.
No file elconducto con tornillos u otros medios de sujeci6n que se extiendan dentro del conducto yatrapen
pelusa.
Elconducto de drenaje debe tener 4 pulgadas (102 ram) de di_imetro.
La Iongitud total del conducto flexible met41icono debe superar los 2.4 m (7.8pies).
Enlos Estados Unidos:
Utilice solo los conductos flexibles tipo lamina met_ilica,si los hubiera, identiflcados especiflcamente para suutilizaci6n con el
electrodomd_stico por el fabricante yque cumplan con elEsquema para conductos de transici6n de secadorade ropa,Tema
2158£
EnCanadS:
Utilice soloaquellos conductos flexibles tipo I_mina met_ilica,si los hubiera,especificamente identiflcados por el fabricante
para suuso con el electrodom6stico.
Fuera de los EE.UU_g Canada:
Remitase a losc6digos locales.
ADVERTENCIA
La secadora debe tenet un drenaje con salida hacia el exterior para reducir el riesgo de incendio cuando se
instaB en un gabinete o en unhueco.
NUNCA UTILICEUN CONDUCTOFLEXIBLEDEPLASTICQO DEUN MATERIALQUENO SEAELMETAL
Sisu red de conductos actual esde pl_stico, de un material que no seael metal o es inflamable, reempl_icelapot
una que sea demetal.
Utilice Qnicamente un conducto de drenaje de metal que no seainflamable paraasegurar lacontenci6n del aire
expulsado, el calory la pelusa.
Espa_iol- IS

Sugerencias acerca del drenaje de la secadora
,_ ADVERTENCIA: un conducto flexible de pl_stico o de un material que nosea elmetal presenta un potencial riesgo
de incendio.
Asegt_resede que su secadora estd_instalada correctamente paraque extraiga ......................................................................................................................................................
el aire f_cilmente. 4"
Utilice un conducto de metal rfgido de 4"de di4metro. Coloque cinta en todas ta
las uniones, induso en ]asecadora. Nunca use tornillos que atrapen pelusa.
Mantenga losconductos Io m_isrecto posible.
Limpie todos los viejos conductos antesde instalar ]anueva secadora.
Asegt_resede que la ventilaci6n seabra y secierre sin incorlvenientes. .
Inspeccione y Iimpie el sistema de drenaje todos los a_ios.
# Nopermita que un sistema de drenaje defectuoso demote e! secado:
AI restringir a la secadoracon un sistema de drenaje defectuoso. ............................................................................................................................................
AI utilizar un conducto flexible de pl_stico, con un recubrimiento de@ado o
de un material que no esel metal.
s
i
J
AI utilizar conductos innecesariamente largosque tienen muchos codos.
AI permitir el uso de conductos y ventilaciones aplastados u obstruidos. "
Espa_o[-14

Requisitos en cuanto al gas
LA INSTALACION DEBE REALIZARSE EN CONFORMIDAD CON LOS CODIGOS LOCALES, O EN AUSENCIA DE
ELLOS, CON EL CODIGO NACIONAL PABA GAS Y COMBUSTIBLES ANSI/Z223.1, LA REVISION MAS RECIENTE
(PABA LOS ESTADOS UNIDOS), O CON LOS CODIGOS DE INSTALACION CAN/CGA-B149 (PARA CANADA).
Utilice _nicamente gas natural o gas LP(gas licuado de propano).
Estasecadora ha sido disenada parasu uso con gas natural.Sitiene pensado utilizar su secadora con gas LP(propano
liquido), sedebe realizar laconversion pot un tecnico de servicio califlcado paraIograr un desempeno seguro y
adecuado.
Serecomienda usar unconducto de suministro de gas de 1/2 pulg. (1.27 cm) y debe reducirse para la conexi6n con el
conducto de gas de 3/8 pulg. (1cm) de su secadora. ElC6digo National paraGasy Combustibles exige que seinstale
una vdvula manual de cierredel gas,aprobada y de f&cilacceso, dentro de las6 pulgadas dedistancia de la secadora.
Las secadoras a gas instaladas en garajes residenciales deben estar elevadas a 18 pulgadas (46 cm)
del piso.
Adem_s, inmediatamente contra ]acorriente de ]aconexi6n del suministro de gas de la secadora,se debe instalar una
conexi6n roscada macho N.RT.(rosca national paratubos) de 1/8 pulg. (0.3 cm), accesible para la conexi6n del medidor
de prueba.
Susecadora debe estar desconectada del sistema desuministro de gasdurante las pruebasde presi6n del sistema.
NO vuelva a utilizar el viejo conducto de gas en metal flexible. Eldiseff_odel conducto de gasflexible debe estar
certiflcado por la Asociaci6n Americana del Gas(CGAen Canad&).
• Todocompuesto de uni6n de tuberfas utilizado debe serresistente a la acci6n del gas Iicuado de petr61eo.
A modo de cortesfa, la mayoria de las empresas localesde gas inspeccionar&n la instalaci6n del artefacto
agas.
ENCENDIDO DEL GAS - Lasecadora utiliza un sistema de encendido autom&tico paraencender el quemador.
No existe un piloto que permanezca constantemente encendido.
lnstrucciones de instalaci6n de la Mancomunidad de Massachusetts
La instalaci6n de lasecadora deber_estar a cargo de un plomero o un gasistamatricuBdo. Sedeber_ instalar una vdvula de
gas manual con una manila en forma de"T" en el conducto de suministro de gasde la secadora. Sise utiliza un conector de
gasflexible para instaBr la secadora, elconector debe tenet una Iongitud m_xima de 3 pies(}6 pulgadas).
_,, ADVERTENCIA
Sepueden producir p_rdidas de gasen su sistemaque ocasionen una situaci6n peligrosa.
Las p6rdidasde gas pueden no setdetectadas Qnicamente pot elolor.
Los proveedores de gas recomiendan que compre e instale un detector de gas aprobado pot UL
Inst41eloy utilicelo de acuerdo con lasinstrucciones delfabricante.
Espa_iol- 15

Requisitos el ctricos
Eldiagrama del cableado seencuentra en la plata debajo del panel de control.
_, ADVERTENCIA
La(onexi6n inadecuada del conductor de conexi6n a tierra del equipo puede dar como resultado un riesgo
de descarga el4ctrica. Consulte a un electricista o t_cnico califlcado sile surgen dudas acercade si laconexi6n
atierra de susecadora escorrecta. No modifique el enchufe provisto con lasecadora; sino entraen el
tomacorriente, solicite a un electricista calificado que instale el tomacorriente adecuado.
Paraevitar el riesgo innecesario de incendio, descarga el6ctrica o lesionesfisicas,todo el cableado y la conexi6n
atierra deben realizarseen conformidad con los c6digos locales,o en ausenciade ellos,con el C6digo El6ctrico
National, ANSI/NFPANro.70, su (]ltima revisi6n(para los EE.UU.)o el C6digo Eldctrico CanadienseCSAC22.1,
sus_iltimas revisionesy los c6digos yordenanzas locales.Essu responsabilidad proveer los serviciosel6ctricos
adecuados para susecadora.
Todaslas instalaciones de gas deber4n realizarseen conformidad con elC6digo Nacional paraCombustibles
ANSI/Z2231,su Oltima revisi6n (paralos EE.UU.)o con los C6digos de Instalaci6n CAN/CGA- B149,su Oltima
revisi6n (paraCanad4)y losc6digos y ordenanzas locales.
Conexiones el_ctricas
Antes de poner elelectrodomd_stico enfuncionamiento o realizar pruebas, siga las instrucciones de conexi6n a tierrade la
secci6n "Conexi6n a tierra'en ]a p_igina13.
Serecomienda que sedestine un circuito derivado individual (o separado) solo para la secadora. NOUTILICEUN CABLE
PROLONGADOR.
Mode!osa gas = EEUU.g Caned8
Berequiere un servicio el4ctrico aprobado deCA de 120voltios, 60 Hz,con un fusible o interruptor de 15A.
Mode!ose!@ctpicos= Solo EE.UU.
La mayor parte de lassecadoras estadounidenses requieren un servicio eldctrico aprobado de CA de 120/240 voltios, 60
Hz.Algunas requieren un servicio el6ctrico aprobado de 120/208 voltios, 60 Hz.Los requisitos del servicio eldctrico pueden
encontrarse en la etiqueta con informaci6n ubicada detr_isde lapuerta. Serequiere un fusible o interruptor de 30A a ambos
lados del conducto.
Sise utiliza un cable de alimentaci6n, el cable debe enchufarse a un tomacorriente de 30 A.
NOse provee el cable de alimentaci6n con los modelos dd_ctricosde secadorasestadounidenses.
_, ADVERTENCIA- RIESGO DE DESCARGA EL_:CTRICA
SiIopermitenlosc6digoslocales,elsuministroel6ctricode lasecadorapuedeconectarsepor mediodeun nuevokitdecablesde
alimentaci6nel6ctrica,rotuladoparaqueseIoutiliceconunasecadora,esdecir,quecuenteconcertiflcaci6nU.Lycategorizadoen
un minimode 120/240voltios,30AcontresconductoresdecobreN,° 10queflnalicenen terminalesde bude cerrado,pemosde pala
de%0 abiertoconextremosrebatidosocon conductoresdeestaiio.
Novuelvaa utilizaruncabledealimentaci6nel6ctricade unasecadoravieja.Elcabledealimentaci6nel6ctricadebeconservarse
enel gabinetedela secadoraconun dispositivodealiviodetensi6nconcertiflcaci6nULadecuado.
Laconexi6natierraatrav6sdd conductorneutroest4prohibidapara(1)instaladonesnuevasconcircuitoderivado,(2)casas
rodantes,(3)vehiculosde recreoy(4)4teasen lasquelosc6digoslocalesprohibanlaconexi6natierraatrav6sde unconductor
neutro.(Useun enchufede4 pinesparaeltomacorrientede4 ranuras,tipo NEMA14-30f!.)
Mode!ose!@ctdcos= Solo Caned8
Serequiere un servicio eldctrico aprobado de CAde 120/240 voltios, 60 Hz,equipado con un fusible o interruptor de 30
Aa ambos lados dd conducto.
Todos los moddos canadienses seenvian con el cable de alimentaci6n adjunto. Elcable de alimentaci6n debe
conectarse aun tomacorriente de 30 A.
EnCanad4 no est4 permitido convertir una secadora a 208 voltios.
Espa_o_-16

Conexionesde sistemas de 3 CABLES
1. Afloje o retireel tornillo central del bJoquede terminaJes.
2. Conecte el cable neutro (cable blanco o central) del cable de alimentaci6n a la terminal de tornillo central de color
plateado dd bloque de terminales. Ajuste eltornillo.
S. Conecte los dem4s cables a lostornillos extemos del bloque de terminales. Ajuste los tornillos.
4. Ajuste lostorniJJoscon dispositivo de alivio de tensi6n.
5. Inserte la leng(;letade lacubierta del bloque de terminales en laranura del panel posterior de la secadora.
6. Asegure la cubierta con un tornillo de sujeci6n.
iA Conectoratierraexterno
i
[ B Cable a tierra neutro (blanco o verde/amarillo)
C Tornillo central de color plateado del bloque de terminales
i D Cable neutro(cable blancoocentral)
l Dispositivo de alivio de tensi6n con certiflcaci6n UL de 3/4 pulg.
(1.9 cm)
_ i realiza laconversi6n del sistema el_ctrico de 4 cables a 3 cables, debe volver a conec_ar la cin_a de conexi6n a tierra al
soportedd bloque de terminalesparaconectara_ierrael armaz6nde la secadoraalconductor neu_ro.
Conexionesde sistemas de 4 CABLES
1. Retireel tornil[o central del bloque de terminales.
2. Conecte el cable a tierra (verdeo sin cubierta) del cable dealimentaciGn al tornillo conductor a tierra externo.
S. Conecte el cable neutro (cable blanco o central) del cable de alimentaci6n yel cable atierra del electrodomd_stico
(bianco o verde con franjas amarilias) debajo dd torni[Io central del bloque de terminales.
4. Conecte los demos cables a lostornillos externos de[ bloque de terminales. Ajuste los tornillos.
5. Ajuste lostorniJJoscon dispositivo de alivio de tensi6n.
6. Inserte la leng(;letade lacubierta del bloque de terminales en laranura del panel posterior de la secadora.
7. Asegure la cubierta con un tornillo de sujeci6n.
j A Conector atierra externo
(.able verde o de cobre desnudo de[ cable de alimentaci6n
i
i
i C Dispositivo de alivio de tensi6n con certiflcaci6n UL de3/4 pulg.
j_ (1.9cm)
i D Tornillo central de color pbteado del bloque de terminales
i
' E (.able a tierra neutro (blancoo verde/amarillo)
F Cableneutro (cable blanco o central)
8. Con un nivelador, controle lasecadora y haga losajustes necesariosalas patas niveladoras.
9. Enese momento, aseg0resede que todas las conexiones de gas (en los modelos a gas),y [asconexiones el6ctricas y dd
drenaje est_n completas. Enchufe [asecadora ycontrole el funcionamiento utilizando la [istade veriflcaci6n que flgura
m4s abajo.
10. (SOLOMODELOSA GAS)
Esposible que al principio el quemador no seencienda debido a la presenciade aireen elconducto de gas. Permitir
que lasecadora funcione con laopci6n de calor purgarA el conducto. Si en el lapso de 5 minutos el gas no seenciende,
apague la secadora yespere Sminutos. AsegOresede que el suministro de gashacia su secadora estd_abierto. Para
conflrmar que el gas est4encendido, controle que sesienta caJoren el drenaje.
Espa_iol- 17

Conexi6n de la manguera de entrada
La secadora debe conectarse a la Ilave de agua fria mediante las nuevas mangueras de entrada. No utilice mangueras viejas.
1. Cierre la IBve de agua frfa.
2, Conecte el extremo hembra de bronce del conector en forma de Y (A) a la
Navede agua frfa.
3. Conecte el extremo recto de lamangue_a la_'ga (B) al conector en forma
deY.
4, Ajuste launi6n con dos tercios degiro adicionabs utilizando la pinza.
Siel conector en forma deYno puede conectarse directamente a la Ilave
de agua frfa, sedebe utilizar [amanguera corta.
(Si el espacio Io permite, omita lospasos5 a 8 yvaya directamente al
paso9.)
5. Una la manguera deentrada costa a la Ilave (C) de agua frfa.
Enrosque la uni6n a mano hasta que se asiente en la Ilavede agua.
6. Ajuste launi6n con otros dostercios de giro adicionales utilizando la pinza.
7. Una el conector enforma de Y (A) al extremo macho de bronce de la
manguera pequefla. Enrosquela uni6n a mano basraque seasiente en el
conector.
8. Ajuste launi6n con otros dostercios de giro adicionales utilizando la pinza.
g. Una el extremo angular de lasmangueras largasa la vSIvulade cargaen ]a
parte inferior de] armaz6n trasero de la secadora. Enrosquela uni6n a mano
hasta que se asiente en elconector de la wilvula de carga.
10. Ajuste la uni6n con dos tercios degiro adicionales utilizando la pinza.
/ i
forma de Y (A}. Atornille la uni6n de la manguera basraque est6 ajustada.
Ajuste launi6n conotros dostercios de giro adicionales utilizando la pinza.
12. (.ompruebe que las Havesde agua est6nabiertas.
13. Compruebe que no hayap6rdidas alrededor del conector en forma de Y,las
Navesde agua y las mangueras.
,_ Cuando ajuste la uni6n con la pinza, no laajuste en exceso.Podriadaflar la uni6n.
Espa_o_-18

ReempJazode Jaspiezas y bs accesoMos
Sies predso reempBzar piezas o accesorios de la secadora,comur%uese con el distribuidor al que le compr6 la secadora o
con elcentro de atenci6n al diente de SAMSUNGal 1-800 SAMSUNG(726 7864).
Instalad6n
Para realizar una instalaci6n adecuada, recomendamos contratar a un instalador calificado.
1. Mueva la secadoraal lugar adecuado paraB instalad6n. Considere instaBr
la secadora y la Bvadora una al lado de la otra, parapermitir el accesoalas
conexiones de gas, el6ctricas y del drenaje. Coloque dos de las protecciones
superiores de cart6n en el piso. Incline lasecadora haciauno de los laterales,
de modo tal que quede atravesando ambas protecciones.
2. Vuelva acolocar la secadoraen posici6n vertical.
3o La secadoradebe estar niveBda para garantizar un secado 6primo. Para
minimizar lasvibraciones, los ruidos y los movimientos indeseados, el piso
debe seruna superficie s6liday perfectamente nivelada.
Paracolocar la secadoraa la misma altura que la lavadora,retraiga
completamente las patas niveladoras (A) gir4ndolas en sentido contrario a
las agujas del reloj, luego a%je las parasgir4ndolas en el sentido de lasagujas
del reloj.
Ajuste lasparasniveladoras solo Ionecesario para nivdar la secadora.
Extender las parasniveladoras m_s de Ionecesario puede hater que
la secadora vibre.
4.
Revisela secci6n "Drenaje'de la p_gina 13 antesde instalar el sistema dedrenaje.
Instab la redde conductos des@ lasecadora basra latapa de drenaje. Elextremo con reborde de las seccionesdel
conducto debe apuntar hacia afuera de lasecadora.
NOutilicetomilloscon recubrimientode metalcuando realiceelmontajede losconductos.Sedebecolocardnta enlasuniones.
Nuncautilicematerialde pl_sticoflexible paraeld_enaje.
Suge_endaparaquelasinstalacionesquedenbienaiustadas:conecteunasecci6ndelsistemadedrenajea lasecadoraantesde
coloca_Jaensulugar.
Utilicecintaparaconductosparaasegura_estasecci6na lasecado_a,perono cub_alasabeKurasdelgabinetedela secadora.
Revisela secci6n'Requisitos el6ctricos'de la p_gina 16.
ANTESDEPONERELELECTRODOMESTICOENFUNCIONAMIENTOO REALIZARPEUEBAS,siga las instrucciones de
conexi6n a tierra de la secci6n "Conexi6n a tierra'de la p@ina 9.
ADVEBTENCIA - MODELOS DE EE.UU.
BIESGO DE DESCABGAS ELI_CTRICAS Todos los modelos de EE.UU.fueron fabricados para una
CONEXION DE SISTEMAS DE 3 CABLES.
Elarmaz6n de lasecadoraest4 conectado a tierra alconductor neutro del bloque de terminabs.
Serequiere una CONEXI()N DE SISTEMAS DE 4 CABLES para ]asconstrucciones nuevaso remodeladas,
lascasas rodantes o, silos c6digos locales no permiten ]aconexi6n a tierra, atrav6s de] conductor neutro. Sise
utiliza un sistema de 4 cables, el armaz6n de la secadora no puede conectarse a tierra alconductor neutro del
bloque de terminales.
Remitase alas siguientes instrucciones de'Conexiones el6ctricas'en la p_gina 16.
Retire latapa del bloque de terminales.
Inserte el cable de alimentaci6n con un dispositivo de alivio de tensi6n con certi_caci6n ULa travd_sdd ori_cio provisto
en el gabinete cerca del bloque de terminales.
debe utilizar de alivio de
Se
dispositivo
un tensi6n.
No a%je las tuercasya instaBdas en el bloque de terminales. Aseg@esede que est#n ajustadas.
Utilice un tomacorriente parahuecos profundos de 3/8 pulg. (1cm).
Espa_iol- 19

6,
Revise[asecci6n"l%quisitos en cuanto al gas"de [ap4gina15.
Retirelacubiertaprotectoradelaroscaparatubos.Apliquecompuestodeuni6ndetuberfaso 1 1/2vueltas
aproximadamentedecinta@Teflonentodaslasconexionesroscadas.
Elcompuestodeuni6ndetuberBsutilizadodebesetresistentealaacci6ndelgaslicuadodepetr6leo.
Conecte el suministro de gas a lasecadora.Se requiere un accesorio adicional paraconectar el extremo de la rosca
hembra de 3/4" (1.gcm) de un conector flexible alextremo de larosca macho de 3/8" (1 cm) de la secadora.
Ajuste flrmemente el accesorio de latubeffa de gassobre las roscas.
Abra e]suministro de gas.
Controle todas las conexiones de gaspara detectar si presentan p4rdidas usando unasoluci6n jabonosa.
Siaparecen burbujas, ajuste las conexiones y vuelva acontrolar. NOuse la llama abierta paraveriflcar sihay p_rdidas de
gas.
Invepsi6n de la puepta
1. Desconecte elcable de alimentaci6n.
2. Retire los dostornilios de [abisagra de [apuerta.
S. Levante la puerta yrefirda.
4. Retire los dostornilJos de[ marco frontak
5. Retire los dostornilbs de[ lado opuesto de la bisagra de lapuerta.
6. Retire los dostornillos de[ cierre de [aplacade apoyo.
7. Vuelva a poner los dostornillos en los oriflcios internos.
\
\
\
\
\
Espa_io_- 20

8. Retireun torrfiHo de B bisagra de lapuerta.
[_ Eltornillo es parafljar previamente la puerta en el marco delantero.
9. Vuelva aco]ocar eltornillo en el otto oriflcio
10. Coloque B puerta sobre el Bdo contrario yvueba afljar a la secadora.
11. Vuelva aconectar la pBca de apoyo.
12. Vuelva acolocar lostornillos en los oriflcios restantes.
Lista de verificaci6n final de la instalaci6n
La secadora est.1enchufada a un tomacorriente yest_ conectada atierra correctamente.
Los conductos de drenaje est_n conectados y secoloc6 cinta alas urfiones.
NOse us6 un conducto flexible de pl4stico.
Seus6 material demetal rfgido o flexible con unrecubrimiento de metal resistente para la ventilaci6n.
La secadora est,1niveBda y apoyada flrmemente sobre el piso.
Modelos a gas:el gasest_abierto y no hayp6rdidas de gas.
Encienda la secadora paraconflrmar que funciona, calienta y se apaga.
Espa_ol-21

I NanuaJ de instrucciones, sugerencias
Parareducir el riesgo de incehdio, descarga eFd_ctricao lesiones personaEes,lea Bs INSTIRUCCJONESDESEGURIDAD
IMPOfiTANTESantes de poner en funcionamiento el aparato.
DescNpd6n genepal del panel de control
Modelo a gas
Manual Dry []
HEAVY DUTY NORMAL ECO NORMAL
BEDDING QUICK DRY
SANITIZ_ TIME DRY
PERM AIR FLUFF
DELIC KLE AWAY
[] Sensor Dry Steam Bydes []
EspaSo_- 22

Selector de ciclos
Paraseleccionarun cido, gireel discoSelectorde cidos hasta Ilegaralciclo deseado.
La luzdel indicadorjunto al nombre del cicloseencender_,Losdelos ECONORMAL(ECONORMAL),NORMAL(NORMAL),
HEAVYDUTY(ACCIONFBERTE),BEDDING(ROPADECAMA),SANITIZE(DESINFECCION),PERMPRESS(PLANCHAPERMANENTE),
WOOL(LANA)YDELICATES(DELICADA)sonddos de SensorDry (Secadocon sensor).
ElSensorDry (Secadocon sensor)detecta autom4ticamente la humedad de lacargay apagala secadoracuando alcanzael
nivd de secadosebccionado (deVeryDry [Muy seco]aDamp Dry [H0medo]),
ECONORMAL Algod6n,ropadetrabajo,ropade j Pararedudrelusodeenergra.Esteddoajustaeltiempoyla
(ECONORMAL) camayde mesa Jtemperaturadelcicloparamayorefldencia.
Elddo NORMAL(NORMAL)esparalamayor[adelastelas,induyendo
Algod6n,ropadetrabajo,ropade algod6n,ropainterioryropadecamaydemesa,(SiestecicloestA
iJNORMAL(NORMAL) camayde mesa,cargasmixtas j sdeccionadolafund6nEcoDry(Secadoeco)est4activadade
j j manerapredeterminada,Paraobtenerm4sinformaci6n,consultelas
r /j j descripdonesdelaopci6n"EcoDr}'(Secadoeco)enlasiguientepAgina.)
I
j HEAVYDUTy (ACClON Telasresistentes,talescomojeans, j Utiliceestecicloparaobtenerm4scalorparalastelasresistentes,tales
j FUERTE) corderoyoropadetrabaiopesado Jcomolosieans,elcorderoyolaropadetraba]o.
i BEDDING Prendasvoluminosas,talescomo
cobijas,s4banas,edredonesy Paraprendasvoluminosas,comocobijas,s,ibanasyedredones,
j (ROPADECAMA) almohadas
i ----- Desinfectalasprendasimpregnandolatda concaloraaltatemperatura
i SANITIZE Ropade cama,cortinas,prendas duranteelcidodesecado.Utiliceesteprogramaparamantenersuropa
DESINFECClON) _araniihos
j decamaycortinaslimpiaspotmediode ladesinfecci6n.
I
Camsasteassnt_tcastejdos J..........
j REAMPRESS(PLANCHA . '..... ' ' i betaautomatlcamenteprenaasaealgoaonsmarrugastamDlentelas
i PERMANENTE/ _nsa_Sna_;i_°hl°d_ s'narrugasY j sint@icas,tejidosytdasantiarrugas.
l p
l Soloparalanaquepuedalavarse '
j WOOL(LANA)en lavadoraysecarseensecadora,JSoloparalanaquepuedalavarseenlavadoraysecarseensecadora.
J
<Cant,dadm x ma: lbU gl/
Elcido DELICATES(Ddicada)ruediseiiadoparasecarprendas
JDELICATES(DELICADA) Ropainterior,blusas,lenceria
i j sensiblesal ealorabajatemperaturadesecado.
j QUICKDRY [ '
J(SECADORAPIDO) Cargaspequdias JOfreceunciclode secadoen30 minutos,
, l
t
i ElcicloTIMEDRY(Secadocontemporizador)permiteselecaonarel
j TIMEDRY(SECADOCON j tiempodelcicloenminutos.(SiestecicJoest4sdeccionado,lafunci6n '
EcoDry(Secadoeco)est4activadademanerapredeterminada,
JTEMPORIZADOR) Cualquiercarga j obtenerm4sinformadOn,consultelasdescripciones Para
j delaopci6n'Eco
_ j Dry'(Secadoeco)enlasiguientep4gina,)
I +
j AIRFLUFF(TEMPERATURA j ElcidoAIRFLUFF(TEMPERATURAAMBENTE)secalacargaconairea
j AMBIENTE) Espuma,goma,pl_stico
j _Esteacloesel m_isadecuadoparaaJisararrugasyreducirlosolores '
i Camisas,pantalones,edredones, i de lascargasdeunaacuatroprendassecas,Enestedcloserociauna
REFRESHREFRESCAR)
JWRINKLEAWAY
i (ANTIARRUGAS)
J
almohadas
Camisas,pantalones,blusas
[ pequeiSacantidaddeaguaenlatina delasecadoradespu6sdevarios'
Jminutosdesecadoconcalor,
j ropaqueestuvoenel placarddurantelargotiempo,etc.Ofreceun
l tratamientoantiarrugasmedianteun procesoconvaporoptimizado.
Puedecambiarel dempodesecado.(Tiempominimo:20 minutos)
j _Paraobtenerlosmeioresresultados,nocarguem4sde3prendas.
Espa_iol _23

2,
Opdones de los ddos
Reducela estAticade lafricd6n de aropay rociavaporen a Olfimafasede cido desecado,
Solodisponiblecor_losprogramas:NORMAL(NOR\4AL),HEAVYDUTY(ACCLONFUERTF),PERM
Anti Static (Antiest_tica) PRESS(PLANCHAPERMANENTE),DFLICATFS(DELKADA)(elnive de secadode cadaprogramaes
suoeriora unsecadonorma)yTIMEDRY(SE(ADOCONTEMPORIZADOR).
RackDry
(Secado en estante)
Mixed Load Bell (Timbre
de carga mixta)
WrinklePrevent
(Prevenci6ndearrugas)
MyCycle(Micido)
Adjust Time
(Ajustar tiempo)
Small Load CareTM
(Solo modelos a gas)
EcoDry(Secadoeco)
(Solomodeloel_ctrico)
ate aeraturaquedar4establecidasoloenExtraLow(Extrabaja).(Consultelasecci6n"Secado
enestante el lap4gina29.)
el centrifugadopartial (80%seco).Lepermiteretirarlasprendasqueno deseaquesesequen
completamenteoquesesecanr_pidamentefuerade la secadoramientrasde)aqueotrasprendas
sigansec4ndose.
Puedeseleccionarestafund6rsentodoslos cidosde SensorDry(Secadoconsensor},exeepto
WOOL(LANA),SANITIZE(DESINFECOON).Lasseleccionesdelnivelde secadoselimitan aNormal
Dry(Secadonormal),More Dry(M4sseco)yVeryDry(Muyseco).
LaoDci6nWrinklePrevent(Prevenci6nde arrugas)ofreceaproximadamente180minutosde
secadointermitentecon aimfrescoalfinaldd dclo parareduarlaformad6n de arrugas.Presione
el bot6nWrinklePrevent(Prevenci6ndearrugas)paraactivardichafunci6n.
Laluzdelindicadorarribade lateclaseencender4cuandoseseleccioneWrinklePrevent
(Prevenci6nde arrugas).
Lacargaest4secaypuede setretiradaen cualquiermomentoduranteel cidoWrinklePrevent
_rever_i6nde ar[ugas): ............ t
Elijasuddo favorito,incluidosel cido, h temperatura,laopci6n denivelde secado,etc.(Consulte
!ase_{o;-,"MyC,jc_e(Mi.c!c!or2 !apSg!2a3_)......... ,
Sepuede agregaro restartiempo alostiemposconfiguradosautomAticamenteen losciclos
de ManualDry(Secadomanual)(cidosTIMEDRY[SECADOCONIEMPORIZADOR],QUICK
DRY[SECADORAPIDO]o AIRFLUFF[TEMPERATURAAMBIENTE])yal cidoWRINKLEAWAY
ANTIARRUGAS),
Paraagregarorestartiempo alciclo,presionelatecladeflechaAdjustTime(A]ustartiempo) hacia
a!r!bao.hac!aab!iohasta.queapartz_ae!ti_mpode!.eado:.......
PermitecontrolarelfuncionamientocuandosesecancargaspequeF_ascon el programaSensor
Dry(Secadocon sensor).
Solodisponiblecon los programas:NORMAL(NORMAL),HEAVYDUTY(A{TIONFUERTE),PERM
PRESS(PLANCHAPERMANENTE)YDELICATES(DELICADA),
No sepuedeselecciorlar/cancelarmienlrasseest_efectuandoel cido desecado,
Paramejorarelefectodelsecadoycontrolarelfuncionamiento,latina puede hater pausas
duranteel ddo.
.............. ]
Estafunci6nest_idisponibleenlos ados NORMAL(NORMAL)yTIMEDRY(SECADOCON
TEMPOP,tZADOP,).Cuandolafund6rxE{oDry(Secadoeco)est_activada,laoperaci6ndesecado
requierem4stiempo peroel consumode potenda sereduce.
asecar.C.uandoel productosaledef_ibrica,la fund6n EcoDry (Secadoeco) estahabiitadade
manerapredeterrrfnada.
EspaF/o]- 24

4.
6.
7.
8.
9.
Dry Level (Nivel de secado)
Paraseleccionar el nivd de secado en loscidos NORMAL(NORMAL),HEAVYDUTY(ACCIONFUERTE),u otros cidos de
SensorDry (Secadocon sensor),presione el bot6n Dry Level (Nivd de secado).Seencender4 una luz en el indicador
junto al nivd de secado deseado.
Presione el bot6n repetidamente para desplazarse por lasopciones. Lascargas m_s grandes o m4svoluminosas
posiblemente requieran la opci6n Very Dry (Muy seco) o More Dry (M_isseco) para que el secado seacompleto.
La opci6n LessDry (Menos seco) es lam_s adecuada para telas livianas,o para que quede algo de humedad en las
prendas al final del cido. Laopci6n Damp Dry (NOmedo) rue concebida parasecarlas prendas parcialmente. Utilfcela
para las prendasque deban secarseen posici6n horizontal o colgarse.
Temp. (Temperatura)
Paraseleccionar la temperatura correcta parauna carga, presione el bot6n Temp (Temperatura). SeencenderA la [uz dd
indicador junto a latemperatura deseada. Presione el bot6n repetidamente paradesplazarse pot lasopciones.
i High (Alta) Paralos algodones resistenteso aqudlos con elr6tulo Tumble Dry (Secaren secadora).
J ] Paraprendas de plancha permanente, telas sintd_ticas,algodones livianos u otras prendas
j Medium (Media)
[ con el r6tu[o Tumble Dry Medium (Secaren secadora a temperatura media).
j Med Low (Media baja) Parasecartelas sint_ticas o de tejido lavable a unatemperatura inferior a la mediana.
jLoW (Baja) Paraprendas sensibles a[calor con elr6tu[o Tumble Dry Low (Secaren secadora a
temperatura baja) oTumble Dry Warm (Secaren secadora atemperatura c41ida).
Extra Low (Extra baja) Ofrece la menor temperatura de secado con calor posible.
Time (Tiempo)
Cuando usa loscidos Manual Dry (Secadomanual), puede ajustar el tiempo de secado presionando el bot6n de
se]ecci6nTime (Tiempo).
Durante el ciclo Sensor Dry (Secadocon sensor),el indicador luminico dd tiempo se encuentra apagado porque el
tiempo de secado exacto sedetermina segOnlos nivdes de humedad fluctuantes.
Pantalla LED
La pantal[a digital muestra e[tiempo restante dd cic[o ca[cu[ado despu_s de presionarel bot6n Start/Pause (Inicio/
Pausa).Eltiempo restante calculado puede fluctuar a medida que avance el ciclo.
Seencender_i la [uz de Drying (Secando) yse mantendr_i encendida hasta que secomplete el ciclo.
Cuando la secadora est_en lafasede enfriamiento, se encender_ila [uzde Cooling (Enfriando).
Cuando ]asecadora est4en la fasede prevenci6n de arrugas, seencender_i laluz de Wrinkle Prevent (Prevenci6n de
arrugas}.
(.uando el ciclo hayafinalizado, aparecer4 la palabra "End" (Fin) en el panel de la pantalla hasta que se abra la puerta de
[asecadora o sepresione el bot6n Power (Encendido).
Sisu secadora se detiene durante un cic]o, [aslutes del indicador parpadear&n hastaque se presione el bot6n Start/
Pause([nicio/Pausa).
Power (Encendido)
Presi6ndo una vez paraencender la secadora.Vudva a presionar]o paraapagarla. Sila secadora permanece encendida
durante m4s de 10minutos sin que setoque ninguno de los botones, seapagar4 autom_iticamente.
Start/Pause (Inicio/Pausa)
Presi6r/elo para detener y reiniciar los programas.
Indicadores
Control dd filtro Sin sonido ,
..... _-,, Sensorde ventilaci6n (solo en el modelo j
i %': - _ DV45N6300 ) [
_ Seguro paraniflos _ Vapor [
EspaSol _25

Cargue la secadora de manera adecuada
(.o]oque solo una cargade ropa en lasecadora por vez.
Lascargas mixtas de teBs pesadas y ]Jvianasse secanen forma dJferente,1oque puede ocasJonarque las telas IJvianas
est_n secasmientras que Bste]as pesadasqueden hOmedasa]final del cido de secado.
Agregue una o m4s prendassimi]aresa ]asecadora cuando necesite secarsolo una o dos prendas.
Estomejora el funcionamiento de la secadoray la eficacia del secado.
Sobrecargar la secadoraIimita su funcionamiento y ocasiona un secado desparejo asicomo la formaci6n excesiva de
arrugas en algunas telas.
Sicoloca la ropaen lasecadora cuando est_ muy enredada inmediatamente despu_s del ciclo de lavado o
centrifugado, puede reducirse laeflcacia del secado o causarque seabra la puerta. %comendamos desenredar la
ropa antes de colocarla en lasecadora.
C6mo comenzar
1. Cargue la secadora dejando algo de espacio libre (NO la sobrecargue).
2. (.ierre lapuerta.
3. Seleccione el cic]o y ]asopciones apropiadas parael tipo de carga. (Paraobtener m&sdetalles, consulte"Descripd6n
del ciclo"en la p_gina siguiente.)
4, Presioneel bot6n Start/Pause (Inicio/Pausa).
S. Seencender_ la luz del indicador de la secadora.
6, Eltiempo del cido calculado aparecer&en la pantalla.
Eltiempo puede fluctuar debido a que los niveles de humedad fluctOan en lasecadora.
• Cuando hayafinalizado el ciclo, lapalabra"End"(Fin) aparecer&en la pantaNa.
Sipresiona Power (Encendido), se cancelar&el cido y la secadorasedetendr&.
Los indicadores de Drying (Secando),Cooling (Enfriando) y Wrinkle Prevent (Prevenci6nde arrugas) se
encender&n durante tales rasesdel ciclo.
No coloque ningOn objeto en la parte superior de la secadoracuando est.1en funcionamiento
Espa_io__26

Descpipci6n de! cido
Predefinido
ECONORMAL Mediana Normal Dry o ExtraLow
(ECONORMAL) (Secado (Extrabaja)
j normal)
[
(NORMAL) (Secado
i normal)
.....
HEAW DUTY Grande Normal Dry o
ACCIONFUERTE) (Secado High (Alta)
normal)
BEDDING Grande Normal Dry o
i Sensor Dry ROPADECAMA) (Secado High (A[ta)
(Secado Con normal)
DESiNFECCION) (Muy seco) High (A[ta) -
ERM %BBM d,anaNorma, o
PLANCHA (Secado .,
ERMAN NT norma,
wodi_A_A_ Z_u;Z ZZ;i _i_
ii (Secado Low (Baja)
normal)
i _£iC.AT_ _;Zn_ Z;m_i_;_ o ExtraLow
(DELICADA) (Secado (Extrabaja)
normal)
i ..........
QUICKsELADoDRYR/\PDO)Pequdia Nigh (Affa)
i Manual Dry SECADOCON High (AIta) o
j (Secado
i manual)TEMPORIZADOR)
AIRFLUFF Pequefla
TEMPERATURA
j AMBIENTE)
Steam Cycles High (Alta)
, (C clos de (REFRESCAR)
Jvapor)WRINKLEANTIARRUGAs)AWAY, Pequefla , High (Alta)
Recomendaciones sobre el tama_o de la carga
Paraobtener los mejores resu[tados,siga [asrecomendaciones sobre el tamaflo de la carga paracada cido de secado.
i.. , _ Llene s_de latina. No agregue prendas por encima deeste nivd paraque puedan dar vueltas con j
i _ranae . i
l_"_ _ !'_!_: l
j Peque6a J Co!oque de 3 a 5 p[endas y no !!er!em_isde X de !a[![!a: ]
Espa#iol _27

Opciones
F ECONORMAL
<E_ONORMAL_, o ..... o
NORMAL
i o o o o o
0 0 0 0
A(.CIONFUERTE)
j
j BEDDING
JSensOr Dry ROPADELAMA) o - - o
j (secado Con ......
j sensor) SAN]TEE
DESINFECLION) ......
0
(PLANcHAPERMPRESS o o o o
WOOL(LANA)PERMANENTE) o
j ....
j DELICATES
0 0 0 0
j (DELiCADA)
OuI_KDRY_E_.ADORAPIDO_, o .... o
J TIME DRY
j Manual Dry
j(secado o o o o
j manua ) ....
(TEMPERATURA o o
AMBIENTE)
j Stea m Cycles o
j (Ciclos de (REFRE%AR)
jVaPOr)WRINKLE AWAY ' '
j (ANTIARRUGAS) , , o o
Espafio[ _28

Secado en estante
Znstahci6n de! estante de secado
1. Abra lapuerta de lasecadora.
2. Co]oque elestante de secadoen eltambor, con el borde superior de] estante
de secado (A) encima del flltro parapelusas.
S. Co]oque Bs parastraserasen ]asdos Areasempotradas de lapared posterior
de lasecadora y luego empuje hacia abajo en elcentro dd estante de secado
para ajustarlo en su lugar.
4. Coloque las prendasque se secar_nsobre el estante, dejando espacio entre
elias paraque el aire pueda circulan
S. Cierre la puerta de ]asecadora.
6. Presione el bot6n Rack Dry (Secado en estante) en el cido TIMEDRY
(SECADOCONTEMPORIZADOR)y luego sdeccione el tiempo segOnel nivel
de humedad y el peso de lasprendas. Elsecado en estante tambi6n sepuede
utilizar en el ciclo AIRFLUFF(TEMPERATURAAMBIENTE).
ExtraLow (Extra baja) (dclo TIMEDRY[SECADOCON
TEMPORIZADOR])
Muflecosde pduche ExtraLow (Extra baja)(dclo TIMEDRY[SECADOCON
, (rdienos con fibrasde algod6n o poli@ter) TEMPORIZADOfi])
j Muflecosde peluche
i (rellenoscon goma espuma0 goma)AIR FLUFF(TEMPERATURAAMBIENTE)
i Almohadasde goma espuma AIRFLUFF(TEMPERATURAAMBIENTE)
j Zapatillas AIRFLUFF(TEMPERATURAAMBIENTE)
Secararticulos de goma espuma, plAsticoo goma con laopci6n de calor puede ocasionar daflos a los articulos y
generar un peligro de incendio.
Espa_iol- 29

Seguro para nifios
Evitaque los nifios jueguen con lasecadora.
Configuraci6n/Liberaci6n
Paraacdvar o desacdvar d Seguro para nifios presione simubineamente los botones Temp. (Temperatura) yTime
(Tiempo) durante 3 segundos.
Deta!les de!Seguro para nitros
1. Puede activar elSeguro para niflos mientras su secadora est4 enfuncionamiento.
2. Una vezque configure lafunci6n Seguro paraniF_os,no responder4 ning0n bot6n, excepto el bot6n Power (Encendido),
hasta que desactive dicha funci6n.
3. Seencender4 el indicador de'Seguro para niF/osI_".
• Sisevuelve a encender el dectrodom6stico, ]afunci6n Seguro para niFioscontinuarA encendida.
Paradesacdvar el Seguro para niFios,siga ]asinstrucciones detalladas a continuaci6n.
Cuando otros botones, salvoel bot6n Power (Encendido), norespondan, verifique el indicador de Seguro para
niRos.Siel Seguro para niRosest_ activado, siga las instrucciones precedentes paradesactivarlo.
Luz de la tina
Ilumhla ]atina de B secadora mientras se realizael secado.
Encendidog apagado
Sidesea encender o apagarB luz de Btina, mantenga presionado el bot6n Wrinkle Prevent (Prevenci6n de arrugas)
durante 3 segundos.
Puede encender y apagar laluz de ]atina cuando la secadoraest_funcionando y cuando se dedene.
Sino apagala luzde lathla 5 minutos despud_sde que se endenda, la luzde latina seapaga autom_dcamente.
Sinsonido
Useesta funci6n parasilenciar los sonidosde] bot6n ydd funcionamiento.
Configuraci6n g liberaci6n
Paraacdvar o desacdvar lafunci6n Sound Off (SinSonido) mantenga presionado el bot6n Dry Level (Nivel de secado)
durante 3 segundos.
Deta!les de Sound Off (Sin sonido):
1. Puede configurar Sound Off (Sinsonido) mientras su secadora est_ enfuncionamiento.
2. Despu6s de activar la funci6n Sound Off (Sin Sonido), sesilencian los sonidos dd bot6n y del @ndonamiento basraque
la desactive.
3. Seencender4 el indicador de "Sin Sonido _".
Sino desacdvaSound Off (Sin Sonido) antes deapagar lasecadora, la funci6n seguir_ activada cuando encienda
nuevamente lasecadora. Paradesacdvar Sound Off (Sin Sonido), siga las instrucciones detalladas a continuaci6n.
Espafiol _SO

My Cycle(Miciclo)
Cargar
Presione el bot6n My Cycle (Mi ciclo) durante menos de 3 segundos paraacdvar el modo My Cycle(Mi cic]o) que
tiene cargadas todas lasconfiguraciones de lospogramas y lasopciones seleccionadas.
Cuando e] modo est4activo seenciende e] indicador My Cycle(Mi cido).
Si no ha conflgurado My Cycle(Mi cido), secarga la configuraci6n predeterminada del programa.
6uardar
Puede agregar y guardar los opciones preferidas en My Cycle(Mi ciclo).
1. Gireel selector para seleccionar un programa.
2. Configure losopciones necesariaspara el programa seleccionado. Paraobtener detalles sobre cada programa y las
opciones, consulte lap_igina 27.
S. Mantenga presionado el bot6n My Cycle (Mi ciclo) durante m_isde 3 segundos paraguardar Bopdones del
programa. Elindicador My q/de (Mi dclo) parpadea mbntras seguardan los opdones.
Laopci6n Prevent (Prevend6n arrugas) noest_ disponible en My Cycle(Mi ddo).
Wrinkle de la funci6n
Smart Care
Estafunci6n permite comprobar el estado de lasecadora con un tel6fono inteligente.
1. Mantenga presionados los botones Eco Dry (Secado eco) (modelo el6ctrJco)o Small Load Care (modelo a gas)
durante 3 segundos cuando se produce un erroro si noha presionado ningOn bot6n de la secadora despuF_sde
encender la alimentaci6n.
2. Cuando la funci6n Smart Careest_activada, la LEDde la pantalla gira durante 2 o 3 segundos yel c6digo de error
aparece en la pantalla.
S. Ejecute la aplicaci6n Smart Care en su tel6fono inteligente.
Lafunci6n Smart Carese ha optimizado para: seriesGalaxye iPhone (no escompatible con algunos modelos)
4. Sienfoca lac4mara del teldono inteligente al panelde la pantalla de la secadora,el panel y el mensaje de error se
reconocen autom_iticamente y el tipo de error y ]asoluci6n semuestran en el tel&ono inteligente.
5. Siel teldfono inteligente no reconoce el c6digo de error m4sde dos veces,ingrese en forma manual elc6digo de error
indicado en el panel de la pantalla de lasecadora en ]aaplicaci6n Smart Care.
Descarga de la aplicaci6n Smart Care
Descargue B Samsung Laundry App en su td6fono celuBr des@ Android Market o Apple App store. (BuscarpaBbra:
Lavadora/secadora Jntdigente Samsung)
Precauciones de uso de Smart Care
Si B luz de un fluorescente o una I_imparase refleja en el panel de la pantaIB de laBvadora, es posible que el teld_fono
inteligente no reconozca f_cilmente el panel o el mensaje de error.
Sisostiene el teldfono inteligente en un 4ngulo demasiado abierto respecto al frontal del panel de la pantalB, es posible
qua no se reconozca el c6digo de error. Paraobtener los mejores resultados, sostenga el teld_fonointeligente en una
posici6n paraMa o casi paraMa respecto al frontal del panek
Espa_ol-Sl

SensoP de vendlaci6n
Elsensorde ventiBd6n soloest_ disponibb enel modelo DV45H6300t
Susecadora Samsung est_equipada con un sensorde ventilaci6n que @tecta y le informa cu_ndo esmomento de limpiar
los conductos. Mantenga laseguridad y la eflcacia de susecadora limpiando los conductos cuando sele avise.
EISensopdeventihci6n @tecta Jasobstpucciones de los conductos
Puede @duck si hay unaobstrucci6n en los conductos en basea B Juzdd "Sensorde ventiJaci6n_"de la pantaNadigital.
I
i
La luz del"Sensor de ventilaci6n Elconducto est_ Iibre de i -
i 0 =_,_"seapaga, obstrucciones, i
i
i
La luz del"Sensor deventiBci6n Cuando una parte del conducto o Verifique laconexi6n del
=_" seenciende, el flltro de pelusaest,1obstruido conducto y ac6rtelo y ender6celo
con pelusao un objeto extraF/o, sufuera necesario.
Cuando [aresistencia es aJta ControJeel flJtrode pelusa o
[ porque el conducto esdemasiado el conducto y limpielo sifuera
' largo o est,1dobBdo, necesario.
,' La luz del"Sensor deventiBci6n Cuando el conducto est,1 Verifique la conexi6n del
=_"titila. bloqueado con pelusa o un conducto y ac6rtelo y ender6celo
objeto extraf/o, sufuera necesario.
J 2 Cuando [aresistenda es rnuy aJta Controb el flJtrode pelusao el
, porque el conducto esdemasiado conducto y limpielo Ioantes
largo o est,1excesivamente posibJe.
doblado.
i
Enel estado de NIVEL2,la luz titila durante 3 horasuna vezflnalizado el cido. (Sila funci6n de prevenci6n de arrugas est,1
activada, este mensaje aparece durante 3 horas.)
Sise presiona el bot6n Power(Encendido) o se abre la puerta, lasecadora se apagaautom4ticamente.
Paraobtener m4s informaci6n sobre la instalaci6n de conductos, consulte la secci6n"Requisitos para el tendido
de conductos" de la p_gina 12.
Aunque lasecadora est_disponible incluso si apareceel mensaje de obstrucci6n, el tiempo de secado puede
extenderse.
Siel mensajede NIVEL1aparece laprimera vezque seenciende lasecadora despu6sde la instalaci6n, veriflque
la conexi6n y [impie el conducto. Siel mensaje de NIVEL1aparece a pesar de haber verificado y limpiado los
conductos, puede indicar que hay algunas restricciones del conducto debido a la Iongitud, el estado,etc.
Siesto ocurre, puede usar la secadora normalmente y no es necesario tomar otras medidas. Sinembargo, el
tiempo de secado puede extenderse o eldesempeFiodel secado puede degradarse.
Espa_io_- 32

I Cuidade y Jimpieza
Panel de control
Limpie con un patio suavey hOmedo. No utilice sustanciasabrasivas.
No rocieel parle] directamente con Iimpiadores enaerosol.
Elacabado del panel de control puede datiarse a causade algunos productos removedores de suciedady manchas de
tratamiento previo al Bvado.
Aplique dichos productos lejosde lasecadora y Iimpie el liquido derramado o rociado inmediatamente.
Tambor
Elimine todas lasmanchas ocasionadas por cray6n, tinta o tintura de latela (proveniente de arficulos nuevos,tales como
toallas o jeans) con un limpiador comOn.
Posteriormente, seque toallas o trapos para eliminar restosde manchas o soluci6n de limpieza.
Unavez que se hayan seguido estos pasos,es posible que las manchas a@lseanvisibles, pero no setransferir_n alas cargas
subsiguientes.
Tambor de acero inoxidable
Paralimpiar eltambor de acero inoxidable, useun patio humedecido con un limpiador suave, noabrasivo, adecuado para
superficies deacero inoxidable.
Elimine losresiduos del limpiador y seque con un patio limpio.
Exterior de la secadora
Limple con un patio suavey humedo. No utilice sustanciasabrasivas.
Proteja la superficie de objetos aflBdos.
No coloque objetos pesados niafilados ni tampoco el paquete de detergente sobre la secadora. Mant6ngalos apartados
sobreel pedestal o en una cajade almacenaje, que puedeadquirir por separado.Lacubierta superior de la secadorase podr[a
rayar o datiar.
La secadora tiene un acabado brillante y la superficie sepuede rayaro datiar f_cilmente.
Evite rayaro datiar la superficie cuando use lasecadora.
Sistema de drenaje de la secadora
Paramantener un 6primo desempetio, se Iodebe inspeccionar y limpiar todos los atios.
Latapa de drenaje exterior debe limpiarse con m_s frecuencia paragarantizar un funcionamiento adecuado.
Limpie el filtro para pelusas
Despu4s de cadacarga.
Parareducir el tiempo de secado.
Parahacer uso de la energia con mayor eficacia.
[_ No haga funcionar lasecadora sinel flltro parapelusas colocado.
Espa_iol- 33

I Sugepencias papa ppendas especiaJes
Sugerendas para prendas especiales
Sigalas instmcciones de] fabricante o de B etiqueta de indicaciones para secarprendas especiales.Sino sedispone de
etiquetas con indicadones, use lasiguiente informaci6n como 9uia.
Siga lasinstrucciones de la etiqueta con indicaciones o seque en el ado
BEDDING(ROPADELAMA).
Cubrecamas y edredones AsegOresede que la prenda estdcompbtamente secaantes de usarla o
9uardarh.
Talvez deba volver acoJocarJaparagarantizar un secado uniforme.
Utilice el cido NORMAL(NORMAL)y seque de a una solacobija por vez para
Iograr un mejor funcionamiento de lasecadora.
Cobijas
Aseg@esede que B prenda estdcompbtamente seca antes de usarJao
9uardarla.
Utilice el ddo PERMPRESS(PLANLHA PERMANENTE)y Eatemperatura Medium
(Media) para redudr Bformaci6n de armgas.
Cortinas y pa_os de tela
Seque estos artffulos en tandas pequeflas para obtener mejores resultados y
retire]os Ioantes posible.
Pa6ales de tela Utilice el cido NORMAL(NORMAL)y la temperatura High (Alta) parapaflales
suavesy mullidos.
Prendas con relleno de plumas Uti]ice el cido NORMAL(NORMAL)y la opd6n de temperatura Medium (Media).
(chaquetas, bolsas de dormir, Agregar toallas secasacorta el tiempo de secadoy abso4)e lahumedad.
edredones, etc.)
NOseque con el ddo de secado con calor. Useel ddo AIRFLUFF(TEMPERATURA
Goma espuma (reverso de AMBIENTE)(sin calor).
alfombras, munecos de peluche,
ADVERTEN(.IA Secar un articulo de goma con calor puede daflarlo u ocasionar
hombreras, etc.)
un riesgo de incendio.
Useel cido NORMAL(NORMAL).
Agregue un par detoallas secasy un parde zapatillaslimpias paramejorar d
Almohadas fundonamiento de lasecadora y secarel articulo.
NOseque aimohadas de capoc o de goma espuma en lasecadora.Utilice d cido
AB FLUFF(TEMPERATURAAMBIENTE).
Pl_sticos (cortinas de ba6o, Utilice elcido AIRFLUFF(TEMPERATURAAMBIENTE)o el cicioTiME DRY(SECADO
cubiertas de muebles para CONTEMPOREADOR)y laopci6n de temperatura Low (Baja)o ExtraLow
exteriores, etc.) (Extrabaja) de acuerdo con ]asinstmcciones de B etiqueta. .
ARTICULOS QUE SE DEBE EVITAR PONER EN LA SECADORA:
Articulos de fibra de vidrio (cortinas, patios de tela, etc.).
Lanas,salvo que se recomiende en la etiqueta.
Articulos embebidos en aceite vegetal, aceite de cocina o 9asolina.
EspaSo_ _S4

I Soluci6n de problemas
ControJe estos puntos si su secadora.o.
AsegL_resede que ]apuerta este rerrada con traba,
No funciona, AsegL_resede que el cable de al mentac 6n est_ conectado a un tomacorriente que funcione,
Contro e los interruptores y fus bbs de lacasa,
Presone e4bot6n Start/Pause (Iniqo/Pausa) nuevamente si a puerta se abe durante e4trio,
Controle los interruptores y fusibles de la ,_asa,
Seecrione una opd6n de secado ,_on,_alor d st nta de Air Fuff (Temperatura arab ente).
No calienta, En una se,_adoraa gas, veriflque que e suministro de gasest_ abierto,
L'mpe el fl tro atrapapelusas y e conducto de drenaie.
La secadora puede haberse desplazado a la fase de enfr am ento de trio,
Vet flque todos os 'tern anteriores y, ademas...
AsegOrese de q ue la tapa de drenaje hacia el exter or de a rasa se pueda abrir y cerrar sn
nconven entes,
Ver flque que e sistema de drenaje no presente obstruc,dones, Los condurtos deben
nspe,_,_onarse y impiarse todos os af/os.
Uti re un ronducto de drenaje de meta rigido, de 4'i
No seca, No la sobre,_argue. 1 carga de lavado 1rarga de se,_ado,
Separe os arficu os pesados de os artiru os ivanos.
Es posb e que seaneresar ovolver a ro ocar os arficulos grandes y voluminosos, como as cobijas
o los edredones, para garantizar un secado uniforme,
Verflque que a secadora est6 drenando en furma correcta para extraer el agua de a carga
adecuadamente.
Es posb e que a rarga seademas ado pequefia eomo para secarse rorrectamente Agregue
algunas toa las
Ver flque s en a rarga hay ob]etos tales como monedas, botones floios, davos, et(, Ret'relos de
nmediato.
Es norma escuchar el ruido de la v_ivu ade gas de la secadora o que e cido del d sposit vo de
calor seenc ende o se apaga durante el tic o de secado.
Hace ruido,
AsegOrese de que lasecadora est_ rorrectamente nve adata como se describe en as
nstrucc ones de instalac 6n,
Es norma que a secadora emta un zumbido debdo aa ta ve oridad de aim que se mueve pot a
tina de a secadora y e sistema de drenaje,
Es posb e que ascosturas, os bo sl os y otras areas resistentes sire ares no sesequen pot
completo ruando el resto de a rarga ha egado a nivel de secado select onado Esto esnormal
[to seca de manera Seeccione la opc6n Very Dry (Muy seco) si o desea,
uniforme. Si sesera un artku o pesado con una carga Iviana, pot ejemplo una toa la con s_ibanas,es posibJe
que el art'cu o pesado no este completamente seco cuando e resto de la carga a canoe el nve de
secado seecqonado. Separe os articu os pesados de los art'cu os iv anos para obtener meiores
resu tados, •
Loso ores de hogar, yasea que provengan de p ntura, barniz, I mpiadores potentes, etc,, pueden
ngresar en a se,_adoracon e aire del ambiente. Esto es norma puesto que la secadora extrae el
Tiene olor. aire de la hab tac 6n, o calienta y Io hate rir,_ular por el tambor y Io expu sa atraves del drenaje
haca el exterior.
Cuando estos o ores perma necen en elaire, venti e bien a hab tac 6n antes de usar a seeadora,
La carga de a seeadora es demasiado pequef/a Agregue mAsprendas o agunas toa lasy reinic e
Se apaga antes de que e cclo,
la carga est_ seca La carga de a secadora es demasiado grande Retire ag unas prendas y vue va poner en
funcionam ento a secadora,
Espa_iol_S5

Pelusa en las prendas
Prendas arrugadas
despu_s del ddo
Antiarrugas
Quedan olores en
la ropa despu_s de
Refrescar,
Limpie elflitro para pelusas antes de cada carga. Con algunas cargas que producen grandes
cantidades de pelusa, quiz_i seanecesario Iimpiar elflltro durante el cido,
Algunas telas producen pelusa (pot ejemplo, una toalla de algod6n blanco con mucho pelo) y
deben secarse por separado de las prendas que atrapan pelusa (por ejemplo, un par de pantalones
de Iino negro).
° Divida lascargas grandes en cargasmSs pequefias para el secado,
- Revise bien los bolsillos antes de lavar y secar las prendas.
Funciona mejor con cargaspequeff_asde 1 a4 prendas,
Cargue menos prendas Cargue prendas similares
Lastelas que contienen o]ores fuertes deben lavarse en un dclo normal.
Gotea agua de Ja , Esto sedebe a a condensa¢ 6n de] vapor. El goteo de agua se detendra en unos m nutos
boquilla cuando
comienza el proceso
de vapor
No se ve el agua El agua rodada esdificil de ver ruando a puerta est_ terraria,
rociada durante el
proceso de vapor
Tiempo extendido Ver que lararga correcta (ropa)/se ecciOn de tic o (vea a p_igina 23)
Espa_io_- 36

C6digos de informaci6n
Pueden aparecer c6digos de informaci6n para ayudarle a comprender mejor qu6 ocurre con la secadora.
i tjz Laresistencia del termistor es muy baja o muy Limpie e4flltro o el conducto de vendlaci6n.
alta Siel problema continOa, Ilame al servicio t6cnico.
Comuniquese con el servicio t6cnico.
i dE Lasecadora funciona con la puerta abierta Limpie la puerta y luego reinicie.
Siel problema continOa, Ilame al servicio t6cnico.
Siel problema continOa, Ilame al servicio t6cnico.
7 _ ,
Frecuencia de fuente de alimentaci6n no v81ida Pruebe reiniciar el ciclo.
Siel problema continOa, Ilame al servicio t6cnico.
i Problemas con el control electr6nico Comun{quese con el servicio t6cnico.
i 9E1
j (Fallade sobrevoltaje)
i Problemas con el control electr6nico Comuniquese con elservicio t6cnico,
j (Error de comunicaciOn)
i
EI_I_ Estado no v41ido de la comunicaci6n Eeprom Comuniquese con elservicio t6cnico.
i dF Puerta no v41ida. Comuniquese con el servicio t6cnico.
l ,
Para los c6digos que rio flguran m4s arnba, Ilame al 1 800 SAMSUNG(726-7864)
Espa_iol _3'7

@Ap ndice
Tabla de indicaciones sobre [atela
Los siguientes sfmbolos ofrecen indicaciones acercade lasprendas. La etiqueta de indicaciones de laprenda induye sffnbolos
para lavado, blanqueado, secadoy pBnchado, o limpieza a secocuando sea necesaria. Eluso de sfmbolos garantiza la
consistencia entre los fabricantes textiles de articulos nacionaJese importados. Siga lasindicaciones de laetiqueta para
proJongar la vida Qtilde [aprenda y reducir los probJemasde[ lavado.
Normal Secarcolgado/tender [ :::_ No lavar
Plarlchaperr_larlente/ _ Colgarparaqueescurra [_ Noretorcer
, Aixiarrugas/ Controlde arrugas []
,_ Prendassuaves/ delicadas Secaren posici6n horizontal No usarbBnqueador
Cuaiquier blanqueador
(cuando seanecesario)
Soloblanqueador sindoro (con
protecd6n pararopade color)
Blanqueador(cuandosea
necesario)
Alta
No Iimpiar en seco
Secarcolgado/tender
Colgar para que escurra
@ (.idodesecadoensecadora '_ Media _ Secarenposici6nhorizontal
i
Baja [
P,ar,c ,apermane,,te,
J_ Antiarrugas/Control de
J Prendassuaves/ delicadas J
iD i
_ Los simbolos con punto representan las temperaturas dd agua del Bvado apropiadas paradiversas prendas. Elrango de
temperatura paraCaJientees de 105 125°F(41 52 °C),paraTibia esde 85 105°F(29 41 °C)y paraFriaes de 60 85 °F
(16 29 °C).(Latemperatura de[ agua del Bvado debe aJcanzarun mfflimo de 60 °F(16 °C)para que se active el detergente y
seIogre un [avadoeflcaz.)
Espa_io[ _S8

Ppotecci6n del medio ambiente
Estee[ectrodomdstico se fabrica con materia[es reciclab[es.Sidecide desechar este electrodomd_stico,siga[a normativa
local rdacionada con ladiminaci6n de desechos.Corte el cable de alimentaci6n para que el dectrodomdstico no pueda
conectarse a una fuente de a[imentaci6n. Quite [apuerta paraque los animales y losniflos pequeflos no puedan quedar
atrapados dentro del electrodom6stico.
Declapad6n de confoemidad
Estedectrodomdstico cumple con ]anorma UL2158.
Ancho j 27"(68.6 cm) j
i DIMENSIONES _ l
j Profundidad j 32.4"(82.3 cm)
j PESO ]25.6 [b (57Kg)
j :7 5300 W (Elec.) "
POTENClA DEL CALENTADOR 22000 BTU/h (Gas)
j CAPACIDAD EXTRA GRANDE 7.5piesc/:lbicos •
EspaSol- S9

@ Garant a (Estades Unides)
SECADORA SAMSUNG
GARANTIA LIMITADA PARA EL COMPRADOR ORIGINAL
Elpresente producto de [amatte SAMSUNG,tal como [oprovee ydistribuye SAMSUNGELECTRONI(.SAMERICA,IN(..
(SAMSUNG)y Ioentrega nuevo,en su empaque decart6n original al comprador o consumidor original, est_ garantizado pot
SAMSUNC_contra defectos de fabricaci6n de los materialesy la mano de obra durante el periodo limitado de lagarantia de:
un (1)aflo paratodas las piezasy [amano de obra
dos (2) aFiospara las piezasde[ panel decontrol
La presente garantia [imitada comienza en [afecha original de compra yes v41ida0nicamente para productos comprados y
usados en los EstadosUnidos.
Pararecibir el servicio t6cnico de [agarantia, el comprador debe comunicarse con SAMSUNGcon elfin deque sedetermine
el probJema y los procedimientos del servicio.
Elservicio t6cnico de lagarantia solo puede ser prestado pot un centro de servicio td_cnicoautorizado de SAMSUNQ
Sedebe presentar [afactura de compra original como prueba de compra a SAMSUNGo al servicio td_cnicoautorizado de
SAMSUNG.
SAMSUNGprestar_ servicio tdcnico a domicilio durante el peffodo de [agarantia sin costo, sujeto a [adisponibiJidad dentro de
los Estados Unidos contiguos.
Elservicio t#cnico a domicilio no est4 disponible en todas ]asBreas.
Pararecibir el servicio t#cnico a domicilio, el producto no debe presentar obstrucciones ydebe set accesible parael agente
del servicio t#cnico.
Siel servicio td_cniconoestBdisponible, SAMSUNGpuede optar pot transportar el producto hasta y des@ el servicio td_cnico
autorizado.
SAMSUNGreparar_, reempBzarB el producto u ofrecer4 un reembolso a su criterio ysin cargo adiciona], ta[como seestabJece
en ]apresente garantia, con piezaso productos nuevos o reacondicionados si secomprueba que esdefectuoso durante el
periodo Iimitado de la garantia especiflcado anteriormente.
Todas [aspiezasy los productos reempBzados pasana ser propiedad deSAMSUNGy @ben setdevudtos aSAMSUNG.
Las piezasy los productos reemplazados asumen [agarantia original que resta,o noventa (90) dias, el periodo que sea elm4s
prolongado.
La presente garantia [imitada cubre defectos de fabricaci6n de losmateriales y [amano de obra encontrados durante el
uso normal y domdstico de este producto y no ser4v4lida para1osiguiente: dafios que ocurran durante el envio; entrega e
instaJaci6n;apJicacionesy usos paraloscuales el presente producto no fue destinado; nQmeros deserie o producto aJterados;
dafio cosmd_ticoo acabado exterior; accidentes, abuso,descuido, incendio, inundaci6n, caida de rayos,u otros casosfortuitos
o de fuerza mayor; usode productos, equipo, sistemas,utilidades, servicios, piezas,suministros, accesorios,aplicaciones,
instaBciones, reparaciones, cabbado externo o conectores no provistos ni autorizados por SAMSUNGque darien este
producto o que acarreen problemas enel servicio; voltaje de la linea eld_ctricaincorrecto, fluctuaciones y sobretensi6n; ajustes
del c]iente e incumplimiento de 1oestabbcido en el manual de instrucciones, instrucciones de mantenimiento y ambientales
que est4n cubiertas y recomendadas en el manual de instrucciones; trasBdo y reinstaBci6n de] producto; problemas
causados pot plagas.
La presente garantia [imitada no cubre probJemas derivados de ]acorriente, el voltaje o el suministro el6ctrico incorrectos, [as
bombiJlasde [uz, losfusibJesde [acasa,el cableado de la casa,el costo del servicio td_cnicopara recibir instrucciones o corregir
erroresen ]ainstaBci6n.
SAMSUNGno garantiza el funcionamiento ininterrumpido o sin erroresdel producto.
EspaSo_- 40

Excepto 1oestablecido en elpresente, no existen garanfias sobre este producto, ya seanexpresas o t_icitas,y Samsung
desconoce todas ]asgaranfiasque incluyen, aunque no en car4ctertaxativo, cualquier garantia t_icita deque el producto
seencuentra encondiciones aptas para laventa, dedefraudaci6n de derechos o de que el producto seadecua a losfines
especfflcos para loscuales se adquiere.
NingOn avalo garantia otorgados pot persona,compa_ifa o corporaci6n alguna con respecto al presente producto revestir_
car&ctervinculante paraSamsung.
Samsung no ser_ responsable pot p6rdida de ingresoso lucro cesante, imposibilidad de generar ahorros uobtener otros
beneflcios, o cualquier da_ioderivado de circunstancias especiales,da_ioimprevisto o derivado causado pot el uso,uso
incorrecto, o incapacidad parausar el presente producto, independientemente de lateorfa legal en que sefunde el reclamo y
aun cuando se le haya notificado a Samsung de laposibilidad de tales daF/os.
NingOn resarcimiento de ninguna indole contra Samsung superar4 elprecio decompra del producto vendido por Samsung y
causante del presunto daF_o.
Sin Iimitar Io precedente, elcomprador asume todo el riesgo y la responsabilidad por p6rdida, daF_oo lesi6nal comprador y
a los bienes del comprador ya terceros y a susbienes derivados del uso, uso incorrecto o incapacidad para usarel presente
producto. La presente garantia limitada no se extenderA a ninguna persona distinta del comprador original del presente
producto, es intransferible y establece su exclusiva reparaci6n.
Algunos estados no permiten limitaciones en cuanto al plazo de una garantia implicita, o la exclusi6n o Iimitaci6n de daF_os
imprevistos o derivados, por Iotanto ]asIimitaciones o exdusiones antedichas pueden no aplicarse en su caso.Estagarantia le
otorga derechos especificos, y adem4s puede tenet otros derechos que varian segOn elEstado enel que se encuentre.
Para recibir un servicio t6cnico de garantJa, comunJquese con SAMSUNG a:
Samsung Electronics America, Inc.
85 Challenger Road Ridgefiemd Park, NJ 07660
1-800-SAMSU NG(726-7864)
www.samsung.com/us/su pport
Espa_ol-41

@ 6arant a (CANABA}
SECADORA SAMSUN6
GARANTIA UMITADA PARA EL COMPRADOR ORIGINAL
Elpresente producto de [amarca SAMSUNG,tal come [eprovee ydistribuye SAMSUNGELECTRONI(.SCANADA, IN(..
(SAMSUNG)y Ioentrega nuevo,en su empaque decart6n original al cemprador o consumidor original, est_ garantizade per
SAMSUNC_contra defectos de fabricaci6n de los materialesy la mane de obra durante el periodo limitado de lagarantia de:
un(1)aflo paralaspiezasy lamanedeobra
La presente garantia [imitada comienza en [afecha original de compra yes v41idaOnicamente para productos comprados y
usados en Canadg
Pararecibir el servicio t#cnico de [agarantia, el comprador debe comunicarse con SAMSUNGcon elfin deque sedetermine
el probJema y los procedimientos del servicio.
Elservicio t#cnico de [agarantia solo puede set prestado per un centre de servicio td_cnicoautorizado de SAMSUNG.
Sedebe presentar [afactura de compra original come prueba de compra a SAMSUNGo al servicio td_cnicoautorizado de
SAMSUNG.
SAMSUNGprestar4 servicio td_cnicoa domicilio durante el perfodo de Eagarantia sin coste, sujeto a la disponibilidad dentro
de Canadg
E[servicio t#cnico a domicilio no est4 disponible en todas las_reas.
Pararecibir el servicio t#cnico a domicilio, d preducto no debe presentar obstrucciones ydebe set accesible parael agente
dd servicio t#cnice.
Sid servicio td_cniconoest_ disponible, SAMSUNGpuede optar per transportar el preducto hasta y des@ d servicio td_cnico
autorizado.
SAMSUNGreparar& reempBzar_ el producto u ofrecer4 un reembolso a su criterio ysin cargo adicional, tal come seestabiece
en lapresente garantia, con piezaso preductos nuevos o reacondicionados si secomprueba que esdefectuoso durante el
periodo limitado de la garantia especiflcado anteriermente.
Tedas las piezasy los preductos reempBzades pasana set propiedad de SAMSUNGy deben setdevudtos aSAMSUNQ
Las piezasy bs productos reemplazados asumen lagarantia original que testa, o noventa (90)dias, el periodo que sea d m4s
prdongado.
La presente garantia [imitada cubre defectos de fabricaci6n de losmateriales y [amane de obra encentrados durante el
use normal y domdstico de este producto y no ser4v4lida para1osiguiente: daflos que ocurran durante el envio; entrega e
instaJaci6n;apJicacionesy uses paraloscuales el presente producto no fue destinado; nOmeros deserie o producto aJterados;
daflo cosmd_ticoo acabado exterior; accidentes, abuse,descuido, incendio, inundaci6n, caida de rayos,u otros casesfortuitos
o de fuerza mayor; usede productos, equipo, sistemas,utilidades, servicios, piezas,suministros, accesorios,aplicaciones,
instaBciones, reparaciones, cabbado externo o conectores no provistos ni autorizados per SAMSUNGque darien este
producto o que acarreen problemas enel servicio; voltaje de la linea eld_ctricaincorrecto, fluctuaciones y sobretensi6n; ajustes
del c]iente e incumplimiento de 1oestabbcido en el manual de instrucciones, instrucciones de mantenimiento y ambientales
que est4n cubiertas y recomendadas en el manual de instrucciones; trasBdo y reinstaBci6n de] producto; problemas
causados per plagas.
La presente garantia [imitada no cubre probJemas derivados de ]acorriente, el voltaje o el suministro el6ctrico incorrectos, [as
bombiJlasde [uz, losfusibJesde [acasa,el cableado de la casa,el costo del servicio td_cnicopara recibir instrucciones o corregir
erroresen ]ainstaBci6n.
SAMSUNGno garantiza el funcionamiento ininterrumpido o sin erroresdel producto.
EspaSo_- 42

SALVOLOESTABLECIDOENLAPP,ESENTEGARANTfA,NOEXISTENGAP,ANTfASSOBP,EELPP,ESENTEPP,ODUCTO,YASEAN
EXPP,ESAS0TACITAS,YSAMSUNGDE%ONOCETODASLASGAP,ANTfASQUEINCLUYEN,AUNQUENOENCAP,ACTEP,
TAXATIVqCUALQUIEP,GAP,ANTrAT/_CITADEQUEELPP,ODU(.TOSEENCUENTP,AENCONDICIONESAPTASPAP,ALAVENTA,
DEDEFP,AUDACIONDEDEP,E(.HOS0DEQUEELPP,ODUCTOSEADE(.UAALOSFINESESPE(.rFI(.OSPAP,ALOSCUALESSE
ADQUIEP,E.
NINC_ONAVAL0GAP,ANTrAOTOP,GADOSPOP`PEP,SONA,COMPAi_fA0COP,POP,ACIONALGUNA(.ONP,ESPE(.TOALPP,ESENTE
PP,ODUCTOP,EVESTIP,ACAP,A(.TEP,VIN(.ULANTEPAP,ASAMSUNG.
SAMSUNGNOSEP,AP,ESPONSABLEPOP`PEP,DIDADEINC_RESOS0LUCP,OCESANTE,IMPOSIBILIDADDEGENEP,AP,
AHORP,OSUOBTENEP,OTROSBENEFI(.IOS,0(.UALQUIEP,DANODEP,IVADODECIP,CUNSTANCIASESPECIALES,DAi_O
IMPP,EVISTO0DEP,IVADO(.AUSADOPOP`ELUSO,USOIN(.OP,P,ECTO,0INCAPACIDADPAP,AUSAP,ELPP,ESENTEPP,ODUCTO,
INDEPENDIENTEMENTEDELATEOP,fALEGALENQUESEFUNDEEL%CLAMOYAUNCUANDOSELEHAYANOTIFICADOA
SAMSUNGDELAPOSIBILIDADDETALESDANOS.
NINC_ONP,ESAP,CIMIENTODENINGUNAiNDOLE(.ONTRASAMSUNGSUPEP,AP,/_,ELMONTODE(.OMPP,ADELPP,ODUCTO
VENDIDOPOP,SAMSUNGYCAUSANTEDELPP,ESUNTODANO.
SINLIMITAP,LOPP,ECEDENTE,ELCOMPP,ADORASUMETODO ELP,IESGOY LA P,ESPONSABILIDADPOP`PEP,DIDA,DANO
0 LESIONALCOMPRADOP,YA LOSBIENESDELCOMPP,ADORY ATEP,(.EP,OSY ASUSBIENESDEP,IVADOSDELUSO,USO
INCORP,ECTO0 INCAPACIDADPARAUSAP,ELPP,ESENTEPP,ODU(.TO.
LA PP,ESENTEGAP,ANTiALIMITADANOSEEXTENDEP,/\ANINGUNAPEP,SONADISTINTADEL(.OMPP,ADOP,OP,IGINALDEL
PP,ESENTEPP,ODUCTO,ESINTP,ANSFEP,IBLEY ESTABLECESUEXCLUSIVAP,EPAP,A(.ION.
Algunas provincias no permiten limitaciones en cuanto al plazo deuna garantia implicita, o [aexclusi6n o Iimitaci6n de daflos
imprevistos o derivados, por Ioque las ]imitaciones o exclusiones antedichas pueden no aplicarse en su caso.Estagarantia le
otorga derechos especiflcos, y adem4s puede tenet otros derechos que variarl seg_n ]aprovincia en [aque seencuentre.
Para recibir un servicio t_cnico de garantJa, comunJquese con SAMSUNG a:
Samsung Electronics Canada Inc.
2050 Derry Road West, Mississauga, Ontario L5N 0139Canada
1-800-SAMSU NG(726-7864)
www.samsung.com/ca/su pport (English)
www.samsung.com/ca fr/support (French)
Espa_io[ _43

Scan this with your smarthphone
Scan the QRcode* or visit
www.samsung.com/spsn
to view our he[pfu[
How-to Videos and Live Shows
*Requires reader to be installed on your smartphone
8TIENE PRE6UNTAS0 COMENTARIOS?
DC68-O3380A-04
-
 1
1
-
 2
2
-
 3
3
-
 4
4
-
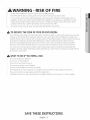 5
5
-
 6
6
-
 7
7
-
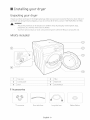 8
8
-
 9
9
-
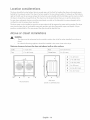 10
10
-
 11
11
-
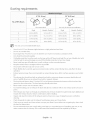 12
12
-
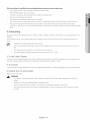 13
13
-
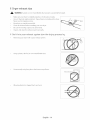 14
14
-
 15
15
-
 16
16
-
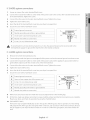 17
17
-
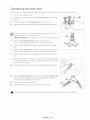 18
18
-
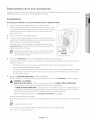 19
19
-
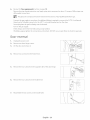 20
20
-
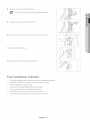 21
21
-
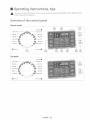 22
22
-
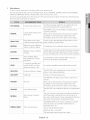 23
23
-
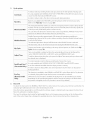 24
24
-
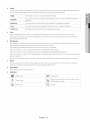 25
25
-
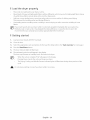 26
26
-
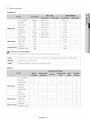 27
27
-
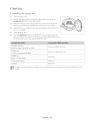 28
28
-
 29
29
-
 30
30
-
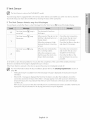 31
31
-
 32
32
-
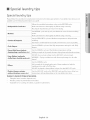 33
33
-
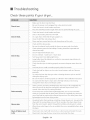 34
34
-
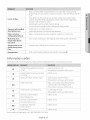 35
35
-
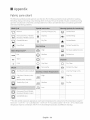 36
36
-
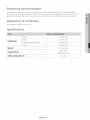 37
37
-
 38
38
-
 39
39
-
 40
40
-
 41
41
-
 42
42
-
 43
43
-
 44
44
-
 45
45
-
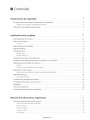 46
46
-
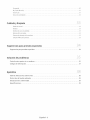 47
47
-
 48
48
-
 49
49
-
 50
50
-
 51
51
-
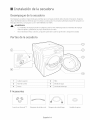 52
52
-
 53
53
-
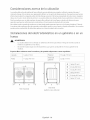 54
54
-
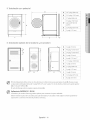 55
55
-
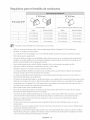 56
56
-
 57
57
-
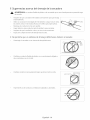 58
58
-
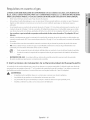 59
59
-
 60
60
-
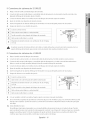 61
61
-
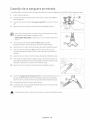 62
62
-
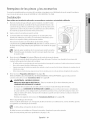 63
63
-
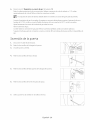 64
64
-
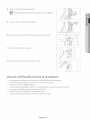 65
65
-
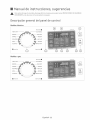 66
66
-
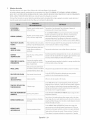 67
67
-
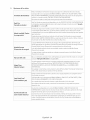 68
68
-
 69
69
-
 70
70
-
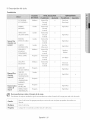 71
71
-
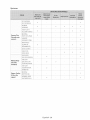 72
72
-
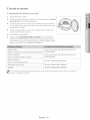 73
73
-
 74
74
-
 75
75
-
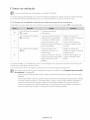 76
76
-
 77
77
-
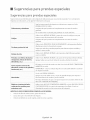 78
78
-
 79
79
-
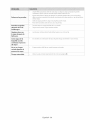 80
80
-
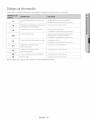 81
81
-
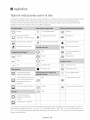 82
82
-
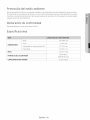 83
83
-
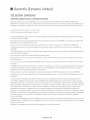 84
84
-
 85
85
-
 86
86
-
 87
87
-
 88
88


Samsung DV42H5600GW/A3-00 El manual del propietario
- Categoría
- Secadoras
- Tipo
- El manual del propietario
- Este manual también es adecuado para
en otros idiomas
Artículos relacionados
-
Samsung DV42H5000GW/A3-01 Manual de usuario
-
Samsung DV45H6300EG/A3-00 El manual del propietario
-
-
-
-
-
-
