Yamaha DRX-730 El manual del propietario
- Categoría
- Reproductores de DVD
- Tipo
- El manual del propietario

MICRO COMPONENT SYSTEM
DRX-730
OWNER'S MANUAL
MANUAL DE INSTRUCCIONES
LV

i
En
• Explanation of Graphical Symbols
The lightning flash with arrowhead symbol,
within an equilateral triangle, is intended to alert
you to the presence of uninsulated “dangerous
voltage” within the product’s enclosure that may
be of sufficient magnitude to constitute a risk of
electric shock to persons.
The exclamation point within an equilateral
triangle is intended to alert you to the presence of
important operating and maintenance (servicing)
instructions in the literature accompanying the
appliance.
1.
Read these instructions.
2.
Keep these instructions.
3.
Heed all warnings.
4.
Follow all instructions.
5.
Do not use this apparatus near water.
6.
Clean only with dry cloth.
7.
Do not block any ventilation openings. Install in accordance
with the manufacturer’s instructions.
8.
Do not install near any heat sources such as radiators, heat
registers, stoves, or other apparatus (including amplifiers)
that produce heat.
9.
Do not defeat the safety purpose of the polarized or
grounding-type plug. A polarized plug has two blades with
one wider than the other. A grounding type plug has two
blades and a third grounding prong. The wide blade or the
third prong are provided for your safety. If the provided plug
does not fit into your outlet, consult an electrician for
replacement of the obsolete outlet.
10.
Protect the power cord from being walked on or pinched
particularly at plugs, convenience receptacles, and the point
where they exit from the apparatus.
11.
Only use attachments/accessories specified by the
manufacturer.
12.
Use only with the cart, stand, tripod, bracket,
or table specified by the manufacturer, or
sold with the apparatus. When a cart is used,
use caution when moving the cart/apparatus
combination to avoid injury from tip-over.
13.
Unplug this apparatus during lightning
storms or when unused for long periods of time.
14.
Refer all servicing to qualified service personnel. Servicing is
required when the apparatus has been damaged in any way,
such as power-supply cord or plug is damaged, liquid has
been spilled or objects have fallen into the apparatus, the
apparatus has been exposed to rain or moisture, does not
operate normally, or has been dropped.
We Want You Listening For A Lifetime
Ya m a ha and the Electronic Industries Association’s Consumer Electronics Group want you to get the most out of your
equipment by playing it at a safe level. One that lets the sound come through loud and clear without annoying blaring or
distortion – and, most importantly, without affecting your sensitive hearing. Since hearing damage from loud sounds is
often undetectable until it is too late, Yamaha and the Electronic Industries Association’s Consumer Electronics Group
recommend you to avoid prolonged exposure from excessive volume levels.
IMPORTANT SAFETY INSTRUCTIONS
IMPORTANT
Please record the serial number of this unit in the
space below.
MODEL:
Serial No.:
The serial number is located on the rear of the unit.
Retain this Owner’s Manual in a safe place for future
reference.
FOR CANADIAN CUSTOMERS
To prevent electric shock, match wide blade of plug to
wide slot and fully insert.
This Class B digital apparatus complies with
Canadian ICES-003.
CAUTION
RISK OF ELECTRIC SHOCK
DO NOT OPEN
CAUTION: TO REDUCE THE RISK OF
ELECTRIC SHOCK, DO NOT REMOVE
COVER (OR BACK). NO USER-SERVICEABLE
PARTS INSIDE. REFER SERVICING TO
QUALIFIED SERVICE PERSONNEL.

ii
En
English
Compliance with FCC regulations does not guarantee that
interference will not occur in all installations. If this
product is found to be the source of interference, which
can be determined by turning the unit “OFF” and “ON”,
please try to eliminate the problem by using one of the
following measures:
Relocate either this product or the device that is being
affected by the interference.
Utilize power outlets that are on different branch (circuit
breaker or fuse) circuits or install AC line filter/s.
In the case of radio or TV interference, relocate/reorient
the antenna. If the antenna lead-in is 300 ohm ribbon lead,
change the lead-in to coaxial type cable.
If these corrective measures do not produce satisfactory
results, please contact the local retailer authorized to
distribute this type of product. If you can not locate the
appropriate retailer, please contact Yamaha Electronics
Corp., U.S.A. 6660 Orangethorpe Ave., Buena Park, CA
90620.
The above statements apply ONLY to those products
distributed by Yamaha Corporation of America or its
subsidiaries.
1 IMPORTANT NOTICE: DO NOT MODIFY THIS
UNIT!
This product, when installed as indicated in the
instructions contained in this manual, meets FCC
requirements. Modifications not expressly approved by
Yamaha may void your authority, granted by the FCC, to
use the product.
2 IMPORTANT: When connecting this product to
accessories and/or another product use only high quality
shielded cables. Cable/s supplied with this product MUST
be used. Follow all installation instructions. Failure to
follow instructions could void your FCC authorization to
use this product in the USA.
3 NOTE: This product has been tested and found to comply
with the requirements listed in FCC Regulations, Part 15
for Class “B” digital devices. Compliance with these
requirements provides a reasonable level of assurance that
your use of this product in a residential environment will
not result in harmful interference with other electronic
devices.
This equipment generates/uses radio frequencies and, if
not installed and used according to the instructions found
in the users manual, may cause interference harmful to the
operation of other electronic devices.
FCC INFORMATION (for US customers)
CAUTION
Use of controls or adjustments or performance of
procedures other than those specified herein may result in
hazardous radiation exposure.
AVERTISSEMENT
L’utilisation de commandes et l’emploi de réglages ou de
méthodes autres que ceux décrits ci-dessous, peuvent
entraîner une exposition à un rayonnement dangereux.
CAUTION CLASS 1M LASER RADIATION WHEN OPEN
DO NOT VIEW DIRECTLY WITH OPTICAL
INSTRUMENTS.

iii
En
1.
To assure the finest performance, please read this manual
carefully. Keep it in a safe place for future reference.
2.
Install this sound system in a well ventilated, cool, dry, clean
place – away from direct sunlight, heat sources, vibration,
dust, moisture, and/or cold. Allow ventilation space of at
least 10 cm on the top, 10 cm on the left and right, and 10 cm
on the back of this unit.
3.
Locate this unit away from other electrical appliances,
motors, or transformers to avoid humming sounds.
4.
Do not expose this unit to sudden temperature changes
from cold to hot, and do not locate this unit in an
environment with high humidity (i.e., a room with a
humidifier) to prevent condensation inside this unit, which
may cause an electrical shock, fire, damage to this unit,
and/or personal injury.
5.
Avoid installing this unit where foreign objects may fall onto
this unit and/or this unit may be exposed to liquid dripping
or splashing. On the top of this unit, do not place:
—Other components, as they may cause damage and/or
discoloration on the surface of this unit.
—Burning objects (i.e., candles), as they may cause fire,
damage to this unit, and/or personal injury.
—Containers with liquid in them, as they may fall and
liquid may cause electrical shock to the user and/or
damage to this unit.
6.
Do not cover this unit with a newspaper, tablecloth, curtain,
etc., in order not to obstruct heat radiation. If the
temperature inside this unit rises, it may cause fire, damage
to this unit, and/or personal injury.
7.
Do not plug in this unit to a wall outlet until all connections
are complete.
8.
Do not operate this unit upside-down. It may overheat,
possibly causing damage.
9.
Do not use force on switches, knobs and/or cords.
10.
When disconnecting the power cable from the wall outlet,
grasp the plug; do not pull the cable.
11.
Do not clean this unit with chemical solvents; this might
damage the finish.
12.
Only voltage specified on this unit must be used. Using this
unit with a higher voltage than specified is dangerous and
may cause fire, damage to this unit, and/or personal injury.
Ya m a ha will not be held responsible for any damage
resulting from use of this unit with a voltage other than
specified.
13.
To prevent damage by lightning, keep the power cord
disconnected from a wall outlet or the unit during a
lightning storm.
14.
Do not attempt to modify or fix this unit. Contact qualified
Ya m a ha service personnel when any service is needed. The
cabinet should never be opened for any reasons.
15.
When not planning to use this unit for long periods of time
(i.e., vacation), disconnect the AC power plug from the wall
outlet.
16.
Install this unit near the AC outlet and where the AC power
plug can be reached easily.
17.
Be sure to read the “Troubleshooting” section in the owner’s
manual on common operating errors before concluding that
this unit is faulty.
18.
Before moving this unit, press STANDBY/ON to set the unit
in standby mode, then disconnect the AC power plug from
the AC wall outlet.
19.
The batteries shall not be exposed to excessive heat such as
sunshine, fire or like.
20.
Excessive sound pressure from earphones and headphones
can cause hearing loss.
■
DANGER
This unit emits visible laser radiation when open. Avoid direct
eye exposure to beam. When this unit is plugged into the wall
outlet, do not place your eyes close to the opening of the disc
tray and other openings to look into inside.
■
LASER SAFETY
This unit employs a laser. Due to possible eye injury, only a
qualified service person should remove the cover or attempt to
service this device.
Caution: Read this before operating your unit.
This unit is not disconnected from the AC power source as
long as it is connected to the wall outlet, even if this unit itself
is turned off. This state is called the standby mode. In this
state, this unit is designed to consume a very small quantity of
power.
The laser component in this product is capable of emitting
radiation exceeding the limit for Class 1.
LASER
Type Semiconductor laser AlGaInP
Wave length 655 nm (DVD)
790 nm (VCD/CD)
Output Power 5 mW (DVD)
7 mW (VCD/CD)
Beam divergence 20 degree
WARNING
TO REDUCE THE RISK OF FIRE OR ELECTRIC SHOCK,
DO NOT EXPOSE THIS APPLIANCE TO RAIN OR
MOISTURE.
CAUTION
Danger of explosion if battery is incorrectly replaced.
Replace only with the same or equivalent type.

iv
En
English
■
Legal notices
This product incorporates copyright protection
technology that is protected by U.S. patents and other
intellectual property rights. Use of this copyright
protection technology must be authorized by
Macrovision, and is intended for home and other
limited viewing uses only unless otherwise
authorized by Macrovision. Reverse engineering or
disassembly is prohibited.
■
iPod™
“Ap p l e ,” “ i P o d ,” and “iTunes” are trademarks of Apple Inc.,
registered in the U.S. and other countries.
Bluetooth is a registered trademark of Bluetooth SIG and is
used by Yamaha in accordance with a license agreement.
■
Memory backup
If the power cable is disconnected from the AC wall
outlet, the DRX-730 will save the radio presets and
other settings for at least 1 week.
■
About this manual
Unless otherwise stated, instructions in this manual
such as “press ENTER” refer to the buttons on the
remote control.
Instructions and procedures in this manual assume
that the DRX-730 is already turned on.
This manual was printed before the DRX-730 went
into production. Under our policy of continuous
improvement, design and specifications are subject to
change. In the unlikely event that an explanation in
this owner’s manual disagrees with the actual
operation on the DRX-730, the DRX-730 is to be
taken as correct.
■
Handling the remote control
•The area between the remote control and this unit must be
clear of large obstacles.
•Do not spill water or other liquids on the remote control.
•Do not drop the remote control.
•Do not leave or store the remote control in the following
types of conditions:
—places of high humidity, such as near a bath
—places of high temperature, such as near a heater or a stove
—places of extremely low temperatures
—dusty places
•Do not expose the remote control sensor to strong lighting,
in particular, an inverter type fluorescent lamp; otherwise,
the remote control may not work properly. If necessary,
position this unit away from direct lighting.
■
Notes on batteries
•Change all of the batteries if you notice that the operation
range of the remote control decreases.
•Use AA, R6, UM-3 batteries.
•Make sure that the polarities are correct. See the illustration
inside the battery compartment.
•Remove the batteries if the remote control is not used for an
extended period of time.
•Do not use old batteries together with new ones.
•Do not use different types of batteries (such as alkaline and
manganese batteries) together. Read the packaging carefully
as these different types of batteries may have the same shape
and color.
•If the batteries have leaked, dispose of them immediately.
Avoid touching the leaked material or letting it come into
contact with clothing, etc. Clean the battery compartment
thoroughly before installing new batteries.
•Do not throw away batteries with general house waste;
dispose of them correctly in accordance with your local
regulations.

v
En
DivX, DivX Ultra Certified, and associated logos are
trademarks of DivX, Inc. and are used under license.
Manufactured under license from Dolby Laboratories. Dolby
and the double-D symbol are trademarks of Dolby
Laboratories.
Manufactured under license under U.S. Patent #’s: 5,451,942;
5,956,674; 5,974,380; 5,978,762; 6,487,535 & other U.S. and
worldwide patents issued & pending. DTS and DTS 2.0 +
Digital Out are registered trademarks and the DTS logos and
Symbol are trademarks of DTS, Inc. © 1996-2007 DTS, Inc. All
Rights Reserved.
“HDMI”, the “HDMI” logo, and “High-Definition Multimedia
Interface” are trademarks or registered trademarks of HDMI
Licensing LLC.
MPEG Layer-3 audio decoding technology licensed from
Fraunhofer IIS and Thomson multimedia.
Windows Media is either a registered trademark or trademark
of Microsoft Corporation in the United States and/or other
countries.

1
En
English
1
2
3
4
5
6
7
8
9
10
Appendix
1 Introduction . . . . . . . . . . . . . . . . . . . . 2
Features . . . . . . . . . . . . . . . . . . . . . . . . . . . . . . . . . 2
Supplied accessories . . . . . . . . . . . . . . . . . . . . . 2
Front panel . . . . . . . . . . . . . . . . . . . . . . . . . . . . . . 3
Display . . . . . . . . . . . . . . . . . . . . . . . . . . . . . . . . . . 4
Rear panel . . . . . . . . . . . . . . . . . . . . . . . . . . . . . . . 5
Remote control . . . . . . . . . . . . . . . . . . . . . . . . . . 6
2 Getting Started . . . . . . . . . . . . . . . . . 8
Installing batteries in the remote control . . 8
Connecting speakers . . . . . . . . . . . . . . . . . . . . . 9
Connecting a powered subwoofer . . . . . . . 10
Connecting antennas . . . . . . . . . . . . . . . . . . . 11
Connecting a TV . . . . . . . . . . . . . . . . . . . . . . . . 12
Connecting a recorder (CDR, MDR, etc.) . . 14
Connecting an AV receiver or decoder . . . 14
Connecting the power cable . . . . . . . . . . . . 15
3 General Functions . . . . . . . . . . . . . . 16
Turning on the DRX-730 . . . . . . . . . . . . . . . . . 16
Selecting input sources . . . . . . . . . . . . . . . . . 16
Adjusting the volume . . . . . . . . . . . . . . . . . . . 17
Muting the sound . . . . . . . . . . . . . . . . . . . . . . . 17
Adjusting the bass and treble . . . . . . . . . . . 18
Adjusting the balance . . . . . . . . . . . . . . . . . . . 18
Pure Direct playback mode . . . . . . . . . . . . . . 19
Using headphones . . . . . . . . . . . . . . . . . . . . . . 19
Adjusting the display brightness . . . . . . . . 20
Using the sleep timer . . . . . . . . . . . . . . . . . . . 20
Setting the clock . . . . . . . . . . . . . . . . . . . . . . . . 21
Viewing the time . . . . . . . . . . . . . . . . . . . . . . . . 22
Auto standby . . . . . . . . . . . . . . . . . . . . . . . . . . . 22
4 Playing Discs . . . . . . . . . . . . . . . . . . . 23
Using the on-screen display . . . . . . . . . . . . . 23
Playing discs . . . . . . . . . . . . . . . . . . . . . . . . . . . . 23
Slow-motion playback . . . . . . . . . . . . . . . . . . 26
Frame-by-frame playback . . . . . . . . . . . . . . . 26
Selecting languages and audio . . . . . . . . . . 27
Selecting subtitles . . . . . . . . . . . . . . . . . . . . . . 27
Selecting camera angles . . . . . . . . . . . . . . . . 28
Zoom . . . . . . . . . . . . . . . . . . . . . . . . . . . . . . . . . . . 28
Repeat playback . . . . . . . . . . . . . . . . . . . . . . . . 29
A–B repeat playback . . . . . . . . . . . . . . . . . . . . 29
Random playback . . . . . . . . . . . . . . . . . . . . . . . 30
Program playback . . . . . . . . . . . . . . . . . . . . . . 30
Searching Discs . . . . . . . . . . . . . . . . . . . . . . . . . 31
Playing JPEG slideshows . . . . . . . . . . . . . . . . 32
Using Disc Navigator with DVD-Video,
VCD, and SVCD discs . . . . . . . . . . . . . . . . .33
Using Disc Navigator with MP3, WMA,
MPEG-4 AAC, DivX®, WMV, and
JPEG discs . . . . . . . . . . . . . . . . . . . . . . . . . . .34
Viewing disc information . . . . . . . . . . . . . . . .35
Viewing the audio format . . . . . . . . . . . . . . . .35
5 Using the Tuner . . . . . . . . . . . . . . . . 36
Tuning in to radio stations . . . . . . . . . . . . . . .36
Using presets . . . . . . . . . . . . . . . . . . . . . . . . . . . .38
6 Using the Timer . . . . . . . . . . . . . . . . 40
Setting the input source . . . . . . . . . . . . . . . . .40
Setting the on time . . . . . . . . . . . . . . . . . . . . . .41
Setting the off time . . . . . . . . . . . . . . . . . . . . . .41
Turning the timer on and off . . . . . . . . . . . . .42
7 Portable Device Playback . . . . . . . 43
Music player playback . . . . . . . . . . . . . . . . . . .43
iPod playback . . . . . . . . . . . . . . . . . . . . . . . . . . .43
USB playback . . . . . . . . . . . . . . . . . . . . . . . . . . . .45
Bluetooth playback . . . . . . . . . . . . . . . . . . . . . .47
8 Recording . . . . . . . . . . . . . . . . . . . . . 49
9
Audio Settings and Video Adjust
.50
Audio Settings menu . . . . . . . . . . . . . . . . . . . .50
Video Adjust menu . . . . . . . . . . . . . . . . . . . . . .51
10Initial Settings . . . . . . . . . . . . . . . . . 52
Initial Settings menu . . . . . . . . . . . . . . . . . . . .52
Appendix . . . . . . . . . . . . . . . . . . . . . . . . . 57
Supported discs and formats . . . . . . . . . . . .57
Looking after discs . . . . . . . . . . . . . . . . . . . . . .60
Looking after the DRX-730 . . . . . . . . . . . . . . .61
Resetting the DRX-730 . . . . . . . . . . . . . . . . . . .61
Language, country, and region lists . . . . . .62
Troubleshooting . . . . . . . . . . . . . . . . . . . . . . . .63
Specifications . . . . . . . . . . . . . . . . . . . . . . . . . . .70
Contents

2
En
Thank your for choosing the Yamaha DRX-730 DVD
Receiver. To get the most enjoyment from your new
Yama ha product, please read this manual carefully,
and keep it in a safe place for future reference.
•Play the following discs: DVD-Video, DVD-VR
(DVD-R/RW/R DL discs recorded in VR mode),
VCD, SVCD, Audio CD, DTS CD
•Play the following files: MP3, WMA, MPEG-4
AAC, JPEG, WMV
1
•Official DivX
®
Ultra Certified product.
•Plays all versions of DivX
®
video (including
DivX
®
6) with enhanced playback of DivX
®
media files and the DivX
®
Media Format.
•HDMI output (1080p upscaling)
• FM/AM tuner with 40 presets
• D-class amp: 30 W x 2 channels into 6Ω
•Pure Direct high-fidelity playback mode
•Front panel mini jack for quick and easy playback
from portable music players.
•Front panel USB port for quick and easy playback
from USB storage devices.
•DOCK jack for connecting an optional Yamaha
iPod universal dock allows you to listen to your
iPod music in high quality. And, you can control
your iPod with the DRX-730’s remote control and
recharge it while enjoying your music.
•The DOCK jack can also be used to connect a
Ya m a h a YBA-10 Bluetooth Wireless Audio
Receiver so you can listen to the music stored on
your Bluetooth-compatible music player or
mobile phone in high quality. And you can
control your Bluetooth device with the DRX-730’s
remote control.
•Timer function
•On-screen display (OSD)
•Full-function remote control
•Optical digital output
The following accessories are included with the
DRX-730. Make sure you have them all.
Chapter 1: Introduction
Features
1. The DRX-730 can play MP3, WMA, MPEG-4 AAC, and
JPEG files stored on CD-R/RW, DVD-R/RW, and
DVD+R/RW discs or USB storage devices, and DivX
®
and
WMV files stored on CD-R/RW, DVD-R/RW, and
DVD+R/RW discs. See “Supported discs and formats” on
page 57 for full details.
Supplied accessories
1
STANDBY/ON
ZOOM
OPEN/CLOSE
ON SCREEN
423
586
90
7
VOLUME
TIMER SLEEP
MUTE
DOCK
TUNER
MEMORY
SOUND
DVD/USB
PURE DIRECT
AUX/PORTABLE
DISPLAY
DIMMER
AUDIO
SUBTITLE
PLAY MODE
ANGLE
CLEAR
BLUETOOTH
ON
OFF
PRESET
MENU
INFO.
TOP MENU
SETUP
RETURN
AEAE
ENTER
BAND
AUTO/
MANUAL
Remote control
Two batteries (AA, R06, UM-3)
Video pin cable
Indoor FM antenna
AM loop antenna

Chapter 1: Introduction
3
En
English
A
STANDBY/ON
Sets the DRX-730 to on or standby (see page 16).
B
Open/Close ( )
Opens and closes the disc tray (see page 23).
C
TIMER LED
Lights up when the DRX-730 is on standby and the
timer is on (see page 42).
D
HDMI LED
Lights up when the HDMI OUT is used (see page 53).
E
PROGRESSIVE LED
Lights up when progressive video is being output (see
page 53).
F
Disc tray
Used to load discs (see page 23).
G
Display
Displays various information. See “Display” on page 4
for more details.
H
Remote control sensor
Receives signals from the remote control.
I
Stop ( )
Stops playback (see page 24).
J
Play/Pause ( / )
Starts and pauses playback (see page 23).
K
USB port
Used to connect a USB storage device containing
music or picture files (see page 45).
L PORTABLE jack
Used to connect a portable music player (see
page 43).
M PHONES jack
Used to connect headphones (see page 19).
N Previous/Rewind ( / )
Selects earlier tracks or chapters (see page 25). Works
the same as the Rewind ( ) button on the remote
control when held down.
O Next/Fast Forward ( / )
Selects subsequent tracks or chapters (see page 25).
Wor ks the same as the Fast Forward ( ) button on
the remote control when held down.
P INPUT control
Selects input sources (see page 16).
Q VOLUME control
Adjusts the volume (see page 17).
Front panel
STANDBY/ON
USB PORTABLE PHONES
INPUT
VOLUME
TIMER
HDMI
PROGRESSIVE
B
KLMNO P Q
9J6345 871
1

Chapter 1: Introduction
4 En
A SLEEP
Lights up when the sleep timer has been set (see
page 20).
B PRESET
Lights up when selecting radio presets (see page 39).
C STEREO
Lights up when listening to an FM station in stereo
(see page 36).
D AUTO
Lights up when Auto Tuning mode is selected. Goes
off when the Manual Tuning mode is selected (see
page 36).
E DOCK
•Lights up when an iPod is inserted in an optional
Ya maha iPod universal dock (YDS-10 or YDS-11)
that’s connected to the DOCK jack (see page 43).
•Lights up when a connection has been established
between a Bluetooth device and an optional
Ya m a h a YBA-10 Bluetooth Wireless Audio
Receiver (see page 47).
•Flashes while the optional Yamaha YBA-10
Bluetooth Wireless Audio Receiver is pairing or
searching for a Bluetooth device (see page 47).
F SHUFFLE
Lights up when shuffle playback is selected on the
iPod (see page 44).
G REPEAT
Lights up when repeat playback is selected on the
iPod (see page 44).
H MUTE
Flashes when the sound is muted (see page 17).
I Information area
Displays various information, such as input source,
radio frequency, and the time.
J TIMER
Lights up when the DRX-730 is on and the timer is on
(see page 42).
K TUNED
Lights up when tuned in to a radio station (see
page 36).
L MEMORY
Lights up when presetting radio stations (see
page 38).
M iPod
These indicators show which iPod menu is selected
for browsing: Playlists, Artists, Albums, Songs, or
Genres (see page 44).
N iPod control
These indicators show which cursor buttons can be
used while navigating iPod menus (see page 44).
Display
GENRES
SONGS
ALBUMS
ARTISTSPLAYLISTS
MEMORY
TUNED
TIMER
SLEEP
STEREO
AUTO
DOCK MUTE
SHUFFLE
REPEAT
PRESET
A BC E 8DFG
JKL M
N
9

Chapter 1: Introduction
5 En
English
A MAINS (power cable)
Connect the power cable to an AC wall outlet (see
page 15).
B HDMI output
This HDMI output can be connected to an HDMI
input on your TV (see page 13).
C FM ANT
The FM antenna connects here (see page 11).
D AM ANT
The AM antenna connects here (see page 11).
E SPEAKERS
Speakers are connected here (see page 9).
F SUBWOOFER OUT
A powered subwoofer (sold separately) can be
connected here (see page 10).
G AUX IN and OUT
A recording component, such as a CDR, MDR, or
cassette deck, can be connected here (see page 14).
H DOCK
An optional Yamaha iPod universal dock (YDS-10 or
YDS-11) or a Yamaha YBA-10 Bluetooth Wireless
Audio Receiver can be connected here (see pages 43
and 47).
I VIDEO OUT
This composite video output can be connected to a
composite video input on your TV (see page 12).
J COMPONENT VIDEO OUT
This component video output can be connected to a
component video input on your TV (see page 12).
K OPTICAL DIGITAL OUT
This optical digital audio output can be connected to
an optical digital audio input on a CDR or MDR
recorder or AV receiver/decoder (see pages 14 and
14).
Rear panel
OUT
OPTICAL
VIDEO
COMPONENT
DIGITALDOCK VIDEO OUT
P
Y
R
P
B
ANT
FM
UNBAL.
75
OUT IN
MIN
AUX
OUT
SUBWOOFER
SPEAKERS
R
R
SPEAKER
CLASS 2 WIRING
CABLAGE CLASSE 2
6
HDMI
MAINS
AM
ANT
GND
1 B 3 4
5 6 7 8 9 J K
1

Chapter 1: Introduction
6 En
This section provides a brief description of the remote
control’s buttons.
Tip:
•In addition to controlling the DRX-730, the
remote control can also be used to control
playback on an iPod (see page 43) or a Bluetooth
music player or mobile phone (see page 47).
A Infrared transmitter
Transmits control signals to the DRX-730 (see
page 8).
B STANDBY/ON ( )
Sets the DRX-730 to on or standby (see page 16).
C Number buttons
Enter numbers.
D SUBTITLE (BLUETOOTH OFF)
•When the input source is DVD, selects subtitles
on DVDs (see page 27).
•When the input source is DOCK, disconnects
from the currently connected Bluetooth device
and makes the DRX-730 non-discoverable (see
page 47).
E AUDIO (BLUETOOTH ON)
•When the input source is DVD, selects audio
formats and foreign-language soundtracks on
DVDs (see page 27).
•When the input source is DOCK, initiates pairing
or establishes a connection with the last used
Bluetooth device and makes the DRX-730
discoverable (see page 47).
F PLAY MODE
Displays the Play Mode menu on the connected TV
when the input source is DVD.
G Pause ( )
Pauses playback.
H Rewind ( )
Rewinds playback. Also used for slow-motion
playback and frame-by-frame playback.
I Previous ( )
Selects earlier tracks or chapters.
J TOP MENU (INFO.)
•When the input source is DVD, displays the
DVD’s top menu.
•When the input source is DOCK, selects the iPod
control mode (see page 43).
K Cursor buttons ( )/( )/( )/( ) and ENTER
Used to navigate on-screen menus and change
settings. Also used to navigate iPod menus. The
cursor buttons are also used for radio tuning and
selecting presets.
L SETUP
Displays the Setup menu on the connected TV when
the input source is DVD.
M MEMORY
Used to store radio presets (see page 38).
Remote control
1
STANDBY/ON
ZOOM
OPEN/CLOSE
ON SCREEN
423
586
90
7
VOLUME
TIMER SLEEP
MUTE
DOCK
TUNER
MEMORY
SOUND
DVD/USB
PURE DIRECT
AUX/PORTABLE
DISPLAY
DIMMER
AUDIO
SUBTITLE
PLAY MODE
ANGLE
CLEAR
BLUETOOTH
ON
OFF
PRESET
MENU
INFO.
TOP MENU
SETUP
RETURN
AEAE
ENTER
BAND
AUTO/
MANUAL
1
B
5
4
7
M
6
8
9
J
L
N
O
P
R
S
T
Q
l
g
j
U
V
W
X
Y
b
Z
a
c
d
e
f
i
h
k
3
K

Chapter 1: Introduction
7 En
English
N AUTO/MANUAL
Selects the Auto and Manual Tuning modes (see
page 36).
O BAND
Selects the FM and AM radio bands (see page 36).
P DVD/USB
Selects the DVD and USB input sources (see page 16).
Q AUX/PORTABLE
Selects the AUX and PORTABLE input sources (see
page 16).
R SOUND
Used to adjust the bass, treble, and balance (see
page 18).
S TIMER
Sets the timer (see page 40).
T SLEEP
Sets the sleep timer (see page 20).
U OPEN/CLOSE ( )
Opens and closes the disc tray (see page 23).
V ON SCREEN
Displays information about the currently playing disc
on the connected TV.
W ZOOM
Zooms the picture (see page 28).
X ANGLE
Selects camera angles on DVDs (see page 28).
Y Stop ( )
Stops playback.
Z CLEAR
Clears entered numbers and deletes steps in the
program.
a Fast forward ( )
Fast forwards playback. Also used for slow-motion
playback and frame-by-frame playback.
b Play ( )
Starts playback.
c Next ( )
Selects subsequent tracks or chapters.
d MENU
•Displays a DVD’s menu. (May work the same as
the TOP MENU button with some DVDs.)
•When the input source is USB, displays Disc
Navigator.
e RETURN
Returns to the previous menu.
f VOLUME (+/–)
Adjusts the volume (see page 17).
g TUNER
Selects the TUNER input source (see page 16).
h DOCK
Selects the DOCK input source (see page 16).
i MUTE
Mutes and unmutes the sound (see page 17).
j PURE DIRECT
Selects the Pure Direct playback mode (see page 19).
k DISPLAY
•Displays the time.
•When the input source is DVD and a disc is being
played, also displays the audio format.
l DIMMER
Dims the DRX-730’s display (see page 20).
1

8 En
This chapter explains how to install the batteries in
the remote control and how to connect speakers and
other components to the DRX-730.
1 Push the tab on the battery compartment
cover in the direction of the arrow and remove
the cover.
2 Insert the supplied batteries into the battery
compartment with the correct polarity
(+ and –).
3 Replace the battery compartment cover.
Notes:
•If the operating range of the remote control
decreases, replace all of the batteries with new
ones.
•Do not use old and new batteries together.
•Do not use different types of batteries together,
such as alkaline and manganese. Although they
may look similar, each type has its own
characteristics.
•When the batteries run out, remove them from
the remote control immediately to prevent an
explosion or acid leak.
•Always follow the battery disposal regulations for
your area.
•If a battery starts leaking, dispose of it
immediately. Be careful not to let leaking battery
acid come into contact with your skin or clothing.
Before inserting new batteries, wipe the battery
compartment clean.
The remote control has an operating range of up to 6
meters (20 feet). When using the remote control,
point it toward the DRX-730’s remote control sensor,
which is next to the display, see below.
Notes:
•Be careful not to spill liquid on the remote
control.
•Be careful not to drop the remote control.
•Do not leave the remote control in the following
places: hot or humid places, such as near a heater
or in a bathroom; extremely cold places; dusty
places.
Chapter 2: Getting Started
Installing batteries in the
remote control
Push here
Operating range
STANDBY/ON
USB PORTABLE PHONES
INPUT
VOLUME
TIMER
HDMI
PROGRESSIVE
30 30
Up to 6 m
(20 feet)

Chapter 2: Getting Started
9 En
English
Connect the NX-E700 speakers to the DRX-730 as shown below.
Notes:
•Do not connect the power cable to the DRX-730
until all other connections have been completed.
•Be sure to connect the right speaker to the
terminals labelled “R,” and the left speaker to the
terminals labelled “L”.
•Make sure the exposed strands of each wire are
not touching any other wires or any metal parts of
the DRX-730, as this could seriously damage the
DRX-730 and your speakers.
•Do not connect speakers with an impedance
lower than the minimum impedance stated on the
rear of the DRX-730.
•Use magnetically shielded speakers if you intend
to position them close to a CRT-type TV. If they
cause picture interference, move them away from
the TV.
Connecting speakers
OUT
OPTICAL
VIDEO
COMPONENT
DIGITALDOCK VIDEO OUT
P
Y
R
P
B
ANT
FM
UNBAL.
75
OUT IN
MIN
AUX
OUT
SUBWOOFER
SPEAKERS
R
R
SPEAKER
CLASS 2 WIRING
CABLAGE CLASSE 2
6
HDMI
MAINS
AM
ANT
GND
Left speaker
DRX-730
Right speaker
Speaker cables
2

Chapter 2: Getting Started
10 En
Speaker cables consist of two insulated wires running
together. Speaker connections are polarized and use
positive (+) and negative (–) terminals that are color-
coded red and black, respectively. To help you
connect the wires correctly, the positive wire is
usually marked with a stripe or some other identifier.
All you need to do is to connect the marked wire to
the positive (+) terminals on the DRX-730 and
speakers, and connect the unmarked wire to the
negative (–) terminals. If you get them crossed over,
your speakers will be out of phase and the sound will
be unnatural and lack bass, so take care.
1 Strip about 10 mm (3/8 in.) of insulation from
the end of each wire, and twist the exposed
strands together to prevent possible short
circuits.
2 Push open the speaker terminal lever, insert
the wire into the hole, and then close the lever.
You can connect a powered subwoofer (sold
separately) to the DRX-730’s SUBWOOFER OUT
jack for a really deep bass sound.
Using an audio pin cable (sold separately),
connect the DRX-730’s SUBWOOFER OUT jack to
the powered subwoofer’s input jack.
Notes:
•Do not connect the power cables to the DRX-730
and powered subwoofer until all other
connections have been completed.
•The SUBWOOFER OUT jack outputs the low-
frequency sounds of a downmix created from all
of the channels available in the source material.
Connecting speaker cables
10 mm (3/8 in.)
Red: positive (+)
Black: negative (–)
Connecting a powered
subwoofer
INPUT
INPUT
OUT
OPTICAL
VIDEO
COMPONENT
DIGITALDOCK VIDEO OUT
P
Y
R
P
B
ANT
FM
UNBAL.
75
OUT IN
MIN
AUX
OUT
SUBWOOFER
SPEAKERS
R
R
SPEAKER
CLASS 2 WIRING
CABLAGE CLASSE 2
6
HDMI
MAINS
AM
ANT
GND
Audio pin cable
Powered
subwoofer

Chapter 2: Getting Started
11 En
English
To listen to FM and AM radio, you must connect the
supplied antennas to the DRX-730. If radio reception
is poor in your area or you want to improve reception,
you can connect outdoor FM and AM antennas.
Consult an qualified antenna installer in your area for
more details.
■ Antenna grounding
For maximum safety and minimum interference,
connect the AM ANT GND terminal to a good earth
ground, such as a metal stake driven into moist earth.
1 Connect the supplied indoor FM antenna to
the DRX-730’s FM ANT jack.
2 Site the antenna away from the DRX-730,
speaker cables, and power cables.
Notes:
•Do not connect the power cable to the DRX-730
until all other connections have been completed.
•Before deciding where to install the antennas
permanently, tune in to an AM or FM radio
station and adjust the position of the AM or FM
antenna, respectively, to find the best reception.
•If you connect an outdoor AM antenna, connect
the supplied AM loop antenna as well.
1 Assemble the antenna’s stand as shown.
If you intend to mount the antenna on a wall, you
do not need to assemble the stand.
2 Push open the AM ANT terminal lever, insert
the AM loop antenna’s wires into the holes,
and then close the lever.
•If both of the wires on your antenna are black, this
means they are not polarized and can be
connected either way around.
•If one of the wires on your antenna is white and
the other one is black, connect the white wire to
the AM ANT terminal, and connect the black
wire to the GND terminal.
3 Site the antenna away from the DRX-730,
speaker cables, and power cables.
Connecting antennas
Connecting the FM antenna
OUT
OPTICAL
VIDEO
COMPONENT
DIGITALDOCK VIDEO OUT
P
Y
R
P
B
ANT
FM
UNBAL.
75
T
IN
AUX
R
HDMI
AM
ANT
GND
Indoor FM antenna
(supplied)
AM loop antenna
(supplied)
Earth
ground
Connecting the AM loop antenna
White
Black
GND terminal
AM ANT terminal
2

Chapter 2: Getting Started
12 En
You can connect the DRX-730 to a TV by using any
one of four different connection types: HDMI,
component video, or composite video. The type you
choose will depend on the connections supported by
your TV. Refer to your TV owner’s manual for details.
HDMI provides the best picture quality. Component
video offers the next best picture quality and the
DRX-730’s component video output supports
progressive scanning for even better picture quality. If
your TV doesn’t support HDMI or component video,
use composite video. Some DRX-730 models have a
SCART jack that can output composite video or RGB
component video.
Notes:
•Do not connect the power cable to the DRX-730
until all other connections have been completed.
•Turn off your TV before connecting it to the
DRX-730.
Tip:
•If your TV has an audio output, you can connect it
to the DRX-730’s AUX IN jacks and listen to your
favorite TV programs through the speakers
connected to the DRX-730.
If your TV doesn’t support HDMI or component
video, you can connect the DRX-730 to your TV with
the supplied video pin cable.
Use the supplied video pin cable to connect the
DRX-730’s VIDEO OUT jack to a composite video
input on your TV.
If your TV supports component video but not HDMI,
you can connect the DRX-730 to your TV with a
component video cable. This will provide better
picture quality than a composite video connection.
Using a component video cable (sold separately),
connect the DRX-730’s COMPONENT VIDEO OUT
jacks to a component video input on your TV.
Notes:
•If you connect a TV that does not support
progressive scanning, make sure the Component
Out setting is set to Interlace. If it’s set to
Progressive, the TV may display no picture.
•If you use the COMPONENT VIDEO OUT and
HDMI connections simultaneously, the
COMPONENT VIDEO OUT jacks may output
progressive video regardless of the Component
Out setting.
Connecting a TV
Composite video connection
VIDEO
IN
OUT
OPTICAL
VIDEO
COMPONENT
DIGITALDOCK VIDEO OUT
P
Y
R
P
B
ANT
FM
UNBAL.
75
OUT IN
MIN
AUX
OUT
SUBWOOFER
SPEAKERS
R
R
SPEAKER
CLASS 2 WIRING
CABLAGE CLASSE 2
6
HDMI
MAINS
AM
ANT
GND
Video pin cable
(supplied)
TV
Component video connection
Y PB PR
COMPONENT
VIDEO IN
OUT
OPTICAL
VIDEO
COMPONENT
DIGITALDOCK VIDEO OUT
P
Y
R
P
B
ANT
FM
UNBAL.
75
OUT IN
MIN
AUX
OUT
SUBWOOFER
SPEAKERS
R
R
SPEAKER
CLASS 2 WIRING
CABLAGE CLASSE 2
6
HDMI
MAINS
AM
ANT
GND
Component video cable
(sold separately)
TV

Chapter 2: Getting Started
13 En
English
If your TV has an HDMI input, you can connect it to
the DRX-730 with an HDMI cable and enjoy the best
possible picture quality.
Using an HDMI cable (sold separately), connect
the DRX-730’s HDMI jack to an HDMI input on
your TV.
Note:
•You must set the DRX-730’s HDMI resolution
and HDMI color settings to match the capabilities
of your HDMI TV (see page 53). If you select the
wrong resolution, you may loose the picture
altogether.
■ Supported HDMI output resolutions
* If your HDMI-compatible TV does not support the above
resolutions, the picture may not display correctly.
* The DRX-730 is designed to be connected to an HDMI
component. If it’s connected to a DVI component, normal
operation may not be possible depending on the DVI
component.
■ HDMI audio output
Normally, the speakers connected to the DRX-730 are
used to output the sound. However, you may want to
listen through your HDMI TV’s speakers, in which
case you can turn HDMI audio output on and off as
follows.
1 Set the DRX-730 to standby.
2 While holding down Stop ( ) on the
DRX-730, press STANDBY/ON, keeping
Stop ( ) pressed until “DVD — NO REQ.”
appears on the display.
3 Press Play/Pause ( / ) repeatedly to select
“HDMI AUDIO ON.”
If you change your mind at this point, select
“DVD — NO REQ.” instead.
4 Press STANDBY/ON.
HDMI Audio output is turned on and the
DRX-730 goes on standby. Press STANDBY/ON
again to turn it back on.
To turn HDMI Audio output off, repeat the above
procedure but select “HDMI AUDIO OFF” in
step 3.
Note:
•The audio output by the HDMI jack is always
2-channel PCM.
■ About HDMI
HDMI stands for High-Definition Multimedia
Interface. An extension of the DVI (Digital Video
Interface) standard used to connect computer
displays, HDMI was designed as the next generation
digital interface standard for TVs and AV equipment,
allowing uncompressed digital video and digital
audio in various formats to be delivered on a single
cable. With HDMI, separate cables for video and
audio connections are no longer necessary. And
because it’s digital, it delivers unimpaired high quality
video and audio. In addition, HDMI supports the
HDCP (High Bandwidth Digital Content Protection)
system that’s used to protect copyrighted video and
audio content from illegal copying.
HDMI connection
North America models Other models
1080p/60 Hz 1080p/60 Hz (NTSC)
1080p/50 Hz (PAL)
1080i/60 Hz 1080i/60 Hz (NTSC)
1080i/50 Hz (PAL)
720p/60 Hz 720p/60 Hz (NTSC)
720p/50 Hz (PAL)
480p/60 Hz 480p/60 Hz (NTSC)
576p/50 Hz (PAL)
480i/60 Hz 480i/60 Hz (NTSC)
576i/50 Hz (PAL)
HDMI
IN
OUT
OPTICAL
VIDEO
COMPONENT
DIGITALDOCK VIDEO OUT
P
Y
R
P
B
ANT
FM
UNBAL.
75
OUT IN
MIN
AUX
OUT
SUBWOOFER
SPEAKERS
R
R
SPEAKER
CLASS 2 WIRING
CABLAGE CLASSE 2
6
HDMI
MAINS
AM
ANT
GND
HDMI cable
(sold separately)
HDMI-compatible TV
2

Chapter 2: Getting Started
14 En
You can connect a recording component, such as a
CDR, MDR, or casette recorder, to the DRX-730 for
recording and playback.
1 Using an audio pin cable (sold separately),
connect the DRX-730’s AUX OUT jacks to the
audio input on your recording component.
2 Using another audio pin cable (sold
separately), connect the DRX-730’s AUX IN
jacks to the audio output on your recording
component.
■ Digital recording
If your recording component has an optical digital
input, you can connect it to the DRX-730’s OPTICAL
DIGITAL OUT jack and record digitally.
See “Recording” on page 49 for more details.
Notes:
•Do not connect the power cable to the DRX-730
until all other connections have been completed.
•Turn off the recording component before
connecting it to the DRX-730.
•The OPTICAL DIGITAL OUT outputs audio
only when the input source is DVD or USB, and
with some discs and files, recording may not be
possible due to copy protection.
The DRX-730 downmixes multi-channel sources,
such as Dolby Digital and DTS, into a 2-channel
stereo mix that you can enjoy through the speakers
connected to the DRX-730. By connecting an AV
receiver/decoder to the DRX-730’s OPTICAL
DIGITAL OUT jack, you can enjoy Dolby Digital and
DTS sources though the speakers connected to your
AV receiver/decoder.
Using an optical digital audio cable (sold
separately), connect the DRX-730’s OPTICAL
DIGITAL OUT jack to a digital optical input on the
AV receiver/decoder.
Notes:
•Make sure the digital audio output settings are
configured so that the OPTICAL DIGITAL OUT
outputs MPEG, Dolby Digital, and DTS material
as it is and not as PCM.
•You may want to turn down the volume on the
DRX-730 all the way when listening through the
speakers connected to your AV receiver/decoder.
•The OPTICAL DIGITAL OUT outputs audio
only when the input source is DVD or USB.
Connecting a recorder (CDR,
MDR, etc.)
IN
AUDIO
L
IN
OUT
R
OPTICAL
DIGITAL
OUT
OPTICAL
VIDEO
COMPONENT
DIGITALDOCK VIDEO OUT
P
Y
R
P
B
ANT
FM
UNBAL.
75
OUT IN
AUX
OUT
SUBWOOFER
R
HDMI
AM
ANT
GND
Recording component
(CDR, MDR, casette deck)
Audio pin
cables (sold
separately)
Optical cable
(sold separately)
Connecting an AV receiver or
decoder
IN
OPTICAL
DIGITAL
OUT
OPTICAL
VIDEO
COMPONENT
DIGITALDOCK VIDEO OUT
P
Y
R
P
B
ANT
FM
UNBAL.
75
OUT IN
MIN
AUX
OUT
SUBWOOFER
SPEAKERS
R
R
SPEAKER
CLASS 2 WIRING
CABLAGE CLASSE 2
6
HDMI
MAINS
AM
ANT
GND
AV receiver/decoder
Optical cable
(sold separately)

Chapter 2: Getting Started
15 En
English
Once you’ve completed all of the other connections,
connect the power cable to an AC wall outlet.
Connecting the power cable
OUT IN
MIN
AUX
OUT
SUBWOOFER
SPEAKERS
R
SPEAKER
CLASS 2 WIRING
CABLAGE CLASSE 2
6
HDMI
MAINS
Connect to
an AC wall
outlet
2

16 En
This chapter explains functions that can be used with
any input source.
To turn on the DRX-730, press STANDBY/ON ( ).
To set the DRX-730 to standby, press
STANDBY/ON ( ) again.
■ Front panel STANDBY/ON
You can also set the DRX-730 to on or standby by
using STANDBY/ON on the DRX-730.
You can enjoy various input sources with the
DRX-730.
To select an input source, use the remote control
buttons listed in the following table.
The name of the selected input source appears on the
display.
Note:
•It may take several seconds to switch to a new
input source, during which time the display will
flash and the sound will be muted.
■ Front panel INPUT control
Yo u can also use the INPUT control on the DRX-730
to select input sources. Turn it to the left or right to
select the input sources in the following order:
Chapter 3: General Functions
Turning on the DRX-730
Selecting input sources
1
STANDBY/ON
ZOOM
OPEN/CLOSE
ON SCREEN
423
586
90
7
AUDIO
SUBTITLE
PLAY MODE
ANGLE
CLEAR
BLUETOOTH
ON
OFF
PRESET
MENU
INFO.
TOP MENU
SETUP
RETURN
AEAE
ENTER
)STANDBY/ON (
DD
DD
VV
VV
DD
DD
Input source Button and description
DVD DVD/USB
1
button—To play a disc in
the DRX-730 (see page 23).
1. Press repeatedly to select DVD or USB.
USB DVD/USB
2
button—To listen to
music or view pictures stored on a
USB storage device connected to the
USB port on the front panel (see
page 45).
2. Press repeatedly to select DVD or USB.
TUNER TUNER button—To listen to the
radio (see page 36).
AUX AUX/PORTABLE
3
button—To listen
to music stored on a component
connected to the AUX IN jacks on
the DRX-730’s rear panel.
3. Press repeatedly to select AUX or PORTABLE.
PORTABLE AUX/PORTABLE
4
button—To listen
to music stored on a portable music
player connected to the PORTABLE
jack on the front panel (see page 43).
4. Press repeatedly to select AUX or PORTABLE.
DOCK DOCK button—To listen to music
stored on an iPod
5
(see page 43) or
Bluetooth-compatible
6
music player
or mobile phone (see page 47)
connected to the DOCK jack.
5. Optional Yamaha iPod universal dock (YDS-10 or YDS-11)
required.
6. Optional Yamaha YBA-10 Bluetooth Wireless Audio
Receiver required.
DVD USB FM AM AUX PORTABLE DOCK

Chapter 3: General Functions
17 En
English
You can enjoy your music at a volume level you like.
To raise the volume, press VOLUME (+).
To lower the volume, press VOLUME (–).
The volume can be set to MIN, 01 to 87, or MAX.
■ Front panel VOLUME control
You can also adjust the volume by using the
VOLUME control on the DRX-730.
While listening to your music, you can temporarily
mute the sound.
To mute the sound, press MUTE.
“MUTE ON” appears on the display and the MUTE
indicator flashes.
To unmute the sound, press MUTE again.
“MUTE OFF” appears on the display and the MUTE
indicator goes off.
Notes:
•If you adjust the volume or change the input
source while the sound is muted, muting will be
cancelled.
•Muting is cancelled automatically when the
DRX-730 is set to standby.
Adjusting the volume
VOLUME
TIMER SLEEP
MUTE
DOCK
TUNER
MEMORY
SOUND
DVD/USB
PURE DIRECT
AUX/PORTABLE
DISPLAY
DIMMER
PRESET
MENU
INFO.
TOP MENU
SETUP
RETURN
AEAE
ENTER
BAND
AUTO/
MANUAL
VOLUME +/–
VV
VV
oo
oo
ll
ll
uu
uu
mm
mm
ee
ee
33
33
55
55
Muting the sound
VOLUME
TIMER SLEEP
MUTE
DOCK
TUNER
MEMORY
SOUND
DVD/USB
PURE DIRECT
AUX/PORTABLE
DISPLAY
DIMMER
PRESET
MENU
INFO.
TOP MENU
SETUP
RETURN
AEAE
ENTER
BAND
AUTO/
MANUAL
MUTE
MM
MM
UU
UU
TT
TT
EE
EE
OO
OO
NN
NN
MUTE
MM
MM
UU
UU
TT
TT
EE
EE
OO
OO
FF
FF
FF
FF
3

Chapter 3: General Functions
18 En
You can adjust the bass and treble to change the tone
as you like.
1 Press SOUND repeatedly to select “BASS” or
“TREBLE.”
2 To increase the bass or treble, press Up ( )
repeatedly. To reduce the bass or treble, press
Down ( ) repeatedly.
The bass and treble can be adjusted up or down by
10 dB in 2 dB steps: –10 dB to 0 dB to +10 dB. The
default setting is 0 dB.
Notes:
•If you make no adjustments for 5 seconds, the
Bass or Treble adjustment mode will be cancelled
and the previous display will reappear.
•Bass and treble adjustments apply to the speakers
and headphones, but not recording.
You can adjust the left and right sound balance.
1 Press SOUND repeatedly to select “BALANCE.”
2 To move the sound toward the left, press Left
() repeatedly. To move the sound toward the
right, press Right ( ) repeatedly.
The balance can be adjusted 6 steps to the left or 6
steps to the right. The default setting is center.
Notes:
•If you make no adjustments for 5 seconds, the
Balance adjustment mode will be cancelled and
the previous display will reappear.
•Balance adjustments apply to the speakers and
headphones, but not recording.
Adjusting the bass and treble
VOLUME
TIMER SLEEP
MUTE
DOCK
TUNER
MEMORY
SOUND
DVD/USB
PURE DIRECT
AUX/PORTABLE
DISPLAY
DIMMER
PRESET
MENU
INFO.
TOP MENU
SETUP
RETURN
AEAE
ENTER
BAND
AUTO/
MANUAL
SOUND
BB
BB
AA
AA
SS
SS
SS
SS
00
00
dd
dd
BB
BB
TT
TT
RR
RR
EE
EE
BB
BB
LL
LL
EE
EE
00
00
dd
dd
BB
BB
Adjusting the balance
VOLUME
TIMER SLEEP
MUTE
DOCK
TUNER
MEMORY
SOUND
DVD/USB
PURE DIRECT
AUX/PORTABLE
DISPLAY
DIMMER
PRESET
MENU
INFO.
TOP MENU
SETUP
RETURN
AEAE
ENTER
BAND
AUTO/
MANUAL
SOUND
BB
BB
AA
AA
LL
LL
AA
AA
NN
NN
CC
CC
EE
EE
--
--
--
--
--
--
∫∫
∫∫
--
--
--
--
--
--

Chapter 3: General Functions
19 En
English
In Pure Direct playback mode, you can enjoy high
quality audio playback.
To turn on Pure Direct playback mode, press PURE
DIRECT repeatedly until “PURE DIRECT ON”
appears on the display.
The first push of the button displays the current
setting on the display. Subsequent pushes turn Pure
Direct playback mode on and off.
To turn off Pure Direct playback mode, press PURE
DIRECT so that “PURE DIRECT OFF” appears on
the display.
While the Pure Direct playback mode is on, the tone
control circuits (bass and treble) are bypassed so that
the signal travels directly to the amp.
Note:
•If you adjust the bass or treble in Pure Direct
playback mode, Pure Direct mode will be
cancelled.
You can use a pair of headphones to enjoy your music
privately or when you don’t want to disturb others.
Connect headphones with a mini plug to the
PHONES jack on the DRX-730’s front panel.
While headphones are plugged into the PHONES
jack, the speakers and, if connected, subwoofer
output no sound.
Pure Direct playback mode
VOLUME
TIMER SLEEP
MUTE
DOCK
TUNER
MEMORY
SOUND
DVD/USB
PURE DIRECT
AUX/PORTABLE
DISPLAY
DIMMER
BAND
AUTO/
MANUAL
PURE DIRECT
PP
PP
UU
UU
RR
RR
EE
EE
DD
DD
II
II
RR
RR
EE
EE
CC
CC
TT
TT
OO
OO
NN
NN
PP
PP
UU
UU
RR
RR
EE
EE
DD
DD
II
II
RR
RR
EE
EE
CC
CC
TT
TT
OO
OO
FF
FF
FF
FF
Using headphones
STANDBY/ON
USB PORTABLE PHONES
INPUT
TIMER
HDMI
PROGRESSIVE
3

Chapter 3: General Functions
20 En
You can adjust the brightness of the display to suit
your room lighting. For example, you’re using the
DRX-730 in a darkened room and the display is too
bright.
To dim the display, press DIMMER repeatedly.
The display can be set to three levels of brightness:
DIMMER –1, DIMMER –2, DIMMER –3, which can
be selected in the following order:
To return to normal brightness, press DIMMER
repeatedly until “DIMMER OFF” appears on the
display.
You can use the sleep timer to automatically stop
playback and set the DRX-730 to standby after a
specified period of time. For example, when you want
to enjoy a movie or some music until you fall asleep.
Press SLEEP repeatedly to select a sleep time.
The sleep time can be set to 120 minutes, 90 minutes,
60 minutes, or 30 minutes, which can be selected in
the following order:
When a sleep time has been selected, the SLEEP
indicator on the display lights up.
Once the specified sleep time has elapsed, playback
will automatically stop and the DRX-730 will go on
standby.
To cancel the sleep timer, press SLEEP repeatedly
until “OFF” appears on the display.
Notes:
•The sleep timer will only set the DRX-730 to
standby. It will not turn off any connected
components.
•The sleep timer will be cancelled if the DRX-730
is set to standby before the sleep time has elapsed.
Adjusting the display
brightness
VOLUME
TIMER SLEEP
MUTE
DOCK
TUNER
MEMORY
SOUND
DVD/USB
PURE DIRECT
AUX/PORTABLE
DISPLAY
DIMMER
BAND
AUTO/
MANUAL
DIMMER
DD
DD
II
II
MM
MM
MM
MM
EE
EE
RR
RR
--
--
11
11
DIMMER OFF DIMMER –1 DIMMER –2 DIMMER –3
DD
DD
II
II
MM
MM
MM
MM
EE
EE
RR
RR
OO
OO
FF
FF
FF
FF
Using the sleep timer
VOLUME
TIMER SLEEP
MUTE
DOCK
TUNER
MEMORY
SOUND
DVD/USB
PURE DIRECT
AUX/PORTABLE
DISPLAY
DIMMER
BAND
AUTO/
MANUAL
SLEEP
SS
SS
LL
LL
EE
EE
EE
EE
PP
PP
11
11
22
22
00
00
mm
mm
ii
ii
nn
nn
..
..
120min 90min 60min 30min OFF
SLEEP
SS
SS
LL
LL
EE
EE
EE
EE
PP
PP
OO
OO
FF
FF
FF
FF

Chapter 3: General Functions
21 En
English
To display the time or program the timer, you must
first set the clock.
1 Press TIMER.
“Set Clock” appears on the display for a few
seconds, and then the message “Press and hold
ENTER key for 3 sec.” scrolls across the display.
If the clock has already been set, “Clock Time” will
appear on the displayed for a few moments, then
the time will be displayed.
2 While the message is scrolling across the
display, press and hold down ENTER for 3
seconds until the hours display starts flashing.
3 Use Up/Down ( / ) to set the hours.
The hours can be set from 0 to 12, AM or PM. On
some models, the default hours display uses the
24-hour clock.
4 Press Right ( ). The minutes display starts
flashing.
5 Use Up/Down ( / ) to set the minutes.
Use Left/Right ( / ) to toggle between the hour
and minute displays if necessary.
6 Press ENTER.
The time is set and the display stops flashing.
Notes:
•To switch between 12- and 24-hour clock, while
the time is being displayed, use Left/Right ( / ).
•If the power cable is disconnected or there’s a
power failure, the clock will continue working for
approximately 5 minutes. But beyond this, the
time setting will be cleared.
Setting the clock
VOLUME
TIMER SLEEP
MUTE
DOCK
TUNER
MEMORY
SOUND
DVD/USB
PURE DIRECT
AUX/PORTABLE
DISPLAY
DIMMER
PRESET
MENU
INFO.
TOP MENU
SETUP
RETURN
AEAE
ENTER
BAND
AUTO/
MANUAL
ENTER
TIMER
PP
PP
rr
rr
ee
ee
ss
ss
ss
ss
aa
aa
nn
nn
dd
dd
hh
hh
oo
oo
ll
ll
dd
dd
00
00
00
00
::
::
00
00
00
00
00
00
00
00
::
::
00
00
00
00
3

Chapter 3: General Functions
22 En
You can view the time while listening to a source.
To view the time, press DISPLAY.
Notes:
•If the DVD input source is selected, you’ll need to
press DISPLAY twice in order to view the time.
•When you view the time as explained above, the
time will be displayed continuously. When you
perform an operation, a message related to that
operation will be displayed, and then the time will
reappear.
•If the clock has not yet been set, “Set Clock!” will
appear on the display for 3 seconds, then the
previous display will reappear. See page 21 for
details on setting the clock.
•The time cannot be displayed while iPod Menu
mode is selected (see page 43).
To save energy and prevent screen burn, you can set
the DRX-730 so that it automatically goes on standby
after 30 minutes of inactivity when using the DVD or
USB input source.
1 With the DVD or USB input source selected,
press MEMORY.
The current Auto Standby setting appears on the
display.
2 Use the cursor buttons ( / / / ) to select
“ON” or “OFF.”
3 Press MEMORY or ENTER to set.
When Auto Standby is on and the DVD or USB
input source is selected, if playback has been
stopped for 30 minutes and there’s been no
operation during that time, the DRX-730 will
automatically go on standby. Depending on the
disc, the DRX-730 may automatically go on
standby when the same menu has been displayed
for 30 minutes.
Note:
•If you make no adjustments for 5 seconds, the
Auto Standby setting mode will be cancelled and
the previous display will reappear.
Viewing the time
VOLUME
TIMER SLEEP
MUTE
DOCK
TUNER
MEMORY
SOUND
DVD/USB
PURE DIRECT
AUX/PORTABLE
DISPLAY
DIMMER
PRESET
MENU
INFO.
TOP MENU
SETUP
RETURN
AEAE
ENTER
BAND
AUTO/
MANUAL
DISPLAY
11
11
99
99
::
::
33
33
00
00
Auto standby
VOLUME
TIMER SLEEP
MUTE
DOCK
TUNER
MEMORY
SOUND
DVD/USB
PURE DIRECT
AUX/PORTABLE
DISPLAY
DIMMER
PRESET
MENU
INFO.
TOP MENU
SETUP
RETURN
AEAE
ENTER
BAND
AUTO/
MANUAL
ENTER
MEMORY
AA
AA
UU
UU
TT
TT
OO
OO
SS
SS
TT
TT
NN
NN
BB
BB
YY
YY
OO
OO
FF
FF
FF
FF

23 En
English
This chapter explains how to play discs.
When the input source is DVD or USB, you can
operate various functions and settings by using the
on-screen menus that appear on the connected TV.
Tips:
•You can change the language of the on-screen
display with the OSD Language setting (see
page 55).
•The buttons that you can use with each menu are
shown at the bottom of each screen.
You can play the following types of discs in the
DRX-730: DVD-Video, DVD-VR (DVD-R/RW/R
DL discs recorded in VR mode), VCD, SVCD, Audio
CD, and DTS CD. Also, data discs containing the
following types of files: MP3, WMA, MPEG-4 AAC,
JPEG, DivX
®
Ultra, and WMV. See page 57 for more
details on supported disc types and file formats.
1 Press Open/Close ( ) on the DRX-730.
The disc tray opens and the DVD input source is
selected automatically. If the DRX-730 was on
standby, it will turn on automatically.
To use the on-screen menus or view video or
pictures, turn on your TV and select the AV input
to which the DRX-730 is connected.
2 Place the disc, label-side up, in the center of
the disc tray, and then press OPEN/CLOSE ( ).
The disc tray closes and the disc is loaded.
3 Press Play/Pause ( / ) on the DRX-730 to
start playback.
You can also use Play ( ) on the remote control
to start playback.
•If you loaded a DVD, VCD, or SVCD disc, a menu
may appear. See “DVD-Video menus” or “VCD
and SVCD menus (PBC)” on page 25 for more
details.
•If you loaded a disc containing JPEG pictures, a
slideshow will start. See “Playing JPEG
slideshows” on page 32 for more details.
•If you loaded a disc containing various file
formats, such as MP3, WMA, MPEG-4 AAC,
JPEG, DivX
®
, or WMV, you’ll need to select the
format you want to play on-screen.
To eject a disc, press Open/Close ( ), or press
OPEN/CLOSE ( ) on the remote control.
Notes:
•You can also close the disc tray by pushing the
tray gently until it starts to close by itself.
•To play a double-sided DVD, load it with the side
you want to play facing down.
•Pressing Open/Close ( ) on the DRX-730 while
its on standby will turn it on, open the disc tray,
and select the DVD input source, ready for disc
playback.
Chapter 4: Playing Discs
Using the on-screen display
Button Description
SETUP Displays the Setup menu
1
1. Only when the input source is DVD.
Cursor
( )/( )
Selects menu items
ENTER Confirms item selection
RETURN Returns to the previous menu
1
STANDBY/ON
ZOOM
OPEN/CLOSE
ON SCREEN
423
586
90
7
VOLUME
TIMER SLEEP
MUTE
DOCK
TUNER
MEMORY
SOUND
DVD/USB
PURE DIRECT
AUX/PORTABLE
DISPLAY
DIMMER
AUDIO
SUBTITLE
PLAY MODE
ANGLE
CLEAR
BLUETOOTH
ON
OFF
PRESET
MENU
INFO.
TOP MENU
SETUP
RETURN
AEAE
ENTER
BAND
AUTO/
MANUAL
TOP MENU
ENTER
)OPEN/CLOSE (
RETURN
SETUP
MENU
Number
buttons
Playing discs
4

Chapter 4: Playing Discs
24 En
•With some discs, some of the playback functions
explained in this chapter may not work as
expected, and some may not work at all.
•Some DVDs restrict the use of certain functions,
for example, random playback or repeat playback,
in some or all parts of the disc. This is not a
malfunction.
To stop playback, press Stop ( ).
You can also use Stop ( ) on the DRX-730 to stop
playback.
If “RESUME” or “LAST MEMORY” appears on the
display after stopping playback, you can resume
playback from where you left off simply by pressing
Play ( ). See “Resume and Last Memory” below for
more details.
When you press Stop ( ) to stop DVD-Video, VCD,
SVCD, DivX
®
, WMV, or Audio CD playback,
“RESUME” appears on the display, and you can
continue playback from where you left off simply by
pressing Play ( ).
For DVD-Video, VCD, and SVCD discs, the
DRX-730 will remember the point at which you
stopped playback even if the disc has been ejected.
The next time you load the disc, “Last Memory”
appears on-screen, and you can continue playback
from where you left off.
If you don’t want the DRX-730 to remember the Last
Memory point, instead of pressing Stop ( ), press
OPEN/CLOSE ( ) to stop playback and eject the
disc.
To cancel the Resume or Last Memory function,
while “RESUME” or “LAST MEMORY” is displayed,
press Stop ( ).
Notes:
•The Last Memory function may not work with
some discs.
•The DRX-730 can remember the Last Memory
points for up to five DVD-Video discs and one
VCD or SVCD disc.
•For DivX
®
, WMV, and Audio CD discs, the
Resume function is cancelled when the disc is
ejected, the input source is changed, or the
DRX-730 is turned off.
To pause playback, press Pause ( ).
To resume playback, press Pause ( ) again, or
press Play ( ).
You can also use Play/Pause ( / ) on the DRX-730
to pause playback.
During playback, you can rewind or fast forward at
various speeds.
To rewind, press Rewind ( ) during playback.
To fast forward, press Fast Forward ( ) during
playback.
Press Rewind ( ) or Fast Forward ( )
repeatedly to change the rewind or fast forward
speed.
The speed is displayed on-screen.
To resume normal playback, press Play ( ).
You can also rewind or fast forward by holding down
Previous/Rewind ( / ) or Next/Fast Forward
(/), respectively, on the DRX-730 for a few
seconds.
Notes:
•For DivX
®
and WMV discs, only one rewind and
fast forward speed is available.
•Normal playback may resume when a new
chapter (DVD-Video) or track (PBC VCD or
SVCD) is reached while rewinding or fast
forwarding.
•For MP3, WMA, and MPEG-4 AAC discs,
normal playback will resume when the beginning
or end of a track is reached while rewinding or
fast forwarding.
Stopping playback
Resume and Last Memory
Pausing playback
Rewind and fast forward

Chapter 4: Playing Discs
25 En
English
To select the next chapter or track, press Next
().
To select the beginning of the current chapter or
track, press Previous ( ). Press it again to select
earlier chapters or tracks.
Yo u can also use Next/Fast Forward ( / ) and
Previous/Rewind ( / ) on the DRX-730 to
select tracks.
You can select titles, chapters, and tracks by number.
1 Use the number buttons to enter the number
of a title, chapter, or track.
2 Press ENTER.
If playback was stopped, playback starts from the
specified title (DVD) or track (Audio CD, VCD,
SVCD).
If playback was in progress, playback goes to the
specified title (DVD-VR [VR mode
DVD-R/RW/R DL]), chapter (DVD-Video), or
track (VCD, SVCD, or Audio CD).
Most DVD-Video discs have menus from which you
can select what you want to watch. Usually, the main
menu appears automatically, although with some
discs, you may need to press MENU or TOP MENU
to display the menu.
The following buttons can be used with menus.
Some VCD and SVCD discs have PBC (Playback
Control) menus from which you can select what you
want to watch.
Load a PBC VCD or SVCD disc, press Play ( ) to
display the menu, and then use the number buttons
and ENTER to select the track you want to play.
The following buttons can be used with menus.
You can turn off PBC and start playback by pressing
Next ( ) or Previous ( ) or the number buttons
and ENTER while playback is stopped.
Notes:
•With some PBC VCD and SVCD discs, the menu
may not appear when you press Play ( ), in
which case you’ll need to press RETURN during
playback to display the menu.
•Some of the disc playback functions explained in
this chapter cannot be used with PBC playback.
To use such a function, turn off PBC playback by
starting playback without using the menu, as
explained above.
•If you turn off PBC temporarily, the menu will not
be displayed when RETURN is pressed during
playback. To display the menu again, press Stop
() twice, and then press Play ( ). PBC will be
turned on and pressing RETURN will display the
menu.
Selecting chapters and tracks
Selecting items by number
DVD-Video menus
Button Description
TOP MENU Displays the DVD’s top menu
1
1. Depends on the disc. With some DivX
®
discs, a menu will be
displayed.
MENU Displays a DVD’s menu
2
2. May work the same as the TOP MENU button with some
discs.
Cursor
( )/( )
Selects menu items
ENTER Confirms item selection
RETURN Returns to the previous menu
Numbers
With some discs, playback can be
started by entering a number and
pressing ENTER.
VCD and SVCD menus (PBC)
Button Description
RETURN
Displays the PBC menu when
pressed during playback
Numbers
Selects numbered menu items. Press
ENTER to confirm selection.
Next ( )
Displays the next menu page (if
available)
Previous
()
Displays the previous menu page (if
available)
4

Chapter 4: Playing Discs
26 En
You can play DVD-Video, VCD, SVCD, DivX
®
, and
WMV discs in slow motion at four different speeds.
You can also play DVD-Video discs in reverse slow
motion.
During playback, press Pause ( ).
Press and hold down Rewind ( ) or Fast
Forward ( ) until slow-motion playback starts.
Press Rewind ( ) or Fast Forward ( )
repeatedly to change the slow-motion speed.
The speed is displayed on-screen.
To resume normal playback, press Play ( ).
Note:
•Normal playback may resume when a new
chapter (DVD-Video) or track (PBC VCD or
SVCD) is reached during slow-motion playback.
You can play DVD-Video, VCD, SVCD, DivX
®
, and
WMV discs frame-by-frame. You can also play
DVD-Video discs frame-by-frame in reverse.
During playback, press pause ( ).
Press Rewind ( ) or Fast Forward ( ) to play
one frame at a time.
To resume normal playback, press Play ( ).
Note:
•Normal playback may resume when a new
chapter (DVD-Video) or track (PBC VCD or
SVCD) is reached during frame-by-frame
playback.
Slow-motion playback
1
STANDBY/ON
ZOOM
OPEN/CLOSE
ON SCREEN
423
586
90
7
AUDIO
SUBTITLE
PLAY MODE
ANGLE
CLEAR
BLUETOOTH
ON
OFF
PRESET
MENU
INFO.
TOP MENU
SETUP
RETURN
AEAE
ENTER
Frame-by-frame playback
1
STANDBY/ON
ZOOM
OPEN/CLOSE
ON SCREEN
423
586
90
7
AUDIO
SUBTITLE
PLAY MODE
ANGLE
CLEAR
BLUETOOTH
ON
OFF
PRESET
MENU
INFO.
TOP MENU
SETUP
RETURN
AEAE
ENTER

Chapter 4: Playing Discs
27 En
English
Some DVD discs have soundtracks in multiple
languages or audio formats, such as Dolby Digital and
DTS, that you can select during playback. Similarly,
some DVD-VR (VR mode DVD-R/RW/R DL) discs
have dual-mono audio soundtracks, and some DivX
®
discs have multiple audio soundtracks.
During playback, press AUDIO repeatedly to
select the available soundtrack languages or
audio formats.
The name of the selected language or audio format is
displayed on-screen.
Notes:
•With some discs, you can only select language
soundtracks and audio formats by using the disc’s
menu. Use TOP MENU and MENU to display the
disc’s menu.
•You can change the default soundtrack language
for DVD-Video discs in the “Language settings”
on page 54.
•The default soundtrack language (see page 54)
may be selected if you stop playback and cancel
the Resume function, or eject the disc without
storing the Last Memory point (see page 24).
Some DVD and DivX
®
discs have subtitles in one or
more languages that you can select during playback.
During playback, press SUBTITLE repeatedly to
select the available subtitles.
The name of the selected subtitle language is
displayed on-screen.
Notes:
•With some discs, you can only select subtitles by
using the disc’s menu. Use TOP MENU and
MENU to display the disc’s menu.
•You can change the default subtitle language for
DVD-Video discs in the “Language settings” on
page 54
•See “About DivX®” on page 58 for details on using
DivX
®
subtitles.
•With some DivX
®
discs, the subtitles may not
display correctly.
•The default subtitle language (see page 54) may be
selected if you stop playback and cancel the
Resume function, or eject the disc without storing
the Last Memory point (see page 24).
Selecting languages and audio
1
STANDBY/ON
ZOOM
OPEN/CLOSE
ON SCREEN
423
586
90
7
AUDIO
SUBTITLE
PLAY MODE
ANGLE
CLEAR
BLUETOOTH
ON
OFF
PRESET
MENU
INFO.
TOP MENU
SETUP
RETURN
AEAE
ENTER
TOP MENU
AUDIO
MENU
Selecting subtitles
1
STANDBY/ON
ZOOM
OPEN/CLOSE
ON SCREEN
423
586
90
7
AUDIO
SUBTITLE
PLAY MODE
ANGLE
CLEAR
BLUETOOTH
ON
OFF
PRESET
MENU
INFO.
TOP MENU
SETUP
RETURN
AEAE
ENTER
TOP MENU
SUBTITLE
MENU
4

Chapter 4: Playing Discs
28 En
Some DVD-Video discs have content recorded at
multiple camera angles that you can select during
playback.
A camera icon ( ) appears on-screen when playing
content that features multiple camera angles. You can
turn this icon off if you prefer (see page 55).
During playback, press ANGLE repeatedly to
select the available camera angles.
Notes:
•With some discs, even though the camera icon
() is displayed on-screen, you may not be able
to select the camera angles.
•With some discs, you can also select the camera
angles from the disc’s menu.
You can zoom the picture 2x or 4x when playing a
DVD-Video, VCD, SVCD, DivX
®
, WMV, or JPEG
disc.
During playback, press ZOOM repeatedly to
select 2x, 4x, or 1x zoom.
Use the cursor buttons ( / / / ) to move
around the picture while zoomed in.
You can change the zoom factor and move around the
picture freely while playback continues.
Notes:
•Since DVD-Video, VCD, SVCD, DivX
®
, WMV,
and JPEG discs use a fixed video resolution, the
picture quality may deteriorate when zoomed in.
This is not a malfunction.
•If the zoom indicator disappears from the screen,
press ZOOM again to display it.
Selecting camera angles
1
STANDBY/ON
ZOOM
OPEN/CLOSE
ON SCREEN
423
586
90
7
AUDIO
SUBTITLE
PLAY MODE
ANGLE
CLEAR
BLUETOOTH
ON
OFF
PRESET
MENU
INFO.
TOP MENU
SETUP
RETURN
AEAE
ENTER
ANGLE
Zoom
1
STANDBY/ON
ZOOM
OPEN/CLOSE
ON SCREEN
423
586
90
7
VOLUME
TUNER
MEMORY
AUDIO
SUBTITLE
PLAY MODE
ANGLE
CLEAR
BLUETOOTH
ON
OFF
PRESET
MENU
INFO.
TOP MENU
SETUP
RETURN
AEAE
ENTER
BAND
AUTO/
MANUAL
ZOOM

Chapter 4: Playing Discs
29 En
English
You can play a title, chapter, track, or disc repeatedly.
Repeat playback can be combined with program
playback to play a compilation of your favorite titles,
chapters, or tracks repeatedly (see page 30).
1 During playback, press SETUP.
The Setup menu appears on-screen.
2 Select “Play Mode,” and then press ENTER.
The Play Mode menu appears on-screen.
3 Select “Repeat,” select a repeat option, and
then press ENTER.
The available repeat options depends on the type
of disc.
•For DVD discs, you can select “Title Repeat” or
“Chapter Repeat.”
•For VCD, SVCD, and Audio CD discs, you can
select “Disc Repeat” or “Track Repeat.”
•For DivX
®
and WMV discs, you can select “Title
Repeat.” With some DivX
®
discs, you can also
select “Chapter Repeat.”
•During program playback (see page 30), you can
select “Program Repeat.”
4 To cancel repeat playback, select “Repeat Off,”
and then press ENTER.
5 To close the Setup menu, press SETUP.
Tip:
•You can display the Play Mode menu quickly by
pressing PLAY MODE.
Note:
•Repeat playback cannot be used with MP3,
WMA, MPEG-4 AAC, and JPEG discs.
You can specify two points (A and B) on a DVD,
VCD, SVCD, or Audio CD, and then play the section
between those two points repeatedly.
1 During playback, press SETUP.
The Setup menu appears on-screen.
2 Select “Play Mode,” and then press ENTER.
The Play Mode menu appears on-screen.
3 Select “A-B Repeat,” and then press ENTER.
4 Select “A(Start point),” and then press ENTER.
5 Select “B(End point),” and then press ENTER.
The section between the A and B points plays
repeatedly.
6 To resume normal playback, select “Off,” and
then press ENTER.
7 To close the Setup menu, press SETUP.
Tip:
•You can display the Play Mode menu quickly by
pressing PLAY MODE.
Note:
•The A and B points must be within the same title
(DVD) or track (VCD, SVCD, Audio CD).
Repeat playback
VOLUME
DOCK
TUNER
MEMORY
DVD/USB
AUX/PORTABLE
AUDIO
SUBTITLE
PLAY MODE
ANGLE
CLEAR
BLUETOOTH
ON
OFF
PRESET
MENU
INFO.
TOP MENU
SETUP
RETURN
AEAE
ENTER
BAND
AUTO/
MANUAL
ENTER
SETUP
PLAY MODE
A–B repeat playback
VOLUME
DOCK
TUNER
MEMORY
DVD/USB
AUX/PORTABLE
AUDIO
SUBTITLE
PLAY MODE
ANGLE
CLEAR
BLUETOOTH
ON
OFF
PRESET
MENU
INFO.
TOP MENU
SETUP
RETURN
AEAE
ENTER
BAND
AUTO/
MANUAL
ENTER
SETUP
PLAY MODE
4

Chapter 4: Playing Discs
30 En
You can play titles or chapters (DVD-Video) or tracks
(VCD, SVCD, or Audio CD) in random order.
1 During playback, press SETUP.
The Setup menu appears on-screen.
2 Select “Play Mode,” and then press ENTER.
The Play Mode menu appears on-screen.
3 Select “Random,” select a random option, and
then press ENTER.
The available random options depends on the
type of disc.
•For DVD discs, you can select “Random Title” or
“Random Chapter.”
•For VCD, SVCD, and Audio CD discs, you can
select “On.”
4 To cancel random playback, select “Random
Off,” and then press ENTER.
5 To close the Setup menu, press SETUP.
Tips:
•During random playback, press Next ( ) to
select another title, chapter, or track. Press
Previous ( ) to return to the beginning of the
current title, chapter, or track.
•You can display the Play Mode menu quickly by
pressing PLAY MODE.
Notes:
•You cannot combine random playback with
program playback.
•Random playback cannot be used with DVD-VR
(VR mode DVD-R/RW/R DL), DivX
®
, WMV,
JPEG, MP3, WMA, or MPEG-4 AAC discs, or
while a DVD menu is displayed.
You can create a program of your favorite titles,
chapters, or tracks for playback.
1 During playback, press SETUP.
The Setup menu appears on-screen.
2 Select “Play Mode,” and then press ENTER.
The Play Mode menu appears on-screen.
3 Select “Program,” select “Create/Edit” from the
list of program options, and then press ENTER.
4 Use the cursor buttons ( / / / ) to select a
title, chapter, or track, and press ENTER to add
it to the program.
The selected item is added to the program and the
program step moves down.
•For DVD discs, you can add titles or chapters to
the program.
•For Audio CD, VCD, and SVCD discs, you can
add tracks to the program.
5 Repeat step 4 to add more items to the
program.
You can add up to 24 items to the program.
•To insert a new item in the program, select the
step where you want to insert it, select the title,
chapter, or track you want to insert, and then
press ENTER.
•To delete a step, select it, and then press CLEAR.
Random playback
VOLUME
DOCK
TUNER
MEMORY
DVD/USB
AUX/PORTABLE
AUDIO
SUBTITLE
PLAY MODE
ANGLE
CLEAR
BLUETOOTH
ON
OFF
PRESET
MENU
INFO.
TOP MENU
SETUP
RETURN
AEAE
ENTER
BAND
AUTO/
MANUAL
ENTER
SETUP
PLAY MODE
Program playback
ZOOM
ON SCREEN
90
VOLUME
MUTE
DOCK
TUNER
MEMORY
SOUND
DVD/USB
PURE DIRECT
AUX/PORTABLE
AUDIO
SUBTITLE
PLAY MODE
ANGLE
CLEAR
BLUETOOTH
ON
OFF
PRESET
MENU
INFO.
TOP MENU
SETUP
RETURN
AEAE
ENTER
BAND
AUTO/
MANUAL
ENTER
CLEAR
SETUP
PLAY MODE

Chapter 4: Playing Discs
31 En
English
6 To play the program, press Play ( ).
The items in the program are played in order.
During playback, use Next ( ) and Previous
() to select subsequent and earlier items in
the program.
■ Program menu options
In addition to “Create/Edit,” the Program menu has
the following options:
• Playback Start: Starts program playback.
• Playback Stop: Turns off program playback, but
keeps the program in memory.
• Playback Delete: Deletes the program.
7 To close the Setup menu, press SETUP.
Tip:
•You can display the Play Mode menu quickly by
pressing PLAY MODE.
Notes:
•The program will be deleted when the disc is
ejected, an input source other than DVD is
selected, or the DRX-730 is turned off.
•Program playback cannot be used with DVD-VR
(VR mode DVD-R/RW/R DL), DivX
®
, WMV,
JPEG, MP3, WMA, or MPEG-4 AAC discs, or
while a DVD menu is displayed.
You can search discs by title, chapter, or track number,
or by time.
1 During playback, press SETUP.
The Setup menu appears on-screen.
2 Select “Play Mode,” and then press ENTER.
The Play Mode menu appears on-screen.
3 Select “Search Mode,” select a search option,
and then press ENTER.
The available search options depends on the type
of disc.
•For DVD discs, you can select “Title Search,”
“Chapter Search,” or “Time Search.”
•For VCD, SVCD, and Audio CD discs, you can
select “Track Search” or “Time Search.”
•For DivX
®
and WMV discs, you can select “Time
Search.” For some DivX
®
discs, you can also select
“Chapter Search.”
Note:
•Time Search can only be selected during playback
and only works within the current title or track.
4 Use the number buttons to enter a title,
chapter, or track number, or a time.
Times are entered in minutes and seconds. To
enter the time 45 minutes, for example, press 4, 5,
0, and 0. To enter 1 hour, 20 minutes, and 30
seconds, press 8, 0, 3, and 0.
Searching Discs
1
STANDBY/ON
ZOOM
OPEN/CLOSE
ON SCREEN
423
586
90
7
VOLUME
TUNER
MEMORY
AUDIO
SUBTITLE
PLAY MODE
ANGLE
CLEAR
BLUETOOTH
ON
OFF
PRESET
MENU
INFO.
TOP MENU
SETUP
RETURN
AEAE
ENTER
BAND
AUTO/
MANUAL
ENTER
SETUP
Number buttons
4

Chapter 4: Playing Discs
32 En
5 Press ENTER to locate and play the specified
title, chapter, track, or time.
6 To close the Setup menu, press SETUP.
Note:
•For DivX
®
and WMV discs, the located time may
differ from the specified time by a few seconds.
You can play a slideshow of JPEG pictures on a data
disc.
Load the JPEG CD, and then press Play ( ) to
start the slideshow.
Starting with the first picture in the first folder, the
slideshow displays every picture in every folder on the
CD in alphabetical order.
The pictures will be scaled automatically so that they
appear on-screen at the largest size possible.
If the disc contains JPEG picture files and music files
(MP3, WMA, MPEG-4 AAC), the music files will
play repeatedly during the slideshow. And,
Pause ( ), Next ( ), Previous ( ),
Rewind ( ), and Fast Forward ( ) will control
music playback, not the slideshow.
The following buttons can be used during slideshow
playback.
Notes:
•Large pictures take longer to load and may not
appear immediately.
•On a single disc, the DRX-730 supports up to 299
folders, and each folder may contain a
combination of up to 648 files and folders.
Playing JPEG slideshows
1
STANDBY/ON
ZOOM
OPEN/CLOSE
ON SCREEN
423
586
90
7
VOLUME
TUNER
MEMORY
AUDIO
SUBTITLE
PLAY MODE
ANGLE
CLEAR
BLUETOOTH
ON
OFF
PRESET
MENU
INFO.
TOP MENU
SETUP
RETURN
AEAE
ENTER
BAND
AUTO/
MANUAL
MENU
ZOOM
Button Description
Pause ( )
Pauses the slideshow (or music
playback if the disc contains music
files)
Next ( )
Select the next picture (or track if the
disc contains music files)
Previous
()
Select the previous picture (or track if
the disc contains music files)
Cursor
( )/( )
Pauses the slideshow and rotates and
flips the current picture. To resume
slideshow playback, press Play ( ).
ZOOM
Pauses the slideshow and zooms the
current picture. Press repeatedly to
select 2x, 4x, or 1x zoom. To resume
slideshow playback, press Play ( ).
MENU Displays Disc Navigator (see below)

Chapter 4: Playing Discs
33 En
English
You can use Disc Navigator to browse and select titles,
chapters, and tracks on DVD, VCD, and SVCD discs.
1 During playback, press SETUP.
The Setup menu appears on-screen.
2 Select “Disc Navigator,” and then press ENTER.
A list of items appear on-screen. The items
available depends on the type of disc.
The following items are available for each disc type.
3 Select the type of item you want to browse,
and then press ENTER.
Six thumbnail images appear on-screen showing
content of the type you specified. If you selected
“Time,” the thumbnails will display the content at
10 minute intervals.
4 Use Next ( ) and Previous ( ) to view
other thumbnail pages if available.
5 Use the cursor buttons ( / / / ) to select
the thumbnail you want to play, and then
press ENTER.
The selected item starts playing.
Yo u can also use the number buttons and ENTER
to select the thumbnails.
Using Disc Navigator with
DVD-Video, VCD, and SVCD
discs
1
STANDBY/ON
ZOOM
OPEN/CLOSE
ON SCREEN
423
586
90
7
VOLUME
MUTE
DOCK
TUNER
MEMORY
SOUND
DVD/USB
PURE DIRECT
AUX/PORTABLE
AUDIO
SUBTITLE
PLAY MODE
ANGLE
CLEAR
BLUETOOTH
ON
OFF
PRESET
MENU
INFO.
TOP MENU
SETUP
RETURN
AEAE
ENTER
BAND
AUTO/
MANUAL
ENTER
SETUP
Number buttons
Disc Navigator
Title
Chapter
Disc Item
DVD-Video
Title
Chapter
1
1. Only chapters within the current title can be selected.
VCD, SVCD
Track
Time
DVD-VR
(VR mode DVD-R/RW/R DL)
2
2. Recordings made on a DVD recorder are called original titles.
Edited recordings based on those original titles are called
playlist titles.
Original: Title
Original: Time
Playlist: Title
Playlist: Time
01
04
02
05
03
06
Disc Navigator: Title
01- 49: - -
4

Chapter 4: Playing Discs
34 En
Yo u can use Disc Navigator to browse and select MP3,
WMA, MPEG-4 AAC, DivX
®
, WMV, and JPEG files
on data discs.
1 Press SETUP.
The Setup menu appears on-screen.
2 Select “Disc Navigator,” and then press ENTER.
Disc Navigator appears on-screen.
3 Use the cursor buttons ( / / / ) to select
the track, file, or folder you want to play.
•Use Up/Down ( / ) to move up and down the
file and folder list.
•Use Left ( ) to move back up the directory tree
one level. Or, select the folder at the top of the list
(...) and press ENTER.
•Use ENTER or Right ( ) to open the selected
folder.
When you select a JPEG picture file, Disc
Navigator displays a thumbnail preview.
4 To play the selected track, file, or folder, press
ENTER.
If you selected an MP3, WMA, MPEG-4 AAC,
DivX
®
, or WMV file, starting with that file, all of
the files in the same folder will be played.
If you selected a JPEG picture file, starting with
that file, all of the files in the same folder will be
played in a slideshow.
5 To close the Setup menu, press SETUP.
Tips:
•If the disc contains JPEG picture files and music
files (MP3, WMA, MPEG-4 AAC), you can listen
to music while watching a slideshow. Simply start
music playback as described above, and then
select a JPEG picture file and start slideshow
playback. All of the files within the current folders
will be played repeatedly. And, Play ( ),
Pause ( ), Next ( ), and Previous ( ) will
control the slideshow, not music playback.
•Disc Navigator only plays the files in the current
folder. To play all of the files on the disc, close
Disc Navigator and start playback by pressing
Play ( ), see “Playing JPEG slideshows” on
page 32.
Using Disc Navigator with MP3,
WMA, MPEG-4 AAC, DivX
®
,
WMV, and JPEG discs
ZOOM
ON SCREEN
90
VOLUME
MUTE
DOCK
TUNER
MEMORY
SOUND
DVD/USB
PURE DIRECT
AUX/PORTABLE
AUDIO
SUBTITLE
PLAY MODE
ANGLE
CLEAR
BLUETOOTH
ON
OFF
PRESET
MENU
INFO.
TOP MENU
SETUP
RETURN
AEAE
ENTER
BAND
AUTO/
MANUAL
ENTER
SETUP
File1
File2
File3
File4
File5
Folder2
00:00/ 00:00 0kbps

Chapter 4: Playing Discs
35 En
English
You can view title, chapter, track, and other
information during playback.
During playback, press ON SCREEN repeatedly to
display the information.
To hide the information, press ON SCREEN
repeatedly until it disappears.
Some information, such as remaining disc time, is
also displayed on the DRX-730’s display.
You can view audio format during playback.
During playback, press DISPLAY.
The audio format appears on the display.
Possible audio formats are listed below.
Note:
•The audio format can be viewed only when the
DVD input source is selected and playback is in
progress.
Viewing disc information
1
STANDBY/ON
ZOOM
OPEN/CLOSE
ON SCREEN
423
586
90
7
AUDIO
SUBTITLE
PLAY MODE
ANGLE
CLEAR
BLUETOOTH
ON
OFF
ON SCREEN
Viewing the audio format
Display Description
PCM PCM (DVD-Video disc)
Dolby D Dolby Digital (DVD-Video disc)
MPEG2 MPEG2 (DVD-Video disc)
DTS DTS (DVD-Video disc)
CDDA Audio CD
VCD Video CD
SVCD Super video CD
DTS CD DTS CD
DATA DISC
MP3, WMA, MPEG-4 AAC, DivX
®
,
WMV, or JPEG
VOLUME
TIMER SLEEP
MUTE
DOCK
TUNER
MEMORY
SOUND
DVD/USB
PURE DIRECT
AUX/PORTABLE
DISPLAY
DIMMER
BAND
AUTO/
MANUAL
DISPLAY
TT
TT
YY
YY
PP
PP
EE
EE
..
..
DD
DD
oo
oo
ll
ll
bb
bb
yy
yy
DD
DD
4

36 En
This chapter explains how to use the tuner to listen to
your favorite radio stations and how to store them as
presets.
■ Tuner display indicators
The following display indicators are used for tuning
and presetting radio stations.
A TUNED
Lights up when tuned in to a radio station.
B PRESET
Lights up when selecting radio presets.
C STEREO
Lights up when listening to an FM station in stereo.
D AUTO
Lights up when Auto Tuning mode is selected. Goes
off when the Manual Tuning mode is selected.
E MEMORY
Lights up when presetting radio stations.
F Preset number
Displays the preset number.
G Band
Displays the band (FM or AM).
H Frequency
Displays the frequency.
You can tune in to radio stations automatically or
manually.
In Auto Tuning mode, the DRX-730 searches for
radio stations automatically.
1 Press TUNER to select the TUNER input source.
2 Press BAND repeatedly to select FM or AM.
3 Press AUTO/MANUAL repeatedly to select
Auto Tuning mode (AUTO indicator on).
In Auto Tuning mode, the AUTO indicator on the
display in on.
4 To search for stations higher up the frequency
band, press Up ( ). To search for stations
lower down the frequency band, press Down
().
The tuner searches for the next available station.
When a station is found, searching stops and the
TUNED indicator on the display lights up.
The STEREO indicator on the display will light up
when tuned to a stereo FM Station. If the signal is
weak, reception may be in mono.
Notes:
•If auto tuning doesn’t find some of the weaker
stations in your area, try using manual tuning.
•If stereo FM reception is noisy, press
AUTO/MANUAL to select Manual Tuning mode
and listen in mono.
Chapter 5: Using the Tuner
MEMORY
TUNED
STEREO
AUTO
PRESET
F
G
H
B
A
E
C
D
A1 FM 100.1 MHz
Tuning in to radio stations
Auto tuning
VOLUME
MUTE
DOCK
TUNER
MEMORY
SOUND
DVD/USB
PURE DIRECT
AUX/PORTABLE
PRESET
MENU
INFO.
TOP MENU
SETUP
RETURN
AEAE
ENTER
BAND
AUTO/
MANUAL
AUTO/MANUAL
BAND
TUNER
AA
AA
MM
MM
77
77
00
00
00
00
kk
kk
HH
HH
zz
zz

Chapter 5: Using the Tuner
37 En
English
In Manual Tuning mode, you can tune in to radio
stations manually.
1 Press TUNER to select the TUNER input source.
2 Press BAND repeatedly to select FM or AM.
3 Press AUTO/MANUAL repeatedly to select
Manual Tuning mode (AUTO indicator off).
In Manual Tuning mode, the AUTO indicator on
the display is off.
4 To increase the tuning frequency, press Up
( ). To decrease the tuning frequency, press
Down ( ).
The frequency will change continuously if you
keep your finger on the button.
Note:
•Only mono reception is possible in Manual
Tuning mode.
■ Changing the frequency step
(Asia and Taiwan models only)
Depending on the frequency spacing used by radio
stations in your area, you may need to change the
Tuning Step setting.
1 Set the DRX-730 to standby.
2 While holding down Stop ( ) on the
DRX-730, press STANDBY/ON, keeping
Stop ( ) pressed until “DVD — NO REQ.”
appears on the display.
3 Press Stop ( ).
“TU – AM9/FM50” (the default setting) appears
on the display.
4 Press Play/Pause ( / ) repeatedly to select
the tuning step used in your area: “TU –
AM10/FM100” or “TU – AM9/FM50.”
• TU – AM10/FM100: AM 10 kHz/FM 100 kHz
• TU – AM9/FM50: AM 9 kHz/FM 50 kHz
5 Press STANDBY/ON.
The frequency step is set and the DRX-730 goes
on standby. Press STANDBY/ON again to turn it
back on.
Manual tuning
VOLUME
TIMER SLEEP
MUTE
DOCK
TUNER
MEMORY
SOUND
DVD/USB
PURE DIRECT
AUX/PORTABLE
DISPLAY
DIMMER
PRESET
MENU
INFO.
TOP MENU
SETUP
RETURN
AEAE
ENTER
BAND
AUTO/
MANUAL
AUTO/MANUAL
BAND
TUNER
FF
FF
MM
MM
11
11
00
00
00
00
..
..
77
77
MM
MM
HH
HH
zz
zz
STANDBY/ON
USB PORTABLE PHONES
INPUT
VOLUME
TIMER
HDMI
PROGRESSIVE
Stop ( )
Play/Pause ( )
STANDBY/ON
5

Chapter 5: Using the Tuner
38 En
Yo u can store your favorite radio stations as presets so
that you can select them more easily. You can store up
to 40 presets, which are organized into 5 banks (A–E),
with 8 stations (1–8) in each bank. Presets can be
stored automatically or manually.
In Auto Presetting mode, the DRX-730 presets all of
the radio stations available in your area automatically.
1 Press TUNER to select the TUNER input source.
2 To start auto presetting, press MEMORY for 3
seconds.
Starting with the lowest FM frequency, the
DRX-730 searches the FM band for valid radio
stations and, starting with preset number A-1,
stores them one by one. When the entire FM band
has been searched, the AM band is searched, after
which auto presetting finishes.
Notes:
•If all of the available presets are stored before the
search is completed, auto presetting will finish.
•Auto presetting will overwrite all existing presets.
In Manual Presetting mode, you can preset radio
stations manually.
1 Press TUNER to select the TUNER input source.
2 Tune in to the radio station that you want to
preset (see page 36).
3 Press MEMORY.
The MEMORY indicator on the display starts
flashing.
4 While the MEMORY indicator is flashing, use
Left/Right ( / ) to select a preset bank (A–E),
and use Up/Down ( / ) to select a preset
number.
If you don’t press any buttons for 10 seconds, the
presetting process will be cancelled.
5 Press MEMORY or ENTER to store the preset.
The preset is stored and the MEMORY indicator
on the display stops flashing.
Repeat steps 2 to 5 to store more of your favorite
radio stations.
Notes:
•In addition to frequency and band (FM/AM)
information, each preset stores the Auto/Manual
Tuning setting.
•To store a different radio station in a preset,
simply perform steps 2 to 5. The previous station
will be overwritten.
Using presets
Auto presetting
VOLUME
TIMER SLEEP
MUTE
DOCK
TUNER
MEMORY
SOUND
DVD/USB
PURE DIRECT
AUX/PORTABLE
DISPLAY
DIMMER
PRESET
MENU
INFO.
TOP MENU
SETUP
RETURN
AEAE
ENTER
BAND
AUTO/
MANUAL
MEMORY
TUNER
Manual presetting
VOLUME
TIMER SLEEP
MUTE
DOCK
TUNER
MEMORY
SOUND
DVD/USB
PURE DIRECT
AUX/PORTABLE
DISPLAY
DIMMER
PRESET
MENU
INFO.
TOP MENU
SETUP
RETURN
AEAE
ENTER
BAND
AUTO/
MANUAL
ENTER
MEMORY
TUNER

Chapter 5: Using the Tuner
39 En
English
Once you’ve preset a radio station, you can tune in to
it simply by selecting the appropriate preset.
1 Press TUNER to select the TUNER input source.
2 Press BAND repeatedly to select “PRESET.”
The PRESET indicator on the display lights up.
3 Use Up/Down ( / ) to select a preset.
You can also use Left/Right ( / ) to select preset
banks A–E and number buttons 1 to 8 to select
presets.
Selecting presets
1
STANDBY/ON
ZOOM
OPEN/CLOSE
ON SCREEN
423
586
90
7
VOLUME
TIMER SLEEP
MUTE
DOCK
TUNER
MEMORY
SOUND
DVD/USB
PURE DIRECT
AUX/PORTABLE
DISPLAY
DIMMER
AUDIO
SUBTITLE
PLAY MODE
ANGLE
CLEAR
BLUETOOTH
ON
OFF
PRESET
MENU
INFO.
TOP MENU
SETUP
RETURN
AEAE
ENTER
BAND
AUTO/
MANUAL
BAND
TUNER
Number buttons
5

40 En
You can program the DRX-730’s timer to
automatically start and stop playback at set times. You
could, for example, use the DRX-730 like an alarm
clock to wake up to your favorite radio station or
music disc.
To use the timer, you must:
1. Set the input source.
2. Set the on time.
3. Set the off time.
4. Turn on the timer.
These settings are explained below.
Notes:
•The DRX-730’s clock must be set in order to
program the timer (see page 21).
•Timer programming can be cancelled at any time
by pressing TIMER.
You can specify the input source that’s to be used
when the timer turns on the DRX-730.
1 Press TIMER, and then use Up/Down ( / ) to
select “Timer Input.”
The TIMER indicator flashes.
2 Use Left/Right ( / ) to select the input
source.
Input sources are selected in the following order:
Yo u can also use DVD/USB, AUX/PORTABLE,
DOCK, TUNER, and BAND on the remote
control, or the INPUT control on the DRX-730 to
select the input source.
If you selected TUNER, use Up/Down ( / ) to
select a preset.
3 Press ENTER.
The input source is set and the ON Time setting
appears on the display (see page 41).
Note:
•The DOCK input source can be used for timer
playback with an iPod, but not a Bluetooth device.
Chapter 6: Using the Timer
Setting the input source
VOLUME
TIMER SLEEP
MUTE
DOCK
TUNER
MEMORY
SOUND
DVD/USB
PURE DIRECT
AUX/PORTABLE
DISPLAY
DIMMER
PLAY MODE
CLEAR
PRESET
MENU
INFO.
TOP MENU
SETUP
RETURN
AEAE
ENTER
BAND
AUTO/
MANUAL
DOCK
TIMER
BAND
DVD/USB
TUNER
AUX/
PORTABLE
TT
TT
ii
ii
mm
mm
ee
ee
rr
rr
II
II
nn
nn
pp
pp
uu
uu
tt
tt
DD
DD
VV
VV
DD
DD
DVD USB FM AM PRESET AUX PORTABLE DOCK
AA
AA
11
11
FF
FF
MM
MM
88
88
77
77
..
..
55
55
MM
MM
HH
HH
zz
zz

Chapter 6: Using the Timer
41 En
English
You can set the time at which you want the DRX-730
to turn on and start playback.
1 Press TIMER, and then use Up/Down ( / ) to
select “ON Time.” If the preset selection screen
appears, press ENTER.
The TIMER indicator flashes and after a few
moments, “ON 0:00” appears on the display. (If
you’re using the 12-hour clock, “ON AM 12:00”
will be displayed.)
2 Press ENTER.
The hours display starts flashing.
3 Use Up/Down ( / ) to set the hours.
4 Press Right ( ).
The minutes display starts flashing.
5 Use Up/Down ( / ) to set the minutes.
Use Left/Right ( / ) to toggle between the hour
and minute displays if necessary.
6 Press ENTER.
The on time is set and the OFF Time setting
appears on the display (see below).
You can set the time at which you want the DRX-730
to stop playback and go on standby.
1 Press TIMER, and then use Up/Down ( / ) to
select “OFF Time.” If the preset selection
screen appears, press ENTER.
The TIMER indicator flashes and after a few
moments, “OFF hh:mm” appears on the display.
(If you’re using the 12-hour clock, “OFF AM
hh:mm” will be displayed.)
Initially, the off time is set to 1 hour after the
specified on time.
2 Press ENTER.
The hours display starts flashing.
3 Use Up/Down ( / ) to set the hours.
4 Press Right ( ).
The minutes display starts flashing.
5 Use Up/Down ( / ) to set the minutes.
Use Left/Right ( / ) to toggle between the hour
and minute displays if necessary.
6 Press ENTER.
The off time is set and the Timer Set setting
appears on the display (see page 42).
Setting the on time
VOLUME
TIMER SLEEP
MUTE
DOCK
TUNER
MEMORY
SOUND
DVD/USB
PURE DIRECT
AUX/PORTABLE
DISPLAY
DIMMER
PRESET
MENU
INFO.
TOP MENU
SETUP
RETURN
AEAE
ENTER
BAND
AUTO/
MANUAL
ENTER
TIMER
OO
OO
NN
NN
TT
TT
ii
ii
mm
mm
ee
ee
00
00
00
00
::
::
00
00
00
00
00
00
00
00
::
::
00
00
00
00
Setting the off time
VOLUME
TIMER SLEEP
MUTE
DOCK
TUNER
MEMORY
SOUND
DVD/USB
PURE DIRECT
AUX/PORTABLE
DISPLAY
DIMMER
PRESET
MENU
INFO.
TOP MENU
SETUP
RETURN
AEAE
ENTER
BAND
AUTO/
MANUAL
ENTER
TIMER
OO
OO
FF
FF
FF
FF
TT
TT
ii
ii
mm
mm
ee
ee
00
00
00
00
::
::
00
00
00
00
00
00
00
00
::
::
00
00
00
00
6

Chapter 6: Using the Timer
42 En
You can turn the timer on and off as you like and it
will remember the settings. If you use the timer like
an alarm clock, for example, you may want to turn it
off while you’re on vacation.
1 Press TIMER, and then use Up/Down ( / ) to
select “Timer Set.” If the preset selection
screen appears, press ENTER.
After a few moments, “Timer Set—>OFF” or
“Timer Set—>ON” appears on the display.
2 Use Left/Right ( / ) to select “ON” or “OFF.”
3 Press ENTER.
When the timer is on, the TIMER indicator on the
display lights up.
Notes:
•If the on time or off time has been set, you can
turn the timer on or off while the DRX-730 is on
standby by simply pressing TIMER.
•When the timer is on, if the DRX-730 is on, the
TIMER indicator on the display lights up. If it’s on
standby, the TIMER LED on the front panel lights
up instead.
•When the timer has been programmed and
turned on, if the DRX-730 is on standby, it will
turn on at the specified on time and play the
specified input source. At the specified off time,
playback will stop and the DRX-730 will go on
standby.
•If the DRX-730 is already on at the specified on
time, the timer settings will have no effect.
Likewise, if the DRX-730 is already off at the
specified off time, they will have no effect.
•If you selected the DVD input source, don’t forget
to load a disc in the DRX-730. Likewise, if you
selected the USB input source, make sure a USB
storage device is plugged into the DRX-730.
•If you selected the AUX, PORTABLE, or DOCK
input source, see the owner’s manual for the
connected component for details on timer and
alarm clock operation.
•If the sleep timer and off time have both been set,
the DRX-730 will switch to standby at whichever
time occurs first.
Turning the timer on and off
VOLUME
TIMER SLEEP
MUTE
DOCK
TUNER
MEMORY
SOUND
DVD/USB
PURE DIRECT
AUX/PORTABLE
DISPLAY
DIMMER
PRESET
MENU
INFO.
TOP MENU
SETUP
RETURN
AEAE
ENTER
BAND
AUTO/
MANUAL
ENTER
TIMER
TT
TT
ii
ii
mm
mm
ee
ee
rr
rr
SS
SS
ee
ee
tt
tt
TT
TT
ii
ii
mm
mm
ee
ee
rr
rr
SS
SS
ee
ee
tt
tt
˘˘
˘˘
OO
OO
FF
FF
FF
FF
TIMER

43 En
English
This chapter explains how to enjoy content stored on
a portable device, such as a music player, iPod, USB
storage device, or Bluetooth-compatible music player
or mobile phone.
You can connect a music player to the PORTABLE
jack on the DRX-730’s front panel and enjoy the
music stored on it through the DRX-730’s speakers in
high quality.
1 Using a mini plug cable (sold separately),
connect the audio output on the music player
to the PORTABLE jack on the DRX-730’s front
panel.
2 Press AUX/PORTABLE repeatedly to select the
PORTABLE input source.
3 Start playback on the music player.
Use the DRX-730’s VOLUME control to adjust
the volume.
Note:
•If the volume control on your music player is
turned down all the way, you may not hear
anything, so set it to a suitable level.
With an optional Yamaha iPod universal dock
(YDS-10 or YDS-11) connected to the DRX-730’s
DOCK jack, you can enjoy the music stored on your
iPod through the DRX-730’s speakers in high quality.
You can also use the DRX-730’s remote control to
control your iPod. In addition, the DRX-730 will
recharge your iPod while you enjoy your music.
The DRX-730 supports 4th Generation (Click Wheel)
and later iPod models, including iPod classic, iPod
nano, iPod mini, and iPod touch. Refer to your
Yama ha dock’s owner’s manual to learn which iPod
models it supports and for setup details.
Notes:
•Set the DRX-730 to standby and disconnect its
power cable before connecting or disconnecting a
Yama ha dock.
•Make sure your iPod has the latest firmware
installed before using it with the DRX-730. See
the Apple Web site for details.
1 Using the dock cable supplied with the
Yamaha dock, connect one end of the cable to
the Yamaha dock, and connect the other end
to the DOCK jack on the DRX-730’s rear panel.
2 Press STANDBY/ON ( ) to turn on the
DRX-730.
3 Insert your iPod into the Yamaha dock.
The DOCK indicator on the display lights up.
Chapter 7: Portable Device Playback
Music player playback
STANDBY/ON
USB PORTABLE PHONES
INPUT
VOLUME
TIMER
HDMI
PROGRESSIVE
AUDIO
OUT
Mini plug cable
(sold separately)
Music player
iPod playback
OUT
OPTICAL
VIDEO
COMPONENT
DIGITALDOCK VIDEO OUT
P
Y
R
P
B
ANT
FM
UNBAL.
75
OUT IN
MIN
AUX
OUT
SUBWOOFER
SPEAKERS
R
R
SPEAKER
CLASS 2 WIRING
CABLAGE CLASSE 2
6
HDMI
MAINS
AM
ANT
GND
Dock cable
(supplied with
Yamaha dock)
Yamaha dock
7

Chapter 7: Portable Device Playback
44 En
4 Press DOCK to select the DOCK input source.
“iPod connected” appears on the display.
5 Use the DRX-730’s remote control to play the
music stored on your iPod. (Point it at the
DRX-730, not your iPod.)
■ iPod display indicators
The following DRX-730 display indicators are used
for iPod playback. Indicators 2 through 9 work only
in Menu mode (see below).
A DOCK
Lights up when an iPod is seated in the Yamaha dock.
B PLAYLISTS
Lights up when browsing playlists.
C SHUFFLE
Lights up when the iPod’s Shuffle function is on.
D REPEAT
Lights up when the iPod’s Repeat function is on.
E ARTISTS
Lights up when browsing artists.
F ALBUMS
Lights up when browsing albums.
G SONGS
Lights up when browsing songs.
H GENRES
Lights up when browsing genres.
I Cursors ( / / )
Indicate which cursor buttons can be used.
■ Simple mode and Menu mode
You can use one of two modes to control your iPod:
Simple mode or Menu mode.
•In Simple mode, you use the DRX-730’s remote
control or the iPod’s controls to control the iPod
and the iPod’s display to view the menus.
•In Menu mode, the iPod menus appear on the
DRX-730’s display and you use the DRX-730’s
remote control to control the iPod. The iPod’s
controls cannot be used, and the Yamaha logo
appears on the iPod’s display.
Press INFO repeatedly to select Simple mode or
Menu mode.
■ Playback control
The following DRX-730 remote control buttons can
be used to control iPod playback.
■ Menu navigation
The following DRX-730 remote control buttons can
be used to navigate iPod menus.
Notes:
•The iPod will be charged while the DRX-730 is
turned on, but not while the DRX-730 is on
standby.
•Video and pictures stored on the iPod are not
output from the DRX-730.
•Depending on your iPod model and its firmware
version, some iPod functions may not work as
expected, and some may not work at all.
•In Menu mode, any unsupported characters will
be replaced with an underscore (_) character.
•Refer to your iPod owner’s manual for details on
using your iPod.
GENRES
SONGS
ALBUMS
ARTISTSPLAYLISTS
DOCK
SHUFFLE
REPEAT
1 C D FE2 G H
I
Button Description
Play ( )
Starts playback. In Simple
mode, it works as Play/Pause.
Pause ( )
Pauses playback. In Simple
mode, it works as Play/Pause.
Stop ( ) Stops playback
Fast Forward ( ) Fast forwards
Rewind ( ) Rewinds
Next ( ) Selects the next track
Previous ( )
Selects the beginning of the
current track. Press again to
select earlier tracks.
Button Description
INFO Selects Menu mode or Simple mode
Up ( ) Moves up the menu
Down ( )
Moves down the menu. While track
information is displayed, press it
repeatedly to see more information.
Left ( )
Displays the menu one level up.
While track information is displayed,
press it to display a menu.
Right ( )
Displays the menu one level down.
(Cannot be used to start playback.)
ENTER
Displays the menu one level down.
When a song is selected, press it to
start playback. When a setting is
selected (e.g., Shuffle or Repeat),
press it repeatedly to select an option.

Chapter 7: Portable Device Playback
45 En
English
You can connect a USB storage device to the USB port
on the DRX-730’s front panel and enjoy music (MP3,
WMA, MPEG-4 AAC) stored on it through the
DRX-730’s speakers in high quality. You can also play
a slideshow of JPEG pictures.
Notes:
•Not all USB storage devices are recognized.
•Only MP3, WMA, MPEG-4 AAC, and JPEG files
with no copy protection (DRM) can be played.
•The DRX-730 supports USB mass storage class
devices formatted with FAT16 or FAT32,
including USB flash memory devices, digital
audio players, and USB hard drives. You cannot
connect your computer directly to the DRX-730.
•Playback with all USB storage devices, and the
ability to power all USB devices is not guaranteed.
Yama ha accepts no responsibility whatsoever in
the unlikely event that any data is lost while the
USB storage device is connected to the DRX-730.
•Large capacity USB storage devices will take
longer to read. High capacity devices may take
several minutes to read.
•USB hubs are not supported.
•While the USB input source is selected, the Setup
menu will be unavailable.
•Connect only USB storage devices to the USB
port.
•If the message “USB ERROR” appears on the
display, the DRX-730 may not be able to supply
enough power to the device for it to function
properly. If the device is not a USB storage device,
do not use it with the DRX-730. If the USB storage
device came with its own power adapter, use it to
power the USB storage device. If the USB storage
device came with no power adapter, do not use it
with the DRX-730.
1 Press DVD/USB repeatedly to select the USB
input source.
Turn on your TV and select the AV input to which
the DRX-730 is connected.
2 Connect your USB storage device to the USB
port on the DRX-730’s front panel.
3 Press MENU to display Disc Navigator and
select the track you want to play. Or, press Play
() to start playback of all files on the USB
storage device.
If you loaded a disc containing JPEG pictures, a
slideshow will start. See “Playing a JPEG
slideshow” on page 46 for more details.
4 To stop playback, press Stop ( ).
5 Before you disconnect the USB storage device,
select another input source first.
Most of the disc playback functions explained in the
“Playing Discs” chapter on page 23 can also be used
with USB storage devices.
The following table lists basic playback functions.
USB playback
Playback controls
Button Description
Play ( ) Starts playback
Pause ( ) Pauses playback
Stop ( ) Stops playback
Fast Forward ( ) Fast forwards
Rewind ( ) Rewinds
Next ( ) Selects the next track
Previous ( )
Selects the beginning of the
current track. Press again to
select earlier tracks.
MENU
Displays Disc Navigator (see
page 46)
STANDBY/ON
USB PORTABLE PHONES
INPUT
VOLUME
TIMER
HDMI
PROGRESSIVE
USB storage device
7

Chapter 7: Portable Device Playback
46 En
You can play a slideshow of JPEG pictures stored on a
USB storage device.
Press Play ( ) to start the slideshow.
Starting with the first picture in the first folder, the
slideshow displays every picture in every folder on the
USB storage device in alphabetical order.
The pictures will be scaled automatically so that they
appear on-screen at the largest size possible.
If the USB storage device contains JPEG picture files
and music files (MP3, WMA, MPEG-4 AAC), the
music files will play repeatedly during the slideshow.
And, Pause ( ), Next ( ), Previous ( ),
Rewind ( ), and Fast Forward ( ) will control
music playback, not the slideshow.
The following buttons can be used during slideshow
playback.
Notes:
•Large pictures take longer to load and may not
appear immediately.
•On a single USB storage device, the DRX-730
supports up to 299 folders, and each folder may
contain a combination of up to 648 files and
folders.
Yo u can use Disc Navigator to browse and select MP3,
WMA, MPEG-4 AAC, and JPEG files stored on a
USB storage device.
1 Press MENU.
Disc Navigator appears on-screen.
2 Use the cursor buttons ( / / / ) to select
the track, file, or folder you want to play.
•Use Up/Down ( / ) to move up and down the
file and folder list.
•Use Left ( ) to move back up the directory tree
one level. Or, select the folder at the top of the list
(...) and press ENTER.
•Use ENTER or Right ( ) to open the selected
folder.
When you select a JPEG picture file, Disc
Navigator displays a thumbnail preview.
3 To play the selected track, file, or folder, press
ENTER.
If you selected an MP3, WMA, or MPEG-4 AAC
file, starting with that file, all of the files in the
same folder will be played.
If you selected a JPEG picture file, starting with
that file, all of the files in the same folder will be
played in a slideshow.
Tips:
•If the USB storage device contains JPEG picture
files and music files (MP3, WMA, MPEG-4
AAC), you can listen to music while watching a
slideshow. Simply start music playback as
described above, and then select a JPEG picture
file and start slideshow playback. All of the files
within the current folders will be played
repeatedly. And, Play ( ), Pause ( ),
Next ( ), and Previous ( ) will control the
slideshow, not music playback.
•Disc Navigator only plays the files in the current
folder. To play all of the files on the USB storage
device, close Disc Navigator and start playback by
pressing Play ( ), see “Playing a JPEG
slideshow” above.
Note:
•With some digital music players, file names may
not display correctly.
Playing a JPEG slideshow
Button Description
Pause ( )
Pauses the slideshow (or music
playback if the device contains music
files)
Next ( )
Selects the next picture (or track if
the device contains music files)
Previous
()
Selects the previous picture (or track
if the device contains music files)
Cursor
( )/( )
Pauses the slideshow and rotates and
flips the current picture. To resume
slideshow playback, press Play ( ).
ZOOM
Pauses the slideshow and zooms the
current picture. Press repeatedly to
select 2x, 4x, or 1x zoom. To resume
slideshow playback, press Play ( ).
MENU Displays Disc Navigator (see below)
Using Disc Navigator with USB
storage devices

Chapter 7: Portable Device Playback
47 En
English
With an optional Yamaha YBA-10 Bluetooth Wireless
Audio Receiver connected to the DRX-730’s DOCK
jack, you can enjoy the music stored on your
Bluetooth device, for example, a Bluetooth-
compatible music player or mobile phone, through
the DRX-730’s speakers in high quality. You can also
use the DRX-730’s remote control to control music
playback on your Bluetooth device.
Notes:
•Set the DRX-730 to standby and disconnect its
power cable before connecting or disconnecting
the Yamaha YBA-10.
•Refer to the Yamaha YBA-10 owner’s manual for
details on using the YBA-10.
•Refer to your Bluetooth device owner’s manual for
details on using your Bluetooth device.
•Depending on your Bluetooth device model and
its firmware version, some playback functions
may not work as expected, and some may not
work at all.
■ Bluetooth setup
Using the dock cable supplied with the Yamaha
YBA-10, connect one end of the cable to the
Yamaha YBA-10, and connect the other end to the
DOCK jack on the DRX-730’s rear panel.
■ Bluetooth pairing
Before you can use a Bluetooth device with the
DRX-730, you must pair, or register it with the
Ya m a h a YBA-10.
1 Press DOCK to select the DOCK input source.
2 Turn on the Bluetooth device and make sure
it’s discoverable.
3 Press and hold down BLUETOOTH ON for 3
seconds to start pairing.
Pairing starts, the DOCK indicator flashes, and
“Searching...” appears on the display.
During pairing, the Yamaha YBA-10 searches for
compatible Bluetooth devices and registers any
that are found. Pairing only needs to be
performed when a Bluetooth-device is used with
the Yamaha YBA-10 for the very first time, or
when the pairing information has been deleted.
See the Yamaha YBA-10 owner’s manual for more
details on pairing.
To cancel pairing, press BLUETOOTH OFF.
4 Make sure the Bluetooth device has detected
the Yamaha YBA-10.
The Yamaha YBA-10 will appear as “YBA-10
YAMAHA” or something similar on the Bluetooth
device.
5 On the Bluetooth device, select the Yamaha
YBA-10, and then enter the pass key “0000”.
When pairing is complete, the message
“Completed” appears on the display.
Note:
•Pairing will be cancelled if no compatible
Bluetooth devices are found within 8 minutes, the
input source is changed on the DRX-730, or the
DRX-730 is set to standby.
■ Connecting Bluetooth devices
Once a Bluetooth device has been paired with the
Ya m a h a YBA-10, you can connect to it and play the
music stored on it.
1 Press DOCK to select the DOCK input source.
2 Press BLUETOOTH ON.
The Yamaha YBA-10 attempts to connect to the
last Bluetooth device used or paired and
“Searching...” appears on the display.
When a connection is established, “BT
connected” appears on the display.
Bluetooth playback
OUT
OPTICAL
VIDEO
COMPONENT
DIGITALDOCK VIDEO OUT
P
Y
R
P
B
ANT
FM
UNBAL.
75
OUT IN
MIN
AUX
OUT
SUBWOOFER
SPEAKERS
R
R
SPEAKER
CLASS 2 WIRING
CABLAGE CLASSE 2
6
HDMI
MAINS
AM
ANT
GND
Dock cable
(supplied with
Yamaha YBA-10)
Yamaha YBA-10
7

Chapter 7: Portable Device Playback
48 En
3 Use the DRX-730’s remote control, or the
Bluetooth device’s controls to play the music
stored on the Bluetooth device.
To disconnect a Bluetooth device and make the
DRX-730 non-discoverable, press BLUETOOTH
OFF. The message “Disconnected” appears on the
display.
To connect to another Bluetooth device, you must
first disconnect from the currently connected device,
and then initiate a connection on the other Bluetooth
device.
■ Playback control
The following DRX-730 remote control buttons can
be used to control playback on a Bluetooth device.
Point the remote control at the DRX-730, not the
Bluetooth device.
Notes:
•The DRX-730’s remote control can only be used
to control a Bluetooth device while its connected
to that device.
•Even if several devices have been registered
through pairing, if the last connected Bluetooth
device is not found, the Yamaha YBA-10 will not
attempt to connect to any of the other devices.
•The DRX-730 will automatically disconnect from
the currently connected Bluetooth device when a
disconnection is initiated on that device,
communication becomes impossible because the
device is too far away, or the DRX-730 is set to
standby.
•The Bluetooth device will not be disconnected
when a different input source is selected on the
DRX-730.
•The Yamaha YBA-10 only supports Bluetooth
music players and mobile phones that are
compatible with A2DP or AVRCP.
•Bluetooth has a line of sight operating range of up
to 10 meters (33 ft.). Make sure there are no
obstacles between the Yamaha YBA-10 and your
Bluetooth device.
Button Description
Play ( ) Starts playback
1
1. Depending on the Bluetooth device, the Play and Pause
buttons may work as Play/Pause buttons.
Pause ( ) Pauses playback
1
Stop ( ) Stops playback
Next ( ) Selects the next track
Previous
()
Selects the beginning of the current
track. Press again to select earlier
tracks.

49 En
English
You can connect a recording component, such as a
CDR, MDR, or casette recorder, to the DRX-730 for
recording and playback.
1 Connect your recording component to the
DRX-730.
See “Connecting a recorder (CDR, MDR, etc.)”
on page 14 for details.
2 Turn on the DRX-730 and recording
component.
3 On the DRX-730, select the input source that
you want to record.
If you selected the DVD input source, load the
disc you want to record.
4 Start recording on the recording component.
5 Start playback on the DRX-730.
To playback the recording, select the AUX input
source (see page 16).
If your recording component has an optical
digital input, you can connect it to the DRX-730’s
OPTICAL DIGITAL OUT jack and record
digitally.
Notes:
•Refer to your recording component’s owner’s
manual for details on using it.
•Adjustments to the DRX-730’s volume, bass,
treble, and balance do not affect recording.
•To prevent a signal loop, the AUX input source is
not output by the AUX OUT jacks, so you cannot
record a source connected to the AUX IN.
•The OPTICAL DIGITAL OUT does not output
signals from the radio, DOCK, AUX IN, or
PORTABLE jacks. To record from these sources,
connect the DRX-730’s AUX OUT jacks to the
analog audio input on your recording component.
•Depending on the source material, the DRX-730’s
OPTICAL DIGITAL OUT may output MPEG,
Dolby Digital, or DTS format digital audio that
the recording component cannot record. In this
case, set the digital audio output settings so that
PCM is output (see page 52).
•Discs and files that use copy protection cannot be
recorded.
Chapter 8: Recording
8

50 En
This chapter explains the Audio Settings and Video
Adjust menus.
These settings only affect disc playback.
1 Press SETUP.
The Setup menu appears on-screen.
2 Select “Audio Settings,” and then press ENTER.
The Audio Settings menu appears on-screen.
3 Use the cursor buttons ( / / / ) and
ENTER to select and change the settings.
The settings are explained below.
4 To close the Setup menu, press SETUP.
Note:
•The effects of the Audio settings depends on your
speakers, TV, and AV receiver’s volume level and
other settings. For each setting, switch between
the available options and choose the one that
provides the best results.
■ Audio DRC
The Audio DRC (Dynamic Range Control) function
makes loud sounds quieter and quiet sounds louder,
which is ideal for watching movies late at night when
you don’t want to disturb anyone.
•High, Medium, Low, Off (default).
Notes:
•Audio DRC only works with Dolby Digital
sources.
•With some discs, Audio DRC may have little or no
effect.
•The Audio DRC function also applies to digital
output signals when the Digital Out setting is set
to On and the Dolby Digital Out setting is set to
Dolby Digital > PCM. See page 52 for details on
the digital audio output settings.
•The Audio DRC function also applies to audio
output from the HDMI output, with the same
restrictions as above.
■ Dialog
When watching a movie or other material on a DVD-
Video disc, depending on the audio format, the center
channel may be too quiet and difficult to hear. With
the Dialog function, you can make the dialog louder
and easier to hear.
•High, Medium, Low, Off (default).
Notes:
•When using the Dialog function, depending on
the source material, the dialog may distort, in
which case you should select a lower setting.
•The Dialog function also applies to digital output
signals that have been converted to 2-channel
PCM. See page 52 for details on the digital audio
output settings.
•The Dialog function also applies to audio output
from the HDMI output, with the same
restrictions as above.
Chapter 9: Audio Settings and Video Adjust
Audio Settings menu
VOLUME
TIMER SLEEP
MUTE
DOCK
TUNER
MEMORY
SOUND
DVD/USB
PURE DIRECT
AUX/PORTABLE
DISPLAY
DIMMER
PRESET
MENU
INFO.
TOP MENU
SETUP
RETURN
AEAE
ENTER
BAND
AUTO/
MANUAL
ENTER
SETUP
Audio Settings
Audio DRC
Dialog
High
Medium
Low
Off

Chapter 9: Audio Settings and Video Adjust
51 En
English
The Video Adjust settings affect the TV picture.
1 Select the DVD input source, and then press
SETUP.
The Setup menu appears on-screen.
Note:
•The Video Adjust menu is only available when the
DVD input source is selected.
2 Select “Video Adjust,” and then press ENTER.
The Video Adjust menu appears on-screen.
3 Use the cursor buttons ( / / / ) and
ENTER to select and change the settings.
The settings are explained below.
The Brightness, Contrast, Hue, and Chroma Level
settings can be adjusted by using Left/Right
(/).
4 To close the Setup menu, press SETUP.
■ Sharpness
Adjusts the sharpness of edges in the picture.
•Fine, Standard (default), Soft.
■ Brightness
Adjusts the brightness of the picture.
• –20 to +20 (default: 0)
■ Contrast
Adjusts the contrast between the lightest and darkest
areas of the picture.
• –16 to +16 (default: 0)
■ Gamma
Adjusts the appearance of dark areas of the picture.
•High, Medium, Low, Off (default).
■ Hue
Adjusts the balance between green and red.
•green 9 to red 9 (default: 0)
■ Chroma Level
Adjusts the color saturation.
• –9 to +9 (default: 0)
Notes:
•The effects of the Video Adjust settings depends
on the source material and your TV and in some
cases may not be that visible.
•The Sharpness setting does not apply to video
output by the HDMI jack.
Video Adjust menu
VOLUME
TIMER SLEEP
MUTE
DOCK
TUNER
MEMORY
SOUND
DVD/USB
PURE DIRECT
AUX/PORTABLE
DISPLAY
DIMMER
PRESET
MENU
INFO.
TOP MENU
SETUP
RETURN
AEAE
ENTER
BAND
AUTO/
MANUAL
ENTER
SETUP
Sharpness
Brightness
Contrast
Gamma
Hue
Chroma Level
Video Adjust
Fine
Standard
Soft
Brightness min max 0
9

52 En
This chapter explains the Initial Settings menu.
The Initial Settings menu contains digital audio
output, video, language, display, and other settings.
When a menu item is grayed out, it means that it
cannot currently be changed. The Initial Settings
cannot be changed during disc playback. You must
stop playback first.
1 Select the DVD input source, and then press
SETUP.
The Setup menu appears on-screen.
Note:
•The Initial Settings menu is available only when
the DVD input source is selected.
2 Select “Initial Settings,” and then press ENTER.
The Initial Settings menu appears on-screen.
3 Use the cursor buttons ( / / / ) and
ENTER to select and change the settings.
The settings are explained below.
Notes:
•The HDMI Resolution and HDMI Color settings
only need to be changed if you’ve connected an
HDMI component to the HDMI jack.
•The Component Out settings cannot be changed
if you’ve connected an HDMI component to the
HDMI jack.
•The Component Out settings may change
automatically due to the HDMI Resolution and
HDMI Color settings.
•While HDMI Audio is set to on (see page 13), or a
component is connected to the HDMI jack, only
the Digital Out setting is available.
•When HDMI Audio is set to on (see page 13),
96 kHz PCM is downsampled to 48 kHz
regardless of the 96 kHz PCM Out setting.
■ Digital Out
Turns the OPTICAL DIGITAL OUT on and off.
• On (default): OPTICAL DIGITAL OUT is on.
• Off: OPTICAL DIGITAL OUT is off.
■ Dolby Digital Out
Turns Dolby Digital to PCM conversion on and off. If
you’ve connected the OPTICAL DIGITAL OUT to
your AV receiver/decoder and it doesn’t support
Dolby Digital, select Dolby Digital > PCM.
• Dolby Digital (default): Dolby Digital signals are
output as they are.
• Dolby Digital > PCM: Dolby Digital signals are
converted and output as 2-channel PCM.
■ DTS Out
Turns DTS to PCM conversion on and off. If you’ve
connected the OPTICAL DIGITAL OUT to your AV
receiver/decoder and it doesn’t support DTS, select
DTS > PCM.
• DTS (default): DTS signals are output as they are.
• DTS > PCM: DTS signals are converted and
output as 2-channel PCM.
Notes:
•If you select DTS and your AV receiver/decoder
doesn’t support DTS, noise may be heard.
•When DTS > PCM is selected, you can also
choose the type of DTS downmix (see “DTS
Downmix” on page 55).
■ 96 kHz PCM Out
Tur ns 96 kHz downsampling on and off. If you’ve
connected the OPTICAL DIGITAL OUT to your AV
receiver/decoder and it supports 96 kHz PCM, select
96 kHz.
• 96 kHz > 48 kHz (default): 96 kHz PCM digital
audio signals are downsampled and output at
48 kHz.
• 96 kHz: 96 kHz PCM digital audio signals are
output as they are.
■ MPEG Out
Turns MPEG to PCM conversion on and off. If you’ve
connected the OPTICAL DIGITAL OUT to an AV
receiver/decoder that supports MPEG, select MPEG.
• MPEG: MPEG signals are output as they are.
• MPEG > PCM (default): MPEG signals are
converted and output as 2-channel PCM.
Chapter 10: Initial Settings
Initial Settings menu
Video Output
Language
Display
Options
Initial Settings
Digital Audio Out Digital Out
Dolby Digital Out
DTS Out
96 kHz PCM Out
MPEG Out
On
Dolby Digital
DTS
96kHz > 48kHz
MPEG > PCM
Digital Audio Out settings

Chapter 10: Initial Settings
53 En
English
■ TV Screen
Sets the aspect ratio of the picture output by the
analog and HDMI video outputs. Choose an option
that matches the aspect ratio of your TV.
• 4:3 (Letter Box) (default): Select if you have a
conventional 4:3 TV. Widescreen movies will be
displayed with black bars top and bottom.
• 4:3 (Pan & Scan): Select if you have a
conventional 4:3 TV. Widescreen movies will be
displayed with the sides trimmed so that the
picture fills the entire screen. Video from discs
that do not support Pan & Scan will be output in
4:3 Letter Box format.
• 16:9 (Wide): Select if you have a widescreen TV.
• 16:9 (Compressed): This option can only be
selected if your TV is connected to the HDMI
jack and the HDMI Resolution setting is set to
1920 x 1080p, 1920 x 1080i, or 1280 x 720p. Select
this if you want to properly display 4:3 content on
a widescreen TV. Black bars will be displayed on
either side of the picture.
■ Component Out
Sets the COMPONENT VIDEO OUT to interlaced or
progressive video output. Progressive scanning offers
better picture quality and reduced picture noise.
If your TV or projector supports progressive
scanning, select Progressive. Refer to your TV
owner’s manual for details.
• Interlace (default): The COMPONENT VIDEO
OUT outputs interlaced video.
• Progressive: The COMPONENT VIDEO OUT
outputs progressive video and the
PROGRESSIVE indicator on the display lights up.
To use progressive video, select the Progressive option
and press ENTER. When the confirmation message
appears on-screen, press ENTER to confirm, or press
RETURN to cancel.
Notes:
•When you switch between Interlace and
Progressive, the picture may be disturbed.
•When the HDMI Resolution is set to 720 x 480i
(NTSC) or 720 x 576i (PAL), the Component Out
setting is forcibly set to Interlace. When another
resolution is selected, the Component Out setting
is forcibly set to Progressive.
•If you select Progressive inadvertently and your
TV doesn’t support it, you may lose the picture
altogether. In this case, connect the DRX-730 to a
TV with a composite video connection and
change the setting back to Interlace, or reset the
DRX-730 (see page 61).
•CONSUMERS SHOULD NOTE THAT NOT
ALL HIGH DEFINITION TELEVISION SETS
ARE FULLY COMPATIBLE WITH THIS
PRODUCT AND MAY CAUSE ARTIFACTS TO
BE DISPLAYED IN THE PICTURE. IN CASE OF
525 PROGRESSIVE SCAN PICTURE
PROBLEMS, IT IS RECOMMENDED THAT
YOU SWITCH THE CONNECTION TO THE
“STANDARD DEFINITION” OUTPUT. IF
THERE ARE QUESTIONS REGARDING YOUR
VIDEO MONITOR COMPATIBILITY WITH
THIS UNIT, PLEASE CONTACT OUR
CUSTOMER SERVICE CENTER.
■ HDMI Resolution
Sets the HDMI output video resolution.
• 1920 x 1080p: Select if your HDMI TV supports
1080p progressive video.
• 1920 x 1080i: Select if your HDMI TV supports
1080i interlace video.
• 1280 x 720p: Select if your HDMI TV supports
720p progressive video.
• 720 x 480p (NTSC), 720 x 576p (PAL) (default):
Select if your HDMI TV supports 480p or 576p
progressive video.
• 720 x 480i (NTSC), 720 x 576i (PAL): Select if
your HDMI TV supports 480i or 576i interlace
video.
To change the resolution, select a resolution, and then
press ENTER. When the confirmation message
appears on-screen, press ENTER to confirm.
Notes:
•When you change the resolution, the picture may
be disturbed and may not appear immediately.
• Resetting the HDMI settings
If no picture is displayed after changing the
resolution, use the procedure below to revert to the
default resolution of 720 x 480p (NTSC), 720 x 576p
(PAL).
1 Set the DRX-730 to standby.
2 While holding down Stop ( ) on the
DRX-730, press STANDBY/ON, keeping
Stop ( ) pressed until “DVD — NO REQ.”
appears on the display.
Video Output settings
10

Chapter 10: Initial Settings
54 En
3 Press Play/Pause ( / ) repeatedly to select
“HDMI CLEAR.”
If you change your mind at this point, select
“DVD — NO REQ.” instead.
4 Press STANDBY/ON.
The HDMI Resolution is reset to its default
setting and the DRX-730 goes on standby. Press
STANDBY/ON again to turn it back on. The
HDMI Audio setting (page 13) is set to off.
■ HDMI Color
Sets the HDMI color output.
• Full range RGB: Provides very bright whites and
deep blacks.
• RGB: Select this if white and black areas of the
picture are too pronounced with the Full range
RGB option.
• Component: This is the standard component
video format used by HDMI components.
The default setting changes depending on the
connected HDMI component.
For the Other Languages options of the Audio
Language, Subtitle Language, and DVD Menu Lang.
settings, you can also specify the language by using
the 2-letter abbreviations or 4-digit codes listed on
page 62.
1 Select “Other Languages,” and then press
ENTER.
2 Use Left/Right ( / ) to select a language by
abbreviation.
For some languages, only the code number is
displayed.
•To specify a language by using the 4-digit codes,
use Up/Down ( / ) or the number buttons to
enter the appropriate code, and then press
ENTER.
■ Audio Language
Sets the default soundtrack language to be used with
DVD-Video discs.
• English (default): English soundtrack will be
used if available.
• Languages: Selected language will be used if
available. (Available languages depends on where
you purchased the DRX-730.)
• Other Languages: Use the language abbreviations
and codes listed on page 62 to specify languages
not listed above.
Notes:
•With some DVD-Video discs, the soundtrack
language will be set by the disc regardless of this
setting.
•With some DVD-Video discs, you can select the
soundtrack language from a menu. In this case,
press MENU to display the menu, and then select
the soundtrack language.
■ Subtitle Language
Sets the default subtitle language to be used with
DVD-Video discs.
• English (default): English subtitles will be used if
available.
• Languages: Subtitles in the selected language will
be used if available. (Available languages depends
on where you purchased the DRX-730.)
• Other Languages: Use the language abbreviations
and codes listed on page 62 to specify languages
not listed above.
Notes:
•With some DVD-Video discs, the subtitle
language will be set by the disc regardless of this
setting.
•With some DVD-Video discs, you can select the
subtitle language from a menu. In this case, press
MENU to display the menu, and then select the
subtitle language.
•The Subtitle Language setting also applies to
DivX
®
discs that use external subtitle files (see
“Ab o u t D i vX®” on page 58).
■ DVD Menu Lang.
Sets the default language to be used for menus on
DVD-Video discs and some DivX
®
discs.
• w/Subtitle Lang. (default): Menus in the same
language as that specified for the Subtitle
Language setting will be used if available.
• Languages: Menus in the selected language will
be used if available. (Available languages depends
on where you purchased the DRX-730.)
• Other Languages: Use the language abbreviations
and codes listed on page 62 to specify languages
not listed above.
Language settings

Chapter 10: Initial Settings
55 En
English
■ Subtitle Display
Determines whether DVD-Video disc subtitles are
displayed by default.
• On (default): Subtitles are displayed by default if
available.
• Off: Subtitles are not displayed by default.
Note:
•Some DVD-Video discs may forcibly display
subtitles regardless of this setting.
■ OSD Language
Sets the language of the on-screen menus.
• English (default): English on-screen menus.
• Language: Available languages depends on where
you purchased the DRX-730.
■ Angle Indicator
Determines whether the camera icon ( ) is
displayed on-screen when playing content on a
DVD-Video disc that features multiple camera angles.
• On (default): Camera icon is displayed.
• Off: Camera icon is not displayed.
■ Parental Lock
See “Parental Lock” below.
■ DTS Downmix
Determines how mutichannel DTS audio is
downmixed when the DTS Out setting (see page 52)
is set to DTS > PCM. Select Lt/Rt if your AV
receiver/decoder supports Dolby Pro Logic but not
DTS and it’s connected to the OPTICAL DIGITAL
OUT.
• STEREO (default): Mutichannel DTS is
downmixed in to a 2-channel stereo mix.
• Lt/Rt: Mutichannel DTS is downmixed in to a
matrix-encoded surround mix that is compatible
with Dolby surround matrix decoders.
■ DivX(R) VOD
See “DivX® VOD” on page 56.
DVD-Video discs containing content that may not be
suitable for everyone may use the parental lock system
to restrict viewing. (See the disc’s case for details.) You
can set the DRX-730 so that discs with a high parental
lock level cannot be played without first entering a
password. There are eight parental lock levels.
In addition, some DVD-Video discs use country or
region codes to block unsuitable content based on the
country or region that you set on the DRX-730.
To use parental lock, you must first enter a password,
set the parental lock level, and specify your country or
region. By default, no password is set.
• Password: Used to set the password.
• Level Change: Used to set the parental lock level.
• Country Code: Used to specify your country or
region.
■ Setting the password
You mus t s et a password before the Level Change and
Country Code settings can be set.
1 Select “Password,” and then press ENTER.
2 Use the number buttons to enter a 4-digit
password.
The numbers appear on-screen as asterisks (*).
3 Press ENTER to set the password.
The password is set.
Notes:
•We recommend that you make a note of the
password. If you forget it, you’ll need to reset the
DRX-730 (see page 61) and set a new password.
•When the password and parental lock level have
been set, when you attempt to play a disc that
exceeds the set parental lock level, you’ll be
prompted to enter the password and playback will
not be possible unless you enter the correct
password.
•Instead of preventing disc playback completely,
some DVD-Video discs may just skip unsuitable
scenes.
•Not all DVD-Video discs support parental lock
and those that don’t can be played regardless of
these parental lock settings.
Display settings
Option settings
Parental Lock
10

Chapter 10: Initial Settings
56 En
■ Changing the password
To change the password, you’ll need to enter the old
password.
1 Select “Password,” and then press ENTER.
2 Use the number buttons to enter the old
password, and then press ENTER.
3 Enter the new password, and then press
ENTER.
The new password is set.
■ Setting the parental lock level
Discs with unsuitable content have higher levels; discs
with content suitable for all have lower levels. To
restrict, for example, playback of discs with a parental
level of 4 or higher, set the DRX-730 to level 3.
1 Select “Level Change,” and then press ENTER.
2 Use the number buttons to enter the
password, and then press ENTER.
3 Use Left/Right ( / ) to set the parental lock
level, and then press ENTER.
The parental lock level is set.
■ Setting your country or region
You can specify the country or region by using the 2-
letter abbreviations or 4-digit codes listed on page 62
1 Select “Country Code,” and then press ENTER.
2 Use the number buttons to enter the
password, and then press ENTER.
3 Use Up/Down ( / ) to select your country or
region by abbreviation, and then press ENTER.
•To specify your country or region by using the 4-
digit codes, use Up/Down ( / ) or the number
buttons to enter the appropriate code, and then
press ENTER.
The country or region is set.
Note:
•The new country or region code setting will take
effect the next time you load a disc. If a disc is
already loaded, you must eject and reload it for
the new setting to take effect.
To play DivX
®
VOD (Video on Demand) files on the
DRX-730, you may need to provide a DivX
®
VOD
registration code to your DivX
®
VOD content
provider. In this case, use the DivX
®
VOD
registration code displayed by the Display setting.
• Display: Displays the DivX
®
VOD registration
code.
■ Viewing the DivX
®
VOD registration code
1 Press SETUP.
The Setup menu appears on-screen.
2 Select “Initial Settings,” and then press ENTER.
The Initial Settings menu appears on-screen.
3 Select “Options,” then “DivX(R) VOD,” then
“Display,” and then press ENTER.
The DivX
®
VOD registration code is displayed.
Notes:
•DivX
®
VOD files use DRM (Digital Rights
Management) copy protection and can only be
played on the registered player.
•If you attempt to play a DivX
®
VOD file that is not
authorized for playback on your DRX-730, the
message “Authorization Error” will be displayed
and playback will not be possible.
•Some DivX
®
VOD files can only be played a
limited number of times. When you play such a
file on the DRX-730, the remaining number of
plays will be displayed on-screen. If you attempt
to play a file with no plays remaining, the message
“Rental Expired” will be displayed and playback
will not be possible. DivX
®
VOD files with no
playback limit do not display the number of plays
remaining and can be played as many times as you
like.
DivX
®
VOD
DivX(R) Video On Demand
Your registration code is : XXXXXXXX
To learn more visit www.divx.com/vod
Done

57 En
English
Appendix
The DRX-730 can play discs bearing the following
logos:
Notes:
•Kodak Picture CD is also supported.
•The FUJICOLOR CD COMPATIBLE logo is a
trademark of Fuji Photo Film Co. Ltd.
•The DVD logo is a trademark of DVD
Format/Logo Licensing Corporation.
•Some recordable CD and DVD discs may not be
playable due the disc’s characteristics or scratches,
or dust, dirt, or condensation on the disc or
pickup lens, etc. See “Recordable disc
compatibility” below for more details.
The DRX-730 conforms to the Audio CD standard.
Operation and performance with discs that do not
conform to this standard cannot be guaranteed.
A DualDisc is a double-sided disc with a DVD layer
for video on one side and a CD layer that can be
played in a standard CD player on the other.
The DRX-730 can play the DVD side of DualDiscs.
Since the CD layer does not conform to the Audio CD
standard, some DualDiscs may not play.
For more details about the DualDisc standard, please
contact the disc’s maker or reseller.
■ CD-R/RW
•The DRX-730 is compatible with CD-R/RW discs
recorded with the following formats: Audio CD,
VCD, SVCD, and ISO 9660 (CD-ROM).
•For ISO 9660 discs, use the ISO 9660 Level 1 or
Level 2 CD-ROM file system, or the extended
Joliet or Romeo file systems.
•Multisession discs are not supported.
•Unfinalized discs cannot be played. See your disc
recorder owner’s manual for details on finalizing.
•Some discs may not play, may produce noise, or
may sound distorted. This is due to the disc and is
not a malfunction.
■ DVD-R/RW/R DL
•The DRX-730 is compatible with DVD-R/RW
and DVD-R DL (Dual Layer) discs recorded with
the following formats: DVD-Video, VR mode
(Video Recording mode), and UDF Bridge
DVD-ROM.
•When playing content that’s been edited on a
DVD recorder (scenes deleted, etc.), the picture
may disappear momentarily at the edit points.
This is not a malfunction.
•Multisession discs are not supported.
•Unfinalized discs cannot be played. See your disc
recorder owner’s manual for details on finalizing.
•Some discs may not play, may produce noise, or
may sound distorted. This is due to the disc and is
not a malfunction.
Appendix
Supported discs and formats
VIDEO
CD
DVD-Video DVD-R DVD-RW
DVD+R DVD+RW DVD+R DL
Audio CD Video CD CD-R CD-RW
Fujicolor CD
Super Video CD (Super VCD)
DVD-R DL
Copy Control CDs
DualDisc
Recordable disc compatibility

Appendix
58 En
■ DVD+R/RW/R DL
•The DRX-730 is compatible with DVD+R/RW
and DVD+R DL (Dual Layer) discs recorded with
the following formats: DVD-Video.
•When playing content that’s been edited, playback
may not follow the editing exactly.
•Multisession discs are not supported.
•Unfinalized discs cannot be played. See your disc
recorder owner’s manual for details on finalizing.
•Some discs may not play, may produce noise, or
may sound distorted. This is due to the disc and is
not a malfunction.
•Discs recorded on a computer may not be
playable due to the settings of the disc burning
software or the computer’s configuration.
•Be careful to use the correct format when burning
discs. Refer to your disc burning software owner’s
manual for details.
•Discs recorded with packet writing are not
supported.
•The DRX-730 can play the following audio file
formats: MP3 (MPEG-1 Audio Layer 3), WMA
(Windows Media Audio), and MPEG-4 AAC.
•The DRX-730 can play MP3, WMA, and
MPEG-4 AAC files stored on CD-R/RW discs
discs and USB storage devices.
•The following sampling rates are supported:
32 kHz, 44.1 kHz, and 48 kHz.
•For MP3 and WMA files, we recommend bit rates
higher than 128 kbps.
•For MPEG-4 AAC files, bit rates from 16 kbps to
320 kbps are supported.
•Variable bit rates (VBR) for MP3, WMA, and
MPEG-4 AAC are not supported.
• WMA Lossless encoding is not supported.
•Files with DRM (Digital Rights Management)
cannot be played.
•Only MP3, WMA, and MPEG-4 AAC files with
an .mp3/.MP3, .wma/.WMA, or .m4a file
extension, respectively, are recognized.
•Each disc may contain up to 299 folders, and each
folder may contain a combination of up to 648
files and folders. However, depending the folder
organization, not all folders and files may be
recognized and playable.
•The DRX-730 can play the following picture disc
formats: Fuji Color CD, Kodak Picture CD. It can
also play JPEG files stored on CD-R/RW discs and
USB storage devices. Some picture discs may not
be playable due to the way in which they were
recorded, etc.
•Baseline JPEG files and Exif 2.2 JPEG files with a
resolution of up to 3,072 x 2,048 are supported.
(Exif, which stands for Exchangeable Image File,
is the format used by digital cameras to store
metadata.)
•Progressive JPEG files are not supported.
•Only JPEG files with a .jpg/.JPG file extension are
recognized.
•Each disc may contain up to 299 folders, and each
folder may contain a combination of up to 648
files and folders. However, depending the folder
organization, not all folders and files may be
recognized and playable.
DivX
®
media technology was developed by DivX,
Inc. It uses compression to fit movies and video
content onto CD and DVD discs at high quality. It
supports interactive features such as menus, subtitles,
and multiple language soundtracks. Like DVD-Video,
individual DivX
®
files are referred to as titles.
The DRX-730 can play DivX
®
files stored on the
recordable CD and DVD media listed in “Recordable
disc compatibility” on page 57. When naming DivX
®
files prior to burning to disc, be aware that DivX
®
files stored on a disc are played in alphabetical order.
•The DRX-730 is an official DivX
®
Ultra Certified
product and can play all versions of DivX
®
video
(including DivX
®
6) with enhanced playback of
DivX
®
media files and the DivX
®
Media Format.
•The DRX-730 can play DivX
®
files stored on
CD-R/RW discs and CD-ROM discs, but not USB
storage devices.
•Only DivX
®
encoded files with a .avi or .divx file
extension are recognized.
■ Using external subtitle files
DivX
®
movies use special files called external subtitle
files for displaying subtitles. The font sets listed below
are available for use with external subtitle files. Use
the Subtitle Language setting on page 54 to select the
font/language that matches the external subtitle file.
Discs made on a computer
MP3, WMA, and MPEG-4 AAC files
JPEG files
About DivX
®

Appendix
59 En
English
Appendix
The DRX-730 supports the following language
groups:
Notes:
•Some external subtitle files may not display
correctly, and some may not display at all.
•Only external subtitle files with a .srt, .sub, .ssa, or
.smi file extension are recognized. (Note that
these files are not displayed by Disc Navigator.)
•The file name of the external subtitle file must
start with the file name of its associated movie file.
•A single movie may have up to 10 external subtitle
files.
WMV, which stands for Windows Media Video, is a
video compression technology developed by
Microsoft Corporation. Video content can be
encoded in WMV format by using the Windows
Media Encoder.
•The DRX-730 supports WMV9 files that were
encoded with the Windows Encoder 9 Series.
•The DRX-730 can play WMV files stored on
CD-R/RW discs, but not USB storage devices.
•Only WMV9 files with a .wmv file extension are
recognized.
•Video resolutions up to 720 x 480 or 720 x 576 are
supported.
•The maximum average bit rate is about 2–3 Mbps.
(The maximum bit rate depends on the encoding
conditions.)
•Advanced Profile is not supported.
•Files with DRM (Digital Rights Management)
cannot be played.
AAC, which stands for Advanced Audio Coding, is the
audio compression technology used for MPEG-2 and
MPEG-4. The actual format of the data and file
extension depends on the application used to make
the AAC file.
•The DRX-730 can play AAC files made with
iTunes that have a .m4a file extension.
•Files with DRM (Digital Rights Management)
cannot be played, and files encoded with some
version of iTunes may not play.
WMA, which stands for Windows Media Audio, is an
audio compression technology developed by
Microsoft Corporation. Audio content can be
encoded in WMA format by using the Windows
Media Player version 7.1.1, Windows Media Player
for Windows XP, or Windows Media Player 9 Series.
•The DRX-730 can play WMA files.
•Use only applications that have been certified
with Microsoft Corporation to encode WMA
files. If you use an application that is not certified,
the resultant files may not play properly.
DVD players and DVD-Video discs are assigned a
region number based on the country or region in
which they are sold. DVD player’s can only play discs
with the same region number. Discs with a different
region number cannot be played.
The region number for the DRX-730 can be found on
its rear panel. The DRX-730 can only play discs with
the same region number or those marked ALL. If you
attempt to play a DVD-Video disc with a different
region number, the message “Incompatible disc
region number, Can’t play disc” will be displayed.
Group 1
Albanian (sq), Basque (eu), Catalan
(ca), Danish (da), Dutch (nl),
English (en), Faroese (fo), Finnish
(fi), French (fr), German (de),
Icelandic (is), Irish (ga), Italian (it),
Norwegian (no), Portuguese (pt),
Rhaeto-Romanic (rm), Scottish
(gd), Spanish (es), Swedish (sv)
Group 2
Albanian (sq), Croatian (hr), Czech
(cs), Hungarian (hu), Polish (pl),
Romanian (ro), Slovak (sk),
Slovenian (sl)
Group 3
Bulgarian (bg), Byelorussian (be),
Macedonian (mk), Russian (ru),
Serbian (sr), Ukrainian (uk)
Group 4 Hebrew (iw), Yiddish (ji)
Group 5 Tur ki sh (tr)
About WMV
About MPEG-4 AAC
About WMA
DVD-Video regions

Appendix
60 En
Always keep discs in their cases and store them
vertically in a place that’s not subject to extreme
temperatures, extreme humidity, or direct sunlight.
Always read the precautions supplied with the discs.
•Always hold discs by the edge to protect them
against fingerprints, scratches, and dirt.
•Discs with fingerprints, scratches, or dirt may not
play properly. In such cases, using a soft, dry
cleaning cloth, wipe the disc from the center
outward in straight lines. Do not wipe the disc in a
circular motion, as this may damage it. Never use
a dirty cleaning cloth.
•For very dirty discs, try using a soft, damp cloth,
and be sure to dry the disc afterward. Never use
benzine, thinner, or other cleaning agents, such as
those designed for cleaning vinyl records.
•Do not load badly damaged, cracked, or warped
discs into the DRX-730, as they may damage it.
•Do not affix stickers or labels to discs, as they may
cause the disc to warp and become unplayable.
Rental discs often have stickers or labels attached.
Make sure there’s no glue jutting out from behind
the label before playing such discs.
•Do not load more than one disc in the DRX-730
at a time.
•For more details on disc handling, refer to the
precautions supplied with the disc.
The DRX-730 cannot play discs with a special shape,
such as heart and hexagonal-shaped discs. Such discs
may cause a malfunction, so do not load them.
If dirt or dust collects on the DRX-730’s pickup lens,
the sound may jump or the picture may be disturbed.
In such cases, contact your Yamaha dealer. Do not use
commercially available pickup lens cleaners, as they
may damage the lens.
Looking after discs
Storing discs
Handling discs
About specially shaped discs
Cleaning the pickup lens

Appendix
61 En
English
Appendix
•Place the DRX-730 on a stable surface close to
your TV and the other AV components that you
intend to use with it.
•Do not place anything on top of the DRX-730.
•Do not place the DRX-730 on top of your TV.
And keep it away from components that are
sensitive to magnetism, such as video recorders.
•Do not place the DRX-730 on top of a power
amplifier or any other heat producing
component. If you install the DRX-730 in a rack,
place the amp or other heat producing
component on the bottom shelf to keep it as far
away as possible from the DRX-730.
Avoid locations that are...
•Subject to direct sunlight
•Very humid or poorly ventilated
•Subject to extreme temperatures
•Subject to vibration
•Very dusty
•Subject to smoke, steam, or hot temperatures,
such as a kitchen
Before you move the DRX-730, eject the disc if
loaded, close the disc tray, and press STANDBY/ON
to set it to standby. When the “STANDBY” message
has disappeared, disconnect the power cable from the
AC wall outlet.
Note:
•Disconnecting the power cable before the
“STANDBY” message has disappeared may reset
the DRX-730 to its factory defaults.
•Moving the DRX-730 with a disc inside may cause
damage.
You can reset the DRX-730 to its factory defaults.
1 Set the DRX-730 to standby.
2 While holding down Stop ( ) on the
DRX-730’s front panel, press STANDBY/ON,
keeping Stop ( ) pressed until “DVD — NO
REQ.” appears on the display.
3 Press Play/Pause ( / ) repeatedly to select
“DVD—INIT.”
If you change your mind at this point, select
“DVD — NO REQ.” instead.
4 Press STANDBY/ON.
The DRX-730 is reset to its factory defaults and
goes on standby. Press STANDBY/ON again to
turn the DRX-730 back on.
The TV Screen, HDMI Resolution, and other
settings will be set to their factory defaults. The
HDMI Audio setting will be set to off.
Looking after the DRX-730
Installation
Moving the DRX-730
Resetting the DRX-730
STANDBY/ON
USB PORTABLE PHONES
INPUT
VOLUME
TIMER
HDMI
PROGRESSIVE
Stop ( )
Play/Pause ( )
STANDBY/ON

Appendix
62 En
■ Language (abbreviation), code number
■ Language, code number, abbreviation
Language, country, and region lists
Language list
Japanese (ja), 1001 Bhutani (dz), 0426 Kirghiz (ky), 1125 Sinhalese (si), 1909
English (en), 0514 Esperanto (eo), 0515 Latin (la), 1201 Slovak (sk), 1911
French (fr), 0618 Estonian (et), 0520 Lingala (ln), 1214 Slovenian (sl), 1912
German (de), 0405 Basque (eu), 0521 Laothian (lo), 1215 Samoan (sm), 1913
Italian (it), 0920 Persian (fa), 0601 Lithuanian (lt), 1220 Shona (sn), 1914
Spanish (es), 0519 Finnish (fi), 0609 Latvian (lv), 1222 Somali (so), 1915
Chinese (zh), 2608 Fiji (fj), 0610 Malagasy (mg), 1307 Albanian (sq), 1917
Dutch (nl), 1412 Faroese (fo), 0615 Maori (mi), 1309 Serbian (sr), 1918
Portuguese (pt), 1620 Frisian (fy), 0625 Macedonian (mk), 1311 Siswati (ss), 1919
Swedish (sv), 1922 Irish (ga), 0701 Malayalam (ml), 1312 Sesotho (st), 1920
Russian (ru), 1821 Scots-Gaelic (gd), 0704 Mongolian (mn), 1314 Sundanese (su), 1921
Korean (ko), 1115 Galician (gl), 0712 Moldavian (mo), 1315 Swahili (sw), 1923
Greek (el), 0512 Guarani (gn), 0714 Marathi (mr), 1318 Tamil (ta), 2001
Afar (aa), 0101 Gujarati (gu), 0721 Malay (ms), 1319 Telugu (te), 2005
Abkhazian (ab), 0102 Hausa (ha), 0801 Maltese (mt), 1320 Tajik (tg), 2007
Afrikaans (af), 0106 Hindi (hi), 0809 Burmese (my), 1325 Thai (th), 2008
Amharic (am), 0113 Croatian (hr), 0818 Nauru (na), 1401 Tigrinya (ti), 2009
Arabic (ar), 0118 Hungarian (hu), 0821 Nepali (ne), 1405 Turkmen (tk), 2011
Assamese (as), 0119 Armenian (hy), 0825 Norwegian (no), 1415 Tagalog (tl), 2012
Aymara (ay), 0125 Interlingua (ia), 0901 Occitan (oc), 1503 Setswana (tn), 2014
Azerbaijani (az), 0126 Interlingue (ie), 0905 Oromo (om), 1513 Tonga (to), 2015
Bashkir (ba), 0201 Inupiak (ik), 0911 Oriya (or), 1518 Turkish (tr), 2018
Byelorussian (be), 0205 Indonesian (in), 0914 Panjabi (pa), 1601 Tsonga (ts), 2019
Bulgarian (bg), 0207 Icelandic (is), 0919 Polish (pl), 1612 Tatar (tt), 2020
Bihari (bh), 0208 Hebrew (iw), 0923 Pashto, Pushto (ps), 1619 Twi (tw), 2023
Bislama (bi), 0209 Yiddish (ji), 1009 Quechua (qu), 1721 Ukrainian (uk), 2111
Bengali (bn), 0214 Javanese (jw), 1023 Rhaeto-Romance (rm), 1813 Urdu (ur), 2118
Tibetan (bo), 0215 Georgian (ka), 1101 Kirundi (rn), 1814 Uzbek (uz), 2126
Breton (br), 0218 Kazakh (kk), 1111 Romanian (ro), 1815 Vietnamese (vi), 2209
Catalan (ca), 0301 Greenlandic (kl), 1112 Kinyarwanda (rw), 1823 Volapük (vo), 2215
Corsican (co), 0315 Cambodian (km), 1113 Sanskrit (sa), 1901 Volof (wo), 2315
Czech (cs), 0319 Kannada (kn), 1114 Sindhi (sd), 1904 Xhosa (xh), 2408
Welsh (cy), 0325 Kashmiri (ks), 1119 Sangho (sg), 1907 Yoruba (yo), 2515
Danish (da), 0401 Kurdish (ku), 1121 Serbo-Croatian (sh), 1908 Zulu (zu), 2621
Country and region list
Argentina, 0118, ar Finland, 0609, fi Malaysia, 1325, my Singapore, 1907, sg
Australia, 0121, au France, 0618, fr Mexico, 1324, mx Spain, 0519, es
Austria, 0120, at Germany, 0405, de Netherlands, 1412, nl Sweden, 1905, se
Belgium, 0205, be Hong Kong, 0811, hk New Zealand, 1426, nz Switzerland, 0308, ch
Brazil, 0218, br India, 0914, in Norway, 1415, no Taiwan, 2023, tw
Canada, 0301, ca Indonesia, 0904, id Pakistan, 1611, pk Thailand, 2008, th
Chile, 0312, cl Italy, 0920, it Philippines, 1608, ph United Kingdom, 0702, gb
China, 0314, cn Japan, 1016, jp Portugal, 1620, pt USA, 2119, us
Denmark, 0411, dk Korea, Republic of, 1118, kr Russian Federation, 1821, ru

Appendix
63 En
English
Appendix
If you experience any issues while using the DRX-730, look them up in the following tables and try the suggested
solution. If an issue is not listed, or you cannot resolve it yourself, contact your Yamaha dealer.
Troubleshooting
General
Issue Possible cause Solution
The DRX-730 turns off as soon
as it’s turned on.
The power cable may not be
connected properly.
Make sure the power cable is
connected to the AC wall outlet
properly.
A speaker cable may be shorting. Make sure the speaker cables are
connected properly (see page 9).
The DRX-730 may have been
subjected to a strong electrical
shock, such as lightning or
excessive static electricity.
Set the DRX-730 to standby, and
then disconnect the power cable.
Wai t 30 seconds, reconnect the
power cable, and turn it back on
again.
The speakers produce no
sound.
The volume is set to minimum. Increase the volume (see page 17).
The sound is muted. Unmute the sound (see page 17
The wrong input source is selected. Select the correct input source (see
page 16).
The speaker cables are connected
incorrectly.
Check the speaker cable
connections (see page 9).
The loaded disc is not supported. Use only supported disc formats
(see page 57).
There’s no TV picture. The TV cables are connected
incorrectly.
Check the TV cable connections
(see page 12).
If the COMPONENT VIDEO OUT
and HDMI connections are used
simultaneously, the COMPONENT
VIDEO OUT jacks may output
progressive video regardless of the
Component Out setting.
Disconnect the HDMI component,
or connect a TV that supports
progressive video to the
COMPONENT VIDEO OUT jacks
(see page 12).
The TV picture is not displayed
correctly.
The Video Output settings are
incorrect.
Check the Video Output settings
and correct as necessary (see
page 53).
The Component Out setting is set
to Progressive, but the TV
connected to the COMPONENT
VIDEO OUT does not support
progressive scanning.
Change the Component Out
setting to Interlace (see page 53).
The TV connected to the HDMI
jack does not support the selected
resolution.
Change the HDMI Resolution
setting to a resolution supported by
the HDMI TV (see page 53).
The message “HDMI ERROR” is
displayed or there’s no picture
on the HDMI TV.
The wrong HDMI resolution is
selected or an HDMI error has
occurred.
Check the HDMI Resolution
setting and correct as necessary
(see page 53).
Reset the HDMI settings (see
page 53).

Appendix
64 En
The DRX-730 turned off
unexpectedly.
The sleep timer was set. Turn the DRX-730 back on again.
The Auto Standby function
automatically set the DRX-730 to
standby.
Check the Auto Standby setting
(see page 22).
One speaker is quieter than the
other.
The cables are connected
incorrectly.
Check the cable connections (see
page 9).
The volume can’t be increased
or the sound is distorted.
The component connected to the
DRX-730’s AUX OUT jacks is
turned off.
Turn the component on.
Certain input sources can’t be
recorded.
The OPTICAL DIGITAL OUT
does not output signals from the
radio, DOCK, AUX IN, or
PORTABLE jacks.
To record from these sources,
connect the DRX-730’s AUX OUT
jacks to the analog audio input on
your recording component (see
page 49).
The DRX-730 doesn’t work
properly.
The DRX-730 may have been
subjected to a strong electrical
shock, such as lightning or
excessive static electricity, or there’s
been a drop in the power supply.
Set the DRX-730 to standby, and
then disconnect the power cable.
Wai t 30 seconds, reconnect the
power cable, and turn it back on
again.
A digital or high-frequency
device close by emits noise.
The device may be too close to the
DRX-730.
Move the device away from the
DRX-730.
The clock is wrong. The power has been disconnected
for more than 5 minutes (power
cable disconnected from the AC
wall outlet or a power outage).
Connect the DRX-730 to an AC
wall outlet, and then set the clock
(see page 21).
Issue Possible cause Solution
Remote control
Issue Possible cause Solution
The remote control doesn’t
work.
The remote control is outside its
operating range.
Use the remote control within its
operating range (see page 8).
The DRX-730’s remote control
sensor is subject to direct sunlight
or inverter-type fluorescent
lighting.
Change the lighting or move
theDRX-730.
The wrong input source is selected.
Some buttons perform different
operations depending on which
input source is selected (see
page 6).
Select the correct input source (see
page 16).
The batteries have run out and
need replacing.
Replace both batteries with new
ones (see page 8).

Appendix
65 En
English
Appendix
Playing discs
Issue Possible cause Solution
Some functions don’t work. Not all discs support all of the
DRX-730’s disc playback functions.
Try another disc.
Playback won’t start, the
picture or sound is noisy, or
playback stops unexpectedly.
The disc is not properly set on the
disc tray.
Place the disc, label-side up, in the
center of the disc tray (see page 23).
The disc is dirty. Check the disc and clean as
necessary (see page 60).
The loaded disc is not supported. Use only supported disc formats
(see page 57).
Condensation on the pickup lens.
When the DRX-730 is moved from
a cold environment to a warm one,
condensation may form on the
pickup lens.
Wait for one to two hours for the
condensation to evaporate, then try
again.
When a DVD-Video disc is
loaded, the same message
keeps appearing and the disc’s
menu or content cannot be
accessed.
The Resume or Last Memory
function is working.
Press Stop ( ) twice to cancel the
Resume function.
Reset the DRX-730 to delete the
stored Resume data (see page 61).
Can’t select foreign language
soundtracks or subtitles.
The loaded disc does not contain
foreign language soundtracks or
subtitles.
See the disc’s packaging for details
on foreign language soundtracks
and subtitles.
Operation is restricted by the disc. Use the disc’s menu to select foreign
language soundtracks and subtitles.
Subtitles are not displayed. Subtitles are turned off. Select a subtitle (see page 27).
The loaded disc does not contain
subtitles.
See the disc’s packaging for details
on subtitles.
When using A–B repeat playback,
subtitles outside of the specified
section may not be displayed.
Turn off A–B repeat playback (see
page 29).
Can’t select camera angles. The loaded disc does not contain
multiple camera angles.
See the disc’s packaging for details
on multiple camera angles.
Can’t play some files. Only MP3, WMA, MPEG-4 AAC,
and JPEG files with no copy
protection (DRM) can be played.
Use files with no copy protection.
The file format is not supported. Use only supported file formats
(see pages 58 and 59).
Can’t record a DVD. The DVD is copy protected. Most DVD-Video discs are copy
protected and cannot be recorded.
The TV picture is disturbed. The picture may be disturbed while
rewinding or fast forwarding.
This is not a malfunction.
The picture is stretched or black
bars are displayed.
The TV Screen setting is set
incorrectly.
Check the TV Screen setting and
change as necessary (see page 53).
Ghosting appears in some areas
of the picture.
The video material is incompatible
with the Progressive Scanning
function due to the way in which it
was edited or the type of material it
is.
Change the Component Out
setting to Interlace (see page 53).

Appendix
66 En
The disc ejected as soon as it
was loaded.
The loaded disc is not supported. Use only supported disc formats
(see page 57).
The message “No Disc” is
displayed even though a disc is
loaded.
The disc is not properly set on the
disc tray.
Place the disc, label-side up, in the
center of the disc tray (see page 23).
Can’t display the Setup, Initial
Settings, or Video Adjust menu.
These menus can be displayed only
when the DVD input source is
selected.
Select the DVD input source (see
page 16).
Issue Possible cause Solution

Appendix
67 En
English
Appendix
■ FM/AM
■ FM
■ AM
Tuner
Issue Possible cause Solution
Cannot select radio presets. The presets have been deleted. Preset the radio stations again (see
page 38).
The presets have been deleted. The DRX-730 has been
disconnected from the AC wall
outlet for more than a week.
Make sure the power cable is
connected properly, and then
preset the radio stations again (see
page 38).
Issue Possible cause Solution
Reception is noisy. The FM antenna is not connected
properly.
Make sure the FM antenna is
connected properly (see page 11).
The signal from the tuned FM
station is weak, or reception of that
station in your area is poor.
Reduce the noise by switching to
Manual Tuning mode (see
page 37), or connect an outdoor
FM antenna (sold separately).
Consult an qualified antenna
installer in your area for more
details.
Reception is poor (sound is
distorted) even with an outdoor
FM antenna.
Multipath interference due to the
FM signal being reflected off
mountains, tall buildings, or other
obstacles.
Adjust the FM antenna’s height,
direction, or location.
Auto Tuning can’t locate certain
radio stations.
The signal from the FM station is
weak, or reception of that station in
your area is poor.
Try switching to Manual Tuning
mode (see page 37), or connect an
outdoor FM antenna (sold
separately). Consult an qualified
antenna installer in your area for
more details.
Issue Possible cause Solution
Reception is very noisy. Atmospheric interference or
lightning, or the DRX-730 is
picking up noise from fluorescent
lighting, motors, or electrical
appliances with a thermostat.
It can be difficult to completely
eliminate this type of noise.
However, it can sometimes be
reduced by connecting an outdoor
AM antenna or by grounding the
antenna (see page 11).
The AM indoor antenna is too
close to the DRX-730.
Move the antenna away from the
DRX-730, or try adjusting the
direction of the antenna.
The DRX-730 is too close to the
TV, particularly if the noise occurs
in the evening.
Move the DRX-730 away from the
TV.
Auto Tuning can’t locate certain
radio stations.
The AM loop antenna is not
connected properly.
Make sure the AM loop antenna is
connected properly (see page 11).
The signal from the tuned AM
station is weak, or reception of that
station in your area is poor.
Try switching to Manual Tuning
mode (see page 37).

Appendix
68 En
Timer
Issue Possible cause Solution
Can’t set the timer. The clock has not yet been set. Set the clock (see page 21).
The timer didn’t work. The on and off times are set to the
same time.
Set the on and off times correctly
(see page 41).
iPod playback
Issue Possible cause Solution
iPod playback doesn’t work. The iPod is not seated in the
Ya m a h a iPod universal dock
properly.
Make sure the iPod is seated in the
Ya m a h a iPod universal dock
properly (see page 43).
The dock cable is not connected to
the Yamaha iPod universal dock or
DRX-730 properly.
Check the dock cable connections
and correct as necessary (see
page 43).
Some iPod functions don’t work
as expected.
Depending on your iPod model
and its firmware version, some iPod
functions may not work as
expected, and some may not work
at all.
Make sure your iPod has the latest
firmware installed. See the Apple
Web site for details.
When playing a video on an
iPod, video playback does not
appear on the iPod’s display.
The iPod is set to display video on a
TV.
With the iPod seated in the Yamaha
iPod universal dock, set the iPod’s
TV Out setting to Off.
The message “Unknown iPod” is
displayed.
The iPod is not supported. Use only supported iPod models
(see page 43).
The message “Disconnected” is
displayed.
There’s no iPod in the Yamaha iPod
universal dock.
Insert your iPod into the Yamaha
iPod universal dock (see page 43).
USB storage device playback
Issue Possible cause Solution
Can’t play content stored on a
USB mass storage device.
Not all USB storage devices are
recognized by the DRX-730.
Try another USB storage device.
Only USB storage devices
formatted with FAT16 or FAT32
are supported.
Reformat the USB storage device
with FAT16 or FAT32.
The USB storage device is
connected to a USB hub, but the
DRX-730 does not support USB
hubs.
Connect the USB storage device
directly to the DRX-730’s USB port.
Can’t play some files. Only MP3, WMA, MPEG-4 AAC,
and JPEG files with no copy
protection (DRM) can be played.
Use files with no copy protection.
The file format is not supported. Use only supported file formats
(see pages 58 and 59).

Appendix
69 En
English
Appendix
The message “NO USB” or “USB
ERROR” is displayed.
The USB device is not compatible,
or the DRX-730 cannot supply
enough power to the device for it to
function properly.
Turn the DRX-730 off and on
again.
Set the DRX-730 to standby,
disconnect the USB storage device,
and then reconnect it.
Select the USB input source, and
then connect the USB device.
Select a different input source and
select USB again.
If the USB storage device came with
its own power adapter, use it to
power the USB storage device while
it’s connected to the DRX-730.
If the message still appears, the USB
storage device is probably
incompatible with the DRX-730.
Issue Possible cause Solution
Bluetooth playback
Issue Possible cause Solution
Can’t connect to a Bluetooth-
compatible music player or
mobile phone.
The dock cable is not connected to
the Yamaha YBA-10 or DRX-730
properly.
Check the dock cable connections
and correct as necessary (see
page 47).
The Bluetooth device doesn’t
support A2DP or AVRCP.
Use a Bluetooth device that
supports A2DP or AVRCP.
The Bluetooth device is too far
away from the Yamaha YBA-10.
Make sure the Bluetooth device is
in line of sight of the Yamaha
YBA-10 and within 10 meters
(33 ft.).
There’s an obstacle between the
Bluetooth device and the Yamaha
YBA-10.
A device close by is transmitting at
2.4 GHz (e.g., a microwave oven or
wireless network device).
Move the Yamaha YBA-10 away
from the device.
Pairing has not been performed. Pair the Bluetooth device with the
DRX-730 (see page 47).
The Bluetooth functionality on the
Bluetooth device is disabled.
Make sure Bluetooth functionality
is enabled on the Bluetooth device.
Some functions don’t work as
expected.
Depending on your Bluetooth
device and its firmware version,
some functions may not work as
expected, and some may not work
at all.
Use a compatible Bluetooth device.
The message “Not found” is
displayed.
The last Bluetooth device used with
the DRX-730 cannot be found.
Make sure the Bluetooth device is
discoverable and within range (see
page 47).
The message “Not Available” is
displayed.
You cannot pair the Yamaha
YBA-10 with a new Bluetooth
device while it’s already connected
to another device.
Disconnect the currently
connected device before pairing
with the new device.

Appendix
70 En
Amplifier section
•Minimum RMS output power per channel (20 kHz Factory LPF)
(6 Ω, 1 kHz, 0.9% THD)......................................... 20 W + 20 W
•Maximum RMS output power per channel (20 kHz Factory LPF)
(6 Ω, 1 kHz, 10% THD).......................................... 30 W + 30 W
•Total harmonic distortion
AUX, PORTABLE (20 kHz–LPF, 1 kHz, 1 W) . less than 0.05%
•Input sensitivity/impedance
AUX, PORTABLE (1 kHz, 20 W).........................400 mV/47 kΩ
•Frequency response
AUX, PORTABLE.....................................10 Hz to 22 kHz ±3 dB
•Signal to noise ratio
(AUX, PORTABLE, IHF-A input shorted)........more than 95 dB
Tuner section
■ FM section
•Tuning range
U.S.A. and Canada models........................................87.5 to 107.9
Taiwan and Asia models............... 87.5 to 107.9 or 87.5 to 108.0
Other models ................................................... 87.5 to 108.0 MHz
•Signal to noise ratio (mono) ...................................................75 dB
•Sensitivity (S/N 30 dB) .......................................................... 1.0 µV
■ AM section
•Tuning range
U.S.A. and Canada models................................. 530 to 1710 kHz
Taiwan and Asia models...530 to 1710 kHz or 531 to 1611 kHz
Other models ....................................................... 531 to 1611 kHz
•Signal to noise ratio..................................................................32 dB
•Sensitivity (S/N 20 dB) ......................................................... 700 µV
DVD section
•AUX OUT
Output level (1 kHz 0 dB) .............................................2 V (±0.3)
Signal to noise ratio.......................................... more than 100 dB
Dynamic range (48 kHz, 24 bit) ........................more than 95 dB
Total harmonic distortion ..................................less than 0.005%
Frequency response
CD-DA/VIDEO CD .........................................10 Hz–20 kHz
DVD (48 kHz)...................................................10 Hz–22 kHz
DVD (96 kHz)...................................................10 Hz–44 kHz
•Video output
Composite.....................................................................1 Vp-p/75Ω
Component............................................................1 Vp-p/75Ω (Y)
0.7 Vp-p/75 Ω (P
B, PR)
•RGB (SCART)......................................................................0.7 Vp-p
Audio format
•Dolby Digital, DTS, MPEG decoding
• PCM DATA: 16 bit
• LPCM DATA: 20/24 bit
Fs: 44.1, 48 kHz, 88.2/96 kHz downmix support
General
•Power supply
U.S.A. and Canada models.................................AC 120 V, 60 Hz
Australia model....................................................AC 240 V, 50 Hz
U.K., Europe, and Russia models.......................AC 230 V, 50 Hz
Korea model.........................................................AC 220 V, 60 Hz
Asia model..............................................AC 220–240 V, 50/60 Hz
China model.........................................................AC 220 V, 50 Hz
Taiwan model.......................................................AC 110 V, 60 Hz
•Power consumption ................................................................. 30 W
•Standby power consumption.................................... less than 1 W
•Laser pickup
Type............................................... Semiconductor laser AlGaInP
Wavelength......................... 655 nm (DVD), 790 nm (VCD/CD)
Output power..........................5 mW (DVD), 7 mW (VCD/CD)
•Dimensions (W x H x D)...............................215 x 113 x 300 mm
(8.46 x 4.45 x 11.81 in.)
•Weight....................................................................................... 2.9 kg
(6.4 lbs.)
•Operating Temperature Range.................. 5 to 35ºC (41 to 95ºF)
•Operating Humidity Range ..............5 to 90% (no condensation)
Specifications are subject to change without notice.
Specifications

i
Es
1.
Para asegurar el mejor rendimiento de este aparato, lea
atentamente este manual. Y luego guárdelo en un lugar
seguro para poder consultarlo en el futuro en caso de ser
necesario.
2.
Instale este sistema de sonido en un lugar bien ventilado,
fresco, seco y limpio, alejado de la luz solar directa, fuentes
de calor, vibración, polvo, humedad y/o frío. Deje un
espacio de ventilación de 10 cm como mínimo en la parte
superior de la unidad, 10 cm por los lados derecho e
izquierdo y 10 cm por la parte trasera.
3.
Coloque este aparato lejos de otros aparatos eléctricos,
motores o transformadores, para evitar así los ruidos de
zumbido.
4.
No exponga este aparato a cambios bruscos de
temperaturas, del frío al calor, ni lo coloque en lugares muy
húmedos (una habitación con deshumidificador, por
ejemplo), para impedir así que se forme condensación en su
interior, lo que podría causar una descarga eléctrica, un
incendio, daños en el aparato y/o lesiones a las personas.
5.
Evite instalar este aparato en un lugar donde puedan caerle
encima objetos extraños o donde quede expuesto al goteo o
a la salpicadura de líquidos. Encima de este aparato no
ponga:
—
Otros componentes, porque pueden causar daños y/o
decoloración en la superficie de este aparato.
—Objetos con fuego (velas, por ejemplo), porque pueden
causar un incendio, daños en el aparato y/o lesiones a
las personas.
—Recipientes con líquidos, porque pueden caerse y
derramar el líquido, causando descargas eléctricas al
usuario y/o dañando el aparato.
6.
No tape este aparato con un periódico, mantel, cortina, etc.
para no impedir el escape del calor. Si aumenta la
temperatura en el interior del aparato, esto puede causar un
incendio, daños en el aparato y/o lesiones a las personas.
7.
No enchufe este aparato a una toma de corriente hasta
después de haber terminado todas las conexiones.
8.
No ponga el aparato al revés. Podría recalentarse y
posiblemente causar daños.
9.
No utilice una fuerza excesiva con los conmutadores, los
controles y/o los cables.
10.
Cuando desconecte el cable de la alimentación de la toma de
corriente, sujete la clavija y tire de ella; no tire del propio cable.
11.
No limpie este aparato con disolventes químicos porque
podría estropear el acabado.
12.
Utilice solamente la tensión especificada en este aparato.
Utilizar el aparato con una tensión superior a la especificada
resulta peligroso y puede producir un incendio, daños en el
aparato y/o lesiones a las personas. Yamaha no se hará
responsable de ningún daño debido al uso de este aparato
con una tensión diferente de la especificada.
13.
Para evitar daños debidos a rayos, durante una tormenta
eléctrica, mantenga el cable de alimentación desconectado
de la toma de corriente de la pared o de la unidad.
14.
No intente modificar ni arreglar este aparato. Póngase en
contacto con el personal de servicio Yamaha cualificado
cuando necesite realizar alguna reparación. La caja no
deberá abrirse nunca por ninguna razón.
15.
Cuando no piense utilizar este aparato durante mucho
tiempo
(es decir, cuando se ausente de casa por vacaciones, etc.)
desconecte el cable de alimentación de la toma de corriente.
16.
Instale esta unidad cerca de la toma de CA y donde se pueda
alcanzar fácilmente la clavija de alimentación de CA.
17.
Asegúrese de leer la sección “Solución de problemas” del
manual del usuario sobre los errores comunes de operación
antes de dar por concluido que su aparato está averiado.
18.
Antes de trasladar esta unidad, pulse STANDBY/ON para
ponerlo en el modo de espera, y luego desconecte el cable de
alimentación de CA de la toma de corriente.
19.
Las pilas no deberán exponerse a un calor excesivo como,
por ejemplo, la luz solar directa, el fuego o algo similar.
20.
La presión acústica excesiva de los auriculares puede causar
pérdida auditiva.
■
PELIGRO
Esta unidad emite radiación láser visible cuando se abre. Evite la
exposición directa a los rayos láser. Cuando se conecte esta
unidad a una toma de corriente no acerque sus ojos a la
abertura de la bandeja del disco ni a otras aberturas para mirar
al interior.
■
SEGURIDAD CONTRA LA RADIACIÓN LÁSER
Esta unidad utiliza rayos láser. Debido a la posibilidad de que se
produzcan daños en los ojos, la extracción de la cubierta de la
unidad o las reparaciones solamente deberán ser realizadas por
un técnico cualificado.
Precaución: Lea las indicaciones siguientes
antes de utilizar este aparato.
Esta unidad no se desconecta de la fuente de alimentación de
CA si está conectada a una toma de corriente, aunque la
propia unidad esté apagada. A este estado se le llama modo de
espera. En este estado, está unidad ha sido diseñada para que
consuma un cantidad de corriente muy pequeña.
El componente láser de este producto es capaz de emitir
radiación que sobrepasa el límite establecido para la clase 1.
LÁSER
Tipo Láser de semiconductor AlGaInP
Longitud de onda 655 nm (DVD)
790 nm (VCD/CD)
Potencia de salida 5 mW (DVD)
7 mW (VCD/CD)
Divergencia del rayo láser 20 grados
ADVERTENCIA
PARA REDUCIR EL RIESGO DE INCENDIO O
DESCARGA ELÉCTRICA, NO EXPONGA ESTA UNIDAD
A LA LLUVIA NI A LA HUMEDAD.
PRECAUCIÓN
Peligro de explosión si la pila se sustituye incorrectamente.
Sustitúyala por otra del mismo tipo o de un tipo equivalente.

ii
Es
Español
■
Avisos legales
Este producto incorpora tecnología de protección del copyright
que está protegida por patentes de los EE.UU. y otros derechos
de propiedad intelectual. La utilización de esta tecnología de
protección del copyright debe estar autorizada por Macrovision
y está pensada sólo para uso doméstico y para fines de
visualización limitados sólo bajo el consentimiento de
Macrovision. Quedan prohibidas la ingeniería inversa así como
su desmontaje.
■
iPod™
“Ap p le”, “ iPo d” y “iTunes” son marcas comerciales de Apple Inc.,
registradas en los EE.UU. y otros países.
Bluetooth es una marca comercial registrada de Bluetooth SIG y
la utiliza Yamaha de acuerdo con un acuerdo de licencia.
■
Memoria de seguridad
Si el cable de alimentación se desconecta de la toma de CA, el
DRX-730 guardará las presintonías de radio y otros ajustes
durante al menos 1 semana.
■
Acerca de este manual
A no ser que se indique lo contrario, las instrucciones en este
manual como “pulse ENTER” se refieren a los botones del
control remoto.
Las instrucciones y los procedimientos en este manual asumen
que el DRX-730 está activado.
Este manual se imprimió antes de producirse el DRX-730.
Según nuestra política de mejora continuada, el diseño y las
especificaciones están sujetos a cambio. En el caso poco
probable de que este manual de instrucciones esté en
desacuerdo con el funcionamiento real del DRX-730, el
DRX-730 se considerará correcto.
■
Manejo del mando a distancia
•En el área entre el mando a distancia y esta unidad no deberá
haber obstáculos.
•No derrame agua u otros líquidos en el mando a distancia.
•No deje caer el mando a distancia.
•No deje ni guarde el mando a distancia en las condiciones
siguientes:
—lugares de humedad alta como, por ejemplo, cerca de un
baño
—lugares de alta temperatura como, por ejemplo, cerca de
una calefacción o estufa
—lugares con temperaturas demasiado bajas
—lugares polvorientos
•No exponga el sensor del mando a distancia a una luz
intensa, y en particular a una lámpara fluorescente tipo
inversor, o el mando a distancia no funcionará bien. Si es
necesario, aleje esta unidad de la luz directa.
■
Notas acerca de las pilas
•Cambie todas las pilas si nota que el margen de control del
mando a distancia se reduce.
•Use pilas AA, R6, UM-3.
•Asegúrese de que las polaridades estén bien puestas. Vea la
ilustración del interior del compartimiento de las pilas.
•Quite las pilas si no va a usar el mando a distancia durante
mucho tiempo.
•No utilice pilas viejas y nuevas juntas.
•No utilice juntas pilas de tipos diferentes (alcalinas y de
manganeso, por ejemplo). Lea las indicaciones de las pilas
con atención porque hay tipos diferentes que pueden tener la
misma forma y color.
•Si las pilas tienen fugas, tírelas inmediatamente. Evite tocar el
material que sale de las pilas o dejar que éste entre en
contacto con ropas, etc. Limpie a fondo el compartimiento de
las pilas antes de instalar otras nuevas.
•No tire las pilas con la basura de casa; disponga
correctamente de ellas según los reglamentos de su localidad.

iii
Es
DivX, DivX Ultra Certified y logotipos asociados son marcas
comerciales de DivX, Inc. y se utilizan bajo licencia.
Fabricado bajo licencia de Dolby Laboratories. Dolby y el
símbolo de la doble D son marcas comerciales de Dolby
Laboratories.
Fabricado bajo la licencia bajo los números de patente de los
EE.UU.: 5,451,942; 5,956,674; 5,974,380; 5,978,762; 6,487,535 y
otras patentes de los EE.UU. e internacionales emitidas y
pendientes. DTS y DTS 2.0 + Digital Out son marcas
comerciales registradas y los logotipos y el símbolo DTS son
marcas comerciales de DTS, Inc. ©1996~2007 DTS, Inc. Todos
los derechos reservados.
“HDMI”, el logotipo “HDMI” y “High-Definition Multimedia
Interface” son marcas comerciales o marcas comerciales
registradas de HDMI Licensing LLC.
La tecnología de decodificación de audio MPEG Layer-3 bajo
licencia de Fraunhofer IIS y Thomson multimedia.
Windows Media es una marca comercial registrada o una marca
comercial de Microsoft Corporation en los Estados Unidos y/u
otros países.

1
Es
1
2
3
4
5
6
7
8
9
10
Apéndice
Español
&
1 Introducción . . . . . . . . . . . . . . . . . . . . 2
Características . . . . . . . . . . . . . . . . . . . . . . . . . . . 2
Accesorios incluidos . . . . . . . . . . . . . . . . . . . . . 2
Panel frontal . . . . . . . . . . . . . . . . . . . . . . . . . . . . . 3
Pantalla . . . . . . . . . . . . . . . . . . . . . . . . . . . . . . . . . 4
Panel posterior . . . . . . . . . . . . . . . . . . . . . . . . . . 5
Control remoto . . . . . . . . . . . . . . . . . . . . . . . . . . 6
2 Primeros pasos . . . . . . . . . . . . . . . . . . 8
Instalar las baterías en el control remoto . . 8
Conectar los altavoces . . . . . . . . . . . . . . . . . . . 9
Conectar un subwoofer autoamplificado. . 10
Conectar antenas . . . . . . . . . . . . . . . . . . . . . . . 11
Conectar un televisor . . . . . . . . . . . . . . . . . . . 12
Conectar un grabador (CDR, MDR etc.) . . . 14
Conectar un receptor o decodificador AV
. . 14
Conectar el cable de alimentación . . . . . . . 15
3 Funciones generales . . . . . . . . . . . . 16
Activar el DRX-730 . . . . . . . . . . . . . . . . . . . . . . 16
Seleccionar las fuentes de entrada . . . . . . . 16
Ajustar el volumen . . . . . . . . . . . . . . . . . . . . . . 17
Enmudecer el sonido . . . . . . . . . . . . . . . . . . . 17
Ajustar los graves y los agudos . . . . . . . . . . 18
Ajustar el balance . . . . . . . . . . . . . . . . . . . . . . . 18
Modo de reproducción directo puro . . . . . 19
Utilizar auriculares . . . . . . . . . . . . . . . . . . . . . . 19
Ajustar el brillo de la pantalla . . . . . . . . . . . . 20
Utilice el temporizador sleep . . . . . . . . . . . . 20
Ajustar el reloj . . . . . . . . . . . . . . . . . . . . . . . . . . 21
Visualizar la hora . . . . . . . . . . . . . . . . . . . . . . . . 22
En espera automático . . . . . . . . . . . . . . . . . . . 22
4 Reproducir discos . . . . . . . . . . . . . . 23
Utilizar la visualización en la pantalla . . . . 23
Reproducir discos . . . . . . . . . . . . . . . . . . . . . . . 23
Reproducción en movimiento lento . . . . . 26
Reproducción fotograma a fotograma . . . 26
Seleccionar los idiomas y el audio . . . . . . . 27
Seleccionar subtítulos . . . . . . . . . . . . . . . . . . . 27
Seleccionar los ángulos de la cámara . . . . 28
Zoom . . . . . . . . . . . . . . . . . . . . . . . . . . . . . . . . . . . 28
Reproducción de repetición . . . . . . . . . . . . . 29
Reproducción repetida A–B . . . . . . . . . . . . . 29
Reproducción aleatoria . . . . . . . . . . . . . . . . . 30
Reproducción programada . . . . . . . . . . . . . . 30
Buscar discos . . . . . . . . . . . . . . . . . . . . . . . . . . . 31
Reproducir los pases de diapositivas
JPEG . . . . . . . . . . . . . . . . . . . . . . . . . . . . . . . . .32
Utilizar Disc Navigator con los discos
DVD-Video, VCD y SVCD . . . . . . . . . . . . . .33
Utilizar Disc Navigator con los discos MP3,
WMA, MPEG-4 AAC, DivX®, WMV y
JPEG . . . . . . . . . . . . . . . . . . . . . . . . . . . . . . . . .34
Visualizar información del disco . . . . . . . . . .35
Visualizar el formato de audio . . . . . . . . . . . .35
5 Utilizar el sintonizador . . . . . . . . . 36
Sintonizar emisoras de radio . . . . . . . . . . . . .36
Utilizar las presintonías . . . . . . . . . . . . . . . . . .38
6 Utilizar el temporizador . . . . . . . . 40
Ajustar la fuente de entrada . . . . . . . . . . . . .40
Ajustar la hora de activación . . . . . . . . . . . . .41
Ajustar la hora de desactivación . . . . . . . . .41
Activar y desactivar el temporizador . . . . .42
7 Reproducción de dispositivos
portátiles . . . . . . . . . . . . . . . . . . . 43
Reproducción del reproductor de música. .43
Reproducción de un iPod . . . . . . . . . . . . . . . .43
Reproducción USB . . . . . . . . . . . . . . . . . . . . . . .45
Reproducción de Bluetooth . . . . . . . . . . . . . .47
8 Grabar . . . . . . . . . . . . . . . . . . . . . . . . . 49
9 Ajustes de audio y ajuste de
vídeo . . . . . . . . . . . . . . . . . . . . . . . 50
Menú “Audio Settings” . . . . . . . . . . . . . . . . . .50
Menú “Video Adjust” . . . . . . . . . . . . . . . . . . . .51
10Ajustes iniciales . . . . . . . . . . . . . . . . 52
Menú “Initial Settings” . . . . . . . . . . . . . . . . . . .52
Apéndice . . . . . . . . . . . . . . . . . . . . . . . . . 58
Discos y formatos compatibles . . . . . . . . . . .58
Mantenimiento de los discos . . . . . . . . . . . .61
Mantenimiento del DRX-730 . . . . . . . . . . . . .62
Reajustar el DRX-730 . . . . . . . . . . . . . . . . . . . .62
Listas de idiomas, países y regiones . . . . . .63
Solucionar problemas . . . . . . . . . . . . . . . . . . .64
Especificaciones . . . . . . . . . . . . . . . . . . . . . . . . .71
Contenido

2
Es
Gracias por elegir el receptor Yamaha DRX-730
DVD. Para disfrutar al máximo de su nuevo producto
Yama ha, le a con atención este manual y guárdelo en
un lugar seguro para futuras consultas.
•Reproduce los siguientes discos: DVD-Video,
DVD-VR (discos DVD-R/RW/R DL grabados en
modo VR), VCD, SVCD, CD, DTS CD de audio
•Reproduce los siguientes archivos: MP3, WMA,
MPEG-4 AAC, JPEG, WMV
1
•Producto DivX
®
Ultra Certified oficial.
•Reproduce todas las versiones de vídeo DivX
®
(incluyendo DivX
®
6) con la reproducción
mejorada de los archivos de soporte DivX
®
y
DivX
®
Media Format.
•Salida HDMI (con conversión de resolución de
vídeo de 1080p)
•Sintonizador FM/AM con 40 presintonías
•Amplificador clase D: 30W x 2 canales en 6Ω
•Modo de reproducción directo puro en alta
fidelidad
•Jack mini del panel frontal para una reproducción
rápida y fácil desde reproductores de música
portátiles.
•Puerto USB en el panel frontal para una
reproducción rápida y fácil desde dispositivos de
almacenamiento USB.
•Jack DOCK para conexión a una base Dock
universal para iPod de Yamaha opcional que
permite escuchar la música del iPod en alta
calidad. Y puede controlar el iPod con el control
remoto del DRX-730 y recargarlo mientras
escucha la música.
•El jack DOCK también se puede utilizar para
conectar un receptor de audio inalámbrico
Bluetooth YBA-10 de Yamaha para que pueda
escuchar la música almacenada en el reproductor
de música compatible con Bluetooth o en el
teléfono móvil en alta calidad. Y puede controlar
el dispositivo Bluetooth con el control remoto del
DRX-730.
•Función del temporizador
•Visualización en pantalla (OSD)
•Control remoto con funciones completas
•Salida digital óptica
El DRX-730 incluye los siguientes accesorios.
Asegúrese de que no falte ninguno.
Capítulo 1: Introducción
Características
1. El DRX-730 puede reproducir archivos MP3, WMA, MPEG-4
AAC y JPEG almacenados en discos CD-R/RW, DVD-R/RW,
y DVD+R/RW o en dispositivos de almacenamiento USB y
archivos DivX
®
y WMV almacenados en discos CD-R/RW,
DVD-R/RW, y DVD+R/RW. Consulte “Discos y formatos
compatibles” en la página 58 para más información.
Accesorios incluidos
1
STANDBY/ON
ZOOM
OPEN/CLOSE
ON SCREEN
423
586
90
7
VOLUME
TIMER SLEEP
MUTE
DOCK
TUNER
MEMORY
SOUND
DVD/USB
PURE DIRECT
AUX/PORTABLE
DISPLAY
DIMMER
AUDIO
SUBTITLE
PLAY MODE
ANGLE
CLEAR
BLUETOOTH
ON
OFF
PRESET
MENU
INFO.
TOP MENU
SETUP
RETURN
AEAE
ENTER
BAND
AUTO/
MANUAL
Control remoto
Dos baterías (AA, R06, UM-3)
Cable de vídeo con
patillas
Antena FM interior
Antena en bucle AM

Capítulo 1: Introducción
3
Es
Español
A
STANDBY/ON
Ajusta el DRX-730 a activado o a en espera (consulte
la página 16).
B
Abrir/Cerrar ( )
Abre y cierra la bandeja del disco (consulte la
página 23).
C
LED TIMER
Se ilumina cuando el DRX-730 está en espera y el
temporizador está activado (consulte la página 42).
D
LED HDMI
Se ilumina cuando se utiliza HDMI OUT (consulte la
página 53).
E
LED PROGRESSIVE
Se ilumina cuando se emite vídeo progresivo
(consulte la página 53).
F
Bandeja del disco
Utilizada para cargar los discos (consulte la
página 23).
G
Pantalla
Visualiza varios tipos de información. Consulte
“Pantalla” en la página 4 para más información.
H
Sensor de control remoto
Recibe las señales del control remoto.
I
Detener ( )
Detiene la reproducción (consulte la página 24).
J
Reproducir/Pausa ( / )
Inicia y pausa la reproducción (consulte la página 23).
K
Puerto USB
Se utiliza para conectar un dispositivo de
almacenamiento USB que contiene archivos de
imágenes o música (consulte la página 45).
L
Jack PORTABLE
Se utiliza para conectar un reproductor de música
portátil (consulte la página 43).
M
Jack PHONES
Se utiliza para conectar los auriculares (consulte la
página 19).
N
Anterior/Rebobinar ( / )
Selecciona pistas o capítulos anteriores (consulte la
página 25). Funciona como el botón de Rebobinar
() del control remoto cuando se mantiene
pulsado.
O
Siguiente/Avanzar rápido ( / )
Selecciona pistas o capítulos posteriores (consulte la
página 25). Funciona como el botón Avanzar Rápido
() del control remoto cuando se mantiene
pulsado.
P
Control INPUT
Selecciona las fuentes de entrada (consulte la
página 16).
Q
Control VOLUME
Ajusta el volumen (consulte la página 17).
Panel frontal
STANDBY/ON
USB PORTABLE PHONES
INPUT
VOLUME
TIMER
HDMI
PROGRESSIVE
B
KLMNO P Q
9J6345 871
1

Capítulo 1: Introducción
4
Es
A
SLEEP
Se ilumina si se ha ajustado el temporizador sleep
(consulte la página 20).
B
PRESET
Se ilumina cuando se seleccionan presintonías de
radio (consulte la página 39).
C
STEREO
Se ilumina cuando se escucha una emisora FM en
estéreo (consulte la página 36).
D
AUTO
Se ilumina cuando se selecciona el modo de
sintonización automática. Se desactiva cuando se
selecciona el modo de sintonización manual (consulte
la página 36).
E DOCK
•Se ilumina cuando se inserta un iPod en una base
Dock universal para iPod de Yamaha opcional
(YDS-10 o YDS-11) que esté conectado al jack
DOCK (consulte la página 43).
•Se ilumina cuando se ha establecido una conexión
entre un dispositivo Bluetooth y un receptor de
audio inalámbrico Bluetooth YBA-10 de Yamaha
opcional (consulte la página 47).
•Parpadea mientras el receptor de audio
inalámbrico Bluetooth opcional YBA-10 de
Yama ha se empareja con o busca un dispositivo
Bluetooth (consulte la página 47).
F SHUFFLE
Se ilumina cuando se selecciona la reproducción
shuffle en el iPod (consulte la página 44).
G REPEAT
Se ilumina cuando se selecciona la reproducción en el
iPod (consulte la página 44).
H MUTE
Parpadea cuando el sonido está enmudecido
(consulte la página 17).
I Área de información
Visualiza varios tipos de información, como la fuente
de entrada, la frecuencia de radio y la hora.
J TIMER
Se ilumina cuando el DRX-730 está activado y el
temporizador está activado (consulte la página 42).
K TUNED
Se ilumina cuando está sintonizado con una emisora
de radio (consulte la página 36).
L MEMORY
Se ilumina cuando se presintonizan las emisoras de
radio (consulte la página 38).
M iPod
Estos indicadores indican que se ha seleccionado el
menú “iPod” para navegar: Listas de canciones,
artistas, álbumes, canciones o géneros (consulte la
página 44).
N Control iPod
Indica qué botones del cursor pueden utilizarse
mientras se navega por los menús del iPod (consulte
la página 44).
Pantalla
GENRES
SONGS
ALBUMS
ARTISTSPLAYLISTS
MEMORY
TUNED
TIMER
SLEEP
STEREO
AUTO
DOCK MUTE
SHUFFLE
REPEAT
PRESET
A BC E 8DFG
JKL M
N
9

Capítulo 1: Introducción
5 Es
Español
A MAINS (cable de alimentación)
Conecte el cable de alimentación a una toma de CA
(consulte la página 15).
B Salida HDMI
Esta salida HDMI puede conectarse a una entrada
HDMI del televisor (consulte la página 13).
C FM ANT
La antena FM se conecta aquí (consulte la página 11).
D AM ANT
La antena AM se conecta aquí (consulte la página 11).
E SPEAKERS
Los altavoces se conectan aquí (consulte la página 9).
F SUBWOOFER OUT
Aquí se puede conectar un subwoofer
autoamplificado (se vende por separado) (consulte la
página 10).
G AUX IN y OUT
Aquí se puede conectar un componente de grabación,
como un CDR, MDR o pletina de cassette (consulte la
página 14).
H DOCK
Aquí se puede conectar una base Dock universal para
iPod de Yamaha (YDS-10 o YDS-11) o un receptor de
audio inalámbrico Bluetooth YBA-10 de Yamaha
(consulte las páginas 43 y 47).
I VIDEO OUT
Esta salida de vídeo compuesto puede conectarse a
una entrada de vídeo compuesto del televisor
(consulte la página 12).
J COMPONENT VIDEO OUT
Esta salida de vídeo componente puede conectarse a
una entrada de vídeo componente del televisor
(consulte la página 12).
K OPTICAL DIGITAL OUT
Esta salida de audio digital óptica puede conectarse a
una entrada de audio digital óptica en un grabador
CDR o MDR o en un receptor/decodificador AV
(consulte las páginas 14 y 14).
Panel posterior
OUT
OPTICAL
VIDEO
COMPONENT
DIGITALDOCK VIDEO OUT
P
Y
R
P
B
ANT
FM
UNBAL.
75
OUT IN
MIN
AUX
OUT
SUBWOOFER
SPEAKERS
R
R
SPEAKER
CLASS 2 WIRING
CABLAGE CLASSE 2
6
HDMI
MAINS
AM
ANT
GND
1 B 3 4
5 6 7 8 9 J K
1

Capítulo 1: Introducción
6 Es
En esta sección se describen brevemente los botones
del control remoto.
Consejo:
•Además de controlar el DRX-730, el control
remoto también se puede utilizar para controlar
una reproducción en un iPod (consulte la
página 43), en un reproductor de música
Bluetooth o en un teléfono móvil (consulte la
página 47).
A Transmisor de infrarrojos
Transmite las señales de control al DRX-730 (consulte
la página 8).
B STANDBY/ON ( )
Ajusta el DRX-730 a activado o a en espera (consulte
la página 16).
C Botones numéricos
Introduzca los números.
D SUBTITLE (BLUETOOTH OFF)
•Cuando la fuente de entrada es DVD, se
seleccionan los subtítulos en los DVDs (consulte
la página 27).
•Cuando la fuente de entrada es DOCK, se
desconecta del dispositivo Bluetooth actual y
ajusta el DRX-730 a modo no descubrible
(consulte la página 47).
E AUDIO (BLUETOOTH ON)
•Cuando la fuente de entrada es DVD, se
seleccionan los formatos de audio y las pistas de
sonido de idiomas extranjeras en los DVDs
(consulte la página 27).
•Cuando la fuente de entrada es DOCK, se inicia el
emparejamiento o se establece una conexión con
el último dispositivo Bluetooth que se ha utilizado
y ajusta el DRX-730 a modo descubrible (consulte
la página 47).
F PLAY MODE
Visualiza el menú Play Mode en el televisor conectado
cuando la fuente de entrada es DVD.
G Pausa ( )
Pausa la reproducción.
H Rebobinar ( )
Rebobina la reproducción. También se utiliza para
reproducir en movimiento lento y para reproducir
fotograma a fotograma.
I Anterior ( )
Selecciona pistas o capítulos anteriores.
J TOP MENU (INFO.)
•Cuando la fuente de entrada es DVD, se visualiza
el menú superior del DVD.
•Cuando la fuente de entrada es DOCK, se
selecciona el modo de control del iPod (consulte
la página 43).
K Botones del cursor ( )/( )/( )/( ) y ENTER
Se utiliza para navegar por los menús en la pantalla y
para cambiar los ajustes. También se utiliza para
navegar por los menús del iPod. Los botones del
cursor también se utilizan para sintonizar la radio y
para seleccionar las presintonías.
Control remoto
1
STANDBY/ON
ZOOM
OPEN/CLOSE
ON SCREEN
423
586
90
7
VOLUME
TIMER SLEEP
MUTE
DOCK
TUNER
MEMORY
SOUND
DVD/USB
PURE DIRECT
AUX/PORTABLE
DISPLAY
DIMMER
AUDIO
SUBTITLE
PLAY MODE
ANGLE
CLEAR
BLUETOOTH
ON
OFF
PRESET
MENU
INFO.
TOP MENU
SETUP
RETURN
AEAE
ENTER
BAND
AUTO/
MANUAL
1
B
5
4
7
M
6
8
9
J
L
N
O
P
R
S
T
Q
l
g
j
U
V
W
X
Y
b
Z
a
c
d
e
f
i
h
k
3
K

Capítulo 1: Introducción
7 Es
Español
L SETUP
Visualiza el menú “Setup” en el televisor conectado
cuando la fuente de entrada es DVD.
M MEMORY
Se utiliza para guardar las presintonías de radio
(consulte la página 38).
N AUTO/MANUAL
Selecciona los modos de sintonización automática y
manual (consulte la página 36).
O BAND
Selecciona las bandas de radio FM y AM (consulte la
página 36).
P DVD/USB
Selecciona las fuentes de entrada DVD y USB
(consulte la página 16).
Q AUX/PORTABLE
Selecciona las fuentes de entrada AUX y PORTABLE
(consulte la página 16).
R SOUND
Utilizado para ajustar los graves, agudos y balance
(consulte la página 18).
S TIMER
Ajusta el temporizador (consulte la página 40).
T SLEEP
Ajusta el temporizador sleep (consulte la página 20).
U OPEN/CLOSE ( )
Abre y cierra la bandeja del disco (consulte la
página 23).
V ON SCREEN
Visualiza la información acerca del disco que se está
reproduciendo actualmente en el televisor conectado.
W ZOOM
Amplia la imagen (consulte la página 28).
X ANGLE
Selecciona los ángulos de la cámara en los DVDs
(consulte la página 28).
Y Detener ( )
Detiene la reproducción.
Z CLEAR
Borra los números introducidos y elimina los
intervalos del programa.
a Avanzar rápido ( )
Avanza rápido la reproducción. También se utiliza
para reproducir en movimiento lento y para
reproducir fotograma a fotograma.
b Reproducir ( )
Inicia la reproducción.
c Siguiente ( )
Selecciona las pistas o capítulos siguientes.
d MENU
•Visualiza un menú del DVD. (Puede funcionar
igual que el botón TOP MENU con algunos
DVDs.)
•Cuando la fuente de entrada es USB, se visualiza
“Disc Navigator”.
e RETURN
Vuelve al menú anterior.
f VOLUME (+/–)
Ajusta el volumen (consulte la página 17).
g TUNER
Selecciona la fuente de entrada TUNER (consulte la
página 16).
h DOCK
Selecciona la fuente de entrada DOCK (consulte la
página 16).
i MUTE
Enmudece y desenmudece el sonido (consulte la
página 17).
j PURE DIRECT
Selecciona el modo de reproducción directo puro
(consulte la página 19).
k DISPLAY
•Visualiza la hora.
•Cuando la fuente de entrada es DVD y se
reproduce un disco, también se visualiza el
formato de audio.
l DIMMER
Oscurece la pantalla del DRX-730 (consulte la
página 20).
1

8 Es
Este capítulo explica cómo instalar las baterías en el
control remoto y cómo conectar los altavoces y otros
componentes al DRX-730.
1 Pulse la ficha en la tapa del compartimiento
de las baterías en la dirección de la flecha y
extraiga la tapa.
2 Inserte las baterías incluidas en el
compartimiento de las baterías con la
polaridad (+ y –) correcta.
3 Sustituya la tapa del compartimiento de la
batería.
Notas:
•Si el campo operativo del control remoto se
reduce, sustituya todas las baterías con las nuevas.
•No utilice baterías viejas y nuevas conjuntamente.
•No utilice diferentes tipos de baterías juntas,
como por ejemplo, baterías alcalinas y baterías de
manganeso. Aunque se pueden parecer, cada tipo
tiene sus propias características.
•Cuando las baterías se agoten, extráigalas
inmediatamente del control remoto para evitar
una explosión o una pérdida de ácido.
•Siga siempre la normativa de desecho baterías de
su zona.
•Si una batería presenta pérdidas, deséchela de
inmediato. Procure que el ácido que pierde la
batería no entre en contacto con la piel o la ropa.
Antes de insertar las baterías nuevas, limpie el
compartimiento de las baterías.
El control remoto tiene un campo operativo de hasta
6 metros. Al utilizar el control remoto, apúntelo hacia
el sensor de control remoto del DRX-730, situado
junto a la pantalla, consulte a continuación.
Notas:
•Tenga cuidado de no verter líquido en el control
remoto.
•Tenga cuidado de no dejar caer el control remoto.
•No deje el control remoto en ninguno de los
siguientes lugares: lugares calurosos o húmedos,
como cerca de un calefactor o en un cuarto de
baño; lugares extremadamente fríos; lugares
polvorientos.
Capítulo 2: Primeros pasos
Instalar las baterías en el
control remoto
Pulse aquí
Campo operativo
STANDBY/ON
USB PORTABLE PHONES
INPUT
VOLUME
TIMER
HDMI
PROGRESSIVE
30 30
Hasta 6m

Capítulo 2: Primeros pasos
9 Es
Español
Conecte los altavoces del NX-E700 al DRX-730 como se muestra a continuación.
Notas:
•No conecte el cable de alimentación al DRX-730
hasta que todas las conexiones se hayan
completado.
•Asegúrese de conectar el altavoz derecho a los
terminales con la etiqueta “R” y el altavoz
izquierdo a los terminales con la etiqueta “L”.
•Asegúrese de que los filamentos de cada cable no
toquen ningún otro cable ni parte metálica del
DRX-730, puesto que podría dañar seriamente el
DRX-730 y los altavoces.
•No conecte altavoces con una impedancia inferior
a la impedancia mínima especificada en la parte
posterior del DRX-730.
•Utilice altavoces blindados magnéticamente si
desea situarlos cerca de un televisor tipo CRT. Si
causan interferencias en la imagen, apártelos del
televisor.
Conectar los altavoces
OUT
OPTICAL
VIDEO
COMPONENT
DIGITALDOCK VIDEO OUT
P
Y
R
P
B
ANT
FM
UNBAL.
75
OUT IN
MIN
AUX
OUT
SUBWOOFER
SPEAKERS
R
R
SPEAKER
CLASS 2 WIRING
CABLAGE CLASSE 2
6
HDMI
MAINS
AM
ANT
GND
Altavoz izquierdo
DRX-730
Altavoz derecho
Cables de los altavoces
2

Capítulo 2: Primeros pasos
10 Es
Los cables de los altavoces se componen de dos
filamentos aislados que funcionan conjuntamente.
Las conexiones de los altavoces están polarizadas y
utilizan terminales positivos (+) y negativos (–) que se
distinguen con los códigos de color rojo y negro,
respectivamente. Para ayudarle a conectar los cables
correctamente, normalmente el cable positivo está
marcado con una tira u otro identificador. Basta con
conectar el cable marcado a los terminales positivos
(+) del DRX-730 y en los altavoces y conectar el cable
sin marcar a los terminales negativos (–). Si los cruza,
los altavoces estarán fuera de fase y el sonido no será
natural y no contendrá bajos, con lo cual debe ir con
cuidado.
1 Pele unos 10mm de aislamiento del extremo
de cada y trence los filamentos descubiertos
para evitar posibles cortocircuitos.
2 Pulse la palanca del terminal del altavoz para
abrirla, inserte el cable en el orificio y a
continuación cierre la palanca.
Puede conectar un subwoofer autoamplificado (se
vende por separado) al jack SUBWOOFER OUT del
DRX-730 para obtener un sonido de bajos
verdaderamente profundo.
Utilizando cable de audio con patillas (se vende
por separado), conecte el jack SUBWOOFER OUT
del DRX-730 al jack de entrada del subwoofer
autoamplificado.
Notas:
•No conecte los cables de alimentación al
DRX-730 y al subwoofer autoamplificado hasta
que se hayan completado todas las demás
conexiones.
•El jack SUBWOOFER OUT emite los sonidos de
baja frecuencia de una mezcla con reducción de
canales creada de todos los canales disponibles en
el material original.
Conectar los cables de los altavoces
10mm
Rojo: positivo (+)
Negro: negativo (–)
Conectar un subwoofer
autoamplificado
INPUT
INPUT
OUT
OPTICAL
VIDEO
COMPONENT
DIGITALDOCK VIDEO OUT
P
Y
R
P
B
ANT
FM
UNBAL.
75
OUT IN
MIN
AUX
OUT
SUBWOOFER
SPEAKERS
R
R
SPEAKER
CLASS 2 WIRING
CABLAGE CLASSE 2
6
HDMI
MAINS
AM
ANT
GND
Cable de audio con patillas
Subwoofer
autoamplificado

Capítulo 2: Primeros pasos
11 Es
Español
Para escuchar la radio FM y AM, debe conectar las
antenas incluidas al DRX-730. Si la recepción de
radio es pobre en su área o si desea mejorar la
recepción, puede conectar las antenas para exteriores
FM y AM. Consulte un instalador cualificado en su
área para más detalles.
■ Derivación a masa de la antena
Para una seguridad máxima y una interferencia
mínima, conecte el terminal AM ANT GND a una
buena toma de derivación a masa, como una estaca
metálica parcialmente enterrada en tierra húmeda.
1 Conecte la antena FM interior incluida al jack
FM ANT del DRX-730.
2 Sitúe la antena lejos del DRX-730, de los
cables del altavoz y de los cables de
alimentación.
Notas:
•No conecte el cable de alimentación al DRX-730
hasta que todas las demás conexiones se hayan
completado.
•Antes de decidir dónde instalar las antenas de
forma permanente, sintonice una emisora de
radio AM o FM y ajuste la posición de la antena
AM o FM, respectivamente, para encontrar la
mejor recepción.
•Si conecta una antena AM para exteriores,
conecte también la antena en bucle AM incluida.
1 Monte el soporte de la antena como se
muestra.
Si desea instalar la antena en una pared, no es
necesario montar el soporte.
2 Pulse la palanca del terminal AM ANT para
abrirla, inserte los cables de la antena en bucle
AM en los orificios y a continuación cierre la
palanca.
•Si los dos cables de la antena son negros, significa
que no están polarizados y pueden conectarse en
cualquier sentido.
•Si uno de los cables de la antena es blanco y el otro
negro, conecte el cable blanco al terminal AM
ANT y el cable negro al terminal GND.
3 Sitúe la antena lejos del DRX-730, de los
cables del altavoz y de los cables de
alimentación.
Conectar antenas
Conectar la antena FM
OUT
OPTICAL
VIDEO
COMPONENT
DIGITALDOCK VIDEO OUT
P
Y
R
P
B
ANT
FM
UNBAL.
75
T
IN
AUX
R
HDMI
AM
ANT
GND
Antena FM interior
(incluida)
Antena en bucle
AM (incluida)
Conexión de
derivación a
masa
Conectar la antena en bucle AM
Blanco
Negro
Terminal GND
Terminal AM ANT
2

Capítulo 2: Primeros pasos
12 Es
Puede conectar el DRX-730 a un televisor utilizando
cualquiera de los cuatro tipos de conexión: HDMI,
vídeo componente, o vídeo compuesto. El tipo que
elija dependerá de las conexiones compatibles con el
televisor. Para obtener más información, consulte el
manual de instrucciones del televisor.
HDMI proporciona la mejor calidad de imagen. El
vídeo componente ofrece la mejor calidad de imagen
y la salida de vídeo componente del DRX-730 es
compatible con el barrido progresivo para una
calidad de imagen aún mejor. Si el televisor no es
compatible con HDMI o el vídeo componente, utilice
el vídeo compuesto. Algunos modelos DRX-730
tienen un jack SCART que puede emitir el vídeo
compuesto o el vídeo componente RGB.
Notas:
•No conecte el cable de alimentación al DRX-730
hasta que todas las demás conexiones se hayan
completado.
•Desactive el televisor antes de conectarlo al
DRX-730.
Consejo:
•Si el televisor dispone de una salida de audio,
puede conectarlo a los jacks AUX IN del
DRX-730 y escuchar sus programas de televisión
favoritos a través de los altavoces conectados al
DRX-730.
Si el televisor no es compatible con HDMI o con el
vídeo componente, puede conectar el DRX-730 al
televisor con el cable de vídeo con patillas incluido.
Utilice el cable de vídeo con patillas incluido para
conectar el jack VIDEO OUT del DRX-730 a una
entrada de vídeo compuesto en el televisor.
Si el televisor es compatible con el vídeo componente,
pero no con HDMI, puede conectar el DRX-730 al
televisor con un cable de vídeo componente. Esto
proporcionará una mejor calidad de imagen que una
conexión de vídeo componente.
Utilizando un cable de vídeo componente
(vendido por separado), conecte los jacks
COMPONENT VIDEO OUT del DRX-730 a una
entrada de vídeo componente del televisor.
Notas:
•Si conecta un televisor que no es compatible con
el barrido progresivo, asegúrese de que el
“Component Out” esté ajustado a “Interlace”. Si
está ajustado a “Progressive”, es posible que el
televisor no muestre ninguna imagen.
•Si utiliza las conexiones COMPONENT VIDEO
OUT y HDMI simultáneamente, es posible que
los jacks COMPONENT VIDEO OUT emitan
vídeo progresivo independientemente del ajuste
“Component Out”.
Conectar un televisor
Conexión de vídeo compuesto
VIDEO
IN
OUT
OPTICAL
VIDEO
COMPONENT
DIGITALDOCK VIDEO OUT
P
Y
R
P
B
ANT
FM
UNBAL.
75
OUT IN
MIN
AUX
OUT
SUBWOOFER
SPEAKERS
R
R
SPEAKER
CLASS 2 WIRING
CABLAGE CLASSE 2
6
HDMI
MAINS
AM
ANT
GND
Cable de
patillas para el
vídeo (incluido)
Televisor
Conexión de vídeo componente
Y PB PR
COMPONENT
VIDEO IN
OUT
OPTICAL
VIDEO
COMPONENT
DIGITALDOCK VIDEO OUT
P
Y
R
P
B
ANT
FM
UNBAL.
75
OUT IN
MIN
AUX
OUT
SUBWOOFER
SPEAKERS
R
R
SPEAKER
CLASS 2 WIRING
CABLAGE CLASSE 2
6
HDMI
MAINS
AM
ANT
GND
Cable de vídeo componente
(se vende por separado)
Televisor

Capítulo 2: Primeros pasos
13 Es
Español
Si el televisor dispone de una entrada HDMI, puede
conectarlo al DRX-730 con un cable HDMI y
disfrutar la mejor calidad de imagen posible.
Utilizando un cable HDMI (vendido por
separado), conecte el jack HDMI del DRX-730 a
una entrada HDMI del televisor.
Nota:
•Debe ajustar la resolución HDMI del DRX-730 y
de los ajustes de color HDMI para que coincidan
con las capacidades del HDMI TV (consulte la
página 53). Si selecciona la resolución equivocada,
es posible que pierda totalmente la imagen.
■ Resoluciones de salida HDMI compatibles
* Si el televisor compatible con HDMI no es compatible con las
resoluciones mencionadas anteriormente, es posible que la
imagen no se visualice correctamente.
* El DRX-730 está diseñado para estar conectado a un
componente HDMI. Si está conectado a un componente
DVI, puede que no sea un funcionamiento normal,
dependiendo del componente DVI.
■ Salida de audio HDMI
Normalmente, los altavoces conectados al DRX-730
se utilizan para emitir el sonido. Sin embargo, es
posible que desee escuchar a través de los altavoces
del HDMI TV, en cuyo caso puede activar y
desactivar la salida de audio HDMI como se describe
a continuación.
1 Ajuste el DRX-730 al modo en espera.
2 Mantenga pulsado Detener ( ) en el DRX-730
y pulse STANDBY/ON, no suelte Detener ( )
hasta que aparezca “DVD — NO REQ.” en la
pantalla.
3 Pulse Reproducir/Pausa ( / ” varias veces
para seleccionar “HDMI AUDIO ON”.
Si cambia de opinión en este punto, seleccione en
su lugar “DVD — NO REQ.”.
4 Pulse STANDBY/ON.
La entrada de audio HDMI está activada y el
DRX-730 pasa al estado en espera. Pulse
STANDBY/ON de nuevo para volver a activarlo.
Para desactivar la salida de audio HDMI, repita el
procedimiento anterior pero seleccione “HDMI
AUDIO OFF” en el paso 3.
Nota:
•La salida de audio a través del jack HDMI siempre
es de 2 canales PCM.
■ Acerca de HDMI
HDMI significa “High-Definition Multimedia
Interface”, Interface multimedia de alta definición. Una
extensión del estándar DVI (“Digital Video Interface”,
Interface de Video Digital) utilizada para conectar
pantallas de ordenador, HDMI fue diseñado como el
interface de digital nueva generación para televisores
y equipos AV, que permite ofrecer vídeo digital no
comprimido y audio digital en varios formatos con un
sólo cable. Con HDMI, no será necesario disponer de
cables separados para las conexiones de vídeo y de
audio. Y porque es digital, ofrece vídeo y audio de alta
calidad insuperable. Además, HDMI es compatible
con el sistema HDCP (“High Bandwidth Digital
Content Protection”, Protección de contenido digital
de elevado ancho de banda) que se utiliza para evitar
que se copie de forma ilegal el contenido de vídeo y de
audio con copyright.
Conexión HDMI
Modelos para América
del Norte
Otros modelos
1080p/60 Hz 1080p/60 Hz (NTSC)
1080p/50 Hz (PAL)
1080i/60 Hz 1080i/60 Hz (NTSC)
1080i/50 Hz (PAL)
720p/60 Hz 720p/60 Hz (NTSC)
720p/50 Hz (PAL)
480p/60 Hz 480p/60 Hz (NTSC)
576p/50 Hz (PAL)
480i/60 Hz 480i/60 Hz (NTSC)
576i/50 Hz (PAL)
HDMI
IN
OUT
OPTICAL
VIDEO
COMPONENT
DIGITALDOCK VIDEO OUT
P
Y
R
P
B
ANT
FM
UNBAL.
75
OUT IN
MIN
AUX
OUT
SUBWOOFER
SPEAKERS
R
R
SPEAKER
CLASS 2 WIRING
CABLAGE CLASSE 2
6
HDMI
MAINS
AM
ANT
GND
Cable HDMI
(se vende por separado)
Televisor compatible
con HDMI
2

Capítulo 2: Primeros pasos
14 Es
Puede conectar un componente de grabación, como
un grabador de cassettes, CDR, o MDR al DRX-730
para grabar y reproducir.
1 Utilizando cable de audio con patillas (se
vende por separado), conecte los jacks AUX
OUT del DRX-730 a la entrada de audio del
componente de grabación.
2 Utilizando otro cable de audio con patillas (se
vende por separado), conecte los jacks AUX IN
del DRX-730 a la salida de audio del
componente de grabación.
■ Grabación digital
Si el componente de grabación cuenta con una
entrada digital óptica, puede conectarlo al jack
OPTICAL DIGITAL OUT del DRX-730 y grabar de
forma digital.
Consulte “Grabar” en la página 49 para más
información.
Notas:
•No conecte el cable de alimentación al DRX-730
hasta que todas las demás conexiones se hayan
completado.
•Desactive el componente de grabación antes de
conectarlo al DRX-730.
•El OPTICAL DIGITAL OUT emite audio sólo
cuando la fuente de entrada es DVD o USB y con
algunos discos y archivos, puede que la grabación
no sea posible debido a la protección de copia.
El DRX-730 mezcla con reducción de canales las
fuentes multicanal, cómo Dolby Digital y DTS, en
una mezcla estéreo de 2 canales de la que puede
disfrutar a través los altavoces conectados al
DRX-730. Conectando un receptor/decodificador
AV al jack OPTICAL DIGITAL OUT del DRX-730,
puede escuchar las fuentes Dolby Digital y DTS a
través de los altavoces conectados al
receptor/decodificador AV.
Utilizando un cable de audio digital (se vende por
separado), conecte el jack OPTICAL DIGITAL OUT
del DRX-730 a una entrada óptica digital del
receptor/decodificador AV.
Notas:
•Asegúrese de que los ajustes de la salida de audio
digital estén configurados para que el OPTICAL
DIGITAL OUT emita material MPEG, Dolby
Digital y DTS tal como es y no como PCM.
•Puede que desee bajar totalmente el volumen del
DRX-730 cuando utilice los altavoces conectados
al receptor/decodificador AV.
•El OPTICAL DIGITAL OUT sólo emite audio
cuando la fuente de entrada es DVD o USB.
Conectar un grabador (CDR,
MDR etc.)
IN
AUDIO
L
IN
OUT
R
OPTICAL
DIGITAL
OUT
OPTICAL
VIDEO
COMPONENT
DIGITALDOCK VIDEO OUT
P
Y
R
P
B
ANT
FM
UNBAL.
75
OUT IN
AUX
OUT
SUBWOOFER
R
HDMI
AM
ANT
GND
Componente de
grabación
(CDR, MDR, pletina de
cassette)
Cables de
audio con
patillas
(se venden
por separado)
Cable óptico
(se vende por separado)
Conectar un receptor o
decodificador AV
IN
OPTICAL
DIGITAL
OUT
OPTICAL
VIDEO
COMPONENT
DIGITALDOCK VIDEO OUT
P
Y
R
P
B
ANT
FM
UNBAL.
75
OUT IN
MIN
AUX
OUT
SUBWOOFER
SPEAKERS
R
R
SPEAKER
CLASS 2 WIRING
CABLAGE CLASSE 2
6
HDMI
MAINS
AM
ANT
GND
Receptor/decodificador AV
Cable óptico
(se vende por separado)

Capítulo 2: Primeros pasos
15 Es
Español
Después de completar todas las demás conexiones,
conecte el cable de alimentación a una toma de CA.
Conectar el cable de
alimentación
OUT IN
MIN
AUX
OUT
SUBWOOFER
SPEAKERS
R
SPEAKER
CLASS 2 WIRING
CABLAGE CLASSE 2
6
HDMI
MAINS
Conéctelo a una
toma de CA
2

16 Es
Este capítulo explica las funciones que se pueden
utilizar con cualquier fuente de entrada.
Para activar el DRX-730, pulse STANDBY/ON ( ).
Para ajustar el DRX-730 al estado en espera,
vuelva a pulsar el STANDBY/ON ( ).
■ Panel frontal STANDBY/ON
También puede activar el DRX-730 o ajustarlo al
estado en espera utilizando STANDBY/ON en el
DRX-730.
Puede utilizar varias fuentes de entrada con el
DRX-730.
Para seleccionar una fuente de entrada, utilice los
botones de control remoto que se detallan en la
siguiente tabla.
Aparecerá en la pantalla el nombre de la fuente de
entrada seleccionada.
Nota:
•Es posible que para cambiar a una fuente de
entrada nueva tarde unos segundos, durante este
tiempo la pantalla parpadeará y el sonido se
enmudecerá.
■ Control INPUT del panel frontal
También puede utilizar el control INPUT del
DRX-730 para seleccionar las fuentes de entrada.
Gírelo hacia la izquierda o hacia la derecha para
seleccionar las fuentes de entrada en el siguiente
orden:
Capítulo 3: Funciones generales
Activar el DRX-730
Seleccionar las fuentes de
entrada
1
STANDBY/ON
ZOOM
OPEN/CLOSE
ON SCREEN
423
586
90
7
AUDIO
SUBTITLE
PLAY MODE
ANGLE
CLEAR
BLUETOOTH
ON
OFF
PRESET
MENU
INFO.
TOP MENU
AEAE
ENTER
)STANDBY/ON (
DD
DD
VV
VV
DD
DD
Fuente de
entrada
Botón y descripción
DVD Botón DVD/USB
1
—Para reproducir
un disco en el DRX-730 (consulte la
página 23).
1. Pulse varias veces para seleccionar DVD o USB.
USB Botón DVD/USB
2
—Para escuchar
música o visualizar imágenes
almacenadas en un dispositivo de
almacenamiento USB conectado a un
puerto USB del panel frontal
(consulte la página 45).
2. Pulse varias veces para seleccionar DVD o USB.
TUNER Botón TUNER—Para escuchar la
radio (consulte la página 36).
AUX Botón AUX/PORTABLE
3
—Para
escuchar música almacenada en un
componente conectado a los jacks
AUX IN del panel posterior del
DRX-730.
3. Pulse varias veces para seleccionar AUX o PORTABLE.
PORTABLE Botón AUX/PORTABLE
4
—Para
escuchar música almacenada en un
reproductor de música portátil
conectado al jack PORTABLE en el
panel frontal (consulte la página 43).
4. Pulse varias veces para seleccionar AUX o PORTABLE.
DOCK Botón DOCK—Para escuchar
música almacenada en un iPod
5
(consulte la página 43), en un
reproductor de música compatible
con Bluetooth
6
, o en un teléfono
móvil (consulte la página 47)
conectado al jack DOCK.
5. Se requiere una base Dock universal para iPod de Yamaha
(YDS-10 o YDS-11).
6. Se requiere un receptor de audio inalámbrico Bluetooth
YBA-10 de Yamaha opcional.
DVD USB FM AM AUX PORTABLE DOCK

Capítulo 3: Funciones generales
17 Es
Español
Puede escuchar la música al nivel de volumen que
desee.
Para subir el volumen, pulse VOLUME (+).
Para bajar el volumen, pulse VOLUME (–).
Puede ajustar el volumen a MIN, 01~87 o a MAX.
■ Control VOLUME del panel frontal
También puede ajustar el volumen utilizando el
control VOLUME del DRX-730.
Al escuchar la música, puede enmudecer el sonido
temporalmente.
Para enmudecer el sonido, pulse MUTE.
Aparece “MUTE ON” en la pantalla y el indicador
MUTE parpadea.
Para desenmudecer el sonido, pulse de nuevo
MUTE.
Aparece “MUTE OFF” en la pantalla y el indicador
MUTE se desactiva.
Notas:
•Si ajusta el volumen o cambia la fuente de entrada
mientras el sonido está enmudecido, el
enmudecimiento se cancelará.
•El enmudecimiento se cancela automáticamente
cuando el DRX-730 está ajustado al estado en
espera.
Ajustar el volumen
VOLUME
TIMER SLEEP
MUTE
DOCK
TUNER
MEMORY
SOUND
DVD/USB
PURE DIRECT
AUX/PORTABLE
DISPLAY
DIMMER
PRESET
MENU
INFO.
TOP MENU
SETUP
RETURN
AEAE
ENTER
BAND
AUTO/
MANUAL
VOLUME +/–
VV
VV
oo
oo
ll
ll
uu
uu
mm
mm
ee
ee
33
33
55
55
Enmudecer el sonido
VOLUME
TIMER SLEEP
MUTE
DOCK
TUNER
MEMORY
SOUND
DVD/USB
PURE DIRECT
AUX/PORTABLE
DISPLAY
DIMMER
PRESET
MENU
INFO.
TOP MENU
SETUP
RETURN
AEAE
ENTER
BAND
AUTO/
MANUAL
MUTE
MM
MM
UU
UU
TT
TT
EE
EE
OO
OO
NN
NN
MUTE
MM
MM
UU
UU
TT
TT
EE
EE
OO
OO
FF
FF
FF
FF
3

Capítulo 3: Funciones generales
18 Es
Puede ajustar los graves y los agudos para cambiar el
tono como desee.
1 Pulse SOUND varias veces para seleccionar
“BASS” o “TREBLE”.
2 Para incrementar los graves o los agudos,
pulse Arriba ( ) varias veces. Para reducir los
graves o los agudos, pulse Abajo ( ) varias
veces.
Es posible ajustar los graves y los agudos hacia
arriba o hacia abajo en 10dB en intervalos de 2dB:
–10dB~0dB~+10dB. El ajuste por defecto es
“0dB”.
Notas:
•Si no realiza ningún ajuste durante 5 segundos, el
modo de ajuste de graves o agudos se cancelará y
volverá a aparecer la pantalla anterior.
•Los ajustes de graves y agudos son aplicables a los
altavoces y auriculares, pero no a la grabación.
Puede ajustar el balance de sonido izquierdo y
derecho.
1 Pulse SOUND varias veces para seleccionar
“BALANCE”.
2 Para mover el sonido hacia la izquierda, pulse
Izquierda ( ) varias veces. Para mover el
sonido hacia la derecha, pulse Derecha ( )
varias veces.
Es posible ajustar el balance 6 niveles hacia la
izquierda o 6 niveles hacia la derecha. El ajuste
por defecto es centro.
Notas:
•Si no realiza ningún ajuste durante 5 segundos, el
modo de ajuste del balance se cancelará y volverá
a aparecer la pantalla anterior.
•Los ajustes del balance son aplicables a los
altavoces y auriculares, pero no a la grabación.
Ajustar los graves y los agudos
VOLUME
TIMER SLEEP
MUTE
DOCK
TUNER
MEMORY
SOUND
DVD/USB
PURE DIRECT
AUX/PORTABLE
DISPLAY
DIMMER
PRESET
MENU
INFO.
TOP MENU
SETUP
RETURN
AEAE
ENTER
BAND
AUTO/
MANUAL
SOUND
BB
BB
AA
AA
SS
SS
SS
SS
00
00
dd
dd
BB
BB
TT
TT
RR
RR
EE
EE
BB
BB
LL
LL
EE
EE
00
00
dd
dd
BB
BB
Ajustar el balance
VOLUME
TIMER SLEEP
MUTE
DOCK
TUNER
MEMORY
SOUND
DVD/USB
PURE DIRECT
AUX/PORTABLE
DISPLAY
DIMMER
PRESET
MENU
INFO.
TOP MENU
SETUP
RETURN
AEAE
ENTER
BAND
AUTO/
MANUAL
SOUND
BB
BB
AA
AA
LL
LL
AA
AA
NN
NN
CC
CC
EE
EE
--
--
--
--
--
--
∫∫
∫∫
--
--
--
--
--
--

Capítulo 3: Funciones generales
19 Es
Español
En el modo de reproducción directo puro, puede
realizar reproducciones de audio de alta calidad.
Para activar el modo de reproducción directo
puro, pulse PURE DIRECT varias veces hasta que
aparezca “PURE DIRECT ON” en la pantalla.
La primera pulsación del botón visualizará el ajuste
actual en la pantalla. Las pulsaciones posteriores
activan y desactivan el modo de reproducción directo
puro.
Para desactivar el modo de reproducción directo
puro, pulse PURE DIRECT para que aparezca
“PURE DIRECT OFF” en la pantalla.
Mientras el modo de reproducción directo puro está
activado, los circuitos de control del tono (graves y
agudos) se omiten de manera que la señal se
transmite directamente al amplificador.
Nota:
•Si ajusta los graves o agudos en el modo de
reproducción directo puro, se cancelará el modo
directo puro.
Puede utilizar unos auriculares para escuchar la
música en privado o para no molestar a los demás.
Conecte los auriculares con un conector mini al
jack PHONES del panel frontal del DRX-730.
Mientras los auriculares estén conectados al jack
PHONES, los altavoces y, si está conectado, el
subwoofer no emitirán ningún sonido.
Modo de reproducción directo
puro
VOLUME
TIMER SLEEP
MUTE
DOCK
TUNER
MEMORY
SOUND
DVD/USB
PURE DIRECT
AUX/PORTABLE
DISPLAY
DIMMER
BAND
AUTO/
MANUAL
PURE DIRECT
PP
PP
UU
UU
RR
RR
EE
EE
DD
DD
II
II
RR
RR
EE
EE
CC
CC
TT
TT
OO
OO
NN
NN
PP
PP
UU
UU
RR
RR
EE
EE
DD
DD
II
II
RR
RR
EE
EE
CC
CC
TT
TT
OO
OO
FF
FF
FF
FF
Utilizar auriculares
STANDBY/ON
USB PORTABLE PHONES
INPUT
TIMER
HDMI
PROGRESSIVE
3

Capítulo 3: Funciones generales
20 Es
Puede ajustar el brillo de la pantalla para adecuarse a
la iluminación de la habitación. Por ejemplo, está
utilizando el DRX-730 en una habitación oscura y la
pantalla es demasiado brillante.
Para oscurecer la pantalla, pulse DIMMER
repetidas veces.
Se puede ajustar la pantalla a tres niveles de brillo:
“DIMMER –1, DIMMER –2, DIMMER –3”, que
pueden seleccionarse según el siguiente orden:
Para volver al brillo normal, pulse DIMMER varias
veces hasta que aparezca “DIMMER OFF” en la
pantalla.
Puede utilizar el temporizador sleep para detener
automáticamente la reproducción y ajustar el DRX-730
al estado en espera después de un periodo de tiempo
especificado. Por ejemplo, cuando desee mirar una
película o escuchar música hasta quedarse dormido.
Pulse SLEEP repetidas varias para seleccionar un
tiempo sleep.
Se puede ajustar el tiempo sleep a 120 minutos, 90
minutos, 60 minutos o 30 minutos, que se pueden
seleccionar en el siguiente orden:
Cuando se ha seleccionado un tiempo sleep, se
ilumina el indicador SLEEP en la pantalla.
Una vez transcurrido el tiempo sleep especificado, se
detendrá automáticamente la reproducción y el
DRX-730 pasará al estado en espera.
Para cancelar el temporizador sleep, pulse SLEEP
varias veces hasta que aparezca “OFF” en la
pantalla.
Notas:
•El temporizador sleep sólo ajustará el DRX-730 a
en espera. No desactivará ningún componente
conectado.
•Se cancelará el temporizador sleep si el DRX-730
está ajustado a en espera antes de que haya
transcurrido el tiempo sleep.
Ajustar el brillo de la pantalla
VOLUME
TIMER SLEEP
MUTE
DOCK
TUNER
MEMORY
SOUND
DVD/USB
PURE DIRECT
AUX/PORTABLE
DISPLAY
DIMMER
BAND
AUTO/
MANUAL
DIMMER
DD
DD
II
II
MM
MM
MM
MM
EE
EE
RR
RR
--
--
11
11
DIMMER OFF DIMMER –1 DIMMER –2 DIMMER –3
DD
DD
II
II
MM
MM
MM
MM
EE
EE
RR
RR
OO
OO
FF
FF
FF
FF
Utilice el temporizador sleep
VOLUME
TIMER SLEEP
MUTE
DOCK
TUNER
MEMORY
SOUND
DVD/USB
PURE DIRECT
AUX/PORTABLE
DISPLAY
DIMMER
BAND
AUTO/
MANUAL
SLEEP
SS
SS
LL
LL
EE
EE
EE
EE
PP
PP
11
11
22
22
00
00
mm
mm
ii
ii
nn
nn
..
..
120min 90min 60min 30min OFF
SLEEP
SS
SS
LL
LL
EE
EE
EE
EE
PP
PP
OO
OO
FF
FF
FF
FF

Capítulo 3: Funciones generales
21 Es
Español
Para visualizar la hora o programar el temporizador,
primero debe ajustar el reloj.
1 Pulse TIMER.
Aparece “Set Clock” en la pantalla durante unos
segundos y, a continuación, el mensaje “Press and
hold ENTER key for 3 sec.” se desplaza por la
pantalla.
Si el reloj ya se ha ajustado, aparecerá “Clock
Time” en la pantalla durante unos segundos, y a
continuación se visualizará la hora.
2 Mientras el mensaje se desplaza por la
pantalla, pulse y mantenga pulsado ENTER
durante 3 segundos, hasta que la pantalla de
las horas empiece a parpadear.
3 Utilice Arriba/Abajo ( / ) para ajustar las
horas.
Las horas se pueden ajustar de 0 a 12, AM o PM.
El algunos modelos, la visualización por defecto
de las horas es de 24 horas.
4 Pulse Derecha ( ). La pantalla de los minutos
empieza a parpadear.
5 Utilice Arriba/Abajo ( / ) para ajustar los
minutos.
Utilice Izquierda/Derecha ( / ) para cambiar
entre las pantallas de horas y minutos en caso
necesario.
6 Pulse ENTER.
Se ha ajustado la hora y la pantalla deja de
parpadear.
Notas:
•Para cambiar el reloj entre 12 y 24 horas, mientras
se visualiza la hora, utilice Izquierda/derecha
(/).
•Si el cable de alimentación está desconectado o si
ha ocurrido un fallo de alimentación, el reloj
seguirá funcionando durante aproximadamente 5
minutos. Pero transcurrido este tiempo, el ajuste
de la hora se perderá.
Ajustar el reloj
VOLUME
TIMER SLEEP
MUTE
DOCK
TUNER
MEMORY
SOUND
DVD/USB
PURE DIRECT
AUX/PORTABLE
DISPLAY
DIMMER
PRESET
MENU
INFO.
TOP MENU
SETUP
RETURN
AEAE
ENTER
BAND
AUTO/
MANUAL
ENTER
TIMER
PP
PP
rr
rr
ee
ee
ss
ss
ss
ss
aa
aa
nn
nn
dd
dd
hh
hh
oo
oo
ll
ll
dd
dd
00
00
00
00
::
::
00
00
00
00
00
00
00
00
::
::
00
00
00
00
3

Capítulo 3: Funciones generales
22 Es
Puede visualizar la hora mientras escucha una fuente.
Para visualizar la hora, pulse DISPLAY.
Notas:
•Si se ha seleccionado la fuente de entrada DVD,
debe pulsar DISPLAY dos veces para visualizar la
hora.
•Cuando visualice la hora como se explicó
anteriormente, la hora se visualizará
continuamente. Cuando realice una operación, se
visualizará un mensaje correspondiente a dicha
operación y aparecerá de nuevo la hora.
•Si aún no se ha ajustado el reloj, aparecerá “Set
Clock!” en la pantalla durante 3 segundos, y a
continuación volverá a aparecer la pantalla
anterior. Consulte la página 21 para obtener
información acerca del reloj.
•No se puede visualizar la hora mientras el modo
iPod Menu está seleccionado (consulte la
página 43).
Para ahorrar energía y evitar que se queme la pantalla,
puede ajustar el DRX-730 para que pase
automáticamente a estado de espera después de 30
minutos de inactividad al utilizar la fuente de entrada
DVD o USB.
1 Con la fuente de entrada DVD o USB
seleccionada, pulse MEMORY.
Aparece el mensaje “Auto Standby” actual en la
pantalla.
2 Utilice los botones del cursor ( / / / )
para seleccionar “ON” u “OFF”.
3 Pulse MEMORY o ENTER para ajustarlo.
Cuando está activado el modo en espera
automático y está seleccionada la fuente de
entrada DVD o USB, si la reproducción se ha
detenido durante 30 minutos y no se ha realizado
ninguna operación durante este periodo, el
DRX-730 pasará automáticamente a en espera.
Dependiendo del disco, el DRX-730 puede pasar
automáticamente a en espera si se ha visualizado
el mismo menú durante 30 minutos.
Nota:
•Si no realiza ningún ajuste durante 5 segundos, el
modo de ajuste “Auto Standby” se cancelará y
volverá a aparecer la pantalla anterior.
Visualizar la hora
VOLUME
TIMER SLEEP
MUTE
DOCK
TUNER
MEMORY
SOUND
DVD/USB
PURE DIRECT
AUX/PORTABLE
DISPLAY
DIMMER
PRESET
MENU
INFO.
TOP MENU
SETUP
RETURN
AEAE
ENTER
BAND
AUTO/
MANUAL
DISPLAY
11
11
99
99
::
::
33
33
00
00
En espera automático
VOLUME
TIMER SLEEP
MUTE
DOCK
TUNER
MEMORY
SOUND
DVD/USB
PURE DIRECT
AUX/PORTABLE
DISPLAY
DIMMER
PRESET
MENU
INFO.
TOP MENU
SETUP
RETURN
AEAE
ENTER
BAND
AUTO/
MANUAL
ENTER
MEMORY
AA
AA
UU
UU
TT
TT
OO
OO
SS
SS
TT
TT
NN
NN
BB
BB
YY
YY
OO
OO
FF
FF
FF
FF

23 Es
Español
Este capítulo explica cómo reproducir los discos.
Cuando la fuente de entrada es DVD o USB, puede
realizar varias funciones y ajustes utilizando los
menús en la pantalla que aparezcan en el televisor
conectado.
Consejos:
•Puede cambiar el idioma de la visualización en la
pantalla con el ajuste “OSD Language” (consulte
la página 55).
•Se visualizan los botones que puede utilizar con
cada menú en la parte inferior de cada pantalla.
Puede reproducir los siguientes tipos de discos en el
DRX-730: DVD-Video, DVD-VR (discos
DVD-R/RW/R DL grabados en el modo VR), VCD,
SVCD, CD y DTS CD de audio. También los discos de
datos que contienen los siguientes tipos de archivo:
MP3, WMA, MPEG-4 AAC, JPEG, DivX
®
Ultra y
WMV. Consulte la página 58 para obtener más
información acerca de los tipos de discos y de los
formatos de archivo compatibles.
1 Pulse Abrir/Cerrar ( ) en el DRX-730.
La bandeja del disco se abre y la fuente de entrada
DVD se selecciona automáticamente. Si el
DRX-730 está en espera, se activará
automáticamente.
Para utilizar los menús en la pantalla o visualizar
vídeos o imágenes, active el televisor y seleccione
la entrada AV a la que está conectado el DRX-730.
2 Sitúe el disco, con la etiqueta de cara arriba,
en el centro de la bandeja y a continuación
pulse OPEN/CLOSE ( ).
La bandeja del disco cierra y el disco se carga.
3 Pulse Reproducir/Pausa ( / ) en el DRX-730
para empezar la reproducción.
También puede utilizar Reproducir ( ) en el
control remoto para empezar la reproducción.
•Si ha cargado un disco DVD, VCD o SVCD, es
posible que aparezca un menú. Consulte “Menús
“DVD-Video”” o “Menús VCD y SVCD (PBC)”
en la página 25 para más información.
•Si ha cargado un disco que contiene imágenes
JPEG, se iniciará un pase de diapositivas.
Consulte “Reproducir los pases de diapositivas
JPEG” en la página 32 para más información.
•Si ha cargado un disco que contiene varios
formatos de archivo, como MP3, WMA, MPEG-4
AAC, JPEG, DivX
®
o WMV, deberá seleccionar el
formato que desee reproducir en la pantalla.
Para expulsar un disco, pulse Abrir/Cerrar ( ) o
pulse OPEN/CLOSE ( ) en el control remoto.
Notas:
•También puede cerrar la bandeja del disco
pulsando suavemente la bandeja hasta que
empiece a cerrarse por si sola.
•Para reproducir un DVD de dos caras, cárguelo
con el lado que desee reproducir hacia abajo.
Capítulo 4: Reproducir discos
Utilizar la visualización en la
pantalla
Botón Descripción
SETUP Visualiza el menú Setup
1
1. Sólo cuando la fuente de entrada es DVD.
Cursor
( )/( )
Selecciona los elementos del menú
ENTER Confirma la selección del elemento
RETURN Vuelve al menú anterior
1
STANDBY/ON
ZOOM
OPEN/CLOSE
ON SCREEN
423
586
90
7
VOLUME
TIMER SLEEP
MUTE
DOCK
TUNER
MEMORY
SOUND
DVD/USB
PURE DIRECT
AUX/PORTABLE
DISPLAY
DIMMER
AUDIO
SUBTITLE
PLAY MODE
ANGLE
CLEAR
BLUETOOTH
ON
OFF
PRESET
MENU
INFO.
TOP MENU
SETUP
RETURN
AEAE
ENTER
BAND
AUTO/
MANUAL
TOP MENU
ENTER
)OPEN/CLOSE (
RETURN
SETUP
MENU
Botones
numéricos
Reproducir discos
4

Capítulo 4: Reproducir discos
24 Es
•Pulsando Abrir/Cerrar ( ) en el DRX-730
mientras está en espera lo activará, abra la
bandeja de discos y seleccione la fuente de
entrada DVD, preparada para la reproducción del
disco.
•Con algunos discos, puede que algunas de las
funciones de reproducción explicadas en este
capítulo no funcionen como se espera y puede
que otros no funcionen en absoluto.
•Algunos DVDs restringen el uso de ciertas
funciones, por ejemplo, la reproducción aleatoria
o repetir la reproducción, en algunas o todas las
partes del disco. No es una función anómala.
Para detener la reproducción, pulse Detener ( ).
También puede utilizar Detener ( ) en el DRX-730
para detener la reproducción.
Si aparece “RESUME” o “LAST MEMORY” en la
pantalla después de detener la reproducción, puede
volver a reanudar la reproducción desde donde la ha
dejado pulsando Reproducir ( ). Consulte
“Reanudar y última memoria” a continuación para
más información.
Cuando pulse Detener ( ) para detener la
reproducción del DVD-Video, VCD, SVCD, DivX
®
,
WMV o CD de audio, aparece “RESUME” en la
pantalla y puede continuar la reproducción desde
donde la ha dejado simplemente pulsando
Reproducir ( ).
Para los discos DVD-Video, VCD y SVCD, el
DRX-730 se acordará el punto en el que detuvo la
reproducción aunque el disco se haya expulsado. La
próxima vez que cargue el disco, aparecerá “Last
Memory” en la pantalla y puede continuar la
reproducción desde donde la haya dejado.
Si no desea que el DRX-730 se acuerde del punto de la
última memoria, en lugar de pulsar Detener ( ),
pulse OPEN/CLOSE ( ) para detener la
reproducción y expulsar el disco.
Para cancelar la función Resume o Last Memory,
mientras se visualiza “RESUME” o “LAST
MEMORY”, pulse Stop ( ).
Notas:
•Es posible que la función “Last Memory” no esté
operativa con algunos discos.
•El DRX-730 puede recordar los puntos de la
última memoria para un máximo de cinco discos
DVD-Video y un disco VCD o SVCD.
•Para los discos DivX
®
, WMV y CDs de audio, se
cancela la función Resume cuando se expulsa el
disco, se cambia la fuente de entrada o se
desactiva el DRX-730.
Para pausar la reproducción, pulse Pausa ( ).
Para reanudar la reproducción, pulse de nuevo
Pausa ( ) o pulse Reproducir ( ).
También puede utilizar Reproducir/Pausa ( / ) en
el DRX-730 para pausar la reproducción.
Durante la reproducción, puede rebobinar o avanzar
rápido a varias velocidades.
Para rebobinar, pulse Rebobinar ( ) durante la
reproducción.
Para avanzar rápido, pulse Avanzar rápido ( )
durante la reproducción.
Pulse Rebobinar ( ) o Avanzar rápido ( )
carias veces para cambiar la velocidad del
rebobinado o del avance rápido.
La velocidad se visualiza en la pantalla.
Para reanudar la reproducción normal, pulse
Reproducir ( ).
También puede rebobinar o avanzar rápido
manteniendo pulsado Anterior/Rebobinar
(/) o Siguiente/Avanzar Rápido ( / ),
respectivamente en el DRX-730 durante unos
segundos.
Notas:
•Para los discos DivX
®
y WMV, sólo está
disponible una velocidad de rebobinado y de
avance rápido.
•Se puede reanudar la reproducción normal
cuando se ha llegado a un nuevo capítulo (DVD-
Video) o pista (PBC VCD o SVCD) mientras se
rebobina o se avanza rápido.
•Para los discos MP3, WMA y MPEG-4 AAC, la
reproducción normal se reanudará cuando se
haya llegado al comienzo o al final de una pista
mientras se rebobina o se avanza rápido.
Detener la reproducción
Reanudar y última memoria
Introducir una pausa en la
reproducción
Rebobinar y avanzar rápido

Capítulo 4: Reproducir discos
25 Es
Español
Para seleccionar el siguiente capítulo o pista,
pulse Siguiente ( ).
Para seleccionar el comienzo de un capítulo o pista
actual, pulse Anterior ( ). Vuelva a pulsarlo para
seleccionar capítulos o pistas anteriores.
También puede utilizar Siguiente/Avanzar Rápido
(/) y Anterior/Rebobinar ( / ) en el
DRX-730 para seleccionar las pistas.
Puede seleccionar los títulos, capítulos y pistas por
número.
1 Utilice los botones numéricos para introducir
el número de un título, capítulo o pista.
2 Pulse ENTER.
Si la reproducción se detiene, la reproducción se
inicia desde un título especificado (DVD) o pista
(CD, VCD, SVCD) de audio.
Si la reproducción estaba en marcha, la
reproducción pasa al título (DVD-VR [modo VR
DVD-R/RW/R DL]), capítulo (DVD-Video) o
pista (VCD, SVCD o CD de audio) especificado.
La mayoría de los discos DVD-Video disponen de
menús en los que puede seleccionar lo que desea
mirar. Normalmente, el menú principal aparece
automáticamente, aunque con algunos discos es
posible que tenga que pulsar MENU o TOP MENU
para visualizar el menú.
Pueden utilizarse los siguientes botones con los menús.
Algunos de los discos VCD y SVCD disponen de
menús “PBC” (Control de reproducción) en los que
puede seleccionar lo que desea mirar.
Cargue un disco PBC VCD o SVCD, pulse
Reproducir ( ) para visualizar el menú y a
continuación utilice los botones numéricos y ENTER
para seleccionar la pista que desea reproducir.
Pueden utilizarse los siguientes botones con los
menús.
Puede desactivar PBC e iniciar la reproducción
pulsando Siguiente ( ) o Anterior ( ) o los
botones numéricos y ENTER mientras la
reproducción está detenida.
Notas:
•Con algunos discos PBC VCD y SVCD, es posible
que el menú no aparezca al pulsar Reproducir
( ), en cuyo caso debe pulsar RETURN durante
la reproducción para visualizar el menú.
•Algunas de las funciones de reproducción de
discos explicadas en este capítulo no se pueden
utilizar con la reproducción PBC. Para utilizar
esta función, desactive la reproducción PBC
iniciando la reproducción sin utilizar el menú,
como se ha explicado anteriormente.
•Si desactiva PBC temporalmente, no se
visualizará el menú cuando se pulsa RETURN
durante la reproducción. Para volver a visualizar
el menú, pulse Detener ( ) dos veces y luego
pulse Reproducir ( ). PBC se activará y
pulsando RETURN visualizará el menú.
Seleccionar capítulos y pistas
Seleccionar los elementos por
número
Menús “DVD-Video”
Botón Descripción
TOP MENU Visualiza el menú superior del DVD.
1
1. Depende del disco. Con algunos discos DivX
®
, se visualizará
un menú.
MENU Visualiza un menú del DVD.
2
2. Puede funcionar igual que el botón TOP MENU con algunos
discos.
Cursor
( )/( )
Selecciona los elementos del menú.
ENTER Confirma la selección del elemento.
RETURN Vuelve al menú anterior.
Números
Con algunos discos, la reproducción
se puede iniciar introduciendo un
número y pulsando ENTER.
Menús VCD y SVCD (PBC)
Botón Descripción
RETURN
Cuando se pulsa, visualiza el menú
“PBC” durante la reproducción.
Números
Selecciona los elementos numerados
del menú. Pulse ENTER para
confirmar la selección.
Siguiente
()
Visualiza la siguiente página del
menú (si está disponible)
Anterior
()
Visualiza la página anterior del menú
(si está disponible)
4

Capítulo 4: Reproducir discos
26 Es
Puede reproducir discos DVD-Video, VCD, SVCD,
DivX
®
y WMV en movimiento lento a cuatro
velocidades diferentes. También puede reproducir los
discos DVD-Video en movimiento lento a la inversa.
Durante la reproducción, pulse Pausa ( ).
Mantenga pulsado Rebobinar ( ) o Avanzar
rápido ( ) hasta que se inicie la reproducción
en movimiento lento.
Pulse Rebobinar ( ) o Avance rápido ( )
varias veces para cambiar la velocidad del
movimiento lento.
La velocidad se visualiza en la pantalla.
Para reanudar la reproducción normal, pulse
Reproducir ( ).
Nota:
•Se puede reanudar la reproducción normal
cuando se ha llegado a un nuevo capítulo (DVD-
Video) o pista (PBC VCD o SVCD) durante el
movimiento lento.
Puede reproducir los discos DVD-Video, VCD,
SVCD, DivX
®
y WMV fotograma a fotograma.
También puede reproducir los discos DVD-Video
fotograma a fotograma a la inversa.
Durante la reproducción, pulse Pausa ( ).
Pulse Rebobinar ( ) o Avanzar Rápido ( )
para reproducir un fotograma a la vez.
Para reanudar la reproducción normal, pulse
Reproducir ( ).
Nota:
•Se puede reanudar la reproducción normal
cuando se ha llegado a un nuevo capítulo (DVD-
Video) o pista (PBC VCD o SVCD) durante la
reproducción fotograma a fotograma.
Reproducción en movimiento
lento
1
STANDBY/ON
ZOOM
OPEN/CLOSE
ON SCREEN
423
586
90
7
AUDIO
SUBTITLE
PLAY MODE
ANGLE
CLEAR
BLUETOOTH
ON
OFF
PRESET
MENU
INFO.
TOP MENU
SETUP
RETURN
AEAE
ENTER
Reproducción fotograma a
fotograma
1
STANDBY/ON
ZOOM
OPEN/CLOSE
ON SCREEN
423
586
90
7
AUDIO
SUBTITLE
PLAY MODE
ANGLE
CLEAR
BLUETOOTH
ON
OFF
PRESET
MENU
INFO.
TOP MENU
SETUP
RETURN
AEAE
ENTER

Capítulo 4: Reproducir discos
27 Es
Español
Algunos discos DVD tienen pistas de sonido en
múltiples idiomas o formatos de audio, como Dolby
Digital y DTS, que puede seleccionar durante la
reproducción. De manera similar, algunos discos
DVD-VR (DVD-R/RW/R DL de modo VR) disponen
de pistas de sonido de audio mono duales y algunos
discos DivX
®
disponen de múltiples pistas de sonido
de audio.
Durante la reproducción, pulse AUDIO varias
veces para seleccionar los idiomas de la pista de
sonido o los formatos de audio disponibles.
El nombre del idioma o formato de audio
seleccionado aparece en la pantalla.
Notas:
•Con algunos discos, sólo puede seleccionar los
idiomas de las pistas de sonido y de los formatos
de audio utilizando el menú del disco. Utilice
TOP MENU y MENU para visualizar el menú del
disco.
•Puede cambiar el idioma por defecto de la pista de
sonido para los discos DVD-Video en “Ajustes de
idioma” en la página 54
•Se puede seleccionar el idioma por defecto de la
pista de sonido (consulte la página 54) si detiene
la grabación y cancela la función Resume o
expulsa el disco sin guardar el punto de la última
memoria (consulte la página 24).
Algunos discos DVD y DivX
®
tienen subtítulos en
uno o más idiomas que puede seleccionar durante la
reproducción.
Durante la reproducción, pulse SUBTITLE varias
veces para seleccionar los subtítulos disponibles.
El nombre del idioma del subtítulo seleccionado se
visualiza en la pantalla.
Notas:
•Con algunos discos, sólo puede seleccionar los
subtítulos utilizando el menú del disco. Utilice
TOP MENU y MENU para visualizar el menú del
disco.
•Puede cambiar el idioma por defecto del subtítulo
para los discos DVD-Video en “Ajustes de idioma”
en la página 54
•Consulte “Acerca de DivX®” en la página 59 para
obtener más información acerca del uso de
subtítulos de DivX
®
.
•Es posible que con algunos discos DivX
®
, los
subtítulos no se visualicen correctamente.
•Se puede seleccionar el idioma del subtítulo por
defecto (consulte la página 54) si detiene la
grabación y cancela la función Resume o expulsa
el disco sin guardar el punto de la última memoria
(consulte la página 24).
Seleccionar los idiomas y el
audio
1
STANDBY/ON
ZOOM
OPEN/CLOSE
ON SCREEN
423
586
90
7
AUDIO
SUBTITLE
PLAY MODE
ANGLE
CLEAR
BLUETOOTH
ON
OFF
PRESET
MENU
INFO.
TOP MENU
SETUP
RETURN
AEAE
ENTER
TOP MENU
AUDIO
MENU
Seleccionar subtítulos
1
STANDBY/ON
ZOOM
OPEN/CLOSE
ON SCREEN
423
586
90
7
AUDIO
SUBTITLE
PLAY MODE
ANGLE
CLEAR
BLUETOOTH
ON
OFF
PRESET
MENU
INFO.
TOP MENU
SETUP
RETURN
AEAE
ENTER
TOP MENU
SUBTITLE
MENU
4

Capítulo 4: Reproducir discos
28 Es
Algunos discos DVD-Video tienen el contenido
grabado en múltiples ángulos de cámara que puede
seleccionar durante la reproducción.
Aparece un icono de cámara ( ) en la pantalla al
reproducir el contenido que ofrece múltiples ángulos
de cámara. Si así lo desea, puede desactivar este icono
(consulte la página 55).
Durante la reproducción, pulse ANGLE varias
veces para seleccionar los ángulos de cámara
disponibles.
Notas:
•Con algunos discos, aunque el icono de cámara
() se visualiza en la pantalla, es posible que no
pueda seleccionar los ángulos de la cámara.
•Con algunos discos, también puede seleccionar
los ángulos de cámara del menú del disco.
Puede aumentar la imagen en 2x o en 4x al reproducir
un disco DVD-Video, VCD, SVCD, DivX
®
, WMV o
JPEG.
Durante la reproducción, pulse ZOOM varias
veces para seleccionar la ampliación en 2x, 4x o
1x.
Utilice los botones del cursor ( / / / ) para
desplazarse por la imagen mientras esté
ampliada.
Puede cambiar el factor de zoom y desplazarse
libremente por la imagen mientras la reproducción
continúa.
Notas:
•Puesto que los discos DVD-Video, VCD, SVCD,
DivX
®
, WMV y JPEG utilizan una resolución de
vídeo fija, es posible que la calidad de imagen se
deteriore al acercarla. No es una función anómala.
•Si el indicador de zoom desaparece de la pantalla,
pulse de nuevo ZOOM para visualizarlo.
Seleccionar los ángulos de la
cámara
1
STANDBY/ON
ZOOM
OPEN/CLOSE
ON SCREEN
423
586
90
7
AUDIO
SUBTITLE
PLAY MODE
ANGLE
CLEAR
BLUETOOTH
ON
OFF
PRESET
MENU
INFO.
TOP MENU
SETUP
RETURN
AEAE
ENTER
ANGLE
Zoom
1
STANDBY/ON
ZOOM
OPEN/CLOSE
ON SCREEN
423
586
90
7
VOLUME
TUNER
MEMORY
AUDIO
SUBTITLE
PLAY MODE
ANGLE
CLEAR
BLUETOOTH
ON
OFF
PRESET
MENU
INFO.
TOP MENU
SETUP
RETURN
AEAE
ENTER
BAND
AUTO/
MANUAL
ZOOM

Capítulo 4: Reproducir discos
29 Es
Español
Puede reproducir varias veces un título, un capítulo,
una pista o un disco.
Puede combinar la repetición de la reproducción con
la reproducción de programa para reproducir varias
veces una compilación de los títulos, capítulos o pistas
favoritos (consulte la página 30).
1 Durante la reproducción, pulse (SETUP).
Aparece el menú “Setup” en la pantalla.
2 Seleccione “Play Mode” y a continuación pulse
ENTER.
Aparece el menú “Play Mode” en la pantalla.
3 Seleccione “Repeat”, seleccione una opción de
repetición y a continuación pulse ENTER.
Las opciones de repetición disponibles dependen
del tipo de disco.
•Para los discos DVD, puede seleccionar “Title
Repeat” o “Chapter Repeat”.
•Para los discos VCD, SVCD y CD de audio, puede
seleccionar “Disc Repeat” o “Track Repeat”.
•Para los discos DivX
®
y WMV, puede seleccionar
o “Title Repeat”. Con algunos discos DivX
®
,
puede seleccionar “Chapter Repeat”.
•Durante la reproducción de un programa
(consulte la página 30), puede seleccionar
“Program Repeat”.
4 Para cancelar la reproducción repetida,
seleccione “Repeat Off” y a continuación pulse
ENTER.
5 Para cerrar el menú “Setup”, pulse SETUP.
Consejo:
•Puede visualizar rápidamente el menú “Play
Mode” pulsando PLAY MODE.
Nota:
•La reproducción repetida no se puede utilizar con
los discos MP3, WMA, MPEG-4 AAC y JPEG.
Puede especificar dos puntos (A y B) en un disco
DVD, VCD, SVCD o CD de audio y a continuación
reproducir varias veces la sección entre estos dos
puntos.
1 Durante la reproducción, pulse (SETUP).
Aparece el menú “Setup” en la pantalla.
2 Seleccione “Play Mode” y a continuación pulse
ENTER.
Aparece el menú “Play Mode” en la pantalla.
3 Seleccione “A-B Repeat” y a continuación
pulse ENTER.
4 Seleccione “A(Start point)” y a continuación
pulse ENTER.
5 Seleccione “B(End point)” y a continuación
pulse ENTER.
Se reproduce varias veces la sección entre los
puntos A y B.
6 Para reanudar la reproducción normal,
seleccione “Off” y a continuación pulse ENTER.
7 Para cerrar el menú “Setup”, pulse SETUP.
Consejo:
•Puede visualizar rápidamente el menú “Play
Mode” pulsando PLAY MODE.
Nota:
•Los puntos A y B deben estar dentro del mismo
título (DVD) o pista (VCD, SVCD, CD de audio).
Reproducción de repetición
VOLUME
MEMORY
AUDIO
SUBTITLE
PLAY MODE
ANGLE
CLEAR
BLUETOOTH
ON
OFF
PRESET
MENU
INFO.
TOP MENU
SETUP
RETURN
AEAE
ENTER
AUTO/
MANUAL
ENTER
SETUP
PLAY MODE
Reproducción repetida A–B
VOLUME
DOCK
TUNER
MEMORY
DVD/USB
AUX/PORTABLE
AUDIO
SUBTITLE
PLAY MODE
ANGLE
CLEAR
BLUETOOTH
ON
OFF
PRESET
MENU
INFO.
TOP MENU
SETUP
RETURN
AEAE
ENTER
BAND
AUTO/
MANUAL
ENTER
SETUP
PLAY MODE
4

Capítulo 4: Reproducir discos
30 Es
Puede reproducir títulos o capítulos (DVD-Video) o
pistas (VCD, SVCD o CD) de audio en orden aleatorio.
1 Durante la reproducción, pulse SETUP.
Aparece el menú “Setup” en la pantalla.
2 Seleccione “Play Mode” y a continuación pulse
ENTER.
Aparece el menú “Play Mode” en la pantalla.
3 Seleccione “Random”, seleccione una opción
aleatoria y a continuación pulse ENTER.
Las opciones aleatorias disponibles dependen del
tipo de disco.
•Para los discos DVD, puede seleccionar “Random
Title” o “Random Chapter”.
•Para los discos VCD, SVCD y CD de audio, puede
seleccionar “On”.
4 Para cancelar la reproducción aleatoria,
seleccione “Random Off” y a continuación
pulse ENTER.
5 Para cerrar el menú “Setup”, pulse SETUP.
Consejos:
•Durante la reproducción aleatoria, pulse
Siguiente ( ) para seleccionar otro título,
capítulo o pista. Pulse Anterior ( ) para volver
al comienzo del título, capítulo o pista actual.
•Puede visualizar rápidamente el menú “Play
Mode” pulsando PLAY MODE.
Notas:
•No puede combinar la reproducción aleatoria con
la reproducción del programa.
•No se puede utilizar la reproducción aleatoria con
discos DVD-VR (DVD-R/RW/R DL de modo
VR), DivX
®
, WMV, JPEG, MP3, WMA o MPEG-4
AAC o mientras se visualiza un menú DVD.
Puede crear un programa de sus títulos, capítulos o
pistas favoritos para la reproducción.
1 Durante la reproducción, pulse SETUP.
Aparece el menú “Setup” en la pantalla.
2 Seleccione “Play Mode” y a continuación pulse
ENTER.
Aparece el menú “Play Mode” en la pantalla.
3 Seleccione “Program”, seleccione “Create/Edit”
de la lista de opciones de programa y a
continuación pulse ENTER.
4 Utilice los botones del cursor ( / / / )
para seleccionar un título, capítulo o pista y
pulse ENTER para añadirlo al programa.
El elemento seleccionado se añade al programa y
el intervalo de programa se desplaza hacia abajo.
•Para los discos DVD, puede añadir títulos o
capítulos al programa.
•Para los discos CD, VCD de audio y SVCD, puede
añadir pistas al programa.
5 Repita el paso 4 para añadir más elementos al
programa.
Puede añadir hasta 24 elementos al programa.
•Para insertar un elemento nuevo en el programa,
seleccione el intervalo en que desea insertarlo,
seleccione el título, capítulo o pista que desea
insertar y a continuación pulse ENTER.
•Para eliminar un intervalo, selecciónelo y a
continuación pulse CLEAR.
Reproducción aleatoria
VOLUME
DOCK
TUNER
MEMORY
DVD/USB
AUX/PORTABLE
AUDIO
SUBTITLE
PLAY MODE
ANGLE
CLEAR
BLUETOOTH
ON
OFF
PRESET
MENU
INFO.
TOP MENU
SETUP
RETURN
AEAE
ENTER
BAND
AUTO/
MANUAL
ENTER
SETUP
PLAY MODE
Reproducción programada
ZOOM
ON SCREEN
90
VOLUME
MUTE
DOCK
TUNER
MEMORY
SOUND
DVD/USB
PURE DIRECT
AUX/PORTABLE
AUDIO
SUBTITLE
PLAY MODE
ANGLE
CLEAR
BLUETOOTH
ON
OFF
PRESET
MENU
INFO.
TOP MENU
SETUP
RETURN
AEAE
ENTER
BAND
AUTO/
MANUAL
ENTER
CLEAR
SETUP
PLAY MODE

Capítulo 4: Reproducir discos
31 Es
Español
6 Para reproducir el programa, pulse
Reproducir ( ).
Los elementos en el programa se reproducen en
orden.
Durante la reproducción, utilice Siguiente ( )
y Anterior ( ) para seleccionar los elementos
siguientes y anteriores en el programa.
■ Opciones del menú “Program”
Además de “Create/Edit”, el menú “Program” tiene las
siguientes opciones:
• Playback Start: Inicia la reproducción del
programa.
• Playback Stop: Desactiva la reproducción del
programa, pero mantiene el programa en la
memoria.
• Playback Delete: Borra el programa.
7 Para cerrar el menú “Setup”, pulse SETUP.
Consejo:
•Puede visualizar rápidamente el menú “Play
Mode” pulsando PLAY MODE.
Notas:
•El programa se elimina cuando se expulsa el
disco, se selecciona una fuente de entrada
diferente de DVD o se desactiva el DRX-730.
•No se puede utilizar la reproducción del
programa con discos DVD-VR (DVD-R/RW/R
DL de modo VR), DivX
®
, WMV, JPEG, MP3,
WMA o MPEG-4 AAC o mientras se visualiza un
menú del DVD.
Puede buscar discos por título, capítulo o número de
pista, así como por tiempo.
1 Durante la reproducción, pulse SETUP.
Aparece el menú “Setup” en la pantalla.
2 Seleccione “Play Mode” y a continuación pulse
ENTER.
Aparece el menú “Play Mode” en la pantalla.
3 Seleccione “Search Mode”, seleccione una
opción de búsqueda y a continuación pulse
ENTER.
Las opciones de búsqueda disponibles dependen
del tipo de disco.
•Para los discos DVD, puede seleccionar “Title
Search”, “Chapter Search” o “Time Search”.
•Para los discos VCD, SVCD y CD de audio, puede
seleccionar “Track Search” o “Time Search”.
•Para los discos DivX
®
y WMV, puede seleccionar
o “Time Search”. Para algunos discos DivX
®
también puede seleccionar “Chapter Search”.
Nota:
•Sólo se puede seleccionar Time Search durante la
reproducción y sólo funciona dentro del título o
pista actual.
Buscar discos
1
STANDBY/ON
ZOOM
OPEN/CLOSE
ON SCREEN
423
586
90
7
VOLUME
TUNER
MEMORY
AUDIO
SUBTITLE
PLAY MODE
ANGLE
CLEAR
BLUETOOTH
ON
OFF
PRESET
MENU
INFO.
TOP MENU
SETUP
RETURN
AEAE
ENTER
BAND
AUTO/
MANUAL
ENTER
SETUP
Botones
numéricos
4

Capítulo 4: Reproducir discos
32 Es
4 Utilice los botones numéricos para introducir
un título, capítulo o número de pista a la vez.
El tiempo se introduce en minutos y segundos.
Para introducir el tiempo de 45 minutos, por
ejemplo, pulse 4, 5, 0 y 0. Para introducir 1 hora,
20 minutos y 30 segundos, pulse 8, 0, 3 y 0.
5 Pulse ENTER para localizar y reproducir el
título, capítulo, pista o tiempo especificado.
6 Para cerrar el menú “Setup”, pulse SETUP.
Nota:
•Para los discos DivX
®
y WMV, el tiempo
localizado puede ser unos segundos diferente al
tiempo especificado.
Puede reproducir un pase de diapositivas de
imágenes JPEG guardadas en un disco de datos.
Cargue el CD que contiene las imágenes JPEG y a
continuación pulse Reproducir ( ) para iniciar el
pase de diapositivas.
Empezando con la primera imagen de la primera
carpeta, el pase de diapositivas muestra cada imagen
de cada carpeta en el CD en orden alfabético.
Las imágenes se escalarán automáticamente para que
aparezcan en pantalla con el mayor tamaño posible.
Si el disco contiene archivos de fotos JPEG y archivos
de música (MP3, WMA, MPEG-4 AAC), los archivos
de música se reproducirán varias veces durante el
pase de diapositivas. Y, Pausa ( ), Siguiente ( ),
Anterior ( ), Rebobinar ( ) y Avance Rápido
() controlarán la reproducción de música, no el
pase de diapositivas.
Se pueden utilizar los siguientes botones durante la
reproducción del pase de diapositivas.
Notas:
•Las imágenes más grandes necesitan más tiempo
para cargarse y es posible que no aparezcan de
inmediato.
•En un único disco, el DRX-730, acepta hasta 299
carpetas y cada carpeta puede contener hasta 648
archivos y carpetas.
Reproducir los pases de
diapositivas JPEG
1
STANDBY/ON
ZOOM
OPEN/CLOSE
ON SCREEN
423
586
90
7
VOLUME
TUNER
MEMORY
AUDIO
SUBTITLE
PLAY MODE
ANGLE
CLEAR
BLUETOOTH
ON
OFF
PRESET
MENU
INFO.
TOP MENU
SETUP
RETURN
AEAE
ENTER
BAND
AUTO/
MANUAL
MENU
ZOOM
Botón Descripción
Pausa ( )
Pausa el pase de diapositivas (o la
reproducción de música si el disco
contiene archivos de música)
Siguiente
()
Seleccione la siguiente imagen (o la
pista si el disco contiene archivos de
música)
Anterior
()
Seleccione la imagen anterior (o la
pista si el disco contiene archivos de
música)
Cursor
( )/( )
Pausa el pase de diapositivas y gira y
cambia la imagen actual. Para
reanudar la reproducción del pase de
diapositivas, pulse Reproducir ( ).
ZOOM
Pausa el pase de diapositivas y amplía
la imagen actual. Púlselo
repetidamente para seleccionar la
ampliación de 2x, 4x o 1x. Para
reanudar la reproducción del pase de
diapositivas, pulse Reproducir ( ).
MENU
Visualiza Disc Navigator (consulte a
continuación).

Capítulo 4: Reproducir discos
33 Es
Español
Puede utilizar Disc Navigator para buscar y
seleccionar títulos, capítulos y pistas en discos DVD,
VCD y SVCD.
1 Durante la reproducción, pulse SETUP.
Aparece el menú “Setup” en la pantalla.
2 Seleccione “Disc Navigator” y a continuación
pulse ENTER.
Aparece una lista de elementos en la pantalla. Los
elementos disponibles dependen del tipo de disco.
Los siguientes elementos están disponibles para cada
tipo de disco.
3 Seleccione el tipo de elemento que desea
buscar y a continuación pulse ENTER.
Aparecen seis imágenes miniaturas en la pantalla
que indican el contenido del tipo que ha
especificado. Si selecciona “Time”, las miniaturas
indicarán el contenido a intervalos de 10 minutos.
4 Utilice Siguiente ( ) y Anterior ( ) para
visualizar otras miniaturas si están
disponibles.
5 Utilice los botones del cursor ( / / / )
para seleccionar la miniatura que desee
reproducir y a continuación pulse ENTER.
Se empieza a reproducir el elemento seleccionado.
También puede utilizar los botones numéricos y
ENTER para seleccionar las miniaturas.
Utilizar Disc Navigator con los
discos DVD-Video, VCD y SVCD
1
STANDBY/ON
ZOOM
OPEN/CLOSE
ON SCREEN
423
586
90
7
VOLUME
MUTE
DOCK
TUNER
MEMORY
SOUND
DVD/USB
PURE DIRECT
AUX/PORTABLE
AUDIO
SUBTITLE
PLAY MODE
ANGLE
CLEAR
BLUETOOTH
ON
OFF
PRESET
MENU
INFO.
TOP MENU
SETUP
RETURN
AEAE
ENTER
BAND
AUTO/
MANUAL
ENTER
SETUP
Botones
numéricos
Disc Navigator
Title
Chapter
Disco Elemento
DVD-Video
Title
Chapter
1
1. Sólo se pueden seleccionar capítulos con títulos actuales.
VCD, SVCD
Track
Time
DVD-VR
(Modo VR DVD-R/
RW/R DL)
2
2. Las grabaciones realizadas en un grabador de DVD se
denominan títulos originales. Las grabaciones editadas
basadas en dichos títulos originales se denominan títulos de
la lista de reproducción.
Original: Title
Original: Time
Playlist: Title
Playlist: Time
01
04
02
05
03
06
Disc Navigator: Title
01- 49: - -
4

Capítulo 4: Reproducir discos
34 Es
Puede utilizar Disc Navigator para buscar y
seleccionar archivos MP3, WMA, MPEG-4 AAC,
DivX
®
, WMV y JPEG en discos de datos.
1 Pulse SETUP.
Aparece el menú “Setup” en la pantalla.
2 Seleccione “Disc Navigator” y a continuación
pulse ENTER.
Aparece “Disc Navigator” en la pantalla.
3 Utilice los botones del cursor ( / / / )
para seleccionar la pista, el archivo o la
carpeta que desea reproducir.
•Utilice Arriba/Abajo ( / ) para subir y bajar
por la lista de archivos y carpetas.
•Utilice Izquierda ( ) para retroceder un nivel en
el árbol de directorios. O seleccione la carpeta
superior de la lista (…) y pulse ENTER.
•Utilice ENTER o Derecha ( ) para abrir la
carpeta seleccionada.
Al seleccionar un archivo de imagen JPEG, Disc
Navigator muestra una previsualización de
miniaturas.
4 Para reproducir la pista, archivo o carpeta
seleccionado, pulse ENTER.
•Si ha seleccionado un archivo MP3, WMA,
MPEG-4 AAC, DivX
®
o WMV, se reproducen
todos los archivos de la misma carpeta,
empezando por ese archivo.
•Si ha seleccionado un archivo de imagen JPEG,
todos los archivos de la misma carpeta se
reproducirán en un pase de diapositivas,
empezando por ese archivo.
5 Para cerrar el menú “Setup”, pulse SETUP.
Consejos:
•Si el disco contiene archivos de imágenes JPEG y
archivos de música (MP3, WMA, MPEG-4 AAC),
puede escuchar la música mientras mira el pase de
diapositivas. Sólo tiene que iniciar la
reproducción de música como se ha descrito
anteriormente y a continuación seleccionar un
archivo de imagen JPEG e iniciar la reproducción
del pase de diapositivas. Se reproducirán varias
veces todos los archivos dentro de las carpetas
actuales. Y, Reproducir, ( ), Pausa ( ),
Siguiente ( ) y Anterior ( ) controlarán el
pase de diapositivas, no la reproducción de la
música.
•Disc Navigator sólo reproduce los archivos de la
carpeta actual. Para reproducir todos los archivos
del disco, cierre Disc Navigator e inicie la
reproducción pulsando Reproducir ( ),
consulte (“Reproducir los pases de diapositivas
JPEG” en la página 32).
Utilizar Disc Navigator con los
discos MP3, WMA, MPEG-4
AAC, DivX
®
, WMV y JPEG
ZOOM
ON SCREEN
90
VOLUME
MUTE
DOCK
TUNER
MEMORY
SOUND
DVD/USB
PURE DIRECT
AUX/PORTABLE
AUDIO
SUBTITLE
PLAY MODE
ANGLE
CLEAR
BLUETOOTH
ON
OFF
PRESET
MENU
INFO.
TOP MENU
SETUP
RETURN
AEAE
ENTER
BAND
AUTO/
MANUAL
ENTER
SETUP
File1
File2
File3
File4
File5
Folder2
00:00/ 00:00 0kbps

Capítulo 4: Reproducir discos
35 Es
Español
Puede visualizar el título, capítulo, pista u otra
información durante la reproducción.
Durante la reproducción, pulse ON SCREEN varias
veces para visualizar la información.
Para ocultar la información, pulse varias veces ON
SCREEN hasta que desaparezca.
En la pantalla del DRX-730 también se visualiza
algún tipo de información, como el tiempo restante
del disco.
Puede visualizar el formato de audio durante la
reproducción.
Durante la reproducción, pulse DISPLAY.
Aparece el formato de audio en la pantalla.
A continuación se presentan diferentes formatos de
audio.
Nota:
•Sólo se puede visualizar el formato de audio
cuando se selecciona la fuente de entrada DVD y
la reproducción aún no ha terminado.
Visualizar información del
disco
1
STANDBY/ON
ZOOM
OPEN/CLOSE
ON SCREEN
423
586
90
7
AUDIO
SUBTITLE
PLAY MODE
ANGLE
CLEAR
BLUETOOTH
ON
OFF
ON SCREEN
Visualizar el formato de audio
Pantalla Descripción
PCM PCM (disco DVD-Video)
Dolby D Dolby Digital (disco DVD-Video)
MPEG2 MPEG2 (disco DVD-Video)
DTS DTS (disco DVD-Video)
CDDA CD de audio
VCD CD de vídeo
SVCD CD de súper vídeo
DTS CD DTS CD
DATA DISC
MP3, WMA, MPEG-4 AAC, DivX
®
,
WMV o JPEG
VOLUME
TIMER SLEEP
MUTE
DOCK
TUNER
MEMORY
SOUND
DVD/USB
PURE DIRECT
AUX/PORTABLE
DISPLAY
DIMMER
BAND
AUTO/
MANUAL
DISPLAY
TT
TT
YY
YY
PP
PP
EE
EE
..
..
DD
DD
oo
oo
ll
ll
bb
bb
yy
yy
DD
DD
4

36 Es
Este capítulo explica cómo utilizar el sintonizador
para escuchar sus emisoras de radio favoritas y cómo
guardarlas como presintonías.
■ Indicadores de pantalla del sintonizador
Los siguientes indicadores de pantalla se utilizan para
sintonizar y presintoninzar emisoras de radio.
A TUNED
Se ilumina cuando se sintoniza una emisora de radio.
B PRESET
Se ilumina al seleccionar presintonías de radio.
C STEREO
Se ilumina al escuchar una emisora FM en estéreo.
D AUTO
Se ilumina cuando se selecciona el modo de
sintonización automática. Se apaga cuando se
selecciona el modo de sintonización manual.
E MEMORY
Se ilumina cuando se presintonizan emisoras de
radio.
F Número de presintonía
Visualiza el número de presintonía.
G Banda
Visualiza la banda (FM o AM).
H Frecuencia
Visualiza la frecuencia.
Puede sintonizar emisoras de radio automática o
manualmente.
En el modo de sintonización automática, el DRX-730
busca automáticamente las emisoras de radio.
1 Pulse TUNER para seleccionar la fuente de
entrada del TUNER.
2 Pulse BAND varias veces para seleccionar FM o
AM.
3 Pulse AUTO/MANUAL varias veces para
seleccionar el modo de sintonización
automática (indicador AUTO activado).
En el modo de sintonización automática, está
activado el indicador AUTO en la pantalla.
4 Para buscar emisoras de una frecuencia de
banda superior, pulse Arriba ( ). Para buscar
emisoras de una frecuencia de banda inferior,
pulse Abajo ( ).
El sintonizador busca la siguiente emisora
disponible. Cuando se encuentra una emisora, la
búsqueda se detiene y se ilumina el indicador
TUNED de la pantalla.
El indicador STEREO de la pantalla se iluminará
al sintonizar una emisora FM estéreo. Si la señal es
débil, la recepción puede ser en mono.
Capítulo 5: Utilizar el sintonizador
MEMORY
TUNED
STEREO
AUTO
PRESET
F
G
H
B
A
E
C
D
A1 FM 100.1 MHz
Sintonizar emisoras de radio
Sintonización automática
VOLUME
MUTE
DOCK
TUNER
MEMORY
SOUND
DVD/USB
PURE DIRECT
AUX/PORTABLE
PRESET
MENU
INFO.
TOP MENU
SETUP
RETURN
AEAE
ENTER
BAND
AUTO/
MANUAL
AUTO/MANUAL
BAND
TUNER
AA
AA
MM
MM
77
77
00
00
00
00
kk
kk
HH
HH
zz
zz

Capítulo 5: Utilizar el sintonizador
37 Es
Español
Notas:
•Si la sintonización automática no encuentra
algunas de las emisoras más débiles en su área,
intente utilizar la sintonización manual.
•Si la recepción FM estéreo produce interferencias,
pulse AUTO/MANUAL para seleccionar el modo
de sintonización manual y escuchar en mono.
En el modo de sintonización manual, puede
sintonizar las emisoras manualmente.
1 Pulse TUNER para seleccionar la fuente de
entrada del TUNER.
2 Pulse BAND varias veces para seleccionar FM o
AM.
3 Pulse AUTO/MANUAL varias veces para
seleccionar el modo de sintonización manual
(indicador AUTO apagado).
En el modo de sintonización manual, el indicador
AUTO de la pantalla está apagado.
4 Para incrementar la frecuencia de
sintonización, pulse Arriba ( ). Para
disminuir la frecuencia de sintonización, pulse
Abajo ( ).
La frecuencia cambiará continuamente si
mantiene pulsado el botón.
Nota:
•Sólo es posible la recepción mono en el modo de
sintonización manual.
■ Cambiar el intervalo de frecuencia
(Sólo los modelos para Asia y Taiwán)
Dependiendo del espaciado de frecuencia utilizado
por las emisoras de radio de su zona, es posible que
necesite cambiar el ajuste del intervalo de
sintonización.
1 Ajuste el DRX-730 a en espera.
2 Mientras mantiene pulsado Detener ( ) en el
DRX-730, pulse STANDBY/ON, manteniendo
pulsado Detener ( ) hasta que aparezca
“DVD — NO REQ.” en la pantalla.
3 Pulse Detener ( ).
“TU – AM9/FM50” (el ajuste por defecto) aparece
en la pantalla.
4 Pulse Reproducir/Pausa ( / ) varias veces
para seleccionar el intervalo de sintonización
utilizado en su área: “TU – AM10/FM100” o “TU
– AM9/FM50”.
• TU – AM10/FM100: AM 10kHz/FM 100kHz
• TU – AM9/FM50: AM 9kHz/FM 50kHz
5 Pulse STANDBY/ON.
Se ha ajustado el intervalo de frecuencia y el
DRX-730 pasa a en espera. Pulse STANDBY/ON
de nuevo para volver a activarlo.
Sintonización manual
VOLUME
TIMER SLEEP
MUTE
DOCK
TUNER
MEMORY
SOUND
DVD/USB
PURE DIRECT
AUX/PORTABLE
DISPLAY
DIMMER
PRESET
MENU
INFO.
TOP MENU
SETUP
RETURN
AEAE
ENTER
BAND
AUTO/
MANUAL
AUTO/MANUAL
BAND
TUNER
FF
FF
MM
MM
11
11
00
00
00
00
..
..
77
77
MM
MM
HH
HH
zz
zz
STANDBY/ON
USB PORTABLE PHONES
INPUT
VOLUME
TIMER
HDMI
PROGRESSIVE
Stop ( )
Play/Pause ( )
STANDBY/ON
Reproducir/Pausa ( / )
Detener ( )
5

Capítulo 5: Utilizar el sintonizador
38 Es
Puede guardas sus emisoras de radio favoritas como
presintonías para que las pueda seleccionar más
fácilmente. Puede guardar hasta 40 presintonías, que
se organizan en 5 bancos (A~E), con 8 emisoras (1~8)
en cada banco. Las presintonías se pueden guardar
automáticamente o manualmente.
En el modo de presintonización automática, el
DRX-730 presintoniza automáticamente todas las
emisoras de radio disponibles en su área.
1 Pulse TUNER para seleccionar la fuente de
entrada del TUNER.
2 Para empezar la presintonización automática,
pulse MEMORY durante 3 segundos.
Empezando por la frecuencia FM inferior, el
DRX-730 busca la banda FM para emisoras de
radio válidas y, empezando por el número de
presintonía A-1, las guarda de una en una.
Después de buscar en toda la banda FM, se busca
en la banda AM, con lo que finaliza la
presintonización.
Notas:
•Si se guardan todas las presintonías disponibles
antes de completar la búsqueda, la
presintonización automática finalizará.
•La presintonización automática sobrescribirá
todas las presintonías existentes.
En el modo de presintonización manual, puede
presintonizar manualmente las emisoras de radio.
1 Pulse TUNER para seleccionar la fuente de
entrada del TUNER.
2 Sintonice la emisora de radio que desee
presintonizar (consulte la página 36).
3 Pulse MEMORY.
El indicador MEMORY de la pantalla empieza a
parpadear.
4 Mientras parpadea el indicador MEMORY
utilice Izquierda/derecha ( / ) para
seleccionar un banco de presintonías (A~E) y
utilice Arriba/abajo ( / ) para seleccionar
un número de presintonía.
Si no pulsa ningún botón durante 10 segundos, el
proceso de presintonización se cancelará.
5 Pulse MEMORY o ENTER para guardar la
presintonía.
Se guarda la presintonía y el indicador MEMORY
de la pantalla deja de parpadear.
Repita los pasos 2 a 5 para guardar más emisoras
de radio favoritas.
Notas:
•Además de la información de frecuencia y banda
FM/AM), cada presintonía guarda el ajuste de
sintonización automática/manual.
•Para guardar una emisora de radio diferente en
una presintonía, simplemente siga los pasos 2 a 5.
Se sobrescribirá la emisora anterior.
Utilizar las presintonías
Presintonización automática
VOLUME
TIMER SLEEP
MUTE
DOCK
TUNER
MEMORY
SOUND
DVD/USB
PURE DIRECT
AUX/PORTABLE
DISPLAY
DIMMER
PRESET
MENU
INFO.
TOP MENU
SETUP
RETURN
AEAE
ENTER
BAND
AUTO/
MANUAL
MEMORY
TUNER
Presintonización manual
VOLUME
TIMER SLEEP
MUTE
DOCK
TUNER
MEMORY
SOUND
DVD/USB
PURE DIRECT
AUX/PORTABLE
DISPLAY
DIMMER
PRESET
MENU
INFO.
TOP MENU
SETUP
RETURN
AEAE
ENTER
BAND
AUTO/
MANUAL
ENTER
MEMORY
TUNER

Capítulo 5: Utilizar el sintonizador
39 Es
Español
Después de presintonizar una emisora de radio,
puede sintonizarla simplemente seleccionando la
presintonía adecuada.
1 Pulse TUNER para seleccionar la fuente de
entrada del TUNER.
2 Pulse BAND varias veces para seleccionar
“PRESET”.
El indicador PRESET de la pantalla se ilumina.
3 Utilice Arriba/abajo ( / ) para seleccionar
una presintonía.
También puede utilizar Izquierda/derecha ( / )
para seleccionar los bancos de presintonía A~E y
los botones numéricos 1 a 8 para seleccionar las
presintonías.
Seleccionar presintonías
1
STANDBY/ON
ZOOM
OPEN/CLOSE
ON SCREEN
423
586
90
7
VOLUME
TIMER SLEEP
MUTE
DOCK
TUNER
MEMORY
SOUND
DVD/USB
PURE DIRECT
AUX/PORTABLE
DISPLAY
DIMMER
AUDIO
SUBTITLE
PLAY MODE
ANGLE
CLEAR
BLUETOOTH
ON
OFF
PRESET
MENU
INFO.
TOP MENU
SETUP
RETURN
AEAE
ENTER
BAND
AUTO/
MANUAL
BAND
TUNER
Botones
numéricos
5

40 Es
Puede programar el temporizador del DRX-730 para
que inicie y detenga la reproducción en horas
predefinidas. Podría, por ejemplo, utilizar el
DRX-730 como un despertador y despertarse con su
emisora de radio o disco de música favorito.
Para utilizar el temporizador, debe:
1. Ajustar la fuente de entrada.
2. Ajustar la hora de activación.
3. Ajustar la hora de desactivación.
4. Activar el temporizador.
Estos ajustes se explican a continuación.
Notas:
•El reloj del DRX-730 se debe ajustar para
programar el temporizador (consulte la
página 21).
•Se puede cancelar en cualquier momento la
programación del temporizador pulsando
TIMER.
Puede especificar la fuente de entrada que se debe
utilizar cuando el temporizador activa el DRX-730.
1 Pulse TIMER y a continuación utilice
Arriba/abajo ( / ) para seleccionar “Timer
Input”.
El indicador del TIMER parpadea.
2 Utilice Izquierda/derecha ( / ) para
seleccionar la fuente de entrada.
Las fuentes de entrada se seleccionan en el siguiente
orden:
También puede utilizar DVD/USB,
AUX/PORTABLE, DOCK, TUNER y BAND en el
control remoto o el control INPUT en el
DRX-730 para seleccionar la fuente de entrada.
Si ha seleccionado TUNER, utilice Arriba/abajo
(/) para seleccionar una presintonía.
3 Pulse ENTER.
Se ha ajustado la fuente de entrada y aparece el
ajuste “ON Time” en la pantalla (consulte la
página 41).
Nota:
•Puede utilizar la fuente de entrada DOCK para la
reproducción del temporizador con un iPod, pero
no con un dispositivo Bluetooth.
Capítulo 6: Utilizar el temporizador
Ajustar la fuente de entrada
VOLUME
TIMER SLEEP
MUTE
DOCK
TUNER
MEMORY
SOUND
DVD/USB
PURE DIRECT
AUX/PORTABLE
DISPLAY
DIMMER
PLAY MODE
CLEAR
PRESET
MENU
INFO.
TOP MENU
SETUP
RETURN
AEAE
ENTER
BAND
AUTO/
MANUAL
DOCK
TIMER
BAND
DVD/USB
TUNER
AUX/
PORTABLE
TT
TT
ii
ii
mm
mm
ee
ee
rr
rr
II
II
nn
nn
pp
pp
uu
uu
tt
tt
DD
DD
VV
VV
DD
DD
DVD USB FM AM PRESET AUX PORTABLE DOCK
AA
AA
11
11
FF
FF
MM
MM
88
88
77
77
..
..
55
55
MM
MM
HH
HH
zz
zz

Capítulo 6: Utilizar el temporizador
41 Es
Español
Puede ajustar la hora en que desea que el DRX-730 se
active e inicie la reproducción.
1 Pulse TIMER y a continuación utilice
Arriba/abajo ( / ) para seleccionar “ON
Time”. Si aparece la pantalla de selección de
presintonías, pulse ENTER.
El indicador TIMER parpadea y después de unos
momentos, aparece “ON 0:00” en la pantalla. (Si
utiliza el reloj de 12 horas, se visualizará “ON AM
12:00”).
2 Pulse ENTER.
La pantalla de las horas empieza a parpadear.
3 Utilice Arriba/abajo ( / ) para ajustar las
horas.
4 Pulse Derecha ( ).
La pantalla de los minutos empieza a parpadear.
5 Utilice Arriba/Abajo ( / ) para ajustar los
minutos.
Utilice Izquierda/Derecha ( / ) para cambiar
entre las pantallas de horas y minutos en caso
necesario.
6 Pulse ENTER.
Se ha ajustado la hora de activación y aparece el
ajuste “OFF Time” en la pantalla (consulte a
continuación).
Puede ajustar la hora en que desea que el DRX-730
detenga la reproducción y pase a espera.
1 Pulse TIMER y a continuación utilice
Arriba/Abajo ( / ) para seleccionar “OFF
Time”. Si aparece la pantalla de selección de
presintonías, pulse ENTER.
El indicador TIMER parpadea y después de unos
momentos, aparece “OFF hh:mm” en la pantalla.
(Si utiliza el reloj de 12 horas, se visualizará “OFF
AM hh:mm”).
Inicialmente, la hora de desactivación está ajustada a
1 hora después de la hora de activación especificada.
2 Pulse ENTER.
La pantalla de las horas empieza a parpadear.
3 Utilice Arriba/Abajo ( / ) para ajustar las
horas.
4 Pulse Derecha ( ).
La pantalla de los minutos empieza a parpadear.
5 Utilice Arriba/Abajo ( / ) para ajustar los
minutos.
Utilice Izquierda/Derecha ( / ) para cambiar entre
las pantallas de horas y minutos en caso necesario.
6 Pulse ENTER.
Se ha ajustado la hora de desactivación y aparece
el ajuste “Timer Set” en la pantalla (consulte la
página 42).
Ajustar la hora de activación
VOLUME
TIMER SLEEP
MUTE
DOCK
TUNER
MEMORY
SOUND
DVD/USB
PURE DIRECT
AUX/PORTABLE
DISPLAY
DIMMER
PRESET
MENU
INFO.
TOP MENU
SETUP
RETURN
AEAE
ENTER
BAND
AUTO/
MANUAL
ENTER
TIMER
OO
OO
NN
NN
TT
TT
ii
ii
mm
mm
ee
ee
00
00
00
00
::
::
00
00
00
00
00
00
00
00
::
::
00
00
00
00
Ajustar la hora de desactivación
VOLUME
TIMER SLEEP
MUTE
DOCK
TUNER
MEMORY
SOUND
DVD/USB
PURE DIRECT
AUX/PORTABLE
DISPLAY
DIMMER
PRESET
MENU
INFO.
TOP MENU
SETUP
RETURN
AEAE
ENTER
BAND
AUTO/
MANUAL
ENTER
TIMER
OO
OO
FF
FF
FF
FF
TT
TT
ii
ii
mm
mm
ee
ee
00
00
00
00
::
::
00
00
00
00
00
00
00
00
::
::
00
00
00
00
6

Capítulo 6: Utilizar el temporizador
42 Es
Puede activar y desactivar el temporizador según
desee y recordará los ajustes. Si utiliza el
temporizador como un despertador, por ejemplo, es
posible que desee desactivarlo mientras esté de
vacaciones.
1 Pulse TIMER y a continuación utilice
Arriba/Abajo ( / ) para seleccionar “Timer
Set”. Si aparece la pantalla de selección de
presintonías, pulse ENTER.
Después de unos momentos, aparece “Timer
Set—>OFF” o “Timer Set—>ON” en la pantalla.
2 Utilice Izquierda/Derecha ( / ) para
seleccionar “ON” u “OFF”.
3 Pulse ENTER.
Cuando el temporizador está activado, se ilumina
el indicador TIMER en la pantalla.
Notas:
•Si se ha ajustado la hora de activación o la hora de
desactivación, puede activar o desactivar el
temporizador mientras el DRX-730 está en espera
simplemente pulsando TIMER.
•Cuando el temporizador está activado, si el
DRX-730 está activado, se ilumina el indicador
TIMER en la pantalla. En cambio, si está en
espera, se iluminará el LED TIMER del panel
frontal.
•Cuando el temporizador se ha programado y
activado, si el DRX-730 está en espera, se activará
a la hora de activación especificada y reproducirá
la fuente de entrada seleccionada. A la hora de
desactivación especificada, la reproducción se
detendrá y el DRX-730 pasará a en espera.
•Si el DRX-730 ya está activado a la hora de
activación especificada, los ajustes del
temporizador no producirán efecto. De la misma
forma, si el DRX-730 ya está desactivado a la hora
de desactivación especificada, no producirán
efecto.
•Si ha seleccionado la fuente de entrada DVD, no
se olvide de cargar un disco en el DRX-730. Del
mismo modo, si ha seleccionado la fuente de
entrada USB asegúrese de que un dispositivo de
almacenimiento USB esté conectado al DRX-730.
•Si ha seleccionado la fuente de entrada AUX,
PORTABLE o DOCK, consulte el manual de
instrucciones para los componentes conectados
para información acerca del funcionamiento del
temporizador y del despertador.
•Si se han ajustado el temporizador sleep y la hora
de desactivación, el DRX-730 pasará a espera en
la hora que se produzca en primer lugar.
Activar y desactivar el
temporizador
VOLUME
TIMER SLEEP
MUTE
DOCK
TUNER
MEMORY
SOUND
DVD/USB
PURE DIRECT
AUX/PORTABLE
DISPLAY
DIMMER
PRESET
MENU
INFO.
TOP MENU
SETUP
RETURN
AEAE
ENTER
BAND
AUTO/
MANUAL
ENTER
TIMER
TT
TT
ii
ii
mm
mm
ee
ee
rr
rr
SS
SS
ee
ee
tt
tt
TT
TT
ii
ii
mm
mm
ee
ee
rr
rr
SS
SS
ee
ee
tt
tt
˘˘
˘˘
OO
OO
FF
FF
FF
FF
TIMER

43 Es
Español
Este capítulo explica cómo disfrutar del contenido
guardado en un dispositivo portátil, como un
reproductor de música, un iPod, un dispositivo de
almacenamiento USB o un reproductor de música o
teléfono móvil compatible con Bluetooth.
Puede conectar un reproductor de música al jack
PORTABLE del panel frontal del DRX-730 y disfrutar
de la música guardada en el mismo a través de los
altavoces del DRX-730 en alta calidad.
1 Utilizando un cable con un conector mini (se
vende por separado), conecte la salida de
audio del reproductor de música al jack
PORTABLE del panel frontal del DRX-730.
2 Pulse AUX/PORTABLE varias veces para
seleccionar la fuente de entrada PORTABLE.
3 Inicie la reproducción en el reproductor de
música.
Utilice el control VOLUME del DRX-730 para
ajustar el volumen.
Nota:
•Si está bajado totalmente el control de volumen
del reproductor de música, puede que no oiga
nada, por lo tanto, ajústelo a un nivel adecuado.
Con una base Dock universal para iPod de Yamaha
(YDS-10 o YDS-11) conectada al jack DOCK del
DRX-730, puede disfrutar de la música guardada en su
iPod mediante los altavoces del DRX-730 en alta
calidad. También puede utilizar el control remoto del
DRX-730 para controlar el iPod. Además, el DRX-730
recargará el iPod mientras disfruta de la música.
El DRX-730 es compatible con modelos de iPod de 4ª
generación (con rueda de clic) y modelos posteriores,
incluyendo el iPod classis, el iPod nano, el iPod mini y
el iPod touch. Consulte el manual de instrucciones de
la base Dock de Yamaha para saber para con qué
modelos de iPod es compatible y para detalles de
instalación.
Notas:
•Ajuste el DRX-730 a en espera y desconecte el
cable de alimentación antes de conectar o
desconectar una base Dock de Yamaha.
•Asegúrese de que el iPod tenga instalado el
firmware más reciente antes de utilizarlo con el
DRX-730. Consulte el sitio web de Apple para
más información.
1 Utilizando el cable para la base Dock de
Yamaha incluido, conecte un extremo del
cable a la base Dock de Yamaha y conecte el
otro extremo al jack DOCK del panel posterior
del DRX-730.
2 Pulse STANDBY/ON ( ) para activar el
DRX-730.
Capítulo 7: Reproducción de dispositivos portátiles
Reproducción del reproductor
de música
STANDBY/ON
USB PORTABLE PHONES
INPUT
VOLUME
TIMER
HDMI
PROGRESSIVE
AUDIO
OUT
Cable con un conector mini
(se vende por separado)
Reproductor de música
Reproducción de un iPod
OUT
OPTICAL
VIDEO
COMPONENT
DIGITALDOCK VIDEO OUT
P
Y
R
P
B
ANT
FM
UNBAL.
75
OUT IN
MIN
AUX
OUT
SUBWOOFER
SPEAKERS
R
R
SPEAKER
CLASS 2 WIRING
CABLAGE CLASSE 2
6
HDMI
MAINS
AM
ANT
GND
Cable para la base Dock
(se entrega con la base
Dock de Yamaha)
Base Dock de Yamaha
7

Capítulo 7: Reproducción de dispositivos portátiles
44 Es
3 Inserte el iPod en la base Dock de Yamaha.
El indicador DOCK de la pantalla se ilumina.
4 Pulse DOCK para seleccionar la fuente de
entrada DOCK.
Aparece “iPod connected” en la pantalla.
5 Utilice el control remoto del DRX-730 para
reproducir la música guardada en el iPod.
(Apunte al DRX-730, no al iPod).
■ Indicadores de pantalla del iPod
Se utilizan los siguientes indicadores de pantalla del
DRX-730 para la reproducción del iPod. Los
indicadores 2~9 funcionan sólo en el modo Menu
(consulte a continuación).
A DOCK
Se ilumina cuando un iPod está colocado en la base
Dock de Yamaha.
B PLAYLISTS
Se ilumina cuando examina listas de reproducción.
C SHUFFLE
Se ilumina cuando la función Shuffle del iPod está
activada.
D REPEAT
Se ilumina cuando la función Repeat del iPod está
activada.
E ARTISTS
Se ilumina cuando examina artistas.
F ALBUMS
Se ilumina cuando examina álbumes.
G SONGS
Se ilumina cuando examina canciones.
H GENRES
Se ilumina cuando examina géneros.
I Cursores ( / / )
Indican qué botones del cursor se pueden utilizar.
■ Modo Simple y modo Menu
Puede utilizar uno de los dos modos para controlar el
iPod: El modo Simple o el modo Menu.
•En el modo Simple, puede utilizar el control
remoto del DRX-730 o los controles del iPod para
controlar el iPod y la pantalla del iPod para
visualizar los menús.
•En el modo Menu, los menús del iPod aparecen
en la pantalla del DRX-730 y se utiliza el control
remoto del DRX-730 para controlar el iPod. No se
pueden utilizar los controles del iPod y el logotipo
Yama ha ap arece en la pantalla del iPod.
Pulse INFO varias veces para seleccionar el modo
“Simple” o el modo “Menu”.
■ Control de reproducción
Se pueden utilizar los siguientes botones de control
remoto del DRX-730 para controlar la reproducción
del iPod.
■ Navegación por menús
Se pueden utilizar los siguientes botones de control
remoto del DRX-730 para navegar por los menús del
iPod.
GENRES
SONGS
ALBUMS
ARTISTSPLAYLISTS
DOCK
SHUFFLE
REPEAT
1 C D FE2 G H
I
Botón Descripción
Reproducir ( )
Inicia la reproducción. En el
modo Simple, funciona como
Reproducir/Pausa.
Pausa ( )
Pausa la reproducción. En el
modo Simple, funciona como
Reproducir/Pausa.
Detener ( ) Detiene la reproducción
Avanzar rápido
()
Avanza rápido
Rebobinar ( ) Rebobina
Siguiente ( ) Selecciona la pista siguiente
Anterior ( )
Selecciona el inicio de la pista
actual. Vuelva a pulsarlo para
seleccionar las pistas anteriores.
Botón Descripción
INFO
Selecciona el modo “Menu” o el modo
“Simple”.
Arriba ( ) Sube por el menú
Abajo ( )
Baja por el menú. Mientras se visualiza
información de la pista, pulse repetidas
veces para ver más información.
Izquierda
()
Visualiza el menú a un nivel superior.
Mientras se visualiza la información de
la pista, púlselo para visualizar un
menú.
Derecha
()
Visualiza el menú a un nivel inferior.
(No se puede utilizar para iniciar la
reproducción).
ENTER
Visualiza el menú a un nivel inferior.
Cuando se ha seleccionado una
canción, púlselo para iniciar la
reproducción. Cuando se ha
seleccionado un ajuste (por ejemplo,
Shuffle o Repeat) púlselo varias veces
para seleccionar una opción.

Capítulo 7: Reproducción de dispositivos portátiles
45 Es
Español
Notas:
•Se cargará el iPod mientras el DRX-730 está
activado, pero no mientras el DRX-730 está en
espera.
•Los vídeos y las imágenes guardadas en el iPod no
se emiten desde el DRX-730.
•Según el modelo de iPod y la versión del
firmware, algunas funciones del iPod pueden no
funcionar como se esperaba y algunas pueden no
funcionar en absoluto.
•En el modo Menu, cualquier carácter no
compatible se sustituirá por un carácter con un
guión bajo (_).
•Consulte el manual de instrucciones del iPod para
información acerca del uso del iPod.
Puede conectar un dispositivo de almacenamiento
USB al puerto USB del panel frontal del DRX-730 y
disfrutar de la música (MP3, WMA, MPEG-4 AAC)
guardada a través de los altavoces del DRX-730 en
alta calidad. También puede reproducir un pase de
diapositivas de imágenes JPEG.
Notas:
•No se reconocen todos los dispositivos de
almacenamiento USB.
•Se pueden reproducir sólo archivos MP3, WMA,
MPEG-4 AAC y JPEG sin protección contra copia
(DRM).
•El DRX-730 es compatible dispositivos de
almacenamiento en masa USB formateados con
FAT16 o FAT32, incluyendo los dispositivos de
memoria flash USB, reproductores de audio
digitales y discos duros USB. No puede conectar
directamente el ordenador al DRX-730.
•No se garantiza la reproducción de todos los
dispositivos de almacenamiento USB y la
habilidad de activar todos los dispositivos USB.
Yama ha no acepta ninguna responsabilidad en el
caso improbable de que se pierdan datos mientras
el dispositivo de almacenamiento USB esté
conectado al DRX-730.
•Los dispositivos de almacenamiento USB de gran
capacidad tardarán más en leerse. Es posible que
los dispositivos de alta capacidad tarden varios
minutos en leerse.
•Los concentradores USB no son compatibles.
•Mientras se selecciona la fuente de entrada USB,
no estará disponible el menú Setup.
•Conecte sólo los dispositivos de almacenamiento
USB al puerto USB.
•Si aparece el mensaje “USB ERROR” en la
pantalla, es posible que el DRX-730 no pueda
suministrar suficiente energía al dispositivo para
que funcione correctamente. Si el dispositivo no
es uno de almacenamiento USB, no lo utilice con
el DRX-730. Si el dispositivo de almacenamiento
USB está provisto de su propio adaptador de
alimentación, utilícelo para activar el dispositivo
de almacenamiento USB. Si el dispositivo de
almacenamiento USB no está provisto de su
adaptador de alimentación, no lo utilice con el
DRX-730.
1 Pulse DVD/USB varias veces para seleccionar
la fuente de entrada USB.
Active el TV y seleccione la entrada AV a la que el
DRX-730 está conectado.
2 Conecte el dispositivo de almacenamiento
USB al puerto USB del panel frontal del
DRX-730.
3 Pulse MENU para visualizar “Disc Navigator” y
seleccione la pista que desea reproducir. O,
pulse Reproducir ( ) para iniciar la
reproducción de todos los archivos del
dispositivo de almacenamiento USB.
Si ha cargado un disco que contiene imágenes
JPEG, se iniciará un pase de diapositivas.
Consulte “Reproducir un pase de diapositivas
JPEG” en la página 46 para más información.
4 Para detener la reproducción, pulse Detener
().
5 Antes de desconectar el dispositivo de
almacenamiento USB, primero seleccione otra
fuente de entrada.
Reproducción USB
STANDBY/ON
USB PORTABLE PHONES
INPUT
VOLUME
TIMER
HDMI
PROGRESSIVE
Dispositivo de
almacenamiento USB
7

Capítulo 7: Reproducción de dispositivos portátiles
46 Es
La mayoría de las funciones de reproducción de
discos explicadas en el capítulo “Reproducir discos”
en la página 23 también se pueden utilizar con los
dispositivos de almacenamiento USB.
La siguiente tabla detalla las funciones de
reproducción.
Puede reproducir un pase de diapositivas de
imágenes JPEG guardadas en un dispositivo de
almacenamiento USB.
Pulse Reproducir ( ) para iniciar el pase de
positivas.
Empezando por la primera foto de la primera carpeta,
el pase de diapositivas visualiza cada foto en cada
carpeta del dispositivo de almacenamiento USB por
orden alfabético.
Las imágenes se escalarán automáticamente para que
aparezcan en pantalla en el mayor tamaño posible.
Si el dispositivo de almacenamiento USB contiene
archivos de imágenes JPEG y archivos de música
(MP3, WMA, MPEG-4 AAC), los archivos de música
se reproducirán repetidamente durante el pase de
diapositivas. Y, Pausa ( ), Siguiente ( ), Anterior
( ), Rebobinar ( ) y Avanzar rápido ( )
controlarán la reproducción de la música, no del pase
de diapositivas.
Se pueden utilizar los siguientes botones durante la
reproducción del pase de diapositivas.
Notas:
•Las imágenes más grandes necesitan más tiempo
para cargarse y es posible que no aparezcan de
inmediato.
•En un único dispositivo de almacenamiento USB,
el DRX-730 acepta hasta 299 carpetas y cada
carpeta puede contener hasta 648 archivos y
carpetas.
Puede utilizar Disc Navigator para examinar y
seleccionar archivos MP3, WMA, MPEG-4 AAC y
JPEG guardados en un dispositivo de
almacenamiento USB.
1 Pulse MENU.
Aparece “Disc Navigator” en la pantalla.
2 Utilice los botones del cursor ( / / / )
para seleccionar la pista, el archivo o carpeta
que desea reproducir.
•Utilice Arriba/Abajo ( / ) para subir y bajar
por la lista de archivos y carpetas.
•Utilice Izquierda ( ) para retroceder un nivel en
el árbol de directorios. O seleccione la carpeta
superior de la lista (…) y pulse ENTER.
Controles de reproducción
Botón Descripción
Reproducir ( ) Inicia la reproducción
Pausa ( ) Pausa la reproducción
Detener ( ) Detiene la reproducción
Avanzar rápido
()
Avanza rápido
Rebobinar ( ) Rebobina
Siguiente ( ) Selecciona la pista siguiente
Anterior ( )
Selecciona el inicio de la pista
actual. Vuelva a pulsarlo para
seleccionar las pistas
anteriores.
MENU
Visualiza “Disc Navigator”
(consulte la página 46).
Reproducir un pase de diapositivas
JPEG
Botón Descripción
Pausa ( )
Pausa el pase de diapositivas (o la
reproducción de música si el
dispositivo contiene archivos de
música)
Siguiente
()
Selecciona la imagen siguiente (o la
pista si el dispositivo contiene
archivos de música)
Anterior
()
Selecciona la imagen anterior (o la
pista si el dispositivo contiene
archivos de música)
Cursor
( )/( )
Pausa el pase de diapositivas y gira y
cambia la imagen actual. Para
reanudar la reproducción del pase de
diapositivas, pulse Reproducir ( ).
ZOOM
Pausa el pase de diapositivas y amplía
la imagen actual. Púlselo
repetidamente para seleccionar la
ampliación de 2x, 4x o 1x. Para
reanudar la reproducción del pase de
diapositivas, pulse Reproducir ( ).
MENU
Visualiza “Disc Navigator” (consulte
la página 46).
Utilizar Disc Navigator con los
dispositivos de almacenamiento USB

Capítulo 7: Reproducción de dispositivos portátiles
47 Es
Español
•Utilice ENTER o Derecha ( ) para abrir la
carpeta seleccionada.
Al seleccionar un archivo de imagen JPEG, Disc
Navigator muestra una previsualización de
miniaturas.
3 Para reproducir la pista, archivo o carpeta
seleccionado, pulse ENTER.
Si ha seleccionado un archivo MP3, WMA o
MPEG-4 AAC, se reproducen todos los archivos
de la misma carpeta, empezando por ese archivo.
Si ha seleccionado un archivo de imagen JPEG,
todos los archivos de la misma carpeta se
reproducirán en un pase de diapositivas,
empezando por ese archivo.
Consejos:
•Si el dispositivo de almacenamiento USB contiene
archivos de imagen JPEG y archivos de música
(MP3, WMA, MPEG-4 AAC), puede escuchar la
música mientras mira el pase de diapositivas. Sólo
tiene que iniciar la reproducción de música como
se ha descrito anteriormente y a continuación
seleccionar un archivo de imagen JPEG e iniciar la
reproducción del pase de diapositivas. Se
reproducirán varias veces todos los archivos
dentro de las carpetas actuales. Y, Reproducir,
( ), Pausa ( ), Siguiente ( ) y Anterior
() controlarán el pase de diapositivas, no la
reproducción de la música.
•Disc Navigator sólo reproduce los archivos en la
carpeta actual. Para reproducir todos los archivos
en el dispositivo de almacenamiento USB, cierre
Disc Navigator e inicie la reproducción pulsando
Reproducir ( ), consulte “Reproducir un pase
de diapositivas JPEG” en la página 46.
Nota:
•Con algunos reproductores de música digitales, es
posible que los nombres de los archivos no se
visualicen correctamente.
Con un receptor de audio inalámbrico Bluetooth
YBA-10 de Yamaha opcional conectado al jack
DOCK del DRX-730, puede disfrutar de la música
guardada en su dispositivo Bluetooth, por ejemplo,
un reproductor de música o un teléfono móvil
compatible con Bluetooth, mediante los altavoces del
DRX-730 en alta calidad. También puede utilizar el
control remoto del DRX-730 para controlar la
reproducción de música del dispositivo Bluetooth.
Notas:
•Ajuste el DRX-730 a en espera y desconecte el
cable de alimentación antes de conectar o
desconectar el YBA-10 de Yamaha.
•Consulte el manual de instrucciones del YBA-10
de Yamaha para información acerca del uso del
YBA-10.
•Consulte el manual de instrucciones del
dispositivo Bluetooth para información acerca del
uso del dispositivo Bluetooth.
•Según el modelo de dispositivo Bluetooth y la
versión de firmware, algunas funciones de
reproducción pueden no funcionar de la forma
esperada y algunas pueden no funcionar en
absoluto.
■ Instalación de Bluetooth
Utilizando el cable para la base Dock incluido con
el YBA-10 de Yamaha, conecte un extremo del
cable al YBA-10 de Yamaha y conecte el otro
extremo al jack DOCK del panel posterior del
DRX-730.
■ Emparejamiento de Bluetooth
Antes de utilizar un dispositivo Bluetooth con el
DRX-730, debe emparejarlo o registrarlo con el
YBA-10 de Ya m a h a .
Reproducción de Bluetooth
OUT
OPTICAL
VIDEO
COMPONENT
DIGITALDOCK VIDEO OUT
P
Y
R
P
B
ANT
FM
UNBAL.
75
OUT IN
MIN
AUX
OUT
SUBWOOFER
SPEAKERS
R
R
SPEAKER
CLASS 2 WIRING
CABLAGE CLASSE 2
6
HDMI
MAINS
AM
ANT
GND
Cable para la base Dock
(se entrega con del
YBA-10 de Yamaha)
Yamaha YBA-10
7

Capítulo 7: Reproducción de dispositivos portátiles
48 Es
1 Pulse DOCK para seleccionar la fuente de
entrada DOCK.
2 Active el dispositivo Bluetooth y asegúrese de
que esté en modo descubrible.
3 Mantenga pulsado BLUETOOTH ON durante 3
segundos para iniciar el emparejamiento.
El emparejamiento se inicia, el indicador DOCK
parpadea y aparece “Searching…” en la pantalla.
Durante el emparejamiento, el YBA-10 de
Yama ha busca dispositivos Bluetooth compatibles
y registra todos los que encuentra. Sólo se debe
realizar el emparejamiento cuando se utiliza un
dispositivo Bluetooth con el YBA-10 de Yamaha
por primera vez o después de haberse eliminado
la información del emparejamiento. Consulte el
manual de instrucciones del YBA-10 de Yamaha
para más detalles acerca de emparejamiento.
Para cancelar emparejamiento, pulse
BLUETOOTH OFF.
4 Asegúrese de que el dispositivo Bluetooth
haya detectado el YBA-10 de Yamaha.
Aparecerá el YBA-10 de Yamaha como “YBA-10
YAMAHA” o similar en el dispositivo Bluetooth.
5 En el dispositivo Bluetooth, seleccione
Yamaha YBA-10 e introduzca la llave maestra
“0000”.
Cuando se haya completado el emparejamiento,
aparecerá el mensaje “Completed” en la pantalla.
Nota:
•Se cancelará el emparejamiento si no se
encuentran dispositivos Bluetooth compatibles
dentro de 8 minutos, si se cambia la fuente de
entrada en el DRX-730 o se ajusta el DRX-730 a
en espera.
■ Conectar dispositivos Bluetooth
Después de emparejar un dispositivo Bluetooth con el
YBA-10 de Yamaha puede conectarse a él y
reproducir la música guardada.
1 Pulse DOCK para seleccionar la fuente de
entrada DOCK.
2 Pulse BLUETOOTH ON.
El YBA-10 de Yamaha intenta conectar con el
último dispositivo Bluetooth que se ha utilizado o
emparejado y aparece “Searching…” en la
pantalla.
Cuando se establece una conexión, aparece “BT
connected” en la pantalla.
3 Utilice el control remoto del DRX-730 o los
controles del dispositivo Bluetooth para
reproducir la música guardada en el
dispositivo Bluetooth.
Para desconectar un dispositivo Bluetooth y
ajustar el DRX-730 a modo no descubrible, pulse
BLUETOOTH OFF. Aparece el mensaje
“Disconnected” en la pantalla.
Para conectarse a otro dispositivo Bluetooth, primero
se debe desconectar del dispositivo conectado
actualmente y después iniciar una conexión en el otro
dispositivo Bluetooth.
■ Control de reproducción
Se pueden utilizar los siguientes botones de control
remoto del DRX-730 para controlar la reproducción
en un dispositivo Bluetooth.
Apunte el control remoto hacia el DRX-730, no hacia
el dispositivo Bluetooth.
Notas:
•Sólo se puede utilizar el control remoto del
DRX-730 para controlar un dispositivo Bluetooth
cuando está conectado a dicho dispositivo.
•Aunque se hayan registrado varios dispositivos
durante el emparejamiento, si no se encuentra el
último dispositivo Bluetooth, el YBA-10 de Yamaha
no intentará conectarse a los otros dispositivos.
•El DRX-730 se desconectará automáticamente del
dispositivo Bluetooth conectado cuando se inicie
una desconexión en dicho dispositivo, sea
imposible realizar una comunicación porque el
dispositivo está demasiado lejos o el DRX-730
esté ajustado a en espera.
•No se desconectará el dispositivo Bluetooth
cuando se selecciona una fuente de entrada
diferente en el DRX-730.
•El YBA-10 de Yamaha es compatible sólo con
reproductores de música y teléfonos móviles
Bluetooth que sean compatibles con A2DP o
AVRC P.
•Bluetooth tiene un área de funcionamiento de
visibilidad directa de hasta 10 metros (33 pies).
Asegúrese de que no haya obstáculos entre el
YBA-10 de Yamaha y el dispositivo Bluetooth.
Botón Descripción
Reproducir ( ) Inicia la reproducción
1
1. Dependiendo del dispositivo Bluetooth, los botones Reproducir
y Pausa pueden funcionar como botones Reproducir/Pausa.
Pausa ( ) Pausa la reproducción
1
Detener ( ) Detiene la reproducción
Siguiente ( ) Selecciona la pista siguiente
Anterior ( )
Selecciona el inicio de la pista
actual. Vuelva a pulsarlo para
seleccionar las pistas anteriores.

49 Es
Español
Puede conectar un componente de grabación, como
un grabador CDR, MDR o de cassettes, al DRX-730
para grabar y reproducir.
1 Conecte el componente de grabación al
DRX-730.
Consulte “Conectar un grabador (CDR, MDR
etc.)” en la página 14 para más información.
2 Active el DRX-730 y el componente de
grabación.
3 En el DRX-730, seleccione la fuente de entrada
que desea grabar.
Si ha seleccionado la fuente de entrada DVD,
cargue el disco que desee grabar.
4 Inicie la grabación en el componente de
grabación.
5 Inicie la reproducción en el DRX-730.
Para reproducir la grabación, seleccione la fuente
de entrada AUX (consulte la página 16).
Si el componente de grabación cuenta con una
entrada digital óptica, puede conectarla al jack
OPTICAL DIGITAL OUT del DRX-730 y grabar
de forma digital.
Notas:
•Consulte el manual de instrucciones del
componente de grabación para obtener
información acerca de su utilización.
•Los ajustes de volumen, graves, agudos y balance
del DRX-730 no afectan a la grabación.
•Para evitar un bucle de señal, la fuente de entrada
AUX no se emite a través de los jacks AUX OUT,
por lo tanto, no puede grabar una fuente
conectada a AUX IN.
•La salida OPTICAL DIGITAL OUT no emite
señales de la radio ni de los jacks DOCK, AUX IN
ni PORTABLE. Para grabar desde estas fuentes,
conecte los jacks AUX OUT del DRX-730 a la
entrada de audio analógica en el componente de
grabación.
•Dependiendo del material fuente, OPTICAL
DIGITAL OUT del DRX-730 puede emitir audio
digital en formato MPEG, Dolby Digital o DTS
que el componente de grabación no puede grabar.
En este caso, realice los ajustes de la salida de
audio digital para que se emita PCM (consulte la
página 52).
•No se pueden grabar discos ni archivos que
utilicen protección contra copia.
Capítulo 8: Grabar
8

50 Es
Este capítulo explica los menús “Audio Settings” y
“Video Adjust”.
Estos ajustes sólo afectan la reproducción del disco.
1 Pulse SETUP.
Aparece el menú “Setup” en la pantalla.
2 Seleccione “Audio Settings” y a continuación
pulse ENTER.
Aparece el menú “Audio Settings” en la pantalla.
3 Utilice los botones del cursor ( / / / ) y
ENTER para seleccionar y cambiar los ajustes.
Estos ajustes se explican a continuación.
4 Para cerrar el menú “Setup”, pulse SETUP.
Nota:
•Los efectos de los ajustes Audio dependen del
nivel de volumen de los altavoces, del televisor y
del receptor de AV, así como de otros ajustes. Para
cada ajuste, cambie entre las opciones disponibles
y seleccione la que proporciona los mejores
resultados.
■ Audio DRC
Con la función Audio DRC (Control de Gama
Dinámica) los sonidos más bajos se oyen más y los
sonidos más altos se oyen menos, lo cual es ideal para
ver películas a altas horas de la noche sin molestar a
los demás.
•High, Medium, Low, Off (por defecto).
Notas:
•Audio DRC sólo funciona con fuentes Dolby
Digital.
•Con algunos discos, puede que Audio DRC tenga
un efecto bajo o nulo.
•La función Audio DRC también se aplica a las
señales de salida digital cuando “Digital Out” esté
ajustado a “On” y “Dolby Digital Out” esté
ajustado a “Dolby Digital > PCM”. Consulte la
página 52 para obtener más información acerca
de los ajustes de la salida de audio digital.
•La función Audio DRC también se aplica a la
salida de audio desde la salida HDMI, con las
mismas restricciones anteriormente
mencionadas.
■ Dialog
Al mirar una película u otro material en un disco
DVD-Video, dependiendo del formato de audio,
puede que el canal central tenga un volumen
demasiado bajo y se oiga con dificultad. Con la
función Dialog, puede hacer que el diálogo tenga un
volumen más alto y se pueda oír con más facilidad.
•High, Medium, Low, Off (por defecto).
Notas:
•Al utilizar la función Dialog, dependiendo del
material de fuente, el diálogo puede
distorsionarse, en cuyo caso debe seleccionar un
ajuste inferior.
•La función Dialog también se aplica a las señales
de salida digital que se han convertido a PCM de 2
canales. Consulte la página 52 para obtener más
información acerca de los ajustes de la salida de
audio digital.
•La función Dialog también se aplica a la salida de
audio desde la salida HDMI, con las mismas
restricciones anteriormente mencionadas.
Capítulo 9: Ajustes de audio y ajuste de vídeo
Menú “Audio Settings”
VOLUME
TIMER SLEEP
MUTE
DOCK
TUNER
MEMORY
SOUND
DVD/USB
PURE DIRECT
AUX/PORTABLE
DISPLAY
DIMMER
PRESET
MENU
INFO.
TOP MENU
SETUP
RETURN
AEAE
ENTER
BAND
AUTO/
MANUAL
ENTER
SETUP
Audio Settings
Audio DRC
Dialog
High
Medium
Low
Off

Capítulo 9: Ajustes de audio y ajuste de vídeo
51 Es
Español
Los ajustes “Video Adjust” afectan a la imagen del
televisor.
1 Seleccione la fuente de entrada de DVD y a
continuación pulse SETUP.
Aparece el menú “Setup” en la pantalla.
Nota:
•El menú “Video Adjust” está disponible sólo
cuando se ha seleccionado la fuente de entrada de
DVD.
2 Seleccione “Video Adjust” y a continuación
pulse ENTER.
Aparece el menú “Video Adjust” en la pantalla.
3 Utilice los botones del cursor ( / / / ) y
ENTER para seleccionar y cambiar los ajustes.
Estos ajustes se explican a continuación.
Los ajustes “Brightness”, “Contrast”, “Hue” y
“Chroma Level” se pueden definir utilizando
Izquierda/Derecha ( / ).
4 Para cerrar el menú “Setup”, pulse SETUP.
■ Sharpness
Ajusta la nitidez de los bordes de la imagen.
•Fine, Standard (por defecto), Soft.
■ Brightness
Ajusta el brillo de la imagen.
• –20~+20 (por defecto: 0)
■ Contrast
Ajusta el contraste entre las áreas más claras y más
oscuras de la imagen.
• –16~+16 (por defecto: 0)
■ Gamma
Ajusta la apariencia de las áreas oscuras de la imagen.
•High, Medium, Low, Off (por defecto).
■ Hue
Ajusta el equilibrio entre el verde y el rojo.
•de verde 9 a rojo 9 (por defecto: 0)
■ Chroma Level
Ajusta la saturación de color.
• –9~+9 (por defecto: 0)
Notas:
•Los efectos de los ajustes “Video Adjust”
dependen del material original y del televisor, y en
algunos casos puede que no sea muy visible.
•El ajuste “Sharpness” no se aplica a la salida de
vídeo a través del jack HDMI.
Menú “Video Adjust”
VOLUME
TIMER SLEEP
MUTE
DOCK
TUNER
MEMORY
SOUND
DVD/USB
PURE DIRECT
AUX/PORTABLE
DISPLAY
DIMMER
PRESET
MENU
INFO.
TOP MENU
SETUP
RETURN
AEAE
ENTER
BAND
AUTO/
MANUAL
ENTER
SETUP
Sharpness
Brightness
Contrast
Gamma
Hue
Chroma Level
Video Adjust
Fine
Standard
Soft
Brightness min max 0
9

52 Es
Este capítulo explica el menú “Initial Settings”.
El menú “Initial Settings” contiene los ajustes de
salida de audio digital, vídeo, idioma, pantalla, entre
otros.
Cuando un menú aparece en gris, significa que no se
puede cambiar. Los ajustes iniciales no se pueden
cambiar durante la reproducción del disco. Primero
debe detener la reproducción.
1 Seleccione la fuente de entrada de DVD y a
continuación pulse SETUP.
Aparece el menú “Setup” en la pantalla.
Nota:
•El menú “Initial Settings” está disponible sólo
cuando se ha seleccionado la fuente de entrada de
DVD.
2 Seleccione “Initial Settings” y a continuación
pulse ENTER.
Aparece el menú “Initial Settings” en la pantalla.
3 Utilice los botones del cursor ( / / / ) y
ENTER para seleccionar y cambiar los ajustes.
Estos ajustes se explican a continuación.
Notas:
•Los ajustes “HDMI Resolution” y “HDMI Color”
sólo se deben cambiar si ha conectado un
componente HDMI al jack HDMI.
•Los ajustes “Component Out” no se pueden
cambiar si ha conectado un componente HDMI al
jack HDMI.
•Los ajustes “Component Out” se pueden cambiar
automáticamente debido a los ajustes “HDMI
Resolution” y “HDMI Color”.
•Mientras “HDMI Audio” está ajustado a “ON”
(consulte la página 13) o un componente está
conectado al jack HDMI, sólo está disponible el
ajuste “Digital Out”.
•Cuando “HDMI Audio” está ajustado a “ON”
(consulte la página 13), 96kHz PCM reduce la
frecuencia de muestreo a 48kHz
independientemente del ajuste “96kHz PCM
Out”.
■ Digital Out
Activa y desactiva OPTICAL DIGITAL OUT.
• On (por defecto): OPTICAL DIGITAL OUT está
activada.
• Off: OPTICAL DIGITAL OUT está desactivada.
■ Dolby Digital Out
Activa y desactiva la conversión de Dolby Digital a
PCM. Si ha conectado la salida OPTICAL DIGITAL
OUT al receptor/decodificador de AV y no es
compatible con Dolby Digital, seleccione Dolby
Digital > PCM.
• Dolby Digital (por defecto): Las señales Dolby
Digital se emiten tal como son.
• Dolby Digital > PCM: Las señales Dolby Digital
se convierten y se emiten como PCM de 2 canales.
■ DTS Out
Activa y desactiva la conversión de DTS a PCM. Si ha
conectado la salida OPTICAL DIGITAL OUT al
receptor/decodificador de AV y no es compatible con
DTS, seleccione DTS > PCM.
• DTS (por defecto): Las señales DTS se emiten tal
como son.
• DTS > PCM: Las señales DTS se convierten y se
emiten como PCM de 2 canales.
Notas:
•Si selecciona DTS y el receptor/decodificador de
AV no es compatible con DTS, es posible que se
oigan interferencias.
•Cuando se selecciona DTS > PCM, también se
puede elegir el tipo de mezcla con reducción de
canales DTS (consulte “DTS Downmix” en la
página 55).
■ 96kHz PCM Out
Activa y desactiva la reducción de la frecuencia de
muestreo de 96kHz. Si ha conectado la salida
OPTICAL DIGITAL OUT al receptor/decodificador
de AV y es compatible con 96kHz PCM, seleccione
96kHz.
• 96 kHz > 48 kHz (por defecto): Las señales de
audio digital 96kHz PCM reducen la frecuencia
de muestreo y se emiten a 48kHz.
Capítulo 10: Ajustes iniciales
Menú “Initial Settings”
Video Output
Language
Display
Options
Initial Settings
Digital Audio Out Digital Out
Dolby Digital Out
DTS Out
96 kHz PCM Out
MPEG Out
On
Dolby Digital
DTS
96kHz > 48kHz
MPEG > PCM
Ajustes “Digital Audio Out”

Capítulo 10: Ajustes iniciales
53 Es
Español
• 96 kHz: Las señales de audio digital 96kHz PCM
se emiten tal como son.
■ MPEG Out
Activa y desactiva la conversión de MPEG a PCM. Si
ha conectado la salida OPTICAL DIGITAL OUT a un
receptor/decodificador de AV que es compatible con
MPEG, seleccione MPEG.
• MPEG: Las señales MPEG se emiten tal como
son.
• MPEG > PCM (por defecto): Las señales MPEG
se convierten y se emiten como PCM de 2 canales.
■ TV Screen
Ajusta la relación de aspecto de la emisión de imagen
a través de las salidas analógicas y de vídeo HDMI.
Seleccione una opción que coincida con la relación de
aspecto de su televisor.
• 4:3 (Letter Box) (por defecto): Selecciónelo si
tiene un televisor 4:3 convencional. Las películas
en formato panorámico se visualizarán con barras
negras en las partes superior e inferior.
• 4:3 (Pan & Scan): Selecciónelo si tiene un
televisor 4:3 convencional. Las películas en
formato panorámico se visualizarán con los
laterales recortados para que la imagen se adapte a
la pantalla completa. Los vídeos de discos que no
son compatibles con Pan & Scan se emitirán en
formato 4:3 Letter Box.
• 16:9 (Wide): Selecciónelo si tiene un televisor
panorámico.
• 16:9 (Compressed): Esta opción se puede
seleccionar sólo si el televisor está conectado al
jack HDMI y el ajuste “HDMI Resolution” está
definido a “1920 x 1080p, 1920 x 1080i” o a “1280
x 720p”. Selecciónelo si desea visualizar
correctamente el contenido 4:3 en un televisor
panorámico. Se visualizarán barras negras en
cada lado de la imagen.
■ Component Out
Ajusta COMPONENT VIDEO OUT a la salida de
video entrelazado o progresivo. El barrido progresivo
ofrece una mejor calidad de imagen y reduce el ruido
de imagen.
Si el televisor o el proyector es compatible con el
barrido progresivo, seleccione “Progressive”. Para más
información, consulte el manual de instrucciones del
televisor.
• Interlace (por defecto): La salida COMPONENT
VIDEO OUT emite el vídeo entrelazado.
• Progressive: La salida COMPONENT VIDEO
OUT emite vídeo progresivo y el indicador
PROGRESSIVE de la pantalla se ilumina.
Para utilizar el vídeo progresivo, seleccione la opción
“Progressive” y pulse ENTER. Cuando aparezca el
mensaje de confirmación en pantalla, pulse ENTER
para confirmar o pulse RETURN para cancelar.
Notas:
•Cuando cambia entre entrelazado y progresivo, la
imagen se puede distorsionar.
•Cuando “HDMI Resolution” está ajustado a “720
x 480i (NTSC)” o a “720 x 576i (PAL)”, el ajuste
“Component Out” se ajusta forzosamente a
“Interlace”. Si se selecciona otra resolución, el
ajuste “Component Out” se ajusta forzosamente a
“Progressive”.
•Si el televisor no es compatible con “Progressive” y
lo selecciona involuntariamente, es posible que
pierda totalmente la imagen. En este caso, conecte
el DRX-730 a un televisor con una conexión de
vídeo compuesto y vuelva a cambiar el ajuste a
entrelazado o reinicie el DRX-730 (consulte la
página 62).
• EL CONSUMIDOR DEBERÍA SABER QUE NO
TODOS LOS TELEVISORES DE ALTA
DEFINICIÓN SON TOTALMENTE
COMPATIBLES CON ESTE PRODUCTO Y ES
POSIBLE QUE APAREZCAN
INTERFERENCIAS EN LA IMAGEN. EN CASO
DE PROBLEMAS DE IMAGEN CON EL
BARRIDO PROGRESIVO 525, ES
RECOMENDABLE QUE CAMBIE LA
CONEXIÓN A LA SALIDA “DEFINICIÓN
ESTÁNDAR”. SI TIENE ALGUNA PREGUNTA
EN RELACIÓN A LA COMPATIBILIDAD DE
SU MONITOR DE VÍDEO CON ESTA
UNIDAD, CONTACTE CON SU CENTRO DE
ATENCIÓN AL CLIENTE.
■ HDMI Resolution
Ajusta la resolución del vídeo de salida HDMI.
• 1920 x 1080p: Selecciónelo si el televisor HDMI
es compatible con el vídeo progresivo 1080p.
• 1920 x 1080i: Selecciónelo si el televisor HDMI es
compatible con el vídeo entrelazado 1080i.
• 1280 x 720p: Selecciónelo si el televisor HDMI es
compatible con el vídeo progresivo 720p.
• 720 x 480p (NTSC), 720 x 576p (PAL) (por
defecto): Selecciónelo si el televisor HDMI es
compatible con el vídeo progresivo 480p o 576p.
• 720 x 480i (NTSC), 720 x 576i (PAL):
Selecciónelo si el televisor HDMI es compatible
con el vídeo entrelazado 480p o 576i.
Para cambiar la resolución, seleccione una resolución
y a continuación, pulse ENTER. Cuando aparezca el
mensaje de confirmación en pantalla, pulse ENTER
para confirmar.
Ajustes “Video Output”
10

Capítulo 10: Ajustes iniciales
54 Es
Notas:
•Si cambia la resolución, la imagen se puede
distorsionar y puede que no aparezca de
inmediato.
• Reajustar los ajustes HDMI.
Si no se visualiza ninguna imagen después de cambiar
la resolución, utilice el siguiente procedimiento para
recuperar la resolución por defecto 720 x 480p
(NTSC), 720 x 576p (PAL).
1 Ajuste el DRX-730 a en espera.
2 Mientras mantiene pulsado Detener ( ) en el
DRX-730, pulse STANDBY/ON, manteniendo
pulsado Detener ( ) hasta que aparezca
“DVD — NO REQ.” en la pantalla.
3 Pulse Reproducir/Pausa ( / ” varias veces
para seleccionar “HDMI CLEAR”.
Si cambia de opinión en este punto, seleccione en
su lugar “DVD — NO REQ.”.
4 Pulse STANDBY/ON.
La resolución HDMI se ajusta a su ajuste por
defecto y el DRX-730 pasa a en espera. Pulse
STANDBY/ON de nuevo para volver a activarlo.
El ajuste “HDMI Audio” (página 13) está
desactivado.
■ HDMI Color
Ajusta la salida de color del HDMI.
• Full range RGB: Proporciona blancos muy
brillantes y negros muy profundos.
• RGB: Selecciónelo si las áreas blancas y negras de
la imagen son demasiado pronunciadas con la
opción “Full range RGB”.
• Component: Éste es el formato de vídeo
componente estándar que utilizan los
componentes HDMI.
El ajuste por defecto cambia dependiendo del
componente HDMI conectado.
Para las opciones “Other Languages” de los ajustes
“Au dio L an gu a g e”, “S u bt i tle Language” y “DVD Menu
Lang.”, también puede especificar el idioma utilizando
las abreviaciones de 2 letras o los códigos de 4 dígitos
detallados en la página 63.
1 Seleccione “Other Languages”, y a
continuación pulse ENTER.
2 Utilice Izquierda/Derecha ( / ) para
seleccionar un idioma por abreviación.
Para algunos idiomas, sólo se visualiza el número
de código.
•Para especificar un idioma utilizando códigos de
4 dígitos, utilice Arriba/Abajo ( / ) o los
botones numéricos para introducir el código
correspondiente y, a continuación, pulse ENTER.
■ Audio Language
Ajusta el idioma por defecto de la banda sonora que
se utilizará con los discos DVD-Video.
• English (por defecto): Si está disponible, se
utilizará la banda sonora inglesa.
• Languages: Si está disponible, se utilizará el
idioma seleccionado. (Los idiomas disponibles
dependen de dónde haya comprado el DRX-730).
• Other Languages: Utilice las abreviaciones y los
códigos de idioma detallados en la página 63 para
especificar idiomas que no se hayan detallado
anteriormente.
Notas:
•Con algunos discos DVD-Video, el disco ajustará
el idioma de la banda sonora independientemente
de este ajuste.
•Con algunos discos DVD-Video, puede
seleccionar el idioma de la banda sonora desde un
menú. En este caso, pulse MENU para visualizar
el menú y a continuación seleccione el idioma de
la banda sonora.
■ Subtitle Language
Ajusta el idioma del subtítulo por defecto que se
utilizará con los discos DVD-Video.
• English (por defecto): Si están disponibles, se
utilizarán subtítulos ingleses.
• Languages: Si está disponible, se utilizarán los
subtítulos en el idioma seleccionado. (Los idiomas
disponibles dependen de dónde haya comprado el
DRX-730).
• Other Languages: Utilice las abreviaciones y los
códigos de idioma detallados en la página 63 para
especificar idiomas que no se hayan detallado
anteriormente.
Ajustes de idioma

Capítulo 10: Ajustes iniciales
55 Es
Español
Notas:
•Con algunos discos DVD-Video, el disco ajustará
el idioma del subtítulo independientemente de
dicho ajuste.
•Con algunos discos DVD-Video, puede
seleccionar el idioma del subtítulo desde un
menú. En este caso, pulse MENU para visualizar
el menú y a continuación seleccione el idioma del
subtítulo.
•El ajuste “Subtitle Language” también se aplica a
los discos DivX
®
que utilizan los archivos de
subtítulos externos (consulte “Acerca de DivX®”
en la página 59).
■ DVD Menu Lang.
Ajusta el idioma por defecto que se utilizará para los
menús en los discos DVD-Video y en algunos discos
DivX
®
.
• w/Subtitle Lang. (por defecto): Si está
disponible, se utilizará el idioma del ajuste
“Subtitle Language” en todos los menús.
• Languages: Si está disponible, se utilizarán los
subtítulos en el idioma seleccionado. (Los idiomas
disponibles dependen de dónde haya comprado el
DRX-730).
• Other Languages: Utilice las abreviaciones y los
códigos de idioma detallados en la página 63 para
especificar idiomas que no se hayan detallado
anteriormente.
■ Subtitle Display
Determina si los subtítulos de los discos DVD-Video
se visualizan por defecto.
• On (por defecto): Si están disponibles, los
subtítulos se visualizan por defecto.
• Off: Los subtítulos no se visualizan por defecto.
Nota:
•Es posible que en algunos de los discos DVD-
Video los subtítulos se visualicen forzosamente,
independientemente de este ajuste.
■ OSD Language
Ajusta el idioma de los menús en pantalla.
• English (por defecto): Menús en pantalla en
inglés.
• Language: Los idiomas disponibles dependen de
dónde haya comprado el DRX-730.
■ Angle Indicator
Determina si el icono de la cámara ( ) se visualiza
en pantalla cuando se reproduce el contenido en un
disco DVD-Video que dispone de múltiples ángulos
de cámara.
• On (por defecto): Se visualiza el icono de la
cámara.
• Off: No se visualiza el icono de la cámara.
■ Parental Lock
Consulte “Bloqueo parental” a continuación.
■ DTS Downmix
Determina cómo se mezcla con reducción de canales
el audio DTS multicanal cuando el ajuste “DTS Out”
(consulte la página 52) está ajustado a “DTS > PCM”.
Seleccione “Lt/Rt” si el receptor/decodificador de AV
es compatible con Dolby Pro Logic pero no con DTS
y está conectado a OPTICAL DIGITAL OUT.
• STEREO (por defecto): El DTS multicanal se
mezcla con reducción de canales a una mezcla
estéreo de 2 canales.
• Lt/Rt: El DTS multicanal se mezcla con reducción
de canales a una mezcla surround codificada en
matrix que sea compatible con los
decodificadores matrix surround Dolby.
■ DivX(R) VOD
Consulte “DivX® VOD” en la página 57.
Ajustes “Display”
Ajustes “Option”
10

Capítulo 10: Ajustes iniciales
56 Es
Los discos DVD-Video que contienen un contenido
que puede no ser adecuado para todos puede utilizar
el sistema de bloqueo parental para restringir la
visualización. (Consulte el estuche del disco para más
información). Puede ajustar el DRX-730 para que los
discos con un elevado nivel de bloqueo parental no
puedan reproducirse sin primero introducir la
contraseña. Existen ocho niveles de bloqueo parental.
Además, algunos de los discos DVD-Video utilizan
códigos específicos según el país o la región para
bloquear contenidos inapropiados basados en el país
o región que ajuste en el DRX-730.
Para utilizar el bloqueo parental, primero debe
introducir una contraseña, ajustar el nivel de bloqueo
parental y especificar su país o región. Originalmente,
no está definida ninguna contraseña.
• Password: Se utiliza para definir la contraseña.
• Level Change: Se utiliza para ajustar el nivel de
bloqueo parental.
• Country Code: Se utiliza para especificar su país
o región.
■ Ajustar la contraseña
Debe ajustar una contraseña antes de poder definir
los ajustes “Level Change” y “Country Code”.
1 Seleccione “Password” y a continuación pulse
ENTER.
2 Utilice los botones numéricos para introducir
una contraseña de 4 dígitos.
Los números aparecen en la pantalla como
asteriscos (*).
3 Pulse ENTER para definir la contraseña.
La contraseña está definida.
Notas:
•Recomendamos que tome nota de la contraseña.
Se la ha olvidado, debe reiniciar el DRX-730
(consulte la página 62) y definir una contraseña
nueva.
•Después de definir la contraseña y ajustar el nivel
de bloqueo parental, si intenta reproducir un
disco que excede el nivel de bloqueo parental
ajustado, se le pedirá que introduzca la contraseña
y no será posible llevar a cabo la reproducción si
no introduce la contraseña correcta.
•Es posible que algunos discos DVD-Video en
lugar de no reproducir en absoluto el vídeo sólo
omitan las escenas inapropiadas.
•No todos los discos DVD-Video permiten el
bloqueo parental. Los que no lo permiten pueden
reproducirse independientemente de los ajustes
de bloqueo parental.
■ Cambiar la contraseña
Para cambiar la contraseña, debe introducir la
contraseña antigua.
1 Seleccione “Password” y a continuación pulse
ENTER.
2 Utilice los botones numéricos para introducir
la contraseña antigua y a continuación pulse
ENTER.
3 Introduzca la nueva contraseña y a
continuación pulse ENTER.
La contraseña nueva está definida.
■ Ajustar el nivel de bloqueo parental
Los discos con un contenido inadecuado tienen
niveles más elevados; los discos con contenidos
adecuados para todos tienen niveles más bajos.
Para restringir, por ejemplo, la reproducción de
discos con un nivel parental de 4 o superior, ajuste
el DRX-730 al nivel 3.
1 Seleccione “Level Change” y a continuación
pulse ENTER.
2 Utilice los botones numéricos para introducir
la contraseña y a continuación pulse ENTER.
3 Utilice Izquierda/Derecha ( / ) para ajustar
el nivel de bloqueo parental y a continuación
pulse ENTER.
El bloqueo parental está ajustado.
■ Ajustar su país o región
Puede especificar el país o la región utilizando las
abreviaciones de 2 letras o los códigos de 4 dígitos
detallados en la página 63.
1 Seleccione “Country Code” y a continuación
pulse ENTER.
2 Utilice los botones numéricos para introducir
la contraseña y a continuación pulse ENTER.
3 Utilice Arriba/Abajo ( / ) para seleccionar
su país o región por abreviaciones y a
continuación pulse ENTER.
•Para especificar su país o región utilizando
códigos de 4 dígitos, utilice Arriba/Abajo ( / )
o los botones numéricos para introducir el código
apropiado y a continuación, pulse ENTER.
Se ha ajustado el país o la región.
Bloqueo parental

Capítulo 10: Ajustes iniciales
57 Es
Español
Nota:
•El nuevo ajuste del código del país o de la región
tendrá efecto la próxima vez que cargue un disco.
Si hay un disco cargado, debe extraerlo y cargarlo
de nuevo para que el nuevo ajuste sea efectivo.
Para reproducir los archivos DivX
®
VOD (Video on
Demand) en el DRX-730, es posible que tenga que
proporcionar un código de registro DivX
®
VOD al
suministrador de contenido DivX
®
VOD. En este
caso, utilice el código de registro DivX
®
VOD que
muestra el ajuste “Display”.
• Display: Visualiza el código de registro DivX
®
VOD.
■ Visualizar el código de registro DivX
®
VOD.
1 Pulse SETUP.
Aparece el menú “Setup” en la pantalla.
2 Seleccione “Initial Settings” y a continuación
pulse ENTER.
Aparece el menú “Initial Settings” en la pantalla.
3 Seleccione “Options”, a continuación pulse
“DivX(R) VOD”, seguido de “Display” y
finalmente pulse ENTER.
Se visualiza el código de registro DivX
®
VOD.
Notas:
•Los archivos DivX
®
VOD utilizan protección
contra copia DRM (“Digital Rights Management”,
Gestión de derechos digitales) y sólo se pueden
reproducir en un reproductor registrado.
•Si intenta reproducir un archivo DivX
®
VOD que
no está autorizado para reproducirlo en el
DRX-730, aparecerá el mensaje “Authorization
Error” y no será posible llevar a cabo la
reproducción.
•Algunos archivos DivX
®
VOD sólo pueden
reproducirse un número limitado de veces.
Cuando reproduzca un archivo de este tipo en el
DRX-730, el número de veces restantes que puede
reproducirse aparecerá en la pantalla. Si intenta
reproducir un archivo para el que no quedan
reproducciones, aparecerá el mensaje “Rental
Expired” y la reproducción no será posible. Los
archivos DivX
®
VOD sin límite de reproducción
no muestran el número de reproducciones
restantes y se pueden reproducir todas las veces
que desee.
DivX
®
VOD
DivX(R) Video On Demand
Your registration code is : XXXXXXXX
To learn more visit www.divx.com/vod
Done
10

58 Es
El DRX-730 puede reproducir discos que incorporen
los siguientes logotipos:
Notas:
• CD Kodak Picture también es compatible.
•El logotipo FUJICOLOR CD COMPATIBLE es
una marca comercial de Fuji Photo Film Co. Ltd.
•El logotipo DVD es una marca comercial de DVD
Format/Logo Licensing Corporation.
•Es posible que no pueda reproducir algunos
discos CD y DVD grabables debido a las
características del disco, a rayadas o al polvo,
suciedad o condensación en el disco o la lente de
lectura, etc. Consulte “Compatibilidad del disco
grabable” a continuación para más información.
El DRX-730 cumple con el estándar de CD de audio.
No se puede garantizar el funcionamiento y
rendimiento de los discos que no cumplen con este
estándar.
Un DualDisc es un disco de doble cara con una capa
DVD para vídeo en un lado y una capa CD que se
puede reproducir en un reproductor CD estándar en
el otro.
El DRX-730 puede reproducir el lado DVD de los
DualDiscs.
Puesto que la capa CD no cumple con el estándar CD
de audio, algunos DualDiscs pueden no reproducirse.
Para más información acerca del estándar DualDisc,
consulte el fabricante o el distribuidor del disco.
■ CD-R/RW
•El DRX-730 es compatible con los discos
CD-R/RW grabados en los siguientes formatos:
CD, VCD, SVCD de audio y ISO 9660
(CD-ROM).
•Para los discos ISO 9660, utilice el sistema de
archivo ISO 9660 Level 1 or Level 2 CD-ROM o
los sistemas de archivo Joliet o Romeo extendidos.
•Los discos multisesión no son compatibles.
•No se pueden reproducir discos no finalizados.
Consulte el manual de instrucciones del disco
para más información acerca de finalizar.
•Es posible que algunos discos no se reproduzcan,
produzcan interferencias o el sonido esté
distorsionado. Esto se debe al disco y no es una
función anómala.
■ DVD-R/RW/R DL
•El DRX-730 es compatible con los discos
DVD-R/RW y DVD-R DL (doble capa) grabados
en los siguientes formatos: DVD-Video, modo VR
(modo Video Recording) y puente UDF
DVD-ROM.
•Al reproducir un contenido que ha sido editado
en una grabadora DVD (escenas eliminadas, etc.),
es posible que la imagen desaparezca
momentáneamente en los puntos de edición. No
se trata de un funcionamiento incorrecto.
•Los discos multisesión no son compatibles.
•No se pueden reproducir discos no finalizados.
Consulte el manual de instrucciones del disco
para más información acerca de finalizar.
•Es posible que algunos discos no se reproduzcan,
produzcan interferencias o el sonido esté
distorsionado. Esto se debe al disco y no es una
función anómala.
■ DVD+R/RW/R DL
•El DRX-730 es compatible con los discos
DVD+R/RW y DVD+R DL (doble capa)
grabados en los siguientes formatos: DVD-Video.
•Cuando se reproduce un contenido que ha sido
editado, es posible que la reproducción no siga la
edición de manera exacta.
Apéndice
Discos y formatos compatibles
CDs con control de copia
DualDisc
VIDEO
CD
DVD-Video DVD-R DVD-RW
DVD+R DVD+RW DVD+R DL
CD de audio CD de Vídeo CD-R CD-RW
CD Fujicolor
Super Video CD (Super VCD)
DVD-R DL
Compatibilidad del disco grabable

Apéndice
59 Es
Apéndice
Español
•Los discos multisesión no son compatibles.
•No se pueden reproducir discos no finalizados.
Consulte el manual de instrucciones del disco
para más información acerca de finalizar.
•Es posible que algunos discos no se reproduzcan,
produzcan interferencias o el sonido esté
distorsionado. Esto se debe al disco y no es una
función anómala.
•Es posible que los discos grabados en un
ordenador no sean reproducibles debido a los
ajustes del software de grabación de discos o la
configuración del ordenador.
•Tenga cuidado de utilizar el formato correcto al
grabar los discos. Para más información, consulte
el manual de instrucciones para el software de
grabación del disco.
•Los discos grabados por packet writing no son
compatibles.
•El DRX-730 puede reproducir los siguientes
formatos de archivos de audio: MP3 (MPEG-1
Audio Layer 3), WMA (Windows Media Audio) y
MPEG-4 AAC.
•El DRX-730 puede reproducir los archivos MP3,
WMA y MPEG-4 AAC guardados en discos
CD-R/RW y dispositivos de almacenamiento
USB.
•Son compatibles las siguientes frecuencias de
muestreo: 32kHz, 44.1kHz y 48kHz.
•Para los archivos MP3 y WMA, recomendamos
frecuencias de bits superiores a 128 kbps.
•Para los archivos MPEG-4 AAC, son compatibles
las frecuencias de muestreo desde 16 kbps a 320
kbps.
•No son compatibles las frecuencias de bit
variables (VBR) para MP3, WMA y MPEG-4
AAC.
•No es compatible la codificación WMA Lossless.
•No se pueden reproducir los archivos con DRM
(“Digital Rights Management”, Gestión de
derechos digitales).
•Se reconocen únicamente los archivos MP3,
WMA y MPEG-4 AAC con una extensión de
archivo .mp3/.MP3, .wma/.WMA o .m4a
respectivamente.
•Cada disco puede contener hasta 299 carpetas y
cada carpeta puede contener una combinación de
hasta 648 archivos y carpetas. Sin embargo,
dependiendo de la organización de carpetas, es
posible que no se reconozcan ni puedan
reproducirse todas las carpetas y archivos.
•El DRX-730 puede reproducir los siguientes
formatos de discos de imagen: CD Fuji Color, CD
Kodak Picture. También puede reproducir los
archivos JPEG guardados en discos CD-R/RW y
dispositivos de almacenamiento USB. Es posible
que algunos discos de imagen no se puedan
reproducir debido a su forma de grabación, etc.
•Baseline Son compatibles los archivos JPEG y los
archivos Exif 2.2 JPEG con una resolución de
hasta 3072 x 2048. (Exif, que significa
“Exchangeable Image File”, es el formato utilizado
por las cámaras digitales para guardar
metadatos).
•Los archivos Progressive JPEG no son
compatibles.
•Sólo se reconocen los archivos JPEG con una
extensión de archivo .jpg/.JPG.
•Cada disco puede contener hasta 299 carpetas y
cada carpeta puede contener una combinación de
hasta 648 archivos y carpetas. Sin embargo,
dependiendo de la organización de carpetas, es
posible que no se reconozcan ni puedan
reproducirse todas las carpetas y archivos.
La tecnología de soportes DivX
®
fue desarrollada por
DivX, Inc. Utiliza la compresión para adecuar el
contenido de películas y vídeos a los discos CD y
DVD de alta calidad. Permite funciones interactivas
como menús, subtítulos y bandas sonoras en
múltiples idiomas. Igual que DVD-Video, los archivos
individuales DivX
®
se conocen como títulos.
El DRX-730 puede reproducir archivos DivX
®
guardados en los soportes CD y DVD grabables
detallados en “Compatibilidad del disco grabable” en
la página 58. Al nombrar los archivos DivX
®
antes de
grabar un disco, tenga en cuenta que los archivos
DivX
®
guardados en un disco se reproducen por
orden alfabético.
•El DRX-730 es un producto oficial DivX
®
Ultra
Certified y puede reproducir todas las versiones
de vídeo DivX
®
(incluyendo DivX
®
6) con la
reproducción mejorada de archivos de soportes
DivX
®
y de DivX
®
Media Format.
•El DRX-730 puede reproducir los archivos DivX
®
guardados en discos CD-R/RW y discos
CD-ROM, pero no en dispositivos de
almacenamiento USB.
•Sólo se reconocen los archivos codificados DivX
®
con una extensión de archivo .avi o .divx.
■ Utilizar archivos de subtítulos externos
Las películas DivX
®
utilizan archivos especiales
denominados archivos de subtítulos externos para
Discos realizados en un ordenador
Archivos MP3, WMA y MPEG-4 AAC
Archivos JPEG
Acerca de DivX
®

Apéndice
60 Es
visualizar los subtítulos. Los ajustes de fuentes
detallados a continuación están disponibles con los
archivos de subtítulos externos. Utilice el ajuste
“Subtitle Language” en la página 54 para seleccionar
la fuente/idioma que coincida con el archivo de
subtítulos externo.
El DRX-730 es compatible con los siguientes grupos
de idiomas:
Notas:
•Es posible que algunos archivos de subtítulos
externos no se visualicen correctamente y es
posible que algunos no se visualicen en absoluto.
•Sólo se reconocen los archivos de subtítulos
externos con una extensión de archivo .srt, .sub,
.ssa o .smi. (Tenga en cuenta que Disc Navigator
no visualiza estos archivos).
•El nombre del archivo de subtítulos externos debe
empezar con el nombre de archivo del archivo de
película asociado.
•Una única película puede tener hasta 10 archivos
de subtítulos externos.
WMV, que significa Windows Media Video, es una
tecnología de compresión de vídeo desarrollada por
Microsoft Corporation. El contenido de vídeo se
puede codificar en el formato WMV utilizando
Windows Media Encoder.
•El DRX-730 es compatible con los archivos
WMV9 codificados con la serie Windows
Encoder 9.
•El DRX-730 puede reproducir los archivos WMV
guardados en discos CD-R/RW, pero no en
dispositivos de almacenamiento USB.
•Sólo se reconocen los archivos WMV9 con una
extensión de archivo .wmv.
•Son compatibles resoluciones de vídeo de hasta
720 x 480 o 720 x 576.
•El promedio de frecuencia de bits máxima es de
unos 2~3 Mbps. (La frecuencia de bits máxima
depende de las condiciones de codificación).
•El perfil avanzado no es compatible.
•No se pueden reproducir los archivos con DRM
(“Digital Rights Management”, Gestión de
derechos digitales).
AAC, que significa Advanced Audio Coding, es una
tecnología de compresión de audio desarrollada por
MPEG-2 y MPEG-4. El formato actual los datos y la
extensión de archivo depende de la aplicación
utilizada para crear el archivo AAC.
•El DRX-730 puede reproducir archivos AAC
creados con iTunes que tengan una extensión de
archivo .m4a.
•No se pueden reproducir los archivos con DRM
(“Digital Rights Management”, Gestión de derechos
digitales) y es posible que los archivos codificados
con alguna versión de iTunes no se reproduzcan.
WMA, que significa Windows Media Audio, es una
tecnología de compresión de audio desarrollada por
Microsoft Corporation. El contenido de audio se
puede codificar en el formato WMA utilizando el
Reproductor de Windows Media versión 7.1.1, el
Reproductor de Windows Media para Windows XP o
el Reproductor de Windows Media Serie 9.
•El DRX-730 puede reproducir archivos WMA.
•Utilice sólo aplicaciones certificadas por
Microsoft Corporation para codificar archivos
WMA. Si utiliza una aplicación que no está
certificada, es posible que los archivos resultantes
no se reproduzcan debidamente.
Los reproductores de DVD y los discos DVD-Video
tienen asignado un número de región basado en el
país o la región donde se venden. El reproductor de
DVD sólo puede reproducir los discos con el mismo
número de región. No se pueden reproducir discos
con un número de región diferente.
Encontrará el número de región del DRX-730 en el
panel posterior. El DRX-730 sólo puede reproducir
discos con el mismo número de región o aquellos
marcados con ALL. Si intenta reproducir un disco
DVD-Video con un número de región diferente, se
visualizará el mensaje “Incompatible disc region
number, Can’t play disc”.
Grupo 1
Albano (sq), Vasco (eu), Catalán
(ca), Danés (da), Holandés (nl),
Inglés (en), Feroés (fo), Finlandés
(fi), Francés (fr), Alemán (de),
Islandésc (is), Irlandés (ga), Italiano
(it), Noruego (no), Portugués (pt),
Reto-románico (rm), Escocés (gd),
Español (es), Sueco (sv)
Grupo 2
Albano (sq), Croata (hr), Checo
(cs), Húngaro (hu), Polaco (pl),
Rumano (ro), Eslovaco (sk),
Esloveno (sl)
Grupo 3
Búlgaro (bg), Bielorruso (be),
Macedonio (mk), Ruso (ru), Serbio
(sr), Ucraniano (uk)
Grupo 4 Hebreo (iw), Yidish (ji)
Grupo 5 Turco (tr)
Acerca de WMV
Acerca de MPEG-4 AAC
Acerca de WMA
Regiones de DVD-Video

Apéndice
61 Es
Apéndice
Español
Mantenga siempre los discos en sus estuches y
guárdelos verticalmente en un lugar no sujeto a
temperaturas extremas, humedad extrema o luz solar
directa. Siempre lea las precauciones que acompañan
los discos.
•Sujete siempre los discos por los bordes para
protegerlos de las huellas digitales, rayadas y
suciedad.
•Es posible que los discos con huellas digitales,
rayadas o suciedad no se reproduzcan
debidamente. En tales casos, utilizando un paño
de limpieza suave y seco, limpie el disco desde el
centro hacia afuera en líneas rectas. No limpie el
disco con movimientos circulares, ya que podría
dañarlo. Nunca utilice un paño de limpieza sucio.
•Para discos muy sucios, intente utilizar un paño
suave y húmedo y asegúrese de secar el disco
después. Nunca utilice gasolina, disolvente u otros
productos de limpieza, como limpiadores de
discos de vinilo.
•No cargue discos muy dañados, agrietados o
deformados en el DRX-730, ya que lo podrían
dañar.
•No pegue adhesivos o etiquetas en los discos, ya
que podrían deformar el disco y evitar su
reproducción. A menudo los discos de alquiler
tienen adhesivos o etiquetas. Asegúrese de que no
haya pegamento que salga por detrás de la
etiqueta antes de reproducir tales discos.
•No cargue más de un disco a la vez en el
DRX-730.
•Para más información acerca del manejo de los
discos, consulte las precauciones incluidas con el
disco.
El DRX-730 no puede reproducir los discos con una
forma especial, como discos en forma de corazones y
hexágonos. Es posible que estos discos causen un
funcionamiento incorrecto. Por lo tanto, no los
cargue.
Si se acumula suciedad o polvo en la lente de lectura
del DRX-730, es posible que el sonido salte o que la
imagen se distorsione. En tales casos, consulte a su
distribuidor Yamaha. No utilice los limpiadores de
lentes de lectura disponibles en comercios, ya que
podrían dañar la lente.
Mantenimiento de los discos
Guardar los discos
Manejar los discos
Acerca de los discos con formas
especiales
Limpiar la lente de lectura

Apéndice
62 Es
•Sitúe el DRX-730 en una superficie estable cerca
del televisor y de los otros componentes de AV
que tiene la intención de utilizar.
•No coloque nada encima del DRX-730.
•No sitúe el DRX-730 encima del televisor. Y
manténgalo alejado de componentes sensibles al
magnetismo, como grabadores de vídeo.
•No sitúe el DRX-730 encima de un amplificador o
cualquier otro componente que produzca calor. Si
instala el DRX-730 en un estante, sitúe el
amplificador u otro componente que produce
calor en el estante inferior para mantenerlo tan
lejos como sea posible del DRX-730.
Evite ubicaciones que estén…
•Sujetas a la luz solar directa
•Muy húmedas o poco ventiladas
•Sujetas a temperaturas extremas
•Sujetas a vibración
•Con mucho polvo
•Sujetas a humo, vapor o temperaturas elevadas,
como una cocina
Antes de mover el DRX-730, expulse el disco si está
cargado, cierre la bandeja de discos y pulse
STANDBY/ON para ajustarlo a en espera. Cuando
haya desaparecido el mensaje “STANDBY”,
desconecte el cable de alimentación de la toma de CA.
Nota:
•Es posible que al desconectar el cable de
alimentación antes de que haya desaparecido el
mensaje “STANDBY” el DRX-730 se reajuste a los
valores predeterminados.
•Mover el DRX-730 con un disco dentro puede
causar daños.
Puede reajustar el DRX-730 a los valores
predeterminados.
1 Ajuste el DRX-730 al modo en espera.
2 Mientras mantiene pulsado Detener ( ) en el
panel frontal del DRX-730, pulse
STANDBY/ON, manteniendo pulsado Detener
() hasta que aparezca “DVD — NO REQ.” en la
pantalla.
3 Pulse Reproducir/Pausa ( / ) varias veces
para seleccionar “DVD—INIT”.
Si cambia de opinión en este punto, seleccione en
su lugar “DVD — NO REQ.”.
4 Pulse STANDBY/ON.
El DRX-730 se reajusta a los valores
predeterminados y pasa a en espera. Pulse
STANDBY/ON de nuevo para volver a activar el
DRX-730.
Los ajustes “TV Screen”, “HDMI Resolution”,
entre otros se ajustarán a los valores
predeterminados. El ajuste “HDMI Audio” se
ajustará a “OFF”.
Mantenimiento del DRX-730
Instalación
Mover el DRX-730
Reajustar el DRX-730
STANDBY/ON
USB PORTABLE PHONES
INPUT
VOLUME
TIMER
HDMI
PROGRESSIVE
Stop ( )
Play/Pause ( )
STANDBY/ON
Reproducir/Pausa ( / )
Detener ( )

Apéndice
63 Es
Apéndice
Español
■ Idioma (abreviación), número de código
■ Idioma, número de código, abreviación
Listas de idiomas, países y regiones
Lista de idiomas
Japonés (ja), 1001 Butaní (dz), 0426 Kirghiz (ky), 1125 Sinhala (si), 1909
Inglés (en), 0514 Esperanto (eo), 0515 Latino (la), 1201 Eslovaco (sk), 1911
Francés (fr), 0618 Estonio (et), 0520 Lingala (ln), 1214 Esloveno (sl), 1912
Alemán (de), 0405 Vasco (eu), 0521 Laosiano (lo), 1215 Samoano (sm), 1913
Italiano (it), 0920 Persa (fa), 0601 Lituano (lt), 1220 Shona (sn), 1914
Español (es), 0519 Finlandés (fi), 0609 Letón (lv), 1222 Somalí (so), 1915
Chino (zh), 2608 Fidji (fj), 0610 Malgache (mg), 1307 Albano (sq), 1917
Holandés (nl), 1412 Feroés (fo), 0615 Maori (mi), 1309 Serbio (sr), 1918
Portugués (pt), 1620 Frisón (fy), 0625 Macedonio (mk), 1311 Siswati (ss), 1919
Sueco (sv), 1922 Irlandés (ga), 0701 Malayalam (ml), 1312 Sesotho (st), 1920
Ruso (ru), 1821 Gaélico escocés (gd), 0704 Mongol (mn), 1314 Sundanés (su), 1921
Coreano (ko), 1115 Gallego (gl), 0712 Moldavo (mo), 1315 Swahili (sw), 1923
Griego (el), 0512 Guaraní (gn), 0714 Marathi (mr), 1318 Tamil (ta), 2001
Afar (aa), 0101 Gujarati (gu), 0721 Malayo (ms), 1319 Telugu (te), 2005
Abkhaziano (ab), 0102 Hausa (ha), 0801 Maltés (mt), 1320 Tayik (tg), 2007
Afrikaans (af), 0106 Hindi (hi), 0809 Birmano (my), 1325 Thai (th), 2008
Amárico (am), 0113 Croata (hr), 0818 Nauri (na), 1401 Tigrinya (ti), 2009
Árabe (ar), 0118 Húngaro (hu), 0821 Nepalí (ne), 1405 Turcmeno (tk), 2011
Asamés (as), 0119 Armenio (hy), 0825 Noruego (no), 1415 Tagalog (tl), 2012
Aymara (ay), 0125 Interlingüe (ia), 0901 Occitán (oc), 1503 Setchwana (tn), 2014
Azerí (az), 0126 Interlingüe (ie), 0905 Oromo (om), 1513 Tonga (to), 2015
Bashkir (ba), 0201 Inupiak (ik), 0911 Oriya (or), 1518 Turco (tr), 2018
Bielorruso (be), 0205 Indonesio (in), 0914 Panjabi (pa), 1601 Tsonga (ts), 2019
Búlgaro (bg), 0207 Islandés (is), 0919 Polaco (pl), 1612 Tatar (tt), 2020
Bihari (bh), 0208 Hebreo (iw), 0923 Pastún (ps), 1619 Twi (tw), 2023
Bislama (bi), 0209 Yidish (ji), 1009 Quechua (qu), 1721 Ucraniano (uk), 2111
Bengalí (bn), 0214 Javanés (jw), 1023 Reto-romance (rm), 1813 Urdu (ur), 2118
Tibetano (bo), 0215 Georgiano (ka), 1101 Kirundi (rn), 1814 Uzbeco (uz), 2126
Bretón (br), 0218 Kazaj (kk), 1111 Rumano (ro), 1815 Vietnamita (vi), 2209
Catalán (ca), 0301 Groenlandés (kl), 1112 Kinyarwanda (rw), 1823 Volapuk (vo), 2215
Corso (co), 0315 Camboyano (km), 1113 Sánscrito (sa), 1901 Wolof (wo), 2315
Checo (cs), 0319 Kannada (kn), 1114 Sindhi (sd), 1904 Xhosa (xh), 2408
Galés (cy), 0325 Cachemir (ks), 1119 Sango (sg), 1907 Yoruba (yo), 2515
Danés (da), 0401 Kurdo (ku), 1121 Serbocroata (sh), 1908 Zulú (zu), 2621
Lista de regiones y países
Argentina, 0118, ar Finlandia, 0609, fi Malasia, 1325, my Singapur, 1907, sg
Australia, 0121, au Francia, 0618, fr México, 1324, mx España, 0519, es
Austria, 0120, at Alemania, 0405, de Países Bajos, 1412, nl Suecia, 1905, se
Bélgica, 0205, be Hong Kong, 0811, hk Nueva Zelanda, 1426, nz Suiza, 0308, ch
Brasil, 0218, br India, 0914, in Noruega, 1415, no Taiwán, 2023, tw
Canadá, 0301, ca Indonesia, 0904, id Pakistán, 1611, pk Tailandia, 2008, th
Chile, 0312, cl Italia, 0920, it Filipinas, 1608, ph Reino Unido, 0702, gb
China, 0314, cn Japón, 1016, jp Portugal, 1620, pt EE.UU., 2119, us
Dinamarca, 0411, dk Corea, Republic of, 1118, kr Rusia, 1821, ru

Apéndice
64 Es
Si experimenta cualquier problema mientras utiliza el DRX-730, consulte las siguientes tablas e intente aplicar la
solución sugerida. Si un problema no aparece en las tablas o no puede resolverlo usted mismo, contacte con su
distribuidor Yamaha.
Solucionar problemas
General
Problema Posible causa Solución
Al activar el DRX-730, se
desactiva inmediatamente.
Es posible que el cable de
alimentación no esté correctamente
conectado.
Asegúrese de que el cable de
alimentación está correctamente
conectado a una toma de CA.
Un cable del altavoz puede estar
provocando un cortocircuito.
Asegúrese de que los cables de los
altavoces están correctamente
conectados (consulte la página 9).
Es posible que el DRX-730 se haya
expuesto a una fuerte descarga
eléctrica, por ejemplo por un rayo,
o a excesiva electricidad estática.
Ajuste el DRX-730 al modo en
espera y a continuación desconecte
el cable de alimentación. Espere 30
segundos, vuelva a conectar el cable
de alimentación y actívelo otra vez.
Los altavoces no producen
sonido.
El volumen está ajustado al
mínimo.
Suba el volumen (consulte la
página 17).
El sonido está enmudecido. Desenmudezca el sonido (consulte
la página 17).
Se ha seleccionado una fuente de
entrada incorrecta.
Seleccione la fuente de entrada
correcta (consulte la página 16).
Los cables de los altavoces se han
conectado de forma incorrecta.
Compruebe las conexiones del
cable del altavoz (consulte la
página 9).
El disco cargado no es compatible. Utilice sólo formatos de disco
compatibles (consulte la
página 58).
No hay imagen de TV. Los cables de TV están conectados
de forma incorrecta.
Compruebe las conexiones de los
cables de TV (consulte la
página 12).
Si utiliza conexiones
COMPONENT VIDEO OUT y
HDMI simultáneamente, es posible
que los jacks COMPONENT
VIDEO OUT emitan vídeo
progresivo independientemente del
ajuste “Component Out”.
Desconecte el componente HDMI
o conecte un televisor que sea
compatible con el vídeo progresivo
a los jacks COMPONENT VIDEO
OUT (consulte la página 12).
La imagen de TV no se visualiza
correctamente.
Los ajustes “Video Output” son
incorrectos.
Compruebe los ajustes “Video
Output” y corríjalos si es necesario
(consulte la página 53).
El ajuste “Component Out” se
encuentra en “Progressive”, pero el
televisor conectado a
COMPONENT VIDEO OUT no
permite el barrido progresivo.
Cambie el ajuste “Component Out”
a “Interlace” (consulte la
página 53).
El televisor conectado al jack
HDMI no permite la resolución
seleccionada.
Cambie el ajuste “HDMI
Resolution” a una resolución
permitida por el televisor HDMI
(consulte la página 53).

Apéndice
65 Es
Apéndice
Español
Aparece el mensaje “HDMI
ERROR” o no hay imagen en el
TV HDMI.
Ha seleccionado una resolución
HDMI incorrecta o se ha
producido un error HDMI.
Compruebe el ajuste “HDMI
Resolution” y corríjalo si es
necesario (consulte la página 53).
Redefina los ajustes “HDMI”
(consulte la página 54).
El DRX-730 se desactiva
inesperadamente.
Ha ajustado el temporizador sleep. Active de nuevo el DRX-730.
La función “Auto Standby” ajusta
de forma automática el DRX-730 al
modo en espera.
Compruebe el ajuste “Auto
Standby” (consulte la página 22).
Un altavoz suena más bajo que
el otro.
Los cables están conectados de
forma incorrecta.
Compruebe las conexiones de los
cables (consulte la página 9).
El volumen no se puede subir o
el sonido se distorsiona.
El componente conectado a los
jacks AUX OUT del DRX-730 está
desactivado.
Active el componente.
Algunas fuentes de entrada no
se pueden grabar.
La salida OPTICAL DIGITAL
OUT no emite señales de la radio ni
de los jacks DOCK, AUX IN ni
PORTABLE.
Para grabar desde estas fuentes,
conecte los jacks AUX OUT del
DRX-730 a la entrada de audio
analógica en el componente de
grabación (consulte la página 49).
El DRX-730 no funciona
correctamente.
Es posible que el DRX-730 se haya
expuesto a una fuerte descarga
eléctrica, por ejemplo por un rayo,
o a excesiva electricidad estática o
que se haya producido un corte de
alimentación.
Ajuste el DRX-730 al modo en
espera y a continuación desconecte
el cable de alimentación. Espere 30
segundos, vuelva a conectar el cable
de alimentación y actívelo otra vez.
Un dispositivo digital o de alta
frecuencia cercano produce
interferencias.
Es posible que el dispositivo esté
muy cerca del DRX-730.
Aleje el dispositivo del DRX-730.
El temporizador está
equivocado.
No ha habido alimentación durante
más de 5 minutos (el cable de
alimentación se ha desconectado
de la toma de CA o se ha producido
un fallo de alimentación).
Conecte el DRX-730 a una toma de
CA y ajuste el reloj (consulte la
página 21).
Problema Posible causa Solución
Control remoto
Problema Posible causa Solución
El control remoto no funciona
correctamente.
El control remoto está fuera del
alcance operativo.
Utilice el control remoto dentro del
alcance operativo (consulte la
página 8).
El sensor de control remoto del
DRX-730 está sujeto a la luz solar
directa o a la luz de un fluorescente
tipo inverter.
Cambie la iluminación o mueva el
DRX-730.
Se ha seleccionado una fuente de
entrada incorrecta. Algunos
botones ejecutan operaciones
diferentes dependiendo de la fuente
de entrada seleccionada (consulte
la página 6).
Seleccione la fuente de entrada
correcta (consulte la página 16).
Las baterías se han agotado y deben
sustituirse.
Sustituya las dos baterías por unas
nuevas (consulte la página 8).

Apéndice
66 Es
Reproducir discos
Problema Posible causa Solución
Algunas funciones no están
operativas.
No todos los discos permiten todas
las funciones de reproducción de
discos del DRX-730.
Pruebe otro disco.
La reproducción no se inicia,
la imagen o el sonido
contienen interferencias o la
reproducción se detiene de
forma inesperada.
El disco no está correctamente
ajustado en la bandeja del disco.
Coloque el disco, con la etiqueta boca
arriba, en el centro de la bandeja del
disco (consulte la página 23).
El disco está sucio. Compruebe el disco y límpielo si es
necesario (consulte la página 61).
El disco cargado no es compatible. Utilice sólo formatos de disco
compatibles (consulte la página 58).
Condensación en la lente de
lectura. Cuando se traslada el
DRX-730 de un entorno frío a uno
cálido, puede formarse
condensación en la lente de lectura.
Espere una o dos horas hasta que se
evapore la condensación y vuelva a
intentarlo.
Cuando se ha cargado un
disco DVD-Video, sigue
apareciendo el mismo
mensaje y no es posible
acceder al menú o al
contenido del disco.
Está activada la función Resume o
Last Memory.
Pulse Detener ( ) dos veces para
cancelar la función Resume.
Reajuste el DRX-730 para que borre
todos los datos Resume almacenados
(consulte la página 62).
No es posible seleccionar
bandas sonoras o subtítulos
de idiomas extranjeros.
El disco cargado no contiene
bandas sonoras o subtítulos de
idiomas extranjeros.
Para más detalles sobre bandas
sonoras y subtítulos de idiomas
extranjeros, consulte el estuche del
disco.
La operación está restringida por el
disco.
Utilice el menú del disco para
seleccionar bandas sonoras o
subtítulos en idiomas extranjeros.
Los subtítulos no se
visualizan.
Los subtítulos están desactivados. Seleccione un subtítulo (consulte la
página 27).
El disco cargado no contiene
subtítulos.
Para más información sobre los
subtítulos, consulte el estuche del
disco.
Al utilizar la reproducción con
repetición A–B, los subtítulos fuera
de la sección especificada pueden
no visualizarse.
Desactive la reproducción con
repetición A–B (consulte la
página 29).
No se pueden seleccionar
ángulos de cámara.
El disco cargado no contiene
múltiples ángulos de cámara.
Para más información sobre los
múltiples ángulos de cámara, consulte
el estuche del disco.
No se pueden reproducir
algunos archivos.
Se pueden reproducir sólo archivos
MP3, WMA, MPEG-4 AAC y JPEG
sin protección contra copia (DRM).
Utilice archivos sin protección contra
copia.
El formato de archivo no es
compatible.
Utilice sólo los formatos de archivo
compatibles (consulte las páginas 59 y
60).
No se puede grabar un DVD. El DVD está protegido contra
copia.
La mayoría de los discos DVD-Video
están protegidos contra copia y no
pueden grabarse.
La imagen de TV está
distorsionada.
La imagen puede distorsionarse al
rebobinar o avanzar rápido.
No se trata de un funcionamiento
incorrecto.

Apéndice
67 Es
Apéndice
Español
■ FM/AM
■ FM
La imagen está extendida o
aparecen barras negras.
El ajuste “TV Screen” está mal
definido.
Compruebe los ajustes “TV Screen” y
corríjalos como sea necesario
(consulte la página 53).
Aparecen zonas blancas en
algunas áreas de la imagen.
El material de vídeo no es
compatible con la función de
barrido progresivo, por la forma en
que se editó o el tipo de material.
Cambie el ajuste “Component Out” a
“Interlace” (consulte la página 53).
Al cargar el disco, se expulsa
inmediatamente.
El disco cargado no es compatible. Utilice sólo formatos de disco
compatibles (consulte la página 58).
Aparece el mensaje “No Disc”
aunque esté cargado un
disco.
El disco no está correctamente
ajustado en la bandeja del disco.
Coloque el disco, con la etiqueta boca
arriba, en el centro de la bandeja del
disco (consulte la página 23).
No es posible visualizar el
menú “Setup”, “Initial
Settings” o “Video Adjust”.
Estos menús estás disponibles sólo
cuando se ha seleccionado la fuente
de entrada de DVD.
Seleccione la fuente de entrada de
DVD (consulte la página 16).
Problema Posible causa Solución
Sintonizador
Problema Posible causa Solución
No puedo seleccionar
presintonías de radio.
Las presintonías se han borrado. Vuelva a presintonizar las emisoras
de radio (consulte la página 38).
Las presintonías se han
borrado.
El DRX-730 se ha desconectado de
una toma de CA durante más de
una semana.
Asegúrese de que el cable de
alimentación está correctamente
conectado y, a continuación, vuelva
a presintonizar las emisoras de radio
(consulte la página 38).
Problema Posible causa Solución
Se producen interferencias en
la recepción.
La antena FM no está conectada
correctamente.
Asegúrese de que la antena FM está
conectada correctamente (consulte
la página 11).
La señal de la emisora FM
sintonizada es débil o la recepción
de la emisora en su zona es de poca
calidad.
Reduzca las interferencias
cambiando al modo de
sintonización manual (consulte la
página 37) o conecte una antena FM
exterior (se vende por separado).
Consulte a un instalador cualificado
en su zona para más detalles.
La recepción es de baja calidad
(el sonido se distorsiona)
incluso con una antena FM
exterior.
Se producen interferencias
multiruta porque la señal FM
obstaculiza con montañas, edificios
altos u otros obstáculos.
Ajuste la altura, dirección o
ubicación de la antena FM.
La sintonización automática no
encuentra algunas emisoras de
radio.
La señal de la emisora FM es débil o
la recepción de la emisora en su
zona es de poca calidad.
Intente cambiar al modo de
sintonización manual (consulte la
página 37) o conecte una antena FM
exterior (se vende por separado).
Consulte a un instalador cualificado
en su zona para más detalles.

Apéndice
68 Es
■ AM
Problema Posible causa Solución
Se producen muchas
interferencias en la
recepción.
Interferencias atmosféricas, tormentas
eléctricas o el DRX-730 está recibiendo
interferencias de luces fluorescentes,
motores o aparatos eléctricos con un
termostato.
Puede resultar difícil eliminar
completamente este tipo de
interferencias. Sin embargo, a veces
pueden reducirse conectando una
antena AM exterior o derivando la
antena a masa (consulte la página 11).
La antena AM interior está muy cerca
del DRX-730.
Aleje la antena del DRX-730 o intente
ajustar la dirección de la antena.
El DRX-730 está muy cerca del televisor,
particularmente si las interferencias se
producen por la noche.
Aleje el DRX-730 del televisor.
La sintonización
automática no
encuentra algunas
emisoras de radio.
La antena AM en bucle no está
conectada correctamente.
Asegúrese de que la antena AM en bucle
está conectada correctamente (consulte
la página 11).
La señal de la emisora AM sintonizada
es débil o la recepción de la emisora en
su zona es de poca calidad.
Intente cambiar al modo de
sintonización manual (consulte la
página 37).
Temporizador
Problema Posible causa Solución
No se puede ajustar el
sintonizador.
Aún no ha ajustado el reloj. Ajuste el reloj (consulte la
página 21).
El temporizador no funcionaba. Las horas de activación y
desactivación están ajustadas a la
misma.
Ajuste las horas de activación y
desactivación correctamente
(consulte la página 41).
Reproducción del iPod
Problema Posible causa Solución
La reproducción del iPod no
funciona.
El iPod no está colocado
correctamente en la base Dock
universal para iPod de Yamaha.
Asegúrese de que el iPod esté
colocado correctamente en la base
Dock universal para iPod de Yamaha
(consulte la página 43).
El cable para base Dock no está
conectado correctamente a la base
Dock universal para iPod de
Ya m a h a o al DRX-730.
Compruebe las conexiones del cable
para base Dock y corríjalas como sea
necesario (consulte la página 43).
Algunas funciones del iPod no
funcionan de la forma
esperada.
Según el modelo de iPod y la versión
del firmware, algunas funciones del
iPod pueden no funcionar como se
esperaba y algunas pueden no
funcionar en absoluto.
Asegúrese de que el iPod tiene
instalado el firmware más reciente.
Consulte el sitio web de Apple para
más información.
Al reproducir un vídeo en un
iPod, la reproducción de
vídeo no aparece en el
visualizador del iPod.
El iPod está ajustado para visualizar
vídeo en un televisor.
Con el iPod asentado en la base
universal para iPod Yamaha,
desactive el ajuste de salida a
televisor del iPod.
Se visualiza el mensaje
“Unknown iPod”.
El iPod no es compatible. Utilice sólo los modelos de iPod
compatibles (consulte la página 43).

Apéndice
69 Es
Apéndice
Español
Se visualiza el mensaje
“Disconnected”.
No hay ningún iPod en la base Dock
universal para iPod de Yamaha.
Inserte el iPod en la base Dock
universal para iPod de Yamaha
(consulte la página 43).
Problema Posible causa Solución
Reproducción de dispositivos de almacenamiento USB
Problema Posible causa Solución
No es posible reproducir el
contenido guardado en un
dispositivo de
almacenamiento en masa
USB.
El DRX-730 no reconoce todos los
dispositivos de almacenamiento
USB.
Pruebe otro dispositivo de
almacenamiento USB.
Sólo son compatibles los dispositivos
de almacenamiento USB
formateados con FAT16 o FAT32.
Vuelva a formatear el dispositivo de
almacenamiento USB con FAT16 o
FAT32.
El dispositivo de almacenamiento
USB está conectado a un
concentrador USB, pero el DRX-730
no acepta concentradores USB.
Conecte el dispositivo de
almacenamiento USB directamente
al puerto USB del DRX-730.
No se pueden reproducir
algunos archivos.
Se pueden reproducir sólo archivos
MP3, WMA, MPEG-4 AAC y JPEG
sin protección contra copia (DRM).
Utilice archivos sin protección
contra copia.
El formato de archivo no es
compatible.
Utilice sólo los formatos de archivo
compatibles (consulte las páginas 59
y 60).
Se visualiza el mensaje “NO
USB” o “USB ERROR”.
El dispositivo USB no es compatible
o el DRX-730 no puede suministrar
suficiente alimentación al dispositivo
para que funcione correctamente.
Desactive el DRX-730 y vuelva a
activarlo.
Ajuste el DRX-730 a en espera,
desconecte el dispositivo de
almacenamiento USB y vuelva a
conectarlo.
Seleccione la fuente de entrada USB
y, a continuación, conecte el
dispositivo USB.
Seleccione una fuente de entrada
diferente y vuelva a seleccionar USB.
Si el dispositivo de almacenamiento
USB está provisto con su propio
adaptador de alimentación, utilícelo
para activar el dispositivo de
almacenamiento USB mientras esté
conectado al DRX-730.
Si sigue apareciendo el mensaje, es
posible que el dispositivo de
almacenamiento USB no sea
compatible con el DRX-730.

Apéndice
70 Es
Reproducción de Bluetooth
Problema Posible causa Solución
No se puede conectar un
reproductor de música o
un teléfono móvil
compatible con
Bluetooth.
El cable para base Dock no está
conectado correctamente al YBA-10 de
Ya m a h a o al DRX-730.
Compruebe las conexiones del cable
para base Dock y corríjalas como sea
necesario (consulte la página 47).
El dispositivo Bluetooth no es
compatible con A2DP o AVRCP.
Utilice un dispositivo Bluetooth
compatible con A2DP o AVRCP.
El dispositivo Bluetooth está muy
alejado del YBA-10 de Yamaha.
Asegúrese de que el dispositivo
Bluetooth está en la línea de
visibilidad del YBA-10 de Yamaha y
dentro de 10 metros.
Hay un obstáculo entre el dispositivo
Bluetooth y el YBA-10 de Yamaha.
Un dispositivo cercano está
transmitiendo a 2.4GHz (por ejemplo,
un microondas, o un dispositivo
inalámbrico).
Aleje el YBA-10 de Yamaha del
dispositivo.
No se ha llevado a cabo el
emparejamiento.
Empareje el dispositivo Bluetooth con
el DRX-730 (consulte la página 47).
La funcionalidad Bluetooth del
dispositivo Bluetooth está desactivada.
Asegúrese de que la funcionalidad
Bluetooth esté activada en el
dispositivo Bluetooth.
Algunas funciones no
funcionan de la forma
esperada.
Según el modelo de dispositivo
Bluetooth y la versión de firmware,
algunas funciones pueden no funcionar
de la forma esperada y algunas pueden
no funcionar en absoluto.
Utilice un dispositivo Bluetooth
compatible.
Se visualiza el mensaje
“Not found”.
No se encuentra el último dispositivo
Bluetooth utilizado con el DRX-730.
Asegúrese de que el dispositivo
Bluetooth esté en modo descubrible y
dentro del intervalo (consulte la
página 47).
Se visualiza el mensaje
“Not Available”.
No puede emparejar el YBA-10 de
Ya m a h a con un nuevo dispositivo
Bluetooth mientras está conectado a
otro dispositivo.
Desconecte el dispositivo conectado
antes de emparejarlo al nuevo
dispositivo.

Apéndice
71 Es
Apéndice
Español
Sección del amplificador
•Potencia de salida RMS mínima por canal
(LPF predeterminado 20kHz)
(6Ω, 1kHz, 0,9% THD) ............................................. 20W + 20W
•Potencia de salida RMS máxima por canal
(LPF predeterminado 20kHz)
(6Ω, 1kHz, 10% THD) .............................................. 30W + 30W
•Distorsión armónica total
AUX, PORTABLE (20kHz–LPF, 1kHz, 1W)... inferior al 0,05%
•Sensibilidad/impedancia de entrada
AUX, PORTABLE (1kHz, 20W)........................... 400mV/47 kΩ
•Respuesta de frecuencia
AUX, PORTABLE...........................................10Hz~22kHz ±3dB
•Relación señal-ruido
(AUX, PORTABLE, IHF-A entrada derivada) ........ más de 95dB
Sección del sintonizador
■ Sección FM
•Intervalo de sintonización
Modelos para los EE.UU. y Canadá............................ 87.5~107.9
Modelos para Taiwán y Asia.................87.5~107.9 o 87.5~108.0
Otros modelos...................................................... 87.5~108.0MHz
•Relación señal-ruido (mono).................................................. 75dB
•Sensibilidad (S/N 30dB) ........................................................1,0 µV
■ Sección AM
•Intervalo de sintonización
Modelos para los EE.UU. y Canadá.......................530~1710kHz
Modelos para Taiwán y Asia...... 530~1710kHz o 531~1611kHz
Otros modelos..........................................................531~1611kHz
•Relación señal-ruido ................................................................ 32dB
•Sensibilidad (S/N 20dB) .......................................................700 µV
Sección DVD
•AUX OUT
Nivel de salida (1kHz 0dB).............................................2V (±0,3)
Relación señal-ruido................................................más de 100dB
Intervalo dinámico (48kHz, 24 bits) .......................más de 95dB
Distorsión armónica total................................ inferior al 0,005%
Respuesta de frecuencia
CD-DA/VIDEO CD ..........................................10Hz~20kHz
DVD (48kHz) ..................................................... 10Hz~22kHz
DVD (96kHz) ..................................................... 10Hz~44kHz
•Salida de vídeo
Compuesta....................................................................1 Vp-p/75Ω
Componente..........................................................1 Vp-p/75Ω (Y)
0.7 Vp-p/75Ω (P
B, PR)
•RGB (SCART)..................................................................... 0.7 Vp-p
Formato de audio
•Decodificación Dolby Digital, DTS, MPEG
•DATOS PCM: 16 bits
•DATOS LPCM: 20/24 bits
Fs: permite mezcla con reducción de canales de 44.1, 48kHz,
88.2/96kHz
General
•Alimentación
Modelos para los EE.UU. y Canadá ....................CA 120V, 60Hz
Modelo para Australia...........................................CA 240V, 50Hz
Modelos para el Reino Unido, Europa y Rusia ..CA 230V, 50Hz
Modelo para Corea................................................CA 220V, 60Hz
Modelo para Asia.................................... AC 220–240V, 50/60Hz
Modelo para China................................................CA 220V, 50Hz
Modelo para Taiwán..............................................CA 110V, 60Hz
•Consumo eléctrico ....................................................................30W
•Consumo eléctrico en espera....................................inferior a 1W
•Lector láser
Tipo............................................... Láser semiconductor AlGaInP
Longitud de onda.................655nm (DVD), 790nm (VCD/CD)
Potencia de salida......................5mW (DVD), 7mW (VCD/CD)
•Dimensiones (Anchura x Altura x Profundidad)
............................... 215 x 113 x 300mm
•Peso ............................................................................................2,9kg
•Intervalo de temperatura de funcionamiento.................. 5~35ºC
•Intervalo de humedad de funcionamiento
...................5~90% (sin condensación)
Las especificaciones están sujetas a cambio sin previo
aviso.
Especificaciones

Printed in Malaysia WQ26610
IP
-
 1
1
-
 2
2
-
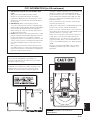 3
3
-
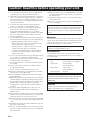 4
4
-
 5
5
-
 6
6
-
 7
7
-
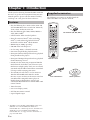 8
8
-
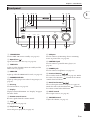 9
9
-
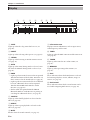 10
10
-
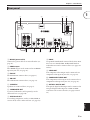 11
11
-
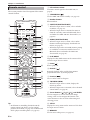 12
12
-
 13
13
-
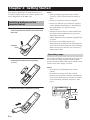 14
14
-
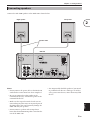 15
15
-
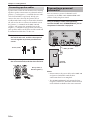 16
16
-
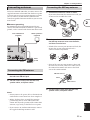 17
17
-
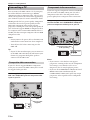 18
18
-
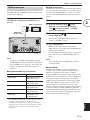 19
19
-
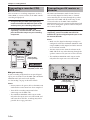 20
20
-
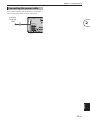 21
21
-
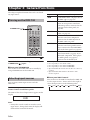 22
22
-
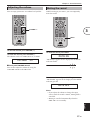 23
23
-
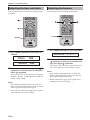 24
24
-
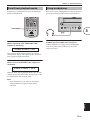 25
25
-
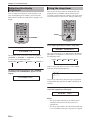 26
26
-
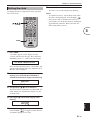 27
27
-
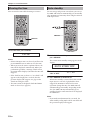 28
28
-
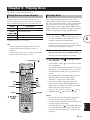 29
29
-
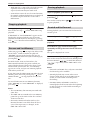 30
30
-
 31
31
-
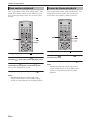 32
32
-
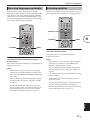 33
33
-
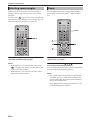 34
34
-
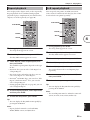 35
35
-
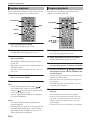 36
36
-
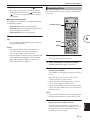 37
37
-
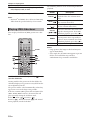 38
38
-
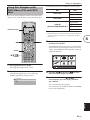 39
39
-
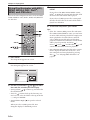 40
40
-
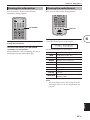 41
41
-
 42
42
-
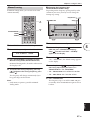 43
43
-
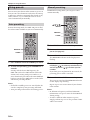 44
44
-
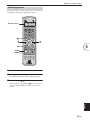 45
45
-
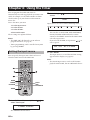 46
46
-
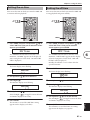 47
47
-
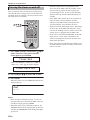 48
48
-
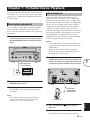 49
49
-
 50
50
-
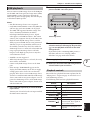 51
51
-
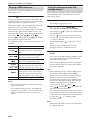 52
52
-
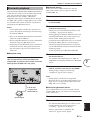 53
53
-
 54
54
-
 55
55
-
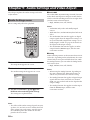 56
56
-
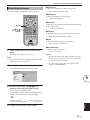 57
57
-
 58
58
-
 59
59
-
 60
60
-
 61
61
-
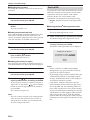 62
62
-
 63
63
-
 64
64
-
 65
65
-
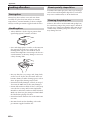 66
66
-
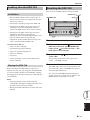 67
67
-
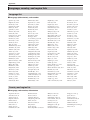 68
68
-
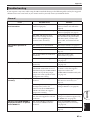 69
69
-
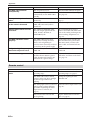 70
70
-
 71
71
-
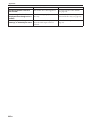 72
72
-
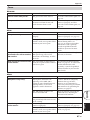 73
73
-
 74
74
-
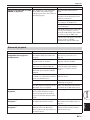 75
75
-
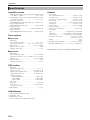 76
76
-
 77
77
-
 78
78
-
 79
79
-
 80
80
-
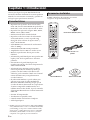 81
81
-
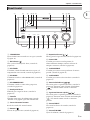 82
82
-
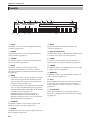 83
83
-
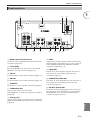 84
84
-
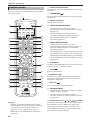 85
85
-
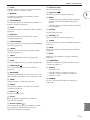 86
86
-
 87
87
-
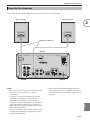 88
88
-
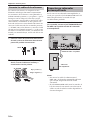 89
89
-
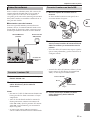 90
90
-
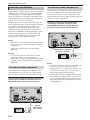 91
91
-
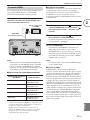 92
92
-
 93
93
-
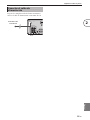 94
94
-
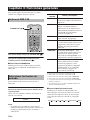 95
95
-
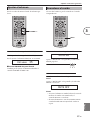 96
96
-
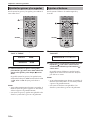 97
97
-
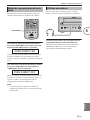 98
98
-
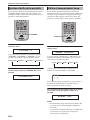 99
99
-
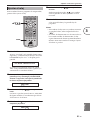 100
100
-
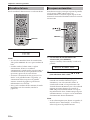 101
101
-
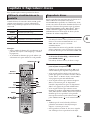 102
102
-
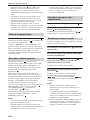 103
103
-
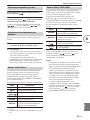 104
104
-
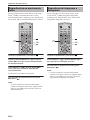 105
105
-
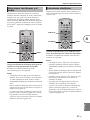 106
106
-
 107
107
-
 108
108
-
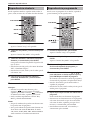 109
109
-
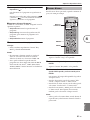 110
110
-
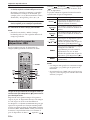 111
111
-
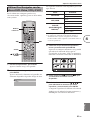 112
112
-
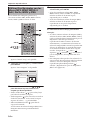 113
113
-
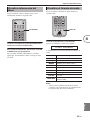 114
114
-
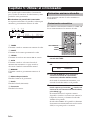 115
115
-
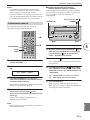 116
116
-
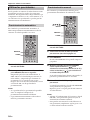 117
117
-
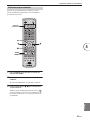 118
118
-
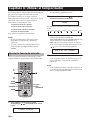 119
119
-
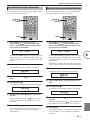 120
120
-
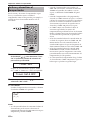 121
121
-
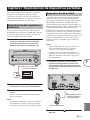 122
122
-
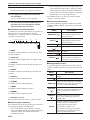 123
123
-
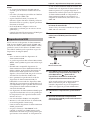 124
124
-
 125
125
-
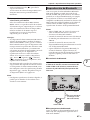 126
126
-
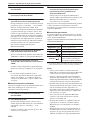 127
127
-
 128
128
-
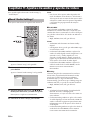 129
129
-
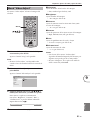 130
130
-
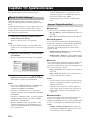 131
131
-
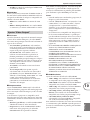 132
132
-
 133
133
-
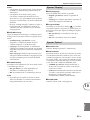 134
134
-
 135
135
-
 136
136
-
 137
137
-
 138
138
-
 139
139
-
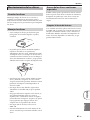 140
140
-
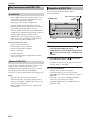 141
141
-
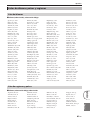 142
142
-
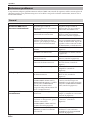 143
143
-
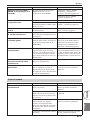 144
144
-
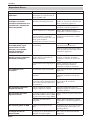 145
145
-
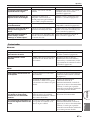 146
146
-
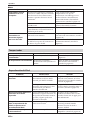 147
147
-
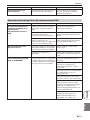 148
148
-
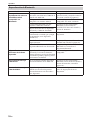 149
149
-
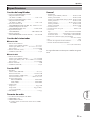 150
150
-
 151
151


Yamaha DRX-730 El manual del propietario
- Categoría
- Reproductores de DVD
- Tipo
- El manual del propietario
En otros idiomas
- English: Yamaha DRX-730 Owner's manual
Documentos relacionados
-
Yamaha S520 El manual del propietario
-
-
-
-
-
Yamaha pianocraft e730 El manual del propietario
-
-
-
-
Yamaha MCR-840 El manual del propietario
Otros documentos
-
TEAC CR-H226 El manual del propietario
-
-
-
-
LG NE8421TNC El manual del propietario
-
-
 Denon Professional DN-300Z Manual de usuario
-
-
Pioneer DV-2242 El manual del propietario
-
Philips HTS3115/12 Manual de usuario
