Electrolux EZC2510ACX Manual de usuario
- Categoría
- Microondas
- Tipo
- Manual de usuario


CONTENTS
1. SAFETY INFORMATION....................................................................................3
2. SAFETY INSTRUCTIONS..................................................................................4
3. PRODUCT DESCRIPTION................................................................................ 7
4. CONTROL PANEL............................................................................................. 7
5. BEFORE FIRST USE......................................................................................... 8
6. DAILY USE......................................................................................................... 8
7. CLOCK FUNCTIONS....................................................................................... 10
8. USING THE ACCESSORIES........................................................................... 11
9. ADDITIONAL FUNCTIONS.............................................................................. 12
10. HINTS AND TIPS........................................................................................... 13
11. CARE AND CLEANING..................................................................................20
12. TROUBLESHOOTING....................................................................................23
13. INSTALLATION.............................................................................................. 25
14. ENERGY EFFICIENCY.................................................................................. 26
WE’RE THINKING OF YOU
Thank you for purchasing an Electrolux appliance. You’ve chosen a product that
brings with it decades of professional experience and innovation. Ingenious and
stylish, it has been designed with you in mind. So whenever you use it, you can
be safe in the knowledge that you’ll get great results every time.
Welcome to Electrolux.
Visit our website for:
Get usage advice, brochures, trouble shooter, service information:
www.electrolux.com/webselfservice
Register your product for better service:
www.registerelectrolux.com
Buy Accessories, Consumables and Original spare parts for your appliance:
www.electrolux.com/shop
CUSTOMER CARE AND SERVICE
Always use original spare parts.
When contacting our Authorised Service Centre, ensure that you have the
following data available: Model, PNC, Serial Number.
The information can be found on the rating plate.
Warning / Caution-Safety information
General information and tips
Environmental information
Subject to change without notice.
www.electrolux.com2

1. SAFETY INFORMATION
Before the installation and use of the appliance, carefully
read the supplied instructions. The manufacturer is not
responsible for any injuries or damages that are the
result of incorrect installation or usage. Always keep the
instructions in a safe and accessible location for future
reference.
1.1 Children and vulnerable people safety
• This appliance can be used by children aged from 8
years and above and persons with reduced physical,
sensory or mental capabilities or lack of experience
and knowledge if they have been given supervision or
instruction concerning the use of the appliance in a
safe way and understand the hazards involved.
• Children between 3 and 8 years of age and persons
with very extensive and complex disabilities shall be
kept away unless continuously supervised.
• Children of less than 3 years of age should be kept
away unless continuously supervised.
• Do not let children play with the appliance.
• Keep all packaging away from children and dispose of
it appropriately.
• Keep children and pets away from the appliance when
it operates or when it cools down. Accessible parts are
hot.
• If the appliance has a child safety device, it should be
activated.
• Children shall not carry out cleaning and user
maintenance of the appliance without supervision.
1.2 General Safety
• Only a qualified person must install this appliance and
replace the cable.
• WARNING: The appliance and its accessible parts
become hot during use. Care should be taken to avoid
touching heating elements.
ENGLISH 3

• Always use oven gloves to remove or put in
accessories or ovenware.
• Before carrying out any maintenance, disconnect the
appliance from the power supply.
• Ensure that the appliance is switched off before
replacing the lamp to avoid the possibility of electric
shock.
• Do not use a steam cleaner to clean the appliance.
• Do not use harsh abrasive cleaners or sharp metal
scrapers to clean the glass door since they can
scratch the surface, which may result in shattering of
the glass.
• If the mains power supply cable is damaged, it must
be replaced by the manufacturer, its Authorised
Service Centre or similarly qualified persons to avoid
an electrical hazard.
• Excessive spillage must be removed before the
pyrolytic cleaning. Remove all parts from the oven.
• To remove the shelf supports first pull the front of the
shelf support and then the rear end away from the
side walls. Install the shelf supports in the opposite
sequence.
2. SAFETY INSTRUCTIONS
2.1 Installation
WARNING!
Only a qualified person must
install this appliance.
• Remove all the packaging.
• Do not install or use a damaged
appliance.
• Follow the installation instructions
supplied with the appliance.
• Always take care when moving the
appliance as it is heavy. Always use
safety gloves and enclosed footwear.
• Do not pull the appliance by the
handle.
• Keep the minimum distance from
other appliances and units.
• Make sure that the appliance is
installed below and adjacent safe
structures.
• The sides of the appliance must stay
adjacent to appliances or units with
the same height.
• The appliance is equipped with an
electric cooling system. It must be
operated with the electric power
supply.
2.2 Electrical connection
WARNING!
Risk of fire and electric
shock.
• All electrical connections should be
made by a qualified electrician.
• The appliance must be earthed.
www.electrolux.com4

• Make sure that the parameters on the
rating plate are compatible with the
electrical ratings of the mains power
supply.
• Always use a correctly installed
shockproof socket.
• Do not use multi-plug adapters and
extension cables.
• Make sure not to cause damage to
the mains plug and to the mains
cable. Should the mains cable need to
be replaced, this must be carried out
by our Authorised Service Centre.
• Do not let mains cables touch or
come near the appliance door,
especially when the door is hot.
• The shock protection of live and
insulated parts must be fastened in
such a way that it cannot be removed
without tools.
• Connect the mains plug to the mains
socket only at the end of the
installation. Make sure that there is
access to the mains plug after the
installation.
• If the mains socket is loose, do not
connect the mains plug.
• Do not pull the mains cable to
disconnect the appliance. Always pull
the mains plug.
• Use only correct isolation devices: line
protecting cut-outs, fuses (screw type
fuses removed from the holder), earth
leakage trips and contactors.
• The electrical installation must have
an isolation device which lets you
disconnect the appliance from the
mains at all poles. The isolation
device must have a contact opening
width of minimum 3 mm.
• Fully close the appliance door, before
you connect the mains plug to the
mains socket.
• This appliance complies with the
E.E.C. Directives.
2.3 Use
WARNING!
Risk of injury, burns and
electric shock or explosion.
• This appliance is for household use
only.
• Do not change the specification of this
appliance.
• Make sure that the ventilation
openings are not blocked.
• Do not let the appliance stay
unattended during operation.
• Deactivate the appliance after each
use.
• Be careful when you open the
appliance door while the appliance is
in operation. Hot air can release.
• Do not operate the appliance with wet
hands or when it has contact with
water.
• Do not apply pressure on the open
door.
• Do not use the appliance as a work
surface or as a storage surface.
• Open the appliance door carefully.
The use of ingredients with alcohol
can cause a mixture of alcohol and
air.
• Do not let sparks or open flames to
come in contact with the appliance
when you open the door.
• Do not put flammable products or
items that are wet with flammable
products in, near or on the appliance.
WARNING!
Risk of damage to the
appliance.
• To prevent damage or discoloration to
the enamel:
– do not put ovenware or other
objects in the appliance directly
on the bottom.
– do not put aluminium foil directly
on the bottom of cavity of the
appliance.
– do not put water directly into the
hot appliance.
– do not keep moist dishes and
food in the appliance after you
finish the cooking.
– be careful when you remove or
install the accessories.
• Discoloration of the enamel or
stainless steel has no effect on the
performance of the appliance.
• Use a deep pan for moist cakes. Fruit
juices cause stains that can be
permanent.
• This appliance is for cooking
purposes only. It must not be used for
other purposes, for example room
heating.
ENGLISH 5

• Always cook with the oven door
closed.
• If the appliance is installed behind a
furniture panel (e.g. a door) make
sure the door is never closed when
the appliance is in operation. Heat
and moisture can build up behind a
closed furniture panel and cause
subsequent damage to the appliance,
the housing unit or the floor. Do not
close the furniture panel until the
appliance has cooled down
completely after use.
2.4 Care and cleaning
WARNING!
Risk of injury, fire, or
damage to the appliance.
• Before maintenance, deactivate the
appliance and disconnect the mains
plug from the mains socket.
• Make sure the appliance is cold.
There is the risk that the glass panels
can break.
• Replace immediately the door glass
panels when they are damaged.
Contact the Authorised Service
Centre.
• Be careful when you remove the door
from the appliance. The door is
heavy!
• Clean regularly the appliance to
prevent the deterioration of the
surface material.
• Clean the appliance with a moist soft
cloth. Only use neutral detergents. Do
not use any abrasive products,
abrasive cleaning pads, solvents or
metal objects.
• If you use an oven spray, follow the
safety instruction on it's packaging.
• Do not clean the catalytic enamel (if
applicable) with any kind of detergent.
2.5 Pyrolytic cleaning
WARNING!
Risk of Injury / Fires /
Chemical Emissions
(Fumes) in Pyrolytic Mode.
• Before carrying out a Pyrolitic self-
cleaning function or the First Use
please remove from the oven cavity:
– any excess food residues, oil or
grease spills / deposits.
– any removable objects (including
shelves, side rails etc., provided
with the product) particularly any
non-stick pots, pans, trays,
utensils etc.
• Read carefully all the instructions for
Pyrolytic cleaning.
• Keep children away from the
appliance while the Pyrolytic cleaning
is in operation.
The appliance becomes very hot and
hot air is released from the front
cooling vents.
• Pyrolytic cleaning is a high
temperature operation that can
release fumes from cooking residues
and construction materials, as such
consumers are strongly advised to:
– provide good ventilation during
and after each Pyrolytic cleaning.
– provide good ventilation during
and after the first use at maximum
temperature operation.
• Unlike all humans, some birds and
reptiles can be extremely sensitive to
potential fumes emitted during the
cleaning process of all Pyrolytic
Ovens.
– Remove any pets (especially
birds) from the vicinity of the
appliance location during and
after the Pyrolytic cleaning and
first use maximum temperature
operation to a well ventilated
area.
• Small pets can also be highly
sensitive to the localized temperature
changes in the vicinity of all Pyrolytic
Ovens when the Pyrolytic self
cleaning program is in operation.
• Non-stick surfaces on pots, pans,
trays, utensils etc., can be damaged
by the high temperature Pyrolytic
cleaning operation of all Pyrolytic
Ovens and can be also a source for
low level harmful fumes.
• Fumes released from all Pyrolytic
Ovens / Cooking Residues as
described are not harmful to humans,
including infants or persons with
medical conditions.
www.electrolux.com6

2.6 Internal lighting
WARNING!
Risk of electric shock.
• The type of light bulb or halogen lamp
used for this appliance is for
household appliances only. Do not
use it for house lighting.
• Before replacing the lamp, disconnect
the appliance from the power supply.
• Only use lamps with the same
specifications.
2.7 Service
• To repair the appliance contact an
Authorised Service Centre.
• Use original spare parts only.
2.8 Disposal
WARNING!
Risk of injury or suffocation.
• Disconnect the appliance from the
mains supply.
• Cut off the mains electrical cable
close to the appliance and dispose of
it.
• Remove the door catch to prevent
children or pets from becoming
trapped in the appliance.
3. PRODUCT DESCRIPTION
3.1 General overview
1 3 42
5
6
7
8
9
4
3
2
1
10
1
Control panel
2
Knob for the heating functions
3
Display
4
Knob for the temperature
5
Air vents for the cooling fan
6
Heating element
7
Lamp
8
Fan
9
Shelf support, removable
10
Shelf positions
3.2 Accessories
• Wire shelf
For cookware, cake tins, roasts.
• Grill- / Roasting pan
To bake and roast or as pan to collect
fat.
4. CONTROL PANEL
4.1 Buttons
Sensor field / Button Function Description
MINUS To set the time.
ENGLISH 7

Sensor field / Button Function Description
CLOCK To set a clock function.
PLUS To set the time.
4.2 Display
A B
DG EF C
A. Timer / Temperature
B. Heat-up and residual heat indicator
C. Core temperature sensor (selected
models only)
D. Door lock (selected models only)
E. Hours / minutes
F. Demo mode (selected models only)
G. Clock functions
5. BEFORE FIRST USE
WARNING!
Refer to Safety chapters.
To set the Time of day refer
to "Clock functions" chapter.
5.1 Initial Cleaning
Remove all accessories and removable
shelf supports from the oven.
Refer to "Care and cleaning"
chapter.
Clean the oven and the accessories
before first use.
Put the accessories and the removable
shelf supports back to their initial
position.
5.2 Preheating
Preheat the empty oven before first use.
1. Set the function
and the maximum
temperature.
2. Let the oven operate for 1 hour.
3. Set the function and set the
maximum temperature.
4. Let the oven operate for 15 minutes.
5. Turn off the oven and let it cool
down.
Accessories can become hotter than
usual. The oven can emit an odour and
smoke. Make sure that the airflow in the
room is sufficient.
6. DAILY USE
WARNING!
Refer to Safety chapters.
6.1 Retractable knobs
To use the appliance, press the control
knob. The control knob comes out.
6.2 Oven Functions
Oven
function
Application
Off posi‐
tion
The oven is off.
www.electrolux.com8

Oven
function
Application
Fan Cook‐
ing
To roast or roast and bake
food with the same cook‐
ing temperature on more
than one shelf position,
without flavour transfer‐
ence.
Conven‐
tional
Cooking
(Top / Bot‐
tom Heat)
To bake and roast food on
one shelf position.
Grilling
To grill flat food and to
toast bread.
Fast Grill‐
ing
To grill flat food in large
quantities and to toast
bread.
Turbo
Grilling
To roast larger meat joints
or poultry with bones on
one shelf position. To
make gratins and to brown.
Bottom
Heat
To bake cakes with crispy
bottom and to preserve
food.
Meat
To prepare very tender
and juicy roasts.
Oven
function
Application
Moist Fan
Baking
This function is designed
to save energy during
cooking. For the cooking
instructions refer to "Hints
and tips" chapter, Moist
Fan Baking. The oven door
should be closed during
cooking so that the func‐
tion is not interrupted and
to ensure that the oven op‐
erates with the highest en‐
ergy efficiency possible.
When you use this func‐
tion, the temperature in the
cavity may differ from the
set temperature. The resid‐
ual heat is used.The heat‐
ing power may be reduced.
For general energy saving
recommendations refer to
"Energy Efficiency" chap‐
ter, Energy Saving.This
function was used to com‐
ply with the energy effi‐
ciency class according to
EN 60350-1.
Defrost
To defrost food (vegeta‐
bles and fruit). The defrost‐
ing time depends on the
amount and size of the fro‐
zen food.
Pyrolysis
To turn on the pyrolytic
cleaning of the oven. This
function burns off residual
dirt in the oven.
6.3 Setting a heating function
1. Turn the knob for the heating
functions to select a heating function.
2. Turn the control knob to select the
temperature.
The lamp turns on when the oven
operates.
3. To turn off the oven, turn the knobs
to the off position.
ENGLISH 9

6.4 Heat-up indicator
When the oven function operates, the
bars in the display
appear one by one
when the temperature in the oven
increases, and disappear when it
decreases.
7. CLOCK FUNCTIONS
7.1 Clock functions table
Clock func‐
tion
Application
TIME OF
DAY
To show or change the
time of day. You can
change the time of day
only when the oven is
off.
DURATION
To set how long the
oven works. Use only
when a heating function
is set.
END
To set when the oven
turns off. Use only when
a heating function is set.
TIME DELAY
Combination of DURA‐
TION and END function.
MINUTE
MINDER
Use to set a countdown
time. This function has
no effect on the opera‐
tion of the oven. You
can set the MINUTE
MINDER at any time, al‐
so if the oven is off.
00:00
COUNT UP
TIMER
If you do not set any
other clock function the
COUNT UP TIMER au‐
tomatically monitor how
long the oven works.
It is on immediately
when the oven starts to
heat.
The Count Up Timer
cannot be used with the
functions: DURATION,
END.
7.2 Setting and changing the
time
After the first connection to the mains,
wait until the display shows
and
"12:00". "12" flashes.
1. Press or to set the hours.
2. Press
to confirm and switch to set
the minutes.
The display shows and the set
hour. "00" flashes.
3. Press or to set the current
minutes.
4. Press to confirm or the set time of
day will be saved automatically after
5 seconds.
The display shows the new time.
To change the time of day press
again and again until the indicator for the
time of day flashes in the display.
7.3 Setting the DURATION
1. Set an oven function.
2. Press again and again until
starts to flash.
3. Press or to set the minutes
and then the hours. Press
to
confirm.
When the set Duration time ends the
signal sounds for 2 minutes.
and
time setting flash in the display. The
oven turns off automatically.
4. Press any button or open the oven
door to stop the signal.
5. Turn the knob for the oven functions
to the off position.
7.4 Setting the END
1. Set an oven function.
2. Press again and again until
starts to flash.
www.electrolux.com10

3. Press or to set the hours and
then the minutes. Press to
confirm.
At the set End time the signal sounds for
2 minutes. and time setting flash in
the display. The oven turns off
automatically.
4. Press any button or open the oven
door to stop the signal.
5. Turn the knob for the oven functions
to the off position.
7.5 Setting the TIME DELAY
function
1. Set a heating function.
2. Press again and again until
starts to flash.
3. Press or to set the minutes
and then the hours for DURATION
time. Press to confirm.
The display shows flashing
.
4. Press or to set the hours and
then the minutes for END time. Press
to confirm.
Oven turns on automatically later on,
works for the set DURATION time and
stops at the set END time.
At the set END time the signal sounds for
2 minutes. and time setting flash in
the display. The oven turns off.
5. Press any button or open the oven
door to stop the signal.
6. Turn the knob for the heating
functions to the off position.
7.6 Setting the MINUTE
MINDER
Minute minder can be both set when the
oven is turned on and off.
1. Press
again and again until
and "00" flash in the display.
2. Press or to set the seconds
and than the minutes.
When the time you set is longer than
60 minutes, flash in the display.
3. Set the hours.
4. The MINUTE MINDER starts
automatically after 5 seconds.
After 90% of the set time the signal
sounds.
5. When the set time ends the signal
sounds for 2 minutes. "00:00" and
flash in the display. Press any button
to stop the signal.
7.7 COUNT UP TIMER
To reset the Count Up Timer, press and
hold and . The timer starts to count
up again.
8. USING THE ACCESSORIES
WARNING!
Refer to Safety chapters.
8.1 Inserting the accessories
Wire shelf:
Push the shelf between the guide bars of
the shelf support and make sure that the
feet point down.
Deep pan:
Push the deep pan between the guide
bars of the shelf support.
ENGLISH 11

Wire shelf anddeep pan together:
Push the deep pan between the guide
bars of the shelf support and the wire
shelf on the guide bars above.
Small indentation at the top
increase safety. The
indentations are also anti-tip
devices. The high rim
around the shelf prevents
cookware from slipping of
the shelf.
9. ADDITIONAL FUNCTIONS
9.1 Using the Child Lock
When the Child Lock is on the oven
cannot be turned on accidentally.
1. Ensure the knob for the oven
functions is in the off position.
2. Press and hold
and at the
same time for 2 seconds.
The signal sounds. SAFE and appear
on the display.
The symbols appear on the
display also when Pyrolysis
function operates.
To turn off the Child Lock, repeat step 2.
9.2 Residual heat indicator
When you turn off the oven, the display
shows the residual heat indicator if
the temperature in the oven is more than
40 °C.
9.3 Automatic Switch-off
For safety reasons the oven turns off
automatically after some time if a heating
function operates and you do not change
the oven temperature.
Temperature (°C) Switch-off time
(h)
30 - 115 12.5
120 - 195 8.5
200 - 245 5.5
250 1.5
After an automatic switch-off, press any
button to operate the oven again.
The Automatic switch-off
does not work with the
functions: Light, Duration,
End.
9.4 Cooling fan
When the oven operates, the cooling fan
turns on automatically to keep the
surfaces of the oven cool. If you turn off
the oven, the cooling fan can continue to
operate until the oven cools down.
9.5 Safety thermostat
Incorrect operation of the oven or
defective components can cause
dangerous overheating. To prevent this,
the oven has a safety thermostat which
www.electrolux.com12

interrupts the power supply. The oven
turns on again automatically when the
temperature drops.
10. HINTS AND TIPS
WARNING!
Refer to Safety chapters.
The temperature and baking
times in the tables are
guidelines only. They
depend on the recipes and
the quality and quantity of
the ingredients used.
10.1 Cooking recommendations
The oven has four shelf positions.
Count the shelf positions from the bottom
of the oven floor.
Your oven may bake or roast differently
to the oven you had before. The below
tables provide you with the standard
settings for temperature, cooking time
and shelf position.
If you cannot find the settings for a
special recipe, look for the similar one.
The oven has a special system which
circulates the air and constantly recycles
the steam. With this system you can
cook in a steamy environment and keep
the food soft inside and crusty outside. It
decreases the cooking time and energy
consumption.
Baking cakes
Do not open the oven door before 3/4 of
the set cooking time is up.
If you use two baking trays at the same
time, keep one empty level between
them.
Cooking meat and fish
Use a deep pan for very fatty food to
prevent the oven from stains that can be
permanent.
Leave the meat for approximately 15
minutes before carving so that the juice
does not seep out.
To prevent too much smoke in the oven
during roasting, add some water into the
deep pan. To prevent the smoke
condensation, add water each time after
it dries up.
10.2 Baking and roasting table
Cakes
Food Top / Bottom Heat Fan Cooking Time
(min)
Com‐
ments
Tempera‐
ture (°C)
Shelf po‐
sition
Tempera‐
ture (°C)
Shelf po‐
sition
Whisked
recipes
170 2 165 2 (1 and
3)
45 - 60 In a cake
mould
Short‐
bread
dough
170 2 160 2 (1 and
3)
20 - 30 In a cake
mould
Butter-milk
cheese
cake
170 1 165 2 70 - 80 In a 26 cm
cake
mould
ENGLISH 13

Food Top / Bottom Heat Fan Cooking Time
(min)
Com‐
ments
Tempera‐
ture (°C)
Shelf po‐
sition
Tempera‐
ture (°C)
Shelf po‐
sition
Apple
cake (Ap‐
ple pie)
170 1 160 2 (1 and
3)
80 - 100 In two 20
cm cake
moulds on
a wire
shelf
Strudel 175 2 150 2 60 - 80 In a bak‐
ing tray
Jam-tart 170 2 160 2 (1 and
3)
30 - 40 In a 26 cm
cake
mould
Fruit cake 170 2 155 2 50 - 60 In a 26 cm
cake
mould
Sponge
cake (Fat‐
less
sponge
cake)
170 2 160 2 90 - 120 In a 26 cm
cake
mould
Christmas
cake /
Rich fruit
cake
170 2 160 2 50 - 60 In a 20 cm
cake
mould
Plum
cake
1)
170 2 165 2 20 - 30 In a bread
tin
Small
cakes
170 3 166 3 (1 and
3)
25 - 35 In a bak‐
ing tray
Biscuits
1)
150 3 140 3 (1 and
3)
30 - 35 In a bak‐
ing tray
Meringues 100 3 115 3 35 - 40 In a bak‐
ing tray
Buns
1)
190 3 180 3 80 - 100 In a bak‐
ing tray
Choux
1)
190 3 180 3 (1 and
3)
15 - 20 In a bak‐
ing tray
Plate tarts 180 3 170 2 25 - 35 In a 20 cm
cake
mould
www.electrolux.com14

Food Top / Bottom Heat Fan Cooking Time
(min)
Com‐
ments
Tempera‐
ture (°C)
Shelf po‐
sition
Tempera‐
ture (°C)
Shelf po‐
sition
Victoria
sandwich
180 1 or 2 170 2 45 - 70 Left + right
in a 20 cm
cake
mould
Rich fruit
cake
160 1 150 2 110 - 120 In a 24 cm
cake
mould
Victoria
sand‐
wich
1)
170 1 160 1 50 - 60 In a 20 cm
cake
mould
1)
Preheat the oven for 10 minutes.
Bread and pizza
Food Top / Bottom Heat Fan Cooking Time
(min)
Com‐
ments
Tempera‐
ture (°C)
Shelf po‐
sition
Tempera‐
ture (°C)
Shelf po‐
sition
White
bread
1)
190 1 195 1 60 - 70 1 - 2
pieces,
500 gr per
piece
Rye bread 190 1 190 1 30 - 45 In a bread
tin
Bread
rolls
1)
190 2 180 2 (1 and
3)
25 - 40 6 - 8 rolls
in a bak‐
ing tray
Pizza
1)
190 1 190 1 20 - 30 On a deep
pan
Scones
1)
200 3 190 2 10 – 20 In a bak‐
ing tray
1)
Preheat the oven for 10 minutes.
Flans
Food Top / Bottom Heat Fan Cooking Time
(min)
Com‐
ments
Tempera‐
ture (°C)
Shelf po‐
sition
Tempera‐
ture (°C)
Shelf po‐
sition
Pasta flan 180 2 180 2 40 - 50 In a mould
Vegetable
flan
200 2 200 2 45 - 60 In a mould
ENGLISH 15

Food Top / Bottom Heat Fan Cooking Time
(min)
Com‐
ments
Tempera‐
ture (°C)
Shelf po‐
sition
Tempera‐
ture (°C)
Shelf po‐
sition
Quiches 190 1 190 1 40 - 50 In a mould
Lasagne 200 2 200 2 25 - 40 In a mould
Cannelloni 200 2 200 2 25 - 40 In a mould
Yorkshire
pudding
1)
220 2 210 2 20 - 30 6 pudding
mould
1)
Preheat the oven for 10 minutes.
Meat
Food Top / Bottom Heat Fan Cooking Time
(min)
Com‐
ments
Tempera‐
ture (°C)
Shelf po‐
sition
Tempera‐
ture (°C)
Shelf po‐
sition
Beef 200 2 190 2 50 - 70 On a wire
shelf and
a deep
pan
Pork 180 2 180 2 90 - 120 On a wire
shelf and
a deep
pan
Veal 190 2 175 2 90 - 120 On a wire
shelf and
a deep
pan
English
roast beef
rare
210 2 200 2 44 - 50 On a wire
shelf and
a deep
pan
English
roast beef
medium
210 2 200 2 51 - 55 On a wire
shelf and
a deep
pan
English
roast beef
well done
210 2 200 2 55 - 60 On a wire
shelf and
a deep
pan
Shoulder
of pork
180 2 170 2 120 - 150 On a deep
pan
www.electrolux.com16

Food Top / Bottom Heat Fan Cooking Time
(min)
Com‐
ments
Tempera‐
ture (°C)
Shelf po‐
sition
Tempera‐
ture (°C)
Shelf po‐
sition
Shin of
pork
180 2 160 2 100 - 120 2 pieces
on a deep
pan
Lamb 190 2 190 2 110 - 130 Leg
Chicken 200 2 200 2 70 - 85 Whole
Turkey 180 1 160 1 210 - 240 Whole
Duck 175 2 160 2 120 - 150 Whole
Goose 175 1 160 1 150 - 200 Whole
Rabbit 190 2 175 2 60 - 80 Cut in
pieces
Hare 190 2 175 2 150 - 200 Cut in
pieces
Pheasant 190 2 175 2 90 - 120 Whole
Fish
Food Top / Bottom Heat Fan Cooking Time
(min)
Com‐
ments
Tempera‐
ture (°C)
Shelf po‐
sition
Tempera‐
ture (°C)
Shelf po‐
sition
Trout /
Sea
bream
190 2 175 2 (1 and
3)
40 - 55 3 - 4
fishes
Tuna fish /
Salmon
190 2 175 2 (1 and
3)
35 - 60 4 - 6 fillets
10.3 Grilling
Preheat the oven for 10 minutes.
Use the third position.
Set the temperature to 250 °C.
Food Quantity Time (min)
Pieces Quantity
(kg)
1st side 2nd side
Fillet steaks 4 0.8 12 - 15 12 - 14
Beef steaks 4 0.6 10 - 12 6 - 8
Sausages 8 - 12 - 15 10 - 12
Pork chops 4 0.6 12 - 16 12 - 14
ENGLISH 17

Food Quantity Time (min)
Pieces Quantity
(kg)
1st side 2nd side
Chicken (cut in 2) 2 1 30 - 35 25 - 30
Kebabs 4 - 10 - 15 10 - 12
Breast of chicken 4 0.4 12 - 15 12 - 14
Hamburger 6 0.6 20 - 30 -
Fish fillet 4 0.4 12 - 14 10 - 12
Toasted sandwiches 4 - 6 - 5 - 7 -
Toast 4 - 6 - 2 - 4 2 - 3
10.4 Turbo Grilling
Set the maximum temperature of 200 °C.
Use the third shelf position.
Food Quantity Time (min)
Pieces (kg) 1st side 2nd side
Rolled joints
(turkey)
1 1 30 - 40 20 - 30
Chicken (cut in
two)
2 1 25 - 30 20 - 30
Chicken drum‐
sticks
6 - 15 - 20 15 - 18
Quail 4 0.5 25 - 30 20 - 25
Vegetable gra‐
tin
- - 20 - 25 -
Scallops - - 15 - 20 -
Mackerel 2 - 4 - 15 - 20 10 - 15
Fish slices 4 - 6 0.8 12 - 15 8 - 10
10.5 Moist Fan Baking
For best results follow the
baking times listed in the
table below.
During cooking, open the
appliance door only when
necessary.
www.electrolux.com18

10.6 Defrost
Food Quantity
(kg)
Defrosting
time (min)
Further defrost‐
ing time (min)
Comments
Chicken 1.0 100 - 140 20 - 30 Place the chicken on an
upturned saucer placed
on a large plate. Turn
halfway through.
Meat 1.0 100 - 140 20 - 30 Turn halfway through.
Meat 0.5 90 - 120 20 - 30 Turn halfway through.
Trout 1.50 25 - 35 10 - 15 -
Strawberries 3.0 30 - 40 10 - 20 -
Butter 2.5 30 - 40 10 - 15 -
Cream 2 x 2.0 80 - 100 10 - 15 Cream can also be
whipped when still
slightly frozen in places.
Gateau 1.4 60 60 -
10.7 Information for test
institutes
Tests according to IEC 60350-1.
Food Function Acces‐
sories
Shelf
posi‐
tion
Tem‐
pera‐
ture
(°C)
Time (min) Comments
Small
cake
Conven‐
tional
Cooking
Baking
tray
3 170 20 - 30 Put 20 small
cakes per one
baking tray.
Apple pie Conven‐
tional
Cooking
Wire
shelf
1 170 80 - 120 Use 2 tins (20
cm diameter), di‐
agonally shifted.
Sponge
cake
Conven‐
tional
Cooking
Wire
shelf
2 170 35 - 45 Use a cake
mould (26 cm di‐
ameter).
Short
bread
Conven‐
tional
Cooking
Baking
tray
3 150 20 - 35 Preheat the
oven for 10 mi‐
nutes.
Toast
4 - 6
pieces
Grilling Wire
shelf
3 max. 2 - 4 minutes
first side; 2 - 3
minutes sec‐
ond side
Preheat the
oven for 3 mi‐
nutes.
ENGLISH 19

Food Function Acces‐
sories
Shelf
posi‐
tion
Tem‐
pera‐
ture
(°C)
Time (min) Comments
Beef bur‐
ger
6 pieces,
0.6 kg
Grilling Wire
shelf and
dripping
pan
3 max. 20 - 30 Put the wire
shelf on the third
level and the
dripping pan on
the second level
of the oven. Turn
the food halfway
through the
cooking time.
Preheat the
oven for 3 mi‐
nutes.
11. CARE AND CLEANING
WARNING!
Refer to Safety chapters.
11.1 Notes on cleaning
Clean the front of the oven with a soft
cloth with warm water and a mild
cleaning agent.
To clean metal surfaces, use a dedicated
cleaning agent.
Clean the oven interior after each use.
Fat accumulation or other food remains
may result in a fire. The risk is higher for
the grill pan.
Clean all accessories after each use and
let them dry. Use a soft cloth with warm
water and a cleaning agent. Do not clean
the accessories in the dishwasher.
Clean stubborn dirt with a special oven
cleaner.
If you have nonstick accessories, do not
clean them using aggressive agents,
sharp-edged objects or a dishwasher. It
can cause damage to the nonstick
coating.
Moisture can condense in the oven or on
the door glass panels. To decrease the
condensation, operate the oven for 10
minutes before cooking. Clean the
moisture from the cavity after each use.
11.2 Stainless steel or
aluminium ovens
Clean the oven door with a damp cloth or
sponge only. Dry it with a soft cloth.
Do not use steel wool, acids or abrasive
materials as they can damage the oven
surface. Clean the oven control panel
with the same precautions.
11.3 Removing the shelf
supports
To clean the oven, remove the shelf
supports.
CAUTION!
Be careful when you remove
the shelf supports.
1. Pull the front of the shelf support
away from the side wall.
2. Pull the rear end of the shelf support
away from the side wall and remove
it.
www.electrolux.com20

2
1
Install the removed accessories in the
opposite sequence.
11.4 Pyrolysis
CAUTION!
Remove all accessories and
removable shelf supports.
Do not start the Pyrolysis if
you did not fully close the
oven door. In some models,
the display shows "C3" when
this error occurs.
WARNING!
The appliance becomes very
hot. There is a risk of burns.
CAUTION!
If there are other appliances
installed in the same
cabinet, do not use them at
the same time as the
Pyrolysis function. It can
cause damage to the
appliance.
1. Remove the worst dirt manually.
2. Clean the inner side of the door with
hot water, so that the residues do not
burn from the hot air.
3. Set the Pyrolysis function. Refer to
"Oven functions".
flashes.
4. You can use the End function to
delay the start of the cleaning
procedure.
5. Press
or turn the knob for the
temperature clockwise to start the
cleaning procedure.
Time of the procedure: 2 h.
During the Pyrolysis the oven lamp is
off.
When the oven is at its set temperature,
the door locks. The display shows the
symbol and the bars of the heat
indicator until the door unlocks.
11.5 Cleaning reminder
To remind you that the pyrolysis is
necessary, PYR flashes in the display for
10 seconds after each activation and
deactivation of the oven.
The cleaning reminder
goes out:
• after the end of the
pyrolysis.
• if you press and at
the same time while PYR
flashes in the display.
11.6 Removing and installing
door
The oven door has four glass panels.
You can remove the oven door and the
internal glass panels to clean them.
The oven door may close if
you try to remove the glass
panels before you remove
the oven door.
CAUTION!
Do not use the oven without
the glass panels.
1. Open the door fully and hold both
hinges.
2. Lift and turn the levers on both
hinges.
ENGLISH 21

3. Close the oven door halfway to the
first opening position. Then pull
forward and remove the door from its
seat.
4. Put the door on a soft cloth on a
stable surface.
5. Release the locking system to
remove the glass panels.
6. Turn the two fasteners by 90° and
remove them from their seats.
90°
7. First lift carefully and then remove
the glass panels one by one. Start
from the top panel.
1
2
8. Clean the glass panels with water
and soap. Dry the glass panels
carefully.
When the cleaning is completed, install
the glass panels and the oven door. Do
the above steps in the opposite
sequence.
Make sure that you put the glass panels
(A, B and C) back in the correct
sequence. Check for the symbol /
printing on the side of the glass panel,
each of the glass panels looks different
to make the disassembly and assembly
easier.
www.electrolux.com22

A B C
Make sure that you install the middle
panel of glass in the seats correctly.
A
B
C
11.7 Replacing the lamp
WARNING!
Risk of electric shock.
The lamp can be hot.
1. Turn off the oven.
Wait until the oven is cooled down.
2. Disconnect the oven from the mains.
3. Put a cloth on the bottom of the
cavity.
The back lamp
1. Turn the lamp glass cover to remove
it.
2. Clean the glass cover.
3. Replace the lamp with a suitable 300
°C heat-resistant lamp.
4. Install the glass cover.
12. TROUBLESHOOTING
WARNING!
Refer to Safety chapters.
12.1 What to do if...
Problem Possible cause Remedy
You cannot activate or op‐
erate the oven.
The oven is not connected
to an electrical supply or it
is connected incorrectly.
Check if the oven is cor‐
rectly connected to the
electrical supply (refer to
the connection diagram if
available).
The oven does not heat
up.
The oven is deactivated. Activate the oven.
The oven does not heat
up.
The clock is not set. Set the clock.
The oven does not heat
up.
The necessary settings are
not set.
Make sure that the settings
are correct.
The oven does not heat
up.
The automatic switch-off is
activated.
Refer to "Automatic switch-
off".
The oven does not heat
up.
The Child Lock is on. Refer to "Using the Child
Lock".
ENGLISH 23

Problem Possible cause Remedy
The oven does not heat
up.
The fuse is blown. Make sure that the fuse is
the cause of the malfunc‐
tion. If the fuse is blown
again and again, contact a
qualified electrician.
The lamp does not oper‐
ate.
The lamp is defective. Replace the lamp.
It takes too long to cook
the dishes or they cook too
quickly.
The temperature is too low
or too high.
Adjust the temperature if
necessary. Follow the ad‐
vice in the user manual.
Steam and condensation
settle on the food and in
the cavity of the oven.
You left the dish in the
oven for too long.
Do not leave the dishes in
the oven for longer than 15
- 20 minutes after the
cooking process ends.
The display shows "C3". The cleaning function does
not operate. You did not
fully close the door, or the
door lock is defective.
Fully close the door.
The display shows "F102". • You did not fully close
the door.
• The door lock is defec‐
tive.
• Fully close the door.
• Deactivate the oven
with the house fuse or
the safety switch in the
fuse box and activate it
again.
• If the display shows
"F102" again, contact
the Customer Care De‐
partment.
The display shows an error
code that is not in this ta‐
ble.
There is an electrical fault. • Deactivate the oven
with the house fuse or
the safety switch in the
fuse box and activate it
again.
• If the display shows the
error code again, con‐
tact the Customer Care
Department.
12.2 Service data
If you cannot find a solution to the
problem yourself, contact your dealer or
an Authorised Service Centre.
The necessary data for the service
centre is on the rating plate. The rating
plate is on the front frame of the oven
cavity. Do not remove the rating plate
from the oven cavity.
www.electrolux.com24

We recommend that you write the data here:
Model (MOD.) .........................................
Product number (PNC) .........................................
Serial number (S.N.) .........................................
13. INSTALLATION
WARNING!
Refer to Safety chapters.
13.1 Building In
589
598
594
114
19
21540
570
558
min. 550
20
600
min. 560
3
9
min. 550
20
590
min. 560
589
598
594
114
19
21540
570
558
3
9
13.2 Securing the appliance to
the cabinet
A
B
13.3 Electrical installation
The manufacturer is not
responsible if you do not
follow the safety precautions
from the Safety chapters.
This appliance is supplied only with a
main cable.
13.4 Cable
Cable types applicable for installation or
replacement:
H07 RN-F, H05 RN-F, H05 RRF, H05
VV-F, H05 V2V2-F (T90), H05 BB-F
For the section of the cable refer to the
total power on the rating plate. You can
also refer to the table:
Total power (W) Section of the ca‐
ble (mm²)
maximum 1380 3 x 0.75
maximum 2300 3 x 1
maximum 3680 3 x 1.5
The earth cord (green / yellow cable)
must be 2 cm longer than phase and
neutral cables (blue and brown cables).
ENGLISH 25

14. ENERGY EFFICIENCY
14.1 Product Fiche and information according to EU 65-66/2014
Supplier's name Electrolux
Model identification EZC2510ACX
Energy Efficiency Index 81.0
Energy efficiency class A+
Energy consumption with a standard load, con‐
ventional mode
0.87 kWh/cycle
Energy consumption with a standard load, fan-
forced mode
0.64 kWh/cycle
Number of cavities 1
Heat source Electricity
Volume 57 l
Type of oven Built-In Oven
Mass 33.7 kg
EN 60350-1 - Household electric cooking
appliances - Part 1: Ranges, ovens,
steam ovens and grills - Methods for
measuring performance.
14.2 Energy saving
The oven contains features
which help you save energy
during everyday cooking.
General hints
Make sure that the oven door is closed
properly when the oven operates. Do not
open the door too often during cooking.
Keep the door gasket clean and make
sure it is well fixed in its position.
Use metal dishes to improve energy
saving.
When possible, do not preheat the oven
before you put the food inside.
When the cooking duration is longer than
30 minutes, reduce the oven temperature
to minimum 3 - 10 minutes before the
end of the cooking time, depending on
the duration of the cooking. The residual
heat inside the oven will continue to
cook.
Use the residual heat to warm up other
dishes.
Keep breaks between baking as short as
possible when you prepare few dishes at
one time.
Cooking with fan
When possible, use the cooking
functions with fan to save energy.
Residual heat
If a programme with the Duration or End
Time selection is activated and the
cooking time is longer than 30 minutes,
the heating elements automatically
deactivate earlier in some oven
functions.
The fan and lamp continue to operate.
Keep food warm
Choose the lowest possible temperature
setting to use residual heat and keep a
meal warm. The residual heat indicator
or temperature appears on the display.
Moist Fan Baking
Function designed to save energy during
cooking.
When you use this function the lamp
automatically turns off after 30 seconds.
www.electrolux.com26

15. ENVIRONMENTAL CONCERNS
Recycle materials with the symbol .
Put the packaging in relevant containers
to recycle it. Help protect the
environment and human health by
recycling waste of electrical and
electronic appliances. Do not dispose of
appliances marked with the symbol
with the household waste. Return the
product to your local recycling facility or
contact your municipal office.
ENGLISH 27

CONTENIDO
1. INFORMACIÓN SOBRE SEGURIDAD............................................................ 29
2. INSTRUCCIONES DE SEGURIDAD................................................................30
3. DESCRIPCIÓN DEL PRODUCTO................................................................... 34
4. PANEL DE MANDOS....................................................................................... 34
5. ANTES DEL PRIMER USO.............................................................................. 35
6. USO DIARIO.....................................................................................................35
7. FUNCIONES DEL RELOJ................................................................................ 37
8. USO DE LOS ACCESORIOS...........................................................................38
9. FUNCIONES ADICIONALES........................................................................... 39
10. CONSEJOS.................................................................................................... 40
11. MANTENIMIENTO Y LIMPIEZA.....................................................................48
12. SOLUCIÓN DE PROBLEMAS........................................................................51
13. INSTALACIÓN................................................................................................53
14. EFICACIA ENERGÉTICA...............................................................................55
PENSAMOS EN USTED
Gracias por adquirir un aparato Electrolux. Ha escogido un producto que contiene
décadas de experiencia e innovación profesionales. Ingenioso y elegante, se ha
diseñado pensando en usted. Así pues, siempre que lo utilice, puede tener la
seguridad de que conseguirá excelentes resultados.
Bienvenido a Electrolux.
Consulte en nuestro sitio web:
Obtener consejos, folletos, soluciones a problemas e información de servicio:
www.electrolux.com/webselfservice
Registrar su producto para recibir un mejor servicio:
www.registerelectrolux.com
Adquirir accesorios, artículos de consumo y recambios originales para su
aparato:
www.electrolux.com/shop
ATENCIÓN Y SERVICIO AL CLIENTE
Le recomendamos que utilice recambios originales.
Al contactar con nuestro centro autorizado de servicio técnico, cerciórese de
tener la siguiente información a mano: Modelo, PNC, Número de serie.
La información se puede encontrar en la placa de características.
Advertencia / Precaución-Información sobre seguridad
Información general y consejos
Información sobre el medio ambiente
Salvo modificaciones.
www.electrolux.com28

1. INFORMACIÓN SOBRE SEGURIDAD
Antes de instalar y utilizar el aparato, lea atentamente
las instrucciones facilitadas. El fabricante no se hace
responsable de lesiones o daños producidos como
resultado de una instalación o un uso incorrectos:
Conserve siempre estas instrucciones en lugar seguro y
accesible para futuras consultas.
1.1 Seguridad de niños y personas vulnerables
• Este aparato puede ser utilizado por niños de 8 años
en adelante y personas cuyas capacidades físicas,
sensoriales o mentales estén disminuidas o que
carezcan de la experiencia y conocimientos
suficientes para manejarlo, siempre que cuenten con
las instrucciones o la supervisión sobre el uso del
electrodoméstico de forma segura y comprendan los
riesgos.
• Es necesario mantener alejados a los niños entre 3 y
8 años, así como a las personas con minusvalías
importantes y complejas, salvo que estén bajo
supervisión continua.
• Es necesario mantener alejados a los niños de menos
de 3 años salvo que estén bajo supervisión continua.
• No deje que los niños jueguen con el aparato.
• Mantenga todo el material de embalaje fuera del
alcance de los niños y deséchelo de forma adecuada.
• Mantenga a los niños y mascotas alejados del aparato
cuando esté funcionando o se esté enfriando. Las
piezas accesibles están calientes.
• Si este aparato tiene un bloqueo de seguridad para
niños, debe activarlo.
• La limpieza y mantenimiento de usuario del aparato
no podrán ser realizados por niños sin supervisión.
1.2 Seguridad general
• Solo un electricista cualificado puede instalar este
aparato y sustituir el cable.
ESPAÑOL 29

• ADVERTENCIA: El aparato y las piezas accesibles se
calientan mucho durante el funcionamiento. Preste
mucha atención para no tocar las resistencias.
• Utilice siempre guantes de horno cuando introduzca o
retire accesorios o utensilios refractarios.
• Antes de realizar tareas de mantenimiento,
desenchufe el aparato de la red eléctrica.
• Asegúrese de que el aparato está desconectado
antes de reemplazar la lámpara con el fin de impedir
que se produzca una descarga eléctrica.
• No utilice un limpiador a vapor para limpiar el aparato.
• No utilice limpiadores abrasivos ásperos ni rascadores
de metal afilado para limpiar la puerta de cristal si no
quiere arañar su superficie, lo que podría hacer que el
cristal se hiciese añicos.
• Si el cable de alimentación eléctrica sufre algún daño,
el fabricante, su servicio técnico autorizado o un
profesional cualificado tendrán que cambiarlo para
evitar riesgos eléctricos.
• La acumulación excesiva de líquidos debe retirarse
antes de la limpieza pirolítica. Saque todas las piezas
del horno.
• Para quitar los carriles laterales, tire primero del
frontal del carril y luego separe el extremo trasero de
las paredes. Coloque los carriles laterales en el orden
inverso.
2. INSTRUCCIONES DE SEGURIDAD
2.1 Instalación
ADVERTENCIA!
Sólo un técnico cualificado
puede instalar el aparato.
• Retire todo el embalaje.
• No instale ni utilice un aparato
dañado.
• Siga las instrucciones de instalación
suministradas con el aparato.
• Tenga cuidado al mover el aparato,
porque es pesado. Utilice siempre
guantes de protección y calzado
cerrado.
• No tire nunca del aparato sujetando el
asa.
• Respete siempre la distancia mínima
entre el aparato y los demás
electrodomésticos y mobiliario.
• Asegúrese de que el aparato se
instala debajo y junto a estructuras
seguras.
• Los laterales del aparato deben estar
adyacentes a aparatos o unidades de
la misma altura.
www.electrolux.com30

• El aparato dispone de un sistema de
enfriamiento eléctrico. Debe utilizarse
con alimentación eléctrica.
2.2 Conexión eléctrica
ADVERTENCIA!
Riesgo de incendios y
descargas eléctricas.
• Todas las conexiones eléctricas
deben realizarlas electricistas
cualificados.
• El aparato debe conectarse a tierra.
• Asegúrese de que los parámetros de
la placa de características son
compatibles con los valores eléctricos
del suministro eléctrico.
• Utilice siempre una toma con
aislamiento de conexión a tierra
correctamente instalada.
• No utilice adaptadores de enchufes
múltiples ni cables prolongadores.
• Asegúrese de no provocar daños en
el enchufe ni en el cable de red. Si es
necesario cambiar el cable de
alimentación del aparato, debe
hacerlo el centro de servicio técnico
autorizado.
• Evite que el cable de red toque o
entre en contacto con la puerta del
aparato, especialmente si la puerta
está caliente.
• Los mecanismos de protección contra
descargas eléctricas de componentes
con corriente y aislados deben fijarse
de forma que no puedan aflojarse sin
utilizar herramientas.
• Conecte el enchufe a la toma de
corriente únicamente cuando haya
terminado la instalación. Asegúrese
de tener acceso al enchufe del
suministro de red una vez finalizada
la instalación.
• Si la toma de corriente está floja, no
conecte el enchufe.
• No desconecte el aparato tirando del
cable de conexión a la red. Tire
siempre del enchufe.
• Use únicamente dispositivos de
aislamiento apropiados: línea con
protección contra los cortocircuitos,
fusibles (tipo tornillo que puedan
retirarse del soporte), dispositivos de
fuga a tierra y contactores.
• La instalación eléctrica debe tener un
dispositivo de aislamiento que permita
desconectar el aparato de todos los
polos de la red. El dispositivo de
aislamiento debe tener una apertura
de contacto con una anchura mínima
de 3 mm.
• Cierre completamente la puerta del
aparato antes de enchufar el cable de
alimentación a la toma de corriente.
• Este aparato cumple las directivas
CEE.
2.3 Uso del aparato
ADVERTENCIA!
Riesgo de lesiones,
quemaduras y descargas
eléctricas o explosiones.
• Este aparato está diseñado
exclusivamente para uso doméstico.
• No cambie las especificaciones de
este aparato.
• Cerciórese de que los orificios de
ventilación no están obstruidos.
• No deje nunca el aparato desatendido
mientras está en funcionamiento.
• Desactive el aparato después de
cada uso.
• Tenga cuidado al abrir la puerta del
aparato cuando esté en
funcionamiento. Pueden liberarse
vapores calientes.
• No utilice el aparato con las manos
mojadas ni cuando entre en contacto
con el agua.
• No ejerza presión sobre la puerta
abierta.
• No utilice el aparato como superficie
de trabajo ni de almacenamiento.
• Abra la puerta del aparato con
cuidado. El uso de ingredientes con
alcohol puede generar una mezcla de
alcohol y aire.
• Procure que no haya chispas ni fuego
encendido cerca cuando se abra la
puerta del aparato.
• No coloque productos inflamables ni
objetos mojados con productos
inflamables dentro, cerca o encima
del aparato.
ADVERTENCIA!
Podría dañar el aparato.
ESPAÑOL 31

• Para evitar daños o decoloraciones
del esmalte:
– no coloque utensilios refractarios
ni otros objetos directamente en
la parte inferior del aparato.
– no coloque papel de aluminio
directamente en la parte inferior
del interior del aparato.
– No ponga agua directamente en
el aparato caliente.
– No deje platos húmedos ni
comida en el aparato una vez
finalizada la cocción.
– Preste especial atención al
desmontar o instalar los
accesorios.
• La pérdida de color del esmalte o el
acero inoxidable no afecta al
rendimiento del aparato.
• Utilice una bandeja honda para
pasteles húmedos. Los jugos de las
frutas podrían ocasionar manchas
permanentes.
• Este aparato está diseñado
exclusivamente para cocinar. No
debe utilizarse para otros fines, por
ejemplo, como calefacción.
• Cocine siempre con la puerta del
horno cerrada.
• Si el aparato se instala detrás de un
panel de un mueble (por ejemplo una
puerta) asegúrese de que la puerta
nunca esté cerrada mientras funciona
el aparato. El calor y la humedad
pueden acumularse detrás de un
panel del armario cerrado y provocar
daños al aparato, la unidad donde se
encuentra o el suelo. No cierre del
panel del armario hasta que el
aparato se haya enfriado totalmente
después de su uso.
2.4 Mantenimiento y limpieza
ADVERTENCIA!
Existe riesgo de lesiones,
incendios o daños al
aparato.
• Antes de proceder con el
mantenimiento, apague el aparato y
desconecte el enchufe de la red.
• Asegúrese de que el aparato esté
frío. Los paneles de cristal pueden
romperse.
• Cambie inmediatamente los paneles
de cristal de la puerta que estén
dañados. Póngase en contacto con el
servicio técnico autorizado.
• Tenga cuidado al desmontar la puerta
del aparato. ¡La puerta es muy
pesada!
• Limpie periódicamente el aparato
para evitar el deterioro del material de
la superficie.
• Limpie el aparato con un paño suave
humedecido. Utilice solo detergentes
neutros. No utilice productos
abrasivos, estropajos duros,
disolventes ni objetos de metal.
• Si utiliza aerosoles de limpieza para
hornos, siga las instrucciones de
seguridad del envase.
• No limpie el esmalte catalítico (en su
caso) con ningún tipo de detergente.
2.5 Limpieza Pirolítica
ADVERTENCIA!
Riesgo de lesiones /
Incendios / Emisiones
químicas (humos) en el
modo pirolítico.
• Antes de realizar una autolimpieza
pirolítica o la función de Primer uso,
elimine de la cavidad del horno:
– cualquier resto de comida, aceite
o grasa.
– todos los objetos desmontables
(incluidos estantes, carriles
laterales, etc. suministrados con
el producto), en especial todos los
recipientes, sartenes, bandejas,
utensilios, etc. antiadherentes.
• Lea atentamente todas las
instrucciones de la limpieza pirolítica.
• Mantenga a los niños alejados del
horno cuando la limpieza pirolítica se
encuentre en funcionamiento.
El aparato alcanza altas temperaturas
y se libera aire caliente de las salidas
de ventilación delanteras.
• La limpieza pirolítica es una
operación a alta temperatura que
puede liberar humos de los residuos
de cocción y de los materiales de
fabricación, por lo que
recomendamos encarecidamente a
los consumidores:
www.electrolux.com32

– asegurar una correcta ventilación
durante y después de cada
limpieza pirolítica.
– asegurar una correcta ventilación
durante y después del primer uso
a máxima temperatura.
• A diferencia de los seres humanos,
algunas aves y algunos reptiles
pueden ser muy sensibles a los
posibles humos emitidos durante la
limpieza de todos los hornos
pirolíticos.
– Retire cualquier mascota
(especialmente pájaros) de las
proximidades del aparato durante
y después de la limpieza pirolítica
y use primero la temperatura
máxima para una zona bien
ventilada.
• Las mascotas de pequeño tamaño
también pueden ser muy sensibles a
los cambios de temperatura
localizados cerca de los hornos
mientras se realiza el programa de
autolimpieza pirolítica.
• Las superficies antiadherentes de
recipientes, sartenes, bandejas,
utensilios, etc., pueden dañarse por
las altas temperaturas de la limpieza
pirolítica y también pueden ser fuente
de humos dañinos de baja intensidad.
• Los humos emitidos por todos los
hornos pirolíticos y residuos de
cocción descritos no son dañinos
para las personas, incluidos los bebés
o personas con problemas médicos.
2.6 Luces interiores
ADVERTENCIA!
Riesgo de descarga
eléctrica.
• El tipo de bombilla o lámpara
halógena utilizada para este aparato
es específica para aparatos
domésticos. No debe utilizarse para la
iluminación doméstica.
• Antes de cambiar la bombilla,
desconecte el aparato del suministro
de red.
• Utilice sólo bombillas de las mismas
características .
2.7 Asistencia
• Para reparar el aparato, póngase en
contacto con un centro de servicio
autorizado.
• Utilice solamente piezas de recambio
originales.
2.8 Eliminación
ADVERTENCIA!
Existe riesgo de lesiones o
asfixia.
• Desconecte el aparato de la red.
• Corte el cable eléctrico cerca del
aparato y deséchelo.
• Retire el pestillo de la puerta para
evitar que los niños o las mascotas
queden atrapados en el aparato.
ESPAÑOL 33

3. DESCRIPCIÓN DEL PRODUCTO
3.1 Descripción general
1 3 42
5
6
7
8
9
4
3
2
1
10
1
Panel de control
2
Mando de las funciones de cocción
3
Pantalla
4
Mando de temperatura
5
Salidas de aire del ventilador de
refrigeración
6
Resistencia
7
Bombilla
8
Ventilador
9
Carril de apoyo, extraíble
10
Posiciones de las parrillas
3.2 Accesorios
• Parrilla
Para bandejas de horno, pastel en
molde, asados.
• Bandeja honda
Para hornear y asar o como bandeja
grasera.
4. PANEL DE MANDOS
4.1 Teclas
Sensor / tecla Función Descripción
MENOS Para ajustar el tiempo.
RELOJ Para ajustar una función de reloj.
MÁS Para ajustar el tiempo.
4.2 Pantalla
A B
DG EF C
A. Temporizador/Temperatura
B. Indicador de calor residual y
calentamiento
C. Sonda térmica (solo los modelos
seleccionados)
D. Cierre puerta (solo los modelos
seleccionados)
E. Horas / minutos
F. modo de demostración (solo los
modelos seleccionados)
G. Funciones de reloj
www.electrolux.com34

5. ANTES DEL PRIMER USO
ADVERTENCIA!
Consulte los capítulos sobre
seguridad.
Para ajustar la hora actual,
consulte el capítulo
"Funciones del reloj".
5.1 Limpieza inicial
Retire todos los accesorios y carriles de
apoyo extraíbles del horno.
Consulte el capítulo
"Mantenimiento y limpieza".
Limpie el horno y los accesorios antes
del primer uso.
Coloque los accesorios y soportes
telescópicos extraíbles en su posición
inicial.
5.2 Precalentamiento
Precaliente el horno vacío antes de
utilizarlo por primera vez.
1. Programe la función
y la
temperatura máxima.
2. Deje funcionar el horno 1 hora.
3. Ajuste la función y ajuste la
temperatura máxima.
4. Deje funcionar el horno 15 minutos.
5. Apague el horno y deje que se
enfríe.
Los accesorios se pueden calentar más
de lo habitual. El horno puede emitir
olores y humos. Asegúrese de que haya
una buena ventilación en la habitación.
6. USO DIARIO
ADVERTENCIA!
Consulte los capítulos sobre
seguridad.
6.1 Mandos escamoteables
Si desea usar el aparato, pulse el mando
de control. El mando de control saldrá de
su alojamiento.
6.2 Funciones de horno
Función
del horno
Aplicación
Posición
de apaga‐
do
El horno está apagado.
Función
del horno
Aplicación
Turbo
Permite asar o asar y hor‐
near a la vez alimentos
que requieran la misma
temperatura, utilizando
más de una bandeja y sin
que se transfieran los sa‐
bores.
Cocción
convencio‐
nal (Bóve‐
da/Calor
Inferior)
Para hornear y asar ali‐
mentos en una posición de
bandeja.
Grill
Para asar al grill alimentos
de poco espesor y tostar
pan.
ESPAÑOL 35

Función
del horno
Aplicación
Grill Rápi‐
do
Para asar al grill grandes
cantidades de alimentos
de poco espesor y tostar
pan.
Grill + Tur‐
bo
Para asar piezas de carne
grandes o aves con hueso
en una posición de bande‐
ja. Para hacer gratenes y
dorar.
Calor Infe‐
rior
Para preparar pasteles con
bases crujientes y conser‐
var alimentos.
Carne
Para preparar asados muy
tiernos y jugosos.
Turbo Plus
Función diseñada para
ahorrar energía durante la
cocción. Para las instruc‐
ciones de cocción, consul‐
te el capítulo "Consejos",
Turbo Plus. La puerta del
horno debe estar cerrada
durante la cocción para
que la función no se so in‐
terrumpa y para garantizar
que el horno funciona con
la máxima eficiencia ener‐
gética posible. Cuando se
utiliza esta función, la tem‐
peratura del horno puede
diferir de la temperatura
programada. Se utiliza el
calor residual.La potencia
de cocción puede reducir‐
se. Para recomendaciones
generales sobre ahorro de
energía, consulte el apar‐
tado sobre ahorro de ener‐
gía del capítulo "Eficiencia
energética".Esta función
se utilizaba para cumplir
con la categoría de eficien‐
cia energética de acuerdo
con EN 60350-1.
Función
del horno
Aplicación
Desconge‐
lar
Para descongelar alimen‐
tos (verdura y fruta). El
tiempo de descongelación
depende de la cantidad y
tamaño de los alimentos
congelados.
Pirólisis
Para activar la limpieza pi‐
rolítica del horno. Esta fun‐
ción quema los restos de
suciedad en el horno.
6.3 Ajuste de una función de
cocción
1. Gire el mando del horno para
seleccionar una función de cocción.
2. Gire el mando de control para
seleccionar la temperatura.
La luz se enciende cuando el horno está
funcionando.
3. Para apagar el horno, gire los
mandos hasta la posición de
apagado.
6.4 Indicador de calentamiento
Mientras está activa la función del horno,
las barras de la pantalla
aparecen
una a una cuando aumenta la
temperatura del horno y desaparecen y
cuando se reduce.
www.electrolux.com36

7. FUNCIONES DEL RELOJ
7.1 Tabla de funciones del reloj
Función de
reloj
Aplicación
HORA AC‐
TUAL
Mostrar o cambiar la
hora del día. Se puede
cambiar la hora solo
cuando el horno está
apagado.
DURACIÓN
Programar la duración
del funcionamiento del
horno. Utilícelo única‐
mente cuando esté
ajustada una función de
cocción.
FIN
Permite ajustar cuando
se apaga el horno. Utilí‐
celo únicamente cuan‐
do esté ajustada una
función de cocción.
TIEMPO DE
RETARDO
Combinación de las fun‐
ciones de DURACIÓN y
FIN.
AVISADOR
Utilícelo para programar
una cuenta atrás. Esta
función no influye en el
funcionamiento del hor‐
no. Puede ajustar el
AVISADOR en cual‐
quier momento, incluso
si el horno está apaga‐
do.
00:00
TIEMPO DE
COCCIÓN
Si no ajusta otra función
del reloj, TIEMPO DE
COCCIÓN supervisa
automáticamente el
tiempo que funciona el
horno.
Se enciende inmediata‐
mente cuando el horno
empieza a calentarse.
El Tiempo de cocción
no se puede utilizar con
las funciones: DURA‐
CIÓN, FIN.
7.2 Ajuste y modificación de la
hora
Tras la primera conexión a la red
eléctrica, espere hasta que en la pantalla
aparezca
y "12:00". "12" parpadea.
1. Pulse o para ajustar las horas.
2. Pulse
para confirmar y cambiar al
ajuste de los minutos.
La pantalla muestra y la hora
ajustada. "00" parpadea.
3. Pulse o para ajustar los
minutos.
4. Pulse para confirmar o la hora
actual se guarda automáticamente
tras 5 segundos.
La pantalla muestra la nueva hora.
Para cambiar la hora actual, pulse
repetidamente hasta que parpadee el
indicador de la función de hora en la
pantalla.
7.3 Ajuste de la DURACIÓN
1. Ajuste una función del horno.
2. Pulse repetidamente hasta que
empiece a parpadear.
3. Pulse o para ajustar los
minutos y después las horas. Pulse
para confirmar.
Cuando termine la duración programada,
sonará una señal acústica durante 2
minutos. y la programación de la
hora parpadearán en la pantalla. El
horno se apaga automáticamente.
4. Pulse cualquier tecla o abra la puerta
del horno para detener la señal.
5. Gire el mando de las funciones del
horno hasta la posición de apagado.
7.4 Ajuste del FIN
1. Ajuste una función del horno.
2. Pulse repetidamente hasta que
empiece a parpadear.
ESPAÑOL 37

3. Pulse o para ajustar las horas
y después los minutos. Pulse
para confirmar.
A la hora programada, se emite una
señal acústica durante 2 minutos y y
la hora parpadean en la pantalla. El
horno se apaga automáticamente.
4. Pulse cualquier tecla o abra la puerta
del horno para detener la señal.
5. Gire el mando de las funciones del
horno hasta la posición de apagado.
7.5 Ajuste de la función INICIO
DIFERIDO
1. Seleccione una función de cocción.
2. Pulse repetidamente hasta que
empiece a parpadear.
3. Pulse o para ajustar los
minutos y después las horas del
tiempo de DURACIÓN. Pulse
para confirmar.
La pantalla muestra
parpadeando.
4. Pulse o para ajustar las horas
y después los minutos de la hora de
FIN. Pulse para confirmar.
El horno se enciende automáticamente
más tarde, funciona el tiempo de
DURACIÓN y se detiene a la hora de
FIN.
A la hora de FIN programada, se emite
una señal acústica durante 2 minutos y
y la hora parpadean en la pantalla. El
horno se apaga.
5. Pulse cualquier tecla o abra la puerta
del horno para detener la señal.
6. Gire el mando de las funciones de
cocción hasta la posición de
apagado.
7.6 Ajuste del AVISADOR
El avisador puede utilizarse cuando el
horno está encendido o apagado.
1. Pulse
repetidamente hasta que
y "00" parpadeen en la pantalla.
2. Pulse o para ajustar las horas
y después los minutos.
Cuando el tiempo ajustado es mayor
que 60 minutos, parpadea en la
pantalla.
3. Ajuste las horas.
4. El AVISADOR empezará
automáticamente después de 5
segundos.
Transcurrido el 90% del tiempo
programado, sonará una señal.
5. Cuando termina el tiempo
programado, la señal suena 2
minutos. "00:00" y
parpadean en
la pantalla. Pulse cualquier tecla para
desconectar la señal.
7.7 TIEMPO DE COCCIÓN
Para restablecer el temporizador de
avance del contador, mantenga pulsada
y . Se inicia de nuevo el contador.
8. USO DE LOS ACCESORIOS
ADVERTENCIA!
Consulte los capítulos sobre
seguridad.
8.1 Inserción de los accesorios
Parrilla:
Inserte la parrilla entre las guías del carril
y asegúrese de que las hendiduras
apuntan hacia abajo.
Bandeja honda:
www.electrolux.com38

Posicione la bandeja honda entre las
guías del carril de apoyo.
Parrilla y bandeja hondajuntas:
Posicione la bandeja honda entre las
guías del carril de apoyo y la parrilla en
las guías de encima.
Las pequeñas hendiduras
en la parte superior
incrementan la seguridad.
Las hendiduras también son
dispositivos anti-vuelco. El
borde elevado que rodea la
bandeja evita que los
utensilios de cocina resbalen
de la parrilla.
9. FUNCIONES ADICIONALES
9.1 Uso del bloqueo de
seguridad para niños
Cuando está activado el bloqueo de
seguridad para niños, no se puede
encender el horno.
1. Gire el mando de las funciones del
horno hasta la posición de apagado.
2. Mantenga pulsado
y al mismo
tiempo durante 2 segundos.
Suena la señal. SAFE y aparecen en
la pantalla.
Los símbolos aparecen
también en pantalla mientras
se realiza la función de
pirólisis.
Para desactivar el bloqueo de seguridad,
repita el paso 2.
9.2 Indicador de calor residual
Al apagar el horno, en la pantalla
aparece el indicador de calor residual
si la temperatura del horno es superior a
40 °C.
9.3 Desconexión automática
Por motivos de seguridad, el aparato se
desactiva automáticamente después de
un tiempo si está en curso una función
de cocción y no se cambia la
temperatura del horno.
Temperatura (°C) Hora de descone‐
xión (h)
30 - 115 12.5
120 - 195 8.5
200 - 245 5.5
ESPAÑOL 39

Temperatura (°C) Hora de descone‐
xión (h)
250 1.5
Después de una desconexión
automática, pulse cualquier tecla para
utilizar de nuevo el horno.
La desconexión automática
no se aplica a las funciones
siguientes: Luz, Duración,
Fin.
9.4 Ventilador de enfriamiento
Cuando el horno funciona, el ventilador
de enfriamiento se pone en marcha
automáticamente para mantener frías las
superficies del horno. Una vez apagado
el horno, el ventilador sigue funcionando
hasta enfriarlo totalmente.
9.5 Termostato de seguridad
El funcionamiento incorrecto del horno o
los componentes defectuosos pueden
provocar sobrecalentamientos
peligrosos. Para evitarlo, el horno
dispone de un termostato de seguridad
que interrumpe la alimentación. El horno
se vuelve a encender automáticamente
cuando desciende la temperatura.
10. CONSEJOS
ADVERTENCIA!
Consulte los capítulos sobre
seguridad.
La temperatura y los
tiempos de cocción de las
tablas son meramente
orientativos; dependen de la
receta, la calidad y la
cantidad de los ingredientes
utilizados en cada caso.
10.1 Recomendaciones de
cocción
El horno tiene cuatro niveles.
Cuente los niveles de las parrillas desde
abajo hacia arriba.
El comportamiento de su horno puede
ser diferente al del que tenía
anteriormente. Las tablas siguientes le
proporcionan los ajustes estándares de
temperatura, tiempo de cocción y
posición de la parrilla.
Si no encuentra los ajustes para una
receta especial, busque otra similar.
El horno está dotado con un sistema
especial que hace circular el aire y
recicla constantemente el vapor. Gracias
a este sistema puede cocinar con un
entorno de vapor y mantener los
alimentos blandos en su interior y
crujientes en su exterior. Reduce el
tiempo de cocción y el consumo de
energía.
Repostería
No abra la puerta del horno antes de que
transcurran 3/4 partes del tiempo de
cocción establecido.
Si utiliza dos bandejas al mismo tiempo,
deje un nivel libre entre ambas.
Carnes y pescados
Utilice una bandeja honda con los
alimentos muy grasos para evitar que el
horno quede manchado de forma
permanente.
Antes de trinchar la carne, déjela reposar
unos 15 minutos, como mínimo, para
que retenga los jugos.
Para evitar que se forme mucho humo
en el horno, vierta un poco de agua en la
bandeja honda. Para evitar la
condensación de humos, añada agua
después de cada vez que se seque.
www.electrolux.com40

10.2 Cuadro de especificaciones para hornear y asar
Repostería
Alimento Bóveda/Calor Inferior Turbo Tiempo
(min)
Comenta‐
rios
Tempera‐
tura (°C)
Posición
de la pa‐
rrilla
Tempera‐
tura (°C)
Posición
de la pa‐
rrilla
Masas ba‐
tidas
170 2 165 2 (1 y 3) 45 - 60 En molde
de repos‐
tería
Masa con
mantequi‐
lla
170 2 160 2 (1 y 3) 20 - 30 En molde
de repos‐
tería
Tarta de
queso a
base de
suero de
leche
170 1 165 2 70 - 80 En molde
de repos‐
tería de 26
cm
Tarta o
pastel de
manzana
170 1 160 2 (1 y 3) 80 - 100 En dos
moldes de
repostería
de 20 cm
en una pa‐
rrilla
Strudel 175 2 150 2 60 - 80 En bande‐
ja
Tarta de
mermela‐
da
170 2 160 2 (1 y 3) 30 - 40 En molde
de repos‐
tería de 26
cm
Pastel de
fruta
170 2 155 2 50 - 60 En molde
de repos‐
tería de 26
cm
Bizcocho
(bizcocho
sin grasa)
170 2 160 2 90 - 120 En molde
de repos‐
tería de 26
cm
Pastel de
Navidad /
Pastel de
fruta
170 2 160 2 50 - 60 En molde
de repos‐
tería de 20
cm
Pastel de
ciruelas
1)
170 2 165 2 20 - 30 En molde
para pan
ESPAÑOL 41

Alimento Bóveda/Calor Inferior Turbo Tiempo
(min)
Comenta‐
rios
Tempera‐
tura (°C)
Posición
de la pa‐
rrilla
Tempera‐
tura (°C)
Posición
de la pa‐
rrilla
Pastelillos 170 3 166 3 (1 y 3) 25 - 35 En bande‐
ja
Galletas
1)
150 3 140 3 (1 y 3) 30 - 35 En bande‐
ja
Meren‐
gues
100 3 115 3 35 - 40 En bande‐
ja
Bollos
1)
190 3 180 3 80 - 100 En bande‐
ja
Masa de
relleno
1)
190 3 180 3 (1 y 3) 15 - 20 En bande‐
ja
Tartaletas 180 3 170 2 25 - 35 En molde
de repos‐
tería de 20
cm
Tarta Vic‐
toria
180 1 o 2 170 2 45 - 70 Izquierda
+ derecha
en molde
de repos‐
tería de 20
cm
Pastel de
fruta
160 1 150 2 110 - 120 En molde
de repos‐
tería de 24
cm
Tarta Vic‐
toria
1)
170 1 160 1 50 - 60 En molde
de repos‐
tería de 20
cm
1)
Precaliente el horno 10 minutos.
Pan y pizza
Alimento Bóveda/Calor Inferior Turbo Tiempo
(min)
Comenta‐
rios
Tempera‐
tura (°C)
Posición
de la pa‐
rrilla
Tempera‐
tura (°C)
Posición
de la pa‐
rrilla
Pan blan‐
co
1)
190 1 195 1 60 - 70 1 - 2 pie‐
zas, 500 g
cada pie‐
za
www.electrolux.com42

Alimento Bóveda/Calor Inferior Turbo Tiempo
(min)
Comenta‐
rios
Tempera‐
tura (°C)
Posición
de la pa‐
rrilla
Tempera‐
tura (°C)
Posición
de la pa‐
rrilla
Pan de
centeno
190 1 190 1 30 - 45 En molde
para pan
Pan/Rolli‐
tos
1)
190 2 180 2 (1 y 3) 25 - 40 6 - 8 pa‐
necillos en
una ban‐
deja de re‐
postería
Pizza
1)
190 1 190 1 20 - 30 En una
bandeja
honda
Galletas
1)
200 3 190 2 10 – 20 En bande‐
ja
1)
Precaliente el horno 10 minutos.
Flanes
Alimento Bóveda/Calor Inferior Turbo Tiempo
(min)
Comenta‐
rios
Tempera‐
tura (°C)
Posición
de la pa‐
rrilla
Tempera‐
tura (°C)
Posición
de la pa‐
rrilla
Pudin de
pasta
180 2 180 2 40 - 50 En un
molde
Pudin de
verduras
200 2 200 2 45 - 60 En un
molde
Quiches 190 1 190 1 40 - 50 En un
molde
Lasaña 200 2 200 2 25 - 40 En un
molde
Canelones 200 2 200 2 25 - 40 En un
molde
Pudin
Yorkshi‐
re
1)
220 2 210 2 20 - 30 6 moldes
de pudin
1)
Precaliente el horno 10 minutos.
ESPAÑOL 43

Carne
Alimento Bóveda/Calor Inferior Turbo Tiempo
(min)
Comenta‐
rios
Tempera‐
tura (°C)
Posición
de la pa‐
rrilla
Tempera‐
tura (°C)
Posición
de la pa‐
rrilla
Carne de
res
200 2 190 2 50 - 70 En una
bandeja
honda en
una parri‐
lla
Cerdo 180 2 180 2 90 - 120 En una
bandeja
honda en
una parri‐
lla
Ternera 190 2 175 2 90 - 120 En una
bandeja
honda en
una parri‐
lla
Rosbif po‐
co hecho
210 2 200 2 44 - 50 En una
bandeja
honda en
una parri‐
lla
Rosbif en
su punto
210 2 200 2 51 - 55 En una
bandeja
honda en
una parri‐
lla
Rosbif
muy he‐
cho
210 2 200 2 55 - 60 En una
bandeja
honda en
una parri‐
lla
Paletilla
de cerdo
180 2 170 2 120 - 150 En una
bandeja
honda
Morcillo
de cerdo
180 2 160 2 100 - 120 2 piezas
en una
bandeja
honda
Cordero 190 2 190 2 110 - 130 Pata
Pollo 200 2 200 2 70 - 85 Entero
Pavo 180 1 160 1 210 - 240 Entero
www.electrolux.com44

Alimento Bóveda/Calor Inferior Turbo Tiempo
(min)
Comenta‐
rios
Tempera‐
tura (°C)
Posición
de la pa‐
rrilla
Tempera‐
tura (°C)
Posición
de la pa‐
rrilla
Pato 175 2 160 2 120 - 150 Entero
Ganso 175 1 160 1 150 - 200 Entero
Conejo 190 2 175 2 60 - 80 En trozos
Liebre 190 2 175 2 150 - 200 En trozos
Faisán 190 2 175 2 90 - 120 Entero
Pescado
Alimento Bóveda/Calor Inferior Turbo Tiempo
(min)
Comenta‐
rios
Tempera‐
tura (°C)
Posición
de la pa‐
rrilla
Tempera‐
tura (°C)
Posición
de la pa‐
rrilla
Trucha/
Pargo
190 2 175 2 (1 y 3) 40 - 55 3 - 4 Pes‐
cado
Atún/
Salmón
190 2 175 2 (1 y 3) 35 - 60 4 - 6 file‐
tes
10.3 Grill
Precaliente el horno 10 minutos.
Use el tercer nivel.
Ajuste la temperatura a 250 °C.
Alimento Cantidad Tiempo (min)
Piezas Cantidad
(kg)
1ª cara 2ª cara
Filetes de solomillo 4 0.8 12 - 15 12 - 14
Filetes de vacuno 4 0.6 10 - 12 6 - 8
Salchichas 8 - 12 - 15 10 - 12
Chuletas de cerdo 4 0.6 12 - 16 12 - 14
Pollo (cortado en 2) 2 1 30 - 35 25 - 30
Brochetas 4 - 10 - 15 10 - 12
Pechuga de pollo 4 0.4 12 - 15 12 - 14
Hamburguesa 6 0.6 20 - 30 -
Filete de pescado 4 0.4 12 - 14 10 - 12
ESPAÑOL 45

Alimento Cantidad Tiempo (min)
Piezas Cantidad
(kg)
1ª cara 2ª cara
Sándwiches tostados 4 - 6 - 5 - 7 -
Tostadas 4 - 6 - 2 - 4 2 - 3
10.4 Grill + Turbo
Ajuste la temperatura máxima de 200 °C.
Use el tercer nivel.
Alimento Cantidad Tiempo (min)
Piezas (kg) 1ª cara 2ª cara
Redondos (pa‐
vo)
1 1 30 - 40 20 - 30
Pollo (cortado
en dos)
2 1 25 - 30 20 - 30
Muslos de pollo 6 - 15 - 20 15 - 18
Codorniz 4 0.5 25 - 30 20 - 25
Gratinado de
verduras
- - 20 - 25 -
Vieiras - - 15 - 20 -
Caballa 2 - 4 - 15 - 20 10 - 15
Pescado en ro‐
dajas
4 - 6 0.8 12 - 15 8 - 10
10.5 Turbo Plus
Para obtener el mejor
resultado, siga los tiempos
de horneado indicados en la
tabla siguiente.
Durante la cocción, abra
únicamente la puerta del
aparato cuando sea
necesario.
www.electrolux.com46

10.6 Descongelar
Alimento Cantidad
(kg)
Tiempo de
desconge‐
lación (min)
Tiempo de des‐
congelación
posterior (mi‐
nutos)
Comentarios
Pollo 1.0 100 - 140 20 - 30 Coloque el pollo sobre
un plato puesto del re‐
vés sobre otro mayor.
Dele la vuelta a media
cocción.
Carne 1.0 100 - 140 20 - 30 Dele la vuelta a media
cocción.
Carne 0.5 90 - 120 20 - 30 Dele la vuelta a media
cocción.
Trucha 1.50 25 - 35 10 - 15 -
Fresas 3.0 30 - 40 10 - 20 -
Mantequilla 2.5 30 - 40 10 - 15 -
Nata 2 x 2,0 80 - 100 10 - 15 La nata se puede mon‐
tar perfectamente inclu‐
so aunque queden pun‐
tos ligeramente conge‐
lados.
Pasteles 1.4 60 60 -
10.7 Información para los
institutos de pruebas
Pruebas conforme a IEC 60350-1.
Alimento Función Acceso‐
rios
Posi‐
ción
de la
parri‐
lla
Tem‐
peratu‐
ra (°C)
Tiempo (min) Comentarios
Pastel
pequeño
Cocción
convencio‐
nal
Bandeja 3 170 20 - 30 Coloque 20 pas‐
telitos por ban‐
deja.
Tarta de
manzana
Cocción
convencio‐
nal
Parrilla 1 170 80 - 120 Utilice 2 moldes
(20 cm de diá‐
metro) en posi‐
ción diagonal.
Bizcocho Cocción
convencio‐
nal
Parrilla 2 170 35 - 45 Use un molde de
repostería (26
cm de diámetro).
ESPAÑOL 47

Alimento Función Acceso‐
rios
Posi‐
ción
de la
parri‐
lla
Tem‐
peratu‐
ra (°C)
Tiempo (min) Comentarios
Manteca‐
dos
Cocción
convencio‐
nal
Bandeja 3 150 20 - 35 Precaliente el
horno 10 minu‐
tos.
Tostadas
4 - 6 pie‐
zas
Grill Parrilla 3 máx. 2 - 4 minutos
el primer lado;
2 - 3 minutos
el segundo
Precaliente el
horno 3 minutos.
Hambur‐
guesa de
vacuno
6 trozos,
0,6 kg
Grill Parrilla y
grasera
3 máx. 20 - 30 Coloque la parri‐
lla en el tercer
nivel y la grasera
en el segundo
nivel del horno.
Dele la vuelta a
la mitad del
tiempo.
Precaliente el
horno 3 minutos.
11. MANTENIMIENTO Y LIMPIEZA
ADVERTENCIA!
Consulte los capítulos sobre
seguridad.
11.1 Notas sobre la limpieza
Limpie la parte delantera del horno con
un paño suave humedecido en agua
templada y detergente suave.
Limpie las superficies metálicas con un
producto no agresivo específico.
Limpie el interior del horno después de
cada uso. La acumulación de grasa u
otros restos de alimentos puede
provocar un incendio. El riesgo es mayor
con la bandeja de grill.
Limpie todos los accesorios después de
cada uso y déjelos secar. Utilice un paño
suave humedecido en agua templada y
jabón neutro. No lave los accesorios en
el lavavajillas.
Elimine la suciedad resistente con
limpiadores especiales para hornos.
No trate los accesorios antiadherentes
con productos agresivos u objetos
punzantes ni los lave en el lavavajillas.
Puede dañar el esmalte antiadherente.
La humedad puede llegar a condensarse
en el horno o en los paneles de cristal. Si
desea reducir la condensación, ponga en
funcionamiento el horno 10 minutos
antes de cocinar.Limpie la humedad del
interior después de cada uso.
11.2 Hornos de acero
inoxidable o aluminio
Limpie la puerta del horno únicamente
con una esponja o un paño húmedos.
Séquela con un paño suave.
No utilice productos abrasivos, ácidos ni
estropajos de acero, ya que pueden
dañar la superficie del horno. Limpie el
panel de mandos del horno teniendo en
cuenta las mismas precauciones.
www.electrolux.com48

11.3 Extracción de los carriles
de apoyo
Para limpiar el horno, retire los carriles
de apoyo .
PRECAUCIÓN!
Tenga precaución al retirar
los paneles de los estantes.
1. Tire de la parte delantera del carril de
apoyo para separarlo de la pared.
2. Tire del extremo trasero del carril de
apoyo para despegarlo de la pared y
extráigalo.
2
1
Instale los accesorios retirados siguiendo
el orden inverso.
11.4 Pirólisis
PRECAUCIÓN!
Retire todos los accesorios y
carriles laterales extraíbles.
No empiece la Pirólisis si no
ha cerrado completamente
la puerta del horno. En
algunos modelos, la pantalla
muestra "C3" cuando se
produce este error.
ADVERTENCIA!
El aparato llega a calentarse
mucho. Corre el riesgo de
quemarse.
PRECAUCIÓN!
Si hay otros aparatos
instalados en el mismo
armario, no los utilice al
mismo tiempo que la función
Pirólisis. El aparato podría
dañarse.
1. Retire manualmente los restos de
suciedad más gruesa.
2. Limpie la parte interior de la puerta
con agua caliente para evitar que se
quemen los restos por el aire
caliente.
3. Ajuste la función Pirólisis. Consulte
"Funciones del horno".
parpadea.
4. Puede utilizar la función Fin para
retrasar el inicio del proceso de
limpieza.
5. Pulse o gire el mando de
temperatura a la derecha para iniciar
el procedimiento de limpieza.
Duración del procedimiento: 2h.
Durante la pirólisis, la bombilla del
horno permanece apagada.
Cuando el horno alcanza la temperatura
programada, la puerta se bloquea. La
pantalla muestra el símbolo y las
barras del indicador de calentamiento se
encienden hasta que la puerta se
desbloquea.
11.5 Aviso de limpieza
Para recordarle que es necesaria una
pirólisis, PYR parpadea durante 10
segundos después de la activación y
desactivación del horno.
El aviso de limpieza se
apaga:
• cuando termina la
pirólisis.
• si pulsa y al mismo
tiempo mientras PYR
parpadea en la pantalla.
11.6 Extracción e instalación de
la puerta
La puerta del horno tiene cuatro paneles
de cristal.Es posible retirar la puerta del
ESPAÑOL 49

horno y los paneles de cristal interiores
para limpiarlos.
La puerta del horno podría
cerrarse si intenta retirar los
paneles de cristal antes de
quitar la puerta.
PRECAUCIÓN!
No utilice el aparato sin los
paneles de cristal.
1. Abra completamente la puerta y
sujete las dos bisagras.
2. Levante y gire las palancas de
ambas bisagras.
3. Cierre la puerta del horno a medio
camino hasta la primera posición de
apertura. A continuación, tire de la
puerta hacia adelante para
desencajarla.
4.
Coloque la puerta sobre una
superficie estable y protegida por un
paño suave.
5. Libere el sistema de bloqueo para
retirar los paneles de cristal.
6. Gire los dos pasadores en un ángulo
de 90° y extráigalos de sus asientos.
www.electrolux.com50

90°
7. Levante con cuidado primero y retire
después los paneles de cristal uno a
uno. Empiece por el panel superior.
1
2
8. Limpie los paneles de cristal con
agua y jabón. Seque los paneles de
cristal con cuidado.
Una vez finalizada la limpieza, coloque
los paneles de cristal y la puerta del
horno. Lleve a cabo los pasos anteriores
en orden inverso.
Asegúrese de que vuelve a colocar los
paneles de cristal (A, B y C) en el orden
correcto. Compruebe el símbolo/la
ilustración del lado del panel de cristal,
cada uno de los paneles de cristal es
distinto para facilitar el montaje y
desmontaje.
A B C
Asegúrese de que coloca el panel de
cristal central en los soportes
correctamente.
A
B
C
11.7 Cambio de la bombilla
ADVERTENCIA!
Riesgo de descarga
eléctrica.
La lámpara puede estar
caliente.
1. Encienda el horno.
Espere a que se haya enfriado el horno.
2. Desconecte el horno de la red.
3. Coloque un paño en el fondo de la
cavidad.
La bombilla trasera
1. Gire la tapa de cristal de la lámpara
para extraerla.
2. Limpie la tapa de cristal.
3. Cambie la bombilla por otra
apropiada termorresistente hasta 300
°C .
4. Coloque la tapa de cristal.
12. SOLUCIÓN DE PROBLEMAS
ADVERTENCIA!
Consulte los capítulos sobre
seguridad.
ESPAÑOL 51

12.1 Qué hacer si...
Problema Posible causa Solución
El horno no se enciende o
no funciona.
El horno no está conecta‐
do a un suministro eléctri‐
co o está mal conectado.
Compruebe que el horno
está correctamente conec‐
tado al suministro eléctrico
(consulte el diagrama de
conexión, en su caso).
El horno no calienta. El horno está apagado. Encienda el horno.
El horno no calienta. El reloj no está en hora. Ajuste la hora.
El horno no calienta. No se han configurado los
ajustes necesarios.
Asegúrese de que los
ajustes sean correctos.
El horno no calienta. La desconexión automáti‐
ca está activada.
Consulte el apartado "Des‐
conexión automática".
El horno no calienta. El bloqueo de seguridad
para niños está activado.
Consulte "Uso del bloqueo
de seguridad".
El horno no calienta. Ha saltado el fusible. Compruebe si el fusible es
la causa del fallo de fun‐
cionamiento. Si el fusible
se funde repetidamente,
consulte a un electricista
cualificado.
La bombilla no funciona. La bombilla es defectuosa. Sustituya la bombilla.
Se tarda demasiado en co‐
cinar un plato o éste se ha‐
ce demasiado rápido.
La temperatura es dema‐
siado baja o demasiado al‐
ta.
Ajuste la temperatura se‐
gún sea necesario. Siga
las instrucciones del ma‐
nual de usuario.
Se acumula vapor y con‐
densación en los alimentos
y en la cavidad del horno.
El plato ha permanecido
en el horno demasiado
tiempo.
No deje los platos en el
horno más de 15 a 20 mi‐
nutos tras finalizar el pro‐
ceso de cocción.
La pantalla muestra "C3". La función de limpieza no
funciona. No ha cerrado
completamente la puerta o
el cierre de la puerta está
defectuoso.
Cierre completamente la
puerta.
www.electrolux.com52

Problema Posible causa Solución
En la pantalla aparece
"F102".
• No ha cerrado comple‐
tamente la puerta.
• El cierre de la puerta
está averiado.
• Cierre completamente
la puerta.
• Apague el horno con el
fusible doméstico o el
interruptor de seguridad
de la caja de fusibles y
enciéndalo de nuevo.
• Si "F102" vuelve a apa‐
recer en la pantalla,
consulte al Departa‐
mento de atención al
cliente.
La pantalla muestra un có‐
digo de error que no figura
en esta tabla.
Hay un fallo eléctrico. • Apague el horno con el
fusible doméstico o el
interruptor de seguridad
de la caja de fusibles y
enciéndalo de nuevo.
• Si vuelve a aparecer el
código de error en la
pantalla, consulte al De‐
partamento de atención
al cliente.
12.2 Datos de servicio
Si no logra subsanar el problema,
póngase en contacto con su distribuidor
o el centro de servicio técnico.
Los datos que necesita para el centro de
servicio técnico se encuentran en la
placa de características. La placa de
régimen se encuentra en el marco
delantero de la cavidad del horno. No
retire la placa de características de la
cavidad del horno.
Es conveniente que anote los datos aquí:
Modelo (MOD.) .........................................
Número de producto (PNC) .........................................
Número de serie (S.N.) .........................................
13. INSTALACIÓN
ADVERTENCIA!
Consulte los capítulos sobre
seguridad.
ESPAÑOL 53

13.1 Empotrado
589
598
594
114
19
21540
570
558
min. 550
20
600
min. 560
3
9
min. 550
20
590
min. 560
589
598
594
114
19
21540
570
558
3
9
13.2 Fijación del aparato al
mueble
A
B
13.3 Instalación eléctrica
El fabricante declina toda
responsabilidad si la
instalación no se efectúa
siguiendo las instrucciones
de seguridad de los
capítulos sobre seguridad.
El aparato se suministra únicamente con
un cable de alimentación.
13.4 Cable
Tipos de cables adecuados para su
instalación o cambio:
H07 RN-F, H05 RN-F, H05 RRF, H05
VV-F, H05 V2V2-F (T90), H05 BB-F
En lo que respecta a la sección del
cable, consulte la potencia total que
figura en la placa de características.
También puede consultar la tabla:
Potencia total (W) Sección del cable
(mm²)
máximo 1380 3 x 0.75
máximo 2300 3 x 1
máximo 3680 3 x 1.5
El cable de tierra (cable verde/amarillo)
debe tener 2 cm más de longitud que los
cables de fase y neutro (cables azul y
marrón).
www.electrolux.com54

14. EFICACIA ENERGÉTICA
14.1 Ficha de producto e información según EU 65-66/2014
Nombre del proveedor Electrolux
Identificación del modelo EZC2510ACX
Índice de eficiencia energética 81.0
Clase de eficiencia energética A+
Consumo de energía con carga estándar, modo
convencional
0.87 kWh/ciclo
Consumo de energía con carga estándar, modo
con ventilador
0.64 kWh/ciclo
Número de cavidades 1
Fuente de calor Electricidad
Volumen 57 l
Tipo de horno Horno empotrado
Masa 33.7 kg
EN 60350-1 - Aparatos
electrodomésticos - Parte 1: Placas,
hornos, hornos de vapor y parrillas -
Métodos para medir el rendimiento.
14.2 Ahorro de energía
El horno tiene
características que le
ayudan a ahorrar energía
durante la cocina de cada
día.
Consejos generales
Asegúrese de que la puerta del horno
está cerrada correctamente cuando el
horno funciona. No abra la puerta del
aparato muchas veces durante la
cocción. Mantenga limpia la junta de la
puerta y asegúrese de que está bien
fijada en su posición.
Utilice platos de metal para mejorar el
ahorro energético.
En la medida de lo posible, no
precaliente el horno antes de colocar los
alimentos dentro.
Para una duración de la cocción superior
a 30 minutos, reduzca la temperatura del
horno un mínimo de 3 - 10 minutos antes
de que transcurra el tiempo de cocción,
en función de la duración de la cocción.
El calor residual dentro del horno seguirá
cocinando.
Utilice el calor residual para calentar
otros platos.
Reduzca al máximo el tiempo entre
horneados cuando prepare varios platos
de una vez.
Cocción con ventilador
En la medida de lo posible, utilice las
funciones de cocción con ventilador para
ahorrar energía.
Calor residual
En algunas funciones del horno, si está
activado un programa con selección de
tiempo (Duración o Fin) y el tiempo de
cocción es superior a 30 minutos, las
resistencias se desactivan antes
automáticamente.
La bombilla y el ventilador siguen
funcionando.
Mantener calor
Si desea utilizar el calor residual para
mantener calientes los alimentos,
seleccione el ajuste de temperatura más
ESPAÑOL 55

bajo posible. El indicador de calor
residual o la temperatura aparecen en la
pantalla.
Turbo Plus
Función diseñada para ahorrar energía
durante la cocción.
Cuando utilice esta función, la lámpara
se apagará automáticamente después
de 30 segundos.
15. ASPECTOS MEDIOAMBIENTALES
Recicle los materiales con el símbolo .
Coloque el material de embalaje en los
contenedores adecuados para su
reciclaje. Ayude a proteger el medio
ambiente y la salud pública, así como a
reciclar residuos de aparatos eléctricos y
electrónicos. No deseche los aparatos
marcados con el símbolo junto con los
residuos domésticos. Lleve el producto a
su centro de reciclaje local o póngase en
contacto con su oficina municipal.
*
www.electrolux.com56

ESPAÑOL 57

www.electrolux.com58

ESPAÑOL 59

www.electrolux.com/shop
867341731-A-162018
-
 1
1
-
 2
2
-
 3
3
-
 4
4
-
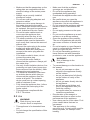 5
5
-
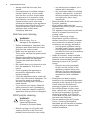 6
6
-
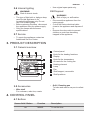 7
7
-
 8
8
-
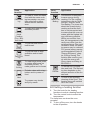 9
9
-
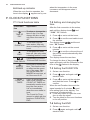 10
10
-
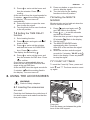 11
11
-
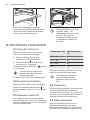 12
12
-
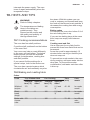 13
13
-
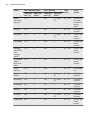 14
14
-
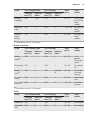 15
15
-
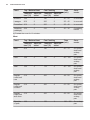 16
16
-
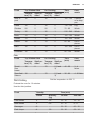 17
17
-
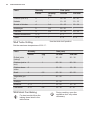 18
18
-
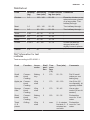 19
19
-
 20
20
-
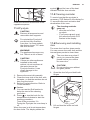 21
21
-
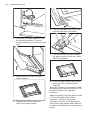 22
22
-
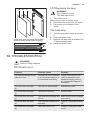 23
23
-
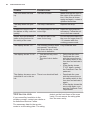 24
24
-
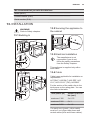 25
25
-
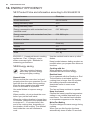 26
26
-
 27
27
-
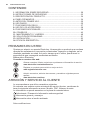 28
28
-
 29
29
-
 30
30
-
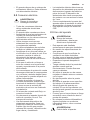 31
31
-
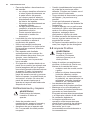 32
32
-
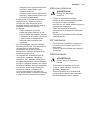 33
33
-
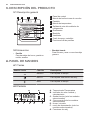 34
34
-
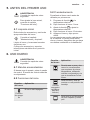 35
35
-
 36
36
-
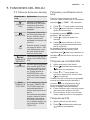 37
37
-
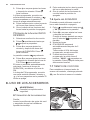 38
38
-
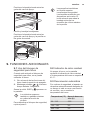 39
39
-
 40
40
-
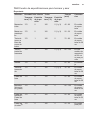 41
41
-
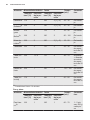 42
42
-
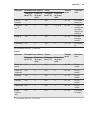 43
43
-
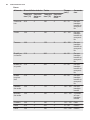 44
44
-
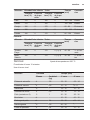 45
45
-
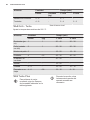 46
46
-
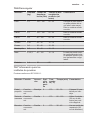 47
47
-
 48
48
-
 49
49
-
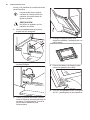 50
50
-
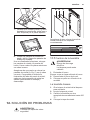 51
51
-
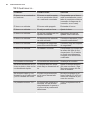 52
52
-
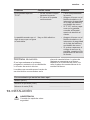 53
53
-
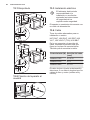 54
54
-
 55
55
-
 56
56
-
 57
57
-
 58
58
-
 59
59
-
 60
60


Electrolux EZC2510ACX Manual de usuario
- Categoría
- Microondas
- Tipo
- Manual de usuario
en otros idiomas
- English: Electrolux EZC2510ACX User manual
Artículos relacionados
-
Electrolux EOF6P60X Manual de usuario
-
-
-
Electrolux EOZ3430AOX Manual de usuario
-
-
-
-
-
Electrolux KODDP66X Manual de usuario
-
Otros documentos
-
Progress PBP23100X Manual de usuario
-
AEG BE300300IM Manual de usuario
-
-
Zanussi ZOP38903XD Manual de usuario
-
AEG BPK535270M Manual de usuario
-
-
CORBERO CCHMP1023N Manual de usuario
-
-
Haier HWO60SM5F8BH Manual de usuario