Kenmore 81214 El manual del propietario
- Categoría
- Aspiradoras
- Tipo
- El manual del propietario

Model/Modelo: 125.81214610
Vacuum Cleaner Help Line:
1-877-531-7321
8:00am-5:00pm EST, M-F
Use & Care Guide
Manual de Uso y Cuidado
®
Kenmore®
Canister Vacuum Cleaner
Aspiradora con tanque
Sears Brands Management Corporation
Hoffman Estates, IL 60179 USA
www.kenmore.com
www.sears.com

TABLE OF CONTENTS
Before Using Your New Vacuum Cleaner . . . . . . . . . . . . . . . . . . . . . . . . . . . . . . . . . . 2
Kenmore Vacuum Cleaner Warranty . . . . . . . . . . . . . . . . . . . . . . . . . . . . . . . . . . . . . . 3
Important Safety Instructions . . . . . . . . . . . . . . . . . . . . . . . . . . . . . . . . . . . . . . . . . . . 4
Parts and Features . . . . . . . . . . . . . . . . . . . . . . . . . . . . . . . . . . . . . . . . . . . . . . . . . . 5-7
Assembly Instructions . . . . . . . . . . . . . . . . . . . . . . . . . . . . . . . . . . . . . . . . . . . . . . . . . 8
Operating Instructions . . . . . . . . . . . . . . . . . . . . . . . . . . . . . . . . . . . . . . . . . . . . . . 9-13
Performance/Safety Features . . . . . . . . . . . . . . . . . . . . . . . . . . . . . . . . . . . . . . . . . . . 14
Canister Care . . . . . . . . . . . . . . . . . . . . . . . . . . . . . . . . . . . . . . . . . . . . . . . . . . . . 15-18
PowerMate
®
Care . . . . . . . . . . . . . . . . . . . . . . . . . . . . . . . . . . . . . . . . . . . . . . . . . 19-21
Troubleshooting . . . . . . . . . . . . . . . . . . . . . . . . . . . . . . . . . . . . . . . . . . . . . . . . . . 22-23
BEFORE USING YOUR NEW VACUUM CLEANER
Your KENMORE VACUUM CLEANER is packaged with the following parts and
components assembled separately in the carton:
• Canister Vacuum Cleaner (with Floor Brush)
• PowerMate
®
• Crevice tool
• Handle & Hose Assembly
Dusting brush
Attachment holder
•
•
•
Use & Care Guide
PACKING LIST
- 2 -
Please read this guide. It will help you assemble and operate your new Kenmore vacuum
cleaner in the safest and most effective way.
For more information about vacuum cleaner care and operation, call the Vacuum Cleaner
Help Line at 1-877-531-7321. You will need the complete model and serial numbers when
requesting information. Your vacuum cleaner’s model and serial numbers are located on the
Model and Serial Number Plate.
Use the space below to record the model number and serial number of your new Kenmore
vacuum cleaner.
Model No.____________________________________________
Serial No. ____________________________________________
Date of Purchase ______________________________________
Keep this book and your sales check (receipt) in a safe place for future reference.

KENMORE VACUUM CLEANER WARRANTY
- 3 -
KENMORE LIMITED WARRANTY
FOR ONE YEAR from the date of sale this appliance is warranted against defects in
material or workmanship when it is correctly installed, operated and maintained
according to all supplied instructions.
WITH PROOF OF SALE, a defective product will receive free repair or replacement at
option of seller.
For warranty coverage details to obtain free repair or replacement, visit the web page:
www.kenmore.com/warranty
This warranty applies for only 90 DAYS from the sale date if this appliance is ever used
for other than private household purposes.
This warranty covers ONLY defects in material and workmanship, and will NOT pay
for:
1. Expendable items that can wear out from normal use, including but not limited to
filters, belts, bags or screw-in base light bulbs.
2. A service technician to clean or maintain this appliance, or to instruct the user in
correct appliance installation, operation and maintenance.
3. Service calls to correct appliance installation not performed by Sears authorized
service agents, or to repair problems with house fuses, circuit breakers, house wiring,
and plumbing or gas supply systems resulting from such installation.
4. Damage to or failure of this appliance resulting from installation not performed by
Sears authorized service agents, including installation that was not in accord with
electrical, gas or plumbing codes.
5. Damage to or failure of this appliance, including discoloration or surface rust, if it is
not correctly operated and maintained according to all supplied instructions.
6. Damage to or failure of this appliance, including discoloration or surface rust,
resulting from accident, alteration, abuse, misuse or use for other than its intended
purpose.
7. Damage to or failure of this appliance, including discoloration or surface rust,
caused by the use of detergents, cleaners, chemicals or utensils other than those
recommended in all instructions supplied with the product.
8. Damage to or failure of parts or systems resulting from unauthorized modifications
made to this appliance.
9. Service to an appliance if the model and serial plate is missing, altered, or cannot
easily be determined to have the appropriate certification logo.
Disclaimer of implied warranties; limitation of remedies
Customer’s sole and exclusive remedy under this limited warranty shall be product
repair or replacement as provided herein. Implied warranties, including warranties of
merchantability or fitness for a particular purpose, are limited to one year or the
shortest period allowed by law. Seller shall not be liable for incidental or consequential
damages. Some states and provinces do not allow the exclusion or limitation of
incidental or consequential damages, or limitation on the duration of implied warranties
of merchantability or fitness, so these exclusions or limitations may not apply to you.
This warranty applies only while this appliance is used in the United States.
This warranty gives you specific legal rights, and you may also have other rights which
vary from state to state.
Sears Brands Management Corporation, Hoffman Estates, IL 60179

- 4 -
IMPORTANT SAFETY INSTRUC
TIONS
Read all instructions in this guide before assembling or using your vacuum cleaner.
Your safety is important to us. To reduce the risk of fire, electrical shock, injury to
persons or damage when using your vacuum cleaner, follow basic safety
precautions including the following:
WARNING:
SAVE THESE INSTRUCTIONS
Proper assembly and safe use of your vacuum cleaner are your responsibilities. Your vacuum
cleaner is intended for Household use. Read this Use & Care Guide carefully for important
use and safety information. This guide contains safety statements under warning and
caution symbols.
Use your vacuum cleaner only as described
in this guide. Use only with Sears
recommended attachments.
Disconnect electrical supply before servicing
or cleaning out the brush area. Failure to do
so could result in brush unexpectedly starting
causing personal injury from moving parts.
Do not leave vacuum cleaner when plugged
in. Unplug from outlet when not in use and
before performing maintenance.
To reduce the risk of electrical shock - Do
not use outdoors or on wet surfaces.
Do not allow to be used as a toy. Close
attention is necessary when used by or near
children.
Do not use with a damaged cord or plug. If
vacuum cleaner is not working as it should,
has been dropped, damaged, left outdoors,
or dropped in water, return it to a Sears
Service Center.
Do not pull or carry by cord, use cord as a
handle, close a door on cord, or pull cord
around sharp edges or corners. Do not run
vacuum cleaner over cord. Keep cord away
from heated surfaces.
Do not unplug by pulling on cord. To unplug,
grasp the plug, not the cord.
Do not handle plug or vacuum cleaner with
wet hands.
Do not put any objects into openings.
Do not use with any opening blocked; keep
free of dust, lint, hair, and anything that may
reduce air flow.
Keep hair, loose clothing, fingers, and all
parts of body away from openings and
moving parts.
Turn off all controls before unplugging.
Use extra care when cleaning on stairs.
Do not put on chairs, tables, etc. Keep on
floor.
Do not use vacuum cleaner to pick up
flammable or combustible liquids (gasoline,
cleaning fluid, perfumes, etc.), or use in
areas where they may be present. The
fumes from these substances can create a
fire hazard or explosion.
Do not pick up anything that is burning or
smoking, such as cigarettes, matches, or hot
ashes.
Do not use vacuum cleaner without dust cup
and/or filters in place.
Always change the dust bag after
vacuuming carpet cleaners or freshener,
powders, and fine dust. These products clog
the bag, reduce airflow and can cause the
bag to burst. Failure to change the bag
could cause permanent damage to the
vacuum cleaner.
Do not use the vacuum cleaner to pick up
sharp hard objects, small toys, pins, paper
clips, etc. They may damage the vacuum
cleaner.
Do not operate the vacuum cleaner without
the exhaust filter or filter door in place.
The hose contains electrical wires. Do not use
when damaged, cut, or punctured. Replace
if cut or worn. Do not pick up sharp objects.
Always turn off and unplug vacuum cleaner
before connecting or disconnecting either
hose, wand, or PowerMate
®
.
Hold plug when rewinding onto cord reel.
Do not allow plug to whip when rewinding.
You are responsible for making sure that
your vacuum cleaner is not used by anyone
unable to operate it properly.
WARNING:
This product contains a chemical known to
the state of California to cause cancer and
birth defects or other reproductive harm.

PARTS AND FEATURES
It is important to know your vacuum cleaner’s parts and features to ensure its proper and
safe use. Review these before using your vacuum cleaner.
- 5 -
.oN traPtraP
tleB 20-53013*
20-54321*
20-86880*
20-81002*
KC84REEJZ000
Dust Bag (3-pack)
20-50104*Dust Bag (8-pack)
retliF tsuahxE
Motor Safety Filter
PowerMate
®
Agitator Assembly
To order a replacement part call 1-844-553-6667
or visit www.searspartsdirect.com
* Available online at www.sears.com
NOTE: Detailed illustrations and listings of all
vacuum cleaner parts are also available at
searspartsdirect.com
REPLACEMENT PARTS
Scan to reorder bags or go
to kenmore.com/reorderCQ

CANISTER
- 6 -
CREVICE TOOL DUSTING BRUSH ATTACHMENT HOLDER
ON/OFF Button
ATTACHMENTS

Height Adjustment
Pedal
Height Adjustment
Indicator
- 7 -
POWERMATE
WAND
HANDLE & HOSE ASSEMBLY
®
Indicator
ZD\2Q2ç
Switch
Handle

ASSEMBLY INSTRUCTIONS
Please pay special attention to these hazard alert boxes, and follow any instruc-
tions given. WARNING statements alert you to such dangers as fire, electric
shock, burns and personal injury. CAUTION statements alert you to such dangers
as personal injury and/or property damage.
WARNING
Electrical Shock Hazard
DO NOT plug into electrical supply until
assembly is complete. Failure to do so
could result in electrical shock or injury.
HANDLE ASSEMBLY
Insert wand into handle
until lock button snaps
inplace.
To remove: Press wand
release button
and pull
up on handle.
To store: Disconnect hose
from wand and canister
to prevent stress on hose
during storage. Store
hose in a loosely coiled
position so the hose
covering is not stressed.
- 8 -
POWERMATE
Align wand and insert
onto PowerMate until
the wand locks into
place.
WANDS
Align the wand and
insert the upper wand
into the lower wand
until lock button snaps
in place.
Connect the plug to
the hand assembly
and lock the cord
onto the cord retainer.
Before assembling vacuum cleaner, check the PACKING LIST (page 2). Use this list to
verify that you have received and identified all the components of your new Kenmore
vacuum cleaner.
®
ATTACHMENT HOLDER
Align the attachment holder clip with the
front of wand. Push and snap into place
on wand.
®

- 9 -
HOSE
To install: Line up
the hose latch tab
with the notch in
the canister hood,
and insert hose
into canister until
it snaps into place.
CANISTER
1. Open the canister hood.
2. Check to see that the dust bag isproperly
installed. See BAG CHANGING (page 16)
for instructions.
3. Check to see that the motor safety filteris
properly installed. See MOTOR SAFETY
FILTER CLEANING (page 17) for instructions.
IMPORTANT:
Push hose firmly into the canister until the
hose latch tab snaps into place. The
vacuum cleaner will not operate until hose
is fully connected.
NOTE: To reduce the risk of electric shock,
this vacuum cleaner has a polarized plug;
one blade is wider than the other. This plug
will fit in a polarized outlet only one way.
If the plug does not fit fully in the outlet,
reverse the plug. If it still does not fit,
contact a qualified electrician to install the
proper outlet. Do not change the plug in
any way.
HOW TO START
WARNING
Personal Injury and Product Damage
Hazard
• ALWAYS turn off the vacuum cleaner
before unplugging.
• The cord moves rapidly when
rewinding. Keep children away and
provide a clear path when rewinding the
cord to prevent personal injury.
• DO NOT use outlets above counters.
Damage from cord to items in surrounding
area could occur.
• When any abnormality/failure occurs, stop
using the product immediately and discon-
nect the power plug.
CAUTION
Moving parts! To reduce the risk of personal injury,
DO NOT touch the agitator when vacuum cleaner is
on. Contacting the agitator while it is rotating can cut,
bruise or cause other injuries. Always turn off and
unplug from electrical outlet before servicing.
Use caution when operating near children.
OPERATING INSTRUCTIONS
To remove: Do not open hood before
removing hose. With hood closed, press the
hose latch tab in to release and remove hose.
WARNING
Personal Injury and Product Damage
Hazard
• DO NOT run over power cord with
PowerMate
®
. Personal injury or
product damage could result.
• DO NOT pull plug from wall by the
power cord. If there is damage to the
cord or plug, personal injury or property
damage could result.

- 10 -
3. Lower the wand from upright position by
pressing on the HANDLE RELEASE pedal.
5. Push the power switch on the canister
body to turn the vacuum suction ON or OFF.
To turn on the PowerMate
®
motor, slide
the handle switch to the CARPET position.
The PowerMate
®
agitator will start to spin.
To use the canister motor only, slide the
handle switch to the FLOOR position. The
PowerMate
®
agitator will stop spinning.
Agitator On Agitator OFF
To rewind: Turn off and unplug the vacuum
cleaner. Hold the plug while rewinding to
prevent damage or injury from the moving
cord. Push cord rewind button.
1. Pull cord out of canister to desired length.
The cord will not rewind until the cord rewind
button is pushed.
2. Plug the polarized power cord into a 120
Volt outlet located near the floor.
4. Select a pile height setting by pressing
the height adjustment pedal on the rear of
the PowerMate
®
. The pile height setting
shows on the indicator.
Handle
Release
Height
Adjustment Indicator
Height
Adjustment
Pedal

SUGGESTED PILE HEIGHT
SETTINGS
Attention: Refer to your carpet
manufacturers cleaning recommendations.
Some more delicate carpets may require
that they be vacuumed with the PowerMate
®
agitator turned off to prevent carpet damage.
For best deep down cleaning, use the XLO
setting. However, you may need to raise the
height to make some jobs easier, such as
scatter rugs and some deep pile carpets,
and to prevent the vacuum cleaner from
shutting off. Suggested settings are:
HI – Shag, deep pile, super-soft, or
ultraplush carpets, and scatter rugs.
MED – Medium to deep pile.
LO – Low to medium pile.
XLO – The preferred setting for many
carpets and also for bare floors.
NOTE: To protect bare floors, slide the 2-
way On/Off switch to the FLOOR position
to turn off agitator rotation.
CAUTION
DO NOT leave the PowerMate
®
running in
one spot for any length of time. Damage
to carpet may occur.
CAUTION
Product Damage Hazard
Use care if the PowerMate
®
and wand is
left in the upright position as it may tip
over easily. Property damage can occur if
tipped.
- 11 -
VACUUMING TIPS
SUCTION CONTROL
The suction control allows you
to change vacuum
cleaner
suction for different
fabric and
carpet weights.
• Opening control decreases suction for
lightweight rugs.
• Closing control increases suction for
upholstery and carpets.
• Keep the airflow passage open.
Check each assembly area in REMOVING
CLOGS (page 15) occasionally for clogs.
WARNING: Turn off and unplug vacuum
cleaner from outlet before checking for clogs.
SUGGESTED SWEEPING PATTERN
For best cleaning action, the PowerMate
should be pushed straight away from you
and pulled straight back. At the end of each
pull stroke, the direction of the PowerMate
should be changed to point into the next
section to be cleaned. This pattern should
be continued across the carpet with slow,
gliding motions.
NOTE: Fast,
jerky strokes
do not provide
complete
cleaning.
®
®

- 12 -
ATTACHMENTS
CAUTION
DO NOT attach or remove handle or wands while vacuum cleaner is ON. This could
cause sparking and damage the electrical contacts or electronic controls.
ATTACHMENT STORAGE
This vacuum cleaner is equipped with on-
board attachment storage. The floor brush
is stored in the canister, and the dusting
brush and crevice tool are stored in the
attachment holder on the wand.
See ATTACHMENT USE TABLE on page 13.
ATTACHMENTS ON HANDLE
NOTE: If the
PowerMate
®
is attached, turn
vacuum cleaner off before removing handle
from wand.
1. Press wand release button and pull up on
handle.
The PowerMate
®
must be in the flat position
for storage attachment. Use the handle
release pedal to place it in this position.
The wand will slip out of the slot as it is
lifted up for use and will slide into the slot
as it is lowered for storage.
POWERMATE
STORAGE
The lower wand has a U-shaped storage
hook at its base that slides into the U-shaped
slot on the canister. The storage hook allows
the wands and PowerMate
®
to be stored with
the canister to conserve storage space.
The canister must be stored on end for this
feature to be used.
®
EDGE CLEANER
Active brush edge
cleaners are on both
sides of the
PowerMate . Guide
either side of the
PowerMate along
base-boards or next
to furniture to help
remove dirt trapped
at carpet edges.
®
®
Storage
Hook
Slot

- 13 -
ATTACHMENT USE TABLE
ATTACHMENT
Crevice Tool
detepraCeraBneewteB
Furniture
1
Cushions
1
Drapes
1
Stairs Floors Floors/Rugs Walls
2
Floor Brush
Dusting Brush
PowerMate
CLEANING AREA
1 . Always clean attachments before using on fabrics.
2. The 2-way On/Off switch should be in the FLOOR position.
®
2. Slide attachments onto handle as needed.
The floor brush will click into place.
See ATTACHMENT USE TABLE (page 13).
2. Press wand release pedal with foot and
pull the wand straight up and out of
PowerMate
®
.
ATTACHMENTS ON WAND
1. To remove wand from PowerMate
®
, lock
wand in upright position.
3. Slide attachments onto wand as needed.
The floor brush will click into place.
See ATTACHMENT USE TABLE below.

- 14 -
THERMAL PROTECTOR
This vacuum cleaner has a thermal protector
which automatically trips to protect the
vacuum cleaner from overheating. If a clog
prevents the normal flow of air to the motor,
the thermal protector turns the motor off
automatically. This allows the motor to cool
in order to prevent possible damage to the
vacuum cleaner.
To correct problem: Turn off and unplug
vacuum cleaner to allow the vacuum
cleaner to cool and the thermal protector
to reset. Check for and remove clogs, if
necessary. Also check and clean or
replace any clogged filters. Wait
approximately fifty (50) minutes and plug
the vacuum cleaner in and turn back on
to see if the motor protector has reset.
If the canister motor does not resume
operation after the reset procedure
described above, have the unit serviced
by a Sears or other qualified service
dealer.
PERFORMANCE/SAFETY FEATURES
SUCTION CONTROL
The suction control located at the base
of the handle allows you to change the
vacuum airflow.
Decrease suction for draperies and
lightweight rugs by turning control to open
the airflow hole.
Increase suction for carpets, uphostery and
bare floors by turning the control to close
the airflow hole.
WARNING
Personal Injury Hazard
To avoid accidental agitator starting,
always turn off and unplug the vacuum
cleaner before cleaning the agitator area.
Failure to do so can result in personal
injury.
OVERLOAD PROTECTOR
The PowerMate has built-in protection against
motor and belt damage should the agitator
jam. If the agitator slows down or stops, the
overload protector shuts off the PowerMate
®
.
The canister motor will continue to run.
To correct problem: Turn off and unplug
vacuum cleaner, remove obstruction, then
press OVERLOAD PROTECTOR RESET
button.
If the PowerMate
®
motor still does not run
after reset, have the unit serviced by a Sears
or other qualified service dealer.
®

- 15 -
CANISTER CARE
REMOVING CLOGS
The vacuum cleaner creates suction that
picks up dirt. Rapidly moving air carries
the dirt to the dust bag through the airflow
passages. The dust bag lets the air pass
through, while it traps the dirt.
For best cleaning results, keep the
airflow passage open. Check the
starred ( ) areas occasionally
for clogs. Turn off and unplug
vacuum cleaner from outlet
before checking.
TO CHECK FOR CLOGS:
· Check dust bag and change if full. See
DUST BAG CHANGING (page 16).
· Check motor safety filter and exhaust
filter and clean or replace if dirty. See
MOTOR SAFETY FILTER CLEANING
(page 17) and EXHAUST FILTER
CHANGING (page 18).
· Check PowerMate
®
for any dirt or debris
in the belt path area or in the agitator
area. Carefully remove any string or
debris located on the agitator or end
caps. See TO CLEAN AGITATOR (page
20).
If the vacuum cleaner still has poor
suction, do the following:
1. Connect the hose to the canister and
turn vacuum cleaner on. Check the end
of the hose for suction. If there is good
suction on the hose handle, there is no
clog in the hose. If the suction is bad,
remove any dirt or debris in the hose
and handle.
2. Connect hose handle to wand. Check
the end of the wand for suction. If
there is good suction at the end of the
wand, there is no clog in the wand. If
the suction is bad, remove any dirt or
debris in the wand.
3. Check PowerMate swivel. Remove any
dirt or debris.
1. Turn off and unplug vacuum cleaner.
DO
NOT drip water on vacuum cleaner.
2. To clean exterior, or to reduce static
electricity and dust build-up, wipe
outersurface with a clean, soft cloth that
hasbeen dipped in a solution of mild
liquiddetergent and water, then wrung dry.
Wipe dry after cleaning.
CLEANING EXTERIOR AND ATTACHMENTS
CAUTION
Do not use attachments if they are wet.
Attachments used in dirty areas, such as
under a refrigerator, should not be used on
other surfaces until they are washed. They
could leave marks.
®

- 16 -
DUST BAG CHANGING
DO NOT bend or crease the middle of the
cardboard when installing the bag into the
bag mount slots.
6. Rotate bag mount down and install bag
into slots per illustration, pushing down
untilthe cardboard tab locks into position
andthe holes align.
7. Tuck the bag securely into the bag cavity
so that none of the bag will be pinched
by the hood.
8. Close and latch canister hood.
9. Insert hose into canister until it snaps in
place.
10. Plug cord into wall outlet.
For best cleaning results, the dust bag should
be changed when the suction is weak or the
airflow is blocked.
NOTE: See REPLACEMENT PARTS for part
number and purchase details (page 5).
1. Turn off and
unplug vacuum
cleaner.
2. Remove hose
from canister.
3. Squeeze the
hood release
button, then lift
canister hood.
4. Pull bag out of the bag mount.
5. Check the motor safety filter and clean
or, if necessary, replace.
See MOTOR
SAFETY FILTER CLEANING (page 17).
CAUTION
NEVER REUSE A DUST BAG. Very fine
materials, such as carpet freshener, face
powder, fine dust, plaster, soot, new
carpet lint, etc. can clog the bag and
cause it to burst before it is full, which
may damage the vacuum cleaner motor.
Change bag more often when vacuuming
these materials.
Note:
The bag mount will flip forward after
removing bag. This will prevent the hood
from closing until a new bag is installed.

- 17 -
2. Lift the rubber retainer and pull out motor
safety filter as shown.
3. Wash filter in warm soapy water, rinse,
then dry. Do not clean in dishwasher or
install while damp.
4. Slide the filter back into place under the
ribs in the bag cavity.
5. Replace the bag as outlined in the DUST
BAG CHANGING (page 16) section.
MOTOR SAFETY FILTER CLEANING
MOTOR SAFETY FILTER
Check motor safety filter occasionally and
clean when dirty.
NOTE: See REPLACEMENT PARTS for part
number and purchase details (page 5).
1. Remove the bag as outlined in the DUST
BAG CHANGING (page 16) section.
WARNING
Electrical Shock Hazard
Turn off and unplug vacuum cleaner from
electrical outlet. Do not operate the
vacuum cleaner without the motor safety
filter. Be sure the filter is dry and properly
installed to prevent motor failure and/or
electrical shock.

- 18 -
4. Insert the new exhaust filter cartridge
into the filter cover with the rubber seal
upward.
5. To replace the exhaust filter cover,
insert the two tabs on the cover into
the slots at the top of the filter chamber.
6. Rotate filter cover down until it snaps into
place.
EXHAUST FILTER CHANGING
EXHAUST FILTER - HEPA MEDIA
The exhaust filter cartridge must be
replaced when dirty. Replace the filter
when the entire surface area is covered
evenly. The filter CANNOT be washed as
it will lose its dust trapping ability.
NOTE: See REPLACEMENT PARTS for part
number and purchase details (page 5).
WARNING
Fire and/or Electrical Shock Hazard
Do not operate with a clogged exhaust
filter or without the exhaust filter
installed. Do not operate without filter
cover installed.
1. Push latch up to release the exhaust filter
cover from slot in canister.
2. Pull filter cover down and outward to
remove it from filter chamber in the canister.
3. Remove the exhaust filter cartridge from
the filter cover.

- 19 -
BELT CHANGING AND AGITATOR CLEANING
3. Grasp cover by rear and pull up to
remove it from base.
4. Lift agitator assembly out and remove
worn belt.
5. Check and clean end cap areas.
See picture on page 20 for complete
agitator assembly.
Always follow all safety precautions when performing maintenance to the PowerMate
®
.
WARNING
Electrical Shock Or Personal Injury Hazard
Always turn off and unplug vacuum
cleaner
before performing maintenance
to the vacuum cleaner
. Failure to do so
could result in electrical shock or personal
injury from vacuum cleaner suddenly
starting.
POWERMATE
®
CARE
TO REMOVE BELT
1. Press handle release pedal and lower the
swivel. Turn PowerMate
®
upside down and
remove the four (4) screws securing base
to PowerMate
®
cover.
2. Turn PowerMate
®
right side up. Loosen
the rear and side latches. (A flat blade
screwdriver may be required.)
Agitator

- 20 -
End Cap
End Cap
Belt Path
Brush Unit
TO CLEAN AGITATOR:
NOTE: In order to keep cleaning efficiency
high and to prevent damage to your vacu-
um cleaner, the agitator must be cleaned
every time the belt is changed.
The agitator must also be cleaned accord-
ing to the following schedule:
Vacuum Cleaner Use Clean Agitator
HEAVY - every week
(used daily)
MODERATE - every month
(used 2-3 times/week)
LIGHT - every 2 months
(used 1 time/week)
IMPORTANT
Turn off and unplug vacuum cleaner from
electrical outlet. Check and remove hair,
string and lint build-up in the PowerMate
®
agitator and end cap areas.
Remove any dirt or debris in the belt path
area or in the brush unit area.
Carefully remove any string wound onto
the agitator and end caps.
AGITATOR ASSEMBLY
2. Place agitator
assembly back
into PowerMate
®
.
TO REPLACE BELT
1. Install new belt over motor shaft, then
over belt path.
NOTE: See REPLACEMENT PARTS for part
number and purchase details (page 5).
3. Line up front of cover and base. Rest
cover on front edge of base as shown.
4. Rotate cover back. Press cover firmly
until
side and rear latches snap into place.
NOTE: Make sure there is no gap between
the cover and base.
5. Turn PowerMate
®
upside down and replace
the four (4) screws that secure the cover
to the base.
Cover
Base

- 21 -
AGITATOR SERVICING
TO CHECK THE BRUSHES
When brushes are worn to the level of the
base support bars, replace the agitator
assembly.
TO REPLACE AGITATOR ASSEMBLY
1. Remove the floor brush from the
PowerMate .
2. Remove PowerMate cover, belt and
agitator assembly. See “To Remove Belt” in
BELT CHANGING AND AGITATOR
CLEANING (page 19).
3. Install new agitator assembly.
4. Reinstall belt and PowerMate
®
cover. See
“To replace belt” in BELT CHANGING AND
AGITATOR CLEANING (page 20).
NOTE: See REPLACEMENT PARTS for part
number and purchase details (page 5).
Base
Support
Bar
Worn Brushes
New Brushes
WARNING
Electrical Shock Or Personal Injury
Hazard
Always turn off and unplug vacuum
cleaner
before performing maintenance
to the vacuum cleaner
. Failure to do so
could result in electrical shock or personal
injury from vacuum cleaner suddenly
starting.
®
®

- 22 -
WARNING
Always turn off and unplug vacuum cleaner
before performing maintenance to the
vacuum cleaner
.
Failure to do so could result in electrical shock or personal injury.
Review this table to find do-it-yourself solutions for minor performance problems. Any other
service needed should be performed by a Sears or other qualified service agent.
TROUBLESHOOTING
Vacuum cleaner won’t 1. Unplugged at wall outlet. 1. Plug in firmly, press ON/OFF switch.
start.
2. Tripped circuit breaker/blown 2. Reset circuit breaker or replace
fuse.
fuse at household service panel.
3. Loose hose electrical 3. Reconnect hose ends.
connections.
Poor job of dirt 1. Change bag.
pick-up. 2. Clear airflow passages.
3. Clean/change filters.
4. Adjust setting.
5. Adjust suction control.
6. Replace hose.
7. Change agitator.
8&9. See BELT CHANGING AND
AGITATOR CLEANING (page 19).
10. Close and latch hood.
11. Remove any items that may be
caught or jammed, then reset. If
vacuum cleaner starts and stops
again, clean agitator and end caps,
then reset.
Vacuum cleaner starts 1. Hose or hood electrical 1. Check connections, reconnect hose
but shuts off. .sdne.snoitcennoc
2. Tripped overload protector in 2. Remove any items that may be
caught or jammed, then reset. If
vacuum cleaner starts and stops
PowerMate
®
. See OVERLOAD
PROTECTOR (page 14).
again, clean agitator and end caps,
then reset.
3.
1.
Tripped thermal protector 3. See THERMAL PROTECTOR (page
.)41.retsinac ni
PowerMate
®
will not
PowerMate
®
connections
2&3.
1. Plug in firmly.
run when attached. unplugged.
2. Worn or broken belt.
See
BELT CHANGING AND
AGITATOR CLEANING (page 19).
3. Dirty agitator or end caps.
4. Tripped overload protector in 4.
5.
Remove any items that may be
PowerMate
®
. See OVERLOAD
PROTECTOR (page 14). vacuum cleaner starts and stops
again, clean agitator and end caps,
then reset.
Slide handle switch to CARPET
position to activate
PowerMate
®
.
PROBLEM POSSIBLE CAUSE POSSIBLE SOLUTION
Full or clogged dust bag.
Clogged airflow passages.
Dirty filters.
Wrong pile height setting.
Wrong suction control position
selected.
Hole in hose.
Worn PowerMate
®
agitator.
Worn or broken belt.
Dirty agitator or end caps.
Canister hood open.
Tripped overload protector in
PowerMate
®
. See OVERLOAD
PROTECTOR (page 14).
1.
2.
3.
4.
5.
6.
7.
8.
9.
10.
11.
5. Handle switch set to FLOOR
position.
caught or jammed, then reset. If

- 23 -
Vacuum cleaner picks 1. Wrong pile height setting. 1. Adjust setting.
up moveable rugs -or- 2. Suction too strong. 2. Reduce suction by turning suction
control on handle base to open
airflow hole.
PowerMate
®
pushes too
hard.
Cord won’t rewind. 1. Dirty power cord. 1. Clean the power cord.
2. Cord jammed.
2. Pull out cord and rewind.
Vacuum cleaner leaves
marks on carpet.
1. Wrong vacuuming pattern.
1. See VACUUMING TIPS (page 11).
PROBLEM POSSIBLE CAUSE POSSIBLE SOLUTION

TABLA DE CONTENIDOS
Antes De Usar Su Nueva Aspiradora . . . . . . . . . . . . . . . . . . . . . . . . . . . . . . . . . . . . . .2
Garantía De La Aspiradora Kenmore . . . . . . . . . . . . . . . . . . . . . . . . . . . . . . . . . . . . . .3
Importantes Instrucciones De Seguridad . . . . . . . . . . . . . . . . . . . . . . . . . . . . . . . . . . . .4
Piezas Y Características . . . . . . . . . . . . . . . . . . . . . . . . . . . . . . . . . . . . . . . . . . . . . . .5-7
Instrucciones De Montaje . . . . . . . . . . . . . . . . . . . . . . . . . . . . . . . . . . . . . . . . . . . . . . . 8
Instrucciones De Uso . . . . . . . . . . . . . . . . . . . . . . . . . . . . . . . . . . . . . . . . . . . . . . . . .9-13
Desempeño/características De Seguridad . . . . . . . . . . . . . . . . . . . . . . . . . . . . . . . . . . .14
Cuidado Del Contenedor. . . . . . . . . . . . . . . . . . . . . . . . . . . . . . . . . . . . . . . . . . . . . .15-18
Cuidado Del Equipo PowerMate
®
. . . . . . . . . . . . . . . . .. . . . . . . . . . . . . . . . . . . . . . 19-21
Resolución De Problemas . . . . . . . . . . . . . . . . . . . . . . .. . . . . . . . . . . . . . . . . . . . . .22-23
ANTES DE USAR SU NUEVA ASPIRADORA
Su ASPIRADORA KENMORE posee las siguientes piezas y componentes ensamblados
por separado en la caja:
• Aspiradora con contenedor (con cepillo para pisos)
• PowerMate
®
• Herramienta para grietas
• Manilla y conjunto de piezas de la manguera
• Guía de uso y cuidado
• Cepillo para limpiar polvo
• Soporte de fijación
LISTA DE EMPAQUE
- 2 -
Lea esta guía. Le ayudará a ensamblar y utilizar su nueva aspiradora Kenmore de la manera
más efectiva y segura posible.
Para obtener más información sobre el cuidado y uso de la aspiradora, llame a la línea de
ayuda al 1-877-531-7321. Necesitará el modelo completo y los números de serie al solicitar
información. El modelo de su aspiradora y los números de serie se ubican en la placa de
modelo y número de serie.
Utilice el espacio a continuación para anotar el número de modelo y número de serie de su
nueva aspiradora Kenmore.
N° de modelo ____________________________________________
N° de serie ______________________________________________
Fecha de compra _________________________________________
Guarde este libro y su boleta (recibo) de venta en un lugar seguro para usarlos como
referencia a futuro.

GARANTÍA DE LA ASPIRADORA KENMORE
- 3 -
GARANTÍA LIMITADA KENMORE
DURANTE UN AÑO a contar de la fecha de compra, este aparato está garantizado
contra defectos de fabricación al estar instalado, operado y mantenido correctamente
según las instrucciones incluidas.
CON LA PRUEBA DE VENTA, un producto defectuoso recibirá una reparación gratuita o
un cambio a opción del vendedor.
Para conocer la cobertura de la garantía y obtener un reemplazo gratuito, visite el sitio Web
www.kenmore.com/warranty
Esta garantía se aplica durante sólo 90 DÍAS a contar de la fecha de venta sólo en caso
de que el aparato no se utilice para propósitos distintos al uso doméstico privado.
Esta garantía SÓLO cubre defectos de materiales y fabricación; por lo tanto NO cubre:
1. Artículos desechables que puedan desgastarse con el uso normal, incluyendo, pero no
limitándose a, filtros, correas, bolsas o ampolletas de base atornillable.
2. A un técnico de servicio que limpie o realice mantenimiento al aparato, o bien que
instruya al usuario sobre la instalación, operación y mantenimiento correctos del aparato.
3. Llamadas de servicio para corregir la instalación del aparato no realizada por
agentes de servicio autorizados por Sears, o para reparar problemas con fusibles
domésticos, automáticos, cableado doméstico y sistemas de cañerías o suministro de
gas provocados por tal instalación.
4. Daños a o fallas de este aparato provocados por una instalación no realizada por
agentes de servicio autorizados por Sears, incluyendo una instalación realizada de
manera tal que no cumpla con los códigos eléctricos, de gas o de cañerías.
5. Daños a o fallas de este aparato, incluyendo decoloración u óxido superficial, en
caso de no ser operado o mantenido siguiendo las instrucciones incluidas.
6. Daños a o fallas de este aparato, incluyendo decoloración u óxido superficial
provocados por accidentes, alteraciones, abuso, mal uso o un uso distinto a aquel
para el cual se fabricó el producto.
7. Daños a o fallas de este aparato, incluyendo decoloración u óxido superficial
provocados por el uso de detergentes, limpiadores, químicos o utensilios que no sean
los recomendados en las instrucciones incluidas con el producto.
8. Daños a o fallas de este aparato o sistemas provocados por modificaciones no
autorizadas al aparato.
9. Reparaciones a un aparato si falta su placa de modelo o número de serie, si ésta se
encuentra alterada o si no se puede determinar con facilidad la presencia del logo
de certificación apropiado.
Renuncia de responsabilidad a las garantías implícitas; limitación de actos reparatorios
El único y exclusivo acto reparatorio del cliente bajo esta garantía limitada será la reparación
del producto o su cambio según lo aquí indicado. Las garantías implícitas, incluyendo
garantías de mercantibilidad o aptitud para un propósito particular están limitadas a un
año, o al periodo más breve que la ley permita. El vendedor no será responsable por
daños incidentales o consecuentes. Algunos estados y provincias no permite la exclusión
o limitación de daños incidentales o consecuentes, o bien la limitación de la duración de
las garantías implícitas de mercantibilidad o aptitud, por lo cual estas exclusiones o
limitaciones podrían no aplicarse a usted.
Esta garantía se aplica sólo mientras este aparato se utilice en los Estados Unidos.
Esta garantía le entrega derechos legales específicos que pueden variar según su estado
(podría tener otros derechos adicionales).
Sears Brands Management Corporation, Hoffman Estates, IL 60179

- 4 -
INSTRUCCIONES DE SEGURIDAD IMPORTANTES
Lea todas las instrucciones de esta guía antes de ensamblar o usar su aspiradora.
Su seguridad es importante para nosotros. Para reducir el riesgo de incendio,
descarga eléctrica, lesiones a personas o daños al utilizar su aspiradora, siga las
precauciones de seguridad básicas, incluidas las siguientes:
ADVERTENCIA:
GUARDE ESTAS INSTRUCCIONES
El correcto ensamblaje y el uso seguro de su aspiradora son su responsabilidad. Su aspiradora
está hecha sólo para uso doméstico. Lea esta guía de uso y cuidado para obtener información
importante sobre uso y seguridad. Esta guía contiene afirmaciones de seguridad bajo símbolos
de advertencia y precaución.
Utilice su aspiradora sólo como se describe
en esta guía. Utilice solo los aditamentos
recomendados por Sears.
Desconecte el suministro de alimentación antes
de reparar o limpiar la zona de cepillado.
No hacerlo podría provocar que el cepillo se
encienda inesperadamente, lo cual podría
provocar lesiones personales causadas por
las piezas móviles.
No deje la aspiradora sin supervisión en caso
de que esté conectada. Desconéctela del
tomacorriente cuando no esté en uso y antes
de realizarle mantenimiento.
Para reducir el riesgo de descarga eléctrica,
no utilice el aparato en exteriores ni sobre
superficies húmedas.
No permita que se utilice como un juguete.
Se debe prestar estricta atención cuando el
aparato lo usen niños o cuando se use cerca
de ellos.
No utilizar si el enchufe o cable están dañados.
Si la aspiradora no funciona como debiera o
si se ha caído, dañado, dejado en exteriores
o sumergido bajo el agua, llévela a un centro
de servicio Sears.
No jale o transporte utilizando el cable como
manija, no apriete el cable al cerrar puertas ni
lo jale cerca de bordes afilados o esquinas.
No use la aspiradora sobre su cable. Mantenga
el cable alejado de superficies calientes.
No desconecte jalando el cable. Para
desconectarlo tire del enchufe, no del cable.
No manipule el enchufe o la aspiradora con las
manos mojadas.
No ponga objetos sobre las aberturas.
No utilizar si las aberturas están bloqueadas;
mantenga las aberturas libres de polvo, pelos,
pelusas y cualquier cosa que pueda reducir el
flujo de aire.
Mantenga su pelo, ropas holgadas, dedos y
partes de su cuerpo lejos de las aberturas y
piezas móviles del producto.
Apague todos los controles antes de
desconectar el dispositivo.
Tenga precaución adicional al limpiar en
escaleras.
No la ponga sobre sillas, mesas, etc.
Manténgala sobre el piso.
No utilice la aspiradora para aspirar líquidos
inflamables o combustibles (gasolina, líquidos
de limpieza, perfumes, etc.) ni tampoco la
utilice en lugares donde tales líquidos puedan
estar presentes. Los gases de esas sustancias
pueden crear un peligro de incendio o explosión.
No aspire elementos que estén en llamas o
humeando, tales como cigarrillos, fósforos
o cenizas calientes.
No utilice la aspiradora sin el tazón para
polvo y/o sus filtros instalados.
Cambie siempre la bolsa de polvo tras aspirar
limpiadores de alfombras o aromatizadores,
polvos de distinta procedencia y polvo fino.
Estos productos tapan la bolsa, reducen el
flujo de aire y provocan que la bolsa explote.
No cambiar la bolsa podría provocar daño
permanente a la aspiradora.
No utilice la aspiradora para aspirar objetos
duros afilados, juguetes pequeños, alfileres,
clips, etc., ya que pueden dañar la aspiradora.
No utilice la aspiradora sin el filtro de escape
o puerta del filtro en su lugar.
La manguera contiene cables eléctricos. No
utilizar si está dañada, cortada o rota.
Cambie si se corta o desgasta. No aspire
objetos afilados.
Apague siempre y desconecte la aspiradora
antes de conectar o desconectar ya sea la
manguera, vara o PowerMate
®
.
Sostenga el enchufe al enrollarlo en el carrete.
No permita que el cable actúe como látigo
al enrollarlo.
Usted es responsable de garantizar que nadie
que no sea capaz de operar su aspiradora
adecuadamente lo haga.
ADVERTENCIA:
Este producto contiene un químico que, según
los conocimientos que maneja el estado de
California, provoca cáncer y defectos de
nacimiento u otro daño reproductivo.

PIEZAS Y CARACTERÍSTICAS
Es importante conocer las piezas y características de su aspiradora para así garantizar su
uso adecuado y seguro. Revise estas indicaciones antes de usar su aspiradora.
- 5 -
N° de piezaPieza
Correo 20-53013*
20-54321*
20-86880*
20-81002*
KC84REEJZ000
Bolsa Para Polvo (Paquete De 3)
20-50104*Bolsa Para Polvo (Paquete De 8)
Filtro De Escape
Filtro De Seguridad Del Motor
Conjunto De Piezas Del Agitador Powermate
®
Para ordenar una pieza de repuesto, llame al
1-844-553-6667 o visite www.searspartsdirect.com
* Disponible en línea en www.sears.com
NOTA: Las ilustraciones y listas detalladas de todas
las piezas de la aspiradora también están disponibles
en searspartsdirect.com
PIEZAS DE REPUESTO
Manilla y conjunto
de piezas de la
manguera
Contenedor
Escanee para reordenar bolsas
o visite kenmore.com/reorderCQ

CONTENEDOR
- 6 -
HERRAMIENTA
PARA GRIETAS
CEPILLO PARA
POLVO
SOPORTE DE
FIJACIÓN
Botón De ON/OFF
Cable De Corriente
Filtro De Seguridad
Del Motor
Bolsa Para
Polvo
Seguro De
La Tapa
Puerto De La
Manguera
Botón Para Enrollar
El Cable
Cepillo Para Piso
Tapa Del Contenedor
(Bolsa Para Polvo Y
Filtro De Seguridad
Del Motor Dentro)
ACCESORIOS

Pedal De Ajuste
De Altura
Pedal De Liberación
Rápida De La Vara
Correa
Protección Para
Muebles
Giratorio
Indicador De Ajuste
De Altura
Limpiador De Bordes
(No Ilustrado)
Botón De
REINICIO DEL
PROTECTOR
CONTRA
SOBRECARGA
- 7 -
POWERMATE
VARA
MANILLA Y CONJUNTO DE
PIEZAS DE LA MANGUERA
®
Indicador
Parte Giratoria
De La Manguera
Interruptor De Encendido
Y Apagado De 2 Vías
Manilla

INSTRUCCIONES DE ARMADO
Preste especial atención a estos cuadros de alerta de peligro y siga todas las
instrucciones indicadas. Las afirmaciones de ADVERTENCIA lo alertan sobre
peligros tales como fuego, descarga eléctrica, quemaduras y lesiones personales.
Las afirmaciones de PRECAUCIÓN lo alertan sobre peligros tales como lesiones
personales y/o daños a la propiedad.
ADVERTENCIA
Riesgo de descarga eléctrica
NO conectar a la alimentación hasta que
el ensamblaje esté completo. El no seguir
estas indicaciones puede provocar lesiones
o descargas eléctricas.
ENSAMBLAJE DE LA MANILLA
Inserte la vara en la manilla
hasta que el botón de
bloqueo calce en su lugar.
Extracción: Presione el
botón de liberación de la
vara y tire de la manilla.
Almacenamiento:
Desconecte la manguera
de la vara y contenedor
para evitar ejercer tensión
sobre la manguera durante
el almacenamiento.
Almacena la manguera en
una posición enrollada con
holgura, de manera tal que
la cubierta de la manguera
no esté bajo tensión.
- 8 -
POWERMATE
Alinee la vara e inserte
en el equipo PowerMate
®
hata que la vara calce
en su lugar.
VARAS
Alinee la vara e inserte
la vara superior en la
inferior hasta que el
botón de bloqueo calce
en su lugar.
Conecte el enchufe al
conjunto de piezas de
mano y fije el cable en
su pieza de retención.
Antes de ensamblar su aspiradora, revise la LISTA DE PIEZAS (página 2). Utilice esta
lista para verificar haber recibido e identificado todos los componentes de su nueva
aspiradora Kenmore.
®
SOPORTE DE FIJACIÓN
Alinee el clip de soporte de fijación con la
parte frontal de la vara. Empuje y haga
calzar en la vara.

- 9 -
MANGUERA
Instalación: Alinee
la lengüeta de seguro
de la manguera con
la muesca de la tapa
del contenedor e
inserte la manguera
en él hasta que calce
en su lugar.
Lengüeta De
Seguro De La
Manguera
Muesca
CONTENEDOR
1. Abra la tapa del contenedor.
2. Revise que la bolsa de polvo esté
correctamente instalada. Consulte CAMBIO
DE BOLSA (página 16) para obtener
instrucciones.
3. Revise que el filtro de seguridad del
motor esté correctamente instalado. Consulte
LIMPIEZA DEL FILTRO DE SEGURIDAD DEL
MOTOR (página 17) para obtener instrucciones.
IMPORTANTE:
Empuje firmemente la manguera hacia el
contenedor hasta que la lengüeta de seguro
calce en su lugar. La aspiradora no
funcionará sino hasta que la manguera esté
completamente conectada.
NOTA: Para reducir el riesgo de descargas
eléctricas, esta aspiradora posee un enchufe
polarizado (una punta es más ancha que la
otra). Este enchufe calzará en el tomacorriente
de pared polarizado solo en una posición.
Si el enchufe no entra completamente en el
tomacorriente, póngalo al revés. Si aún no
calza, contacte a un técnico electricista
calificado que pueda ayudarle a instalar el
tomacorriente indicado. No modifique el
enchufe de ningún modo.
CÓMO COMENZAR
ADVERTENCIA
Riesgo de daños al producto y lesiones
personales
• Apague SIEMPRE la aspiradora antes
de desconectarla.
• El cable se mueve rápidamente al
enrollarlo. Para evitar lesiones, mantenga
a los niños alejados y tenga una ruta
despejada al enrollar el cable.
• NO utilice tomacorrientes que estén sobre
mesones o mesas. El cable podría dañar
algunos artículos o al área circundante.
• Cuando ocurra una anormalidad/falla,
deje de usar el producto inmediatamente
y desconecte el enchufe.
PRECAUCIÓN
INSTRUCCIONES DE USO
Extracción: No abra la tapa antes de extraer
la manguera. Con la tapa cerrada, presione
la lengüeta de seguro hacia adentro para
liberar y extraer la manguera.
ADVERTENCIA
Riesgo de daños al producto y lesiones
personales
• NO utilice el aparato sobre el cable con
el sistema PowerMate
®
. Podrían ocurrir
lesiones personales o daños al producto.
• NO desconecte el cable tirando desde
él en lugar de hacerlo desde el enchufe.
Si el cable o enchufe están dañados,
podrían ocurrir lesiones personales o
daños a la propiedad.
¡Piezas móviles! Para reducir el riesgo de lesiones
personales, NO toque el agitador mientras la
aspiradora esté encendida. Tocar el agitador mientras
está girando puede cortar, golpear o provocar otras
lesiones. Siempre apague y desconecte del tomacorriente
antes de realizar reparaciones. Preste cuidado al usar el
aparato cerca de niños.

- 10 -
3. Baje la vara presionando el pedal de
LIBERACIÓN DE LA MANILLA.
5. Presione el interruptor de encendido del
cuerpo del contenedor para encender o
apagar la succión de la aspiradora.
Para encender el motor del equipo
PowerMate
®
, deslice el interruptor de la
manilla hacia la posición CARPET. El
agitador PowerMate
®
comenzará a girar.
Para usar sólo el motor del contenedor,
deslice la manilla hacia la posición FLOOR.
El agitador PowerMate
®
dejará de girar.
Agitador Encendido Agitador Apagado
Para enrollar: Apague y desconecte la
aspiradora. Para evitar daños o lesiones,
sostenga el enchufe mientras enrolla el cable.
Presione el botón para enrollar el cable.
1. Saque el cable desde el contenedor hasta
el largo deseado. El cable no se enrollará sino
hasta que se presione el botón de enrollado.
2. Conecte el cable polarizado a una
tomacorriente de 120 Volts ubicado cerca
del suelo.
4. Seleccione un ajuste de altura del
grosor presionando el pedal pertinente, en
la parte posterior del equipo PowerMate
®
.
El ajuste de grosor aparece en el indicador.
Indicador De
Ajuste De Altura
Pedal De
Ajuste De
Altura
Liberación
De La
Manilla

AJUSTES DE ALTURA DE
GROSOR SUGERIDOS
Atención: Consulte las recomendaciones
de limpieza del fabricante de su alfombra.
Algunas alfombras más delicadas podrían
requerir un aspirado con el equipo PowerMate
®
apagado, a fin de evitar daños.
Para obtener la mejor y más profunda
limpieza, utilice el ajuste XLO. Sin embargo,
tal vez deba elevar la altura para facilitar
algunos trabajos, tales como raspar
felpudas y algunas de pelo largo, además
de para evitar que la aspiradora se apague.
Los ajustes recomendados son:
HI –
Alfombras afelpadas, de fibra profunda,
súper suave, ultra plush o felpudas.
MED – Grosor medio a profundo.
LO – Grosor bajo a medio.
XLO – El ajuste predilecto para muchas
alfombras y para pisos sin alfombrar.
NOTA: Para proteger a los pisos sin alfombrar,
deslice el interruptor de encendido/apagado
del agitador bidireccional hacia la posición
FLOOR para así detener el giro del agitador.
PRECAUCIÓN
NO deje el equipo PowerMate
®
funcionando
en un solo lugar durante ningún periodo
de tiempo. Podría dañar la alfombra.
PRECAUCIÓN
Peligro de daños al producto.
Tenga cuidado si el equipo PowerMate
®
y
la vara están en la posición vertical, ya que
podrían voltearse fácilmente. Si se inclina,
podrían ocurrir daños a la propiedad.
- 11 -
CONSEJOS DE ASPIRADO
CONTROL DE SUCCIÓN
El control de succión le permite
cambiar la succión de la
aspiradora para distintas telas
y alfombras.
• Al abrir el control se reduce la succión,
para alfombras ligeras.
• Al cerrar el control se aumenta la succión,
para tapizado y alfombras.
• Mantenga el pasaje de aire despejado.
Revise cada área de ensamblaje indicada
en ELIMINACIÓN DE TAPONES (página 15)
ocasionalmente en búsqueda de tapones.
ADVERTENCIA:
Apague y desconecte la
aspiradora antes
de revisarla.
PATRÓN DE LIMPIEZA
RECOMENDADO
Para obtener la mejor limpieza posible, el
equipo PowerMate
®
debe empujarse en línea
recta desde usted y luego tirarse hacia usted
también en línea recta. Al finalizar cada
movimiento hacia usted, la dirección del
equipo PowerMate
®
debe cambiarse para
apuntar hacia la siguiente sección por limpiar.
Este patrón debe seguirse en toda la alfombra,
de manera lenta y en movimientos de
deslizamiento.
NOTA: Los
movimientos
rápidos y
torpes no
permiten una
limpieza completa.

- 12 -
ACCESORIOS
PRECAUCIÓN
NO fije ni extraiga la manilla o varas mientras la aspiradora esté encendida. Esto podría
provocar chispas y dañar los contactos o controles eléctricos.
ALMACENAMIENTO DE LOS
ACCESORIOS
Este aspirador está equipado con almacenaje
de accesorios incorporado. El cepillo de
suelo se guarda en el contenedor y el cepillo
para el polvo y la herramienta para grietas
se guardan en el soporte de accesorios de
la vara. Consulte la TABLA DE USO DE
ACCESORIOS (página 13).
ACCESORIOS EN LA MANILLA
NOTA: Si el equipo PowerMate
®
está
equipado, apague la aspiradora antes de
extraer la manilla desde la vara.
1. Presione el botón de liberación de la
vara y tire de la manilla.
El equipo PowerMate
®
debe estar en una
posición plana para fijar la pieza al momento
de almacenarlo. Utilice el pedal de liberación
de la manilla para que quede en esta posición.
La vara se saldrá de la ranura al levantarla
para utilizarla y se deslizará hacia la ranura
tras bajarla para almacenarla.
ALMACENAMIENTO DEL EQUIPO
POWERMATE
®
La vara inferior posee un gancho de
almacenamiento en forma de U en su base,
el cual se desliza en la ranura en forma de
U del contenedor. El gancho de
almacenamiento permite a las varas y al
equipo PowerMate
®
almacenarse junto al
contenedor y así conservar el espacio de
almacenamiento. El contenedor debe
almacenarse para poder usar esta
característica.
LIMPIADOR DE BORDES
Limpiadores de bordes
con cepillos activos en
ambos lados del equipo
PowerMate
®
. Guíe
cualquier lago del equipo
PowerMate
®
junto a las
bases o junto a los
muebles para ayudar a extraer la suciedad
atrapada en los bordes de las alfombras.
Ranura
Gancho De
Almacenamiento

- 13 -
TABLA DE USO DE ACCESORIOS
ACCESORIO
Herramienta
Para Grietas
Pisos
alfombrados/
alfombras
Pisos sin
alfombrar
Paredes
Entre
Cojines
1
Muebles
1
Cortinas
1
Escaleras
2
Cepillo Para
Piso
Cepillo Para
Limpiar Polvo
PowerMate
ÁREA DE LIMPIEZA
1 . Limpie siempre los accesorios antes de usarlos sobre telas.
2. El interruptor de encendido y apagado de 2 vías debería estar en la posición FLOOR.
®
2. Deslice los accesorios hacia la manilla
según sea necesario. El cepillo de suelo
hará clic al encajar. Consulte la TABLA
DE USO DE ACCESORIOS (página 13).
2. Presione el pedal de liberación de la vara
con el pie y tírela hacia arriba y afuera
del equipo PowerMate
®
.
ACCESORIOS EN LA VARA
1.
Para extraer la vara del equipo PowerMate
®
,
fije la vara en posición vertical.
3. Deslice los accesorios hacia la vara según
sea necesario.
El cepillo de suelo hará clic al encajar.
Véase la TABLA DE USO DE ACCESORIOS
a continuación.
Pedal De
Liberación
De La Vara

- 14 -
PROTECTOR TÉRMICO
Esta aspiradora posee un sistema de
protección térmica que se activa
automáticamente para proteger a la
aspiradora contra sobrecalentamientos. Si
un tapón evita el flujo normal de aire hacia
el motor, el protector térmico apaga el
motor automáticamente. Esto deja enfriar
el motor a fin de evitar posibles daños a la
aspiradora.
Para corregir el problema: Apague y
desconecte la aspiradora para dejarla
enfriar y para que el protector térmico se
reinicie. Revise y extraiga los tapones, en
caso de ser necesario. Revise también o
cambie los filtros tapados. Espere
aproximadamente cincuenta (50) minutos
para enchufar y encender la aspiradora
a fin de ver si el protector del motor se
reinició.
Si el motor del contenedor sigue sin
funcionar tras el procedimiento de reinicio
descrito, lleve la unidad a reparación en
un centro de servicio Sears u otro centro
calificado.
DESEMPEÑO/CARACTERÍSTICAS DE SEGURIDAD
CONTROL DE SUCCIÓN
El control de succión ubicado en la base
de la manilla le permite cambiar el flujo
de aire que se aspira.
Reduzca la succión para cortinas y alfombras
ligeras, moviendo el control a fin de abrir el
orificio del flujo de aire.
Incremente la succión para alfombras,
tapizado y pisos sin alfombrar girando el
control para cerrar el orificio del flujo de aire.
ADVERTENCIA
Riesgo de lesiones personales
Para evitar el encendido accidenta del
agitador, apague siempre y desconecte la
aspiradora antes de limpiar el área del
agitador. En caso contrario existe riesgo
de lesiones personales.
PROTECTOR CONTRA SOBRECARGAS
Para corregir el problema: IApague y
desconecte la aspiradora, extraiga la
obstrucción y presione el botón de REINICIO
DEL PROTECTOR CONTRA SOBRECARGA.
Si el motor del equipo PowerMate
®
sigue sin
funcionar tras el reinicio, lleve la unidad a
reparación en un centro de servicio Sears u
otro centro calificado.
REINICIO DEL
PROTECTOR CONTRA
SOBRECARGA
El equipo PowerMate
®
posee protección
integrada contra daños al motor y a la correa
provocados por un atascamiento del agitador.
Si el agitador se vuelve más lento o se detiene,
el protector contra sobrecargas apaga al
equipo PowerMate
®
. El motor del contenedor
seguirá funcionando.

- 15 -
CUIDADO DEL CONTENEDOR
ELIMINACIÓN DE TAPONES
La aspiradora crea succión para recoger suciedad.
El aire en rápido movimiento transporta la suciedad
hacia la bolsa de polvo mediante los pasajes de
aire. La bolsa de polvo permite al aire pasar
a través de ella y atrapa la suciedad.
Para obtener los mejores resultados de
limpieza, mantenga el pasaje de aire
despejado. Revise las zonas con
asterisco ( ) ocasionalmente en
búsqueda de tapones. Apague
y desconecte la aspiradora
antes de revisarla.
PASAJE DE AIRE
PARA REVISAR SI HAY TAPONES:
• Revise la bolsa de polvo y cámbiela
completa. Consulte CAMBIO DE LA BOLSA
DE POLVO (página 16).
• Revise el filtro de seguridad del motor y
filtro de escape para luego limpiar o
reemplazar según sea necesario. Consulte
LIMPIEZA DEL FILTRO DE SEGURIDAD
DEL MOTOR (página 17) y CAMBIO DEL
FILTRO DE ESCAPE (página 18).
• Revise el equipo PowerMate
®
en búsqueda
de suciedad o sedimentos en la zona de
recorrido de la correa o en la zona del
agitador. Extraiga cuidadosamente
cualquier hebra o sedimento ubicados en
el agitador o tapas del extremo. Consulte
LIMPIEZA DEL AGITADOR (página 20).
Si la aspiradora tiene poca succión, haga
lo siguiente:
1.Conecte la manguera al contenedor y
encienda la aspiradora. Revise que haya
succión en el extremo de la manguera.
Si hay buena succión en la manilla de la
manguera, no hay tapones en ella. Si la
succión es mala, extraiga toda suciedad
o sedimentos en la manguera y manilla.
2. Conecte la manilla de la manguera a la
vara. Revise que haya succión en el
extremo de la vara. Si hay buena succión
en el extremo de la vara, no hay tapones
en ella. Si la succión es mala, extraiga
toda suciedad o sedimentos de la vara.
3. Revise la zona giratoria del equipo
PowerMate
®
. Extraiga cualquier suciedad
o sedimentos.
1. Apague y desconecte la aspiradora. NO
deje caer agua sobre la aspiradora.
2. Para limpiar el exterior o para reducir la
electricidad estática y la acumulación de
polvo, limpie la superficie exterior con un
paño limpio y suave que se haya empapado
con una solución de detergente líquido
suave y agua para luego haberse estrujado.
Seque después de limpiar.
LIMPIEZA DEL EXTERIOR Y DE LOS ACCESORIOS
PRECAUCIÓN
No use accesorios si están mojados. Los
accesorios usados en zonas sucias, tales
como bajo un refrigerador, no deben
usarse en otras superficies sino hasta
haberlas lavado. Podrían dejar marcas.

- 16 -
CAMBIO DE LA BOLSA PARA POLVO
NO doble ni pliegue la mitad del cartón al
instalar la bolsa en las ranuras de montaje.
6. Gire el montaje de la bolsa e instálela
en las ranuras según la ilustración,
empujando hasta que la lengüeta de
cartón se bloquee en posición y se
alineen los orificios.
7. Inserte la bolsa de manera segura hacia
su cavidad, de forma que ninguna parte
de ella quede pinzada por la tapa.
8. Cierre y asegure la tapa del contenedor.
9. Inserte la manguera en el contenedor
hasta que calce en su lugar.
10. Enchufe el cable en el tomacorriente.
Para obtener los mejores resultados de
limpieza posibles, la bolsa para polvo debe
cambiarse cuando la succión sea débil o
cuando el flujo de aire esté bloqueado.
NOTA: Consulte PIEZAS DE REPUESTO para
conocer los números de piezas y detalles de
adquisición (página 5).
1. Apague y
desconecte la
aspiradora.
2. Extraiga la
manguera
desde el
contenedor.
3. Apriete el
botón de liberación de la tapa y luego
levante la tapa del contenedor.
4.
Saque la bolsa desde su lugar de montaje.
5. Revise el filtro de seguridad del motor y
limpie o, si es necesario, cámbielo. Consulte
LIMPIEZA DEL FILTRO DE SEGURIDAD
DEL MOTOR (página 17).
Liberación
De La Tapa
Montaje De
La Bolsa
Filtro De
Seguridad
Del Motor
PRECAUCIÓN
JAMÁS REUTILICE UNA BOLSA PARA
POLVO. Los materiales muy finos, tales
como aromatizadores de alfombras,
maquillaje en polvo, polvo fino, yeso,
hollín, pelusas de alfombra nueva, etc.
pueden tapar la bolsa y hacer que explote
antes de llenarse, lo cual puede dañar al
motor de la aspiradora. Cambie la bolsa
más a menudo cuando aspire este tipo de
materiales.
Nota:
El montaje de la bolsa se moverá
hacia adelante tras extraer la bolsa. Esto
evitará que la tapa se cierre antes de poder
instalar una nueva bolsa.
Filtro De
Seguridad
Del Motor

- 17 -
2. Levante la pieza de retención de goma
y extraiga el filtro de seguridad del
motor como se indica.
3. Lave el filtro en agua jabonosa tibia,
enjuague y seque. No lo limpie en el
lavavajillas ni lo instale mientras esté
mojado.
4. Deslice el filtro de vuelta a su lugar en
la cavidad para la bolsa.
5. Reinstale la bolsa como se indica en la
sección CAMBIO DE LA BOLSA PARA
POLVO (página 16).
LIMPIEZA DEL FILTRO DE SEGURIDAD DEL MOTOR
FILTRO DE SEGURIDAD DEL MOTOR
Revise ocasionalmente el filtro de seguridad
del motor y límpielo cuando esté sucio.
NOTA: Consulte PIEZAS DE REPUESTO para
conocer los números de piezas y detalles de
adquisición (página 5).
1. Extraiga la bolsa como se indica en la
sección CAMBIO DE LA BOLSA PARA
POLVO (página 16).
ADVERTENCIA
Riesgo de descarga eléctrica
Apague y desconecte la aspiradora del
tomacorriente. No utilice la aspiradora sin
el filtro de seguridad del motor instalado.
Asegúrese de que el filtro esté seco y
adecuadamente instalado para así evitar
que el motor falle o sucedan descargas
eléctricas.
Pieza De
Retención
De Goma

- 18 -
4. Inserte el nuevo cartucho en la tapa del
filtro con el sello de goma hacia arriba.
5. Para reinstalar la tapa del filtro de
escape, inserte las dos lengüetas de la
tapa en las ranuras sobre la cámara del
filtro.
6. Gire la tapa del filtro hacia abajo hasta
que calce en su lugar.
Lengüetas
CAMBIO DEL FILTRO DE ESCAPE
FILTRO DE ESCAPE, MEDIOS HEPA
El cartucho del filtro de escape debe
reemplazarse cuando esté sucio. Reemplace
el filtro cuando toda su superficie esté
cubierta de manera pareja. El filtro NO
puede lavarse, ya que esto lo haría perder
su capacidad de atrapar el polvo.
NOTA: Consulte PIEZAS DE REPUESTO
para conocer los números de piezas y
detalles de adquisición (página 5).
ADVERTENCIA
Riesgo de incendio o descarga eléctrica
No utilice el producto con un filtro de
escape tapado o sin el filtro de escape
instalado. No utilice el producto sin la
tapa del filtro instalada.
1. Empuje el seguro para liberar la tapa del
filtro de escape desde la ranura del contenedor.
2. Tire la tapa del filtro hacia abajo y
afuera para extraerla desde su cámara
en el contenedor.
3. Extraiga el cartucho del filtro de escape
desde la tapa del filtro.
Tapa Del Filtro
De Escape
Seguro
Filtro De
Escape

Lengüetas
- 19 -
CAMBIO DE LA CORREA Y LIMPIEZA DEL AGITADOR
3. Tome la tapa desde la parte posterior
y tire de ella hacia arriba para extraerla
de la base.
4. Eleve el agitador y extraiga la correa
gastada.
5. Revise y limpie las áreas de las tapas de
los extremos. Consulte la imagen de la
página 20 para conocer el conjunto de
piezas completo del agitador.
Agitador
Siga siempre todas las precauciones de seguridad al realizar mantenimiento al equipo PowerMate
®
.
ADVERTENCIA
Riesgo de descarga eléctrica o lesiones
personales
Apague siempre y desconecte la aspiradora
antes de realizarle mantenimiento. No
hacer esto podría provocar descargas
eléctricas o lesiones personales provocadas
por un encendido súbito de la aspiradora.
CUIDADO DEL EQUIPO POWERMATE
®
EXTRACCIÓN DE LA CORREA
1. Presione el pedal de liberación de la
manilla y baje la zona giratoria. Voltee
el equipo PowerMate
®
y extraiga los
cuatro (4) tornillos que fijan la base a la
tapa del equipo PowerMate
®
.
2. Voltee el equipo PowerMate
®
hacia
arriba. Suelte los seguros trasero y
lateral. (Un destornillador de paleta
podría ser necesario).
Lengüeta Lateral
(No Ilustrada)
Giratorio
Seguro
Trasero
Pedal De
Liberación
De La Manilla
Seguro
Trasero
Seguro
Lateral

- 20 -
Tapa Del Extremo
Tapa Del
Extremo
Ruta De
La Correa
Unidad De
Cepillo
LIMPIEZA DEL AGITADOR:
NOTA:
Para mantener la eficiencia de
limpieza y evitar daños a su aspiradora, el
agitador se debe limpiar cada vez que se
cambie la correa.
El agitador también debe limpiarse bajo el
siguiente programa:
Uso De La Aspiradora Limpiar El Agitador
PESADO - Cada Semana
(se utiliza todos los días)
MODERADO- Cada Mes
(se utiliza de 2 a 3 veces por semana)
LIGHT - Cada 2 Meses
(se utiliza 1 vez por semana)
IMPORTANTE
Apague y desconecte la aspiradora del
tomacorriente. Revise y extraiga pelos,
hebras y pelusas acumuladas en el agitador
PowerMate
®
y áreas de los extremos.
Extraiga cualquier suciedad o sedimentos
en la zona de recorrido de la correa o en
el área de la unidad de cepillado.
Extraiga cuidadosamente cualquier hebra
enrollada en el agitador o tapas del extremo.
CONJUNTO DE PIEZAS
DEL AGITADOR
2.
REINSTALACIÓN DE LA CORREA
1. Instale una nueva correa sobre el eje del
motor y luego sobre la ruta de la correa.
NOTA: Consulte PIEZAS DE REPUESTO para
conocer los números de piezas y detalles de
adquisición (página 5).
3. Alinee el frente de la tapa y la base.
Deje la tapa reposando sobre el borde
frontal de la base, como se indica.
4.
Gire la parte posterior de la tapa. Presione
la tapa firmemente hasta que los seguros
lateral y trasero calcen en su lugar.
NOTA: Asegúrese de que no hayan brechas
entre la tapa y la base.
5. Voltee el equipo PowerMate
®
al revés y
reinstale los cuatro (4) tornillos que fijan
la tapa a la base.
Agitador
Correa
Ruta De La Correa
Tapa Del Extremo
Eje Del
Motor
Reinstale el conjunto
de piezas del
agitador en el equipo
PowerMate
®
.
Tapa
Base

- 21 -
REPARACIÓN DEL AGITADOR
REVISIÓN DE LOS CEPILLOS
Cuando los cepillos están gastados al nivel
de las barras de soporte de la base, cambie
el conjunto de piezas del agitador.
REEMPLAZO DEL CONJUNTO DE
PIEZAS DEL AGITADOR
1. Extraiga el cepillo para piso desde el
equipo PowerMate
®
.
2. Extraiga la tapa del equipo PowerMate
®
,
correa y conjunto de piezas del agitador.
Consulte “Extracción de la correa” en
CAMBIO DE LA CORREA Y LIMPIEZA
DEL AGITADOR (página 19).
3. Instale el nuevo conjunto de piezas del
agitador.
4. Reinstale la correa y la tapa del equipo
PowerMate
®
. Consulte “Reinstalación de
la correa” en CAMBIO DE LA CORREA
Y LIMPIEZA DEL AGITADOR (página 20).
NOTA: Consulte PIEZAS DE REPUESTO para
conocer los números de piezas y detalles
de adquisición (página 5).
Barra De
Soporte De
La Base
Cepillos Gastados
Cepillos Nuevos
ADVERTENCIA
Riesgo de descarga eléctrica o lesiones
personales
Apague siempre y desconecte la aspiradora
antes de realizarle mantenimiento. No
hacer esto podría provocar descargas
eléctricas o lesiones personales provocadas
por un encendido súbito de la aspiradora.

- 22 -
ADVERTENCIA
Apague siempre y desconecte la aspiradora antes de realizarle mantenimiento. El no seguir
estas indicaciones puede provocar lesiones personales o descargas eléctricas.
Revise esta tabla para encontrar soluciones que pueda aplicar usted mismo a problemas de
rendimiento menores. Cualquier otra reparación necesaria deberá ser realizada por Sears u
otro agente de servicio calificado.
RESOLUCIÓN DE PROBLEMAS
La aspiradora no
enciende.
1.
Está desenchufada del
tomacorriente.
2. Fusible quemado/automático
activado en el panel eléctrico
de la casa.
3. Conexiones eléctricas de la
manguera sueltas.
1. Enchufe firmemente, presione el
interruptor de encendido.
2. Reinicie el automático o cambie el
fusible.
3. Reconecte los extremos de la
manguera.
Recolección de suciedad
ineficiente.
1. Cambie la bolsa.
2. Limpie los pasajes de aire.
3. Limpie/cambie los filtros.
4. Ajuste la configuración.
5. Ajuste el control de succión.
6. Cambie la manguera.
7.
Cambie el agitador.
8y9. Consulte CAMBIO DE LA CORREA Y
LIMPIEZA DEL AGITADOR (página 19).
10. Cierre y asegure la tapa.
11.
Extraiga cualquier artículo que pueda
estar atrapado o atascado y luego
reinicie. Si la aspiradora enciende y
se detiene nuevamente, limpie el
agitador y las tapas del extremo
para luego reiniciarla.
La aspiradora enciende,
pero se apaga.
1. Las conexiones eléctricas de la
manguera o contenedor se detienen.
2. Protector de sobrecarga activado
en el equipo PowerMate
®
.
Consulte PROTECTOR CONTRA
SOBRECARGA (página 14).
3. Protector térmico activado en
el contenedor.
1.
Revise las conexiones y reconecte los
extremos de la manguera.
Consulte PROTECTOR TÉRMICO
(página 14).
2.
Extraiga cualquier artículo que pueda
estar atrapado o atascado y luego
reinicie. Si la aspiradora enciende y
se detiene nuevamente, limpie el
agitador y las tapas del extremo
para luego reiniciarla.
3.
El equipo PowerMate
®
no funciona al estar
adjunto.
1.
Conexiones del equipo
PowerMate
®
desconectadas.
2y3.
1. Enchufe firmemente.
2.
Correa gastada o rota.
Consulte CAMBIO DE LA CORREA Y
LIMPIEZA DEL AGITADOR (página 19).
3.
Agitador o tapas del extremo
sucios.
4.
Protector de sobrecarga activado
en el equipo PowerMate
®
.
Consulte PROTECTOR CONTRA
SOBRECARGA (página 14).
4.
5.
Extraiga cualquier artículo que pueda
estar atrapado o atascado y luego
reinicie. Si la aspiradora enciende y
se detiene nuevamente, limpie el
agitador y las tapas del extremo para
luego reiniciarla.
Deslice el interruptor de la manilla
hacia la posición CARPET para activar
el equipo PowerMate
®
.
PROBLEMA
POSIBLE CAUSA
POSIBLE SOLUCIÓN
Bolsa para polvo llena o tapada.
Pasajes de aire tapados.
Filtros sucios.
Ajuste de altura de grosor
equivocado.
Posición de control de succión
equivocada seleccionada.
Orificio en la manguera.
Agitador PowerMate
®
gastado.
Correa gastada o rota.
Agitador o tapas del extremo
sucios.
Tapa del contenedor abierta.
Protector de sobrecarga activado
en el equipo PowerMate
®
.
Consulte PROTECTOR CONTRA
SOBRECARGA (página 14).
1.
2.
3.
4.
5.
6.
7.
8.
9.
10.
11.
5. Interruptor de la manilla en la
posición FLOOR.

- 23 -
La aspiradora recoge
alfombras movibles o
el equipo PowerMate
®
empuja demasiado fuerte.
1. Ajuste la configuración.
2. Reduzca la succión girando el
control de succión en la base del
asa para abrir el agujero del flujo
de aire.
El cable no se enrolla. 1. Cable de alimentación sucio. 1. Limpie el cable de alimentación.
2. Cable atascado.
1. Ajuste de altura de grosor
equivocado.
2. La succión es demasiado
potente.
2. Tire del cable y enrolle nuevamente.
La aspiradora deja
marcas en la alfombra
1. Patrón de aspirado incorrecto.
1.
Consulte CONSEJOS DE ASPIRADO
(página 11).
PROBLEMA POSIBLE CAUSA POSIBLE SOLUCIÓN

-
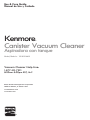 1
1
-
 2
2
-
 3
3
-
 4
4
-
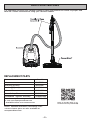 5
5
-
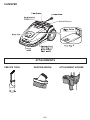 6
6
-
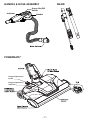 7
7
-
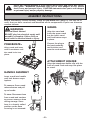 8
8
-
 9
9
-
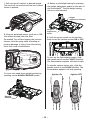 10
10
-
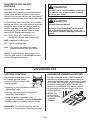 11
11
-
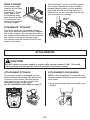 12
12
-
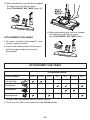 13
13
-
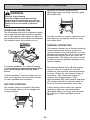 14
14
-
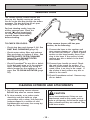 15
15
-
 16
16
-
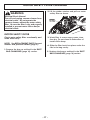 17
17
-
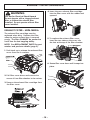 18
18
-
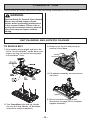 19
19
-
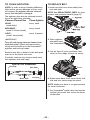 20
20
-
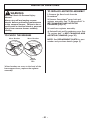 21
21
-
 22
22
-
 23
23
-
 24
24
-
 25
25
-
 26
26
-
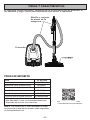 27
27
-
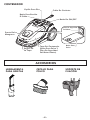 28
28
-
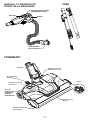 29
29
-
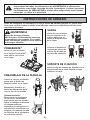 30
30
-
 31
31
-
 32
32
-
 33
33
-
 34
34
-
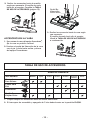 35
35
-
 36
36
-
 37
37
-
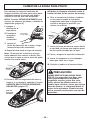 38
38
-
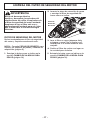 39
39
-
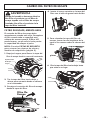 40
40
-
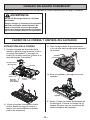 41
41
-
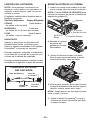 42
42
-
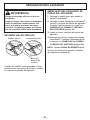 43
43
-
 44
44
-
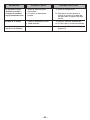 45
45
-
 46
46


Kenmore 81214 El manual del propietario
- Categoría
- Aspiradoras
- Tipo
- El manual del propietario
en otros idiomas
- English: Kenmore 81214 Owner's manual
Artículos relacionados
-
Kenmore 81414 El manual del propietario
-
Kenmore BC4002 Manual de usuario
-
-
-
-
-
 Kenmore Elite 125.21814610 El manual del propietario
-
Kenmore 125.81614610 Manual de usuario
-
-


