Allen + Roth F51A1138NP Guía de instalación
- Categoría
- Artículos sanitarios
- Tipo
- Guía de instalación

1
VR20524
ITEM #0749745
#3730616
#3730617
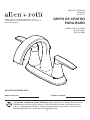
CENTERSET BATH
FAUCET
MODEL #F51A1138NP
#F51A1138CP
#F51A1138BL
Español p. 9
Serial Number Purchase Date
ATTACH YOUR RECEIPT HERE
Questions, problems, missing parts? Before returning to your retailer, call our
customer service department at 1-866-439-9800, 8 a.m. - 8 p.m., EST, Monday - Sunday.
You could also contact us at [email protected] or visit www.lowespartsplus.com.
ALLEN + ROTH and logo design are trademarks or
registered trademarks of LF, LLC. All rights reserved.

2
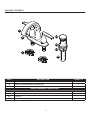
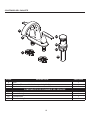
PACKAGE CONTENTS
PART DESCRIPTION QUANTITY
A Faucet 1
B Aerator (Preassembled to Faucet (A)) 1
C Lock Nuts 2
DRAIN ASSEMBLY COMPONENTS
AA Main plunger 1
BB Rubber washer 1
CC Lock nut 1
DD Drain assembly 1
A
AA
BB
CC
DD
B
C

3
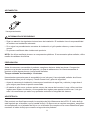
• Follow these installation instructions carefully. Proper installation is the installer’s responsibility.
• Failure to follow correct installation procedures can cause the faucet to become loose, which can
result in serious injury.
• The product should be installed by a locally licensed plumber.
NOTE: Please DO NOT use plumber’s putty on plastic components. Use silicone caulk if sealant is
required.
WARNING
This product is engineered to meet the EPA WaterSense ow requirement. The ow rate is governed by
the aerator or ow controller. If replacement is ever required, be sure to replace it with a WaterSense
compliant aerator or ow controller to retain the water conserving ow rate of this product.
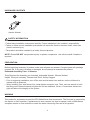
SAFETY INFORMATION
PREPARATION
Before beginning assembly of product, make sure all parts are present. Compare parts with package
contents list. If any part is missing or damaged, do not attempt to assemble the product.
Estimated Assembly Time: 12 minutes
Tools Required for Assembly (not included): Adjustable Wrench, Silicone Sealant.
Helpful Tools (not included): Channel-lock Pliers, Safety Goggles.
• Prior to beginning installation, turn off the cold and hot water lines and turn on the old faucet to
release built-up pressure.
• When installing your new faucet, first, hand-tighten connector nuts. Then, use one wrench to hold
the fitting and a second wrench to tighten the nut an additional 1/4 turn. Connections that are too
tight will reduce the integrity of the system.
HARDWARE CONTENTS
Aerator Wrench
D

4
1
2
2
1
1
1
1
3
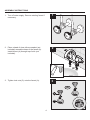
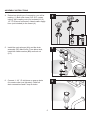
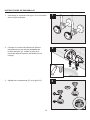
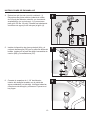
1. Turn off water supply. Remove existing faucet if
necessary.
2. Place a bead of clear silicone sealant (not
included) around the base of the faucet (A).
Install faucet (A) through top of sink (not
included).
3. Tighten lock nuts (C) onto the faucet (A).
ASSEMBLY INSTRUCTIONS
A
A
C
1
2
3
2
3
2

5
4
A
5-1
5-2
1 2
6
2
5
1
2
4. Determine which type of connection you will be
making. (1) Ball nose risers (3/8” O.D. copper
tubing) with coupling nuts (not included) or (2)
1/2” I.P.S faucet connectors. Attach water supply
lines (not included) to the faucet (A).
ASSEMBLY INSTRUCTIONS
5
4
6
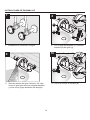
6. Connect 1-1/4” I.D. tail piece on pop-up drain
8 to waste outlet (not included). Check all
drain connections and P trap for leaks.
AA
DD
BB
CC
3
4
5. Install the main plunger (AA) and the drain
assembly (DD) above sink. From below sink,
install the rubber washer (BB) and lock nut
(CC).

6
7
6
7
8
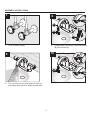
7. Turn on water supply.
9. Turn on both hot and cold water to flush out
any debris and check for leaks around drain.
10. Replace aerator (B).
8. Using aerator wrench(D). Remove aerator
(B) from faucet (A).
7
9
10
8
ASSEMBLY INSTRUCTIONS
A
B
B
6-1
1
7-1
1
6-2
2
7-2
2
D

7
CARE AND MAINTENANCE
• Clean periodically with a soft cloth. Avoid abrasive cleaners, steel wool and harsh chemicals as
these will dull the finish and void your warranty.
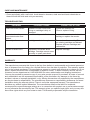
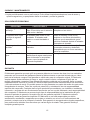
TROUBLESHOOTING
PROBLEM POSSIBLE CAUSE CORRECTIVE ACTION
Leak from under handle. Retainer nut has come loose.
O-ring on cartridge is dirty or
damaged.
Tighten the retainer nut.
Clean or replace O-ring.
Aerator leaks or has an
inconsistent water ow
pattern.
Aerator is dirty or mistted. Unscrew the aerator to check rubber
packing or replace the aerator.
Water drips from aerator. Cartridge needs to be replaced. Remove handle assembly. Take
out existing cartridge and discard.
Replace with new cartridge and
reassemble.
Handle is hard to turn. Impurities in the water block
cartridge. Cartridge cannot move
smoothly or spare parts burst.
Replace cartridge.
WARRANTY
The manufacturer warrants this faucet to be free from defects in workmanship and material present at
time of shipment from the factory for a limited lifetime from the date of purchase. This warranty applies
only to the original purchaser. The manufacturer agrees to correct such defects at no charge or, at our
option, replace the faucet with a comparable or superior model. To obtain warranty service, call our
customer service department at 1-866-439-9800 for return authorization and shipping instructions.
You may be required to present a copy of your sales receipt as proof of purchase. All costs of removal
and reinstallation are the expressed responsibility of the purchaser. Any damage to the faucet by
accident, misuse or improper installation, or by afxing accessories not produced by the manufacturer,
are the purchaser’s responsibility. The manufacturer assumes no responsibility whatsoever for faucet
installation during the warranty period. There is no further expressed warranty. The manufacturer
disclaims any and all implied warranties. The manufacturer shall not be liable for incidental,
consequential or special damages arising at or in connection with product use or performance except
as may otherwise be accorded by law. This warranty gives you specic legal rights, and you may also
have other rights which vary from state to state. This warranty supersedes all prior warranties.

8
1.
2.1
2.2
3.
4.1
4.2
5.
6.
7.
8.
9.
10.
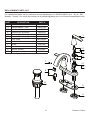
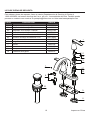
REPLACEMENT PARTS LIST
PART DESCRIPTION PART #
1 Metal Handle A662040
2.1 Handle Adapter - Cold A66G378C
2.2 Handle Adapter- Hot A66G378H
3 Retainer Nut Assembly A66D644
4.1 Ceramic Disc Cartridge - Hot A507179N
4.2 Ceramic Disc Cartridge - Cold A507180N
5 Putty Plate A011097NF
6 Lock Nut Set A504023
7 Screw A065198
8 Aerator A663446N
9 Aerator Wrench A203005
10 Pop-Up Assembly A505218
Printed in China
For replacement parts, call our customer service department at 1-866-439-9800, 8 a.m. - 8 p.m., EST,
Monday - Sunday. You could also contact us at [email protected] or visit www.lowespartsplus.com.

9
ARTÍCULO #0749745
#3730616
#3730617
GRIFO DE CENTRO
PARA BAÑO
MODELO #F51A1138NP
#F51A1138CP
#F51A1138BL
Número de serie Fecha de compra
ADJUNTE SU RECIBO AQUÍ
ALLEN + ROTH y el diseño del logo son marcas
comerciales o marcas registradas de LF, LLC. Todos los
derechos reservados.
¿Preguntas, problemas, piezas faltantes? Antes de volver a la tienda, llame a nuestro
Departamento de Servicio al Cliente al 1-866-439-9800, de lunes a domingo de 8 a.m.
a 8 p.m., hora estándar del Este. También puede ponerse en contacto con nosotros en
[email protected] o visitar www.lowespartsplus.com

10
CONTENIDO DEL PAQUETE
PIEZA DESCRIPCIÓN CANTIDAD
A Grifo 1
B Aireador (Preensamblada al cuerpo del grifo (A)) 1
C Contratuercas 2
COMPONENTES DEL ENSAMBLE DEL DESAGÜE
AA Émbolo principal 1
BB Arandela de goma 1
CC Contratuerca 1
DD Tubo de desagüe 1
A
AA
BB
CC
DD
B
C

11
INFORMACIÓN DE SEGURIDAD
PREPARACIÓN
Antes de comenzar a ensamblar el producto, asegúrese de tener todas las piezas. Compare las
piezas con la lista del contenido del paquete y la lista de aditamentos. No intente ensamblar el
producto si falta alguna pieza o si estas están dañadas.
Tiempo estimado de ensamblaje: 12 minutos
Herramientas necesarias para el ensamblaje (no se incluyen): Llave ajustable, sellador de silicona.
Herramientas útiles (no se incluyen): Pinzas channel-lock, gafas de seguridad.
• Antes de comenzar la instalación, interrumpa el suministro de agua fría y caliente y luego abra el
grifo antiguo para liberar la presión acumulada.
• Al instalar el grifo nuevo, primero apriete a mano las tuercas del conector. Luego, utilice una llave
inglesa para sujetar el conector y una segunda llave inglesa para apretar la tuerca con ¼ de giro
más. Las conexiones que estén muy apretadas reducirán la integridad del sistema.
• Siga con atención las siguientes instrucciones de instalación. El instalador tiene la responsabilidad
de realizar una instalación adecuada.
• Si no sigue los procedimientos correctos de instalación, el grifo puede soltarse y causar lesiones
graves.
• Un plomero certificado debe instalar este producto.
NOTA: No utilice masilla de plomero en componentes plásticos. Si es necesario aplicar sellador, utilice
masilla de calafateo de silicona.
ADVERTENCIA
Este producto se diseñó para cumplir los requisitos de ujo Watersense de la EPA. El índice de ujo
está regulado por el aireador o por el caudal de ujo. Si alguna vez se requiere reemplazo, asegúrese
de reemplazarlo con el aireador de ujo o con el aireador que cumpla con la norma WaterSense para
mantener el índice de ujo que conserva el agua de este producto.
ADITAMENTOS
Llave para aireador
D

12
1
2
2
1
1
1
1
3
A
A
C
1
2
3
2
3
2
INSTRUCCIONES DE ENSAMBLAJE
1. Interrumpa el suministro de agua. Si es necesario,
retire el grifo existente.
2. Coloque un cordón de sellador de silicona
transparente (no se incluye) alrededor de
la base del grifo (A). Instale el grifo (A) a
través de la parte superior del lavabo (no se
incluye).
3. Apriete las contratuercas (C) en el grifo (A).

13
4
A
5-1
5-2
1 2
6
2
5
1
2
5
4
6
AA
DD
BB
CC
3
4
4. Determine qué tipo de conexión realizará. (1)
Elevadores de punta esférica (tubería de cobre
de 3/8 pulg de diámetro exterior) con tuercas de
acoplamiento (no se incluyen) o (2) conectores
para grifo IPS de 1/2 pulg. Conecte las tuberías de
suministro de agua (no se incluyen) al grifo (A).
5. Instale el dispositivo de cierre principal (AA) y el
conjunto de desagüe (DD) por la parte de arriba del
lavabo. Instale por la parte de abajo la arandela de
caucho (BB) y la contratuerca (CC).
INSTRUCCIONES DE ENSAMBLAJE
6. Conecte el empalme de 1-1/4” de diámetro
interior del desagüe levadizo con la salida de
aguas residuales (no incluida). Verifique todas las
conexiones de desagüe y sifones en P para ver si
hay fugas.

14
7
6
7
8
7
9
10
8
A
B
B
6-1
1
7-1
1
6-2
2
7-2
2
D
7. Restablezca el suministro de agua.
8. Con la llave del aireador (D). Retire el
aireador (B) del grifo (A).
9. Abra las manijas de agua caliente y fría, deje
correr el agua para eliminar cualquier desecho
y revise si hay fugas alrededor del desagüe.
10. Vuelva a colocar el aireador (B).
INSTRUCCIONES DE ENSAMBLAJE

15
CUIDADO Y MANTENIMIENTO
• Limpie periódicamente con un paño suave. Evite utilizar limpiadores abrasivos, lana de acero y
químicos agresivos, ya que pueden dañar el acabado y anular la garantía.
SOLUCIÓN DE PROBLEMAS
PROBLEMA CAUSA POSIBLE ACCIÓN CORRECTIVA
Hay una fuga debajo de
la manija.
La tuerca de retención está
oja. El aro tórico en el cartucho
está sucio o dañado.
Apriete la tuerca de retención. Limpie o
reemplace el aro tórico.
El aireador tiene fugas
o el ujo de agua es
irregular.
El aireador está suelto o mal
instalado. El aireador está
suelto o no está instalado el
sello.
Retire el aireador, revise si hay
residuos en los ltros del aireador y
conrme que la arandela de goma
esté bien instalada. Apriete el aireador.
Reemplace el aireador.
El agua gotea del
aireador.
Se necesita reemplazar el
cartucho.
Retire el ensamble de la manija, Saque
el cartucho existente y deséchelo.
Reemplácelo por un nuevo cartucho y
vuelva a ensamblar.
La manija es difícil de
girar.
Las impurezas en el cartucho
del bloque de agua ocasionaron
que el cartucho no se pudiera
mover o que las piezas de
repuesto explotaran.
Reemplace el cartucho.
GARANTÍA
El fabricante garantiza que este grifo no presenta defectos en la mano de obra ni en los materiales
presentes en el momento del transporte desde la fábrica durante un período limitado de por vida a
partir de la fecha de compra. Esta garantía es válida solo para el comprador original. El fabricante
acepta reparar dichos defectos sin cargo o, según nuestro criterio, reemplazar el grifo por un
modelo comparable o superior. Para obtener los servicios cubiertos por la garantía, llame a nuestro
Departamento de Servicio al Cliente al 1-866-439-9800 para enviarle una autorización de devolución
y las instrucciones de envío. Es posible que se le exija presentar una copia del recibo de venta como
comprobante de compra. Todos los costos de extracción y reinstalación son de responsabilidad
explícita del comprador. Cualquier daño al grifo producido por accidente, uso indebido o instalación
incorrecta, o a causa del uso de elementos accesorios que no son del fabricante, será responsabilidad
del comprador. El fabricante no asume ningún tipo de responsabilidad por la instalación del grifo
durante el período de garantía. No existe otro tipo de garantía explícita. El fabricante rechaza
cualquiera y todas las garantías implícitas. El fabricante no se hará responsable por daños
accidentales, resultantes o especiales que surjan en relación con el uso o el funcionamiento del
producto, excepto que la ley indique lo contrario. Esta garantía le otorga derechos legales especícos,
pero podría tener también otros derechos que varían según el estado. Esta garantía sustituye
cualquier garantía previa.

16
LISTA DE PIEZAS DE REPUESTO
Impreso en China
PIEZA DESCRIPCIÓN PIEZA #
1 Manija de metal A662040
2.1 Adaptador de la manija: Frío A66G378C
2.2 Adaptador de la manija: Caliente A66G378H
3 Tuerca de retención y arandela A66D644
4.1 Cartucho de disco de cerámica: Caliente A507179N
4.2 Cartucho de disco de cerámica: Frío A507180N
5 Placa para masilla A011097NF
6 Juego de contratuercas A504023
7 Tornillo A065198
8 Aireador A663446N
9 Llave para aireador A203005
10 Ensamble emergente A505218
Para obtener piezas de repuesto, llame a nuestro Departamento de Servicio al Cliente al
1-866-439-9800, de lunes a domingo de 8 a.m. a 8 p.m., hora estándar del Este. También puede
ponerse en contacto con nosotros en [email protected] o visitar www.lowespartsplus.com
1.
2.1
2.2
3.
4.1
4.2
5.
6.
7.
8.
9.
10.
-
 1
1
-
 2
2
-
 3
3
-
 4
4
-
 5
5
-
 6
6
-
 7
7
-
 8
8
-
 9
9
-
 10
10
-
 11
11
-
 12
12
-
 13
13
-
 14
14
-
 15
15
-
 16
16


Allen + Roth F51A1138NP Guía de instalación
- Categoría
- Artículos sanitarios
- Tipo
- Guía de instalación
en otros idiomas
Artículos relacionados
Otros documentos
-
allen+roth allen – roth URM819003J-G Offset Umbrella Manual de usuario
-
-
-
Project Source FW6BC002OB Guía de instalación
-
-
Glacier Bay FW6A0018BNV Guía de instalación
-
-
-
Jacuzzi F51A1116NP Guía de instalación
-