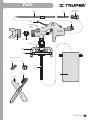
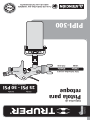
Truper PIPI-300 El manual del propietario
- Categoría
- Rociador de pintura
- Tipo
- El manual del propietario

Manual
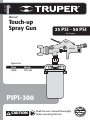
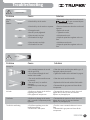
Touch-up
Spray Gun
ModelCode
PIPI-300
Applies for:
14088
PIPI-300
ENGLISH
ESPAÑOL
25 PSI - 50 PSI
Air Pressure
Read the user’s manual thoroughly
before operating this tool.
CAUTION

2
CAUTION
Contents
Keep this manual for future references.
The illustrations in this manual are for reference
only. They might be different from the real tool.
To gain the best performance of
the tool, prolong the duty life,
make the Warranty valid if
necessary, and to avoid hazards
of fatal injuries please read and
understand this Manual before
using the tool.
ENGLISH
Technical Data
Pneumatic Requirements
Safety Warnings for the Use of
Pneumatic Tools
Safety Warnings for the Use of
Spray Guns
Parts
Preparation
Start Up
Maintenance
Troubleshooting
Notes
2
2
3
4
5
6
7
8
9
10
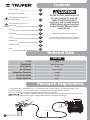
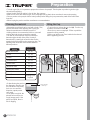
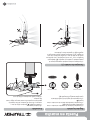
Technical Data
Pneumatic Requirements
PIPI-300
14088
6.7 oz
25 PSI - 50 PSI
1/4 NPT
Touch-up spray gun
Code
Description
Jar Capacity
Air Pressure
Connection Diameter
6 CFM
Air Consumption
0.05”
Nozzle Diameter
Regulating
filter
Air
compressor
• For household jobs, it is possible to use 1.5 CV compressors with a 25 liters’ deposit. For more demanding jobs, like
bodywork, industry, etc., we recommend using 3 CV compressors with a 100-liter deposit as minimum.
• Use high-pressure hoses with the adequate length to do the job comfortably.
• Dust and water condensation inside the compressor tank can cause a deficient finish in the surface to be
painted. To prevent that possibility, install a regulating filter between the compressor and the gun.
CAUTION
Air hose

3
ENGLISH
Safety Warnings
for the Use of Pneumatic Tools
Keep your work area clean, tidy and well lit.
Cluttered and dark areas may cause accidents.
Never use the tool in explosive environments
or near flammable liquids.
Sparks generated by the tool may cause explosion or fire.
Keep children and visitors at a safe distance
when using the tool.
Distractions may cause loosing control
and cause accidents.
Avoid contact with power lines and circuits.
Find and avoid both power lines and circuits,
especially hidden wires and grounded devices.
Stay alert, use care and common sense.
Do not rely on your knowledge of the tool.
Do not get distracted while operating it.
It could cause accidents.
Do not use the tool when tired or under the influence of
drugs, alcohol or medication.
One second of distraction while using the tool
may cause severe injuries.
Use the tool with guards and protective devices in place
and in good working conditions.
Failure to comply with these measures may cause
severe injuries.
Secure and support the work piece properly.
Use bench vices and a stable working area.
Do not force the tool.
It will do the job better and safer at the rate
for which it was intended.
Store the tool in a safe place away from the reach of
children.
Pneumatic tools are dangerous in inexperienced
hands.
Dress properly.
Loose clothing, jewelry or long hair may get
caught in moving parts.
Keep your hands away from rotating and/or mobile
parts.
Failure to comply with this safety measure
exposes you to severe personal injury.
Use adequate personal protection.
Using safety glasses, anti-dust mask, safety non-skid
shoes, helmet and earplugs used in adequate conditions
considerably reduce the risk of injury.
Disconnect the air hose from the tool servicing,
changing devices or storing.
Reduce the risk of unintentional starting causing
accidents.
Never use a tool if the switch is not working or is not
properly assembled.
You are exposed to severe personal injury.
Do not overreach.
Good footing and balance allow you to gain better
control of the tool in unexpected situations.
Never pull the air hose.
Do not use it to carry or disconnect the tool pulling out
the air supply. Damaged or tangled hoses can burst
and shoot residues towards the operator.
Avoid accidental start up.
Make sure the air supply tool is switched off
before connecting or moving the tool.
Remove vices before starting the tool.
Additional tools or vices set into a moving part
may cause severe injury.
Service the tool and verify it is in excellent working
conditions.
Carefully check all moving parts, alignment and
assembly. Make this periodically. Look for damaged or
malfunctioning parts to immediately be repaired.
Accessories.
Use only accessories or spare parts recommended in
this MANUAL or certified by .
Never leave a running tool unattended.
Switch off and disconnect the tool from the air supply
after operating and before putting it aside. Avoid
severe injury.
CAUTION CAUTION
CAUTION
CAUTION
CAUTION
CAUTION
CAUTION
CAUTION
CAUTION
WARNING
WARNING
WARNING
WARNING
WARNING
WARNING
WARNING
WARNING
WARNING
DANGER
DANGER
DANGER
DANGER

4ENGLISH
Safety Warnings
for the Use of Spray Guns
• The unit is designed to apply covering
materials like paint, varnish, enamel, etc. These should
have an ignition point not lower than 70 °F. Check the
product can label or container.
• Do not spray substances you are not
familiar with and if their potential danger is unknown to
you.
• Do not spray flammable substances.
• Use care with dangers originated by the sprayed
substances. Read the text and information in the cans and
containers or the manufacturer specifications.
Substances and Materials
• The unit shall not be used in enclosed
areas or explosive environments.
• If working outdoors consider wind direction. Wind carries
the covering to great distances, causes damages and
makes the job difficult.
• If working indoors, verify there is
adequate ventilation.
• The work area shall be free of any
ignition source. Do not smoke while spraying or near the
work area.
• Wear a face mask and safety goggles
when spraying. Prevents damaging lungs and eyes.
• Wearing gloves and an overall is recommended to
protect hands and clothes from the product when
applying.
Before operating the unit
CAUTION
CAUTION
CAUTION
CAUTION
WARNING
WARNING
WARNING
• Never point the sprayer towards your
body, passersby or animals.
• Make sure that the equipment does not absorb any
steam solvent.
• In the event you need to pause during
the application process, do not set the sprayer sideways.
Hold it by the hook of somewhere for it be vertical.
While operating the device
• When finishing the job clean the gun
perfectly to eliminate any product residue. Accumulations
can damage the gun and cancel the Warranty
After operating the unit
CAUTION
CAUTION
WARNING

5
ENGLISH
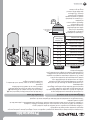
Parts
Cup
Cup
Cap
Cup
Bracket
Air
Inlet
Suction
Pipe
Trigger
Needle Spring Fluid Volume
Adjusting Screw
Liquid NozzleSprayer
Spray Width
Adjusting
Screw
Cup Lock
Brush
Spike Nut
Wrench
Included accessories:

00:20
6ENGLISH
Preparation
J
• Most paints are sold ready to be used with a brush. They
need to be thinned before applying with a spray gun.
Follow the manufacturer’s instructions to thin it.
• Adding a thinner is recommended. Add 5 to 10% until
reaching the right viscosity to apply the material.
• Use the din 4 viscosity flow cup (not included) to
determine right viscosity of the paint. Viscosity is
determined by counting the seconds it takes for the
material to be discharged into the measuring glass. The
following table shows the recommended times for
different products.
• If after thinning the product
the dispersion capacity is too
low, add thinner. Add slowly
from 5 to 10 % until the
dispersion capacity meets
your needs.
• If the paint is too thick, the
painted surface will be too
rough (orange peel). If the
paint is too liquid, there is
risk of dripping.
Thinning the material
• To open the cup, release the cup lock (A). Turn the cup
to release it from the bracket (B).
• Place the cup onto a newspaper. Fill the cup with the
prepared covering material.
• Set the cup into the cap. Close it with the bracket and
block it tightening the lock.
Filling the Cup
• To make a good job, it is important to prepare the surface to be sprayed. Thin the paint or product to gain the right
viscosity before applying.
• Always double check the surface is free of dust, dirt or grease.
• Make sure to cover with adhesive tape, some newspaper and/or plastic those areas that do not require spraying.
• Paint or product to be sprayed shall be mixed perfectly before filling the jar to prevent they settle and to make them
lump-free.
• Before buying the product read the manufacturer recommendations.
Product Second to
discharge
Water based Paint
Primer
Varnish
Oil Based Paint
Enamel Paint
Aluminum Paint
Automotive Sealant
Wood Sealant
Wood Preserver
Wood Stain
20 - 25
24 - 28
20 - 25
18 - 22
18 - 22
22 - 25
25 - 35
28 - 35
Din 4 Viscosity
Flow Cup
Thinning is not
Required
BA

7
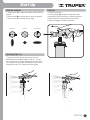
Start Up
ENGLISH
• Turn the screw (A) to adjust the volume of the fluid to be
sprayed.
• Turn the knob (B) to regulate the fan size to be sprayed.
• Turn the spryer (C) to change the fan angle.
Volume Selector
• Start the compressor.
• Press the trigger (D) to open the air flow and start
suctioning the product from the jar. Point the paint gun
towards a piece of cardboard until the spray flows.
• Release the trigger to stop the spray flow.
Start up
• To get good results, keep the gun always level and
parallel to the surface (E). Keep the nozzle 6” - 7.8” and
spray evenly from one side to the other and up and down.
Do not spray in an angle (F). Otherwise the paint may run
through the surface. Go in light and uniform passes.
Spraying Tips (1)
D
EF
A
B
C
Vertical Fan Horizontal FanCircular

8
Start Up
Maintenance
ENGLISH
• It is very important to clean the spray gun thoroughly
after each use.
An inadequate cleansing can result in
malfunctioning and will cancel the Warranty.
• Turn the jar to remove it from the gun. Do not remove
completely. Press the trigger to remove remaining product
from inside the spray gun system (B).
• Pour the remaining material into an adequate container.
• Disconnect the paint gun hose.
• Clean the jar, the gasket seal and the suction pipe
thoroughly with a rag soaked with the solvent that is right
for the product.
• Disassemble the regulator, the sprayer, the nozzle and the needle. Clean them with a brush and solvent.
• Clean the paint gun body with a piece of rag moistened with solvent.
Do not immerse the gun in solvent. The gasket may get damaged.
• When the parts are clean assemble back the spray gun.
• Pour a small amount of solvent into the jar.
• Connect the hose to the spray gun.
• Start the compressor and spray into a container until getting clean solvent out through the nozzle.
Cleansing and Care
WARNING
CAUTION
B
CD
• Use special care adjusting the needle seal. This is very
important to obtain good results.
• Adjust the needle seal using a wrench (C).
• Periodically check the seal to be sure it is not damaged.
To gain access to the seal remove the needle and remove
the seal pressing piece (D).
Needle Seal
Spraying Tips (2)
A
• Move the gun in a constant and uniform speed. Fast
movements produce thin layer and slow movements
produce thick layers.
• Apply one layer at a time. If needing a second layer read
the manufacturer drying recommendations before applying
a second layer. Remember, to get a better finish apply two
thin layer is better than applying a thick layer only.
• When spraying small areas turn the adjusting screw to
lessen the volume of the material to be applied. This way
using too much paint is prevented and also you will not
spray in excess.
• To assure a uniform application, when possible, do not
pause while spraying an object.
• Do not tilt the paint gun in an angle higher than 45°
• When spraying large areas use a crossed pattern (A).

9
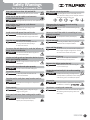
Troubleshooting
ENGLISH
Wrong
Mist
Patterns:Half Moon
Tilted
Divided
Centered
• Paint build up in the nozzle.
• Paint build up in the nozzle or asperser.
• Damaged nozzle.
• Nozzle is poorly tightened.
• Paint viscosity is too low.
• Fluid outlet is too high.
• Paint viscosity is too high.
• Fluid outlet is too low.
• Remove the obstructions from the nozzle.
Do not use metal objects
to clean the funnel orifices.
• Remove obstructions from the nozzle and
asperser.
• Replace the nozzle.
• Tighten the nozzle.
• Add paint to the mix.
• Adjust the paint flow regulator or the air
flow.
• Add thinner to the mix.
• Adjust the paint flow regulator or the air
flow.
Problem Cause Solution
• Air is entering between the nozzle
and the gun body.
• Air is suctioned though the seal
washer in the needle.
• The nozzle and the needle are not
set correctly.
• The nozzle and / or needle is
damaged.
• Fluid build up inside the gun
system.
• Residues or damage in the air flow
regulating knob system.
Poorly tightened components.
• Residues or damage in the nozzle
and / or needle. Components poorly
tightened.
• Fluid flow regulating screw has
insufficient opening.
• Obstruction in the system.
• Clean the nozzle and the joint with the gun. If
damaged, replace the nozzle.
• Tighten the needle seal as indicated in page 8.
• Clean the nozzle and the needle.
• Replace the fluid nozzle and the fluid needle.
• Disassemble the gun parts and clean all the
components.
• Disassemble the system to check, clean and
tighten the air valve, its seat and washers.
Replace any damaged part.
• Disassemble the system to check, clean and
tighten the air valve, its seat and washers.
Replace any damaged part.
• Turn the screw counterclockwise to increase
flow.
• Disassemble la gun parts and clean all the
components.
Problem Cause Solution
Right Mist Pattern
Right Fan
CAUTION
Wrong Fan:
Air leaks.
Fluid leaks.
The fluid is not flowing.
Fluctuation
Divided

Imported by:
Truper, S.A. de C.V.
Parque Industrial 1, Parque Industrial Jilotepec, Jilotepec,
Edo. de Méx. C.P. 54257 Made in China, Tel.: 76 1782 9100.
www.truper.com
10-2022
Notes
10 ENGLISH

Importado por:
Truper, S.A. de C.V.
Parque Industrial 1, Parque Industrial Jilotepec, Jilotepec,
Edo. de Méx. C.P. 54257 Hecho en China, Tel.: 76 1782 9100.
www.truper.com
10-2022
10 ESPAÑOL
Notas

9
Solución de problemas
ESPAÑOL
• Acumulación de pintura en la boquilla.
• Acumulación de pintura en la boquilla o
el aspersor.
• Boquilla dañada.
• Boquilla mal apretada.
• Viscosidad de pintura demasiado baja.
• Salida de fluido demasiado alta.
• Viscosidad de la pintura demasiado alta.
• Salida del fluido demasiado baja.
• Retire las obstrucciones de la boquilla.
No use objetos de
metal para limpiar los orificios del embudo.
• Retire las obstrucciones de la boquilla y el
aspersor.
• Reemplace la boquilla.
• Apriete la boquilla.
• Agregue pintura a la mezcla.
• Ajuste el regulador de flujo de pintura o
el de flujo de aire.
• Agregue diluyente a la mezcla.
• Ajuste el regulador de flujo de pintura o
el de flujo de aire.
Problema Causa Solución
Abanicos incorrectos:
Fugas de aire.
Fugas de pintura.
La pintura no fluye.
• Entra aire entre la boquilla y el
cuerpo de la pistola.
• Se succiona aire por el empaque
del sello de la aguja.
• La boquilla y la aguja no están
asentadas correctamente.
• Boquilla y/o aguja dañadas.
• Acumulación de pintura dentro del
sistema de la pistola.
• Residuos o daños en el sistema del
tornillo regulador de flujo de aire.
Componentes mal apretados.
• Residuos o daños en la boquilla y/o
aguja. Componentes mal apretados.
• Tornillo regulador de flujo de
pintura con abertura insuficiente.
• Obstrucción en el sistema.
• Limpie la boquilla y la unión con la pistola. Si
está dañada, reemplace la boquilla.
• Apriete el sello de la aguja como se indica en
la página 8.
• Limpie la boquilla y la aguja.
• Reemplace la boquilla de fluido y la aguja de
fluido.
• Desmonte las piezas de la pistola y limpie
todos sus componentes.
• Desmonte el sistema para revisar, limpiar y
apretar la válvula de aire, su asiento y
empaques. Reemplace cualquier parte dañada.
• Desmonte el sistema para revisar, limpiar y
apretar la boquilla, la aguja, su asiento y
empaques. Reemplace cualquier parte dañada.
• Gire el tornillo en sentido contrario a las
manecillas del reloj para aumentar el flujo.
• Desmonte las piezas de la pistola y limpie
todos sus componentes.
Problema Causa Solución
Patrón de rocío correcto
Abanico
correcto
Fluctuación
Dividido
ATENCIÓN
Patrones
de rocío
incorrectos: Media luna
Inclinado
Dividido
Centrado

B
8
Puesta en marcha
Mantenimiento
ESPAÑOL
• Tenga especial cuidado con el ajuste del sello de la
aguja. Es importante para un buen trabajo.
• Ajuste el sello de la aguja con ayuda de una llave (C).
• Revise el sello periódicamente para asegurarse que no
presente daños, para tener acceso al sello retire la aguja y
remueva la pieza opresora del sello (D).
• Es muy importante limpiar la pistola por completo
después de cada uso.
Una limpieza inadecuada a la larga
dará como resultado un mal funcionamiento e invalidará la
garantía.
• Gire el vaso para retirarlo de la pistola. Sin retirar el vaso
por completo presione el gatillo para que retirar todo el
producto del interior del sistema (B).
• Vacíe el material sobrante del vaso en un contenedor
adecuado.
• Desconecte la manguera de la pistola.
• Limpie el vaso, el empaque y el tubo de succión por completo con un trapo empapado en solvente adecuado para el
producto que haya utilizado.
• Desmonte el regulador, el aspersor, la boquilla y la aguja para limpiarlos con un cepillo y solvente.
• Limpie el cuerpo de la pistola con un trapo humedecido con solvente.
No sumerja la pistola en solvente o los empaques podrían dañarse.
• Una vez que las piezas estén limpias arme de nuevo la pistola.
• Vierta un poco del solvente en el vaso. Conecte la manguera a la pistola.
• Encienda el compresor y rocíe en un contenedor hasta que salga solvente limpio por la boquilla.
Limpieza y cuidados
Sello de la aguja
ADVERTENCIA
ATENCIÓN
CD
Consejos de rociado (2)
A
• Desplace la pistola a una velocidad constante y uniforme.
Los movimientos rápidos producen capas delgadas y los
movimientos lentos producen capas gruesas.
• Aplique una capa a la vez. En caso de requerir otra capa
vea las recomendaciones de secado del fabricante del
producto antes de aplicar una segunda capa. Recuerde que
para un mejor acabado, aplicar dos capas delgadas siempre
es mejor que aplicar sólo una capa gruesa.
• Cuando rocíe áreas pequeñas gire el tornillo de ajuste para
disminuir el volumen de material a aplicar. Con esto se evita
utilizar demasiada pintura y previene sobre rociar.
• Siempre que sea posible evite hacer pausas durante el
rociado de un objeto. Para asegurar una aplicación uniforme.
• No incline la pistola para pintura en un ángulo mayor a 45°
• Cuando rocíe áreas grandes, utilice un patrón cruzado (A).

7
Puesta en marcha
ESPAÑOL
• Para regular el volumen de material a rociar abra o cierre
la perilla de salida de pintura (A).
• Para regular el tamaño del abanico de rocío abra o cierre
la perilla B.
• Para determinar el ángulo de la huella del abanico
(vertical/horizontal) gire la boquilla (C).
• Para obtener un buen resultado mantenga siempre la
pistola nivelada y paralela a la superficie (E). Mantenga la
boquilla a 15 cm - 20 cm de la superficie y rocíe de manera
pareja de un lado al otro y de arriba hacia abajo. No rocíe
en ángulo, de lo contrario la pintura podría correrse por la
superficie (F). Dé pasadas suaves y uniformes.
Regular la pistola
• Encienda el compresor.
• Presione el gatillo (D) para abrir el flujo de aire y
comience a succionar el producto del vaso. Apunte la
pistola hacia un pedazo de cartón hasta que salga el rocío
del producto.
• Suelte el gatillo para detener el flujo de rocío.
Encendido
Consejos de rociado (1)
D
EF
A
B
C
Abanico vertical Abanico horizontalCircular

00:20
Preparación
6ESPAÑOL
• La mayoría de las pinturas se venden listas para su
aplicación con brocha y necesitan ser adelgazadas antes de
ser adecuadas para su aplicación con pistola. Siga las
instrucciones del fabricante del producto para adelgazarlo
adecuadamente.
• Se recomienda agregar un diluyente del 5 al 10% hasta
alcanzar la viscosidad adecuada para aplicar el material.
• Utilice un vaso medidor de viscosidad DIN 4 (no
incluido) para determinar la viscosidad correcta de la
pintura. La viscosidad se determina contando los segundos
que tarda el material en ser descargado del vaso medidor.
La siguiente tabla muestra los tiempos recomendados para
diferentes productos.
• Si después de adelgazar el
producto la capacidad de
dispersión es muy baja
añada más diluyente del 5
al 10% poco a poco hasta
que la capacidad de
dispersión cumpla con sus
necesidades.
• Si la pintura es demasiado
espesa, la superficie pintada
quedará rugosa (piel de
naranja). Si la pintura es
demasiado fluida, existe el
riesgo de que chorree.
Adelgazamiento del material
• Para abrir el vaso primero libere el seguro del vaso (A),
después gire el vaso para soltarlo de la abrazadera (B).
• Coloque el vaso sobre una pieza de papel periódico.
Rellene el vaso con el material de recubrimiento
preparado.
• Coloque el vaso en su tapa, ciérrelo con la abrazadera y
bloquéelo apretando el seguro.
Llenado del vaso
• Para obtener un buen trabajo es importante que prepare la superficie a rociar y adelgace la pintura o producto para que
obtenga la viscosidad correcta antes de su aplicación.
• Confirme siempre que la superficie a rociar esté libre de polvo, suciedad y grasa.
• Asegúrese de cubrir las áreas que no requiera rociar con cinta adhesiva, periódico y/o plástico.
• La pintura o producto a rociar debe removerse antes de llenar el vaso para evitar asentamientos y debe estar libre de
grumos u otras partículas.
• Revise siempre las recomendaciones del fabricante del producto antes de comprarlo.
Producto Segundos
de descarga
Pintura con base de agua
Primer
Barnices
Pinturas con base de aceite
Pinturas de esmalte
Pinturas de aluminio
Sellador automotriz
Sellador para madera
Preservador de madera
Tinta para madera
20 - 25
24 - 28
20 - 25
18 - 22
18 - 22
22 - 25
25 - 35
28 - 35
B
Vaso
medidor de
viscosidad DIN 4
No requiere
adelgazante
A

5
Partes
ESPAÑOL
Vaso
Tapa
del vaso
Abrazadera
del vaso
Entrada de aire
(Conexión macho 1/4 NPT)
Tubo de
succión
Gatillo
Aguja Resorte Tornillo regulador
de flujo de pintura
ToberaBoquilla
Tornillo regulador
de abanico
Seguro de la
tapa del vaso
Cepillo
Espiga Tuerca
Llave
Accesorios incluidos

4ESPAÑOL
Advertencias de Seguridad
para uso de pistolas para pintar
• El equipo está diseñado para aplicar
materiales de recubrimiento como pintura, barniz, esmalte,
etc. Los cuales deben tener un punto de inflamación no
menor de 21 °C, consulte la etiqueta de la lata o
contenedor del producto.
• No rocíe substancias con las cuales
no esté familiarizado y desconozca su peligro potencial.
• No rocíe substancias inflamables.
• Tenga cuidado con los peligros que se originen por las
substancias rociadas. Consulte el texto y la información de
las latas y contenedores o las especificaciones del
fabricante.
Substancias y materiales
• El equipo no debe utilizarse en
espacios cerrados ni en ambientes explosivos.
• Si va a trabajar en exteriores considere la dirección del
viento. El viento puede llevar el recubrimiento a grandes
distancias y ocasionar daños, además de dificultar el
trabajo.
• Si va a trabajar en interiores verifique
que haya ventilación adecuada.
• El área de trabajo debe de estar
libre de cualquier fuente de ignición. No fume durante el
trabajo de rociado ni cerca del área de trabajo.
• Utilice una mascarilla y lentes
de seguridad cuando rocíe para evitar daños en
los pulmones y los ojos.
• Se recomienda utilizar guantes y overol para proteger sus
manos y ropa del producto a aplicar.
Antes de operar el equipo
ATENCIÓN
ATENCIÓN
ATENCIÓN
ATENCIÓN
ADVERTENCIA
ADVERTENCIA
ADVERTENCIA
• Nunca apunte la pistola para pintar
hacia usted ni a otras personas o animales.
• Asegúrese de que el equipo no absorba ningún vapor
solvente.
• Si va a hacer una pausa durante el
proceso de aplicación, no ponga de lado la pistola,
sosténgala en algún lugar por el gancho para que quede
en posición vertical.
Mientras opera el equipo
• Limpie perfectamente la pistola
para eliminar cualquier residuo de producto al terminar el
trabajo. Las acumulaciones pueden estropear la pistola e
invalidar la garantía.
Después de operar el equipo
ATENCIÓN
ATENCIÓN
ADVERTENCIA

3
ESPAÑOL
Advertencias de Seguridad
para uso de herramientas neumáticas
Mantenga su área de trabajo limpia, ordenada y bien
iluminada.
Áreas desordenadas y obscuras pueden provocar
accidentes.
Nunca utilice la herramienta en ambientes explosivos, o
en presencia de líquidos inflamables o sin ventilación.
Las chispas que genera la herramienta podría
provocar una explosión o incendio.
Mantenga a los niños y a otras personas a una distancia
segura mientras utiliza la herramienta.
Las distracciones pueden hacerle perder el
control y provocar accidentes.
Evite hacer contacto con líneas y circuitos eléctricos.
Ubique y evite todas las líneas y circuitos
eléctricos, especialmente el cableado oculto.
Así como cualquier objeto conectado a tierra.
Esté siempre alerta, sea prudente y utilice el sentido común.
No deje que la familiaridad con el uso de la
herramienta lo distraiga mientras la utiliza.
Esto puede provocar accidentes.
No utilice la herramienta si está cansado, o bajo la
influencia de drogas, alcohol o medicamentos.
Un momento de distracción mientras utiliza la
herramienta puede provocar lesiones
personales graves.
Utilice la herramienta con todas sus piezas en su lugar
y en buen estado.
De no hacerlo se expone a lesiones personales graves.
Asegure y apoye adecuadamente la pieza de trabajo.
Utilice abrazaderas y una superficie de trabajo estable.
Nunca fuerce la herramienta.
Trabajar dentro del rango para el que fue diseñada
asegura un mejor trabajo y es más seguro.
Guarde la herramienta en un lugar seguro fuera del
alcance de los niños.
Las herramientas neumáticas son peligrosas en
manos inexpertas.
Utilice la indumentaria adecuada.
La ropa suelta, joyas o cabello largo pueden
ser atrapados por las piezas móviles.
Mantenga las manos alejadas de las partes giratorias
y/o móviles.
De no hacerlo se expone a lesiones personales graves,
como cortes, quemaduras o aplastamiento.
Utilice equipo adecuado de protección personal.
Utilice protección para los ojos. Mascarilla antipolvo,
zapatos de seguridad antideslizantes, casco y protección
para los oídos en condiciones adecuadas reducen
considerablemente el riesgo de lesiones.
Desconecte la manguera de aire de la herramienta antes
de darle mantenimiento o cambiar sus accesorios.
Para evitar encendidos accidentales que
deriven en accidentes.
Nunca utilice la herramienta si el interruptor no
funciona o no está debidamente ensamblada.
De hacerlo se expone a lesiones personales
graves, repárela inmediatamente.
No sobre extienda su campo de acción.
Un buen apoyo y equilibrio permiten un mejor control
de la herramienta en situaciones inesperadas.
Nunca tire de la manguera de aire.
No la use para cargar la herramienta o desconectarla de
la toma de aire. Las mangueras dañadas o enredados
pueden reventar y lanzar residuos al operador.
Evite encendidos accidentales.
Asegúrese de que la toma de aire está desconectada
antes de lubricar, colocar accesorios o dar
mantenimiento a la herramienta.
Retire cualquier llave de ajuste antes de encender la
herramienta.
Herramientas adicionales o llaves colocadas
en una pieza giratoria de la herramienta
puede provocar lesiones personales graves.
Déle mantenimiento a la herramienta y cerciórese que
se encuentra en condiciones óptimas antes de utilizarla.
Revise cuidadosamente sus partes móviles, su
alineación y montaje. Hágalo periódicamente.
Busque cualquier elemento dañado o pieza que no
funcione adecuadamente para su inmediata reparación.
Accesorios.
Utilice sólo los accesorios o refacciones
indicados en este Instructivo o
certificados por .
Nunca deje la herramienta en marcha sin supervisión.
Desconecte la herramienta de la toma de aire después de
operarla y antes de dejarla para evitar accidentes graves.
ATENCIÓN
ATENCIÓN
ATENCIÓN
ATENCIÓN
ATENCIÓN
ATENCIÓN
ATENCIÓN
ATENCIÓN
ATENCIÓN
ADVERTENCIA
ADVERTENCIA
ADVERTENCIA
ADVERTENCIA
ADVERTENCIA
ADVERTENCIA
ADVERTENCIA
ADVERTENCIA
ADVERTENCIA
PELIGRO
PELIGRO
PELIGRO
PELIGRO

Í
ndice
Especificaciones técnicas
Requerimientos neumáticos
2
PIPI-300
14088
200 ml
172 kPa - 345 kPa (25 PSI - 50 PSI)
1/4 NPT
Pistola para retoque
Código
Descripción
Capacidad del vaso
Presión de trabajo
Diámetro de conexión
169.9 L/min (6 CFM)
Consumo de aire
1.5 mm
Diámetro de la boquilla
Especificaciones técnicas
Requerimientos neumáticos
Advertencias de Seguridad
para uso de herramientas neumáticas
Advertencias de Seguridad
para uso de pistolas para pintar
Partes
Preparación
Puesta en marcha
Mantenimiento
Solución de problemas
Notas
Guarde este Instructivo para futuras referencias.
Los gráficos de este Instructivo son para
referencia, pueden variar del aspecto real de la
herramienta.
2
2
3
4
5
6
7
8
9
10
Para poder sacar el máximo
provecho de la herramienta,
alargar su vida útil, hacer válida
la garantía en caso de ser
necesario y evitar riesgos o
lesiones graves, es fundamental
leer este Instructivo por
completo antes de usar la
herramienta.
ESPAÑOL
ATENCIÓN
Filtro
regulador
Compresor
de aire
• Para trabajos caseros es posible utilizar compresores de 1.5 CV con depósito de 25 litros; para trabajos más demandantes
como trabajos en carrocería, industria, etc. se recomienda utilizar compresores de al menos 3 CV con depósito de 100 litros.
• Utilice mangueras de alta presión con una longitud adecuada para realizar el trabajo de pintado cómodamente.
• El polvo y agua condensada dentro del tanque del compresor pueden ocasionar un acabado deficiente
en la superficie a pintar. Se recomienda instalar un filtro regulador entre el compresor y la pistola para evitar esta posibilidad.
ATENCIÓN
Manguera
de aire

Lea este Instructivo por completo
antes de usar la herramienta.
ATENCIÓN
Instructivo de
Pistola para
retoque 25 PSI - 50 PSI
Presión de trabajo
172 kPa 345 kPa
ModeloCódigo
PIPI-300
Este Instructivo es para:
14088
PIPI-300
ESPAÑOL
ENGLISH
-
 1
1
-
 2
2
-
 3
3
-
 4
4
-
 5
5
-
 6
6
-
 7
7
-
 8
8
-
 9
9
-
 10
10
-
 11
11
-
 12
12
-
 13
13
-
 14
14
-
 15
15
-
 16
16
-
 17
17
-
 18
18
-
 19
19
-
 20
20


Truper PIPI-300 El manual del propietario
- Categoría
- Rociador de pintura
- Tipo
- El manual del propietario
en otros idiomas
- English: Truper PIPI-300 Owner's manual
Artículos relacionados
Otros documentos
-
 Evercraft 776-3703 Manual de usuario
-
Husky HDS790 Manual de usuario
-
Campbell Hausfeld DH580000AV Manual de usuario
-
-
-
URREA PPG10 El manual del propietario
-
Sagola turbo 1000 El manual del propietario
-
Nordson Encore Engage External Controller El manual del propietario
