Andersen Side Stop Replacement Service Instructions
- Tipo
- Service Instructions

Use caution when working at elevated heights and around unit openings.
Follow manufacturers’ instructions for ladders and/or scaffolding. Failure
to do so may result in injury or death.
Sea cauteloso al trabajar en lugares elevados y cerca de las aberturas de
la unidad. Siga las instrucciones del fabricante para el uso de escaleras
y/o andamios. Si no lo hiciera, podrían producirse lesiones o la muerte.
Follow manufacturers’ instructions for hand or power tools. Always
wear safety glasses. Failure to do so may result in injury and/or
product damage.
Siga las instrucciones del fabricante para el uso de herramientas
eléctricas o manuales. Utilice siempre gafas de seguridad. Si no lo
hiciera, podrían producirse lesiones y/o daños al producto.
9069239 BA Revised 06/20/13
Tools Needed Herramientas necesarias
∙Safety Glasses Lentes de seguridad
∙Flat Pry Bar Flat Pry Bar
∙Finish Nailer Finish Nailer
∙Thin Blade Putty Knife Thin Blade Putty Knife
∙End Cutting Tool End Cutting Tool
Side Stop Replacement
for E-Series French Casement and Casement & Awning Windows with Standard or Piano Hinge
for E-Series/Eagle® French Casement and Casement & Awning Windows with Standard or Piano Hinge
Parts Included Partes incluidas
(1) Hinged Side Stop oror
(1) Lock Side Stop
Hinged Side Stop
Hinged Side Stop
Lock Side Stop
Lock Side Stop
Thank you for choosing Andersen.
For questions call 1-888-888-7020. For more information and/or guides visit www.eaglewindow.com.
Please leave this guide with building owner.
Si tiene alguna pregunta llame al 1-888-888-7020. Para obtener más información y/o guías, visite www.eaglewindow.com
Deje esta guía con el dueño de la construcción.
▶Read guide from beginning to end before starting installation. Read all warnings and cautions during unit installation.
Lea completamente la guía antes de comenzar la instalación. Lea y respete todas las advertencias y precauciones durante la instalación de la unidad.
▶Check with your local building code ofcial to identify and conrm compliance with local building code requirements.
Consulte los códigos locales de construcción para identicar y conrmar que se cumplan los requisitos del código de construcción.
Standard casement window shown in guide.
“Andersen” and all other marks where denoted are trademarks of Andersen Corporation and its subsidiary. ©2013 Andersen Corporation. All rights reserved.

2
9069239
Loosen set screw on handle using a small at
blade screwdriver.
Loosen set screw on handle using a small at
blade screwdriver.
Remove any brad nails or debris from area.Insert at pry bar between head stop and frame and pry down to
release head stop. Remove head stop and save for reuse.
End Cutting Tool
Frame
Head Stop
Flat Pry Bar
1
Interior
Handle
Flat Blade
Screwdriver
Set Screw
Remove handle and save for reuse.
Remove handle and save for reuse.
Operator Cover
Operator
Drill/Driver
Sill Cover Flat Blade Pry Bar
Sill Cover
Remove operator cover and save for reuse.
Remove operator cover and save for reuse.
Remove screws from sill cover and save for
reuse.
Remove screws from sill cover using a drill/
driver and save for reuse.
Remove sill cover and save for reuse.
Remove sill cover using a at pry bar and
save for reuse.
2
Interior
3
Interior
5
Interior
6
Interior
7
Interior
▶For hinge side stop replacement, proceed
to Step 8.
▶For lock side stop replacement, proceed
to Step 12.
Handle
4
Interior
Temporarily reapply handle. Unlock and open
sash.
Hinge Side Stop Replacement
8
Interior

Remove hinge side stop using a at pry bar
and dispose of properly.
Remove hinge side stop using a at pry bar
and dispose of properly.
3
9069239
Apply new hinge side stop by pressing onto
splines.
Spline
Open lock handle 90º. Remove bezel cover and save for reuse.
Lock Handle
Bezel Cover
Thin Blade
Putty Knife
Bezel Cover
Pry bezel cover from lock side stop using a
thin blade putty knife.
Open to 90°
Remove lock side stop using a at pry bar
and dispose of properly.
Remove lock side stop using a at pry bar
and dispose of properly.
Apply new lock side stop by pressing onto
splines.
Apply new lock side stop by pressing onto
splines.
Avoid prying
near lock parts.
Lock Side Stop
Lock Side
Stop
Spline
Slide lock bezel over lock handle until tight
against stop.
Slide lock bezel over lock handle until tight
against stop.
Lock Bezel
Lock Handle
Lock Side Stop Replacement
9
Interior
10
Interior
12
Interior
13
Interior
14
Interior
15
Interior
16
Interior
17
Interior
Close sash and remove handle. Save for
reuse. Proceed to Step 18.
11
Interior

Operator Cover
Operator
4
9069239
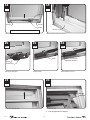
Slide sill cover into place over operator and between side stops.
Slide sill cover into place over operator and between side stops.
Reapply operator cover.
Reapply operator cover.
Fasten sill cover using saved screws.
Fasten sill cover using saved screws.
Reapply handle.
Reapply handle.
Tighten handle set screw.
Tighten handle set screw.
Sill Cover
Sill Cover
Operator
Fasten head stop.
Fasten head stop.
Slide head stop into place.
Slide head stop into place.
Head Stop
Finish Nailer
Side Stop Side Stop
Handle
Handle
Flat Blade Screwdriver
Set Screw
▶Side stop replacement is complete.
18
Interior
19
Interior
20
Interior
21
Interior
22
Interior
23
Interior
24
Interior
Hinge Side Stop and Lock Side Stop Replacement
-
 1
1
-
 2
2
-
 3
3
-
 4
4


Andersen Side Stop Replacement Service Instructions
- Tipo
- Service Instructions
en otros idiomas
- English: Andersen Side Stop Replacement
Artículos relacionados
-
Andersen Head Stop Replacement Service Instructions
-
-
-
-
-
-
-
-
-
