Generac 005842-0 El manual del propietario
- Categoría
- Generadores de poder
- Tipo
- El manual del propietario
Este manual también es adecuado para

L: 842-0
GENERAC
iX1
i
inverterGeneratorOperator'slVlanu

AccessoryBox..............................................insideFrontCover
introduction..............................................................................1
Readthis ManualThoroughly..................................................1
Safety Rules............................................................................1
StandardsIndex...............................................................3
Generalinformation.................................................................4
Specifications...........................................................................4
EmissionsInformation......................................................4
UnitIdentification......................................................................4
ControlPanel....................................................................5
Operation.................................................................................5
Pre-UseCheck..........................................................................5
Starting theGenerator...............................................................6
Adding Loads............................................................................6
Usingthe FlexPowerTM Switch...................................................7
Usingthe 12 VDCBatteryCharger............................................7
Shutting Down..........................................................................7
LowOil LevelShutdown............................................................8
Fuelingthe Generator................................................................8
ToFilltheFuelTank..........................................................8
Adding EngineOil......................................................................8
ToAdd EngineOilto the Crankcase..................................8
Maintenance............................................................................9
GeneratorMaintenance.............................................................9
GeneratorMaintenanceSchedule..............................................9
Cleaningthe Generator..............................................................9
EngineMaintenance................................................................10
Changingthe EngineOil..........................................................10
Changingthe FuelFilter...........................................................10
Changingthe SparkPlug.........................................................11
TransportationandStorage.....................................................11
CleanSparkArrestor Screen...................................................12
Troubleshooting.....................................................................13
TroubleshootingGuide.............................................................13
ACCESSORYBOX
Checkall contents. If anyparts are missingor damagedlocate an
authorizeddealerat 1=888=436=3722.
Contentsinclude:
• 1 bottleSAE30 Oil • Oil Funnel
• SparkPlugWrench • Screwdriver
• BatteryChargeCable
WARNING!
California Proposition 65
Engine exhaust and some of its constituents are known to the state of California to cause cancer,
birth defects, and other reproductive harm.
WARNING!
California Proposition 65
This product contains or emits chemicals known to the state of California to cause cancer,
birth defects, and other reproductive harm.

iNTRODUCTiON
Thankyou for purchasingthis modelby GeneracPowerSystems,
Inc. This model is a compact, high performance, air-cooled,
engine driven generatordesigned to supply electrical power to
operateelectrical loads where no utility power is availableor in
placeof utility dueto a poweroutage.
READTHiSMANUALTHOROUGHLY
If any portion of this manual is not understood, contact the
nearest Authorized Dealerfor starting, operating and servicing
procedures.
The operator is responsiblefor proper and safe use of the
equipment.We strongly recommendthat the operator read this
manualandthoroughlyunderstandall instructionsbeforeusingthe
equipment.Wealsostronglyrecommendinstructingotherusersto
properlystart andoperatethe unit.This preparesthem ifthey need
to operatetheequipmentin an emergency.
Thegeneratorcan operatesafely,efficiently and reliablyonly if it
is properlylocated,operatedand maintained.Beforeoperatingor
servicingthe generator:
• Becomefamiliar with and strictly adhereto all local, stateand
nationalcodes and regulations.
• Study all safety warnings in this manual and on the product
carefully.
• Becomefamiliar with this manualandthe unit beforeuse.
Themanufacturercannot anticipateevery possible circumstance
that might involvea hazard.Thewarnings in this manual,and on
tags and decals affixedto the unit are,therefore,not all inclusive.
If usinga procedure,work method or operatingtechniquethat the
manufacturerdoes not specifically recommend,ensurethat it is
safe for others. Also make sure the procedure,work method or
operatingtechnique utilizeddoes not renderthe generatorunsafe.
THE INFORMATIONCONTAINEDHEREIN WAS BASED ON
MACHINESIN PRODUCTIONAT THE TIME OF PUBLICATION.
GENERACRESERVESTHERIGHTTOMODIFYTHISMANUALAT
ANYTIME.
SAFETYRULES
Throughoutthis publication,and on tags and decals affixedto the
generator,DANGER,WARNING,CAUTIONand NOTEblocks are
usedto alert personnelto special instructionsabout a particular
operation that may be hazardous if performed incorrectly or
carelessly. Observe them carefully. Their definitions are as
follows:
indicates a hazardous situation or action which, if
not avoided, will result in death or serious injury.
indicates a hazardous situation or action which,
if not avoided, could result in death or serious
injury.
ACAUTION!
indicates a hazardous situation or action which,
if not avoided, could result in minor or moderate
injury.
NOTE:
Notes containadditional informationimportantto a procedure
and will be found withinthe regulartextbody of thismanual.
These safety warnings cannot eliminate the hazardsthat they
indicate. Common sense and strict compliancewith the special
instructionswhileperforming theaction or serviceareessentialto
preventingaccidents.
Four commonly used safety symbols accompanythe DANGER,
WARNINGand CAUTIONblocks. The type of information each
indicatesis asfollows:
This symbol points out important safety
information that, if not followed, could
endanger personal safety and/or property of
others.
This symbol points out potential explosion
hazard.
//_This symbol points out potential fire hazard.
/i_This symbol points out potential electrical
shock hazard.
GENERAL HAZARDS
• NEVERoperatein an enclosed area, in a vehicle, or indoors
EVENIFdoorsand windows areopen.
• For safety reasons, the manufacturer recommends that the
maintenanceof this equipmentis carried out by an Authorized
Dealer.Inspectthe generatorregularly,and contactthe nearest
AuthorizedDealerfor parts needingrepairor replacement.
• Operategeneratoronly on levelsurfacesandwhereit will notbe
exposedto excessivemoisture,dirt, dust or corrosivevapors.
• Keep hands, feet, clothing, etc., away from drive belts, fans,
and othermoving parts. Neverremoveany fan guardor shield
whilethe unit isoperating.
• Certain parts of the generator get extremely hot during
operation. Keep clear of the generator until it has cooled to
avoidsevereburns.
• Do NOToperategeneratorinthe rain.
• Donotaltertheconstructionofthegeneratoror changecontrols
which might createan unsafeoperatingcondition.
• Never start or stop the unit with electrical loads connected
to receptaclesAND with connecteddevicesturned ON. Start
the engine and let it stabilize before connecting electrical
loads. Disconnectall electricalloads beforeshutting downthe
generator.

,_t Save These instructions - The manufacturer suggests that these rules for safe operation be copied
and posted near the unit's installation site. Safety should be stressed to aii operators and potential
operators of this equipment, if you loan this unit to anyone, be sure to also loan this Owner's Manual
and advise that it be read thoroughly before operating the unit.
• When working on this equipment, remain alert at all times.
Never work on the equipment when physically or mentally
fatigued.
• Neverusethe generatoror anyof its parts as a step. Stepping
on the unit can stress and break parts, and may result in
dangerousoperating conditions from leakingexhaust gases,
fuel leakage,oil leakage,etc.
EXHAUST& LOCATIONHAZARDS
• Never operatein an enclosedarea or indoors!NEVERuse
in the home,in a vehicle,or in partlyenclosedareassuch
as garages,evenif doorsand windowsare open! ONLYuse
outdoors and far from openwindows,doors,vents,andinan
areathatwill notaccumulatedeadlyexhaust.
Using a generator indoors CAN KILL YOU iN MINUTES.
Generator exhaust contains carbon monoxide. This is
a poison you cannot see or smell,
NEVER use insidea home
or garage, EVEN iF doors
and windows are open.
Only use OUTSIDE and
far away from windows,
doors, and vents.
• The engine exhaustfumes contain carbon monoxide, which
you cannot see or smell. This poisonous gas, if breathedin
sufficientconcentrations,can causeunconsciousnessor even
death.
• Adequate, unobstructed flow of cooling and ventilating air
is critical to correct generator operation. Do not alter the
installation or permit even partial blockage of ventilation
provisions, as this can seriously affect safe operationof the
generator.ThegeneratorMUSTbeoperatedoutdoors.
• This exhaustsystemmust be properlymaintained.Do nothing
that mightrendertheexhaustsystemunsafeorinnoncompliance
with any localcodes and/orstandards.
• Alwaysusea batteryoperatedcarbonmonoxidealarmindoors,
installedaccordingto themanufacturersinstructions.
• If you start to feet sick, dizzy,or weak after the generatorhas
beenrunning,moveto fresh air IMMEDIATELY.Seea doctor,as
you couldhavecarbonmonoxidepoisoning.
ELECTRICALHAZARDS
• The generator produces dangerously high voltage when in
operation.Avoidcontactwith barewires,terminals,connections,
etc., while the unit is running,even on equipmentconnected
to the generator. Ensureall appropriate covers, guards and
barriersarein placebeforeoperatingthegenerator.
• Never handle any kind of electrical cord or device while
standinginwater,while barefootorwhile handsor feet arewet.
DANGEROUSELECTRICALSHOCKMAYRESULT.
• TheNationalElectricCode(NEC)requirestheframe andexternal
electrically conductive parts of the generator be properly
connectedto an approvedearthground.Local electricalcodes
may also require proper grounding of the generator.Consult
with a localelectricianfor groundingrequirementsin thearea.
• Use a ground fault circuit interrupter in any damp or highly
conductivearea(such as metaldecking or steelwork).
• Do not useworn, bare,frayed or otherwisedamagedelectrical
cord setswith the generator.
• In caseof accidentcausedby electricshock, immediatelyshut
down the source of electrical power. If this is not possible,
attempt to free the victim from the live conductor. AVOID
DIRECTCONTACTWITH THEVICTIM. Use a non-conducting
implement,such asa rope or board,to freethevictim from the
live conductor.If the victim is unconscious,applyfirst aid and
getimmediatemedical help.
FIREHAZARDS
• GasolineishighlyFLAMMABLEand itsvaporsare EXPLOSIVE.
Do not permitsmoking,open flames, sparksor heat in the
vicinitywhilehandlinggasoline.
• Never add fuel while unitis runningor hot.Allow engineto
cool completelybeforeaddingfuel.
• Never fill fuel tankindoors,Comply with all laws regulating
storageand handlingof gasoline.
• Do not overfill the fuel tank. Always allow roomfor fuel
expansion.If tank is over=filled,fuel can overflow onto a hot
engineandcauseFIREor an EXPLOSION.Neverstoregenerator
with fuel in tank where gasolinevapors might reachan open
flame, spark or pilot light (as on a furnace, water heateror
clothes dryer). FIREor EXPLOSIONmay result. Allow unit to
cool entirelybeforestorage.
• Wipe up any fuel or oil spills immediately.Ensure that no
combustiblematerialsareleft on or nearthegenerator.Keepthe
areasurroundingthe generatorcleanandfree from debrisand
keepa clearanceof five (5) feet on all side to allow for proper
ventilationofthe generator.
• Do notinsert objectsthrough unit's cooling slots.

• Do not operatethe generatorif connected electrical devices
overheat,if electricaloutputislost, if engineor generatorsparks
or ifflames or smokeare observedwhileunit is running.
• Keepafire extinguishernearthe generatoratall times.
STAtVDARDS/NDEX
1. NationalFireProtectionAssociation(NFPA)70:TheNATIONAL
ELECTRICCODE(NEC)availablefrom www.nfpa.org
2. NationalFire ProtectionAssociation (NFPA)5000: BUILDING
CONSTRUCTIONAND SAFETYCODEavailablefrom www.
nfpa.org
3. InternationalBuildingCodeavailablefrom www.iccsafe.org
4. Agricultural Wiring Handbookavailablefrom www.rerc.org ,
Rural ElectricityResourceCouncil RO.Box 309 Wilmington,
OH45177-0309
5. ASAEEP-364.2Installationand Maintenanceof FarmStandby
Electric Power available from www.asabe.org, American
Society of Agricultural & Biological Engineers2950 Niles
Road,St. Joseph,MI 49085
This list is not all inclusive.Checkwith theAuthority HavingLocal
Jurisdiction (AHJ)for any localcodes or standardswhich may be
applicableto yourjurisdiction.
MODELNO:
SERIALNO:
Figure 1 - Generator/D P/ate
ID PLATE

SPECiFiCATiONS
EngineType........................ SingleCylinder,4-Stroke
EngineSize....................................... 80c0
StarterType...................................... Recoil
FuelCapacity/Type................. 0.73Gal(2.77L)/Unleaded
OilCapacity................................ 0.03Qt(O.TL)
RuntimeFull/HalfLoad........................ 2.5/5.0Hours
SparkPlugType................................. BPR7HS
SparkPlugGap..................................... 030"
DimensionsLx Wx H (in)...................... 22x 12x 18
WeightLb/kg................................. 46.0/20.09
MaximumACOutput.............................. 1400W
SurgeACOutput................................. 1450W
ACVolts....................................... 120VAC
RatedACCurrent.................................. 11.6A
Frequency....................................... 60 Hz
THD............................................. 3.0%
InsulationClass.................................. ClassB
Outlets.............................. (2) 5-15R,(1) 12VDC
DCVolts........................................ 12VDC
RatedDCCurrent.................................... 5 A
NOTE:
Power output and runtime are influenced by many factors,
someofwhichare fuel quality,ambienttemperatureand engine
condition.Outputdecreases approximately 3.5% for each1,000
feet abovesea level and 1% for every 10 degrees above60°F.
EMISSIONSINFORMATION
The EnvironmentalProtection Agency (EPA) and California Air
ResourceBoard(CARB) requirethat your generatorcomply with
exhaust and evaporativeemission standards. This generator is
certified to meet the applicableEPAand CARBemission levels.
Additionalinformationregardingthe requirementsset by EPAand
CARBis as follows:
It is important that you follow the maintenance specifications
providedin this manualto ensurethat your enginecomplies with
the applicableemission standardsfor the durationof the engine's
life. This engineis certifiedto operateon gasoline.The emission
control systemon your generatorconsists ofthefollowing:
• FuelSystem • Air InductionSystem
FuelTank - Intakepipe/manifold
FuelCap _ Air cleaner
Carburetor • IgnitionSystem
FuelLines - Sparkplug
• EvaporativeControl System _ Ignitionmodule
CarbonCanister • ExhaustSystem
Vapor Hoses _ PulseAir InjectionValve
Muffler
The Emissions CompliancePeriod referredto on the Emissions
Compliance Label indicatesthe number of operating hours for
which the enginehas beenshown to meet Federaland California
emission requirements. See the table below to determinethe
compliance period for your generator.The displacementof your
generatoris listed onthe EmissionsComplianceLabel.
UNiTIDENTIFICATION(Figure2)
1. CarryingHandle:Lift the generatorby this handleonly.
2. SparkPlugCover:Allows access to theenginespark plug.
3. Fuel System Primer: Used to prime the fuel system for
starting.
4. FuelCapPressureValve: Allows air to enterthe fuel tank to
equalizepressure.
5. FuelTankCap:Accessto fuel tankfor filling.
6. Control Panel: location of generator controls and output
receptacles.
7. Air IntakeSlats:Allows for cooling airto enterthe housing.
8. Muffler: Lowers engine exhaust noise (includes the spark
arrestor).
9. Choke:Coldenginestartingaid
10. Left Side ServiceCover:Allows access to air filter,fuel filter
and oil fill.
11. VentHoses: Hosesallowventing ofthe carburetor.
12. FuelShutoff:Controlsfuelsupply to thecarburetor.
13. Starter Rope:Pullropefor startingengine.
Figure 2- Unit Identification
1
\
8\
12
11
10
9

CONTROLPANEL
14. LOW OIL LEVELLED (yellow): Lights up when oil level is
belowsafe operatinglevelandthe engineshuts down..
15. OVERLOADLED(red): Lights up if the generatorexperiences
a load greaterthanthe ratedoutput,low voltage,overheatsor
thepoweredcircuitexperiencesa short.Theoutputis stopped
eventhoughthe enginekeeps running.
16. READY LED (green): Indicates output from the generator
unlessthereis a low oil or overloadcondition.
17. 12 VDCPlug:Connectionfor re-charging12VDCautomotive-
style batterieswhile generatoris in operation.
18. FlexPowerTM Switch: This switch slows the engine speed
whenthe loadis reducedto savefueland enginewear.
19. 12 VDC Circuit Breaker:Overloadprotectionfor the 12 VDC
chargingsystem.
20. Ground (Earth) Connection Lug: Grounding point for the
generator;consultstateand local electricalcodes beforeuse
(floating ground).
21. 120 VAC Receptacles:Two (2) receptaclesfor connecting
accessories.
NOTE:
Donot exceedthe ratedoutputofthe generator.
Figure3 - ControlPanel
14---._
15--
16--
17
18--
o",
19 20 21
PRE-USECHECK
Prior to starting the generatorand adding loads, perform the
followingtasks:
1. Makesurethe generatoris on a firm, level(notto exceed15°
in any direction), non-combustiblesurface with at leastfive
(5) feet of clearanceon all sides.
Never operate in an enclosed area or
indoors! NEVER use in the home, in a
vehicle, or in partly enclosed areas such
as garages, even if doors and windows are
open! ONLY use outdoors and far from open
windows, doors, vents, and in an area that
will not accumulate deadly exhaust.
Using a generator indoors CAN KiLL YOU IN MINUTES.
Generator exhaust contains carbon monoxide. This is
a poison you cannot see or smell.
NEVER use insidea home
or garage, EVEN iF doors
and windows are open.
Only use OUTSIDE and
far away from windows,
doors, and vents.
2. Removethefuel capandcheckthe fuellevel. Iffuel isneeded,
seethe section "FUELINGTHEGENERATOR".
3. Removethe left side service cover and check the oil level
by removingthe oil filler cap. The oil level should be to the
bottom ofthe threadson the oil fill pipe. If oil is needed,see
thesection "ADDINGENGINEOIL:'.
4. Replaceand securethe left sideservicecover.
5. Makesurethereare no loadsconnectedto the generator.
6. The National Electric Code (NEC) requires the frame and
external electrically conductive parts of the generator be
properly connected to an approved earth ground. Proper
grounding of the generatorwill prevent electrical shock in
the event of a ground fault condition in the generatoror in
connected electrical devices. Proper grounding also helps
dissipatestatic electricity,which often builds up in unguarded
devices.
7. Local electricalcodes may also require proper grounding of
thegenerator.
_CAUTION!
Starting the generator with accessories
connected to the 120 VAC outlets will
damage the generator and the connected
accessories.

STARTINGTHEGENERATOR
Oncethe fuel and oil levels have beenchecked and it has been
verified there are no loads connected, the generator may be
started. Turnthe FlexPowerSwitchOFF(0).
1. Openthe fuel valve (Figure4), locatedbelowthe starter rope
pull,byturningto thevalve90° counter-clockwisetothe "ON"
(I) position.
2. Pull up on the center of the fuel fill cap and primethe fuel
systemby depressingthe plungerup tofive (5) timeswith the
ventclosed (Figure5 on nextpage).
3. Openthefueltankvent onthetop ofthefuelfill capbyturning
thecenter portionto the "ON" mark(Figure6 on nextpage).
4. Ifthe engineiscold orhasnotbeenrunfor sometime, engage
thechoke by pushingthe choke leverto the right.
5. Gripthe handlefor the pull starterand braceyour other hand
againstthe generator.Pull the rope slowly until resistanceis
felt,then pullthe rope rapidly.
Figure 4 - rue/Va/ve
6. If the enginedoes not start, repeatsteps2-5 untilthe engine
fires and beginsto run.
7. Carefullyadjust the choke to approximatelythe 1/2position
untiltheenginebeginsto run smoothly,thenpushtheleverall
theway to the left (Figure6).
8. Makesurethebottom ofthegeneratorisnot blockedbysand,
leaves,grass, etc. as the cooling vents are located on the
bottom ofthe unit.
Figure 5 - Prime Fuel System
PLUNGER
FUEL
SYSTEM
VENT
Figure 6 - Adjust Choke
ADDINGLOADS
Oncethe generatorhas been running smoothly for 2-3 minutes,
electricalloadscanbe added.
/_ Do not use worn, bare, frayed or otherwise
damaged electrical cord sets with the
generator. Do not handle any kind of electrical
device while standing in water, while barefoot,
or while hands or feet are wet.
1. Therearetwo grounded 120 VACduplexoutletson the front
of the generator.
2. DO NOT overloadthe generator; if the red "overload" LED
lights up and the accessories attached to the generator
stop operating, stop the engine and reduce the load to the
generator.Restartand applyreducedloads.
3. Consultthe following tableto estimate what can be powered
by thegenerator.
Device ................................ RunningWatts
*Air Conditioner(12,000Btu) ......................... 1700
*Air Conditioner(24,000Btu) ......................... 3800
*Air Conditioner(40,000Btu) ......................... 6000
BatteryCharger(20Amp) ............................. 500
BeltSander(3").................................... 1000
ChainSaw........................................ 1200
CircularSaw(6-1/2").......................... 800to 1000
*ClothesDryer(Electric)............................. 5750
*ClothesDryer(Gas)................................. 700
*ClothesWasher................................... 1150
CoffeeMaker...................................... 1750
*Compressor(1 HP)................................ 2000
*Compressor(3/4HP)............................... 1800
*Compressor(1/2HP)............................... 1400
Curlingiron ........................................ 700
*Dehumidifier...................................... 650
DiscSander(9") ................................... 1200
EdgeTrimmer...................................... 500
ElectricBlanket..................................... 400
ElectricNailGun.................................... 1200
ElectricRange(perelement).......................... 1500
ElectricSkillet ..................................... 1250
*Freezer........................................... 700
*FurnaceFan(3/5HP)................................ 875

*GarageDoorOpener........................... 500to750
HairDryer........................................ 1200
HandDrill................................... 250to11O0
HedgeTrimmer..................................... 450
ImpactWrench..................................... 500
Iron............................................. 1200
*JetPump......................................... 800
LawnMower...................................... 1200
LightBulb......................................... 1O0
MicrowaveOven............................. 700to1000
*MilkCooler...................................... 1100
OilBurneronFurnace................................. 300
OilFiredSpaceHeater(140,000Btu)..................... 400
OilFiredSpaceHeater(85,000Btu)...................... 225
OilFiredSpaceHeater(30,000Btu)...................... 150
*PaintSprayer,Airless(1/3HP)......................... 600
PaintSprayer,Airless(handheld)........................ 150
Radio........................................ 50to200
*Refrigerator....................................... 700
SlowCooker....................................... 200
*SubmersiblePump(1-1/2HP)........................ 2800
*SubmersiblePump(1HP)........................... 2000
*SubmersiblePump(1/2HP).......................... 1500
*SumpPump................................ 800to1050
*Allowthree(3)timesthelistedrunningwattsforstartingthesesdevices.
NOTE:
When an electricmotoris started,the "OVERLOAD"LEDmay
lightup for up t0 five (5) seconds(thisis n0rmal), if itstayson,
a fault has0ccured. Removeall loadsand shutdown generator
to resetthe alarm. Restart the generator. If the "OVERLOAD"
LEDremainslit, contacta GeneracDealerfor assistance.
USINGTHEFLEXPOWERTM SWITCH
Whenthe accessoriesconnected to the generator are going to
be used intermittently (such as a hand drill), the FtexPowerTM
switch canbe pushedto the "ON" (I) position. Thiswill lowerthe
generatorenginespeedwhen loadsare not being applied,saving
fuel, reducingenginewearand extendingruntime.
USINGTHE12VDCBATTERYCHARGER
The 12 VDC receptacle may be used to recharge 12 VDC
automotivebatteriesonly.TheDCchargingoutput isnot regulated.
Thecircuit protectordoesnot preventover-charginga battery.
1. Connectthe charging cable to the generatorfirst, then the
battery,ALWAYSconnectingthe red leadto positive (+) and
the blackto negative(-).
Do not permit smoking, open flame, sparks
or any other source of heat around a battery.
Wear protective goggles, rubber apron
and rubber gloves when working around
a battery. Battery electrolyte fluid is an
extremely corrosive sulfuric acid solution
that can cause severe burns. If a spill occurs,
flush area with clear water immediately.
Storage batteries give off explosive hydrogen
gas white recharging. An explosive mixture
wiii remain around the battery for a long
time after it has been charged. The slightest
spark can ignite the hydrogen and cause an
explosion. Such an explosion can shatter the
battery and cause blindness or other serious
injury.
,_ NEVER reverse the polarity when connecting
the battery terminals to the charging jack.
Severe damage may occur to the generator
and battery.
2. Keepthe FlexPowerTM switch in the "OFF"(O)position.
3. Start the generatorand use it as normal. Chargingtime will
vary with batterysize andcondition. Checkthevoltageatthe
batteryterminalsoncethechargingcablehasbeenunplugged
or the generatorhasbeenshut down.
NOTE:
Thisreceptaclecannot recharge5-V01tbatteries and cannot
be used to crankan engine having a discharged battery.
SHUTTINGDOWN
Oncethe generatoris no longerneededit can be shut down.
1. Switchoff anyaccessoriesconnectedto thegenerator.Unplug
anycords to the 120 VACduplexoutletsor the 12VDCplug.
2. Turnthe fuel valve to the "OFF" (0) position (Figure 7). A
switch behind the fuel valve grounds the ignition system,
stoppingthe engineand thefuel supply is shut off.
3. Closethevent on thefuel cap.
4. Allowthe generatorto cool beforemoving or storing.
ACAUTION!
,_t Always allow the generator to cool off before
storing. High temperatures will be present
at the rear of the unit for some time after
shutdown.
Figure 7- Turn Off Fue/

LOWOiLLEVELSHUTDOWN
Thisgeneratorisequippedwith a lowoil levelshut down. If theoil
levelin the enginecrankcasedrops belowa pre-determinedlevel,
the enginewill stop automaticallyand the "LOWOILLEVEL:'LED
will lightup.
Removethe Left Side Service Cover and check the oil level of
the engine.Add or drain oil as necessary;referto seethe section
"ADDINGENGINEOIL'.
FUELINGTHEGENERATOR
Use carewhen fuelingthe generator. Onlyfill the fuel tank when
the generatorhascooledentirely.Usefresh unleadedgasolinewith
a minimum ResearchOctaneNumber (RON)of 87.
NOTE:
Do not use any gasolinecontainingmore than 10% Ethanol.
NEVERfill the fuel tankwith E85or a mixtureof 0il and gasoline
designatedfor tw0-cycleengines.
Do not light a cigarette or smoke when filling the
fuel tank.
Gasoline is highly FLAMMABLE and its
vapors are EXPLOSIVE. Do net permit
smoking, open flames, sparks or heat in the
vicinity while handling gasoline.
Never fill fuel tank indoors, never fill fuel
thank when engine is running or hot. avoid
spilling gasoline on a hot engine, allow
engine to cool entirely before filling fuel tank.
Do not overfill the fuel tank. Always allow
room for fuel expansion, if tank is over=filled,
fuel can overflow onto a hot engine and
cause FIRE or an EXPLOSION. Wipe up fuel
spills immediately!
TOF/LLTHEFUELTAflK
1. Removethe fueltank cap.
2. Add fuel slowly,stopping abouttwo (2) inchesbelowthe top
of thefiller neck.
3. Replacethefueltank cap. Makesurethevalveonthefuelcap
is in the "OFF"position.
4. If the generator is going to be started, refer to the section
"STARTINGTHE GENERATOR"for additional directions on
primingthefuel system.
Figure 8 - rue/Tank Cap
FUEL
TANK
CAP
FILL TANK UNTIL
FUEL IS TWO (2)
INCHES
THE TOP
ADDINGENGINEOIL
All oil should meet minimum American PetroleumInstitute (API)
Service Class SJ, SL or better. Do not use any aftermarket
additives.
Selecttheoil'sviscosity gradeaccordingtothe expectedoperating
temperature.
• Above40° F,useSAE30
• Below40° Fto 10° F,use10W-30
• Below10° F,use synthetic5W=30
°F =20 =10 0 10 20 32 40 60 80 100
oc-3'o -2'o -io o _'o 2'0 3'o 4o
Temperature Range of Expected Use
TOADD ENG/NEO/LTO THECRANKCASE
1. Placethe unitonafirm, levelsurface(notto exceed15° inany
direction).
2. Removethe Left Side ServiceCover.
3. Removethe oil fill cap located on the bottom of the engine
crankcase.
4. Add the recommendedengineoil slowly, stoppingfrequently
to check the level.Thefull levelis the baseof the threads in
thefiller neck.DONOTOVERFILL!

5. Replacetheoilfillcapandtighten.
6. Alwayschecktheoil levelbeforestartingthegenerator
engine.
_,CAUTION!
DO NOT overfill the engine crankcase with
oil. High oil pressure may result, causing
premature engine wear and damage.
Figureg- Oil Fill
GENERATORMAINTENANCE
Propercarewill ensuremaximum performanceof your generator.
Generatormaintenanceconsists of keepingtheunitcleanand dry.
Operateand storethe unitin a cleandry environmentwhere itwill
not be exposedto excessivedust, dirt, moistureor any corrosive
vapors.
Coolingair slots in the generatormust not become cloggedwith
snow,leaves,or anyotherforeignmaterial.
Checkthe cleanlinessof the generatorfrequentlyandcleanwhen
dust, dirt, oil, moistureor otherforeignsubstancesarevisible on
its exteriorsurface.
NOTE:
Never insert any object or toolthroughthe air coolingslots,
even ifthe engine isnot running.
NOTE:
DO NOT use a garden hose to clean the generator. Water
can enter the engine fuel system and cause problems, in
addition, if water enters the generator throughcooling air
slots,somewaterwill be retainedin voidsand crevicesof the
rotor and statorwindinginsulation.Water and dirt buildup on
the generator internalwindingswill eventually decreasethe
insulationresistanceof thesewindings.
GENERATORMAINTENANCESCHEDULE
Followthe recommendedservice schedule;to order replacement
parts call1=888=436=3722.
Each EverylO0 Every6 Each
Use Hours Months Year
FuelLevel X
OilLevel X
CheckAir Filter X
*ChangeEngineOil X
**Clean Air Filter X
CheckSparkPlug
CheckMuffler
InspectandClean
SparkArrestor
ReplaceSparkPlug
ReplaceFuelFilter
X
X
X
* Perform initial oil changeafterthe first five (5) hours of operation
** Glean the air filter more often if operating in dusty or sandy
conditions. Replaceas necessary.
*** Inspectand clean every50 hour of operation.
CLEANINGTHEGENERATOR
1. Usea dampcloth to wipe exteriorsurfaces clean.
2. A soft, bristle brushmay be usedto loosencakedon dirt, oil,
etc.
3. A vacuum cleaner may be used to pick up loose dirt and
debris.
4. Low pressure air (not to exceed 25 psi) may be used to
blow away dirt. Inspect cooling air slots and openings
on the generator.These openings must be kept clean and
unobstructed.
5. Inspectthevent hoses on the left side ofthe generator.Make
surethehoses protrudethroughthe slotsbelowthe door and
thatthe endsare openandfree of debris.
X
X

ENGINEMAINTENANCE
NOTE:
0nly workona generatorthathasc001edc0mpletely.
Inspecttheoil levelandair filter condition eachtime you aregoing
to usethe generator.Tocheckthe airfilter and oil leveltheleft side
service cover must be removed;usea screwdriverto loosenthe
screw securingthe cover and remove.
Theair filter is located behinda coverfor the air box (Figure10).
Pushthetab on the bottom of the air boxupwardsto releasethe
cover.Toservicethe air cleaner:
1. Removethe air cleaner.Tapthe elementto shake looseany
largeparticles.
2. Wash the element in soapy water. Squeezethe filter dry in
cleancloth (DONOTTWIST).
3. Soakthefilter elementin cleanengineoil. Squeezethe excess
oil from thefilter,leavinga lightcoating.
4. Cleanair cleaner housing and cover before re-installingthe
filter element.
Figure10- Air Fi/ter
AIR
FILTER
LEFT SIDE
SERVICE
COVER
ACAUTION!
Change the oil only when the fuel tank is low
or nearly empty. Tipping the generator with a
full fuel tank may cause fuel leakage.
1. Placethe generatorover a drain pan and removethe drain
plug. Tip the generatoron its sideto drain the usedoil from
thecrankcase.
NOTE:
Tomakedraining the 0il easier, a 6" lengthof vinyl(PVC)hose
with an insidediameter of 125" (32ram) any be placedover
thedrain lip.
2. Tip the generatoruprightonce the oil hasfinished draining.
Replacethe engine oil with the proper grade called out in
Section"ADDINGENGINEOIL:',thenreplacethedrain plug.
CHANGINGTHEFUELFILTEB
Locatethe fuel filter,just belowthe engineintake housing(Figure
11). Makesurethe FuelShutoffis in the "OFF"(0) position.
1. Removethe pinch clamps securing the fuel filter. Pull the
hosesfree.
Wipe up any fuel spills immediately! Do not
smoke or replace the fuel filter near sparks
or open flam!!
2. Replacethe usedfilter with a new one. Pushthefuel hoses
ontothe barbedfilter fittings untilthey are seatedcompletely.
3. Replace the clamps, making sure they are seated on the
fittings.
Figure11-Fue/ Fi/ter
FILTER
HOUSING
COVER
LEFT SIDE
SERVICE COVER
SCREW
FUEL
FILTER
OIL FILL PLUG/
OIL DRAIN
CHANGINGTHEENGINEOIL
ACAUTION!
Hot oil may cause burns. Allow engine
to cool entirely before draining oil. Avoid
prolonged or repeated skin exposure with
used oil. Thoroughly wash exposed areas
with soap.
Changethe engine oil after the first five (5) hours of operation.
Changethe engineoil every 100 hours thereafter.To changethe
engineoil:
CARBURETOR
VENT HOSE
CARBURETOR
DRAIN HOSE
1o

CHANGINGTHESPARKPLUG
Replacethe spark plug eachyear,regardlessof how many hours
the generatorhas been run. Use a NGK BPR7HSthat has be
gappedto .030" (.76mm). Toreplacethe spark plug:
1. Removethe spark plug cover on the top right side of the
generator,just belowthe handle(Figure12).
2. Carefullypull the spark plug leadfrom the spark plug. Usea
socketwrenchto removethe spark plug.
3. Installthe new spark plug into the cylinder head.Tightenthe
sparkplug to 15 ft/Ib.
4. Replacethe sparkpluglead,makingsure it isfully seated.
5. Replacethe sparkplugcover.
Figure 12 - Replace Spark Plug
SPARK PLUG
LOCATION
If thegeneratoris goingto be storedfor morethan six (6) months,
thegeneratorshouldbe preparedasfollows:
1. Removeall gasolinefrom the fueltank.
2. Start and run engine until engine stops from lack of fuel or
open the valve on carburetor bowl (Figure 13), and allow
gasoline to drain down tube into a receptacle. Discard
appropriately.Besureto closethevalveoncethegasolinehas
drained.
3. After the enginecools down, drain oil from crankcase.Refill
with recommendedgrade.
4. Remove spark plug and pour about 1/2 ounce (15 ml) of
engineoil intothecylinder.Coversparkplug holewith rag.Pull
the starting ropeseveraltimes to coat the cylinder walt with
engineoil.
5. Installandtightenthe spark plug.
6. Cleanthe generatorouter surfaces. Check that cooling air
slots andopeningson generatorareopen and unobstructed.
7. Storethe unit in a clean,dry place.
Do notstore gasolinefrom oneseasonto another.
If possible,store the unit indoorsand cover it to give protection
from dust anddirt.
Figure 13 - Carburetor Drain Valve
CARBUREATOR DRAIN
VALVE LOCATED BEHIND
AIR INTAKE
TRANSPORTATIONAND STORAGE
Transportor store the generatoronly if it has cooled completely.
Makesurethe fuel valve and the vent on the fuel cap are both in
the OFF("0") position.
It is important to preventgum depositsfrom forming in essential
fuel system parts such as the carburetor,fuel hoseor tank during
long-termstorage.Also, experienceindicatesthat alcohol-blended
fuels (calledgasohol, ethanolor methanol) can attract moisture,
which leadsto separationandformationof acids;theseacids gas
can damagethe fuel systemof an enginewhile in storage.
Toavoid engineproblems,the useof a commercial fuel stabilizer
prior to storage is recommended. Follow the manufacturer's
instructionswhenaddingthefuel stabilizer.
TURN VALVE COUNTER-
CLOCKWISE TO DRAIN FUEL,
CLOCKWISE TO CLOSE
11

CLEANSPARKARRESTORSCREEN
Theengine exhaustmuffler has a spark arrestor screen. Inspect
and clean the screen every 50 hours of operationor once each
year,whichevercomesfirst.
NOTE:
If usingthe generatoron any forest covered,brush covered
unimproved land, it MUST BE equipped with a sparkarrestor.
The sparkarrestormustbe maintainedin coodconditionby the
owner/operator.
Cleanand ispectthe spark arrestorasfollows:
• Removethe screen retainerby removingthe retainerclamp.
• Slide the spark arrestor screen out from the muvvter outlet
tube.
• Inspect screen and replace if torn, perforated or otherwise
damaged. Do NOT use a defective screen. If screen is not
damaged,cleanwith a commercialsolvent.
• Replace the screen and retainer and secure with retainer
clamp.
Figure 14- Spark Arrestor Screen
vUFFLER OUTLET TLBE ,,,
CLA,.P, SP.LRK ARRESTER
COLLAR, SP.LRK ARRE_.TER _,
\
FIXATION, ".:PARK A:_tESTER
12

TROUBLESHOOTINGGUIDE
Enginewon't start.
1. No fuel in tank.
2. Fuelvalveturnedoff.
3. Defectivesparkplug.
4. Pluggedfuelfilter.
5. Defectiveor stuck enginestop switch.
1.Add fuel to tank.
2.Turnfuel valveon.
3. Replacespark plug.
4. Replacefuel filter.
5. Replaceenginestart switch.
Enginestarts, then shuts down.
1. Low fuel level.
2. Fueltank ventclosed.
3. Incorrect engineoil level.
4. Contaminatedfuel.
5. Defectivelow oil levelswitch.
6. Defectiveignitioncoil.
1.Add fuel to tank.
2. Openfuel tank vent.
3. Checkengineoil level,add or drain asneeded.
4. Replacefuel filter.
5. ReplaceLow Oil Levelswitch.
6. Replaceignition coil.
Enginestarts, then runs rough.
1. Chokeis stuck or left on.
2. Dirty or clogged airfilter.
3. Defectiveor dirty spark plug.
4. Dirtyfuel filter.
5. DefectiveFlexPowerswitch.
1.Turn choke off.
2. Cleanor replacethe airfilter element.
3. Replacespark plug.
4. Replacefuel filter.
5. ReplaceFlexPowerswitch.
No AC output. 1. Generatoris overloaded(OVERLOADLEDis on).
2. ACvoltageis low (OVERLOADLEDis on).
3. Inverter moduleis overheated(OVERLOADLEDis
on).
4. Short circuit in load (OVERLOADLEDis on).
5. Defectiveinverterassembly.
1. Shutdown generatorto resetmodule.Reduce
loads andrestart generator.
2.Verify vent is open andchokeis OFF.
3.Verify service door is ON.Let coolfor 15 minutes
andrestartgenerator.
4. Verifycondition of any extensioncords and all
loads beingpowere.
5. Replaceinverter assembly.
' ! !
No DCoutput.** 1. DCcircuit breakeris open. 1. ResetDCcircuit breaker.
2. DefectiveDCcircuit breaker. 2. ReplaceDCcircuit breaker.
3. Defectiverectifier. 3. Replacerectifier.
Fuelleaksfrom drainhoses. 1. Fuelsystem over primed(flooded). 1.Turn vent incap ONand letgeneratorsit 15
minutesbeforerestarting.
2. Carburetordrain inbowl is not closed. 2.Turn valveclockwise to close.
* Engine speed increases and decreases -- This is normal as the generator starts u and as loads vary.
** Verify FlexPowerSwitchis inthe "O"OFFposition.
13

Manual PartNo. 0H8050 RevF (06/26/13) Printedin China

I
. 005842-0
I
GENERAC
anu
Digital
delUsuariodel enerarJorlnversor

Cajadeaccesorios ..........................Dentrode la portada
Introducci6n....................................................................1
Leaestemanual ensutotalidad.....................................1
Reglasde Seguridad......................................................1
indicede normas.....................................................3
Informaci6n general........................................................ 4
Especificaciones .............................................................. 4
Informacion de las emisiones ................................... 4
Identificacion de la unidad ................................................ 4
Panel de control ....................................................... 5
Operacion ....................................................................... 5
Verificacion antes de arrancar .......................................... 5
Como arrancar el generador ............................................. 6
Como agregar cargas ....................................................... 6
Como usar el interruptor FlexPowerTM.............................. 7
Como usar el cargador de bateria de 12 VCD ................... 7
Como apagarlo ................................................................ 7
Paro por bajo nivel de aceite ............................................ 8
Como cargar combustible al generador ............................ 8
Para Ilenar el deposito de combustible ..................... 8
Como agregar aceite al motor .......................................... 8
Para a[_adiraceite de motor al carter del motor ........ 8
IVlantenimiento................................................................ 9
Mantenimiento del generador ........................................... 9
Programa de mantenimiento del generador ....................... 9
Limpieza del generador .................................................... 9
Mantenimiento del motor ................................................ 10
Cambio del aceite de motor ........................................... 10
Cambio del filtro de combustible .................................... 10
Cambio de la bujia ......................................................... 11
Transporte y almacenamiento ........................................ 11
Limpieza del filtro del supresor de chispas ..................... 12
Locaiizaci6ny correccionde falias..............................13
Guiadedeteccionde problemas....................................13
CAJADEACCESORI0S
Compruebetodo el contenido. Si algunaspiezasfaltan o estanda_adas,
Iocalice aun distribuidor autorizadoIlamandoal 1-888-436-3722.
El paqueteincluye:
• 1bote deaceiteSAE30 • Embudoparaaceite
,, Llavepara bujias ,, Destornillador
• Cabledecarga de bateria
ADVERTENCIA!
Proposicion 65 de California
El escape del motor y algunos de sus componentes son conocidos pore el Estado de California como
causa de cancer, defectos congenitos y otros daSos reproductivos.
ADVERTENCIA!
Proposicion 65 de California
Este producto contiene o emite sustancias quimicas que son conocidas por el Estado de California como
causa de cancer, defectos congenitos y otros daSos reproductivos.

INTRODUCCION
Graciasporcomprar estegeneradorportatil deGeneracPowerSystems,
Inc. Este modelo es un generador compacto, de alto rendimiento,
enfriado por aire y accionado por un motor que esta disefiado para
suministrar corriente electrica para impulsar cargas electricasdonde no
estedisponibleel servicio publico electricoo en lugardelservicio publico
electricopor un apagon.
LEAESTEMANUALENSUTOTALIDAD
Si cualquier parte de este manual no se entiende, contacte al
DistribuidorAutorizadomas cercanopara obtenerinformacion sobre los
procedimientosde arranque,operaciony mantenimiento.
El operador es responsable del uso apropiado y seguro del equipo.
Recomendamos encarecidamenteque el operador lea este manual y
comprenda a fondo todas las instrucciones antes de usar el equipo.
Tambien recomendamos encarecidamentedarle instrucciones a otros
usuarios sobrecomo arrancary operarcorrectamentela unidad. Estolos
prepararaen caso dequenecesitenoperarel equipoen una emergencia.
El generador puede operar de forma segura, eficiente y confiable
solamentesi sesitua, operay mantienecorrectamente.Antesde operaro
darmantenimientoal generador:
* Familiaricesecon todos los codigosy regulacioneslocales, estatales
y nacionales,y sigalasal piede laletra.
. Estudiecuidadosamentetodas las advertenciasde seguridaden este
manualy enel producto.
* Familiaricesecon estemanual y con la unidadantesde usarla.
El fabricante no puede anticipar cada circunstancia posible que pueda
implicar un riesgo. Las advertencias en este manual,y en las etiquetas
y calcomaniasen la unidadson, por Io tanto, no exhaustivas.Si usa un
procedimiento,metododetrabajoo tecnicade operacionqueelfabricante
no recomiendeespecificamente,cercioresedeque esseguroparaotros.
Tambienaseguresede que el procedimiento,metodode trabajootecnica
de operacionutilizadano hagaque el generadorseainseguro.
LA INFORMACIONINCLUIDA EN EL PRESENTESE BASA EN LAS
MAQUINAS EN PRODUCCIONA LA HORA DE LA PUBLICACION.
GENERACSERESERVAEL DERECHODEMODtFICARESTEMANUALEN
CUALQUIERMOMENTO.
REGLASDESEGURIDAD
En esta publicaci6n, yen las etiquetasy calcomanias en el generador,
los recuadros de PELIGRO,ADVERTENCIA,PRECAUCIONy NOTAse
utilizan para alertar al personal de instrucciones especialessobre una
operacion en particular que pueda ser peligrosa si se realizaincorrecta
o negligentemente.Observelos cuidadosamente. Sus definiciones son
como sigue:
Indica una situacion o accion peligrosa que, si no se
evita, puede ocasionar la muerte o una lesion grave.
Indica una situacion o accion pe|igrosa que, si no se
evita, podria ocasionar la muerte o una lesion grave.
CUIDADO
Indica una situacion o accibn peligrosa que, si no se
evita, podria oeasionar una lesion menor o moderada.
NOTA:
Las N0tas c0ntienen inf0rmaci6n adici0nal imp0rtante para un
pr0cedimient0yseincluyendentr0del cuerp0del text0de este manual
Estas advertencias de seguridad no pueden eliminar los peligros que
indican.Elsentidocomuny elestrictocumplimiento conlas instrucciones
especialesmientrasrealizala accion o el servicio son esencialesparala
prevencionde accidentes.
Cuatrosimbolos de seguridadde uso frecuenteacompafianlos cuadros
de PELIGRO,ADVERTENOIAy PREOAUOION.Eltipo de informacion que
cadauno indica escomo sigue:
,t_ Este simbolo se_ala inforrnacion de seguridad
importante que, si no se sigue, podria porter en
peligro la seguridad persona| y/o las propiedades
de tereeros.
Este simbolo indiea el riesgo de posibie exp|osion.
t_Este simbolo indiea el riesgo de posibie incendio.
//_Este simbolo indiea el riesgo de posibie desearga
el_ctrica.
PELIGROSGENERALES
* NUNCAopere en un area cerrada o en interiores, en un vehiculo,
incluso si laspuertas y ventanasestanabiertas.
* Porrazonesdeseguridad,elfabricanterecomiendaqueelmantenimiento
de este equipo se realicepor un DistribuidorAutorizado. Examineel
generadorregularmente,y contacte al Distribuidor Autorizado mas
cercanoparalas piezasquenecesitanrepararseo reemplazarse.
* Solo opere el generadoren superficies niveladas y donde no este
expuestoa humedad,suciedad,polvoovaporescorrosivos,enexceso.
* Mantenga las manos, pies, ropa, etc, alejados de las bandas de
impulsi6n, de los ventiladoresy de otras piezasmoviles.Nuncaquite
algunaguarda o blindajede los ventiladoresmientras la unidad esta.
en operacion.
* Ciertas piezas del generador se calientan demasiado durante la
operacion. Mantengase alejado del generador hasta que se haya
enfriadoparaevitarquemadurasgraves.
* NOopereel generadoren la Iluvia.
* No modifique la estructura del generador ni cambie los controles
puestoque podria crear una condicion defuncionamientoinsegura.
* Nuncaarranqueo parela unidadcon las cargas electricasconectadas
alos tomacorrientesY con los dispositivosconectadosENCENDIDOS.
Arranqueel motor y dejelo estabilizarseantesde conectar las cargas
electricas. Desconectetodas las cargas electricasantes deapagarel
generador.
* AItrabajar en este equipo, permanezcaalerta todo el tiempo. Nunca
realice trabajos en el equipo cuando este cansado fisicamente o
mentalmente.

Guae.de estas inste.ucciones - E| fabe.icante sugiee.e que estas e.eglas pae.a |a opee.acion segue.a se copien y
se coloquen tee.ca de| sitio de insta|acion de |a unidad. Se debe hacee, hincapi_ de la segue.idad a todos |os
opee.adoe.es y a los posibies opee.adoe.es de este equipo. Si pe.esta esta unidad a alguien, asegue.ese tarnbi_n de
pe.estae.le este Manual del Pe.opietae.io a la pee.sona y acons_jele que debe see"leido poe"complete antes de opee.ae.
la unidad.
Nuncautilice el generadoro ninguna desus piezascome escalon.Si
separa sobrela unidad puedeejercerprestony romper piezas,y esto
puedegenerarcondicionesdefuncionamiento peligrosascome fugas
de gasesde escape,fugasde combustible,fugas de aceite,etc.
PELIGROSDELESCAPEY DELAUBICACION
iNuncaepereenareascerradasointeriores!iNUNCAopereenun
areacerrada,en unvehiculo,oenel interiorAUNQUElaspuertas
y ventanasestanabiertas!0sele SOLOenexterieresy lejesde
ventanasabiertas,puertas,duties de ventilaci6ny en ;ireasque
noacumularanel mortalgasdelescape.
El use del generador en ambientes cerrados PUEDE
MATARLO EN MINUTES.
El los gases de escape del generador contienen rnonoxido
de carbono. Este es un venenos que no se puede vet ni oler.
NUNCAIo utilice dentrode una
casa o garaje, INCLUSOSl las
puertasy lasventanasestan
abiertas.
Utilicelo SOLAMENTEalaire
librey lejosdeventanas,
puertas,respiraderos.
• Los gases de escape del motor contiene monoxide de carbono,
que no se puede ver ni oler. Este gas venenoso, si es inhalado en
concentraciones altas, puede causar inconsciencia o incluso la
muerte.
• El flujo adecuadoy sin obstrucciones del aire de enfriamientoy de
ventilacionesesencialpara el correctofuncionamiento delgenerador.
No modifique la instalaci6nni permitaalgun bloqueo,incluso parcial,
de los componentes de la ventilaci6n, ya que esto puede afectar
seriamentela operacionseguradel generador.El generadorSEDEBE
ponerenfuncionamiento al airefibre.
• Este sistema de escape debe recibir el mantenimientocorrecto. No
haganadaque puedahacerque el dispositivo de escapeseainseguro
o que no cumplacon los codigos o normaslocales.
• Utilice siempre una alarma a pilas para deteccion del monoxide de
carbonoen interiores,siguiendo las instruccionesdelfabricante.
• Si comienza a sentirse enfermo, mareado o debil despues de que
el generadoreste en funcionamiento,trasladese a un lugar con aire
fresco INMEDtATAMENTE.Visite a un doctor, pues podria sufrir de
intoxicacionper monoxidede carbono.
PELIGROSELi':CTRICOS
• El generadorproduce un voltaje peligrosamentealto cuando esta en
funcionamiento. Evite tocar alambres pelados, los terminales, las
conexiones,etc. mientras la unidad esta en funcionamiento, incluso
en el equipo conectado al generador.Asegurese de que todas las
cubiertas, guardasy barrerasadecuadasestencolocadas en su sitio
antesdehacerfuncionar el generador.
• Nunca manipuleninguntipo de cable o dispositivo electrico mientras
este parade en agua, mientras este descalzo, o mientras tenga
las manes o los pies mojados. PUEDESUFRIR UNA BESCARGA
ELECTRICAPEUGROSA.
• El Codigo ElectricoNacional(NEC)requiereque el marco y las partes
conductorasdel exteriordelgeneradorestenconectadascorrectamente
a una tierra aprobada.Los codigoselectricoslocalespuedentambien
requerirqueelgeneradorse pongaatierraadecuadamente.Consultecon
unelectricistalocalsobrelos requerimientosdepuestaatierraensuarea.
• Utilice un interrupter de circuito per falla a tierra en areas humedas
o altamenteconductivas (come los trabajos en pisos meta.licoso en
herreria).
• No use cables electricosgastados,pelados, quemadoso dafiados de
algunaotraforma con el generador.
• En case de un accidente ocasionado per descarga electrica, corte
inmediatamentela fuente de corrienteelectrica. Siesto no es posible,
intente liberara la victima del conductor vivo. EMITEEL CONTACTO
DIRECTOCONLAViCTIMA. Utiliceun instrumentono conductor,tal
come una cuerda o unatabla, para liberara la victima delconductor
vivo. Si la victima esta inconsciente, apliquelos primeros auxilios y
consigaayudamedicainmediatamente.
RIESGOSDEINCENDIOS
• La gasolina es altamente INFLAMABLE y sus vapores son
EXPLOSIVOS.N0 permitafumar, llamasabiertas, chispas 0 cal0r a
su alreded0r mientras manipula la gas01ina.
• Nuncaafiadacombustiblemientras laonidadesta enfunci0namiente
o caliente.Permitaque el motor se enfrietotalmenteantesde afiadir
combustible.
• NuncaIleneeldep6silodecombustibleeo interiores.Cumplacontodas
las leyesque regulanel almacenamientoy el manejo dela gasolina.
• No s0brellene el dep6site de combustible.Siempre deje espacio
para la dilataci6n del combustible.Si se sobrellena el deposito, el
combustible puede desbordarse sobre el motor caliente y causar
un INCENDIOo una EXPLOSION.Nunca almaceneel generadorcon
combustible en el deposito donde los vapores de gasolina pueden
liegar a una llama abierta, una chispa o un piloto (come en un
horno, calentadorde aguao un secadora de ropa). Puede suceder
un INCENDIOo una EXPLOSION.Permita que la unidad se enfrie
totalmenteantesde almacenafla.
• Limpie los derrames de combustible o aceite inmediatamente.
Aseguresede que no sedejenmaterialescombustiblessobreo cerca
delgenerador.Mantengael areaalrededordel generadorlimpia y libre
de desechos y deje un espacio de cinco (5) pies a cada lade para
permitir la adecuadaventilaci6ndelgenerador.
• No inserteobjetosa travesdelas ranurasde enfriamientodela unidad.

• Noopere el generador si los dispositivos electricos conectados
se recalientan, si se pierde la corriente de salida, si el motor o el
generadorgeneranchispas o si se observanllamas o humo mientras
la unidadesta enfuncionamiento.
• Tengaunextintor cercadel genertadoren todo momento.
#NB/CEBEflORMAS
1. Asociacion nacional de proteccion contra incendios (NFPA)70: El
CODIGOEL%TRICONACIONAL(NEC)disponibleenwww.nfpa.org
2. Asociaci6n nacional de protecci6n contra incendios (NFPA)5000:
CODtGODEEDIFICACIONY SEGURIDADdisponibleenwww.nfpa.org
3. El Codigo internacional de la construccion disponible en www.
iccsafe.org
4. Manualde CableadoAgricola disponible enwww.rerc.org, Oonsejo
de Recursos de Electricidad Rural RO. Box 309 Wilmington, OH
45177-0309
5. ASAE EP-364.2 Instalaci6n y mantenimiento de energia electrica
de respaldo en granjas disponible en www.asabe.org, Sociedad
AmericanadeIngenierosAgricolasy Bio16gicos2950NilesRoad,St.
Joseph, MI49085
EstaNstano esinclusiva. Verifiquecon la Autoridadcon jurisdicci6n local
(AHJ) cualesquieracodigos locales o normas que puedanser aplicables
asu jurisdicci6n.
N.° DEMODELO:
N.° DESERIE:
Figura1 -Placa de identificaci6nde/generador
PLACA DE
IDENTIFICACION

ESPECiFiCACIONES
Tipo de motor ........................ Un cilindro, 4 tiempos
Tamahodel motor ................................. 80 cc
Tipo de arrancador.............................. Retroceso
Capacidad de combustible/Tipo ... 0,73 galones (2.77 L)/Sin plomo
Capacidad de aceite.............. 0,63 Cuartos de galon (0,6 L)
Tiempo de operacion con carga total/media ......... 2,5/5,0 horas
Tipo de bujia ................................... BPR7HS
Separacion entre electrodos .......................... 0,030"
Dimensiones Largox Ancho x Alto (pulg.) .......... 22 x 12 x 18
Peso Lb/kg................................... 46,0/20,09
Salida Maxima de CA.............................. 1400 W
Salida de sobretension de CA........................ 1450 W
Voltios de CA................................... 120 VCA
Corriente nominal de AC............................. 11,6 A
Frecuencia....................................... 60 Hz
Distorsion armonica total ............................. 3,0%
Tipo de aislamiento ............................... ClaseB
Tomacorrientes ....................... (2) 5-15R, (1) 12 VCD
Voltios de CD.................................... 12 VCD
Corriente nominal de CD .............................. 5 A
NOTA:
La energia generada y el tiempo de operation son influenciadospot
muchos faclores,algunos de los cualesSOBla calidaddelcombustible,
la temperatura ambiente y la coodici6ndel motor. La corriente de
salida disminuye aproximadamente en 3,5%per cada1.000 piessobre
el nivel delmar y en 1% porcada 10 gradossobre 60° E
/NFORMAC/6flDE/.AS E/V//$/OflE$
La AgenciadeProteccionAmbientalde losEstadosUnidos(UnitedStates
EnvironmentalProtection Agency, EPA)y la Junta de Recursos Aereos
de California (California Air Resource Board,CARB) requieren que su
generadorcumplacon las normasdeescapesy emisionevaporativa.Este
generadoresta certificado por cumplir con los niveles correspondientes
para emisiones de la EPA y la CARB. A continuacion se muestra
informacionadicionalde los requisitosestablecidosporla EPAy la CARB:
Es importante que ested siga las especificaciones de mantenimiento
proporcionadasen estemanual paraasegurarsede queel motor cumple
con las normas deemision aplicablesa la duracionde la vida delmotor.
Este motor esta certificado para operar con gasolina. El sistema de
control de emisionesen sugeneradorconsiste en Io siguiente:
* Sistemade combustible * Sistemade induccionde aire
-Tanque decombustible - Tuberidmultipledeadmision
_Tap6n delcombustible - Limpiador deaire
_Carburador * Sistemade ignicion
-Lineas de combustible _ Bujia
* Sistemade control evaporativo _ Modulode ignicion
-Dep6sito decarbon * Sistemade escape
_Mangueras de vapor _ Valvulade inyecciondeaire
por impulsos
Silenciador
El Periodode Cumplimientoparalas Emisionesreferido en la Etiquetade
Cumplimientoparalas Emisionesindicael numerodehoras deoperacion
paralas que el motorha demostradocumplir los requisitos deemisiones
Federalesy de California.Veala tablaabajoparadeterminarel periodode
cumplimiento parasu generador.Eldesplazamientode sugeneradoresta.
listado enla Etiquetade Cumplimientoparalas Emisiones.
IDENTIFICACIONDELAUNIDAD(FIGURA2)
1. Agarradera:Solo levanteel generadorpor esta agarradera.
2. Cubiertade la bujia: Permitetener acceso a la bujia delmotor.
3. Cebadordelsistemade combustible: Utilizadoparacebarel sistema
de combustibleparael arranque.
4. Va_lvulade presion del tapon del combustible: Permiteque el aire
entreen eldeposito de combustibleparaigualar la presion.
5. Tapon del deposito de combustible: Acceso al deposito de
combustiblepara Ilenarlo.
6. Panelde control: ubicacion de los controles del generadory de los
recepta_culosde sand&
7. Rejillade la toma de aire: Permitela entradade airede enfriamiento
al alojamiento.
8. Silenciador: Reduce el ruido del escape del motor (incluye el
supresorde chispas).
9. Ahogador:Ayudaparaarranquedelmotor enfrio.
10. Cubiertade serviciodel lado izquierdo:Permiteel acceso al filtro de
aire,al filtro de combustibley al Ilenadode aceite.
11. Manguerasdeventilacion:Lasmangueraspermitenlaventilaciondel
carburador.
12. Cierrede combustible: Controlael suministro de combustible hacia
el carburador.
13. Cuerdadelarrancador:Cuerdaparaarrancarel motor.
Figura2 -Identificacion dela unidad
1 2
\
8\
12
11
10
9

PANELBECONTROL_F/GURA3)_
14. LUZ INDtCADORADE NIVEL DE ACEtTEBAJO (AMARILLA): Se
enciendecuando el nivel de aceiteesta.debajo del nivel seguro de
operaci6n,y el motor seapaga.
15. LUZ INDICADORADE SOBRECARGA(ROJA): Se enciende si el
generadorpresenta una carga mayor que la salida nominal, baja
tensi6n, serecaNentao el circuito energizadotiene un cortocircuito.
Secorta la corrientede salida aunqueelmotor sigue enoperaci6n.
16. LUZ INDICADORALISTO (VERDE):Indica que el generador tiene
corriente de salida, a menos quehaya una condici6n de bajo nivel
de aceiteo de sobrecarga.
17. Clavija de 12 VCD: Conexi6n para recargar las baterias tipo
automotrizde 12VCDmientrasel generadoresta.en operaci6n.
18. Interruptor FlexPowerT': Este interruptor reduce la velocidad del
motor cuando la carga se reduce para ahorrar combustible y
desgastedel motor.
19. Disyuntorde 12 VCD: Protecci6ncontra sobrecargapara elsistema
de cargade 12 VCD
20. Orejadeconexi6n atierra (Tierra):Puntodeconexi6natierra parael
generador;consulte losc6digos electricoslocalesy estatalesantes
de usarla(tierra m6vil).
21. Tomacorrientesde 120VCA:Dos (2)tomacorrientesparaaccesorios
de conexion.
NOTA:
No exceda la salidan0minal del generad0r.
Figura 3 - Panelde control
14_
15--
16_
17--
18_
Fo o-",
19 20 21
VERIFICACIONANTESDEARRANCAR
Antesdearrancarel generadory deahadircargas,realiceIosiguiente:
1. Aseguresede que el generadoreste en una superficiefirme
(noexcedalos15° enningunadireccion),niveladae ignifugacon
un espaciode por Iomenoscinco (5) piesa cadalado.
_l_ iNunca opere en _reas cerradas o interiores!
iNUNCA opere en un area terraria, en un vehiculo,
o en el interior AUNQUE ias puertas y ventanas
estan abiertas! Uselo SOLO en exteriores y
lejos de ventanas abiertas, puertas, ductos de
ventilation yen _reas que no acurnular_n el
mortal gas del escape.
El uso del generador en ambientes cerrados PUEDE
MATARLO EN MINUTOS,
El los gases de escape del generador contienen monoxido
de carbono. Este es un venenos que no se puede vet ni oler.
NUNCAIo utilice dentro de una
casa o garaje, INCLUSOSl las
puertasy lasventanasestan
abiertas.
Utilicelo SOLAMENTEal aire
librey lejos de ventanas,
puertas,respiraderos.
2. Quiteel tapon del combustible y compruebeel nivelde gasolina.Si
se necesita combustible, vea la seccion "CARGARCOMBUSTIBLE
AL GENERADOR".
3. Quitela cubierta de servicio del lado izquierdoy compruebeel nivel
de aceite quitandoel tapon de Ilenadode aceite. El nivel de aceite
debeestar en la parte inferior de la rosca en el tubo de Ilenado de
aceite. Si se necesita aceite, vea la seccion "COMO RELLENAR
ACEITEAL MOTOR".
4. Vuelva a colocar la cubierta de servicio del lado izquierdo y
asegurela.
5. Aseguresede que no haya cargasconectadasal generador.
6. El Codigo Electrico Nacional (NEC) requiere que el marco y las
partes conductoras del exterior del generador esten conectadas
correctamentea unatierra aprobada.Ponera tierra adecuadamente
el generadorevitara descargaselectricas en caso de fallas a tierra
del generador o de los dispositivos electricos conectados. Una
tierra adecuadatambienayuda adisiparla electricidadesta.tica,que
a menudoseacumula enlos dispositivos sin proteccion.
7. Los codigos electricos locales pueden tambien requerir que el
generadorseponga atierra adecuadamente.
CUIDADO
_l_ rrancar el generador con los accesorios
conectados a los tornacorrientes de 120 VCA
dafiar_ el generador y los accesorios conectados.

C6MOARRANCARELGENERADOR
Una vezque se haya comprobado los niveles de combustible y aceite,
y quese hayaverificado que no hay dispositivos electricos conectados,
el generadorpuedeser arrancado.Apagueel interruptorFlexPower(O).
1. Abralavalvuladelcombustible(Figura4), situadadebajodela cuerda
delarrancador,girandola90° ala izquierda,a la posicion"ON"(t).
2. Levanteel centro del tapon de Ilenado del combustible y cebe el
sistema de combustible presionando el embolo hasta cinco (5)
vecescon el respiraderocerrado (Figura5, enla pagina siguiente).
3. Abrael respiraderodeldeposito de combustibleen la parte superior
del tap6n de combustible girando la parte central a la marca "ON"
(Figura6, en la paginasiguiente).
4. Siel motor esta frio o no seha puesto enfuncionamiento pot algun
tiempo, enganche el ahogador moviendo la palanca del ahogador
hacia la derecha.
5. Sujetela manijade la cuerda del arrancadory apoyesu otra mano
contra el generador.Tire de la cuerda lentamentehasta que sienta
resistencia,despuestire dela cuerdara.pidamente.
Figura4 - Valvu/ade/combustible
6. Si el motor no arranca, repita los pasos 2-5 hasta que el motor
arranquey comience a funcionar.
7. Ajustecuidadosamenteelahogadoraproximadamentea la posicion
media hasta que el motor comience a funcionar suavemente,
despuesmuevala palancacompletamenteala izquierda(Figura6).
8. Aseguresede quela parte inferior delgeneradorno este bloqueada
con arena, hojas, hierba, etc. puesto que los respiraderos de
enfriamientoseIocalizanen la parte inferiorde la unidad.
Figura5 - Cebadode/sistema de combustible
RESPIRADERO
DE SISTEMA
DE COMBUSTIBLE
€:MBOLO
Figura6 - Ajustede/ahogador
COMOAGREGARCARGAS
Una vez que el generadorfuncione suavementepor 2-3 minutos, los
dispositivoselectricosse puedenenchufar.
i/_No use cables el6ctricos gastados, pelados,
quernados o da_ados de aiguna otra forrna con el
generador. No rnanipule ningun tipo de dispositivo
el_ctrico rnientras est6 parado en agua, rnientras
est6 descalzo, o rnientras tenga las rnanos o los
pies rnojados.
1. Hay dos tomacorrientes dobles de 120 VCA dobles a tierra en el
frentedelgenerador.
2. NO sobrecargue el generador; si las luces indicadoras rojas
de "sobrecarga" se encienden y los dispositivos conectados al
generadordejan defuncionar, pare el motor y reduzcala carga del
generador.Vuelvaacomenzary apliquemenoscargas.
3. Consultela tabla siguienteparaestimar que se puedealimentarcon
el generador.
Disp0sitivo.............................. Vati0s de 0peraci6n
*Aire acondicionado (12,000 BTU) ..................... 1700
*Aire acondicionado (24,000 BTU) ..................... 3800
*Aire acondicionado (40,000 BTU) ..................... 6000
Cargadorde bateria (20 Amperios)....................... 500
Lijadora de banda (3") ............................... 1000
Moto sierra ....................................... 1200
Cierra circular (6-1/2") .......................... 800 a 1000
*Secadora de ropa (Electrica) ......................... 5750
*Secadora de ropa (Gas) .............................. 700
*Lavadora de ropa .................................. 1150
Cafetera.......................................... 1750
*Compresor (1/2 HP) ............................... 2000
*Compresor (3/4 HP) ............................... 1800
*Compresor (1/2 HP) ............................... 1400
Plancha para cabe]lo ................................. 700
*Deshumidificador ................................... 650
Lijadora de banda (9") ............................... 1200
Desbrozadora....................................... 500
Manta Electrica ..................................... 400
Clavadoraelectrica.................................. 1200
Parrilla electrica (por elemento) ........................ 1500
Sarten electrica .................................... 1250
*Congelador ....................................... 700
*Ventilador de homo (3/5 HP) .......................... 875

*Dispositivodeaperturadepuertadegaraje.......... 500a750
Secadoraparacabello............................... 1200
Taladrodemano.............................. 250a1100
Cortadoradesetos.................................. 450
Llavedeimpacto.................................... 500
Plancha.......................................... 1200
*Bombadechorroapresion........................... 800
Podadora......................................... 1200
Bombillaelectrica.................................... 1O0
Homodemicroondas........................... 700a1000
*Enfriadordeleche................................. 1100
Quemadordeaceiteenhomo........................... 300
Calentadordeespaciosdeaceite(140.000BTU)............ 400
Calentadordeespaciosdeaceite(85.000BTU)............. 225
Calentadordeespaciosdeaceite(30.000BTU)............. 150
Pistolapulverizadora,sinaire(1/3HP).................... 600
Pistolapulverizadora,sinaire(porta.til).................... 150
Radio......................................... 50a200
*Refrigerador....................................... 700
Ollaelectricadecoccionlenta.......................... 200
*Bombasumergible(1-1/2HP)........................ 2800
*Bombasumergible(1HP)........................... 2000
*Bombasumergible(1/2HP).......................... 1500
*Bombadesumidero........................... 800a1050
*Consideretres(3)veceslosvatiosdeoperacionmencionadospara
arrancarestosdispositivos.
NOTA:
Cuand0searranca unmotorelectric0, la luzindicad0ra "SOBRECARGA"
puedeencenderse p0 r basra cinc0 (5) segund0s(est0 es normal).
Si permanece encendida, ha 0currid0 una falla. Desenchufe t0d0s
10sdisp0sitiv0s y apague el generador para restablecerla alarma.
Vuelvaa arrancar el generador. Si la luz indieadora"SOBRECARGA"
permaneceencendida,c0nt_ictesec0n un DistribuidorAut0rizadode
Genera¢para obtenerayuda.
COMOUSARELINTERRUPTORFLEXPOWER'M
Cuando los accesorios conectados al generadorvan a ser utilizados
intermitentemente(porejemplo,untaladrodemano),elinterruptorFlexPowerTM
sepuedepresionaralaposicion"ON"(1).Estoreduciralavelocidaddelmotor
delgeneradorcuandono hay cargas,ahorrandocombustible,reduciendoel
desgastedelmotor,elruido,y prolongandoeltiempodeoperacion.
COIVIOUSARELCARGADORDEBATERIADE12VCD
El recepta.culode 12VCD puedeser usado para recargarlas bateriasde
automoviles solamente. La salida de carga de CDno esta.regulada.El
protectordel circuito no evita sobrecargarunabateria.
1. Conecteel cabledecargaal generadorprimero,despuesa la bateria,
conectando SIEiViPREel cable rojo al positivo (+) y el negro al
negativo (-).
z_No perrnita furnar, llamas abiertas, chispas o ninguna
otra fuente de calor alrededor de una bateria. Use
galas protectoras, delantal de hole y guantes de hule
ai trabajar ¢erca de una bateria. E! liquido electr61ito
de una bateria es una soluci6n de _cido sulfuri¢o
extremmadarnente corrosiva que puede ocasionar
quernaduras graves. Si ocurre un derrarne, lave el
_rea con agua limmpiainmmediatarnente.
Las baterias almmacenadas despiden gas de
hidr6geno explosivo rnientras se recargan. Una
rnezcla de gas explosivo perrnanecera altededor
de la bateria durante rnucho tiernpo despots de
clue se haya cargado. La chispa rnas leve puede
encender el hidr6geno y ¢ausar una explosi6n.
Tai explosi6n puede romper la bateria y causar
¢eguera u otta lesi6n grave.
,_ NUNCA invierta la polaridad al conectar los
terrninales de la bateria al enchufe hemmbra de
carga. E! generador y la bateria pueden da_arse
gravernente.
2. Mantengael interruptor FlexPowerTM en la posicion "OFF"(0).
3. Arranqueel generadory utilicelo normalmente. Eltiempo de carga
dependeradel tamafio y de la condicion de la bateria. 0ompruebe
el voltaje de los terminales de la bateria una vez que se haya
desenchufadoel cablede carga, o se haya apagadoel generador.
NOTA:
Estetomac0rriente no puederecargar baterias de 6-V01tiosy no
se puedeutilizarpara arrancar un motor quetiene una bateria
descargada.
C0iViOAPAGARLO
Cuandoel generadorya no se necesita,puede apagarse.
1. Apague cualquier accesorio electrico conectado al generador.
Desenchufetodos los cables de los tomacorrientes dobles de 120
VCAo deltomacorrientede 12 VCD.
2. Gire la va.lvuladel combustible a la posicion "OFF"(0) (Figura7).
Un interruptordetras de la valvuladel combustible pone atierra el
sistema de ignicion, parandoel motor y cerrando el suministro de
combustible.
3. Cierreel respiraderoenel tapon del combustible.
4. Permitaque el generadorse enfrieantesde moverloo almacenarlo.
A'kCUIDADO
,_Siernpre perrnita clue el generador se enfrie antes
de alrnacenarlo. Habra ternperaturas altas en la
parte posterior de la unidad pot aigun tiernpo
despots de apagarlo.
Figura7 - Cierre de/combustible
COMO APAGAR EL COMBUSTIBLE--
/

PAROPORBAJOHIVE DEACEiTE
Este generador incluye un sistema de paro por bajo nivel de aceite.
Si el nivel de aceite en el carter del motor cae debajo de un nivel
predeterminado,elmotor se detendraautomaticamentey laluzindicadora
"BAJONIVELDEACEITE"se encender&
Quitela Cubiertade Servicio del LadoIzquierdoy compruebe elnivel de
aceitedel motor.Agregueo dreneaceite segunsea necesario.Consultela
seccion "COMOAGREGARACEITEDELMOTOR".
C6MOCABGARCOMBUSTIBLEALGENERADOR
Tengacuidado al cargar combustible al generador. Solamente Ileneel
deposito de gasolina cuando el generadorse hayaenfriado totalmente.
Utilicegasolinasin plomo nuevacon unoctanaje minimo de87.
NOTA:
No utilice ninguna gas0iina que c0ntenga mas del 10% de etan01.
NUNCAIlene el dep0sit0 de gas01inacon E85 0 con una mezcla de
aceite y gas01inapara m0t0res de dostiemp0s.
No encienda un cigarrilio ni fume ai llenar el deposito
de gasolina.
La gasolina es aitamente INFLAMABLE y sus
vapores son EXPLOSIVOS. No permita fumar,
llamas abiertas, chispas o caior a su airededor
mientras trabaja con la gasolina.
Nunca llene el deposito de combustible en
interiores, nunca llene el deposito de combustible
cuando est_ funcionando o est_ caliente. Evite
derramar gasolina en un motor caliente. Permita
clue el motor se enfrie totaimente antes de llenar
el deposito de combustible.
No sobrellene el dep6sito de combustible.
Siempre deje espacio para la dilataci6n del
combustible. Si se sobrellena el deposito, el
combustible puede desbordarse sobre el motor
caliente y causar un INCENDIO o una EXPLOSION.
iLimpie inmediatamente los derrames de
combustible!
PARA LLENARELDEPOS/TODE COMBUStiBLE
1. Quiteel tapon deldeposito de combustible.
2. Ahada el combustible lentamente,dejando un espacio de dos (2)
pulgadasdebajo delcuello dela boca de Ilenado.
3. Vuelvaacolocar eltapondeldeposito decombustible. Aseguresede
quela valvulaen eltapon delcombustibleeste en la posicion "OFF".
4. Si el generadorva a ser arrancado, consulte la seccion "OOMO
ARRANCARELGENERADOR"paraobtenerinstruccionesadicionales
sobre como cebarel sistemade combustible.
Figura 8 - Tapondel depositodecombustible
TAPON DEL
TANQUE DE
COMBUSTIBLE
LLENE EL TANQUE HASTA
QUE EL COMBUSTIBLE ESTE
A DOS (2) PULGADAS DEBAJO
DEL CUELLO DE LABOCA_
\
DE LLENADO.
COIVIOAGBEGABACEITEAL MOTOR
Todoelaceitedebecumplir por Iomenos con laClasede ServicioSJ, SL
o mejor del Instituto del PetroleoNorteamericano.No utilice aditivos del
mercado derefacciones.
Seleccione el grado de viscosidad del aceite
temperaturade funcionamientoesperada.
* Sobre40° F,utilice SAE30
= Debajode 40° F a10° F,utilice 10W-30
* Debajode 10° F,utilice5W-30 sintetico
de acuerdo con la
mEm
°F -20 -10 0 10 20 32 40 60 80
°c-3'0 -2'0 -;0 ; ;0 2'0
Rango de temperaturas de uso esperado
1OO
3'0 40
PARAANAD/RACE/TEDEMOTORAL CARTERDELMOTOR
1. Ooloqueel generadoren unasuperficie nivelada(no excedalos 15°
en ningunadireccion).
2. Quitela OubiertadeServicio del Lado Izquierdo.
3. Quite el tapon de Ilenadodel aceite situado en la parte inferior del
ca.rterdelmotor.
4. Ahada el aceite de motor recomendado lentamente, parando con
frecuencia para comprobar el nivel. El nivel m_imo de Ilenado
es en la base de la rosca en el cuello de la boca de Ilenado.iNO
SOBRELLENE!
5. Vuelvaa colocar el tapon de Ilenadode aceitey aprietelo.

6. Siemprecompruebeelniveldeaceiteantesdearrancarelmotordel
generador.
CUIDADO
,_NO sobrellene el carter dell motor con aceite.
Puede generarse allta presll6n dell aceite, causando
desgaste dell motor y da_os prematuros.
Figura 9 - Boca de Ilenado de/aceite
NOTA:
NOutiliceunamaogueradejardinparalimpiarelgenerador.Elaguapuede
entrareo el sistemadecombustibledelmotory ocasiooarproblemas.
Ademas,sielaguaeotraenel geoeradoratravesdelasranurasdelairo
deenfriamiento,unpocodeaguapermaneceraenhuecosy hendiduras
delaislamientodeldevanadodelrotory delestator.Laacumulacionde
aguay suciedadeo losdevanadosinternesdelgeneradordisminuira
eventualmentela resistenciadelaislamientodeestosdevanados.
PBOGBAIVIADEMANTENIIVIENTODEL
GENEBADOB
Sigaelprogramadeserviciorecomendado;parapedirpiezasderepuesto,
Ilameal 1-888-436-3722.
Cada Cada100 Cada6 Cada
use betas meses a_o
Niveldecombustible X
Niveldeaceite X
Compruebeelfiltro de aire X
*Cambieel aceitedel motor X
**Limpie el filtro deaire X
Oompruebelabujia X
Oompruebeelsilenciador X
Inspeccioney limpie el X
supresorde chispas
Remplacela bujia X
Remplaceel filtro de X
combustible
* Realiceel cambio deaceite inicial despuesde las primerascinco (5)
horasde operacion
** Limpie el filtro de aire mas a menudo siesta funcionando en
condiciones de polvo o arena.Reemplacecuandosea necesario.
*** Inspeccioney limpie cada50 horas deoperacion.
MANTENIMIENTODELGENEBADOB
El cuidadoapropiadoaseguraraun maximorendimientode sugenerador.
El mantenimientodel generadorconsiste en mantenerla unidad limpia y
seca. Operey almacenela unidad en un ambienteseco y limpio deride
no este expuestaa mucho polvo, suciedad, humedad o a ningun vapor
corrosive.
Las ranuras del aire de enfriamiento del generador no deben quedar
bloqueadascon nieve,hojas o algunotro materialextraho.
Oompruebela limpieza del generadorcon frecuencia y limpielo cuando
haya polvo, suciedad, aceite, humedad u otras sustancias extrahas
visibles en lasuperficie exterior.
NOTA:
Nuncainserteningunobjetoe herramieotaa travesdelasranurasde
enfriamientoperaire,inclusosiel motornoestaenfunciooamiento.
LIIVIPIEZADELGENEBADOB
1. Utiliceun paho humedoparalimpiar las superficiesexteriores.
2. Un cepillo decerda suavessepuedeutilizar paraaflojar la suciedad
apelmazada,el aceite,etc.
3. Unaaspiradorase puedeutilizar para recoger suciedady desechos
sueltos.
4. Puedeusarse airede baja presion (sin exceder25 PSI)para soplar
la suciedad. Reviselas ranurasy aberturas del aire de enfriamiento
del generador. Estas aberturas se deben mantener limpias y sin
obstrucciones.
5. Examine las mangueras de ventilacion en el lade izquierdo del
generador.Asegurese de que las manguerassalgan atraves de las
ranuras debajo de la puerta y que los extremes esten abiertos y
libres de desechos.

IV]ANTENIIVliENTODELMOTOR
NOTA:
Trabajes01amenteen un generad0r quese ha enfriad0 t0talmente.
Reviseel nivel del aceitey la condicbn del filtro de aire cada vez que
vaya a utilizar el generador.Para revisar el filtro de aire y el nivel de
aceite, la cubierta de servicio del lado izquierdo debe quitarse, usando
un destornilladorparaafiojary quitar lostornillos quesujetanla cubierta.
El filtro de aire esta situado detras de una cubierta para la caja de aire
(Figura10). Empujelaleng_etaenla parte inferiorde lacaja deaire hacia
arribaparaliberar la cubierta. Paradar servicio al filtro de aire:
1. Quiteelfiltro deaire.Golpeeligeramenteel elementoparasacudirlas
particulas grandes.
2. Laveelelementoenaguajabonosa.Sequeelfiltro exprimiendolocon
un paholimpio (NOLOTUERZA).
3. Empapeel elementofiltrante en aceitede motor limpio. Exprimael
aceiteexcedentedelfiltro, dejandouna capa tiger&
4. Limpieel alojamientoy la cubiertadelfiltro de aireantesdevolvera
colocar el elementofiltrante.
Figura10 - Filtrode aim
FILTRO
DEAIRE
CUBIERTA DE
SERVICIO DEL
LADO IZQUIERDO
CUBIERTA DEL
ALOJAMIENTO
DEL FILTRO
TORNILLO DE CUBIERTA
DE SERVICIO DEL
LADO IZQUIERDO
CAIVIBIODELACEITEDEMOTOR
CUIDADO
,_EI aceite caliente puede ocasionar quernaduras.
Perrnita que el motor se enfrie totalrnente antes de
drenar el aceite. Evite la exposici6n prolongada o
repetida de la piel con el aceite usado. Lave a rondo
los _reas expuestas con jabon.
Cambieel aceitedel motor despues de las primeras cinco (5) horas de
operacbn. Despues,cambie el aceite del motor cada 100 horas. Para
cambiarel aceite delmotor:
CUIDADO
,_Carnbie el aceite solarnente cuando el nivel de
combustible en el deposito est6 bajo o casi
vacio. Inclinar el generador con un deposito de
combustible lleno puede ocasionar una fuga de
combustible.
1. Coloqueel generador sobre una charola de recolecciony quite el
taponde drenado.Incline el generadorsobre uncostado paradrenar
el aceiteusadodel carter del motor.
NOTA:
Parafacilitar el drenad0 del aoeite,se poedec010carunamanguera de
vinil0(PVC)de6" de largo y conundi;imetr0interiorde 1,25" (32ram)
s0bre el labi0 del drenaje.
,
Enderece el generadoruna vez que el aceite se haya drenado.
Remplaceel aceite de motor con el grado apropiadoindicadoen la
Seccbn "COMOAGREGARACEITEDE MOTOR",despuesvuelva a
colocar el tapon dedrenado.
CAMBIODELFILTRODECOMBUSTIBLE
Localiceel filtro de combustible,justo debajo delalojamientode la toma
delmotor (Figura11). Aseguresede queel CierredeCombustibleeste en
la posicbn "OFF"(0).
1. Quitelasabrazaderasdepresionqueaseguranelfiltro decombustible.
Halelas mangueraspara quitarlas.
,_ iLirnpie inrnediatarnente los derrarnes de
combustible! iNo fume ni carnbie el filtro de
combustible cerca de chispas o llamas abiertas!
2. Remplaceel filtro usado por uno nuevo. Empujelas manguerasde
combustible dentrode las conexionesdentadasdelfiltro hasta que
seasiententotalmente.
3. Remplace las abrazaderas,asegurandosede que asientan en las
conexiones.
Figura 11 - Filtro decombustible
TAPON DE DRENAJE/
LLENADO DE ACEITE
FILTRO DE
COMBUSTIBLE
MANGUERA DE
VENTILACION
DEL CARBURADOR
MANGUERA DE
DRENAJE DELCARBURADOR
1o

OAMBIODELABWIA
Remplacela bujia cadaafio, sin importarcuantas horashafuncionado el
generador.Useunabujia NGKBPR7HSquehayasido espaciadaa0,030"
(0,76mm). Parasubstituirla bujia:
1. Quitela cubiertadela bujiaenel ladosuperiorderechodelgenerador,
justo debajodela agarradera(Figura12).
2. Halecuidadosamenteelcable de la bujia. Utilice una Navede dado
paraquitarla bujia.
3. Instalela nuevabujia enel cabezaldel cilindro.Apriete la bujia a 15
ft!Ib.
4. Vuelvaa colocar el cable de la bujia, asegura.ndosede que quede
asentadocompletamente.
5. Vuelvaa colocar la cubiertade la bujia.
Fi#ura 12 - Remp/azode la bujia
UBICACION DE
LA BUJiA
Si el generador va a ser almacenado por ma.s de seis (6) meses, el
generadordebeser preparadocomo sigue:
1. Quitetoda la gasolinadel deposito decombustible.
2. Arranquey haga funcionar el motor hasta que se pare por falta de
combustibleo abra lavalvulaen lacuba delcarburador (Figura13),
y permita que la gasolina escurrapor el tubo hastaun receptaculo.
Desecheapropiadamente.Aseguresede cerrarla va,lvulauna vezque
la gasolinasehaya drenado.
3. Despues de que el motor se enfrie; drene el aceite del ca,rter.
Reemplacecon el grado recomendado.
4. Quitelas bujiay vierta cercade1/2 onza(15 ml) de aceite demotor
en los cilindro. Oubrael agujerode labujia con un trapo. Tire de la
cuerda del arrancador varias veces para recubrir las paredes del
cilindrocon aceitede motor.
5. Instaley aprietela bujia.
6. Limpie las superficies externasdel generador.Compruebe que las
ranuras y aberturas del aire de enfriamientoen el generadoresten
abiertasy sin obstaculos.
7. Almacenela unidad enun lugar limpio y seco.
No almacenelagasolinade una estaci6na otra.
Si es posible, almacenela unidad en interioresy cubrala paraprotegerla
contra el polvo y la suciedad.
Fi#ura 13 - Valvula dedrenadode/carburador
V/_,LVULA DE DRENAJE DEL
CARBURADOR UBICADA DETRAS
DE LA TOMA DE AIRE.
TRANSPORTACIONY ALMACENAMIENTO
Transporte o almacene el generador solamente si se ha enfriado
totalmente. Aseguresede quela valvuladel combustibley el respiradero
en eltapon delcombustible estenen la posicion OFF("0").
Es importante evitar que se formen depositos de goma en las piezas
esenciales del sistema de combustible tales como el carburador, la
manguera de combustible o el deposito duranteel almacenamientopor
periodos largos.Tambien,la experienciademuestraquelos combustibles
con mezclas de alcohol (llamados Gasohol, etanol o metanol) pueden
atraerhumedad,Ioquegeneraseparaciony laformaci6n de acidos;estos
a.cidosen el combustible puedendafiar el sistemade combustible de un
motor duranteel almacenamiento.
Paraevitarproblemasdelmotor,se recomiendael usode un estabilizador
comercialdecombustibleantesdelalmacenamiento.Sigalasinstrucciones
delfabricante alafiadir el estabilizadorde combustible.
GIRE LA V#,LVULAA LA IZQUIERDA
PARA DRENAR EL COMBUSTIBLE,
Y A LA DERECHA PARA CERRAR.
11

LIMPiEELFiLTBODELSUPBESOBDECHiSPAS
El silenciador del escapedel motor tiene un fiitro supresor de chispas.
Inspeccioney limpieel filtro cada 50 horasde operacbno unavez alabe,
Io quesuceda primero.
NOTA:
Si se usael generaderen cualquier;irea cubiertade bosqueso
matorrales,el generadorDEBEestar equipadecon unsupresorde
¢hispas.Elpropietario/operadordebemantenerelsupresorde¢hispas
enunabuena¢ondi¢ion.
Limpiee inspeccioneel supresor dechispas come sigue:
• Retireel retenedordelfiitro retirandoia abrazaderadel retenedor.
• Deslice el filtro del supresor de chispas fuera del tube de salida del
silenciador.
• Inspeccioneelfiltro y reemplacelosiesta rasgado,perforadoo deotra
maneradahado.NOuse unfiltro defectuoso. Si el filtro esta.dahado,
limpielo con un solventecomercial.
• Reemplaceel filtro y el retenedor y asegure con abrazaderadel
retenedor.
Fi#ura 14 - Filtrode/supresorde chispas
TUBe DE SALIDA DEL SILENClADOR -,
INTERIOR DEL FILTRO, SUPRESOR DE CHISPAS ,
EXTERIOR DEL FILTRO, SUPRESOR DE CHISPAS
ABRAZADERA, SUPRESOR DE CHISPAS
ANILLO, SUPRESOR DE CHISPAS
FIJACION, SUPRESOR DE CHISPAS
12

GUiADEDETECCIONDEPROBLEMAS
El motor no arranca.
1. El depositono tienecombustible.
2. Valvuladelcombustible cerrada.
3. Bujiadefectuosa.
4. Filtrode combustibletapado.
5. Interruptorde paro demotor defectuosoo pegado.
1.Agreguecombustible al deposito.
2. Girela valvuladel combustibleala posicion "ON".
3. Remplacela bujia.
4. Remplaceel filtro decombustible.
5. Remplaceel interruptorde arranquedelmotor.
El motor arrancay luegose para.
1. Nivelde combustiblebajo.
2. Respiraderodel deposito degasolinacerrado.
3. Nivelde aceitedel motor incorrecto.
4. Combustiblecontaminado.
5. Interruptorde bajo nivelde aceitedefectuoso.
6. Bobinade ignicion defectuosa.
1.Agreguecombustible al deposito.
2.Abra el respiraderodel depositode gasolina.
3. Compruebeelnivelde aceitedel motor,agregueo
drenesegunse requiera.
4. Remplaceel filtro decombustible.
5. Remplaceel interruptorde nivelbajo de aceite.
6. Remplacela bobina de ignicion.
El motor arrancay luegofunciona
deforma irregular.
1. El ahogadoresta.pegadoo se dejo enla posicion
"ON".
2. Filtrode aire sucio otapado.
3. Bujiadefectuosao sucia.
4. Filtrode combustiblesucio.
5. InterruptorFlexPowerdefectuoso.
1. Gireel ahogadora la posicion "OFF".
2. Limpieo remplaceel elementodelfiltro de aire.
3. Remplacela bujia.
4. Remplaceel filtro decombustible.
5. Remplaceel interruptorFlexPower.
,
Generadorsobrecargado(laluz indicadora
"SOBRECARGA"esta.encendida).
No hay salidade CA.
2. Voltajede CAbajo (laluz indicadora
"SOBRECARGA"esta.encendida).
3. M6dulo del inversorrecalentado(laluz indicadora
"SOBRECARGA"esta.encendida).
,
Cortocircuito en cargaelectrica (laluz indicadora
"SOBRECARGA"esta.encendida).
1.Apagueel generadorparareajustarel modulo.
Reduzcalas cargasy vuelvaa arrancarel
generador.
2.Verifiqueque el respiraderoeste abierto y el
ahogadoreste en la posicion"OFF".
3.Verifiqueque la puertade servicio esteenla
posicion"ON".Dejeenfriarpor 15 minutos y vuelva
aarrancarel generador.
4. Verifiquela condicionde todos los cables de
extensiony detodas las cargas electricasque
recibenenergia.
5. Montajedefectuosodelinversor. 5. Remplaceel montajedel inversor.
m
No hay salidade CD.** 1. Disyuntordel circuito de CDabierto. 1. Reajusteel disyuntordelcircuito de CD.
2. Disyuntordefectuosodel circuito deCD. 2. Remplaceel disyuntordel circuito deCD.
3. Rectificadordefectuoso. 3. Remplaceel rectificador.
m i
Hayfugas de combustibleen las 1. Sistemade combustiblesobre cebado (ahogado). 1. Gireel respiraderoen eltapon a "ON"y deje
manguerasdedrenado, inactivoel generadordurante 15 minutos antesde
volvera arrancarlo.
2. El drendel carburadoren la cuba no esta.cerrado. 2. Girela va.lvulahacia la derechaparacerrarla.
* Lavelocidaddel motoraumentay se reduce,esto es normal duranteel arranquedelgeneradory durantelavariacion decargas.
** VerifiquequeInterruptorFlexPowereste enla posicion "OFF"(O).
13

NOde partedelManual.0H8050 RevF (26/06/13) Impresoen China

GENERAC POWER SYSTEMS "TWO YEAR" LiMiTED WARRANTY FOR
iX SERIES PORTABLE GENERATORS
Foraperiod of two yearsfrom the dateof originalsale, GeneracPowerSystems, Inc. (Generac)warrantsits iX Seriesgeneratorswill befreefrom defects
in materialsand workmanshipfor the items and period setforth below. Generacwill, atits discretion, repairor replaceany part that, uponexamination,
inspectionand testingby Generacor a GeneracAuthorizedWarrantyServiceDealer,is foundto be defective.Anyequipmentthatthe purchaser/owner
claimsto bedefectivemust be returnedto andexaminedbythe nearestGeneracAuthorizedWarrantyServiceDealer.All transportation costs underthe
warranty,includingreturnto the factory,areto beborneand prepaidbythe purchaser/owner.This warranty appliesonlyto GeneraciXSeriesportable
generatorsand is nottransferablefrom originalpurchaser.Saveyour proof-of-purchase receipt.Ifyou do not provideproof ofthe initial purchasedate,
the manufacturer'sshippingdateof the product will beusedto determinethe warranty period.
WARRANTY SCHEDULE
Consumerapplications arewarrantedfor two (2) years.Commercialand Rentalapplicationsarewarrantedfor six (6) months.
CONSUMER APPLICATION
YEARONE- Limited Comprehensivecoverageon Laborand Part(s) listed (proof of purchaseand maintenanceis required):
• Engine-All Components
• Alternator- All Components
YEARTWO- LimitedComprehensivecoverageon Part(s) listed (proof of purchaseand maintenanceis required):
• Engine-All Components
• Alternator- All Components
COMMERCIAL/RENTAL APPLiCATiON
FIRSTSIXMONTHS- LimitedComprehensivecoverageon Laborand Part(s) listed (proof of purchaseandmaintenanceis required):
• Engine-All Components
• Alternator- All Components
NOTE: Forthe purpose ofthis warranty "consumer use" meanspersonalresidentialhouseholdor recreationaluseby originalpurchaser.Thiswarranty
doesnot applyto units usedfor Prime Powerinplace of utility whereutility powerservice is presentor whereutility power service does not
normally exist. Onceageneratorhas experiencedcommercialor rentaluse, it shallthereafter be consideredanon-consumeruse generatorfor
the purposeof this warranty.
All warrantyexpenseallowancesaresubjectto the conditions definedin Generac'sServicePolicyManual.
THIS WARRANTY SHALL NOT APPLY TO THE FOLLOWING:
• Generacportable generatorsthatutilizenon-Generacreplacementparts.
• Costs of normalmaintenanceand adjustments.
• Failurescausedbyany contaminatedfuels, oils or lack ofproper oil levels.
• Repairsor diagnosticsperformedby individualsotherthan Guardian/Generacauthorizeddealersnot authorizedin writing by GeneracPowerSystems.
• Failuresdue,but not limited,to normalwear andtear,accident,misuse,abuse,negligenceor improperuse. As with all mechanicaldevices,the Generac
enginesneedperiodicpart(s) serviceand replacementto perform as designed.This warrantywill notcover repairwhen normal usehas exhaustedthe
life of apart(s) or engine.
• Failurescausedbyany act ofGod andotherforce majeureeventsbeyondthe manufacturer'scontrol.
• Damagerelatedto rodentand/orinsect infestation.
• Productsthat aremodified or alteredin a mannernot authorizedby Generacin writing.
• Any incidental,consequentialor indirectdamagescausedby defectsin materials orworkmanship,or any delayin repairor replacementof the defective
part(s).
• Failuredueto misapplication.
• Telephone,cellularphone,facsimile, internetaccess or othercommunication expenses.
• Livingor travelexpensesof person(s) performing service,exceptas specificallyincludedwithin theterms of aspecific unitwarranty period.
• Expensesrelatedto "customerinstruction" or troubleshootingwhere nomanufacturingdefectisfound.
• Rentalequipmentusedwhile warrantyrepairs arebeingperformed.
• Overnightfreight or specialshippingcostsfor replacementpart(s).
• Overtime,holiday or emergencylabor.
• Startingbatteries,fuses,light bulbs and enginefluids.
THISWARRANTYISIN PLACEOFALLOTHERWARRANTIES,EXPRESSEDORIMPLIED,SPECIFICALLY,GENERACPOWERSYSTEMSMAKESNOOTHER
WARRANTIESASTOTHEMERCHANTABILITYORFITNESSFORAPARTICULARPURPOSE.Any implied warrantieswhich areallowed by law,shall be
limited in durationto the terms ofthe expresswarranty providedherein.Somestates do not allow limitationson how long an implied warranty lasts,so
the abovelimitationmay not apply to purchaser/owner.

GENERACPOWERSYSTEMSONLYLIABILITYSHALLBETHEREPAIRORREPLACEMENTOFPART(S)ASSTATEDABOVE.INNOEVENTSHALL
GENERACPOWERSYSTEMSBELIABLEFORANYINCIDENTAL,ORCONSEQUENTIALDAMAGES,EVENIFSUCHDAMAGESAREADIRECTRESULT
OFGENERACPOWERSYSTEMS,INC.NEGLIGENCE.Somestatesdonotallowtheexclusionorlimitationofincidentalorconsequentialdamages,so
theabovelimitationsmaynotapplytopurchaser/owner.Purchaser/owneragreestomakenoclaimsagainstGeneracPowerSystems,Inc.basedon
negligence.Thiswarrantygivespurchaser/ownerspecificlegalrights.Purchaser/owneralsomayhaveotherrightsthatvaryfromstatetostate.
FORAUSTRALIAONLY:Ourgoods comewith guaranteesthatcannot be excludedunder the AustralianConsumerLaw.Youareentitledto a replacement
or refundfor a majorfailure and for compensationfor any other reasonablyforeseeableloss or damage.Youarealso entitledto havethe goods repaired
or replacedif thegoods fail to be of acceptablequalityand the failure doesnot amountto a majorfailure. ForServiceor otherproduct inquiriesin
Australia,pleasecontactAIIpowerbyphone at 1800-333-428 or visit AIIpower's websiteatwww.allpower.com.au.
FORNEWZEALANDONLY:Nothingin this warranty statementexcludes,restricts or modifies anycondition, warranty rightor remedywhich pursuantto
the NewZealandLegislation(Commonwealthor State)includingthe FairTradingPracticesAct of 1986 or the ConsumerGuaranteesAct 1993 ("CGA")
appliesto this limited warranty and may notbe so excluded,restrictedor modified. Nothingin this statementis intendedto havethe effectof contracting
out of the provisions of the CGA,exceptto the extentpermittedbythat Act, andtheseterms areto be modifiedto the extentnecessaryto give effectto
thatintention. If you acquiregoodsfrom GeneracPowerSystemsor anyof its authorizedresellersand distributorsfor the purposesof a business,then
pursuantto section43(2) of the CGA,it is agreedthat the provisionsof the CGAdo not apply.ForServiceor otherproduct inquiriesin New Zealand,
pleasecontactAIIpowerby phone at09-269-1160 or visit AIIpower's websiteatwww.allpower.com.nz.
GENERAC POWER SYSTEMS, iNC.
RO. BOX 8 • Waukesha, Wi 53187
Ph: (888) GENERAC (436=3722) • Fax: (262) 544=4851
To locate the nearest Authorized Dealer visit our website www.generac.com
PartNo.0H4535 RevisionH (01/13) Printedin China

GARANTiA LIMITADA DE "DOS Ai_IOS" DE SISTENIAS DE POTENCIA GENERAC PARA
GENERADORES PORTATILES SERIE iX
Porun periododetres afios desdela fecha dela ventaoriginal, GeneracPowerSystems, Inc. (Generac)garantizasusgeneradoresserieiX comolibres
de defectosenmaterialesy mano de obra porlos items y periodos indicadosabajo.Generac,a su discrecion, repararao reemplazaracualquierparte
que, luegodeun examen,inspeccion y pruebas realizadasporun concesionariode serviciode garantiaautorizadode Generac,seencuentrequeesta
defectuoso.Oualquierequipo queel comprador/propietarioreclamecomo defectuosodebeser regresadoay examinadopor el concesionario deservicio
de garantiaautorizadoporGeneracmas cercano.Todoslos costos de transporte bajo la garantia,incluyendoel retorno a la fabrica, seranpor cuentay
prepagadospor el propietario/comprador.Estagarantiaseaplicasolo a los generadoresportatilesserie iX de Generacy no estransferibledelpropietario
original. Guardesucomprobantede compra. Si ustedno proporcionaunaprueba dela fecha dela comprainicial, se usara,la fecha deembarquedel
producto delfabricante paradeterminarel periodo degarantia.
PROGRAMAC|(_N DE GARANTiA
Lasaplicacionesparaconsumidor esta.ngarantizadaspor dos (2) afios. Las aplicacionescomercialesy dealquileresta.ngarantizadasporseis (6)
meses.
APLICACION PARA CONSUMIDOR
ANOUNO- Coberturaamplialimitadaen manode obra y repuestoslistados (se requierecomprobantede compray mantenimiento):
• Motor- Todoslos componentes
• Alternador-Todoslos componentes
ANODOS- Coberturaamplia limitadaenrepuestoslistados (se requierecomprobantede compray mantenimiento):
• Motor- Todoslos componentes
• Alternador-Todoslos componentes
APL|CACION COMERCIAL[ DE ALQUILER
SEISMESES- 100%(cien por ciento) decobertura en manode obra y repuestoslistados (se requierecomprobantede compray mantenimiento):
• Motor- Todoslos componentes
• Alternador-Todoslos componentes
NOTA: Parael proposito de estagarantia"uso deconsumidor" significa uso personalencasa residencialo recreacionalpor el comprador original.
Lagarantiano aplicaa unidadesusadaspara FuentePrimariade Energiaen lugardel servicio publico dondeel servicio publico se encuentre
presenteo donde el servicio publicode energiano existanormalmente.Unavezque el generadorhaexperimentadouso comercial o dealquiler,
se le consideraraenadelanteun generadorno parauso del consumidorparapropositos de esta garantia.
Todaprestacionde gastosde garantiaesta.sujetaalas condicionesdefinidasen las politicas de garantiade Generac,sus procedimientosy el manualde
costos medios.
ESTA GARANTiA NO SE APLICARA A LO SIGUIENTE:
= GeneradoresportatilesdeGeneracqueutilizanrepuestosque no son deGenerac.
• Oostos demantenimientonormaly ajustes.
• Fallascausadasporcombustibleso aceitescontaminados,o lafalta de nivelesapropiados.
• Reparacioneso diagnosticosrealizadosporindividuosdiferentesalos concesionarios autorizadospor Guardian/Generacqueno estenautorizadospor
escrito porGeneracPowerSystems.
• Fallasdebidoa, perono limitandosea, el usoy desgastenormal,accidente,mal uso, abuso,negligenciao usoinapropiado.Oomotodo dispositivo
mecanico,los motoresGeneracnecesitanservicio y repuestosperiodicamenteparafuncionarcomo esta.ndisefiados.Estagarantiano cubre reparacio-
nes cuandoel uso normalha agotadola vidautil deunaparte o motor.
• Lasfallas causadasporcualquier acto deDiosy otros eventosde fuerzamayorma.salia.delcontrol delfabricante.
• Eldafio relacionadoaroedoresy/o plagadeinsectos.
• Losproductos que sonmodificados o alteradosdemanerano autorizadapor Generacpor escrito.
• Cualquierdafio incidental,consecuencialoindirecto causadopor defectosen losmaterialesy manodeobra, o cualquierretrasoen repararo reemplazar
las partes defectuosas.
,, Falladebidoaunamala aplicacion.
• Gastos detelefono,telefonocelular,fax, acceso ainternetu otros gastosdecomunicacion.
• Costo devidao gastosdeviaje delas personasque realizanel servicio, exceptotalcomo especificamenteseincluyadentrode losterminosdel periodo
de garantiade unaunidadespecifica.
• Gastos relacionadosa "instruccionesdel cliente"o deteccionde problemasdondeno seencuentredefectodefa.brica.
• Equipodealquilerusadomientrasserealizalas reparacionesde garantia.
• Fletede un diaparaotro ocostos especialesdeembarqueparalos repuestos.
• Sobretiempos,vacacionesotrabajode emergencia.
• Bateriasde arranque,fusibles, bombillos deluz y fluidos de motor.

ESTAGARANT[AREEMPLAZACUALQUIEROTRAGARANT[A,EXPRESAOIMPL[CITA,ESPEC[FICAMENTE,GENERACPOWERSYSTEMSNOOTORGA
OTRASGARANT[ASCOMODEMERCANTIBtLtDADOADECUACIONPARAUNPROPOSITOPARTICULAR.Cualquiergarantiaimplicitaqueseapermitida
porley,estaralimitadaenduracionalosterminosdelagarantiaexpresadispuestaaqui.AIgunosestadosnopermitenlimitacionesencua.ntodurauna
garantiaimplicita,demodoquelalimitacionexpresadaarribapuedenoaplicarsealcomprador/propietario.
LA0NICARESPONSABILIDADDEGENERACPOWERSYSTEMSSERD,LAREPARACIONOREEMPLAZODELASPARTESTALCOMOSEESPECIFICA
ARRIBA.ENNINGONCASOGENERACPOWERSYSTEMSSERD,RESPONSABLEPORCUALQUIERDANOINCIDENTALOCONSECUENCIAL,A0NSI
TALESDAI_OSSEANUNRESULTADODIRECTODEUNANEGLIGENCtADEGENERACPOWERSYSTEMS.Algunosestadosnopermitenlaexclusiono
limitaciondedafiosincidentalesoconsecuenciales,asiquelaslimitacionesindicadasarribapuedennoaplicarsealcomprador/propietario.Elcomprador/
propietarioesta.deacuerdoennohacerreclamoscontraGeneracPowerSystemsbasadosennegligencia.Estagarantialedaalcomprador/propietario
derechoslegalesespecificos.Elcomprador/propietariotambienpuedetenerotrosderechosquevariandeestadoaestado.
SOLOPARAAUSTRALIA:NuestrosproductosseentregancongarantiasquenopuedenserestarsujetasaexclusionesconformealaAustralian
ConsumerLaw(LeydelconsumidordeAustralia).Ustedtienederechoaunasustitucionounreembolsoporunafallamayoryacompensacionpor
cualquierotraperdidaodafiorazonableprevisible.Ustedtambientienederechoaquelosproductosseanreparadososustituidossilosproductosno
sondecalidadaceptableylafallanoIlegaasetunafallamayor.ParaconsultassobreserviciouotrosproductosenAustralia,pongaseencontactocon
AIIpowerportelefonoal1800-333-428ovisiteelsitiowebdeAllpowerenwww.allpower.com.au.
SOLOPARANUEVAZELANDA:Nadadeestadeclaraci6ndegarantiaexcluye,restringeomodificaningunacondicion,derechodegarantiaosolucion
que,conformealalegislaciondeNuevaZelanda(MancomunidadoEstado),inclusolaFairTradingPracticesAct(Leydepracticaslealesdecomercio)
de1986olaConsumerGuaranteesAct(Leydegarantiasdelconsumidor,"CGA")de1993,seapliqueaestagarantialimitada,yestanopuedeestar
sujetaaexclusiones,restriccionesomodificaciones.Nadadeestadeclaraciontieneelpropositodetenetelefectodeestableceruncontratofuerade
lasdisposicionesdelaCGA,exceptoconelalcancepermitidopordichaley,yestosterminossedebenmodificarenlamedidanecesariaparadar
efectoadichaintencion.SiadquiereproductosdeGeneracPowerSystemsoalgunodesusrevendedoresydistribuidoresautorizadosconpropositos
comerciales,conformealaseccion43(2)delaCGA,seacuerdaquenoseaplicanlasdisposicionesdelaCGA.Paraconsultassobreserviciouotros
3roductosenNuevaZelanda,pongaseencontactoconAIIpowerportelefonoal09-269-1160ovisiteelsitiowebdeAIIpowerenwww.allpower.com.nz.
GENERAC POWER SYSTEMS, |NC.
RO. BOX 8 • Waukesha, W| 53187
Tel: (888) GENERAC (436=3722) • Fax: (262) 544-4851
Para ubicar al concesionario aulorizado mas cercano visile nueslro silio web: www.generac.com
PartNo.0H4535 RevisionH (01/13) ImpresoenChina.

GARANT|E LIMITEE DE <, DEUX ANS ,, DES SYSTEMES D'ALIMENTAT|ON DE GENERAC POWER
SYSTEMS POUR LES GENERATR|CES PORTABLE DES SER|ES iX
Pourune periodede deuxansa partir dela dated'achatd'origine, GeneracPowerSystems, Inc. (Generac)garantieque sesgen6ratricesiX Seriesseront
exemptesde defautdefabrication et de materiauxne presenterontaucundefaut materielni defabrication pour leselementset la periodementionnee
ci-apres.Generacr@areraou remplacera,a sa seule discretion,toute piecejugee defectueuseapres un examen,uneinspectionet untest realisespar
Generacou un d@ositairede servicede garantieagreeparGenerac.Toutequipementdeclaredefectueuxpar I'acquereur/ le proprietairedolt etreretourne
etexaminepar le d@ositairedeservice de garantieagreeparGeneracle plus proche.Tousles frais d'envoi apayerdans le cadre de la garantie,dontle
retoura I'usine,seront supportes etpayes a I'avancepar I'acquereur/ le proprietaire.Cettegarantiene s'appliquequ'auxgeneratricesportablesGenerac
de SerieiX et n'estpastransferableparI'acquereurd'origine. IIestconseille deconserver les preuvesd'achat.Si vous ne fournissezpasde preuvede la
dated'achatd'origine, la dated'envoidu produit parsonfabricant servira a.determinerla periodede garantie.
PROGRAMME DE GARANT|E
Lesapplications desclients sont garantiespendantdeux (2) ans. Lesapplications commerciales etde locationsont garantiespendantsix (6) mois.
APPLICATION DES CLIENTS
PREMII'--REANNI_E- Couverturecompletelimitee pour la main d'oeuvreet Idles piece(s) listees (il est necessairede presenterune preuved'achatet de
maintenance):
• Moteur- tousles composants
• Alternateur- tousles composants
DEUXtI_MEANNI_E- Couverturecompletelimitee pour Idles piece(s) listees(il estnecessairede presenterunepreuve d'achatet de maintenance)'
• Moteur- tousles composants
• Alternateur- tousles composants
APPLICATION COMMERCIAL/DE LOCATION
SiXPREMIERSMOIS- Couverturecompletelimitee pour lamain d'oeuvreetIdles piece(s)listees (il est necessairedepresenterune preuved'achatetde
maintenance):
• Moteur- tousles composants
Alternateur- tousles composants
REMARQUE ." auxfins de la presentegarantie,<,utilisation duconsommateur,, designeune utilisation menagerepersonnelleou recreativede la
part deI'acquereurd'origine.Lapresentegarantiene s'appliquepas aux unites utiliseespour deI'energieprimaireau lieudu reseau
Iorsquele reseauelectriqueprincipalest presentou n'existenormalementpas. Unefois quela generatricea ete utiliseede maniere
commercialeou locative, elle seraconsidereepar la suite comme unegeneratricea.utilisationnon personnelledartsle cadrede la
presentegarantie.
Toutesles indemnitesde garantiesont soumisesaux conditions definiesdartsle manuel des politiques,proceduresettarifs forfaitaires de garantiede
Generac.
LA PRESENTE GARANTIE NE S'APPLIQUE PAS AUX ELEMENTS SUIVANTS ;
• Lesgeneratricesde Generacqui utilisentdes piecesde rechangequi nesont pas deGenerac.
Lescoots de maintenanceetdes modificationsnormales.
Lesdefaillancesentraineesparde I'essenceou deI'huilecontaminee,ou parI'utilisationdeniveauxd'huilenon appropries.
Lesreparationsoudiagnostics realisespardes d@ositairesnonagreesparGuardian/Generacetnonautorises parecrit parGeneracPowerSystems.
Lesdefaillancesdues,sanss'y limiter,a I'usurenormale,a desaccidents,mauvaisesutilisations,usagesabusifs,negligenceouutilisation inadaptee.
Commepourtousles dispositifs mecaniques,lesmoteurs Generacnecessitentunereparationet unremplacementperiodiquesdeleurs pieces pour
fonctionnercomme prevu.La presentegarantiene couvrepas les reparationsIorsquele probleme dela ou les piece(s) ou du moteurdecouled'une
utilisationnormale.
Lesdefaillancescauseespartoute causeexterieureoutout cas deforce majeureind@endantesde lavolonte dufabricant.
Lesdommagesdus a.desrongeurset/ou insectes.
Lesproduits modifies ou alteresd'unefa9on n'ayantpas eteautoriseeparecrit parGenerac.
Lesdommagesaccessoires,importants ou indirectscausespar desdefaillancesmateriellesoudefabrication, ou partoutretardde reparationou de
remplacementdela ou despiece(s) defectueuses.
Lesdefaillancesdues a_unemauvaiseapplication.
Lesfrais detelephone,detelephoneportable, defax, d'accesa Internetou d'autresmoyensdecommunication.
Lesfrais d'hebergementoudetransport de la ou despersonne(s)realisantI'entretien,sauf si celaest specifiquementinclusdartsles termesd'une
periodede garantied'uneunitespecifique.
Lesd@ensesfleesa.<,I'instructiondu client,, ou aud@annageIorsqu'aucundefaut Westdetecte.
LesequipementsIouesutilises pendantla realisationdes reparationsdans le cadredela garantie.
Lesfrais detransport de nuitou d'envoispecialde laou despiece(s)de rechange.
Lesheures supplementaires,letravailde jourferieou enurgencede la main d'oeuvre.
Lesbatteriesdedemarrage,fusibles,ampoulesetfluides dumoteur.

LAPRI_SENTEGARANTIEREMPLACETOUTESLESAUTRESGARANTIES,IMPLICITESOUEXPLICITES.ENPARTICULIER,GENERACPOWERSYSTEMS
N'EMETAUCUNEGARANTIEDECONFORMITFt OUD'USAGEPOURUNOBJECTIFPARTtCULIER.Toutegarantietaciteautoriseeparla Ioi devraetrelimitee
la dureedes conditions dela garantieexpressementionneeci-apres. Certainsetatsnepermettentpas de poserune limite a.la dureede la garantie
implicite, la limite susmentionneene s'appliquedonc pas a.ces derniers.
GENERACPOWERSYSTEMSNESERARESPONSABLEQUEDELA RI_PARATIONOU DUREMPLACEMENTDE LAOUDESPII_CESTELQUE
SUSMENTtONNI_.ENAUCUNCAS GENERACPOWERSYSTEMSNEPOURRAETRETENURESPONSABLEDETOUTDOMMAGEACCESSOIREOU
IMPORTANT,MEMESICEDOMMAGEDt_COULEDIRECTEMENTD'UNENEGLIGENCEDEGENERACPOWERSYSTEMS,INC.Certainsetats n'autorisent
3asI'exclusionou la limitede dommagescirconstancielsou consequents,de sorte queles limites ci-dessus nes'appliquerontpus pour I'acheteur/
proprietaire.L'acquereur/leproprietaires'engagea nefaireaucune reclamationcontre GeneracPowerSystems,Inc. pour negligence.Lapresentegarantie
vous conferedes droitsjuridiques specifiques.Votreetat vous confereegalementd'autresdroits.
POURUAUSTRALIEUNIGUEIVlENT: Nos produitssont fournis avecdes garantiesqui nepeuventpas etreexclues envertu de laIoi australiennesur
la consommation (AustralianConsumerLaw).Vous avezle droita un remplacementou un remboursementpour une defaillancemajeureeta une
indemnisationpourtoute autre perte ou dommageraisonnablementprevisible.Vous disposezegalementd'un droit a la reparationou au remplacementsi
les produits nesont pas d'une qualiteacceptableet si cettedefaillancen'est pas considereecomme majeure.Pourtout renseignementsupplementaire
sur les produits ou sur le service en Australie,veuillezcommuniquer avecAIIpowerpartelephoneau +61 1800-333-428 ouvous rendre sur lesite
Interneta.cetteadresse: www.allpower.com.au.
POURLANOUVELLE-ZI_LANDEUNIQUEIVlENT: Cettegarantien'exclut,nerestreintni nemodifieaucunecondition,aucundroitdegarantieou recours
qui, conformementala legislationdeNouvelle-Zelande(Commonwealthou Etat),y comprisla Ioisur lapratiquecommercialeIoyalede1986 (FairTrading
PracticesAct) ou la Ioisur laprotectiondu consommateurde 1993 (CGAouConsumerGuaranteesAct), s'appliqueacette garantielimiteeetnepeutpas
6treexclue,restreinteou modifiee.Cettegarantien'est enaucuncasdestineea contournerles dispositionsduCGA,sauf danslamesurepermiseparcette
Ioi,etcestermesdoivent_tremodifiesdartsla mesurenecessairepour donnereffeta cetteintention.Si vousfaites I'acquisitiond'un produitchezGenerac
PowerSystemsou aupresdesdistributeurset revendeursautorisesadesfins commerciales,alors,conformementa la section43(2) de la CGA,il est
convenuqueles dispositionsdu CGAnes'appliquentpas.Pourtout renseignementsupplementairesur les produitsousur leservice enNouvelle-Zelande,
veuillezcommuniqueravecAIIpowerpartelephoneau + 64 09-269-1160 ouvous rendresur le siteIntemeta.cetteadresse: www.allpower.com.nz.
GENERAC POWER SYSTEMS, INC.
RO. Box (boite postale) 8 * Waukesha, W! 53187
Tel. : (888) GENERAC (436=3722) * Fax : (262) 544=4851
Pour Iocaliser le depositaire autorise le plus proche, visitez notre site Web www.generac.com
N° depiece0H4535 RevisionH (01/13) ImprimeenChine
-
 1
1
-
 2
2
-
 3
3
-
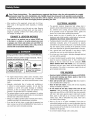 4
4
-
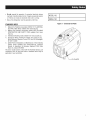 5
5
-
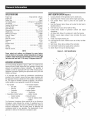 6
6
-
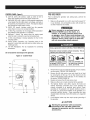 7
7
-
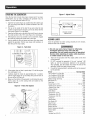 8
8
-
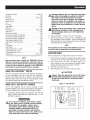 9
9
-
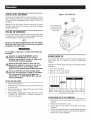 10
10
-
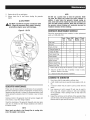 11
11
-
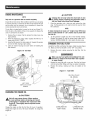 12
12
-
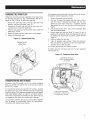 13
13
-
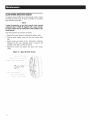 14
14
-
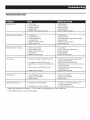 15
15
-
 16
16
-
 17
17
-
 18
18
-
 19
19
-
 20
20
-
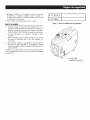 21
21
-
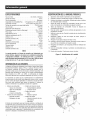 22
22
-
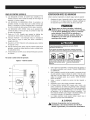 23
23
-
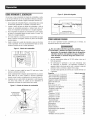 24
24
-
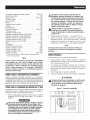 25
25
-
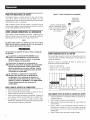 26
26
-
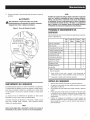 27
27
-
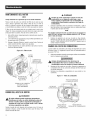 28
28
-
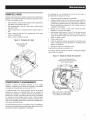 29
29
-
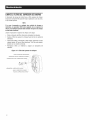 30
30
-
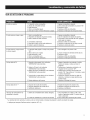 31
31
-
 32
32
-
 33
33
-
 34
34
-
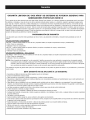 35
35
-
 36
36
-
 37
37
-
 38
38


Generac 005842-0 El manual del propietario
- Categoría
- Generadores de poder
- Tipo
- El manual del propietario
- Este manual también es adecuado para
en otros idiomas
- English: Generac 005842-0 Owner's manual
Artículos relacionados
-
Generac Power Systems 005800-0 (XGSO00) El manual del propietario
-
Generac 005939-2 El manual del propietario
-
-
Generac GP7500E-5943-5 El manual del propietario
-
-
Generac 005788-0 XG4000 El manual del propietario
-
-
-