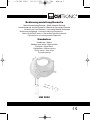
Clatronic HM 2830 El manual del propietario
- Tipo
- El manual del propietario

HM 2830
Bedienungsanleitung/Garantie
Gebruiksaanwijzing/Garantie • Mode d’emploi/Garantie
Instrucciones de servicio/Garantía • Manual de instruções/Garantia
Istruzioni per l’uso/Garanzia • Instruction Manual/Guarantee
Bruksanvisning/garanti • Instrukcja obsługi/Gwarancja
Návod k použití/Záruka • A használati utasítás/garancia
Руководство по эксплуатации/Гарантия
Handmixer
Handmixer • Mixeur
Batidora con varilla • Mixer portátil
Frullatore • Hand Mixer
Håndmikser • Mikser ręczny
Ruční mixér • Kézi mixer
Ручной миксер
5....-05-HM 2830 29.10.2003 8:26 Uhr Seite 1

Inhalt
Inhoud • Sommaire • Indice • Índice • Indice
Contents • Innhold • Spis treści • Obsah • Tartalom • Содержание
D
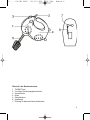
Übersicht Bedienelemente . . . . . . . . . . . . . . . . . . . . . . . . . .Seite 3
Bedienungsanleitung . . . . . . . . . . . . . . . . . . . . . . . . . . . . . . .Seite 4
Garantie . . . . . . . . . . . . . . . . . . . . . . . . . . . . . . . . . . . . . . . .Seite 6
NL
Overzicht bedieningselementen . . . . . . . . . . . . . . . . . . . . . .Pagina 3
Gebruiksaanwijzing . . . . . . . . . . . . . . . . . . . . . . . . . . . . . . . .Pagina 8
Garantie . . . . . . . . . . . . . . . . . . . . . . . . . . . . . . . . . . . . . . . .Pagina 10
F
Aperçu des éléments de commande . . . . . . . . . . . . . . . . . . .Page 3
Mode d’emploi . . . . . . . . . . . . . . . . . . . . . . . . . . . . . . . . . . .Page 11
Garantie . . . . . . . . . . . . . . . . . . . . . . . . . . . . . . . . . . . . . . . .Page 13
E
Vista de conjunto Elementos de mando . . . . . . . . . . . . . . . .Página 3
Instrucciones de servicio . . . . . . . . . . . . . . . . . . . . . . . . . . . .Página 14
Garantia . . . . . . . . . . . . . . . . . . . . . . . . . . . . . . . . . . . . . . . .Página 16
P
Vista geral dos elemntos de comando . . . . . . . . . . . . . . . . .Página 3
Manual de instruções . . . . . . . . . . . . . . . . . . . . . . . . . . . . . .Página 17
Garantía . . . . . . . . . . . . . . . . . . . . . . . . . . . . . . . . . . . . . . . .Página 19
I Descrizione dei singoli pezzi . . . . . . . . . . . . . . . . . . . . . . . .Pagina 3
Istruzioni per l’uso . . . . . . . . . . . . . . . . . . . . . . . . . . . . . . . . .Pagina 20
Garanzia . . . . . . . . . . . . . . . . . . . . . . . . . . . . . . . . . . . .Pagina 22
GB
Control element overview . . . . . . . . . . . . . . . . . . . . . . . . . . .Page 3
Instruction Manual . . . . . . . . . . . . . . . . . . . . . . . . . . . . . . . . .Page 23
Guarantee . . . . . . . . . . . . . . . . . . . . . . . . . . . . . . . . . . . . . .Page 25
N
Oversikt over betjeningselementer . . . . . . . . . . . . . . . . . . . .Side 3
Bruksanvisning . . . . . . . . . . . . . . . . . . . . . . . . . . . . . . . . . . .Side 26
Garanti . . . . . . . . . . . . . . . . . . . . . . . . . . . . . . . . . . . . . . . . .Side 28
PL
Przegląd elemetów obsługi . . . . . . . . . . . . . . . . . . . . . . . . .Strona 3
Instrukcja obsługi . . . . . . . . . . . . . . . . . . . . . . . . . . . . . . . .Strona 29
Gwarancja . . . . . . . . . . . . . . . . . . . . . . . . . . . . . . . . . . .Strona 31
CZ
Přehled obsluhovací prvky . . . . . . . . . . . . . . . . . . . . . . . . . .Strana 3
Návod k použití . . . . . . . . . . . . . . . . . . . . . . . . . . . . . . . . . .Strana 33
Záruka . . . . . . . . . . . . . . . . . . . . . . . . . . . . . . . . . . . . .Strana 35
H
A hasznalt elemek megtekintése . . . . . . . . . . . . . . . . . . . . .Oldal 3
A hasznalati utasítás . . . . . . . . . . . . . . . . . . . . . . . . . . . . . .Oldal 36
Garancia . . . . . . . . . . . . . . . . . . . . . . . . . . . . . . . . . . . . . . . .Oldal 38
RUS
Обзор управляющих элементов . . . . . . . . . . . . . . . . . . . .стр. 3
Руководство по эксплуатации . . . . . . . . . . . . . . . . . . . . . .стр. 39
Гарантия . . . . . . . . . . . . . . . . . . . . . . . . . . . . . . . . . . . . . . . . .стр. 41
5....-05-HM 2830 29.10.2003 8:26 Uhr Seite 2
La página se está cargando...
La página se está cargando...

Inbetriebnahme
Stellen Sie sicher, dass das Gerät vom Netz getrennt ist.
Montage der Schneebesen/Knethaken
Drücken Sie die beiden Schneebesen bzw. Knethaken an der Unterseite unter
leichtem Drehen bis zum mechanischen Einrasten ein.
Achtung: Der markierte Knethaken/Schneebesen muss in die linke Öffnung (7)
des Mixers eingesteckt werden!
Benutzung des Gerätes
1. Stellen Sie sicher, dass der Geschwindigkeitsregler (2) auf 0/AUS steht.
2. Schließen Sie das Gerät an eine vorschriftsmäßig installierte Schutzkontakt-
steckdose 230 V, 50 Hz an.
3. Tauchen Sie die Knethaken bzw. Schneebesen in das Mixgut ein. Stellen Sie
die gewünschte Geschwindigkeit mit dem Geschwindigkeitsschalter (2) ein.
Bewegen Sie das Gerät dabei leicht auf und ab.
Hinweis:
Verwenden Sie für optimale Ergebnisse hochwandige und nicht zu große Gefäße.
Turbo-Taste (1)
Zum kurzzeitigen Schalten auf Höchstdrehzahl. Beim Drücken in kurzen Abständen
erreichen Sie einen Pulsbetrieb.
Achtung: Benutzen Sie diese Funktion maximal 2 Minuten!
Wählen Sie für die Anwendung ein Werkzeug und eine Geschwindigkeit gemäß fol-
gender Tabelle:
Produkt / Zubereitungsart max. Menge Werkzeug Stufe Max. Betriebszeit
Schwerer Teig (z. B. Hefeteig) 500 g Knethaken 3 -5 3 min
Rührteig 750 g Schneebesen 2 -5 5 min
Biskuitteig, Waffelteig, Sahne 750 g Schneebesen 1 -5 5 min
Knethaken/Schneebesen lösen
Um die Haken zu lösen, drücken Sie die Auswurftaste (3).
Hinweis: Die Haken lassen sich nur auswerfen, wenn sich der Geschwindigkeits-
schalter (2) in Position "0" befindet.
5
D
5....-05-HM 2830 29.10.2003 8:26 Uhr Seite 5
La página se está cargando...

7
D
Service für unsere
Haushaltsartikel
Verschleißteile für Haushaltsartikel
(soweit diese nicht vom Fachmann
ausgewechselt werden müssen),
Ersatzkannen, Staubsaugerfilterbeutel
usw. können Sie mit Angabe des
Gerätetyps unter folgender Telefon-
Hotline bestellen:
0 21 52 / 20 06 – 888
Service für unsere
Unterhaltungselektronik
Verschleißteile und Ersatzteile für
unsere Unterhaltungselektronik (soweit
diese nicht vom Fachmann ausge-
wechselt werden müssen) wie z. B.
Fernbedienungen, Bedienteilklappen,
Lautsprecherblenden usw. können Sie
mit Angabe des Gerätetyps unter fol-
gender Telefon-Hotline bestellen:
0 21 52 / 20 06 – 666
Für technische Fragen haben wir für Sie folgende e-mail-Adresse eingerichtet:
Interessieren Sie sich für weitere Clatronic-Produkte?
Besuchen Sie doch einmal unsere Homepage unter
www.clatronic.de oder www.clatronic.com
5....-05-HM 2830 29.10.2003 8:26 Uhr Seite 7

Algemene veiligheidsinstructies
• Lees vóór de ingebruikname van dit apparaat de handleiding uiterst zorgvuldig
door en bewaar deze goed, samen met het garantiebewijs, de kassabon en zo
mogelijk de doos met de binnenverpakking.
•
Gebruik het apparaat uitsluitend privé en uitsluitend voor de voorgeschreven toe-
passing. Dit apparaat is niet geschikt voor commercieel gebruik (tenzij het bedoeld
is voor beperkt gebruik in de buitenlucht). Bescherm het tegen hitte, directe zonne-
stralen, vocht (i geen geval in vloeistoffen dompelen) en scherpe kanten. Gebruik
het apparaat niet met vochtige handen. Bij vochtig of nat geworden apparaat
onmiddellijk de stroomtoevoer onderbreken. Niet in het water grijpen.
• Schakel het apparaat uit en onderbreek altijd de stroomtoevoer (trek aan de
steker, nooit aan de kabel) wanneer u het apparaat niet gebruikt, hulpstukken
aanbrengt, reinigt of wanneer storingen optreden.
• Laat het ingeschakelde apparaat niet zonder toezicht werken. Schakel het
apparaat altijd uit of trek de steker uit de contactdoos (trek aan de steker, niet
aan de kabel) voordat u de werkplek verlaat.
• Bescherm kinderen tegen gevaren en zorg ervoor dat kabels nooit los omlaag
hangen en dat het apparaat buiten het bereik van kinderen blijft.
• Controleer regelmatig of het apparaat beschadigingen vertoont. Een bescha-
digd apparaat mag niet in gebruik worden genomen.
• Repareer het apparaat nooit zelf, maar breng het naar een geautoriseerde vak-
man. Voorkom gevaren en laat een defecte kabel altijd alleen door de fabrikant,
onze technische dienst of een eender gekwalificeerde persoon vervangen door
een soortgelijke kabel.
• Gebruik alleen originele reserveonderdelen.
• Neem de onderstaande “Speciale veiligheidsinstructies“ in acht.
Speciale veiligheidsinstructies voor dit apparaat
• Raak nooit bewegende delen van het apparaat aan en wacht altijd tot deze stil-
staan.
• Voor de vervanging van hulpstukken moet het apparaat uitgeschakeld en de
stroomtoevoer onderbroken zijn!
• Steek de haken of de kloppers altijd volledig in het menggoed voordat u inscha-
kelt. Zo voorkomt u spatten.
• Gebruik deze mixer alleen voor het mengen van voedingsmiddelen.
• Laat de mixer niet langer dan 5 minuten ingeschakeld! Laat het apparaat daarna
ca. 10 minuten afkoelen voordat u het opnieuw inschakelt.
De bedienungselementen
1. Turbotoets 5. Kloppers
2. Schakeling met vijf standen 6. Deeghaken
3. Uitstoottoets 7. Opening voor de
4. Mixer gekenmerkte kneedhaak
8
NL
5....-05-HM 2830 29.10.2003 8:26 Uhr Seite 8

Ingebruikname
Controleer eerst of de stroomtoevoer naar het apparaat onderbroken is.
Montage van de kloppers/deeghaken
Druk de beide kloppers of deeghaken enigszins draaiend aan de onderzijde in tot-
dat zij mechanisch inklikken.
Opgelet: De gekenmerkte kneedhaak/klopper moet in de linkeropening (7) van de
mixer worden gestoken!
Bediening van het apparaat
1. Controleer of de snelheidsschakelaar (2) op “0/UIT” staat.
2. Sluit het apparaat aan op een correct geïnstalleerd stopcontact 230 V, 30 Hz.
3. Steek de haken of de kloppers in het menggoed. Stel de gewenste snelheid in
met de snelheidsschakelaar (2). Beweeg het apparaat tijdens het mengen
enigszins omhoog en omlaag.
Aanwijzing: Gebruik voor een optimaal resultaat een hoge, niet te grote mengkom.
Turbotoets (1)
Hiermee kunt u kortstondig naar een hoog toerental schakelen. Als u de knop
steeds indrukt en loslaat, kunt u pulserend werken.
OPGELET: Gebruik deze functie maximaal 2 minuten!
Kies voor het gebruik een hulpstuk en een snelheid volgens onderstaande tabel:
Product/bereidingswijze max. Hoeveelheid Hulpstuk Stand Max. arbeidsdur
Zwaar deeg (bijv. gistdeeg) 500 g deeghaken 3 -5 3 min
Roerdeeg 750 g kloppers 2 -5 5 min
Biscuitdeeg, wafelbeslag, Slagroom 750 g kloppers 1 -5 5 min
Deeghaken / kloppers uitstoten
Druk op de uitstoottoets (3) om de hulpstukken uit te stoten.
Opmerking: De haken kunnen alleen worden verwijderd wanneer de snelheids-
schakelaar (2) op "0" staat.
Reiniging
1. Trek vóór iedere reiniging de apparaatsteker uit de contactdoos.
2. Gebruik een vochtige doek om de buitenkant van het apparaat te reinigen.
3. Gebruik geen scherpe of schurende reinigingsmiddelen.
4. Afneembare delen die met deeg in contact zijn gekomen (kneedwerktuigen en
mengkom) kunt u gewoon afwassen.
9
NL
5....-05-HM 2830 29.10.2003 8:26 Uhr Seite 9
La página se está cargando...
La página se está cargando...

Présentation des différentes parties
1. Touche turbo 3. Touche éjecter 6. Pétrir
2. Variateur de puissance 4. Mixeur 7. Orifice pour le fouet pétrin
à 5 postions 5. Fouets marqué d’un symbole
Mise en service
Veillez toujours à ce que l’appareil ne soit pas encore branché sur le secteur.
Fixation des accessoires pétrir / fouetter
Enfoncez les deux fouets ou le pétrin par le dessous, tout en tournant légèrement
jusqu’à ce qu’ils s’enclenchent.
Attention: L’accessoire pétrin/fouet marqué d’un symbole doit être introduit dans
l’orifice gauche (7) du robot!
Utilisation de l’appareil
1. Assurez-vous que le variateur de vitesses (2) est placé sur « 0/ Arrêt ».
2. Branchez l’appareil dans une prise de courant de 230V, 50 Hz, en bon état de
fonctionnement.
3. Plongez les pétrins ou fouets dans les aliments. Réglez la vitesse desirée á
l' aide du variateur de vitesse (2). Bougez l’appareil simultanément légèrement
de haut en bas.
Remarque:
Pour de meilleurs résultats, utilisez des récipients pas trop grands et à bords hauts.
Touche turbo (1)
Pour une courte utilisation à très grande vitesse. En appuyant par à-coup, vous
obtenez un fonctionnement Pulse.
ATTENTION: N’utilisez cette fonction que 2 minutes maximum!
Choisissez, selon l’utilisation, l’accessoire et la vitesse adaptés d’après le tableau
suivant:
Produit/mode de préparation quantité max. accessoires position durée max. de
fonctionnement
Pâte épaisse (par ex. pâte à levain) 500 g pétrin 3 -5 3 min
Pâte à gâteau 750 g fouet mélangeur 2 -5 5 min
Pâte à biscuit , à gaufre, Crème fraîche
750 g fouet mélangeur 1 -5 5 min
Détacher les pétrins / fouets
Pour détacher les accessoires, appuyez sur la touche éjecter (3).
Remarque: les fouets ne peuvent être éjectés que lorsque le variateur de vitesses
(2) se trouve sur la position „0”.
12
F
5....-05-HM 2830 29.10.2003 8:26 Uhr Seite 12
La página se está cargando...

Indicaciones generales de seguridad
• Antes de la puesta en servicio de este aparato lea detenidamente el manual de
instrucciones y guarde este bien incluido la garantía, el recibo de pago y si es
posible también el cartón de embalaje con el embalaje interior.
• Solamente utilice el aparato para el uso privado y para el fin previsto. Este
aparato no está destinado para el uso profesional. No lo utilice al aire libre
(en excepto que esté destinado para el uso limitado al aire libre). No lo expon-
ga al calor, a la entrada directa de rayos de sol, a la humedad ( en ningún caso
sumerja el aparato en agua) y a los cantos agudos. No utilice el aparato con las
manos húmedas. En caso de que el aparato esté húmedo o mojado retire de
momento la clavija de la caja de enchufe. No tocar el agua.
• Desconecte el aparato y siempre retire la clavija de la caja de enchufe (tire de
la clavija no del cable), cuando no quiera utilizar el aparato, montar piezas o en
caso de limpieza o defectos.
• No utilice el aparato sin vigilancia. En caso de que tenga que dejar su lugar de
trabajo, desconecte siempre el aparato o retire la clavija de la caja de enchufe
(por favor tire de la clavija y no del cable).
•
Para evitar que los niños se hagan daños eléctricos, siempre tenga atención, que
el cable no cuelgue hacia abajo y que los niños no tengan acceso al aparato.
• Controle regularmente si el aparato o el cable tiene defectos. No ponga en ser-
vicio un aparato defecto.
• No repare el aparato por su cuenta, sino vaya a un establecimiento autorizado.
Para evitar peligros, deje sustituir un cable defecto por uno de la misma calidad
solamente por el fabricante, nuestro servicio al cliente o una similar persona
cualificada.
• Solamente utilice accesorios originales.
• Por favor tenga atención a las “Indicaciones especiales de seguridad…“
indicadas a continuación.
Consejos de seguridad especiales para este aparato
• No toque nunca ningún de los accesorios del aparato cuando estos se mueven
todavía. Espere hasta que se paren.
• ¡Antes de cambiar los accesorios debe estar el aparato apagado y desconecta-
do de la red!
• Para evitar salpicaduras, introduzca antes de la conexión las varillas siempre
por completo en el alimento a batir.
• Sólo bata o mezcle, con este aparato, productos alimenticios.
• ¡No deje el aparato más de 5 minutos en función! ¡Después, antes de usarlo
otra vez, deje enfríar el aparato unos 10 minutos!
14
E
5....-05-HM 2830 29.10.2003 8:26 Uhr Seite 14

Presentación de las partes
1. Botón turbo 4. Batidora de mano 7. Abertura para
2. 5 velocidades 5. Batidor el gancho amasador
3. Botón de liberación 6. Gancho amasador marcado
Puesta en marcha
Siempre tenga cuidado que el aparato ne esté todavía conectado a la red.
Montaje del batidor/gancho amasador
Empuje los dos brazos batidores o el brazo triturador por debajo, girándolos ligera-
mente hasta que se enganchen.
Atención: ¡El gancho amasador marcado/las varillas deben ser introducidas en la
abertura izquierda (7) del batidor!
Utilización del aparato
1. Asegúrese, que el interruptor de velocidad (2) esté en posición “0/OFF”.
2. Conecte el aparato a una caja de enchufe 230 V, 50 Hz instalada por la
norma.
3. Sumerja el gancho amasador y batidor en el alimento a batir. Ajuste la veloci-
dad deseada con el interruptor de velocidad (2). Mueva el aparato al mismo
tiempo ligeramente de arriba hacia abajo.
Observación: Para los mejores resultados, utilize recipientes que no estén
demasido grandes y que tengan bordes altos.
Tecla turbo (1)
Para una utilización corta a alta velocidad. Apriete la tecla por intermitencias para
obtener un funcionamiento Pulso.
CUIDADO: Sólo utilize esta función 2 minutos máximo!
Para la utilización elija una herramienta y una velocidad según la tabla a continuación:
Producto / Cantidad máxima Herramienta Escalón Tiempo de
Método de preparación uso máximo
Masa pesada
(p.ej. masa de levadura) 500 g ganchos amasadores 3 -5 3 min
Pastaflora 750 g ganchos batidores 2 -5 5 min
Masa de bizcocho, gofres, Nata 750 g ganchos batidores 1 -5 5 min
Liberar gancho amasador / batidor
Para liberar los ganchos, presione el botón de liberación (3).
Nota: Los ganchos solamente se dejan expulsar, si el interruptor de velocidad (2)
se encuentra en la posición „0“.
15
E
5....-05-HM 2830 29.10.2003 8:26 Uhr Seite 15

Limpieza
1. Antes de cada limpieza, retire la clavija de la caja de enchufe.
2. Para la limpieza exterior del aparato solamente utilice un paño humedecido.
3. No utilice detergentes agresivos o abrasivos.
4. Piezas desmontables que hayan entrado en contacto con la masa (las herra-
mientas de amasar y las varillas) se pueden limpiar en un baño jabonoso.
Este aparato se ha examinado según las normativas actuales y vigentes de la
Comunidad Europea, como p.ej. compatibilidad electromagnética y directiva de
baja tensión y se ha construido según las más nuevas especificaciones en razón
de la seguridad.
No reservamos el derecho de efectuar modificaciones técnicas.
Garantía
Para el aparato comercializado por nosotros nos responsabilizamos con una
garantía de 24 meses a partir de la fecha de compra (factura de compra).
Durante el período de garantía nos encargamos gratuítamente de los defectos del
aparato y de los accesorios*), que se hayan originado por defectos del material o
de la fabricación. Dependiendo de nuestra estimación se realizará una reparación
o un cambio. ¡Los servicios de garantía no prolangan la garantía, ni se incia por
ello un período nuevo de garantía!
Como comprobante para la garantía es válido la factura de compra. Sin este com-
probante no se podrá realizar un cambio o una reparación gratuíta.
En caso de garantía entregue el aparato completo en su embalaje original
junto con la factura a su agente comerciante.
*) Defectos en las piezas de accesorio, no significan automáticamente el recambio
gratuito del aparato completo. ¡En este caso dirijase por favor a nuestra linea de
atención al cliente! ¡Rotos de vidrio o roturas en las piezas de plástico deben
pagarse siempre por el cliente !
Defectos en los accesorios de uso o en las piezas de desgaste (p.ej. escobillas de
carbón del motor, varillas amasadoras, correas de transmisión, mando a distancia
de repuesto, cepillos de dientes de repuesto, hojas de sierra etc.), como también la
limpieza, mantenimiento o el recambio de piezas de desgaste no recaen en la
garantía e irán al cargo del cliente!
En caso de intervención ajena se expira la garantía.
Después de la garantía
Después de haber expirado la garantía se pueden realizar las reparaciones por el
concesionario o por el servicio de reparaciones. Los gastos irán al cargo del cliente.
16
E
5....-05-HM 2830 29.10.2003 8:26 Uhr Seite 16
La página se está cargando...

Elementos de manuseamento
1. Tecla turbo 5. Amassar e bater claras
2. 5 velocidades 6. Varinha de amassar
3. Tecla para soltar as peças 7. Abertura para a varinha de
4. Batedeira de mão amassar com marcação
Colocação em funcionamento
Assegure-se que o aparelho esteja separado da rede.
Montagem da varinha de bater claras/varinha de amassar
Introduza os dois batedores de claras ou ganchos amassadores na parte de baixo,
girando-os ligeiramente, até que haja um engate mecânico.
Atenção: A varinha de amassar/de bater claras com marcação deverá ser introdu-
zida na abertura esquerda (7) da batedeira!
Uso do aparelho
1. O selector de velocidades (2) terá de se encontrar na posição „0/OFF„.
2. Ligar o aparelho a uma tomada de 230 V, 50 Hz, instalada convenientemente.
3. Introduzir a peça para amassar ou a peça para bater claras nos ingredientes.
Regular a velocidade desejada, usando o selector de velocidades (2). Mova o
aparelho lentamente para cima e para baixo.
Aviso:
Para obter os melhores resultados, use recipientes altos e não muito grandes.
Tecla turbo (1)
Para obter momentaneamente o número máximo de rotações. Carregando a tecla
em intervalos curtos, consegue-se uma operação intermitente.
ATENÇÃO: Use esta função 2 minutos ao máximo!
Utilize uma varinha e uma velocidade segundo a tabela seguinte:
Produto / Forma de preparação Quantidade máx. Varinha Velocidade Funcionamento máx.
Massa pesada (p. ex. massa para pão 500 g Varinha de amassar 3 -5 3 min
Massa normal para bolos 750 g Varinha de bater claras 2 -5 5 min
Massa para tartes, wafles, natas 750 g Varinha de bater claras 1 -5 5 min
Soltar a peça para amassar/para bater claras
Para soltar estas peças, carregar na tecla (3).
Nota: As varinhas só sairão quando o selector de velocidades (2) se encontrar na
posição „0“.
18
P
5....-05-HM 2830 29.10.2003 8:26 Uhr Seite 18
La página se está cargando...
La página se está cargando...

Elementos de manuseamento
1. Tasto funzionamento rapido 5. Fruste
2. 5 velocità 6. Gancio per l’impasto
3. Tasto di sblocco 7. Apertura per il gancio
4. Frullatore da imastatura marcato
Messa in funzione
Accertarsi che l’apparecchio sia staccato dalla rete elettrica.
Montaggio della frusta / del gancio per l’impasto
Spingere entrambe le fruste ovvero i ganci impastatori nel fondo dell’apparecchio e
girare leggermente fino all’arresto meccanico.
Attenzione: Il gancio per impastare /frullare marcato deve essere inserito nell’
apertura sinistra (7)!
Uso dell’apparecchio
1. Accertarsi che l’interruttore di velocità (2) sia su “0/Off”.
2. Collegare l’apparecchio ad una presa regolarmente installata da 230 V, 50 Hz.
3. Immergere i ganci impastatori o le fruste nell’impasto da miscelare. Impostare la
velocità desiderata con l’interruttore di velocità (2). Muovere leggermente l’ap-
parecchio.
Avvertenza:
per avere risultati ottimali usare recipienti dalle pareti alte e non troppo grandi.
Tasto funzionamento rapido (1)
Per passare in breve tempo al numero massimo di giri. Premendo a brevi intervalli
potete lavorare con il funzionamento ad impulsi.
Attenzione: non utilizzare questa funzione per più di 2 minuti!
Per l’uso scegliere un utensile e una velocità conformemente alla seguente tabella:
prodotto / tipo di preparazione quantità massima utensile velocità durata massima
pasta pesante (per esempio
pasta per il pane o la pizza) 500 g fruste a spirale 3 -5 3 min
pasta per dolci 750 g fruste a filo 2 -5 5 min
pasta per biscotto o cialde, panna 750 g fruste a filo 1 -5 5 min
Staccare il gancio impastatore / la frusta
Per staccare i ganci premere il tasto di sblocco (3).
Nota: i ganci vengono espulsi unicamente se l’ interruttore della velocit’a (2) si trova
in posizione „0“.
21
I
5....-05-HM 2830 29.10.2003 8:26 Uhr Seite 21
La página se está cargando...
La página se está cargando...

Initial Operation
Ensure that the machine is not connected to the mains.
Assembly of the Whisk/Kneading Hook
Press the two whisks or kneading hooks on the bottom by turning slightly until they
lock in place.
Note: The marked kneading hook/whisk has to be inserted into the left-hand ope-
ning (7) of the mixer!
Using the Machine
1. Please ensure that the speed switch (2) is turned to "0/OFF".
2. Connect the mixer to a properly installed power socket, 230 V, 50 Hz.
3. Insert the kneading hook or whisk into the food to be mixed.
Set the desired speed with the speed switch (2). Tilt the machine slightly up and
down.
Note: For optimum results use high-walled vessels that are not too large.
Turbo Switch (1)
This is for switching to maximum speed for a short time. Press at short intervals for
pulsed mode operation.
WARNING: Do not use this function for more than 2 minutes!
Always choose a utensil and a speed according to the following table:
Product/ Max. Quantity Utensil Level Max.
Type of Preparation Operating Time
Heavy dough (e.g. yeast dough) 500 g kneader hook 3 -5 3 min
Cake mixture 750 g beater 2 -5 5 min
Sponge mixture, wafer mixture, Cream 750 g beater 1 -5 5 min
Releasing the kneading hook / whisk
In order to release the hook, press the release button (3).
Note: The hooks can only be removed if the speed switch (2) is in the "0" position.
Cleaning
1. Before cleaning the equipment, always remove the mains plug from the socket.
2. Only a damp cloth should be used for cleaning the outside of the machine.
3. Do not use any caustic or abrasive detergents.
4. Removable parts that have been in contact with the dough or mixture (kneading
utensil and whisk) can be cleaned in soapy water.
24
GB
5....-05-HM 2830 29.10.2003 8:26 Uhr Seite 24
La página se está cargando...
La página se está cargando...
La página se está cargando...
La página se está cargando...
La página se está cargando...
La página se está cargando...
La página se está cargando...
La página se está cargando...
La página se está cargando...
La página se está cargando...
La página se está cargando...
La página se está cargando...

A használati tartozékok bemutatása
1. Turbógomb 4. Kézi mixer 7. A megjelölt
2. 5 fokozatú kapcsoló 5. Keverőpálca dagasztóhorog
3. Kivetőbillentyű 6. Dagasztóhorog nyílása
Beinditás
Kérjük ellenőrizze, hogy a berendezés ki van húzva a hálózatból.
A habverő/dagasztóhorog
Kérjük helyezze be mindkét felverőpálcát illetve összekavaró pálcát a berende-
zés alsó részén található nyílásba és könnyedén fordítsa meg addig a pillanatig
míg be nem kattannak a helyükre.
Figyelem: A megjelölt dagasztóhorgot/habverőt a mixer bal oldali nyílásába (7)
kell dugni!
A berendezés használata
1.Győződjék meg róla, hogy a sebességkapcsoló (2) „0/OFF“ állásban van-e!
2. Csatlakoztassa a készüléket előírásszerűen szerelt, 230V, 50Hz-es konnek-
torba!
3. Nyomja bele a dagasztóhorgokat, ill. a habverőt a mixelendő anyagba! Állít-
sa be a sebességkapcsolóval (2) a kívánt sebességet! Keverés közben kér-
jük könnyedén mozgassa a berendezést egyik majd másik irányba.
Vigyázat: Ahhoz, hogy optimális eredményt érjen el, a keveréshez kérjük hasz-
náljon egy nem túlságosan nagy de mély tálat.
Turbó funkció gombja (1)
Rendeltetése a legmagasabb forgási sebességre történő és rövid időre szóló
kapcsolás. Ha Önök rövid időközönként nyomják meg ezt a gombot, akkor a
berendezés pulzusonként fog működni.
VIGYÁZAT: Kérjük ne használja ezt a funkciót több mint 2 percig!
Kies voor het gebruik een hulpstuk en een snelheid volgens onderstaande tabel:
Termék/Elkészítési mód Max. tömeg Szerszám Fokozat Max. üzemidő
Sűrű tészta (pl. kelt tészta) 500 g dagasztóhorog
3 -5
3 min
Kevert tészta 750 g habverõ 2 -5 5 min
Piskótatészta, ostyatészta, Tejszín 750 g habverõ 1 -5 5 min
A dagasztóhorgok és a habverő kioldása
A horgok kioldásához nyomja meg a kivetőgombot (3)!
Figyelem: A horgok csak akkor vethetők ki, ha a sebességkapcsoló (2) "0"
állásban van.
37
H
5....-05-HM 2830 29.10.2003 8:26 Uhr Seite 37
La página se está cargando...
La página se está cargando...
La página se está cargando...
La página se está cargando...

Stünings Medien, Krefeld • 10/03
D-47906 Kempen/Germany · Industriering Ost 40
Internet: http://www.clatronic.de · email: inf[email protected]
Technische Daten
Modell: HM 2830
Spannungsversorgung: 230 V, 50 Hz
Leistungsaufnahme: 300 W
Schutzklasse: II
Kurzzeitbetrieb: 5 Min.
Turbo-Betrieb: 2 Min.
Dieses Gerät wurde nach allen zutreffenden,
aktuellen CE-Richtlinien geprüft, wie z.B.
elektromagnetische Verträglichkeit und
Niederspannungsdirektive und wurde nach den
neuesten sicherheitstechnischen Vorschriften
gebaut.
Technische Änderungen vorbehalten!
Bitte führen Sie das ausgediente Gerät
einer umweltgerechten Entsorgung zu.
5....-05-HM 2830 29.10.2003 8:26 Uhr Seite 42
Transcripción de documentos
5....-05-HM 2830 29.10.2003 8:26 Uhr Seite 1 Bedienungsanleitung/Garantie Gebruiksaanwijzing/Garantie • Mode d’emploi/Garantie Instrucciones de servicio/Garantía • Manual de instruções/Garantia Istruzioni per l’uso/Garanzia • Instruction Manual/Guarantee Bruksanvisning/garanti • Instrukcja obsługi/Gwarancja Návod k použití/Záruka • A használati utasítás/garancia Руководство по эксплуатации/Гарантия Handmixer Handmixer • Mixeur Batidora con varilla • Mixer portátil Frullatore • Hand Mixer Håndmikser • Mikser ręczny Ruční mixér • Kézi mixer Ручной миксер HM 2830 5....-05-HM 2830 29.10.2003 8:26 Uhr Seite 2 Inhalt D NL F E P I GB N PL CZ H RUS Inhoud • Sommaire • Indice • Índice • Indice Contents • Innhold • Spis treści • Obsah • Tartalom • Содержание Übersicht Bedienelemente . . . . . . . . . . . . . . . . . . . . . . . . . .Seite Bedienungsanleitung . . . . . . . . . . . . . . . . . . . . . . . . . . . . . . .Seite Garantie . . . . . . . . . . . . . . . . . . . . . . . . . . . . . . . . . . . . . . . .Seite Overzicht bedieningselementen . . . . . . . . . . . . . . . . . . . . . .Pagina Gebruiksaanwijzing . . . . . . . . . . . . . . . . . . . . . . . . . . . . . . . .Pagina Garantie . . . . . . . . . . . . . . . . . . . . . . . . . . . . . . . . . . . . . . . .Pagina Aperçu des éléments de commande . . . . . . . . . . . . . . . . . . .Page Mode d’emploi . . . . . . . . . . . . . . . . . . . . . . . . . . . . . . . . . . .Page Garantie . . . . . . . . . . . . . . . . . . . . . . . . . . . . . . . . . . . . . . . .Page Vista de conjunto Elementos de mando . . . . . . . . . . . . . . . .Página Instrucciones de servicio . . . . . . . . . . . . . . . . . . . . . . . . . . . .Página Garantia . . . . . . . . . . . . . . . . . . . . . . . . . . . . . . . . . . . . . . . .Página Vista geral dos elemntos de comando . . . . . . . . . . . . . . . . .Página Manual de instruções . . . . . . . . . . . . . . . . . . . . . . . . . . . . . .Página Garantía . . . . . . . . . . . . . . . . . . . . . . . . . . . . . . . . . . . . . . . .Página Descrizione dei singoli pezzi . . . . . . . . . . . . . . . . . . . . . . . .Pagina Istruzioni per l’uso . . . . . . . . . . . . . . . . . . . . . . . . . . . . . . . . .Pagina Garanzia . . . . . . . . . . . . . . . . . . . . . . . . . . . . . . . . . . . .Pagina Control element overview . . . . . . . . . . . . . . . . . . . . . . . . . . .Page Instruction Manual . . . . . . . . . . . . . . . . . . . . . . . . . . . . . . . . .Page Guarantee . . . . . . . . . . . . . . . . . . . . . . . . . . . . . . . . . . . . . .Page Oversikt over betjeningselementer . . . . . . . . . . . . . . . . . . . .Side Bruksanvisning . . . . . . . . . . . . . . . . . . . . . . . . . . . . . . . . . . .Side Garanti . . . . . . . . . . . . . . . . . . . . . . . . . . . . . . . . . . . . . . . . .Side Przegląd elemetów obsługi . . . . . . . . . . . . . . . . . . . . . . . . .Strona Instrukcja obsługi . . . . . . . . . . . . . . . . . . . . . . . . . . . . . . . .Strona Gwarancja . . . . . . . . . . . . . . . . . . . . . . . . . . . . . . . . . . .Strona Přehled obsluhovací prvky . . . . . . . . . . . . . . . . . . . . . . . . . .Strana Návod k použití . . . . . . . . . . . . . . . . . . . . . . . . . . . . . . . . . .Strana Záruka . . . . . . . . . . . . . . . . . . . . . . . . . . . . . . . . . . . . .Strana A hasznalt elemek megtekintése . . . . . . . . . . . . . . . . . . . . .Oldal A hasznalati utasítás . . . . . . . . . . . . . . . . . . . . . . . . . . . . . .Oldal Garancia . . . . . . . . . . . . . . . . . . . . . . . . . . . . . . . . . . . . . . . .Oldal Обзор управляющих элементов . . . . . . . . . . . . . . . . . . . .стр. Руководство по эксплуатации . . . . . . . . . . . . . . . . . . . . . .стр. Гарантия . . . . . . . . . . . . . . . . . . . . . . . . . . . . . . . . . . . . . . . . .стр. 3 4 6 3 8 10 3 11 13 3 14 16 3 17 19 3 20 22 3 23 25 3 26 28 3 29 31 3 33 35 3 36 38 3 39 41 5....-05-HM 2830 29.10.2003 8:26 Uhr Seite 5 Inbetriebnahme D Stellen Sie sicher, dass das Gerät vom Netz getrennt ist. Montage der Schneebesen/Knethaken Drücken Sie die beiden Schneebesen bzw. Knethaken an der Unterseite unter leichtem Drehen bis zum mechanischen Einrasten ein. Achtung: Der markierte Knethaken/Schneebesen muss in die linke Öffnung (7) des Mixers eingesteckt werden! Benutzung des Gerätes 1. Stellen Sie sicher, dass der Geschwindigkeitsregler (2) auf 0/AUS steht. 2. Schließen Sie das Gerät an eine vorschriftsmäßig installierte Schutzkontaktsteckdose 230 V, 50 Hz an. 3. Tauchen Sie die Knethaken bzw. Schneebesen in das Mixgut ein. Stellen Sie die gewünschte Geschwindigkeit mit dem Geschwindigkeitsschalter (2) ein. Bewegen Sie das Gerät dabei leicht auf und ab. Hinweis: Verwenden Sie für optimale Ergebnisse hochwandige und nicht zu große Gefäße. Turbo-Taste (1) Zum kurzzeitigen Schalten auf Höchstdrehzahl. Beim Drücken in kurzen Abständen erreichen Sie einen Pulsbetrieb. Achtung: Benutzen Sie diese Funktion maximal 2 Minuten! Wählen Sie für die Anwendung ein Werkzeug und eine Geschwindigkeit gemäß folgender Tabelle: Produkt / Zubereitungsart Schwerer Teig (z. B. Hefeteig) Rührteig Biskuitteig, Waffelteig, Sahne max. Menge 500 g 750 g 750 g Werkzeug Knethaken Schneebesen Schneebesen Stufe 3 -5 2 -5 1 -5 Max. Betriebszeit 3 min 5 min 5 min Knethaken/Schneebesen lösen Um die Haken zu lösen, drücken Sie die Auswurftaste (3). Hinweis: Die Haken lassen sich nur auswerfen, wenn sich der Geschwindigkeitsschalter (2) in Position "0" befindet. 5 5....-05-HM 2830 29.10.2003 8:26 Uhr Service für unsere Haushaltsartikel Verschleißteile für Haushaltsartikel (soweit diese nicht vom Fachmann ausgewechselt werden müssen), Ersatzkannen, Staubsaugerfilterbeutel usw. können Sie mit Angabe des Gerätetyps unter folgender TelefonHotline bestellen: Seite 7 Service für unsere D Unterhaltungselektronik Verschleißteile und Ersatzteile für unsere Unterhaltungselektronik (soweit diese nicht vom Fachmann ausgewechselt werden müssen) wie z. B. Fernbedienungen, Bedienteilklappen, Lautsprecherblenden usw. können Sie mit Angabe des Gerätetyps unter folgender Telefon-Hotline bestellen: 0 21 52 / 20 06 – 888 0 21 52 / 20 06 – 666 Für technische Fragen haben wir für Sie folgende e-mail-Adresse eingerichtet: [email protected] Interessieren Sie sich für weitere Clatronic-Produkte? Besuchen Sie doch einmal unsere Homepage unter www.clatronic.de oder www.clatronic.com 7 5....-05-HM 2830 29.10.2003 8:26 Uhr Seite 8 Algemene veiligheidsinstructies NL • • • • • • • • • Lees vóór de ingebruikname van dit apparaat de handleiding uiterst zorgvuldig door en bewaar deze goed, samen met het garantiebewijs, de kassabon en zo mogelijk de doos met de binnenverpakking. Gebruik het apparaat uitsluitend privé en uitsluitend voor de voorgeschreven toepassing. Dit apparaat is niet geschikt voor commercieel gebruik (tenzij het bedoeld is voor beperkt gebruik in de buitenlucht). Bescherm het tegen hitte, directe zonnestralen, vocht (i geen geval in vloeistoffen dompelen) en scherpe kanten. Gebruik het apparaat niet met vochtige handen. Bij vochtig of nat geworden apparaat onmiddellijk de stroomtoevoer onderbreken. Niet in het water grijpen. Schakel het apparaat uit en onderbreek altijd de stroomtoevoer (trek aan de steker, nooit aan de kabel) wanneer u het apparaat niet gebruikt, hulpstukken aanbrengt, reinigt of wanneer storingen optreden. Laat het ingeschakelde apparaat niet zonder toezicht werken. Schakel het apparaat altijd uit of trek de steker uit de contactdoos (trek aan de steker, niet aan de kabel) voordat u de werkplek verlaat. Bescherm kinderen tegen gevaren en zorg ervoor dat kabels nooit los omlaag hangen en dat het apparaat buiten het bereik van kinderen blijft. Controleer regelmatig of het apparaat beschadigingen vertoont. Een beschadigd apparaat mag niet in gebruik worden genomen. Repareer het apparaat nooit zelf, maar breng het naar een geautoriseerde vakman. Voorkom gevaren en laat een defecte kabel altijd alleen door de fabrikant, onze technische dienst of een eender gekwalificeerde persoon vervangen door een soortgelijke kabel. Gebruik alleen originele reserveonderdelen. Neem de onderstaande “Speciale veiligheidsinstructies“ in acht. Speciale veiligheidsinstructies voor dit apparaat • • • • • Raak nooit bewegende delen van het apparaat aan en wacht altijd tot deze stilstaan. Voor de vervanging van hulpstukken moet het apparaat uitgeschakeld en de stroomtoevoer onderbroken zijn! Steek de haken of de kloppers altijd volledig in het menggoed voordat u inschakelt. Zo voorkomt u spatten. Gebruik deze mixer alleen voor het mengen van voedingsmiddelen. Laat de mixer niet langer dan 5 minuten ingeschakeld! Laat het apparaat daarna ca. 10 minuten afkoelen voordat u het opnieuw inschakelt. De bedienungselementen 1. 2. 3. 4. 8 Turbotoets Schakeling met vijf standen Uitstoottoets Mixer 5. Kloppers 6. Deeghaken 7. Opening voor de gekenmerkte kneedhaak 5....-05-HM 2830 29.10.2003 8:26 Uhr Seite 9 Ingebruikname NL Controleer eerst of de stroomtoevoer naar het apparaat onderbroken is. Montage van de kloppers/deeghaken Druk de beide kloppers of deeghaken enigszins draaiend aan de onderzijde in totdat zij mechanisch inklikken. Opgelet: De gekenmerkte kneedhaak/klopper moet in de linkeropening (7) van de mixer worden gestoken! Bediening van het apparaat 1. Controleer of de snelheidsschakelaar (2) op “0/UIT” staat. 2. Sluit het apparaat aan op een correct geïnstalleerd stopcontact 230 V, 30 Hz. 3. Steek de haken of de kloppers in het menggoed. Stel de gewenste snelheid in met de snelheidsschakelaar (2). Beweeg het apparaat tijdens het mengen enigszins omhoog en omlaag. Aanwijzing: Gebruik voor een optimaal resultaat een hoge, niet te grote mengkom. Turbotoets (1) Hiermee kunt u kortstondig naar een hoog toerental schakelen. Als u de knop steeds indrukt en loslaat, kunt u pulserend werken. OPGELET: Gebruik deze functie maximaal 2 minuten! Kies voor het gebruik een hulpstuk en een snelheid volgens onderstaande tabel: Product/bereidingswijze max. Hoeveelheid Zwaar deeg (bijv. gistdeeg) 500 g Roerdeeg 750 g Biscuitdeeg, wafelbeslag, Slagroom 750 g Hulpstuk deeghaken kloppers kloppers Stand 3 -5 2 -5 1 -5 Max. arbeidsdur 3 min 5 min 5 min Deeghaken / kloppers uitstoten Druk op de uitstoottoets (3) om de hulpstukken uit te stoten. Opmerking: De haken kunnen alleen worden verwijderd wanneer de snelheidsschakelaar (2) op "0" staat. Reiniging 1. 2. 3. 4. Trek vóór iedere reiniging de apparaatsteker uit de contactdoos. Gebruik een vochtige doek om de buitenkant van het apparaat te reinigen. Gebruik geen scherpe of schurende reinigingsmiddelen. Afneembare delen die met deeg in contact zijn gekomen (kneedwerktuigen en mengkom) kunt u gewoon afwassen. 9 5....-05-HM 2830 29.10.2003 8:26 Uhr Seite 12 Présentation des différentes parties F 1. Touche turbo 2. Variateur de puissance à 5 postions 3. Touche éjecter 4. Mixeur 5. Fouets 6. Pétrir 7. Orifice pour le fouet pétrin marqué d’un symbole Mise en service Veillez toujours à ce que l’appareil ne soit pas encore branché sur le secteur. Fixation des accessoires pétrir / fouetter Enfoncez les deux fouets ou le pétrin par le dessous, tout en tournant légèrement jusqu’à ce qu’ils s’enclenchent. Attention: L’accessoire pétrin/fouet marqué d’un symbole doit être introduit dans l’orifice gauche (7) du robot! Utilisation de l’appareil 1. Assurez-vous que le variateur de vitesses (2) est placé sur « 0/ Arrêt ». 2. Branchez l’appareil dans une prise de courant de 230V, 50 Hz, en bon état de fonctionnement. 3. Plongez les pétrins ou fouets dans les aliments. Réglez la vitesse desirée á l' aide du variateur de vitesse (2). Bougez l’appareil simultanément légèrement de haut en bas. Remarque: Pour de meilleurs résultats, utilisez des récipients pas trop grands et à bords hauts. Touche turbo (1) Pour une courte utilisation à très grande vitesse. En appuyant par à-coup, vous obtenez un fonctionnement Pulse. ATTENTION: N’utilisez cette fonction que 2 minutes maximum! Choisissez, selon l’utilisation, l’accessoire et la vitesse adaptés d’après le tableau suivant: Produit/mode de préparation quantité max. Pâte épaisse (par ex. pâte à levain) Pâte à gâteau Pâte à biscuit , à gaufre, Crème fraîche 500 g 750 g 750 g accessoires position pétrin fouet mélangeur fouet mélangeur 3 -5 2 -5 1 -5 durée max. de fonctionnement 3 min 5 min 5 min Détacher les pétrins / fouets Pour détacher les accessoires, appuyez sur la touche éjecter (3). Remarque: les fouets ne peuvent être éjectés que lorsque le variateur de vitesses (2) se trouve sur la position „0”. 12 5....-05-HM 2830 29.10.2003 8:26 Uhr Seite 14 Indicaciones generales de seguridad E • • • • • • • • • Antes de la puesta en servicio de este aparato lea detenidamente el manual de instrucciones y guarde este bien incluido la garantía, el recibo de pago y si es posible también el cartón de embalaje con el embalaje interior. Solamente utilice el aparato para el uso privado y para el fin previsto. Este aparato no está destinado para el uso profesional. No lo utilice al aire libre (en excepto que esté destinado para el uso limitado al aire libre). No lo exponga al calor, a la entrada directa de rayos de sol, a la humedad ( en ningún caso sumerja el aparato en agua) y a los cantos agudos. No utilice el aparato con las manos húmedas. En caso de que el aparato esté húmedo o mojado retire de momento la clavija de la caja de enchufe. No tocar el agua. Desconecte el aparato y siempre retire la clavija de la caja de enchufe (tire de la clavija no del cable), cuando no quiera utilizar el aparato, montar piezas o en caso de limpieza o defectos. No utilice el aparato sin vigilancia. En caso de que tenga que dejar su lugar de trabajo, desconecte siempre el aparato o retire la clavija de la caja de enchufe (por favor tire de la clavija y no del cable). Para evitar que los niños se hagan daños eléctricos, siempre tenga atención, que el cable no cuelgue hacia abajo y que los niños no tengan acceso al aparato. Controle regularmente si el aparato o el cable tiene defectos. No ponga en servicio un aparato defecto. No repare el aparato por su cuenta, sino vaya a un establecimiento autorizado. Para evitar peligros, deje sustituir un cable defecto por uno de la misma calidad solamente por el fabricante, nuestro servicio al cliente o una similar persona cualificada. Solamente utilice accesorios originales. Por favor tenga atención a las “Indicaciones especiales de seguridad…“ indicadas a continuación. Consejos de seguridad especiales para este aparato • • • • • 14 No toque nunca ningún de los accesorios del aparato cuando estos se mueven todavía. Espere hasta que se paren. ¡Antes de cambiar los accesorios debe estar el aparato apagado y desconectado de la red! Para evitar salpicaduras, introduzca antes de la conexión las varillas siempre por completo en el alimento a batir. Sólo bata o mezcle, con este aparato, productos alimenticios. ¡No deje el aparato más de 5 minutos en función! ¡Después, antes de usarlo otra vez, deje enfríar el aparato unos 10 minutos! 5....-05-HM 2830 29.10.2003 8:26 Uhr Seite 15 Presentación de las partes 1. Botón turbo 2. 5 velocidades 3. Botón de liberación 4. Batidora de mano 5. Batidor 6. Gancho amasador E 7. Abertura para el gancho amasador marcado Puesta en marcha Siempre tenga cuidado que el aparato ne esté todavía conectado a la red. Montaje del batidor/gancho amasador Empuje los dos brazos batidores o el brazo triturador por debajo, girándolos ligeramente hasta que se enganchen. Atención: ¡El gancho amasador marcado/las varillas deben ser introducidas en la abertura izquierda (7) del batidor! Utilización del aparato 1. Asegúrese, que el interruptor de velocidad (2) esté en posición “0/OFF”. 2. Conecte el aparato a una caja de enchufe 230 V, 50 Hz instalada por la norma. 3. Sumerja el gancho amasador y batidor en el alimento a batir. Ajuste la velocidad deseada con el interruptor de velocidad (2). Mueva el aparato al mismo tiempo ligeramente de arriba hacia abajo. Observación: Para los mejores resultados, utilize recipientes que no estén demasido grandes y que tengan bordes altos. Tecla turbo (1) Para una utilización corta a alta velocidad. Apriete la tecla por intermitencias para obtener un funcionamiento Pulso. CUIDADO: Sólo utilize esta función 2 minutos máximo! Para la utilización elija una herramienta y una velocidad según la tabla a continuación: Producto / Cantidad máxima Herramienta Método de preparación Masa pesada (p.ej. masa de levadura) 500 g ganchos amasadores Pastaflora 750 g ganchos batidores Masa de bizcocho, gofres, Nata 750 g ganchos batidores Escalón Tiempo de uso máximo 3 -5 2 -5 1 -5 3 min 5 min 5 min Liberar gancho amasador / batidor Para liberar los ganchos, presione el botón de liberación (3). Nota: Los ganchos solamente se dejan expulsar, si el interruptor de velocidad (2) se encuentra en la posición „0“. 15 5....-05-HM 2830 29.10.2003 8:26 Uhr Seite 16 Limpieza E 1. 2. 3. 4. Antes de cada limpieza, retire la clavija de la caja de enchufe. Para la limpieza exterior del aparato solamente utilice un paño humedecido. No utilice detergentes agresivos o abrasivos. Piezas desmontables que hayan entrado en contacto con la masa (las herramientas de amasar y las varillas) se pueden limpiar en un baño jabonoso. Este aparato se ha examinado según las normativas actuales y vigentes de la Comunidad Europea, como p.ej. compatibilidad electromagnética y directiva de baja tensión y se ha construido según las más nuevas especificaciones en razón de la seguridad. No reservamos el derecho de efectuar modificaciones técnicas. Garantía Para el aparato comercializado por nosotros nos responsabilizamos con una garantía de 24 meses a partir de la fecha de compra (factura de compra). Durante el período de garantía nos encargamos gratuítamente de los defectos del aparato y de los accesorios*), que se hayan originado por defectos del material o de la fabricación. Dependiendo de nuestra estimación se realizará una reparación o un cambio. ¡Los servicios de garantía no prolangan la garantía, ni se incia por ello un período nuevo de garantía! Como comprobante para la garantía es válido la factura de compra. Sin este comprobante no se podrá realizar un cambio o una reparación gratuíta. En caso de garantía entregue el aparato completo en su embalaje original junto con la factura a su agente comerciante. *) Defectos en las piezas de accesorio, no significan automáticamente el recambio gratuito del aparato completo. ¡En este caso dirijase por favor a nuestra linea de atención al cliente! ¡Rotos de vidrio o roturas en las piezas de plástico deben pagarse siempre por el cliente ! Defectos en los accesorios de uso o en las piezas de desgaste (p.ej. escobillas de carbón del motor, varillas amasadoras, correas de transmisión, mando a distancia de repuesto, cepillos de dientes de repuesto, hojas de sierra etc.), como también la limpieza, mantenimiento o el recambio de piezas de desgaste no recaen en la garantía e irán al cargo del cliente! En caso de intervención ajena se expira la garantía. Después de la garantía Después de haber expirado la garantía se pueden realizar las reparaciones por el concesionario o por el servicio de reparaciones. Los gastos irán al cargo del cliente. 16 5....-05-HM 2830 29.10.2003 8:26 Uhr Seite 18 Elementos de manuseamento P 1. 2. 3. 4. Tecla turbo 5 velocidades Tecla para soltar as peças Batedeira de mão 5. Amassar e bater claras 6. Varinha de amassar 7. Abertura para a varinha de amassar com marcação Colocação em funcionamento Assegure-se que o aparelho esteja separado da rede. Montagem da varinha de bater claras/varinha de amassar Introduza os dois batedores de claras ou ganchos amassadores na parte de baixo, girando-os ligeiramente, até que haja um engate mecânico. Atenção: A varinha de amassar/de bater claras com marcação deverá ser introduzida na abertura esquerda (7) da batedeira! Uso do aparelho 1. O selector de velocidades (2) terá de se encontrar na posição „0/OFF„. 2. Ligar o aparelho a uma tomada de 230 V, 50 Hz, instalada convenientemente. 3. Introduzir a peça para amassar ou a peça para bater claras nos ingredientes. Regular a velocidade desejada, usando o selector de velocidades (2). Mova o aparelho lentamente para cima e para baixo. Aviso: Para obter os melhores resultados, use recipientes altos e não muito grandes. Tecla turbo (1) Para obter momentaneamente o número máximo de rotações. Carregando a tecla em intervalos curtos, consegue-se uma operação intermitente. ATENÇÃO: Use esta função 2 minutos ao máximo! Utilize uma varinha e uma velocidade segundo a tabela seguinte: Produto / Forma de preparação Quantidade máx. Varinha Massa pesada (p. ex. massa para pão 500 g Varinha de amassar Massa normal para bolos 750 g Varinha de bater claras Massa para tartes, wafles, natas 750 g Varinha de bater claras Velocidade 3 -5 2 -5 1 -5 Funcionamento máx. 3 min 5 min 5 min Soltar a peça para amassar/para bater claras Para soltar estas peças, carregar na tecla (3). Nota: As varinhas só sairão quando o selector de velocidades (2) se encontrar na posição „0“. 18 5....-05-HM 2830 29.10.2003 8:26 Uhr Seite 21 Elementos de manuseamento 1. 2. 3. 4. Tasto funzionamento rapido 5 velocità Tasto di sblocco Frullatore I 5. Fruste 6. Gancio per l’impasto 7. Apertura per il gancio da imastatura marcato Messa in funzione Accertarsi che l’apparecchio sia staccato dalla rete elettrica. Montaggio della frusta / del gancio per l’impasto Spingere entrambe le fruste ovvero i ganci impastatori nel fondo dell’apparecchio e girare leggermente fino all’arresto meccanico. Attenzione: Il gancio per impastare /frullare marcato deve essere inserito nell’ apertura sinistra (7)! Uso dell’apparecchio 1. Accertarsi che l’interruttore di velocità (2) sia su “0/Off”. 2. Collegare l’apparecchio ad una presa regolarmente installata da 230 V, 50 Hz. 3. Immergere i ganci impastatori o le fruste nell’impasto da miscelare. Impostare la velocità desiderata con l’interruttore di velocità (2). Muovere leggermente l’apparecchio. Avvertenza: per avere risultati ottimali usare recipienti dalle pareti alte e non troppo grandi. Tasto funzionamento rapido (1) Per passare in breve tempo al numero massimo di giri. Premendo a brevi intervalli potete lavorare con il funzionamento ad impulsi. Attenzione: non utilizzare questa funzione per più di 2 minuti! Per l’uso scegliere un utensile e una velocità conformemente alla seguente tabella: prodotto / tipo di preparazione quantità massima pasta pesante (per esempio pasta per il pane o la pizza) 500 g pasta per dolci 750 g pasta per biscotto o cialde, panna 750 g utensile velocità durata massima fruste a spirale fruste a filo fruste a filo 3 -5 2 -5 1 -5 3 min 5 min 5 min Staccare il gancio impastatore / la frusta Per staccare i ganci premere il tasto di sblocco (3). Nota: i ganci vengono espulsi unicamente se l’ interruttore della velocit’a (2) si trova in posizione „0“. 21 5....-05-HM 2830 29.10.2003 8:26 Uhr Seite 24 Initial Operation GB Ensure that the machine is not connected to the mains. Assembly of the Whisk/Kneading Hook Press the two whisks or kneading hooks on the bottom by turning slightly until they lock in place. Note: The marked kneading hook/whisk has to be inserted into the left-hand opening (7) of the mixer! Using the Machine 1. Please ensure that the speed switch (2) is turned to "0/OFF". 2. Connect the mixer to a properly installed power socket, 230 V, 50 Hz. 3. Insert the kneading hook or whisk into the food to be mixed. Set the desired speed with the speed switch (2). Tilt the machine slightly up and down. Note: For optimum results use high-walled vessels that are not too large. Turbo Switch (1) This is for switching to maximum speed for a short time. Press at short intervals for pulsed mode operation. WARNING: Do not use this function for more than 2 minutes! Always choose a utensil and a speed according to the following table: Product/ Max. Quantity Type of Preparation Heavy dough (e.g. yeast dough) 500 g Cake mixture 750 g Sponge mixture, wafer mixture, Cream 750 g Utensil Level kneader hook beater beater 3 -5 2 -5 1 -5 Max. Operating Time 3 min 5 min 5 min Releasing the kneading hook / whisk In order to release the hook, press the release button (3). Note: The hooks can only be removed if the speed switch (2) is in the "0" position. Cleaning 1. 2. 3. 4. 24 Before cleaning the equipment, always remove the mains plug from the socket. Only a damp cloth should be used for cleaning the outside of the machine. Do not use any caustic or abrasive detergents. Removable parts that have been in contact with the dough or mixture (kneading utensil and whisk) can be cleaned in soapy water. 5....-05-HM 2830 29.10.2003 8:26 Uhr Seite 37 A használati tartozékok bemutatása 1. Turbógomb 2. 5 fokozatú kapcsoló 3. Kivetőbillentyű 4. Kézi mixer 5. Keverőpálca 6. Dagasztóhorog H 7. A megjelölt dagasztóhorog nyílása Beinditás Kérjük ellenőrizze, hogy a berendezés ki van húzva a hálózatból. A habverő/dagasztóhorog Kérjük helyezze be mindkét felverőpálcát illetve összekavaró pálcát a berendezés alsó részén található nyílásba és könnyedén fordítsa meg addig a pillanatig míg be nem kattannak a helyükre. Figyelem: A megjelölt dagasztóhorgot/habverőt a mixer bal oldali nyílásába (7) kell dugni! A berendezés használata 1. Győződjék meg róla, hogy a sebességkapcsoló (2) „0/OFF“ állásban van-e! 2. Csatlakoztassa a készüléket előírásszerűen szerelt, 230V, 50Hz-es konnektorba! 3. Nyomja bele a dagasztóhorgokat, ill. a habverőt a mixelendő anyagba! Állítsa be a sebességkapcsolóval (2) a kívánt sebességet! Keverés közben kérjük könnyedén mozgassa a berendezést egyik majd másik irányba. Vigyázat: Ahhoz, hogy optimális eredményt érjen el, a keveréshez kérjük használjon egy nem túlságosan nagy de mély tálat. Turbó funkció gombja (1) Rendeltetése a legmagasabb forgási sebességre történő és rövid időre szóló kapcsolás. Ha Önök rövid időközönként nyomják meg ezt a gombot, akkor a berendezés pulzusonként fog működni. VIGYÁZAT: Kérjük ne használja ezt a funkciót több mint 2 percig! Kies voor het gebruik een hulpstuk en een snelheid volgens onderstaande tabel: Termék/Elkészítési mód Max. tömeg Sűrű tészta (pl. kelt tészta) 500 g Kevert tészta 750 g Piskótatészta, ostyatészta, Tejszín 750 g Szerszám dagasztóhorog habverõ habverõ Fokozat 3 -5 2 -5 1 -5 Max. üzemidő 3 min 5 min 5 min A dagasztóhorgok és a habverő kioldása A horgok kioldásához nyomja meg a kivetőgombot (3)! Figyelem: A horgok csak akkor vethetők ki, ha a sebességkapcsoló (2) "0" állásban van. 37 5....-05-HM 2830 29.10.2003 8:26 Uhr Seite 42 Technische Daten Modell: HM 2830 Spannungsversorgung: 230 V, 50 Hz Leistungsaufnahme: 300 W Schutzklasse: II Kurzzeitbetrieb: 5 Min. Turbo-Betrieb: 2 Min. Dieses Gerät wurde nach allen zutreffenden, aktuellen CE-Richtlinien geprüft, wie z.B. elektromagnetische Verträglichkeit und Niederspannungsdirektive und wurde nach den neuesten sicherheitstechnischen Vorschriften gebaut. Technische Änderungen vorbehalten! D-47906 Kempen/Germany · Industriering Ost 40 Internet: http://www.clatronic.de · email: [email protected] Stünings Medien, Krefeld • 10/03 Bitte führen Sie das ausgediente Gerät einer umweltgerechten Entsorgung zu.-
 1
1
-
 2
2
-
 3
3
-
 4
4
-
 5
5
-
 6
6
-
 7
7
-
 8
8
-
 9
9
-
 10
10
-
 11
11
-
 12
12
-
 13
13
-
 14
14
-
 15
15
-
 16
16
-
 17
17
-
 18
18
-
 19
19
-
 20
20
-
 21
21
-
 22
22
-
 23
23
-
 24
24
-
 25
25
-
 26
26
-
 27
27
-
 28
28
-
 29
29
-
 30
30
-
 31
31
-
 32
32
-
 33
33
-
 34
34
-
 35
35
-
 36
36
-
 37
37
-
 38
38
-
 39
39
-
 40
40
-
 41
41
-
 42
42


Clatronic HM 2830 El manual del propietario
- Tipo
- El manual del propietario
en otros idiomas
- français: Clatronic HM 2830 Le manuel du propriétaire
- italiano: Clatronic HM 2830 Manuale del proprietario
- English: Clatronic HM 2830 Owner's manual
- Deutsch: Clatronic HM 2830 Bedienungsanleitung
- русский: Clatronic HM 2830 Инструкция по применению
- Nederlands: Clatronic HM 2830 de handleiding
- português: Clatronic HM 2830 Manual do proprietário
- polski: Clatronic HM 2830 Instrukcja obsługi
- čeština: Clatronic HM 2830 Návod k obsluze
Artículos relacionados
-
Clatronic hm 2935 El manual del propietario
-
Clatronic HMS 2739 Manual de usuario
-
-
-
-
-
-
-
-
