Hampton Bay DE101 Instrucciones de operación
- Tipo
- Instrucciones de operación

HAMPTONBAY.com
Please contact 1-855-HD-HAMPTON for further assistance.
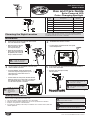
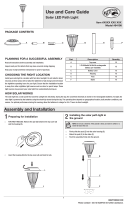
Installation
2
TURNING THE SWITCH “AUTO”
□ Put the switch, located under the solar panel,
to the AUTO position.
3
ADJUSTING THE DIMMER SWITCH AND
SWITCHING COLORS
□ Using the dimmer switch (B) on the back
of the solar top housing (A) allows you to
adjust the focus of the Smart Focus™
Solar Spot Light.
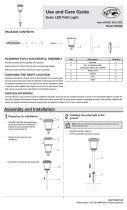
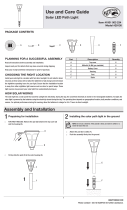
5
□ Push the solar spot light asembly
into the ground.
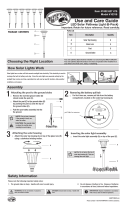
Safety Information
Please note the following important safety notes:
1. The ground stake is sharp. Handle with care to avoid injury.
2. Clean the solar panel with a damp cloth. Do not use any chemicals or abrasives.
3. Keep the solar panel free of dirt and debris.
4. Do not dispose of battery in fire. Dispose of batteries in accordance all local, state and
federal regulations.
WARNING: Do not use hammer. If ground is
hard, use water to soften.
DANGER: Ground stake is sharp. Handle with
care.
IMPORTANT: Dispose of batteries in accordance
with all local, state and federal regulations.
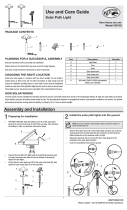
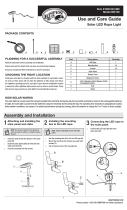
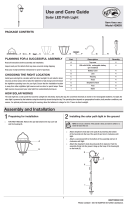
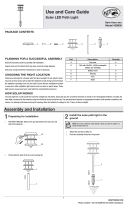
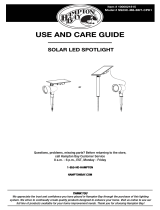
PACKAGE CONTENTS
Use and Care Guide
Solar Powered LED
Color-Changing Spotlight
Item #xxxx xxx xxx
Model #10238
Part Description Quantity
A
Solar Top Housing 1
B Dimmer 1
C Screw 1
1
ATTACHING THE SOLAR TOP HOUSING
TO THE GROUND STAKE
□ Align the ground stake (D)
to the screw (C) on the
solar top housing (A).
CAUTION: The ground stake
is sharp. Be careful when
handling to avoid injury.
□ Attach the ground stake (D)
to the solar top housing (A)
by tightening the screw (C)
using a clockwise motion.
Choosing the Right Location
Your solar spot light should be installed in an area that gets DIRECT SUNLIGHT.
Your solar spot light will produce more hours of operation when installed in an
area which is free from cover, shade, or shadowing.
□ Located under the solar panel, the Color Control
Button (E) allows you to manually cycle through
the colored LED options. You may also use the
use the remote (F) that is included.
INSERTING THE SOLAR SPOT LIGHT ASSEMBLY
INTO THE GROUND
D
E
F
Ground Stake
Color Contron Button
Remote
1
1
1
NOTE: Do not press hard on top
of solar top housing (A). This can
damage the solar light.
NOTE: Do not use a hammer.
If the ground is hard, use water
to soften.
NOTE: The remote (F)
functions best
within 5 meters
and at an angle
of 45°.

HAMPTONBAY.com
Please contact 1-855-HD-HAMPTON for further assistance.
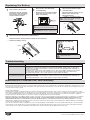
Replacing the Battery
1
REPLACING THE BATTERY
□ Remove the solar top assembly
(A) from the ground stake (D) by
loosening the screw (C) with a
counter-clockwise motion.
2
REPLACING THE BATTERY
(CONTINUED)
□ Remove the screws from the bottom
of the solar panel (A) using a screw-
driver (not included.)
CAUTION: Dispose of battery in accordance
with local, state and federal regulations.
DANGER: Do not dispose of battery in fire.
3
REPLACING THE BATTERY
(CONTINUED)
□ Remove the battery cover (1) on the
bottom of the solar panel (A).
□ Remove the battery.
NOTE: Use only Lithium Phosphate
18500 (3.2V 1000mAh) rechargeable
battery for spot light.
Battery
1
4
REPLACING THE BATTERY (CONTINUED)
□ Replace the battery, paying attention to match the correct polarity.
□ Reattach the battery cover (1).
Battery
1
Troubleshooting
Problem
Solution
Light stops working after a
period of working properly:
-The battery is not adequately charged. Place the unit in direct sunlight for three sunny days.
-The lights are located in an area that does not provide enough sunlight. If a tree, house, or other object
is shading the solar light, move the light to a sunnier location. Also note that lighting times will always be
shorter on overcast days.
-The light level is too high for the solar spotlight to turn on. The solar spotlight is designed to turn on when
it is dark outside. Make sure the solar top housing is not under any direct light source when testing.
-The battery may be weak or can no longer produce a charge. Replace the battery.
The light only operates for a
short duration in the evening:
-The lights are located in an area that does not provide enough sunlight. If a tree, house, or other object
is shading the solar light, move the light to a sunnier location. Also note that lighting times will always be
shorter on overcast days.
-The battery may be weak or can no longer produce a charge. Replace the battery.
Manufacturer’s Limited One-Year Warranty
WHAT IS COVERED
Manufacturer warrants this product to be free for one (1) year against any defects that are due to faulty materials or workmanship. Manufacturer shall promptly correct such
defects by repair or replacement, at its option. This warranty covers only product defects and shall expire one year after the date of purchase by the original purchaser. Proof
of Purchase (Sales Receipt) is required.
WHAT IS NOT COVERED
This warranty does not apply to (1) bulbs and batteries or (2) defects caused by and resulting from misuse, neglect, accident or improper operation, maintenance, storage,
transportation, or handling of the product. The warranty does not cover any transportation costs for return of the product or for reshipment of any repaired or replaced product,
or cost associated with installation, removal or reinstallation of the product. This warranty extends to the original purchaser only and is not transferable or assignable to
subsequent purchasers. This warranty does not cover surface scratches or weathering as this is considered normal wear.
Manufacturer shall have no responsibility for damage to persons or property or other loss or injury resulting from a defect in the product or from improper use or installation.
UNDER NO CIRCUMSTANCES SHALL MANUFACTURER BE LIABLE FOR SPECIAL OR CONSEQUENTIAL DAMAGES. ANY WARRANTIES IMPLIED BY LAW, INCLUDING THOSE OF
MERCHANTABILITY AND FITNESS FOR A PARTICULAR PURPOSE, ARE LIMITED IN DURATION TO ONE YEAR AFTER THE DATE OF THE ORIGINAL PURCHASE. In no event shall
the Manufacturer’s liability under this warranty exceed the cost of repair or replacing such defective product, and the Manufacturer’s maximum liability under any warranty
is in lieu of all other warranties expressed or implied.
Some states do not allow the exclusion or limitation of special or consequential damages or allow limitations on how long an implied warranty lasts, so the above limitation
may not apply to you. This warranty gives you specific legal rights, and you may have rights that vary from state to state. If you feel you have a claim under this warranty,
contact consumer service for advice on handling the claim. Written notice of any defects must be given to Manufacturer upon discovery.
NOTE: Use CR2025 Lithium Button Cell
battery for the remote.

HAMPTONBAY.com
Póngase en contacto con el 1-855-HD-HAMPTON para asistencia adicional.
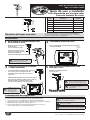
Instalación
2
COLOCACIÓN DEL INTERRUPTOR «AUTO»
□ Ponga el interruptor, ubicado debajo del panel solar,
en la posición AUTO.
3
AJUSTE DEL INTERRUPTOR ATENUADOR
Y CAMBIO DE COLORES
□ Uso del interruptor atenuador (B) en la parte
trasera de la carcasa superior solar (A)
le permite ajuste el foco del Smart Focus™
Foco solar
5
□ Presione el ensamblaje del foco
solar en el suelo.
Información de seguridad
Por favor, tenga en cuenta las siguientes notas de seguridad importantes:
1. La estaca de suelo es filosa. Manéjese con cuidado para evitar lesiones.
2. Limpie el panel solar con un trapo húmedo. No use productos químicos ni abrasivos.
3. Mantenga el panel solar libre de suciedad y desechos.
4. No deseche las baterías en el fuego. Deseche las baterías de acuerdo con
todas las regulaciones locales, estatales y federales.
ADVERTENCIA: No use martillo. Si el suelo está
duro, use agua para ablandarlo.
PELIGRO: La estaca de suelo es filosa.
Manéjese con cuidado
IMPORTANTE:
Deseche las baterías de acuerdo con
todas las regulaciones locales, estatales y federales.
PAQUETE CONTENIDO
Guía de uso y cuidado
LED alimentado por energía solar
Foco de cambio de color
Núm. de artículo xxxx xxx xxx
Núm. de modelo 10238
Pieza Descripción Cantidad
A
Carcasa superior solar 1
B Atenuador 1
C Atornille
1
Interruptor
AUTO/OFF
1
INSTALACIÓN DE LA LA CARCASA SUPERIOR SOLAR
EN LA ESTACA DE SUELO
□ Alinee la estaca de suelo (D)
al tornillo (C) en
carcasa superior solar (A).
PRECAUCIÓN: La estaca de suelo
es filosa. Tenga cuidado cuando
la maneje para evitar lesiones.
□ Instale la estaca de suelo (D)
a la carcasa superior solar (A)
apretando el tornillo (C)
usando un movimiento hacia la derecha.
Elección del lugar correcto
Su foco solar debe instalarse en un área que obtenga LUZ SOLAR DIRECTA.
Su foco solar producirá más horas de funcionamiento cuando se instala en un
área libre de cubiertas, sombra, o apantallamiento.
□ Ubicado debajo del panel solar, el botón de control
del color (E) le permite cambiar a través opciones
del LED de colores. También puede usar el
uso del control remoto /F) que está incluido.
CÓMO INSERTAR EL ENSAMBLAJE DEL FOCO
SOLAR EN EL SUELO
D
E
F
Estaca de suelo
Botón de control del color
Control remoto
1
1
1
NOTA: No presione fuerte sobre la parte
superior de la carcasa superior solar
(A). Esto puede dañar la lámpara solar.
NOTA: No use un martillo. Si el
suelo está duro, use agua
para ablandarlo.
NOTA: El control remoto
(F) funciones mejor
dentro de 5 metros
y a un ángulo de 45°.
Control remoto (Incuido)

HAMPTONBAY.com
Póngase en contacto con el 1-855-HD-HAMPTON para asistencia adicional.
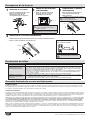
Reemplazo de la batería
1
REEMPLAZO DE LA BATERÍA
□ Retire el ensamblaje del panel solar
(A) de la estaca de tierra (D)
aflojando el tornillo (C) con
un movimiento hacia la izquierda.
2
REEMPLAZO DE LA BATERÍA
(CONTINUACIÓN)
□ Retire los tornillos del fondo
del panel solar (A) usando un
destornillador (no incluido)
PRECAUCIÓN: Deseche las baterías de
acuerdo con las regulaciones locales,
estatales y federales.
PELIGRO:No deseche las baterías en el fuego.
3
REEMPLAZO DE LA BATERÍA
(CONTINUACIÓN)
□ Retire la cubierta de la batería (1)
en el fondo del panel solar (A).
□ Retire la batería.
NOTA: Use únicamente baterías recargables
de fosfato de litio 18500
(3.2V 1000mAh) para el foco.
Batería
1
4
REEMPLAZO DE LA BATERÍA (CONTINUACIÓN)
□ Cambie la batería, prestando atención para hacer coincidir la polaridad correcta.
□ Vuelva a colocar la cubierta de las baterías (1).
Batería
1
Resolución de fallas
Problema
Solución
La lámpara deja de funcionar
después de un periodo de
funcionamiento apropiado:
- La batería no está adecuadamente cargada. Coloque la unidad bajo la luz directa del sol durante tres días soleados.
- Las lámpara están ubicadas en un área que no proporciona suficiente luz solar. Si un árbol, casa u otro
objeto le da sombra a la lámpara solar, mueva la lámpara a un lugar más soleado. Tenga en cuenta también
que las horas de iluminación siempre serán mas cortas en días nublados.
- El nivel de luz es demasiado alto para que el foco solar encienda. El foco solar está diseñado para encenderse
cuando está oscuro afuera. Asegúrese de que la carcasa superior solar no esté bajo ninguna fuente de luz
- Es posible que la batería esté débil o que ya no pueda producir carga. Cambie la batería.
La lámpara solo funciona
durante una corta duración
en la noche:
- Las lámpara están ubicadas en un área que no proporciona suficiente luz solar. Si un árbol, casa u otro objeto
le da sombra a la lámpara solar, mueva la lámpara a un lugar más soleado. Tenga en cuenta también que las
horas de iluminación siempre serán mas cortas en días nublados.
- Es posible que la batería esté débil o que ya no pueda producir carga. Cambie la batería.
Garantía limitada de un año del fabricante
LO QUEESTÁ CUBIERTO
El fabricante garantiza por un (1) año que este producto está libre de cualquier defecto que sea debido a materiales defectuosos o a mano de obra. El fabricante corregirá
inmediatamente tales defectos mediante reparación o reemplazo, a su opción. Esta garantía cubre únicamente defectos del producto y expirará un año después de la fecha
de compra por el comprador original. Es necesaria la prueba de compra (recibo de venta).
LO QUE NO ESTÁ CUBIERTO
Esta garantía no aplica para (1) bombillas y baterías o (2) defectos causados por y resultantes de mal uso, negligencia, accidente u operación, mantenimiento, almacenamiento
inapropiados. transporte, o manejo del producto. La garantía no cubre ningún costo de transporte para devolución del producto o para el reenvío de cualquier producto reparado
o reemplazado. o costos asociados con la instalación, retiro o reinstalación del producto. Esta garantía se extiende al comprador original únicamente y no es transferible ni
atribuible a compradores posteriores. Esta garantía no cubre rayones superficiales o intemperización ya que esto se considera deterioro por uso.
El fabricante no será responsable de daños a personas o la propiedad u otras pérdidas o lesiones que resulten de un defecto en el producto o de uso o instalación inapropiados.
BAJO NINGUNA CIRCUNSTANCIA EL FABRICANTE SERÁ RESPONSABLE DE DAÑOS ESPECIALES O CONSECUENTES. CUALQUIER GARANTÍA IMPLÍCITA POR LA LEY, INCLUYENDO
LAS DE COMERCIALIZACIÓN O IDONEIDAD PARA UN PROPÓSITO PARTICULAR, ESTÁN LIMITADOS EN DURACIÓN A UN AÑO DESPUÉS DE LA FECHA DE LA COMPRA ORIGINAL.
En ningún caso la responsabilidad del fabricante bajo esta garantía excederá el costo de reparación o reemplazo del producto defectuoso, y la máxima responsabilidad del
fabricante bajo esta garantía sustituye a cualquier otra garantía, expresa o implícita.
Algunos estados no permiten la exclusión o limitación de daños incidentales o consecuentes, ni permiten limitaciones sobre la duración de la garantía implícita, de modo que
las limitaciones anteriores podrían no aplicar a usted. Esta garantía le da derechos legales específicos y también puede tener otros derechos que varían de un estado a otro.
Si cree tener un reclamo bajo esta garantía. comuníquese con servicio al consumidor para obtener consejo sobre el manejo de reclamaciones. Luego del hallazgo, se debe dar
notificación escrita al fabricante de cualquier defecto encontrado.
NOTA: Use baterías de botón de litio
CR2025 batería para el control remoto.
directa cuando se pruebe.
TORNILLOS
Reemplazo de la batería
del control remoto
-
 1
1
-
 2
2
-
 3
3
-
 4
4


Hampton Bay DE101 Instrucciones de operación
- Tipo
- Instrucciones de operación
En otros idiomas
Documentos relacionados
-
 Hampton Bay 82056-055SR Guía de instalación
-
 Hampton Bay 29152 Guía de instalación
-
 Hampton Bay 84130 Guía de instalación
-
 Hampton Bay 29603 Guía de instalación
-
 Hampton Bay 93839 Guía de instalación
-
 Hampton Bay SS23C-M8-BKT-CPK1 Guía de instalación
-
 Hampton Bay 84198 Guía de instalación
-
 Hampton Bay 84066 Instrucciones de operación
-
 Hampton Bay 93130 Guía de instalación
-
 Hampton Bay 10318 Guía de instalación


