
1
HAMPTONBAY.COM
Please contact 1-855-HD-HAMPTON for further assistance.
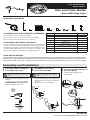
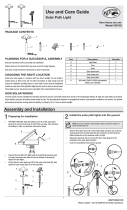
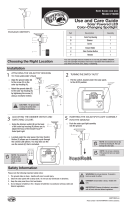
PACKAGE CONTENTS
PLANNING FOR A SUCCESSFUL ASSEMBLY
Read all instructions before assembly and installation.
Inspect each part for defects that may have occurred during shipping.
Keep your receipt and these instructions for proof of purchase.
CHOOSING THE RIGHT LOCATION
Install your solar light in a location with full, direct sunlight. Do not install in shad-
ed areas as these areas will not allow the batteries to fully charge and reduce
the nighttime operating hours for your light. Ensure that the installation location
is away from other nighttime light sources such as street or porch lamps. These
light sources may prevent your solar light from automatically turning on.
Part Description Quantity
A LED Rope 1
B Mounting ties 16
C Screws 16
D Solar Panel 1
E Battery Cover 1
F Waterproof Cover 1
G
3.2V 1000mAh LiFePO4 (Model 18500)
rechargeable battery
1
H Post 1
I Stake 1
HOW SOLAR WORKS
The solar light has a solar panel that converts sunlight into electricity. During the day, the converted electricity is stored in the rechargeable batteries.
At night, the solar light is powered by the batteries using the electricity stored during the day. The operating time depends on geographical location,
daily weather conditions, and season. For optimal performance during the evening, allow the batteries to charge for 6 to 7 hours in direct sunlight.
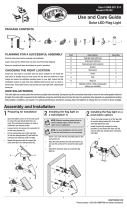
Assembly and Installation
NOTE: Do not use a hammer. If the ground is
hard, use water to soften or a trowel to loosen
the soil.
NOTE: DO NOT PUNCTURE OR CUT THE ROPE
LIGHT.
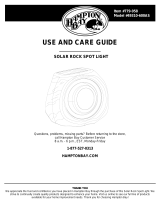
Attaching and installing the
solar panel and stake
Installing the mounting
ties to the LED rope.
□ Insert the post (H) into the bottom of the solar
panel (D).
□
solar panel post (H).
□ Push the assembly into the ground.
□ Use the mounting ties (B) to tie the LED rope (A).
□ Mount the ties (B) on the surface you want with
screws (C).
□ Cut off excess ends of the mounting tie.
1 2
Solar LED Rope Light
Use and Care Guide
Item #1002 643 989
Model #84130
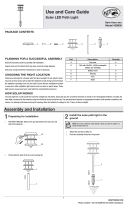
Connecting the LED rope to
the solar panel.
□ Connect the LED rope light (A) to the
solar panel (D).
3
A
B
C
D
E
F
G
H
I
A
B
C
D
H
I
D
A
A
B
C

2
Maintenance
Care & Cleaning
Troubleshooting
Warranty
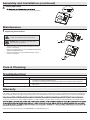
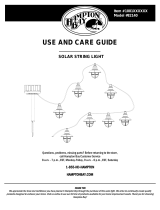
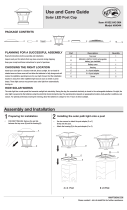
Replacing the batteries
1
CAUTION: When repl
acing the battery, use one (1) 3.2V
1000mAh LiFePO4 (Model 18500) rechargeable battery
IMPORTANT: Dispose of the batteries in accordance with
local, state, and federal regulations.
□ Remove the battery cover (E) and then the waterproof cover (F)
from the solar panel (D).
□ Replace the old battery with a fresh 3.2V 1000mAh LiFePO4 (Model
18500) rechargeable battery (G).
□ Replace the waterproof cover (F) and then the battery cover (E)
onto the solar panel (D).
□ Clean the solar panel with a damp cloth. Do not use any chemicals or abrasives.
Problem Solution
The nightly runtime for the lights is shorter. □ The battery is not adequately charged. Locate the solar light in an area where it can receive the maxi-
mum amount of full, direct sunlight every day.
□ The batteries are reaching the end of their useful life. Replace the old batteries with new batteries.
The lights do not turn on in the evening. □ The solar panel is installed close to other light sources. Relocate the solar panel or eliminate the other
light sources.
The manufacturer warrants this product to be free for two (2) years against any defects that are due to faulty materials or workmanship. This warranty applies only
to the original consumer purchaser and only to products used in normal use and service. If this product is found to be defective, the manufacturer’s only obligation,
and your exclusive remedy, is the repair or replacement of the product at the manufacturer’s discretion, provided that the product has not been damaged through
installed, set up, or used in any way not in accordance with the instructions supplied with the product. This warranty shall not apply to a failure of the product as
a result of an accident, misuse, abuse, negligence, alteration, or faulty installation or any other failure not relating to faulty workmanship. This warranty shall not
-
replacement or repair of said product.
Contact the Customer Service Team at 1-855-HD-HAMPTON or visit www.hamptonbay.com.
D
E
F
G
ONFLASH
ONFLASH
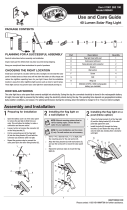
Assembly and Installation (continued)
□ Position switch on the solar panel (D) to your desired function.
D
ONFLASH
ONFLASH
Setting light mode
4

1
HAMPTONBAY.COM
Para obtener asistencia, llama al 1-855-HD-HAMPTON.
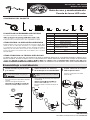
CONTENIDO DEL PAQUETE
PLANIFICAR UN ENSAMBLAJE EXITOSO
Lee todas las instrucciones antes de ensamblar e instalar.
Conserva el recibo y estas instrucciones como comprobante de compra.
CÓMO ELEGIR LA UBICACIÓN ADECUADA
Instala tu lámpara solar en un lugar que reciba luz solar plena y directa. No la
instales en áreas de sombra pues las baterías no se cargarán completamente
y se reducirán las horas de funcionamiento nocturno. Asegúrate de instalar la
lámpara lejos de otras fuentes de luz nocturna como luces públicas o luces de
porche. Estas fuentes de luz pueden evitar que tu lámpara solar se encienda
automáticamente.
Pieza Descripción Cantidad
A Cuerda LED 1
B Amarres de montaje 16
C Tornillos 16
D Panel solar 1
E Cubierta de la batería 1
F Cubierta impermeable 1
G
Bateria recargable de litio 3.2V 100mAh
LiFePO4 (Modelo 18500)
1
H Poste 1
I Estaca 1
CÓMO FUNCIONA LA TECNOLOGÍA SOLAR
La lámpara solar tiene un panel solar que convierte la luz diurna en electricidad. Durante el día, la electricidad convertida se almacena en las
baterías recargables. De noche, la lámpara solar usa la electricidad que las baterías almacenaron durante el día. El tiempo de funcionamiento
baterías se carguen de 6 a 7 horas en la luz solar directa.
Ensamblaje e instalación
NOTA: No uses un martillo. Si la tierra está dura,
usa agua para ablandarla o una paleta para
NOTA: NO PERFORES NI CORTES LA CUERDA DE
LUCES.
Cómo instalar el panel solar
y la estaca
Cómo instalar los amarres
de montaje en la cuerda LED.
□ Coloca el poste (H) en la parte inferior del panel
solar (D).
□ Inserta la estaca (I) para el panel solar
□ Entierra el ensamblaje completo en el suelo.
□ Usa los amarres (B) de montaje para asegurar la
cuerda LED (A).
□
quieras usando tornillos (C).
□ Recorta los extremos sobrantes del amarre de
montaje.
1 2
Cuerda de luces LED solar
Guía de uso y mantenimiento
Artículo núm. 1002 643 989
Modelo núm. 84130
Cómo conectar la cuerda
LED al panel solar.
□ Conecta la cuerda (A) de luces LED al
panel solar (D).
3
A
B
C
D
E
F
G
H
I
A
B
C
D
H
I
D
A
A
B
C

2
Mantenimiento
Cuidado y limpieza
Solución de problemas
Garantía
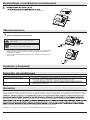
Cómo reemplazar las baterías
1
PRECAUCIÓN: Al
reemplazar la batería, utilice una (1)
batería recargable de Litio de 3.2V 1000mAh LiFePO4
(Modelo 18500).
IMPORTANTE: Desecha las baterías conforme con
las regulaciones locales, estatales y federales.
□ Quita la cubierta de la batería (E) y luego la cubierta impermeable (F) del panel solar (D).
□ Reemplaza la batería vieja con batería recargable nueva de Litio de 3.2V 1000mAh
LiFePO4 (modelo 18500)(G).
□ Coloca de vuelta la cubierta impermeable (F) y luego la cubierta de la batería (E) en el
panel solar (D).
□ Limpia el panel solar con un paño húmedo. No uses ningún químico ni producto abrasivo.
Problema Solución
Las luces funcionan por menos tiempo. □ La batería no está debidamente cargada. Asegúrate de que el producto esté colocado en una zona
donde pueda recibir la cantidad máxima de luz solar directa y total todos los días.
□
Las luces no encienden en la noche. □ El panel solar está instalado cerca de otras fuentes de luz. Cambia la ubicación del panel solar o
elimina las otras fuentes de luz.
El fabricante garantiza que este producto no presentará defectos debidos a materiales o fabricación defectuosos, durante dos (2) años. Esta garantía es válida
sólo para el comprador original y sólo cubre productos en uso y funciones normales. Si se descubre algún defecto en este producto, la única obligación y solución
exclusiva del fabricante, a criterio del mismo, será reparar o reemplazar el producto, siempre y cuando el defecto no sea resultado de un mal uso, abuso, accidente,
instalaciones defectuosas, o cualquier otra falla no relacionada con defectos de fabricación. Esta garantía no se aplica al acabado de ninguna parte del producto,
cualquier costo de mano de obra o gastos relacionados con el reemplazo o reparación de dicho producto.
Comuníquese con el equipo de servicio al cliente al 1-855-HD-HAMPTON o visite www.hamptonbay.com.
D
E
F
G
ONFLASH
ONFLASH
D
ONFLASH
ONFLASH
Ensamblaje e instalación (continuado)
4
□ Posición del interruptor en el panel solar (D) a su función deseada.
-
 1
1
-
 2
2
-
 3
3
-
 4
4


En otros idiomas
- English: Hampton Bay 84130 Installation guide
Documentos relacionados
-
 Hampton Bay 29152 Guía de instalación
-
 Hampton Bay 82056-055SR Guía de instalación
-
 Hampton Bay 79132 Guía de instalación
-
 Hampton Bay 82140 Guía de instalación
-
 Hampton Bay 99940 Guía del usuario
-
 Hampton Bay DE101 Instrucciones de operación
-
 Hampton Bay 49310-600AS Guía de instalación
-
 Hampton Bay 93839 Guía de instalación
-
 Hampton Bay 84044 Instrucciones de operación
-
 Hampton Bay SS23C-M8-BKT-CPK1 Guía de instalación


