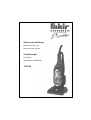
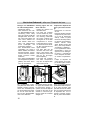
Fakir 1205 BL El manual del propietario
- Categoría
- Aspiradoras
- Tipo
- El manual del propietario
Este manual también es adecuado para

Gebrauchsanleitung
Instructions for use
Instrucciones de uso
Combisauger
Combivac
Aspiradora combinada
1205 BL
Prestige

2

3
Informationen für Ihr Sicherheit und Entsorgungshinweise Seite 4-5
Grundausstattung / Gerätebeschreibung Seite 10-11
Zusammenbau Seite 12
Inbetriebnahme Seite 13-14
Nach dem Gebrauch Seite 15-20
Informations for your safety and notes on disposal page 6-7
Standard equipment / Description page 10-11
Assembly page 12
Operation page 13-14
After use page 15-20
Informaciones para su seguridad e instrucciones para la eliminación
del aparato desechado Pág. 8-9
Eqipamiento básico / Descripción del aparato Pág. 10-11
Ensamblaje Pág. 12
Funcionamiento y uso Pág. 13-14
Después del uso Pág. 15-20
Indice
Inhaltsverzeichnis
Table of contents
D
GB
E

4
Vor dem Gebrauch
• Bitte lesen Sie alle im folgenden aufgeführten Informationen aufmerksam durch. Sie
geben wichtige Hinweise für den Einsatz, die Sicherheit sowie die Wartung/Pflege der
Geräte. Bewahren Sie die Gebrauchsanleitung sorgfältig auf und geben Sie diese
gegebenenfalls an den Nachbesitzer weiter.
• Fakir Geräte entsprechen den anerkannten Regeln der Technik und dem aktuellen
Gerätesicherheitsgesetz.
• Diese Geräte erfüllen die Anforderungen der EG-Richtlinien 89/336/EWG
“Elektromagnetische Verträglichkeit” und 73/23/EWG “Niederspannungsrichtlinie”.
Das Gerät trägt auf dem Typenschild die CE-Kennzeichnung.
• Fakir behält sich Konstruktions- und Ausstattungsänderungen vor.
Allgemeine Hinweise
• Das Gerät nicht in Betrieb nehmen, wenn das Gehäuse erkennbare Schäden (Risse
oder Brüche) aufweist, die Anschlussleitung defekt ist oder der Verdacht auf einen
unsichtbaren Defekt (z.B. nach einem Sturz) besteht.
• Das Gerät nur dann anschließen, wenn die auf dem Typenschild angegebene
Spannung mit der Netzspannung übereinstimmt.
• Die Steckdose muss über einem Haushalts-Sicherungsautomaten 16 A abgesichert
werden.
• Wird das Gerät zweckentfremdet, unsachgemäß bedient oder nicht fachgerecht repa-
riert und gewartet, kann keine Haftung für eventuelle Schäden übernommen werden.
• Vor Inbetriebnahme prüfen, ob alle Filter richtig eingesetzt sind. Das Gerät darf ohne
Filter nicht benutzt werden.
• Nur Original-Fakir-Filter und Fakir-Zubehörteile verwenden.
• Für eine einwandfreie Funktion des Gerätes ist der Einsatz von Staubbehälter mit
Zentrifugalfiler, Motorschutzfilter sowie Abluftfilter erforderlich.
• Beim Reinigen und Warten des Gerätes, beim Auswechseln von Teilen oder beim
Umstellen auf eine andere Funktion ist das Gerät auszuschalten und der Netzstecker
zu ziehen.
• Dieser Combisauger ist kein Arbeitsgerät für Kinder.
• Dieses Gerät ist nicht zum Saugen gesundheitsgefährdender Stoffe geeignet.
• Reparaturen dürfen nur von Fachkräften ( z.B. Fakir-Kundendienst - Adressen siehe
Verzeichnis ) ausgeführt werden. Dabei dürfen nur Original Fakir-Ersatzteile einge-
setzt werden. Nicht fachgerecht reparierte Geräte stellen eine Gefahr für den Benutzer
dar.
Informationen für Ihre Sicherheit und Entsorgungshinweise

5
Sicherheits-Hinweise
• Den Stecker nie über die Anschlussleitung aus der Steckdose ziehen.
• Die Anschlussleitung nicht über scharfe Kanten ziehen oder einklemmen.
• Keine beschädigten Verlängerungsleitungen verwenden.
• Die Netzanschlussleitung darf nur von einer autorisierten Fakir-Kundendienstwerkstatt
ersetzt werden.
• Düsen und Rohr-Enden dürfen niemals in die Nähe von Augen und Ohren gelangen.
• Das Gerät ist nur zur Trockenreinigung zu verwenden - nicht zum Nass-Saugen oder
Saugen im Freien. Menschen oder Tiere dürfen mit dem Gerät nicht abgesaugt wer-
den. Der Hersteller haftet nicht für evtl. Schäden, die durch nicht bestimmungs-
gemäßen Gebrauch oder falsche Bedienung verursacht werden.
• Keine heißen oder glühenden Stoffe saugen.
• Keine groben Glassplitter saugen.
• Keine Lösungsmittel, explosible Flüssigkeiten und Gase saugen.
• Nicht in die laufende Bürstwalze greifen - Verletzungsgefahr..
• Das Gerät nicht im Freien aufbewahren.
• Gerät keinen Witterungseinflüssen, keiner Feuchtigkeit und keinen Hitzequellen aus-
setzen.
• Das Gerät nur trocken oder mit einem leicht feuchten Tuch reinigen. Dabei dürfen die
stromführenden Teile (Schalter, Stecker etc.) nicht mit Wasser in Berührung kommen.
Entsorgungs-Hinweise
• Bitte werfen Sie die Verpackung, die gefüllten Filter und später das aus-
gediente Gerät nicht einfach weg, sondern entsorgen Sie alles gemäß
den von Ihrer Stadt- oder Gemeindeverwaltung oder vom zuständigen
Entsorgungsunternehmen aufgestellten Richtlinien.
• Das Verpackungsmaterial sortenrein in die dafür vorgesehenen
Sammelbehälter geben, damit es der Wiederverwendung zugeführt
werden kann.
• Das ausgediente Gerät sofort unbrauchbar machen und bei der dafür vorgesehenen
Sammelstelle abgeben.
Informationen für Ihre Sicherheit und Entsorgungshinweise

6
Before use
• Please read the information below with care. This gives important guidance on the
safety, use and maintenance of the appliance. Keep this booklet in a safe place and,
if appropriate, hand it on to the next owner.
• Fakir appliances comply with recognized technological standards and the current
safety regulations for electrical appliances.
• These appliances fulfil the requirements of EU Guidelines 89/336/EEC
(Electromagnetic compatibility) and 73/23/EEC (Low voltage guideline). The applian-
ce is marked with the CE symbol on the rating plate.
• Fakir reserves the right to modify designs and specifications without notice.
Important information
• Do not switch on the appliance if the housing exhibits any evidence of damage
(cracks/fractures), if the connecting lead is defective, or if an internal defect is sus-
pected (e.g. if the appliance has been dropped).
• Appliance only to be connected to voltage indicated on the rating plate.
• You have acquired an appliance of exceptionally strong suction power. As fuse pro-
tection a min. 16 ampere fuse has to be used.
• Fakir will not accept any liability for damage or injury if the appliance is used other than
for its intended purpose or is improperly operated or inexpertly repaired and maintai-
ned.
• Before use, check to ensure that all the filters are correctly installed. The appliance
must not be used without filters.
• Use only genuine Fakir filters and accessories.
• The appropriate filters (main filter, motor protection filter and exhaust filter) must be
installed at all times to ensure the effizient operation of the appliance.
• When connecting accessories, cleaning, repairing or servicing the unit, unplug the unit.
• Do not let children use electrical appliances unsupervised.
• This appliance is not suitable to be used to pick up substances constituting a health
hazard.
• Repairs should be carried out by an authorized Fakir service center (see enclosed list
of adresses). Incorrect repairs may the user to electrical danger.
Informations for your safety and notes on disposal

7
Safety Precautions
• Do not pull out the plug from power supply socket by pulling on the connecting lead.
• Do not pull the connecting lead over sharp edges or allow it to become jammed.
• Do not use damaged extension leads.
• lf required, the conpecting lead has to be replaced together with the cable rewind by a
specialist.
• The supply cable has to be replaced by an autorized Fakir After-Sales-Service only.
• Keep the nozzles and ends of tubes well away from the eyes and ears.
• The appliance must only be used for dry vacuum cleaning. lt is not a dual-purpose
(wet/dry) vacuum cleaner.
• Do not use the appliance to pick up hot or glowing substances.
• Do not use the appliance to pick up coarse slivers of glass.
• Do not use the appliance to pick up any solvents, explosive liquids or gases.
• Warning: keep the hands clear of the rotating brush roller and take care not to run over
the connecting lead.
• Do not store the appliarice in the open air.
• Do not exposure the machine to weather, humidity nor excessive heat.
• Clean the appliance only with a dry or slightly moist cloth. Do not allow any of the elec-
trical components (switches, plug, socket, electronics, etc.) to come into contact with
water.
Disposal instructions
• Please dispose of packaging materials, used filters and, eventually, the
appliance itself in accordance with any official regulations or guidelines
which may apply.
• If facilities are available in your locality for the recycling of packaging
materials, please make use of these accordingly.
• When finally disposing of the appliance itself, please render it unserviceable before
taking it to the autorized place of disposal.
Informations for your safety and notes on disposal

8
Informaciones para su seguridad e instrucciones para
la eliminación del aparato desechado
Antes del uso
• Sírvase leer detenidamente las informaciones expuestas a continuación. Estas conti-
enen instrucciones importantes relacionadas con el uso, la seguridad y el cuidado,
conservación y mantenimiento del aparato. Guarde estas instrucciones adecuada-
mente y entrégueselas, en caso dado, al siguiente propietario.
• Los aparatos de Fakir corresponden a las reglas reconocidas de la técnica y a la últi-
ma versión de la Ley de Seguridad de Aparatos Eléctricos.
• Estos aparatos cumplen con los requisitos de las directrices de la CE 89/336/CEE
(Compatibilidad electromagnética) y 73/23/CEE (Directriz relativa a sistemas de baja
tensión). El aparato lleva la marca CE grabada en la placa de caracteristicas.
• La empresa Fakir se reserva el derecho de realizar modificaciones en el diseño y en
el equipamiento.
Instrucciones generales
• No poner en funcionamiento el aparato si la carcasa mostrase desperfectos visibles
(fisuras o roturas), la línea de conexión estuviese defectuosa o existiese la sospecha
de daños internos (p.ej., después de una caída eventual).
• El aparato sólo debe ser conectado a la red cuando la tensión indicada en la placa de
caracteristicas coincida con la tensión de la red.
• La toma de corriente tiene que estar protegida con un fusible automático doméstico
de 16 A.
• Cuando el aparato se ha empleado para una finalidad no prevista, se ha operado ina-
propiadamente o reparado y mantenido deficientemente, no se asumirá responsabili-
dad alguna en el caso de daños eventuales.
• Antes de poner el aparato en funcionamiento, comprobar si todos los filtros están cor-
rectamente instalados. El aparato no debe ponerse en marcha sin los filtros corre-
spondientes.
• Sólo se deben utilizar filtros y piezas de recambio originales de Fakir.
• Para un funcionamiento perfecto del aparato es imprescindible el empleo del depósi-
to de polvo con filtro centrífugo, respectivamente, así como del filtro de protección del
motor y del filtro aire evacuado.
• Desenchufar siempre el conector de la red antes de proceder al montaje de las pie-
zas de accesorios y a la limpieza del aparato, así como antes de realizar trabajos de
reparación o de mantenimiento.
• Esta aspiradora combinada no debe dejarse al alcance de los niños.
• Este aparato no es adecuado para aspirar materiales peligrosas para la salud.
• Las reparaciones sólo deben ser realizadas por tiendas especializadas (p.ej. por un
taller de servicio postventa de Fakir - direcciones en la lista adjunta) y solo se deben
utilizar piezas de recambio originales de Fakir. En caso de una reparación inapropia-
do pueden resultar peligros para el usuario.

9
Informaciones para su seguridad e instrucciones para
la eliminación del aparato desechado
Instrucciones de seguridad
• No desenchufar nunca el aparato tirando del cable del enchufe.
• No pasar el cable de conexión nunca por cantos agudos y no aprisionarlo.
• No emplear cables de prolongación dañados.
• En caso de necesidad, el cable de alimentación solamente debe ser cambiado por un
técnico autorizado.
• Las toberas y los extremos de los tubos no deben ser aproximados nunca a los ojos
ni a las orejas.
• El aparato sólo se debe emplear para una limpieza en seco, no aspirar en húmedo o
en el exterior. No debe utilizarse ni en personas ni en animales. El fabricante no se
hace responsable de cualquier daño eventual producido por un uso equivocado del
aparato.
• No aspirar sustancias o materiales calientes ni incandescentes.
• No aspirar astillas de vidrio gruesas.
• No aspirar ningún tipo de disolvente, liquidos explosivos ni gases.
• No tocar el cepillo cilíndrico con la mano estando éste en funcionamiento - riesgo de
lesiones!
• No guardar el aparato al aire libre.
• No exponer la máquina a la influencia de la intemperie, ni a la humedad, ni a fuentes
de calor.
• Limpiar el aparato sólo en seco o con un paño húmedo. Las piezas baja tensión no
deben encontrar en contacto con el agua (p.ej. interruptor, enchufe, etc.).
Instrucciones para la eliminación del aparato desechado
• Ni el embalaje del aparato, ni el filtro lleno y posteriormente tampoco el
aparato mismo después de su vida útil, deben ser desechados con la
basura doméstica corriente. Al respecto, rogamos observar las disposi-
ciones de las autoridades locales previstas para este fin.
• Clasificar el material del embalaje y desecharlo en los contenedores
correspondientes para facilitar su reciclaje y nuevo uso.
• Una vez puesto el aparato fuera de uso, procédase inmediatamente a su inutilización
y llévenlo a uno de los lugares de recolección previstos para ello.

10
1
2
3
4
5
6
7
8
9
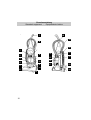
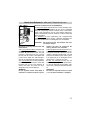
Grundausstattung
Standard equipment - Equipamiento básico
10
12
13
14
15
16
17
18
19
20
21
22
23
24
11

1 Filtergehäuse mit Hauptfilter
filter compartment with main filter / Cuerpo del filtro con filtro principal
2 Netzkabel
power cord / Cable de la alimentación
3 unterer Staubbehälter
lower dirt container / Depósito de polvo inferior
4 Motorschutzfilter
motor protection filter / Filtro de protección del motor
5 Bürsten-Höhenverstellung
brush height adjustmend knob / Regulación de la altura del cepillo
6 Elektro-Saugbürste
electrical suction brush / Cepillo eléctrico
7 Handgriff
handle / Mango
8 EIN-AUS-Schalter
on-off-switch / Interruptor con./des.
9 oberer Staubbehälter
upper dirt container / Depósito de polvo superior
10 Abluftfilter
exhaust air filter / Filtro aire evacuado
11 Verriegelung unterer Staubbehälter
release lower dirt container / Enclavamiento - depósito de polvo inferior
12 Fußpedal
handle release pedal / Pedal
13 Stoßband
furniture protection guard / Cinta protectora contra choques
14 Fugendüse
crevice nozzle / Tobera juntas
15 Verriegelung oberer Staubbehälter
releae upper dirt container / Enclavamiento - depósito de polvo superior
16 Saugrohr
suction tube / Tubo de aspiración
17 Möbel-/Polsterbürste
dusting brush / Tobera muebles/tapicería
18 Schlauchhalter
hose clip / Soporte fijador - tubo flexible
19 Saugschlauch
suction hose / Tubo flexible de aspiración
20 schwenkbarer Kabelhalter
quick release cord hook / Soporte cable giratorio
21 Tragegriff
carrying handle / Asa de transporte
22 Handgriff Saugrohr
handle of tube / Empuñadura - tubo de aspiración
23 Saugrohr
suction tube / Tubo de aspiración
24 Saugrohrstutzen
suction tube base / Empalme tubular de aspiración
11

Befestigung des Hand-
stiels
Handstiel in die Fugen am
Gehäuseoberteil einsetzen
und nach vorne schieben.
Die beigefügte Schraube in
das Loch oberhalb des Tra-
gegriffs einsetzen und mit
einem Schraubendreher an-
schrauben. Vor dem end-
gültigen fest schrauben prü-
fen, ob der Handstiel pass-
genau auf dem
Gehäuseoberteil sitzt.
12
Zusammenbau / Assembly / Ensamblaje
Attaching the handle
Stand the vacuum upright
and slide the base of the
handle firmly into the groo-
ves at the top of the vacuum
body. Insert the screw provi-
ded into the existing hole.
Tighten the screw securely
with a screw-driver. Before
securing the handle, please
check that the handle is fit-
ted to the vacuum body and
make sure there´s no gap.
Fijación del mango
Encaje el mango en las
ranuras de la parte superior
de la carcasa y empújelo
hacia adelante. Inserte el
tornillo adjunto en el aguje-
ro dispuesto por encima del
asa de transporte y atornil-
lelo con un atornillador.
Antes de apretarlo a fondo
definitivamente, compruebe
si el mango está encajado
exactamente en la parte
superior de la carcasa.
Befestigung von Saug-
schlauch und Zubehör
Saugschlauch mit den bei-
den beiliegenden Schrau-
ben an der Rückseite des
Gerätes befestigen. Das
Saugrohr mit Haltegriff (am
Saugschlauch) auf den
Saugstutzen rechts unten
an der Rückseite des
Gerätes aufstecken.
Attaching the hose and
tools
Position the hose assembly
on the back of the vacuum
as shown. Attach the hose
with the remaiing two scr-
ews from the packet.
Tighten securely with a scr-
ewdriver. Slide the end of
the hose wand with tabs
into the suction intake
valve.
Sujeción del tubo flexible
de aspiración y accesori-
os
Fije el tubo flexible de aspi-
ración con los dos tornillos
adjuntos en la parte poster-
ior del aparato. Encaje el
tubo de aspiración con el
asidero (en el tubo flexible
de aspiración) en el empal-
me tubular de aspiración
dispuesto en la parte inferi-
or derecha del lado posteri-
or de la aspiradora.

Den oberen Saugschlauch-
bogen im Halteclip am
Hand-stiel befestigen. Das
zweite Saugrohr im linken
Halteclip und die Kombi-
düse im mittleren Halteclip
an der Rückseite befesti-
gen. Die Fugendüse in das
zweite Saugrohr ein-
stecken.
13
Inbetriebnahme / operation and use / Funcionamiento y uso
Slide the extension wand
and the crevice tool
together into the storage
clip.
Fije el codo superior del
tubo flexible de aspiración
en el clip de retención del
mango. Fije el segundo
tubo de aspiración en el clip
de retención central dispue-
sto en la parte posterior.
Encaje la tobera juntas en
el segundo tubo de aspira-
ción.
EIN-AUS-Schalter
In Position I (ON) ist das
Gerät eingeschaltet.
In Position 0 (OFF) ist das
Gerät ausgeschaltet.
Neigen
der Führungsstange
in drei Positionen:
senkrecht
für Arbeitspausen
oder Aufbewahrung oder
Arbeiten mit Saugzubehör.
geneigt
für Arbeiten auf
Teppich- oder Hartboden.
flach geneigt
für Arbeiten
unter Möbeln etc.
Fußpedal nach unten drük-
ken und Führungsstange
neigen.
Tragegriff
Ebenfalls zum leichten
Transport den Tragegriff an
der Geräterückseite ver-
wenden.
ON-OFF switch
To turn cleaner on, press
the switch to the ( I ) positi-
on.
To turn cleaner off, press
the switch to the ( 0 ) positi-
on .
Handle positions
The handle of the cleaner
has three positions:
upright
for storage and
when using cleaning tools
operating
for general opera-
tion on carpet and floors
low
for raching under low
furniture.
Step on handle release
pedal to lower handle.
Carrying handle
The cleaner canalso be
moved by using the carrying
handle.
Interruptor CON./DES.
La aspiradora está conecta-
da en la posición I (ON).
La aspiradora está des-
conectada en la posición 0
(OFF).
Inclinación del tubo de
conducción
En tres posiciones:
V
ertical:
Para pausas del
trabajo o para guardar o tra-
bajar con accesorios de
aspiración.
Inclinada: Para aspirar al-
fombras o pisos duros.
Muy inclinada: Para aspirar
debajo de muebles, etc.
Presione el pedal hacia
abajo e incline el tubo de
conducción.
Transporte
Para transportar también
fácilmente la aspiradora,
utilice el asa dispuesta en la
parte posterior del aparato.

14
Reinigung von Teppich-
böden, Brücken etc.
Teppichböden in Bahnen
von einem zum anderen
Ende reinigen. Um das
Festsaugen von losen
Teppichen oder Einwickeln
von Fransen an Ecken oder
Enden zu verhindern, den
Sauger kurz vorher leicht
anheben.
Florhöhen-Einstellung
Die Florhöhen-Einstellung
(B) ermöglicht eine individu-
elle Anpassung der Saug-
düse (A) an verschiedenste
Teppich-Oberflächen und
auch Hartfußböden.
Cleaning lightweight flex-
ible rugs
Stand on one end of rug and
move cleaner toward other
end or edge. Before rea-
ching edge, push down on
handle. This will lift up the
nozzle (front of cleaner) and
will prevent rug from clin-
ging to cleaner.
Carpet height adjustment
Carpet and rug cleaning
takes place at the nozzle
(A). When it is necessary to
raise and lower the nozzle
for various carpet pile
heights, rotate the nozzle
control knob (B) to the desi-
red set.
Inbetriebnahme / operation and use / Funcionamiento y uso
Saugzubehör
Möbel-/Polsterdüse (A), Fugen-
düse (B) und Saugrohrverlänger-
ung (C) zur Reinigung von Möbel,
Polster, Fugen und Ecken am
Saugrohr verwenden. Hierzu das
Gerät senkrecht stellen.
Using tool attachments
Attachment tools A, B and C can be used
to clean furniture or drapes, on stairs or in
corners. Place the vacuum on the floor
with the handle in upright position.
Accesorios de aspiración
Encaje la tobera combinada (muebles-
/tapicería) A, la tobera juntas B y la pro-
longación del tubo C de aspiración para
limpiar muebles, acolchados, esquinas y
juntas. Coloque para ello la aspiradora en
posición vertical.
Limpieza de alfombras,
alfombras cortas, etc.
Limpie las alfombras en
bandas de uno al otro extre-
mo. Para evitar la adheren-
cia de alfombras sueltas o
el enrollamiento de flecos
en esquinas o extremos,
levante antes ligera y bre-
vemente la aspiradora.
Ajuste de la altura del
pelo
El ajuste de la altura del
pelo B permite adaptar indi-
vidualmente la tobera de
aspiración A a las superfi-
cies más distintas de alfom-
bras y también de pisos
duros.

15
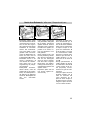
Nach dem Gebrauch / after use / Después del uso
Leeren des unteren
Staubbehälters
Der Staubbehälter D muss
nach Erreichen der seitlich
auf dem Behälter ange-
brachten Füllstandslinie
“full” ge-leert werden:
- Netzstecker ziehen.
- Arretierungshebel A nach
links in Position “unlock”
stellen.
- Staubbehälter D nach vor-
ne herausnehmen.
- Staubbehälter leeren.
- Den leeren Staubbehälter
wieder einsetzen und mit
Hebel A in Position C “lock”
arretieren.
Empty dirt container
The lower dirt container D
needs to be emptied when
the dirt reaches the “full”
line on the side of the con-
tainer:
- Unplug the cleaner from
electrical outlet.
- Slide the lock’n seal lever
A to the “unlock” position B.
- Grasp handle and pull the
dirt container D straight out
to remove from the cleaner.
- Empty dirt into garbage
container.
- Put the dirt container back
in the cleaner and slide the
lever A to the “lock” position
C.
Die besten Reinigungser-
gebnisse erzielt man mit
folgenden Einstellungen:
- niedrig (1) für alle norma-
len Bodenbeläge/Hartfuß-
boden
- mittel (4) für Schlingen-
ware
- hoch (7) für hochflorige
Teppichböden
Achtung
: Ist der Sauger nur
schwer vorwärts zu bewe-
gen, die nächst höhere
Einstellung wählen.
For maximum cleaning
performance.
The following carpet height
settings are recommended:
- Lowest setting for all types
of carpet
- Higher settings for very
deep pile carpet where
easier pushing effort is
desired, while maintaining
good cleaning performan-
ce.
Note:
If the cleaner is diffi-
cult to push, rotate knob to
the next higher setting.
Los mejores resultados
de limpieza se longran
con los siguientes aju-
stes:
- bajo (1) para todos los
revestimientos de piso nor-
males/pisos duros.
- medio (4) para alfombras
con crespón de bucles.
- alto (7) para alfombras de
crespón alto
Atención: Si la aspiradora
se deja mover difícilmente
hacia adelante, elija un aju-
ste más alto.
B
C
A
D E F
Vaciado del depósito de
polvo inferior
El depósito de polvo D tiene
que ser vaciado al alcanzar
la línea de nivel de relleno
"full" dispuesta al costado
del depósito.
- Desenchufe el conector de
red.
- Ponga la palanca de rete-
nción A en la posición
"unlock" hacia la izquierda.
- Extraiga el depósito de
polvo D hacia adelante.
- Vacíe el depósito de polvo.
- Coloque de nuevo el
depósito de polvo vacío y
asegúrelo poniendo la pa-
lanca A en la posición C
"lock".

Bitte beachten:
Zur problemlosen Reini-
gung kann der obere Staub-
behälter entfernt werden.
Hierzu den Knebelknopf G
an der Rückseite des Gerä-
tes um 90° nach links dre-
hen und den Staubbehälter
nach vorne abziehen
Note:
For easier access, the enti-
re upper dirt container may
be removed by turning ( a
quarter move to the left) the
knob G on the back of the
cleaner to unlock and pul-
ling the entire dirt container
straight out.
Nach dem Gebrauch / after use / Después del uso
16
Reinigen von Staubbehäl-
ter und Zentrifugal-Filter
- Netzstecker ziehen.
- Nach Entfernen des unte-
ren Staubbehälters D (Be-
schreibung siehe oben)
kann der untere Teil E des
Filtergehäuses durch Dre-
hen nach links gelöst und
nach unten ziehend ent-
fernt werden. Staub vom
Filter und Filtergehäuse
durch Ausklopfen und
Ausbürsten entfernen.
- Den abnehmbaren Filter
regelmäßig von Hand in
kaltem Wasser mit mildem
Reinigungsmittel auswa-
schen F und nach vollstän-
digem Trocknen wieder
einsetzen.
- Den oberen Staubbehälter
mit Filtergehäuse (Zentrifu-
galfilter) mit einem feuch-
ten Tuch auswischen.
Cleaning upper dirt con-
tainer and filter
- Unplug the cleaner from
electrical outlet.
- The upper dirt container
can be reached by remo-
ving the lower dirt contai-
ner, reaching underneath
the upper container and
turning the rim of the filter
compartment to unlock.
Pull straight down to remo-
ve. Brush the dirt off the fil-
ter, filter compartment and
upper container.
- The foam filter may be
removed and hand was-
hed in cold water F with
mild detergent. Rinse well
then air dry thoroughly
before replacing.
- The upper dirt container
and filter compartment
may also be wiped clean
wiath a damp cloth.
Limpieza del depósito de
polvo y del filtro centrífu-
go
- Desenchufe el conector
de red.
- Después de haber retirado
el depósito de polvo inferi-
or D (vea la descripción
arriba), suelte la parte
inferior E del cuerpo del fil-
tro girando a la izquierda y
retírela tirando hacia
abajo. Elimine el polvo del
filtro y del cuerpo del filtro
sacudiendo y cepillando.
- Lave regularmente el filtro
desmontable a mano en
agua fría con un detergen-
te suave F y colóquelo de
nuevo después de haber-
se secado completamen-
te.
- Limpie el depósito de
polvo superior con el cuer-
po del filtro (filtro centrífu-
go) con un paño húmedo.
G
H
Observe por favor:
Para una limpieza fácil se
puede desmontar el depósi-
to de polvo superior. Gire
para ello el botón de muletil-
la G en la parte posterior de
la aspiradora 90° a la iz-
quierda y extraiga el depó-
sito de polvo hacia adelan-
te.

17
Nach dem Gebrauch / after use / Después del uso
K
Wechsel von Motorschutz- und Abluftfilter
Der Motorschutzfilter
H be-findet sich in einer Kassette unter-
halb des unteren Staubbehälters D und muss regelmäßig
überprüft und gereinigt werden. Kassette nach vorne heraus-
ziehen, Filter entnehmen und mit einem milden Reinigungs-
mittel im handwarmen Was-ser waschen, trocknen lassen und
wieder einsetzen.
Der Abluftfilter K muss regelmäßig nach entsprechender
Verschmutzung er-neuert werden. Seitliches Abluftgitter öff-
nen, Filter austauschen und Abluftgitter fest verschließen.
ACHTUNG: Nie ohne Filter bzw. mit feuchten oder nas-
sen Filtern saugen.
Exchange of motor protection filter and
exhaust filter
The motor protection filter
H, located in the
slide out tray underneath the lower dirt
container D, protects the motor from dirt
particles. If filter becomes dirty, pull out
the tray and lift out filter. Hand wash filter
in hand worm water with mild detergent,
then air dry. Reposition dry filter and grill.
The exhaust filter
K is located behind the
door on the side of the cleaner. If the filter
becomes dirty, it has to be replaced. To
remove this filter, first open the door.
Grasp filter and pull it straight out.
WARNING:
Do not operate cleaner with damp or
wet filters or without all filters in place.
Cambio del filtro de protección del
motor y del filtro aire evacuado
El filtro de protección del motor
H se encu-
entra en un chasis por debajo del depósi-
to de polvo inferior D y tiene que ser con-
trolado y limpiado regularmente. Tire del
chasis hacia adelante, quite el filtro y láve-
lo en agua tibia con un detergente suave,
déjelo secar y colóquelo de nuevo.
El filtro aire evacuado
K tiene que ser
sustituido según el grado de ensuciamien-
to. Abra la rejilla del aire de salida, susti-
tuya el filtro y después ciérrela fuertemen-
te.
ATENCIÓN:
No utilice la aspiradora nunca sin filtro
o con los filtros húmedos o mojados.

18
Bürstenantrieb
Für eine einwandfreie Funk-
tion und Saugleistung ist
eine regelmäßge Überprü-
fung und Reinigung der
gesamten Antriebseinheit
unerlässlich.
Spätestens jedoch nach je-
dem Filterwechsel.
Antriebsriemen
Der Antriebsriemen befindet
sich unter der Bodenplatte
L und ist das Bindeglied
zwischen Antriebsmotor
und Bürstwalze. Er muss
ebenfalls regelmäßig über-
prüft und gereinigt werden.
Ausgedehnte und lockere,
beschädigte oder gerissene
Riemen sofort ersetzen.
Wechsel von Riemen und
Bürstwalze
- Führungsstange ganz nei-
gen, Gerät umdrehen und
Bodenplatte L nach Lösen
der 4 Schrauben entfer-
nen.
- Bürstwalze und Antriebs-
riemen herausnehmen.
- Neuen Antriebsriemen zu-
erst über die Motorachse
M legen.
Check agitator shield
Because your cleaner picks
up so well, we strongly re-
commend you check for
debris accumulation under
the agitator shield each time
you clean the filters. Re-
moving debris under the
shield will help maintain
your cleaner´s excellent
pick up and suction.
The belt
The belt on your cleaner
causes the agitator to rotate
and is important for the
effective operation of the
cleaner. The belt is located
under the bottom plate L of
the cleaner and should be
checked from time to time to
be sure it is in good conditi-
on. Replace belt it is stret-
ched, cut or broken.
How to replace
- Place handle in low positi-
on and turn cleaner over
so bottom side is up.
Remove the 4 screws as
shown with a screw driver.
- Remove agitator and belt.
Discard used agitator/belt.
- With lettering on outside of
belt and positioned as
shown in box on P slide
new belt over motor pulley
M.
L
M
Nach dem Gebrauch / after use / Después del uso
Accionamiento del cepillo
cilíndrico
Para un funcionamiento y
un rendimiento aspirador
perfectos es indispensable
revisar y limpiar regular-
mente toda la unidad de
accionamiento, pero por lo
después de cada cambio de
filtro.
Correa de accionamiento
La correa de accionamiento
se encuentra debajo de la
placa de fondo L y es el ele-
mento de unión entre el
motor de accionamiento y
del cepillo cilíndrico. Ésta
también tendrá que ser
examinada y limpiada regu-
larmente. Sustituya inme-
diatamente la correa si está
alargada y holgada, dañada
o desgarrada.
Cambio de la correa y del
cepillo cilíndrico
- Incline completamente el
tubo de conducción, dé la
vuelta a la aspiradora y des-
monte la placa de fondo L
después de haber soltado
los 4 tornillos.
- Extraiga el cepillo cilíndri-
co y la correa de acciona-
miento.
- Coloque la nueva correa
de accionamiento primera-
mente sobre el eje del
motor M.

- Bürstwalze seitlich durch
den Antriebsriemen führen
und soweit nach vorne zie-
hen, bis sich die Lager in
die Lagerführungen O des
Gehäuses P einsetzen
lassen. Der Antriebsrie-
men muss dabei in einer
geraden Linie von Motor-
achse zur Bürstwalze ver-
laufen und darf nicht im
Führungskanal N streifen.
- Bürstwalze zuerst in die
rechte Lagerführung S
und danach die Riemen-
seite (links) fest in die
Lagerführung R passge-
nau einsetzen.
Bodenplatte aufsetzen,
darauf achten, dass die
Haltenocke an der Vorder-
kante der Bodenplatte in
die Öffnung am Gehäuse
einras-tet. Bodenplatte mit
den vier Schrauben
sichern.
- Insert agitator throug belt
and place belt in belt guide
N on agitator. Should the
agitator shield P become
dislodged while replacing
the belt or the agitator, re-
position it as shown, no-
ting the placement of its
belt guide O.
- Grasp agitator firmly and
fit it into position by first sli-
ding the end opposite the
belt into the rectangular
slot S on side of cleaner.
Pull other side of agitator
R into place. Turn agitator,
making sure belt is not pin-
ched between agitator and
agitator shield.
- Reposition plate and the
four screws. Tighten scr-
ews securely.
R S
N
O
P
Nach dem Gebrauch / after use / Después del uso
19
- Conduzca el cepillo cilín-
drico lateralmente por la
correa de accioamiento y
tire de ella hacia adelante
hasta que los rodamientos
se dejen encajar en las
guías de rodamientos O
de la carcasa P. La correa
de accionamiento habrá
de tener un recorrido recto
desde el eje del motor al
cepillo cilíndrico y no de-
berá rozar en el canal de
guía N.
- Encaje primeramente el
cepillo cilíndrico en la guía
de rodamiento derecha S
y luego el lado de la cor-
rea (izquierdo) exacta-
mente en la guía de roda-
miento R.
- Coloque la placa de fondo
teniendo cuidado que el
talón de retención del
canto delantero de la
placa de fondo encaje en
la abertura de la carcasa.
Asegure la placa de fondo
con los cuatros tornillos.

Fakir-Hausgeräte GmbH
D-71657 Vaihingen / Enz · Postfach 14 80
D-71665 Vaihingen / Enz · Industriestraße 6
Telefon ( 07042 ) 912-0 · Telefax ( 07042 ) 5612
Internet: http://www.fakir.de · E-Mail: info@fakir.de
8601-6040 Änderungen vorbehalten 25 08 994
Nach dem Gebrauch / after use / Después del uso
Reinigen des Gerätes
Saugschlauch und Saug-
rohr an der Rückseite des
Gerätes sollten regelmäßig
auf Verstopfungen überprüft
werden. Erkennbar an einer
schlechteren Saugleistung
und am veränderten Saug-
geräusch.
Saugschlauch und Saug-
rohr vom Gerät entfernen
und evtl. Verstopfung(en)
beseitigen.
Regelmäßig den Saugstut-
zen nach Entfernen des
oberen Staubbehälters auf
Verstopfung prüfen.
Nach Entfernen der Boden-
platte kann der gesamte
Innenraum der Antriebsein-
heit incl. Saugschlauchan-
schluss auf Verstopfung
überprüft werden.
Clearing clogs
The hose on the back of the
vaccum cleaner that carries
the dirt from the nozzle to
the dust bag can someti-
mes become clogged. If you
notice a change in the
sound of the vacuum motor,
check for clogs.
Disconnect the suction tube
and check for clogs in the
vacuum base, the suction
tube and the suction hose.
Remove the upper dirt con-
tainer and check the suction
inlet for a clog.
If the clog persists, turn the
vacuum cleaner off and
unplug it. Remove the bot-
tom plate. Lift up the short
hose in the base of the
vacuum. Inspect the hose
for clogs and remove any
obstructions. Replace the
short nozzle hose and the
bottom plate.
Limpieza de la aspiradora
El tubo flexible de aspira-
ción y el tubo de aspiración
en la parte posterior de la
aspiradora deberían ser
examinados regularmente
con respecto a obstruccio-
nes. Esto se nota por un
mal rendimiento aspirador y
un ruido de aspiración alte-
rado. Desacople el tubo fle-
xible y el tubo de aspiración
de la aspiradora y elimine
las posibles obstrucciones.
Examine regularmente el
empalme tubular de aspira-
ción para ver si está obstrui-
do. Una vez de haber des-
montado la placa de fondo,
podrá examinar todo el
compartimiento de la
unidad de accionamiento,
incluyendo la conexión del
tubo flexible de aspiración
con respecto a obstruccio-
nes.
-
 1
1
-
 2
2
-
 3
3
-
 4
4
-
 5
5
-
 6
6
-
 7
7
-
 8
8
-
 9
9
-
 10
10
-
 11
11
-
 12
12
-
 13
13
-
 14
14
-
 15
15
-
 16
16
-
 17
17
-
 18
18
-
 19
19
-
 20
20


Fakir 1205 BL El manual del propietario
- Categoría
- Aspiradoras
- Tipo
- El manual del propietario
- Este manual también es adecuado para
En otros idiomas
- English: Fakir 1205 BL Owner's manual
- Deutsch: Fakir 1205 BL Bedienungsanleitung
Documentos relacionados
-
Fakir combi | CS 1105 El manual del propietario
-
-
Fakir Ares El manual del propietario
-
-
Fakir 2100 El manual del propietario
-
-
-
-
-