Cuisinart SS-4N1 Series Coffee Center BaristaBar Manual de usuario
- Categoría
- Cafeteras
- Tipo
- Manual de usuario

For your safety and continued enjoyment of this product, always read the instruction book carefully before using.
Cuisinart® Coffee Center® BaristaBar SS-4N1 Series
INSTRUCTION AND RECIPE BOOKLET

2
IMPORTANT
SAFEGUARDS
When using electrical appliances, basic safety
precautions should always be taken to reduce
the risk of fire, electric shock and/or injury to
persons, including the following:
1. READ ALL INSTRUCTIONS.
2. Do not touch hot surfaces. Use handles
and knobs.
3. To protect against electric shock, do not
place cord, plug, or base unit in water or
other liquids.
4. This appliance should not be used by or
near children or individuals with certain
disabilities.
5. Unplug from outlet when either the appliance
or display clock is not in use, and before
cleaning. Allow to cool before putting on or
taking off parts, and before cleaning the
appliance.
6. Do not operate any appliance with a
damaged cord or plug or after the appliance
malfunctions or has been dropped or
damaged in any manner. Return appliance
to the nearest Cuisinart Repair Center for
examination, repair, and electrical or
mechanical adjustment.
7. The use of accessory attachments not
recommended by Cuisinart may cause
injuries.
8. Do not use outdoors.
9. Do not let cord hang over edge of table or
counter, or touch hot surfaces.
10. Do not place on or near a hot gas or
electric burner, or in a heated oven.
11. Always fill water reservoir first, then plug
cord into the wall outlet. To disconnect,
turn any control to "off" position, remove
plug from wall outlet.
12. Do not use appliance for other than its
intended use.
13. Snap lid securely onto carafe before
serving any beverages.
14. Scalding may occur if the lid is removed
during the brewing cycle.
15. The glass carafe is designed for use with this
appliance only. It must never be used on the
range top.
16. Do not set a hot carafe on a wet or cold
surface.
17. Do not use a cracked carafe or a carafe
having a loose or weakened handle.
18. Do not lift handle to open the lid of the
Coffeemaker while brewing is in progress.
19. Do not overfill the water reservoir with water.
Use ONLY WATER in this appliance! Do not
put any other liquids or foods in the water
reservoir except as instructed in the cleaning
instructions in this guide.
20. Do not clean carafe, heating plate or single
serve drip tray with harsh cleansers, steel
wool pads, or other abrasive materials.
21. WARNING: TO REDUCE THE RISK OF
FIRE OR ELECTRIC SHOCK, DO NOT
REMOVE THE BASE PANEL. NO USER-
SERVICEABLE PARTS ARE INSIDE.
REPAIR SHOULD BE DONE ONLY BY
AUTHORIZED PERSONNEL.
22. Do not place cloth or otherwise restrict
airflow beneath Coffeemaker.
23. Use only the Cuisinart® Gold-Tone
Commercial-Style Filter or standard cone-
shaped paper filter with this unit. OTHER
GOLD TONE PERMANENT FILTERS MAY
CAUSE THE COFFEEMAKER TO OVERFLOW.
24. Do not operate your appliance in an
appliance garage or under a wall cabinet.
When storing in an appliance garage
always unplug the unit from the electrical
outlet. Not doing so could create a risk of
fire, especially if the appliance touches the
walls of the garage or the door touches the
unit as it closes.
25. Use only capsules intended for this appliance.
If the capsule does not fit, do not force the
capsule into the appliance.
26. WARNING: To avoid the risk of injury,
do not open the brew chamber during the
brew process.
SAVE THESE
INSTRUCTIONS
FOR HOUSEHOLD
USE ONLY

3
WARNING: RISK OF FIRE
OR ELECTRIC SHOCK
The lightning flash with arrowhead
symbol within an equilateral triangle
is intended to alert the user to the
presence of dangerous uninsulated
voltage within the product’s
enclosure that may be of sufficient
magnitude to constitute a risk of fire
or electric shock to persons.
The exclamation point within an
equilateral triangle is intended to
alert the user to the presence of
important operating and
maintenance (servicing) instructions
in the literature accompanying
the appliance.
SPECIAL CORD SET
INSTRUCTIONS
A short power-supply cord is provided to
reduce the risks resulting from becoming
entangled in or tripping over a longer cord.
Longer extension cords may be used if care
is exercised.
If a long extension cord is used, the marked
electrical rating of the extension cord must
be at least as great as the electrical rating of
the appliance, and the longer cord should be
arranged so that it will not drape over the
countertop or tabletop, where it can be pulled
on by children or tripped over.
NOTICE
This appliance has a polarized plug (one blade
is wider than the other). To reduce the risk of
electric shock, this plug will fit into a polarized
outlet only one way. If the plug does not fit
fully into the outlet, reverse the plug. If it still
does not fit, contact a qualified electrician.
Do not modify the plug in any way.
OPERATING NOTICE
Clogging and backing up of water and/or
coffee in the filter basket can occur under
any or a combination of any of the following
conditions: the use of too finely ground coffee;
using two or more paper filters; using the gold
tone filter in conjunction with a paper filter;
not properly cleaning coffee grounds from the
gold tone filter, or allowing coffee grounds to
spill over the filter.
Caution: Never open the filter basket during
the brewing cycle, even if no water is draining
from the filter basket, since extremely hot
water/coffee can spill out from the filter
basket and cause injury. If water/coffee is
not draining from the filter basket during the
brewing cycle, unplug the unit and wait 10
minutes before opening and checking the
filter basket.
WARNING
RISK OF FIRE OR
ELECTRIC SHOCK DO NOT OPEN
WARNING: TO REDUCE THE RISK OF FIRE OR
ELECTRIC SHOCK,
DO NOT REMOVE COVER (OR BACK)
NO USER-SERVICEABLE PARTS INSIDE
REPAIR SHOULD BE DONE BY
AUTHORIZED SERVICE PERSONNEL ONLY

4
CONTENTS
Important Safeguards. . . . . . . . . . . . . . . . . . . . 2
Unpacking Instructions . . . . . . . . . . . . . . . . . . 4
The Quest for the Perfect Cup of Coffee . . . . . . 4
Features and Benefits . . . . . . . . . . . . . . . . . 5–6
Control Panel . . . . . . . . . . . . . . . . . . . . . . . . 7–8
Charcoal Water Filter . . . . . . . . . . . . . . . . . . . .9
12-Cup Coffeemaker Instructions
Setting Up Your 12-Cup Coffeemaker . . . . . . . 9
Programming Your 12-Cup Coffeemaker. . . . . 9
Brewing Coffee. . . . . . . . . . . . . . . . . . . . . . . . 10
Brew Pause™ Feature . . . . . . . . . . . . . . . . . . 10
12-Cup Coffeemaker Cleaning
and Maintenance . . . . . . . . . . . . . . . . . . . . . . 11
Single-Serve Coffeemaker Instructions
Setting Up Your Single-Serve Coffeemaker . . 12
Using the Single-Serve Coffeemaker. . . . . . . 13
Brewing with a Reusable Filter Cup. . . . . . . . 14
Making Espresso . . . . . . . . . . . . . . . . . . . . . . 14
Using Steam Wand for Frothing Milk. . . . . . . 16
Using Steam Wand for Hot Water . . . . . . . . . 17
Single-Serve Cleaning and Maintenance. . . . 18
Cleaning the Steam Wand . . . . . . . . . . . . . . . 19
Troubleshooting . . . . . . . . . . . . . . . . . . . . . . . 20
Warranty . . . . . . . . . . . . . . . . . . . . . . . . . . . . . 21
Recipes. . . . . . . . . . . . . . . . . . . . . . . . . . . . . . 22
UNPACKING
INSTRUCTIONS
1. Place the box on a large, sturdy, flat surface.
2. Remove the instruction book and any other
literature.
3. Turn the box so that the back side of the
Coffeemaker is down and slide the
Coffeemaker from the box.
4. After the Coffeemaker has been removed,
place the box out of the way and lift off the
packing material.
5. Grasp the carafe by its handle, remove it from
the heating plate, and remove the polybag.
6. Remove the polybag covering the Coffeemaker.
Save all packing materials in case you have to
ship the machine in the future.
KEEP ALL PLASTIC BAGS AWAY FROM
CHILDREN.
THE QUEST
FOR THE PERFECT
CUP OF COFFEE
ELEMENT 1: WATER
Hot beverages are made up primarily of
water. If water doesn’t taste good from
the tap, it won’t taste good in your drink.
Cuisinart includes charcoal water filters
in its water reservoirs to remove chlorine,
bad tastes and odors, for the purest
flavors every time you brew.
ELEMENT 2: COFFEE
The flavor of your beverage comes
from the coffee, tea, cocoa – or whatever
you’re brewing. To achieve the best
taste, always use the best ingredients.
Select fresh, high-quality beans or
ground coffee, and only the best
single-serve capsules.
ELEMENT 3: GRIND
The grind of coffee, or the refinement
of tea leaves, is critical for proper flavor
extraction. Pre-ground ingredients in
top-quality single-serve capsules ensure
excellent, flavorful results. When using
beans or pre-ground coffee to brew into
the carafe, the grind is just as critical. If
it’s too fine, over-extraction will result in
bitterness and may clog the filter. If too
coarse, maximum flavor is not extracted.
We recommend a medium-fine grind.
ELEMENT 4: PROPORTION
Coffee that is too strong or too weak is
always a disappointment. Follow the
recommended portions of ground coffee
in the instructions under Brewing Coffee
for the drip side or under Brewing with
a Reusable Filter Cup for the single serve
side. You can later adjust the amount to
suit your taste.

5
1. Coffeemaker Reservoir Cover
Flips back for easy filling.
2. Coffeemaker Water Reservoir
(not shown)
With water level indicator window.
3. Showerhead (not shown)
Distributes water evenly over coffee,
reducing temperature loss as water
passes through grounds.
4. Coffeemaker Control Panel
See detailed illustration, page 7.
5. Brew PauseTM
Stops flow of coffee from basket when
carafe is removed from the heater plate,
so a cup can be poured mid-brew.
6. Carafe
The easy-pour, no-drip, 12-cup carafe has
an ergonomic handle and brewed coffee
markings.
7. Charcoal Water Filter Holder
Holds filter firmly in place.
8. Charcoal Water Filter
Eliminates chlorine, bad tastes and odors
from tap water.
9. Heater Plate
Keeps brewed coffee at perfect
temperature in Keep Warm mode.
Scratch resistant with nonstick coating.
10. Filter Basket (not shown)
Holds a #4 paper filter or a permanent
filter.
11. Filter Basket Holder (not shown)
12. Ready Tone (not shown)
Signals the end of the brew cycle with
five beeps.
13. Power Loss Back-Up System (not shown)
One-minute protection if a breaker trips,
unit is unplugged, or power fails. Holds all
programmed information, including time of
day, Auto On time and Auto Off time.
12-CUP COFFEEMAKER FEATURES AND BENEFITS
*All materials that come in contact with coffee or water are BPA free.
1
4
5
6
9
8
7

6
SINGLE-SERVE COFFEEMAKER FEATURES AND BENEFITS
14. Brewer Handle
15. Brew Head
16. Brewing Chamber
Single Serve Coffee
Holds Removable Pod Capsule Holder.
Espresso
Holds Removable Espresso Capsule
Holder.
17. Control Panel
See detailed illustration on page 8.
18. Steam & Hot Water Wand
Steams milk or dispenses hot water.
19. Adjustable Shelf
Add removable drip tray as flip-down shelf
to accommodate smaller brews.
a. Removable Drip Tray Plate
b. Removable Drip Tray
20. Reservoir Lid
21. 72-Ounce Removable Water Reservoir
22. Charcoal Water Filter Holder
23. Charcoal Water Filter
24. Removable Pod Capsule Holder
25. Removable Espresso Capsule Holder
26. Power Cord (not shown)
27. Energy-Saving Mode (not shown)
Unit lights will dim after 30 minutes
of being idle. To reactivate, turn function
knob or press any button. To turn off
completely, unplug the unit.
*All materials that come in contact with coffee or water are BPA free.
14
20
21
23
24
25
22
15
16
17
18
19
19a
19b

7
1. Clock Display
Displays time of day, Auto On, and
Auto Off times.
2. Hour and Minute Buttons
Use to set hours and minutes for time
of day, Auto On, and Auto Off times.
3. ON/OFF Button
Turns Coffeemaker on and off.
Activates and Deactivates AUTO ON
feature.
4. BOLD Strength Setting with Indicator
Lets you choose bold or regular coffee
strength; indicator appears in Clock
Display when bold is selected.
5. Clean Button
Indicator appears in Clock Display when
it is time to decalcify your coffeemaker.
6. WARM Indicator
WARM appears in Clock Display when
brew cycle is complete. When in Keep Warm
mode, single-serve functions can be used.
7. Function Knob
a. AUTO ON with Indicator
Select to automatically start brewing
coffee at the time you’ve programmed.
Further details for setting up AUTO ON
on page 10.
b. AUTO OFF with Indicator
Select to program your Coffeemaker to
automatically shut off Keep Warm mode
up to 4 hours after brewing.
c. BREW with Indicator
Select BREW when you are ready to begin
brew cycle. BREW indicator will appear.
Press ON/OFF button to begin or stop the
brew cycle.
GETTING TO KNOW YOUR CONTROL PANEL
12-CUP COFFEEMAKER CONTROLS
Detailed programming and use instructions are on pages 9–11.
2345
671

8
1. START/STOP Knob
Turn to toggle through and select start, or
stop for single serve, espresso, hot water
and steam functions.
2. ESPRESSO Indicator
Single or double sizes.
3. POD Indicator
6 oz., 8 oz., or 10 oz. sizes.
4. ADD WATER Indicator
Indicates the need to add water to
removable water reservoir for use of
single serve, espresso, or hot water
functions.
5. CLEAN Indicator
Indicator appears in Display when it is
time to decalcify single-serve side.
6. STEAM Indicator
Manual steam for frothing when making
beverages like cappuccinos or lattes.
7. HOT WATER Indicator
Dispenses hot water for tea, soup,
oatmeal and more.
8. ON
When illuminated, the single-serve coffee,
espresso or hot water/steam function is
in process.
7156
8432
SINGLE-SERVE COFFEEMAKER CONTROLS
Detailed use instructions are on pages 12–17.
GETTING TO KNOW YOUR CONTROL PANEL (CONTINUED)

9
SETTING UP YOUR
12-CUP COFFEEMAKER
INITIAL CLEANING
Perform an initial cleaning before making
your first beverage. Follow these
instructions, without adding coffee.
1. Insert charcoal water filter as shown on left
(if you haven't already).
2. Fill water reservoir.
3. Make sure carafe is in place.
4. If you haven’t already, plug the power
cord into an independent outlet.
5. Turn Function knob to BREW.
6. Press the ON/OFF button and allow brew
cycle to run.
7. The one-time cleaning process is complete.
Discard hot water. Your Coffeemaker is
ready to use.
PROGRAMMING YOUR
12-CUP COFFEEMAKER
SETTING THE CLOCK
When the Coffeemaker is plugged in,
12:00 will flash.
Turn the Function knob to BREW Press Hour
or Minute buttons to select the desired time.
Hold buttons down to scroll through the digits,
or press and release to advance one digit at a
time. When scrolling, the numbers will advance
slowly and then speed up. When the number
displayed approaches the desired time, press
and release to advance one digit at a time.
Be sure the PM indicator is on if a PM time
is desired.
To finish setting the clock, turn the Function
knob to any other setting or simply wait until
the numbers stop flashing.
CHARCOAL
WATER FILTER
INSERTING THE WATER FILTER
1. Remove the filter from the polybag and
soak, fully immersed, in cold tap water
for 15 minutes.
2. Lift the water filter holder out of the water
reservoir on the 12-Cup Coffeemaker side.
3. Press down on the filter compartment
and pull toward you to open.
4. Place filter into the holder and snap
closed. Be careful – improper placement
can tear the filter skin.
5. Flush filter by running cold tap water
through holes in bottom of compartment
for 10 seconds.
6. Allow the filter to drain completely.
7. Slide the water filter holder back into the
channel in the water reservoir, pushing
down to the base of the unit.
NOTE: Repeat steps 1-7 above on the
Single-Serve side.
NOTE: We recommend changing the water filter
every 60 days or after 60 uses, and more often
if you have hard water.
Replacement filters can be purchased in stores,
by calling Cuisinart Consumer Service, or at
www.cuisinart.com

10
SETTING THE AUTO-ON TIME
When you turn the Function knob to AUTO
ON, the previously selected Auto-On time,
or the default time (12:00) will flash.
1. Turn the Function knob to AUTO ON.
AUTO ON indicator will flash to begin
programming. Use the Hour and Minute
buttons as above to program your
start-brew time.
2. Press the ON/OFF button to activate
the program.
When you press ON/OFF, the AUTO ON
indicator will illuminate, indicating the AUTO
ON function has been activated. Clock
Display will show the current time.
3. AUTO ON brew cycle begins.
The BREW indicator will flash slowly when
the brew cycle begins at the time you have
selected. When the brew cycle ends,
WARM will illuminate indicating Keep Warm
cycle. Lights will turn off when the Keep
Warm cycle ends and BREW will come
back on indicating the coffeemaker is ready
for the next brew.
NOTE: To start brew time at the same
time the next day, simply make sure the
Function knob is at AUTO ON and press
and release ON/OFF button once more.
The AUTO ON indicator will turn on.
SETTING THE AUTO-OFF TIME
Turn the Function knob to AUTO OFF
Use the Hour and Minute buttons as above
to program your Coffeemaker to shut off from
0 to 4 hours after brew cycle is finished.
BREWING COFFEE
Follow instructions in Setting Up Your
12-Cup Coffeemaker on page 9.
1. Insert charcoal water filter
Follow directions for the preparation and
insertion of the filter on page 9.
2.
Fill the water reservoir
Open the Coffeemaker reservoir cover by
lifting it up. Pour in the desired amount of
water, using the water level indicator
located at the side of the Coffeemaker.
3.
Before brewing
Make sure the glass carafe is in position on
the heater plate and the top cover is closed.
Plug the cord into an electrical outlet.
4.
Set preferences
Push the BOLD button if you would like
a stronger brew. BOLD indicator will
illuminate.
5.
Add the ground coffee
Remove the filter basket by grasping the
handle and lifting straight up. Insert a #4
paper filter or permanent filter. Be sure that
a paper filter is completely open and fully
inserted in the basket. It may help to fold
and flatten the seams of a paper filter
beforehand. Add 1 level scoop of ground
coffee per cup. Adjust the amount
according to taste.
NOTE: The maximum capacity for
ground coffee is 15 tablespoons for this
Coffeemaker. Exceeding this amount
may cause overflow if the coffee is too
finely ground.
Replace the filter basket in the filter basket
holder and press firmly on cover to be sure
it closes securely.
6.
Brewing coffee
Turn the Function knob to BREW, press the
ON/OFF button, and the BREW indicator
light will flash slowly. Or, set the AUTO ON
function (this page) and the AUTO ON
indicator will be illuminated.
7.
After brewing
When the brewing cycle has been
completed, coffee will continue to stream
from the filter for several seconds. When
streaming completely stops, five beeps will
sound and you can now enjoy your coffee.
NOTE: Reservoir cover may be hot
during and directly after brewing.
Wait at least 10 minutes before opening.
BREW PAUSE™ FEATURE
This feature interrupts the flow of
coffee from the basket to let you
pour that first cup mid-brew.
Because the flavor profile of coffee
brewed at the start of a cycle differs
from that brewed toward the end,
be aware that using this feature will
weaken the flavor strength of the
finished pot.
NOTE: Removing carafe for more
than 20 seconds may cause filter
basket to overflow.

11
12-CUP COFFEEMAKER
CLEANING AND
MAINTENANCE
Always make sure the unit is off by
removing the plug from the electrical
outlet before cleaning.
Lift up the Coffeemaker reservoir cover.
Remove and discard the paper filter and
ground coffee. The filter basket can be washed
in warm, soapy water and rinsed thoroughly,
or cleaned in the upper rack of the dishwasher.
Dry all parts after use.
Do not put any water in the unit once
the filter basket has been removed.
Wipe the area under the filter basket
with a damp cloth.
Remove the carafe from the heating plate.
Discard any remaining coffee. The carafe and
lid can be washed in warm, soapy water and
rinsed thoroughly, or placed in a dishwasher.
The carafe and carafe lid should be placed on
the upper rack only.
Do not use any scouring agents or harsh
cleansers on any part of the Coffeemaker.
Never immerse base unit in water or other
liquids. To clean base, simply wipe with a clean,
damp cloth and dry before storing. Fingerprints
and other blemishes on the housing can be
washed off with soap and water or a
nonabrasive cleaning solution. Wipe heater
plate with a clean, damp cloth. Never use
rough, abrasive materials or cleansers to clean
the heater plate. Do not dry the inside of the
water reservoir with a cloth, as lint may remain.
DESCALING
Descaling refers to the removal of calcium
deposits that form over time on the metal parts
of the Coffeemaker.
To Descale Your Coffeemaker
Depending on the mineral content of water in
your area, calcium deposits (scale) may build up
in your Coffeemaker. Though scale is not toxic,
it can affect performance. Descaling the
Coffeemaker when the indicator signals it is time
to do so will help protect the heating element
and other parts that come into contact with water.
For optimal performance, descale Coffeemaker
every 3 to 6 months. If calcium deposits build up
faster, the CLEAN light will illuminate, indicating
12-cup Coffeemaker should be descaled.
To clean:
1. Fill the water reservoir to capacity with a
mixture of ⁄ white vinegar and ⁄ water.
2. Press and hold the CLEAN button.
When the CLEAN LED indicator flashes,
the coffeemaker is in Clean mode.
Release the button.
3. When the cycle is completed, 5 beeps will
sound and the coffeemaker will shut off.
4. If the CLEAN indicator illuminates once
more, repeat the cleaning procedure with
a fresh solution of vinegar and water.
NOTE: One cleaning cycle is usually
sufficient.
5. While the CLEAN indicator remains off, run
one cycle with a full reservoir of fresh, cold
water to rinse the unit.
6. Return the charcoal water filter to the
holder inside the water reservoir and your
coffeemaker is ready to brew!
MAINTENANCE
Any other servicing should be performed by
an authorized service representative.

12
SETTING UP YOUR
SINGLE-SERVE
COFFEEMAKER
INITIAL CLEANING FOR USE
WITH PODS
Perform an initial cleaning before making
your first beverage. Follow these
instructions, without inserting a pod or
espresso capsule.
1. Insert charcoal water filter if you haven’t
already. Instructions on page 9.
2. Remove water reservoir from the unit.
3. Fill the reservoir in sink and put back on
unit.
4. If you haven’t already, plug the power cord
into an independent outlet. The coffeemaker
will turn on and be ready for use.
5. Open and close the brew head. Do not add
a pod.
6. Place mug on the drip tray.
7. Using the START/STOP knob, select
the 6 oz. cup POD size and press the
START/STOP knob. POD indicator will
flash slowly and the hot water will start
to dispense momentarily.
8. A beep will sound when the one-time
cleaning process is complete. Discard hot
water. Your brewer is ready to use.
INITIAL CLEANING FOR
ESPRESSO CAPSULES
1. Repeat steps 1 to 4 in INITIAL CLEANING
WITH PODS.
2. Open and close the brew head. Do not add
an espresso capsule.
3. Move drip tray to adjustable tray position
to avoid any splashing and place espresso
cup on tray.
4. Using the START/STOP knob, select
the Single espresso size and press the
START/STOP knob. Light will flash slowly
and the hot water will start to dispense
momentarily.
5. A beep will sound when the one-time
cleaning process is complete. Discard hot
water. Your brewer is ready to use.

13
USING THE SINGLE-SERVE
COFFEEMAKER
MAKING COFFEE WITH PODS
IMPORTANT: Complete the initial cleaning
steps before brewing. Follow instructions in
Setting Up Your Single-Serve Coffeemaker,
page 12.
BREWING
1. Remove single-serve water reservoir.
2. Fill reservoir to desired level, then replace
on unit.
3. Place mug on the drip tray. The drip tray can
be removed to accommodate travel mugs.
4. Select a pod.
NOTE: Do not remove the foil lid or
puncture the capsule.
5. Turn the START/STOP knob clockwise to
enter POD setting mode. The POD indicator
will illuminate.
6. Open the brew head. The POD indicator
will turn off while brew chamber is open.
Place a pod in the brewing chamber and
close brew head. The POD indicator will
turn back on.
Caution: There are two sharp needles
in the brewing chamber that puncture
the pod, one above and one below.
To avoid risk of injury, do not put your
fingers in the single-serve brewing
chamber.
7. Turn the START/STOP knob clockwise to
choose your desired brew POD size of 6, 8,
or 10 oz. and press knob for selected size.
The ON indicator will illuminate and the
selected brew size will flash slowly while
brewing.
NOTE: To cancel brewing, simply press
the START/STOP knob once again and the
brewing process will be stopped.
Caution: There is very hot water in the
capsule chamber during the brewing
process. To avoid risk of injury, do not
lift the handle or open the capsule
chamber during the brewing process.
8. Once fully dispensed, one short beep will
sound. The POD indicator and the brew size
chosen will illuminate again. The ON indicator
will turn off signifying the brew is complete.
9. Lift the handle, then remove and dispose of
the used pod. Close the brew head.
Caution: Pod will be hot.
10. Enjoy your cup of coffee! Your brewer is
ready to use again.
NOTE: When ADD WATER indicator is on,
no brewing can be done. Once you refill the
reservoir, your unit is ready to brew.

14
ADD WATER
The Add Water light will illuminate when water
is below 10.5 ounces. Simply fill the reservoir
with water and continue to brew as usual.
BREWING WITH THE
HOMEBARISTATM REUSABLE
FILTER CUP
The Single-Serve Coffeemaker can be used
with a reusable coffee pod, which allows you
to use your own ground coffee.
The HomeBarista™ Reusable Filter Cup is not
included, but is for sale at most retailers with
Cuisinart® products.
1. Fill the filter basket within the reusable pod
with ground coffee, making sure not to fill
past the max indicator. Adjust the amount
to your personal preference. Do not tamp
the grounds. Make sure there are no
grounds remaining on the upper rim of the
filter basket. Close lid.
NOTE: Max fill: 2.5 scoops or 15 grams.
2.
Remove the pod capsule holder from the
brewing chamber by pulling toward you.
2a. Drop the reusable coffee pod into the
brewing chamber. There is no need to
snap it into place.
2b. Follow brewing instructions on page 13.
NOTE: To cancel brewing, simply press
the START/STOP knob once again and the
brewing process will be stopped.
Caution: There are two sharp needles
in the brewing chamber that puncture
the pod, one above and one below.
To avoid risk of injury, do not put your
fingers in the brewing chamber.
3. After brewing, raise the handle and remove
the reusable coffee pod. Use caution as
the reusable coffee pod will be hot.
4. Replace the pod capsule holder, ensuring
that the arrow on pod capsule rim aligns
with the arrow on the brewing chamber.
Gently push the pod capsule holder to
snap into place.
NOTE: This Coffeemaker is compatible with
most reusable coffee pods.
MAKING ESPRESSO
IMPORTANT: Complete the initial cleaning
steps before brewing. Follow instructions in
Setting Up Your Single-Serve Coffeemaker,
page 12.
This machine is compatible with Nespresso®
OriginalLine style capsules.
1. If ADD WATER indicator is on, remove
reservoir and fill.
2. Move drip tray to adjustable tray position
to avoid any splashing and more accurate
dispensing of espresso.
3. Place an espresso cup on the drip tray and
select your desired espresso capsule.
4. Turn the START/STOP knob clockwise
to enter ESPRESSO setting mode.
The ESPRESSO indicator will illuminate.

15
5. Open the brew head. The ESPRESSO
indicator will go off while Brew chamber is
open. Remove the espresso capsule holder
from the brew chamber and place the
espresso capsule in the holder.
Caution: There are sharp needles on the
brewing chamber lid that puncture the
capsule. To avoid risk of injury, do not
put your fingers on the needles in upper
chamber lid.
6. Place the espresso capsule holder back
into brew chamber and close brew head.
The espresso indicator will turn back on.
7. Turn the START/STOP knob clockwise
to choose your desired ESPRESSO
Single (1.4 oz) or Double (3.2 oz.) size
and press knob for selected size. The ON
indicator will illuminate and selected espresso
size will flash slowly. The espresso will start
to dispense momentarily.
NOTE: To cancel brewing, simply press
the START/STOP knob once again and
the brewing process will be stopped.
Caution: There is very hot water in the
capsule chamber during the brewing
process. To avoid risk of injury, do not
lift the handle or open the capsule
chamber during the brewing process.
8. Once fully dispensed, one short beep
will sound. The ESPRESSO indicator will
illuminate, and the ON indicator will go off.
9. Lift the brew head handle and take out
the espresso capsule holder. Push the
espresso capsule out of the holder and
place capsule holder back into brew
chamber. Close the brew head.
Caution: Espresso capsule will be hot.
Please wait a few minutes to remove if
possible.
10. Enjoy your espresso! Your brewer is ready
to use again.
NOTE: For optimal results, we recommend
using the double espresso button with a lungo
or more bold espresso capsule. Using this
setting with lighter or less bold varieties will
alter the taste.

16
USING STEAM WAND FOR
FROTHING MILK
Milk frothing is the steaming of milk. The steam
does two things: It heats milk and it mixes in
air to form a foamy texture. As with anything,
perfecting the art of milk texturing takes
practice, but the results are well worth it!
For best results use cold, refrigerated milk.
1. Turn the START/STOP knob clockwise to
choose STEAM setting. STEAM indicator
will illuminate.
2. Fill a mug or frothing pitcher with milk of
your choice. For best results, use a range
of 4–8 ounces for your drink recipe to avoid
overflow when frothing.
TIP: Keep in mind that the volume of milk
will increase during the texturing.
3. Purge the steam wand of any water:
with the steam wand positioned over
the drip tray, activate the steam function
by pressing START/STOP knob to start
steam process. The ON indictor will
illuminate. Once any water has been
purged, stop the steam by pressing the
START/STOP knob. The ON indictor will
turn off.
4. Swing the steam wand back to the side
of the unit. Place the mug or frothing
pitcher under the HOT WATER/STEAM
wand. Place the steam want in the milk so
that the nozzle is just below the surface of
the milk.
NOTE: Pitcher not included.
5. Press the START/STOP knob.
The STEAM indicator will flash slowly,
then begin steaming. The ON indicator
will illuminate signifying steam process
has started.
NOTE: To cancel steaming, simply press
the START/STOP knob once again and the
steaming process will be stopped.
6. Keeping the pitcher at an angle, insert the
steam wand and rest it against the pitcher,
keeping the nozzle just below the surface
of the milk.
MILK FROTHING LEVELS
Whole Milk
Low-Fat Milk
Fat-Free Milk
Non-Dairy Milk
NOTE: Frothing levels depend on the amount
of milk being used.

17
This will start to create a whirlpool action
in the milk.
NOTE: If the steam spurts unevenly, it will
create aerated froth/large bubbles. If this is
happening, raise the pitcher so that the
steam nozzle is lowered farther into the milk.
7. As the steam heats and textures the milk,
the level of the milk in the pitcher will begin
to rise. As this happens, follow the level
of the milk by lowering the pitcher, always
keeping the tip of the steam nozzle just
below the surface.
8. Once the foam is created, raise the mug
or pitcher until the steam nozzle is in the
center of the milk to keep heating it without
creating more foam.
TIP: The amount of foam required will vary
depending on the drinks being made; for
example, a cappuccino requires more foam
than a latte.
9. Stop the steam immediately when the milk
is heated by pressing the START/STOP
knob. The steam indicator will illuminate,
and the ON indicator will turn off signifying
steaming has stopped.
IMPORTANT: Do not boil the milk. The ideal
temperature for steaming milk is 140–150°F.
10. Remove the pitcher, immediately wipe the
steam nozzle and wand with a clean damp
cloth and purge a small amount of steam
over the drip tray as in step 3. Cleaning the
wand after every use is recommended to
avoid milk buildup. For further steam wand
cleaning see instructions on page 19.
USING THE STEAM WAND
FOR HOT WATER
1. If ADD WATER indicator is on, remove
reservoir and fill.
2. Place a cup or container under the
HOT WATER/STEAM wand.
3. Turn the START/STOP knob clockwise to
choose HOT WATER setting. Indicator will
illuminate.
4. Press the START/STOP knob. The HOT WATER
indicator will flash slowly, then begin dispensing
water. The ON indicator will illuminate to
signify hot water function is in process.
5. When the desired amount of water is
dispensed, press the START/STOP knob
to stop the HOT WATER function.
The HOT WATER indicator will remain
illuminated and the ON indicator will
turn off.
6. Remove the cup or container and swing
the steam/hot water wand over the drip
tray to catch any drips of water.

18
SINGLE-SERVE
COFFEEMAKER CLEANING
AND MAINTENANCE
CLEANING EXTERNAL PARTS
We recommend regular cleaning of the
Coffeemaker’s external components.
1. Never immerse the Coffeemaker in water
or other liquids. The housing and other
external components may be cleaned with
a soapy, damp, nonabrasive cloth.
2. To remove the drip tray, lift it up from finger
slots on the side, keeping it level at all
times in order to prevent spills. The drip
tray and drip tray plate are dishwasher
safe. Do not clean drip tray with cleansers,
steel wool pads or other abrasive materials.
CLEANING THE CAPSULE
HOLDERS
Caution: There are sharp needles that
puncture the capsules above and below.
To avoid risk of injury, do not put your
fingers in the capsule brewing chamber.
1. The capsule holders are top-shelf
dishwasher safe (use low temperature
cycle). To remove, lift the handle to open
the brewing chamber. Grasp the top of
the capsule holder and pull up.
2. Cleaning the Funnel
To remove funnel from pod capsule holder,
hold funnel in left hand, twist bottom away
from you slightly and pull away from pod
capsule holder to remove. The funnel is
top-rack dishwasher safe.
NOTE: The funnel may be tight the first few
times you go to remove it; this is normal
and will loosen with continued use.
3. Cleaning the Exit Needle
The exit needle is located on the inside
bottom of the pod capsule holder assembly.
Should a clog arise because of coffee
grounds, it can be cleaned using a paper
clip or similar tool. Remove pod capsule
holder from unit, then remove funnel from
pod capsule holder and insert the paper
clip into exit needle to loosen the clog and
push it out.
Replace funnel in pod capsule holder
by lining up tabs in funnel with notches on
pod capsule holder, and twist toward you
until it locks into place. After cleaning,
replace pod capsule holder, being sure to
align the arrow on the pod capsule holder
rim with arrow on the brewing chamber.
4. Cleaning the Piercing Needle
The piercing needle is located on the inside
of the brewing chamber. Should a clog
occur because of coffee grounds, it can be
cleaned using a paper clip or similar tool.
Insert paper clip to loosen the clog and
push it out.
5. Espresso Capsule Holder
The capsule holder is top-shelf dishwasher
safe (use low temperature cycle).
CLEANING THE HOMEBARISTATM
REUSABLE FILTER CUP
Simply dispose of coffee grounds, then
hand-wash both the filter cup and filter,
or clean on top rack of dishwasher.

19
CLEANING THE WATER
RESERVOIR
It is normal over time for discoloration, spotting
or staining to appear in the water reservoir.
Results will vary depending on the mineral
content of the water used, but will not affect
the operation of the brewer. However, be sure
to clean the water reservoir regularly to
minimize buildup.
Clean inside the water reservoir with a damp,
lint-free cloth as necessary.
Descaling Your Single-Serve Brewer and
Steam Wand
Mineral content in water varies from place to
place. Depending on the mineral content of the
water in your area, calcium deposits or scale
may build up in your Coffeemaker. Though
scale is nontoxic, it can hinder Coffeemaker
performance. Descaling your Coffeemaker will
help maintain the heating element and other
parts that come in contact with water.
For optimal performance, descale your
Coffeemaker every 3 to 6 months. It is possible
for calcium deposits to build up faster, making
it necessary to descale more often. The CLEAN
indicator will turn on when the unit needs to
be descaled.
NOTE: Before descaling your Coffeemaker,
remember to remove the charcoal water filter
from the water filter holder located in the water
reservoir.
To begin, you will need the following:
• 13 oz. of distilled white vinegar
• 26 oz. of water
• 16 oz. ceramic mug or container
(do not use paper cup)
• Access to a sink
Step 1: First Vinegar Rinse
1. Fill the single-serve water reservoir with
13 oz. of white vinegar and 26 oz. of water.
2. Place the ceramic mug or container on
the drip tray and under the Steam and
Hot Water Wand.
3. Rotate START/STOP knob to CLEAN and
press the START/STOP knob to begin
descale. The CLEAN indicator will flash.
4. When the single serve descale is complete,
the STEAM and HOT WATER indicators
will go on. Press START/STOP knob again,
the STEAM and HOT WATER wand descale
cycle will begin.
5. Discard contents of mug into the sink.
6. Repeat until ADD WATER indicator
comes on.
7. When descaling is complete, the CLEAN
indicator will turn off and 5 beeps will sound.
8. Discard any remaining diluted vinegar into
sink.
Step 2: Fresh Water Rinse
1. Repeat Step 1 three times, using fresh
water in place of vinegar.
2. This will clean the Coffeemaker plumbing
and remove any residual vinegar taste.
CLEANING THE
STEAM WAND
• The steam wand should always be cleaned
after steaming milk. Wipe the steam wand
with a damp cloth after use.
• Fill a cup or mug with water and run the
steaming function as if you are frothing milk.
This will release any remaining milk from
inside the steam wand.
• The stainless steel steaming wand can be
twisted off and removed for further cleaning
and rinsed off. The steaming tube that is
underneath the wand can be wiped with a
damp, clean cloth.
• If the steam tube remains blocked, use a
paper clip or similar tool to clear the opening.
Move the steam wand over drip tray and
purge the steam wand by activating STEAM
function.
MAINTENANCE
Any other servicing should be performed by an
authorized service representative.

20
TROUBLESHOOTING
PROBLEM SOLUTION
Machine will not brew. Turn off and unplug the machine for 1 minute or more.
Make sure there is water in the reservoir.
Make sure the removable reservoir is properly installed.
Make sure brew head is completely closed.
Machine turned off by itself. The machine’s energy-save mode puts unit to sleep after
30 minutes of nonuse. Simply turn the START/STOP knob,
function knob or press any button to “wake up” the unit.
E0 is flashing on screen and unit
will not brew. Unplug and plug in the machine. Perform an initial
clean cycle for pods and espresso brewing. Follow the
instructions on page 12, without inserting a pod or
espresso capsule.
Coffee basket is overflowing. If coffee ground basket is overflowing this could be
caused by overfilling with coffee grounds or using a
coffee grind that is too fine. See “The Quest for the
Perfect Cup of Coffee” on page 4 for suggestions on
how to find the right grind and portion.
Make sure paper filter is not used with gold tone filter.
Either one or the other should be used at a time, not both.
The Single-Serve functions are
not working while brewing coffee
in the carafe.
The Pod, Espresso, Steam and Hot Water functions
cannot be used while the 12-Cup Coffeemaker is brewing
coffee. Once the brew is complete and in WARM mode,
the Single-Serve functions can be used.
Pod brewer has a slow stream of
water, makes a short cup OR it
sputters as it brews.
The piercing or exit needle may be clogged with coffee.
Remove pod capsule holder from your unit and then twist
off the funnel that makes up the bottom portion on the
holder. Use a paper clip to loosen the clog and push it
out. See page 18 of your instruction booklet and follow
steps 1–4.
Milk does not froth. Try removing the stainless steam wand tube from the
frothing mechanism by twisting it off. Rinse the tube,
dry off and replace on unit.
If milk still does not froth, clean the steam/frothing wand
further by following instructions on page 19.
The CLEAN indicator is still on
after decalcifying. Be sure the decalcification process was properly done
by following the instructions on page 11 for 12-Cup
Coffeemaker side and page 18 for Single-Serve side.
Run the decalcification process until the clean indicators
no longer appear.

21
WARRANTY
Limited Three-Year Warranty
This warranty is available to U.S. consumers
only who purchase products directly from
Cuisinart® or an authorized Cuisinart® reseller
only. You are a consumer if you own a Cuisinart®
Coffee Center® BaristaBar that was purchased
at retail for personal, family or household use.
Except as otherwise required under applicable
law, this warranty is not available to retailers
or other commercial purchasers or owners or
consumers who purchase from unauthorized
Cuisinart® resellers. We warrant that your
Cuisinart® Coffee Center® BaristaBar will be
free of defects in materials and workmanship
under normal home use for 3 years from the
date of original purchase.
We recommend that you visit our website,
https://cuisinart.registria.com, for a fast,
ef cient way to complete your product
registration. However, product registration does
not eliminate the need for the consumer to
maintain the original proof of purchase in order
to obtain the warranty bene ts. In the event that
you do not have proof of purchase date, the
purchase date for purposes of this warranty will
be the date of manufacture.
CALIFORNIA RESIDENTS ONLY
California law provides that for In-Warranty
Service, California residents have the option
of returning a nonconforming product (A) to
the store where it was purchased or (B) to
another retail store that sells Cuisinart products
of the same type. The retail store shall then,
according to its preference, either repair the
product, refer the consumer to an independent
repair facility, replace the product, or refund
the purchase price less the amount directly
attributable to the consumer’s prior usage of
the product. If neither of the above two options
results in the appropriate relief to the consumer,
the consumer may then take the product to an
independent repair facility, if service or repair
can be economically accomplished. Cuisinart
and not the consumer will be responsible for
the reasonable cost of such service, repair,
replacement, or refund for nonconforming
products under warranty. California residents
may also, according to their preference, return
nonconforming products directly to Cuisinart for
repair or, if necessary, replacement by calling
our Consumer Service Center toll-free at
1-800-726-0190. Cuisinart will be responsible
for the cost of the repair, replacement, and
shipping and handling for such nonconforming
products under warranty.
HASSLE-FREE REPLACEMENT WARRANTY
Your ultimate satisfaction in Cuisinart
products is our goal, so if your Cuisinart®
Coffee Center® BaristaBar should fail within
the generous warranty period, we will repair
it or, if necessary, replace it at no cost to you.
To obtain a return shipping label, visit us at
https://www.cuisinart.com/customer-care/
product-return/product-assistance/product-
inquiry. Or call our Consumer Service Center
toll-free at 1-800-726-0190 to speak with a
representative.
Your Cuisinart® Coffee Center® BaristaBar
has been manufactured to the strictest
speci cations and has been designed for
use only in 120-volt outlets and only with
authorized accessories and replacement parts.
This warranty expressly excludes any defects
or damages caused by attempted use of
this unit with a converter, as well as use with
accessories, replacement parts or repair service
other than those authorized by Cuisinart. This
warranty does not cover any damage caused
by accident, misuse, shipment or other than
ordinary household use. This warranty excludes
all incidental or consequential damages. Some
states do not allow the exclusion or limitation
of these damages, so these exclusions may not
apply to you. You may also have other rights,
which vary from state to state.
Important: If the nonconforming product is to
be serviced by someone other than Cuisinart’s
Authorized Service Center, please remind the
servicer to call our Consumer Service Center
at 1-800-726-0190 to ensure that the problem
is properly diagnosed, the product is serviced
with the correct parts, and the product is still
under warranty.

22
RECIPES
STANDARDS
Café Mocha . . . . . . . . . . . . . . . . . . . . . . . . . . 23
Café Latte. . . . . . . . . . . . . . . . . . . . . . . . . . . . 23
Cappuccino . . . . . . . . . . . . . . . . . . . . . . . . . . 24
Cortado . . . . . . . . . . . . . . . . . . . . . . . . . . . . . 24
Macchiato. . . . . . . . . . . . . . . . . . . . . . . . . . . . 24
Americano . . . . . . . . . . . . . . . . . . . . . . . . . . . 25
NEW HITS
Flat White . . . . . . . . . . . . . . . . . . . . . . . . . . . . 25
Hot Chocolate . . . . . . . . . . . . . . . . . . . . . . . . 26
Chai Latte . . . . . . . . . . . . . . . . . . . . . . . . . . . . 26
Espresso Tonic . . . . . . . . . . . . . . . . . . . . . . . . 27
Café con Leche . . . . . . . . . . . . . . . . . . . . . . . 27
Matcha Latte . . . . . . . . . . . . . . . . . . . . . . . . . 27
Hibiscus Latte . . . . . . . . . . . . . . . . . . . . . . . . 28
Hibiscus Syrup . . . . . . . . . . . . . . . . . . . . . . . . 28
Fruity Cereal Milk Latte . . . . . . . . . . . . . . . . . 28
Fruity Cereal Milk . . . . . . . . . . . . . . . . . . . . . . 29
Cinnamon Toast Latte . . . . . . . . . . . . . . . . . . 29
Cinnamon Toast Milk . . . . . . . . . . . . . . . . . . . 29
Butterfly Pea Powder Latte . . . . . . . . . . . . . . 30
DESSERTS/SHAKE
Affogato . . . . . . . . . . . . . . . . . . . . . . . . . . . . . 30
Espresso-Cocoa Smoothie . . . . . . . . . . . . . . 30
Simple Tiramisu . . . . . . . . . . . . . . . . . . . . . . . 31

23
Café Mocha
It is hard to resist a chocolaty coffee drink,
even more so when it’s topped with whipped
cream and shaved chocolate. Serve this drink
in a tall glass for an extra-special presentation.
Makes 1 serving
1 espresso capsule
1 tablespoon chocolate syrup
½ cup milk (dairy or nondairy)
¼ cup heavy cream, whipped to a
medium-soft peak
1 teaspoon shaved bittersweet
chocolate, or unsweetened cocoa
powder, for garnish (optional)
1. Put the espresso capsule into the unit. Put
the chocolate syrup into a large mug and
place underneath the brew head. Reserve.
2. Put the milk into a separate heatproof mug.
Hold the mug in one hand and place under
the steam wand so the bottom of the wand
is just below the surface of the milk at an
angle. Select the Steam function and press
the START/STOP knob to start steaming.
While holding the mug at an angle, allow
the steam to move the milk around.
Once the milk begins to increase in volume,
lift the mug up higher so the steam wand
immerses deeper into the milk. When you
can feel that the milk in the mug is quite
hot, press the START/STOP knob to stop
steaming. Tap the mug a few times to
remove any larger bubbles.
3. Select a Single Espresso and allow it to
brew into the mug with the chocolate
syrup.
4. Slowly pour the steamed milk into the mug
with the espresso and chocolate. Top the
drink off with about 2 tablespoons of the
whipped cream. If desired, top with shaved
chocolate or cocoa powder.
5. Serve immediately.
Café Latte
The classic coffee shop beverage made
simple at home – just steam your milk and
pour over your freshly brewed espresso and
top with a thin layer of foam.
Makes 1 serving
1 espresso capsule
½ cup milk (dairy or nondairy)
1. Put the espresso capsule into the unit.
2. Put the milk into a heatproof mug. Hold
the mug in one hand and place under the
steam wand so the bottom of the wand
is just below the surface of the milk at an
angle. Select the Steam function and press
the START/STOP knob to start steaming.
While holding the mug at an angle, allow
the steam to move the milk around.
Once the milk begins to increase in volume,
lift the mug up higher so the steam wand
immerses deeper into the milk (this will
prevent large bubbles from forming and
will make a nice fine milk foam). When the
foam has almost reached the top of the
mug and you can feel that the milk in the
mug is quite hot, press the START/STOP
knob to stop steaming. Tap the mug a few
times to remove any larger bubbles.
3. Place one mug underneath the brew head
and select Single Espresso. Once the
espresso has finished brewing, slowly pour
the steamed milk into the mug with the
espresso.
4. Serve immediately.

24
Cappuccino
Traditionally, a cappuccino is made by layering
equal parts espresso, steamed milk, and
foam. We recommend using a lungo capsule
when preparing this drink, but if a stronger
drink is desired, 2 single espresso capsules
can be used.
Makes 1 serving
1 lungo espresso capsule
(or 2 standard espresso capsules)
¹⁄³ cup milk (dairy or nondairy)
1. Put 1 espresso capsule into the unit.
2. Put the milk into a heatproof mug. Hold
the mug in one hand and place under the
steam wand so the bottom of the wand is
just below the surface of the milk at an
angle. Select the Steam function and
press the START/STOP knob to start
steaming. While holding the mug at an
angle, allow the steam to move the milk
around. Once the milk begins to increase in
volume, lift the mug up higher so the steam
wand immerses deeper into the milk (this
will prevent large bubbles from forming and
will make a nice fine milk foam). When the
foam has almost reached the top of the
mug and you can feel that the milk in the
mug is quite hot, press the START/STOP
knob to stop steaming. Tap the mug a few
times to remove any larger bubbles.
3. Place one mug underneath the brew head
and select Double Espresso if using a
lungo capsule. If using 2 capsules, brew
2 single espressos. Once the espresso has
finished brewing, slowly pour about 3
ounces of the steamed milk into the mug
with the espresso and then spoon 3 to 4
tablespoons of frothed milk on top.
4. Serve immediately.
Cortado
A cortado is very similar to a latte, but instead
of being heavy on milk, it calls for equal parts
espresso and milk and has no foam on top.
Makes 1 serving
1 espresso capsule
¼ cup milk (dairy or nondairy)
1. Put the espresso capsule into the unit.
2. Put the milk into a heatproof mug. Hold
the mug in one hand and place under the
steam wand so the bottom of the wand
is just below the surface of the milk at an
angle. Select the Steam function and
press the START/STOP knob to start
steaming. While holding the mug at an
angle, allow the steam to move the milk
around. Once the milk begins to increase in
volume, lift the mug up higher so the steam
wand immerses deeper into the milk (this
will prevent large bubbles from forming and
will make a nice fine milk foam). When the
foam has almost reached the top of the
mug and you can feel that the milk in the
mug is quite hot, press the START/STOP
knob to stop steaming. Tap the mug a few
times to remove any larger bubbles.
3. Place one mug underneath the brew head
and select Single Espresso. Once the
espresso has finished brewing, slowly pour
a small amount of the steamed milk, about
1½ to 2 ounces, into the mug with the
espresso.
4. Serve immediately.
Macchiato
A macchiato is a smaller espresso drink
topped with a little bit of foamed milk. There
are many interpretations around the world, but
here at Cuisinart we are staying traditional,
starting with the perfect espresso.
Makes 1 serving
1 espresso capsule
¼ cup milk (dairy or nondairy)
1. Put the espresso capsule into the unit.
2. Put the milk into a heatproof mug. Hold
the mug in one hand and place under the

25
steam wand so the bottom of the wand
is just below the surface of the milk at an
angle. Select the Steam function and
press the START/STOP knob to start
steaming. While holding the mug at an
angle, allow the steam to move the milk
around. Once the milk begins to increase in
volume, lift the mug up higher so the steam
wand immerses deeper into the milk (this
will prevent large bubbles from forming and
will make a nice fine milk foam). When the
foam has almost reached the top of the
mug and you can feel that the milk in the
mug is quite hot, press the START/STOP
knob to stop steaming. Tap the mug a few
times to remove any larger bubbles.
3. Place one demitasse/espresso cup
underneath the brew head and select
Single Espresso. Once the espresso has
finished brewing, spoon one tablespoon
of the frothed milk on top.
4. Serve immediately.
Americano
Simply stated an Americano is an espresso
with extra hot water. It is a great halfway point
between the assertive flavor of an espresso
and a full cup of coffee.
Makes 1 serving
1 lungo espresso capsule or 2
standard espresso capsules,
depending on strength preference
²⁄³ to ¾ cup hot water
1. Put 1 espresso capsule into the unit.
2. Hold a 6- to 8-ounce cup/mug underneath
the steam wand. Select HOT WATER and
allow water to flow into the cup/mug until it
is about two-thirds full. Press START/STOP
knob to stop water when desired amount
is reached.
3. Place the cup/mug with the hot water
already in it underneath the brew head and
select Double Espresso if using a lungo
capsule. If using 2 capsules, brew 2 single
espressos.
4. Serve immediately.
Flat White
A simple way to describe this increasingly
popular coffee shop drink would be “a small
strong latte.” It typically has a higher
proportion of espresso to milk and slightly
less foam than a latte.
Makes 1 serving
1 lungo espresso capsule
(or 2 standard espresso capsules)
¼ cup milk (dairy or nondairy)
1. Put 1 espresso capsule, either a lungo or
one of the standard espresso capsules, into
the unit.
2. Put the milk into a heatproof mug. Hold
the mug in one hand and place under the
steam wand so the bottom of the wand is
just below the surface of the milk at an
angle. Select the Steam function and press
the START/STOP knob to start steaming.
While holding the mug at an angle, allow
the steam to move the milk around.
Once the milk begins to increase in volume,
lift the mug up higher so the steam wand
immerses deeper into the milk (this will
prevent large bubbles from forming and
will make a nice fine milk foam). When the
foam has almost reached the top of the
mug and you can feel that the milk in the
mug is quite hot, press the START/STOP
knob to stop steaming. Tap the mug a few
times to remove any larger bubbles.
3. Place a separate mug underneath the brew
head and select Double Espresso if using a
lungo capsule, or brew 2 single espressos,
depending on strength preference. Once
the espresso has finished brewing, slowly
pour a small amount of the steamed milk,
about half the volume of the espresso, into
the mug with the espresso, holding back
the foam with a spoon. Top with a very thin
layer of foam.
4. Serve immediately.

26
Hot Chocolate
The perfect cup of decadence sure to please
everyone. Try one of our adult twists!
Makes 1 serving
1 ounce bittersweet chocolate,
finely chopped
1 tablespoon cocoa powder
1 tablespoon granulated sugar
Tiny pinch of kosher salt (optional)
3 tablespoons hot water
¹⁄8 teaspoon pure vanilla extract
¾ cup whole milk
¼ cup heavy cream, whipped to a
medium-soft peak and lightly
sweetened to taste
1. Put the chopped chocolate, cocoa powder,
sugar, and salt, if using, into a large mug.
Add the hot water and whisk until chocolate
is melted and mixture is smooth. Whisk in
vanilla.
2. Put the milk into a separate heatproof mug.
Hold the mug in one hand and place under
the steam wand so the bottom of the wand
is just below the surface of the milk at an
angle. Select the Steam function and press
the START/STOP knob to start steaming.
While holding the mug at an angle, allow
the steam to move the milk around.
Once the milk begins to increase in volume,
lift the mug up higher so the steam wand
immerses deeper into the milk. When you
can feel that the milk in the mug is quite
hot, press the START/STOP knob to stop
steaming. Tap the mug a few times to
remove any larger bubbles.
3. Slowly pour the steamed milk into the mug
with chocolate mixture. Whisk to combine.
Top the drink off with about 2 tablespoons
of the whipped cream.
4. Serve immediately.
Hot Chocolate Toddy:
Add 2 tablespoons bourbon or dark rum to the
chocolate mixture.
Espresso Hot Chocolate:
Brew 1 espresso capsule into the chocolate
mixture.
Chai Latte
With so many artisanal chai concentrates to
choose from nowadays, you can make your
own barista-worthy cuppa right at home.
Makes 1 serving
½ cup sweetened or unsweetened
chai concentrate
½ cup milk (dairy or nondairy)
1. Put the chai concentrate into a large mug.
2. Put the milk into a separate heatproof mug.
Hold the mug in one hand and place under
the steam wand so the bottom of the wand
is just below the surface of the milk at an
angle. Select the Steam function and press
the START/STOP knob to start steaming.
While holding the mug at an angle, allow
the steam to move the milk around.
Once the milk begins to increase in volume,
lift the mug up higher so the steam wand
immerses deeper into the milk (this will
prevent large bubbles from forming and
will make a nice fine milk foam). When the
foam has almost reached the top of the
mug and you can feel that the milk in the
mug is quite hot, press the START/STOP
knob to stop steaming. Tap the mug a few
times to remove any larger bubbles.
3. Slowly pour the steamed milk, holding back
the foam, into the mug with chai concentrate.
4. Serve immediately.
Dirty Chai:
Brew 1 espresso capsule into the mug with the
chai concentrate.

27
Espresso Tonic
Swap out gin for espresso for a carbonated
drink that is both refreshing and buzzy. You
can experiment with flavored simple syrups
and garnishes to mix it up!
Makes 1 serving
2 espresso capsules
(preferably medium-light roast)
1 teaspoon simple syrup
(optional or to taste)
1 to 2 dashes aromatic bitters
(such as Angostura)
5 ounces tonic water
Orange or lemon twist for garnish
1. Put 1 espresso capsule into the unit.
Place a small glass or mug underneath the
brew head. Select Single Espresso and
allow it to brew into the small mug. When
brewing process is complete, discard used
capsule and place a new capsule into the
unit. Reselect Single Espresso and brew
into same mug. Let cool to room temperature.
2. Fill a highball glass with ice. Add the simple
syrup (if using), bitters, and tonic water
and stir. Gently pour in the cooled espresso.
Drop an orange or lemon twist into the
glass to garnish.
3. Serve immediately.
Café con Leche
Start your morning off right with this
traditional Spanish-style espresso drink.
Makes 1 serving
2 espresso capsules
¹⁄³ cup whole milk
1 teaspoon granulated sugar
(optional or to taste)
1. Put 1 espresso capsule into the unit.
Place a small mug underneath the brew
head. Reserve.
2. Put the milk into a separate heatproof mug.
Hold the mug in one hand and place under
the steam wand so the bottom of the wand
is just below the surface of the milk at an
angle. Select the Steam function and press
the START/STOP knob to start steaming.
While holding the mug at an angle, allow
the steam to move the milk around.
Once the milk begins to increase in volume,
lift the mug up higher so the steam wand
immerses deeper into the milk (this will
prevent large bubbles from forming and
will make a nice fine milk foam). When the
foam has almost reached the top of the
mug and you can feel that the milk in the
mug is quite hot, press the START/STOP
knob to stop steaming. Tap the mug a few
times to remove any larger bubbles.
3. Select Single Espresso and allow it to brew
into the small mug. When brewing process
is complete, discard used capsule and
place a new capsule into the unit. Reselect
Single Espresso and brew.
4. Slowly pour the steamed milk, holding back
the foam, into the mug with the espresso.
Sweeten to taste.
5. Serve immediately.
Matcha Latte
Matcha powder can be purchased either
sweetened or not. Be sure to look at the
ingredient list to see which type you are
purchasing. If it is sweetened, you most likely
will not want to add the honey.
Makes 1 serving
1½ teaspoons matcha powder, sifted
1 tablespoon water
1 teaspoon honey, optional or
to taste
1 cup milk (dairy or nondairy)
1. Put the matcha in a glass that’s at least 12
ounces in capacity with the tablespoon of
water. Whisk or stir well with a fork or small
whisk until smooth (if using honey, stir into
the matcha mixture at this time). Reserve.
2. Put the milk into a heatproof mug. Hold
the mug in one hand and place under the
steam wand so the bottom of the wand
is just below the surface of the milk at an
angle. Select the Steam function and press
the START/STOP knob to start steaming.
While holding the mug at an angle, allow
the steam to move the milk around.
Once the milk begins to increase in volume,
lift the mug up higher so the steam wand

28
immerses deeper into the milk (this will
prevent large bubbles from forming and
will make a nice fine milk foam). When the
foam has almost reached the top of the
mug and you can feel that the milk in the
mug is quite hot, press the START/STOP
knob to stop steaming. Tap the mug a few
times to remove any larger bubbles.
3. Pour the steamed milk into the glass with
the matcha mixture. Serve immediately.
Hibiscus Latte
A slightly tart caffeine-free drink that is
delicious both hot and iced.
Makes 1 serving
¼ cup Hibiscus Syrup
(recipe follows), chilled
½ cup milk (dairy or nondairy)
1. Put the Hibiscus Syrup in a glass that’s at
least 12 ounces in capacity. Reserve.
2. Put the milk into a heatproof mug. Hold
the mug in one hand and place under the
steam wand so the bottom of the wand is
just below the surface of the milk at an
angle. Select the Steam function and press
the START/STOP knob to start steaming.
While holding the mug at an angle, allow
the steam to move the milk around.
Once the milk begins to increase in volume,
lift the mug up higher so the steam wand
immerses deeper into the milk (this will
prevent large bubbles from forming and
will make a nice fine milk foam). When the
foam has almost reached the top of the
mug and you can feel that the milk in the
mug is quite hot, press the START/STOP
knob to stop steaming. Tap the mug a few
times to remove any larger bubbles.
3. Pour the steamed milk into the glass with
the hibiscus syrup. Serve immediately.
Hibiscus Syrup
While we love it in the Hibiscus Latte, it can
also be added to fresh lemonade, mixed into
cocktails or mocktails, or added to a glass of
champagne for a festive toast. The syrup can
stay refrigerated for up to 3 weeks.
Makes about 2 cups
2 cups water
½ cup granulated sugar
8 hibiscus tea bags
1. Put the water and sugar into a heavy-
bottomed saucepan set over medium heat.
Heat until the sugar has fully dissolved into
the water. Remove from heat and add the
tea bags. Allow to steep for 30 minutes.
2. Remove the tea bags and cool fully prior
to use.
Fruity Cereal Milk Latte
Inspired by Christina Tosi’s famous Cereal
Milk and Cereal Milk Ice Cream, here at
Cuisinart we take that idea and turn it into a
sweet and fruity latte. Adding a shot of
espresso cuts the sweetness nicely, but for
the non-coffee drinkers and kids in the house,
just having the cereal milk is a nice treat!
Makes 1 serving
1 espresso capsule
½ cup Fruity Cereal Milk,
recipe follows
1. Put the espresso capsule into the unit.
2. Put the milk into a heatproof mug. Hold
the mug in one hand and place under the
steam wand so the bottom of the wand is
just below the surface of the milk at an
angle. Select the Steam function and press
the START/STOP knob to start steaming.
While holding the mug at an angle, allow
the steam to move the milk around.
Once the milk begins to increase in volume,
lift the mug up higher so the steam wand
immerses deeper into the milk (this will
prevent large bubbles from forming and
will make a nice fine milk foam). When the
foam has almost reached the top of the
mug and you can feel that the milk in the
mug is quite hot, press the START/STOP

29
knob to stop steaming. Tap the mug a few
times to remove any larger bubbles.
3. Put a separate mug underneath the brew
head and select Single Espresso.
4. Once the espresso has finished brewing,
slowly pour the steamed milk into the mug
with the espresso and top with a bit of
foam. Serve immediately.
Fruity Cereal Milk
Makes about 1½ cups
1 cup fruity sweet cereal (either
flakes or rings)
2 cups milk (dairy or nondairy)
1 tablespoon maple syrup, optional
Pinch fine sea salt
1. Put all of the ingredients into a large
liquid measuring cup or a small bowl.
Steep 45 minutes. Strain through fine mesh
strainer, pressing the soft cereal through
the mesh with the back of a spoon or ladle
as much as possible.
2. Reserve in the refrigerator, up to 3 days,
until ready to use.
Cinnamon Toast Latte
For those that enjoy cinnamon in your coffee,
this drink is for you. A dusting of freshly grated
cinnamon on top of the frothed milk is the
perfect finishing touch.
Makes 1 serving
1 espresso capsule
½ cup Cinnamon Toast Milk,
recipe follows
Freshly grated cinnamon,
for finishing
1. Put the espresso capsule into the unit.
2. Put the milk into a heatproof mug. Hold
the mug in one hand and place under the
steam wand so the bottom of the wand is
just below the surface of the milk at an
angle. Select the Steam function and press
the START/STOP knob to start steaming.
While holding the mug at an angle, allow
the steam to move the milk around.
Once the milk begins to increase in volume,
lift the mug up higher so the steam wand
immerses deeper into the milk (this will
prevent large bubbles from forming and
will make a nice fine milk foam). When the
foam has almost reached the top of the
mug and you can feel that the milk in the
mug is quite hot, press the START/STOP
knob to stop steaming. Tap the mug a few
times to remove any larger bubbles.
3. Put a separate mug underneath the brew
head and select Single Espresso.
4. Once the espresso has finished brewing,
slowly pour the steamed milk into the mug
with the espresso and top with a bit of
foam. Sprinkle the fresh cinnamon over the
top and serve immediately.
Cinnamon Toast Milk
If there are kids in the house, this sweet milk
plain would be a special pairing with some
freshly baked cookies.
Makes about 1½ cups
1 cup cinnamon-based cereal
(squares or Os work best)
2 cups milk (dairy or nondairy)
1 tablespoon maple syrup, optional
Pinch ground cinnamon
Pinch fine sea salt
1. Put all of the ingredients into a large liquid
measuring cup or a small bowl. Steep 45
minutes. Strain through fine mesh strainer,
pressing the soft cereal through the mesh
with the back of a spoon or ladle as much
as possible.
2. Reserve in the refrigerator, up to 3 days,
until ready to use.

30
Butterfly Pea
Powder Latte
There are many people touting the benefits —
from mood enhancement to stress relief —
of butterfly pea flower tea drinks, which hail
from Thailand. What we do know for sure is
that the brilliant blue hue in addition to the
delicious earthy flavor will have you in love at
first sip. Some specialty gourmet stores and
tea shops carry this vibrant tea sold in powder
form, but it is readily available online.
Makes 1 serving
1½ teaspoons butterfly pea flower
powder, sifted
1 tablespoon water
1 to 2 teaspoons honey, or to taste
2 cups milk (dairy or nondairy)
1. Put the butterfly pea flower powder in a
glass that’s at least 12 ounces in capacity
with the tablespoon of water. Add honey to
pea flower mixture, if using. Reserve.
2. Put the milk into a heatproof mug. Hold
the mug in one hand and place under the
steam wand so the bottom of the wand is
just below the surface of the milk at an
angle. Select the Steam function and press
the START/STOP knob to start steaming.
While holding the mug at an angle, allow
the steam to move the milk around.
Once the milk begins to increase in volume,
lift the mug up higher so the steam wand
immerses deeper into the milk (this will
prevent large bubbles from forming and
will make a nice fine milk foam). When the
foam has almost reached the top of the
mug and you can feel that the milk in the
mug is quite hot, press the START/STOP
knob to stop steaming. Tap the mug a few
times to remove any larger bubbles.
3. Pour the steamed milk into the glass with
the pea powder mixture. Serve immediately.
Note: this drink is also delicious iced.
Increase the powder to 1 tablespoon and
then fully chill. Serve over ice.
DESSERTS/SHAKE
Affogato
Many would turn their nose up at anything
other than vanilla gelato for use in this Italian
dessert, but we have found that there are
many other flavors that work just as well,
with chocolate, espresso, or caramel being
our favorites.
Makes 1 serving
1 scoop vanilla gelato (or your
favorite gelato or ice cream flavor)
1 espresso capsule
Water
1. Put the scoop of gelato into a small cup or
glass. Store in the freezer while preparing
the espresso.
2. Put the espresso capsule into the unit.
Put an espresso/demitasse cup underneath
the brew head and select Single Espresso.
3. Once the espresso has finished brewing,
remove the cup with the gelato from the
freezer and slowly pour the espresso over
the gelato.
4. Serve immediately.
Espresso-Cocoa Smoothie
A great jolt to the system first thing
in the morning!
Makes 1 serving
¼ cup brewed espresso, chilled
(2 single espresso capsules)
¼ cup milk (dairy or nondairy)
¼ teaspoon pure vanilla extract
1 tablespoon cashew butter
1 tablespoon cocoa powder
1 frozen banana, cut into 1-inch
pieces
1. Put all the ingredients in the order listed
into a blender jar.
2. Run on High until smooth, about 1 minute.
3. Serve immediately.

31
Simple Tiramisu
Tiramisu needn’t be a laborious task.
You can get this impressive dessert on the
table quickly thanks to our shortcuts.
Makes 20 servings
1 container (8 ounces) mascarpone
cheese, room temperature
1 cup chilled heavy cream
¼ cup plus 2 tablespoons
confectioners’ sugar
2 tablespoons plus 1 teaspoon dark
rum, divided
1½ cups brewed espresso, chilled
(6 single espresso capsules or
3 lungo espresso capsules)
28 Savoiardi (crisp Italian ladyfingers)
¼ cup unsweetened cocoa powder,
for garnish
1. Beat the mascarpone in a medium bowl
using a Cuisinart® hand mixer until
lightened and slightly whipped. In another
bowl, whip the heavy cream to soft peaks,
adding the confectioners’ sugar a little at
a time while whipping. Add 1 teaspoon
of the rum and whip briefly to incorporate.
Gently fold the whipped cream into the
mascarpone one third at a time until
completely incorporated.
2. In a shallow bowl, mix the espresso
with the remaining 2 tablespoons of rum.
Working with one ladyfinger at a time, dip
the cookie into the espresso, soaking each
side for a few seconds, and transfer to
9-inch square baking pan or dish. Repeat
with 13 more of the ladyfingers, arranging
in the bottom of the dish to cover the entire
surface. It should be a tight fit.
3. Evenly spread half of the mascarpone cream
over the ladyfingers, covering the entire
surface. Dip the remaining ladyfingers and
arrange over the cream. Spread an even
layer of the remaining mascarpone mixture
on top. Cover with plastic wrap and chill for
at least 6 hours.
4. Before serving, pour the cocoa powder into
a small strainer and dust over the top of the
tiramisu.

32
F IB-17408-ESP
©2022 Cuisinart
Glendale, AZ 85307
Printed in China
22CE080218

MANUAL DE INSTRUCCIONES Y LIBRO DE RECETAS
Para su seguridad y para disfrutar plenamente de este producto, siempre lea atentamente
las instrucciones antes del uso.
Cafetera 3 en 1 Coffee Center® BaristaBar Serie SS-4N1

2
MEDIDAS DE
SEGURIDAD
IMPORTANTES
Al usar aparatos eléctricos, siempre se deben
tomar precauciones básicas de seguridad para
reducir el riesgo de incendio, descarga
eléctrica o lesiones personales, entre ellas las
siguientes:
1. LEA TODAS LAS INSTRUCCIONES.
2. No toque las superficies calientes;
use los mangos/asas/agarraderas y los
botones/perillas.
3. Para reducir el riesgo de descarga eléctrica,
no sumerja el cable, el enchufe ni la base
del aparato en agua u otros líquidos.
4. Este aparato no debe ser usado por o
cerca de niños o personas con ciertas
discapacidades.
5. Desenchufe el aparato cuando este o
el reloj no estén en uso, y antes de la
limpieza. Permita que se enfríe antes de
instalar/sacar piezas y antes de limpiarlo.
6. No use este aparato si el cable o el enchufe
están dañados, después de un mal
funcionamiento, después de una caída,
o si está dañado; devuélvalo a un centro
de servicio autorizado para su revisión,
reparación o ajuste (eléctrico o mecánico).
7. El uso de accesorios no recomendados por
Cuisinart puede causar lesiones.
8. No lo use en exteriores.
9. No permita que el cable cuelgue del borde
de la encimera o de la mesa, ni que tenga
contacto con superficies calientes.
10. No coloque el aparato sobre o cerca de un
quemador a gas o de un hornillo eléctrico
caliente, ni en un horno caliente.
11. Siempre llene el depósito de agua antes de
enchufar el aparato. Para desconectar el
aparato, ponga todos los controles en
“OFF”, y luego desenchúfelo.
12. Solo use este aparato para el uso previsto.
13. Compruebe que la tapa de la jarra está bien
cerrada antes de servir café.
14. Para evitar las quemaduras, no quite la
tapa durante la preparación.
15. La jarra provista con esta cafetera ha sido
diseñada para ser usada solamente con
ella; no la ponga sobre un hornillo caliente.
16. No coloque la jarra caliente en una
superficie húmeda o fría.
17. No use la jarra si está rajada o si el asa
está floja.
18. No abra la tapa durante el funcionamiento.
19. No sobrellene el depósito de agua. ¡Use
SOLAMENTE AGUA en este aparato! No
ponga ningún otro líquido u alimento en el
depósito, a excepción de cuando sea para
limpiarlo, según las instrucciones indicadas
en este manual.
20. No limpie la jarra, la placa calentadora ni la
bandeja de goteo de la cafetera monodosis
con limpiadores abrasivos, lana de acero u
otros materiales abrasivos.
21. ADVERTENCIA: PARA REDUCIR EL
RIESGO DE INCENDIO O DESCARGA
ELÉCTRICA, NO DESARME LA BASE
DEL APARATO. ESTE APARATO NO
CONTIENE NINGUNA PIEZA QUE PUEDA
SER REPARADA/REEMPLAZADA POR
EL USUARIO. LAS REPARACIONES
DEBEN SER REALIZADAS POR UN
TÉCNICO AUTORIZADO.
22. No coloque la cafetera encima de un paño/
trapo, ni obstruya el flujo de aire debajo de
la unidad de ninguna manera.
23. Use solamente el filtro dorado permanente
Cuisinart® o filtros de papel estándares
con este aparato. OTROS FILTROS
PERMANENTES PUEDEN PROVOCAR
UN DERRAME.
24. No haga funcionar el aparato debajo o
dentro de un armario/gabinete. Siempre
desenchufe el aparato antes de
guardarlo en un armario/gabinete. Dejar
el aparato enchufado representa un riesgo
de incendio, especialmente si este toca las
paredes o la puerta del armario/gabinete
cuando se cierra.
25. Use solamente cápsulas diseñadas para
uso con este aparato. Si una cápsula no
cabe, no la introduzca a la fuerza.
26. ADVERTENCIA: Para evitar el riesgo de
lesiones, no abra la cámara de preparación
durante el ciclo de preparación.

3
GUARDE ESTAS
INSTRUCCIONES
PARA USO
DOMÉSTICO
SOLAMENTE
ADVERTENCIA: RIESGO
DE INCENDIO O
DESCARGA ELÉCTRICA
El símbolo de relámpago con punta
de flecha dentro de un triángulo
equilátero tiene como fin alertar al
usuario de la presencia de voltajes
peligrosos no aislados en el interior
del aparato, los cuales pueden ser
de suficiente magnitud para
constituir un riesgo de incendio o
descarga eléctrica.
El signo de exclamación dentro de
un triángulo equilátero tiene como
fin alertar al usuario de la presencia
de instrucciones importantes de uso
y mantenimiento (servicio) en la
documentación que acompaña al
equipo.
USO DE ALARGADORES
El cable provisto con este aparato es corto,
para reducir el riesgo de que alguien se
enganche o tropiece con un cable más largo.
Se puede usar un cable alargador/de
extensión, siempre que respete las
precauciones siguientes.
La clasificación nominal del cable alargador/
de extensión debe ser por lo menos igual a
la del aparato. El cable más largo debe ser
acomodado de tal manera que no cuelgue de
la encimera/mesa, donde puede ser jalado
por niños o causar tropiezos.
AVISO:
El cable de este aparato cuenta con un
enchufe polarizado (una pata es más ancha
que la otra). Como medida de seguridad,
aquel enchufe se podrá enchufar de una sola
manera en las tomas de corriente polarizadas.
Si el enchufe no entra en la toma de corriente,
inviértalo. Si aun así no entra completamente,
comuníquese con un electricista.
No intente modificarlo.
IMPORTANTE
Algunas condiciones pueden producir un
atascamiento del agua o del café en el
portafiltros y provocar un derrame. Para evitar
que esto ocurra, no muela el café demasiado
fino, no use más de un filtro de papel a la vez
(o un filtro permanente al mismo tiempo que
un filtro de papel), limpie cuidadosamente el
filtro dorado, y no sobrellene el filtro.
Precaución: Nunca abra la tapa durante la
preparación, aunque líquido no esté bajando,
ya que agua o café muy calientes pueden
rebosar del portafiltros y causar quemaduras.
Si el café no se escurre debidamente durante
la preparación, desenchufe el aparato y
espere 10 minutos antes de abrir la tapa y
examinar el portafiltros.
ADVERTENCIA
RIESGO DE INCENDIO O DESCARGA
ELÉCTRICA – NO LO ABRA
ADVERTENCIA: PARA REDUCIR EL RIESGO
DE DESCARGA ELÉCTRICA,
NO DESARME LA CARCASA DEL APARATO.
ESTE APARATO NO CONTIENE NINGUNA PIEZA QUE PUEDA
SER REPARADA/REEMPLAZADA POR EL USUARIO.
LAS REPARACIONES DEBEN SER EFECTUADAS POR
TÉCNICOS AUTORIZADOS SOLAMENTE.

4
ÍNDICE
Medidas de seguridad importantes . . . . . . . . . 2
Instrucciones de desembalaje . . . . . . . . . . . . 4
Sugerencias para la preparación
de un buen café . . . . . . . . . . . . . . . . . . . . . . . . 4
Piezas y características . . . . . . . . . . . . . . . 5–6
Panel de control . . . . . . . . . . . . . . . . . . . . . . 7–8
Filtro de agua de carbón . . . . . . . . . . . . . . . . . 9
Instrucciones de uso de la cafetera
de 12 tazas
Preparación de la cafetera de 12 tazas . . . . . . 9
Programación de la cafetera de 12 tazas . . . . 9
Cómo preparar café . . . . . . . . . . . . . . . . . . . . 10
Función de pausa al servir Brew Pause™ . . . 11
Limpieza y mantenimiento de la cafetera
de 12 tazas . . . . . . . . . . . . . . . . . . . . . . . . . . 11
Instrucciones de uso de la cafetera
monodosis
Preparación de la cafetera monodosis . . . . . 12
Instrucciones de uso de la
cafetera monodosis . . . . . . . . . . . . . . . . . . . . 13
Cómo preparar café usando una cápsula
reutilizable . . . . . . . . . . . . . . . . . . . . . . . . . . . 14
Cómo preparar expreso. . . . . . . . . . . . . . . . . 14
Cómo usar el tubo de vapor
para espumar leche . . . . . . . . . . . . . . . . . . . . 16
Cómo usar el tubo de vapor
para servir agua caliente . . . . . . . . . . . . . . . . 17
Limpieza y mantenimiento de la cafetera
monodosis . . . . . . . . . . . . . . . . . . . . . . . . . . 18
Limpieza del tubo de vapor . . . . . . . . . . . . . . 20
Resolución de problemas . . . . . . . . . . . . . . . 21
Garantía . . . . . . . . . . . . . . . . . . . . . . . . . . . . . 22
Recetas . . . . . . . . . . . . . . . . . . . . . . . . . . . . . 23
INSTRUCCIONES DE
DESEMBALAJE
1. Coloque la caja en una superficie
espaciosa, plana y segura.
2. Retire el manual de instrucciones y otros
folletos de la caja.
3. Voltee la caja para que repose en su lado y
retire la cafetera.
4. Aleje la caja y levante el material de embalaje.
5. Agarre la jarra por el asa, y retírela de la
placa y de la bolsa protectora.
6. Quite la bolsa protectora que envuelve la
cafetera.
SUGERENCIAS PARA
LA PREPARACIÓN DE
UN BUEN CAFÉ
ELEMENTO 1: EL AGUA
El ingrediente principal de cualquier bebida
caliente es el agua. Si el agua tiene mal
sabor, el café tendrá mal sabor. Por eso
Cuisinart equipó esta cafetera con un filtro
de agua de carbón que elimina el cloro y el
mal sabor y olor, para preparar café puro
taza tras taza.
ELEMENTO 2: EL CAFÉ
El sabor de su bebida caliente proviene del
café, del té o del chocolate (o de cualquier
otra planta que esté usando). Para un sabor
óptimo, siempre use los mejores ingredientes.
Elija granos de café o café molido fresco y
de alta calidad, y solo las mejores cápsulas
monodosis.
ELEMENTO 3: EL GRADO
DE LA MOLIENDA
El grado de molienda de los granos de
café y el proceso de elaboración del té son
primordiales para preservar el sabor del café
y de té. Ingredientes molidos directamente
en cápsulas monodosis de primera calidad
garantizan el mejor sabor. El grado de la
molienda también es esencial, ya sea esté
usando café premolido o moliendo su propio
café. Café molido demasiado fino producirá
un café amargo y puede atascar el filtro.
Café molido muy grueso producirá un café
aguado. Recomendamos una molienda
media a fina.
ELEMENTO 4: LAS
PROPORCIONES
Para que el café sea perfecto, ni muy débil
ni muy fuerte, se debe usar la proporción
adecuada de café y agua. Siga las pautas
en las secciones “Cómo preparar café” y
“Cómo preparar café usando una cápsula
reutilizable”. Ajuste las proporciones al
gusto si desea.
Se recomienda conservar el material de
embalaje para su uso futuro.
MANTENGA LAS BOLSAS DE PLÁSTICO
FUERA DEL ALCANCE DE LOS NIÑOS.

5
1. Tapa del depósito de agua de la cafetera
Articulada para un fácil llenado.
2. Depósito de agua de la cafetera
(no ilustrado)
Con indicador de nivel de agua.
3. Rociador de agua (no ilustrado)
Distribuye el agua uniformemente por
encima del café, reduciendo la pérdida
de temperatura durante la infusión.
4. Panel de control de la cafetera
Véase los detalles en la página 7.
5. Función de pausa al servir Brew Pause™
Detiene el flujo de café al retirar la jarra de
la placa, lo que permite servir una taza de
café antes del final de la preparación.
6. Jarra
Jarra de 12 tazas (1.75L), con cómoda
asa ergonómica, boca antigoteo y marcas
de medición.
7. Soporte del filtro de agua de carbón
Sujeta firmemente el filtro.
8. Filtro de agua de carbón
Elimina el cloro, el mal olor
y sabor del agua corriente.
9. Placa calentadora
Mantiene el café a la temperatura cuando
la cafetera está en el modo “mantener
caliente”. Revestimiento antiadherente y
a prueba de rayas.
10. Portafiltros (no ilustrado)
Para filtro de papel n.° 4 o filtro
permanente.
11. Compartimento del portafiltros
(no ilustrado)
12. Señal de listo (no ilustrada)
Cinco pitidos indican el final de la
preparación.
13. Sistema de protección contra falla
eléctrica (no ilustrado)
Provee una protección de un minuto en
caso de interrupción del suministro eléctrico,
guardando la información programada,
incluyendo la hora, la hora de encendido
automático y el tiempo de apagado
automático, en la memoria de la cafetera.
PIEZAS Y CARACTERÍSTICAS
CAFETERA DE 12 TAZAS (1.75 L)
*Ninguna de las piezas en contacto con el agua o el café contiene bisfenol A (BPA).
1
4
5
6
9
8
7

6
PIEZAS Y CARACTERÍSTICAS
CAFETERA MONODOSIS
14. Asa
15. Tapa de la cámara de preparación
16. Cámara de preparación
Para cápsulas monodosis desechables
de caféo de expreso
17. Panel de control
Véase los detalles en la página 8.
18. Tubo de vapor y agua caliente
Espuma la leche o sirve agua caliente.
19. Bandeja de goteo/Estante
La bandeja de goteo puede servir de
estante para colocar tazas más pequeñas.
a. Rejilla removible
b. Bandeja de goteo removible
20. Tapa del depósito de agua
21. Depósito de agua caliente removible
de 72 oz (2 L)
22. Soporte del filtro de agua de carbón
23. Filtro de agua de carbón
24. Portacápsula para cápsulas de café
removible
25. Portacápsula para cápsulas de expreso
removible
26. Cable (no ilustrado)
27. Modo de ahorro de energía
(no ilustrado)
La intensidad de las luces bajará después
de 30 minutos de inactividad. Gire el
selector de función o presione cualquier
botón para volver a activar el aparato.
Para apagar completamente, desenchufe
el aparato.
*Ninguna de las piezas en contacto con el agua o el café contiene bisfenol A (BPA).
14
20
21
23
24
25
22
15
16
17
18
19
19a
19b

7
1. Pantalla digital
Indica la hora del día, la hora de
encendido automático y el tiempo de
apagado automático.
2. Botones HR (horas) y MIN (minutos)
Permiten fijar la hora, la hora de encendido
automático y el tiempo de apagado
automático.
3. Botón ON/OFF (encendido/apagado)
Permite encender/apagar de la cafetera.
También activa/desactiva el encendido
automático.
4. Botón BOLD (café fuerte) con indicador
Permite aumentar la intensidad del café.
El indicador “BOLD” aparece en la pantalla
cuando esta opción ha sido seleccionada.
5. Botón CLEAN (descalcificar)
con indicador
El indicador “CLEAN” aparece en
la pantalla cuando sea necesario
descalcificar el aparato.
6. Indicador “WARM” (mantener caliente)
Aparece en la pantalla al final del ciclo
de preparación. Nota: Se puede usar la
cafetera monodosis cuando la cafetera
regular esté en el modo “mantener caliente”.
7. Selector de función
a. Modo “AUTO ON” (encendido
automático) con indicador
Selecciónelo para programar y activar el
encendido automático. Véase los detalles
de programación del encendido
automático en la página 10.
b. Modo “AUTO OFF” (apagado
automático) con indicador
Selecciónelo para programar el apagado
automático (desactivando el modo
“mantener caliente”) hasta 4 horas
después de la preparación.
c. Modo “BREW” (preparación)
con indicador
Selecciónelo cuando esté listo/a para
empezar el ciclo de preparación; el
indicador “BREW” aparecerá en la
pantalla. Presione el botón ON/OFF para
iniciar o detener el ciclo de preparación.
FAMILIARÍCESE CON EL PANEL DE CONTROL
CONTROLES DE LA CAFETERA DE 12 TAZAS (1.75 L)
Véase las instrucciones detalladas de programación y uso en las páginas 9 a 11.
2345
671

8
1. Perilla START/STOP
Gírela para elegir, activar y desactivar las
funciones “POD” (cafetera monodosis),
“ESPRESSO” (cafetera expreso
monodosis), “STEAM” (espumar leche) y
“HOT WATER” (agua caliente).
2. Indicador “ESPRESSO” (EXPRESO)
Indica el tipo de expreso elegido: simple
(taza pequeña) o doble (taza grande).
3. INDICADOR “POD” (cápsula
monodosis)
Indica la opción de cápsula monodosis
elegida: “6oz” (175 ml), “8oz” (235 ml) o
“10oz” (295 ml).
4. Indicador “ADD WATER” (NIVEL DE
AGUA BAJO)
Aparece en la pantalla cuando el nivel de
agua del depósito que sirve para las
funciones “POD” (cafetera monodosis),
“ESPRESSO” (cafetera expreso monodosis)
y “HOT WATER” (agua caliente) está bajo.
5. Indicador “CLEAN” (DESCALIFICAR)
Aparece en la pantalla cuando sea
necesario descalcificar la cafetera
monodosis.
6. Indicador “STEAM” (ESPUMAR LECHE)
Indica que la función “espumar leche” ha
sido seleccionada para preparar bebidas
tales como capuchinos o lattes.
7. Indicador “HOT WATER”
(AGUA CALIENTE)
Indica que la función “agua caliente” ha
sido seleccionada para preparar té, sopa
instantánea, avena y más.
8. INDICADOR “ON” (ENCENDIDO)
Indica que la función “POD” (cafetera
monodosis), “ESPRESSO” (cafetera
expreso monodosis), “STEAM” (espumar
leche) o “HOT WATER” (agua caliente) ha
sido activada.
7156
8432
CONTROLES DE LA CAFETERA MONODOSIS
Véase las instrucciones detalladas de uso en las páginas 12 a 15.
FAMILIARÍCESE CON EL PANEL DE CONTROL
(CONTINUACIÓN)

9
PREPARACIÓN DE LA
CAFETERA DE 12 TAZAS
(1.75L)
LIMPIEZA INICIAL
Limpie el sistema interno antes del primer
uso, como se indica a continuación. Nota:
No use café durante la limpieza inicial.
1. Si aún no lo ha hecho, instale el filtro de
agua de carbón como se indica a la
izquierda.
2. Llene el depósito de agua con agua.
3. Coloque la jarra en su sitio.
4. Si aún no lo ha hecho, enchufe el cable en
una toma de corriente.
5. Ponga el selector de función en “BREW”.
6. Presione el botón ON/OFF para iniciar el
ciclo de preparación.
7. Finalizado el ciclo, el sistema interno estará
limpio. Tire el agua caliente. Su cafetera
está lista para su uso.
PROGRAMACIÓN DE LA
CAFETERA DE 12 TAZAS
(1.75L)
CÓMO FIJAR LA HORA
Al conectar el cable a la toma de corriente,
“12:00” aparecerá en la pantalla, parpadeando.
Ponga el selector de función en “BREW”.
Use el botón HR para fijar la hora y el botón
MIN para fijar los minutos. Mantenga
presionado el botón para desplazarse por las
horas o los minutos más rápidamente, o
presione el botón repetidamente para avanzar
en incrementos de una hora o de un minuto a
la vez. Al mantener el botón presionado, los
números avanzarán muy rápidamente.
FILTRO DE AGUA
DE CARBÓN
INSTALACIÓN DEL FILTRO
DE AGUA
1. Retire el filtro de la bolsa de plástico y
remójelo en agua fría por 15 minutos.
2. Retire el soporte del filtro ubicado en
el depósito de agua de la cafetera de
12 tazas (1.75 L).
3. Abra el soporte, jalando la base.
4. Instale el filtro en el soporte y ciérrelo.
Importante: Haga esto con mucho con
cuidado; si no instala el filtro de manera
correcta, la membrana del filtro puede
romperse.
5. Enjuague el filtro en agua corriente fría
por 10 segundos para limpiarlo, con las
aberturas directamente bajo el flujo de agua.
6. Permita que el filtro se seque por completo.
7. Vuelva a colocar el soporte del filtro en el
depósito, empujándolo hasta el fondo.
NOTA: Repita los pasos 1 a 7 con el filtro de
la cafetera monodosis.
NOTA: Se recomienda reemplazar el filtro de
agua cada 60 días o 60 usos, o más
frecuentemente si el agua es dura.
Puede comprar filtros de repuesto en las tiendas,
en www.cuisinart.com, o llamando a nuestro servicio de
atención al cliente al 1-800-726-0190.

10
Cuando llegue cerca del número deseado,
suelte el botón y avance un número a la vez.
NOTA: Cuando fije una hora de tarde/noche,
compruebe que el indicador “PM” está en la
pantalla.
Para confirmar la hora programada, ponga el
selector de función en otra posición, o
simplemente espere hasta que la hora deje de
parpadear.
CÓMO PROGRAMAR LA HORA
DE ENCENDIDO AUTOMÁTICO
Cuando ponga el selector de función en la
posición “AUTO ON”, “12:00” (la hora de
encendido automático por defecto) o la hora
de encendido automático previamente fijada
aparecerán en la pantalla.
1. Deje el selector de función en “AUTO ON”
El indicador “AUTO ON” estará parpadeando.
Use los botones HR y MIN para programar la
hora de encendido automático.
2. Presione el botón ON/OFF para activar
la programación; el indicador “AUTO ON”
se encenderá, lo que indica que el
encendido automático ha sido activado.
Nota: El reloj mostrará la hora actual.
3. A la hora de encendido automático
programada: El indicador “BREW”
parpadeará lentamente y el ciclo de
preparación empezará. Finalizado el ciclo de
preparación, el indicador “WARM” se
encenderá, lo que indica que la función
“mantener caliente” se ha activado.
Finalizado el ciclo “mantener caliente”, el
indicador “WARM” se apagará y el indicador
“BREW” se encenderá para indicar que la
cafetera está lista para el ciclo de
preparación siguiente.
NOTA: Si desea que la cafetera se ponga
en marcha automáticamente a la misma
hora al día siguiente, deje el selector de
función en “AUTO ON” y presione el
botón ON/ OFF; el indicador “AUTO ON”
se encenderá.
CÓMO PROGRAMAR EL
APAGADO AUTOMÁTICO
Ponga el selector de función en
“AUTO OFF.”
Use los botones HR y MIN para programar
el apagado automático deseado, desde
0 hasta 4 horas después del final del ciclo
de preparación.
CÓMO PREPARAR CAFÉ
Siga las instrucciones de preparación de la
cafetera de 12 tazas (1.75L) en la página 9.
1. Instale el filtro de agua de carbón
Siga las instrucciones de preparación e
instalación descritas en la sección “Filtro de
agua de carbón”.
2.
Llene el depósito de agua
Abra la tapa del depósito. Agregue agua
hasta el nivel deseado, fijándose en las
marcas en el costado del aparato.
3.
Antes de preparar café
Compruebe que la jarra está en su puesto y
que su tapa esté puesta. Enchufe el cable
en una toma de corriente.
4.
Fije sus preferencias
Si desea preparar café más fuerte/intenso,
presione el botón BOLD; el indicador
“BOLD” se encenderá.
5.
Agregue café molido
Agarre el portafiltros por el asa y levántelo
para retirarlo. Instale un filtro de papel n.° 4
o un filtro permanente. Compruebe que el
filtro está completamente abierto y
correctamente instalado. Puede resultar útil
doblar y aplanar las costuras del filtro de
papel de antemano. Agregue 1 cucharada
llena de café molido por taza (5 oz/145 ml)
de café. Ajuste la cantidad de café molido a
gusto.
NOTA: Esta cafetera tiene una capacidad
máxima de 15 cucharadas de café
molido. No exceda esta cantidad; esto
podría provocar un derrame,
especialmente si el café está molido muy
fino.
Vuelva a colocar el portafiltros en su sitio y
presione firmemente la tapa para comprobar
que está bien cerrada.
6.
Encienda el aparato
Ponga el selector de función en “BREW” y
presione el botón ON/OFF; el indicador
“BREW” parpadeará lentamente. O:
Programe la hora de encendido automático,
como se indicó anteriormente; el indicador
“AUTO ON” se encenderá.
7.
Después del ciclo de preparación
El café seguirá saliendo del pico por varios
segundos después del final del ciclo de
preparación. Cuando el flujo se detenga, el
aparato emitirá 5 pitidos y usted podrá
disfrutar de su café.

11
NOTA: Puede que la tapa del depósito
de agua esté caliente durante e
inmediatamente después de la
preparación; permita que se enfríe
por un mínimo de 10 minutos antes
de abrir el depósito de agua.
LIMPIEZA Y
MANTENIMIENTO
DE LA CAFETERA DE 12
TAZAS (1.75 L)
Siempre apague y desenchufe el aparato
antes de limpiarlo.
Abra el depósito de agua de la cafetera. Retire
y tire el filtro de papel. El portafiltros puede
lavarse a mano, con detergente y agua tibia, o
en la bandeja superior del lavavajillas. Permita
que todas las piezas se sequen.
No vierta agua en el depósito de agua
después de haber quitado el portafiltros.
Limpie el área bajo el portafiltros con un
paño húmedo.
Retire la jarra de la placa calentadora. Tire el
café restante. Lave la jarra y su tapa a mano,
con agua tibia y detergente, o en la bandeja
superior del lavavajillas.
No use productos o materiales abrasivos para
limpiar el aparato.
No sumerja la base en agua u otros líquidos.
Limpie la base con un paño húmedo y séquela
antes de guardar el aparato. Las huellas
dactilares y otras manchas pueden quitarse
con agua y detergente, o con una solución
limpiadora no abrasiva.
Limpie la placa calentadora con un paño
húmedo. Nunca use materiales ásperos o
limpiadores abrasivos para limpiar la placa
calentadora. No seque el interior del depósito
de agua con un paño ya que esto puede dejar
pelusas en el mismo.
DESCALCIFICACIÓN
Con el tiempo, depósitos de calcio/sarro
pueden acumularse en las piezas metálicas de
la cafetera.
Cómo descalcificar la cafetera
Cuando usa agua dura, depósitos de calcio/sarro
pueden acumularse en las partes internas de la
cafetera. Aunque el calcio/sarro no es tóxico,
puede afectar el rendimiento del aparato.
Descalcificar el aparato cuando el indicador de
limpieza lo indique protegerá la resistencia y
otros elementos en contacto con el agua.
Para un rendimiento óptimo, se recomienda
descalcificar el aparato cada 3 a 6 meses, Si el
indicador “CLEAN” se enciende antes de este
tiempo, descalcifique el aparato lo más pronto
posible.
Para limpiar:
Para descalcificar el aparato:
1. Llene el depósito de agua hasta la
capacidad máxima con ⁄ de vinagre
blanco y ⁄ de agua.
2. Mantenga presionado el botón CLEAN.
Cuando el indicador “CLEAN” empiece a
parpadear, suelte el botón.
3. Finalizado el ciclo de limpieza (indicado por
5 pitidos), la cafetera se apagará.
4. Si el indicador “CLEAN” sigue encendido,
haga un segundo ciclo de descalcificación,
usando una nueva solución de agua con
vinagre.
NOTA: Por lo general, un ciclo de limpieza
es suficiente para descalcificar el aparato.
5. Cuando el indicador “CLEAN” se apague,
repita estos pasos con un depósito de
agua fresca para eliminar el olor a vinagre.
6. Vuelva a instalar el filtro de agua de carbón.
¡Su cafetera está lista para su uso!
MANTENIMIENTO
Cualquier otro servicio debe ser realizado por
un técnico autorizado.
FUNCIÓN DE PAUSA AL
SERVIR BREW PAUSE™
La función Brew Pause™ (pausa al servir)
permite sacar la jarra de la placa para
servir una taza de café antes del final del
ciclo de preparación. Nota: Tenga
presente que hacer esto cambiará el
sabor y la intensidad final del café, ya que
el sabor y la intensidad cambian durante
el ciclo de preparación.
NOTA: La función Brew Pause™ detiene
el flujo por solo 20 segundos; no deje la
jarra fuera de la placa por más tiempo, o
esto puede causar un derrame.

12
PREPARACIÓN DE LA
CAFETERA MONODOSIS
LIMPIEZA INICIAL PARA USO CON
CÁPSULAS MONODOSIS DE CAFÉ
Limpie el sistema interno antes del primer
uso, como se indica a continuación. Nota:
No use cápsula durante la limpieza inicial.
1. Si aún no lo ha hecho, instale el filtro de
agua de carbón (véase las instrucciones en
la sección “Filtro de agua de carbón”)
2. Retire el depósito de agua del aparato.
3. Llene el depósito de agua con agua de la
llave y vuelva a colocarlo en su sitio.
4. Si aún no lo ha hecho, enchufe el cable
en una toma de corriente; el aparato
se encenderá y estará listo para su uso.
5. Abra y cierre la tapa de la cámara de
preparación. No coloque ninguna cápsula
en la cámara.
6. Coloque una taza en la bandeja de goteo
7. Gire la perilla START/STOP para elegir la
opción “6oz”, y luego presione la perilla
para confirma su selección; el indicador
“POD” parpadeará lentamente y el agua
caliente empezará a bajar poco después.
8. Finalizado el ciclo de limpieza, el aparato
emitirá un pitido. Tire el agua caliente.
Su cafetera está lista para su uso.
LIMPIEZA INICIAL PARA USO
CON CÁPSULAS MONODOSIS
DE EXPRESO
1. Siga los pasos 1 a 4 de la sección
“Limpieza inicial para uso con cápsulas
monodosis de café regular”.
2. Abra y cierre la tapa de la cámara de
preparación. No coloque ninguna cápsula
de expreso en la cámara.
3. Coloque la bandeja de goteo en la posición
adecuada para que sirva de estante para
evitar las salpicaduras y coloque una taza
de expreso en ella.
4. Gire la perilla START/STOP para elegir la
opción “expreso simple” (taza pequeña),
y luego presione la perilla para confirmar
su selección; el indicador luminoso
parpadeará lentamente y el agua caliente
empezará a bajar poco después.
5. Finalizado el ciclo de limpieza, el aparato
emitirá un pitido. Tire el agua caliente.
Su cafetera está lista para su uso.

13
INSTRUCCIONES DE
USO DE LA CAFETERA
MONODOSIS
CÓMO PREPARAR CAFÉ CON
CÁPSULAS MONODOSIS
IMPORTANTE: Lleve a cabo un ciclo de
limpieza inicial antes del primer uso. Siga
las instrucciones de preparación de la
cafetera monodosis en la página 12.
CÓMO PREPARAR CAFÉ
1. Retire el depósito de agua de la cafetera
monodosis.
2. Llene el depósito hasta el nivel deseado,
luego vuelva a colocarlo en su sitio.
3. Coloque una taza en la bandeja de goteo.
Nota: Puede retirar la bandeja de goteo
para colocar una taza grande.
4. Elija una cápsula monodosis.
NOTA: No abra la cápsula, ni perfore su
tapa de aluminio.
5. Gire la perilla START/STOP para ingresar al
modo “POD” (cafetera monodosis); el
indicador “POD” se encenderá.
6. Abra la tapa de la cámara de preparación;
el indicador “POD” se apagará. Coloque
una cápsula monodosis en el portacápsula
y cierre la tapa de la cámara de
preparación; el indicador “POD” volverá
a encenderse.
Precaución: Hay dos agujas en el
portacápsula (una arriba y una en el
fondo), cuyo papel es perforar las
cápsulas. Para evitar las lesiones, no
introduzca los dedos en el portacápsula.
7. Gire la perilla START/STOP para elegir la
opción deseada de cápsula monodosis:
“6oz” (175 ml), “8oz” (235 ml) o “10oz”
(295 ml), luego presione la perilla para
confirmar su selección; el indicador “ON”
se encenderá y el indicador de la opción
elegida parpadeará lentamente durante la
preparación.
NOTA: Para cancelar la preparación,
simplemente presione la perilla START/
STOP otra vez.
Precaución: El agua que circula dentro
de la cámara de preparación durante el
ciclo de preparación está muy caliente.
Para evitar las quemaduras, nunca
levante el asa ni abra la cámara de
preparación durante el ciclo de
preparación.
8. Finalizado el ciclo de preparación, el
aparato emitirá un pitido breve. El indicador
“POD” y el indicador de la opción elegida
se encenderán otra vez. El indicador “ON”
se apagará para indicar que el ciclo de
preparación está completo.

14
9. Levante el asa para abrir la tapa de la
cámara de preparación, retire la cápsula
usada y tírela. Cierre la tapa de la cámara
de preparación.
Precaución: La cápsula monodosis
estará muy caliente.
10. ¡Disfrute de su taza de café! Su cafetera
está lista para volverse a usar si necesita.
NOTA: El ciclo de preparación no
empezará si el indicador “ADD WATER”
(nivel de agua bajo) está encendido.
Deberá llenar el depósito de agua para
que el ciclo empiece.
INDICADOR “ADD WATER”
(NIVEL DE AGUA BAJO)
El indicador “ADD WATER” se encenderá si el
nivel de agua en el depósito está debajo de
10.5 oz (310 ml). En caso de que esto suceda
durante la preparación, simplemente llene el
depósito de agua y continúe.
PREPARACIÓN CON LA
CÁPSULA REUTILIZABLE
HOMEBARISTA™
La cafetera monodosis también le deja
preparar café con una cápsula reutilizable,
un método que le permite usar su propio
café molido.
La cápsula monodosis reutilizable
HomeBarista™ (no incluida) está disponible a la
venta en la mayoría de las tiendas que venden
productos Cuisinart®.
1. Llene la cápsula reutilizable con café
molido, cerciorándose de que el café no
pasa la línea “MAX”. Use más o menos
café, al gusto. No apisone el café.
Compruebe que la orilla del portacápsula
está limpia. Cierre la tapa.
NOTA: Capacidad máxima: 2½
cucharadas (15 g) de café molido.
2.
Retire el portacápsula de la cámara de
preparación, jalando hacia el frente.
2a. Coloque la cápsula reutilizable en la
cámara de preparación, sin presionar.
2b. Siga las instrucciones de preparación
del café en la página 13.
NOTA: Para cancelar la preparación,
simplemente presione la perilla START/
STOP otra vez.
Precaución: Hay dos agujas en el
portacápsula (una arriba y una en el
fondo), cuyo papel es perforar las
cápsulas. Para evitar las lesiones, no
introduzca los dedos en el portacápsula.
3. Después del ciclo de preparación, levante
el asa para abrir la cámara de preparación
y saque la cápsula reutilizable.
Advertencia: La cápsula reutilizable
estará caliente.
4. Vuelva a instalar el portacápsula, alineando
la flecha en la orilla del portacápsula con
la flecha en la cámara de preparación.
Empuje suavemente el portacápsula hasta
que encaje.
NOTA: Esta cafetera está compatible con
la mayoría de las cápsulas reutilizables.
CÓMO PREPARAR
EXPRESO
IMPORTANTE: Lleve a cabo un ciclo de
limpieza inicial antes del primer uso.
Siga las instrucciones de preparación de
la cafetera monodosis en la página 12.
Esta máquina es compatible con las cápsulas
Nespresso® OriginalLine.
1. Si el indicador “ADD WATER” está
encendido, retire el depósito de agua y
llénelo.
2. Coloque la bandeja de goteo en la posición
adecuada para que sirva de estante (esto
evitará las salpicaduras).

15
3. Coloque una taza de expreso en la bandeja
de goteo y elija la cápsula de expreso
deseada.
4. Gire la perilla START/STOP para ingresar
al modo “ESPRESSO” (cafetera expreso
monodosis); el indicador “ESPRESSO”
se encenderá.
5. Abra la tapa de la cámara de preparación;
el indicador “ESPRESSO” se apagará.
Retire el portacápsula para cápsulas de
expreso de la cámara de preparación y
coloque una cápsula de expreso en él.
Precaución: Hay dos agujas afiladas en
la cámara de preparación, cuyo papel es
perforar las cápsulas. Para evitar las
lesiones, no toque la parte superior de la
cámara de preparación.
6. Vuelva a insertar el portacápsula en la
cámara de preparación y cierre la tapa;
el indicador “ESPRESSO” volverá a
encenderse.
7. Gire la perilla START/STOP para elegir la
opción deseada, expreso simple (taza
pequeña de 1.4 oz/40 ml) o expreso doble
(taza grande de 3.2 oz/95 ml), luego
presione la perilla para confirmar su
selección; el indicador “ON” se encenderá
y opción elegida parpadeará lentamente.
El expreso empezará a salir del pico poco
después.
NOTA: Para cancelar la preparación,
simplemente presione la perilla START/STOP
otra vez.
Precaución: El agua que circula dentro
de la cámara de preparación durante el
ciclo de preparación está muy caliente.
Para evitar las quemaduras, nunca levante
el asa ni abra la cámara de preparación
durante el ciclo de preparación.
8. Finalizado el ciclo de preparación, el aparato
emitirá un pitido breve. El indicador
“ESPRESSO” se encenderá y el indicador
“ON” se apagará.
9. Abra la cámara de preparación y retire el
portacápsula para cápsulas de expreso.
Empuje la cápsula de expreso fuera del
portacápsula y vuelva a colocar este en la
cámara de preparación. Cierre la tapa de la
cámara de preparación.
Precaución: La cápsula de expreso
estará muy caliente. De lo posible,
espere unos minutos antes de retirarla.
10. ¡Disfrute de su expreso! Su cafetera está
lista para volverse a usar si necesita.
NOTA: Para conseguir resultados óptimos
se recomienda usar la opción “expreso doble”
con una cápsula “lungo” (expreso largo) o más
fuerte. Nota: Usar este modo con variedades
menos fuertes cambiará el sabor del café.

16
CÓMO USAR EL TUBO DE
VAPOR PARA ESPUMAR
LECHE
Espumar la leche consiste en calentarla con
vapor hasta crear espuma en la superficie. El
vapor hace dos cosas: Calienta la leche e
incorpora aire en ella para crear espuma de
leche. Al igual que todas las cosas,
perfeccionar el arte de espumar la leche
requiere tiempo y práctica, pero vale la pena.
Para conseguir resultados óptimos, use leche
refrigerada.
1. Gire la perilla START/STOP para elegir la
función “STEAM” (espumar leche); el
indicador “STEAM” se encenderá.
2. Llene una taza grande o una jarra
espumadora con la leche de su elección.
Para conseguir mejores resultados, use
entre 4 y 8 oz (120 a 235 ml) de leche para
evitar que la espuma se derrame.
CONSEJO: Tenga presente que el volumen
de la leche aumentará a medida que la
espuma.
3. Purgue el agua del tubo de vapor:
Oriente el tubo de vapor hacia la bandeja
de goteo y presione la perilla START/STOP
para activar el vapor; el indicador “ON”
se encenderá. Después de purgar el agua,
apague el vapor, presionando la perilla
START/STOP; el indicador “ON” se apagará.
4. Vuelva a colocar el tubo de vapor al
costado de la cafetera. Coloque una taza
grande o una jarra espumadora debajo del
tubo de vapor. Coloque el tubo en la leche,
sumergiendo aprox. ½ in (1.5 cm) de la
boquilla del tubo en ella.
NOTA: Jarra no incluida.
5. Presione la perilla START/STOP;
el indicador “STEAM” parpadeará
lentamente, luego el vapor empezará a
espumar la leche. El indicador “ON”
se encenderá para indicar que el
proceso ha empezado.
NOTA: Para cancelar el proceso,
simplemente presione la perilla START/
STOP otra vez.
LECHE NIVEL DE ESPUMA
Leche entera
Leche baja en
grasa/
semidescremada
Leche sin grasa/
descremada
Leche vegetal
NOTA: El nivel de espuma depende de la
cantidad de leche usada.

17
6. Incline la jarra de tal manera que el tubo de
vapor descanse en el pico y baje la jarra a
medida que suba la leche, manteniendo la
boquilla del tubo justo bajo la superficie de
la leche; esto creará un movimiento de
vórtice en la leche.
NOTA: No permita que el vapor produzca
burbujas grandes; esto produce una
espuma demasiado ligera. En caso de que
esto suceda, levante un poco la jarra para
sumergir un poco más la boquilla del tubo
de vapor.
7. El nivel de la leche subirá a medida que el
vapor la caliente y la espume. Baje la jarra
a medida que suba la leche, manteniendo
la boquilla del tubo de vapor justo bajo la
superficie de la leche.
8. Una vez espumada la leche, levante la taza
o la jarra hasta que el tubo de vapor quede
en el centro de la leche para seguir
calentando la leche sin crear más espuma.
CONSEJO: La cantidad de espuma de
leche depende del tipo de brebaje que
desea preparar. Por ejemplo, un capuchino
requiere más espuma de leche que un
expreso con leche.
9. Una vez caliente la leche, apague el vapor,
presionando la perilla START/STOP; el
indicador “STEAM” se encenderá y el
indicador “ON” se apagará.
IMPORTANTE: No permita que la leche
hierva. La temperatura ideal para que la
leche se espume es entre 140 y 150 °F
(de 60 a 65 °C)
10. Retire la jarra, limpie el tubo con un paño
húmedo limpio y haga salir una pequeña
cantidad de vapor del tubo por encima de
la bandeja de goteo. Se recomienda limpiar
el tubo de vapor después de cada uso para
evitar la acumulación de residuos de leche.
Véase la sección “Limpieza del tubo de
vapor ”.
CÓMO USAR EL TUBO DE
VAPOR PARA SERVIR
AGUA CALIENTE
1. Si el indicador “ADD WATER” está
encendido, retire el depósito de agua y
llénelo.
2. Coloque una taza grande o un recipiente
debajo del tubo de vapor.
3. Gire la perilla START/STOP en sentido
horario para elegir la opción “HOT
WATER”; el indicador “HOT WATER”
se encenderá.
4. Presione la perilla START/STOP; el
indicador “HOT WATER” parpadeará
lentamente, y luego agua caliente
empezará a salir del tubo. El indicador
“ON” se encenderá
5. Después de servir la cantidad deseada
de agua, presione la perilla START/STOP
para detener el flujo de agua caliente.
El indicador “HOT WATER” permanecerá
encendido y el indicador “ON” se apagará.

18
6. Retire la taza y oriente el tubo de vapor
hacia la bandeja de goteo para recoger el
agua que pueda seguir bajando del mismo.
LIMPIEZA Y
MANTENIMIENTO DE LA
CAFETERA MONODOSIS
LIMPIEZA DE LAS PARTES
EXTERNAS
Se recomienda limpiar la carcasa del aparato
regularmente.
1. Nunca sumerja el aparato en agua u
otros líquidos. Limpie la carcasa y otros
componentes externos con un paño no
abrasivo humedecido con agua jabonosa.
2. Levante con cuidado la bandeja de goteo,
agarrándola por las muescas en los
costados y manteniéndola recta para evitar
los derrames. La rejilla y la bandeja de
goteo son aptas para lavavajillas. No limpie
la bandeja de goteo con limpiadores
abrasivos, lana de acero u otros materiales
abrasivos.
LIMPIEZA DE LOS
PORTACÁPSULA
Precaución: Hay dos agujas en el
portacápsula (una arriba y una en el fondo),
cuyo papel es perforar las cápsulas.
Para evitar las lesiones, no introduzca los
dedos en el portacápsula.
1. Los portacápsula son aptos para
lavavajillas (bandeja superior solamente),
siempre que use baja temperatura para
lavarlos. Remoción: Abra la tapa de la
cámara de preparación, levantando el asa.
Agarre el portacápsula por la cumbre y
jálelo hacia arriba.
2. Limpieza del embudo del portacápsula –
Para retirar el embudo del portacápsula
para cápsulas de café, sostenga el embudo
con una mano mientras gira ligeramente la
parte inferior y jala el portacápsula con la
otra mano. El embudo es apto para
lavavajillas (bandeja superior solamente).
NOTA: Puede que el embudo sea muy
apretado y difícil de quitar las primeras
veces que lo saque; esto es normal. Se
aflojará con el tiempo.
3. Limpieza del pico del portacápsula – El
pico ubicado dentro del portacápsula para
cápsulas de café debe limpiarse en caso
de atascamiento, usando la punta de un
sujetapapeles u otro objeto similar. Retire
el portacápsula para cápsulas de café de la
cámara de preparación, y luego retire el
embudo del portacápsula. Introduzca la
punta del sujetapapeles en el pico del
portacápsula para desatascarlo.
Para volver a instalar el embudo sobre el
portacápsula, haga coincidir las patas del
embudo con las muescas en el
portacápsula y gire hacia su cuerpo hasta
que encaje y se bloquee. Después de
lavarlo, vuelva a instalar el portacápsula,
alineando la flecha con la flecha en la
cámara de preparación.

19
4. Limpieza de la aguja perforadora
La aguja perforadora, situada en la cámara
de preparación, debe limpiarse en caso de
atascamiento, usando la punta de un
sujetapapeles u otro objeto similar.
Introduzca la punta del sujetapapeles en el
pico para desatascarlo.
5. Portacápsula para cápsulas de expreso
El portacápsula es apto para lavavajillas
(bandeja superior solamente), siempre que
use baja temperatura para lavarlo.
LIMPIEZA DE LA CÁPSULA
REUTILIZABLE HOMEBARISTA™
Simplemente tire los posos de café y lave la
cápsula y el portacápsula a mano, o en la
bandeja superior del lavavajillas.
LIMPIEZA DEL DEPÓSITO
DE AGUA
Con el tiempo, es normal que manchas
aparezcan en el depósito de agua. Estas
manchas son el resultado del alto contenido
en minerales del agua y no afectarán el buen
funcionamiento de la cafetera. Sin embargo,
cerciórese de limpiar regularmente el depósito
de agua para minimizar la acumulación de
depósitos.
Limpie el interior del depósito con un paño
libre de pelusa húmedo.
Descalcificación de la cafetera monodosis
y del tubo de vapor
Según el lugar donde vive, el agua puede ser
más o menos dura, es decir contener una
concentración de minerales más o menos alta.
Cuando usa agua dura, depósitos de calcio/
sarro pueden acumularse en las partes
internas de su cafetera. El calcio/sarro no es
tóxico, pero puede afectar el rendimiento del
aparato. Eliminarlo mantendrá la resistencia y
otras piezas en contacto con el agua en
condición óptima.
Para un rendimiento óptimo, se recomienda
descalcificar el aparato cada 3 a 6 meses,
o más a menudo si es necesario. NOTA: Si el
indicador “CLEAN” se enciende, esto significa
que es necesario descalcificar la cafetera.
NOTA: Siempre retire el filtro de agua de
carbón del soporte antes de descalificar el
aparato.
Prepare lo siguiente:
• 13 oz (385 ml) de vinagre blanco destilado
• 26 oz (770 ml) de agua
• Una taza de cerámica o un recipiente
de 16 oz (475 ml) (no use vaso de papel)
• Acceso al fregadero
Paso 1: Primer enjuague con vinagre
1. Llene el depósito de agua de la cafetera
monodosis con 13 oz (385 ml) de vinagre
blanco y 26 oz (770 ml) de agua.
2. Coloque la taza de cerámica o el recipiente
en la bandeja de goteo y debajo del tubo
de vapor.
3. Gire la perilla START/STOP para elegir
la opción “CLEAN”, y luego presione la
perilla para empezar el proceso de
descalcificación; el indicador “CLEAN”
parpadeará.
4. Al final del ciclo, los indicadores “STEAM”
y “HOT WATER” se encenderán. Presione
la perilla START/STOP otra vez; el proceso
de descalcificación empezará.
5. Finalizado el ciclo, tire el contenido de la
taza.
6. Repita estos pasos hasta que el indicador
“ADD WATER” se encienda.
7. Finalizado el proceso de descalcificación,
el indicador “CLEAN” se apagará y el
aparato emitirá 5 pitidos.
8. Tire la mezcla de vinagre/agua restante.
Paso 2: Enjuague con agua fresca
1. Repita el paso 1 tres veces, usando agua
fresca en vez de vinagre;
2. esto enjuagará el sistema interno y
eliminará el sabor a vinagre.

20
LIMPIEZA DEL TUBO
DE VAPOR
• Siempre limpie el tubo de vapor después de
espumar leche. Limpie el exterior del tubo
de vapor con un paño húmedo después de
cada uso.
• Llene una taza grande con agua y use la
función “STEAM” de la misma manera que
lo hiciera para espumar leche; esto eliminará
los residuos de leche dentro del tubo.
• El tubo de vapor de acero inoxidable puede
quitarse, girándolo, para una limpieza más
profunda. El pequeño tubo de vapor debajo
del tubo más grande puede limpiarse con un
paño húmedo.
• Si el tubo de vapor sigue bloqueado,
use la punta de un sujetapapeles o una
herramienta similar para despejar la
abertura. Oriente el tubo de vapor hacia la
bandeja de goteo y active la función
“STEAM” para purgar el tubo.
MANTENIMIENTO
Cualquier otro servicio debe ser realizado por
un técnico de servicio autorizado.

21
RESOLUCIÓN DE PROBLEMAS
PROBLEMA SOLUCIÓN
El ciclo de preparación no
se inicia. Apague y desenchufe el aparato por 1 minuto o más.
Compruebe que hay agua en el depósito.
Compruebe que el depósito está correctamente instalado.
Compruebe que la cámara de preparación está bien
cerrada.
El aparato se apagada solo. El modo de ahorro de energía del aparato se activa
automáticamente después de 30 minutos de inactividad.
Para “despertar” el aparato, simplemente gire la perilla
START/STOP o el selector de función, o presione
cualquier botón.
El código “E0” parpadea en
la pantalla y el aparato no
se enciende.
Desenchufe, y luego vuelva a enchufar el aparato. Lleve a
cabo un ciclo de limpieza inicial para ambos sistemas, la
cafetera expreso y la cafetera monodosis, como se indica
en la página 12. Nota: No use cápsula durante la limpieza
inicial.
El portafiltros está a rebosar. Puede que se haya usado demasiado café, o café molido
demasiado fino. Véase la sección “Sugerencias para la
preparación de un buen café” para obtener consejos
sobre cómo elegir el grado de molienda y la porción
adecuados.
Cerciórese de no usar un filtro de papel al mismo tiempo
que un filtro dorado. Se debe usar uno o el otro, no
ambos a la vez.
La cafetera monodosis no
funciona mientras la cafetera
regular está en uso.
Las funciones “POD” (cafetera monodosis), “ESPRESSO”
(cafetera expreso monodosis), “STEAM” (espumar leche)
y “HOT WATER” (agua caliente) no pueden usarse
mientras está usando la cafetera de 12 tazas (1.75 L).
Deberá esperar el final del ciclo de preparación, cuando
la cafetera regular ingrese el modo “mantener caliente”,
para poder usarlas.
La cafetera monodosis produce
un chorro lento, preparar una taza
corta o chisporrotea.
Puede que el pico del portacápsula esté atascado. De ser
así, retírelo y gire la parte inferior para separarla de la
parte superior. Luego, introduzca la punta de un
sujetapapeles en el pico para desatascarlo. Siga los
pasos 1 a 4 de la sección “Limpieza y mantenimiento”.
La leche no se espuma. Gire el tubo de vapor de acero inoxidable para retirarlo.
Enjuague el tubo, séquelo y vuelva a instalarlo.
Si aún no espuma la leche, límpielo a fondo como
se describe la sección “Limpieza y mantenimiento de
la cafetera monodosis”.
El indicador “CLEAN” sigue
encendido después de la
descalcificación.
Cerciórese de llevar a cabo el proceso de descalcificación
como se describe en las secciones “Limpieza y
mantenimiento” para cada cafetera. Siga llevando a
cabo ciclos de limpieza hasta que los indicadores
desaparezcan.

22
GARANTÍA
Garantía limitada de tres años
Esta garantía es válida solo en los Estados
Unidos, para los consumidores que hayan
comprado este producto directamente a
Cuisinart o a un revendedor autorizado de
Cuisinart. Usted es un consumidor si posee
una cafetera 3 en 1 Coffee Center® BaristaBar
de Cuisinart® que haya sido comprada en una
tienda para uso personal, familiar o casero.
A menos que la ley aplicable exija lo contrario,
esta garantía no es para los minoristas u otros
consumidores/compradores comerciales,
ni propietarios/consumidores que hayan
comprado este producto a revendedores
no autorizados por Cuisinart. Cuisinart
garantiza este producto contra todo defecto
de materiales o fabricación durante 3 años
después de la fecha de compra original,
siempre que haya sido usado para uso
doméstico y según las instrucciones.
Se recomienda llenar el formulario de registro
disponible en https://cuisinart.registria.com
a fin de facilitar la verificación de la fecha de
compra original de este producto Sin embargo,
no es necesario registrar el producto para
recibir servicio bajo esta garantía. En ausencia
de prueba de la fecha de compra, el período de
garantía será calculado a partir de la fecha de
fabricación del producto.
RESIDENTES DE CALIFORNIA
La ley del estado de California ofrece dos
opciones bajo el período de garantía. Los
residentes del estado de California pueden
devolver el producto defectuoso (A) a la tienda
donde lo compraron o (B) a otra tienda que
venda productos Cuisinart® de este tipo.
La tienda podrá, a su elección, reparar el
producto, referir el consumidor a un centro de
servicio independiente, sustituir el producto, o
reembolsar al consumidor el precio de compra
menos la cantidad directamente atribuible al
uso anterior del producto por el consumidor.
Si estas dos opciones no satisfacen al
consumidor, podrá llevar el aparato a un centro
de servicio independiente, siempre que se
pueda arreglar o reparar el aparato de manera
económica. Cuisinart (no el consumidor)
será responsable por los gastos de servicio,
reparación, sustitución o reembolso de los
productos defectuosos bajo garantía.
Los residentes de California también pueden,
si lo desean, mandar el producto defectuoso
directamente a Cuisinart para que sea reparado
o sustituido. Para esto, se debe llamar a
nuestro servicio posventa al
1-800-726-0190. Cuisinart será responsable
por los gastos de reparación, reemplazo,
manejo y envío de los productos defectuosos
durante el período de garantía.
GARANTÍA DE REEMPLAZO SIN
DIFICULTADES
Su máxima satisfacción es nuestra prioridad,
así que si este producto Cuisinart® falla
dentro del generoso período de garantía,
lo repararemos o, de ser necesario, lo
reemplazaremos, sin costo alguno para usted.
Para obtener una etiqueta de devolución,
visite https://www.cuisinart.com/customer-
care/product-return/product-assistance/
product-inquiry . O llame a nuestro servicio
posventa al 1-800-726-0190 para hablar con
un representante.
Este producto satisface las más altas
exigencias de fabricación y ha sido diseñado
para uso con corriente de 120V, usando
accesorios y repuestos autorizados solamente.
Esta garantía excluye expresamente los
defectos o daños causados por accesorios,
piezas o reparaciones no autorizados por
Cuisinart, así como los defectos o daños
causados por el uso de un convertidor de
voltaje. Esta garantía no cubre el uso comercial
o industrial del producto, y no es válida en caso
de daños causados por mal uso, negligencia
o accidente. Esta garantía excluye todos los
daños incidentales o consecuentes. Algunos
Estados no permiten la exclusión o limitación
de daños incidentales o consecuentes, de
modo que las limitaciones mencionadas
pueden no regir para usted. Usted puede tener
otros derechos que varían de un Estado a otro.
Importante: Si debe llevar el aparato
defectuoso a un centro de servicio no
autorizado, por favor informe al personal
del centro de servicio que deben llamar al
Centro de Servicio al Cliente de Cuisinart,
al 1-800-726-0190 a fin de diagnosticar el
problema correctamente, usar las piezas
correctas para repararlo, y comprobar que
el producto aún está bajo garantía.

23
RECETAS
CLÁSICOS
Café moca . . . . . . . . . . . . . . . . . . . . . . . . . . . 24
Latte (expreso con leche). . . . . . . . . . . . . . . . 24
Capuchino . . . . . . . . . . . . . . . . . . . . . . . . . . . 25
Cortado . . . . . . . . . . . . . . . . . . . . . . . . . . . . . 25
Macchiato. . . . . . . . . . . . . . . . . . . . . . . . . . . . 25
Americano . . . . . . . . . . . . . . . . . . . . . . . . . . . 26
NOVEDADES
“Flat White” . . . . . . . . . . . . . . . . . . . . . . . . . . 26
Chocolate caliente . . . . . . . . . . . . . . . . . . . . . 27
Latte de té Chai . . . . . . . . . . . . . . . . . . . . . . . 27
Gaseosa de expreso . . . . . . . . . . . . . . . . . . . 28
Café con leche . . . . . . . . . . . . . . . . . . . . . . . . 28
Latte de té matcha. . . . . . . . . . . . . . . . . . . . . 28
Latte de hibisco . . . . . . . . . . . . . . . . . . . . . . . 29
Jarabe de hibisco. . . . . . . . . . . . . . . . . . . . . . 29
Latte con leche de cereales con sabor
a fruta . . . . . . . . . . . . . . . . . . . . . . . . . . . . . . .29
Leche de cereales con sabor a fruta . . . . . . . 30
Latte con leche con sabor
a tostada de canela . . . . . . . . . . . . . . . . . . . . 30
Leche con sabor a tostada de canela . . . . . . 30
Latte de flores de guisantes de mariposa . . . 31
POSTRES/BATIDOS
Affogato . . . . . . . . . . . . . . . . . . . . . . . . . . . . . 31
Smoothie de expreso-cacao . . . . . . . . . . . . . 31
Tiramisú simple . . . . . . . . . . . . . . . . . . . . . . . 32

24
Café moca
Es difícil resistirse a una bebida de café con
chocolate, y más aún si está cubierta con
crema batida y chocolate rallado. Sirva esta
bebida en un vaso alto para una presentación
súper especial.
Rinde 1 porción
1 cápsula de expreso
1 cucharada de jarabe de chocolate
½ taza (120 ml) de leche o leche
vegetal
¼ taza (60 ml) de crema líquida para
batir (“heavy cream”), batida hasta
que se formen picos medio-suaves
1 cucharadita de virutas de
chocolate semiamargo o de cacao
en polvo sin azúcar (opcional)
1. Colocar la cápsula de expreso en la
máquina. Verter el jarabe en una taza
grande y colocar la taza en la bandeja de
goteo. Reservar.
2. Colocar la leche en otra taza grande a
prueba de calor. Sostener la taza con una
mano y colocarla debajo del tubo de vapor,
de tal manera que la boquilla del tubo de
vapor se encuentre justo bajo la superficie
de la leche, a un ángulo. Elegir la función
“STEAM” y presionar la perilla START/
STOP. Inclinar la taza y dejar que el vapor
espume la leche. Cuando la leche empiece
a subir, levantar la taza para que el tubo
e vapor quede sumergido en la leche.
Cuando siente que la leche está caliente,
presionar la perilla START/STOP para dejar
de espumar la leche. Dar unos golpecitos
en la taza varias veces para eliminar las
burbujas grandes.
3. Elegir la función “expreso simple” y
preparar el expreso en la taza con el jarabe
de chocolate.
4. Verter lentamente la leche espumada en la
taza de expreso con chocolate. Agregar 2
cucharadas de crema batida. Si desea,
esparcir virutas de chocolate o cacao en
polvo encima.
5. Servir inmediatamente.
Latte (expreso con leche)
Un clásico de cafetería hecho fácilmente casa.
Simplemente espume la leche, viértala en
el expreso recién hecho, y añada una fina
capa de espuma.
Rinde 1 porción
1 cápsula de expreso
½ taza (120 ml) de leche o leche
vegetal
1. Colocar la cápsula de expreso en la
máquina.
2. Colocar la leche en una taza grande a
prueba de calor. Sostener la taza con una
mano y colocarla debajo del tubo de vapor,
de tal manera que la boquilla del tubo de
vapor se encuentre justo bajo la superficie
de la leche, a un ángulo. Elegir la función
“STEAM” y presionar la perilla START/
STOP. Inclinar la taza y dejar que el vapor
espume la leche. Cuando la leche empiece
a subir, levantar la taza para que el tubo de
vapor quede sumergido en la leche; esto
evitará crear burbujas grandes y producirá
u hermosa espuma sedosa. Cuando la
espuma casi alcance la orilla de la taza y
siente que la leche está caliente, presionar
la perilla START/STOP para dejar de
espumar la leche. Dar unos golpecitos en
la taza varias veces para eliminar las
burbujas grandes.
3. Colocar una taza grande debajo del
cabezal y elegir la función “expreso
simple”. Finalizado el ciclo de preparación,
verter lentamente la leche espumada en la
taza de expreso.
4. Servir inmediatamente.

25
Capuchino
Tradicionalmente, el cappuccino se elabora
con capas iguales de expreso, leche espumada
y espuma de leche. Recomendamos usar una
cápsula “lungo” para preparar esta bebida,
pero si desea una bebida más fuerte, puede
usar 2 cápsulas de expreso simple.
Rinde 1 porción
1 cápsula de expreso “lungo”
(o 2 cápsulas de expreso simple)
¹⁄³ taza (80 ml) de leche o leche
vegetal
1. Colocar 1 cápsula de expreso en la
máquina.
2. Colocar la leche en una taza grande a
prueba de calor. Sostener la taza con una
mano y colocarla debajo del tubo de vapor,
de tal manera que la boquilla del tubo de
vapor se encuentre justo bajo la superficie
de la leche, a un ángulo. Elegir la función
“STEAM” y presionar la perilla START/
STOP. Inclinar la taza y dejar que el vapor
espume la leche. Cuando la leche empiece
a subir, levantar la taza para que el tubo de
vapor quede sumergido en la leche; esto
evitará crear burbujas grandes y producirá
u hermosa espuma sedosa. Cuando la
espuma casi alcance la orilla de la taza y
siente que la leche está caliente, presionar
la perilla START/STOP para dejar de
espumar la leche. Dar unos golpecitos en
la taza varias veces para eliminar las
burbujas grandes.
3. Colocar una taza grande debajo del
cabezal y elegir la función “expreso doble”
(si usa una cápsula “lungo”) o la función
“expreso simple” (si usa dos cápsulas de
expreso simple). Finalizado el ciclo de
preparación, verter lentamente aprox. 3 oz
(90 ml) de la leche espumada en la taza de
expreso y agregar 3 a 4 cucharadas de
espuma de leche.
4. Servir inmediatamente.
Cortado
Un cortado es muy parecido a un latte,
pero en lugar de llevar mucha leche,
lleva partes iguales de expreso y leche,
y no lleva espuma de leche.
Rinde 1 porción
1 cápsula de expreso
¼ taza (60 ml) de leche o leche
vegetal
1. Colocar la cápsula de expreso en la
máquina.
2. Colocar la leche en una taza grande a
prueba de calor. Sostener la taza con una
mano y colocarla debajo del tubo de vapor,
de tal manera que la boquilla del tubo de
vapor se encuentre justo bajo la superficie
de la leche, a un ángulo. Elegir la función
“STEAM” y presionar la perilla START/
STOP. Inclinar la taza y dejar que el vapor
espume la leche. Cuando la leche empiece
a subir, levantar la taza para que el tubo de
vapor quede sumergido en la leche; esto
evitará crear burbujas grandes y producirá
u hermosa espuma sedosa. Cuando la
espuma casi alcance la orilla de la taza y
siente que la leche está caliente, presionar
la perilla START/STOP para dejar de
espumar la leche. Dar unos golpecitos en
la taza varias veces para eliminar las
burbujas grandes.
3. Colocar una taza grande debajo del
cabezal y elegir la función “expreso
simple”. Finalizado el ciclo de preparación,
verter lentamente 1½ a 2 oz (45 a 60 ml) de
la leche espumada en la taza de expreso.
4. Servir inmediatamente.
Macchiato
Un macchiato es un expreso pequeño al que
se le añade un poco de leche espumada.
Hay muchas variaciones en el mundo, pero
aquí en Cuisinart nos gusta lo tradicional,
empezando con un expreso perfecto.
Rinde 1 porción
1 cápsula de expreso
¼ taza (60 ml) de leche o leche
vegetal

26
1. Colocar la cápsula de expreso en la
máquina.
2. Colocar la leche en una taza grande a
prueba de calor. Sostener la taza con una
mano y colocarla debajo del tubo de vapor,
de tal manera que la boquilla del tubo de
vapor se encuentre justo bajo la superficie
de la leche, a un ángulo. Elegir la función
“STEAM” y presionar la perilla START/
STOP. Inclinar la taza y dejar que el vapor
espume la leche. Cuando la leche empiece
a subir, levantar la taza para que el tubo de
vapor quede sumergido en la leche; esto
evitará crear burbujas grandes y producirá
u hermosa espuma sedosa. Cuando la
espuma casi alcance la orilla de la taza y
siente que la leche está caliente, presionar
la perilla START/STOP para dejar de
espumar la leche. Dar unos golpecitos en
la taza varias veces para eliminar las
burbujas grandes.
3. Colocar una taza pequeña debajo del
cabezal y elegir la función “expreso
simple”. Finalizado el ciclo de preparación,
agregar una cucharada de espuma de
leche.
4. Servir inmediatamente.
Americano
En pocas palabras, un Americano es un
expreso con agua extra caliente. El sabor está
a medio camino entre el sabor asertivo de un
expreso y el de una taza de café regular.
Rinde 1 porción
1 cápsula de expreso “lungo” o 2
cápsulas de expreso simple, según
su preferencia
²⁄³ a ¾ tazas (160 a 175 ml) de agua
caliente
1. Colocar 1 cápsula de expreso en la
máquina.
2. Colocar una taza de 6 a 8 oz (175 a 235 ml)
debajo del tubo de vapor. Elegir la función
“HOT WATER” y llenar la taza hasta aprox.
dos tercios de su capacidad. Cuando el
agua llegue al nivel deseado, presionar la
perilla START/STOP/
3. Colocar la taza debajo del cabezal y elegir
la función “expreso doble” (si usa una
cápsula “lungo” o la función “expreso
simple” (si usa dos cápsulas de expreso
simple).
4. Servir inmediatamente.
“Flat White”
Una forma simple de describir esta bebida
cada vez más popular sería “un pequeño latte
fuerte”. Suele tener una mayor proporción de
expreso respecto a la leche, y un poco menos
de espuma de leche que un latte.
Rinde 1 porción
1 cápsula de expreso “lungo”
(o 2 cápsulas de expreso simple)
¼ taza (60 ml) de leche o leche
vegetal
1. Colocar 1 cápsula de expreso en la
máquina.
2. Colocar la leche en una taza grande a
prueba de calor. Sostener la taza con una
mano y colocarla debajo del tubo de vapor,
de tal manera que la boquilla del tubo de
vapor se encuentre justo bajo la superficie
de la leche, a un ángulo. Elegir la función
“STEAM” y presionar la perilla START/
STOP. Inclinar la taza y dejar que el vapor
espume la leche.
Cuando la leche empiece a subir, levantar
la taza para que el tubo de vapor quede
sumergido en la leche; esto evitará crear
burbujas grandes y producirá u hermosa
espuma sedosa. Cuando la espuma casi
alcance la orilla de la taza y siente que la
leche está caliente, presionar la perilla
START/STOP para dejar de espumar la
leche. Dar unos golpecitos en la taza varias
veces para eliminar las burbujas grandes.
3. Colocar una taza grande debajo del
cabezal y elegir la función “expreso doble”
(si usa una cápsula “lungo”) o la función
“expreso simple” (si usa 2 cápsulas de
expreso simple), dependiendo de su
preferencia. Finalizado el ciclo de
preparación, verter lentamente una
pequeña cantidad (aprox. la mitad de la
cantidad de expreso) de la leche caliente
en la taza de expreso, reteniendo la
espuma de leche con una cuchara. Cubrir
con una capa fina de espuma de leche.
4. Servir inmediatamente.

27
Chocolate caliente
La taza perfecta de delicia que seguramente
les encantará a todos. ¡Pruebe una de nuestras
versiones para adultos!
Rinde 1 porción
1 onza (30g) de chocolate
semiamargo, finamente picado
1 cucharada (5 g) de cacao en polvo
1 cucharada (10 g) de azúcar
granulada
1 pizca diminuta de sal kosher
(opcional)
3 cucharadas (45 ml) de agua
caliente
¹⁄8 cucharadita de extracto natural de
vainilla
¾ taza (175 ml) de leche entera
¼ taza (60 ml) de crema líquida para
batir (“heavy cream”), batida hasta
que se formen picos medio-suaves,
al gusto
1. Colocar el chocolate picado, el cacao en
polvo, el azúcar y la sal (opcional) en una
taza grande. Agregar el agua caliente y
batir hasta que el chocolate esté derretido
y que la mezcla esté suave. Agregar la
vainilla; batir para combinar.
2. Colocar la leche en otra taza grande a
prueba de calor. Sostener la taza con una
mano y colocarla debajo del tubo de vapor,
de tal manera que la boquilla del tubo de
vapor se encuentre justo bajo la superficie
de la leche, a un ángulo. Elegir la función
“STEAM” y presionar la perilla START/
STOP. Inclinar la taza y dejar que el vapor
espume la leche.
Cuando la leche empiece a subir, levantar
la taza para que el tubo de vapor quede
sumergido en la leche. Cuando siente que
la leche está caliente, presionar la perilla
START/STOP para dejar de espumar la
leche. Dar unos golpecitos en la taza varias
veces para eliminar las burbujas grandes.
3. Verter lentamente la leche espumada en la
taza de chocolate. Batir para combinar
Agregar 2 cucharadas de crema batida.
4. Servir inmediatamente.
“Toddy” de chocolate caliente:
Agregar 2 cucharadas de Bourbon o ron
oscuro a la mezcla de chocolate.
Chocolate caliente con expreso:
Preparar una cápsula de expreso y agregarlo
a la mezcla de chocolate.
Latte de té Chai
Con tantos concentrados artesanales
de té Chai entre los que elegir hoy en día,
puedes preparar tu propia taza digna de
un barista en casa.
Rinde 1 porción
½ taza (120 ml) de concentrado de té
Chai con o sin azúcar, al gusto
½ taza (120 ml) de leche o leche
vegetal
1. Colocar el concentrado de té Chai en una
taza grande.
2. Colocar la leche en otra taza grande a
prueba de calor. Sostener la taza con una
mano y colocarla debajo del tubo de vapor,
de tal manera que la boquilla del tubo de
vapor se encuentre justo bajo la superficie
de la leche, a un ángulo. Elegir la función
“STEAM” y presionar la perilla START/
STOP. Inclinar la taza y dejar que el vapor
espume la leche.
Cuando la leche empiece a subir, levantar
la taza para que el tubo de vapor quede
sumergido en la leche; esto evitará crear
burbujas grandes y producirá u hermosa
espuma sedosa. Cuando la espuma casi
alcance la orilla de la taza y siente que la
leche está caliente, presionar la perilla
START/STOP para dejar de espumar la
leche. Dar unos golpecitos en la taza varias
veces para eliminar las burbujas grandes.
3. Verter lentamente la leche caliente en la
taza de concentrado de té Chai, reteniendo
la espuma.
4. Servir inmediatamente.
Chai con expreso:
Preparar una cápsula de expreso y agregar
este a la mezcla de concentrado de té Chai.

28
Gaseosa de expreso
Sustituya el gin por expreso, para conseguir
una bebida gaseosa a la vez refrescante y
estimulante. ¡Puede experimentar con jarabes
aromatizados y guarniciones para variar!
Rinde 1 porción
2 cápsulas de expreso
(preferiblemente de tueste ligero
a mediano)
1 cucharadita de jarabe simple
(opcional)
1 o 2 chorros de amargos aromáticos
(tal como el amargo de Angostura)
5 onzas (145 ml) de gaseosa
“Twist” de naranja o limón para
decorar
1. Colocar 1 cápsula de expreso en la
máquina. Colocar una taza debajo del
cabezal. Elegir función “expreso simple” y
preparar el expreso en la taza. Finalizado
el ciclo de preparación, tirar la cápsula
usada e instalar otra cápsula. Volver a
elegir “expreso simple” y preparar el
segundo expreso, en la misma taza.
Dejar enfriar a temperatura ambiente.
2. Llenar un vaso alto con hielo. Agregar el
jarabe simple (opcional), los amargos y la
gaseosa; revolver. Agregar lentamente el
expreso enfriado. Colocar un “twist” de
naranja o limón en el vaso para decorar.
3. Servir inmediatamente.
Café con leche
Empiece bien la mañana con esta tradicional
bebida de expreso al estilo español.
Rinde 1 porción
2 cápsulas de expreso
¹∕³ taza (80 ml) de leche entera
1 cucharadita de azúcar granulada
(opcional)
1. Colocar 1 cápsula de expreso en la
máquina. Colocar una taza debajo del
cabezal. Reservar.
2. Colocar la leche en otra taza grande a
prueba de calor. Sostener la taza con una
mano y colocarla debajo del tubo de vapor,
de tal manera que la boquilla del tubo de
vapor se encuentre justo bajo la superficie
de la leche, a un ángulo. Elegir la función
“STEAM” y presionar la perilla START/
STOP. Inclinar la taza y dejar que el vapor
espume la leche.Cuando la leche empiece
a subir, levantar la taza para que el tubo de
vapor quede sumergido en la leche; esto
evitará crear burbujas grandes y producirá
u hermosa espuma sedosa. Cuando la
espuma casi alcance la orilla de la taza y
siente que la leche está caliente, presionar
la perilla START/STOP para dejar de
espumar la leche. Dar unos golpecitos en
la taza varias veces para eliminar las
burbujas grandes.
3. Elegir función “expreso simple” y preparar
el expreso en la taza. Finalizado el ciclo
de preparación, tirar la cápsula usada e
instalar otra cápsula. Volver a elegir
“expreso simple” y preparar el segundo
expreso, en la misma taza.
4. Verter lentamente la leche caliente en la
taza de expreso, reteniendo la espuma.
Agregar azúcar al gusto.
5. Servir inmediatamente.
Latte de té matcha
El polvo de té Matcha está disponible
con o sin azúcar. Consulte la lista de
ingredientes para cerciorarse del tipo
que está comprando. Si contiene azúcar,
omita la miel si así lo desea.
Rinde 1 porción
1½ cucharaditas de polvo de té
matcha, tamizado
1 cucharada de agua
1 cucharadita de miel (opcional al
gusto)
1 taza (235 ml) de leche o leche
vegetal
1. Colocar el té matcha y el agua en un vaso
de al menos 12 oz (355 ml). Batir con un
pequeño batidor (o revolver bien con un
tenedor) hasta conseguir una mezcla
suave. Si usa miel, agregarla a la mezcla.
Reservar.
2. Colocar la leche en una taza grande a
prueba de calor. Sostener la taza con una
mano y colocarla debajo del tubo de vapor,

29
de tal manera que la boquilla del tubo de
vapor se encuentre justo bajo la superficie
de la leche, a un ángulo. Elegir la función
“STEAM” y presionar la perilla START/
STOP. Inclinar la taza y dejar que el vapor
espume la leche. Cuando la leche empiece
a subir, levantar la taza para que el tubo de
vapor quede sumergido en la leche; esto
evitará crear burbujas grandes y producirá
u hermosa espuma sedosa. Cuando la
espuma casi alcance la orilla de la taza y
siente que la leche está caliente, presionar
la perilla START/STOP para dejar de
espumar la leche. Dar unos golpecitos en
la taza varias veces para eliminar las
burbujas grandes.
3. Agregar la leche espumada a la mezcla de
té matcha. Servir inmediatamente.
Latte de hibisco
Bebida sin cafeína ligeramente ácida, deliciosa
tanto caliente como helada.
Rinde 1 porción
¼ taza (60 ml) de jarabe de hibisco
(receta a continuación) helado
½ taza (120 ml) de leche o leche
vegetal
1. Colocar el jarabe de hibisco en un vaso de
al menos 12 oz (355 ml). Reservar.
2. Colocar la leche en una taza grande a
prueba de calor. Sostener la taza con una
mano y colocarla debajo del tubo de vapor,
de tal manera que la boquilla del tubo de
vapor se encuentre justo bajo la superficie
de la leche, a un ángulo. Elegir la función
“STEAM” y presionar la perilla START/
STOP. Inclinar la taza y dejar que el vapor
espume la leche. Cuando la leche empiece
a subir, levantar la taza para que el tubo de
vapor quede sumergido en la leche; esto
evitará crear burbujas grandes y producirá
u hermosa espuma sedosa. Cuando la
espuma casi alcance la orilla de la taza y
siente que la leche está caliente, presionar
la perilla START/STOP para dejar de
espumar la leche. Dar unos golpecitos en
la taza varias veces para eliminar las
burbujas grandes.
3. Agregar la leche espumada al jarabe de
hibisco. Servir inmediatamente.
Jarabe de hibisco
Aunque nos encanta en el latte de hibisco,
el jarabe de hibisco también puede añadirse
a la limonada fresca, mezclarse en cócteles
(con o sin alcohol), o añadirse a una copa
de champán para un brindis festivo.
Puede conservarse en el refrigerador hasta
3 semanas.
Rinde aprox. 2 tazas (475 ml)
2 tazas (475 ml) de agua
½ taza (100 g) de azúcar granulada
8 bolsitas de té de hibisco
1. Colocar el agua y el azúcar en una cacerola
de fondo pesado y poner a calentar a
fuego medio. Cuando el azúcar esté
completamente disuelto, retirar del fuego y
agregar las bolsitas de té. Dejar remojar
por 30 minutos.
2. Quitar las bolsitas de té y dejar enfriar
antes de usar.
Latte con leche de
cereales con sabor a fruta
Este dulce y afrutado latte está inspirado por la
famosa leche de cereales y el helado de leche
de cereales de Christina Tosi. Añadir un
expreso atenúa la dulzura, pero para los que
no beben café y los niños, ¡la leche de cereales
sola es una delicia!
Rinde 1 porción
1 cápsula de expreso
½ taza (120 ml) de leche de cereales
con sabor a fruta (receta a
continuación)
1. Colocar la cápsula de expreso en la
máquina.
2. Colocar la leche en una taza grande a
prueba de calor. Sostener la taza con una
mano y colocarla debajo del tubo de vapor,
de tal manera que la boquilla del tubo de
vapor se encuentre justo bajo la superficie
de la leche, a un ángulo. Elegir la función
“STEAM” y presionar la perilla START/
STOP. Inclinar la taza y dejar que el vapor
espume la leche. Cuando la leche empiece
a subir, levantar la taza para que el tubo de
vapor quede sumergido en la leche;

30
esto evitará crear burbujas grandes y
producirá u hermosa espuma sedosa.
Cuando la espuma casi alcance la orilla de
la taza y siente que la leche está caliente,
presionar la perilla START/STOP para dejar
de espumar la leche. Dar unos golpecitos
en la taza varias veces para eliminar las
burbujas grandes.
3. Colocar otra taza debajo del cabezal y
elegir la función “expreso simple”.
4. Finalizado el ciclo de preparación, verter
lentamente la leche caliente en la taza de
expreso y cubrir con un poco de espuma
de leche. Servir inmediatamente.
Leche de cereales con
sabor a fruta
Rinde aprox. 1½ tazas (355 ml)
1 taza (150 g) de cereales con sabor
a fruta (hojuelas o aros)
2 tazas (475 ml) de leche o leche vegetal
1 cucharada de jarabe de arce/maple,
opcional
1 pizca de sal marina fina
1. Colocar todos los ingredientes en una
taza medidora grande o un tazón pequeño.
Dejar remojar por 45 minutos. Colar a
través de un colador de malla fina,
presionando el cereal blando a través
de la malla con el dorso de una cuchara
o de un cucharón lo más posible.
2. Refrigerar hasta el momento de usar, por
un máximo de 3 días.
Latte con leche con sabor
a tostada de canela
Si disfruta de la canela en su café, esta bebida
es para usted. Un rocío de canela recién
molida sobre la espuma de leche es el toque
final perfecto.
Rinde 1 porción
1 cápsula de expreso
½ taza (120 ml) de leche con sabor
a tostada de canela (receta a
continuación)
Canela recién molida (para decorar)
1. Colocar la cápsula de expreso en la
máquina.
2. Colocar la leche en una taza grande a
prueba de calor. Sostener la taza con una
mano y colocarla debajo del tubo de vapor,
de tal manera que la boquilla del tubo de
vapor se encuentre justo bajo la superficie
de la leche, a un ángulo. Elegir la función
“STEAM” y presionar la perilla START/
STOP. Inclinar la taza y dejar que el vapor
espume la leche.
Cuando la leche empiece a subir, levantar
la taza para que el tubo de vapor quede
sumergido en la leche; esto evitará crear
burbujas grandes y producirá u hermosa
espuma sedosa. Cuando la espuma casi
alcance la orilla de la taza y siente que la
leche está caliente, presionar la perilla
START/STOP para dejar de espumar la
leche. Dar unos golpecitos en la taza varias
veces para eliminar las burbujas grandes.
3. Colocar otra taza debajo del cabezal y
elegir la función “expreso simple”.
4. Finalizado el ciclo de preparación, verter
lentamente la leche caliente en la taza de
expreso y cubrir con un poco de espuma
de leche. Rociar con canela recién molida y
servir inmediatamente.
Leche con sabor a tostada
de canela
Si hay niños en la casa, esta leche dulce
es perfecta para servir con galletas
recién horneadas.
Rinde aprox. 1½ tazas (355 ml)
1 taza (150 g) de cereales con sabor
a canela
2 tazas (475 ml) de leche o leche
vegetal
1 cucharada de jarabe de arce/maple,
opcional
1 pizca de canela en polvo
1 pizca de sal marina fina
1. Colocar todos los ingredientes en una
taza medidora grande o un tazón pequeño.
Dejar remojar por 45 minutos. Colar a
través de un colador de malla fina,
presionando el cereal blando a través de
la malla con el dorso de una cuchara o de
un cucharón lo más posible.

31
2. Refrigerar hasta el momento de usar, por
un máximo de 3 días.
Latte de flores de
guisantes de mariposa
Son muchos los que promueven los beneficios
(desde la mejora del estado de ánimo hasta el
alivio del estrés) de las bebidas a base de
flores de guisantes de mariposa, procedentes
de Tailandia. Lo que sí sabemos con certeza es
que su brillante tono azul, además de su
delicioso sabor orgánico, le enamorarán al
primer sorbo. Este vibrante té en polvo está
disponible en algunas tiendas especializadas
en productos gourmet y tiendas de té, y se
puede conseguir fácilmente en línea.
Rinde 1 porción
1½ cucharaditas de polvo de flores de
guisantes de mariposa, tamizado
1 cucharada de agua
1 a 2 cucharaditas de miel, o al gusto
2 tazas (475 ml) de leche o leche
vegetal
1. Colocar el polvo de flores de guisantes de
mariposa y el agua en un vaso de al menos
12 oz (355 ml); revolver. Agregar la miel a la
mezcla. Reservar.
2. Colocar la leche en una taza grande a
prueba de calor. Sostener la taza con una
mano y colocarla debajo del tubo de vapor,
de tal manera que la boquilla del tubo de
vapor se encuentre justo bajo la superficie
de la leche, a un ángulo. Elegir la función
“STEAM” y presionar la perilla START/
STOP. Inclinar la taza y dejar que el vapor
espume la leche.
Cuando la leche empiece a subir, levantar
la taza para que el tubo de vapor quede
sumergido en la leche; esto evitará crear
burbujas grandes y producirá u hermosa
espuma sedosa. Cuando la espuma casi
alcance la orilla de la taza y siente que la
leche está caliente, presionar la perilla
START/STOP para dejar de espumar la
leche. Dar unos golpecitos en la taza varias
veces para eliminar las burbujas grandes.
3. Agregar la leche espumada a la mezcla de
polvo de flores de guisantes de mariposa.
Servir inmediatamente.
Nota: Esta bebida también es deliciosa helada.
Si piensa servirla helada, usar 1 cucharada de
polvo y refrigerar bien la bebida. Servir con
hielo.
POSTRES/BATIDOS
Affogato
Muchos rechazarían cualquier cosa que no
fuera gelato de vainilla para usar en este postre
italiano, pero hemos descubierto que hay
muchos otros sabores que funcionan igual de
bien. Nuestros favoritos son el chocolate, el
expreso o el caramelo.
Rinde 1 porción
1 bola/cucharada de gelato de
vainilla (o de su gelato favorito)
1 cápsula de expreso
Agua
1. Colocar la bola/cucharada de gelato en una
taza o un vaso. Conservar en el congelador
hasta que el expreso esté listo.
2. Colocar la cápsula de expreso en la
máquina. Colocar una pequeña taza debajo
del cabezal y elegir la función “expreso
simple”.
3. Finalizado el ciclo de preparación, sacar
el gelato del congelador y agregarle
lentamente el expreso caliente.
4. Servir inmediatamente.
Smoothie de
expreso-cacao
¡Una saludable sacudida a primera hora
de la mañana!
Rinde 1 porción
¼ taza (60 ml) de expreso helado
(2 cápsulas de expreso simple)
¼ taza (60 ml) de leche o leche
vegetal
¼ cucharadita de extracto natural de
vainilla
1 cucharada (15 g) de la mantequilla
de anacardo

32
1 cucharada (5 g) de cacao en polvo
1 banana congelada, en trozos de
1 in (2.5 cm)
1. Colocar todos los ingredientes en la jarra
de una licuadora, en el orden indicado
2. Licuar a velocidad alta por aprox. 1 minuto,
hasta obtener una mezcla suave.
3. Servir inmediatamente.
Tiramisú simple
Hacer un tiramisú no tiene que ser
complicado. Puede tener este impresionante
postre en la mesa en poco tiempo gracias
a nuestros trucos.
Rinde 20 porciones
1 paquete de 8 oz (225 g) de queso
Mascarpone, a temperatura
ambiente
1 taza (235 ml) de crema líquida
para batir (“heavy cream”)
¼ taza + 2 cucharadas (35 g)
de azúcar glasé
2 cucharadas + 1 cucharadita (35 ml)
de ron oscuro
1½ tazas de expreso helado
(6 cápsulas de expreso simple o
3 cápsulas de expreso “lungo”)
28 galletas Savoiardi (bizcochos de
soletilla italianos crujientes)
¼ taza (30 g) de cacao en polvo sin
azúcar, para decorar
1. Colocar el queso Mascarpone en un tazón
mediano y batir con una batidora de mano
Cuisinart® hasta que esté ligero. Colocar
la crema liquida en otro tazón y batir,
agregando progresivamente el azúcar
glasé, hasta obtener picos suaves. Agregar
una cucharadita de ron y batir brevemente
para incorporar. Incorporar suavemente
la crema batida a la mezcla de queso
Mascarpone, un tercio a la vez.
2. Colocar el expreso y las 2 cucharadas de
ron restantes en un plato poco profundo;
revolver. Bañar los bizcochos en la mezcla
uno por uno, varios segundos por lado,
y disponerlos en el fondo de un molde de
9 x 9 in (23 x 23 cm).
Repetir con 13 bizcochos adicionales,
cubriendo todo el fondo del molde.
No dejar espacio entre los bizcochos.
3. Esparcir la mitad de la mezcla de queso
Mascarpone uniformemente encima de los
bizcochos, cubriendo toda la superficie.
Bañar los bizcochos restantes y
disponerlos encima de la mezcla. Esparcir
el resto de la mezcla uniformemente
encima de los bizcochos. Cubrir con papel
film/plástico y refrigerar por 6 horas.
4. Antes de servir, colocar el cacao en polvo
en un pequeño colador de malla fina y
esparcir encima del tiramisú.
F IB-17408-ESP
©2022 Cuisinart
Glendale, AZ 85307
Impreso en China
22CE080218
-
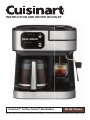 1
1
-
 2
2
-
 3
3
-
 4
4
-
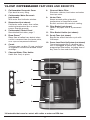 5
5
-
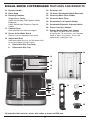 6
6
-
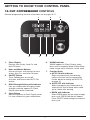 7
7
-
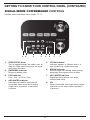 8
8
-
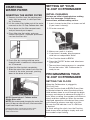 9
9
-
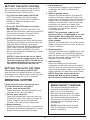 10
10
-
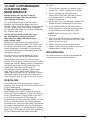 11
11
-
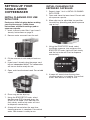 12
12
-
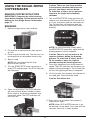 13
13
-
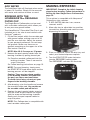 14
14
-
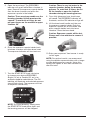 15
15
-
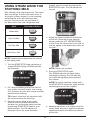 16
16
-
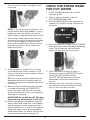 17
17
-
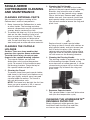 18
18
-
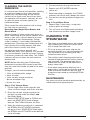 19
19
-
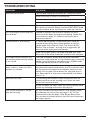 20
20
-
 21
21
-
 22
22
-
 23
23
-
 24
24
-
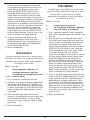 25
25
-
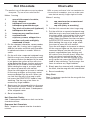 26
26
-
 27
27
-
 28
28
-
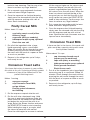 29
29
-
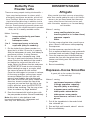 30
30
-
 31
31
-
 32
32
-
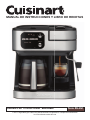 33
33
-
 34
34
-
 35
35
-
 36
36
-
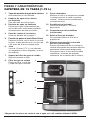 37
37
-
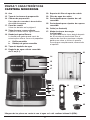 38
38
-
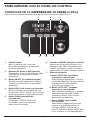 39
39
-
 40
40
-
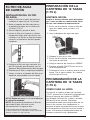 41
41
-
 42
42
-
 43
43
-
 44
44
-
 45
45
-
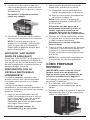 46
46
-
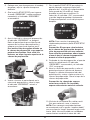 47
47
-
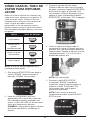 48
48
-
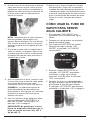 49
49
-
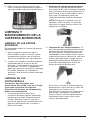 50
50
-
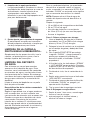 51
51
-
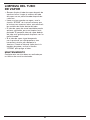 52
52
-
 53
53
-
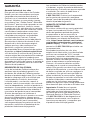 54
54
-
 55
55
-
 56
56
-
 57
57
-
 58
58
-
 59
59
-
 60
60
-
 61
61
-
 62
62
-
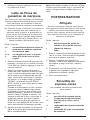 63
63
-
 64
64


Cuisinart SS-4N1 Series Coffee Center BaristaBar Manual de usuario
- Categoría
- Cafeteras
- Tipo
- Manual de usuario
