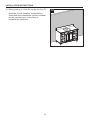
Allen + Roth 1789VA-48-310 Guía de instalación
- Tipo
- Guía de instalación

1
ATTACH YOUR RECEIPT HERE
Serial Number__________________ Purchase Date__________________
ALLEN + ROTH
and logo design are trademarks or registered
trademarks of LF, LLC. All rights reserved.
welcoming • sophisticated • inspiring
SM20513
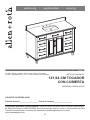
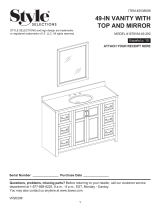
ITEM #2694518
Español p. 13
MODEL #1789VA-48-310
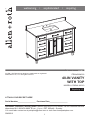
Questions, problems, missing parts? Before returning to your retailer, call our customer service
department at 1-866-439-9800, 8 a.m. - 8 p.m., EST, Monday - Sunday.
You could also contact us at [email protected] or visit www.lowespartsplus.com.
48-IN VANITY
WITH TOP

2
TABLE OF CONTENTS
Package Contents...........................................................................................................................3
Hardware Contents..........................................................................................................................3
Safety Instructions...........................................................................................................................3
Preparation......................................................................................................................................4
Assembly or Installation Instructions ...............................................................................................4
Care and Maintenance..................................................................................................................11
Warranty........................................................................................................................................11
Replacement Parts List..................................................................................................................12

3
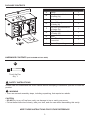
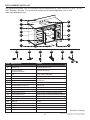
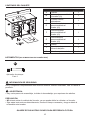
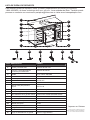
HARDWARE CONTENTS (NOT SHOWN ACTUAL SIZE)
PACKAGE CONTENTS
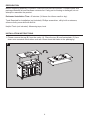
SAFETY INSTRUCTIONS
Please read and understand this entire manual before attempting to assemble, operate or install the
product.
WARNING
• There are several assembly steps, including unpacking, that require two adults.
CAUTION
• DO NOT try to pry off top from vanity, as damage to top or vanity may occur.
• Follow these instructions closely, take your time, and use care while assembling this vanity.
KEEP THESE INSTRUCTIONS FOR FUTURE REFERENCE.
PART DESCRIPTION QUANTITY
A Vanity 1
B
Top (preassembled
to vanity (A))
1
C Backsplash 1
E
Tip-out Door (preassembled
to Vanity (A))
1
F
Left Door (preassembled
to Vanity (A))
1
G
Right Door (preassembled
to Vanity (A))
1
H Shelf 1
N Center Support Leg 1
I
Floor Plumbing
Cutout Lid
1
AA
Touch Up Pen
Qty. 1
A
B
C
E
F
G
H
N
I

4
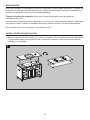
INSTALLATION INSTRUCTIONS
PREPARATION
Before beginning assembly of product, make sure all parts are present. Compare parts with
package contents list and hardware contents list. If any part is missing or damaged, do not
attempt to assemble the product.
Estimated Installation Time: 45 minutes (24 hours for silicone caulk to dry).
Tools Required for Installation (not included): Phillips screwdriver, utility knife or scissors,
silicone caulk, power drill with drill bit
Helpful Tools (not included): Measuring tape, level
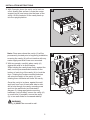
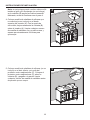
1. Please remove the top (B) from the vanity (A). Place the top (B) and backsplash (C) face
down onto a scratch-free surface such as a foam sheet that came in the packaging.
1
A
B
2
3
3
1
1
BACK

5
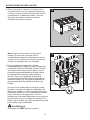
INSTALLATION INSTRUCTIONS
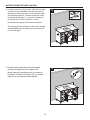
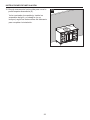
2. With 2 people, place the vanity on its back on
a flat, scratch free surface. Locate the center
support leg (N) and screw into the base of the
vanity. Once complete, lift the vanity back up
into the upright position.
2
N
N
WARNING
Vanity (A) MUST be secured to wall.
Note: Clean area where the vanity (A) will be
permanently located prior to beginning installation,
ensuring the vanity (A) will not interfere with any
water supply and drain lines once mounted.
3. With two people, carefully place vanity (A)
against the wall in its final location.
While holding the vanity base firmly against the
wall, use the pre-assembled levelers on the
bottom of each leg of the vanity (A) to level the
item. Twisting the levelers counterclockwise
will raise the height of the vanity (A), and
twisting them clockwise will lower the vanity.
Once the vanity is in place, against the wall,
and level from front to back and side to side,
drill a hole through the vanity mounting area
and into the wall studs (as illustrated in
diagram 3). Using appropriate mounting
hardware (not included), secure the vanity (A)
to a wall stud. If possible, secure the vanity
(A) to two wall studs for increased stability.
3
1
2
A

6
INSTALLATION INSTRUCTIONS
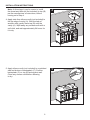
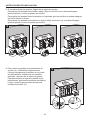
5. Apply silicone caulk (not included) to unpolished
side and bottom of backsplash (C). Position
backsplash (C) on top (B) and against wall.
Clean any excess caulk before allowing
to dry.
Note: A
t this stage it may be easier to install
the faucet and drain kit (not included) to top (B)
per the manufacturer’s instructions, before
moving on to Step 4.
4.
Apply stain free silicone caulk (not included) to
the top edge of vanity (A). With the help of
another adult, gently lower top (B) onto the
vanity (A). Wipe away any excess caulk with a
soft cloth, and wait approximately 24 hours for
it to dry.
4
1
2
2
A
B
5
1
2
2
B
C

7
INSTALLATION INSTRUCTIONS
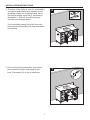
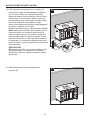
6. The back of the vanity is open for accessibility
for drain(s) and water line(s) hookup. If your
plumbing comes out of the back wall, insert
the floor plumbing cutout lid (I), as shown in
Illustration 6. This will close the hole and
increase your storage space.
If your plumbing comes out of the floor, this
hole provides accessibility for drain and water
line hookup.
7. From the front of the assembly, insert shelf
pins at desired height, ensuring they are
level. Place shelf (H) on top of shelf pins.
6
I
I
A
7
1
H
2

8
INSTALLATION INSTRUCTIONS
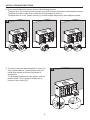
8.
If you need to adjust the doors, do so in the following manner.
To adjust door up or down, loosen screws (a) on both hinges, adjust door, and retighten screws.
To adjust door left or right, turn screws (b) on both hinges, in and out.
To adjust door in or out, loosen screws (c) on both hinges, adjust door, and retighten screws.
9. To remove drawers preassembled in vanity (A),
fully extend drawers. Locate plastic levers on
metal glide tracks at left and right sides of
drawer box.
To disengage drawer box from glides, push on
plastic levers. Then, gently lift drawer up to
remove it from vanity (A).
8
2
2
2
2
2
2
b
1
1
c
1
c
3
a
1
a
3
9
A
1
2

9
INSTALLATION INSTRUCTIONS
10. To reinstall drawers into vanity (A), fully extend
metal glide tracks. Gently lower and slide
drawer box into rear glide catch. Next lower
drawer box down to completely rest on
extended glides. Then, push plastic levers to
lock the drawer box in place.
Repeat for remaining drawers.
Note: To adjust the drawer box height, spin
the adjustment wheel to the left to raise the
drawer box or spin the adjustment wheel to
the right to lower the drawer box. You can
adjust the left and right-side glide heights
independently in order to find the drawers best
alignment position.
CAUTION
DO NOT force drawer or damage to glide may
occur. If drawer does not slide in with ease,
remove and try again from the start.
10
A
3
2
1
11
E
11.
Gently open the top tip-out door (E).

10
INSTALLATION INSTRUCTIONS
Assembly is now complete. Install desired
faucet and drain assemblies (neither included)
per the manufacturers’ instructions to
complete the installation.
12
E
12.
Gently push up to close the top tip-out door (E).

11
CARE AND MAINTENANCE
WARRANTY
IMPORTANT
• Dust the vanity regularly with a soft, non-lint producing cloth or household dusting product.
• You can clean the vanity with a gentle, non-abrasive household cleaner.
• Make sure to dry the wood immediately with a soft cloth or towel.
• The stone top can be cleaned using standard marble cleaning agents available at your local
supplier.
• Tips for using touch-up pen (AA): For scratches, stroke in direction of scratch. Rub off excess
colorant promptly with a soft cloth.
• Shade variations and patterns are an inherent characteristic of stone (e.g. granite, marble,
engineered stone). Stone tops will vary from product to product. Use caution placing items
such as soap or any fragranced material on the stone surface. Use a soap dish, coaster or
similar item to protect the surface if placing any soap or fragranced products on the stone.
• If soap or fragranced products come in contact with the stone top, rinse the surface with water
and dry using a soft non-abrasive cloth.
• WARNING: Must use cleaning agents safe for stone. Check your cleaning agents use
restrictions before using on any stone. Damage to the stone may result. Vanity manufacturer not
responsible for damage caused by improper cleaning agents or soaps used. Warranty will not
cover damage caused by the use of improper soaps or cleaning agents.
• DO NOT use products to clean the stone top that contain acetone, lemon, vinegar or other
acids as these may cause damage to the stone surface.
• Periodically reseal the stone top using an appropriate stone sealer available from your local
home store. Follow the manufacturer’s directions on how to apply.
The manufacturer warrants this item against defects in materials and workmanship for a period of
one (1) year from the date of original retail purchase. This warranty applies only to the original
purchaser. This warranty does not apply to any damage on the product by accident, misuse, or
modified, improper installation or by affixing accessories not produced by the manufacturer. The
manufacturer will not be held liable for damages caused from cleaners or soaps that etch or stain
the stone top. The manufacturer is not accountable whatsoever for product installation during the
warranty period. There is no further expressed warranty. The manufacturer shall not be legally
responsible for incidental, consequential or special damages arising at or in connection with
product use or performance except as may otherwise be accorded by law. The manufacturer
disclaims any and all implied warranties.

12
REPLACEMENT PARTS LIST
For replacement parts, call our customer service department at 1-866-439-9800, 8 a.m. - 8 p.m.,
EST, Monday - Sunday. You could also contact us at [email protected] or visit
www.lowespartsplus.com.
ALLEN + ROTH
and logo design are trademarks or registered
trademarks of LF, LLC. All rights reserved.
Printed in Vietnam
AA Touch-up pen M-1128
1789VA-BN HANDLE
PUDTC-14X3-HANDLE
CC Pull (with screw)
B1044
BB Shelf Pin
DD
Drawer Glide Set
C-90-107
FF
T-1007Leveler EE
Hinge
PART DESCRIPTION PART#
B
Left Door
1789VA-48-925 TOP
C 1789VA-48-925 BS
F 1789VA-48-310
DOOR SET
G Right Door
H Shelf 1789VA-48-310-SHELF
310 FP LID
I Floor Plumbing Cutout Lid
1789VA-48-310-TRAY
J Tip-out Tray
1789VA-48-310-UPPER DRAWER FRONT
K Upper Drawer Front
1789VA-48-310-MID DRAWER FRONT
L Middle Drawer Front
1789VA-48-310-LOWER DRAWER FRONT
M Lower Drawer Front
1789VA-48-310-C LEG
N Center Support Leg
925 Engineered
Carrara Top
925 Engineered
Carrara Backsplash
D PU17-18X14-SQUARE
Sink
E 1789VA-48-310-TIP-OUT DOOR
Tip-out Door
B
F
I
H
E
J
C
D
M
K
L
G
N
BBAA CC DD EE FF

13
ADJUNTE SU RECIBO AQUÍ
Número de serie__________________ Fecha de compra__________________
ALLEN + ROTH
y el diseño del logo son marcas comerciales
o marcas registradas de LF, LLC. Todos los derechos reservados.
welcoming • sophisticated • inspiring
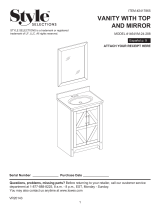
ARTÍCULO #2694518
MODELO #1789VA-48-310
¿Preguntas, problemas, piezas faltantes? Antes de volver a la tienda, llame a nuestro Departamento
de Servicio al Cliente al 1-866-439-9800, de lunes a domingo de 8 a.m. a 8 p.m., hora estándar del Este.
También puede ponerse en contacto con nosotros en [email protected] o visitar
www.lowespartsplus.com.
121,92-CM TOCADOR
CON CUBIERTA

14
ÍNDICE
Contenido del paquete..................................................................................................................15
Aditamentos........................................................................................................................15
Información de seguridad..............................................................................................................15
Preparación..................................................................................................................................16
Instrucciones de ensamblaje o instalación...................................................................................16
Cuidado y mantenimiento..............................................................................................................23
Garantía.........................................................................................................................................23
Lista de piezas de repuesto...........................................................................................................24

15
ADITAMENTOS (NO SE MUESTRAN EN TAMAÑO REAL)
CONTENIDO DEL PAQUETE
INFORMACIÓN DE SEGURIDAD
Lea y comprenda completamente este manual antes de intentar ensamblar, usar o instalar el
producto.
ADVERTENCIA
• Hay varios pasos de ensamblaje, incluido el desembalaje, que requieren dos adultos.
PRECAUCIÓN
• NO intente retirar la cubierta del tocador, ya que puede dañar la cubierta o el tocador.
• Siga estas instrucciones detenidamente, tómese el tiempo necesario y tenga cuidado al
ensamblar este tocador.
GUARDE ESTAS INSTRUCCIONES PARA REFERENCIA FUTURA.
PIEZA DESCRIPCIÓN CANTIDAD
A Tocador 1
F
Puerta izquierda
(preensamblada al
tocador (A))
1
G
Puerta derecha
(preensamblada al
tocador (A))
1
H Estante 1
N Pata de soporte central 1
I
Tapa de corte para
plomería del piso
1
B
Cubierta (preensamblada
al tocador (A))
1
C
Protector contra
salpicaduras
1
E
Puerta basculante
(preensamblada al
tocador (A))
1
AA
Aplicador de retoque
Cant. 1
A
B
C
E
F
G
H
N
I

16
INSTRUCCIONES DE INSTALACIÓN
PREPARACIÓN
Antes de comenzar a ensamblar el producto, asegúrese de tener todas las piezas. Compare las
piezas con la lista del contenido del paquete y la lista de aditamentos. No intente ensamblar el
producto si falta alguna pieza o si estas están dañadas.
Tiempo de instalación estimado:
45 minutos (24 horas para que seque la masilla de
calafateo de silicona).
Herramientas necesarias para la instalación (no se incluyen): destornillador Phillips, cuchillo para
uso general o tijera, masilla de calafateo de silicona, taladro eléctrico con broca para taladro.
Herramientas útiles (no se incluyen): cinta métrica, nivel.
1. Retire la cubierta (B) del tocador (A). Coloque la cubierta (B) y el protector contra salpicaduras
(C) boca abajo sobre una superficie que no produzca rayones, como la lámina de espuma
incluida en el embalaje.
1
A
B
2
3
3
1
1
BACK

17
INSTRUCCIONES DE INSTALACIÓN
2
N
N
ADVERTENCIA
El tocador (A) DEBE fijarse a la pared.
Nota: limpie el área donde se colocará el
tocador (A) antes de comenzar con la
instalación permanente y asegúrese de que el
tocador (A) no interfiera con ningún suministro
de agua ni desagües una vez montado.
3. Con la ayuda de dos personas, coloque
cuidadosamente el tocador (A) contra la pared en
su ubicación definitiva. Mientras sostiene la base
del tocador firmemente contra la pared, use los
niveladores preensamblados en la parte inferior
de cada pata del tocador (A) para nivelar el
artículo. Si gira los niveladores en dirección
contraria a las manecillas del reloj aumentará la
altura del tocador (A); si los gira en dirección de
las manecillas del reloj disminuirá la altura del
tocador.
Una vez que el tocador esté en su lugar, contra
la pared, y nivelado de adelante hacia atrás y de
lado a lado, taladre un orificio a través del área de
montaje del tocador y en los montantes de la pared
(como se ilustra en el diagrama 3). Con los
aditamentos de montaje adecuados (no se incluyen),
fije el tocador (A) a un montante de la pared. Si es
posible, fije el tocador (A) a dos montantes de pared
para obtener mayor estabilidad.
3
1
2
A
2. Entre 2 personas, coloquen el tocador sobre
su parte posterior en una superficie plana que
no raye. Localice la pata de soporte central (N)
y atorníllela en la base del tocador. Una vez
que haya terminado, levante el tocador y
colóquelo en posición vertical.

18
INSTRUCCIONES DE INSTALACIÓN
5. Coloque masilla de calafateo de silicona (no se
incluye) en el lado inferior y sin pulir del
protector contra salpicaduras (C). Coloque el
protector contra salpicaduras (C) sobre la
cubierta (B) y pegado a la pared. Limpie
cualquier exceso de masilla de calafateo antes
de permitir que se seque.
Nota:
en esta etapa puede resultar más sencillo
instalar el grifo y kit de drenaje (no se incluye)
en la cubierta (B) según las instrucciones del
fabricante, antes de continuar con el paso 4.
4.
Coloque masilla de calafateo de silicona que
no mancha (no se incluye) en el borde
superior del tocador (A). Con la ayuda de
otro adulto, baje suavemente la cubierta (B)
sobre el tocador (A). Limpie cualquier exceso
de masilla de calafateo con un paño suave y
espere aproximadamente 24 horas para
que seque.
5
1
2
2
B
C
4
1
2
2
A
B

19
INSTRUCCIONES DE INSTALACIÓN
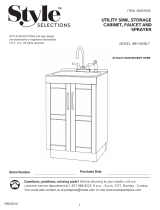
6. La parte posterior del tocador está abierta para
contar con accesibilidad a las conexiones de
drenajes y líneas de agua. Si la plomería sale
de la pared posterior, inserte la tapa de corte
de plomería del piso (I), como se muestra en
la Ilustración 6. Esto cerrará el orificio y
aumentará su espacio de almacenamiento.
Si la plomería sale del piso, este orificio brinda
accesibilidad para el drenaje y la conexión de
la línea de agua.
7.
Desde la parte delantera del ensamblaje,
coloque los soportes para estante a la
altura deseada y asegúrese de que queden
nivelados. Coloque el estante (H) en la parte
superior de los soportes para estante.
6
I
I
A
7
1
H
2

20
INSTRUCCIONES DE INSTALACIÓN
8. Si necesita ajustar las puertas, hágalo de la siguiente manera.
Para ajustar las puertas hacia arriba o abajo, afloje los tornillos (a) en ambas bisagras,
ajuste la puerta y vuelva a apretar los tornillos.
Para ajustar las puertas hacia la derecha o la izquierda, gire los tornillos en ambas bisagras
(b) hacia adentro y afuera.
Para ajustar las puertas hacia adentro o afuera, afloje los tornillos (c) en ambas bisagras,
ajuste la puerta y vuelva a apretar los tornillos.
9. Para retirar las gavetas preensambladas al
tocador (A), extiéndalas completamente.
Coloque las palancas de plástico en los rieles
de deslizamiento metálicos a los costados
izquierdo y derecho de la caja de la gaveta.
Para desconectar la caja de la gaveta de los
deslizadores, presione las palancas de plástico.
Luego, levante la gaveta suavemente para
retirarla del tocador (A).
8
2
2
2
2
2
2
b
1
1
c
1
c
3
a
1
a
3
9
A
1
2

21
INSTRUCCIONES DE INSTALACIÓN
PRECAUCIÓN
Repita el procedimiento con las gavetas restantes.
10. Para reinstalar las gavetas en el tocador (A),
extienda los rieles de deslizamiento metálicos
por completo. Baje con cuidado la gaveta y
deslícela hasta el cerrojo posterior de los rieles
deslizantes. A continuación, baje la caja de la
gaveta para que se asiente por completo sobre
los rieles deslizantes extendidos. Luego,
presione las palancas de plástico para asegurar
la caja de la gaveta en su lugar.
Nota: para regular la altura de la gaveta, gire la
rueda de ajuste a la izquierda para elevar la
caja de la gaveta o gire la rueda de ajuste a la
derecha para bajar la caja de la gaveta. Puede
regular la altura de los rieles de deslizamiento a
la izquierda y a la derecha independientemente
para encontrar la mejor posición de alineamiento
de las gavetas.
NO fuerce la gaveta, ya que puede dañar el riel
de deslizamiento. Si la gaveta no se desliza
fácilmente, retírela y vuelva a intentarlo desde
el principio.
10
A
3
2
1
11
E
11.
Abra suavemente la puerta basculante
superior (E).

22
INSTRUCCIONES DE INSTALACIÓN
Ya ha terminado el ensamblaje. Instale los
ensambles del grifo y el desagüe (no se
incluyen) según las instrucciones del fabricante
para completar la instalación.
12
E
12.
Empuje suavemente hacia arriba para cerrar la
puerta superior basculante (E).

23
CUIDADO Y MANTENIMIENTO
GARANTÍA
IMPORTANTE
• Limpie el tocador regularmente con un paño suave que no deje pelusas o con un producto de
limpieza doméstico.
• Puede limpiar el tocador con un limpiador doméstico suave no abrasivo.
• Asegúrese de secar la madera inmediatamente con un paño o una toalla suave.
• La cubierta de piedra se puede limpiar con limpiadores para mármol estándar disponibles en
su tienda local.
• Consejos para usar el aplicador de retoque (AA): para rayones, aplique en la dirección del rayón.
Frote el exceso de colorante rápidamente con un paño suave para retirarlo.
• La variación en el tono y diseño es una característica propia de la piedra (como en el caso del
granito, el mármol y la piedra procesada). Las cubiertas de piedra varían de un producto a otro.
Tenga cuidado al colocar artículos como jabón o cualquier material perfumado en la superficie
de piedra. Utilice una jabonera, un posavasos o un artículo similar para proteger la superficie al
colocar jabón o productos con alguna fragancia sobre la piedra.
• Si el jabón o los productos con alguna fragancia entran en contacto con la superficie de piedra,
enjuague el área con agua y seque usando un paño suave de material no abrasivo.
• ADVERTENCIA: se deben usar agentes de limpieza aptos para la piedra. Revise las
restricciones de uso de los agentes de limpieza antes de usar sobre cualquier piedra. Se
pueden producir daños a la piedra. El fabricante del tocador no es responsable de los daños
provocados por agentes de limpieza o jabones inadecuados utilizados. La garantía no cubrirá
los daños provocados por el uso de jabones o agentes de limpieza inadecuados.
• NO utilice productos que contengan acetona, limón, vinagre u otros ácidos para limpiar la parte
superior de piedra, ya que estos pueden dañar la superficie de piedra.
• Vuelva a sellar la cubierta de piedra de forma periódica con un sellador de piedra, disponible
en la tienda más cercana a su domicilio. Siga las instrucciones del fabricante sobre cómo aplicar
el artículo.
El fabricante garantiza que este artículo está libre de defectos en los materiales y la mano de obra
por un período de un (1) año a partir de la fecha de compra original. Esta garantía es válida solo
para el comprador original. Esta garantía no se aplica si el producto ha sido dañado por accidentes
o uso indebido, modificación o instalación incorrecta, o a causa de elementos accesorios que no
son del fabricante. El fabricante no será responsable por daños causados de limpiadores o jabones
que produzcan decapado o manchas en la cubierta de piedra. El fabricante no asume ningún tipo
de responsabilidad por la instalación del producto durante el período de garantía. No existe otro
tipo de garantía explícita. El fabricante no será legalmente responsable por daños accidentales,
especiales o resultantes que surjan o se relacionen con el uso o rendimiento del producto, excepto
que la ley indique lo contrario. El fabricante rechaza cualquiera y todas las garantías implícitas.

24
LISTA DE PIEZAS DE REPUESTO
Para obtener piezas de repuesto, llame a nuestro Departamento de Servicio al Cliente al
1-866-439-9800, de lunes a domingo de 8 a.m. a 8 p.m., hora estándar del Este. También puede
ponerse en contacto con nosotros en [email protected] o visitar www.lowespartsplus.com.
ALLEN + ROTH
y el diseño del logo son
marcas comerciales o marcas registradas de
LF, LLC. Todos los derechos reservados.
Impreso en Vietnam
AA Aplicador de retoque M-1128
M Frente de la gaveta inferior 1789VA-48-310-LOWER DRAWER FRONT
N Pata de soporte central 1789VA-48-310-C LEG
L Parte delantera de la gaveta central 1789VA-48-310-MID DRAWER FRONT
K Frente de la gaveta superior 1789VA-48-310-UPPER DRAWER FRONT
J Bandeja basculante 1789VA-48-310-TRAY
1789VA-BN HANDLE
T-1007
CC Tirador (con tornillo)
B1044
BB Pasador de repisa
DD
Nivelador
C-90-107
EE
PUDTC-14X3-HANDLEJuego de deslizadores de gavetaFF
Bisagra
PIEZA DESCRIPCIÓN PIEZA #
B
Puerta izquierda
1789VA-48-925 TOP
C 1789VA-48-925 BS
F 1789VA-48-310
DOOR SET
G Puerta derecha
H Estante 1789VA-48-310-SHELF
310 FP LID
I
Tapa de corte para plomería
del piso
Cubierta de mármol de
Carrara procesado 925
Protector contra salpicaduras
de Carrara procesado 925
D PU17-18X14-SQUARE
Lavabo
E 1789VA-48-310-TIP-OUT DOOR
Puerta basculante
B
F
I
H
E
J
C
D
M
K
L
G
N
BBAA CC DD EE FF
-
 1
1
-
 2
2
-
 3
3
-
 4
4
-
 5
5
-
 6
6
-
 7
7
-
 8
8
-
 9
9
-
 10
10
-
 11
11
-
 12
12
-
 13
13
-
 14
14
-
 15
15
-
 16
16
-
 17
17
-
 18
18
-
 19
19
-
 20
20
-
 21
21
-
 22
22
-
 23
23
-
 24
24


Allen + Roth 1789VA-48-310 Guía de instalación
- Tipo
- Guía de instalación
en otros idiomas
Artículos relacionados
-
Allen + Roth 1605VA-36-201-925 Guía de instalación
-
-
-
LF allen+roth Roveland 2026VA-36-200 Manual de usuario
-
allen+roth allen roth 1541VA-60-201-901 60-in White Undermount Double Sink Bathroom Vanity Manual de usuario
-
-
-
allen+roth allen roth 1483VA-48-201 48-In Vanity Manual de usuario
-
-
Otros documentos
-
Style Selections 1678VA-49-311-934 Manual de usuario
-
 Style Selections 1544VM-36-290 Guía de instalación
-
Eviva 2483VA-36-201 Instrucciones de operación
-
allen plus roth 46142TNXLG Manual de usuario
-
-
 Style Selections 1678VM-49-292 Guía de instalación
-
 Style Selections 1464VM-24-288 Guía de instalación
-
-
 Style Selections BV-8636LT Guía de instalación
-
Kobalt 19137 Manual de usuario


