Style Selections BV-8636LT Guía de instalación
- Categoría
- Artículos sanitarios
- Tipo
- Guía de instalación

ITEM #2807656
ATTACH YOUR RECEIPT HERE
Questions, problems, missing parts? Before returning to your retailer, call our
customer service department at 1-877-888-8225, 8 a.m. - 8 p.m., EST, Monday - Sunday.
You could also contact us at [email protected] or visit www.lowespartsplus.com.
Serial Number
Purchase Date
MODEL #BV-8636LT
1
UTILITY SINK, STORAGE
CABINET, FAUCET AND
SPRAYER
STYLE SELECTIONS and logo design
are trademarks or registered trademarks
of LF, LLC. All rights reserved.
RR20310

2
Package Contents .............................................................................................................................2-3
Hardware Contents ................................................................................................................................3
Safety Information ..................................................................................................................................4
Warning ..................................................................................................................................................4
Preparation .............................................................................................................................................4
Tools Required (Not included) ................................................................................................................4
Installation Instrucions .....................................................................................................................5-8
Care and Maintenance ...................................................................................................................9-10
Warranty ...............................................................................................................................................11
Replacement Parts List .......................................................................................................................12
TABLE OF CONTENTS
PACKAGE CONTENTS
B
Carefully check all components for damages and/or missing parts prior to installation. If there are any
damages or if you are missing parts, do not proceed with the installation. Report damages and/or
missing parts immediately to the manufacturer. Do not dispose of packaging before you are satisfied
with your new utility sink.
A
C

3
D
E
II
PACKAGE CONTENTS
Note: Hardware not shown to size.
HARDWARE CONTENTS
BB
AA
CC

4
SAFETY INFORMATION
TOOLS REQUIRED (NOT INCLUDED)
• Keep small parts away from children.
• Installing the item will require more than one person.
WARNING
Before beginning assembly of product, make sure all parts are present. Compare parts with package
contents list and hardware contents list. If any part is missing or damaged, do not attempt to assemble
the product.
Estimated Installation Time: 60 minutes
Tools and materials recommended for installation (not included): saw, hammer, variable speed drill,
tape measure, level, adjustable wrench, stud finder, lag bolts, screwdrivers (Phillips and flathead),
socket and ratchet (for lag bolts), toggle bolts (optional), clear silicone caulk/sealant (do not use
plumber’s putty).
PREPARATION
Please read and understand this entire manual before attempting to assemble, operate or install the
product.
Phillips
Screwdriver Utility Knife Sealant
Power Drill
With Drill Bit Measuring Tape Level

5
A thorough inspection must be made before
installation and any damages or missing parts must
be promptly reported. Do not proceed with the
installation. Do not dispose of packaging before you
are satisfied with your new sink.
1a. Unpack the unit and place the sink (B) on a
blanket or cardboard to protect the surface.
1b. Turn the cabinet (A) upside down onto the
protective surface.
1c. Gently attach the cabinet base (C) onto its proper
location. Using the supplied cabinet base screws
(AA), attach the base (C) to the cabinet (A).
1d. Gently place the cabinet upright.
CAUTION: Do not place side load onto
feet when righting the cabinet.
INSTALLA
TION INSTRUCTIONS
C
A
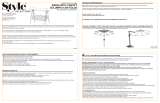
2a. Place a door pull (BB) over the pre-drilled holes
on the right door and secure to the door using the
included bolts.
2b. Repeat for remaining door pull (BB).
BB
Step 1: Installing the Base
Step 2: InstallingThe Door Pulls
1
2
AA

6
INSTALLATION INSTRUCTIONS
Before installing, carefully unpack the
faucet and ensure no parts are missing.
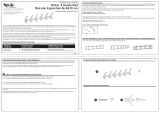
3a. Insert the sprayer housing support through
the pre-drilled hole in the sink corner. Screw the
nut onto the threads and hand tighten.
3b. Run the sprayer hose down through the
sprayer housing and up through the center faucet
mounting hole. Connect the spray hose to the
quick connection of faucet just by a simple push.
3c. Install the faucet in the sink with hot water
handle (marked with an H or red indicator) on the
left and cold water handle (marked with a C or blue
indicator) on the right. From under the sink, thread
mounting nuts and rubber gaskets onto the faucet
shanks and tighten the mounting nuts.
3d. Connect the water supply lines (not supplied) to
the faucet.
Sprayer and hose
Faucet
Faucet shank
Mounting nut
Sprayer housing support
Nut
Water Supply Lines
Step 3: Faucet and Sprayer Installation
3

7
INSTALLATION INSTRUCTIONS
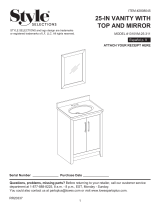
5a. Carefully place a bead of adhesive all around the
top of the cabinet.
5b. Ease the sink into the cabinet , ensuring that it is
placed evenly and is centered on the cabinet. Wipe
off any excess adhesive. Use masking tape to hold
the sink in place until the adhesive dries.
Step 4: Installing the Strainer
4
Step 5: Mounting the Sink
5
4
4a. Apply a ring of sealant (not included) to the underside
of the strainer flange.
4b. Insert the strainer body (2) into the sink.
4c. Assemble the rubber washer (3), the paper washer
(4) and locknut (5) onto the strainer body (2) from
underneath the sink.
4d. Hand tighten the locknut (5). Do not over tighten
the locknut as it may split or deform the strainer
body.
4e. Assemble the plastic joint (6) and connecting nut (7)
onto the strainer body (2) from underneath the sink.
4f. Insert the screener (1) into the strainer.

INSTALLATION INSTRUCTIONS
NOTE: Clean area where the cabinet will be
permanently located prior to beginning installation,
ensuring the cabinet will not interfere with any water
supply and drain lines once mounted.
6a. With the help of another adult, carefully place
cabinet against the wall in its final location.
6b. Find and mark locations of wall studs behind the
permanent location of cabinet.
6c.
From inside cabinet, drill hole through cabinet
mounting area into wall studs.
6d. Using mounting hardware (not included)
appropriate for your installation site, secure cabinet
to wall stud. If possible, secure cabinet to two wall
studs for increased stability.
WARNING:
Cabinet MUST be secured to wall studs.
NOTE: Use preassembled levelers on feet of
cabinet base to level the item. Twisting the levelers
counterclockwise will increase the height of cabinet base, twisting them clockwise will decrease it.
If you need to adjust the doors, do so in the
following manner.
7a. To adjust the door up or down, loosen screws
(a) on both hinges, adjust door, and retighten
screws.
7b. To adjust the door left or right, turn screws(b)
on both hinges, in or out.
7c. To adjust the door in or out, loosen screws (c)
on both hinges, adjust door, and retighten screws.
8
1
3
1
1
1
3
Step 6: Adjusting the Levelers
6
Step 7: Aligning the Doors
7

9
CARE AND MAINTENANCE
SINK
C
ABINET
Do
• After use, always rinse your sink with tap water to
dilute and remove deposits.
• Towel dry after use whenever possible to prevent
water spots. Should water spots occur, clean with
a mild solution of vinegar and water followed by a
thorough rinse.
• Use liquid soap, a general household cleaner, or a
weak solution of vinegar and water for regular
cleaning.
• Only use plastic scouring pads recommended for
use in stainless steel sinks, and only use them in
the bowl of the sink. Scrub in the direction of the
satin finish lines.
Do not
• Do not allow any food, detergent, soap or grease
to dry or sit for extended periods of time on the
surface of the sink.
• Never use abrasive cleaning products, as they
will dull and scratch the finish.
• Do not use scouring pads on the deck, as they
will dull the mirror finish.
• Never use steel wool pads, as they will leave iron
particles on the sink, which will cause corrosion.
• Never leave steel or cast iron pans in your sink
for extended periods of time, as this can cause
corrosion.
Do
• Remove dust and dry dirt with a soft, damp cloth.
• Clean grease, oil, paint and ink stains with
isopropyl (rubbing alcohol). Immediately rinse with
water after stain removal.
Do not
• Do not allow your cabinet surface to come into
contact with products such as acetone (nail polish
remover), nail polish, dry cleaning solution,
lacquer thinners, gasoline, pine oil, etc.
• Use caution when using sharp instruments that
may fall and scratch the surface.
This sink is manufactured with the highest grade stainless steel and will provide you many years of
enjoyment with the proper care.

10
Before installing, carefully unpack the faucet and
ensure
no parts are missing.
• Turn off the water supply to the faucet at the nearest
shut-off valve.
• Unscrew the handle (7) and remove water indicator (6).
• Remove handle (5) and screw (4) with a cross
screwdriver.
• Remove the handle seat (3) and unscrew cartridge
cover (2).
• Pull out the cartridge (1) by hand.
• Insert the new cartridge.
• Screw on the cartridge cover (2).Do not over tighten.
• Place the handle seat (3) over top and secure the
screw (4) with a cross screwdriver.
• Replace the handle (5) and water indicator (6), screw back the handle (7).
CARE AND MAINTENANCE
CARTRIDGE REPLACEMENT

11
WARRANTY
ONE YEAR LIMITED WARRANTY
A thorough inspection must be made before installation and any damage must be promptly reported.
We will not be liable for failures or damage that could have been discovered or avoided by proper
inspection and testing prior to installation. The manufacturer warrants this product to be free from
defects in materials or workmanship for one (1) year from the date of purchase. Proof of purchase
(original sales receipt) from the original consumer purchaser must be made available to the
manufacturer for all warranty claims. This warranty is non-transferable and shall be voided if the unit is
removed from its initial installation or if it is not installed following the manufacturer’s instructions. It
does not apply in the event of product damage due to the use of other than genuine Conglom Kitchen
& Bath replacement parts (replacement parts may be obtained by calling 1-877-888-8225, 8 a.m. - 8
p.m., EST, Monday -Sunday), installation error, abuse, misuse or improper care and maintenance
(whether performed by a plumber, contractor, service provider or member of the purchaser’s
household). The warranty excludes damage due to aggressive air or water conditions, harsh or
abrasive cleaners and/or materials. Under no circumstance shall we be held liable for personal injury or
property damage resulting from improper installation or use of this product. We will not be held liable
for inconvenience caused by loss of use of this product, costs incurred for labor or materials, removal
and installation of replacement units, or any other incidental or consequential damages. Costs relating
to obtaining access for repair or replacement are the responsibility of the user. Our obligation shall be
limited to the repair or replacement of a unit (at our discretion) that may prove, by our sole examination,
to be defective under normal use and service during the warranty period. Any failure of this product that
is not traceable to a defect in material or workmanship is not covered by this warranty. These non-
warrantable items include, but are not limited to:
WARRANTY CLAIM PROCEDURE
If a claimable defect occurs or replacement parts are needed, please contact our customer service team
at 1-877-888-8225, 8 a.m. - 8 p.m., EST, Monday - Sunday. You could also contact us at
[email protected] or visit www.lowespartsplus.com.
Before you make your call, please ensure that you have:
• Model number or description.
• Proof of sale.
• Details regarding the defect and/or part number.
• Name(s) and address(es) of the owner and/or installer.
• Improper installation not in accordance with manufacturer’s instructions.
• Dents and/or scratches incurred during shipping, handling, or installation.
• Change in colour or finish due to chemical usage.
• Damage caused by failure to follow care and cleaning guidelines, including damage caused by the use
of abrasive cleaners.
• Alterations made to the unit by the purchaser or installer.
• Damage caused by accidental impact, fire, flood, freezing, and normal wear.
• Bends and warping caused by forced connections, over-tightened fittings, and inadequate support
during installation.

12
AA BB CC EE D E II
H
G
REPLACEMENT PARTS LIST
p.m., EST,
For replacement parts, call our customer service department at 1-877-888-8225, 8 a.m. - 8
Monday - Sunday. You could also contact us at [email protected] or visit
www.lowespartsplus.com.
Printed in Vietnam
STYLE SELECTIONS and logo design are
trademarks or registered trademarks of LF,
LLC. All rights reserved.
B

ARTÍCULO #2807656
ADJUNTE SU RECIBO AQUÍ
¿Preguntas, problemas, piezas faltantes? Antes de volver a la tienda, llame a nuestro
Departamento de Servicio al Cliente al 1-877-888-8225, de lunes a domingo de 8 a.m. a
8 p.m., hora estándar del Este. También puede ponerse en contacto con nosotros en
[email protected] o visitar www.lowespartsplus.com.
MODELO #BV-8636LT
13
STYLE SELECTIONS y el diseño del logotipo
son marcas comerciales o marcas registradas
de LF, LLC. Todos los derechos reservados.
RR20310
LAVABO PARA USO GENERAL,
GABINETE DE ALMACENAMIENTO,
GRIFO Y ROCIADOR
Número de serie
Fecha de compra

14
Contenido del paquete ....................................................................................................................14-15
Aditamentos .........................................................................................................................................15
Información de seguridad .....................................................................................................................16
Advertencia ..........................................................................................................................................16
Preparación ..........................................................................................................................................16
Herramientas necesarias (no se incluyen) ...........................................................................................16
Instrucciones de instalación ............................................................................................................17-20
Cuidado y mantenimiento ...............................................................................................................21-22
Garantía ...............................................................................................................................................23
Lista de piezas de repuesto .................................................................................................................24
ÍNDICE
CONTENIDO DEL PAQUETE
B
Verifique detenidamente que ninguno de los componentes esté dañado o que no falte ninguna pieza
antes de la instalación. Si hay piezas dañadas o faltantes, no continúe con la instalación. Informe al
fabricante de inmediato sobre los daños y las piezas faltantes. No elimine el empaque antes de
estar satisfecho con su nuevo lavabo para uso general.
A
C

15
D
E
II
CONTENIDO DEL PAQUETE
Nota: los aditamentos no se muestran en tamaño real.
ADITAMENTOS
BB
AA
CC

16
HERRAMIENTAS NECESARIAS (NO SE INCLUYEN)
INFORMACIÓN DE SEGURIDAD
• Mantenga a los niños alejados de las piezas pequeñas.
• La instalación del artículo requiere más de una persona.
ADVERTENCIA
Antes de comenzar a ensamblar el producto, asegúrese de tener todas las piezas. Compare las
piezas con la lista del contenido del paquete y la lista del contenido de aditamentos. No intente
ensamblar el producto si falta alguna pieza o si estas están dañadas.
Tiempo de instalación estimado: 60 minutos
Herramientas y materiales necesarios para la instalación (no se incluyen): sierra, martillo, taladro de
velocidad variable, cinta métrica, nivel, llave inglesa ajustable, detector de vigas, pernos de cabeza
cuadrada, destornilladores (Phillips y de cabeza plana), dado y trinquete (para los pernos de cabeza
cuadrada), tornillos de fiador (opcionales), masilla de calafateo/sellador de silicona transparente (no
use masilla de plomero).
PREPARACIÓN
Lea y comprenda completamente este manual antes de intentar ensamblar, usar o instalar el producto.
Destornillador
Phillips Cuchillo para uso general
Sellador
Taladro eléctrico con broca Cinta métrica Nivel

17
INSTRUCCIONES DE INSTALACIÓN
C
A
BB
1
2
Se debe realizar una inspección minuciosa antes de la
instalación y se debe informar de inmediato cualquier
daño o pieza faltante. No continúe con la instalación.
No elimine el empaque antes de estar satisfecho con
su nuevo lavabo.
1a. Desempaque la unidad y coloque el lavabo
(B) sobre una manta o un cartón para proteger la
superficie.
1b. Coloque el gabinete (A) hacia abajo sobre
la superficie protectora.
1c. Coloque suavemente la base del gabinete (C) en
su ubicación adecuada. Con los tornillos de la
base del gabinete (AA) suministrados, fije la
base (C) al gabinete (A).
1d. Coloque con cuidado el gabinete en posición
vertical.
PRECAUCIÓN: no coloque cargas laterales
sobre los pies al enderezar el gabinete.
Paso 1: instalación de la base
2a. Coloque un tirador de puerta (BB) sobre los
orificios pretaladrados en la puerta derecha y
asegúrelo a la puerta con los pernos incluidos.
2b. Repita el procedimiento para el tirador de
puerta (BB) restante.
Paso 2: instalación de los tiradores de puerta
AA

18
INSTRUCCIONES DE INSTALACIÓN
Rociador y manguera
Grifo
Vástago del grifo
Tuerca de montaje
Soporte de la carcasa
del rociador
Tuerca
Líneas de suministro
de agua
3
Antes de instalar, desempaque el grifo con cuidado
y asegúrese de que no haya piezas faltantes
3a. Inserte el soporte de la carcasa del rociador a
través del orificio pretaladrado en la esquina del
lavabo. Enrosque la tuerca en las roscas y apriete
a mano.
3b. Pase la manguera del rociador hacia abajo a través
de la carcasa del rociador y hacia arriba a través
del orificio de montaje central del grifo. Conecte la
manguera rociadora a la conexión rápida del grifo
con solo presionar.
3c. Instale el grifo en el lavabo con la manija de agua
caliente (marcada con un indicador H o rojo) a la
izquierda y la manija de agua fría (marcada con una
C o un indicador azul) a la derecha. Desde debajo
del lavabo, enrosque las tuercas de montaje y los
empaques de goma en los vástagos del grifo y
apriete las tuercas de montaje.
3d. Conecte las tuberías de entrada de agua (no se
incluyen) al grifo.
Paso 3: instalación del grifo y del rociador

19
INSTRUCCIONES DE INSTALACIÓN
5a. Coloque con cuidado un cordón de adhesivo
alrededor de la parte superior del gabinete.
5b. Coloque el lavabo en el gabinete, asegurándose de
que esté colocado de manera uniforme y centrado
en el gabinete. Retire el exceso de adhesivo. Use
cinta protectora para mantener el lavabo en su lugar
hasta que el adhesivo se seque.
4
Paso 5: montaje del lavabo
5
Paso 4: instalación del colador
4a. Aplique un anillo de sellador (no se incluye) en la
parte inferior de la brida del colador.
4b. Inserte el cuerpo del colador (2) en el lavabo.
4c. Monte la arandela de goma (3), la arandela de
papel (4) y la contratuerca (5) en el cuerpo del
colador (2) desde debajo del lavabo.
4d. Apriete la contratuerca (5) a mano. No apriete
demasiado la contratuerca, ya que podría partirse o
deformar el cuerpo del colador.
4e. Ensamble la junta de plástico (6) y la tuerca de
conexión (7) en el cuerpo del colador (2)
desde abajo del lavabo.
4f. Inserte el controlador (1) en el colador.
4

INSTRUCCIONES DE INSTALACIÓN
NOTA: limpie el área donde se colocará el gabinete
antes de comenzar con la instalación permanente y
asegúrese de que el gabinete no interfiera con ningún
suministro de agua ni desagües una vez montado.
6a. Con ayuda de otro adulto, coloque con cuidado
el gabinete sobre la pared en su ubicación definitiva.
6b. Encuentre y marque la ubicación de las montantes
de pared detrás de la ubicación permanente del
gabinete.
6c. Desde el interior del gabinete, taladre un orificio a
través del área de montaje del gabinete en los
montantes de pared.
6d. Encuentre y marque la ubicación de las montantes de pared detrás de la ubicación permanente
del Con los aditamentos de montaje (no se incluyen) adecuados para su lugar de instalación,
asegure el gabinete al montante de pared. De ser posible, asegure el gabinete a dos montantes
de pared para obtener mayor estabilidad.
ADVERTENCIA:
El gabinete DEBE fijarse a los montantes de pared.
NOTA: utilice los niveladores preensamblados a las patas de la base del gabinete para nivelar el
artículo. Si gira los niveladores en dirección contraria a las manecillas del reloj, la altura de la base
del gabinete aumentará; si los gira en dirección de las manecillas del reloj, la altura disminuirá.
Si necesita ajustar las puertas, hágalo de la
siguiente manera.
7a. Para ajustar la puerta hacia arriba o hacia
abajo, afloje los tornillos (a) de ambas
bisagras, ajuste la puerta y vuelva a apretar
los tornillos.
7b. Para ajustar la puerta hacia la derecha o
hacia la izquierda, gire los tornillos (b) en
ambas bisagras hacia dentro o hacia afuera.
7c. Para ajustar la puerta hacia adentro o afuera,
afloje los tornillos (c) en ambas bisagras, ajuste
la puerta y vuelva a apretar los tornillos.
20
1
3
1
1
1
3
Paso 6: ajuste de los niveladores
6
Paso 7: alineación de las puertas
7

21
CUIDADO Y MANTENIMIENTO
FREGADERO GABINETE
Lo que se debe hacer
• Después de usar, siempre enjuague el lavabo con
agua del grifo para diluir y remover depósitos.
• Siempre que sea posible, seque con una toalla
después de usar para evitar manchas de agua. Si
aparecen manchas de agua, lave con una solución
suave de vinagre y agua y luego enjuague con
abundante agua.
• Use jabón líquido, un limpiador doméstico general
o una solución suave de vinagre y agua para una
limpieza regular.
• Solo use almohadillas abrasivas plásticas
recomendadas para uso en lavabos de acero
inoxidable y úselas solo en el tazón del lavabo.
Restriegue en dirección de las líneas de acabado
satinado.
• No deje que alimentos, detergente, jabón o grasa
se sequen o se queden por mucho tiempo en la
superficie del lavabo.
• Nunca use productos de limpieza abrasivos, ya
que pueden rayar y estropear el acabado.
• No use almohadillas abrasivas en el mostrador,
ya que pueden estropear el acabado espejado.
• Nunca use almohadillas de lana de acero, ya que
dejarán partículas de acero en el lavabo y
causarán corrosión.
• Nunca deje sartenes de acero o hierro fundido
en el lavabo por un tiempo prolongado, ya que
esto puede causar corrosión.
Lo que se debe hacer
• Retire el polvo y la suciedad seca con un paño
húmedo y suave.
• Limpie la grasa, el aceite, la pintura y las
manchas de tinta con alcohol isopropílico (alcohol
para frotar). Enjuague con agua inmediatamente
después de remover las manchas.
Lo que no se debe hacer
Lo que no se debe hacer
• No permita que la superficie del gabinete entre
en contacto con productos como acetona
(removedor de esmalte de uñas), esmalte de
uñas, solución de limpieza en seco, disolventes
de laca, gasolina, aceite de pino, etc.
• Tenga cuidado al usar instrumentos afilados
que puedan caer y rayar la superficie.
Este lavabo está fabricado con acero inoxidable de la mejor calidad y podrá disfrutarlo durante muchos
años con el cuidado adecuado.

22
Antes de la instalación, desempaque con cuidado el
grifo y asegúrese de que no falten piezas.
• Cierre el suministro de agua al grifo en la válvula de
cierre más cercana.
• Desatornille el mango (7) y retire el indicador de agua (6).
• Retire el mango (5) y el tornillo (4) con un destornillador
de cruz.
• Retire el asiento del mango (3) y desatornille la cubierta del
cartucho (2).
• Extraiga el cartucho (1) con la mano.
• Inserte el cartucho nuevo.
• Atornille la cubierta del cartucho (2). No apriete demasiado.
• Coloque el asiento del mango (3) sobre la parte superior y asegure el tornillo (4) con
un destornillador de cruz.
• Vuelva a colocar el mango (5) y el indicador de agua (6), atornille el mango (7).
CUIDADO Y MANTENIMIENTO
REEMPLAZO DEL CARTUCHO

23
GARANTÍA
UN AÑO DE GARANTÍA LIMITADA
Se debe realizar una inspección minuciosa antes de la instalación y cualquier daño se debe informar
de inmediato. No seremos responsables por fallas o daños que pudieran haber sido descubiertos o
evitados mediante una inspección y prueba adecuadas antes de la instalación. El fabricante garantiza
que este producto no presentará defectos en los materiales ni la mano de obra por un período de un
(1) año desde la fecha de compra. Debe presentarse el comprobante de compra (recibo de venta
original) del consumidor/comprador original al fabricante en cualquier caso de reclamación de
garantía. Esta garantía no es transferible y quedará anulada si la unidad se retira de su instalación
inicial o si no se instala siguiendo las instrucciones del fabricante. No se aplica en caso de daño del
producto debido al uso de piezas de repuesto que no sean genuinas de Conglom Kitchen & Bath (las
piezas de repuesto se pueden obtener llamando al 1-877-888-8225, de lunes a domingo de 8 a.m. a 8
p.m., hora estándar del Este), error de instalación, abuso, uso indebido o cuidado y mantenimiento
inadecuado (ya sea realizado por un plomero, contratista, proveedor de servicios o miembro de la
familia del comprador). La garantía excluye los daños a causa de condiciones de aire o agua
agresivas o del uso de productos de limpieza o materiales abrasivos. Bajo ninguna circunstancia
seremos responsables por lesiones personales o daños materiales que surjan producto de una
instalación o uso incorrectos de este producto. No seremos responsables de los inconvenientes
causados por la pérdida de uso de este producto, los costos incurridos por mano de obra o materiales,
la remoción e instalación de unidades de reemplazo o cualquier otro daño accidental o consecuente.
Los costos relacionados con la obtención de acceso para reparación o reemplazo son responsabilidad
del usuario. Nuestra obligación se limitará a la reparación o el reemplazo de una unidad (a nuestra
discreción) que, mediante nuestro único examen, pueda resultar defectuosa en condiciones normales
de uso y servicio durante el período de garantía. Cualquier falla de este producto que no sea atribuible
a un defecto de material o mano de obra no está cubierta por esta garantía. Estos artículos no
cubiertos por la garantía incluyen, pero no se limitan a:
PROCEDIMIENTO PARA EL RECLAMO DE LA GARANTÍA
Si ocurre un defecto reclamable o se necesitan piezas de repuesto, póngase en contacto con nuestro
equipo de servicio al cliente llamando al 1-877-888-8225, de lunes a domingo de 8 a.m. a 8 p.m., hora
estándar del Este. También puede ponerse en contacto con nosotros en partsplus@lowes.com o visitar
www.lowespartsplus.com.
Antes de realizar la llamada, asegúrese de tener:
• Número de modelo o descripción.
• Comprobante de venta.
• Detalles sobre el defecto o número de pieza.
• Nombres y direcciones del propietario o instalador.
• Instalación indebida que no está de acuerdo con las instrucciones del fabricante.
• Abolladuras o rayones incurridos durante el envío, la manipulación o la instalación.
• Cambio en el color o el acabado debido al uso de productos químicos.
• Daño causado por no seguir las pautas de cuidado y limpieza, incluido el daño causado por el uso de
limpiadores abrasivos.
• Modificaciones hechas a la unidad por el comprador o instalador.
• Daños causados por impacto accidental, incendio, inundación, congelación y desgaste normal.
• Dobleces y deformaciones causadas por conexiones forzadas, conectores demasiado apretados y
soporte inadecuado durante la instalación.

24
AA BB CC EE D E II
H
G
LISTA DE PIEZAS DE REPUESTO
Para obtener piezas de repuesto, llame a nuestro Departamento de Servicio al Cliente al 1-877-888-
8225, de lunes a domingo de 8 a.m. a 8 p.m., hora estándar del Este. También puede ponerse en
contacto con nosotros en partsplus@lowes.com o visitar www.lowespartsplus.com.
B
Impreso en Vietnam
STYLE SLECTIONS
TM
y el diseño del logotipo son marcas
comerciales o marcas registradas de LF, LLC. Todos los
derechos reservados.
-
 1
1
-
 2
2
-
 3
3
-
 4
4
-
 5
5
-
 6
6
-
 7
7
-
 8
8
-
 9
9
-
 10
10
-
 11
11
-
 12
12
-
 13
13
-
 14
14
-
 15
15
-
 16
16
-
 17
17
-
 18
18
-
 19
19
-
 20
20
-
 21
21
-
 22
22
-
 23
23
-
 24
24


Style Selections BV-8636LT Guía de instalación
- Categoría
- Artículos sanitarios
- Tipo
- Guía de instalación
en otros idiomas
Artículos relacionados
-
 Style Selections 49551TNXLG Manual de usuario
-
 Style Selections GSS00352B-1 Manual de usuario
-
Style Selections GCS00395A Manual de usuario
-
Style Selections 46319PHELG Manual de usuario
-
 Style Selections 46305PKXLG Manual de usuario
-
Style Selections 24146TNXLG Manual de usuario
-
 Style Selections 46323CHELG Manual de usuario
-
Style Selections 46321PKELG Manual de usuario
-
 Style Selections 1310VM-25-311 Guía de instalación
-
Style Selections SGY-GAR4 Manual de usuario


Otros documentos
-
allen+roth allen roth 1483VA-48-201 48-In Vanity Manual de usuario
-
DeLOCK 66547 Ficha de datos
-
Allen + Roth 1652VA-30-200 Guía de instalación
-
-
-
-
-
-
Kobalt SGY-AIR264 Manual de usuario
-
Westinghouse QL292 El manual del propietario