
VS82H 2-Port True 4K HDMI Splitter
www.aten.com
© Copyright 2019 ATEN
®
International Co., Ltd.
ATEN and the ATEN logo are trademarks of ATEN International Co., Ltd. All rights reserved. All
other trademarks are the property of their respective owners.
This product is RoHS compliant.
Part No. PAPE-1223-P50G Printing Date: 07/2019
2-Port True 4K HDMI Splitter
Quick Start Guide
VS82H
VS82H 2-Port True 4K HDMI Splitter
VS82H 2-Port True 4K HDMI Splitter
Support and Documentation Notice
All information, documentation, fi rmware, software utilities, and
specifi cations contained in this package are subject to change without
prior notifi cation by the manufacturer.
To reduce the environmental impact of our products, ATEN
documentation and software can be found online at
http://www.aten.com/download/
Technical Support
www.aten.com/support
이 기기는 업무용(A급) 전자파적합기기로서 판매자 또는 사용자는 이 점을 주의하시기 바라며,
가정외의 지역에서 사용하는 것을 목적으로 합니다.
EMC Information
FEDERAL COMMUNICATIONS COMMISSION INTERFERENCE
STATEMENT:
This equipment has been tested and found to comply with the
limits for a Class A digital device, pursuant to Part 15 of the
FCC Rules. These limits are designed to provide reasonable
protection against harmful interference when the equipment
is operated in a commercial environment. This equipment
generates, uses, and can radiate radio frequency energy and, if not installed and used in accordance
with the instruction manual, may cause harmful interference to radio communications. Operation of
this equipment in a residential area is likely to cause harmful interference in which case the user will be
required to correct the interference at his own expense.
FCC Caution: Any changes or modifi cations not expressly approved by the party responsible for
compliance could void the user's authority to operate this equipment.
Warning: Operation of this equipment in a residential environment could cause radio interference.
This device complies with Part 15 of the FCC Rules. Operation is subject to the following two
conditions: (1) this device may not cause harmful interference, and (2) this device must accept any
interference received, including interference that may cause undesired operation.
Scan for
more information
A
Hardware Review
B
Hardware Installation
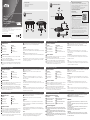
VS82H Front View VS82H Rear View
A
Hardware Review
Front View
1
Output Port 1 LED
2
HDMI Output Port 1
3
HDMI Output Port 2
4
Output Port 2 LED
B
Hardware Installation
1
Use a Male-to-Male Type A HDMI cable to connect your computer or HDMI
source device to VS82H’s HDMI input port.
2
Use up to two Male-to-Male Type A HDMI cables to connect up to two HDMI
display devices to the VS82H’s HDMI Output ports.
3
Plug one end of the supplied Micro-USB cable into VS82H’s Micro-USB Power
Port; plug the other end to a USB Type A port of a computer / laptop / power
adapter.
4
Use the instructions below to select EDID mode. EDID modes include Port 1 and Default.
Note: When a port is connected, its corresponding LED will light.
EDID Mode
Port 1
This mode applies the EDID data read from port 1 to all video sources.
For Port 1 Mode, connect an HDMI cable between VS82H’s HDMI Input Port 1 and a display.
Default
This mode applies Aten’s default EDID data to all video sources.
For Default Mode, disconnect any display currently connected to VS82H’s HDMI Input Port 1.
Note:
VS82H will detect the resolution of the monitor connected to port 1 of the installation.
If you would like to change the resolution, simply adjust the settings from the HDMI
source device confi guration menu.
Rear View
1
Input Port LED
2
HDMI Input Port
3
Power LED
4
Micro-USB Power Port
Package Contents
1 VS82H 2-Port True 4K HDMI Splitter
1 Micro-USB Cable
1 User Instructions
2 3
1 4
2
31
4
VS82H Front View
VS82H Rear View
Blu-ray player
2
3
1
Blu-ray player
2
3
1
ATEN VanCryst
™
Divisor HDMI 4K real de 2 puertos VS82H
www.aten.com
Répartiteur HDMI True 4K à 2 ports VS82H Splitter HDMI True 4K a 2 porte VS82H
VS82H 2-Port True 4K HDMI Splitter VS82H 2-портовый разветвитель True 4K HDMI
www.aten.com
www.aten.com
www.aten.com
www.aten.com
A
Description de l’appareil
Vue avant
1
DÈL du port de sortie 1
2
Port de sortie HDMI 1
3
Port de sortie HDMI 2
4
DÈL du port de sortie 2
B
Installation matérielle
1
Utilisez un câble HDMI Type A mâle à mâle pour relier votre ordinateur ou votre
appareil source HDMI au port d’entrée HDMI du VS82H.
2
Utilisez jusqu'à deux câbles HDMI Type A mâle à mâle pour connecter jusqu'à
deux périphériques d'affi chage HDMI aux ports de sortie HDMI du VS82H.
3
Branchez une extrémité du câble Micro-USB fourni dans le port d'alimentation
Micro-USB du VS82H ; branchez l'autre extrémité sur un port USB Type A d'un
ordinateur / notebook / adaptateur secteur.
4
Suivez les instructions ci-dessous pour sélectionner un mode EDID. Les modes EDID
incluent Port 1 et Par défaut.
Remarque : Lorsqu'un port est connecté, la DÉL correspondante s'allume.
Mode EDID
Port 1
Ce mode applique les données EDID lues depuis le port 1 vers la source vidéo.
Pour le mode Port 1, connectez un câble HDMI entre le port de sortie HDMI 1 du
VS82H et un affi chage.
Par défaut
Ce mode applique les données EDID par défaut d’Aten vers la source vidéo.
Pour le mode Par défaut, déconnectez tout affi chage actuellement connecté au port de
sortie HDMI 1 du VS82H.
Remarque :
Le VS82H détecte la résolution du moniteur connecté au port 1 de l’installation. Si vous
souhaitez modifi er la résolution, réglez simplement les paramètres depuis le menu de
confi guration de l’appareil source HDMI.
Vue arrière
1
DÈL du port d'entrée
2
Port d'entrée HDMI
3
DÈL d'alimentation
4
Port d'alimentation Micro-USB
A
Hardware Übersicht
Vorderseite
1
Ausgang Port 1 LED
2
HDMI Ausgang 1
3
HDMI Ausgang 2
4
Ausgang Port 2 LED
B
Hardware-Installation
1
Verbinden Sie Ihren Computer oder Ihr HDMI-Eingangsgerät über ein Stecker
auf Stecker Typ-A HDMI-Kabel mit dem HDMI-Eingang am VS82H.
2
Verwenden Sie bis zu zwei Stecker auf Stecker Typ-A HDMI-Kabel, um bis zu
zwei HDMI-Anzeigegeräte an die HDMI Ausgänge des VS82H anzuschließen.
3
Stecken Sie ein Ende des mitgelieferten Micro-USB Kabels in den Micro-USB
Stromanschluss des VS82H; schließen Sie das andere Ende an einen USB Typ-A
Anschluss eines Computers / Laptops / Netzteils an.
4
Verwenden Sie die folgenden Anweisungen, um einen EDID-Modus auszuwählen.
Die EDID-Modi sind Port 1 und Standard.
Hinweis: Wenn ein Port angeschlossen ist, leuchtet die entsprechende LED.
EDID-Modus
Port 1
Dieser Modus wendet die von Port 1 gelesenen EDID-Daten auf die Videoquelle an.
Verbinden Sie für den Modus Port 1 ein HDMI-Kabel zwischen dem HDMI-Ausgang 1
des VS82H und einem Monitor.
Standard
Dieser Modus wendet die Standard-EDID-Daten von Aten auf die Videoquelle an.
Für den Standardmodus trennen Sie jeden Monitor, die derzeit an den HDMI-Ausgang 1
des VS82H angeschlossen ist.
Hinweis:
Der VS82H erkennt die Aufl ösung des an Port 1 der Installation angeschlossenen
Monitors. Wenn Sie die Aufl ösung ändern möchten, passen Sie einfach die
Einstellungen im Konfi gurationsmenü des HDMI-Eingangsgerätes an.
Rückseite
1
Eingang-LED
2
HDMI Eingang
3
Netz-LED
4
Micro-USB Stromanschluss
A
Presentación del hardware
Vista frontal
1
LED de puerto de salida 1
2
Puerto de salida HDMI 1
3
Puerto de salida HDMI 2
4
LED de puerto de salida 2
B
Instalar el hardware
1
Utilice un cable HDMI de Tipo A macho-macho para conectar su PC o dispositivo
fuente HDMI al puerto de entrada HDMI del VS82H.
2
Use hasta dos cables HDMI de Tipo A macho-macho para conectar hasta dos
dispositivos de visualización HDMI a los puertos de salida HDMI del VS82H.
3
Conecte un extremo del cable Micro-USB incluido al puerto de alimentación
Micro-USB del VS82H; conecte el otro extremo a un puerto USB Tipo A de un
ordenador de sobremesa / portátil / adaptador de corriente.
4
Use las instrucciones que verá a continuación para seleccionar un modo EDID.
Los modos EDID incluyen el de puerto 1 y el predeterminado.
Nota: Cuando un puerto esté conectado, el LED correspondiente se encenderá.
Modo EDID
Puerto 1
Este modo aplica los datos EDID leídos desde el puerto 1 a la fuente de vídeo.
Para el modo puerto 1, conecte un cable HDMI entre el puerto de salida HDMI 1 del
VS82H y una pantalla.
Predeterminado
Este modo aplica los datos EDID predeterminados de Aten a la fuente de vídeo.
Para el modo predeterminado, desconecte cualquier pantalla conectada al puerto de
salida HDMI 1 del VS82H.
Nota:
VS82H detectará la resolución del monitor conectado al puerto 1 de la instalación.
Si desea cambiar la resolución, simplemente ajuste la confi guración desde el menú de
confi guración del dispositivo fuente HDMI.
Vista posterior
1
LED de puerto de entrada
2
Puerto de entrada HDMI
3
LED de alimentación
4
Puerto de alimentación Micro-USB
A
Panoramica hardware
Vista frontale
1
LED porta uscita 1
2
Porta uscita HDMI 1
3
Porta uscita HDMI 2
4
LED porta uscita 2
B
Installazione hardware
1
Utilizzare un cavo HDMI di tipo A maschio-maschio per collegare il computer o il
dispositivo sorgente HDMI alla porta di ingresso HDMI VS82H.
2
Usare fi no a 2 cavi HDMI di tipo A maschio-maschio per connettere fi no a due
dispositivo di visualizzazione HDMI alle porta di uscita HDMI del VS82H.
3
Collegare una estremità del cavo micro USB in dotazione alla porta di
alimentazione micro USB del VS82H; collegare l'altra estremità alla porta USB di
tipo A del computer / portatile / adattatore di alimentazione.
4
Usare le istruzioni di seguito per selezionare una modalità EDID. Le modalità EDID
includono Porta 1 e Predefi nito.
Nota: Quando è collegata una porta, il LED corrispondente si illumina.
Modalità EDID
Porta 1
Questa modalità si applica alla lettura dei dati EDID dalla porta 1 alla sorgente video.
Per la modalità Porta 1, collegare una cavo HDMI tra la porta uscita HDMI 1 del VS82H
e uno schermo.
Predefi nito
Questa modalità si applica ai dati EDID predefi niti di Aten alla sorgente video.
Per la modalità predefi nito, scollegare qualsiasi schermo collegato alla porta uscita
HDMI 1 del VS82H.
Nota:
VS82H rileva la risoluzione del monitor collegato alla porta 1 dell'installazione. Per
modifi care la risoluzione, basta regolare le impostazioni dal menu di confi gurazione del
dispositivo sorgente HDMI.
Vista posteriore
1
LED porta di ingresso
2
Porta ingresso HDMI
3
LED di accensione
4
Porta di alimentazione micro USB
A
Обзор аппаратного обеспечения
Вид спереди
1
Индикатор выходного разъема 1
2
Выходной разъем HDMI 1
3
Выходной разъем HDMI 2
4
Индикатор выходного разъема 2
B
Установка оборудования
1
Подключите компьютер или устройство-источник сигнала HDMI к входному
порту HDMI на VS82H кабелем HDMI Type A с двумя штекерными разъемами
(Male-to-Male).
2
К выходным разъемам HDMI разветвителя VS82H можно подключить два
устройства отображения HDMI с помощью двух кабелей HDMI со штекерами
Type A на обоих концах.
3
Один конец прилагаемого кабеля micro USB вставьте в разъем питания micro
USB разветвителя VS82H, а другой конец - в разъем USB Type A компьютера /
ноутбука / адаптера пи
тани
я.
4
Выберите режим EDID в соответствии с приведенными ниже инструкциями.
Режимы EDID: "Порт 1" и "По умолчанию".
Примечание: При подключении к разъему его индикатор загорится.
Режим EDID
Порт 1
В этом режиме данные EDID, считываемые с порта 1, применяются к источнику
видеосигнала.
Режим "Порт 1": HDMI-кабелем подключите дисплей к выходному разъему HDMI 1
разветвителя VS82H.
По умолчанию
В этом режиме стандартные данные EDID, установленные Aten, применяются к
источнику видеосигнала.
Режим "По умолчанию": отсоедините все дисплеи, подключенные сейчас к
выходному разъему HDMI 1 разветвителя VS82H.
Примечание:
VS82H определяет разрешение монитора, подключенного к порту 1 устройства.
Для смены разрешения отрегулируйте параметры в меню настройки устройства-
источника сигнала HDMI.
Вид сзади
1
Светодиодный индикатор входного порта
2
Входной разъем HDMI
3
Светодиодный индикатор питания
4
Разъем питания micro USB
La página se está cargando...
Transcripción de documentos
Package Contents B 1 VS82H 2-Port True 4K HDMI Splitter 1 Micro-USB Cable 1 User Instructions A ATEN VanCryst™ Support and Documentation Notice All information, documentation, firmware, software utilities, and specifications contained in this package are subject to change without prior notification by the manufacturer. To reduce the environmental impact of our products, ATEN documentation and software can be found online at http://www.aten.com/download/ Hardware Installation 2 Technical Support www.aten.com/support Hardware Review EMC Information VS82H Front View VS82H VS82H Front View VS82H Rear View 3 2-Port True 4K HDMI Splitter Quick Start Guide © Copyright 2019 ATEN® International Co., Ltd. ATEN and the ATEN logo are trademarks of ATEN International Co., Ltd. All rights reserved. All other trademarks are the property of their respective owners. This product is RoHS compliant. Part No. PAPE-1223-P50G 1 3 4 1 3 VS82H 2-Port True 4K HDMI Splitter www.aten.com A Hardware Review Rear View 4 Use the instructions below to select EDID mode. EDID modes include Port 1 and Default. Note: When a port is connected, its corresponding LED will light. 1 Output Port 1 LED 1 Input Port LED 2 HDMI Output Port 1 EDID Mode 2 HDMI Input Port 3 HDMI Output Port 2 3 Power LED 4 Output Port 2 LED 4 Micro-USB Power Port Port 1 This mode applies the EDID data read from port 1 to all video sources. For Port 1 Mode, connect an HDMI cable between VS82H’s HDMI Input Port 1 and a display. Default This mode applies Aten’s default EDID data to all video sources. For Default Mode, disconnect any display currently connected to VS82H’s HDMI Input Port 1. B Hardware Installation 1 Use a Male-to-Male Type A HDMI cable to connect your computer or HDMI source device to VS82H’s HDMI input port. 2 Use up to two Male-to-Male Type A HDMI cables to connect up to two HDMI display devices to the VS82H’s HDMI Output ports. 3 Plug one end of the supplied Micro-USB cable into VS82H’s Micro-USB Power Port; plug the other end to a USB Type A port of a computer / laptop / power adapter. Note: VS82H will detect the resolution of the monitor connected to port 1 of the installation. If you would like to change the resolution, simply adjust the settings from the HDMI source device configuration menu. A Description de l’appareil www.aten.com 4 Suivez les instructions ci-dessous pour sélectionner un mode EDID. Les modes EDID Vue arrière 1 DÈL du port de sortie 1 1 DÈL du port d'entrée 2 Port de sortie HDMI 1 2 Port d'entrée HDMI 3 Port de sortie HDMI 2 3 DÈL d'alimentation 4 DÈL du port de sortie 2 4 Port d'alimentation Micro-USB B Installation matérielle 1 Utilisez un câble HDMI Type A mâle à mâle pour relier votre ordinateur ou votre appareil source HDMI au port d’entrée HDMI du VS82H. 2 Utilisez jusqu'à deux câbles HDMI Type A mâle à mâle pour connecter jusqu'à deux périphériques d'affichage HDMI aux ports de sortie HDMI du VS82H. 3 Branchez une extrémité du câble Micro-USB fourni dans le port d'alimentation Micro-USB du VS82H ; branchez l'autre extrémité sur un port USB Type A d'un ordinateur / notebook / adaptateur secteur. incluent Port 1 et Par défaut. Remarque : Lorsqu'un port est connecté, la DÉL correspondante s'allume. Mode EDID Port 1 Ce mode applique les données EDID lues depuis le port 1 vers la source vidéo. Pour le mode Port 1, connectez un câble HDMI entre le port de sortie HDMI 1 du VS82H et un affichage. Par défaut Ce mode applique les données EDID par défaut d’Aten vers la source vidéo. Pour le mode Par défaut, déconnectez tout affichage actuellement connecté au port de sortie HDMI 1 du VS82H. Remarque : Le VS82H détecte la résolution du moniteur connecté au port 1 de l’installation. Si vous souhaitez modifier la résolution, réglez simplement les paramètres depuis le menu de configuration de l’appareil source HDMI. VS82H 2-Port True 4K HDMI Splitter www.aten.com A Hardware Übersicht Vorderseite 4 Verwenden Sie die folgenden Anweisungen, um einen EDID-Modus auszuwählen. Rückseite 1 Ausgang Port 1 LED 1 Eingang-LED 2 HDMI Ausgang 1 2 HDMI Eingang 3 HDMI Ausgang 2 3 Netz-LED 4 Ausgang Port 2 LED 4 Micro-USB Stromanschluss B Hardware-Installation 1 Verbinden Sie Ihren Computer oder Ihr HDMI-Eingangsgerät über ein Stecker auf Stecker Typ-A HDMI-Kabel mit dem HDMI-Eingang am VS82H. 2 Verwenden Sie bis zu zwei Stecker auf Stecker Typ-A HDMI-Kabel, um bis zu zwei HDMI-Anzeigegeräte an die HDMI Ausgänge des VS82H anzuschließen. 3 Stecken Sie ein Ende des mitgelieferten Micro-USB Kabels in den Micro-USB Stromanschluss des VS82H; schließen Sie das andere Ende an einen USB Typ-A Anschluss eines Computers / Laptops / Netzteils an. Blu-ray player Die EDID-Modi sind Port 1 und Standard. Hinweis: Wenn ein Port angeschlossen ist, leuchtet die entsprechende LED. EDID-Modus Port 1 Dieser Modus wendet die von Port 1 gelesenen EDID-Daten auf die Videoquelle an. Verbinden Sie für den Modus Port 1 ein HDMI-Kabel zwischen dem HDMI-Ausgang 1 des VS82H und einem Monitor. Standard Dieser Modus wendet die Standard-EDID-Daten von Aten auf die Videoquelle an. Für den Standardmodus trennen Sie jeden Monitor, die derzeit an den HDMI-Ausgang 1 des VS82H angeschlossen ist. Hinweis: Der VS82H erkennt die Auflösung des an Port 1 der Installation angeschlossenen Monitors. Wenn Sie die Auflösung ändern möchten, passen Sie einfach die Einstellungen im Konfigurationsmenü des HDMI-Eingangsgerätes an. FEDERAL COMMUNICATIONS COMMISSION INTERFERENCE STATEMENT: This equipment has been tested and found to comply with the limits for a Class A digital device, pursuant to Part 15 of the FCC Rules. These limits are designed to provide reasonable protection against harmful interference when the equipment is operated in a commercial environment. This equipment generates, uses, and can radiate radio frequency energy and, if not installed and used in accordance with the instruction manual, may cause harmful interference to radio communications. Operation of this equipment in a residential area is likely to cause harmful interference in which case the user will be required to correct the interference at his own expense. FCC Caution: Any changes or modifications not expressly approved by the party responsible for compliance could void the user's authority to operate this equipment. Warning: Operation of this equipment in a residential environment could cause radio interference. This device complies with Part 15 of the FCC Rules. Operation is subject to the following two conditions: (1) this device may not cause harmful interference, and (2) this device must accept any interference received, including interference that may cause undesired operation. 이 기기는 업무용(A급) 전자파적합기기로서 판매자 또는 사용자는 이 점을 주의하시기 바라며, 1 가정외의 지역에서 사용하는 것을 목적으로 합니다. Divisor HDMI 4K real de 2 puertos VS82H A Presentación del hardware Vista frontal www.aten.com 4 Use las instrucciones que verá a continuación para seleccionar un modo EDID. Vista posterior 1 LED de puerto de salida 1 1 LED de puerto de entrada 2 Puerto de salida HDMI 1 2 Puerto de entrada HDMI 3 Puerto de salida HDMI 2 3 LED de alimentación 4 LED de puerto de salida 2 4 Puerto de alimentación Micro-USB B Instalar el hardware 1 Utilice un cable HDMI de Tipo A macho-macho para conectar su PC o dispositivo fuente HDMI al puerto de entrada HDMI del VS82H. 2 Use hasta dos cables HDMI de Tipo A macho-macho para conectar hasta dos dispositivos de visualización HDMI a los puertos de salida HDMI del VS82H. 3 Conecte un extremo del cable Micro-USB incluido al puerto de alimentación Micro-USB del VS82H; conecte el otro extremo a un puerto USB Tipo A de un ordenador de sobremesa / portátil / adaptador de corriente. VS82H 2-Port Répartiteur HDMI TrueTrue 4K HDMI 4K à 2Splitter ports VS82H Vue avant VS82H Rear View 4 2 Printing Date: 07/2019 Front View 2 Scan for more information Los modos EDID incluyen el de puerto 1 y el predeterminado. Nota: Cuando un puerto esté conectado, el LED correspondiente se encenderá. Modo EDID Puerto 1 Este modo aplica los datos EDID leídos desde el puerto 1 a la fuente de vídeo. Para el modo puerto 1, conecte un cable HDMI entre el puerto de salida HDMI 1 del VS82H y una pantalla. Predeterminado Este modo aplica los datos EDID predeterminados de Aten a la fuente de vídeo. Para el modo predeterminado, desconecte cualquier pantalla conectada al puerto de salida HDMI 1 del VS82H. Nota: VS82H detectará la resolución del monitor conectado al puerto 1 de la instalación. Si desea cambiar la resolución, simplemente ajuste la configuración desde el menú de configuración del dispositivo fuente HDMI. Splitter HDMI True 4K a 2 porte VS82H A Panoramica hardware Vista frontale www.aten.com 4 Usare le istruzioni di seguito per selezionare una modalità EDID. Le modalità EDID Vista posteriore 1 LED porta uscita 1 1 LED porta di ingresso 2 Porta uscita HDMI 1 2 Porta ingresso HDMI 3 Porta uscita HDMI 2 3 LED di accensione 4 LED porta uscita 2 4 Porta di alimentazione micro USB B Installazione hardware 1 Utilizzare un cavo HDMI di tipo A maschio-maschio per collegare il computer o il dispositivo sorgente HDMI alla porta di ingresso HDMI VS82H. 2 Usare fino a 2 cavi HDMI di tipo A maschio-maschio per connettere fino a due dispositivo di visualizzazione HDMI alle porta di uscita HDMI del VS82H. 3 Collegare una estremità del cavo micro USB in dotazione alla porta di alimentazione micro USB del VS82H; collegare l'altra estremità alla porta USB di tipo A del computer / portatile / adattatore di alimentazione. includono Porta 1 e Predefinito. Nota: Quando è collegata una porta, il LED corrispondente si illumina. Modalità EDID Porta 1 Questa modalità si applica alla lettura dei dati EDID dalla porta 1 alla sorgente video. Per la modalità Porta 1, collegare una cavo HDMI tra la porta uscita HDMI 1 del VS82H e uno schermo. Predefinito Questa modalità si applica ai dati EDID predefiniti di Aten alla sorgente video. Per la modalità predefinito, scollegare qualsiasi schermo collegato alla porta uscita HDMI 1 del VS82H. Nota: VS82H rileva la risoluzione del monitor collegato alla porta 1 dell'installazione. Per modificare la risoluzione, basta regolare le impostazioni dal menu di configurazione del dispositivo sorgente HDMI. VS82H 2-портовый разветвитель True 4K HDMI A Обзор аппаратного обеспечения Вид спереди 1 Индикатор выходного разъема 1 Вид сзади 1 Светодиодный индикатор входного порта 2 Выходной разъем HDMI 1 2 Входной разъем HDMI 3 Выходной разъем HDMI 2 3 Светодиодный индикатор питания 4 Индикатор выходного разъема 2 4 Разъем питания micro USB B Установка оборудования 1 Подключите компьютер или устройство-источник сигнала HDMI к входному порту HDMI на VS82H кабелем HDMI Type A с двумя штекерными разъемами (Male-to-Male). 2 К выходным разъемам HDMI разветвителя VS82H можно подключить два устройства отображения HDMI с помощью двух кабелей HDMI со штекерами Type A на обоих концах. 3 Один конец прилагаемого кабеля micro USB вставьте в разъем питания micro USB разветвителя VS82H, а другой конец - в разъем USB Type A компьютера / ноутбука / адаптера питания. www.aten.com 4 Выберите режим EDID в соответствии с приведенными ниже инструкциями. Режимы EDID: "Порт 1" и "По умолчанию". Примечание: При подключении к разъему его индикатор загорится. Режим EDID Порт 1 В этом режиме данные EDID, считываемые с порта 1, применяются к источнику видеосигнала. Режим "Порт 1": HDMI-кабелем подключите дисплей к выходному разъему HDMI 1 разветвителя VS82H. По умолчанию В этом режиме стандартные данные EDID, установленные Aten, применяются к источнику видеосигнала. Режим "По умолчанию": отсоедините все дисплеи, подключенные сейчас к выходному разъему HDMI 1 разветвителя VS82H. Примечание: VS82H определяет разрешение монитора, подключенного к порту 1 устройства. Для смены разрешения отрегулируйте параметры в меню настройки устройстваисточника сигнала HDMI.-
 1
1
-
 2
2


en otros idiomas
- français: ATEN VS82H Guide de démarrage rapide
- italiano: ATEN VS82H Guida Rapida
- English: ATEN VS82H Quick start guide
- Deutsch: ATEN VS82H Schnellstartanleitung
- русский: ATEN VS82H Инструкция по началу работы
- português: ATEN VS82H Guia rápido
- polski: ATEN VS82H Skrócona instrukcja obsługi
- 日本語: ATEN VS82H クイックスタートガイド
- Türkçe: ATEN VS82H Hızlı başlangıç Kılavuzu
Artículos relacionados
-
ATEN VS82H Guía de inicio rápido
-
ATEN VS0110HA Guía de inicio rápido
-
-
-
ATEN VS1814T Guía de inicio rápido
-
ATEN VS1808T-AT-U Guía de inicio rápido
-
ATEN VE803-AT-U Guía de inicio rápido
-
-
ATEN VC010 Guía de inicio rápido
-
ATEN VS184A Guía de inicio rápido