
Активный оптический кабель True 4K HDMI 2.0 VE7832/VE7833/VE7834/VE7835
www.aten.com
A
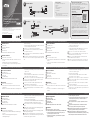
Обзороборудования
1
Вход HDMI (источник)
2
Переходник Micro HDMI - HDMI
3
Порт Micro USB
4
Выход HDMI (экран)
Примечание. Переходник Micro HDMI - HDMI съемный.
B
Установка
1
Подсоедините кабель к устройству-источнику.
a. Снимите переходник micro HDMI - HDMI с входного разъема HDMI кабеля.
b. Закройте входной разъем кабеля (HDMI In) в инструмент для
протяжки, входящий в комплект поставки.
c. Прикрепите нить к инструменту и протяните кабель через канал к
устройству-источнику.
d. Снимите инструмент для протяжки.
e. Обратно закрепите переходник HDMI - HDMI к входному разъему
HDMI и закрепите полученный узел с помощью входящего в
комплект поставки болта.
2
Чтобы подсоединить кабель к устройству отображения, выполните
шаги 1a - 1e.
3
Подсоедините входной разъем HDMI с обозначением SOURCE к
выходному порту HDMI на своем устройстве отображения.
4
Подсоедините выходной разъем HDMI с обозначением DISPLAY к
входному порту HDMI на своем устройстве отображения.
5
Если видео не отображается, подведите дополнительное питание,
Подсоединитв активный оптический кабель HDMI к устройству-источнику с
помощью входящего в комплект поставки кабеля micro USB - USB.
Cavo ottico True 4K HDMI 2.0 attivo VE7832/VE7833/VE7834/VE7835 HDMI 2.0
www.aten.com
A
Revisione Hardware
1
HDMI In (sorgente)
2
Adattatore da Micro HDMI a HDMI
3
Porta Micro USB
4
HDMI Out (display)
Nota: L'adattatore da Micro HDMI a HDMI è removibile.
B
Installazione
1
Avvitare il cavo al dispositivo sorgente.
a. Rimuovere l'adattatore da micro HDMI a HDMI sul connettore HDMI In
del cavo.
b. Schermare il connettore HDMI IN con lo strumento di cablaggio in
dotazione.
c. Fissare una fi lettatura all'attrezzo di cablaggio e tirare il cavo attraverso un
condotto verso il dispositivo sorgente.
d. Rimuovere l'attrezzo di cablaggio.
e. Inserire l'adattatore da micro HDMI a HDMI nel connettore HDMI In e
fi ssare il gruppo con la vite in dotazione.
2
Seguire i passi da 1a a 1e per collegare il cavo al dispositivo di visualizzazione.
3
Collegare il connettore HDMI In, indicato con SOURCE, alla porta HDMI Out
del dispositivo sorgente video.
4
Collegare il connettore HDMI Out, indicato con DISPLAY, alla porta HDMI In
del dispositivo di visualizzazione.
5
Se il video non viene visualizzato, alimentare l'alimentazione supplementare
collegando il cavo ottico attivo HDMI al dispositivo sorgente utilizzando il cavo
micro USB a USB in dotazione.
Cable óptico activo HDMI 2.0 de 4K reales VE7832/VE7833/VE7834/VE7835
www.aten.com
A
Revisión del hardware
1
Entrada HDMI (fuente)
2
Adaptador Micro HDMI a HDMI
3
Puerto Micro USB
4
Salida HDMI (pantalla)
Nota: El adaptador Micro HDMI a HDMI es extraíble.
B
Instalación
1
Pase el cable hacia el dispositivo fuente.
a. Quite el adaptador micro HDMI a HDMI del conector de entrada HDMI
del cable.
b. Cubra el conector de entrada HDMI con la herramienta de cableado
suministrada.
c. Ate un cordón a la herramienta de cableado y tire del cable a través del
conducto hacia el dispositivo fuente.
d. Retire la herramienta de cableado.
e. Enchufe el adaptador micro HDMI a HDMI de nuevo en el conector de
entrada HDMI y fi je el montaje con el tornillo suministrado.
2
Siga los pasos 1a a 1e para pasar el cable al dispositivo de pantalla.
3
Conecte el conector de entrada HDMI, indicado con SOURCE, al puerto de
salida HDMI de su dispositivo de fuente de vídeo.
4
Conecte el conector de salida HDMI, indicado con DISPLAY, al puerto de
entrada HDMI de su dispositivo de pantalla.
5
Si el vídeo no se muestra, suministre más alimentación conectando el cable
óptico activo HDMI al dispositivo fuente usando el cable micro USB a USB.
VE7832/VE7833/VE7834/VE7835 Aktives optisches True-4K-HDMI-2.0-Kabel
www.aten.com
A
Hardware Übersicht
1
HDMI-Eingang (Quelle)
2
Micro-HDMI auf HDMI Adapter
3
Micro-USB Anschluss
4
HDMI-Ausgang (Display)
Hinweis: Der Micro-HDMI auf HDMI Adapter ist abnehmbar.
B
Installation
1
Fädeln Sie das Kabel in das Quellgerät ein.
a. Entfernen Sie den Micro-HDMI auf HDMI Adapter am HDMI-Eingang
des Kabels.
b. Schirmen Sie den HDMI-Eingang mit dem mitgelieferten
Verdrahtungswerkzeug ab.
c. Binden Sie ein Gewinde an das Verdrahtungswerkzeug und ziehen Sie das
Kabel durch eine Leitung zum Quellgerät.
d. Entfernen Sie das Verdrahtungswerkzeug.
e. Stecken Sie den Micro-HDMI auf HDMI Adapter wieder in den HDMI-Eingang
und befestigen Sie die Baugruppe mit der mitgelieferten Schraube.
2
Führen Sie die Schritte 1a bis 1e aus, um das Kabel zum Anzeigegerät zu
führen.
3
Verbinden Sie den mit SOURCE gekennzeichneten HDMI-Eingang mit dem
HDMI-Ausgang an Ihrem Videoquellgerät.
4
Verbinden Sie den mit DISPLAY gekennzeichneten HDMI-Ausgang mit dem
HDMI-Eingang Ihres Anzeigegeräts.
5
Wenn das Video nicht angezeigt wird, stellen Sie zusätzliche Energie bereit,
indem Sie das aktive optische HDMI-Kabel mit dem mitgelieferten Micro-USB
auf USB Kabel an das Quellgerät anschließen.
Câble optique actif HDMI 2.0 4K authentique VE7832/VE7833/VE7834/VE7835
www.aten.com
A
Présentation du matériel
1
Entrée HDMI (Source)
2
Adaptateur Micro HDMI vers HDMI
3
Port Micro USB
4
Sortie HDMI (Affi chage)
Remarque : L'adaptateur Micro HDMI vers HDMI est amovible.
B
Installation
1
Enfi lez le câble sur le périphérique source.
a. Retirez l'adaptateur micro HDMI vers HDMI du connecteur d'entrée
HDMI du câble.
b. Blindez le connecteur d'entrée HDMI à l'aide de l'outil de câblage fourni.
c. Fixez un fi letage à l'outil de câblage et tirez le câble à travers un conduit sur
l'appareil source.
d. Retirez l'outil de câblage.
e. Rebranchez l'adaptateur micro HDMI vers HDMI sur le connecteur d'entrée
HDMI et fi xez l'ensemble à l'aide de la vis fournie.
2
Suivez les étapes 1a à 1e pour enfi ler le câble sur le périphérique d'affi chage.
3
Connectez le connecteur d'entrée HDMI, indiqué par SOURCE, au port de
sortie HDMI de votre périphérique source vidéo.
4
Connectez le connecteur de sortie HDMI, indiqué par DISPLAY, au port
d'entrée HDMI de votre périphérique d'affi chage.
5
Si la vidéo ne s'affi che pas, ajoutez une alimentation en connectant le câble
optique actif HDMI au périphérique source à l'aide du câble micro USB vers
USB fourni.
VE7832/VE7833/VE7834/VE7835 True 4K HDMI 2.0 Active Optical Cable
www.aten.com
A
Hardware Review
1
HDMI In (Source)
2
Micro HDMI to HDMI Adapter
3
Micro USB Port
4
HDMI Out (Display)
Note: The Micro HDMI to HDMI Adapter is removable.
B
Hardware Installation
1
Thread the cable to the source device.
a. Remove the micro HDMI to HDMI adapter on the HDMI In connector of
the cable.
b. Shield the HDMI In connector with the supplied wiring tool.
c. Tie a thread to the wiring tool and pull the cable through a conduit to
the source device.
d. Remove the wiring tool.
e. Plug the micro HDMI to HDMI adapter back to the HDMI In connector and
secure the assembly with the supplied screw.
2
Follow steps 1a to 1e to thread the cable to the display device.
3
Connect the HDMI In connector, indicated with SOURCE, to the HDMI Out
port on your video source device.
4
Connect the HDMI Out connector, indicated with DISPLAY, to the HDMI In port
on your display device.
5
If the video does not display, supply additional power by connecting the HDMI
active optical cable to the source device using the provided micro USB to USB
cable.
A
B
Hardware Review
Installation
© Copyright 2019 ATEN
®
International Co., Ltd.
ATEN and the ATEN logo are trademarks of ATEN International Co., Ltd. All rights reserved. All
other trademarks are the property of their respective owners.
This product is RoHS compliant.
Part No. PAPE-1223-M10G Printing Date: 03/2019
True 4K HDMI 2.0 Active Optical Cable
Quick Start Guide
VE7832/VE7833/VE7834/VE7835
ATEN VanCryst
™
Package Contents
1 True 4K HDMI 2.0 Active Optical Cable
1 Wiring Tool
2 Screws
1 Micro USB to USB Cable
2
1 Installation Notice
1 User Instructions
Note:
1. The AOC cables differ in length: VE7832 (15m), VE7833 (30m),
VE7834 (60m), VE7835 (100m).
2. The package of VE7835 includes 2 Micro USB to USB Cables
Support and Documentation Notice
All information, documentation, fi rmware, software utilities, and
specifi cations contained in this package are subject to change without
prior notifi cation bythe manufacturer.
To reduce the environmental impact of our products, ATEN
documentation and software can be found online at
http://www.aten.com/download/
Technical Support
www.aten.com/support
이 기기는 업무용(A급) 전자파적합기기로서 판매자 또는 사용자는 이 점을 주의하시기 바라며,
가정외의 지역에서 사용하는 것을 목적으로 합니다.
EMC Information
FEDERAL COMMUNICATIONS COMMISSION
INTERFERENCE STATEMENT:
This equipment has been tested and found to comply
with the limits for a Class A digital device, pursuant
to Part 15 of the FCC Rules. These limits are designed
to provide reasonable protection against harmful
interference when the equipment is operated in a
commercial environment. This equipment generates,
uses, and can radiate radio frequency energy and, if not installed and used in accordance
with the instruction manual, may cause harmful interference to radio communications.
Operation of this equipment in a residential area is likely to cause harmful interference in
which case the user will be required to correct the interference at his own expense.
FCC Caution: Any changes or modifi cations not expressly approved by the party
responsible for compliance could void the user's authority to operate this equipment.
Warning: Operation of this equipment in a residential environment could cause radio
interference.
This device complies with Part 15 of the FCC Rules. Operation is subject to the following
two conditions:(1) this device mat not cause harmful interference, and(2) this device
must accept any interference received, including interference that may cause undesired
operation.
Scan for
more information
SOURCE
1a
1b
1c
SOURCE
True 4K HDMI 2.0
Active Optical Cable
Thread
Micro HDMI to HDMI Adapter
Wiring Tool
SOURCE
DISPLAY
1
2
2
4
3
3
Transmitter Receiver
Fiber Extension
Display
Source Device
SOURCE
DISPLAY
4
3
5
La página se está cargando...
Transcripción de documentos
A Hardware Review 1 2 2 4 3 SOURCE DISPLAY B True 4K HDMI 2.0 Active Optical Cable Quick Start Guide 1a Installation True 4K HDMI 2.0 Active Optical Cable 3 SOURCE © Copyright 2019 ATEN® International Co., Ltd. ATEN and the ATEN logo are trademarks of ATEN International Co., Ltd. All rights reserved. All other trademarks are the property of their respective owners. Part No. PAPE-1223-M10G Transmitter 1b SOURCE 4 5 VE7832/VE7833/VE7834/VE7835 True 4K HDMI 2.0 Active Optical Cable 1 HDMI In (Source) 4 HDMI Out (Display) Note: The Micro HDMI to HDMI Adapter is removable. B Hardware Installation 2 3 4 5 1 Thread the cable to the source device. a. Remove the micro HDMI to HDMI adapter on the HDMI In connector of the cable. b. Shield the HDMI In connector with the supplied wiring tool. c. Tie a thread to the wiring tool and pull the cable through a conduit to the source device. Câble optique actif HDMI 2.0 4K authentique VE7832/VE7833/VE7834/VE7835 1 Entrée HDMI (Source) 2 Adaptateur Micro HDMI vers HDMI 3 Port Micro USB Remarque : L'adaptateur Micro HDMI vers HDMI est amovible. B Installation 2 3 4 1 Enfilez le câble sur le périphérique source. a. Retirez l'adaptateur micro HDMI vers HDMI du connecteur d'entrée HDMI du câble. b. Blindez le connecteur d'entrée HDMI à l'aide de l'outil de câblage fourni. 5 VE7832/VE7833/VE7834/VE7835 Aktives optisches True-4K-HDMI-2.0-Kabel 1 HDMI-Eingang (Quelle) 2 Micro-HDMI auf HDMI Adapter 3 Micro-USB Anschluss Hinweis: Der Micro-HDMI auf HDMI Adapter ist abnehmbar. B Installation 1 Fädeln Sie das Kabel in das Quellgerät ein. a. Entfernen Sie den Micro-HDMI auf HDMI Adapter am HDMI-Eingang des Kabels. b. Schirmen Sie den HDMI-Eingang mit dem mitgelieferten Verdrahtungswerkzeug ab. c. Fixez un filetage à l'outil de câblage et tirez le câble à travers un conduit sur l'appareil source. d. Retirez l'outil de câblage. e. Rebranchez l'adaptateur micro HDMI vers HDMI sur le connecteur d'entrée HDMI et fixez l'ensemble à l'aide de la vis fournie. Suivez les étapes 1a à 1e pour enfiler le câble sur le périphérique d'affichage. Connectez le connecteur d'entrée HDMI, indiqué par SOURCE, au port de sortie HDMI de votre périphérique source vidéo. Connectez le connecteur de sortie HDMI, indiqué par DISPLAY, au port d'entrée HDMI de votre périphérique d'affichage. Si la vidéo ne s'affiche pas, ajoutez une alimentation en connectant le câble optique actif HDMI au périphérique source à l'aide du câble micro USB vers USB fourni. www.aten.com A Hardware Übersicht 4 HDMI-Ausgang (Display) d. Remove the wiring tool. e. Plug the micro HDMI to HDMI adapter back to the HDMI In connector and secure the assembly with the supplied screw. Follow steps 1a to 1e to thread the cable to the display device. Connect the HDMI In connector, indicated with SOURCE, to the HDMI Out port on your video source device. Connect the HDMI Out connector, indicated with DISPLAY, to the HDMI In port on your display device. If the video does not display, supply additional power by connecting the HDMI active optical cable to the source device using the provided micro USB to USB cable. www.aten.com A Présentation du matériel 4 Sortie HDMI (Affichage) EMC Information FEDERAL COMMUNICATIONS COMMISSION INTERFERENCE STATEMENT: This equipment has been tested and found to comply with the limits for a Class A digital device, pursuant to Part 15 of the FCC Rules. These limits are designed to provide reasonable protection against harmful interference when the equipment is operated in a commercial environment. This equipment generates, uses, and can radiate radio frequency energy and, if not installed and used in accordance with the instruction manual, may cause harmful interference to radio communications. Operation of this equipment in a residential area is likely to cause harmful interference in which case the user will be required to correct the interference at his own expense. FCC Caution: Any changes or modifications not expressly approved by the party responsible for compliance could void the user's authority to operate this equipment. Warning: Operation of this equipment in a residential environment could cause radio interference. Display 이 기기는 업무용(A급) 전자파적합기기로서 판매자 또는 사용자는 이 점을 주의하시기 바라며, 가정외의 지역에서 사용하는 것을 목적으로 합니다. www.aten.com A Hardware Review 3 Micro USB Port Scan for more information SOURCE 1c 2 Micro HDMI to HDMI Adapter Technical Support www.aten.com/support This device complies with Part 15 of the FCC Rules. Operation is subject to the following two conditions:(1) this device mat not cause harmful interference, and(2) this device must accept any interference received, including interference that may cause undesired operation. Source Device Wiring Tool Thread Printing Date: 03/2019 Receiver Fiber Extension Micro HDMI to HDMI Adapter This product is RoHS compliant. All information, documentation, firmware, software utilities, and specifications contained in this package are subject to change without prior notification bythe manufacturer. To reduce the environmental impact of our products, ATEN documentation and software can be found online at http://www.aten.com/download/ DISPLAY VE7832/VE7833/VE7834/VE7835 Support and Documentation Notice 1 True 4K HDMI 2.0 Active Optical Cable 1 Wiring Tool 2 Screws 1 Micro USB to USB Cable2 1 Installation Notice 1 User Instructions Note: 1. The AOC cables differ in length: VE7832 (15m), VE7833 (30m), VE7834 (60m), VE7835 (100m). 2. The package of VE7835 includes 2 Micro USB to USB Cables 3 ATEN VanCryst™ Package Contents 2 3 4 5 c. Binden Sie ein Gewinde an das Verdrahtungswerkzeug und ziehen Sie das Kabel durch eine Leitung zum Quellgerät. d. Entfernen Sie das Verdrahtungswerkzeug. e. Stecken Sie den Micro-HDMI auf HDMI Adapter wieder in den HDMI-Eingang und befestigen Sie die Baugruppe mit der mitgelieferten Schraube. Führen Sie die Schritte 1a bis 1e aus, um das Kabel zum Anzeigegerät zu führen. Verbinden Sie den mit SOURCE gekennzeichneten HDMI-Eingang mit dem HDMI-Ausgang an Ihrem Videoquellgerät. Verbinden Sie den mit DISPLAY gekennzeichneten HDMI-Ausgang mit dem HDMI-Eingang Ihres Anzeigegeräts. Wenn das Video nicht angezeigt wird, stellen Sie zusätzliche Energie bereit, indem Sie das aktive optische HDMI-Kabel mit dem mitgelieferten Micro-USB auf USB Kabel an das Quellgerät anschließen. Cable óptico activo HDMI 2.0 de 4K reales VE7832/VE7833/VE7834/VE7835 www.aten.com A Revisión del hardware 1 Entrada HDMI (fuente) 2 Adaptador Micro HDMI a HDMI 3 Puerto Micro USB 4 Salida HDMI (pantalla) Nota: El adaptador Micro HDMI a HDMI es extraíble. B Instalación 2 3 4 1 Pase el cable hacia el dispositivo fuente. a. Quite el adaptador micro HDMI a HDMI del conector de entrada HDMI del cable. b. Cubra el conector de entrada HDMI con la herramienta de cableado suministrada. 5 Cavo ottico True 4K HDMI 2.0 attivo VE7832/VE7833/VE7834/VE7835 HDMI 2.0 www.aten.com A Revisione Hardware 1 HDMI In (sorgente) 2 Adattatore da Micro HDMI a HDMI 3 Porta Micro USB 4 HDMI Out (display) Nota: L'adattatore da Micro HDMI a HDMI è removibile. B Installazione 2 3 4 1 Avvitare il cavo al dispositivo sorgente. a. Rimuovere l'adattatore da micro HDMI a HDMI sul connettore HDMI In del cavo. b. Schermare il connettore HDMI IN con lo strumento di cablaggio in dotazione. 5 Активный оптический кабель True 4K HDMI 2.0 VE7832/VE7833/VE7834/VE7835 A Обзор оборудования 1 Вход HDMI (источник) 2 Переходник Micro HDMI - HDMI 3 Порт Micro USB 4 Выход HDMI (экран) Примечание. Переходник Micro HDMI - HDMI съемный. B Установка 1 Подсоедините кабель к устройству-источнику. a. Снимите переходник micro HDMI - HDMI с входного разъема HDMI кабеля. b. Закройте входной разъем кабеля (HDMI In) в инструмент для протяжки, входящий в комплект поставки. c. Прикрепите нить к инструменту и протяните кабель через канал к устройству-источнику. c. Ate un cordón a la herramienta de cableado y tire del cable a través del conducto hacia el dispositivo fuente. d. Retire la herramienta de cableado. e. Enchufe el adaptador micro HDMI a HDMI de nuevo en el conector de entrada HDMI y fije el montaje con el tornillo suministrado. Siga los pasos 1a a 1e para pasar el cable al dispositivo de pantalla. Conecte el conector de entrada HDMI, indicado con SOURCE, al puerto de salida HDMI de su dispositivo de fuente de vídeo. Conecte el conector de salida HDMI, indicado con DISPLAY, al puerto de entrada HDMI de su dispositivo de pantalla. Si el vídeo no se muestra, suministre más alimentación conectando el cable óptico activo HDMI al dispositivo fuente usando el cable micro USB a USB. 2 3 4 5 c. Fissare una filettatura all'attrezzo di cablaggio e tirare il cavo attraverso un condotto verso il dispositivo sorgente. d. Rimuovere l'attrezzo di cablaggio. e. Inserire l'adattatore da micro HDMI a HDMI nel connettore HDMI In e fissare il gruppo con la vite in dotazione. Seguire i passi da 1a a 1e per collegare il cavo al dispositivo di visualizzazione. Collegare il connettore HDMI In, indicato con SOURCE, alla porta HDMI Out del dispositivo sorgente video. Collegare il connettore HDMI Out, indicato con DISPLAY, alla porta HDMI In del dispositivo di visualizzazione. Se il video non viene visualizzato, alimentare l'alimentazione supplementare collegando il cavo ottico attivo HDMI al dispositivo sorgente utilizzando il cavo micro USB a USB in dotazione. www.aten.com d. Снимите инструмент для протяжки. e. Обратно закрепите переходник HDMI - HDMI к входному разъему HDMI и закрепите полученный узел с помощью входящего в комплект поставки болта. Чтобы подсоединить кабель к устройству отображения, выполните шаги 1a - 1e. Подсоедините входной разъем HDMI с обозначением SOURCE к выходному порту HDMI на своем устройстве отображения. Подсоедините выходной разъем HDMI с обозначением DISPLAY к входному порту HDMI на своем устройстве отображения. Если видео не отображается, подведите дополнительное питание, Подсоединитв активный оптический кабель HDMI к устройству-источнику с помощью входящего в комплект поставки кабеля micro USB - USB.-
 1
1
-
 2
2


ATEN VE7834 Guía de inicio rápido
- Tipo
- Guía de inicio rápido
en otros idiomas
- français: ATEN VE7834 Guide de démarrage rapide
- italiano: ATEN VE7834 Guida Rapida
- English: ATEN VE7834 Quick start guide
- Deutsch: ATEN VE7834 Schnellstartanleitung
- русский: ATEN VE7834 Инструкция по началу работы
- português: ATEN VE7834 Guia rápido
- 日本語: ATEN VE7834 クイックスタートガイド
Artículos relacionados
-
ATEN VE883K2-AT-U Technical Manual
-
-
ATEN VE803-AT-U Guía de inicio rápido
-
ATEN VS82H Guía de inicio rápido
-
-
-
ATEN CS1844 Guía de inicio rápido
-
-
ATEN CE820-AT-U Guía de inicio rápido
-