ATEN VS1814T Guía de inicio rápido
- Categoría
- Secadoras
- Tipo
- Guía de inicio rápido
Este manual también es adecuado para

Hardware Review
A
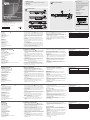
Front View
1. Port LEDs
2. HDMI Out LED
3. HDMI In LED
4. EDID Learn Pushbutton
5. EDID Learn LED
6. Power LED
Rear View
1. Power Socket
2. Power Switch
3. Grounding Terminal
4. EDID Mode
5. HDBaseT Output Port
6. HDMI Input Port
7. HDMI Output Port
8. Firmware Upgrade Pushbutton
9. RS-232 Port
Description de l’appareil
A
Vue avant
1. Voyants des ports
2. Voyant de sortie HDMI
3. Voyant d’entrée HDMI
4. Bouton-poussoir d’apprentissage EDID
5. Voyant d’apprentissage EDID
6. Voyant d’alimentation
Vue arrière
1. Prise d'alimentation
2. Interrupteur
3. Prise de terre
4. Mode EDID
5. Port de sortie HDBaseT
6. Port d’entrée HDMI
7. Port de sortie HDMI
8. Bouton-poussoir de mise à niveau du microprogramme
9. Port RS-232
Hardwareübersicht
A
Vorderseitige Ansicht
1. Port-LEDs
2. LED-Anzeige des HDMI-Ausgangs
3. LED-Anzeige des HDMI-Eingangs
4. Taste für EDID-Abfrage
5. LED-Anzeige für EDID-Abfrage
6. LED-Betriebsanzeige
Rückseitige Ansicht
1. Netzeingangsbuchse
2. Netzschalter
3. Erdungsanschluss
4. EDID-Modus
5. HDBaseT-Ausgang
6. HDMI-Eingang
7. HDMI-Ausgang
8. Taste für Firmwareaktualisierung
9. RS-232-Port
Presentación del hardware
A
Vista frontal
1. Indicadores LED de los puertos
2. Indicador LED de salida HDMI
3. Indicador LED de entrada HDMI
4. Botón de petición de EDID
5. Indicador de petición de EDID
6. Indicador de alimentación
Vista posterior
1. Entrada de alimentación
2. Interruptor de alimentación
3. Toma de tierra
4. Modo EDID
5. Puerto de salida HDBaseT
6. Puerto de entrada HDMI
7. Puerto de salida HDMI
8. Botón de actualización del rmware
9. Puerto RS-232
Hardware
A
Vista anteriore
1. LED delle porte
2. LED uscita HDMI
3. LED ingresso HDMI
4. Pulsante apprendimento EDID
5. LED apprendimento EDID
6. LED d’alimentazione
Vista posteriore
1. Presa per l’alimentazione
2. Interruttore di alimentazione
3. Terminale di messa a terra
4. Modalità EDID
5. Porta d’uscita HDBaseT
6. Porta d’ingresso HDMI
7. Porta d’uscita HDMI
8. Pulsante per l’aggiornamento del rmware
9. Porta RS-232
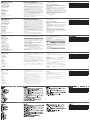
Hardware Installation
B
1. Ground the VS1814T / VS1818T by connecting one end of the
grounding wire to the grounding terminal, located on the unit’s
back panel, and the other end of the wire to a grounded object.
2. Use HDMI cable to connect your HDMI source device to the
VS1814T / VS1818T’s HDMI In port, located on the unit’s rear
panel.
3. Use HDMI cable to connect your local HDMI display device to
the VS1814T / VS1818T’s HDMI Out port, located on the unit’s
rear panel.
4. Use the Cat 5e cables to connect the VS1814T / VS1818T’s
HDBaseT Output Ports, located on the unit’s rear panel, to the
Receiving Devices.
Note: Compatible receiving devices are the ATEN HDMI Over
Cat 5 Repeater.
5. If you are using a serial controller, connect it to the VS1814T /
VS1818T’s RS-232 Serial port, located on the unit’s rear panel.
6. Using the power cord supplied with this package, connect the
VS1814T / VS1818T to an AC power outlet.
7. Turn on the source, displays, and receiving devices.
Installation du matériel
B
1. Raccordez le répartiteur VS1814T / VS1818T à la terre en reliant
une extrémité du câble de mise à la terre à la prise de terre situé
à l’arrière de l’unité et l'autre extrémité à un objet correctement
mis à la terre.
2. Utilisez un câble HDMI pour relier votre périphérique source
HDMI au port d'entrée HDMI du VS1814T / VS1818T, situé à
l’arrière de l’unité.
3. Utilisez un câble HDMI pour relier votre périphérique d’af chage
HDMI local au port de sortie HDMI du VS1814T / VS1818T, situé
à l’arrière de l’unité.
4. Utilisez les câbles de catégorie 5e pour connecter les ports de
sortie HDBaseT du VS1814T / VS1818T, situés à l’arrière de
l’unité, aux périphériques de réception.
Remarque : les périphériques de réception compatibles sont les
répéteurs Cat 5 HDMI ATEN.
5. Si vous utilisez un contrôleur série, connectez-le au port série
RS-232 du VS1814T / VS1818T, situé à l’arrière de l’unité.
6. En utilisant le cordon d’alimentation fourni, branchez le VS1814T
/ VS1818T sur une prise de courant.
Hardware installieren
B
1. Erden Sie den VS1814T / VS1818T mithilfe des Erdleiters.
Verbinden Sie dazu das eine Ende des Leiters mit der
Erdungsschelle auf der Geräterückseite und das andere Ende
mit einem geerdeten Gegenstand.
2. Verbinden Sie die HDMI-Signalquelle mit dem HDMI-Eingang auf
der Rückseite des VS1814T / VS1818T. Verwenden Sie dazu ein
HDMI-Kabel.
3. Verbinden Sie Ihr HDMI-Anzeigegerät mit dem HDMI-Ausgang
auf der Rückseite des VS1814T / VS1818T. Verwenden Sie dazu
ein HDMI-Kabel.
4. Verbinden Sie die Empfangsgeräte mit den HDBaseT-Ausgängen
auf der Rückseite des VS1814T / VS1818T. Verwenden Sie dazu
Kat. 5e-Kabel.
Hinweis: Kompatible Empfangsgeräte sind die ATEN HDMI Over
Kat 5-Repeater.
5. Wenn Sie einen seriellen Controller verwenden möchten,
verbinden Sie diesen mit dem seriellen RS-232-Port auf der
Rückseite des VS1814T / VS1818T.
Instalar el hardware
B
1. Conecte el VS1814T / VS1818T a tierra. Para ello, conecte un
extremo del cable de tierra incluido a la toma de tierra ubicada
en el panel posterior y el otro extremo a un objeto correctamente
conectado a tierra.
2. Use un cable HDMI para conectar el dispositivo fuente al puerto
de entrada HDMI situado en el panel posterior del VS1814T /
VS1818T.
3. Use un cable HDMI para conectar el dispositivo de visualización
local al puerto de salida HDMI situado en el panel posterior del
VS1814T / VS1818T.
4. Use cables de Cat. 5e para conectar las salidas HDBaseT
ubicadas en el panel posterior del VS1814T / VS1818T a los
dispositivos de recepción.
Nota: Los dispositivos de recepción compatibles son los
repetidores HDMI sobre Cat. 5 de ATEN.
5. Si desea emplear una controladora serie, conéctela al puerto
serie RS-232 situado en el panel posterior del VS1814T /
VS1818T.
Installazione dell’hardware
B
1.Utilizzare un lo per la messa a terra del VS1814T/VS1818T,
collegando un’estremità del lo al terminale di messa a terra
collocato sul pannello posteriore dell’unità e l’altra estremità a un
dispositivo dotato di adeguata messa a terra.
2. Utilizzare un cavo HDMI per collegare il dispositivo HDMI
sorgente alla porta d’ingresso HDMI del VS1814T/VS1818T
collocata sul pannello posteriore dell’unità.
3. Utilizzare un cavo HDMI per collegare il dispositivo locale di
visualizzazione HDMI alla porta d’uscita HDMI del VS1814T/
VS1818T collocata sul pannello posteriore dell’unità.
4. Utilizzare i cavi Cat 5e per connettere le porte d’uscita HDBaseT
del VS1814T/VS1818T collocate sul pannello posteriore dell’unità
ai dispositivi riceventi.
Nota: I dispositivi riceventi compatibili sono il ripetitore ATEN
HDMI Over Cat 5.
5. Se si sta utilizzando un controller seriale, collegarlo alla porta
seriale RS-232 del VS1814T/VS1818T collocata sul pannello
posteriore dell’unità.
EDID Operation
Simply press the EDID Mode pushbutton to toggle between the
Default and other EDID Settings (0~7), as follows:
• 0 (Default) – EDID is set to the ATEN default con guration
• 1 (Port 1) – Implements the EDID of the connected display to Port
1, and passes it to the video source
• 2 (Auto) - Implements the EDID of all connected displays. The
VS1814T / VS1818T uses the best resolution for all displays
• 3 (Learn) - Uses the EDID con guration acquired from the EDID
Learning process.
• 4 ~ 7- Reserved.
7. Allumez les périphériques source, d’af chage et de réception.
Fonctionnement du mode EDID
Appuyez simplement sur le bouton-poussoir de mode EDID a n
de basculer entre le réglage par défaut et les autres réglages EDID
(0~7), comme suit :
• 0 (Défaut) - Le mode EDID est paramétré selon la con guration
ATEN par défaut
• 1 (Port 1) - Ce réglage active les données EDID du périphérique
d’af chage connecté sur le Port 1 et les transfère à la source
vidéo.
• 2 (Auto) - Ce réglage active les données EDID de tous les
périphériques d’af chage connectés. Le VS1814T / VS1818T
utilise la meilleure résolution pour tous les périphériques
d’af chage.
• 3 (Apprentissage) – Ce réglage utilise la con guration EDID
acquise grâce au processus d’apprentissage EDID.
• 4 ~ 7- Réservés.
6. Verbinden Sie den VS1814T / VS1818T mithilfe des
mitgelieferten Netzkabels mit einer Steckdose.
7. Schalten Sie die Signalquelle, die Anzeigegeräte und die
Empfangsgeräte ein.
EDID-Funktion
Betätigen Sie die EDID Mode-Drucktaste, um zwischen der
Standard- und anderen EDID-Einstellungen (0-7) wie folgt
umzuschalten:
• 0 (Standard) – Es wird die Standard-EDID-Einstellung von ATEN
verwendet.
• 1 (Port 1) – Implementiert die EDID des an Port 1
angeschlossenen Gerätes, und leitet sie an die Bildsignalquelle
weiter.
• 2 (Automatisch) – Implementiert die EDID aller angeschlossenen
Displays. Dabei verwendet der VS1814T / VS1818T die für alle
Bildschirme beste Au ösung.
• 3 (Abfrage) – Verwendet die EDID-Kon guration, die von der
EDID-Abfrage stammt.
• 4 ~ 7- Reserviert.
6. Conecte el VS1814T / VS1818T a una toma eléctrica mediante
el cable de alimentación incluido.
7. Encienda el dispositivo fuente, las pantallas y los dispositivos de
recepción.
Funcionamiento EDID
Pulse el botón de modo EDID para alternar entre el ajuste
predeterminado y los otros ajustes de EDID (0 a 7) como se explica
a continuación:
• 0 (Predeterminado) – se utiliza el EDID predeterminado de
ATEN.
• 1 (Puerto 1) – implementa el EDID de la pantalla conectada al
puerto 1 y lo envía a la fuente de señal de vídeo.
• 2 (Automático) - implementa el EDID de todas las pantallas
conectadas. El VS1814T / VS1818T empleará la mejor resolución
con todas las pantallas.
• 3 (Pedir EDID) – utiliza la con guración de EDID adquirida a
través del proceso de petición de EDID.
• 4 a 7 - Reservados.
6. Utilizzare il cavo di alimentazione fornito per connettere il
VS1814T/VS1818T a una presa di corrente CA.
7. Accendere i dispositivi di visualizzazione, quelli sorgente e quelli
riceventi.
Funzionamento EDID
Premere semplicemente il pulsante della Modalità EDID per
scegliere tra la impostazione prede nita e altre impostazioni (0~7),
come segue:
• 0 (prede nita) - EDID viene impostato sulla con gurazione ATEN
prede nita
• 1 (porta 1) – Implementa l‘EDID dello schermo collegato alla
porta 1 e lo passa alla sorgente video
• 2 (automatica) – Implementa l‘EDID di tutti gli schermi collegati.
Il VS1814T/VS1818T utilizza la migliore risoluzione per tutti gli
schermi
• 3 (apprendi) – utilizza la con gurazione EDID acquisita nel
processo di apprendimento EDID.
• 4 ~ 7- Riservate.
RS-232 Setting
Baud Rate 19200
Data Bits 8
Parity None
Stop Bits 1
Flow Control None
Paramètres RS-232
Débit en bauds 19200
Bits de données 8
Parité Aucune
Bits d’arrêt 1
Contrôle de ux Aucun
RS-232-Einstellungen
Übertragungsgeschwindigkeit
(Baud):
19200
Datenbits 8
Parität Ohne
Stoppbits 1
Flusssteuerung Ohne
Con guración RS-232
Velocidad (Baudios) 19200
Bits de datos 8
Paridad Sin
Bits de parada 1
Control de ujo Sin
Impostazione RS-232
Baud Rate 19200
Bit dati 8
Parità Nessuna
Bit di stop 1
Controllo di usso Nessuno
B
Package Contents
1 VS1814T/VS1818T 4/8-Port HDMI Over Single Cat 5 Splitter
1 Power Cord
1 Mounting Kit
1 User Instructions
Front View
Rear View
Hardware Installation
© Copyright 2014 ATEN
®
International Co., Ltd.
ATEN and the ATEN logo are trademarks of ATEN International Co., Ltd. All rights reserved.
All other trademarks are the property of their respective owners.
This product is RoHS compliant.
Part No. PAPE-1223-B40G Printing Date: 02/2014
4/8-Port HDMI Over Single Cat 5 Splitter
Quick Start Guide
VS1814T / VS1818T
VS1814T / VS1818T 4/8-Port HDMI Over Single Cat 5 Splitter
www.aten.com
Répartiteur sur câble de catégorie 5 simple HDMI à 4/8 ports VS1814T/VS1818T – Guide de démarrage rapide
www.aten.com
VS1814T / VS1818T 4/8-Port HDMI-Splitter Over Single Cat 5 Kurzanleitung
www.aten.com
Repartidor de señal HDMI sobre un único cable de Cat. 5 de 4/8 puertos VS1814T / VS1818T Guía rápida
www.aten.com
Splitter HDMI Over Single Cat 5 a 4/8 porte VS1814T / VS1818T – Guida rapida
www.aten.com
Important Notice
Considering environmental protection, ATEN
does not provide a fully printed user manual
for this product. If the information contained
in the Quick Start Guide is not enough for
you to configure and operate your product,
please visit our website www.aten.com, and
download the full user manual.
Online Registration
http://eservice.aten.com
Technical Phone Support
International:
886-2-86926959
North America:
1-888-999-ATEN Ext: 4988
United Kingdom:
44-8-4481-58923
All information, documentation, software utilities,
and speci cations contained in this package are
subject to change without prior notification by
the manufacturer.
The following contains information that relates
to China:
ATEN VanCryst™
4 5 6
1 2 3
1 2 3 4 5 6 7 8
4 5 6
1 2 3
1 2 3 4
5 6 7 982
1
3 4
5 6 7 982
1
3 4
6
1
34
2 5
VE812R X8
A
Hardware Review
La página se está cargando...
Transcripción de documentos
Package Contents B 1 VS1814T/VS1818T 4/8-Port HDMI Over Single Cat 5 Splitter 1 Power Cord 1 Mounting Kit 1 User Instructions A Important Notice Hardware Installation Considering environmental protection, ATEN does not provide a fully printed user manual for this product. If the information contained in the Quick Start Guide is not enough for you to configure and operate your product, please visit our website www.aten.com, and download the full user manual. Online Registration http://eservice.aten.com Hardware Review Front View 4 5 6 1 2 3 4 Technical Phone Support 3 International: 886-2-86926959 VE812R X8 4 North America: 1-888-999-ATEN Ext: 4988 1 ATEN VanCryst™ 2 3 6 United Kingdom: 44-8-4481-58923 4 5 6 VS1814T / VS1818T 2 4/8-Port HDMI Over Single Cat 5 Splitter Quick Start Guide 1 2 3 4 5 6 7 1 The following contains information that relates 5 to China: 1 8 2 3 Rear View 1 © Copyright 2014 ATEN® International Co., Ltd. ATEN and the ATEN logo are trademarks of ATEN International Co., Ltd. All rights reserved. 2 3 4 All other trademarks are the property of their respective owners. 5 6 7 8 9 6 7 8 9 All information, documentation, software utilities, and specifications contained in this package are subject to change without prior notification by the manufacturer. This product is RoHS compliant. Part No. PAPE-1223-B40G Printing Date: 02/2014 1 2 3 4 5 VS1814T / VS1818T 4/8-Port HDMI Over Single Cat 5 Splitter Hardware Review www.aten.com Hardware Installation A Front View EDID Operation B 1. Ground the VS1814T / VS1818T by connecting one end of the grounding wire to the grounding terminal, located on the unit’s back panel, and the other end of the wire to a grounded object. 2. Use HDMI cable to connect your HDMI source device to the VS1814T / VS1818T’s HDMI In port, located on the unit’s rear panel. 3. Use HDMI cable to connect your local HDMI display device to the VS1814T / VS1818T’s HDMI Out port, located on the unit’s rear panel. 4. Use the Cat 5e cables to connect the VS1814T / VS1818T’s HDBaseT Output Ports, located on the unit’s rear panel, to the Receiving Devices. Note: Compatible receiving devices are the ATEN HDMI Over Cat 5 Repeater. 5. If you are using a serial controller, connect it to the VS1814T / VS1818T’s RS-232 Serial port, located on the unit’s rear panel. 6. Using the power cord supplied with this package, connect the VS1814T / VS1818T to an AC power outlet. 7. Turn on the source, displays, and receiving devices. 1. Port LEDs 2. HDMI Out LED 3. HDMI In LED 4. EDID Learn Pushbutton 5. EDID Learn LED 6. Power LED Rear View 1. Power Socket 2. Power Switch 3. Grounding Terminal 4. EDID Mode 5. HDBaseT Output Port 6. HDMI Input Port 7. HDMI Output Port 8. Firmware Upgrade Pushbutton 9. RS-232 Port Simply press the EDID Mode pushbutton to toggle between the Default and other EDID Settings (0~7), as follows: • 0 (Default) – EDID is set to the ATEN default configuration • 1 (Port 1) – Implements the EDID of the connected display to Port 1, and passes it to the video source • 2 (Auto) - Implements the EDID of all connected displays. The VS1814T / VS1818T uses the best resolution for all displays • 3 (Learn) - Uses the EDID configuration acquired from the EDID Learning process. • 4 ~ 7- Reserved. RS-232 Setting Baud Rate Data Bits Parity Stop Bits Flow Control 19200 8 None 1 None Répartiteur sur câble de catégorie 5 simple HDMI à 4/8 ports VS1814T/VS1818T – Guide de démarrage rapide Description de l’appareil www.aten.com Installation du matériel A Vue avant 1. Voyants des ports 2. Voyant de sortie HDMI 3. Voyant d’entrée HDMI 4. Bouton-poussoir d’apprentissage EDID 5. Voyant d’apprentissage EDID 6. Voyant d’alimentation Vue arrière 1. Prise d'alimentation 2. Interrupteur 3. Prise de terre 4. Mode EDID 5. Port de sortie HDBaseT 6. Port d’entrée HDMI 7. Port de sortie HDMI 8. Bouton-poussoir de mise à niveau du microprogramme 9. Port RS-232 7. Allumez les périphériques source, d’affichage et de réception. B 1. Raccordez le répartiteur VS1814T / VS1818T à la terre en reliant une extrémité du câble de mise à la terre à la prise de terre situé à l’arrière de l’unité et l'autre extrémité à un objet correctement mis à la terre. 2. Utilisez un câble HDMI pour relier votre périphérique source HDMI au port d'entrée HDMI du VS1814T / VS1818T, situé à l’arrière de l’unité. 3. Utilisez un câble HDMI pour relier votre périphérique d’affichage HDMI local au port de sortie HDMI du VS1814T / VS1818T, situé à l’arrière de l’unité. 4. Utilisez les câbles de catégorie 5e pour connecter les ports de sortie HDBaseT du VS1814T / VS1818T, situés à l’arrière de l’unité, aux périphériques de réception. Remarque : les périphériques de réception compatibles sont les répéteurs Cat 5 HDMI ATEN. 5. Si vous utilisez un contrôleur série, connectez-le au port série RS-232 du VS1814T / VS1818T, situé à l’arrière de l’unité. 6. En utilisant le cordon d’alimentation fourni, branchez le VS1814T / VS1818T sur une prise de courant. Fonctionnement du mode EDID Appuyez simplement sur le bouton-poussoir de mode EDID afin de basculer entre le réglage par défaut et les autres réglages EDID (0~7), comme suit : • 0 (Défaut) - Le mode EDID est paramétré selon la configuration ATEN par défaut • 1 (Port 1) - Ce réglage active les données EDID du périphérique d’affichage connecté sur le Port 1 et les transfère à la source vidéo. • 2 (Auto) - Ce réglage active les données EDID de tous les périphériques d’affichage connectés. Le VS1814T / VS1818T utilise la meilleure résolution pour tous les périphériques d’affichage. • 3 (Apprentissage) – Ce réglage utilise la configuration EDID acquise grâce au processus d’apprentissage EDID. • 4 ~ 7- Réservés. Paramètres RS-232 Débit en bauds Bits de données Parité Bits d’arrêt Contrôle de flux 19200 8 Aucune 1 Aucun VS1814T / VS1818T 4/8-Port HDMI-Splitter Over Single Cat 5 Kurzanleitung Hardwareübersicht www.aten.com Hardware installieren A Vorderseitige Ansicht B 1. Erden Sie den VS1814T / VS1818T mithilfe des Erdleiters. Verbinden Sie dazu das eine Ende des Leiters mit der Erdungsschelle auf der Geräterückseite und das andere Ende mit einem geerdeten Gegenstand. 2. Verbinden Sie die HDMI-Signalquelle mit dem HDMI-Eingang auf der Rückseite des VS1814T / VS1818T. Verwenden Sie dazu ein HDMI-Kabel. 3. Verbinden Sie Ihr HDMI-Anzeigegerät mit dem HDMI-Ausgang auf der Rückseite des VS1814T / VS1818T. Verwenden Sie dazu ein HDMI-Kabel. 4. Verbinden Sie die Empfangsgeräte mit den HDBaseT-Ausgängen auf der Rückseite des VS1814T / VS1818T. Verwenden Sie dazu Kat. 5e-Kabel. Hinweis: Kompatible Empfangsgeräte sind die ATEN HDMI Over Kat 5-Repeater. 5. Wenn Sie einen seriellen Controller verwenden möchten, verbinden Sie diesen mit dem seriellen RS-232-Port auf der Rückseite des VS1814T / VS1818T. 1. Port-LEDs 2. LED-Anzeige des HDMI-Ausgangs 3. LED-Anzeige des HDMI-Eingangs 4. Taste für EDID-Abfrage 5. LED-Anzeige für EDID-Abfrage 6. LED-Betriebsanzeige Rückseitige Ansicht 1. Netzeingangsbuchse 2. Netzschalter 3. Erdungsanschluss 4. EDID-Modus 5. HDBaseT-Ausgang 6. HDMI-Eingang 7. HDMI-Ausgang 8. Taste für Firmwareaktualisierung 9. RS-232-Port 6. Verbinden Sie den VS1814T / VS1818T mithilfe des mitgelieferten Netzkabels mit einer Steckdose. 7. Schalten Sie die Signalquelle, die Anzeigegeräte und die Empfangsgeräte ein. EDID-Funktion Betätigen Sie die EDID Mode-Drucktaste, um zwischen der Standard- und anderen EDID-Einstellungen (0-7) wie folgt umzuschalten: • 0 (Standard) – Es wird die Standard-EDID-Einstellung von ATEN verwendet. • 1 (Port 1) – Implementiert die EDID des an Port 1 angeschlossenen Gerätes, und leitet sie an die Bildsignalquelle weiter. • 2 (Automatisch) – Implementiert die EDID aller angeschlossenen Displays. Dabei verwendet der VS1814T / VS1818T die für alle Bildschirme beste Auflösung. • 3 (Abfrage) – Verwendet die EDID-Konfiguration, die von der EDID-Abfrage stammt. • 4 ~ 7- Reserviert. RS-232-Einstellungen Übertragungsgeschwindigkeit (Baud): Datenbits Parität Stoppbits Flusssteuerung 19200 8 Ohne 1 Ohne Repartidor de señal HDMI sobre un único cable de Cat. 5 de 4/8 puertos VS1814T / VS1818T Guía rápida Presentación del hardware A Vista frontal 1. Indicadores LED de los puertos 2. Indicador LED de salida HDMI 3. Indicador LED de entrada HDMI 4. Botón de petición de EDID 5. Indicador de petición de EDID 6. Indicador de alimentación Vista posterior 1. Entrada de alimentación 2. Interruptor de alimentación 3. Toma de tierra 4. Modo EDID 5. Puerto de salida HDBaseT 6. Puerto de entrada HDMI 7. Puerto de salida HDMI 8. Botón de actualización del firmware 9. Puerto RS-232 Instalar el hardware www.aten.com B 1. Conecte el VS1814T / VS1818T a tierra. Para ello, conecte un extremo del cable de tierra incluido a la toma de tierra ubicada en el panel posterior y el otro extremo a un objeto correctamente conectado a tierra. 2. Use un cable HDMI para conectar el dispositivo fuente al puerto de entrada HDMI situado en el panel posterior del VS1814T / VS1818T. 3. Use un cable HDMI para conectar el dispositivo de visualización local al puerto de salida HDMI situado en el panel posterior del VS1814T / VS1818T. 4. Use cables de Cat. 5e para conectar las salidas HDBaseT ubicadas en el panel posterior del VS1814T / VS1818T a los dispositivos de recepción. Nota: Los dispositivos de recepción compatibles son los repetidores HDMI sobre Cat. 5 de ATEN. 5. Si desea emplear una controladora serie, conéctela al puerto serie RS-232 situado en el panel posterior del VS1814T / VS1818T. 6. Conecte el VS1814T / VS1818T a una toma eléctrica mediante el cable de alimentación incluido. 7. Encienda el dispositivo fuente, las pantallas y los dispositivos de recepción. Funcionamiento EDID Pulse el botón de modo EDID para alternar entre el ajuste predeterminado y los otros ajustes de EDID (0 a 7) como se explica a continuación: • 0 (Predeterminado) – se utiliza el EDID predeterminado de ATEN. • 1 (Puerto 1) – implementa el EDID de la pantalla conectada al puerto 1 y lo envía a la fuente de señal de vídeo. • 2 (Automático) - implementa el EDID de todas las pantallas conectadas. El VS1814T / VS1818T empleará la mejor resolución con todas las pantallas. • 3 (Pedir EDID) – utiliza la configuración de EDID adquirida a través del proceso de petición de EDID. • 4 a 7 - Reservados. Configuración RS-232 Velocidad (Baudios) Bits de datos Paridad Bits de parada Control de flujo 19200 8 Sin 1 Sin Splitter HDMI Over Single Cat 5 a 4/8 porte VS1814T / VS1818T – Guida rapida Hardware A Vista anteriore 1. LED delle porte 2. LED uscita HDMI 3. LED ingresso HDMI 4. Pulsante apprendimento EDID 5. LED apprendimento EDID 6. LED d’alimentazione Vista posteriore 1. Presa per l’alimentazione 2. Interruttore di alimentazione 3. Terminale di messa a terra 4. Modalità EDID 5. Porta d’uscita HDBaseT 6. Porta d’ingresso HDMI 7. Porta d’uscita HDMI 8. Pulsante per l’aggiornamento del firmware 9. Porta RS-232 www.aten.com Installazione dell’hardware B 1.Utilizzare un filo per la messa a terra del VS1814T/VS1818T, collegando un’estremità del filo al terminale di messa a terra collocato sul pannello posteriore dell’unità e l’altra estremità a un dispositivo dotato di adeguata messa a terra. 2. Utilizzare un cavo HDMI per collegare il dispositivo HDMI sorgente alla porta d’ingresso HDMI del VS1814T/VS1818T collocata sul pannello posteriore dell’unità. 3. Utilizzare un cavo HDMI per collegare il dispositivo locale di visualizzazione HDMI alla porta d’uscita HDMI del VS1814T/ VS1818T collocata sul pannello posteriore dell’unità. 4. Utilizzare i cavi Cat 5e per connettere le porte d’uscita HDBaseT del VS1814T/VS1818T collocate sul pannello posteriore dell’unità ai dispositivi riceventi. Nota: I dispositivi riceventi compatibili sono il ripetitore ATEN HDMI Over Cat 5. 5. Se si sta utilizzando un controller seriale, collegarlo alla porta seriale RS-232 del VS1814T/VS1818T collocata sul pannello posteriore dell’unità. 6. Utilizzare il cavo di alimentazione fornito per connettere il VS1814T/VS1818T a una presa di corrente CA. 7. Accendere i dispositivi di visualizzazione, quelli sorgente e quelli riceventi. Funzionamento EDID Premere semplicemente il pulsante della Modalità EDID per scegliere tra la impostazione predefinita e altre impostazioni (0~7), come segue: • 0 (predefinita) - EDID viene impostato sulla configurazione ATEN predefinita • 1 (porta 1) – Implementa l‘EDID dello schermo collegato alla porta 1 e lo passa alla sorgente video • 2 (automatica) – Implementa l‘EDID di tutti gli schermi collegati. Il VS1814T/VS1818T utilizza la migliore risoluzione per tutti gli schermi • 3 (apprendi) – utilizza la configurazione EDID acquisita nel processo di apprendimento EDID. • 4 ~ 7- Riservate. Impostazione RS-232 Baud Rate Bit dati Parità Bit di stop Controllo di flusso 19200 8 Nessuna 1 Nessuno-
 1
1
-
 2
2


ATEN VS1814T Guía de inicio rápido
- Categoría
- Secadoras
- Tipo
- Guía de inicio rápido
- Este manual también es adecuado para
en otros idiomas
- français: ATEN VS1814T Guide de démarrage rapide
- italiano: ATEN VS1814T Guida Rapida
- English: ATEN VS1814T Quick start guide
- Deutsch: ATEN VS1814T Schnellstartanleitung
- русский: ATEN VS1814T Инструкция по началу работы
- português: ATEN VS1814T Guia rápido
- 日本語: ATEN VS1814T クイックスタートガイド
Artículos relacionados
-
ATEN VE814T Guía de inicio rápido
-
ATEN VS0110HA Guía de inicio rápido
-
-
-
ATEN VM0404H Guía de inicio rápido
-
ATEN VS1808T Guía de inicio rápido
-
-
-
ATEN VC010 Guía de inicio rápido
-
ATEN VS82H Guía de inicio rápido