Panasonic TC-26LX50 El manual del propietario
- Categoría
- Equipo de música suplementario
- Tipo
- El manual del propietario

Panasonic
0 mnstructions
LCD Television
Model No.
TV screen image is simulated.
For assistance, please call : 1-800-211-PANA (7262)
or visit us at www.panasonic.com/contactinfo (U.S.A.)
For assistance, please call : 787-750-4300
or visit us at www.panasonic.corn (Puerto Rico)
For assistance, pmeasecall : 1o800o561o5505
or visit us at www.panasonic.ca (Canada)
Before connecting, operating or adjusting this product, please read these instructions completely.
Please keep this manual for future reference.
I English }
( Espa_ol } [Resumen] TQBC2010

Thelightningflashwitharrow _ The exclamation point within a
head within atriangle is intended ,__ triangle is intended to te!l the
to tell the user that parts inside user that important operating
the product are a risk of electric and servicing instructions are in
shock to persons, the papers with the appliance,
[] Note to CATV System Insta(ier: This reminder is provided to direct the CATV system (nstaUer's
attention to Art(c(e 820-40 of the NEC that provides gu(deUnesfor proper grounding and, in part(cu(ar,specifies
that the came ground shah be connected to the grounding system of the buUd(ng, as chose to the point of
came entry as practical
SHotsand openings in the cabinet and the back or bottom are provided for ventilation, and to ensure reliable
operation of the LCD TV and to protect it from overheating, These openings must not be blocked or covered,
There should be at least 10 cm of space from these openings, The openings should never be blocked by
placing the LCD TV on a bed, sofa, rug or other similar surface, This LCD TV should not be placed in a built-
in installation such as a bookcase unless proper ventilation is provided,
[] (rnportant Safety (nstructions for LCD TV
1 Read these instructions,
2 Keep these instructions,
3 Heed all warnings,
4 Follow all instructions,
5 Do not use this apparatus near water,
6 Clean only with dry cloth,
7 Do not block any ventilation openings, Install in accordance with the manufacturer's instructions,
8 Do not install near any heat sources such as radiators, heat registers, stoves, or other apparatus (including
amplifiers) that produce heat,
9 Do not defeat the safety purpose of the polarized or grounding-type plug, A polarized plug has two
blades with one wider than the other, A grounding type plug has two blades and a third grounding prong,
The wide blade or the third prong are provided for your safety, If the provided plug does not fit into your
outlet, consult an electrician for replacement of the obsolete outlet,
10) Protect the power cord from being walked on or pinched particularly at plugs, convenience receptacles,
and the point where they exit from the apparatus,
11) Only use attachments / accessories specified by the manufacturer,
12) Use only with the cart, stand, tripod, bracket, or table specified by the manufacturer, or sold
with the apparatus, When a cart is used, use caution when moving the cart / apparatus
combination to avoid injury from tip-over,
13) Unplug this apparatus during lightning storms or when unused for long periods of time,
14) Refer all servicing to qualified service personnel, Servicing is required when the apparatus has been
damaged in any way, such as power-supply cord or plug is damaged, liquid has been spilled or objects
have fallen into the apparatus, the apparatus has been exposed to rain or moisture, does not operate
normally, or has been dropped,
15) Operate only from the type of power source indicated on the marking label, If you are not sure of the
type of power supplied to your home consult your television dealer or local power company,
16) Follow all warnings and instructions marked on the LCD TV,
17) Never push objects of any kind into this LCD TV through cabinet slots as they may touch dangerous
voltage points or short out parts that could result in a fire or electric shock, Never spill liquid of any kind
on the LCD TV,

mmportant Safety mnstructions
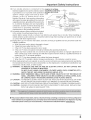
18) If an outside antenna is connected to the
television equipment, be sure the antenna system
is grounded so as to provide some protection
against voltage surges and built up static
charges. In the U.S. Section 810-21 of the
National Electrical Code provides information
with respect to proper grounding of the mast and
supporting structure, grounding of the lead-in wire
to an antenna discharge unit, size of grounding
conductors, location of antenna discharge unit,
connection to grounding electrodes, and
requirements for the grounding electrode.
19)An outside antenna system should not be located
in the vicinity of overhead power lines or other
EXAMPLEOF ANTENNA
GROUNDmNGAS PER(NEC)
NATmONALELECTRICAL
CODE
CLAMP
LEAD-IN WIRE
ANTENNA
DISCHARGE UNIT
(NECSECTION810-20)
GROUNDINGCONDUCTORS
(NECSECTION810-21)
GROUNDCLAMPS
POWER SERVICE GROUNDING
ELECTRODESYSTEM
(NECART 250,PARTH)
electric light or power circuits, or where it can fall into such power lines or circuits. When installing an
outside antenna system extreme care should be taken to keep from touching such power lines or circuits
as contact with them might be fatal.
20) Unplug this LCD TV from the wall outlet, and refer servicing to qualified service personnel under the
following conditions:
a. When the power cord or plug is damaged or frayed.
b. If liquid has been spilled into the LCD TV.
c. If the LCD TV has been exposed to rain or water.
d. If the LCD TV does not operate normally by following the operating instructions.
Adjust only those controls that are covered by the operating instructions as improper adjustment of
other controls may result in damage and will often require extensive work by a qualified technician to
restore the LCD TV to normal operation.
e. If the LCD TV has been dropped or the cabinet has been damaged.
f. When the LCD TV exhibits a distinct change in performance - this indicates a need for service.
21) When replacement parts are required, be sure the service technician uses replacement parts specified by
the manufacturer that have the same characteristics as the original parts. Unauthorized substitutions may
result in fire, electric shock, or other hazards.
22) WARNING : TO REDUCE THE RISK OF FIRE OR ELECTRIC SHOCK, DO NOT EXPOSE THIS
APPARATUS TO RAIN OR MOISTURE.
DO NOT PLACE LIQUID CONTAINERS (FLOWER VASES, CUPS, COSMETICS, ETC.)
ABOVE THE SET. (iNCLUDiNG ON SHELVES ABOVE, ETC.)
23) WARNING : KEEP UNNEEDED SMALL PARTS AND OTHER OBJECTS OUT OF THE REACH OF
SMALL CHILDREN. THESE OBJECTS CAN BE ACCIDENTALLY SWALLOWED. ALSO,
BE CAREFUL ABOUT PACKAGING MATERIALS AND PLASTIC SHEETS.
24) CAUTION : TO PREVENT ELECTRIC SHOCK DO NOT USETHIS PLUG WITH A RECEPTACLE OR OTHER
OUTLET UNLESSTHE BLADESCAN BE FULLYINSERTEDTO PREVENTBLADE EXPOSURE.
25) CAUTION : USE WITH OTHER STAND MAY RESULT IN INSTABILITY POSSIBLY CAUSING INJURY.
26) CAUTION : DANGER OF EXPLOSION IF BATTERY IS INCORRECTLY REPLACED. REPLACE ONLY
WITH THE SAME OR EQUIVALENT TYPE.
m This product utilizes timmeadsomder,andhas afluorescent mampcontaining aemam_amount of mercury. Dispoeamof
these materiamemay be regumatedin your community dueto environmentaBconsiderations. For disposaBorrecycling
information p_eaeecontact your Iocamauthorities, orthe EmectroniceindustriesAHiance: www.eiae.or_
3

Dear Panasonie Customer
Welcome to the Pat_asonic family c_:fcustomers.
We hope that you wi[! have many years _.!f enjoyment from your new LCD T_
To obtain maximum bene/_'t j?om your set, please read these instructions be[_;we
making any adjustments, and retain them i?_r j_ture r<A_rence.
Retain your purchase receipt, and record the model number and seria! number
of your set in the space provided on the rear cover of these instructions.
For assistance, please call : 1-800-211-PANA (7262)
or visit us at www.panasonic.com/contactinfo (U.S.A.)
For assistance, please call : 787°750-4300
or visit us at www.panasonic°com (Puerto Rico)
For assistance, please call : 1-800-561 °5505
or visit us at www.panasonic.ca (Canada)
; Federal Communication Commission information
This equipment has been tested and found to comply with the limits for a TV Broadcast Receiver, pursuant
to Part 15 of the FCC Rubs. These limits are designed to provide reasonable protection against harmful
interference in a residential installation. This equipment generates, uses and can radiate radio frequency
energy and, if not installed and used in accordance with the instructions, may cause harmful interference to
radio communications. However, there is no guarantee that interference wiii not occur in a particular
installation. If this equipment does cause or receive interference, which can be determined by turning
equipment off and on, the user is encouraged to try to correct the interference by one or more of the
following measures:
Reorient or relocate the TV antenna.
Increase the separation between TV and other equipment.
Connect TV into separate outlet from other equipment.
Consult the dealer or an experienced radio / TV technician for help.
FCC Caution: Any changes or modifications not expressly approved by the party responsible for compliance
could void the user's authority to operate this equipment.
The ENERGY STAR'_-_label, a symbol for energy efficiency, was created by the U.S.
Environmental Protection Agency (EPA) and the U.8. Department of Energy
(DOE) to help customers identify products that can save them money and protect
the environment by saving energy. ENERGY STAR'_'compliant products generally
consume less energy than similar standard products.
ILll_lli[tt_,11_i
TN
HIGH=DEFINITION MULTiMEDiA INTERFACE
HDMI, the HDMI logo and High-Definition Multimedia interface are
trademarks or registered trademarks of HDMI Licensing LLC.
4

important Safety instructions .............................. 2
Maintenance .......................................................... 5
SUPPLIED ACCESSORIES ................................... 6
Remote control battery instafladon ...................... 6
Installation ............................................................. 7
Connections .......................................................... 8
Antenna Connection ............................................ 8
Cabb Box Connection ......................................... 8
Connecting Other Equipment .............................. 9
Front Panel Connection ..................................... 11
Power ON / OFF ................................................... t2
Basic Controls ..................................................... t3
Menu Operations ................................................. t4
Tuning Channels ................................................. t6
LOCK .................................................................... t7
CLOSED CAPTION .............................................. 21
iNPUT LABEL ...................................................... 2!
OTHER ADJUST .................................................. 22
PICTURE ADJUST ............................................... 23
POSITION/SIZE .................................................... 24
AUDIO ADJUST ................................................... 25
ASPECT Controts ................................................ 26
Operating peripheral equipment using
the remote control ............................................ 27
Programming the remote control code .............. 27
infrared Code index ........................................... 28
Mode Operational Key Chart ............................. 30
--Manuel de instrueeiones [ Resumen ] --
lnstalaci6n .................................................. 31
Instalaci6nde laspilasdelmandoa distancia..... 31
Cone×i6n .................................................... 32
Conexi6n de antena .................................. 32
Conexi6n del receptor de TV pot cable ..... 32
Conexi6n de otro equipo ........................... 33
Conexiones dei panel frontal ..................... 35
Cone×i6n / desconexi6n de la alimentaci6n ,,, 36
Controles basicos ...................................... 37
Operaciones con menus ........................... 38
Sintonizaei6n de eanaJes .......................... 40
Troubleshooting .................................................. 4t
CUSTOMERSERVICESDIRECTORY(for U.S.A.)...........42
Specifications ...................................................... 43
To clean this unit, wipe with a soft, dry cloth.
If the surfaces are extremely dirty, use a soft cloth dipped in a soap and
water solution or a weak detergent solution.
* Use eyeglass cleaner to remove stubborn dirt from the LCD.
* Never use alcohol, paint thinner or benzine to clean this unit=
* Before using a chemically treated cloth, carefully read the instructions that
came with the cloth.
Mild
detergent
CAUTION :
If water or other liquid enters the monitor through the display panel surface, a malfunction may occur.
5

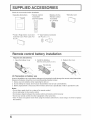
Check the accessories before installation.
, Operating instructions
Panason_
, Remote Control
Transmitter
, Batteries for the
Remote Control
Transmitter
(2 x AA size)
, Warranty Card
, Product Registration Card and
Customer Care Plan Card (For
U.S.A.)
, F-Type Antenna Connector
(for 4C-2V) ( x 1)
Remote control battery
Requires two AA batteries.
1. Open the battery cover. 2. Install the batteries.
Notethecorrectpolarity(+and-).
Two AA size
3. Replace the cover.
Z_ Precaution on battery use
klcorrect installation can cause battery bakage and corrosion that will damage the remote control transmitter.
Disposal of batteries should be in an environmentally friendly manner.
1. Always use new batteries when replacing the old set.
2. Do not attempt to charge, short-circuit, disassemble, heat or burn used batteries.
3. Battery replacement is necessary when remote control acts sporadically or fails to operate this unit.
Notes:
* Do not drop, apply shock to or step on the remote control
* Do not spill water on the remote control.
* Do not place objects between the remote control and remote control receiver.
* Do not use remote controls for other equipment at the same time.
* If the TV does not operate even when using the remote control from a close range, it is time to replace
the batteries.
6

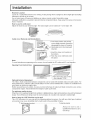
Receiver Location
Locate at a comfortaMe distance for viewing. Avoid pHacingwhere sunlight or other bright Hight(incHuding
reflections) wHHfan on the screen.
Use of some types of fHuorescent Hghting can reduce remote controHtransmitter range.
Adequate ventilation is essentiaH to prevent internaHcomponent failure. Keep away from areas of excessive
heat or moisture.
Now to use the LOD stand
Adjust the stand to your desired angHe.The stand angHecan be rotated 20 o to the right / Heft.
Cabte cover Removal and Reinstaltation
Removal
Note:
20 0 °
1. Push down hooks and pull the
cover slightly towards yourself to
disengage the claws (at 3 points).
2. Slowly pull out in the downward
direction.
1. Insert the claws (at 3 points) at
the bottom.
2. Push the cover until hooks click
into place.
To avoid interference appearing on the screen, do not bundle the RF cable and AC cord to,
Opening Front Controt Door
Optiona! ExternaJ Equipment
ether,
!
Raise the lower part of the
door labeled "PULL".
The Video /Audio connection between components can be made with shielded video and audio cables. For
best performance, antenna cables should utilize 75 ohm coaxial shielded wire. Cables are available from
your dealer or electronic supply store.
Before you purchase any cables, be sure you know what type of output and input connectors your various
components require. Also determine the length of cable you'll need.
For optimum quality picture
When the LCD isexposed to light from outdoors or lighting fixtures, high-contrast pictures may not be displayed
clearly. Turn off florescent lamps near the LCD and place in a location not exposed to outdoor light.
Now to hang the LCD Television on the wan
This LCD Television is for use only with the following optional accessory. Use with any other type of optional
accessories may cause instability which could result in the possibility of injury.
• Wall-hanging bracket ........................................................ TY-WK32LX20W
Always be sure to ask a
qualified technician to carry
out set-up.
7

Note:
CaMes and connectors are not supplied with this seL
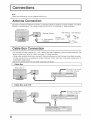
Antenna Connection
For proper reception of VHF/UHF channeHs, an externaHantenna is required, For best reception, an outdoor
antenna is recommended, The antenna mode must be set to TV (see page 16, Mode seHection),
Back of the TV
Antenna TerminaH VHFAntenna UHFAntenna
CabmeBox Connection
oFor reception of came channeHs(01 - 125), connect the cabHesupplied by your HocaHcame company, The
antenna mode must be set to CABLE (see page 16, Mode seHection),
* Certain cabHesystems offset some channeHsto reduce interference or view Premium (scrambHed)channeHs,
A came converter box is required for proper reception, Check with your local cable company for its
compatibility requirements,
* Set the TV channel to CH3 or CH4 when using this connection,
Back of the TV
incoming 75 Ohm Cable
from Cable Company
I Cabme Box and VCR ]
Back of the TV
incoming 75 Ohm Cable
from Cable Company
8

Connecting Other Equipment
I Rear mnput Terminals ]
Back of the TV
COMPONENT \ EDEO OUT
DVD / STB P_C il_
SupeFVHS VCR
OAMCORDER s_o _,
VIDEO GAME
CONSOLE
COMPONENT VIDEO came
=___ VIDE0_
AuDio4--
2
COMP©NENTVID
S-VIDEO came INPUT
VIDEO came
AUDIO came
P
S_VfDEO
¢IDEO
I
)
TOAUDLO
INPUT2 A,MP
PROGOUT
Notes:
* When connecting video cables, priority is given to the S-Video cable when both the S-VIDEO input terminal
and the VIDEO input terminal are connected,
* Please make inquiries of video game manufacturers concerning component cables to connect with video
game console,
Rear Output Terminals
VIDEO,
Back of the TV
9

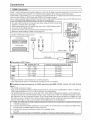
HDMm Connection
HDMP 1(High DefinRion Multi media k_terface) is the first all-digital consumer electronbs A/V interface that
supports uncompressed standard. The HDMI terminal supports both video and audio information.
To the HDMP 1input terminal, you can connect an EIA/CEA-861/861B _'2compliant consumer electronic device,
such as a Set Top Box or DVD player with HDMI or DVl output terminal.
Input a High-bandwidth Digital Content Protection (HDCP) high-definition picture source to this HDMI terminal,
so you can display high-definition pictures on this TV in digital form.
. An audio cable should be connected only when using an HDMI conversion
adapter to connect with a DVl cable.
. Ifthe external device has DVl output only, use a DVl to HDMI adapter cabb _:'s
to connect to the HDMI terminal.
. Connect the audio cables to the AUDIO IN terminals for HDML
. Select the audio setting in HDMI In (see page 25).
Example of HDMI input signal source
DVD player HDMIOUT
a,
Set-Top Box
AUDIO
OUT
R L
®®
HDMI cable
[] Compatible VIDEO Signa!
720p
1080i
480p
480i
Notes:
No. of dots (H x V)
1,280 x 720p
1,920 x 1,080i
720 x 480p
640 x 480p
720 x 480i
Vertical scanning frequency (Hz)
59.94/60
59.94/60
59.94/60
59.94/60
59.94/60
* This input terminal is not intended for use with computers.
,720p/1080i signals wiii be re-formatted for viewing on your LCD display.
[] Compatible sampling fregueney of AUDIO signal through NDMI (L.PCM) : 48 kNz / 44.t kNz / 32 kNz
Notes:
* This HDbll connector is Type A.
, If you connect equipment without a digital output terminal, connect to the COMPONENT VIDEO, S-VIDEO or
VIDEO input terminal on the TV so you can receive an analog signal.
, The HDMI INterminal can only be used with 720p, 1080i, 480i or 480p picture signals. Set the Digital Set -
Top Box DIG ITAL OUT terminal Output setting to 720p, 1080i, 480i or 480p. For detailed information, refer to
the Digital Set -Top Box instruction manual. If you cannot display the picture because your Digital Set -Top
Box does not have a DIGITAL OUT terminal Output setting, use the component Video Input (or the S-Video
Input or Video Input). In this case the picture wiii be displayed as an analog signal.
s 1. HDMI, the HDMI logo and High-Definition Multimedia Interface are trademarks or registered trademarks
of HDMI Licensing LLC.
s2. EIA/CEA-861/861B profiles compliance covers profiles for transmission of uncompressed digital video
including high bandwidth digital content protection.
s3. Consult your consumer electronics dealer for availability details.
[for USA]
HDMI-DVl conversion cable (TY-SCH03DH): available on Panasonic website (www.panasonic.com).
10

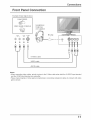
Connections
Front PanemConnection
Example of input signal source
CAMCORDER
VIDEO GAME CONSOLE
AUDIO VIDEO S-VIDEO
OUT OUT OUT
L R
®®®_
(not supplied)
VIDEO cable
AUDIO cable
Notes:
* When connecting video cables, priority is given to the S-Video cable when both the S-VIDEO input terminal
and the VIDEO input terminal are connected.
* Please make inquiries of video game manufacturers concerning component cables to connect with video
game console.
11

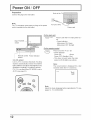
PreparatWon
Connect the plug to the wall outlet.
Note:
The TV consumes some power as long as the power
cord is inserted into the wall outlet. Power cord
Main POWER
switch
Remote control Power indicator
sensor
C.A.T.S. sensor
LCD C.A.T.S. (Contrast Automatic Tracking
System) automatically senses the ambient
light conditions and adjusts the brightness and
gradation accordingly, to optimize contrast.
C.A.T.S. is in effect when PIC MODE is set to
AUTO (see page 23).
SAP
On the main unit
POWER
Press to turn the TV's main power on /
oft.
* Power indicator
Main power ON: Green
Main power OFF: No light
On the remote control
Press to turn the TV on / off.
* Power indicator
Power ON : Green
Power OFF (Standby): Red
oThis does not work when the main
power is off (No light) (see above).
Note:
The screen below is displayed for a few
moments when the TV is turned on.
ZOOM
Note:
Select the menu language before operating the TV (see
pages 14, 15, LANGUAGE).
12

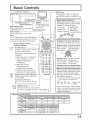
< Front Side ControB >
on/off.(see page 12) ChanneJ Up/Down
Power button
Press to turn the TV ON or OFR
Note:
The TV's power cord must first be plugged
into the wall outbt and then the TV can
be turned on using the POWER switch.
Direct program number
selection buttons
R-TUNER-TUNE button
Switches to previously viewed
channel or video mode.
Not effective under the following
conditions:
1. Right after the TV is turned on.
2. After switching TV / CATV
(MODE inPROGRAM
3. Right after the ACP
SLEEP
PROG
®
4. When the same channel as
thepresent channel is sebcted.
PROGdashbutton/SLEEPTIMERbutton
Program dash channel numbers for
DTV and DBS.
Sbep timer (MINUTES)
F0 -_ 30 -_ 60 -_ 90 --]
ASPECTASPECT button
TV/VCR
O Change screen size (see page 26).
_SAP button
Selects Audio mode (see page 25).
FSTEREO-_ SAP -_ blONO q
Mode Selection buttons
Digital Broadcasting Satellite mode
for Remote Control / Cable TV Mode
TV ModeSelection for RemoteControl
Changes to the next channet up
Movescursorupwardduringmenumode.
Reduces volume
Moves cursor to
the left during
menu mode.
_ncrease$ volume
Moves cursor to
the right during
menu mode.
__J
Displays menu Press to Return
Press to access to previous
TV, DTV, DBS MENU or EXIT
or DVD menus, from menu.
Changes to the next channel down
Movescursordownwardduringmenumode.
Press to display input mode menu.
While the menu is displayed, press
again to change the input mode.
The input mode changes each time
this button is pressed.
I Pressthis buttonto mutethe sound,
pressagainto cancelthe mute.
1
TV/VIDEO RECALL MUTE GUIDE GUIDEbutton
0 0 0 O--
for DBS.
Press to display the current system
status, for example, Aspect mode,
F JUST-_ZOOM -_ FULL-_ NORMALq
Channel number, Stereo mode, TV/
VIDEO and Off timer.
Operation of other Device
VOR VCR REW/FF PLAY
CABLE/DBS - =
DVD Skip Search REW/FF PLAY
Pause
Pause
vcF''''_' vcRRECORD
CABLE/DBS
..............9YD..............
TVNCR Switch VCR CH up/down
STB-ASPECT PAGE up/down
...........2P2£{.2!222................................_2_.2/Z..................
STOP
STOP
13

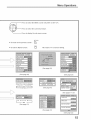
Press to display MENU
screen.
TV/VIDEO
Change the input mode.
, Press to display the Input
sebction menu.
, Press corresponding
number key on the
remote control to select
the input of your choice.
Note:
Video input can also be
TV/VIDEO
selectedbypressing O '
then the CH _ buttons,
and push OK" key.
®
SAP
OK
VOL VOL
ECALL MUTE GUIDE
® ® ®
R-TUNE PROG
ON SCREEN HELP 'instruction' box
An On Screen Help box is displayed when a menu is displayed
on the TV.This Help box indicates which keys on the remote control
are used to navigate the menu shown.
or
_D LANGUAGE
[
14

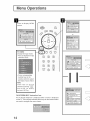
Menu Operations
.............................Press to seHectthe MENU screen (ADJUST or SET UP),
Press to seHectthe sub-menu feature,
Press to dispHaythe sub-menu screen,
o To return to the previous screen "
®To exit the MENU screen:
RETURN
EXIT
(D
MENU
0
This returns TV to normaHviewing,
PIC MODE
BRIGHTNESS
COLOR
TINT
SHARPNESS
(See page 24)
SURROUND
(See page 23) (See page 25)
SeHectthe menu Hanguage,
MODE
AUTO PROGRAM
MANUAL PROGRAM
(See page16)
BLOCK PROGRAMS:
STATUS
ENTER CODE FIRST
(See pages 17-20)
OFF -_--
(See page 21)
COMPONENT1
HDMI
VIDE01
VIDE03 - _u[,_"¢
i
(See page 21)
VIDEO NR
MPEG NR
3D Y/C FILTER
COLOR MATRIX
(See page 22)
15

Press the TV/VIDEO button to display the TV channel.
Press the MENU button to display the MENU screen and select SET UP.
Press to select PROGRAM CH.
3
Mode sebction
Press to select MODE.
select TV or CABLE.
Automatic channem programming
AutomatbaHHyscans and stores aii the TV channeis.
Manuam channem programming
Add or deiete a channei manuaiiy.
Press to select AUTO 4
PROGRAM.
Press to display the
AUTO PROGRAM
screen.
Press to select
MANUAL PROGRAM.
Press to display the
MANUAL PROGRAM
screen.
5
Press to select YES.
Press to start AUTO
PROGRAM.
5
Press to select the
channel.
, You can also use the
numbered buttons.
Channels wiii automatically advance until aii channels
have been scanned. Channel numbers with video
signal received wiii be stored in the Channel Memory.
Notes:
*When any button is pressed during AUTO
PROGRAM, the TV wiii return to normal viewing.
(Channels searched up to that point are added.)
*After AUTO PROGRAM finishes, the lowest channel
number added wiii be displayed.
*When there is no receivable channel, channel 69 (for
TV) or channel 125 (for cable TV) is displayed.
6
channel from the
Channel Memory (the
channel number turns
yellow).
, Repeat steps 5 and 6 for other channels.
16

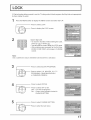
V-Chip technoHogyallows parents to use the TV rating codes to Mock programs that they feeHare inappropriate
for their children to watch.
Press the MENU button to dispHaythe MENU screen and seHectSET UP.
Press to seHectLOCK
-- Press to dispHaythe LOCK screen.
Input 4-digit code.
oTo dear the numbers while entering the code,
press Up _ or Down _.
oYou wHHneed the code to enter the LOCK menu.
oAfter entering your password for the first time,
ENTER CODE FBRSTwHHchange to CHANGE
CODE.
Note:
Use a code that is easy to remember and record it in a safe pHace.
3
Press to seHectBLOCK PROGRAMS.
-- Press to seHect U.S. MOVES, U.S. TV
PROGRAMS, CANADIAN ENGLISH
or CANADIAN FRENCH.
4
Press to seHectSTATUS.
-- Press to seHectOFF or ON.
OFF : Can view aHprograms.
ON : Cannot view programs Hocked in
CHANGE SETTBNG.
5
Press to seHectCHANGE SETTBNG.
Press to enter the next menu.
17

U.S. MOVIES
This TV features the "V-Chip technology" which allows you to use Motion Picture Ratings when viewing movies
or video tapes. This innovation allows parents to block various types of movies and video tapes at their discretion.
f Press to select VIEW NR PROGRAMS?.
.......... Press to select NO or YES.
NO "Cannot view programs with NR signals.
__ YES "Can view programs with NR signals.
Press to select the rating.
Notes:
, When a rating is locked, all ratings below this rating are locked.
, When a rating is unlocked, all ratings above this rating are unlocked.
.............................Press to lock or unlock the rating.
Lock : Red
Unlock: Green
CONTAINS NO RATING (NOT RATED) AND NA (NOT APPLICABLE)
PROGRAMS. Movie has not been rated or rating does not apply.
GENERAL AUDIENCES. All ages admitted.
PARENTAL GUIDANCE SUGGESTED. Some material may not be suitable for children.
PARENTSSTRONGLYCAUTIONED.Somematerialmaybeinappropriatefor childrenunder13.
RESTRICTED. Under 17 requires accompanying parent or adult guardian.
NO ONE 17AND UNDER ADMITTED.
ADULTS ONLY.
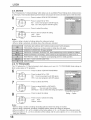
U.S. TV PROGRAMS
This TV features the "V-Chip technology" which allows you to use U.S. TV PROGRAMS Guide ratings to
block various types of TV programs.
Press to select VIEW NR PROGRAMS?
Press to select NO or YES.
NO "Cannot view programs with NR signals.
YES "Can view programs with NR signals.
Notes:
Press to select SETTING.
Press to select BASIC or DETAILED.
BASIC :You can select the ratings.
DETAILED :You can select the ratings and options.
Press to select the rating.
Press to lock or unlock the rating.
Lock : Red
Unlock : Green
L jl_
Rating Option
*When a rating is locked, aii ratings (including options) below this rating are locked.
, When a rating is unlocked, aii ratings (including options) above this rating are unlocked.
, When an option (V, S, L or D) is locked, aii the same options (V, S, L or D) below this rating are locked.
, When an option (V, S, L or D) is unlocked, aii the ratings and the same options (V, S, L or D) above this
rating are unlocked.
18

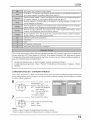
Not Rated. See Customer Caution below.
All cNdren. The themes and elements in this program are specifically designed for a
very young audience, including cNdren from ages 2-6.
_irected to older children. Themes and elements in this program may include mild physical
or comedic violence, or may frighten children under the age of 7.
General audience, it contains little or no violence, no strong language, and little or no
sexual dialogue or situations.
Parental guidance suggested. The program may contain infrequent coarse language,
limited violence, some suggestive sexual dialogue and situations.
Parents strongly cautioned. This program may contain sophisticated themes, sexual
content, strong language and more intense violence.
Mature audiences only. This program may contain mature themes, profane language,
graphic violence, and explicit sexual content.
FANTASY/CARTOON VIOLENCE
VIOLENCE
OFFENSIVE LANGUAGE
DIALOGUE WITH SEXUAL CONTENT
'unexpected and possibly confusing results may occur, and you may not recewe emergency bulletins or
any of the following types of programming:"
• Emergency Bulletins, Such as EAS messages, weather warnings and others}
, Locally originated B3rogramm_ng• News , Political , Public Service Announcements , Religious • Sports
Weather
CANADIAN ENGMSH / CANADIAN FRENCH
The V-CHIP used in this TV allows you to block various types of movies and television programs based on
the two rating systems used in Canada. Italso lets you block or unbiock Canadian French programs according
to various ratings categories.
Press to select VIEW E
- Press to select NO or YES.
NO : Cannot view programs
with E signals.
YES : Can view programs
with E signals.
_'-E means Exempt
Press to select the rating.
Press to lock or unlock the rating.
Lock "Red
Unlock: Green
Notes:
* When a rating is locked, all ratings below this rating are locked.
* When a rating is unlocked, all ratings above this rating are unlocked.
19

CANADIAN ENGLISH RATINGS CHART
Exempt - Exempt programming incHudes: news, sports, documentaries and other
information programming, taHkshows, music videos, and variety programming,
Programming intended for children under age 8, No offensive Hanguage,nudity or sexuaH
content,
Programming generally considered acceptaMe for children 8 years and over, No profanity,
nudity or sexuaHcontent,
GeneraHprogramming, suitabHefor aHaudiences,
ParentaH Guidance suggested, Some material may not be suitable for children,
Programming contains themes or content which may not be suitable for viewers under
the age of 14, Parents are strongly cautioned to exercise discretion in permitting viewing
by pre-teens and early teens,
18+ years old, Programming restricted to adults, Contains constant violence or scenes
of extreme violence,
CANADIAN FRENCH RATINGS CHART
Exempt - Exempt programming,
General - Programming intended for audience of all ages, Contains no violence, or the
violence content is minimal or is depicted appropriately,
8+ General - Not recommended for young children, Programming intended for a broad
audience but contains light or occasional violence, Adult supervision recommended,
Programming may not be suitable for children under the age of 13 - Contains either a
few violent scenes or one or more sufficiently violent scenes to affect them, Adult
supervision strongly suggested,
Programming may not be suitable for children under the age of 16 - Contains frequent
scenes of violence or intense violence,
Programming restricted to adults, Contains constant violence or scenes of extreme
violence,
2O

This unit has a built in decoder that provides a visual depiction of the audio portion of a television program
in the form of written words across the screen (white or colored letters on a black background). It allows you
to read the dialogue of a television program or other information.
Notes:
*This feature is available only with the 480i input signal and with programs that include closed captions.
, The closed caption is not displayed when you set the aspect to "ZOOM" (see page 26).
1
Press the MENU button to display the MENU screen and select SET UP.
f Press to select CLOSED CAPTION.
-- Press to display the CLOSED
CAPTION screen.
-- Press to select OFF, C1 or C2.
*OFF (NO) : Recommended mode when Closed Caption is not being used.
* Ot
° 02
_!i!iiiiii_i_!_i_ii_!_[[[[[[iii[[[ii[iiii[[iii[ii[i[[[[ilij
_i!!iii!i!i!_!i_i_i_!i_i!_i@i!iiiiiii_i!_i_[iii!i[i!iiii![[![i[[i!
For video related information that can be displayed (up to 4 lines of script strategically placed on
the television screen so that it does not obstruct relevant parts of the picture).
Another mode used for video related information.
You can changethe video input labelsdisplayed on the screen to match the connected
device (VCR, DVD player, etc.).
Press the MENU button to display the MENU screen and select SET UP.
Press to select INPUT LABEL.
-- Press to display the INPUT LABEL screen.
f
oK
\ \"---_2L//
Press to select the video input.
Press to select the INPUT LABEL.
(COMPONENT1 / COMPONENT2 / HDMI/
VIDEO1 /VDEO2/VlDEO3/ VCR, LD,
GAME, DVD, DTV, [BLANK] and SKIP _:')
:'-Select to skip unused video input when
pressing TV/VlDEO button.
COMPONENTI_
COMPONENT2_
VDEO2
VDEO3

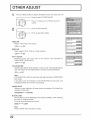
Press the MENU button to display the MENU screen and sebct SET UP.
Press to sebct OTHER ADJUST.
Press to display the OTHER ADJUST
screen.
I
Press to sebct the item.
...............................Press to sebct the setting.
VIDEO NR
Reduce video noise in the picture.
OFF _ ON
MPEG NR
Noise unique to DVD, STB, etc. will be reduced.
OFF _ ON
3B Y/C FILTER
Minimizes noise and cross color in the picture. Not available for
COMPONENT VIDEO iNPUT.
OFF _ ON
COLOR MATRIX
Displays input signals (480p signals) in natural color. Automatically adjusts
color parameters for HD (high definition) and SD (standard definition).
SD<---_ HD
Note:
COLOR MATRIX is effective only when 480p signal is input in COMPONENT
input mode.
In any other case the indication of COLOR MATRIX becomes blue, and
changing between SD and HD is not possible.
POWER SAVE
Reduces screen brightness to lower power consumption. Eye-friendly for
viewing in a dark room.
STAN BAR D--_-------_,-SAVl NG
BLACK LEVEL
Select DARK or LIGHT depending on the picture conditions, when selecting
the video or component input.
The dark scene becomes easy to see.
DARK _'_'''_ LIGHT
Note:
Fixed to DARK when selecting TV mode.
VIDEO NR
MPEG NR
3D Y/C FILTER
OOLOR MATRIX

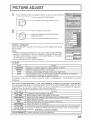
Press the MENU button to display the MENU screen and select ADJUST.
Press to select PICTURE ADJUST.
-- Pressto displaythe PICTUREADJUSTscreen.
Press to select the sub-menu.
-- Adjust the setting wNe watching the picture
behind the menu.
Press to activate the setting if necessary.
NORMAL / NORMALIZE
Select "NORMALIZE" and press "OK" to return each PIC MODE to the factory
PIC MODE
PICTURE
BRIGHTNESS
COLOR
TINT
SHARPNESS
A! PICTURE
Notes:
* "NORMAL" means the PIC MODE is at the factory default setting. "NORMAL"
changes to "NORMALIZE" when you change the setting of BACK LIGHT,
PICTURE, BRIGHTNESS, COLOR, TINT, SHARPNESS, AI PICTURE,
COLOR TEMP or COLOR ENHANCE.
*You can normalize each PIC MODE separately.
COLOR ENHANCE
PIC MODE
MODE Function
STANDARD Displays a standard image for average lighting conditions.
CINEMA Ideal for watching movies in a dark room.
VIVID Displays a dear image with high contrast in a bright room.
AUTO Automatically senses the ambient light conditions and adjusts the brightness
and gradation accordingly, to optimize contrast.
PIC MODE is stored for TV, VIDEO1, VIDEO2, VIDEO3, COMPONENT1, COMPONENT2 and HDMI
individually.
BACKLIGHT,P{CTURE,BRIGHTNESS,COLOR,TINT,SHARPNESS,AiPmCTURE,COLORTEMP,COLORENHANCE
You can change the level of each Item (BACK LIGHT, PICTURE, BRIGHTNESS, COLOR, TINT,
SHARPNESS, AI PICTURE, COLOR TEMP and COLOR ENHANCE) foreach MODE (STANDARD,
CINEMA, VIVID and AUTO) according to your personal preference.
Sub-menu
BACK LIGHT
PICTURE
BRIGHTNESS
COLOR
TINT
SHARPNESS
AI PICTURE
COLOR TEMP
CoBor temperature)
COLOR ENHANCE
Function
Luminance of the back light is adjusted.
Selects proper contrast and density for the room.
Adjusts for easier viewing of dark pictures such as night scenes.
Adjusts the level of color.
Adjusts for flesh tone color (more green or more red).
Adjusts the degree of sharpness.
Controls dark areas without affecting the biack IeveI or brightness in the overalI picture.
Increases or decreases WARM (red) and COOL (blue) colors to suit personal
preference. F,.NORMAL..-_ COOL..---_WARM..]
Enables automatic vivid color adjustment.
23

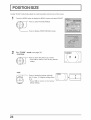
During "ZOOM" mode fineHyadjust the verticaHposition and the size of the screen,
Press the MENU button to dispHaythe MENU screen and seHectADJUST,
Press to seHectPOSITBON/SIZE,
Press to dispHayPOSITBON/SIZE screen,
For "ZOOM" mode (see page 26)
oPOSITION
Press to move the picture up or down,
o Press OK to return to the factory defauHt
setting,
o SIZE
-- Press to shrink, the picture vertically
[by 15 steps: 15 (originaHsetting) down
to 1]_
o Press OK to return to the factory
t

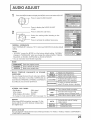
Press the MENU button to dispHaythe MENU screen and seHectADJUST,
Press to seHectAUDIO ADJUST,
Press to dispHaythe AUDIO ADJUST
screen,
f
Press to seHectthe sub-menu,
SeHect the setting while Hstening to the
sound,
Press to activate the setting if necessary,
NORMAL / NORMALIZE
Select "NORMALIZE" and press "OK" to return each MODE to the factory defauHt
setting,
Notes:
, "NORMAL" means the MODE is at the factory defauHt setting, "NORMAL"
changes to "NORMALIZE" when you change the setting of BASS, TREBLE,
BALANCE, AI SOUND, SURROUND or AUDIO LEVELER,
, You can normalize each MODE separateHy,
MODE
STANDARD Emits the odginaHsound_
DYNAMIC Gives contrast to sound,
SPEECH Make voice sound dear,
HDMI IN
BASS, TREBLE, BALANCE, Am SOUND,
SURROUND
You can change the HeveHof each sub-menu (BASS,
TREBLE, BALANCE, AI SOUND, SURROUND) for
each MODE (STANDARD, DYNAMIC and SPEECH)
according to your personal preference,
BASS Adjusts low frequencies,
TREBLE Adjusts high frequencies,
BALANCE Adjusts left and right volume,
AmSOUND
To enjoy a concert hall effect,
SURROUND select ON when stereo is playing,
STEREO / SAP / MONO
* Red display :With signal
White display : No signal
White display (All modes) : MONO
*To change the mode using SAP button (see page 13),
STEREO Two channel Audio reception,
Second Audio Programming
SAP
( typically used for bilingual audio ),
MONO Select when stereo signal is weak,
HDMi IN
When using HDMI connection (see page 10), this
feature will let you switch between Analog Input
and Digital Input,
Automatically selects Analog /
AUTO Digital signal,
DIGITAL Digital Input only,
ANALOG Analog Input only,
AUDIO LEVELER
You can adjust the volume level for each of the input modes (TV, VIDEO1, VIDEO2, VIDEO3, COMPONENT1,
COMPONENT2 and HDMI),
25

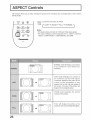
This feature allows you to enjoy viewing the picture at its maximum size, including wide screen cinema
format picture.
R-TUNF PROG
© ® ®
PLAY FF
PAUSE STOP RE(
Panas@_c
ASPECT
TV/VCR
0
Each time you press the button:
uus_-_zoom-_FULL-_.O_MAL-_
! !
Notes:
oThis feature does not work for 1080i and 720p input signals.
oThe aspect setting is stored separately for TV, VIDEO1, VIDEO2,
VIDEO& COMPONENT1, COMPONENT2 and HDMk
i_!31 !
iiiiiiiiiiiiiiiiiiiiiiiiiiiiiiiiiiiiiiiiiiiiiiiiiiiiii!i
iliiii!i!i!i!i
iiiiiii iiilli ilillillillillilliiiiili
i 4 t
s
s
0 0 1
I 4 t
!o o T
o0oi
NORMAL mode wiii display a 4:3 picture
at its standard 4:3 size without any
stretching.
JUST mode wiii display a 4:3 picture at
its maximum size but with aspect
correction applied to the sides of the
screen so that elongation is only
apparent at the left and right edges of
the screen. The size of the picture wiii
depend on the original signak
ZOOM mode magnifies the central
section of the picture.
FULL will display the picture at its
maximum size but with slight elongation.
26

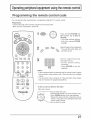
Programming the remote control code
You can operate other manufacturers' components using this TV's remote control.
Preparations:
. Connect the plug of the external component to the wall outbt.
. Make sure the component is turned off.
1
Press and hold POWER and
OK together, for at 1east 5
seconds=
+The mode selection buttons
flash, then release POWER
and OK.
_ Sebct the type of the component.
4:_ _ * The sebcted button lights and
all others go out.
_USE__STOP _I
ASPECT
TV/VCR VCR/DBS OH
TV
Enter the 3-digit infrared code
(see pages 28, 29).
*Factory default setting:
Panasonb
* Press POWER to test the
operation.
Notes:
* if the component does not operate with the remote control, repeat
the procedure using another code. (Some brands have multiple
codes).
, if an incorrect code is entered, or if the procedure takes longer
than 30 seconds, the programming wiii faii.
To find a code not tisted in the index
After step 2 above,
-- Press to select the code.
* Apotentialcodeisloadedforthedeviceselectedinstep2.
* Press POWER button to test the operation.
* Repeat the steps until the component code is
found. It may take many attempts before the
correct code is found.
Press to store the code.

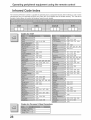
Operating peripheral equipment using the remote control
mnfrared Code mndex
The UniversaH Remote ControHis capabHe of operating many component brands after entering a code, Some
components may not operate because the codes are not avaHaMe due to Hmited memory, The UniversaH
Remote ControHdoes not controHaHfeatures found in each model
Codes for VCR
335
332
314,315,316,329
311,339
305,313
320,326
323,325
306
305,306,329
324,345
301,324,343
310,311,339
345
303, 319,320,325, 326,343
305,307,308,309,313
320,326,334
324,333,345
1306
334
300,323,345
323,324
339
310,311,334,339
306,310, 311,339
300,305, 306,307, 308,309
323,324,331
310,311,339
306
309,
338,
300,
i338,
304,
310,
323,
1306,
324
340,341,347,348
345
340,341,347,348
347
311,334,339
324
321,328,335
320,326
321,322, 323,324
300,305,310,311,324,
339, 345
300,311,345
320, 323,324, 326, 331,343
323, 324,331
323
300,301,302, 323,324,
331,333,345,346
321,322, 323,324
305, 309,324, 333, 336, 340
300,301,302, 323,324,
331,333,345,346
305,309,324, 336, 340
Codes for Personam Video Recorders
302,
320,
305,
301,
326,
300,
335,
317
335
317
328,
323,
306
310,
310,
321,
324
301,
311
306,
305,
306,
304,333
326,339,352
309,313
302,304,309,320,
338,340,347,348
305,306,307,308
336
329,330
324,331
311,339
311,339
322,
346
309,
310,
344
323,324
335,336,344
311,339
28
100
101
102

Operating peripheral equipment using the remote control
Codes for Cable Box
_i_i_:!_i_i_i_!_i!_i_i_i_!i_i_i!i!i!i!i!i!i!i!i!i!i!i!i!_!_i_!i!!_i_!_i_i_iii_ii_i!i_i!_i
24
125,
105,
105,
112,
124, 125,
129
134
105, 132
122
111, 119,
123, 124,
112, 118,
145
103,
103,
133
130
105,
102,
109,
106,
101,
105,
132
132
122
113
132
120,121,122,
125,126,127
140,141,142,
124
104,105
132
137,139
110,114
107,128,129,130
116
132
132
115
132
112,118,140,141,142,
145
134
105,132,137
105
111,112,113
101,105
105,110
105,132
101,105
144
135
104
125,132
122,132
106
129,130
100,117
100
Codes for DBS
105, 115, 116
105
105,115
106
108
i114
103,111,112
103
!!!!!0_i_i_:i_!;!;!;!;!;!;!;!;!;!;!;!;!;!;!;!;!;!;!;!;!;!;!;!;!;!;!;!;!;!;!;!;!;!;!;!;!;!;!;!;!;!_
101, 102
104
101, 102
108
106, 109, 110, 113
106, 109, 110, 113
107
103, 108
100
101, 102
Codes for DVD
lO0
101
109
105
101
lO0
103
102
B_ 101
101
i110
108
104
i100
101
103
lO0
107
29

Operating peripheral equipment using the remote control
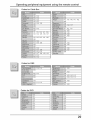
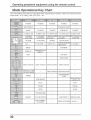
Mode Operational Key Chart
This chart defines which keys are operational after programmff)g (if needed), whib if) the sebcted remote
control mode "DTV, CABLE, DBS, VCR, DVD ,_etc,
iiiiiiiiiiiiiiiiiiiiiiiiiiiii_i31313131311111111!
_!_!_!_!_!_!_!_!_!_!_!_!_!_!_!_!_!_!_!_!_!_!_!_!_!_!_!_!_!_!_!!i!_;;_;;_ii_!i_i_i_i_i_i_i_i_i_i_i_i_i_i_i_i_i_i_i_i_i_i_i_i_i_i_i_i_i_i_i_i_i_i_i_i_!_
iiiiiiiiiiiiiiiiiiiiiiiiiiiiiiiiiiiiiiiiiiiiiiiiiiiiiiiiiiiiiiiiiiiiiiiiiiiiiiiiiiB
i!i!ii!ii!ii_ii_ii_ii_iii!ii!iiiii_i_i_
_!i!i!_i!_i!_i!_!!_!!@_!!_!_!_!_!_!!i!!i_i!_i!@_!_i!i_!i_!i;!_;!_!_i_!i_!i_!i_!_!_
@_!_!_!_i_!i!i!iiiiiiiii_i6_i!i_!i_!i;!i_!i_!i_@_!_!_!_!_!_!_!_!_!_!_!_i!_!!_!!i_
iiiii ii!iiiiiiii!!ii!iiiiiiiii!iiiiii!iiii
POWER
SAP ON/OFF
MUTE
TV INPUT SW
CHANNEL
UP/DOWN
ACTION
VOL + / -
MENU
DISPLAY
EXIT
Select Channel
TV MUTE
TV INPUT SW
TV CHANNEL
UP/DOWN
TV ACTION
TV VOLUME +/-
ONSCREEN VCR
DISPLAY
Select Channel
TV MUTE
TV INPUT SW
3ABLECHANNEL
UP/DOWN
ENTER
CABLE VOL +/-
Select Channel
POWER
STBAUDIOTRACK
STB MUTE
TV INPUT SW
STB NAViGATiON
UP/DOWN
STB ACTION
STB NAViGATiON
RIGHT/LEFT
STB MENU
STB EXIT
STB GUIDE
Select Channel
TV MUTE
TV INPUT SW
NEXT/PREVIOUS
CHAPTER
TV VOLUME +/-
PREVIOUSCHAN _ CABLEPREVIOUSSTB PREVIOUS -
ORVIDEO MODE
STB PROGRAM/
BLEEP - - DASH -
SKIP SEARCH
VCR REW/FF - -
<<REW/>>FF
- PLAY - - PLAY
- PAUSE - - PAUSE
- STOP - - STOP
- VCR RECORD - - -
ASPECT TV/VCR SWITCH - STB ASPECT OPEN/CLOSE
VCR CHANNEL
- UP/DOWN - PAGE UP/DOWN SLOW +/-
3O

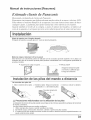
ManueJ de instrucciones [Resumen]
Esdmado cliente de Panasonic
BienveMdo a la/umilia de cliet_tes de PanasoMc.
Espe_mos since_mente que dLt#_ute dural_te muchos a_os de su l_uevo televisor LCD.
Pard obtel_er el m4ximo bet_ejicio de su aparato, lea estas il¢sfrucciol_es antes de hacer
cualquier ajuste, y gu4tdelas para poder utilizarlas como re/el_neia el_ el i_ltum.
Gualde tambidl_ el t_cibo de su con_pra, y al_ote el m,_mem del modelo y el m_mem de
serie de su aparato en el espacio pmvism en la cubierta posterior de estas instrucciones.
Ajuste el soporte con eJanguJo deseado
El _ngulo del soporte se puede girar 20° hacia la derecha/izquierda.
2O
Modo de coigar eJteJevisor LCD en Japared
Este televisor LCD solamente puede ser utilizado con el accesorio opcional siguiente. Si se utiliza con
cualquier otro tipo de accesorio opcional podr_ producir inestabilidad con la consiguiente posibilidad de
ocasionar heridas.
® Soporte para colgar en pared ........................................... TY-WK32LX20W
Asegurese siempre de pedir
a un tecnico cualificado que
le haga la instalaci6n.
JnstaJaci6n de Jas piJas deJ mando a distancia
Se necesitan dos pitas AA.
1. Abra la cubierta de las pilas. 2. Instale las pilas. Tenga en cuenta las 3. Vuelva a colocar la cubierta.
polaridades (+y -) al instalar las pilas.
Z_ Precauciones reJacionadas con Ja utiHzaci6n de Jas piJas
La instalaci6n incorrecta de las pilas puede causar _ugasen las mismas que podrian estropear el transmisor
de mando a distancia.
Las pilas deben desecharse pot medios ecol6gicos.
1. Utilice siempre pilas nuevas cuando reemplace las viejas.
2. No intente cargar, cortocircuitar, desarmar, calentar o quemar las pilas usadas.
3. El cambio de las pilas resulta necesario cuando el mando a distancia _unciona espor&dicamente o no
puede controlar esta unidad.
31

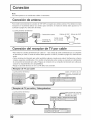
Nota:
Con este aparato no se suministran cabHesni conectores.
Conexion de antena
Para recibir correctamente Hoscanariesde VHF/UHF se requiere una antena extema. Para obtener Hamejor
recepci6n se recomienda utHizar una antena para extedores. EHmodo de antena debe ajustarse a TV
(consuHte Hap_gina 40, SeHecci6ndell mode).
La parte posterior dell televisor
Terminal de antena Antena de VHF Antena de UHF
Cone×ion del receptor de TV pot cabme
oPara recibir los canaries de teHevisi6npor cable (01 - 125) conecte el cable suministrado por su compat_ia
de teHevisidn por cable. El modo de antena debe ajustarse a CABLE (consuHteHap&gina 40, SeHeccidndell
mode)=
° Ciertos sistemas de teHevisidn por cable neutraHizan aHgunoscanaries para reducir interferencias o tienen
canaries especiaHes (codificados). Paca cecibic coccectamente estos canaries se necesita un sintonizadoc
de conversi6n de teHevisidn por cable. Pdngase en contacto con su compatiia de teHevisidn por cable para
conoceclosrequerimientosde compatibiHidad.
,Ponga elcanaldelltelevisoren CH3 o CH4 utiHiceestaconexi6n.
I Receptor de TV cabme
pot
La parteposteriordel televisor
]
Cable entrante de 75
ohmios procedente
_ ompahiade televisidnpor
cable
I Receptor pot y Videograbadora
de TV cabme
La parteposteriordel televisor
]
able entrante de 75 ohmios
procedente compa_ia de
elevisidn pot cable
32

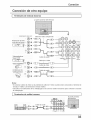
Cone×ion de otto equipo
I Terminabs de entrada traseros ]
La parte posterior del tebvisor
COMPONENT VIDEO CuT
Reproauctorde DVD _ _ pC,
Cajasobre el Equ_po P_ _ '_
Videograbadora
Super-VHS
S-Vide_ @
VIDEOCAMARA oL,T
CONSOLA DE
VIDEOJUEGOS R _)
_u_lc
ou[
Cable de video componente
© ©
AuD!01
L.R#
Gable de audio 1 2 TOAUDEO
INPUT
Cable de s-video
Cable de video
Cable de audio
Notas:
*AI conectar cables de video se da prioridad al cable de S-video cuando est_n conectados el terminal de
entrada S-VIDEO y el terminal de entrada VIDEO.
*Consulte a los fabricantes de los videojuegos acerca de los cables necesarios para conectar la consola
de videojuegos.
Terminabs de samida traseros
Ei panel posterior
del televisor
33

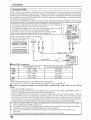
Cone×i6n HDMm
HDMI _:"(interfaz multimedia de alta definici6n) es la primera interfaz A/V para electr6nica de consumidor
completamente digital que soporta todos los est_ndares no comprimidos. El terminal HDMI soporta informad6n
de video y audio. AI terminal de entrada HDM1.1 ,usted puede conectar un dispositivo electr6nico de consumidor
que cumpla con la norma EIA/CEA-861/861B .2 come, per ejemplo, un decodificador o un reproductor DVD
con terminales de salida HDMI o DVL
Introduzca en este terminal una fuente de imagen de alta definici6n con protecci6n digital de copia con alto
ancho de banda (HDCP), para poder mostrar las im_genes de alta definici6n en este televisor en forma digital.
, Un cable de sonido debe ser conectado s61ocuando se usa un adaptador
de conversi6n HDMI para conectarse con el cable DVl.
, Si el dispositivo externo tiene una salida DVl solamente, utilice un cable
adaptador DVl a HDM1.3 para conectar al terminal HDMI.
, Conecte los cables de audio a los terminales AUDIO IN para HDMI.
, Seleccione el ajuste de audio en HDMI In (yea la p_gina 25).
Ejemplo de fuente de la serial de entrada HDMI
AUDIO
Reproductor de DVD HDMIOUT R OUT L
®®®
Caja sobre el Equipo
Cable HDMI
[] SeSaJ VIDEO compatible
N° de puntos (H x V)
720p 1,280 x 720p
1080i 1,920 x 1,080i
480p 720 x 480p
640 x 480p
480i 720 x 480i
HDMI AUDIO IN
rADDIO"_
R L
©©
HDNI IN
Frecuencia de exploraeidn vertical (Hz)
59.94/60
59.94/60
59.94/60
59.94/60
59.94/60
Nota$:
* Este terminal de entrada no es para utilizaci6n con ordenadores.
* Las setiales 720p/1080i ser&n reformateadas para poderlas vet en la pantalla LCD.
[] Frecueneia de muestreo compatible de las seSaleeAUDIOa trav6e de HDMI(L.POM): 48 kHz / 44,1 kHz/ 32 kHz
Notas:
* Este conector HDMI es del Tipo A.
* Si conecta un equipo sin terminal de salida digital, conecte al terminal de entrada COMPONENT VIDEO, S
VIDEO o VIDEO del televisor para disfrutar de la serial anal6gica.
* EI terminal HDMI IN s61opuede utiIizarse con set]aies de imagen 720p, 1080i, 480i o 480p. Ajuste la salida deI
terminal DIGITAL OUT de Iacaja digitaI sobre el aparato a 720p, 1080i, 480i o 480p. Para mas detaIIes, consulte
el manual de instrucciones de Ia caja digitai sobre el aparato. Si no aparecen imagenes porque su caja digital
sobre el aparato no tiene un ajuste de salida de terminal DIGITAL OUT, utilice Iaentrada de video componente (o
la entrada S Video o la entrada Video). En este case la imagen aparecera come una seflaI anaI6gica.
;_1. HDMI, el simbolo HDMI y la Interface de Multimedios de Alta Definici6n son marcas comerciales o
marcas registradas de HDMI Licensing LLC.
;_2. Los perfiles EIA/CEA-861/861B cumplen con los perfiles para transmisi6n de video digital sin comprimir/
induyendo la protecci6n del contenido digital de alto ancho de banda.
;_3. Cablede conversi6nHDMI-DVl(TY-SCH03DH):disponibleen ei sitioWebde Panasonic(www.parlasonic.com).
[para USA]
ConsuIte a su concesionario de productos electr6nicos para conocer mas detailes.
34

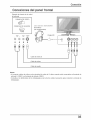
Cone×Jones del panel frontal
EjempHo de fuente de Haset_aH
de entrada
CAMARA DE VIDEO
CONSOLA DE JUEGOS
AUDIO VIDEO S-VIDEO
OUT OUT OUT
L R
®®®_
Los cascos auricuiares/
auricuiares
Cable de video
Cable de audio
Nota$:
* AHconectar caMes de video se da prioridad aHcame de S-video cuando est&n conectados eHterminaHde
entrada S-VIDEO yeH terminaHde entrada VIDEO,
* ConsuHte a Hosfabricantes de Hosvideojuegos acerca de HoscaMes necesarios para conectar HaconsoHade
videojuegos,
35

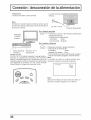
Preparaci6n
Conecte el enchufe al tomacorriente.
La parte posterior del
televisor
Nora ."
Ei televisor consumirA aigo de corriente siempre que ei
enchufe del cable de alimentaci6n est6 introducido en
la toma de corriente.
CA120V, 60Hz
Cable de alimentaci6n
POWER
principal
En el aparato principaJ
C:::::::::::::::::DPowE_Pulselo para conectar / desconectar la alimentaci6n
principal dei televisor.
o Indicador de la alimentaci6n
Conectada : Verde
Desconectada :Apagado
En et mando a distancia
Sensor de mando Indicador de ia
a distancia alimentaci6n
Sensor C.A.T.S.
POiseiopara encender / apagar ei televisor.
o Indicador de la alimentaci6n
Encendido : Verde
Apagado (En espera) : Rojo
oEsto no funciona cuando la alimentaci6n principal
Ei LCD C.A.T.S. (Contrast Automatic Tracking System = est_ desconectada (apagado) (consuite arriba).
Sistema de seguimiento autom_tico del contraste) Nora:
detecta autom_ticamente las condiciones de la luz La pantalla de abajo se visualiza durante unos
ambiental y ajusta el brillo y la gradaci6n en conformidad, momentos cuando se enciende el televisor.
para optimizar el contraste. C.A.T.S. estar_ activado
cuando Modo de Imagen est6 ajustado a Auto. AC,EROAM_ENTO O_,_
r
SAP
0
%
Nota:
Seleccione el idioma de menu antes de utilizar el
televisor (consulte la p_gina 38, 39, Idioma).
36

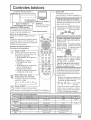
televisor (consulte Iap_.gina36)
Botch de ta alirnentaci6n
POlselopara encendero apagarel televisor.
Nota:
El cabiede Iaalimentaci6ndel televisordeber_
enchufarse primero al tomacorriente, y el
televisor encenderse Iuego con el interruptor
POWER (modo de espera).
Botches de selecoi6n directa
de n_3meros de programas
R-TUNE
©
Bot6n R-TUNE
Cambiaalcanalomodedevideoanterior.
No resuHta efectivo bajo Has
condidones siguientes:
1. Justo despu6s de encender eH
teHevisor.
2. Despues de cambiar TV /
CATV(MODO en Prog.
Canaries).
3. Justo despues de Haejecuci6n
de ACP (programaci6n
autom_tica decanaHes).
4. Cuando se seHeccionaeHmismo
canaHque eHcanaHactual
CanaBsuperior/inferior
SLEEP BOt6n PROG raya / Bot6n
PROG_Temporizador de cancelado
Programa nOmeros de canales
para DTV y DBS.
F-_O -- 30 .-_ 60 .-_ 90 "7
J
ASPECTBOtOn ASPECT
TV/VCR
0 Cambia eHtamatio de HapantaHHa.
[-_ JUSTIFICADO-_ACERCAMIENTO-_COMPLETO-_NORMAL7
Bot6n SAP
Selecciona el modo de audio.
--_ ESTEREO-_ SPA -_ MONO -
Botches de selecci6n de modo
Satelitedeemisi6ndigitalparaelcontrolremote
Selecci6ndelmododetelevisi6nporcable
paraelcontrolremoto
Selecciondelmodode Seleccbndelmodode
videograbadoraparael discodevide0digital
control[.__ _ __rem°te paraelcontrolremote
Seleccbndelmod0detelevisorparaelcontrolremote
Cambia a! siguiente canal superior
Mueve eIcursor hacia arribadurante el
modedeImen&
Reduceelvolumen
Mueve e! cursor
hacialaizquierda
durante el modo
del men&
Aumentaelvolumen
Mueveelcursorhacia
laderechaduranteel
nododelmen&
Visualizael menu Presione para
Presione para volver MENU
accedera losmenL_s anterior o saHirde
DTV,DBSo DVD. MENU.
Cambia a! siguiente canaJ inferior
Mueve eH cursor hacia abajo
durante eHmodo dell men&
POlseloparavisualizarelmenudelmodode
entrada.Mientrassevisualizaelmen&pQlselo
denuevoparacambiarelmododeentrada.
Elmodedeentradacambiacadavezquese
pulsaestebot6n.
TVNIDEO RECALL MUTE GUIDE Bot6nGUIDE
0 0 00--
paraDBS
R3lseloparavisualizarel estadoactualdel
sistemacome,por ejemplo,el modode
aspecto,elnOmerodelcanal,elmodeest_reo
TViVIDEOyeltemporizadordeapagado.
Funcionamiento de otto dispositivo
CAIBLE/DBS
DVD BOsquedaconsattoenrebobinado/ avancer&pido Reproducci6n Pausa Parada
CABLE/DBS ASPECTO de STB
DVD Abertura/cierre Lentamente / + / -
37

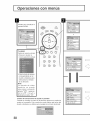
POise[o para visuaiizar [a
pantaiia MENU.
L
TV/VlDEO
Cambia et modo de entrada.
, Pulseparavisualizarel
menOdeselecci6ndeentrada.
, Pulse la tecla de numero
correspondiente en el
mando a distancia para
seleccionar la entrada
de su eiecci6n.
Nota:
La entrada de video
tambi6n se puede
seleccionar pulsando
• TV/VIDEO
pnmero 0 ' iuegoios
botones CH£_y
finalmente la tecla "OK".
Cuadro de Jnstrucciones de ayuda en pantalta
Cuando se visualiza un menO en el televisor aparece un cuadro de
ayuda en la pantalla. Este cuadro de ayuda indica qu6 teclas del
mando a distancia se utiiizan para navegar pot ei menO mostrado.
[
[
38

Operaciones con menus
_(_ POiseio para seieccionar ia pantaiia MENU (Ajuste o Configu.}.
i:ii: Para selecciOnar la funci6n de menQ secundariO.
para visuaiizar ia pantaiia de menu secundario.
RETURN
EXIT
o Para voiver a HapantaHa anterior :f+%
MENU
® Para saHr de HapantaHa MENU " 0
Con esto se retorna a la visi6n normal.
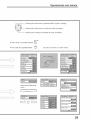
Luz de Atras
BRILLO
COLOR
TINTE
NmDEZ
BAJOS
BALANCE
SONIDOIA
SON, ENVOL
Entr. HDM!
Seieccione ei idioma dei
men&
--_ ESPANOL+--
MODO
PROGRAMA AUTO
PROGRAMA MANUAL
Programas:
I INGRESAR CLAVE
No '_--
Video1
Video2
REDUC DE RUIDO
REDUC DE RUIDO MPEG
3D Y/C Filtro
Matriz Color
39

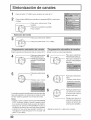
Pulse el bot6n TV/VIDEO para visualizar el canal de TM
3
Pulse el bot6n MENU para visualizar la pantanlla MENU y seleccione
Configu,
Pulse para seieccionar Prog.
Canales.
voLo Pulse para visualizar la pantalla
Prog. Canaies.
Sebcci6n del mode
Pulse para seieccionar MODO.
-- Pulse para seieccionar TV o CABLE.
Programaci6n automatica de canabs
Explorayguardaautom_,ticamentetodosloscanalesde TV.
4
f Pulse para seieccionar
PROGRAMA AUTO.
voLo POiseioparavisuaiizaria
pantalla
PROGRAMA
AUTO.
Programaci6n automatica de canabs
Atiada o borre un canal manuaimente.
Pulse para seieccionar
PROGRAMA MANUAL.
Pulse para visuaiizar ia
pantalla PROGRAMA
MANUAL.
Pulse para seieccionar
Si.
POiseio para iniciar
PROGRAMA AUTO.
5
Pulse para seieccionar
canal.
oTambien puede utilizar
losbotonesnumerados.
Loscanalesavanzaranautom_ticamentebasraquetodosellos
hayansidoexplorados.LosnOmerosdeloscanabsconsenal
devfdeorecibidaseguardar_nen lamemoriadecanales.
Notas:
oCuando se puIsecualquier bot6n durante PROGRAMA
AUTO, el televisor volver_ a mostrar la imagen normal.
(Loscanabs encontrados hasta ese puntose ahaden.)
oDespu6s de terminar PROGRAMA AUTO se
visualizar_ el numero del canal m_s bajo atiadido.
oCuando no hay canal que puedan recibirse, se
visualizar_ el canal 69 (para TV) o el canal 125
(para TV por cable).
6
POlseloparaanadirelcanal
a la memoria de canales
(el nOmerodeI canal se
ponede color azul).
POiseio para borrar ei
canal de ia memoria de
canaies (el numero dei
oRepita los pasos 5 y 6 para otros canales.
4O

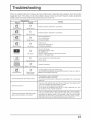
If there is a probbm with your TV phase refer to the tabb bebw to determine the symptoms, then carry out the
suggested check, If this does not soive the probbm, phase contact your bcai Panasonb deabr, quoting the
modei number and seriai number (both found on the rear of the TV},
Symptoms
Picture
Snowy Picture
Multiple images
hterference
Normal Picture
No Picture
No Color
Pooror DistortedPicture
Normal Picture
Sound
Noisy Sound
Normal Sound
@
Noisy Sound
No Sound
No Sound
Normal Sound
Weak or No Sound
Weak, Wrong
or No Sound
Cannot operate with the remote control.
The main unit is hot.
There may be red spots, blue spots, green
spots and black spots on the screen.
Checks
Antenna location, direction or connection.
Antenna location, direction or connection.
Electrical appliances.
Cars / Motorcycles.
Fluorescent lights.
Volume level.
Sound mute switched on.
STEREO/SAP/MONO
TV set to AV mode.
Not plugged into AC outlet.
Not switched on.
Picture / Sound controls set at minimum levels.
Check if in Standby mode.
Color controls set at minimum levels.
Weak signal.
Retune Channel(s).
Sound reception may have deteriorated.
Set STEREO/SAP/MONO setting (AUDIO ADJUST menu) to SAP or
MONO until reception improved.
The battery/ies is/are exhausted.
The batteries' polarity is wrong.
The remote control sensor is exposed to strong light from a fluorescent
lamp, etc.
The main unit radiates heat and some of the parts may become hot.
This is not a problem for performance or quality.
Set up in a location with good ventilation.
Do not cover the ventilation holes of the TV with a tablecloth, etc. and
do not place on top of other equipment.
This is a characteristic of liquid crystal panels and is not a problem.
The liquid crystal panel is built with very high precision technology
giving you fine picture details. Occasionally, a few non-active pixels
may appear on the screen as fixed points of red, blue, green, or black.
Please note this does not affect the performance of your LCD.
41

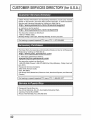
Obtain Product information and Operating Assistance; locate your nearest
DeaJer or Servicenter; purchase Parts and Accessories; or make Customer
Service and Literature requests by visiting our Web Site at:
http :i/www.panasonic.com/consumersupport
or, contact us via the web at:
:/ ,Www.panasonic.com/contactinfo
You may aJso contact us directJy at:
t-800-211-PANA (7282)
Monday-Friday 9 am-9 pro; Saturday-Sunday t0 am-7 pro, EST.
For hearing or speech impaired TTY users, TTY : t-877-833=8855
Purchase Parts, Accessories and instruction Books on tine for aH Panasonic
Products by visiting our Web Site at:
http :/ ,Www.pasc.panasonic.com
or, send your request by EomaH to:
[email protected], com
You may aJso contact us directly at:
t-800-332o5368 (Phone) t-800-237-9080 (Fax Only) (Monday - Friday 9 am to 8
pro, EST.)
Panasonic Services Company
20421 84th Avenue South,
Kent, WA 98032
(We Accept Visa, MasterCard, Discover Card, American Express, and Personal
Checks)
For hearing or speech impaired TTY users, TTY : t-888-805-t277
Panasonic Puerto Rico, mnc.
Ave. 85 de mnfanteria,Kin. 9.5, San Gabriel mndustriaJPark,
Carolina, Puerto Rico 00985
Phone (787)750-4300, Fax (787)788-2910

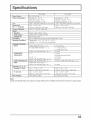
Power Source
Power Consumption
LCD
Screen Size
(W × H × diagonaB)
Channel Capability
Sound
Speakers
Audio Output
Headphones
FEATURES
Operating Conditions
TC-26LX50
AC 120V, 60Hz
Average use : 121 W
Maximum Current : 2.2 A
Stand-by condition : 0.1 W
1366 × 768 pixels widescreen LCD panel.
22=7 "×! 2=8"x 26"
(576 mm x 324 mmx 661 mm)
VHF-12 : UHF-56 : Cable-125
TC-32LX50
Average use : 147 W
Maximum Current : 2.6 A
Stand-by condition : 0.1 W
1366 × 768 pixels widescreen LCD panel=
27.5"× 15.4"x31.5"
(698 mm × 392 mmx 800 mm)
o8 cm × 2 pcs, e5cm × 2 pcs
20 W [!0 W + 10 W] (10%THD)
M3 (3=5mm) Jack × 1
3D Y/C Digital Comb Filter, CLOSED CAPTION, V-Chip
Temperature : 41 °F - 95 °F (5 °C - 35 °C)
Humidity : 5 % - 90 % RH (non-condensing)
Connection Terminals
iNPUT VIDEO (RCA PiN Type x 1} x 3 1.0 Vp-p (75 _(_)
S-VIDEO (MiNi DiN 4pin x 1) × 3 Y : 1=0Vp-p (75 _(_)_
C : 0.286 Vp-p (75 _2)
AUDIO L-R (RCA PIN Type x 2) x 3 0=5Vrms
COMPONENT Y × 2 1=0Vp-p
VmDEOmNPUT (including synchronization)
PB/ PRx 2 _+0.35Vp-p
AUDIO L-R (RCA PIN Type × 2) x 2 0=5Vrms
0UTPUT(PROGRAM0UT} AUDIO L-R (RCA PIN Type × 2) x 1 0=5Vrms, VIDEO (RCA PIN Type x 1) × 1
HDMm HDMI TYPE A Connector × !
AUDIO L-R (RCA PIN Type x 2) x 1 0=5Vrms
Dimensions ( Wx Hx O)
IncmudingTV Stand 26=1 "× 2! =9"× 11.8" 31 =3"× 25 "× 11=8"
(663 mm x 556 mm x 299=5 mm) (795 mm x 634=7 mmx 299=5 mm)
TV Set Only 26=1 "× 19=5"× 5.54 " 31 =3" × 22=6 " × 5=54 "
(663 mm x 494.3 mm × 140.7 mm) (795 mm x 573 mm x 140.7 mm)
Mass (Weight} 18 kg (39=6 Ib=)NET 21 kg (46=2 Ib=)NET
Note:
Design and Specifications are subject to change without notice, Weight and Dimensions shown are approximate,
43

Customer's Record
The model number and serial number of this product can be found on its rear panel. You should
note this serial number in the space provided below and retain this book, plus your purchase
receipt, as a permanent record of your purchase to aid in identification in the event of theft or loss,
and for Warranty Service purposes.
Model Number Serial Number
Panasonic Consumer EJectronice
Company, Division of Panasonic
Corporation of North America
One Panasonb Way Secaucus
New Jersey 07094
Panasonic Puerto Rico inc.
Ave. 65 de Infanteria, Km 9.5
San Gabriel Industrial Park,
Carolina, Puerto Rico 00985
Panasonic Canada inc.
5770 Ambler Drive
Mississauga, Ontario
L4W 2T3
_>2005 Matsushita Electric industrial Co.Ltd. All Rights Reserved. Printed in Japan
MBS0205S0
-
 1
1
-
 2
2
-
 3
3
-
 4
4
-
 5
5
-
 6
6
-
 7
7
-
 8
8
-
 9
9
-
 10
10
-
 11
11
-
 12
12
-
 13
13
-
 14
14
-
 15
15
-
 16
16
-
 17
17
-
 18
18
-
 19
19
-
 20
20
-
 21
21
-
 22
22
-
 23
23
-
 24
24
-
 25
25
-
 26
26
-
 27
27
-
 28
28
-
 29
29
-
 30
30
-
 31
31
-
 32
32
-
 33
33
-
 34
34
-
 35
35
-
 36
36
-
 37
37
-
 38
38
-
 39
39
-
 40
40
-
 41
41
-
 42
42
-
 43
43
-
 44
44


Panasonic TC-26LX50 El manual del propietario
- Categoría
- Equipo de música suplementario
- Tipo
- El manual del propietario
En otros idiomas
- English: Panasonic TC-26LX50 Owner's manual
Documentos relacionados
-
Panasonic TC-22LH1 El manual del propietario
-
-
Panasonic TC20LA5 - 20" LCD COLOR TV Instrucciones de operación
-
-
Panasonic TC-32LX70 El manual del propietario
-
-
Panasonic TC32LX20 Instrucciones de operación
-
-
-