
Premium Security Screen Door
Installation Instructions
Recessed Mount
• Read completely through the installation instructions before proceeding with installation
• Installation requires two people
• Use appropriate protective equipment, including safety glasses
• Children should not be allowed in work area
• Failure to install door correctly could result in injury
Above average degree of difculty. Requires
installation experience.
PROFESSIONAL INSTALLATION RECOMMENDED
Even professional installers will benet from watching.
REVIEW INSTALLATION VIDEO
Customer service and technical support are available.
Monday - Friday: 7:00am - 5:00pm PT
CONTACT US BEFORE RETURNING
1-866-317-8867
NEED HELP?
RETAIN PACKAGING DURING INSTALLATION
Do NOT discard packaging materials until
installation is complete
RECOMMENDED TOOLS
Safety Glasses Measuring Tape
Level
1/8" Drill Bit
minimum length: 4"
Phillips-head
screwdriver
HacksawBox Cutter
Wood Blocks (2"x4"x6")
Shims
Paintable Caulk &
Caulk Gun
Tin Snips
Drill
INSTALLATION
EASY HARD
INSTALLATION
EASY HARD
INSTALLATION
EASY HARD
INSTALLATION
EASY HARD
INSTALLATION
EASY HARD
INSTALLATION
EASY HARD
Pencil
MK1229 04062020
1/2" Spade Drill Bit

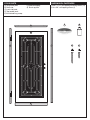
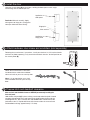
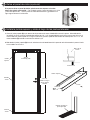
A) Hinge-side jamb
B) Door slab
C) Lock-side jamb
D) Top header jamb
E) Mulit-blade bug sweep
DOOR PARTS HARDWARE & FASTENERS
H) #8 x 1-1/4" self-tapping mounting screws (12)
I) #8 x 5/8" self-tapping screws (2)
F) Weatherstripping
G) Touch-up paint
A
B
C
D
E
H I
GF
2” drywall 1” athead 5/8” panhead 3/4” panhead 1” panhead2-1/2” athead 1/2” athead 1-1/2” panhead3-1/2” athead 1/2” panhead bolt
1/2” panhead
self drilling
2” drywall 1” athead 5/8” panhead 3/4” panhead 1” panhead2-1/2” athead 1/2” athead 1-1/2” panhead3-1/2” athead 1/2” panhead bolt
1/2” panhead
self drilling

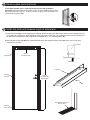
Determining Your Build Out Area (continued)Remove glass panel (optional)
1
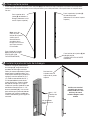
If your door includes glass, remove it before you start the installation
procedure. Loosen (do not remove) each screw. Carefully hold the glass panel in
place and rotate each clip 90°. Carefully remove the glass panel and store it in a
safe place during installation.
Rotate
clips 90°
Determining Your Build Out Area (continued)Remove glass panel (optional)
1
Determining Your Build Out Area (continued)Install top jamb and measure length of side jambs
2
1. Center the top jamb (D) in the existing entryway opening against the edge of the door frame. Mark the frame through holes A &
B. Pre-drill two 1/8" holes 3/4" deep through the marks you made on the frame. Put the top jamb back in place and mount it to
the door frame through holes A & B using two of the supplied #8 x 1-1/4" mounting screws (H).
2. Measure from the top jamb (D) to the existing threshold at the front edge of the back of the door frame. You will use these
measurements in Step 3.
Door Frame
Side View
Front
Top jamb
Hole A
Hole B
Top jamb
Existing
entryway
Step A:
Install top jamb
Existing
threshold
Step B:
Measure side
jamb lengths
Existing threshold from
primary door

Hinge
pins
face up
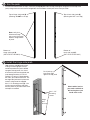
Use the measurement taken in step 2, mark each jamb (A,C) down from the top (see diagram, hinge pins face the top of the
jamb). Using a hacksaw and a metal cutting blade, trim the bottom of each jamb at the mark you made.
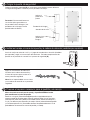
Top of hinge-side jamb (A)
(Warning: do NOT cut at top)
Top of latch-side jamb (C)
(Warning: do NOT cut at top)
Note: verify that
direction of hinge
pins match illustration
before cutting bottom
of jamb.
Bottom of
hinge-side jamb (A)
(CUT AT BOTTOM ONLY)
Bottom of
latch-side jamb (C)
(CUT AT BOTTOM ONLY)
Hold the hinge-side (A) jamb in place,
making sure the hinge pins face up
and the top end of the jamb is butted
up against the top jamb. Use a level
to ensure the jamb remains plumb and
mark through the holes A, B, C & D.
Drill four 1/8" holes 3/4" deep through
the marks you made on the frame. Put
the hinge-side jamb back in place and
mount it using four of the supplied
#8 x 1-1/4" mounting screws (H). Use
a level to ensure the hinge-side jamb
remains plumb as you install each screw
and adjust as needed.
Push jamb up
into corner tight
against the top jamb
Check with a level as
you mark each hole to
drill and again as you
install each screw
A
B
C
D
#8 x 1-1/4"
mounting
screws
Determining Your Build Out Area (continued)Trim the jamb
3
Determining Your Build Out Area (continued)Install the hinge-side jamb
4

Hinge pins
Hang the security door (B) on the hinges, holding the door open to a 90 angle
and starting with the bottom pin first.
Applied to
door panel
Applied to
hinge jamb
Shim washer
Determining Your Build Out Area (continued)Install the door
5
Reminder: Maintain annually. Apply
white grease to hinge pins. (Hinge pins
come pre-lubricated from factory).
Following the manufacturer's instructions, install your choice of 2-3/8" backset handle
and lock set (Sold separately). Fully extend the lock bolts into the "locked" position on
the security door (B).
Determining Your Build Out Area (continued)Attach hardware, door closer and windchain (sold separately)
6
Follow the manufacturer’s instructions
included with the wind chain and door
closer to install on your new security door.
Note: It is not required to use a wind
chain and door closer for your security
door.
Determining Your Build Out Area (continued)Prepare latch and deadbolt clearance
7
Mark for latch and deadbolt clearance BEFORE permanently installing the
lock-side jamb.
Hold the lock-side jamb (C) in place, making sure the top end of the jamb is butted
up against the top jamb. Use a level to ensure the jamb remains plumb, mark the
mounting holes E, F, G & H, and the latch and deadbolt holes. Remove latch-side
jamb and use the 1/2" Spade drill bit to drill clearance holes in center of latch
and deadbolt markings approximately 1/4" deep.

E
F
G
H
Re-insert lock-side jamb (C). Check reveal by closing
door. Gap should be about 5/32". Use shims or spacers
to set reveal. Drill 1/8" holes 3/4" deep through the
mounting hole marks at E, F, G & H holes. Attach the
latch-side jamb using 4 of the #8 x 1-1/4" mounting screws
(H) provided, being sure to maintain the 5/32" reveal
throughout the mounting process.
Push jamb up
into corner tight
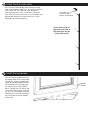
against the top jamb.
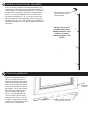
#8 x 5/8" self-tapping screws
Bottom
of door
Push the bug sweep (E) in place on
the bottom edge of the security door
and adjust it so that the rubber bug
sweep on the bottom lightly touches
the threshold. You may need to tap
the sweep in place using a wood
block. Pre-drill with 1/8" drill bit and
secure the sweep in place using 2 of
the #8 x 5/8" self-tapping screws (I)
provided. Be sure to keep your drill
on a low speed so that the threads
do not strip.
Check with a level as
you mark each hole to
drill and again as you
install each screw
Determining Your Build Out Area (continued)Install the latch-side jamb
8
Determining Your Build Out Area (continued)Install the bug sweep
9

Re-install glass panel if removed prior to door installation.
Install foam weatherstripping (F) around top and both sides of door.
Determining Your Build Out Area (continued)
Re-install glass panel and install weatherstripping
10
Determining Your Build Out Area (continued)Final touch-up suggestions
Paintable caulk & gun
Caulk (not included)
Caulk around the outside
of the security door jamb
frame, using paintable
caulk, and paint to the
desired color.
Touch-Up Paint
Shake the supplied touch-up paint (G)
vigorously for 2 minutes and paint the heads
of the one-way screws as indicated in the
diagram.
White Grease Lubricant (not included)
Use white grease to lubricate the hinges of
your new security door every six months.
Warranty
Your Titan Premium Security Screen door is warranted for residential installations against manufacturer defects under normal use for as long
as you own your Titan product, and terminates if you sell or otherwise transfer the product or the property upon which it was installed. The
Powder Coat Finish is warranted for ve years from date of purchase. All other components of the product, including sunscreen material, bug
sweeps, weather-stripping, and composite materials are covered for one year from date of purchase.
On security screen doors equipped with
the Meshtec Advanced Screen System, the screen material is warranted against manufacturer defects under normal, residential use for the rst 10
years you own the product and terminates if you sell or otherwise transfer the product or the property on which it was installed.
If the door breaks
or structural defects occur, Titan will, at our discretion, repair or replace the door. If your home is burglarized and entry was accomplished
through a Titan security door, locked with a double dead bolt, Titan will pay your insurance deductible up to $1000 or replace as applicable the
damaged Titan security door at no charge (the "Home Protection Warranty"). Replacement items may vary in style due to changes in suppliers
and product. Not all colors can be reproduced if colors have been discontinued. Titan is not responsible for any labor expense required to
repair or replace the door. Titan is not responsible for securing the property while warranted items are being repaired or replaced. Cutting
parts not specied by the installation guide or parts drilled incorrectly are not included in this warranty. Any problem caused by abuse, misuse,
failure to maintain warranted item properly, adjustments due to settling of the structure that the product is mounted on, or acts of God, are not
covered.
To make a claim under this Warranty, send a brief written description of the problem, a picture of the claim, proof of purchase, and your contact
information to: Titan Security Doors, 973 N. Colorado Street, Gilbert AZ. 85233 Attn: Warranty Claims

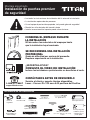
Grado de dicultad por encima del promedio.
Requiere experiencia en la instalación.
SE RECOMIENDA UNA INSTALACIÓN
PROFESIONAL
Incluso los instaladores profesionales se benecian al verlo.
CONSULTA EL VIDEO DE INSTALACIÓN
Servicio al cliente y soporte técnico disponibles.
Lunes - Viernes: De 7:00 am a 5:00 pm Hora del Pacíco
CONTÁCTANOS ANTES DE DEVOLVERLO
1-866-317-8867
¿NECESITAS AYUDA?
CONSERVA EL EMPAQUE DURANTE
LA INSTALACIÓN
NO deseches los materiales del empaque hasta
que la instalación haya terminado.
• Lee todas las instrucciones de instalación del kit antes de la instalación
• La instalación requiere de dos personas
• Usa el equipo de protección apropiado, incluyendo gafas de seguridad
• Mantén los niños alejados del área de trabajo
• Instalar incorrectamente la puerta puede causar lesiones
HERRAMIENTAS RECOMENDADAS
INSTALLATION
EASY HARD
INSTALLATION
EASY HARD
INSTALLATION
EASY HARD
INSTALLATION
EASY HARD
INSTALLATION
EASY HARD
INSTALLATION
EASY HARD
Instalación de puertas premium
de seguridad
Montaje empotrado
Gafas de
seguridad
Cinta de medir
Nivel
1/8" Broca
tamaño mínimo: 4"
Destornillador de
cabeza Phillips
Sierra para metalesCortador de
cajas
Bloques de madera
(5.1 cm x 10.2 cm x 15.2 cm)
Cuñas
Pistola para pasta
selladora y pasta
selladora que se
puede pintar
Tijeras de hojalatero
Taladro
Lápiz
1/2" Spade Broca

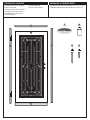
A) Jamba del lado de las bisagras
B) Hoja de la Puerta
C) Jamba del Lado de la cerradura
D) Jamba del travesaño superior
E) Guardapolvo contra insectos,
de aletas múltiples
PIEZAS DE LA PUERTA HERRAJES Y SUJETADORES
F) Weatherstripping
G) Pintura para retoques
H)
Montar tornillo que auto utilizando, núm. 8 x 1-1/4"
(12)
I)
Tornillos autorroscantes de montaje, núm. 8 x 5/8"
(2)
A
B
C
D
E
H I
GF
2” drywall 1” athead 5/8” panhead 3/4” panhead 1” panhead2-1/2” athead 1/2” athead 1-1/2” panhead3-1/2” athead 1/2” panhead bolt
1/2” panhead
self drilling
2” drywall 1” athead 5/8” panhead 3/4” panhead 1” panhead2-1/2” athead 1/2” athead 1-1/2” panhead3-1/2” athead 1/2” panhead bolt
1/2” panhead
self drilling

Determining Your Build Out Area (continued)Remove glass panel (optional)
1
Si tu puerta tiene un panel de vidrio, quítalo antes de empezar a instalar.
Aoja (sin quitar) cada tornillo. Con cuidado sostén el panel de vidrio en su sitio
y rota cada presilla 90°. Quita el panel de vidrio delicadamente y guárdalo en un
lugar seguro durante la instalación.
Determining Your Build Out Area (continued)Retire el panel de vidrio (opcional)
1
Rota las
presillas 90°
Determining Your Build Out Area (continued)Instala la jamba superior y mide el largo de las jambas laterales
2
1. Centra la jamba superior (D) en la abertura de la entrada actual contra el borde del marco de la puerta. Marca dónde irán
los oricios A y B en el marco. Pretaladra dos oricios de 1/8" y 3/4" de profundidad a través de las marcas que hiciste en el
marco. Coloca la jamba superior en su lugar e instálala en la puerta, jando los dos tornillos de montaje Núm. 8 x 1-1/4" , de
acero inoxidable (H) incluidos a través de los oricios A y B.
2. Mide desde la jamba superior (D) hasta el umbral actual en el borde frontal de la parte de atrás del marco de la puerta. Usarás
estas medidas en el Paso 3.
Marco de la
Puerta
Vista Lateral
Frente
Jamba superior
Oricio A
Oricio B
Jamba
superior
Entrada
actual
Step A:
Install top jamb
Umbral
actual
Paso B:
Mide los largos
de las jambas
laterales
Umbral actual de la
puerta principal

Usa las medidas que tomaste en el paso 2; marca cada jamba
(A,C)
desde arriba hacia abajo (ver diagrama: los pasadores de la bisagra deben
quedar hacia la parte superior de la jamba). Con una sierra para metales y una cuchilla para metales, corta la parte inferior de cada jamba donde
marcaste.
Parte superior de la
jamba (A) del lado de la
bisagra (Advertencia: NO
cortes la parte superior)
Determining Your Build Out Area (continued)Cómo cortar la jamba
3
Nota: antes de
cortar la parte
inferior de la jamba,
verica que la
dirección de los
pasadores de la
bisagra sea la misma
que la que muestra
la ilustración.
Parte inferior de la jamba
(A) del lado de la bisagra
(CORTA SÓLO EN
LA PARTE INFERIOR)
Parte superior de la jamba (C)
de lado del pestillo
(Advertencia: NO cortes la parte
superior)
Parte inferior de la jamba (C) del
lado del pestillo
(CORTA SÓLO EN LA PARTE
INFERIOR)
Los pasadores
deben ver hacia
arriba
Sostén en su lugar la jamba del lado
de la bisagra (A), asegurándote de los
pasadores de la bisagra vean hacia
arriba y el extremo superior de la jamba
pegue contra la jamba de arriba. Usa
un nivel para vericar que la jamba esté
a plomo y marca los oricios A, B, C,
y D. Taladra cuatro oricios de 1/8" y
3/4" de profundidad a través de las
marcas que hiciste. Coloca la jamba
del lado de la bisagra en su lugar e
instálala en la puerta, jando los cuatro
tornillos de montaje Núm. 8 x 1-1/4",
de acero inoxidable (H). Usa un nivel
para vericar que la jamba del lado de
la bisagra esté a plomo a medida que
instalas cada tornillo y ajusta según sea
necesario.
Presiona bien
la jamba contra la
esquina de la jamba
superior
Verica con un nivel
a medida que marcas
donde taladrarás cada
oricio y de nuevo
cuando coloques cada
tornillo
A
B
C
D
#8 x 1-1/4"
Tornillos de
montaje
Determining Your Build Out Area (continued)Instalar la jamba del lado de la bisagra
4

Pasador de la bisagra
Cuelga la puerta de seguridad (B) en las bisagras sosteniendo la puerta abierta en
un ángulo de 90 grados. Comienza por los pasadores de abajo.
Aplicar a la
jamba de la
bisagra
Arandela de la cuña
Determining Your Build Out Area (continued)Colgar la puerta de seguridad
5
Recuerda: Dale mantenimiento una
vez al año. Aplica grasa blanca a
los pasadores de las bisagras. (Los
pasadores de las bisagras vienen
prelubricados de fábrica).
Aplicar al
panel de la
puerta
Instala la manija con retiro de 2-3/8" y el juego de cerradura de tu elección (Vendidos
por separado), según las instrucciones del fabricante. Extiende completamente los
pestillos en la posición de “cerrado” en la puerta de seguridad (B).
Determining Your Build Out Area (continued)
Instala los herrajes, el cierre de la puerta y la cadena de retención (vendidos por separado)
6
Sigue las instrucciones del fabricante
incluidas con la cadena de retención y
el cierre de la puerta para instalar en tu
nueva puerta de seguridad.
Nota: No es imprescindible usar un cierre
y una cadena de retención en tu puerta de
seguridad.
Determining Your Build Out Area (continued)Prepara el espacio necesario para el pestillo y el cerrojo
7
Marca el espacio necesario para el cerrojo y el pestillo ANTES de instalar
permanentemente la jamba del pestillo.
Sostén en su lugar la jamba del lado (C) del pestillo, asegurándote de que el
extremo superior de la jamba pegue contra la jamba de arriba. Usa un nivel para
vericar que la jamba esté a plomo, marca dónde irán los oricios de montaje E, F,
G, y H y las aberturas para el pestillo y el cerrojo. Quita la jamba del lado del pestillo
y usa la broca plana de 1/2" para taladrar aberturas de aproximadamente 1/4" de
profundidad en el centro de las marcas del pestillo y el cerrojo.

Empuja el guardapolvo hasta su
lugar en el borde inferior de la
puerta de seguridad y ajústalo de
modo que el guardapolvo inferior
contra insectos toque ligeramente
el umbral. Es posible que necesites
darle golpes suaves con un bloque
de madera para colocarlo en su
lugar. Pretaladra con la broca
de 1/8" y ja el guardapolvo en
su sitio usando 2 de los tornillo
autorroscantes Núm. 8 x 5/8" (I)
incluidos. Asegúrate de mantener el
taladro en una velocidad baja para
que las roscas no dejen tiras.
E
F
G
H
Vuelve a insertar la jamba del lado del pestillo (C). Cierra
la puerta para vericar que hay un espacio de reborde. El
espacio debe ser de aproximadamente 5/32". Usa cuñas
o espaciadores para marcar el espacio. Taladra oricios
de 1/8" y 3/4" de profundidad a través las marcas para
los tornillos de montaje E, F, G, y H. Instala la jamba del
lado del pestillo con 4 de los tornillos montaje, de acero
inoxidable Núm. 8 x 1-1/4" (H) incluidos, asegurándote de
mantener un reborde de 5/32" durante todo el proceso de
instalación.
Presiona bien la jamba
contra la esquina de la
jamba superior
Verica con un nivel
a medida que marcas
donde taladrarás cada
oricio y de nuevo
cuando coloques cada
tornillo
Determining Your Build Out Area (continued)Instala la jamba del lado del pestillo
8
Tornillos autorroscantes de
montaje, núm. 8 x 5/8"
Determining Your Build Out Area (continued)Coloca el guardpolvo
9
Parte
inferior de
la puerta

Vuelva a instalar el panel de vidrio si se quitó antes de la instalación de la puerta
Instale burletes de espuma (F) alrededor de la parte superior y ambos lados de la puerta.
Determining Your Build Out Area (continued)
Vuelva a instalar el panel de vidrio e instale el burlete
10
Determining Your Build Out Area (continued)Sugerencias nales de retoque
Pasta selladora pintable
y pistola
Pasta selladora (no
incluido)
Aplica pasta selladora
pintable por el exterior del
marco de la jamba de tu
puerta de seguridad y pinta
del color deseado.
Pintura para retoques
Agita bien durante 2 minutos la pintura de
retoque (G) provista y pinta las cabezas de los
tornillos unidireccionales tal como lo indica el
diagrama.
Lubricante de grasa blanca (no incluido)
Cada seis meses lubrica con grasa blanca las
bisagras de nueva puerta de seguridad.
Warranty
Se garantiza que su puerta de Seguridad con Pantalla de Titan para instalaciones residenciales no presentará defectos de fabricación bajo
condiciones de uso normal durante todo el período en que usted sea propietario de este producto de Titan, y concluye si usted vende o
transere el producto o la propiedad en la cual se instaló. El Acabado Recubierto de Material Granular está garantizado durante cinco años a
partir de la fecha de compra. Todos los demás componentes del producto, incluyendo el material protector solar, guardapolvo contra insectos,
burlete y materiales compuestos están cubiertos durante un año a partir de la fecha de compra.
En la pantalla de seguridad puertas equipadas
con el sistema de pantalla avanzada Meshtec, la pantalla material está garantizado contra defectos de fabricación en condiciones normales
de uso residencial, durante los primeros 10 años el propietario del producto y naliza si vende o transere de algún otro modo el producto o la
propiedad en la que se instaló.
Si la puerta se rompe u aparecen defectos estructurales, Titan, a discreción, repará o reemplazará la puerta.
Si roban en su hogar mediante entrada forzosa y logran entrar a través de una puerta de seguridad de Titan, cerrada con cerrojo doble,
Titan le pagará hasta $1000 de deducible de su seguro o reemplazará según sea el caso la puerta de seguridad de Titan dañada sin costo
alguno (la “Garantía de Protección del Hogar”). El estilo de los repuestos puede variar debido a cambios de proveedores y productos. No
todos los colores pueden estar disponibles si se han descontinuado. Titan no se responsabiliza por cualquier costo de mano de obra que se
necesite para reparar o reemplazar la puerta. Titan no se responsabiliza por asegurar la propiedad mientras los artículos bajo la garantía estén
siendo reparados o reemplazados. Las piezas de corte no especicadas por la guía de instalación o las piezas con fallas de perforación no
están incluidas en esta garantía. La garantía no cubre ningún problema causado por abuso, uso inapropiado, fuerza mayor, por no mantener
correctamente el artículo garantizado o por ajustes debido al asentamiento de la estructura en la que está montado el producto.
Para efectuar una reclamación bajo esta garantía, envíe por escrito una descripción breve del problema, una foto de la reclamación,
comprobante de compra y su información de contacto a: Titan Security Doors, 973 N. Colorado Street, Gilbert, AZ. 85233 Atención: Warranty
Claims
-
 1
1
-
 2
2
-
 3
3
-
 4
4
-
 5
5
-
 6
6
-
 7
7
-
 8
8
-
 9
9
-
 10
10
-
 11
11
-
 12
12
-
 13
13
-
 14
14


Titan 1S2001DN1WHP5A Guía de instalación
- Tipo
- Guía de instalación
- Este manual también es adecuado para
en otros idiomas
Artículos relacionados
Otros documentos
-
Unique Home Designs 5V0000ULWH00D Guía de instalación
-
-
Unique Home Designs 1S2026KN2WHISA Guía de instalación
-
Unique Home Designs MESHTEC Guía de instalación
-
-
-
-
Unique Home Designs 1U0330EN0FGGLA Guía de instalación
-
Unique Home Designs ISHV700032WHT Guía de instalación
-
Gatehouse LF617-32-BLK Guía de instalación