HearthPro Door Fireplace Electric Manual de usuario
- Categoría
- Calentadores espaciales
- Tipo
- Manual de usuario

Model#: SP5768
USER MANUAL
Keep this manual for future reference
QUESTIONS, PROBLEMS, OR MISSING PARTS?
Please Contact Customer Service Before Returning to Store
+1-844-455-4621
www.soupro.com
THIS INSTRUCTION BOOKLET CONTAINS IMPORTANT SAFETY INFORMATION. PLEASE
READ AND KEEP FOR FUTURE REFERENCE
Lot number: _____________
Date: _____________

• GENERAL INFORMATION
Package Contents
Safety Instructions
Warranty
• ASSEMBLY INSTRUCTIONS
Preparation
Assembly
• FIREBOX OPERATIONS
FCC/IC Information
Safety Information
Operating Instructions
Care And Maintenance
Troubleshooting
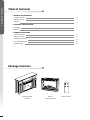
Table of Contents
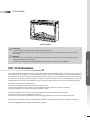
Package Contents
Fireplace Mantel
SP5768
Firebox
SP2618-IR-FGPB
Remote Control
2
GENERAL INFORMATION
2
3
4
5
7
15
16
17
18
19

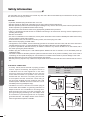
Safety Instructions
Please read and understand this entire manual before attempting to assemble, operate or install the product.
IMPORTANT NOTICE
When using electrical appliances, basic precautions should always be followed to reduce the risk of re, electric shock
and injury to persons, including the following:
WARNING:
Place this unit in a location that avoids direct sunlight and high temperatures.
WARNING:
Plastic bags, nails, etc. should be kept out of reach of children.
WARNING:
This appliance is hot when in use. To avoid burns, DO NOT let bare skin touch hot surfaces. Keep
combustible material, such as furniture, pillows, bedding, papers, clothes and curtains, at least 3 feet from the front
of the heater and keep them away from the side and rear.
WARNING:
Extreme caution is necessary when any heater is used by or near children or individuals with
disabilities and whenever the replace is left operating and unattended.
WARNING:
DO NOT run cord under carpeting. DO NOT cover cord with throw rugs, runners, or similar covering.
Do not route cord under furniture or appliances. Arrange cord away from traffic areas and where it will not be
tripped over.
WARNING:
DO NOT insert or allow foreign objects to enter any ventilation or exhaust opening as this may cause
an electric shock or re, or damage the appliance.
WARNING:
This appliance has hot and arcing or sparking parts inside. DO NOT use it in areas where gasoline,
paint or ammable vapors or liquids are used or stored. This replace should not be used as a drying rack for
clothing. Christmas stockings or decorations should not be hung in the area of it.
3
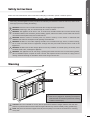
GENERAL INFORMATION
Warning
58"
CAUTION:
This unit is intended for use only with the products and maximum weights indicated. Use with other
products or products heavier than the maximum weights indicated may result in instability causing possible injury.
NOTE:
Flat panel TVs with base support should be placed squarely in the center of the stand with no overhang
on any side.
Max. 75 lbs (34 kg)
Max. 13 lbs (5.9 kg)
WARNING: DO NOT
cover the fireplace heater
while unit is plugged in. Operating the fireplace
while the heater is covered may lead to re resulting
in death or serious injury.

Warranty
1-YEAR LIMITED WARRANTY
Soupro Limited Inc.
(hereinafter referred to collectively as “the Company”) warrants that your new
BOLDFLAME
Electric
Fireplace is free from manufacturing and materials defects for a period of one (1) year from date of purchase. Subject to the
following conditions and limitations:
1. The electric fireplace must be installed and operated at all times in accordance with the installation
and operating instructions furnished with the product. Any unauthorized repair, alteration, willful abuse,
accident, or misuse of the product shall nullify this warranty.
2. This warranty is non-transferable, and is made to the original owner, provided that the purchase was
made through an authorized supplier of the Company.
3. The warranty is limited to the repair or replacement of part(s) found to be defective in material or
workmanship – provided that such part(s) have been subjected to normal conditions of use and service –
after said defect is conrmed by the Company’s inspection. All replacement parts or products will be new,
remanufactured, or refurbished.
4. The Company may, at its discretion, require that any defective part(s) be returned in exchange for the
replacement part(s).
5. The Company may, at its discretion, fully discharge all obligations with respect to this warranty by
refunding the wholesale price of the defective part(s).
6. This warranty does not cover the LED light bar included with the electric replace.
7. Any installation, labor, construction, transportation, or other related costs/expenses arising from defective
part(s), repair, replacement, or otherwise of same, will not be covered by this warranty, nor shall the
Company assume responsibility for the same.
8. The owner/user assumes all other risks – if any – including but not limited to the risk of any direct, indirect
or consequential loss or damage arising out of the use, or inability to use the product, except as provided
by law.
9. All other warranties – express or implied – with respect to the unit, its components and accessories, or
any obligations/liabilities on the part of the Company are hereby expressly excluded.
10. The Company neither assumes, nor authorizes any third party to assume on its behalf, any other liabilities
with respect to the sale of the unit.
11. The warranties as outlined within this document do not apply to non-accessories used in conjunction with
the installation of this product.
12. This warranty gives you specic legal rights, and you may also have other rights which vary from state to
state.
This warranty is void if:
(a) The replace is subjected to prolonged periods of dampness or condensation.
(b) Any unauthorized alteration, willful abuse, accident, or misuse of the product.
(c) You do not have the original purchase receipt.
IF WARRANTY SERVICE IS NEEDED
Please Contact Customer Service
Make sure you have the following information ready:
• Warranty
• Sales Receipt
• Product Model/Serial Number
• Date of Purchase
• Location of Purchase
4
GENERAL INFORMATION
+1-844-455-4621
www.soupro.com

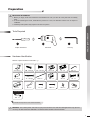
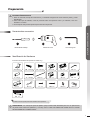
Preparation
IMPORTANT INFORMATION
1. Before you begin, locate the instructions and hardware. Be sure you have all of the parts and can identify
them.
2. To avoid scratching the finish, assemble the product on a soft, non-abrasive surface such as carpet or
cardboard.
3. Assembly of this product may require more than one person.
Tools Required
Philips Screwdriver Hand Drill Hex Key
5
ASSEMBLY INSTRUCTIONS
Number of spare hardware is indicated in ( ).
Hardware Identication
Use the Touch-up Pen to cover surface scratches.
WARNING:
The included plastic wall anchors (OO) are intended for use with solid wall applications only (tile and
concrete). DO NOT USE WITH DRYWALL OR OTHER HOLLOW WALL APPLICATIONS.
FF x 2
SS x 3
AA x 8+(1)
II x 4+(1)
TT x 1
KK x 2 LL x 2 MM x 2
GG x 1
PP x 1
BB x 76+(3)
JJ x 16+(2)
OO x 2NN x 4
CC x 37+(3)
QQ x 2
EE x 35
RR x 3
HH x 1
Touch-up Pen

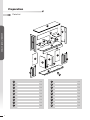
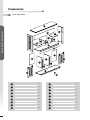
Parts List
Preparation
6
ASSEMBLY INSTRUCTIONS
x 1
x 1
x 1
x 1
x 1
x 2
x 1
x 1
x 2
x 1
x 1
x 1
x 1
x 1
x 2
x 2
x 1
x 1
A J
C L
B K
D
M
E
N
F
O
G P
H Q
I R
A
N
P
C
F
F
G
H
O
O
R
J
K
I
I
L
M
Q
E
D
P
B

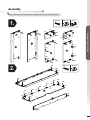
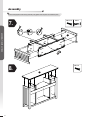
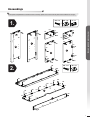
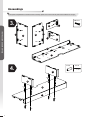
Assembly
1.
7
ASSEMBLY INSTRUCTIONS
Do not fully tighten screws during assembly. Only tighten when all parts are installed in place.
2.
B
C
D
J
E
K
BB
BB
BB
BB BB
BB
BB
BB
BB
BB
BB
BB
BB
BB
BB
BB
BB
BB
BB
BB
BB
BB
BB
BB
BB
BB
BB
BB
BB
BB
BB
BB
BB
EE
EE
EE
EE
EE
EE
EE
EE
EE
EE
EE
BB
BB
BB
BB
BB
BB
EE
EE
EE
EE
EE
EE
EE
EE
EE
EE
EE
EE
EE
EE
EE
EE
EE
EE
EE
EE EE
EE
EE
EE
FF
FF
FF x 2EE x 20BB x 24
L
G
H
EE x 15BB x 15

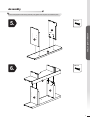
Assembly
Do not fully tighten screws during assembly. Only tighten when all parts are installed in place.
8
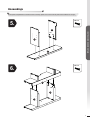
ASSEMBLY INSTRUCTIONS
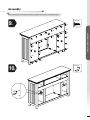
3.
BB x 11
4.
BB
BB
BB
BB
BB
BB
JJ
JJ
JJ
JJ
II
II
II
II
BB
BB
BB
BB
BB
J
I
K
I
D
F
E
F
H
G
G
H
D
E
JJ x 4II x 4

Assembly
9
ASSEMBLY INSTRUCTIONS
Do not fully tighten screws during assembly. Only tighten when all parts are installed in place.
BB x 4
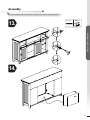
5.
BB x 4
6.
BB
BB
H
J
K
L
J
K
BB
BB

Assembly
Do not fully tighten screws during assembly. Only tighten when all parts are installed in place.
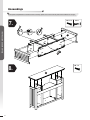
10
ASSEMBLY INSTRUCTIONS
7.
8.
A
BB
BB
BB
BB
BB x 8
C
M
B
PP x 1BB x 10
PP
BB
BB
BB
BB
BB
BB

Assembly
11
ASSEMBLY INSTRUCTIONS
Do not fully tighten screws during assembly. Only tighten when all parts are installed in place.
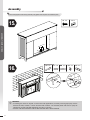
CC x 34
9.
AA x 8
10.
N
O
O
CC
CC
CC
CC
CC
CC
CC
CC
CC
CC
CC
CC
CC
CC
CC
CC
CC
CC
CC
CC
CC
CC
CC
CC
CC
CC
CC
CC
CC
CC
CC
CC
CC
CC
P
P
AA

Assembly
Do not fully tighten screws during assembly. Only tighten when all parts are installed in place.
12
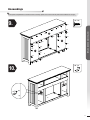
ASSEMBLY INSTRUCTIONS
11.
12.
R
QQ
SS
RR
SS
SS
JJ
JJ
JJ
JJ
JJ
JJ
JJ
JJ
QQ
SS x 3RR x 1QQ x 2JJ x 8

Assembly
13
ASSEMBLY INSTRUCTIONS
Do not fully tighten screws during assembly. Only tighten when all parts are installed in place.
13.
14.
Q
RR
JJ
JJ
QQ
RR x 2JJ x 4

FCC / IC Information
Firebox Model
Assembly
Do not fully tighten screws during assembly. Only tighten when all parts are installed in place.
WARNING:
• If installing the mantel on drywall or other hollow wall applications, the safety mounting tape (KK) must be
fastened to studs, headers, or other structural wall members. The included plastic wall anchors (OO) are
intended for use with solid wall applications only (tile or concrete).
• DO NOT USE WITH DRYWALL OR OTHER HOLLOW WALL APPLICATIONS.
14
ASSEMBLY INSTRUCTIONS
LL x 2KK x 2 MM x 2 NN x 4 OO x 2
15.
16.
KK
KK
NN
NN
MM
OO
LL
TT x 1CC x 3
TT
CC
CC
CC

ATTENTION:
• Find a location for the rebox that is protected from direct sunlight.
• Failure to read all instructions may result in a possible electric shock, re hazard and/or injury and will void
the warranty.
WARNING:
• If the information in this manual is not followed exactly, an electric shock or re may result causing property
damage, personal injury or loss of life.
• Do not store or use gasoline or other ammable vapors or liquids in the vicinity of this appliance.
This equipment has been tested and found to comply with the limits for Class B digital devices, pursuant to part 15 of the FCC
rules. These limits are designed to provide reasonable protection against harmful interference in a residential installation.
The equipment generates, uses and can radiate radio frequency energy and, if not installed and used in accordance with
the instructions, may cause harmful interference to radio or television reception, which can be determined by turning the
equipment off and on. The user is encouraged to try and correct the interference by one or more of the following measures:
(a) Reorient or relocate the receiving antenna
(b) Increase the separation between the equipment and the receiver
(c) Connect the equipment into an outlet on a circuit different from that to which the receiver is connected.
(d) Consult the dealer or an experienced radio/TV technician for help.
This device complies with Part 15 of the FCC rules. Operation is subject to the following two conditions:
(a) This device may not cause harmful interference, and
(b) This device must accept any interference received, including interference that may cause undesired operation.
Modications not approved by the party responsible for compliance could void user’s authority to operate the equipment.
This Class B digital apparatus complies with Canadian ICES-003.
FCC / IC Information
Firebox Model
15
FIREBOX OPERATIONS
SP2618-IR-FGPB

Safety Information
Use this rebox only as described in the manual. Any other use is NOT recommended by the manufacturer and may cause
re, electric shock or injury to persons.
CAUTION:
• If possible, ALWAYS unplug this rebox when not in use.
• DO NOT operate any rebox with a damaged cord or plug or after the heater malfunctions.
• DO NOT operate any rebox if it has been dropped or damaged in any manner. Disconnect power at service panel and have
rebox inspected by a reputable electrician before reusing.
• Any repairs to this unit should be carried out by appropriately qualied service personnel.
• Under no circumstances should this unit be modied. Parts having to be removed for servicing must be replaced prior to
operating this unit again.
• DO NOT use outdoors.
• This unit is not intended for use in bathrooms, laundry areas and similar indoor locations. NEVER place heater where it may
fall into a bathtub or other water container.
• To disconnect this unit, turn all controls to the OFF position, then remove plug from outlet.
• ONLY connect to properly grounded outlets.
• This appliance, when installed, must be electrically grounded in accordance with local codes, with the current CSA C22.1
Canadian Electrical Code or, for USA installations, follow the National Electrical Code, ANSI/NFPA NO.70.
• To prevent a possible re, DO NOT block any air intakes or exhaust in any manner. DO NOT use on soft surfaces, like a
bed, where opening may become blocked.
• ALWAYS plug this unit directly into a wall outlet/receptacle. NEVER use with an extension cord or relocatable power tap
(outlet/power strip).
• This heater includes an automatic protection system that will shut off the unit to prevent overheating. If the unit is at risk of
overheating, the front panel will display "E1" and a thermal cut out will shut off the heater to prevent damage or risk of re.
• DO NOT slide rebox on top of wood to avoid scratching wood surface.
• DO NOT place any objects on top of rebox and top air intake vents as this will cause the unit to overheat and can cause a
re.
ELECTRICAL CONNECTION:
• A 15-amp, 120-volt, 60 Hz circuit with a properly grounded
outlet is required. Preferably, the fireplace will be on
a dedicated circuit as other appliances on the same
circuit may cause the circuit breaker to trip or the fuse
to blow when the heater is in operation. The unit comes
standard with 6-ft. three-wire cord, exiting from the rear
of the fireplace. DO NOT exceed the current rating of
the current tap. ALWAYS plug this unit directly into a wall
outlet/receptacle. NEVER use with an extension cord or
relocatable power tap (outlet/power strip).
• This rebox is for use on 120 volts. The cord has a plug as
shown below. See illustration for grounding instruction. An
adapter as shown at C is available for connecting three-
blade grounding type plugs to two-slot receptacles. The
green grounding lug extending from the adapter must
be connected to a permanent ground such as a properly
grounded outlet box. The adapter should not be used if a
three-slot grounded receptacle is available.
Grounding Pin
Grounding Pin
Grounding Means
Adapter
A
C
B
D
Metal Screw
Cover of
Grounding Box
ELECTRICAL SPECIFICATIONS
Voltage:
Amps:
Watts:
120 VAC, 60 Hz
12.5 Amps
1500 Watts
16
FIREBOX OPERATIONS

17
FIREBOX OPERATIONS
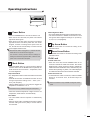
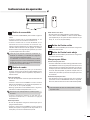
Operating Instructions
Flame Brightness Mode
• The Flame Brightness Mode sets the ame brightness.
• Use UP arrow button or DOWN arrow button to scroll
through the flame brightness settings: F0 (no flame),
F1, F2, F3, F4, F5 (brightest).
• Use UP arrow button to increase the setting of the
selected function.
• Use DOWN arrow button to decrease the setting of the
selected function.
Activate Child Lock
• When the unit is ON, hold the POWER button for 10
seconds to activate the Child Lock function. "E3" will be
displayed and a "beep" will sound 3 times to indicate the
Child Lock function is activated. Then, all function keys are
locked. When pressing any button, "E3" will be displayed
to indicate the Child Lock function has been activated.
Deactivate Child Lock
• To deactivate the Child Lock function, hold the POWER
button for 10 seconds. Then, all functions keys are
unlocked.
• Press the POWER button to turn ON or OFF the unit.
• When the unit is in ON mode, the power icon indicator
light will be shown green.
• When the unit is in OFF mode, the power icon indicator
light will be shown red. When power OFF, unit will be
stopped, if heater is working before power OFF the
unit, fan will have 20 seconds delay to ensure heat will
not be trapped inside the unit.
• Press the MODE button to cycle through the different
functions. Each time the MODE button is pressed, the
mode will enter the next function – Temperature, Timer
or Flame Brightness.
Temperature Mode
• The Temperature Mode controls the heater’s thermostat
setting.
• Press UP arrow button or DOWN arrow button to scroll
through temperature settings: 59°F – 86°F (15°C –
30°C), ON, OF (OFF).
• Hold the MODE button for 3 seconds; this toggles the
temperature unit between °C or °F.
• When the ambient temperature is higher than the set
temperature, heater will turn off automatically.
Timer Mode
• The Timer Mode sets the fireplace to automatically
shutoff.
• Press UP arrow button or DOWN arrow button to adjust
the timer setting from 0 hour (OFF) to 9 hours with 0.5
hour intervals.
Power Button
Each time the rebox is plugged in, a 5-second fan and
heater will turn on for internal check program.
The unit has a memory function with last settings for
heating level and ame brightness effect, unless the main
power to the unit has been interrupted.
Mode Button
Up Arrow Button
Down Arrow Button
Child Lock
This function is only available if using the control panel.
Child Lock function is only available if using the control
panel.

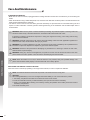
Care And Maintenance
NOTE:
When the heater is not in use, it should be stored in a dry location, away from possible damage. The
power cord should be stored properly to avoid contact with hot or sharp objects.
REPLACING THE REMOTE CONTROL BATTERY:
When the remote control stops operating or its range seems reduced, it is time to replace the batteries.
NOTE:
The batteries should be removed if the product is to be left unused for a long time.
CAUTION:
Non-rechargeable battery is not to be recharged. Exhausted battery is to be removed from the product:
1. The battery compartment is located on the back end of the remote control.
2. Press the small tab inward as you slide the battery door open and remove the old battery.
3. Insert a new CR2025 lithium battery (not included), ensuring the polarities of the battery match the inside of
the battery compartment.
4. Re-insert the battery door.
WARNING:
Make sure the power is turned off before proceeding. Any electrical repairs or rewiring of this unit
should be carried out by a licensed electrician in accordance with national and local codes.
If repairing or replacing an electrical component or wiring, the original wire routing, color coding and securing
locations must be followed.
WARNING:
Electrical outlet wiring must comply with local building codes and other applicable regulations to
reduce the risk of re, electrical shock and injury to persons.
WARNING:
Do not use this replace if any part of it has been under water. Immediately call a qualied service
technician to inspect the replace and replace any part of the electrical system.
WARNING:
Disconnect the power before attempting any maintenance or cleaning to reduce the risk of re,
electrical shock or personal injury.
WARNING:
During any service of this appliance, the power to the unit must be turned off. First turn the main
power switch to the "OFF" position. Then remove the electrical plug from the wall outlet.
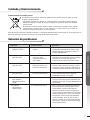
Troubleshooting
Problems
1. No power, logs do not
glow.
2. "E1" is displayed on
control panel.
3. "E2" is displayed on
control panel.
4. "E3" is displayed on
control panel.
5. Fan motor continues
to blow after unit is
powered off.
6. Power cord gets warm
to the touch.
1. The unit does not have
power.
2. The overheat protection
device has been
engaged.
3. The ambient temperature
sensor is broken or not
working correctly.
4. Child Lock function is
activated.
5. Normal operation.
6. Normal operation.
Possible Causes
1. Check that unit is plugged into a standard
120 volt outlet. Then make sure power is set
at "ON" position.
2. Unplug unit, wait 5-10 minutes, then the
sensor will reset itself. Plug the unit back
in and turn on the heater. If the problem
persists, call customer service.
3. Unplug unit, wait 5-10 minutes, then the
sensor will reset itself. Plug the unit back
in and turn on the heater. If the problem
persists, call customer service.
4. To inactivate the Child Lock function, hold
the POWER button for 10 seconds.
5. This is a standard feature; the blower runs
for an additional 20 seconds to ensure heat
will not be trapped inside the unit.
6. This is normal for a heater appliance as it
requires more current to operate. Check the
connections of the appliance cord and the
outlet. Make sure the plug fits tightly into
the outlet. During use, check the plug and
outlet frequently to determine if it is HOT;
if so, discontinue use of the appliance and
consult with a qualied electrician to check
or change the overheating outlet(s).
Solutions
CLEANING INFORMATION:
• Make sure the unit is turned off, unplugged and the heating elements of heater are cool whenever you are cleaning the
heater.
• Clean the metal trim using a water-dampened, soft, and clean cloth. DO NOT use brass polish or household cleaners as
these products will damage the metal trim.
• The motors used on the fan and the flame generator assembly are pre-lubricated for extended bearing life and
require no further lubrication. However, periodic cleaning/vacuuming of the fan/heater and air intake/output vents is
recommended.
18
FIREBOX OPERATIONS

Care And Maintenance
Troubleshooting
Problems
1. No power, logs do not
glow.
2. "E1" is displayed on
control panel.
3. "E2" is displayed on
control panel.
4. "E3" is displayed on
control panel.
5. Fan motor continues
to blow after unit is
powered off.
6. Power cord gets warm
to the touch.
1. The unit does not have
power.
2. The overheat protection
device has been
engaged.
3. The ambient temperature
sensor is broken or not
working correctly.
4. Child Lock function is
activated.
5. Normal operation.
6. Normal operation.
Possible Causes
1. Check that unit is plugged into a standard
120 volt outlet. Then make sure power is set
at "ON" position.
2. Unplug unit, wait 5-10 minutes, then the
sensor will reset itself. Plug the unit back
in and turn on the heater. If the problem
persists, call customer service.
3. Unplug unit, wait 5-10 minutes, then the
sensor will reset itself. Plug the unit back
in and turn on the heater. If the problem
persists, call customer service.
4. To inactivate the Child Lock function, hold
the POWER button for 10 seconds.
5. This is a standard feature; the blower runs
for an additional 20 seconds to ensure heat
will not be trapped inside the unit.
6. This is normal for a heater appliance as it
requires more current to operate. Check the
connections of the appliance cord and the
outlet. Make sure the plug fits tightly into
the outlet. During use, check the plug and
outlet frequently to determine if it is HOT;
if so, discontinue use of the appliance and
consult with a qualied electrician to check
or change the overheating outlet(s).
Solutions
For more information about collection and recycling of used batteries, please contact your local municipality, your waste
disposal service or the point of sale where you purchased this item.
A battery may contain hazardous substances that could be endangering to the environment
and human health.
• This symbol marked on the battery and/or packaging indicates that used battery shall not be
treated as municipal waste. Instead it shall be left at the appropriate collection point for recycling.
• By ensuring the used battery is disposed of correctly, you will help prevent potential negative
consequences for the environment and human health. The recycling of materials will help to
conserve natural resources.
DISPOSAL OF USED BATTERY:
19
FIREBOX OPERATIONS

Crafted in China
Distributed by Source Pro Industries Ltd., Workshop 15 & 18 , 10/F Metro Centre, No.32
Lam Hing Street, Kowloon Bay, Hong Kong
QUESTIONS, PROBLEMS, OR MISSING PARTS?
Please Contact Customer Service Before Returning to Store
+1-844-455-4621
www.soupro.com
Ver. 1

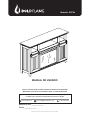
Modelo#: SP5768
MANUAL DE USUARIO
Conserve este manual para futuras consultas.
ESTE FOLLETO DE INSTRUCCIONES CONTIENE INFORMACIÓN DE SEGURIDAD
IMPORTANTE. POR FAVOR LEA Y GUARDELO PARA FUTURAS REFERENCIAS
Número de lote: _____________
Fecha: _____________
¿PREGUNTAS, PROBLEMAS O PIEZAS QUE FALTAN? Por favor, póngase en
contacto con el servicio al cliente antes de volver a la tienda
+1-844-455-4621
www.soupro.com

• INFORMACIÓN GENERAL
Contenido del paquete
Instrucciones de seguridad
Advertencia de carga Máxima
Garantía
• NSTRUCCIONES DE MONTAJE
Preparación
Ensamblaje
• OPERACIONES DE FIREBOX
Información FCC/IC
Informacion de seguridad
Instrucciones de operación
Cuidado y mantenimiento
Solución de problemas
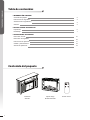
Tabla de contenidos
Contenido del paquete
Chimenea
SP5768
Caja de fuego
SP2618-IR-FGPB
Control remoto
2
INFORMACIÓN GENERAL
2
3
3
4
5
7
15
16
17
18
19

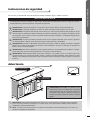
Advertencia
PRECAUCIÓN:
Esta unidad está diseñada para usarse solo con los productos y los pesos máximos indicados.
El uso con otros productos o productos con un peso mayor que el peso máximo indicado puede resultar en
inestabilidad y causar posibles lesiones.
NOTA:
Los televisores de panel plano con soporte de base deben colocarse directamente en el centro del
soporte, sin sobresalir por ningún lado.
Instrucciones de seguridad
Por favor,lea y comprenda todo este manual antes de intentar ensamblar, operar o instalar el producto.
NOTICIA IMPORTANTE
Al usar aparatos eléctricos, siempre se deben seguir las precauciones básicas para reducir el riesgo de incendio,
descarga eléctrica y lesiones a personas, incluyendo las siguientes:
ADVERTENCIA:
coloque esta unidad en un lugar que evite la luz solar directa y las altas temperaturas.
ADVERTENCIA:
Las bolsas de plástico, las uñas, etc. deben mantenerse fuera del alcance de los niños.
ADVERTENCIA:
Este aparato está caliente cuando está en uso. Para evitar quemaduras, NO permita que la piel
desnuda toque las supercies calientes. Mantenga el material combustible, como muebles, almohadas, ropa de
cama, papeles, ropa y cortinas, al menos a 3 pies de la parte frontal del calentador y manténgalos alejados de los
lados y de la parte posterior.
ADVERTENCIA:
Se requiere extrema precaución cuando se use cualquier calentador cerca de niños o personas
con discapacidades y siempre que la chimenea se deje en funcionamiento y desatendida.
ADVERTENCIA:
NO pase el cable debajo de la alfombra. NO cubra el cable con tapetes, corredores o cubiertas
similares. No coloque el cable debajo de muebles o electrodomésticos. Coloque el cable lejos de las áreas de
tráco y donde no se pueda tropezar.
ADVERTENCIA:
NO inserte ni permita que entren objetos extraños en ninguna abertura de ventilación o escape,
ya que esto puede causar una descarga eléctrica o un incendio, o dañar el aparato.
ADVERTENCIA:
Este electrodoméstico tiene partes calientes y con chispas o arcos en el interior. NO lo use
en áreas donde se use o almacene gasolina, pintura o vapores o líquidos inamables. Esta chimenea no debe
utilizarse como estante de secado para la ropa. Las medias o adornos navideños no deben colgarse en el área de
la misma.
3
INFORMACIÓN GENERAL
58"
ADVERTENCIA: NO cubra
el calentador de la
chimenea mientras la unidad está enchufada.
El funcionamiento de la chimenea mientras el
calentador está cubierto puede provocar un
incendio que puede causar la muerte o lesiones
graves.
Max. 75 lbs (34 kg)
Max. 13 lbs (5.9 kg)

Garantía
GARANTÍA LIMITADA DE 1 AÑO
Soupro Limited Inc.
(en lo sucesivo, denominado colectivamente "la Compañía") garantiza que su nueva chimenea eléctrica
BOLDFLAME está libre de defectos de fabricación y materiales por un período de un (1) año a partir de la fecha de compra.
Sujeto a las siguientes condiciones y limitaciones:
1. La chimenea eléctrica debe instalarse y operarse en todo momento de acuerdo con las instrucciones
de instalación y funcionamiento suministradas con el producto. Cualquier reparación no autorizada,
alteración, abuso deliberado, accidente o mal uso del producto anulará esta garantía.
2. Esta garantía no es transferible y se otorga al propietario original, siempre que la compra se haya
realizado a través de un proveedor autorizado de la Compañía.
3. La garantía se limita a la reparación o el reemplazo de las piezas que se encuentren defectuosas en el
material o en la mano de obra, siempre que dichas piezas hayan sido sometidas a condiciones normales
de uso y servicio, una vez que dicho defecto haya sido conrmado por el Inspección de la empresa.
Todas las piezas o productos de reemplazo serán nuevos, remanufacturados o reacondicionados.
4. La Compañía puede, a su discreción, requerir que cualquier pieza defectuosa sea devuelta a cambio de
la(s) pieza(s) de reemplazo.
5. La Compañía puede, a su discreción, cumplir por completo todas las obligaciones con respecto a esta
garantía reembolsando el precio al por mayor de la(s) parte(s) defectuosa(s).
6. Esta garantía no cubre la barra de luz LED incluida con la chimenea eléctrica.
7. Cualquier instalación, mano de obra, construcción, transporte u otros costos / gastos relacionados que
surjan de la(s) pieza(s) defectuosa(s), la reparación, el reemplazo o cualquier otro de los mismos, no
estarán cubiertos por esta garantía, ni la Compañía asumirá la responsabilidad por la mismo.
8. El propietario/usuario asume todos los demás riesgos, si los hay, incluidos, entre otros, el riesgo de
cualquier pérdida o daño directo, indirecto o consecuente que surja del uso o la incapacidad de usar el
producto, excepto según lo estipulado por la ley.
9. Quedan expresamente excluidas todas las demás garantías, expresas o implícitas, con respecto a la
unidad, sus componentes y accesorios, o cualquier obligación/responsabilidad por parte de la Compañía.
10. La Compañía no asume, ni autoriza a ningún tercero a asumir en su nombre, cualquier otra
responsabilidad con respecto a la venta de la unidad.
11. Las garantías que se describen en este documento no se aplican a los accesorios que no se utilizan
junto con la instalación de este producto.
12. Esta garantía le otorga derechos legales especícos, y también puede tener otros derechos que varían
de estado a estado.
Esta garantía es nula si:
(a) La chimenea está sujeta a períodos prolongados de humedad o condensación.
(b) Cualquier alteración no autorizada, abuso intencional, accidente o mal uso del producto.
(c) No tiene el recibo de compra original.
4
INFORMACIÓN GENERAL
SI SE NECESITA SERVICIO DE GARANTÍA
Por favor, póngase en contacto con el servicio al cliente
Asegúrese de tener lista la siguiente información:
• Garantía
• Recibo de compra
• Modelo del producto/Número de serie
• Fecha de compra
• Ubicación de la compra
+1-844-455-4621
www.soupro.com

Preparación
INFORMACIÓN IMPORTANTE
1. Antes de comenzar, busque las instrucciones y el hardware. Asegúrese de tener todas las partes y puede
identicarlas.
2. Para evitar rayar el acabado, monte el producto sobre una superficie suave y no abrasiva, como una
alfombra o un cartón.
3. El montaje de este producto puede requerir más de una persona.
Herramientas necesarias
Destornillador Phillips Taladro de mano Llave hexagonal
5
INSTRUCCIONES DE MONTAJE
El número de hardware de repuesto se indica en ().
Identicación de Hardware
Utilice el Touch-up Pen para cubrir arañazos en la supercie.
ADVERTENCIA:
Los anclajes de pared de plástico (OO) incluidos están diseñados para uso con aplicaciones
de pared sólida solamente (baldosas y concreto). NO LO USE CON PARED DE PARED SECO U OTRAS
APLICACIONES DE LA PARED HUECA.
FF x 2
SS x 3
AA x 8+(1)
II x 4+(1)
TT x 1
KK x 2 LL x 2 MM x 2
GG x 1
PP x 1
BB x 76+(3)
JJ x 16+(2)
OO x 2NN x 4
CC x 37+(3)
QQ x 2
EE x 35
RR x 3
HH x 1
Touch-up Pen

Lista de partes
Preparación
6
INSTRUCCIONES DE MONTAJE
x 1
x 1
x 1
x 1
x 1
x 2
x 1
x 1
x 2
x 1
x 1
x 1
x 1
x 1
x 2
x 2
x 1
x 1
A J
C L
B K
D
M
E
N
F
O
G P
H Q
I R
A
N
P
C
F
F
G
H
O
O
R
J
K
I
I
L
M
Q
E
D
P
B

Ensamblaje
1.
7
INSTRUCCIONES DE MONTAJE
No apriete completamente los tornillos durante el montaje. Apriete solo cuando todas las piezas estén instaladas en su lugar.
2.
B
C
D
J
E
K
BB
BB
BB
BB BB
BB
BB
BB
BB
BB
BB
BB
BB
BB
BB
BB
BB
BB
BB
BB
BB
BB
BB
BB
EE
EE
EE
EE
EE
EE
EE
EE
EE
EE
EE
EE
EE
EE
EE
EE EE
EE
EE
EE
FF
FF
FF x 2EE x 20BB x 24
BB
BB
BB
BB
BB
BB
BB
BB
BB
BB
BB
BB
BB
BB
BB
EE
EE
EE
EE
EE
EE
EE
EE
EE
EE
EE
EE
EE
EE
EE
L
G
H
EE x 15BB x 15

Ensamblaje
8
INSTRUCCIONES DE MONTAJE
No apriete completamente los tornillos durante el montaje. Apriete solo cuando todas las piezas estén instaladas en su lugar.
3.
BB x 11
4.
BB
BB
BB
BB
BB
BB
JJ
JJ
JJ
JJ
II
II
II
II
BB
BB
BB
BB
BB
J
I
K
I
D
F
E
F
H
G
G
H
D
E
JJ x 4II x 4

Ensamblaje
9
INSTRUCCIONES DE MONTAJE
No apriete completamente los tornillos durante el montaje. Apriete solo cuando todas las piezas estén instaladas en su lugar.
5.
BB x 4
6.
BB
BB
H
J
K
BB x 4
J
K
L
BB
BB

Ensamblaje
10
INSTRUCCIONES DE MONTAJE
No apriete completamente los tornillos durante el montaje. Apriete solo cuando todas las piezas estén instaladas en su lugar.
7.
8.
A
BB
BB
BB
BB
BB x 8
C
M
B
PP x 1BB x 10
PP
BB
BB
BB
BB
BB
BB

Ensamblaje
11
INSTRUCCIONES DE MONTAJE
No apriete completamente los tornillos durante el montaje. Apriete solo cuando todas las piezas estén instaladas en su lugar.
CC x 34
9.
10.
N
O
O
CC
CC
CC
CC
CC
CC
CC
CC
CC
CC
CC
CC
CC
CC
CC
CC
CC
CC
CC
CC
CC
CC
CC
CC
CC
CC
CC
CC
CC
CC
CC
CC
CC
CC
P
P
AA
AA x 8

Ensamblaje
12
INSTRUCCIONES DE MONTAJE
No apriete completamente los tornillos durante el montaje. Apriete solo cuando todas las piezas estén instaladas en su lugar.
11.
QQ
SS
RR
SS
SS
JJ
JJ
JJ
JJ
JJ
JJ
JJ
JJ
QQ
SS x 3RR x 1QQ x 2JJ x 8
12.
R

Ensamblaje
13
INSTRUCCIONES DE MONTAJE
No apriete completamente los tornillos durante el montaje. Apriete solo cuando todas las piezas estén instaladas en su lugar.
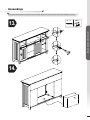
14.
13.
14.
Q
RR
JJ
JJ
QQ
RR x 2JJ x 4

Información FCC/IC
Modelo Firebox
Ensamblaje
ADVERTENCIA:
• Si instala la repisa en paneles de yeso u otras aplicaciones de pared hueca, la cinta de montaje de seguridad
(KK) debe sujetarse a los postes, cabezales u otros miembros estructurales de la pared. Los anclajes de
pared de plástico (OO) incluidos están diseñados para uso con aplicaciones de pared sólida solamente
(baldosa o concreto).
• NO LO USE CON PARED DE PARED SECO U OTRAS APLICACIONES DE LA PARED HUECA.
14
INSTRUCCIONES DE MONTAJE
No apriete completamente los tornillos durante el montaje. Apriete solo cuando todas las piezas estén instaladas en su lugar.
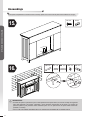
LL x 2KK x 2 MM x 2 NN x 4 OO x 2
15.
16.
KK
KK
NN
NN
MM
OO
LL
TT x 1CC x 3
TT
CC
CC
CC

ATENCIÓN:
• Encuentre una ubicación para la caja de fuego que esté protegida de la luz solar directa.
• No leer todas las instrucciones puede provocar una posible descarga eléctrica, riesgo de incendio y/o
lesiones y anulará la garantía
ADVERTENCIA:
• Si no se sigue exactamente la información de este manual, se puede producir una descarga eléctrica o un
incendio que cause daños a la propiedad, lesiones personales o la muerte.
• No almacene ni use gasolina u otros vapores o líquidos inamables cerca de este aparato.
Este equipo ha sido probado y cumple con los límites para dispositivos digitales de Clase B, de conformidad con la parte 15
de las normas de la FCC. Estos límites están diseñados para proporcionar una protección razonable contra interferencias
perjudiciales en una instalación residencial. El equipo genera, utiliza y puede emitir energía de radiofrecuencia y, si no
se instala y utiliza de acuerdo con las instrucciones, puede causar interferencias perjudiciales en la recepción de radio o
televisión, lo que puede determinarse encendiendo y apagando el equipo. Se recomienda al usuario que intente corregir la
interferencia mediante una o más de las siguientes medidas:
(a) Reorientar o reubicar la antena receptora
(b) Aumentar la separación entre el equipo y el receptor.
(c) Conecte el equipo a una toma de corriente en un circuito diferente al que está conectado el receptor.
(d) Consulte al distribuidor oa un técnico de radio/TV con experiencia para obtener ayuda.
Este dispositivo cumple con la Parte 15 de las reglas de la FCC. El funcionamiento está sujeto a las siguientes dos
condiciones:
(a) Este dispositivo no puede causar interferencias perjudiciales, y
(b) Este dispositivo debe aceptar cualquier interferencia recibida, incluida la interferencia que pueda causar un
funcionamiento no deseado. Las modicaciones no aprobadas por la parte responsable del cumplimiento podrían anular la
autoridad del usuario para operar el equipo.
Este aparato digital de Clase B cumple con la norma canadiense ICES-003.
Información FCC/IC
Modelo Firebox
15
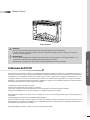
FIREBOX OPERATIONS
SP2618-IR-FGPB

Información de seguridad
Use esta Firebox solo como se describe en el manual. Cualquier otro uso NO es recomendado por el fabricante y puede
provocar incendios, descargas eléctricas o lesiones personales.
PRECAUCIÓN:
• Si es posible, SIEMPRE desenchufe esta cámara de combustión cuando no esté en uso.
• NO opere ningún Firebox con un cable o enchufe dañado o después de que el calentador no funcione correctamente.
• NO opere ningún Firebox si se ha caído o dañado de alguna manera. Desconecte la energía en el panel de servicio y haga
que un electricista de renombre inspeccione la cámara de combustión antes de volver a usarla.
• Cualquier reparación a esta unidad debe ser realizada por personal de servicio debidamente calicado.
• Bajo ninguna circunstancia debe modificarse esta unidad. Las piezas que deben retirarse para su reparación deben
reemplazarse antes de operar esta unidad nuevamente.
• NO lo use al aire libre.
• Esta unidad no está diseñada para su uso en baños, áreas de lavandería y ubicaciones interiores similares. NUNCA
coloque el calentador donde pueda caer en una bañera u otro recipiente de agua.
• Para desconectar esta unidad, gire todos los controles a la posición de APAGADO, luego retire el enchufe del
tomacorriente.
• SOLO conecte a tomacorrientes debidamente conectados a tierra.
• Este dispositivo, una vez instalado, debe estar conectado a tierra de acuerdo con los códigos locales, con el CSA C22.1
actual. El Código Eléctrico Canadiense o, para instalaciones en EE. UU., Siga el Código Eléctrico Nacional, ANSI/NFPA
NO.70.
• Para evitar un posible incendio, NO bloquee las entradas o salidas de aire de ninguna manera. NO lo use en supercies
blandas, como una cama, donde la abertura se puede bloquear.
• SIEMPRE conecte esta unidad directamente a un tomacorriente/tomacorriente de pared. NUNCA lo use con un cable de
extensión o una toma de corriente reubicable (tomacorriente/regleta ).
• Este calentador incluye un sistema de protección automático que apagará la unidad para evitar el sobrecalentamiento. Si la
unidad está en riesgo de sobrecalentamiento, el panel frontal mostrará "E1" y un corte térmico apagará el calentador para
evitar daños o riesgo de incendio.
• NO deslice el Firebox sobre la madera para evitar rayar la supercie de la madera.
• NO coloque ningún objeto encima de la cámara de combustión y los respiraderos superiores de admisión de aire, ya que
esto podría sobrecalentar la unidad y provocar un incendio.
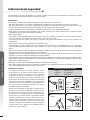
CONEXIÓN ELÉCTRICA:
• La chimenea estará en un circuito dedicado, ya que
otros aparatos en el mismo circuito pueden hacer que
el disyuntor se dispare o el fusible se funda cuando el
calentador está en funcionamiento. La unidad viene
de serie con 6 pies. Cable de tres hilos, saliendo por la
parte trasera de la chimenea. NO exceda la clasificación
actual de la toma actual. SIEMPRE conecte esta unidad
directamente a un tomacorriente de pared/NUNCA lo
use con un cable de extensión o una toma de corriente
reubicable (tomacorriente/regleta).
• El fuego ha sido utilizado en 120 voltios. El cable tiene un
enchufe como se muestra a continuación. Vea la ilustración
para instrucciones de conexión a tierra. Un adaptador como
se muestra en C está disponible para conectar enchufes
de tres patas con conexión a tierra a receptáculos de dos
ranuras. El terminal de conexión a tierra verde que se
extiende desde el adaptador debe estar conectado a una
conexión a tierra permanente, como una caja de toma de
corriente correctamente conectada a tierra. El adaptador
no debe usarse si hay disponible un receptáculo de tres
ranuras con conexión a tierra.
Clavija de conexión
a tierra
Clavija de conexión a
tierra
Medios de conexión
a tierra
Adaptador
A
C
B
D
Tornillo de
metal
Cubierta de la
caja de conexión
a tierra
ESPECIFICACIONES ELECTRICAS
Voltaje:
Amperios:
Vatios:
120 VAC, 60 Hz
12.5 Amperios
1500 Vatios
16
OPERACIONES DE FIREBOX

Modo de brillo de la llama
• El modo de brillo de la llama establece el brillo de la llama.
• Use el botón de echa ARRIBA o el botón de echa ABAJO
para desplazarse por los ajustes de brillo de la llama: F0 (sin
llama), F1, F2, F3, F4, F5 (más brillante).
• Use el botón de echa ARRIBA para aumentar la conguración
de la función seleccionada.
• Use el botón de echa ABAJO para disminuir la conguración
de la función seleccionada.
Activar el bloqueo para niños
• Cuando la unidad está encendida, mantenga presionado el botón
de ENCENDIDO durante 10 segundos para activar la función de
bloqueo para niños. Se mostrará "E3" para indicar que la función
de bloqueo para niños está activada. Entonces, todas las teclas
de función están bloqueadas. Al presionar cualquier botón, se
mostrará "E3" para indicar que la función de bloqueo para niños
se ha activado.
Desactivar bloqueo para niños
• Para desactivar la función de bloqueo para niños, mantenga
presionado el botón de ENCENDIDO durante 10 segundos.
Entonces, todas las teclas de funciones están desbloqueadas.
• Presione el botón de ENCENDIDO para encender o apagar la
unidad.
• Cuando la unidad está en modo ENCENDIDO, la luz
indicadora del icono de encendido se mostrará en ver
• Cuando la unidad está en el modo APAGADO, la luz
indicadora del icono de encendido se mostrará en rojo.
Cuando se apaga la alimentación, la unidad se detendrá; si el
calentador está funcionando antes de apagarla, el ventilador
tendrá un retraso de 20 segundos para garantizar que el calor
no quede atrapado dentro de la unidad.
• Presione el botón MODE para pasar por las diferentes
funciones. Cada vez que se presiona el botón MODE, el modo
ingresará a la siguiente función: temperatura, temporizador o
brillo de la llama.
Modo de temperatura
• El modo de temperatura controla el ajuste del termostato del
calentador.
• Presione el botón de flecha ARRIBA o el botón de flecha
ABAJO para desplazarse por los ajustes de temperatura: 59°
F - 86 ° F (15 ° C - 30 ° C), ON, OF (OFF).
• Mantenga presionado el botón MODE durante 3 segundos;
esto alterna la unidad de temperatura entre ° C o ° F.
• Cuando la temperatura ambiente es más alta que la
temperatura establecida, el calentador se apagará
automáticamente.
Modo temporizador
• El modo de temporizador congura la chimenea para que se
apague automáticamente.
• Presione el botón de flecha ARRIBA o el botón de flecha
ABAJO para ajustar la configuración del temporizador de 0
horas (OFF) a 9 horas con intervalos de 0,5 horas.
Instrucciones de operación
Botón de encendido
Cada vez que se enchufa la cámara de combustión, se
encienden un ventilador y un calentador de 5 segundos
para el programa de vericación interna.
La unidad tiene una función de memoria con las últimas
conguraciones para el nivel de calentamiento y el efecto
de brillo de la llama, a menos que se haya interrumpido
la alimentación principal de la unidad.
Botón de modo
Botón de echa arriba
Botón de echa hacia abajo
Bloqueo para Niños
Esta función solo está disponible si se utiliza el panel
de control.
La función Bloqueo de niños solo está disponible si se utiliza
el panel de control.
17
OPERACIONES DE FIREBOX

Cuidado y mantenimiento
NOTA:
Cuando el calentador no está en uso, debe almacenarse en un lugar seco, lejos de posibles daños.
El cable de alimentación debe almacenarse correctamente para evitar el contacto con objetos calientes o
alados.
REEMPLAZO DE LA BATERÍA DEL CONTROL REMOTO:
Cuando el control remoto deja de funcionar o su alcance parece reducido, es hora de reemplazar las baterías.
NOTA:
Las baterías deben retirarse si el producto no se va a utilizar durante mucho tiempo.
PRECAUCIÓN:
La batería no recargable no debe recargarse. La batería agotada debe retirarse del producto:
1. El compartimiento de la batería se encuentra en la parte posterior del control remoto.
2. Presione la pestaña pequeña hacia adentro mientras desliza la tapa de la batería para abrirla y retire la
batería antigua.
3. Inserte una nueva batería de litio CR2025 (no incluida), asegurándose de que las polaridades de la batería
coincidan con el interior del compartimiento de la batería.
4. Vuelva a insertar la tapa de la batería.
ADVERTENCIA:
Asegúrese de que la alimentación esté apagada antes de continuar. Todas las reparaciones
o reparaciones eléctricas de esta unidad deben ser realizadas por un electricista autorizado de acuerdo con
los códigos nacionales y locales.
Si se repara o reemplaza un componente eléctrico o el cableado, se deben seguir las rutas originales de los
cables, la codicación de colores y las ubicaciones de seguridad.
ADVERTENCIA:
El cableado de la toma de corriente eléctrica debe cumplir con los códigos de construcción
locales y otras regulaciones aplicables a reducir el riesgo de incendio, descarga eléctrica y lesiones a
personas.
ADVERTENCIA:
No use esta chimenea si alguna de sus partes ha estado bajo el agua. Llame inmediatamente
a un técnico de servicio calicado para que inspeccione la chimenea y reemplace cualquier parte del sistema
eléctrico.
ADVERTENCIA:
Desconecte la alimentación antes de intentar cualquier mantenimiento o limpieza para
reducir el riesgo de incendio, descarga eléctrica o lesiones personales.
ADVERTENCIA:
Durante cualquier servicio de este aparato, la alimentación de la unidad debe estar apagada.
Primero, gire el interruptor principal a la posición "OFF". Luego retire el enchufe eléctrico de la toma de
corriente.
Solución de problemas
Problemas
1. No hay energía, los
registros no brillan.
1. La unidad no tiene
energía.
Posibles Causas Soluciones
INFORMACIÓN DE LIMPIEZA:
• Asegúrese de que la unidad esté apagada, desenchufada y que los elementos calentadores del calentador estén fríos
cada vez que limpie el calentador.
• Limpie el borde metálico con un paño humedecido con agua, suave y limpio. NO use pulidor de latón ni limpiadores
para el hogar, ya que estos productos dañarán el borde metálico.
• Los motores utilizados en el ventilador y el conjunto del generador de llama están lubricados previamente para
prolongar la vida útil de los rodamientos y no requieren más lubricación. Sin embargo, se recomienda la limpieza/
aspiración periódica del Ventilador/Calentador y las salidas de aire de admisión/salida.
18
OPERACIONES DE FIREBOX

Cuidado y Mantenimiento
Solución de problemas
Problemas
1. No hay energía, los
registros no brillan.
1. La unidad no tiene
energía.
Posibles Causas Soluciones
Para obtener más información sobre la recolección y el reciclaje de baterías usadas, comuníquese con su municipio local, su
servicio de eliminación de desechos o el punto de venta donde adquirió este artículo.
Una batería puede contener sustancias peligrosas que pueden poner en peligro el medio
ambiente y la salud humana.
• Este símbolo marcado en la batería y/o el empaque indica que la batería usada no debe ser
tratada como basura municipal. En su lugar, se dejará en el punto de recolección apropiado
para el reciclaje.
• Al asegurarse de que la batería usada se elimine correctamente, ayudará a evitar posibles
consecuencias negativas para el medio ambiente y la salud humana. El reciclaje de
materiales ayudará a conservar los recursos naturales.
ELIMINACIÓN DE LA BATERÍA USADA:
19
OPERACIONES DE FIREBOX
2. "E1" se muestra en el
panel de control.
3. "E2" se muestra en el
panel de control.
4. "E3" se muestra en el
panel de control.
5. El motor del ventilador
sigue soplando
después de apagar la
unidad.
6. El cable de
alimentación se
calienta al tacto.
2. El dispositivo de
protección contra
sobrecalentamiento ha
sido activado.
3. El sensor de temperatura
ambiente está roto o no
funciona correctamente.
4. La función de bloqueo
para niños está activada.
5. Funcionamiento normal.
6. Funcionamiento normal.
1. Verique que la unidad esté enchufada a un
tomacorriente estándar de 120 voltios. Luego,
asegúrese de que la alimentación esté en la
posición "ENCENDIDO".
2. Desenchufe la unidad, espere 5-10 minutos,
luego el sensor se reiniciará. Vuelva a enchufar
la unidad y encienda el calentador. Si el
problema persiste, llame al servicio al cliente.
3. Desenchufe la unidad, espere de 5 a 10
minutos, luego el sensor se reiniciará. Vuelva a
enchufar la unidad y encienda el calentador. Si
el problema persiste, llame al servicio al cliente.
4. Para desactivar la función de bloqueo para
niños, mantenga presionado el botón de
ENCENDIDO durante 10 segundos.
5. Esta es una característica estándar; el soplador
funciona durante 20 segundos adicionales para
garantizar que el calor no quede atrapado dentro
de la unidad.
6. Esto es normal para un aparato de calefacción,
ya que requiere más corriente para funcionar.
Compruebe las conexiones del cable del
aparato y la toma de corriente. Asegúrese de
que el enchufe encaje rmemente en la toma de
corriente. Durante el uso, revise el enchufe y el
tomacorriente con frecuencia para determinar
si está CALIENTE; Si es así, deje de usar el
aparato y consulte con un electricista calicado
para revisar o cambiar el (los) tomacorriente(s)
de sobrecalentamiento.

Ver. 2
Hecho a mano en china
Distribuido por Source Pro Industries Ltd., Workshop 15 & 18 , 10/F Metro Centre, No.32
Lam Hing Street, Kowloon Bay, Hong Kong
¿PREGUNTAS, PROBLEMAS O PIEZAS QUE FALTAN? Por favor, póngase
en contacto con el servicio al cliente antes de volver a la tienda
+1-844-455-4621
www.soupro.com
-
 1
1
-
 2
2
-
 3
3
-
 4
4
-
 5
5
-
 6
6
-
 7
7
-
 8
8
-
 9
9
-
 10
10
-
 11
11
-
 12
12
-
 13
13
-
 14
14
-
 15
15
-
 16
16
-
 17
17
-
 18
18
-
 19
19
-
 20
20
-
 21
21
-
 22
22
-
 23
23
-
 24
24
-
 25
25
-
 26
26
-
 27
27
-
 28
28
-
 29
29
-
 30
30
-
 31
31
-
 32
32
-
 33
33
-
 34
34
-
 35
35
-
 36
36
-
 37
37
-
 38
38
-
 39
39
-
 40
40


HearthPro Door Fireplace Electric Manual de usuario
- Categoría
- Calentadores espaciales
- Tipo
- Manual de usuario
en otros idiomas
Artículos relacionados

Otros documentos
-
Muskoka 259-170-186 Manual de usuario
-
-
 Dorel Home Furnishings 5033196COM El manual del propietario
-
-
Home Decorators Collection 257-188-213-Y Manual de usuario
-
-
-
