

4-SLICE TOASTER OVEN
HORNO TOSTADOR DE 9 L
USER MANUAL / MANUAL DE INSTRUCCIONES
MODEL: PTO91R
MODELO: PTO91R
Use and care manual. Important safeguards. This product is for domestic use only.
Manual de uso y cuidado. Precausiones importantes. Este producto es para uso doméstico únicamente.


IMPORTANT SAFETY INSTRUCTIONS
When using electrical appliances, basic safety precautions should always
be followed including the following:
READ ALL INSTRUCTIONS, PRODUCT
LABELS AND WARNINGS BEFORE
USING THE APPLIANCE.
Do not touch hot surfaces, use handles or knobs. Always use oven
mitts when handling hot materials and allow metal parts to cool before
cleaning. Allow the unit to cool thoroughly before putting in or taking off
parts.
When the unit is not in use and before cleaning, unplug the appliance
from the wall outlet. Make sure the appliance is turned off before
unplugging.
To protect against risk of electrical shock, do not immerse the appliance
in water or any other liquids.
Don't leave children alone or unattended where the appliance is hot or
in operation. This appliance is not designed to be used by children.
Never use your appliance for heating the room. Your oven is not
designed to heat your kitchen.
Do not operate this or any appliance with a frayed or damaged cord or
plug, after the appliance malfunctions, is dropped or has been damaged
in any manner.
Do not use attachments not recommended by the manufacturer; they
may cause re, electric shock or personal injury.
Do not use outdoors or for commercial purposes.
Do not use this appliance for other than its intended use.
Do not let the cord dangle over the edge of a tabletop, countertop or to
touch hot surfaces.
Do not place the appliance near a hot gas or electric burner or in a
heated oven.
Extreme caution should be used when using containers constructed of
other than metal or glass.
1

A re may occur if the appliance is covered or touching ammable
materials, including curtains, draperies, walls, etc., when in operation. Do
not store any items on top of the appliance when in operation.
Do not store any materials, other than manufacturer's recommended
accessories in this unit when not in use.
Do not place any ammable materials in the appliance, such as paper,
cardboard, plastic or any materials that may catch re or melt.
Never clean the appliance with ammable liquids. The fumes can
create a re hazard or explosion.
Do not cover the appliance with metal foil. This will cause overheating
of the appliance.
Oversized foods or metal utensils must not be inserted in the appliance
as they may create a re or risk of electrical shock.
Do not clean with metal scouring pads. Pieces can break off the pad
and touch electrical parts involving a risk of electrical shock.
When broiling, use extreme caution when removing tray or disposing of
hot grease.
To turn this appliance off, return all controls to the “0” / “OFF” position,
then remove the plug from wall outlet.
Cooked food can be very hot, especially pastry lling. Handle with care.
Never pick up a aming pan. Turns the controls off. Smother a aming
pan on a surface unit by covering the pan completely with a well-tting
lid.
Do not use water on grease res. Flaming grease outside a pan can
be put out by covering it with baking soda, multipurpose dry chemical, or
re extinguisher. Flame in the oven can be smothered completely by
closing the oven door and turning the oven off or by using baking soda,
multipurpose dry chemical, or re extinguisher.
THIS UNIT IS FOR HOUSEHOLD USE ONLY
- SAVE THESE INSTRUCTIONS -
2

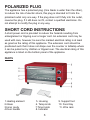
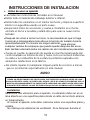
POLARIZED PLUG
The appliance has a polarized plug (One blade is wider than the other),
to reduce the risk of electric shock, this plug is intended to fit into the
polarized outlet only one way. If the plug does not fit fully into the outlet,
reverse the plug. If it still does not fit, contact a qualified electrician. Do
not attempt to modify the plug in any way.
SHORT CORD INSTRUCTIONS
A short power cord is provided to reduce the hazards resulting from
entanglement or tripping over a longer cord. An extension cord may be
used with care, however, be sure the marked electrical rating is at least
as great as th
e rating of this appliance. The extension cord should be
positioned such that it does not drape over the counter or tabletop where
it can be pulled on by children or tripped over. The electrical rating of this
appliance is listed on the bottom panel of the appliance.
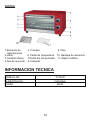
PARTS
1.Heating element 5. Housing 9. Support foot
2.Glass 6. Temp knob 10. Food tray
3.Inner cavity 7.Timer knob 11. Wire rack
4.Door handle 8. Indicator
3

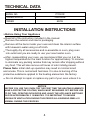
TECHNICAL DATA
INSTALLATION INSTRUCTIONS
4
MODEL NO. PTO91R
POWER SUPPLY 120V/60Hz
POWER 800W
NOTICE
BEFORE YOU USE THIS OVEN FOR THE FIRST TIME THE HEATING ELEMENTS
PROTECTIVE COATING, WHICH MUST BE BURNED OFF BEFORE USE.
THE OVEN DOOR AND LEAVE THE APPLIANCE SWITCHED
ADEQUATE VENTILATION DURING THIS PERIOD
AS A BURNING SMELL IS
HAVE A
TO DO THIS, OPEN
ON FOR APPROXIMATELY 15
MINUTES. IT IS IMPORTANT TO ENSURE
NORMAL DURING THIS PROCESS.
Before Using Your Appliance
Read all of the instruction included in the manual.
Remove the exterior and interior packaging.
Remove all the items inside your oven and clean the interior surface
using a soft cloth.
Thoroughly dry all accessories and re-assemble in oven, plug oven
ready to use your new toaster oven.
After- reassembling your oven, we recommend that you run it at the
on the toast function for approximately 15 mi
any food. This will also remove all traces of odor initially
present.
Please Note: initial start-up operation may result i
n minimal smell
protective substance applied to the heating elements
in the factory.
Do not attempt to repair or replace any part of your oven unless it is.
with lukewarm water
into outlet and you are
highest temperature
to eliminate any packing residue that
nutes
may remain after shipping without
an
d smoke. This is normal
and harmless. It is due to burning of the

Installation
Select a location for the appliance. The location should be in an open
area on a at counter where the plug will reach an outlet.
When positioning the appliance, it should be set on a at, steady
surface.
Do not block air vents. If they are blocked during operation, the oven
may overheat and eventually cause the appliance failure.
Keep the appliance away from hot air, steam or splashing liquids when
choosing a place to locate it, otherwise, the unit's operation may be
adversely affected, causing it to break down.
Direct sunlight may affect the acrylic coating and heat sources may
increase electrical consumption.
Plug the appliance into an exclusive properly installed grounded wall
outlet. Any questions concerning power should be directed toward a
certied electrician or an authorized service center.
Do not place anything on top of the toaster oven.
Keep the appliance at least 5 inches away from rear wall to ensure the
proper ventilation.
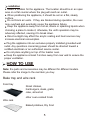
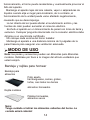
HOW TO USE
Note: the parts and accessories may be different for different models.
Please refer the image to the real item you buy.
Bake tray and wire rack
Food tray
Roast chicken,
hamburgers, steak, gratin,
cake, almost all
other oven-cooked foods
Wire rack
Baked potatoes, Dry food
5

Note:
Be careful when removing hot food from the oven. Food will be hot!
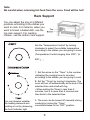
Rack Support
6
You can adjust the tray at 2 different
positions according to the dishes you
want to cook. For instance, when you
want to brown a baked dish, use the
top rack support. For roasting
chicken, use the bottom rack support.
Set the “Temperature Control” by turning
clockwise to select the suitable temperature
according to the dishes you are going to cook.
(Temperature Control ranging from 200 ףto
450 ױ
You can observe whether
the heating elements are
working or not by observing
the front Indicator light.
1. Set the arrow on the “Timer” to the number
indicating the cooking time (in minutes)
according to the dishes you are going to cook.
2. Set the “Timer” by turning it clockwise. The
oven will turn off automatically at the end of the
selected time and a bell will ring.
• When setting the Timer to less than 5
minutes, turn it to more than 6 minutes and
then back to the selected time.
3. The oven can be turned off manually during
cooking by turning the “Timer”
counterclockwise to the "OFF" position.
F
°
F )
°

CLEANING
7
Take off the plug and allow the appliance to cool
down before cleaning.
When cleaning, clean the interior and exterior
surface, bake tray and wire rack
soft sponge
w
ith neutral cleaner. Then wipe with a
cloth
with
clean water.
Do not use hard brushes or sponges to clean, to
avoid scraping the interior surface of the oven, and
to protect the bake tray, the wire rack.
Do not use toxic or abrasive cleaners such as
gasoline, polishing powder, solvents.
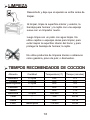
RECOMMENDED BAKING TIMES
.
Type of food Quantity Temperature (
o
F) Timer (minutes)
Sandwich
2-3 pcs
400
2-3
Toast
2-4 pcs
450
2-5
Hamburger
2-3 pcs
400
3-5
Fish
/
400
7-10
Ham
2 cm
400
7-12
Sausage
3-4 pcs
400-450
8-10
Cake
/
300
20-30
Steak
1-2 cm
450
10-15
Chicken Half chicken 275-375 30-40

SPECIAL WARNING:
8
Recycling symbol. Do not dispose the product with
household regular waste.
Caution: The temperature of the appliance surfaces
may be high when the appliance is in operation.

INSTRUCCIONES IMPORTANTES DE
SEGURIDAD
Cuando utilice aparatos eléctricos, siempre se deben seguir las
precauciones básicas de seguridad, incluyendo las siguientes:
LEA TODAS LAS INSTRUCCIONES,
ETIQUETAS Y ADVERTENCIAS DEL
PRODUCTO ANTES DE USAR EL
APARATO.
No toque supercies calientes, use asas o perillas. Siempre use
guantes para el horno cuando manipule materiales calientes y permita
que las partes metálicas se enfríen antes de limpiar. Deje que la unidad
se enfríe completamente antes de colocar o retirar piezas.
Cuando la unidad no esté en uso y antes de limpiarla, desconecte el
aparato de la toma de corriente. Asegúrese de que el aparato esté
apagado antes de desenchufarlo.
Para evitar el riesgo de descargas eléctricas, no sumerja el aparato en
agua u otros líquidos.
No deje a los niños solos o desatendidos donde el aparato esté
caliente o en funcionamiento. Este aparato no está diseñado para ser
utilizado por niños.
Nunca utilice su aparato para calentar la habitación. El horno no está
diseñado para calentar la cocina.
No utilice este aparato ni ningún otro con un cable o enchufe
desgastado o dañado, después de que el aparato funcione mal, se caiga
o se haya dañado de alguna manera.
No utilice accesorios no recomendados por el fabricante. Pueden
causar fuego, descargas eléctricas o lesiones personales.
No lo utilice al aire libre o con nes comerciales.
No utilice este electrodoméstico para otro uso que no sea el previsto.
No deje que el cable cuelgue sobre el borde de una mesa, encimera o
que toque supercies calientes.
9

No coloque el aparato cerca de una estufa eléctrica o de gas o en un
horno caliente.
Se debe tener extrema precaución cuando se utilicen recipientes que
no sean de metal ni de vidrio.
No almacene ningún material, excepto los accesorios recomendados
por el fabricante en esta unidad cuando no esté en uso.
No coloque ningún material inamable en el aparato, como papel,
cartón, plástico o cualquier material que pueda incendiarse o fundirse.
Nunca limpie el aparato con líquidos inamables. Los vapores pueden
crear un riesgo de incendio o explosión.
No cubra el aparato con papel metálico. Esto provocará un
sobrecalentamiento del aparato.
Los alimentos de gran tamaño o los utensilios de metal no deben ser
introducidos en el aparato ya que pueden crear un incendio o riesgo de
descarga eléctrica.
No limpie con esponjas metálicas. Estas pueden dejar partículas de
metal en el aparato, entrar en contacto con las partes eléctricas y
generar un riesgo de descarga eléctrica.
Al cocinar, tenga mucho cuidado al retirar la bandeja y deshacerse de
la grasa y alimentos calientes.
Para apagar este aparato, regrese todos los controles a la posición "0"
/ "OFF", luego retire el enchufe de la toma de corriente.
Los alimentos cocinados pueden estar muy calientes, especialmente
los alimentos rellenos de pastelería. Trátelos con cuidado.
Nunca levante un recipiente en llamas. Apague los controles. Cubra el
recipiente en llamas cubriéndolo completamente con una tapa bien
ajustada.
10
Puede ocurrir un incendio si el aparato está cubierto o toca materiales
inamables, incluyendo cortinas, paredes, etc., cuando está en
funcionamiento. No coloque ningún artículo encima del aparato cuando
esté en funcionamiento.
No utilice agua en los fuegos de grasa. La grasa ardiente fuera de un
recipiente se puede apagar cubriéndola con bicarbonato de sodio,
productos químicos secos multiusos, o un extintor de fuego. La llama en
el horno se puede sofocar completamente cerrando la puerta del horno y
apagando el horno o utilizando bicarbonato de sodio, polvo químico
polivalente o extintor.

ESTA UNIDAD ES SOLO PARA USO
DOMÉSTICO
GUARDE ESTAS INSTRUCCIONES
11
ENCHUFE POLARIZADO
Este aparato tiene un enchufe polarizado (una hoja es más ancha que la
otra). Para reducir el riesgo de descarga eléctrica, este enchufe está
diseñado para encajar en la toma polarizada de una sola manera. Si el
enchufe no entra completamente en el tomacorriente, invierta el enchufe.
Si todavía no encaja, póngase en contacto con un electricista cualicado.
No intente modicar el enchufe de ninguna manera.
INSTRUCCIONES DEL CABLE CORTO
Se suministra un cable de alimentación corto para reducir los riesgos
derivados de enredarse o tropezar con un cable más largo. Un cable de
extensión puede ser usado con cuidado. Sin embargo, asegúrese de
que la clasicación eléctrica marcada del cable sea al menos tan alta
como la clasicación de este aparato. El cable de extensión debe
colocarse de tal manera que no se cuelgue sobre el mostrador o sobre
la mesa donde pueda ser halado por los niños o tropezado. La
clasicación eléctrica de este aparato se indica en el panel inferior del
aparato.

12
PARTES
1.Elemento de 5. Carcasa 9. Pata
calentamiento
2.Vidrio 6. Perilla de temperatura 10. Bandeja de alimentos
3.Cavidad interior 7.Perilla del temporizador 11. Rejilla metálica
4.Asa de la puerta 8. Indicador
INFORMACION TECNICA
MODELO NO. PTO91R
ALIMENTACION 120V/60Hz
PODER 800W

Seque bien todos los accesorios y vuelva a montarlos en el horno,
salida y estará listo para usar su nuevo horno
Tenga en cuenta: la operación de puesta en marcha inicial puede dar
Se debe a la combustión de la
elementos calefactores en la fábrica.
No intente reparar ni reemplazar ninguna parte de su horno a menos
que se recomiende especialmente en este manual.
enchufe el horno a la
tostador.
como resultado un
mínimo de olor y humo. Esto es normal e inofensivo.
sustancia protectora aplicada a los
31
AVISO
ANTES DE USAR ESTE HORNO POR PRIMERA VEZ: LOS ELEMENTOS DE CALENTAMIENTO
TIENEN UN REVESTIMIENTO DE PROTECCIÓN, QUE DEBE SER QUEMADO ANTES DE USAR.
PARA HACER ESTO, ABRA LA PUERTA DEL HORNO Y DEJE EL APARATO ENCENDIDO POR 15
MINUTOS APROXIMADAMENTE. ES IMPORTANTE ASEGURAR UNA VENTILACIÓN ADECUADA
DURANTE ESTE PERÍODO YA QUE SE PRODUCIRA UN OLOR A QUEMADO QUE ES NORMAL.
Instalación
Seleccione una ubicación para el aparato. La ubicación debe ser en un
área abierta en una supercie plana donde el cable del enchufe alcance
un tomacorriente.
Al colocar el aparato, éste debe colocarse sobre una supercie plana y
estable.
No obstruya las aberturas de ventilación. Si se bloquean durante el
INSTRUCCIONES DE INSTALACION
Antes de usar su aparato
Lea todas las instrucciones incluidas en el manual.
Retire todo el material de embalaje exterior e interior.
Retire todos los elementos en el interior del horno y limpie la superficie
tibia usando un paño suave.
interior con agua
Después de volver a armar su horno, le recomendamos que lo haga
aproximadamente 15 minutos sin ningún alimento
cualquier residuo de empaque que pueda quedar después del envío.
eliminará todos los rastros de olor inicialmente presentes.
funcionar a la
temperatura más alta en la función de tostado durante
para eliminar
Esto también

La luz directa del sol puede afectar el recubrimiento acrílico y las
fuentes de calor pueden aumentar el consumo eléctrico.
No coloque nada encima del horno tostador.
Mantenga el aparato a una distancia mínima de 5 pulgadas de la
pared trasera para asegurar una ventilación adecuada.
MODO DE USO
Nota: las piezas y accesorios pueden ser diferentes para diferentes
modelos. Refiérase por favor a la imagen del artículo verdadero que
usted compró.
14
Bandeja y rejillas para hornear
Bandeja para
alimentos
Pollo asado,
hamburguesas, carnes, graten,
tortas, casi todos los demás
alimentos horneados
Rejilla metálica
Patatas horneadas,
alimentos secos
Nota:
Tenga cuidado al retirar los alimentos calientes del horno. La
comida estará caliente!
Mantenga el aparato lejos del aire caliente, vapor o salpicaduras de
líquidos cuando elija un lugar para localizarlo, de lo contrario, el
funcionamiento de la unidad puede verse afectado negativamente,
causando que se descomponga.
funcio
namiento, el horno puede recalentarse y eventualmente provocar el
fallo del aparato.
Enchufe el aparato en un tomacorriente de pared con toma de tierra y
exclusivo. Cualquier pregunta relacionada con la conexión eléctrica debe
dirigirse a un electricista certicado.

15
Puede ajustar la bandeja en 2
posiciones diferentes según los
platos que desee cocinar. Por
ejemplo, cuando
desee dorar un plato horneado,
utilice el
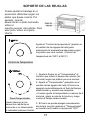
SOPORTE DE LAS REJILLAS
Ajuste el "Control de temperatura" girando en
el sentido de las agujas del reloj para
seleccionar la temperatura adecuada según
los platos que va a cocinar. (Control de
temperatura de 100℃ a 250℃)
Timer/Temporizador
Puede observar si los
elementos calefactores
funcionan o no observando
el indicador luminoso frontal.
1. Ajuste la flecha en el "Temporizador" al
número que indica el tiempo de cocción (en
minutos) según los platos que va a cocinar.
2. Ajuste el "Temporizador" girándolo en el
sentido de las agujas del reloj. El horno se
apagará automáticamente al final del tiempo
seleccionado y sonará una campana.
• Cuando ajuste el temporizador a menos de 5
minutos, gírelo a más de 6 minutos y luego
vuelva al tiempo seleccionado.
3. El horno se puede apagar manualmente
durante la cocción girando el "Temporizador"
en sentido anti horario a la posición "OFF".
Control de Temperatura
soporte superior del estante. Para
asar pollo, utilice el soporte
inferior.

16
LIMPIEZA
Desenchufe y deje que el aparato se enfríe antes de
limpiar.
Al limpiar, limpie la superficie interior y exterior, la
bandeja para hornear y la rejilla
con una esponja
suave con un limpiador
neutro.
Luego limpie con un paño con agua limpia. No
utilice cepillos o esponjas duras para limpiar, para
evitar raspar la superficie interior del horno y para
proteger la bandeja de hornear, la rejilla.
No utilice productos de limpieza tóxicos o abrasivos
como gasolina, polvo de pulir, o disolventes.
TIEMPOS RECOMENDADOS DE COCCION
.
Alimento Cantidad Temperatura (℃) Tiempo (minutos)
Sándwich
200
2-3
Tostada
250
2-5
Hamburguesa
200
3-5
Pescado
/
200
7-10
Jamón
200
7-12
Salchicha
3-4
200-250
8-10
Torta
/ 150
20-30
Carne
250
10-15
Pollo
Medio pollo
175-200
30-40
2-3 pza
2-4 pza
2-3 pza
1 porción de 2 cm de grosor
pza
1 porción de 2 cm de grosor

17
ADVERTENCIA:
Símbolo de reciclaje. No deseche el producto con los
residuos domésticos regulares.
Precaución: La temperatura de las supercies del aparato
puede ser alta cuando el aparato está en funcionamiento.

-
 1
1
-
 2
2
-
 3
3
-
 4
4
-
 5
5
-
 6
6
-
 7
7
-
 8
8
-
 9
9
-
 10
10
-
 11
11
-
 12
12
-
 13
13
-
 14
14
-
 15
15
-
 16
16
-
 17
17
-
 18
18
-
 19
19
-
 20
20
-
 21
21


en otros idiomas
- English: PREMIUM PTO91R User manual
Artículos relacionados
Otros documentos
-
Thulos TH-HE09L El manual del propietario
-
Hamilton Beach 31143 Manual de usuario
-
Hamilton Beach 31144 Guía del usuario
-
Black & Decker CTO4501S Manual de usuario
-
-
-
Black & Decker CTO4300W Guía del usuario
-
Bialetti 35047 Guía del usuario
-
Sanyo Convection Oven SK-VF7S Manual de usuario
-
Hamilton Beach 31243 Guía del usuario