


1
5
6
7
8
9
3
4
2
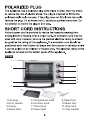
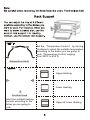
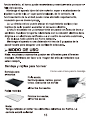
1.Housing 5.Temperature knob 9.Stand foot
2.Door handle 6.Function knob 10.Bake tray
3.Cavity 7.Timer knob 11.Wire rack
4.Glass door 8.Power light 12.Tray handle

1440W
PTO191
120V-60HZ


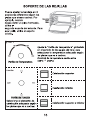
Temperature Knob
Function Knob
Set the “Temperature Control” by turning
clockwise to select the suitable temperature
according to the dishes you are going to
cook. (Temperature Control ranging
from 200℉ to 450℉)
Select the suitable heating
element according to the
dishes you are going to
cook.
Upper Heating
Lower Heating
Upper & Lower Heating
450
400300
200
TEMP/ F

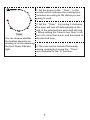
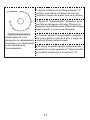
Timer
1. Set the arrow on the “Timer” to the
number which indicates the cooking time
(minutes) according to the dishes you are
going to cook.
2. Set the “Timer” by turning it clockwise.
The oven will turn off automatically at the
end of the selected time and a bell will ring.
• When setting the Timer to less than 5 min,
turn it to more than 6 min. and then back to
the selected time.
3. The oven can be turned off manually
during cooking by turning the “Timer”
anti-clockwise to the "O" position.
You can observe whether
the heating elements are
working or not by observing
the front Power Indicator
light.
7

8

9

10

11

12

1
5
6
7
8
9
3
4
2
13
1440W
PTO191
120V-60HZ
1.Cubierta 5.Perilla de Temperatura 9.Pie
2.Asa de la Puerta 6.Perilla de Función 10.bandeja para Hornear
3.Cavidad 7.Perilla Temporizador 11.Rejilla metálica
4.Puerta de Vidrio 8.Luz indicadora 12.Asa para la Bandeja

14

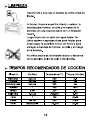
Como usar el asa para la bandeja

Parte superior
Segundo
Tercero
a

Perilla Temporizador
1. Ajuste la flecha en el "Temporizador" al
número que indica el tiempo de cocción
(minutos) según los platos que va a cocinar.
2. Ajuste el "Temporizador" girándolo en el
sentido de las agujas del reloj. El horno se
apagará automáticamente al final del tiempo
seleccionado y sonará una campana.
3. Cuando ajuste el temporizador a menos
de 5 min, gírelo a más de 6 min. y luego de
vuelta al tiempo seleccionado.
4. El horno se puede apagar manualmente
durante la cocción girando el "Temporizador"
en sentido antihorario a la posición "O".
Puede observar si los
elementos de calentamiento
funcionan o no, observando
la luz indicadora de
funcionamiento.
17

C

19


-
 1
1
-
 2
2
-
 3
3
-
 4
4
-
 5
5
-
 6
6
-
 7
7
-
 8
8
-
 9
9
-
 10
10
-
 11
11
-
 12
12
-
 13
13
-
 14
14
-
 15
15
-
 16
16
-
 17
17
-
 18
18
-
 19
19
-
 20
20
-
 21
21
-
 22
22
-
 23
23
-
 24
24


