La página se está cargando...

Convection Air Flow And Digital Functions
Flujo de aire convección y funciones digitales
INSTRUCTION MANUAL • MANUAL DE INSTRUCCIONES

ÍNDICE
Medidas de seguridad importantes
.......................................................................
Otras medidas de seguridad importante ............................................................
Notas sobre el enchufe .............................................................................
Notas sobre el cable ...............................................................................
Advertencia sobre los plastificantes ................................................................
Corriente eléctrica. . . . . . . . . . . . . . . . . . . . . . . . . . . . . . . . . . . . . . . . . . . . . . . . . . . . . . . . . . . . . . . . . . . . . . . . . . . . . .
Conozca su horno tostador .........................................................................
Accesorios .........................................................................................
Panel de control ...................................................................................
Funciones preprogramadas ........................................................................
Carta de funciones .................................................................................
Posiciones de estantes .............................................................................
Cocción por convección ............................................................................
Límites de peso/tamaño ...........................................................................
Antes de utilizar por primera vez ...................................................................
Guías de cocinar según el USDA ....................................................................
Descongelar .......................................................................................
Tostada ............................................................................................
Consejos para tostar ...............................................................................
Rosca ..............................................................................................
Consejos para tostar roscas .........................................................................
Hornear/asar con convección ......................................................................
Consejos para recipientes de cocinar ...............................................................
Consejos para hornear con convección .............................................................
Consejos para asar con convección .................................................................
Pizza con convección ..............................................................................
Consejos para pizzas ...............................................................................
Asar ...............................................................................................
Consejos para asar/asar con convección ............................................................
Galletas ............................................................................................
Calentar ...........................................................................................
Recalentar con convección .........................................................................
Instrucciones de mantenimiento ...................................................................
Instrucciones de cuidado y limpieza ................................................................
Instrucciones de almacenamiento ..................................................................
Garantía ...........................................................................................
TABLE OF CONTENTS
Important Safeguards ......................................................................................
Additional Important Safeguards ...........................................................................
Notes on the Plug .........................................................................................
Notes on the Cord .........................................................................................
Plasticizer Warning .........................................................................................
Electric Power. . . . . . . . . . . . . . . . . . . . . . . . . . . . . . . . . . . . . . . . . . . . . . . . . . . . . . . . . . . . . . . . . . . . . . . . . . . . . . . . . . . . . . . . . . . . . .
Getting to Know Your Toaster Oven .........................................................................
Accessories ................................................................................................
Control Panel ..............................................................................................
Pre-Programmed Functions ................................................................................
Function Chart .............................................................................................
Shelf Positions .............................................................................................
Convection Cooking .......................................................................................
Weight/Size Restrictions ...................................................................................
Before Using for the First Time ..............................................................................
USDA Cooking Guidelines ..................................................................................
Defrost ....................................................................................................
Toast ......................................................................................................
Hints For Toast ............................................................................................
Bagel ......................................................................................................
Hints For Bagel ............................................................................................
Convection Bake/Roast .....................................................................................
Hints For Cooking Containers ..............................................................................
Hints For Convection Bake .................................................................................
Hints For Convection Roast ................................................................................
Convection Pizza ...........................................................................................
Hints for Convection Pizza ..................................................................................
Broil .......................................................................................................
Hints For Broil/Convection Broil ............................................................................
Cookies ....................................................................................................
Warm ......................................................................................................
Convection Reheat .........................................................................................
User Maintenance Instructions .............................................................................
Care & Cleaning Instructions ...............................................................................
Storing Instructions ........................................................................................
Warranty ..................................................................................................

1
IMPORTANT SAFEGUARDS
When using electrical appliances, basic safety precautions should always be
followed including the following:
1. READ ALL INSTRUCTIONS.
2. Do not touch hot surfaces. Use handles or knobs.
3. To protect against electrical shock do not immerse cord, plugs, or appliance in
water or other liquid.
4. This appliance is not intended for use by persons (including children) with
reduced physical, sensory or mental capabilities, or lack of experience and
knowledge, unless they have been given supervision or instruction concerning
use of the appliance by a person responsible for their safety.
5. Children should be supervised to ensure that they do not play with the appliance.
6. Unplug from outlet when not in use and before cleaning. Allow Toaster Oven to
cool before putting on or taking o parts.
7. Do not operate any appliance with a damaged cord or plug or after the appliance
malfunctions, or has been damaged in any manner. Bring it to a qualied
technician for examination, repair or electrical or mechanical adjustment.
8. The use of accessory attachments not recommended by the appliance
manufacturer may cause injuries.
9. Do not use outdoors.
10. Do not let cord hang over edge of table or counter, or touch hot surfaces.
11. Do not place on or near a hot gas or electric burner, or in a heated oven.
12. Extreme caution must be used when moving an appliance containing hot oil or
other liquids.
13. To disconnect, press the red START/CANCEL Button. Remove the plug from the
wall outlet.
14. Do not use appliance for other than intended use.
15. Oversize foods or metal utensils must not be inserted in the Toaster Oven as they
may create a re or risk of electric shock.
16. A re may occur if the Toaster Oven is covered or touching ammable material,
including curtains, draperies, walls, and the like, when in operation. Do not store
any item on top of the appliance when in operation.
17. Do not clean with metal scouring pads. Pieces can break o the pad and touch
electrical parts involving a risk of electrical shock.
18. Extreme caution should be exercised when using containers constructed of other
than metal or glass.
19. Do not store any materials, other than manufacturer’s recommended accessories,
in this Toaster Oven when not in use.
20. Do not place any of the following materials in the Toaster Oven: paper,
cardboard, plastic, and the like.

2 3
NOTES ON THE PLUG
This appliance has a polarized plug (one blade is wider than the other). To reduce
the risk of electric shock, this plug will t in a polarized outlet only one way. If the
plug does not t fully into the outlet, reverse the plug. If it still does not t, contact
aqualied electrician. Do not modify the plug in any way.
NOTES ON THE CORD
The provided short power-supply cord (or detachable power-supply cord) should
be used to reduce the risk resulting from becoming entangled in or tripping over
alonger cord. An extension cord is not recommended for use with this product.
PLASTICIZER WARNING
CAUTION: To prevent Plasticizers from migrating to the nish of the counter top or
table top or other furniture, place NON-PLASTIC coasters or place mats between the
appliance and the nish of the counter top or table top. Failure to do so may cause
the nish to darken; permanent blemishes may occur or stains can appear.
ELECTRIC POWER
If the electrical circuit is overloaded with other appliances, your appliance may
not operate properly. It should be operated on a separate electrical circuit from
otherappliances.
21. Do not cover crumb tray or any part of the Toaster Oven with metal foil. This will
cause overheating of the Toaster Oven.
22. Use extreme caution when removing the crumb tray or disposing of hot grease.
23. Do not cover the Toaster Oven with anything that would prevent steam from
escaping. This may cause warping, discoloration, malfunction or even re.
SAVE THESE INSTRUCTIONS
FOR HOUSEHOLD USE ONLY
ADDITIONAL IMPORTANT
SAFEGUARDS
CAUTION HOT SURFACES: This appliance generates heat and escaping steam during
use. Proper precautions must be taken to prevent the risk of burns, res, or other
injury to persons or damage to property.
1. A person who has not read and understood all operating and safety instructions
is not qualied to operate this appliance. All users of this appliance must read and
understand this instruction manual before operating or cleaning this appliance.
2. If this appliance falls or accidentally becomes immersed in water, unplug it from
the wall outlet immediately. Do not reach into the water!
3. When using this appliance, provide adequate air space above and on all sides for
air circulation. Do not operate this appliance while it is touching or near curtains,
wall coverings, clothing, dishtowels or other ammable materials.
4. To reduce the risk of re, do not leave this appliance unattended during use.
5. If this appliance begins to malfunction during use, press the red START/CANCEL
Button. Remove the plug from the
wall outlet. Do not use or attempt to repair a malfunctioning appliance!
6. The cord to this appliance should only be plugged into a 120V AC electrical
walloutlet.
7. Do not use this appliance in an unstable position.
8. To reduce the risk of burns or other injuries, do not touch hot surfaces. Use of
protective oven mitts or gloves as well as long-handled utensils is recommended.
Use the handle when removing bar assembly from inside the Toaster Oven cavity.
9. To reduce the risk of injury to persons or property, unplug this appliance before
inserting food. Always keep the appliance unplugged from the wall outlet when
not in use.
10. Do not attempt to dislodge food or clean the while it is plugged in or while it is
still hot.
11. Do not attempt to use the without the bake/broil pan in the lower shelf position
and the glass door closed.
CAUTION: Never leave the Toaster Oven unattended while in use.

4 5
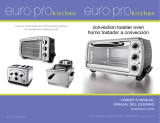
GETTING TO KNOW YOUR TOASTER OVEN
Product may vary slightly from illustrations.
Figure 1
FUNCTION
START / CANCEL
TEMP
TIME
A LITTLE EXTRA
CONVECTION
ºF
Upper Shelf
Position
Center Shelf
Position
Lower Shelf
Position
Glass Door
Upper Heating
Elements
Convection Fan
(not shown)
Door Handle
White Backlit
Digital Display
Control Panel
Oven Vents
Polarized Plug
Lower Heating
Elements
Crumb Tray
ACCESSORIES
Figure 2
Bake Pan
Wire Rack
CONTROL PANEL
1. DIGITAL DISPLAY. When the unit is plugged in, an audible beep will sound
andthe blue backlighted screen will show active FUNCTION, toast color (1-7),
cooking TIME remaining and TEMP (Temperature).
2. FUNCTION Button. Press once to advance the arrow to 10 pre-programmed
cook cycles. An audible beep can be heard and the active cycle will flash,
theFUNCTION button will illuminate blue every time it is pressed.
3. START/CANCEL Button. Press to START the selected function or CANCEL.
Thebutton will illuminate red to indicate the unit is ON. When the START/
CANCELbutton is pressed again, the unit will turn OFF and the red lighted
buttonwill flash.
4. A LITTLE EXTRA Button extends cook time after cooking cycle is completed.
Ifyouopen the glass door and check for brownness, for a bit more time, press
theALITTLE EXTRA button. An audible beep can be heard as the button
illuminates blue and additional TIME will be added on the digital display.
5. CONVECTION Button illuminates blue to indicate the convection fan is
operating.Press the CONVECTION button to turn the fan ON or OFF.
6. TIME Control Dial. Turn to manually change times from 01:00 minute
minimumto99:00 minutes maximum. An audible beep can be heard as
theTIMEis changed.
NOTE: Some functions are preprogrammed and can only be changed
withinpreset limits.
7. TEMP Control Dial. Turn to manually change temperature from 150ºF minimum
to450ºF maximum. An audible beep can be heard as the TEMP is changed.
NOTE: Some functions are preprogrammed and can only be changed
withinpreset limits
PREPROGRAMMED FUNCTIONS
1. TOAST: High heat sears and produces deliciously crisp results. Bread, muffins, frozen waffles,
frozentoaster pastries, prepared toaster foods, etc.
2. WARM: Maintains hot foods for up to 99:00 minutes.
3. BAGEL: High heat sears the topsides of bagels, while warming the insides.
The BAGEL function is ideal for toasting English muffins or thick sliced specialty breads.
4. CONVECTION BAKE: Use of the convection fan seals in juices, promotes browning and may
shortencooking time without turning and basting. Bake cakes, pies, cookies, poultry, beef, pork, etc.
NOTE: Press the CONVECTION button to turn the convection fan OFF.
5. CONVECTION PIZZA: This Toaster Oven accommodates any 12-inch (or smaller) freshorfrozen pizza.
Convection baking assures even pizza cooking and browning.
NOTE: Press the CONVECTION button to turn the convection fan OFF.
NOTE: Press the CONVECTION button to turn the convection fan OFF.
6. BROIL: Fish, steak, poultry, pork chops, etc.
7. COOKIES: Perfect for baking home made or prepared refrigerated cookies, biscuits,
cinnamonorcrescent rolls.
NOTE: Press the CONVECTION button to turn the convection fan OFF.
8. DEFROST: Low temperatures assist in thawing frozen foods to be cooked in the toaster oven
9. CONVECTION REHEAT: Reheat leftovers using convection fan for even warming without browning.
NOTE: Press the CONVECTION button to turn the convection fan OFF.
NOTE: This model is equipped with a cooling fan that runs during the cooking process to cool internal
electronic components. It is normal for this fan to continue to run for an extended period of time,
evenwhen the oven is off.
FUNCTION
START / CANCEL
TEMP
TIME
A LITTLE EXTRA
CONVECTION
ºF
Figure 3

6 7
WEIGHT/SIZE RESTRICTIONS
WARNING:
• Food cooked on the must be no wider than 9 inches and must fit comfortably in the Toaster Oven
without touching either the lower or the upper heating elements.
• The Toaster Oven can cook up to a 4 lb. chicken or turkey and up to a 4 lb. roast.
• We suggest that you periodically check the cooking progress with a meat thermometer.
BEFORE USING FOR THE FIRST TIME
CAUTION: To protect against electric shock, do not immerse the Toaster Oven or allow cord to come
intocontact with water or other liquids.
1. Read all operating instructions carefully.
2. Carefully unpack the Toaster Oven and accessories, removing all packaging materials.
Remove any labels from the outer surfaces.
3. Place your Toaster Oven on a level surface such as a countertop or table. Be sure the sides, back, and
top of the Toaster Oven are at least 4 inches away from any walls, cabinets, or objects on the counter
ortable.
4. To avoid scratching, marring, or discoloration, do not store anything on top of the Toaster Oven
duringoperation.
5. Wash the wire rack, bake/broil pan, and crumb tray in warm, soapy water. Rinse and dry thoroughly
before placing in the Toaster Oven.
6. Do not use abrasive cleaners.
7. To ensure that the Toaster Oven is free from oils used in manufacturing, it is necessary to operate
theunit once, empty.
8. Make sure the crumb tray is in place in the bottom of the Toaster Oven.
9. Plug into a 120V AC electrical wall outlet. A long audible beep will sound; 3 blue buttons and the red
START/CANCEL button will flash once; the blue digital display will illuminate as the function arrow
points to a flashing TOAST; the BROWNING control will flash at 4, the medium setting. If no buttons are
pressed within 60 seconds, the blue digital display will turn OFF as the Toaster Oven rests in standby
mode. Press any button. The blue digital display will illuminate.
10. Press the FUNCTION button until the arrow points to a flashing BAKE. Turn the TEMP control dial to
400ºF. The default 30:00 minutes will be displayed.
11. Press the START/CANCEL button; the button will illuminate red indicating the Toaster Oven is
ON. TheToaster Oven will pre-heat and then count down. This will burn off any residue or oils on
theovenor heating elements.
12. At the end of the 30:00 minutes, the TIMER control will display 00:00, 3 audible beeps can be heard
andthe Toaster Oven will turn OFF. The Toaster Oven is ready for use.
CAUTION: Appliance surfaces are hot during and after use. Always wear protective, insulated oven
mitts on hands when touching a hot Toaster Oven.
NOTE: The Toaster Oven will not operate until the START/CANCEL button is pressed.
NOTE: Press the red START/CANCEL button at any time to turn the Toaster Oven OFF. If no buttons are
pressed within 30 seconds, the blue digital display will turn OFF as the Toaster Oven rests in standby mode.
USDA COOKING GUIDELINES
A meat thermometer should always be used to gauge internal temperature. The thermometer should be
inserted into thickest portion of roast away from bones or fatty areas.
The United States Department of Agriculture recommends that meat and poultry be cooked to the
following internal temperatures to be sure any harmful bacteria has been killed. Ground turkey and
chicken should be cooked to an internal temperature of 165°F and ground beef, veal, lamb and pork
be cooked to an internal temperature of 160°F. Chicken and turkey should be cooked to an internal
temperature of 170°F for white meat and 180°F for dark meat. Goose and duck should be cooked to an
internal temperature of 180°F. Fresh beef, veal and lamb, etc. should be cooked to an internal temperature
of at least 145°F. Fresh pork should be cooked to an internal temperature of at least 160°F. When re-heating
meat and poultry products, they should also be cooked to an internal temperature of 165°F.
FUNCTION CHART
Function Time (Min) Temp (Farenheit) A little
Extra
Convection
Default Adjustable Default Adjustable
Toast Shade 4 Shade 1-7 450º - 00:40 OFF
Bagel Shade 4 Shade 1-7 450º - 00:40 OFF
Bake 30:00 01:00 - 99:00 350º 170º - 450º 05:00 ON
Pizza 16:00 01:00 - 60:00 450º 350º - 450º 02:00 ON
Broil 10:00 01:00 - 60:00 450º - 02:00 OFF
(Default)*
Cookies 11:00 01:00 - 60:00 350º 170º - 450º 02:00 ON
Defrost 30:00 01:00 - 60:00 150º - 05:00 OFF
(Default)*
Warm 90:00 01:00 - 99:00 170º 150º - 200º 10:00 OFF
(Default)*
Reheat 15:00 01:00 - 60:00 350º 170º - 450º 05:00 OFF
(Default)*
NOTE: When the functions BAKE, PIZZA, COOKIES and WARM are selected, the Toaster Oven requires few
minutes to pre-heat to reach the optimum temperature. Once the function is selected the text PRE-HEAT
will appear on the screen and the unit will begin pre-heating. The timer will begin to count down only
after pre-heat is completed. After the desired temperature is achieved, 3 beeps will sound and the text will
disappear from the screen and the unit will continue to cook in the selected function.
SHELF POSITIONS
NOTE: Certain foods may require different shelf positions depending on the recipe, size, amount of food
tobe cooked and personal taste. Use the following information as a guide only.
1. There are 3 height positions that the wire rack or the bake/broil pan may be inserted.
2. Use the upper shelf position for the BROIL function.
3. The center shelf position is commonly used for TOAST, BAGEL, PIZZA and COOKIE functions.
4. Use the lower shelf position for BAKE, ROAST, REHEAT and WARM functions.
WARNING: Never set the bake/broil pan directly onto the lower heating elements.
CONVECTION COOKING
Convection cooking circulates heated air throughout the Toaster Oven cavity to maintain uniform
temperature around the food. This constant, gentle airflow promotes browning and seals in juices when
cooking meats. Due to the efficiency of using a convection fan, cooking time may be shortened.
• As a general rule, baked goods require a lower temperature when using a convection fan than cooking
in a convectional oven. Lower the temperature by 25°F to a minimum of 300°F when baking cakes, pies,
cookies, and bread.
• Follow package instructions for time and temperature when cooking convenience foods.
• Check food about 3/4 way through cooking cycle and adjust time or temperature if necessary.
• CONVECTION cooking is the default setting on the BAKE, PIZZA, COOKIES and REHEAT functions. Turn
the convection fan OFF at any time by pressing the blue CONVECTION button.
• CONVECTION cooking is available for all functions except TOAST and BAGEL by pressing the
CONVECTION button.
• Use oven-proof baking dishes, roasting pans, pizza pans or cookie sheets with very low sides, and place
on the center of the wire rack to allow maximum airflow.
• Do not cover foods with metal foil or any other type of lid for maximum airflow.

9 8
TOAST
1. Make sure the crumb tray is clean and in place in the bottom of the Toaster Oven.
2. Open the glass door. Slide the wire rack into the center shelf position and arrange bread or food on the wire
rack. Close the glass door.
3. Plug into a 120V AC electrical wall outlet. The blue digital display will illuminate as the function arrow
points to a flashing TOAST; the BROWNING control will flash at 4, the medium setting. If a lighter browning
color is desired, turn the TIME control dial counter-clockwise and for a darker browning color, turn the dial
clockwise until the desired setting is displayed.
Desired Browning Browning Setting
Light 1 or 2
Medium 3, 4, 5
Dark 6 or 7
NOTE: If bread or toaster food is frozen, increase browning setting by 1.
4. Press the START/CANCEL button; the button will illuminate red indicating the Toaster Oven is ON. TOAST
will appear on the display, TIME will count down.
CAUTION: As soon as the START/CANCEL button is pressed, the Toaster Oven will turn ON. Boththe top and
the lower heating elements may cycle ON and OFF to maintain temperature for the entire cooking time.
CAUTION: Use care not to place anything on top of the Toaster Oven. Do not touch the Toaster Oven or any
part of the Toaster Oven without wearing oven mitts.
NOTE: Press the red START/CANCEL button at any time to turn the Toaster Oven OFF.
5. When the TIMER control displays 00:00, 3 audible beeps can be heard and the Toaster Oven willturn OFF.
6. Open the glass door and check for toasting progress. For a bit more time, press the A LITTLE EXTRA button.
An audible beep can be heard as the button illuminates blue, and cook TIME on the display is extended
00:40 seconds.
7. When you are satisfied with the toast color, wear protective oven mitts to pull the wire rack out from
theToaster Oven. Be careful when removing toast from the back of the wire rack. The inside of the
ToasterOven is very hot. Close glass door.
8. Unplug unit and allow to cool before cleaning.
WARNING: DO NOT LEAVE THE TOASTER OVEN UNATTENDED WHILE TOASTING.
9. Unplug when not in use.
HINTS FOR TOAST
• Remove all protective wrappings from food before placing in Toaster Oven.
Follow toaster food directions.
• Frozen and heavy bread require a longer time setting (e.g. bagels and English muffins).
NOTE: Use extra caution when using this Toaster Oven for toasting pastry items with runny-type frosting
oropen fillings.
• When toasting more than one slice of bread, use slices of similar size, thickness and freshness.
• Stale bread, thin bread or sweet bread products, such as tea cakes and fruit loaf, brown much more quickly
than ordinary bread, so they should be toasted for less time.
• For best results, clean crumb tray frequently.
DEFROST
Use the DEFROST function when thawing frozen foods to be cooked in the Toaster Oven.
1. Slide the bake/broil rack into the center shelf position.
2. Plug into a 120V AC electrical wall outlet. The blue digital display will illuminate.
Press the FUNCTION button until the arrow points to a flashing DEFROST;
the default TIME 30:00 minutes and TEMP 150ºF will be displayed.
3. To adjust the TIME, turn the TIME control dial to a minimum of 01:00 minute and a maximum of
60:00 minutes. The TEMP is fixed at 150ºF and cannot be changed as higher temperatures may cause
incompletethawing.
4. Press the START/CANCEL button; the button will illuminate red indicating the Toaster Oven is ON.
DEFROSTwillappear on the display, TIME will count down.
NOTE: Press the CONVECTION button at any time to turn the fan ON.
CAUTION: As soon as the START/CANCEL button is pressed, and the Toaster Oven is turned ON, both the
top and the lower heating elements may cycle ON and OFF to maintain temperature for the entire cooking
time.
CAUTION: Use care not to place anything on top of the Toaster Oven. Do not touch the Toaster Oven
oranypart of the Toaster Oven without wearing oven mitts.
NOTE: Press the red START/CANCEL button at any time to turn the Toaster Oven OFF.
5. When the TIMER control displays 00:00, 3 audible beeps can be heard and the Toaster Oven will turn OFF.
NOTE: If no buttons are pressed within 30 seconds, the blue digital display will turn OFF as the Toaster
Oven rests in standby mode.
6. Open the glass door and check to see if food is thoroughly defrosted. For a bit more time,
press the ALITTLE EXTRA button. An audible beep can be heard as the button illuminates blue,
and defrost TIME on the display is extended 05:00 minutes.

11 10
HINTS FOR BAGEL
• Remove all protective wrappings from food before placing in
Toaster Oven. Follow toaster food directions.
• The BAGEL function offers a darker browning to
accommodate bagels and English muffins, thicker and
denser slices of bread.
• WARNING: Use extra caution when toasting pastry items
with runny-type frosting or open fillings.
• When toasting more than one bagel, use halves of similar
size, thickness and freshness.
• Stale bagels, thin bagels or sweet bread products, such
astea cakes and fruit loaf, brown much more quickly
thanordinary bread, so reduce toasting time.
• For best results, clean crumb tray frequently.
BAGEL
Use the BAGEL function to toast English muffins or thick sliced specialty breads which require only the top side
to be toasted.
1. Make sure the crumb tray is clean and in place in the bottom of the Toaster Oven.
2. Open the glass door. Slide the wire rack into the center shelf position and arrange bagels,
English muffins or toaster food cut-side-up on the wire rack. (See Figure 4.) Close the glass door.
3. Plug into a 120V AC electrical wall outlet.
The blue digital display will illuminate.
4. Press the FUNCTION button until the arrow points to a flashing BAGEL; the BROWNING control will flash at
4, themedium setting. If a lighter browning color is desired, turn the TIME control dial counter-clockwise
and for a darker browning color, turn the dial clockwise until the desired setting is displayed.
Desired Browning Browning Setting
Light 1 or 2
Medium 3, 4, 5
Dark 6 or 7
NOTE: If bread or toaster food is frozen,
increase browning setting by 1.
5. Press the START/CANCEL button; the button will illuminate red indicating the Toaster Oven is ON.
BAGELwill appear on the display, TIME will count down.
CAUTION: As soon as the START/CANCEL button is pressed, the Toaster Oven will turn ON. Both the top and
the lower heating elements may cycle ON and OFF to maintain temperature for the entire cooking time.
CAUTION: Use care not to place anything on top of the Toaster Oven. Do not touch the Toaster Oven or any
part of the Toaster Oven without wearing oven mitts.
NOTE: Press the red START/CANCEL button at any time to turn the Toaster Oven OFF.
6. When the TIMER control displays 00:00, 3 audible beeps can be heard and the Toaster Oven willturn OFF.
7. Open the glass door and check for toasting progress. For a bit more time, press the EXTRA TIME button.
An audible beep can be heard as the button illuminates blue, and cook TIME on the display is extended
00:40seconds.
8. When you are satisfied with the toast color, wear protective oven mitts to pull the wire rack out from the
Toaster Oven. Be careful when removing toast from the back of the wire rack. The inside of the Toaster Oven
is very hot. Close glass door.
9. Unplug unit and allow to cool before cleaning.
WARNING: DO NOT LEAVE THE TOASTER OVEN UNATTENDED WHEN USING THE BAGEL FUNCTION.
10. Unplug when not in use.
FUNCTION
START / CANCEL
TEMP
TIME
A LITTLE EXTRA
CONVECTION
ºF
Figure 4

13 12
HINTS FOR COOKING CONTAINERS
• The bake/broil pan included with the Toaster Oven is suitable for cooking items such as cookies, rolls,
biscuits, nachos and hot appetizers.
• A variety of standard baking dishes, such as casseroles, any 8” or 9” round or square cake pan, a 12-cup
muffin pan, 1 and 2 quart round, square, or rectangular casserole dishes may be used for cooking many
different foods.
• Choose bakeware made of either metal or glass/ceramic without lids.
• Dark or dull pans absorb heat faster; foods will bake more rapidly and crust will brown more easily than
inshiny bake pans.
• Check package directions on the container or contact the ovenware manufacturer to determine the
container’s suitability for use in a Toaster Oven.
• Do not use oven roasting bags in this Toaster Oven, as they may come in contact with the heating elements.
HINTS FOR CONVECTION BAKE
• When using CONVECTION BAKE, lower the bake recipe temperature by 25°F to a minimum of 300°F when
baking cakes, pies, cookies, and bread.
• When baking, the shelf position used will depend on the size of the food being prepared. It is important
toplace your food as close to the center of the Toaster Oven as possible to ensure even cooking.
• Dark or dull pans absorb heat faster; foods will bake more rapidly and crust will brown more easily than
inshiny bake pans.
• Choose bakeware made of metal, ovenproof glass, and ceramic.
• Check package directions to determine if the container is suitable for use in a conventional or toaster oven.
CAUTION: Allow at least 1” air space between the top of the container and the upper heating elements.
Never use glass lids on glass or metal bakeware. If a lid is necessary, cover tightly with aluminum foil.
HINTS FOR CONVECTION ROAST
• IMPORTANT! Consult the USDA Cooking Guidelines section of this instruction manual before cooking
begins. Always test meat using an accurate cooking thermometer.
• A meat thermometer inserted into the center of the meat should always be used to ensure desired
doneness.
• Cook to 5 to 10 degrees below desired doneness (internal temperature). Allow meat to stand
15to20minutes before serving. The temperature will continue to rise while standing.
• CONVECTION ROAST large, tender cuts of meat and poultry. Seasoning prior to cooking adds to
theflavorand the aroma during cooking.
• A layer of fat on the top of the roast promotes better browning and provides natural basting.
• To speed up browning, brush lean cuts of meat, chicken and fish with oil, margarine or melted butter.
• When roasting meats with a high fat content, the bake/broil pan may fill with grease before cooking
is completed. Carefully remove the bake/broil pan assembly using oven mitts and empty. Replace for
continued roasting.
• Place meat (fat side up) or food to be cooked into a bake pan. If desired, turn over half-way through
BAKE/ROAST time.
CONVECTION BAKE/ROAST
Use BAKE or CONVECTION BAKE to bake casseroles, cakes, cookies, pies, biscuits or your favorite recipe
according to package or recipe instructions. ROAST is a term often applied when using the BAKE or
CONVECTION BAKE function to cook meats.
NOTE: Please read previous section entitled “Convection Cooking” for additional information.
CAUTION: NEVER use roasting bags or plastic containers in the Toaster Oven.
CAUTION: Do not use glass covers on baking pans. If using a glass or glass-ceramic baking container,
makesure it is at least 1 inch away from the upper heating element.
1. Make sure the crumb tray is in place in the bottom of the Toaster Oven.
2. Open the glass door. If you choose to use your own baking dish, slide the wire rack onto the center or
lowershelf position. Carefully center baking dish directly on wire rack and close the glass door.
CAUTION: Make sure the baking dish is at least 1 inch away from the upper heating element.
3. You may use the bake/broil pan alone to bake foods such as biscuits, cookies, or hot appetizers.
4. To ROAST meats or fish, place the wire rack, feet side down, into the bake/broil pan to create the bake/
broil assembly. Place meats or fish onto the bake/broil assembly. Juices and/or fat will drip into the pan
anddecrease spattering while roasting.
5. Plug into a 120V AC electrical wall outlet. The blue digital display will illuminate.
Press the FUNCTION button until the arrow points to a flashing BAKE; the default TIME 30:00 minutes
andTEMP 350ºF will bedisplayed.
6. Adjust the TIME and TEMP according to recipe instructions. Turn the TIME control dial to a minimum of
01:00 minute and a maximum of 99:00 minutes. Turn the TEMP control dial to adjust from 170ºF to 450ºF.
7. Press the START/CANCEL button; the button will illuminate red indicating the Toaster Oven is ON. The
CONVECTION button will illuminate blue indicating the fan is ON. BAKE will appear on the display,
TIMEwillcount down.
NOTE: When the BAKE function is selected, the Toaster Oven requires few minutes to pre-heat toreach the
optimum temperature. Once the function is selected the text PRE-HEAT will appear on the screen and the
unit will begin pre-heating. After the desired temperature is achieved, 3 beeps will sound and the text will
disappear from the screen and the unit will continue to cook in the selected function.
NOTE: Press the blue CONVECTION button at any time to turn the fan OFF.
CAUTION: As soon as the START/CANCEL button is pressed, and the Toaster Oven is turned ON, boththetop
and the lower heating elements may cycle ON and OFF to maintain temperature for the entire cooking time.
CAUTION: Use care not to place anything on top of the Toaster Oven. Do not touch the Toaster Oven or any
part of the Toaster Oven without wearing oven mitts.
NOTE: Press the red START/CANCEL button at any time to turn the Toaster Oven OFF.
8. When the TIMER control displays 00:00, 3 audible beeps can be heard and the Toaster Oven will turn OFF.
NOTE: If no buttons are pressed within 30 seconds, the blue digital display will turn OFF as the Toaster
Oven rests in standby mode.
9. Open the glass door and check for brownness. For a bit more time, press the A LITTLE EXTRA button.
Anaudible beep can be heard as the button illuminates blue, and cook TIME on the display is extended
05:00 minutes.
10. When you are satisfied with the baked or roasted food, wear protective oven mitts and pull the wire rack
out from the Toaster Oven. Be careful when removing foods from the back of the wire rack. The inside
ofthe Toaster Oven is very hot. Close glass door.
11. Unplug unit and allow to cool before cleaning.
WARNING: DO NOT LEAVE THE TOASTER OVEN UNATTENDED WHILE CONVECTION BAKING
ORROASTING.
12. Unplug when not in use and allow the Toaster Oven to cool completely before cleaning.

15 14
BROIL
BROIL is used to cook tender cuts of meats or marinated meats, fish and some fruits and vegetables.
Cookingtime is determined by the desired doneness and the distance between the food and the element.
NOTE: Turn food halfway through cooking time. To speed up browning, brush lean cuts of meat, chicken
andfish with oil or melted butter.
1. To BROIL meats, poultry or fish, place the wire rack, feet side down, into the bake/broil pan to create
thebake/broil assembly. Place meats or fish onto the bake/broil assembly. Juices and/or fat will drip
intothe pan and decrease spattering while broiling.
2. Make sure the crumb tray is in place in the bottom of the Toaster Oven.
3. Open the glass door. Slide the bake/broil assembly into the upper shelf position. Close the glass door.
4. Plug into a 120V AC electrical wall outlet. The blue digital display will illuminate. Press the FUNCTION
button until the arrow points to a flashing BROIL; the default TIME 10:00 will be displayed.
5. Adjust the TIME and TEMP according to recipe instructions. Turn the TIME control dial to a minimum of
01:00 minute and a maximum of 60:00 minutes. The temperature is fixed at 450ºF.
6. Press the START/CANCEL button; the button will illuminate red indicating the Toaster Oven is ON.
BROIL will appear on the display, TIME will count down.
NOTE: Press the CONVECTION button at any time to turn the fan ON.
CAUTION: As soon as the START/CANCEL button is pressed, and the Toaster Oven is turned ON,
boththetop and the lower heating elements may cycle ON and OFF to maintain temperature for
theentirecooking time.
CAUTION: Use care not to place anything on top of the Toaster Oven. Do not touch the Toaster Oven
oranypart of the Toaster Oven without wearing oven mitts.
NOTE: Press the red START/CANCEL button at any time to turn the Toaster Oven OFF.
7. When the TIMER control displays 00:00, 3 audible beeps can be heard and the Toaster Oven will turn OFF.
NOTE: If no buttons are pressed within 30 seconds, the blue digital display will turn OFF as the Toaster
Oven rests in standby mode.
8. Open the glass door and check for brownness. For a bit more time, press the A LITTLE EXTRA button.
An audible beep can be heard as the button illuminates blue, and cook TIME on the display is extended
02:00minutes.
9. When you are satisfied with the baked or roasted food, wear protective oven mitts to pull the wire rack out
from the Toaster Oven. Be careful when removing foods from the back of the wire rack. The inside of the
Toaster Oven is very hot. Close glass door.
10. Unplug unit and allow to cool before cleaning.
WARNING: DO NOT LEAVE THE TOASTER OVEN UNATTENDED WHILE BROILING.
11. Unplug when not in use and allow the Toaster Oven to cool completely before cleaning.
HINTS FOR BROIL/CONVECTION BROIL
• The Toaster Oven defaults to BROIL. If you would prefer to CONVECTION BROIL,
presstheCONVECTIONbutton to turn the fan ON.
• Convection Broiling is used for thinner, tender cuts of meats.
• Marinated meats and fish should be dried before broiling.
• Broiling time is determined by the desired doneness and the distance between the food and the upper
heating elements.
• NEVER place aluminum foil on top of the bake/broil pan. This traps grease and can cause a fire.
• Trim excess fat from meat and score edges to prevent curling.
• Thaw frozen meats and fish before broiling.
• ALWAYS pat meat dry to reduce smoke and promote brownness during broiling.
CONVECTION PIZZA
NOTE: Please read previous section entitled “Convection Cooking” for additional information.
Your Toaster Oven can accommodate a 12-inch fresh or frozen pizza.
1. Make sure the crumb tray is in place in the bottom of the Toaster Oven.
2. When cooking prepared pizza, fresh or frozen, remove all packaging, including cardboard, plastic, paper,
or other flammable materials before placing the pizza in the Toaster Oven. When baking fresh pizza,
usealightly oiled pizza pan sprinkled with cornmeal to make removing the baked pizza easier.
WARNING: Place bake pan below the wire rack in lowest position as melted cheese and other ingredients
may fall onto the heating elements and create a potential fire risk.
3. Depending on the depth of the pizza, slide the wire rack or bake/broil assembly into the center or lower
shelf position. Carefully center pizza pan directly on the wire rack and close the glass door.
CAUTION: Make sure the pizza is at least 1 inch away from the upper heating element.
4. Plug into a 120V AC electrical wall outlet. The blue digital display will illuminate. Press the FUNCTION button
until the arrow points to a flashing PIZZA; the default TIME 16:00 minutes and TEMP 450ºF will be displayed.
5. Adjust the TIME and TEMP according to recipe instructions. Turn the TIME control dial to a minimum of
01:00 minute and a maximum of 60:00 minutes. Turn the TEMP control dial to adjust from 350ºF to 450ºF.
6. Press the START/CANCEL button; the button will illuminate red indicating the Toaster Oven is ON. The
CONVECTION button will illuminate blue indicating the fan is ON. PIZZA will appear on the display, TIME
will count down.
NOTE: When the PIZZA function is selected, the Toaster Oven requires few minutes to pre-heat to reach
theoptimum temperature. Once the function is selected the text PRE-HEAT will appear on the screen and
the unit will begin pre-heating. After the desired temperature is achieved, 3 beeps will sound and the text
will disappear from the screen and the unit will continue to cook in the selected function.
NOTE: Press the blue CONVECTION button at any time to turn the fan OFF.
CAUTION: As soon as the START/CANCEL button is pressed, and the Toaster Oven is turned ON, both the
top and the lower heating elements may cycle ON and OFF to maintain temperature for the entire cooking
time.
CAUTION: Use care not to place anything on top of the Toaster Oven. Do not touch the Toaster Oven or any
part of the Toaster Oven without wearing oven mitts.
NOTE: Press the red START/CANCEL button at any time to turn the Toaster Oven OFF.
7. When the TIMER control displays 00:00, 3 audible beeps can be heard and the Toaster Oven will turn OFF.
NOTE: If no buttons are pressed within 30 seconds, the blue digital display will turn OFF as the Toaster
Oven rests in standby mode.
8. Open the glass door and check for brownness. For a bit more time, press the A LITTLE EXTRA button.
Anaudiblebeep can be heard as the button illuminates blue, and cook TIME on the display is extended
02:00minutes.
9. When you are satisfied with the baked pizza, wear protective oven mitts to pull the wire rack out from
theToaster Oven. Be careful when removing foods from the back of the wire rack. The inside of the Toaster
Oven is very hot. Close glass door.
10. Unplug unit and allow to cool before cleaning.
WARNING: DO NOT LEAVE THE TOASTER OVEN UNATTENDED WHILE BAKING PIZZA.
11. Unplug when not in use and allow the Toaster Oven to cool completely before cleaning.
HINTS FOR PIZZA
NOTE: If package directions do not list convection cooking times, lower the TEMP 25ºF and monitor cooking
progress carefully.
The versatility of this digital Toaster Oven allows you to cook a wide variety of pizzas: fresh or frozenpizza;
thincrust, stuffed or deep dish perfectly every time.
• Use the TIME and TEMP controls for consistent and precision baking results.

17 16
WARM
CAUTION: NEVER use plastic containers in the Toaster Oven.
NOTE: Please read previous section entitled “Cooking Containers” for before placing any food in the Toaster
Oven for warming.
1. The WARM function maintains previously cooked foods at 150°F to 200ºF, for up to 00:99 minutes.
2. Make sure the crumb tray is in place in the bottom of the Toaster Oven.
3. Open the glass door. Place food on the bake/broil pan or in an oven-proof dish, then place on thecenter of
the wire rack so air flows around all sides of the food.
4. Close the glass door.
5. Plug into a 120V AC electrical wall outlet. The blue digital display will illuminate. Press the FUNCTION
button until the arrow points to a flashing WARM; the default TIME 90:00 minutes and TEMP 170ºF will be
displayed.
6. To adjust the TIME, turn the TIME control dial to a minimum of 01:00 minute and a maximum of 99:00
minutes. Turn the TEMP control dial to adjust from 150ºF to 200ºF.
7. Press the START/CANCEL button; the button will illuminate red indicating the Toaster Oven is ON. REHEAT
will appear on the display, TIME will count down.
NOTE: When the WARM function is selected, the Toaster Oven requires few minutes to pre-heat to reach
the optimum temperature. Once the function is selected the text PRE-HEAT will appear on the screen and
the unit will begin pre-heating. After the desired temperature is achieved, 3 beeps will sound and the text
will disappear from the screen and the unit will continue to cook in the selected function.
NOTE: Press the CONVECTION button at any time to turn the fan ON.
CAUTION: As soon as the START/CANCEL button is pressed, and the Toaster Oven is turned ON, both the
top and the lower heating elements may cycle ON and OFF to maintain temperature for the entire cooking
time.
CAUTION: Use care not to place anything on top of the Toaster Oven. Do not touch the Toaster Oven or any
part of the Toaster Oven without wearing oven mitts.
NOTE: Press the red START/CANCEL button at any time to turn the Toaster Oven OFF.
8. When the TIMER control displays 00:00, 3 audible beeps can be heard and the Toaster Oven will turn OFF.
NOTE: If no buttons are pressed within 30 seconds, the blue digital display will turn OFF as the Toaster
Oven rests in standby mode.
9. Open the glass door and check for warming progress. For a bit more time, press the EXTRA TIME button.
Anaudible beep can be heard as the button illuminates blue, and cook TIME on the display is extended
10:00 minutes.
10. Be careful when removing foods from the back of the wire rack. The inside of the Toaster Oven is very hot.
Close glass door.
11. Unplug unit and allow to cool before cleaning.
WARNING: DO NOT LEAVE THE TOASTER OVEN UNATTENDED WHILE USING THE KEEP WARM
FUNCTION.
12. Unplug when not in use and allow the Toaster Oven to cool completely before cleaning.
COOKIES
The Toaster Oven’s flexibility and pinpoint accuracy makes it perfect for baking a wide variety of cookie types -
fresh, refrigerated or frozen cookie doughs can all be used to produce fabulous results.
NOTE: For example, frozen cookie dough may need additional baking time. The amount of dough per cookie
or the thickness of the cookie many also vary the cooking time.
1. Slide the cookie-filled bake/broil rack into the center shelf position.
2. Plug into a 120V AC electrical wall outlet. The blue digital display will illuminate. Press the FUNCTION
button until the arrow points to a flashing COOKIES; the default TIME 11:00 minutes and TEMP 350ºF will be
displayed.
3. Adjust the TIME and TEMP according to recipe instructions. Turn the TIME control dial to a minimum of
01:00 minute and a maximum of 60:00 minutes. Turn the TEMP control dial to adjust from 170ºF to 450ºF.
4. Press the START/CANCEL button; the button will illuminate red indicating the Toaster Oven is ON.
COOKIES will appear on the display, TIME will count down. The CONVECTION button will illuminate blue
indicating
the fan is on.
NOTE: When the COOKIES function is selected, the Toaster Oven requires few minutes to pre-heat to reach
the optimum temperature. Once the function is selected the text PRE-HEAT will appear on the screen and
the unit will begin pre-heating. After the desired temperature is achieved, 3 beeps will sound and the text
will disappear from the screen and the unit will continue to cook in the selected function.
NOTE: Press the CONVECTION button at any time to turn the fan OFF.
CAUTION: As soon as the START/CANCEL button is pressed, and the Toaster Oven is turned ON, both the
top and the lower heating elements may cycle ON and OFF to maintain temperature for the entire cooking
time.
CAUTION: Use care not to place anything on top of the Toaster Oven. Do not touch the Toaster Oven or any
part of the Toaster Oven without wearing oven mitts.
NOTE: Press the red START/CANCEL button at any time to turn the Toaster Oven OFF.
5. When the TIMER control displays 00:00, 3 audible beeps can be heard and the Toaster Oven will turn OFF.
NOTE: If no buttons are pressed within 30 seconds, the blue digital display will turn OFF as the Toaster
Oven rests in standby mode.
6. Open the glass door and check for brownness. For a bit more time, press the A LITTLE EXTRA button.
Anaudible beep can be heard as the button illuminates blue, and cook TIME on the display is extended
02:00 minutes.
7. When you are satisfied with the cookies, wear protective oven mitts and pull the bake/broil pan out from
the Toaster Oven. Be careful when removing foods from the back of the wire rack. The inside of the Toaster
Oven is very hot. Close glass door.
8. Unplug unit and allow to cool before cleaning.
WARNING: DO NOT LEAVE THE TOASTER OVEN UNATTENDED WHILE BAKING COOKIES.
9. Unplug when not in use and allow the Toaster Oven to cool completely before cleaning.

19 18
USER MAINTENANCE INSTRUCTIONS
This appliance requires little maintenance. It contains no user serviceable parts. Do not try to repair it yourself.
Any servicing that requires disassembly other than cleaning must be performed by a qualified appliance
repairtechnician.
CARE & CLEANING INSTRUCTIONS
1. Allow the Toaster Oven and all accessories to cool completely before cleaning.
2. Clean the outside of the Toaster Oven with a damp cloth and dry thoroughly. A non-abrasive liquid cleaner
may be used for stubborn stains. Rinse and dry thoroughly. Do not use metal scouring pads or abrasive
cleaners that will scratch the surface.
3. Clean interior with a mild or non-abrasive cleaner and plastic scouring pad after each use to avoid build-up.
Do not rub too hard as surface can be scratched.
4. To remove baked-on food, pour a small amount of cooking oil onto the food and allow to stand for 5 to
10minutes. Remove the softened food with a soft cloth. Do not use steel wool, scouring pads or abrasive
cleaners.
5. Rinse and dry thoroughly before closing the glass door. Clean the glass door with a cloth or sponge
dampened with warm, sudsy water. Dry thoroughly.
6. Wash bake/broil pan, wire rack, and crumb tray in soapy water and dry thoroughly.
7. If crumbs and spills have accumulated on the crumb tray, wipe with a damp cloth. Always dry the crumb
tray thoroughly before replacing.
8. DO NOT use abrasive cleaners or metal scouring pads to clean bake/broil pan, wire rack, wire rack, or crumb
tray. For stubborn stains, clean with a nylon or polyester mesh pad and a mild, non-abrasive cleaner. Rinse
and dry thoroughly.
CAUTION: DO NOT use spray-on or other oven cleaners. Using these types of cleaners may cause cosmetic
and/or electrical damage to the Toaster Oven.
STORING INSTRUCTIONS
1. Unplug unit, allow to cool, and clean before storing.
2. Slide the bake/broil assembly (wire rack and bake/broil pan) into the lower shelf position.
3. Store Toaster Oven in its box in a clean, dry place.
4. Never store appliance while it is hot or still plugged in.
5. Never wrap cord tightly around the appliance. Do not put any stress on the cord where it enters theunit,
asit could cause the cord to fray and break.
CONVECTION REHEAT
NOTE: Please read previous section entitled “Convection Cooking” for additional information.
CAUTION: NEVER use plastic containers in the Toaster Oven.
NOTE: Please read previous section entitled “Cooking Containers” for before placing any food in the Toaster
Oven for reheating.
1. Make sure the crumb tray is in place in the bottom of the Toaster Oven.
2. Open the glass door. Place food on the bake/broil pan or in an oven-proof dish, then place on the center
ofthe wire rack so air flows around all sides of the food.
3. Close the glass door.
4. Plug into a 120V AC electrical wall outlet. The blue digital display will illuminate.
Press the FUNCTION button until the arrow points to a flashing REHEAT; the default TIME 15:00 minutes
andTEMP 350ºF will be displayed.
5. To adjust the TIME, turn the TIME control dial to a minimum of 01:00 minute and a maximum of
60:00minutes. Turn the TEMP control dial to adjust from 170ºF to 450ºF.
6. Press the START/CANCEL button; the button will illuminate red indicating the Toaster Oven is ON. REHEAT
will appear on the display, TIME will count down.
NOTE: Press the blue CONVECTION button at any time to turn the fan ON.
CAUTION: As soon as the START/CANCEL button is pressed, and the Toaster Oven is turned ON, both the
top and the lower heating elements may cycle ON and OFF to maintain temperature for the entire cooking
time.
CAUTION: Use care not to place anything on top of the Toaster Oven. Do not touch the Toaster Oven or any
part of the Toaster Oven without wearing oven mitts.
NOTE: Press the red START/CANCEL button at any time to turn the Toaster Oven OFF.
7. When the TIMER control displays 00:00, 3 audible beeps can be heard and the Toaster Oven willturn OFF.
NOTE: If no buttons are pressed within 30 seconds, the blue digital display will turn OFF as the Toaster
Oven rests in standby mode.
8. Open the glass door and check for reheat progress. For a bit more time, press the A LITTLE EXTRA button.
An audible beep can be heard as the button illuminates blue, and cook TIME on the display is extended
05:00 minutes.
9. When you are satisfied with the reheated food, wear protective oven mitts and pull the wire rack out from
the Toaster Oven. Be careful when removing foods from the back of the wire rack. The inside of the Toaster
Oven is very hot. Close glass door.
10. Unplug unit and allow to cool before cleaning.
WARNING: DO NOT LEAVE THE TOASTER OVEN UNATTENDED WHILE REHEATING FOODS.
11. Unplug when not in use and allow the Toaster Oven to cool completely before cleaning.

21
Limited ONE-YEAR Warranty
SENSIO Inc. hereby warrants that for a period of ONE YEAR from the date of purchase, this product
will be free from mechanical defects in material and workmanship, and for 90 days in respect to
non-mechanical parts. At its sole discretion, SENSIO Inc. will either repair or replace the product
found to be defective, or issue a refund on the product during the warranty period.
The warranty is only valid for the original retail purchaser from the date of initial retail purchase
and is not transferable. Keep the original sales receipt, as proof of purchase is required to obtain
warranty validation. Retail stores selling this product do not have the right to alter, modify, or in
any way revise the terms and conditions of the warranty.
EXCLUSIONS:
The warranty does not cover normal wear of parts or damage resulting from any of the following:
negligent use of the product, use of improper voltage or current, improper routine maintenance,
use contrary to the operating instructions, disassembly, repair, or alteration by anyone other than
qualied SENSIO Inc. personnel. Also, the warranty does not cover Acts of God such as re, oods,
hurricanes, or tornadoes.
SENSIO Inc. shall not be liable for any incidental or consequential damages caused by the
breach of any express or implied warranty. Apart from the extent prohibited by applicable law,
any implied warranty of merchantability or tness for a particular purpose is limited in time to
the duration of the warranty. Some states, provinces or jurisdictions do not allow the exclusion
or limitation of incidental or consequential damages, or limitations on how long an implied
warranty lasts, and therefore, the above exclusions or limitations may not apply to you.
The warranty covers specic legal rights which may vary by state, province and/or jurisdiction.
HOW TO OBTAIN WARRANTY SERVICE:
You must contact Customer Service at our toll-free number: 1-866-832-4843. A Customer Service
Representative will attempt to resolve warranty issues over the phone. If the Customer Service
Representative is unable to resolve the problem, you will be provided with a case number and
asked to return the product to SENSIO Inc. Attach a tag to the product that includes: your name,
address, daytime contact telephone number, case number, and description of the problem.
Also, include a copy of the original sales receipt. Carefully package the tagged product with the
sales receipt, and send it (with shipping and insurance prepaid) to SENSIO Inc.’s address.
SENSIO Inc. shall bear no responsibility or liability for the returned product while in transit to
SENSIO Inc.’s Customer Service Center.
20
MEDIDAS DE SEGURIDAD
IMPORTANTES
Siempre se deben seguir las precauciones básicas de seguridad cuando se usan
artefactos eléctricos, incluso lo siguiente:
1. LEA TODAS LAS INSTRUCCIONES.
2. No toque las supercies calientes. Utilice las asas o los mangos.
3. Para protegerse del riesgo de descarga eléctrica, no sumerja el cable, el enchufe ni la
unidad en agua ni en ningún otro líquido.
4. Este electrodoméstico no debe ser utilizado por personas (incluidos niños) con
capacidades físicas, sensoriales o mentales reducidas, o con falta de experiencia y
conocimientos, a menos que una persona responsable de su seguridad les haya
brindado supervisión o instrucciones sobre el uso de los electrodomésticos.
5. Los niños deben ser supervisados para asegurarse de que no juegan con el aparato.
6. Desenchufe el electrodoméstico del tomacorriente cuando no esté en uso y antes
de limpiarlo. Deje que la tostadora se enfríe antes de colocar o retirar piezas.
7. No utilice ningún electrodoméstico que tenga un cable o enchufe dañado, que
muestre un funcionamiento defectuoso o que se haya dañado de cualquier manera.
Lleve el electrodoméstico a un técnico calicado para que lo examine, lo repare o le
haga ajustes eléctricos o mecánicos.
8. El uso de accesorios no recomendados o vendidos por el fabricante puede causar
fuego, descarga eléctrica o lesiones.
9. No lo utilice en exteriores.
10. No permita que el cable cuelgue del borde de la mesa o encimera o toque
supercies calientes.
11. NO coloque el aparato encima de, cerca de o en un quemador eléctrico o de gases
calientes, ni dentro una estufa encendida.
12. Se debe tener extrema precaución al mover un aparato que contenga aceite caliente
u otros líquidos.
13. Para desconectar, presione el botón rojo START / CANCEL. Retire el enchufe de la
toma de corriente.
14. No utilice el aparato para otro uso que no sea el previsto.
15. Las comidas de gran tamaño o utensilios de metal no deben ser insertados en el
horno tostador ya que pueden crear un incendio o riesgo de descarga eléctrica.
16. Si el horno tostador está cubierto o se toca materiales inamables, incluyendo
cortinas, tapicerías, paredes y demás, puede ocurrir un incendio cuando esté en
funcionamiento. No almacene ningún artículo en la encima del aparato cuando esté
en funcionamiento.
17. No limpie con estropajos metálicos jabonosos. Las piezas pueden romper y tocar las
partes eléctricas que resultarían un riesgo de descarga eléctrica.
18. Se debe tener una cautela extrema cuando utilicen envases construidos de otros
materiales que no sean de metal o vidrio.

23 22
tomacorriente cuando no esté en uso.
10. No intente desalojar los alimentos ni limpiarlos mientras que esté enchufado u esté
caliente.
11. No intente utilizar sin la bandeja de hornear/asar colocado en el estante inferior y la
puerta de cristal cerrada.
PRECAUCION: Nunca deje el horno tostador desatendido cuando está en uso.
NOTAS SOBRE EL ENCHUFE
Este aparato tiene un enchufe polarizado (una hoja es más ancha que la otra).
Para reducir el riesgo de descarga eléctrica, este enchufe encajará en una toma de
corriente polarizada sólo de una manera. Si el enchufe no entra completamente en el
tomacorriente, invierta el enchufe. Si el enchufe no puede encajar en la toma eléctrica,
póngase en contacto con un electricista calicado. No modique el enchufe de ninguna
manera.
NOTAS SOBRE EL CABLE
El corto cable suministrado debe ser utilizado para reducir el riesgo de que se enreden
o se tropiecen con un cable más largo. No se puede utilizar los cables de extensión o
alargadoras con este producto.
ADVERTENCIA SOBRE LOS PLASTIFICANTES
PRECAUCIÓN: A n de evitar que los plasticantes se adhieran al acabado de la
encimera, la mesa u otro mueble, coloque un posafuentes o salvamanteles que NO SEA
DE PLÁSTICO entre el electrodoméstico y la supercie de la encimera o mesa. Si no se
hace esto, es posible que el acabado se oscurezca, se formen marcas permanentes o
aparezcan manchas.
CORRIENTE ELECTRICA
Si el circuito eléctrico esta sobrecargado con otros artefactos, es posible que el
electrodoméstico no funcione correctamente. El electrodoméstico debe funcionar en un
circuito eléctrico separado de otros aparatos.
19. No almacene ningún material, aparte de los accesorios recomendados por el
fabricante en este horno tostador cuando no esté en uso.
20. No coloque ninguno de los siguientes materiales en el horno tostador: papeles,
cartones, plásticos y demás.
21. No cubra la bandeja para migas ni ninguna parte del horno tostador con papel de
aluminio. Esto provocara el sobrecalentamiento del horno tostador.
22. Utilice extrema cautela cuando retire la bandeja para migas o deseche las grasas
calientes.
23. No cubra el horno tostador con algo que pueda evitar que el vapor escape. Esto
puede causar deformaciones, decoloraciones, o un fallo, incluido un fuego.
SOLO PARA EL USO DOMESTICO
GUARDE ESTAS INSTRUCCIONES
OTRAS MEDIDAS DE SEGURIDAD
IMPORTANTES
ADVERTENCIA, SUPERFICIES CALIENTES: Este aparato emite calor y se escape el vapor
durante el uso.
Se deben tomar las medidas necesarias para evitar riesgos de quemaduras, incendios u
otras lesiones a personas o daños a la propiedad.
1. Una persona que no ha leído y entendido todas las instrucciones de operación y
seguridad no está calicada para operar este electrodoméstico. Todos los usuarios
de este electrodoméstico deben leer y comprender este manual de instrucciones
antes de poner en funcionamiento o limpiar el aparato.
2. Si este aparato se cae o se sumerge accidentalmente en agua, desenchúfelo
inmediatamente. ¡No se meta en el agua!
3. Cuando use este aparato, permita un espacio aéreo suciente por encima y por
todos lados para la circulación de aire. No utilice este aparato mientras esté tocando
o cerca de cortinas, revestimientos de paredes, ropas, toallas de cocina u otros
materiales inamables.
4. No deje este aparato desatendido durante el uso para reducir el riesgo de incendio.
5. Si el aparato comienza a funcionar mal durante el uso, presione el botón rojo de
START/CANCEL. Desenchúfelo del tomacorriente. ¡No utilice ni intente reparar el
aparato que funciona mal!
6. El cable de este electrodoméstico solo debe enchufarse en un tomacorriente de
120V CA.
7. No utilice este aparato en una posición inestable.
8. Para reducir el riesgo de quemaduras u otras lesiones, no toque las supercies
calientes. Se recomienda el uso de guantes de cocina, así como de utensilios de
mango largo. Utilice el asa para quitar el conjunto de la barra de dentro del horno
tostador.
9. Para reducir el riesgo de lesiones personales o materiales, desenchufe este aparato
antes de insertar comidas. Mantenga siempre el aparato desenchufado del

25 24
PANEL DE CONTROL
1. PANTALLA DIGITAL. Cuando el aparato esta enchufado, sonará un bip audible ya la
pantalla iluminada en azul mostrará la FUNCIÓN (FUNCTION) activa, la oscuridad del
pan tostado (1-7), el tiempo restante de la cocción (TIME) y TEMP (Temperatura).
2. El botón de FUNCIÓN (FUNCTION). Pulse una vez para avanzar la flecha a 10 ciclos
de cocción preprogramados. Se escuchará un bip audible y el ciclo activo parpadeará,
el botón FUNCTION se iluminará en azul cada vez que se pulse.
3. El botón de INICIO/CANCELAR. Pulse INICIO (START) para empezar la función
seleccionada o CANCELAR (CANCEL).
El botón se iluminará en rojo para indicar que la unidad está encendida. Cuando
se vuelve a pulsar el botón INCIO/CANCELAR, el aparato se apagará y la luz roja
parpadeará.
El botón de UN POCO MÁS (A LITTLE EXTRA) Extiende el tiempo de cocción
después de completar el ciclo de cocción. Si abre la puerta de cristal y comprueba si
hay marrón, para añadir un poco más de tiempo, presione el botón UN POCO MÁS.
Se escuchará un bip audible cuando el botón se ilumine en azul y se agregará tiempo
adicional en la pantalla digital.
4. El botón de CONVECCIÓN (CONVECTION) se ilumina en azul para indicar que el
ventilador de convección está funcionando. Presione el botón CONVECCIÓN para
encender o apagar el ventilador.
5. El dial de TIEMPO (TIME). Gire para cambiar manualmente los horarios desde el
mínimo de 01:00 minutos hasta el máximo de 99:00 minutos. Se escucha un bip
audible cuando se cambia la hora.
NOTA: Algunas funciones están preprogramadas y sólo pueden cambiarlas dentro de
los límites preestablecidos.
6. El dial de TEMP Gire para cambiar manualmente la temperatura desde la mínima
de 150ºF hasta la máxima de 450ºF. Se escucha un bip audible cuando se cambia la
temperatura.
NOTA Algunas funciones están preprogramadas y sólo pueden cambiarlas dentro de los límites
preestablecidos.
FUNCIONES PREPROGRAMADAS
1. TOSTADA (TOAST): Las temperaturas elevadas soasan y cocinan comidas ricas y crujientes. El calor alto se
lleva y produce resultados deliciosamente crujientes. Pan, muffins, gofres congelados, pasteles congelados,
comidas de tostador etc.
2. CALENTAR (WARM): Se mantiene comidas calientes hasta 99:00 minutos.
3. ROSCAS (BAGELS): Las temperaturas elevadas cocinan las tapas de las roscas, mientras que calienta las
interiores. La función de ROSCA es ideal para tostar muffins ingleses o panes gruesos o especiales.
4. HORNEAR DE CONVECCIÓN (CONVECTION BAKE): El uso del ventilador de convección ayuda a conservar
los sabores, promueve el dorado y puede reducir el tiempo de cocción sin girando y hirviendo las comidas.
Hornee pasteles, tartas, galletas, aves, carne de res, cerdo etc.
NOTA: Pulse el botón CONVECCIÓN para apagar el ventilador de convección.
5. PIZZA DE CONVECCIÓN: Este horno tostador acomoda cualquier pizza de 12 pulgadas (o menor), fresco o
congelado. La cocción por convección asegura una cocción de pizza plana y el dorado.
NOTA: Pulse el botón CONVECCIÓN para apagar el ventilador de convección.
6. ASAR: Pescado, carne, aves, chuletas de cerdo, etc.
7. GALLETAS: Ideal para hornear galletas caseras o preparadas, galletitas, canelas o cruasanes.
NOTA: Pulse el botón CONVECCIÓN para apagar el ventilador de convección.
8. DESCONGELAR (DEFROST): Las bajas temperaturas ayudan a descongelar las comidas congeladas que se
cocinan en el horno tostador.
9. RECALENTAR CON CONVECCIÓN (CONVECTION REHEAT): Recalentar las sobras al ventilador de
convección para calentar sin dorar.
NOTA: Pulse el botón CONVECCIÓN para apagar el ventilador de convección.
NOTA: Este tostador está equipado con un ventilador de refrigeración que funciona durante el proceso
de cocción para enfriar los internos componentes electrónicos. Es normal que este ventilador continúe a
funcionar durante un período prolongado de tiempo, incluso cuando el horno está apagado.
CONOZCA A SU HORNO TOSTADOR
El producto puede diferir levemente de las ilustraciones.
Figura 1
FUNCTION
START / CANCEL
TEMP
TIME
A LITTLE EXTRA
CONVECTION
ºF
Estante
superior
Estante
centrado
Estante
inferior
Mango
Puerta de
vidrio
Elementos
térmicos en el
superior
Ventilador por
convección
(no mostrado)
Puerta
White Backlit
Digital Display
Panel de control
Ventilador
del horno
Enchufe
polarizado
Elementos
térmicos en el
inferior
Bandeja para
migas
ACCESSORIES
Figura 2
Bake Pan
Rejilla de alambre
Bandeja para hornear/asar
FUNCTION
START / CANCEL
TEMP
TIME
A LITTLE EXTRA
CONVECTION
ºF
Figura 3

27 26
LIMITES DE PESO/TAMAÑO
ADVERTENCIA:
• Las comidas cocinan en la rejilla no deben tener más de 9 pulgadas de ancho y deben encajar en el horno
tostador sin tocar los elementos térmicos inferiores o superiores.
• El horno tostador puede cocinar hasta 4 libras de pollo o pavo y hasta un asado de 4 libras.
• Le sugerimos que comprueba periódicamente el progreso de la cocción con un termómetro de carne.
ANTES DE UTILIZAR POR PRIMERA VEZ
PRECAUCIÓN: Para protegerse del riesgo de descarga eléctrica, no sumerja el horno tostador, ni permita que
el enchufe entre en contacto con agua ni en ningún otro líquido
1. Lea bien todas las instrucciones.
2. Desembale cuidadosamente el horno tostador y los accesorios, retirando todos los materiales de embalaje.
Retire las etiquetas de las superficies exteriores.
3. Coloque el horno de la tostadora en una superficie nivelada, como una encimera o una mesa. Asegúrese de
que los lados, la parte posterior y la parte superior del horno tostador estén por lo menos a 4 pulgadas de
distancia de cualquier pared, gabinete u objetos en la encimera o en la mesa.
4. Para evitar rasguños, deterioros o decoloración, no guarde nada en la encima del horno tostador durante el
funcionamiento.
5. Limpie la rejilla y la bandeja de migas en agua caliente y jabonosa. Enjuague y seque completamente antes
de colocarlo en el horno tostador
6. No utilice limpiadores abrasivos.
7. Para asegurar que el horno tostador está libre de aceites utilizados durante la fabricación, es necesario
operar el aparato vacío una vez.
8. Asegúrese de que la bandeja para migas esté colocada en la parte inferior del horno tostador.
9. Enchufe en un tomacorriente eléctrico de 120V CA. Un largo pitido audible sonará; 3 botones azules y el
botón rojo INICIO/ CANCELAR parpadearán una vez; La pantalla digital azul se iluminará cuando la flecha
de función apunte a la función TOASTADA parpadeante; El control DORAR (BROWNING) parpadeará a 4, el
ajuste del medio. Si no se presiona ningún botón en 60 segundos, la pantalla digital azul se apagará cuando
el horno esté en modo de espera. Presione cualquier botón. La pantalla digital azul se iluminará.
10. Presione el botón FUNCION hasta que la flecha apunte a la función HORNEAR parpadeante. Gire el dial de
control TEMP a 400 ºF. Se mostrarán 30:00 minutos por defecto.
11. Pulse el botón INICIO / CANCELAR; El botón se iluminará en rojo indicando que el horno tostador está
encendido. El horno tostador precalentará y luego, contará hacia atrás. Esto va a quemar cualquier residuo
o aceites en el horno o elementos de calefacción.
12. Al final de los 30:00 minutos, el control TEMPORIZADOR (TIMER) mostrará 00:00, se escuchará 3 pitidos
audibles y el horno tostador se apagará. El horno tostador está listo para su uso.
PRECAUCIÓN: Las superficies de los electrodomésticos están calientes durante y después del uso. Siempre
use guantes de cocina protectores y aislados en las manos al tocar un horno tostador caliente.
NOTA: El horno tostador no funcionará hasta que se presione el botón INICIO/CANCELAR.
NOTA: Pulse el botón rojo INICIO/ CANCELAR en cualquier momento para apagar el horno tostador. Si no
se presiona ningún botón en 30 segundos, la pantalla digital azul se apagará para que el horno se vuelve
en modo de espera.
GUIAS DE COCINAR SEGUN EL USDA
Se debería siempre usar un termómetro para medir la temperatura interna. El termómetro debe ser insertado
en la parte más gruesa del asado, lejos de los huesos o áreas grasas.
El Departamento de Agricultura de los Estados Unidos (USDA) recomienda que la carne y las aves sean
cocinadas a las siguientes temperaturas internas para asegurarse de que se ha matado cualquier bacteria
dañina.
El pavo molido y el pollo deben ser cocidos a una temperatura interna de 165 ° F y la carne molida, la ternera,
el cordero y el cerdo cocinan a una temperatura interna de 160 ° F. El pollo y el pavo deberían ser cocidos
a una temperatura interna de 170 ° F para la carne blanca y 180 ° F para la carne oscura. El ganso y el pato
deberían ser cocidos a una temperatura interna de 180 ° F. La carne fresca, la ternera y el cordero, etc. se
deberían ser cocidos a una temperatura interna de por lo menos 145 ° F. El cerdo fresco debería ser cocido a
una temperatura interna de por lo menos 160 ° F. Cuando se recaliente carne y productos de aves, también
deberían ser cocidos a una temperatura interna de 165 ° F.
CARTA DE FUNCIONES
Función Tiempo (Min) Temp (Fahrenheit) Un poco
más
Convección
Por defecto Ajustable Por defecto Ajustable
Tostada El color de
tostada 4
El color de
tostada 1-7
450º - 00:40 APAGADO
Rosca El color de
tostada 4
El color de
tostada 1-7
450º - 00:40 APAGADO
Hornear 30:00 01:00 - 99:00 350º 170º - 450º 05:00 ENCENDIDO
Pizza 16:00 01:00 - 60:00 450º 350º - 450º 02:00 ENCENDIDO
Asar 10:00 01:00 - 60:00 450º - 02:00 APAGADO
(Por defecto) *
Galletas 11:00 01:00 - 60:00 350º 170º - 450º 02:00 ENCENDIDO
Descongelar 30:00 01:00 - 60:00 150º - 05:00 APAGADO
(Por defecto) *
Calentar 90:00 01:00 - 99:00 170º 150º - 200º 10:00 APAGADO
(Por defecto) *
Recalentar 15:00 01:00 - 60:00 350º 170º - 450º 05:00 APAGADO
(Por defecto) *
NOTA: Cuando se seleccionan las funciones HORNEAR, PIZZA, GALLETAS y CALENTAR, el horno tostador requiere
unos minutos de precalentar para alcanzar su temperatura óptima. Una vez seleccionada la función, aparecerá
la palabra PRECALENTAR (PRE-HEAT) en la pantalla y el horno precalentará. El temporizador contará para atrás
solamente después de que se haya completado el precalentamiento. Después de alcanzar la temperatura
deseada, sonarán 3 pitidos y el texto desaparecerá de la pantalla y la unidad seguirá cocinar en la función
seleccionada.
POSICIONES DE ESTANTES
NOTA: Algunas comidas pueden requerir una cocción en posiciones diferentes en el estante dependiendo
de la receta, el tamaño, la cantidad de comida que se va a cocinar y el gusto personal. Utilice la siguiente
información sólo como guía.
1. Hay 3 niveles diferentes donde se pueden colocar la rejilla u el molde de hornear.
2. Utilice el estante superior para la función ASAR
3. El nivel centrado es utilizado normalmente con el uso de las funciones TOSTADAS, ROSCAS, PIZZA O
GALLETAS.
4. Utilice el estante inferior para las funciones HORNEAR, ASAR, RECALENTAR y CALENTAR.
ADVERTENCIA: Nunca coloque el molde de hornear en los elementos térmicos inferiores.
COCCIÓN POR CONVECCIÓN
La cocción por convección circular el aire caliente a través de la caja del horno tostador para mantener la
temperatura uniforme. Este flujo de aire constante y suave promueve el dorado y sella los sabores al cocinar
carnes. Debido a la eficiencia del uso de un ventilador de convección, el tiempo de cocción puede ser reducido.
• Por regla general, las comidas horneadas requieren una temperatura más baja cuando se usa un ventilador
de convección que la cocción en un horno convencional. Baje la temperatura en 25 ° F a un mínimo de 300
° F cuando hornee tartas, pasteles, galletas y pan.
• • Siga las instrucciones del paquete para el tiempo y la temperatura al cocinar las comidas de conveniencia.
• Compruebe las comidas durante como las últimas tres cuatros del tiempo programado del ciclo de cocción
y ajuste el tiempo o la temperatura si es necesario.
• La convección es el ajuste por defecto en las funciones HORNEAR, PIZZA, GALLETAS y PRECALENTER.
Apague el ventilador de convección en cualquier momento con la pulsa el botón azul CONVECCIÓN.
• La cocción por CONVECCIÓN es posible durante todas las funciones excepto TOSTADA y ROSCA con la pulsa
el botón CONVECCIÓN
• Utilice platos aptos para hornos, placas de asar, de pizzas o placas para galletas con lados muy bajos, y
colóquelos en el centro de la rejilla para permitir un óptimo flujo de aire.
• No cubra las comidas con papel de aluminio ni ningún otro tipo de tapa para un flujo de aire máximo.

29 28
TOSTADA
1. Asegúrese de que la bandeja de migas esté limpia y en su lugar en la parte inferior del horno tostador.
2. Abra la puerta de vidrio. Deslice la rejilla de alambre en la posición central del estante y ponga el pan o las
comidas en la rejilla. Cierra la puerta de vidrio.
3. Enchufe en un tomacorriente eléctrico de 120V CA. La pantalla digital azul se iluminará cuando la flecha de
función apunte a TOSTADA parpadeante; El control DORAR parpadeará a 4, el ajuste del medio. Si se desea
un color parduzco más claro, gire el dial de control TIEMPO en sentido antihorario para obtener un color
pardo más oscuro, gire el dial en el sentido horario hasta que se muestre el ajuste deseado.
Dorado deseado Ajuste de dorado
Claro 1 o 2
Promedio 3, 4, 5
Oscuro 6 o 7
NOTA: Si el pan o la comida está congelado, aumente el ajuste de dorado por 1.
4. Presione el botón INICIO/CANCELAR; El botón iluminará en rojo indicando que el horno tostador está
encendido. TOSTADA aparecerá en la pantalla, TIEMPO hará la cuenta para atrás.
PRECAUCIÓN: Tan pronto como se pulsa el botón INICIO/ CANCELAR, y el horno tostador se enciende,
tanto los elementos térmicos superiores e inferiores pueden encenderse y apagarse para mantener la
temperatura durante todo el tiempo de cocción.
PRECAUCIÓN: Tenga cuidado de no colocar nada encima del horno tostador. No toque el horno tostador ni
ninguna parte del horno tostador sin usar guantes de cocina.
NOTA: Pulse el botón rojo INICIO/ CANCELAR en cualquier momento para apagar el horno tostador.
5. Cuando el control TEMPORIZADOR (TIMER) muestre 00:00, se escucharán 3 pitidos audibles y el horno
tostador apagará.
6. Abra la puerta de vidrio y verifique si las tostadas están bien tostadas. Por un poco más de tiempo, presione
el botón UN POCO MÁS. Se escuchará un bip audible cuando el botón ilumine en azul y el TIEMPO en la
pantalla se amplía por 00:40 segundos.
7. Cuando esté satisfecho con el color tostado, use guantes para horno para sacar la rejilla de alambre del
horno tostador. Tenga cuidado al retirar la tostada de la parte posterior de la rejilla. El interior del horno
tostador es muy caliente. Cierre la puerta de vidrio.
8. Desenchufe la unidad y déjela enfriar antes de limpiarla.
ADVERTENCIA: NO DEJE EL HORNO TOSTADOR ENCENDIDO SIN LA SUPERVISIÓN.
9. Desenchúfelo cuando no esté en uso.
CONSEJOS PARA TOSTADAS
• Retire todos los embalajes protectores de las comidas antes de colocarlas en el horno tostador. Siga las
instrucciones de comida del tostador.
• El pan congelado y pesado requiere un ajuste de tiempo más largo (por ejemplo, roscas y muffins ingleses).
NOTA: Tenga mucho cuidado cuando utilice este horno tostador para tostar productos de pastelería con
glaseados a o rellenos abiertos.
• Cuando tueste más de una rebanada de pan, use rebanadas de tamaño, grosor y frescura similares.
• Pan rancio, pan fino o productos de pan dulce, como pasteles de té y pan de frutas, se vuelven marrón
mucho más rápido que el pan ordinario, por lo que deben ser tostados por menos tiempo.
• Para obtener mejores resultados, limpie la bandeja de migas con frecuencia.
DESCONGELAR
Utilice la función DESCONGELAR al descongelar comidas congeladas para cocinar en el horno tostador.
1. Deslice la rejilla para hornear/asar a la posición central del estante.
2. Enchufe en un tomacorriente eléctrico de 120V AC. La pantalla digital azul iluminará. Presione el botón
FUNCTION hasta que la flecha apunte a la función DESCONGELAR parpadeante; Se mostrará el TIEMPO
30:00 minutos y TEMP 150ºF por defecto.
3. Para ajustar el TIEMPO, gire el dial de control TIME a un mínimo de 01:00 minutos y un máximo de 60:00
minutos. La TEMP se fija a 150ºF y no se puede cambiar ya que las temperaturas más altas pueden causar
una descongelación incompleta.
4. Presione el botón INICIO/CANCELAR; El botón iluminará en rojo indicando que el horno tostador está
encendido. DESCONGELAR aparecerá en la pantalla, el TIEMPO contará para atrás.
NOTA: Presione el botón CONVECCIÓN en cualquier momento para encender el ventilador.
PRECAUCIÓN: Tan pronto como se pulsa el botón INICIO/ CANCELAR, y el horno tostador se enciende,
tanto los elementos térmicos superiores e inferiores pueden encenderse y apagarse para mantener la
temperatura durante todo el tiempo de cocción.
PRECAUCIÓN: Tenga cuidado de no colocar nada encima del horno tostador. No toque el horno tostador ni
ninguna parte del horno tostador sin usar guantes de cocina.
NOTA: Pulse el botón rojo INICIO/ CANCELAR en cualquier momento para apagar el horno tostador.
5. Cuando el control TEMPORIZADOR (TIMER) muestre 00:00, se escucharán 3 pitidos audibles y el horno
tostador apagará.
NOTA: Si no se presiona ningún botón en 30 segundos, la pantalla digital azul se apagará para que el horno
se vuelve en modo de espera.
6. Abra la puerta de vidrio y verifique si las comidas están bien descongeladas. Por un poco más de tiempo,
presione el botón UN POCO MÁS. Se escuchará un bip audible cuando el botón ilumine en azul y el tiempo
de descongelación en la pantalla se amplía 05:00 minutos.

31 30
ROSCA
Utilice la función ROSCA para tostar los muffins ingleses o panes gruesos especiales quienes requieren ser
tostados por sus tapas.
1. Asegúrese de que la bandeja de migas esté limpia y en su lugar en la parte inferior de la tostadora del
horno.
2. Abra la puerta de vidrio. Deslice la rejilla de alambre en el estante central y ponga roscas, muffins ingleses o
tostadas en la rejilla. (Véase la Figura 4.)
Cierre la puerta de vidrio.
3. Enchufe en un tomacorriente eléctrico de 120V AC. La pantalla digital azul se iluminará.
4. Presione el botón FUNCION hasta que la flecha apunte a ROSCA parpadeante; El control DORAR parpadeará
a 4, el ajuste del medio. Si desea un color parduzco más claro, gire el dial de TIEMPO en sentido antihorario
para obtener un color pardo más oscuro, gire el dial en el sentido horario hasta que se muestre el ajuste
deseado.
Dorado deseado Ajuste de dorado
Claro 1 o 2
Medio 3, 4, 5
Oscuro 6 o 7
NOTA: Si el pan o la comida está congelado, aumente el ajuste de dorado por 1.
5. Presione el botón INICIO/CANCELAR; El botón iluminará en rojo indicando que el horno tostador está
encendido. ROSCA aparecerá en la pantalla, TIEMPO hará la cuenta para atrás.
PRECAUCIÓN: Tan pronto como se pulsa el botón INICIO/ CANCELAR, y el horno tostador se enciende,
tanto los elementos térmicos superiores e inferiores pueden encenderse y apagarse para mantener la
temperatura durante todo el tiempo de cocción.
PRECAUCIÓN: Tenga cuidado de no colocar nada encima del horno tostador. No toque el horno tostador ni
ninguna parte del horno tostador sin usar guantes de cocina
NOTA: Pulse el botón rojo INICIO/ CANCELAR en cualquier momento para apagar el horno tostador.
6. Cuando el control TEMPORIZADOR (TIMER) muestre 00:00, se escucharán 3 pitidos audibles y el horno
tostador apagará.
7. Abra la puerta de vidrio y verifique si las roscas están bien tostadas. Por un poco más de tiempo, presione
el botón UN POCO MÁS. Se escuchará un bip audible cuando el botón ilumine en azul y el TIEMPO en la
pantalla se amplía por 00:40 segundos.
8. Cuando esté satisfecho con el color tostado, use guantes para horno para sacar la rejilla de alambre del
horno tostador. Tenga cuidado al retirar la tostada de la parte posterior de la rejilla. El interior del horno
tostador es muy caliente. Cierre la puerta de vidrio.
9. Desenchufe la unidad y déjela enfriar antes de limpiarla.
ADVERTENCIA: NO DEJE EL HORNO TOSTADOR ENCENDIDO SIN LA SUPERVISIÓN AL USAR LA
FUNCIÓN BAGEL.
10. Desenchúfelo cuando no esté en uso.
CONSEJOS PARA TOSTAR ROSCAS
• Retire todos los embalajes protectores de las comidas antes
de colocarlas en el horno tostador. Siga las instrucciones de
comida del tostador.
• La función ROSCA ofrece un bronceado más oscuro para
acomodar roscas y muffins ingleses, rebanadas de pan más
gruesas y densas.
• ADVERTENCIA: Tenga mucho cuidado cuando utilice este
horno tostador para tostar productos de pastelería con
glaseados a o rellenos abiertos.
• Cuando tueste más de una rosca, use mitades de tamaño,
grosor y frescura similares.
• Roscas rancias, roscas finas o productos de pan dulce, como pasteles de té y pan de frutas, se vuelven
marrón mucho más rápido que el pan ordinario, por lo que deben ser tostados por menos tiempo.
• Para obtener mejores resultados, limpie la bandeja de migas con frecuencia.
FUNCTION
START / CANCEL
TEMP
TIME
A LITTLE EXTRA
CONVECTION
ºF
Figura 4

33 32
HORNEAR/ASAR CON CONVECCIÓN
Utilice HORNEAR u HORNEAR CON CONVECCIÓN para hornear cacerolas, pasteles, galletas, tartas, galletitas o
su receta favorita de acuerdo con las instrucciones del paquete o de la receta. ASAR es un término aplicado con
frecuencia cuando se usa la función HORNEAR o HORNEAR CON CONVECCIÓN para cocinar carnes.
NOTA: Lea la sección anterior llamada “Cocción por convección” para obtener más información.
CAUTION: NUNCA use bolsas de asar o recipientes de plástico en el horno tostador.
CAUTION: No utilice tapas de vidrio en las rejillas. Si usa un recipiente para hornear de vidrio o vitrocerámica,
asegúrese de que esté a una distancia mínima de 1 pulgada del elemento térmico superior.
1. Asegúrese de que la bandeja para migas esté colocada en la parte inferior del horno tostador.
2. Abra la puerta de vidrio. Si usted escoge utilizar su propio plato para hornear, deslice la rejilla hacia la
posición central o inferior. Cuidadosamente, centre el plato para hornear directamente sobre una rejilla de
alambre y cierre la puerta de vidrio.
PRECAUCIÓN: Asegúrese de que el plato para hornear esté a una distancia mínima de 1 pulgada del
elemento térmico superior.
3. Usted puede usar la bandeja de hornear/asar solo para hornear comidas como galletas, galletitas o
aperitivos calientes.
4. Para asar carnes o pescado, coloque la rejilla de alambre, con los pies hacia abajo, en la bandeja de hornear/
asar para crear el montaje de hornear/asar. Coloque las carnes o los pescados en el montaje de hornear/
asar. Los jugos y/o la grasa se gotearán en la sartén y disminuirán las salpicaduras mientras que se asan.
5. Enchufe en un tomacorriente eléctrico de 120V CA. La pantalla digital azul iluminará.
Presione el botón FUNCIÓN hasta que la flecha apunte a HORNEAR parpadeante; Se mostrará el TIEMPO
30:00 minutos por defecto y el TEMP 350ºF.
6. Ajuste el TIEMPO y la TEMPERATURA según las instrucciones de la receta. Gire el dial de TIEMPO a un
mínimo de 01:00 minutos y un máximo de 99:00 minutos. Gire el dial de TEMP para ajustar de 170ºF a
450ºF.
7. Presione el botón INICIO/CANCELAR; El botón iluminará en rojo indicando que el horno tostador está
encendido. El botón CONVECIÓN iluminará en azul indicando que el ventilador está encendido. HORNEAR
aparecerá en la pantalla, TIEMPO contará para atrás.
NOTA: Cuando se selecciona la función HORNEAR, el horno tostador requiere unos minutos de precalentar
para alcanzar la temperatura óptima. Una vez seleccionada la función, aparecerá el texto PRECALENTAR
en la pantalla y el horno empezará a precalentar. Después de alcanzar la temperatura deseada, sonarán 3
pitidos y el texto desaparecerá de la pantalla y el horno seguirá cocinando en la función seleccionada.
NOTA: Presione el botón CONVECCIÓN azul en cualquier momento para apagar el ventilador.
PRECAUCIÓN: Tan pronto como se pulsa el botón INICIO/ CANCELAR, y el horno tostador se enciende,
tanto los elementos térmicos superiores e inferiores pueden encenderse y apagarse para mantener la
temperatura durante todo el tiempo de cocción.
PRECAUCIÓN: Tenga cuidado de no colocar nada encima del horno tostador. No toque el horno tostador ni
ninguna parte del horno tostador sin usar guantes de cocina.
NOTA: Pulse el botón rojo INICIO/ CANCELAR en cualquier momento para apagar el horno tostador.
8. Cuando el control TEMPORIZADOR (TIMER) muestre 00:00, se escucharán 3 pitidos audibles y el horno
tostador apagará.
NOTE: Si no se presiona ningún botón en 30 segundos, la pantalla digital azul se apagará para que el horno
se vuelve en modo de espera.
9. Abra la puerta de vidrio y verifique el tono de marrón. Por un poco más de tiempo, presione el botón UN
POCO MÁS. Se escuchará un bip audible cuando el botón ilumine en azul y el TIEMPO en la pantalla se
amplía 05:00 minutos.
10. Cuando esté satisfecho con las comidas tostadas o asadas, use guantes para horno para sacar la rejilla de
alambre del horno tostador. Tenga cuidado al retirar la tostada de la parte posterior de la rejilla. El interior
del horno tostador es muy caliente. Cierre la puerta de vidrio
11. Desenchufe la unidad y déjela enfriar antes de limpiarla.
ADVERTENCIA: NO DEJE EL HORNO TOSTADOR ENCENDIDO SIN LA SUPERVISIÓN AL USAR LA
FUNCIÓN HORNEAR O ASAR
12. Desenchufe cuando no esté en uso y permita que se enfrié antes de limpiarlo.
CONSEJOS PARA RECIPIENTES DE COCINAR
• La rejilla para hornear/asar incluido con el horno tostador es apto para cocinar comidas como galletas,
rollos, galletitas, nachos y aperitivos calientes.
• Se puede usar una variedad de platos de hornear estándar, tales como cacerolas, cualquier molde de
torta redondo o cuadrado de 8 “o 9”, un molde de muffins de 12 tazas, cacerolas redondas, cuadradas o
rectangulares de 1 y 2 cuartos para muchas comidas diferentes.
• Escoja utensilios de cocina hechos de metal o vidrio/cerámica sin tapas.
• Las cacerolas oscuras o aburridas absorben el calor más rápidamente; Los alimentos hornean más
rápidamente y la corteza se doran más fácilmente que en las sartenes de hornear brillantes.
• Revise las instrucciones del paquete en el recipiente o póngase en contacto con el fabricante del horno
para determinar la idoneidad del recipiente para su uso en un horno tostador.
• No utilice bolsas de horno en este horno tostador, ya que pueden entrar en contacto con los elementos
térmicos
CONSEJOS PARA HORNEAR CON CONVECCIÓN
• Cuando utilice HORNEAR CON CONVECCIÓN, baje la temperatura de la receta de hornear en 25 ° F a un
mínimo de 300 ° F cuando hornee tartas, pasteles, galletas y pan.
• Al hornear, la posición del estante utilizado dependerá del tamaño de la comida que esté preparando. Es
importante colocar la comida lo más cerca posible del centro del horno tostador para asegurar una cocción
uniforme.
• Las cacerolas oscuras o aburridas absorben el calor más rápidamente; Los alimentos hornean más
rápidamente y la corteza se doran más fácilmente que en las sartenes de hornear brillantes.
• Escoja utensilios para hornear hechos de metal, vidrio y cerámica resistente al horno.
• Compruebe las instrucciones del paquete para determinar si el recipiente es apto para su uso en un horno
convencional o tostador.
PRECAUCIÓN: Deje espacio de aire de al menos 1 “entre la parte superior del recipiente y los elementos
térmicos superiores. Nunca utilice tapas de vidrio en recipientes de vidrio o de metal. Si es necesaria una
tapa, cubra firmemente con papel de aluminio.
CONSEJOS PARA ASAR CON CONVECCIÓN
• ¡IMPORTANTE! Consulte la sección Guías de cocinar según el USDA de este manual de instrucciones antes
de cocinar. Siempre pruebe la carne utilizando un termómetro de cocción preciso.
• Se debe usar siempre un termómetro de carne insertado en el centro de la carne para asegurar la cocción
deseada.
• Cocine a 5 a 10 grados por debajo de la cocción deseada (temperatura interna). Deje reposar la carne de 15
a 20 minutos antes de servir. La temperatura sigue subiendo mientras que está de pie.
• ASE CON CONVECCIÓN cortes grandes y tiernas de carne y pollo. Condimentar antes de cocinar añade
sabor y aroma durante la cocción.
• Una capa de grasa en la parte superior del asado promueve un mejor dorado y proporciona un sabor
natural.
• Para acelerar el dorado, cepille los cortes de carne magros, pollo y pescado con aceite, margarina o
mantequilla derretida.
• Al tostar carnes con un alto contenido de grasa, la bandeja de hornear/asar puede llenarse con grasa antes
de completar la cocción. Retire cuidadosamente el conjunto de la rejilla para hornear con guantes de
cocina y vacíelo. Reemplace para seguir la torrefacción.
• Coloque la carne (cara gorda hacia arriba) o las comidas que se van a cocinar en una rejilla para hornear. Si
lo desea, gire a la mitad del tiempo HORNEAR/ASAR.

35 34
PIZZA DE CONVECCIÓN
NOTA: Lea la sección anterior llamada “Cocción por convección” para obtener más información. Su horno
tostador puede acomodar una pizza de 12 pulgadas fresca o congelada.
1. Asegúrese de que la bandeja para migas esté colocada en la parte inferior del horno tostador.
2. Al cocinar una pizza preparada, fresca o congelada, retire todos los embalajes, incluyendo cartones,
plásticos, papeles u otros materiales inflamables antes de colocar la pizza en el horno tostador. Al hornear
la pizza fresca, utilice una bandeja ligeramente engrasado de la pizza asperjada con la harina de maíz para
hacer la extracción de la pizza cocida al horno más fácil.
ADVERTENCIA: Coloque la bandeja debajo de la rejilla de alambre en la posición más baja como el queso
fundido y otros ingredientes pueden caer en los elementos térmicos y crear un riesgo de incendio.
3. Dependiendo de la profundidad de la pizza, deslice la rejilla de alambre o el conjunto de hornear/asar a
la posición central o inferior. Con cuidado, centre la bandeja de pizza directamente en la rejilla y cierre la
puerta de vidrio
PRECAUCIÓN: Asegúrese de que la pizza esté a una distancia mínima de 1 pulgada del elemento térmico
superior.
4. Enchufe en un tomacorriente eléctrico de 120V CA. La pantalla digital azul iluminará. Presione el botón
FUNCIÓN hasta que la flecha apunte a PIZZA parpadeante; Se mostrará el TIEMPO 16:00 minutos por
defecto y el TEMP 450ºF.
5. Ajuste el TIEMPO y la TEMPERATURA según las instrucciones de la receta. Gire el dial de TIEMPO a un
mínimo de 01:00 minutos y un máximo de 60:00 minutos. Gire el dial de TEMP para ajustar de 350ºF a
450ºF.
6. Presione el botón INICIO/CANCELAR; El botón iluminará en rojo indicando que el horno tostador está
encendido. El botón CONVECIÓN iluminará en azul indicando que el ventilador está encendido. PIZZA
aparecerá en la pantalla, TIEMPO contará para atrás.
NOTA: Cuando se selecciona la función PIZZA, el horno tostador requiere unos minutos de precalentar para
alcanzar la temperatura óptima. Una vez seleccionada la función, aparecerá el texto PRECALENTAR en la
pantalla y el horno empezará a precalentar. Después de alcanzar la temperatura deseada, sonarán 3 pitidos
y el texto desaparecerá de la pantalla y el horno seguirá cocinando en la función seleccionada.
NOTA: Presione el botón CONVECCIÓN azul en cualquier momento para apagar el ventilador.
PRECAUCIÓN: Tan pronto como se pulsa el botón INICIO/ CANCELAR, y el horno tostador se enciende,
tanto los elementos térmicos superiores e inferiores pueden encenderse y apagarse para mantener la
temperatura durante todo el tiempo de cocción.
PRECAUCIÓN: Tenga cuidado de no colocar nada encima del horno tostador. No toque el horno tostador ni
ninguna parte del horno tostador sin usar guantes de cocina.
NOTA: Pulse el botón rojo INICIO/ CANCELAR en cualquier momento para apagar el horno tostador.
7. Cuando el control TEMPORIZADOR (TIMER) muestre 00:00, se escucharán 3 pitidos audibles y el horno
tostador apagará.
NOTE: Si no se presiona ningún botón en 30 segundos, la pantalla digital azul se apagará para que el horno
se vuelve en modo de espera.
8. Abra la puerta de vidrio y verifique el tono de marrón. Por un poco más de tiempo, presione el botón UN
POCO MÁS. Se escuchará un bip audible cuando el botón ilumine en azul y el TIEMPO en la pantalla se
amplía 02:00 minutos
9. Cuando esté satisfecho con la pizza cocida, use guantes para horno para sacar la rejilla de alambre del
horno tostador. Tenga cuidado al retirar la tostada de la parte posterior de la rejilla. El interior del horno
tostador es muy caliente. Cierre la puerta de vidrio.
10. Desenchufe la unidad y déjela enfriar antes de limpiarla.
A DVERTENCIA: NO DEJE EL HORNO TOSTADOR ENCENDIDO SIN LA SUPERVISIÓN AL COCINAR LA
PIZZA.
11. Desenchufe cuando no esté en uso y permita que se enfrié antes de limpiarlo.
CONSEJOS PARA PIZZAS
NOTA: Si las instrucciones del paquete no indican los tiempos de cocción por convección, baje la
TEMPERATURA de 25 ° F y controle cuidadosamente el progreso de la cocción.
La versatilidad de este horno tostador digital le permite cocinar una grande variedad de pizzas: pizza fresca o
congelada; Cortezas finas, platos rellenos o profundas perfectamente cada vez.
• Utilice los ajustes TIEMPO y TEMP para obtener resultados de cocción consistentes y de precisión.
ASAR
ASAR se utiliza para cocinar cortes tiernos de carnes o carnes marinadas, pescado y algunas frutas y verduras. El
tiempo de cocción está determinado por la cocción deseada y la distancia entre las comidas y el elemento.
NOTA: Dé la vuelta a la mitad del tiempo de cocción. Para acelerar el dorado, cepille los cortes de carne
magros, pollo y pescado con aceite o mantequilla derretida.
1. Para ASAR carnes, aves o pescados, coloque la rejilla de alambre, con las patas hacia abajo, en la bandeja
para hornear/asar para crear el conjunto de hornear/asar. Coloque las carnes o los pescados en el conjunto.
Los jugos y/o las grasas se gotearán en la sartén y disminuirán las salpicaduras mientras que se asan.
2. Asegúrese de que la bandeja de migas esté colocada en la parte inferior del horno tostador.
3. Abra la puerta de cristal. Deslice el conjunto de hornear/asar en la posición del estante superior. Cierre la
puerta de vidrio.
4. Enchufe en un tomacorriente eléctrico de 120V CA. La pantalla digital azul iluminará. Presione el botón
FUNCIÓN hasta que la flecha apunte a PIZZA parpadeante; Se mostrará el TIEMPO 10:00 minutos por
defecto.
5. Ajuste el TIEMPO y la TEMPERATURA según las instrucciones de la receta. Gire el dial de TIEMPO a un
mínimo de 01:00 minutos y un máximo de 60:00 minutos. La temperatura está fijada por 450ºF.
6. Presione el botón INICIO/CANCELAR; El botón iluminará en rojo indicando que el horno tostador está
encendido. ASAR aparecerá en la pantalla, TIEMPO contará para atrás.
NOTA: Presione el botón CONVECCIÓN azul en cualquier momento para encender el ventilador.
PRECAUCIÓN: Tan pronto como se pulsa el botón INICIO/ CANCELAR, y el horno tostador se enciende, tanto los
elementos térmicos superiores e inferiores pueden encenderse y apagarse para mantener la temperatura
durante todo el tiempo de cocción.
PRECAUCIÓN: Tenga cuidado de no colocar nada encima del horno tostador. No toque el horno tostador ni
ninguna parte del horno tostador sin usar guantes de cocina.
NOTA: Pulse el botón rojo INICIO/ CANCELAR en cualquier momento para apagar el horno tostador.
7. Cuando el control TEMPORIZADOR (TIMER) muestre 00:00, se escucharán 3 pitidos audibles y el horno
tostador apagará.
NOTA: Si no se presiona ningún botón en 30 segundos, la pantalla digital azul se apagará para que el horno se
vuelve en modo de espera.
8. Abra la puerta de vidrio y verifique el tono de marrón. Por un poco más de tiempo, presione el botón UN
POCO MÁS. Se escuchará un bip audible cuando el botón ilumine en azul y el TIEMPO en la pantalla se
amplía 02:00 minutos.
9. Cuando esté satisfecho con las comidas asadas u horneadas, use guantes para horno para sacar la rejilla de
alambre del horno tostador. Tenga cuidado al retirar la tostada de la parte posterior de la rejilla. El interior
del horno tostador es muy caliente. Cierre la puerta de vidrio.
10. Desenchufe la unidad y déjela enfriar antes de limpiarla.
ADVERTENCIA: NO DEJE EL HORNO TOSTADOR ENCENDIDO SIN LA SUPERVISIÓN AL USAR LA
FUNCIÓN ASAR.
11. Desenchufe cuando no esté en uso y permita que se enfrié antes de limpiarlo.
CONSEJOS PARA ASAR/ASAR CON CONVECCIÓN
• El horno tostador tiene por defecto ASAR. Si prefiere ASAR CON CONVECCIÓN, presione el botón
CONVECTION para encender el ventilador.
• El asar con convección se usa para cortes de carnes más delgados y tiernos.
• Las carnes y pescados marinados deben ser secados antes de asar.
• El tiempo de asado se determina por la cocción deseada y la distancia entre las comidas y los elementos
térmicos superiores.
• UNCA coloque papel de aluminio encima de la bandeja de hornear/asar. Esto atrapa la grasa y puede
causar un incendio.
• Corte el exceso de grasa de la carne y marque los bordes para evitar que se encrespen.
• Descongele las carnes congeladas y el pescado antes de asar.
• SIEMPRE acaricien la carne seca para reducir el humo y promover el tono marrón durante el asado.

37 36
GALLETAS
La flexibilidad y la exactitud punta del horno del tostador lo hacen perfecto para cocer una grande variedad de
tipos de la galleta - las masas frescas, refrigeradas o congeladas de la galleta se pueden utilizar para producir
resultados ideales.
NOTA: Por ejemplo, la masa de galleta congelada puede necesitar tiempo de horneado adicional. La
cantidad de masa por galleta o el grosor de la galleta también pueden variar el tiempo de cocción.
1. Deslice la rejilla de hornear/asar con las galletas en la posición central del estante.
2. Enchufe en un tomacorriente eléctrico de 120V CA. La pantalla digital azul iluminará. Presione el botón
FUNCIÓN hasta que la flecha apunte a GALLETAS parpadeante; Se mostrará el TIEMPO 11:00 minutos por
defecto y el TEMP 350ºF.
3. Ajuste el TIEMPO y la TEMPERATURA según las instrucciones de la receta. Gire el dial de TIEMPO a un
mínimo de 01:00 minutos y un máximo de 60:00 minutos. Gire el dial de TEMP para ajustar de 170ºF a
450ºF.
4. Presione el botón INICIO/CANCELAR; El botón iluminará en rojo indicando que el horno tostador está
encendido. GALLETAS aparecerá en la pantalla, TIEMPO contará para atrás. El botón CONVECIÓN iluminará
en azul indicando que el ventilador está encendido.
NOTA: Cuando se selecciona la función GALLETAS, el horno tostador requiere unos minutos de precalentar
para alcanzar la temperatura óptima. Una vez seleccionada la función, aparecerá el texto PRECALENTAR
en la pantalla y el horno empezará a precalentar. Después de alcanzar la temperatura deseada, sonarán 3
pitidos y el texto desaparecerá de la pantalla y el horno seguirá cocinando en la función seleccionada.
NOTA: Presione el botón CONVECCIÓN azul en cualquier momento para apagar el ventilador.
PRECAUCIÓN: Tan pronto como se pulsa el botón INICIO/ CANCELAR, y el horno tostador se enciende,
tanto los elementos térmicos superiores e inferiores pueden encenderse y apagarse para mantener la
temperatura durante todo el tiempo de cocción.
PRECAUCIÓN: Tenga cuidado de no colocar nada encima del horno tostador. No toque el horno tostador ni
ninguna parte del horno tostador sin usar guantes de cocina.
NOTA: Presione el botón CONVECCIÓN azul en cualquier momento para apagar el ventilador.
5. Cuando el control TEMPORIZADOR (TIMER) muestre 00:00, se escucharán 3 pitidos audibles y el horno
tostador apagará.
NOTA: Si no se presiona ningún botón en 30 segundos, la pantalla digital azul se apagará para que el horno
se vuelve en modo de espera.
6. Abra la puerta de vidrio y verifique el tono marrón. Por un poco más de tiempo, presione el botón UN
POCO MÁS. Se escuchará un bip audible cuando el botón ilumine en azul y el TIEMPO en la pantalla se
amplía 02:00 minutos.
7. Cuando esté satisfecho con las galletas, use guantes para horno para sacar la rejilla de alambre del horno
tostador. Tenga cuidado al retirar la tostada de la parte posterior de la rejilla. El interior del horno tostador
es muy caliente. Cierre la puerta de vidrio.
8. 10. Desenchufe la unidad y déjela enfriar antes de limpiarla.
ADVERTENCIA: NO DEJE EL HORNO TOSTADOR ENCENDIDO SIN LA SUPERVISIÓN AL HORNEAR
GALLETAS.
9. Desenchufe cuando no esté en uso y permita que se enfrié antes de limpiarlo.
CALENTAR
PRECAUCIÓN: NUNCA use recipientes de plástico en el horno tostador.
NOTA: Por favor, lea la sección anterior titulada “Recipientes para cocinar” antes de colocar cualquier alimento
en el horno tostador para calentar.
1. La función CALENTAR mantiene los alimentos cocinados previamente entre 150 °F y 200 °F, durante un
máximo de 00:99 minutos.
2. Asegúrese de que la bandeja para migas esté colocada en la parte inferior del horno tostador.
3. Abra la puerta de vidrio. Coloque las comidas en la bandeja de hornear/asar o en un plato apto para
hornos, y después, coloque en el centro de la rejilla para que el aire circula por todos los lados de la comida.
4. Cierre la puerta de vidrio
5. Enchufe en un tomacorriente eléctrico de 120V CA. La pantalla digital azul iluminará. Presione el botón
FUNCIÓN hasta que la flecha apunte a CALENTAR parpadeante; Se mostrará el TIEMPO 90:00 minutos por
defecto y el TEMP 170ºF.
6. Para ajustar el TIEMPO, gire el dial de TIEMPO a un mínimo de 01:00 minutos y un máximo de 99:00
minutos. Gire el dial de TEMP para ajustar de 150ºF a 200ºF.
7. Presione el botón INICIO/CANCELAR; El botón iluminará en rojo indicando que el horno tostador está
encendido. RECALENTAR aparecerá en la pantalla, TIEMPO contará para atrás.
NOTA: Cuando se selecciona la función CALENTAR, el horno tostador requiere unos minutos de precalentar
para alcanzar la temperatura óptima. Una vez seleccionada la función, aparecerá el texto PRECALENTAR
en la pantalla y el horno empezará a precalentar. Después de alcanzar la temperatura deseada, sonarán 3
pitidos y el texto desaparecerá de la pantalla y el horno seguirá cocinando en la función seleccionada.
NOTA: Presione el botón CONVECCIÓN azul en cualquier momento para encender el ventilador.
PRECAUCIÓN: Tan pronto como se pulsa el botón INICIO/ CANCELAR, y el horno tostador se enciende,
tanto los elementos térmicos superiores e inferiores pueden encenderse y apagarse para mantener la
temperatura durante todo el tiempo de cocción.
PRECAUCIÓN: Tenga cuidado de no colocar nada encima del horno tostador. No toque el horno tostador ni
ninguna parte del horno tostador sin usar guantes de cocina.
NOTA: Pulse el botón rojo INICIO/ CANCELAR en cualquier momento para apagar el horno tostador.
8. Cuando el control TEMPORIZADOR (TIMER) muestre 00:00, se escucharán 3 pitidos audibles y el horno
tostador apagará.
NOTA: Si no se presiona ningún botón en 30 segundos, la pantalla digital azul se apagará para que el horno
se vuelve en modo de espera.
9. Abra la puerta de vidrio y verifique el parduzco. Por un poco más de tiempo, presione el botón UN POCO
MÁS. Se escuchará un bip audible cuando el botón ilumine en azul y el TIEMPO en la pantalla se amplía
10:00 minutos.
10. Tenga cuidado al retirar la tostada de la parte posterior de la rejilla. El interior del horno tostador es muy
caliente. Cierre la puerta de vidrio.
11. Desenchufe la unidad y déjela enfriar antes de limpiarla.
ADVERTENCIA: NO DEJE EL HORNO TOSTADOR ENCENDIDO SIN LA SUPERVISIÓN AL CALENTAR.
12. Desenchufe cuando no esté en uso y permita que se enfrié antes de limpiarlo.

39 38
INSTRUCCIONES DE MANTENIMIENTO
Este aparato requiere poco mantenimiento. No contiene piezas que el usuario pueda reparar. Cualquier servicio
que requiera el desmontaje que no sea la limpieza debe ser realizada por un técnico calificado.
INSTRUCCIONES DE CUIDADO Y LIMPIEZA
1. Permita que el horno tostador y todos sus accesorios se enfríen antes de limpiarlo.
2. Limpie el exterior del horno tostador con un paño húmedo y séquelo completamente. Se puede utilizar
un limpiador líquido no abrasivo para manchas difíciles. Enjuague y seque completamente. No utilice
estropajos metálicos jabonosos ni limpiadores abrasivos que rayen la superficie.
3. Limpie el interior con un limpiador suave o no abrasivo y una almohadilla de fregado de plástico después
de cada uso para evitar la acumulación de suciedad. No frotar demasiado, ya que la superficie puede ser
rayado.
4. Para quitar los residuos horneados, vierta una pequeña cantidad de aceite de cocina sobre los alimentos y
deje reposar durante 5 a 10 minutos. Retire el alimento suavizado con un paño suave. No utilice lanas de
acero, almohadillas abrasivas o limpiadores abrasivos.
5. Enjuague y seque completamente antes de cerrar la puerta de vidrio. Limpie la puerta de vidrio con un
paño o una esponja humedecida con agua tibia y jabonosa. Seque completamente.
6. Lave la bandeja para hornear/asar, la rejilla y la bandeja para migas en agua jabonosa y séquela
completamente.
7. Si se han acumulado migas y derrames en la bandeja de migas, limpie con un paño húmedo. Siempre
seque la bandeja de migas cuidadosamente antes de reutilizarlo.
8. NO utilice limpiadores abrasivos o almohadillas metálicas para limpiar la bandeja de hornear/asar, la rejilla
de alambre o la bandeja de migas. Para manchas difíciles, limpie con una almohadilla de malla de nylon o
poliéster y un limpiador suave y no abrasivo. Enjuague y seque completamente.
PRECAUCIÓN: NO utilice aerosoles ni otros limpiadores del horno. El uso de este tipo de productos de
limpieza puede causar daños cosméticos y/o eléctricos al horno tostador.
INSTRUCCIONES DE ALMACENAMIENTO
1. Desenchufe la unidad y deje que se enfríe antes de almacenar.
2. Deslice el conjunto de hornear/asar (rejilla de alambre y bandeja) en el estante inferior.
3. Guarde el horno tostador en su caja o en un lugar fresco y seco.
4. No guarde nunca el electrodoméstico si este todavía caliente o enchufada.
5. Nunca envuelva el cable alrededor del aparato. No ponga tensión en el cable donde entra en la unidad, ya
que podría provocar que el cable se rompiera.
RECALENTAR CON CONVECCIÓN
NOTE: Por favor, lea la sección anterior llamada “Cocción por convección” para obtener más información.
PRECAUCIÓN: NUNCA use recipientes de plástico en el horno tostador.
NOTA: Por favor, lea la sección anterior titulada “Recipientes para cocinar” antes de colocar cualquier alimento
en el horno tostador para recalentar.
1. Asegúrese de que la bandeja para migas esté colocada en la parte inferior del horno tostador.
2. Abra la puerta de vidrio. Coloque las comidas en la bandeja de hornear/asar o en un plato apto para
hornos, y después, coloque en el centro de la rejilla para que el aire circula por todos los lados de la comida.
Cierre la puerta de vidrio.
3. Enchufe en un tomacorriente eléctrico de 120V CA. La pantalla digital azul iluminará. Presione el botón
FUNCIÓN hasta que la flecha apunte a RECALENTAR parpadeante; Se mostrará el TIEMPO 15:00 minutos por
defecto y el TEMP 350ºF.
4. Para ajustar el TIEMPO, gire el dial de TIEMPO a un mínimo de 01:00 minutos y un máximo de 60:00
minutos. Gire el dial de TEMP para ajustar de 170ºF a 450ºF.
5. Presione el botón INICIO/CANCELAR; El botón iluminará en rojo indicando que el horno tostador está
encendido. RECALENTAR aparecerá en la pantalla, TIEMPO contará para atrás.
NOTA: Presione el botón CONVECCIÓN azul en cualquier momento para encender el ventilador.
PRECAUCIÓN: Tan pronto como se pulsa el botón INICIO/ CANCELAR, y el horno tostador se enciende,
tanto los elementos térmicos superiores e inferiores pueden encenderse y apagarse para mantener la
temperatura durante todo el tiempo de cocción.
PRECAUCIÓN: Tenga cuidado de no colocar nada encima del horno tostador. No toque el horno tostador ni
ninguna parte del horno tostador sin usar guantes de cocina.
NOTA: Pulse el botón rojo INICIO/ CANCELAR en cualquier momento para apagar el horno tostador.
6. Cuando el control TEMPORIZADOR (TIMER) muestre 00:00, se escucharán 3 pitidos audibles y el horno
tostador apagará.
NOTA: Si no se presiona ningún botón en 30 segundos, la pantalla digital azul se apagará para que el horno
se vuelve en modo de espera.
7. Abra la puerta de vidrio y la progresión del ciclo recalentar. Por un poco más de tiempo, presione el botón
UN POCO MÁS. Se escuchará un bip audible cuando el botón ilumine en azul y el TIEMPO en la pantalla se
amplía 05:00 minutos.
8. Cuando esté satisfecho con el recalentamiento de las comidas, use guantes para horno para sacar la rejilla
de alambre del horno tostador. Tenga cuidado al retirar la tostada de la parte posterior de la rejilla.
El interior del horno tostador es muy caliente. Cierre la puerta de vidrio.
9. Desenchufe la unidad y déjela enfriar antes de limpiarla.
ADVERTENCIA: NO DEJE EL HORNO TOSTADOR ENCENDIDO SIN LA SUPERVISIÓN AL RECALENTAR
COMIDAS.
10. Desenchufe cuando no esté en uso y permita que se enfrié antes de limpiarlo.

Garantía limitada de UN AÑO
Mediante la presente, SENSIO Inc. garantiza que, durante el plazo de UN AÑO a partir de la fecha
de compra, este producto no presentará defectos mecánicos en el material ni en la mano de obra,
y durante 90 días, no los presentará en las piezas no mecánicas. A su entera discreción, SENSIOInc.
reparará o reemplazará el producto que resulte defectuoso, o emitirá un reembolso por el
producto durante el plazo de garantía.
Esta garantía es válida únicamente para el comprador minorista original a partir de la fecha de
compra minorista inicial y no es transferible. Conserve el recibo de compra original, ya que se
exige una prueba de compra para obtener la validación de la garantía. Las tiendas minoristas no
tienen derecho a alterar, modicar ni corregir de ninguna manera los términos y condiciones de la
garantía.
EXCLUSIONES:
La garantía no cubre el desgaste normal de las piezas ni el daño ocasionado por cualquiera de
las siguientes causas: uso negligente del producto, uso de un voltaje o corriente incorrectos,
mantenimiento de rutina inadecuado, uso contrario al de las instrucciones de funcionamiento,
desarmado, reparación o alteración a cargo de personas que no sean miembros del personal
calicado de SENSIO Inc. Asimismo, la garantía no cubre actos de la naturaleza, como incendios,
inundaciones, huracanes o tornados.
SENSIO Inc. no asumirá responsabilidad por daños incidentales o resultantes ocasionados por la
violación de cualquier garantía expresa o implícita. Salvo en la medida en que lo prohíban las leyes
aplicables, cualquier garantía implícita de comerciabilidad o aptitud para un propósito particular
se limita temporalmente a la duración de la garantía. Algunos estados, provincias o jurisdicciones
no permiten la exclusión ni la limitación de daños incidentales o resultantes, o limitaciones sobre
la duración de una garantía implícita y, por lo tanto, es posible que las exclusiones o limitaciones
mencionadas no le correspondan. La garantía cubre derechos legales especícos que pueden
variar de un estado, una provincia o una jurisdicción a otros.
CÓMO OBTENER EL SERVICIO DE GARANTÍA:
Debe comunicarse con el Servicio de atención al cliente a nuestro número telefónico gratuito:
1-866-832-4843. Un representante del Servicio de atención al cliente intentará resolver los
problemas referidos a la garantía por teléfono. Si este no puede resolver el problema,
le proporcionarán un número de caso y le solicitarán que devuelva el producto a SENSIO Inc.
Adhiera una etiqueta al producto que incluya: su nombre, dirección, número telefónico de contacto
durante el día, número de caso y descripción del problema. Además, incluya una copia del recibo
de compra original. Envuelva cuidadosamente el producto etiquetado con el recibo de compra,
y envíelo (con el envío y el seguro prepagados) a la dirección de SENSIO Inc. SENSIO Inc. no asumirá
obligación ni responsabilidad alguna por el producto devuelto que esté en el trayecto hacia el
Centro de servicio al cliente de SENSIO Inc.
40

For customer service questions or comments
Dudas o comentarios contactar el departamento de servicio al cliente
1-866-832-4843
Register your product and get support at:
Para registrar y obtener asistencia de su producto ir:
www.bialetti.com
This product is manufactured by Sensio Inc.
Bialetti is a trademark of BIALETTI INDUSTRIE S.P.A. CORPORATION ITALY, used under license.
Este producto está fabricado por Sensio Inc.
Bialetti es una marca comercial de BIALETTI INDUSTRIE SPA CORPORACIÓN ITALY, utilizada bajo licencia.
Montréal, Canada H3B 3X9
SO-314478 R4
1/24