Electrolux EDC67150W Manual de usuario
- Categoría
- Secadoras
- Tipo
- Manual de usuario

user manual
manual de instrucciones
EDC 67150W
Tumble Dryer
Secadora
125985272_gb.qxp 2007-03-02 12:39 Page 1

125985272_gb.qxp 2007-03-02 12:39 Page 2

electrolux 3
Welcome to the world of Electrolux
Thank you for choosing a first class product from Electrolux, which
hopefully will provide you with lots of pleasure in the future. The
Electrolux ambition is to offer a wide variety of quality products that
make your life more comfortable. You find some examples on the
cover in this manual. Please take a few minutes to study this manual
so that you can take advantage of the benefits of your new
machine. We promise that it will provide a superior User Experience
delivering Ease-of-Mind. Good luck!
GB
125985272_gb.qxp 2007-03-02 12:39 Page 3

4 electrolux contents electrolux
Contents
Safety information..............................5
Product description ...........................7
Control panel.....................................7
Use....................................................8
Drying hints ................................12-13
Drying programme .....................14-15
Programme information ...................16
Care and cleaning ...........................17
Something not working ..............20-22
Technical data .................................23
Consumption values ........................24
Installation ..................................25-26
Environment concerns.....................27
Guarante/Customer Service .......28-29
The following symbols are used in this manual:
Important information concerning your personal safety and information on how
to avoid damaging the appliance.
General information and tips
Environmental information
125985272_gb.qxp 2007-03-02 12:39 Page 4

safety information electrolux 5
Safety Information
In the interest of your safety and to
ensure the correct use, before
installing and first using the
appliance, read this user manual
carefully, including its hints and
warnings. To avoid unnecessary
mistakes and accidents, it is
important to ensure that all people
using the appliance are thoroughly
familiar with its operation and safety
features. Save these instructions
and make sure that they remain
with the appliance if it is moved or
sold, so that everyone using it
through its life will be properly
informed on appliance use and safety.
General safety
● It is dangerous to alter the
specifications or attempt to modify
this product in any way.
● This appliance is not intended for use by
persons (including children) with reduced
physical, sensory or lack of experience
and knowledge, unless they have
been given supervision or instruction
concerning use of the appliance by a
person responsible for their safety.
● Make sure that small pets do not climb
into the drum. To avoid this, please
check into the drum before using.
● Any objects such as coins, safety
pins, nails, screws, stones or any
other hard, sharp material can cause
extensive damage and must not be
placed into the machine.
● In order to avoid danger of fires
caused by excessive drying, do not
use appliance to dry the following
items: Cushions, quilts and the like
(these items accumulate heat).
● Items such as foam rubber (latex foam),
shower caps, waterproof textiles, rubber
backed articles and clothes or pillows
fitted with foam rubber pads should
not be dried in the tumble dryer.
● Always unplug the appliance after
use, clean and maintenance.
● Under no circumstances should you
attempt to repair the machine
yourself. Repairs carried out by
inexperienced persons may cause
injury or serious malfunctioning.
Contact your local Service Centre.
Always insist on genuine spare parts.
● Items that have been soiled with sub-
stances such as cooking oil acetone,
petrol, kerosene, spot removers, tur-
pentine, waxes and wax removers
should be washed in hot water with
an extra amount of detergent before
being dried in the tumble dryer.
●
DDaannggeerr ooff eexxpplloossiioonn::
Never tumble dry
items that have been in contact with
inflammable solvents (petrol, methylated
spirits, dry cleaning fluid and the
like). As these substance are volatile,
they could cause an explosion. Only
tumble dry items washed with water.
●
RRiisskk ooff ffiirree
: items that have been
spotted or soaked with vegetable or
cooking oil constitute a fire hazard
and should not be placed in the
tumble dryer.
● If you have washed your laundry
with stain remover you must
execute an extra rinse cycle before
loading your tumble dryer.
● Please make sure that no gas lighters
or matches have accidentally been left
in pockets of garments to be loaded
into appliance
Installation
● This appliance is heavy. Care should
be taken when moving it.
● When unpacking the appliance, check
GB
125985272_gb.qxp 2007-03-02 12:39 Page 5

6 electrolux safety information
that it is not damaged. If in doubt, do not
use it and contact the Service Centre.
● All packing and transit bolts must be
removed before use. Serious damage
can occur to the product and to
property if this is not adhered to. See
relevant section in the user manual.
● The final part of a tumble dryer cycle
occurs without heat ( cool down
cycle ) to ensure that the items are
left at a temperature that ensures
that items will not be damaged.
● Any electrical work required to
install this appliance should be
carried out by a qualified electrician
or competent person.
● Care must be taken to ensure that
the appliance does not stand on the
electrical supply cable.
● If the machine is situated on a
carpeted floor, please adjust the feet
in order to allow air to circulate freely
● After having installed the appliance,
check that it is not pressing or
standing on its electrical supply
cable, inlet hose and drain hose.
● If the tumble dryer is placed on top of a
washing machine, it is compulsory to
use the stacking kit (optional accessory).
Use
● This appliance is designed for domestic
use. It must not be used for purposes
other than those for which it was
designed.
● Only wash fabrics which are designed
to be machine dried. Follow the
instructions on each garment label.
● Do not dry unwashed items in the
tumble dryer.
● Fabric softeners, or similar products,
should be used as specified by the
fabric softener instructions.
● Do not overload the appliance. See
the relevant section in the user
manual.
● Clothes which are dripping wet
should not be placed in the dryer.
● Garments which have been in
contact with volatile petroleum
products should not be machine
dried. If volatile cleaning fluids are
used, care should be taken to
ensure that the fluid is removed from
the garment before placing in the
machine.
● Never pull the power supply cable to
remove the plug from the socket;
always take hold of the plug itself.
● Never use the tumble dryer if the
power supply cable, the control
panel, the working surface or the
base are damaged so that the inside
of the tumble dryer is accessible.
WWAARRNNIINNGG::
Never stop a tumble dry before the
end of the drying cycle.
Child safety
● This machine is not intended for use
by young children or infirm persons
without supervision.
● Children should be supervised to ensure
that they do not play with the appliance.
● The packaging components (e.g.
plastic film, polystyrene) can be
dangerous to children - danger of
suffocation! Keep them out of
children’s reach
● Keep all detergents in a safe place
out of children’s reach.
● Make sure that children or pets do
not climb into the drum.
125985272_gb.qxp 2007-03-02 12:39 Page 6

product description/Control panel electrolux 7
Product description
Control panel
Fluff filters
Rating Plate
Condenser unit
Water reservoir
Adjustable feet
6
5
4
3
2
1
GB
Control panel
Programme selector dial
Delicate button -Delicado
Dryness button -G. Secado
Buzzer button - Alarma
Indicator lights
5
4
3
2
1
1
1
2
6
3
4
5
7
Delicado
Alarma
Inicio Diferido
Inicio/Pausa
G. Secado
Secado
Aireación
Fin/
Anti-Arrugas
9 h
6 h
3 h
Algodón
Extra Seco
Seco
Seco Armario
Semiseco
Seco Plancha
Seco Plancha
Seco Armario
Extra Seco
Tiem
po
Fácil Plancha
Vaqueros
Aireación
Especial
Sintéticos
Start/Pause button -
Inicio/Pausa
Delay button- Inicio Diferido
7
6
125985272_gb.qxp 2007-03-02 12:39 Page 7

8 electrolux use
Use
First Use
● Ensure that the electrical connections
comply with the installation
instructions.
● Remove the polystryrene block and
any material from the drum.
● Before using your tumble dryer for
the first time, were commend that
you to place a few damp cloths
inside the appliance and dry for 30
minutes.
There may be dust inside a brand
new tumble dryer.
Daily Use
Load the laundry
Connect the appliance.
Open the door (see picture).
Place the laundry in the drum, one item
at a time, shaking them out as much as
possible. Close the door.
Please check the laundry does not get
caught between the door and filter.
Select the required programme
Turn the programme selector dial to the
required programme.
The light Start/Pause starts to flash.
The selector dial is divided into following
sections:
Cottons
Synthetics
Time
Special
Allows you to select electronically
controlled or time controlled drying.
Turn the dial to the required programme
or time.
Electronically controlled drying (automatic)
The appliance runs these programmes
with the help of probes which detect the
degree of dampness of the laundry.
Simply select the programme according
to the type of laundry and degree of
drying required.
The selector dial can be turned either
clockwise or anticlockwise. The lights Drying,
Cooling and End/Anticrease come on.
Algodón
Extra Seco
Seco
Seco Armario
Semiseco
Seco Plancha
Seco Plancha
Seco Armario
Extra Seco
Tiem
po
Fácil Plancha
Vaqueros
Aireación
Especial
Sintéticos
125985272_gb.qxp 2007-03-02 12:39 Page 8

use electrolux 9
At the end of the programme the
selector dial must be turned to
position O, to switch the machine off.
Attention!
If you turn the programme selector dial
to another programme when the
machine is working, the lights of the
programme progress display start to
flash. The machine will not perform the
new selected programme.
Programme Option buttons
Depending on the programme, different
functions can be combined. These must
be selected after choosing the desired
programme and before depressing the
Start/Pause button.
When these buttons are pressed, the
corresponding pilot lights come on.
When they are pressed again, the pilot
lights go out.
Select Delicate- Delicado
Pressing this button allows drying to be
performed at a lower temperature, for
delicate items.
The corresponding pilot light comes
on. This option can also be used for
time controlled drying.
DELICATE is only suitable for use with
loads of up to 3kg!
When the programme has finished the
pilot lights End is on.
Select the Dryness - G. Secado
Press the Dryness button repeatedly, to
select the desired option. The relevant
light will light up. Laundry becomes
dryer from MIN to MAX.
Press the Dryness button as many
Delicado
times as necessary until the small light
at the level of residual dampness
required is illuminated.
When the programme has finished the
pilot lights End is on.
Select the Buzzer Alarma
When the drying cycle has finished, an
intermittent audible signal will sound.
By depressing button the acoustic
signal is switched off in the following cases:
• when selecting the programme
• when depressing the buttons
• when the programme selector dial is
turned to another position during the
programme or when you depress an
option button during the cycle
• at the end of the programme.
The corresponding light comes on
Select the Start/Pause - Inicio Pausa
Inicio/Pausa
Alarma
G. Secado
GB
125985272_gb.qxp 2007-03-02 12:39 Page 9

10 electrolux use
Press this button to start the dryer after
having selected the programme and
the options.
The relevant light will stop flashing.
If the programme selector dial is turned
to another position, when the machine is
running, the buzzer will sound and the
programme phase indicator lights will flash.
The drum turns alternately in both direc-
tions during drying.
All drying programmes end with a 10 minute
cooling phase (light Cooling is on).
You may remove the laundry after this
phase.
The lights End/Anticrease, , illumi-
nate and the buzzer sounds
IIff tthhee ddoooorr ooff tthhee aapppplliiaannccee oorr tthhee ssmmaallll
ddoooorr aatt tthhee bboottttoomm iiss ooppeenneedd wwhhiillee tthhee
pprrooggrraammmmee i
iss rruunnnniinngg,, tthhiiss bbuuttttoonn mmuusstt
bbee pprreesssseedd aaggaaiinn aafftteerr cclloossiinngg tthhee ddoooorr
iinn oorrddeerr ttoo rreessttaarrtt tthhee pprrooggrraammmmee ffrroomm
tthhee ppooiinntt aatt wwhhiicchh iitt wwaass iinntteerrrruupptteedd..
TThhiiss bbuuttttoonn mmuusstt bbee ddeepprreesssseedd aallssoo
aafftteerr aa ppoowweerr ffaaiilluurree aanndd aafftteerr hhaavviinngg rree--
iinnsseerrtteedd tthhee wwaatteerr rreesseerrvvooiirr,, iiff iitt hhaass
bbeeeenn eemmppttiieedd iinn tthhee mmiiddddllee ooff aa pprroo--
ggrraammmmee aafftteerr lliigghhttiinngg uupp ooff lliigghhtt
..
In both cases the light of the Start/Pause
button flashes to remind you that the
start button needs to be pressed again.
Delay Start- Inicio Diferido
This button allows you to delay the starting of
the programme by 3, 6 or 9 hours.
Press the button until the light relevant
to the desired delay lights up. This
option must be selected
after
having
selected the programme and
before
3h
6h
9h
Inicio Diferido
pressing START/PAUSE to start the
programme.
The machine begins the countdown,
which is shown by the pilot lights. For
example, if you have chosen a 9-hour
delay (pilot light 9h lit), after 3 hours, 9h
goes out and 6h lights up; after 3 more
hours, 6h goes out and 3h lights up.
When the 9 hours are over (pilot light 3h
off), the drying cycle begins.During the
delayed start period, it is not possible to
change the programme or the selected
delay. If you wish to do so, you must first
cancel everything by rotating the pro-
gramme selector dial to position “
OO
”.
Select the new programme, the options
and the delayed start, then press
START/PAUSE. If you wish to change
only the options, this can be done on
condition that the new option(s) is(are)
compatible with the programme. Set the
machine to PAUSE by depressing the rel-
evant button, select the new option(s) and
depress START/PAUSE button again.
If you wish to add some laundry while the
machine is performing the countdown, after
having done so and having closed the door,
press START/PAUSE again, in order to allow
the machine to complete the remaining
countdown time.
Indicator lights
TThese lights indicate the following
functions:
“
DDrryyiinngg
”
lliigghhtt -- SSeeccaaddoo””
This light indicates that the appliance is
in the drying phase
.
““CCoooolliinngg”” lliigghhtt --Aireación”
This light indicates that the appliance is in the
cooling phase. At the end of drying, there is
a 10 minute cooling phase to cool the
laundry.
125985272_gb.qxp 2007-03-02 12:39 Page 10

use electrolux 11
“
EEnndd ooff pprrooggrraammmmee”” lliigghhtt --Fin //Anti- AArrugas
This light is on at the end of the cooling
phase, during the anti-creasing phase and at
the end of the programme.
“
WWaatteerr rreesseerrvvooiirr ffuullll””
”
lliigghhtt
This light indicates that the appliance is in the
drying phase
.
This light comes on at the end of the
programme to remind you that the water
reservoir must be emptied out. If this light
illuminates during a programme this means
that the water reservoir is full. The buzzer
sounds, the programme stops, the light of
the Start/Pause button flashes. This light
comes on also when the water reservoir is
not inserted correctly.
““FFiilltteerr cclleeaanniinngg”
” lliigghhtt
This light illuminates at the end of the
programme to remind you that the
filters must be cleaned.
““CCoonnddeennsseerr cclleeaanniinngg”” lliigghhtt
This light illuminates at the end of the
programme to remind you that the
filters must be cleaned.
At the end of the programme
All drying programmes end with a 10
minute cooling phase. You may remove
the laundry after this phase. The lights
and , and illuminate.
If the laundry is not removed at the
end of the cycle, the dryer performs
an
aannttii--ccrreeaassiinngg
phase (duration: 30
minutes maximum).
If you do not remove the laundry, the
dryer will stop automatically at the end of
the anti-creasing phase.
Lights and remain lit and the
buzzer sounds for 2 minutes.
If you do not intend to carry out another
wash, close the water tap. Leave the
door open to prevent the formation of
mildew and unpleasant smells.
Turn the programme selector dial to
““OO””
to switch the machine off. Remove the
laundry from the drum and carefully
check that the drum is empty. The appli-
ance is switched off.
Remove the laundry.
IIff yyoouu ooppeenn aanndd tthheenn cclloossee tthhee ddoooorr bbeeffoorree
ttuurrnniinngg tthhee sseelleeccttoorr ddiiaall ttoo ““OO”” aallll tthhee lliigghhttss
c
coorrrreessppoonnddiinngg ttoo tthhee pphhaasseess mmaakkiinngg uupp
tthhee ppeerrffoorrmmeedd pprrooggrraammmmee ccoommee oonn..
AAfftteerr eeaacchh uussee
• Clean the filters.
• Empty the water reservoir.
Important!
If the drying programme has to be
stopped before it reaches the end, we
recommend that you turn the pro-
gramme selector dial to position Cooling
and wait until the end of this cooling
phase before removing the laundry. This
will avoid a build-up of heat inside the
appliance.To do this first turn the dial to
“
OOffff
” and then to Cooling and
depress Start button.
MMooddiiffyyiinngg tthhee pprrooggrraammmmee
To change a programme which is run-
ning, first cancel it by turning the pro-
gramme selector dial to “
OO
”. Select the
new programme and press the Start
button .
GB
125985272_gb.qxp 2007-03-02 12:39 Page 11

12 electrolux drying hints
Drying hints
Before loading the laundry
Never tumble dry the following:
Particularly delicate items such as
net curtains, woollen, silk, fabrics
with metal trim, nylon tights, bulky
materials such as anoraks, blankets,
eiderdowns, sleeping bags, feather
quilts and any items containing rub-
ber foam or materials similar to rub-
ber foam.
• Always follow the instructions on gar-
ment labels:
may be tumble dried
normal drying (high tempera-
ture)
delicate drying (low tempera-
ture)
do not tumble dry
• Close pillowcases and covers with
fasteners to prevent small laundry
items getting tangled inside them.
Close press studs, zips and hooks
and tie belts and apron strings.
• Sort laundry according to type and
degree of drying required.
• Do not over-dry laundry, this avoids
creasing and saves energy.
• Avoid drying dark clothes with light
coloured fluffy items such as towels
as they could attract the fluff.
• The laundry must be thoroughly spun
before tumble drying.
•
Easy-ccare iitems
, too, e.g. shirts,
should be briefly pre-spun before
drying (depending on crease resist-
ance approx. 30 seconds or using
the special brief spin programme of
your washing machine).
• Knitted textiles (knitted underwear)
may shrink a little during drying.
Please do not overdry items of this
type. It is advisable to allow for
shrinkage when choosing the size of
new purchases.
• You can also put starched items into
your dryer. However, to achieve the
desired starched effect, choose the
programme “iron dry”. To remove any
starch residues, wipe out the internal
drum after drying with a moist cloth
and then rub it dry.
• To avoid a static charge when drying
is completed, use either a fabric sof-
tener when you are washing the
laundry or a fabric conditioner specif-
ically for tumble dryers.
• Remove the laundry when the dryer
has finished drying.
• If individual items are still damp after
drying, set a brief post-drying time,
but
at lleast 330 mminutes
. This will be
necessary particularly for multilayered
items (e.g. collars, pockets, etc.).
Make sure that no metal objects
are left in the laundry (e.g. hair
clips, safety pins, pins).
Button up pillowcases, close zip
fasteners, hooks and poppers. Tie any
belts or long tapes.
To avoid laundry becoming tangled:
close zips, button up duvet covers and
tie loose ties or ribbons (e.g. of aprons).
Turn items with double-layered fabrics
inside out (e.g. with cottonlined anoraks,
the cotton layer should be outermost).
These fabrics will then dry better.
125985272_gb.qxp 2007-03-02 12:39 Page 12

Maximum loads
Recommended loads are indicated in
the programme charts.
General rules:
Cotton, linen: drum full but not too
tightly packed;
Synthetics: drum no more than half full;
Delicate fabrics and woollens: drum
no more than one third full.
Try to load to the maximum capacity
of the machine as small loads are
uneconomical.
Laundry weights
The following weights are indicative:
1200 gbathrobe
100 gnapkin
700 gquilt cover
500 gsheet
200 gpillow case
250 gtablecloth
200 gtowelling towel
100 gtea cloth
200 gnight dress
100 gladies’ briefs
600 gman’s work shirt
200 gman’s shirt
500 gman’s pyjamas
100 gblouse
100 gmen’s underpants
drying hints electrolux 13
GB
125985272_gb.qxp 2007-03-02 12:39 Page 13

14 electrolux drying programmes
Drying programmes
Programme
Type of
laundry
Options
Description of programme
Extra
Cotton and
linen
G.Secado
G.Secado
Cotton and
linen
Cupboard
Extra
Synthetics
G.Secado
Cupboard
Synthetics
G.Secado
G.Secado
Cotton and
linen
Strong
G.Secado
Cotton and
linen
Damp
G.Secado
Cotton and
linen
Iron
Drying thick or multi-layered textiles,
e.g. terry towelling items
Max load: 6 kg
Drying thick textiles, e.g. terry towelling
items, towels.
Drying textiles of even thicknesses,
e.g. terry towelling items, knitted
items, towels.
Drying thick or multi-layered textiles,
e.g. pullovers, bedding, table linen.
For thin textiles which are not ironed,
e.g. easy care shirts, table linen,
baby’s clothes, socks, underwear.
For thin textiles which are still to be
ironed, e.g. knitted items, cotton
shirts.
For cotton or linen laundry which are
still to be put through a machine, e.g.
bedding, table linen.
Time
30 min
60 min
Synthetics
Cotton
G.Secado
Synthetics
Iron
Drying thick or multi-layered textiles,
e.g. terry towelling items.
For drying individual items of laundry
or for small volumes of less than 1kg.
For thin textiles which are still to be
ironed, e.g. knitted items, cotton
shirts.
125985272_gb.qxp 2007-03-02 12:39 Page 14

GB
drying programmes electrolux 15
Drying programmes
Programme
Type of
laundry
Options Description of programme
Special
Mix
Cotton
Cupboard dry
Synthetics
G.Secado
G.Secado
Cotton
Cupboard dry
Special
Jeans
Synthetics
Special
Easy
Cotton and
linen
Synthetics
Special
Cooling
Special programme for cotton and
easy care, which can drying together
in the same time.
Special programme for leisure
clothing, such as jeans, sweat-shirts,
etc., of different material thicknesses
(e.g. at the cuffs and seams).
Special programme with anti-crease
mechanism for easy care textiles such
shirts and blouses; for minimum
ironing effort. The result depends on
the type and quality of textiles. (The
loading volume corresponds to
approx. 4 to 5 shirts.)
Recommendation: Place textiles in the
dryer straight after spinning. Once
dried, immediately remove textiles and
place on clothes hanger.
Special programme, lasting around 10
minutes, for refreshing or gently
cleaning textiles with commercially
available dry cleaning sets.
(Only use those products which are
declared as suitable for the drier by
the manufacturer; please observe the
manufacturer’s instructions for use.)
Max Cottons load: 7 kg
Max Synthetics load: 3 kg
Max Time load: 1 kg
Max Special Mix load: 3 kg
Max Special Jeans load: 7 kg
125985272_gb.qxp 2007-03-02 12:39 Page 15

16 electrolux programme information
Adjusting the level
of conductivity
Water contains, a variable quantity of limestone and mineral salts
of which quantities vary according to geographical locations thus
varying its conductivity values. Relevant variations of the
conductivity of the water compared to those prefixed by the
factory could slightly influence the residual humidity of the laundry
at the end of the cycle. Your dryer allows you to regulate the
sensitivity of the drying sensor based on conductivity values of the
water by using the following procedure.
TToo aacccceessss aaddjjuussttmmeenntt mmooddee::
1. Turn the programme selector dial to switch on the appliance.
2. In selection mode,press simultaneously the buttons
DRYNESS and START.
Press the buttons down until the pilot lights above each ones
begin to flash and one of the pilot lights indicating the drying
phase lights , and remains it.
AAddjjuussttiinngg tthhee lleevveell ooff ccoonndduuccttiivviittyy
:
Press the START/PAUSE button sequentially: the level of
conductivity is indicated by the phase pilot lights, which light
in various combinations as follows:
LED lit Conductivity Approximate value µS/cm
Low < 300
Medium 300-600
High >600
Normally, the appliance is factory-set to the highest level;
however, certain models may be configured differently.
MMeemmoorriizziinngg tthhee nneeww sseettt
tiinngg::
Simultaneously press the buttons DRYNESS and START.
Press the buttons down until the pilot lights above each
ones stop flashing and the buzzer sounds.
O = Cancelling/OFF
To reset a programme and to switch off the machine turn
the selector dial to O. Now can a new programme be
selected.
Objective
Implementation
Programme information
125985272_gb.qxp 2007-03-02 12:39 Page 16

care and cleaning electrolux 17
Care and cleaning
You must DISCONNECT the appliance
from the electricity supply, before you
can carry out any cleaning or
maintenance work.
External cleaning
Use only soap and water and then dry
thoroughly.
Important:
do not use methylated spirit,
diluents or similar products..
Cleaning the door
Clean periodically the interior part of
the door to remove any fluff from the
seals around the filter. Accurate clean-
ing ensures correct drying.
Cleaning the filters
Your dryer will only function well if the fil-
ters are clean.
The filters collect all the fluff which
accumulates during drying and they
must therefore be cleaned
at tthe eend
of eeach pprogramme
, before removing
the laundry, with a damp cloth.
The light is on to remind you this
operation.
The filter in the inner door must be
removed for cleaning.
Do not be alarmed by the amount of fluff. It
is not due to excessive wear caused by the
dryer.
All fabric loses fluff when drying but it
goes un-noticed in the air. In a tumble
dryer it simply collects in the filter.
After a while, a withish patina due to
detergent residue on laundry forms on
the filters. When this occurs, clean the
filters with warm water using a brush.
Remove the filter in the door opening
as per picture (it can be positioned with
the tooth facing to the left or to the
right).
GB
125985272_gb.qxp 2007-03-02 12:39 Page 17

18 electrolux care and cleaning
Do nnot uuse tthe aappliance wwithout ffilters.
Cleaning the condenser unit
Clean the condenser when light comes
on.
The condenser is situated at the lower part
of the cabinet behind a small door. To open
the door, push the catch as per picture.
During the drying cycle or at the end, it is normal
for water to be present on the surface of the
condenser insertion.
To pull out the condenser, first turn the two
red stops downwards and then remove the
condenser unit holding it at the handle.
Clean it with a brush and rinse it under the
shower if necessary.
Also clean the outside, removing all fluff.
Clean the rubber seal round the condenser
cabinet and in the inner part of the small
door with a damp cloth.
Important!
Do not use pointed objects
or utensils to clean the spaces
between the plates, as this could dam-
age the condenser and make it perme-
able.
Re-fit the condenser, turn the red stops
upwards and close the door.
Do nnot uuse tthis aappliance iif tthe ccondenser
has nnot bbeen ffitted.
Emptying the water reservoir
Water extracted from the laundry condens-
es inside the machine and is collected in a
reservoir.
The reservoir must be emptied after each
drying cycle to ensure efficient operation
when the machine is next used. The pilot
125985272_gb.qxp 2007-03-02 12:39 Page 18

light reminds you this operation.
Proceed as follows:
• Open the small door at the lower part of
the cabinet
• Turn the yellow stop upwards
• Pull out the reservoir
• Open the small cover and let water flow
down
• Close the small cover and re-insert cor-
rectly the reservoir
•
Push it until it clicks and turn the yellow
stop downwards to lock firmly it
•
Close the small door and press the
IInniicciioo//PPaauussaa
button again to allow the
programme to continue.
The rreservoir mmust bbe rre-iinserted ccorrectly.
If this is not done the pilot light comes
on during next drying and the programme
stops, leaving the laundry damp. The
buzzer will sound for 1 minute.
E1157
After emptying and inserting the reservoir
the
IInniicciioo//PPaauussaa
T-button has to be
depressed again to allow the programme to
continue.
Handy tip: The condensed water may be
used in a steam iron or to top up a battery,
etc. In this case it must be filtered (e.g.
through a coffee filter).
Cleaning the air intake grille
Using a vacuum cleaner remove the fluff
from the air intake grille at the back of the
appliance.
Cleaning the drum
When your laundry does not reach the desired
degree of dryness, in other words, when it
turns out either too dry or too damp, we
advise you to clean the inside of the drum with
a cloth soaked with vinegar.
This will eliminate the slight patina that has
formed in the drum (due to residues of
detergent and softeners used in the wash-
ing, and to the lime contained in the water),
which prevents the probes from detecting
the correct degree of dryness.
care and cleaning electrolux 19
GB
125985272_gb.qxp 2007-03-02 12:39 Page 19

20 electrolux something not working
Something not working
Certain problems are due to lack of simple maintenance or oversights, which can be
solved easily without calling out an engineer. Before contacting your local Service
Centre, please carry out the checks listed below.
During machine operation it is possible that the red Start/Pause pilot light flashes to
indicate that the machine is not working.
Once the problem has been eliminated, press the Start/Pause button to restart the
programme. If after all checks, the problem persists, contact your local Service
Centre.
Malfunction Possible cause Solution
Dryer does not work.
● Mains plug is not plugged in
or fuse is not working
correctly.
● Loading door is open.
● Have you pressed the
START/ PAUSE button?
● Plug in at mains socket.
Check fuse in fuse box
(domestic installation).
● Close loading door.
● Press the START/PAUSE
button again.
Drying results
unsatisfactory.
● Wrong programme selected.
● Lint filter clogged.
● Heat exchanger clogged with lint.
● Incorrect volume of laundry.
● Ventilation slots in base area
covered up.
●Residue on inside surface of
drum or drum ribs.
●Conductance of water at
installation site differs from
standard setting of machine.
● Select a different programme the
next time you dry (see “Overview
of programmes” section).
● Clean lint filter.
● Clean heat exchanger.
● Observe recommended
loading volumes.
● Uncover ventilation slots in
base area.
● Clean inside surface of drum
and drum ribs
● Re-programme standard setting
for degree of drying (see
‘Programming options’ section).
Loading door does not
close.
● Fine strainer not in place
and/or large mesh filter not
locked in place.
● Install fine strainer and/or
snap large mesh filter into
place.
125985272_gb.qxp 2007-03-02 12:39 Page 20

GB
Drying cycle lasts an
unusually long time.
Note:
After around 5 hours
the drying cycle ends
automatically (see
„Drying cycle complete“)
● Lint filter clogged.
● Heat exchanger clogged with
lint.
● DELICATE button pressed
and load volume too big.
● Load volume too big.
● Laundry insufficiently
predrained.
● Clean lint filter
● Clean heat exchanger.
● DELICATE is only suitable for
use with loads of up to 3 kg!
● Reduce load volume.
● Laundry must be adequately
pre-drained.
Malfunction Possible cause Solution
When pressing a button,
the corresponding
button flashes several
times.
● Washing protection.
After the start of the program-
me, the option can no longer
be set.
● Turn the programme knob to
OFF. Set the programme
again
Programme inactive,
Water rreservoir ffull
light illuminated.:
● Condensate tank is full.
● Empty condensate tank, then
start programme with
START/PAUSE button.
Drying cycle ends
shortly after programme
starts. END
light illuminated.
● Not enough washing loaded
or washing loaded is too
dry for selected programme.
● Select time programme or
higher drying level (e.g. EXTRA
DRY instead of CUPBOARD).
something not working electrolux 21
125985272_gb.qxp 2007-03-02 12:39 Page 21

If you are unable to identify or solve the
problem, contact our service centre.
Before telephoning, make a note of the
model, serial number and purchase date
of your machine: the Service Centre will
require this information.
1206
IMPORTANT: if you call out an engineer to a fault listed
below, or to repair a fault caused by incorrect use or
installation, a charge will be made even if the appliance is
under guarantee.
22 electrolux something not working
125985272_gb.qxp 2007-03-02 12:39 Page 22

technical data electrolux 23
Technical data
Dimensions Width 60 cm
85 cm
58 cm
Height
Depth
Depth with loading door open 109 cm
Cotton
Synthetics
Maximum Load 7 kg
3 kg
Electrical connection
Voltage - Overall power -
Fuse
Information on the electrical connection is given
on the rating plate on the inner edge of the
appliance door
This appliance conforms with the following EU Directives:
– 73/23/EEC dated 19.02.1973 Low Voltage Directive
– 89/336/EEC dated 03.05.1989 EMC Directive inclusive of
Amending
Directive 92/31/EEC
– 93/68/EEC dated 22.07.1993 CE Marking Directive
GB
Use
Domestic
+ 5°C + 35°C
125985272_gb.qxp 2007-03-02 12:39 Page 23

The consumption values have been
established under standard conditions.
They may deviate when the machine is
operated in domestic circumstances.
24 electrolux consumption values
Consumption values
Programme
duration
(in minutes)
Programme Energy
consumption
(in kWh)
Revolutions
per
minute
Cottons Cupboard
1)
1000
Cottons Iron
1)
1000
Cottons Cupboard
1)
1400
Cottons Iron
1)
1400
Synthetics Cupboard
2)
1200
1)
Max Cottons load: 7 kg
2)
Max Synthetics load: 3 kg
130 4,5
100 3,4
115 3,9
85 2,8
57 1,6
125985272_gb.qxp 2007-03-02 12:39 Page 24

installation electrolux 25
Installation
Unpacking
Slide out the polythene bag with the
polystyrene stuffing before using the
appliance Pull off adhesive strips from
inside machine on top of drum.
SShhoouulldd tthhee aapppplliiaannccee bbee mmoovveedd,, iitt mmuusstt
bbee ttrraannssppoorrtteedd vveerrttiiccaallllyy
.
TThhee aapppplliiaannccee mmuusstt nnoott bbee iinnsst
taalllleedd
bbeehhiinndd aa lloocckkaabbllee ddoooorr,, aa sslliiddiinngg ddoooorr aa
ddoooorr wwiitthh aa hhiinnggee oonn tthhee ooppppoossiittee ssiiddee
ttoo tthhaatt ooff tthhee aapppplliiaannccee..
Positioning
It is recommended that, for your
convenience, the machine is positioned
close to your washing machine.
The tumble dryer must be installed in a
clean place, where dirt does not build up.
Air must be able to circulate freely all
round the appliance. Do not obstruct the
front ventilation grille or the air intake
grilles at the back of the machine.
To keep vibration and noise to a
minimum when the dryer is in use, it
should be placed on a firm, level surface.
Once in its permanent operating position,
check that the dryer is absolutely level
with the aid of a spirit level. If it is not,
raise or lower the feet until it is.
The feet must never be removed. Do not
restrict the floor clearance through
deeppile carpets, strips of wood or
similar. This might cause heat build-up
which would interfere with the operation
of the appliance.
IImmppoorrttaanntt
The hot air emitted by the tumble dryer
can reach temperatures of up to 60°C.
The appliance must therefore not be
installed on floors which are not resistant
to high temperatures.
When operating the tumble dryer, the
room temperature must not be lower than
+5°C and higher than +35°C, as it may
affect the performance of the appliance.
Stacking kit
A special stacking kit is available through
your dealer, to enable the mounting of
the dyer on top of a front loading
washing machine with cover’s depth
between 48 and 60 cm.
Read carefully the instructions supplied
with the kit.
GB
125985272_gb.qxp 2007-03-02 12:39 Page 25

26 electrolux installation
Door reversal
To make it easier to load or unload the
laundry the door can be reversed.
Reversing the door is not possible if after
this operation the appliance result
installed behind a door with a hinge on
the opposite side to that of the
appliance.
This operation must be carried out by
qualified personnel.
Please contact the nearest Service
Centre.
Electrical connection
This machine is designed to operate on
a 230 V, single-phase, 50 Hz supply.
Check that your domestic electrical
installation can
take the maximum load required (2.35
kW), also taking into account any other
appliances in use.
Connect the machine to an earthed
socket, in accordance with current
wiring regulations.
The manufacturer declines any
responsibility for damage or injury
through failure to comply with the
above safety precaution. Should
the appliance power supply cable
need to be replaced, this must be
carried out by our Service Centre.
IImmppoorrttaanntt!!
TThhee ppoowweerr ssuuppppllyy ccaabbllee mmuusstt bbee
aacccceessssiibbllee aafftteerr iinnssttaalllliinngg tthhee mmaacchhiinnee
.
125985272_gb.qxp 2007-03-02 12:39 Page 26

environment concerns electrolux 27
Environment concerns
Packaging materials
The materials marked with the symbol
are recyclable.
>PE<=polyethylene
>PS<=polystyrene
>PP<=polypropylene
This means that they can be recycled by
disposing of them properly in
appropriate collection containers.
Old machine
Use authorised disposal sites for your
old appliance. Help to keep your country
tidy!
The symbol on the product or on its
packaging indicates that this product
may not be treated as household waste.
Instead it shall be handed over to the
applicable collection point for the
recycling of electrical and electronic
equipment. By ensuring this product is
disposed of correctly, you will help
prevent potential negative consequences
for the environment and human health,
which could otherwise be caused by
inappropriate waste handling of this
product. For more detailed information
about recycling of this product, please
contact your local city office, your
household waste disposal service or the
shop where you purchased the product.
Ecological hints
To save energy and to help protect the
environment,we recommend that you
follow these hints:
• Try to load the maximum capacity of
the machine as small loads are
uneconomical.
• Always load well spun laundry. The
higher the spin speed, the lower the
electricity consumption and the shorter
the drying times.
• Do not over-dry laundry, this avoids
creasing and saves energy.
Select the drying programme
according to the type of laundry and
the required degree of dryness.
• To utilize the maximum load, laundry
which is to be dried ready to put away
(store dry) can be dried together with
items to be ironed. To do this, select
the programme for iron-dry, remove
the iron-dry items at the end of the
programme and then finish-dry the
rest of the load.
• Clean the filters regularly to avoid
excessive drying times and high
electricity consumption.
• Ventilate the room well. The room
temperature should not exceed +35°C
during drying.
GB
125985272_gb.qxp 2007-03-02 12:39 Page 27

28 electrolux guarantee/customer service
EEuurrooppeeaann gguuaarraanntteeee
This appliance is guaranteed by Electrolux, in each of the countries listed in the following
page, for the period specified in the appliance guarantee or otherwise by law. If you move
from one of these countries to another of these countries the appliance guarantee will move
with you subject to the following qualifications:
• The appliance guarantee starts from the date you first purchased the appliance
which will be evidenced by production of a valid purchase document issued by
seller of the appliance.
• The appliance guarantee is for the same period and to the same extent for
labour and parts as exists in your country of residence for this particular model or
range of appliances.
• The appliance guarantee is personal to the original purchaser of the appliance and cannot
be transferred to another user.
• The appliance is installed and used in accordance with instructions issued by Electrolux and
is only used within the home, i.e. is not used for commercial purposes.
• The appliance is installed in accordance with all relevant regulations in force within your new
country of residence.
The provisions of this European Guarantee do not affect any of the rights granted to you by
law.
wwwwww..eelleeccttrroolluuxx..ccoomm
Albania
+35 5 4 261 450
Rr. Pjeter Bogdani Nr. 7
Tirane
Belgique/België/
Belgien
+32 2 363 04 44
Bergensesteenweg 719, 1502
Lembeek
Česká republika
+420 2 61 12 61 12
Budìjovická 3,
Praha 4, 140 21
Danmark
+45 70 11 74 00
Sjællandsgade 2, 7000
Fredericia
Deutschland
+49 180 32 26 622
Muggenhofer Str. 135, 90429
Nürnberg
Eesti
+37 2 66 50 030
Mustamäe tee 24, 10621
Tallinn
España
+34 902 11 63 88
Carretera M-300, Km. 29,900
Alcalá de Henares Madrid
France
www.electrolux.fr
Great BBritain
+44 8705 929 929
Addington Way, Luton,
Bedfordshire LU4 9QQ
125985272_gb.qxp 2007-03-02 12:39 Page 28

guarantee/customer service electrolux 29
GB
Hellas
+30 23 10 56 19 70
4 Limnou Str., 54627 Thessaloniki
Hrvatska
+385 1 63 23 338
Slavonska avenija 3, 10000
Zagreb
Ireland
+353 1 40 90 753
Long Mile Road Dublin 12
Italia
+39 (0) 434 558500
C.so Lino Zanussi, 26 -
33080 Porcia (PN)
Latvija
+37 17 84 59 34
Kr. Barona iela 130/2, LV-
1012, Riga
Lietuva
+370 5 2780609
Ozo 10A, LT 08200 Vilnius
Luxembourg
+35 2 42 43 13 01
Rue de Bitbourg, 7, L-1273
Hamm
Magyarország
+36 1 252 1773
H1142 Budapest XIV,
Erzsébet királyné útja 87
Nederland
+31 17 24 68 300
Vennootsweg 1, 2404 CG -
Alphen aan den Rijn
Norge
+47 81 5 30 222
Risløkkvn. 2 , 0508 Oslo
Polska
+48 22 43 47 300
ul. Kolejowa 5/7, Warsaw
Portugal
+35 12 14 40 39 39
Quinta da Fonte - Edificio
Gonçalves Zarco - Q 35
2774 - 518 Paço de Arcos
Romania
+37 17 84 59 34
Kr. Barona iela 130/2, LV-
1012, Riga
Schweiz/Suisse/ SSvizzera
+41 62 88 99 111
Industriestrasse 10, CH-5506
Mägenwil
Slovenija
+38 61 24 25 731
Electrolux Ljubljana d.o.o.
Gerbiceva 98, 1000 Ljubljana
Slovensko
+421 2 43 33 43 22
Electrolux Slovakia s.r.o.,
Electrolux Domáce spotrebiče
SK, Seberíniho 1, 821 03
Bratislava
Suomi
www.electrolux.fi
Sverige
+46 (0)771 76 76 76
Electrolux Service, S:t
Göransgatan 143,S-105 45
Stockholm
Türkiye
+90 21 22 93 10 25
Tarlabașý caddesi no : 35 Taksim
Ístanbul
Россия
+7 095 937 7837
129090 Москва, Олимпийский
проспект, 16, БЦ „Олимпик“
125985272_gb.qxp 2007-03-02 12:39 Page 29

30 electrolux
Bienvenido al mundo Electrolux
Gracias por elegir un producto Electrolux de
primera clase, el cual esperamos le
proporcione una gran satisfacción en el futuro.
Electrolux ambiciona ofrecerle una amplia
variedad de productos de calidad que haga su
vida más cómoda. Usted encontrará algunos
ejemplos en la portada de este manual. Por
favor, tómese unos minutos para estudiar este
manual de modo que pueda aprovecharse de
los beneficios de su nueva máquina. Nosotros
prometemos proporcionarle una experiencia
superior como usuario y mucha tranquilidad.
¡Buena suerte!
125985272_es.qxp 2007-03-09 08:26 Page 30

índice electrolux 31
Indice
Advertencias....................................32
Descripción del aparato...................34
Panel de mando ..............................34
Secuencia de las operaciones....35-38
Consejos útiles...........................39-40
Cuadro de mandos ....................41-42
Posibilidades de programación........43
Limpieza y mantenimiento..........44-46
Qué hacer cuando... ...........................47
Datos técnicos ................................50
Valores de consumo........................51
Instalación..................................52-53
Eliminación ......................................54
Garantía europea/Servicio ..........55-56
Algunos párrafos de este libro de instrucciones han sido identificados con símbolos
que tienen el siguiente significado:
El triángulo de advertencia subraya instrucciones muy importantes para Su
seguridad o para el buen funcionamiento del aparato. Le rogamos respetarlas.
Las informaciones precedidas por este símbolo completan las instrucciones
de uso y de utilización práctica del aparato.
Este símbolo indica consejos e instrucciones para un empleo económico del
aparato que respete el ambiente.
E
125985272_es.qxp 2007-03-09 08:26 Page 31

32 electrolux advertencias
Advertencias
Por su seguridad y para garantizar
el funcionamiento correcto del aparato,
antes de instalarlo y utilizarlo por
primera vez lea atentamente este
manual del usuario, incluidos los
consejos y advertencias. Para evitar
errores y accidentes, es importante
que todas las personas que utilicen
el aparato estén perfectamente al
tanto de su funcionamiento y de
las características de seguridad.
Conserve estas instrucciones y no
olvide mantenerlas junto al aparato
en caso de su desplazamiento o
venta para que quienes lo utilicen a
lo largo de su vida útil dispongan
siempre de la información adecuada
sobre el uso y la seguridad.
Seguridad en general
● Es peligroso modificar o tratar de
modificar las características
técnicas de este aparato.
● Asegúrese de que los pequeños
animales domésticos no entren en
el tambor de la secadora. Para
evitar esto, compruebe el interior
del tambor antes de usarlo.
● Cualquier objeto como, por ejemplo,
monedas, imperdibles, clavos, tornillos,
piedras o cualquier otro material
duro y afilado puede causar numerosos
daños, por lo que no se debe
colocar dentro de la máquina.
● No trate de reparar el aparato sin la
ayuda de un técnico. Las reparaciones
efectuadas por personal no
especializado pueden provocar daños a
personas o averías. Póngase en
contacto con el Centro de Asistencia y
solicite las piezas de repuesto originales.
● Controle siempre que en los bolsillos no
se hayan olvidado encendedores.
● Si va a estar un tiempo sin utilizar el
aparato, desconecte el aparato de
la red eléctrica.
● Cerciórese de que no lleguen objetos
explosivos (p.ej. mecheros, botes de
aerosol, etc.) con la ropa en la secadora.
¡Peligro de incendio o de explosión!.
● No ponga elementos con rellenos
sueltos (p.ej. cojines) en la secadora.
¡Peligro de incendio!
● No introduzca en la secadora ropa que
haya estado en contacto con sustancias
químicas, como solventes para la limpieza
a seco, pues son sustancias volátiles y
podrían provocar una explosión. Seque
solamente prendas lavadas en agua.
● Riesgo de incendio: los tejidos que
se han impregnado o empapado con
aceites de cocina constituye un
peligro de incendio y no debería
introducirse en la secadora para
realizar un proceso de secado.
● Si usted ha lavado su ropa con el
producto quitamanchas deberá
realizar un aclarado extra en el
programa de lavado antes de
introducir la ropa la secadora
● No seque zapatos de lona ni
zapatos deportivos ya que podrían
detenerse entre la puerta y el
tambor bloqueando el tambor.
● Deje la puerta entreabierta cuando no se
usa el aparato; esto permite una mejor
conservación de la junta de la puerta.
● La última fase del programa de secado,
es una fase de refrigeración para que la
ropa quede protegida frente a los daños
causados por las altas temperaturas.
AAddvveerrtteenncciiaa!!
Si interrumpe el programa antes deque
termine el programa de secado.
Instalación
● Cualquier intervención eléctrica
necesaria para la instalación de
este aparato debe ser efectuada
por personal especializado.
● Si el aparato está colocado sobre un piso
cubierto de moqueta, controle que entre las
patas de apoyo y el piso haya
circulación de aire.
125985272_es.qxp 2007-03-09 08:26 Page 32

E
● Cuando desembale el electrodoméstico,
compruebe que no presenta daños.
En caso de duda, no lo utilice y
póngase en contacto con el centro
de asistencia.
● Todos los pernos de embalaje y
transporte se deben retirar antes
del uso. De lo contrario, se pueden
producir daños materiales y daños
en el producto graves. Véase el
capítulo correspondiente en el
manual de usuario.
● Si la máquina está situada sobre una
moqueta, ajuste las patas para
permitir que el aire circule libremente.
● Una vez que haya instalado el aparato,
verifique que no está presionando ni
descansa sobre el cable del suministro
eléctrico, la manguera de entrada y la
manguera de desagüe al cabo de un
tiempo.
● Si la secadora está colocada sobre
una lavadora, es obligatorio utilizar el
kit de apilamiento (accesorio opcional).
● Controle que el aparato no esté apoyado
sobre el cable de alimentación.
Uso
● El aparato ha sido proyectado para un uso
doméstico. El fabricante no asume
responsabilidad alguna por los daños
provocados por un uso impropio
del aparato o por la inobservancia
de las instrucciones de uso.
● Desenchufe siempre el aparato
después del uso.
● Las prendas que han entrado en contacto
con sustancias tales como aceite,
acetona, alcohol, gasolina, keroseno,
quitamanchas, trementina,cera o
eliminador de cera deben lavarse a
mano en profundidad utilizando agua
caliente y algún detergente antes
de proceder a su secado y alisado.
● No debe poner ropa que gotea
dentro de la secadora.
● El aparato no debe ser utilizado por
personas (incluidos los niños) que tengan
algún tipo de incapacidad física, sensorial o
mental, ni tampoco por personas que
carezcan de experiencia o conocimientos
sobre el funcionamiento del aparato, a
menos que estén acompañadas de una
persona responsable de su seguridad
que les acompañe y vigile durante
el empleo de dicho aparato.
● Queda prohibida cualquier modificacióno
cambio en la estructura del aparato.
● No tire del cable eléctrico para
desenchufar la máquina; sujete siempre
el enchufe propiamente dicho.
● No introduzca en el aparato
ninguna prenda que contenga
gomaespuma (espuma de látex) o
cualquier otro material gomoso,
como son las cortinas de ducha o
los tejidos impermeables o con
relleno de goma, nitampoco
prendas o cojines que tengan un
almohadillado de gomaespuma.
Seguridad para los niños
●
Los niños no se dan cuenta de los peli-
gros de los aparatos eléctricos. Cuando
el aparato está funcionando vigile atenta-
mente a los niños y no los deje jugar con
el aparato.
●
Las piezas de embalaje (por ej.
películas, poliestireno), pueden ser
peligrosas para los niños. ¡Peligro
de sofocación! Tenga las piezas
fuera del alcance de los niños.
●
Asegúrese de que los niños o los
pequeños animales domésticos no
entren en el tambor de la secadora.
●
Cuando quiera destruir el aparato,
desenchúfelo, corte el cable de ali-
mentación y elimine el enchufe con
el cable restante. Inutilice el cierre
de la puerta: de esta manera los
niños que están jugando no se
quedarán atrapados en el aparato.
advertencias electrolux 33
125985272_es.qxp 2007-03-09 08:26 Page 33

34 electrolux descripción del aparato/panel de mando
Descripción del aparato
Panel de mando
Filtros
Tarjeta matrícula
Condensador
Contenedor de agua
Patas regulables
6
5
4
3
2
1
Panel de mando
Mando selector de programas
Tecla Delicado
Tecla G. Secado
Tecla Alarma
Display fases programa
5
4
3
2
1
1
1
2
6
3
4
5
7
Delicado
Alarma
Inicio Diferido
Inicio/Pausa
G. Secado
Secado
Aireación
Fin/
Anti-Arrugas
9 h
6 h
3 h
Algodón
Extra Seco
Seco
Seco Armario
Semiseco
Seco Plancha
Seco Plancha
Seco Armario
Extra Seco
Tiem
po
Fácil Plancha
Vaqueros
Aireación
Especial
Sintéticos
Tecla “Inicio/Pausa”
Tecla “Inicio Diferido”
7
6
125985272_es.qxp 2007-03-09 08:26 Page 34

secuencia de las operaciones electrolux 35
Secuencia de las operaciones
Primer uso
● Compruebe que las conexiones
eléctricas sean conformes con las
instrucciones de instalación.
● Saque el bloque de poliestireno y
cualquier otro material del tambor.
Antes de hacer funcionar el aparato la
primera vez, introduzca algunos trapos
limpios, húmedos y seleccione un
tiempo de secado de 30 minutos. Así
estará seguro de que no habrá polvo o
suciedad en el tambor.
En el uso diario
Enchufe el aparato. Abra la puerta.
Introduzca las prendas en el tambor de una
en una, desplegándolas. Cierre la puerta.
Asegúrese de que las prendas no queden
atascadas entre la puerta y el filtro.
Seleccionar el programa
Gire el selector hasta el programa
requerido. La luz de Arranque/Pausa
comienza a parpadear.
El selector está dividido en las siguientes
secciones:
Algodón
Sintéticos
Tiempo
Especial
El mando selector le permite seleccionar
un secado electrónico o a tiempo.
Seleccione el tiempo o el programa de
secado deseado.
Secado automático (programas electrónicos)
Con estos programas el aparato funciona
mediante sensores de humedad. Lo único
que usted tiene que hacer es colocar el
mando selector en el programa requerido
según el tipo de ropa y el grado de secado
deseado (véase el cuadro programas).n.
El selector se puede girar hacia la
derecha o hacia la izquierda.
¡Atención!
Si gira el selector hasta otro programa
mientras la lavadora está funcionando, las
luces del display de progreso del programa
comienzan a parpadear. La máquina no
ejecutará el nuevo programa seleccionado.
Teclas de programas adicionales
Existe la posibilidad de combinar distintas
funciones según el programa. Las funciones
se deben seleccionar después de elegir el
programa y antes de presionar el botón
Arranque/Pausa. Al presionar estos botones,
las luces piloto correspondientes se
Algodón
Extra Seco
Seco
Seco Armario
Semiseco
Seco Plancha
Seco Plancha
Seco Armario
Extra Seco
Tiem
po
Fácil Plancha
Vaqueros
Aireación
Especial
Sintéticos
E
125985272_es.qxp 2007-03-09 08:26 Page 35

36 electrolux secuencia de las operaciones
encienden. Si se vuelven a presionar, las
luces piloto se apagan.
Seleccione Secado delicado
Al presionar este botón, el secado se
puede realizar a una temperatura inferi-
or, para prendas delicadas.
Pulsando esta tecla se puede realizar
el secado a una temperatura inferior,
para las prendas delicadas.
¡Delicado sólo tiene sentido con una
carga de hasta 3kg!
La luz piloto correspondiente se enciende.
Esta opción también se puede utilizar
para el secado con control de tiempo.
G. Secado
Para el ajuste fino del contenido de
humedad residual de la ropa. De MIN a
MAX la ropa queda más seca.
Pulse la tecla HUMEDAD hasta que se
encienda el piloto del nivel de
humedad deseado.
Alarma
Al final del secado suena una señal
acústica en intervalos.
Alarma
G. Secado
La señal acústica se activa :
• cuando se selecciona el programa
• cuando se pulsan las teclas
• cuando se selecciona una opción
incorrecta
• cuando se modifica la posición del
selector de programas durante el pro-
grama o cuando se pulsa una tecla de
opción durante el ciclo
• al final del programa
• cuando el depósito de agua está lleno.
Inicio/Pausa
Pulsar esta tecla para poner en marcha la
secadora tras haber seleccionado el progra-
ma y las opciones. La luz correspondiente
cesará de parpadear. Si se ha seleccionado
un inicio diferido, la máquina empezará la
cuenta hacia atrás.
Si se abre la puerta del aparato o la
pequeña puerta inferior cuando el pro-
grama está en curso, se debe volver a
pulsar esta tecla tras haber cerrado la
puerta para reiniciar el programa desde
el punto en que se había interrumpido.
Esta tecla también se debe pulsar tras una
interrupción de corriente y tras haber reintro-
ducido el depósito de agua, si se ha vaciado
durante un programa tras el encendido de la
luz "Depósito” .
Vuelva a pulsar el botón para desconec-
tar el aparato después de un corte eléc-
trico y tras haber colocado de nuevo el
depósito para el agua, si ha sido vacia-
do en mitad del programa tras haberse
encendido el piloto luminoso “Depósito”.
En ambos casos la luz de la tecla
Inicio/Pausa parpadea para recordar que
se debe volver a pulsar la tecla de inicio.
Inicio/Pausa
125985272_es.qxp 2007-03-09 08:26 Page 36

secuencia de las operaciones electrolux 37
Inicio Diferido
La tecla
Inicio DDiferido
permite aplazar el ini-
cio de un programa en 3, 6 ó 9 horas.
Seleccione el programa. PPara este fin,
pulse la tecla
Inicio DDiferido
hasta que se
encienda el indicador deseado: Indicación
9h para el inicio del programa dentro
de 9horas; –Indicación 6h para el inicio
del programa dentro de 6horas;
Indicación 3h para el inicio del progra-
ma dentro de 3horas.
Pulsando una vez más la tecla
Inicio DDiferido
,
la preselección de tiempo queda anulada. El
indicador se apaga.
Para activar la preselección, pulse la tecla
Inicio/Pausa.
Nota: Si se ha elegido una preselección de 9
horas, se enciende el indicador 9h. Al cabo
de 3 horas cambia la indicación y se encien-
de 6h al cabo de 3 horas más se enciende
3h. Al cabo de un total de 9horas se inicia
entonces el programa.
Hasta el inicio del programa, el tambor
se mueve en intervalos prolongados
para aflojar la ropa.
Para cancelar o modificar las opciones
que se han seleccionado, es suficiente
situar el aparato en PAUSA. Una vez
realizada la operación deseada, pulsar
la tecla "Inicio/Pausa" otra vez.
Si se desea añadir ropa durante la
cuenta hacia atrás de la máquina, es
suficiente abrir la puerta.
Cuando se cierra la puerta, pulsar la
tecla "Inicio/Pausa" otra vez para rea-
nudar la cuenta hacia atrás.
3h
6h
9h
Inicio Diferido
La luz
Después de haber arrancado el
programa, la luz piloto correspondiente
a la fase en curso se enciende:
LLuuzz ““SSeeccaaddoo””
Esta luz señala que el aparato está
efectuando la fase de secado.
Luz ““Aireación”
Esta luz indica que el aparato está en fase
de enfriado. Al final del secado, hay una fase
de enfriado de 10 minutos para enfriar la
ropa.
Luz ““Fin //Anti- AArrugas”
Esta luz se enciende al final de la fase de
enfriado, durante la fase antiarrugas y al final
del programa.
LLuuzz ““FFiillttrrooss””
Esta luz se enciende al final del programa
para recordar que se deben limpiar los filtros.
LLuuzz ““DDeeppóóssiittoo LLlleennoo””
Esta luz se enciende al final del programa
para recordar que se debe vaciar el depósito
de agua. Si esta luz se enciende durante un
programa, significa que el depósito de
agua está lleno. La señal acústica se
activa, el programa se para y la luz de
la tecla Inicio/Pausa parpadea.
LLuuzz ““CCoonnddeennssaaddoorr””
Se enciende cada 80 ciclos para recordar
que se debe limpiar el condensador.
E
125985272_es.qxp 2007-03-09 08:26 Page 37

38 electrolux secuencia de las operaciones
Secado terminado
Todos los programas de secado terminan
con una fase de enfriado de 10 minutos; la
luz "Enfriado" está encendida). Tras esta fase
se puede sacar la ropa.
Las luces Filtros , y Depósito
,,
y
Fin //Anti- AArrugas
están encendidas.
Los pilotos luminosos Filtros , y
Depósito
,,
y
Fin //Anti- AArrugas
se
encienden y suena la senal sonora.
En el display aparece un cero estático.
Si no se saca la ropa al final del ciclo, la
secadora ejecuta una fase antiarrugas
(duración máxima: 30 minutos).
Si no se saca la ropa, la secadora se
parará automáticamente al final de la
fase antiarrugas. La luz de la tecla
"Inicio/Pausa" se apaga y en el display
aparece un cero intermitente. Situar el
selector de programas en "O"; todas las
luces se apagan. El aparato está apaga-
do. Sacar la ropa. Si se abre y luego se
cierra la puerta antes de situar el selec-
tor en "O", todas las luces correspondi-
entes a las fases que componen el pro-
grama ejecutado se encienden y en el
display aparece la duración del progra-
ma.
TTrraass eell uussoo
• Limpiar los filtros
• Vaciar el depósito de agua
¡Importante!
Si el programa de secado debe ser
parado antes de que finalice su ciclo, le
recomendamos que gire el mando
selector en la posición “O” y luego en la
posiciónn y pulse la tecla de arranque
“Inicio/Pausa”.
Espere hasta el final de la fase de enfriamien-
to antes de sacar la ropa. De este modo
se evitará que la temperatura aumente
de manera excesiva en el aparato.
MMooddiiffiiccaacciióónn ddeell pprrooggrraammaa
Para cambiar un programa que está
ejecutándose, antes de todo se debe
cancelarlo colocando el mando selec-
tor en “O”. Seleccione el nuevo progra-
ma y pulse la tecla de arranque
“Inicio/Pausa”.
125985272_es.qxp 2007-03-09 08:26 Page 38

consejos útiles electrolux 39
Consejos útiles
•
Nunca seque las prendas siguientes
en la secadora:
Prendas particularmente delicadas
como cortinas de encaje, lana, seda,
tejidos con aplicaciones en metal,
medias de nylon, prendas volumino-
sas como chaquetas de invierno,
cubrecamas, mantas acolchadas,
sacos de dormir, edredones o cual-
quier otra prenda que contiene
gomapluma o materiales similares.
• Siga siempre las instrucciones indi-
cadas en las etiquetas de los vesti-
dos:
se puede secar en la secadora
secado normal (alta temperatura)
secado delicado (baja temperatura)
no secar en la secadora
• Abroche las fundas de los almohadones y
sábanas para evitar que la ropa más
chica se envuelva en el interior.
Cierre los botones a presión, cierres
y ganchitos y anude los cinturones y
tiras de delantales.
• Seleccione la ropa según el tipo y el
grado de secado requerido.
• No seque la ropa excesivamente, de
esta manera se evita la formación de
pliegues y se ahorra energía.
• Evite introducir ropa oscura junto con
las prendas más claras como las
toallas, porque la primera podría
atraer la pelusa.
• La ropa debe ser bien centrifugada
antes de ser introducida en la seca-
dora.
• Los tejidos sintéticos deben ser cen-
trifugados brevemente (aprox. 30
segundos, o bien utilizando el ciclo
de centrifugado breve de vuestra
lavadora).
• Los tejidos de punto (por ejemplo la
ropa interior) pueden achicarse leve-
mente con el calor. Recuérdelo cuan-
do los compren.
• Se pueden secar también las telas
almidonadas. Para mantener el efec-
to de almidonado, elija el programa
“húmedo para planchar”. Para remo-
ver los residuos de almidón del tam-
bor, límpielo con un trapo húmedo.
• Para evitar que haya electricidad estáti-
ca al final de la fase de secado, use
un suavizante para tejidos durante el
lavado o un producto especial para
las secadoras.
• Quite la ropa cuando el aparato ha
completado el ciclo de secado.
• Si alguna ropa está todavía húmeda
al final del secado, seleccione un
tiempo de
aall mmeennooss 3300 mmiinnuuttooss..
Esto podría ser necesario en el caso
de ropa multi-estrato (por ejemplo
cuellos, bolsillos, etc.).
Para evitar el apelotonamiento de la
ropa: cierre las cremalleras, abotone
fundas, ate cintas sueltas (p.ej. de
delantales).
Vacíe los bolsillos. Retire elementos
metálicos (clips, imperdibles, etc.).
Dé la vuelta a tejidos de doble capa
(p.ej. en anoracs con forro de algodón,
con la capa de algodón hacia fuera).
De este modo, estos tejidos se secan
mejor.
CCaarrggaa
Como es difícil calcular el peso de la
E
125985272_es.qxp 2007-03-09 08:26 Page 39

ropa, se aconseja de cargar el tambor:
• completamente, pero sin comprimir,
ddee aallggooddóónn yy lliinnoo
;
• a la mitad,
ddee ssiinnttééttiiccooss
;
• a un tercio,
ddee tteejjiiddooss mmuuyy ddeelliiccaaddooss
.
puuvillavaatteille.
Trate de usar la secadora a plena
carga, las cargas pequeñas son
antieconómicas.
La siguiente es una lista indicativa
del peso promedio de las prendas
más comunes.
Como es difícil calcular el peso de la
ropa, se aconseja de cargar el tambor:
• completamente, pero sin comprimir,
de algodón y lino;
• a la mitad, de sintéticos;
• a un tercio, de tejidos muy delicados.
40 electrolux consejos útiles
1200 gAlbornoces
100 gServilletas
700 gSábana
500 gsheet
200 gManteles
250 gFundas
200 gToallas pequeñas
100 gPaños de cocina
200 gEngalanar
100 gCamisas de señora
600 gCamisas de laboro hombre
200 gCamisas de hombre
500 gPijamas de hombre
100 gCamisones
100 gCalzón de hombre
125985272_es.qxp 2007-03-09 08:26 Page 40

Cuadro programas
Programas Pyykin laji
Funciones
adicionales
Aplicación/características
Extra
Seco
Algodón
Algodón
Seco
Armario
Extra
Seco
Sintéticos
Seco
Armario
Sintéticos
Algodón
Seco
Algodón
Semiseco
Algodón
Seco
Plancha
Secado completo de prendas
gruesas o de varias capas, p.ej.
prendas de rizo o albornoces.
Secado completo de prendas
gruesas, p.ej. prendas de rizo o
toallas.
Secado completo de prendas de
un grueso uniforme, p.ej. prendas
de rizo, prendas de punto, toallas.
Secado completo de prendas
gruesas o de varias capas, p.ej.
jerseys, ropa de cama o mantelería.
Para prendas finas que no serán
planchadas, p.ej. camisas sintéticas,
mantelería, ropa de bebé, calcetines,
corsetería.
Para prendas finas que serán
planchadas, p.ej. prendas de punto,
camisas de algodón.
Para prendas de algodón o lino de
grosor normal, p.ej. ropa de cama
o mantelería.
Tiempo
30 min
60 min
Sintéticos
Algodón
Sintéticos
Seco
Plancha
Para el secado posterior de prendas
individuales o pequeñas cantidades
de menos de 1kg.
Para prendas finas que serán
planchadas, p.ej. prendas de punto,
camisas de algodón.
E
cuadro programas electrolux 41
G.Secado
G.Secado
G.Secado
G.Secado
G.Secado
G.Secado
G.Secado
G.Secado
125985272_es.qxp 2007-03-09 08:26 Page 41

Cuadro programas
Programas Pyykin laji
Funciones
adicionales
Aplicación/características
Especial
Mix
Algodón
Sintéticos
Algodón
SEC. ARM.
Especial
Jeans
TEJ.
GRUESO
Sintéticos
Especial
FÁCIL
PLANCHA
Algodón
Sintéticos
Especial
EXPRESS
Programa especial con algodón y
sintéticos.
Programa especial para ropa de ocio,
como vaqueros, sudaderas, etc., con
distintos grosores de material (p.ej. en
puños y costuras).
Programa especial con mecanismo
antiarrugas para materiales textiles de fácil
mantenimiento, p.ej. camisas y blusas;
para reducir al mínimo el trabajo de
planchado. El resultado depende de
tipo de tejido y del acabado. (La carga
corresponde a aprox. 5 a 7 camisas.)
Recomendación: coloque las prendas
en la secadora inmediatamente después
del centrifugado. Después del secado,
retire inmediatamente las prendas y
cuélguelas en una percha.
Programa especial con una duración
de aprox. 10 min. para reavivar o
limpiar suavemente prendas con
juegos de limpieza en seco corrientes
en el mercado. (Utilice únicamente
productos declarados por el fabricante
como aptos para secadoras; observe
las indicaciones del fabricante para la
aplicación.)
Carga máxima:
Algodón: 7 kg
Sintéticos: 3 kg
Tiemp: 1 kg
Especial Mix: 3 kg
Especial Jeans: 7 kg
42 electrolux cuadro programas
G.Secado
G.Secado
125985272_es.qxp 2007-03-09 08:26 Page 42

posibilidades dde pprogramación
electrolux 43
Posibilidades de programación
E
AAjjuussttee ddeell nniivveell ddee
ccoonndduuccttiivviiddaadd
El agua contiene una cantidad variable de carbonato cál-
cico y sales minerales dependiendo de la localización
geográfica, variando así los valores de conductividad.
Cambios importantes en la conductividad del agua com-
parados con los prefijados en la fábrica podrían influir lige-
ramente en la humedad residual de la colada al final del
proceso. Su secadora le permite regular la sensibilidad del
sensor de secado basado en los valores de conductividad
del agua mediante el siguiente procedimiento.
PPaarraa aacccceeddeerr aall mmooddoo ddee sseelleecccciióónn::
1. Gire el selector de programas para encender el aparato.
2. En el modo de selección, pulse simultáneamente los botones
G. Secado y Inicio/Pausa, hasta que , y final
a quando non appaia.
Para acceder al modo de selección:
Pulse secuencialmente el botón Inicio/Pausa el nivel de
conductividad se indica mediante la fase de pilotos luminosos,
que se encienden siguiendo varias combinaciones, como apa-
rece a continuación:
LLaa lluuzz
Conductividad Valor aproximado
µµSS//ccmm
Bajo <300
Medio 300-600
Alto >600
Normalmente, el aparato viene programado de fábri-
ca al más alto nivel; sin embargo, algunos modelos
pueden configurarse de forma diferente.
Memorizado del nuevo programa:
Pulse los botones G. Secado y Inicio/Pausa, forma
simultánea. Pulse los botones hasta que el piloto que se
encuentra sobre los mismos deje de parpadear y suene la
senal sonora.
O = anular un
programa/OFF
Para anular un programa en curso gire el mando selec-
tor en “O”. Cuando termina el secado gire el mando
selector en “O” antes de abrir la puerta.
Objetivo
Ejecución
125985272_es.qxp 2007-03-09 08:26 Page 43

44 electrolux limpieza y mantenimiento
Limpieza y mantenimiento
Se debe desenchufar el aparato antes
de efectuar cualquier operación de lim-
pieza o de mantenimiento.
LLiimmppiieezzaa eexxtteerrnnaa
Use solamente agua y jabón y luego
seque cuidadosamente.
IImmppoorrttaannttee::
no use alcohol, solventes o
productos similares.
LLiimmppiieezzaa ddee llaa ppuueerrttaa
Limpie periódicamente la parte interna
de la puerta para eliminar la pelusa de
las juntas que hay alrededor del filtro.
Una limpieza correcta asegura un
secado correcto.
Limpieza dos filtros
La secadora funcionará bien si los fil-
tros estan limpios.
Los filtros recogen toda la “pelusa”
que se acumula durante el secado y
de consecuencia deben ser limpiados
al final de cada programa, antes de
sacar la ropa, con un paño húmedo.
La luz "Filtros" está encendida
para recordar esta operación.
El filtro que hay en la parte interna de la
puerta debe ser extraido para su limpieza.
No se alarme por la cantidad de pelusa.
Esto no se debe a un desgaste excesivo de
la ropa causado por la secadora. Todas
las fibras pierden pelusa durante el secado;
pero mientras en ocasión del secado al aire
libre este fenómeno no se nota, durante el
secado en el aparato la pelusa se recoge en
el filtro. Con el paso del tiempo, en los filtros
puede aparecer una pátina blancuzca
producida por los residuos de detergente
presentes en la ropa. Límpielos con agua
caliente, utilizando un cepillo. Para sacar el fil-
tro de la puerta, levántelo del modo indicado
en la figura. Se puede situar el filtro con la
lengüeta orientada hacia la izquierda o
la derecha.
125985272_es.qxp 2007-03-09 08:26 Page 44

NNoo uussee eell aappaarraattoo ssiinn ffiillttrrooss..
Limpieza del condensador
Limpiar el condensador cuando la luz
"Condensador" se encienda.
El condensador está situado en la
parte inferior del aparato, detrás de
una tapa. Para abrirla, pulse la tecla
según se indica en figura.
Durante o al final del ciclo de secado,
es normal que haya agua sobra la
superficie de introducción de con-
densador.
Para sacar el condensador, gire los
dos discos rojos hacia abajo y luego
tire del condensador hacia el exterior,
tomándolo por el asa.
Limpielo con una ducha de mano o
con un cepillo delicado.
Limpie también la parte exterior, qui-
tando toda la pelusa. Limpie las jun-
tas alrededor del condensador y en el
interior de la trapa con un paño
húmedo.
Vuelva a instalar el conden-
sador en su alojamiento, gire los dos
discos rojos hacia arriba y cierre la
tapa.
¡Importante!
No utilice objetos o herramientas
puntiagudos para limpiar los espacios
entre las placas, porque se podría
dañar el condensador y hacerlo per-
meable.
No use este aparato si el conden-
sador no ha sido colocado en su
lugar.
limpieza y mantenimiento electrolux 45
E
125985272_es.qxp 2007-03-09 08:26 Page 45

Vaciado del contenedor de agua
El agua que sale de la ropa mientras
se está secando se recoge en un
contenedor especial.
Después de cada ciclo de secado,
se debe vaciar el depósito para ase-
gurar un funcionamiento eficaz de la
máquina durante las utilizaciones
futuras. La luz testigo "Depósito
Lleno" recuerda esta operación.
Proceda de la siguiente manera:
• Extraiga con mucho cuidado e el
contenedor
• Vuelque el contenedor y deje correr
el agua.
• Vuelva a colocar el contenedor en
el panel de mandos.
Se debe volver a introducir el
contenedor, empujándolo hasta
el fondo.
Si no se efectúa esta operación, la
luz testigo "Depósito Lleno" se
enciende durante el secado siguiente
y el programa se para, dejando la
ropa húmeda. La señal acústica se
E1157
activa.
Una vez introducido el contenedor, se
debe pulsar otra vez la tecla de
“Inicio/Pausa” para permitir la conti-
nuación del programa.
Importante: el agua de condensación,
después de ser filtrada (por ejemplo
con un filtro de café) se puede usar en una
plancha o para rellenar una batería.
LLiimmppiieezzaa ddee llaa rreejjiillllaa ddee aassppiirraacciióónn
Limpie con cuidado la rejilla de aspira-
ción trasera con una aspiradora.
Limpieza del tambor
Cuando la ropa no alcanza el grado
de secado deseado, y por lo tanto es
demasiado seca o demasiado húme-
da, aconsejamos limpiar el interior del
tambor con un paño embebido de
vinagre.
Éste eliminará la sutil pátina que se
forma en el tambor, causada por los
residuos de detergente y de eventua-
les suavizantes utilizados durante el
lavado y por la caliza contenida en el
agua, que impide a las sondas medir
el grado correcto de secado.
46 electrolux limpieza y mantenimiento
125985272_es.qxp 2007-03-09 08:26 Page 46

Qué hacer cuando...
Antes de ponerse en contacto con el Centro Asistencia de zona, efectue los
siguientes controles.
Durante el funcionamiento de la lavadora puede que la luz piloto roja Arranque/Pausa
parpadee para indicar que la máquina no está funcionando. Cuando se haya solucionado el
problema, presione el botón Arranque/Pausa para reiniciar el programa. Si no
consigue resolver el problema después de realizar todas las comprobaciones
pertinentes, póngase en contacto con el centro de asistencia.
Problema Posible causa Corrección
La secadora no funciona.
● El enchufe de red está
desconectado o el fusible no
está en orden.
● La puerta de carga está abierta.
● ¿Tecla Inicio/Pausa pulsada?
● Conectar el enchufe de red.
Comprobar el fusible en la caja de
fusibles (instalación doméstica).
● Cierre la puerta de carga.
● Vuelva a pulsar la tecla
Inicio/Pausa.
El resultado de secado
no es satisfactorio.
● Se ha seleccionado un
programa inadecuado.
● Filtros de pelusa atascados.
● Condensador atascado con
pelusa.
● Carga incorrecta.
● Ranuras de ventilación en la
zona del zócalo tapadas.
●Incrustaciones en el interior
o en las aletas del tambor.
● En el siguiente secado, seleccionar
otro programa (ver capítulo “Vista
de conjunto de los programas”).
● Limpiar los filtros de pelusa.
● Limpie el condensador.
● Observar la carga recomendada.
● Liberar las ranuras de ventilación
en la zona del zócalo.
● Limpiar el interior y las aletas
del tambor.
● Realizar la adaptación con la
función adicional HUMEDAD.
La puerta de carga no
se puede cerrar.
● Filtro fino no insertado y/o
filtro grueso no encajado.
● Insertar el filtro fino y/o
encajar el filtro grueso.
E
qué hacer cuando... electrolux 47
125985272_es.qxp 2007-03-09 08:26 Page 47

El secado dura más de lo
habitual.
Nota: Al cabo de hasta 5
horas, el secado termina
automáticamente
(ver “Secado terminado”).
● Filtros de pelusa atascados.
● Condensador atascado con
pelusa.
● Tecla G. Secado pulsada y
carga demasiado grande.
● Carga demasiado grande.
● La ropa no se ha
centrifugado lo suficiente.
● Limpiar los filtros de pelusa.
● Limpie el condensador.
● ¡G. Secado sólo tiene sentido
con una carga de hasta 3kg!
● Reducir la carga.
● Centrifugar suficientemente la
ropa.
Problema Posible causa Corrección
Al pulsar una tecla aparece en
el display múltiple.
● Protección de la ropa. Una
vez iniciado el programa ya
no se puede ajustar la
función adicional.
● Colocar el programador en
OFF.
Volver a ajustar el programa.
El programa se detiene, el
indicador DEPÓSITO se
enciende.
● El depósito para el agua de
condensación está lleno.
● Vaciar el depósito para el
agua de condensación; a
continuar, iniciar el programa
con la tecla START/PAUSA
El secado termina poco
después de iniciarse el pro-
grama. El indicador FIN se
enciende.
● Se ha introducido poca
ropab o ropa demasiado
seca para el programa
seleccionado.
● Seleccionar un programa de
secado temporizado o un
nivel de secado superior (p.ej.
SECO en lugar de SECO-
ARMARIO).
48 electrolux qué hacer cuando...
125985272_es.qxp 2007-03-09 08:26 Page 48

Si después de haber efectuado los
controles antes citados la avería per-
siste, llame el Centro de Asistencia de
zona, indicando el tipo de modelo y el
número de serie del aparato.
Estas informaciones figuran en la tarje-
ta matrícula.
1206
E
IMPORTANTE: Si llama a un técnico
para reparar una de las averías
indicadas anteriormente o una avería
originada por un uso o instalación
incorrectos, el servicio se facturará
aunque el aparato se encuentre en
garantía.
qué hacer cuando... electrolux 49
125985272_es.qxp 2007-03-09 08:26 Page 49

50
electrolux datos técnicos
Datos técnicos
DIMENSIONES:
Anchura 60 cm
85 cm
58 cm
Altura
Profundidad
Profundidad con la puerta de
carga abierta
109 cm
Algodón:
Sintéticos :
Carga (en función del
programa)
7 kg
3 kg
Conexión eléctrica Voltaje -
Potencia maxima absorbida:
- Fusible:
Datos sobre la tensión de red, el tipo de corriente y el fusible
necesario figuran en la placa de características. La placa de
aracterísticas se encuentra en la zona del orificio de carga.
Este aparato es conforme a las siguientes directivas CE:
– 73/23/CEE del 19.02.1973 Directiva de Baja Tensión
– 89/336/CEE del 03.05.89 “Directiva de Compatibilidad Electromagnética”,
incluyendo Directiva de modificación 92/31/CEE
– 93/68/CEE del 22.07.93 Directiva de Marcación CE
Campo de aplicación
Uso doméstico
+ 5°C + 35°C
125985272_es.qxp 2007-03-09 08:26 Page 50

Los valores de consumo fueron
determinados en condiciones normales.
Pueden diferir en el uso doméstico.
valores de consumo electrolux
51
Valores de consumo
Secado en
minuti
Programas Energía
en kWh
Revoluciones
por minuto
Algodón SEC. ARM.
1)
1000
Algodón SEC. PLANCHA
1)
1000
Algodón SEC. ARM.
1)
1400
Algodón SEC. PLANCHA
1)
1400
Sintéticos
2)
1200
Carga máxima
1)
Algodón: 7 kg
2)
Sintéticos SEC. ARM.:3 kg
E
130 4,5
100 3,4
115 3,9
85 2,8
57 1,6
125985272_es.qxp 2007-03-09 08:26 Page 51

52
electrolux instalación
Instalación
DDeesseemmbbaallaajjee
Antes de usar el aparato extraiga la bolsa
de politeno con el relleno de poliestireno.
Retire la cinta adhesiva en el interior en el
lado superior del tambor
EEnn ccaassoo ddee qquuee,, eenn ffuuttuurroo,, ssee pprreecciissee
ddeessppllaazzaarr eell aappaarraattoo,, ssee ddeebbeerráá ttrraannss--
ppoorrttaarrlloo eenn sseennttiiddoo v
veerrttiiccaall..
NNoo ccoollooqquuee eell aappaarraattoo ddeettrrááss ddee
–– uunnaa ppuueerrttaa ccoonn cceerrrraadduurraa,,
–– uunnaa ppuueerrttaa ccoorrrreeddeerraa
–– uunnaa ppuueerrttaa ccoonn uunnaa bbiissaaggrraa ooppuueessttaa
aa llaa bbiissaaggrraa ddeell aappaarraattoo..
Colocación
La secadora debe ser instalada en un
ambiente muy bien ventilado.
Para un correcto funcionamiento debe
ubicar el aparato en posición perfecta-
mente horizontal. Asegúrese de esto
con la ayuda de un nivel de aire. egu-
lando las patas es posible compensar los
desniveles e inclinaciones del piso.
El ambiente en donde se instala la
secadora tiene que estar limpio, sin
acumulaciones de polvo y la rejilla
de ventilación anterior no debe estar
atascada.
LLaass ppaattaass nnoo ssee ddeebbeenn qquuiittaarr nnuunnccaa..
NNoo rreedduuzzccaa llaa ddiissttaanncciiaa ddee llaa sseeccaaddoorraa
ddeessddee eell ppiissoo ccoonn mmooqquueettaa oo aallffoomm--
bbrraass ddee ppeelloo aallttoo.. EEssttoo ppooddrrííaa pprroovvooccaarr
uunnaa aaccuummuullaacciióónn ddee ccaalloorr qquuee ppeerrjjuuddii--
ccaarrííaa eell bbuueenn ffuunncciioonnaammiieennttoo ddee llaa
mmááqquuiinnaa..
¡¡IImmppoorrttaannttee!!
El aire caliente que la secadora emite
puede llegar a alcanzar una temperatu-
ra de 60°C. Por lo tanto el aparato no
debe ser instalado sobre pisos que no sean
resistentes a las temperaturas elevadas.
Mientras la secadora está funcionando,
la temperatura del cuarto en que se
encuentra no debe ser inferior a +5°C
y superior a +35°C, ya que podría
afectar el funcionamiento del aparato.
El aire debe circular libremente alrede-
dor del aparato, por lo tanto no obstru-
ya las rejillas de aspiración posteriores.
KKiitt ddee mmoonnttaajjee ssoobbrree llaa llaavvaaddoorraa
En las tiendas de los revendedores
autorizados hay a disposición un kit
para poder instalar la secadora sobre
una lavadora con carga frontal y una
profundidad do plano de trabajo entre
48 y 60 cm.
Las instrucciones de instalación se
suministran con el kit. Le rogamos las
lea atentamente antes de instalar el
aparato.
125985272_es.qxp 2007-03-09 08:26 Page 52

Reversibilidad dde lla ppuerta
Para facilitar la carga o la descarga de
la ropa, se puede modificar el sentido
de abertura de la puerta.
El lado de apertura de la puerta no
sedebe cambiar si en tal caso el lado
deapertura de la puerta del aparato se
encontraseen la parte opuesta al lado
deapertura de una puerta opuesta.
EEssttaa ooppeerraacciióónn ddeebbee sseerr eeffeeccttuuaaddaa ppoorr
ppeerrssoonnaall eessppeecciiaalliizzaaddoo..
Diríjase al centro de asistencia técnica
más cercano a su domicilio.
Conexión eléctrica
El aparato funciona con una tensión de
230 V, monofásica, 50 Hz.
Controle que el equipo eléctrico
doméstico pueda sostener la carga
máxima requerida (2.35 kW) conside-
rando también los otros eventuales
electrodomésticos en funcionamiento.
Conecte el aparato a una toma de tierra, en
conformidad con las normas en vigor.
El fabricante declina cualquier res-
ponsabilidad por los daños o las
lesiones provocadas por el incumpli-
miento de las normas de seguridad
antedichas.
Si se debe sustituir el cable de ali-
mentación, diríjase a nuestro Centro
de Asistencia técnica.
AAddvveerrtteenncciiaa
UUnnaa vveezz qquuee ssee hhaayyaa iinnssttaallaaddoo llaa
mmááqquuiinnaa,, aasseegguurraarrssee ddee qquuee ssee ppuueeddaa
aacccceeddeerr ffáácciillmmeennttee aall ccaabbllee ddee aalliimmeenn--
ttaacciióónn..
instalación electrolux 53
E
125985272_es.qxp 2007-03-09 08:26 Page 53

54
electrolux eliminación
EElliimmiinnaacciióónn
MMaatteerriiaalleess ddee eemmbbaallaajjee
Los materiales de embalaje respetan el
medio ambiente y son reciclables. Los
elementos de materia plástica están
identificados; por ejemplo, >PE<, >PS<
etc. Elimine los materiales de embalaje,
según su identificación, en los
contenedores de recogida disponibles
en los puntos de gestión de desechos
locales.
Aparato viejo
Para una correcta eliminación de su
viejo aparato, Le aconsejamos utilizar
las escombreras autorizadas.
¡Ayúdenos a mantener limpia Su ciu-
dad!
El símbolo en el producto o en su
embalaje indica que este producto no
se puede tratar como desperdicios
normales del hogar. Este producto se
debe entregar al punto de recolección
de equipos eléctricos y electrónicos
para reciclaje. Al asegurarse de que
este producto se deseche
correctamente, usted ayudará a evitar
posibles consecuencias negativas para
el ambiente y la salud pública, lo cual
podría ocurrir si este producto no se
manipula de forma adecuada. Para
obtener información más detallada
sobre el reciclaje de este producto,
póngase en contacto con la
administración de su ciudad, con su
servicio de desechos del hogar o con
la tienda donde compró el producto.
Consejos para la protección del
ambiente
Para ahorrar energía y contribuir a la
protección del ambiente, aconsejamos
atenerse a lo siguiente:
• El aparato trabaja en economía si se
cargan las cantidades máximas de
ropa indicadas.
• Introduzca siempre ropa bien centri-
fugada. Cuanto mayor es la veloci-
dad de centrifugado, menor es el
gasto de electricidad y el tiempo de
secado.
• No seque la ropa excesivamente, de
esta manera se evita la formación de
pliegues y se ahorra energía.
Seleccione el programa de secado
en función del tipo de ropa y del nivel
de secado deseado.
• Para utilizar la carga máxima, la ropa
que se debe secar y guardar (secado
para guardar) puede ser secada
junto con las prendas a planchar. A
tal fin, seleccione el programa para el
secado de prendas a planchar,
saque estas últimas al final del pro-
grama y luego finalice el secado de
lo que queda de la carga.
• Limpie regularmente los filtros para
evitar tiempos de secado excesivos y
un gasto elevado de electricidad.
• Ventile el local de manera adecuada.
La temperatura ambiente no debe
superar +35 °C durante el secado.
125985272_es.qxp 2007-03-09 08:26 Page 54

garantía europea/
servicio
electrolux 55
E
GARANTÍA EUROPEA
Este aparato está garantizado por Electrolux en cada uno de los países abajo
indicados durante el periodo especificado en la garantía del aparato o el periodo que
prevea la ley. Si usted se traslada de uno de estos países a otro de los países abajo
indicados, la garantía del aparato se desplazará con usted siempre que se cumplan
los siguientes requisitos:
· La garantía entra en vigor el día en que usted compre el aparato, que se demostrará
mediante un justificante de compra válido emitido por el vendedor del aparato.
· La garantía del aparato tendrá el mismo periodo de validez y cubrirá las mismas
piezas y mano de obra que las garantías emitidas en su nuevo país de residencia
para ese modelo o gama de aparatos en concreto.
· La garantía del aparato es personal del comprador original e intransferible.
· El aparato deberá ser instalado y utilizado según las instrucciones de Electrolux
y es únicamente de uso doméstico, lo que significa que no podrá ser utilizado
con fines comerciales.
· El aparato deberá ser instalado observando todas las normativas relevantes que
estén en vigor en su nuevo país de residencia.
Las disposiciones de esta Garantía Europea no afectan a los derechos que le
correspondan por ley.
Si necesita ayuda, póngase en contacto con su centro local de asistencia al cliente.
www.electrolux.com
Albania
+35 5 4 261 450
Rr. Pjeter Bogdani Nr. 7
Tirane
Belgique/België/
Belgien
+32 2 363 04 44
Bergensesteenweg 719, 1502
Lembeek
Česká republika
+420 2 61 12 61 12
Budìjovická 3,
Praha 4, 140 21
Danmark
+45 70 11 74 00
Sjællandsgade 2, 7000
Fredericia
Deutschland
+49 180 32 26 622
Muggenhofer Str. 135, 90429
Nürnberg
Eesti
+37 2 66 50 030
Mustamäe tee 24, 10621
Tallinn
España
+34 902 11 63 88
Carretera M-300, Km. 29,900
Alcalá de Henares Madrid
France
www.electrolux.fr
Great BBritain
+44 8705 929 929
Addington Way, Luton,
Bedfordshire LU4 9QQ
125985272_es.qxp 2007-03-09 08:26 Page 55

56
electrolux garantía europea/
servicio
Hellas
+30 23 10 56 19 70
4 Limnou Str., 54627 Thessaloniki
Hrvatska
+385 1 63 23 338
Slavonska avenija 3, 10000
Zagreb
Ireland
+353 1 40 90 753
Long Mile Road Dublin 12
Italia
+39 (0) 434 558500
C.so Lino Zanussi, 26 -
33080 Porcia (PN)
Latvija
+37 17 84 59 34
Kr. Barona iela 130/2, LV-
1012, Riga
Lietuva
+370 5 2780609
Ozo 10A, LT 08200 Vilnius
Luxembourg
+35 2 42 43 13 01
Rue de Bitbourg, 7, L-1273
Hamm
Magyarország
+36 1 252 1773
H1142 Budapest XIV,
Erzsébet királyné útja 87
Nederland
+31 17 24 68 300
Vennootsweg 1, 2404 CG -
Alphen aan den Rijn
Norge
+47 81 5 30 222
Risløkkvn. 2 , 0508 Oslo
Polska
+48 22 43 47 300
ul. Kolejowa 5/7, Warsaw
Portugal
+35 12 14 40 39 39
Quinta da Fonte - Edificio
Gonçalves Zarco - Q 35
2774 - 518 Paço de Arcos
Romania
+37 17 84 59 34
Kr. Barona iela 130/2, LV-
1012, Riga
Schweiz/Suisse/ SSvizzera
+41 62 88 99 111
Industriestrasse 10, CH-5506
Mägenwil
Slovenija
+38 61 24 25 731
Electrolux Ljubljana d.o.o.
Gerbiceva 98, 1000 Ljubljana
Slovensko
+421 2 43 33 43 22
Electrolux Slovakia s.r.o.,
Electrolux Domáce spotrebiče
SK, Seberíniho 1, 821 03
Bratislava
Suomi
www.electrolux.fi
Sverige
+46 (0)771 76 76 76
Electrolux Service, S:t
Göransgatan 143,S-105 45
Stockholm
Türkiye
+90 21 22 93 10 25
Tarlabașý caddesi no : 35
Taksim Ístanbul
Россия
+7 095 937 7837
129090 Москва, Олимпийский
проспект, 16, БЦ „Олимпик“
125985272_es.qxp 2007-03-09 08:26 Page 56

125985272_es.qxp 2007-03-09 08:26 Page 57

125 985 272-02-23022007
www.electrolux.es
125985272_es.qxp 2007-03-09 08:26 Page 58
-
 1
1
-
 2
2
-
 3
3
-
 4
4
-
 5
5
-
 6
6
-
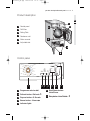 7
7
-
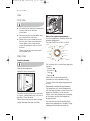 8
8
-
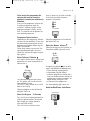 9
9
-
 10
10
-
 11
11
-
 12
12
-
 13
13
-
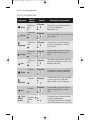 14
14
-
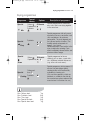 15
15
-
 16
16
-
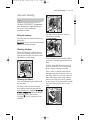 17
17
-
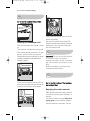 18
18
-
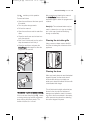 19
19
-
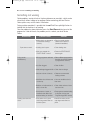 20
20
-
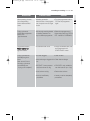 21
21
-
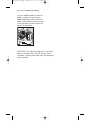 22
22
-
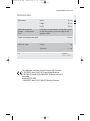 23
23
-
 24
24
-
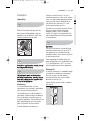 25
25
-
 26
26
-
 27
27
-
 28
28
-
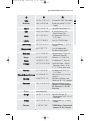 29
29
-
 30
30
-
 31
31
-
 32
32
-
 33
33
-
 34
34
-
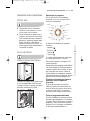 35
35
-
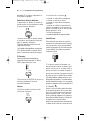 36
36
-
 37
37
-
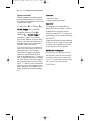 38
38
-
 39
39
-
 40
40
-
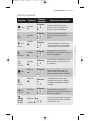 41
41
-
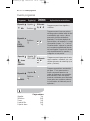 42
42
-
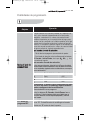 43
43
-
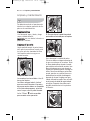 44
44
-
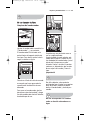 45
45
-
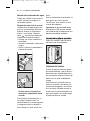 46
46
-
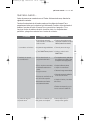 47
47
-
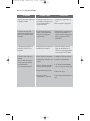 48
48
-
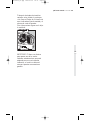 49
49
-
 50
50
-
 51
51
-
 52
52
-
 53
53
-
 54
54
-
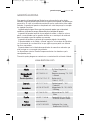 55
55
-
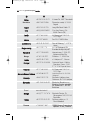 56
56
-
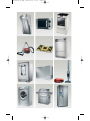 57
57
-
 58
58


Electrolux EDC67150W Manual de usuario
- Categoría
- Secadoras
- Tipo
- Manual de usuario
en otros idiomas
- English: Electrolux EDC67150W User manual
Artículos relacionados
-
Electrolux EDC67150W Manual de usuario
-
Electrolux EDE56140W Manual de usuario
-
-
Electrolux EDC77570W Manual de usuario
-
-
-
-
Electrolux EDC77150W Manual de usuario
-
-