GE UCC15NJII Guía del usuario
- Categoría
- Fabricantes de cubitos de hielo
- Tipo
- Guía del usuario

Write the model and serial
numbers here:
Model # _________________
Serial # _________________
Find these numbers on a label
on the top inner case liner of the
unit toward the front.
GE is a trademark of the General Electric Company. Manufactured under trademark license.
OWNER’S MANUAL
AND INSTALLATION
INSTRUCTIONS
ICE MACHINE
49-60745 Rev. 5 03-19 GEA
UCC15
ENGLISH/FRANÇAIS/
ESPAÑOL
SAFETY INFORMATION .........3
USING THE ICE MACHINE
Packaging ............................5
Controls ..............................5
Features ..............................6
Starting the Ice Machine ................6
INSTALLATION INSTRUCTIONS
Grounding the Ice Machine ..............7
Before You Begin ......................7
Location and Preparation ...............7
Advance Planning .....................9
Dimensions ..........................10
Door Swing .......................... 11
Door Panel ...........................12
Handle Reversing Instructions ..........14
Plumbing ............................14
Placement of the Ice Machine ..........15
CARE AND CLEANING ..........16
TROUBLESHOOTING TIPS ......18
LIMITED WARRANTY ...........19
ACCESSORIES .................. 20
CONSUMER SUPPORT ..........22

2 49-60745 Rev. 5
THANK YOU FOR MAKING GE APPLIANCES A PART OF YOUR HOME.
Whether you grew up with GE Appliances, or this is your first, we’re happy to have you in the family.
We take pride in the craftsmanship, innovation and design that goes into every GE Appliances
product, and we think you will too. Among other things, registration of your appliance ensures that we
can deliver important product information and warranty details when you need them.
Register your GE appliance now online. Helpful websites and phone numbers are available in the
Consumer Support section of this Owner’s Manual. You may also mail in the pre-printed registration
card included in the packing material.

49-60745 Rev. 5 3
CAUTION
To reduce the risk of injury when using your appliance, follow these basic safety
precautions.
Ŷ .HHSILQJHUVRXWRIWKH³SLQFKSRLQW´DUHDV
clearances between the doors and between the
doors and cabinet are necessarily small. Be careful
closing doors when children are in the area.
Ŷ $YRLGFRQWDFWZLWKWKHPRYLQJSDUWVRIWKHHMHFWRU
mechanism, or with the heating element that
releases the cubes. Do not place fingers or hands on
the automatic ice making mechanism while the ice
machine is plugged in.
SAFETY INFORMATION
READ AND SAVE THESE INSTRUCTIONS
WARNING
To reduce the risk of fire, explosion, electric shock, or injury when using your ice
machine follow these basic safety precautions:
Ŷ 7KLVLFHPDFKLQHPXVWEHSURSHUO\LQVWDOOHG
and located in accordance with the Installation
Instructions before it is used.
Ŷ 8QSOXJWKHDSSOLDQFHEHIRUHPDNLQJUHSDLUV
replacing a light bulb, or cleaning.
NOTE: Power to the appliance cannot be
disconnected by any setting on the control panel.
NOTE: Repairs must be performed by a qualified
service professional.
Ŷ 5HSODFHDOOSDUWVDQGSDQHOVEHIRUHRSHUDWLQJ
Ŷ 'RQRWVWRUHRUXVHJDVROLQHRURWKHUIODPPDEOH
vapors and liquids in the vicinity of this or any other
appliance.
Ŷ %HFDXVHRISRWHQWLDOVDIHW\KD]DUGVXQGHUFHUWDLQ
conditions, we strongly recommend against the use
of an extension cord. However, if you must use an
extension cord, it is absolutely necessary that it be a
8/OLVWHGLQWKH8QLWHG6WDWHVRUD&6$FHUWLILHGLQ
&DQDGDZLUHJURXQGLQJW\SHDSSOLDQFHH[WHQVLRQ
cord having a grounding type plug and outlet and
that the electrical rating of the cord be 15 amperes
PLQLPXPDQGYROWV
Ŷ 7RSUHYHQWVXIIRFDWLRQDQGHQWUDSPHQWKD]DUGVWR
children, remove the door from any appliance before
disposing of it or discontinuing its use.
Ŷ 'RQRWDOORZFKLOGUHQWRFOLPEVWDQGRUKDQJRQWKH
door handle of the appliance. They could seriously
injure themselves.
Ŷ ,FHPDFKLQHVFDOHUHPRYHUFRQWDLQVDFLGV$FLGV
can cause burns. If concentrated cleaner comes in
contact with skin, flush with water. If swallowed, do
NOT induce vomiting. Give large amounts of water
RUPLON&DOO3K\VLFLDQLPPHGLDWHO\.HHSRXWRIWKH
reach of children.
IMPORTANT SAFETY INFORMATION
READ ALL INSTRUCTIONS BEFORE USING THE APPLIANCE
INSTALLATION
WARNING
EXPLOSION HAZARD
.HHSIODPPDEOHPDWHULDOVDQGYDSRUVVXFKDVJDVROLQHDZD\IURPDSSOLDQFH)DLOXUHWRGRVRFDQUHVXOWLQILUH
explosion, or death.

4 49-60745 Rev. 5
WARNING
SUFFOCATION AND CHILD ENTRAPMENT HAZARD
5HPRYHWKHGRRUIURPWKHDSSOLDQFHSULRUWRGLVSRVDO)DLOXUHWRGRVRFDQUHVXOWLQFKLOGHQWUDSPHQWZKLFKFDQ
lead to death or brain damage.
IMPORTANT: Child entrapment and suffocation are not
problems of the past. Junked or abandoned appliances
DUHVWLOOGDQJHURXVHYHQLIWKH\ZLOOVLWIRU³MXVWDIHZ
GD\V´,I\RXDUHJHWWLQJULGRI\RXUROGDSSOLDQFH
please follow the instructions below to help prevent
accidents.
Before You Throw Away Your Old Appliance:
Ŷ Take off the doors.
Ŷ /HDYHWKHLQWHUQDOFRPSRQHQWVLQSODFHVRWKDW
children may not easily climb inside.
Refrigerants
All refrigeration products contain refrigerants, which
under federal law must be removed prior to product
disposal. If you are getting rid of an old refrigeration
product, check with the company handling the disposal
about what to do.
PROPER DISPOSAL OF YOUR OLD APPLIANCE
Do not, under any circumstances, cut or remove the third (ground) prong from the power cord. For
personal safety, this appliance must be properly grounded.
The power cord of this appliance is equipped with a
SURQJJURXQGLQJSOXJZKLFKPDWHVZLWKDVWDQGDUG
SURQJJURXQGLQJZDOORXWOHWWRPLQLPL]HWKH
SRVVLELOLW\RIHOHFWULFVKRFNKD]DUGIURPWKLVDSSOLDQFH
Have the wall outlet and circuit checked by a qualified
electrician to make sure the outlet is properly
grounded.
Where a standard 2-prong wall outlet is encountered, it
is your personal responsibility and obligation to have it
replaced with a properly grounded 3-prong wall outlet.
The ice maker should always be plugged into its own
YROW+]DPSFLUFXLW7KLVSURYLGHVWKHEHVW
performance and also prevents overloading house
ZLULQJFLUFXLWVZKLFKFRXOGFDXVHDILUHKD]DUGIURP
overheated wires.
Never unplug your ice maker by pulling on the power
cord. Always grip plug firmly and pull straight out from
the outlet.
Repair or replace immediately all power cords that
have become frayed or otherwise damaged. Do not
use a cord that shows cracks or abrasion damage
along its length or at either end.
When moving the ice maker, be careful not to roll over
or damage the power cord.
KEEP FROM FREEZING: Severe damage will occur
to the unit if left in or operated in temperatures beyond
the limits listed in this manual. That damage is NOT
covered by warranty.
KEEP DRY: Do not locate in low lying areas where
puddles will accumulate
PROVIDE SHADE: Heat gain from the sun will reduce
the unit's ability to make and store ice, and ultraviolet
radiation from the sun can potentially damage the unit's
plastic components.
WATER SUPPLY: Avoid a long run of hose or tubing
exposed to the sun. Plastic water supply tubing should
EHUDWHGIRUSRWDEOHZDWHUDQGLQFOXGH89SURWHFWLRQ
Copper tubing is recommended.
BACK FLOW PREVENTION: The unit includes back
flow prevention, no additional check valve is required.
DRAINAGE: DO NOT drain into swimming pool or onto
grounds.
CONNECTING ELECTRICITY
OUTDOOR USE NOTICE
WARNING
ELECTRICAL SHOCK HAZARD
Plug into a grounded 3-prong outlet
Do not remove the ground prong
Do not use an adapter
)DLOXUHWRIROORZWKHVHLQVWUXFWLRQVFDQUHVXOWLQGHDWKILUHRUHOHFWULFDOVKRFN
SAFETY INFORMATION
IMPORTANT SAFETY INFORMATION
READ ALL INSTRUCTIONS BEFORE USING THE APPLIANCE
READ AND SAVE THESE INSTRUCTIONS

49-60745 Rev. 5 5
Remove Packaging
IMPORTANT: Do not remove any permanent instruction
labels inside your ice machine or the Tech Sheet that is
fastened behind the lower access panel.
Ŷ5HPRYHWDSHDQGDQ\ODEHOVIURP\RXULFHPDNHU
EHIRUHXVLQJH[FHSWWKHPRGHODQGVHULDOQXPEHU
ODEHO
To remove any remaining tape or glue, rub the area
briskly with your thumb. Tape or glue residue can also
be easily removed by rubbing a small amount of liquid
dish soap over the adhesive with your fingers. Wipe
with warm water and dry.
Ŷ'RQRWXVHVKDUSLQVWUXPHQWVUXEELQJDOFRKRO
flammable fluids or abrasive cleaners to remove tape
or glue. These products can damage the surface of
\RXULFHPDNHU)RUPRUHLQIRUPDWLRQVHH,PSRUWDQW
Safety Instructions.
1. POWER ON/OFF - Press to turn the ice machine on or off.
2. ICE MAKING - Glows white when the unit is ON.
3. CHECK WATER - Glows red when there is not water supplied to the machine.
4. TIME TO CLEAN - Glows yellow when it's time to clean the machine. The light will switch ON after 6 months of
use. It will remain on until the ice making system is cleaned using the process in the Care and
Cleaning section.
5. CLEAN RESET 3UHVVHGZLWK3RZHUEXWWRQIRUVHFRQGVWRVWDUWWKHFOHDQLQJSURFHVVVHH&DUHDQG&OHDQLQJ
POWER
ON/OFF
CLEAN
RESET
TIME TO
CLEAN
CHECK
WATER
ICE
MAKING
Packaging
USING THE ICE MACHINE: Packaging/ Controls
1 2 3 4 5
Controls

6 49-60745 Rev. 5
Starting the ice machine
Ice scoop
.LFNSODWH
Control panel
Ice making area
)URQWVHUYLFHSDQHO
Initial Start Up
1. Turn on the water supply.
2. Switch on the electrical power.
3XVKDQGUHOHDVHWKH212))VZLWFKWRVWDUWWKH
PDFKLQH7KH,&(0$.,1*OLJKWQH[WWRWKH212))
switch will glow white.
4. Water will begin to flow into the unit. When the
reservoir is full, water will start to drain from the
machine. After a few minutes the compressor, water
pump and fan motor will begin to operate as the first
ice making cycle begins.
No adjustments are needed.
,QDSSUR[LPDWHO\PLQXWHVLFHZLOOIDOOLQWRWKHLFH
storage bin. The machine makes 24 gourmet cubes at a
time. It is normal for the first batches of ice to melt as the
ELQFRROV,WZLOOWDNHKRXUVRIFRQWLQXRXVUXQWLPH
to fill the ice bin. When the ice bin is full, the ice machine
will shut off. It will automatically restart when the ice level
falls, either from use or normal meltage.
Discard the first bin full of ice.
This machine takes in room temperature air at the lower
right front and forces warm air out the lower left front.
Restricting the airflow or operating the machine in a hot
or cold environment will adversely affect the ability of the
ice machine to make ice.
When the door is opened, the control panel, ice making
area and ice storage bin are visible. The scoop is located
in a holder along the right side wall.
This is a gravity drain model that must have a building
drain connection below the level of the drain tube at the
back of the cabinet. A pump can be installed, which can
IRUFHGUDLQZDWHUXSDPD[LPXPRIIHHWDOORZLQJLW
to be located where a gravity drain isn't available. See
AccessoriesRQSDJHIRUPRUHLQIRUPDWLRQRQWKH
drain pump.
Warm Air Out
Air Intake
Features
USING THE ICE MACHINE:)HDWXUHV6WDUWLQJWKHLFHPDFKLQH

49-60745 Rev. 5 7
GROUNDING THE ICE MACHINE
WARNING
Electrical Shock Hazard.
)DLOXUHWRIROORZWKHVHLQVWUXFWLRQVFDQUHVXOWLQGHDWK
fire, or electrical shock.
The power cord of this appliance is equipped with a
SURQJJURXQGLQJSOXJZKLFKPDWHVZLWKDVWDQGDUG
SURQJJURXQGLQJZDOORXWOHWWRPLQLPL]HWKH
SRVVLELOLW\RIHOHFWULFVKRFNKD]DUGIURPWKLVDSSOLDQFH
Have the wall outlet and circuit checked by a qualified
electrician to make sure the outlet is properly
grounded.
Where a standard 2-prong wall outlet is encountered,
it is your personal responsibility and obligation to have
it replaced with a properly grounded 3-prong wall
outlet.
'212781'(5$1<&,5&8067$1&(6&8725
5(029(7+(7+,5'*5281'3521*)520
THE POWER CORD.
'212786($1$'$37(53/8*72&211(&7
7+($33/,$1&(72$3521*287/(7
'212786($1(;7(16,21&25':,7+7+,6
$33/,$1&(
Questions? Call 800.GE.CARES (800.432.2737) or visit our Website at: GEAppliances.com
In Canada, call 1.800.561.3344 or visit our Website at: GEAppliances.ca
BEFORE YOU BEGIN
Read these instructions completely and carefully.
• IMPORTANT — Observe all governing codes
and ordinances. Save these instructions for local
inspector’s use.
• Note to Installer – Be sure to leave these
instructions with the Consumer.
• Note to Consumer – .HHSWKHVHLQVWUXFWLRQVIRU
future reference.
• Skill level – Installation of this appliance requires
basic mechanical skills.
• Completion time – Installation can vary
:DWHU/LQH,QVWDOODWLRQ
minutes
• Proper installation is the responsibility of the
installer.
• Product failure due to improper installation is not
covered under the Warranty.
ICE MACHINE LOCATION AND
PREPARATION
This ice machine is designed to be used indoors, in
a controlled environment or outdoors within certain
limits.
It is made up of two major systems: the ice making
system and the ice storage system. The ice making
system is a continuous flow that makes ice when the
ice level becomes low and stops when it is full.
The ice storage system is an insulated chest
with a drain at the bottom for melting ice. It is not
refrigerated, insuring that the bin contains fresh ice.
IMPORTANT: Never keep anything in the ice storage
bin that is not ice. Objects like wine or beer bottles are
not only unsanitary, but the labels can slip off and plug
up the drain.
IMPORTANT: Never allow the machine to operate
without regular cleaning. The machine will last longer
if it is kept clean. Regular cleaning should happen
at least once per year, and preferably twice. Some
water conditions will dictate even more frequent
cleaning of the ice making section, and some carpets
or pets will dictate more frequent cleaning of the
condenser.
Specifications
The ice machine will operate adequately within the
limits, but functions best in temperatures between
)DQG)
0LQLPXPDLUWHPSHUDWXUH)&
0D[LPXPDLUWHPSHUDWXUH)&
0LQLPXPZDWHUWHPSHUDWXUH)&
0D[LPXPZDWHUWHPSHUDWXUH)&
0LQLPXPZDWHUSUHVVXUHSVLEDU
0D[LPXPZDWHUSUHVVXUHSVLEDU
Electrical voltage limits:
See the Rating Plate inside the ice machine.
INSTALLATION INSTRUCTIONS
Installation
Instructions
ICE MACHINE

8 49-60745 Rev. 5
Installation Instructions
INSTALLATION INSTRUCTIONS
ICE MACHINE LOCATION AND PREPARATION (Cont.)
Water Quality
All water, including potable water supplied by
municipalities, contains some impurities or minerals.
Water absorbs impurities from the air as rain and/or
as it flows through the ground. Some of the impurities
are solid particles. These are known as suspended
solids, and a fine particle filter will remove them.
Other impurities are chemically bonded to the water
molecules and cannot be filtered out. These are called
dissolved solids.
Ice made by this machine will have a lower mineral
content than the water it was made from. This is due
WRWKHPHWKRGRIPDNLQJLFH3XUHUZDWHUZLOOIUHH]H
first in the ice making molds. The reason for this is that
DQ\WKLQJGLVVROYHGLQZDWHUORZHUVWKHZDWHUVIUHH]LQJ
temperature. This concentrates most of the impurities
of the ice machine water reservoir where they may form
hard deposits known as scale. The machine dilutes the
concentration of minerals by over-filling the reservoir
GXULQJWKHKDUYHVWF\FOHZLWKWKHH[FHVVZDWHUIORZLQJ
GRZQWKHGUDLQ:DWHUXVHYDULHVZLWKDLUDQGZDWHU
temperatures. Between 2 and 4 pints of water flow into
the unit each cycle. Between 1 and 3.5 pints of that
rinses the reservoir and goes down the drain.
Some impurities will inevitably remain, and will stick to
the parts in the machine. This will cause malformed ice
cubes. Eventually, built up mineral scale can shorten
machine life.
To keep the machine operating properly, these
impurities or minerals will have to be regularly dissolved
by an acid cleaner. Directions for this may be found in
the Care and Cleaning section.
Filters and Treatment
In general, it is always a good idea to filter the water.
A proper water filter can remove taste and odors
as well as particles. We recommend using a GE
$SSOLDQFHV:DWHU)LOWHURQ\RXUZDWHULQOHWOLQHVXFK
DV*($SSOLDQFHV0RGHO1XPEHU*;5/43OHDVH
go to GEAppliances.com to review the installation
instructions and determine which filter will suit your
application. In Canada visit GEAppliances.ca. Some
other methods of water treatment for dissolved solids
include reverse osmosis, and polyphosphate feeders.
RO Water
This machine can be supplied with Reverse Osmosis
water, but the water conductivity must be no less than
PLFUR6LHPHQWVFP$UHYHUVHRVPRVLVV\VWHP
should include post treatment to satisfy the R.O. water's
SRWHQWLDODJJUHVVLYHQHVV'HLRQL]HGZDWHULVQRW
recommended.
Because water softeners exchange one mineral
for another, softened water may not improve water
conditions when used with ice machines. Where water
is very hard, softened water could result in white,
mushy cubes that stick together.
If in doubt about the water, contact a local point of
use water specialist for recommendations on water
treatment.
Installation Overview
The ice machine must:
- be connected to cold, potable water
- be connected to a drain
- be connected to the proper power supply
- be able to circulate air through the vents at the front
NOTE: Do not build in so that the door is recessed.

49-60745 Rev. 5 9
ADVANCE PLANNING
CAUTION
Due to excessive weight, TWO
PEOPLE ARE REQUIRED TO MOVE AND INSTALL
THIS Ice maker. Failure to do so can result in back or
other injury.
Cutout & Product Dimensions
Installation Notes
Built-In Installation: If a finished floor is to be installed
in the area after the ice machine has been built in,
shims the expected thickness of the floor should be
installed under the unit to keep the machine level with
the planned floor level.
NOTE: The water connection is at the back and adds a
few inches to the cabinet depth.
Installation on a slab: You will need to install a drain
pump to the appliance and pump the water to the point
of drainage. See Accessories. Pump models will pump
VWRU\IHHWKLJKW
Installation over a crawl space or basement: Either
DJUDYLW\GUDLQRUDSXPSPD\EHXVHG)RUSXPSVHH
Accessories. If there is not enough room behind the
machine for a drain/waste receptacle, the drain will
have to be below the floor.
NOTE: When installed in a corner, the door swing may
be limited due to handle contact with the wall or cabinet
face.
A water supply is required. Water supplies vary in the
degree of mineral content. High mineral content water
will require more frequent maintenance. Water filtration
may improve the taste of the ice as well as cut down on
some of the mineral build up.
Installation Instructions
INSTALLATION INSTRUCTIONS

49-60745 Rev. 5
14 7/8"
AIR IN
AIR OUT
.75
SHEET METAL DOOR FRONT
.63 MIN. CABINET DOOR
29-7/8"
1"
LEG ADJUSTMENT
(4) PLACES
33-7/8
"
22"
2 3/4"
4-3/8"
3 3/4"
1 1/2"
2 1/2"
3 1/4"
7 3/8"
115 V
POWER CORD
DRAIN
FLEXIBLE TUBING
5/8" I.D. x 7/8" I.D.
POTABLE WATER INLET
1/4" COMPRESSION FITTING
3 7/8"
2
0 3/8"
FLOOR DRAIN
ACCESS HOLE
DIMENSIONS
Installation Instructions
INSTALLATION INSTRUCTIONS

49-60745 Rev. 5 11
DOOR SWING
Moving the hinges allows the door to open from either
the left or the right side. Change the swing BEFORE
attaching the door panel.
To change:
1. Open the door. Remove 4 stainless steel screws
opposite the hinge side on the front of the cabinet.
2. Remove innermost screw holding each hinge to the
FDELQHW/RRVHQWKHRWKHUVFUHZ
3. Slide the door to the side so the keyhole on the
hinge clears the screw and remove from cabinet.
4. Remove the screws that were loosened and save.
Install the 4 stainless steel screws that were
removed in Step 1 into the open holes on the
cabinet left by removing the hinge.
5. Remove the hole plug and hinge opening covers
IURPGRRULIDSSOLFDEOH
6. Remove hole plugs or screws from unit's new hinge
ORFDWLRQVLIDSSOLFDEOH6HWDVLGH
7. Install the 2 hinge screws removed after the door
was removed from the cabinet into the outermost
holes on the new hinge side of the cabinet. Screw
these in only about half way.
8. Remove the upper hinge from the door and move it
to the door's opposite side, bottom location. Secure
using the original screws.
NOTE: If door panel is attached, it must be
removed to access hinge screws and to reverse
the handle position.
9. Remove the original lower door hinge and move it
to the opposite side, upper location. Secure using
original screws.
IMPORTANT: If installing a stainless steel door
panel or custom panel, skip to INSTALLING THE
DOOR PANEL section.
,QVWDOOSRFNHWFRYHUVDQGKROHSOXJVRQWRGRRU
11. Place the keyhole slot on the hinge over the
outermost screw, top and bottom, and slide the
door onto the cabinet.
12. Install the door to the cabinet using the original
screws. Tighten all 4 screws.
IMPORTANT: In some situations the door can
open too far and damage adjacent cabinets. To
SUHYHQWWKLVLQVHUWD6WRS3LQLQKDUGZDUHSDFNHW
into the provided hole in the top and bottom hinges.
Drive the pin into the hole until the head is flush
with the hinge.
13. Slide the hinge covers from the hardware packet
over each hinge.
14. Attach the side covers from the hardware packet
over the hinge by peeling off the covering over the
adhesive and placing it over the side of the hinge.
NOTE: If the unit is being built-in a screw can be
used to secure the unit to the cabinet in place of
installing the side covers.
Hole plug
Hinge Opening Cover
Remove
/RRVHQ
Door stop pin
Hinge Cover
Side
Cover
Installation Instructions
INSTALLATION INSTRUCTIONS

12 49-60745 Rev. 5
INSTALLING THE DOOR PANEL
The ice machine is supplied without a conventional
door covering, allowing the attachment of a door panel
or a custom panel.
NOTE: If the door swing is to be changed, it needs to
be done BEFORE attaching the door panel.
Door Panel
)LQLVKHGGRRUSDQHOVZLWKKDQGOHVDUHDYDLODEOHIURP
GE Appliances for attachment to the ice machine. See
AccessoriesRQSDJH
A custom panel of wood or other material not
exceeding 15 lbs can be used and must follow these
guidelines:
ZLGWK´
KHLJKWEHWZHHQ´DQG´
WKLFNQHVV´WR´
For Custom Panel:
1. Measure overall height of the cabinet opening
ZKHUHWKHLFHPDFKLQHZLOOEHLQVWDOOHGIORRUWR
ERWWRPRIWKHFRXQWHUWRSHGJH
'HWHUPLQHGHVLUHGWRHNLFNKHLJKWERWWRPRIGRRU
WRWKHIORRU7KLVFDQEHHTXDOWRWKHDGMDFHQW
cabinet’s toekick height.
3. The clearance between the countertop and the top
RIWKHLFHPDFKLQHVKRXOGEHDWOHDVW´
4. Subtract the toekick height and the clearance from
the opening height to determine the height of your
custom door panel.
5. Cut the panel to the specified width and height.
6. Determine the top of the panel. Measure and mark
hole locations.
7. Drill pilot holes on the back of the panel at your
PDUNLQJV8VHDGULOOVWRSWRSUHYHQWGULOOLQJ
through the panel.
Cabinet
opening
´RUJUHDWHU
clearance
Toekick
height
´
´
´
´
´
´
´
Centerline
´
´
´
´
´
TYP
´
Installation Instructions
INSTALLATION INSTRUCTIONS

49-60745 Rev. 5 13
INSTALLING THE DOOR PANEL (Cont)
If the door swing is going to be changed please complete prior to installing the door panel. See page 11.
Depending on the door kit being installed, the door handle may need to be flipped if the door swing is being
changed. Please see instructions on page 14 on how to flip the door handle.
Attaching the Door Panel
The panel will be held on by 6 sheet metal screws and
2 machine screws.
1. Remove the gasket from the inside of the door and
retain for later use.
2. Remove any plastic covering the stainless steel
panel.
3. Place the door panel onto the outside of the door
and secure it with 2 machine screws in the left
center and right center of the door.
)DVWHQWKHSDQHOWRWKHGRRUXVLQJWKHVKHHW
metal screws. In the hinge opening area opposite
the hinge side, use the outermost screw holes only.
5. Place the covers over the hinge opening areas and
secure each cover to the door using a sheet metal
screw and washer.
6. Insert hole plug over screw installed in step 5.
7. Return the gasket to its original position.
8. Attach the door to the cabinet using the original
screws.
IMPORTANT: In some situations the door can open
too far and damage adjacent cabinets. To prevent
WKLVLQVHUWD6WRS3LQLQKDUGZDUHSDFNHWLQWRWKH
provided hole in the top and bottom hinges. Drive the
pin into the hole until the head is flush with the hinge.
9. Slide the hinge covers from the hardware packet
over each hinge.
$WWDFKWKHVLGHFRYHUVIURPWKHKDUGZDUHSDFNHW
over the hinge by peeling off the covering over the
adhesive and placing it over the side of the hinge.
Note: If the unit is being built-in a screw can be
used
to
secure the unit to the cabinet in place of installing
the side covers.
11. Return the kickplate and front service panel to
their original positions and attach to the cabinet
using the original screws.
Hinge Cover
Side Cover
Gasket
Machine
Screw
Door
Panel
8VH833(5
hole at the top
Hole Plug
Cover
8VH/2:(5
hole at the
bottom
Stop
pin
Installation Instructions
INSTALLATION INSTRUCTIONS

14 49-60745 Rev. 5
PLUMBING
The recommended water supply tubing is 1/4" OD
FRSSHU6WDLQOHVVVWHHOIOH[RUUHLQIRUFHG3&9WXEH
may also be used. Install an easily accessible shut-
off valve between the supply and the unit. This shut-
off valve should not be installed behind the unit.
NOTE: Do not use self-piercing type valves.
1. Remove the
front service
panel.
2. Route the
tubing
through the
right hole in
the back to the inlet water solenoid valve inlet.
3. Install a compression fitting on the tubing and
connect to the inlet of the solenoid.
DRAIN PUMP
Drain Installation
A drain pump is available for this ice machine. The
GUDLQSXPSNLWQXPEHULV83.DQGLVDYDLODEOHDW
GEApplianceparts.com or by calling GE
Appliances at 877.959.8688. In Canada visit
GEAppliances.ca or call
GRAVITY DRAIN
Drain Installation
NOTICE
Restrictions in the drain
system to the machine will cause water to back
up into the ice storage bin and melt the ice.
Gravity drain tubing must be vented, have no
kinks, and slope to the building drain. Air gaps
are typically required by local codes.
1. Place the ice machine in front of the installation
opening. Adjust leveling legs to the approximate
KHLJKW7KHUHDUH/HJ&DSVLQWKHKDUGZDUH
packet that can snap onto the leveling legs if
they are going to show when the unit is level.
2. Remove the front service panel and the upper
black panel.
NOTE: If the drain opening has been located in the
floor under the base pan according to the pre-install
specifications, follow steps 3-6 to drain the unit
through the base. If not, proceed to 6.
3. Remove the clamp and barbed elbow and take
off the plastic cover in the base pan below the
drain hose.
Screw
6HFXULQJ)URQW
Service Panel
Installation Instructions
INSTALLATION INSTRUCTIONS
HANDLE REVERSING INSTRUCTIONS
1. Remove the allen wrench from the panel
installation screw kit envelope
/RRVHQWKHVHWVFUHZXVLQJWKHDOOHQZUHQFK
Remove the handle and flip it around so the logo is
facing the other way.
3. Place the handle caps over the fasteners of the
door. Take care to support the handle so it doesn’t
fall and scratch the appliance finish. Make sure
both handle caps are resting on the face of the
door.
/RFNRQHHQGRIWKHKDQGOHLQWRSRVLWLRQE\
tightening the set screw in the handle cap with the
allen wrench provided. DO NOT over-tighten.
.HHSVXSSRUWLQJWKHKDQGOHDV\RXORFNWKHRWKHU
end of the handle into position by tightening the set
screw in the handle cap. DO NOT over-tighten.
LOOSEN
set screw
set screw
fastener
handle cap
set screw
set screw

49-60745 Rev. 5 15
GRAVITY DRAIN (Cont.)
4. Connect a straight 5/8" barbed connector to
the drain hose, securing with the supplied hose
clamp.
5. Cut an 8"piece of 5/8" OD x 7/8" OD tygon
FOHDUSODVWLFWXELQJ6OLGHRQHHQGRIWKHWXEH
RQWRWKHFODPS/HDYHWKHRWKHUHQGRIWKHWXEH
lying on the floor of the base pan until the unit is
positioned over the floor drain.
5RXWHWKHGUDLQWXEHHLWKHUD,QVHUWWKHGUDLQ
tube through the base pan into the floor drain
RUE5RXWHWKHGUDLQWXEHWKURXJKWKHOHIWKROH
in the lower back panel and connect to barbed
elbow and secure with a clamp.
7. Reinstall the upper back panel.
5HLQVWDOOWKHVHUYLFHDFFHVVSDQHO/HYHOWKH
unit. 7KHUHDUH/HJ&DSVLQWKHKDUGZDUHSDFNHW
that can snap onto the leveling legs if they are
going to show when the unit is level.
Water Supply
The recommended water supply tubing is 1/4" OD
FRSSHU6WDLQOHVVVWHHOIOH[RUUHLQIRUFHG3&9WXEH
may also be used. Install an easily accessible shut-
off valve between the supply and the unit. This shut-
off valve should not be installed behind the unit.
The water connection is at the back of the cabinet.
Connect using a compression fitting, one is supplied
tied to the water inlet tube at the back of the cabinet.
When built in: Coil enough tubing behind the
machine so it can be pushed into the cavity without
kinking the tubing.
Drain
Hose
Drain Hose,
Route to
building drain
Barbed
Elbow
Water Inlet
7XEHILHOG
VXSSOLHG
Installation Instructions
INSTALLATION INSTRUCTIONS
PLACEMENT OF THE ICE
MACHINE
The ice machine is supplied with a power cord.
Do not remove the grounding pin from the cord's
SOXJ'RQRWXVHH[WHQVLRQFRUGV)ROORZDOOFRGHV
Connect the machine so its own 115v, 15amp
circuit.
1. If the electrical outlet for the ice maker is behind
the unit, plug it into the unit.
2. Position the unit in the installation opening.
3. Turn on the water supply. Make sure that the
icemaker is plugged in and the power is on.
4. Slide the unit into the installation opening,
paying special attention to water supply and drain
connections. Do not kink!
5. Pour a couple of quarts of water into the ice
VWRUDJHELQRQGUDLQSXPSHTXLSSHGPDFKLQHV
the drain pump should start and water should
pump out. Check for leaks.
6. Replace the service access panel.
/HYHOWKHXQLWDVQHHGHG

16 49-60745 Rev. 5
Cleaning the Outside
The stainless steel door and door handle can be cleaned
with a commercially available stainless steel cleaner.
&OHDQHUVZLWKR[DOLFDFLGVXFKDV%DU.HHSHUV)ULHQG
Soft Cleanser™ will remove surface rust, tarnish and
small blemishes.
8VHRQO\DOLTXLGFOHDQVHUIUHHRIJULWDQGUXELQWKH
direction of the brush lines with a damp soft sponge. Do
not use appliance wax or polish on the stainless steel.
Cleaning the Condenser
The condenser has fins and tubes that can become
clogged with dirt and lint.
NOTE: Outdoor operation can lead to rapid buildup
of debris, such as leaves and other vegetation. The
condenser will need to be frequently checked for debris.
Clean it whenever the fins are obstructed.
To clean:
1. Remove the kickplate and front service panel.
2./RFDWHWKHFRQGHQVHUVXUIDFH
3.9DFXXPWKHVXUIDFHWRUHPRYHDOOGXVWGLUWDQGOLQW
NOTICE
Do not dent the fins.
4. Return the kickplate and front service panel to their
RULJLQDOSRVLWLRQV)DVWHQWKHPWRWKHFDELQHWXVLQJ
the original screws.
Condenser surface
Cleaning the Ice Storage Bin
7KHLFHVWRUDJHELQVKRXOGEHVDQLWL]HGRFFDVLRQDOO\
,WLVXVXDOO\FRQYHQLHQWWRVDQLWL]HWKHELQDIWHUWKHLFH
making system has been cleaned and the bin is empty.
$VDQLWL]LQJVROXWLRQFDQEHPDGHRIR]RIKRXVHKROG
EOHDFKDQGJDOORQVRIKRW))ZDWHU8VH
a clean cloth and wipe the interior of the ice storage bin
ZLWKWKHVDQLWL]LQJVROXWLRQ3RXUVRPHRIWKHVROXWLRQ
down the drain.
Allow to air dry.
Winterizing
1. Clean the ice making system per the instructions
above.
2. Open the door. Push the ON/OFF button to turn the
ice machine off.
3. Turn off the water supply.
4. Drain the water reservoir by removing the rubber
stopper under the reservoir. It is located near the
back wall of the ice storage bin.
5. Disconnect the incoming water line at the inlet water
valve.
6. Open the door. Push the ON/OFF button to turn the
ice machine on.
7. Blow air through the inlet water valve. A tire pump can
be used.
8. Models with a drain pump installed should have about
JDOORQRI59DQWLIUHH]HSURS\OHQHJO\FROSRXUHG
into the ice storage bin drain.
NOTE: $XWRPRWLYHDQWLIUHH]HPXVW127EHXVHG
9. Turn off and unplug the machine.
Rubber stopper
Care And Cleaning
CARE AND CLEANING

49-60745 Rev. 5 17
Removing Scale from the Ice Making System
7KH7,0(72&/($1OLJKWZLOOFRPHRQDIWHUPRQWKV
of use. It will remain on until the ice making system has
been cleaned.
You should use rubber gloves when using the scale
remover. To order scale remover, go to
GEAppliances.com or call GE Appliances at
*(&$5(6. In Canada visit
GEAppliances.ca or call . Order part
QXPEHU:;;
1. Scoop out all of the ice in the ice bin. Discard the ice
or save it in an ice chest or cooler.
2. Press and hold the ON/OFF button for 3 seconds
until the white light goes out.
3. Press and hold both the CLEAN-RESET and ON/
OFF buttons for 5 seconds. The TIME TO CLEAN
light will blink on and off.
4. 3RXUR]RILFHPDFKLQHVFDOHUHPRYHULQWRWKHLFH
machine reservoir.
5. Operate the machine for about 1/2 hour.
6. Push and release the ON/OFF switch. The machine
will begin to flush out the cleaning solution.
7. Operate the machine for another 1/2 hour.
8. Push and release the ON/OFF switch. The machine
will stop the cleaning process.
9. Pour a gallon of hot water into the bin to flush out
the drain.
10. Clean the bin liner of mineral scale by mixing some
ice machine scale remover and hot water, and using
that solution to scrub the scale off of the liner.
11. Rinse the liner with hot water.
12.6DQLWL]HWKHELQLQWHULRU
13. Replace the ice removed in step 1 if applicable.
14. Push and release the ON/OFF button to restart ice
making.
15. The ice scoop should be washed regularly and is
dishwasher safe.
Normal gourmet cubes are tapered cylinders. If the
gourmet cubes are ragged and miss-shaped, mineral
scale must be removed from the ice making system.
NOTE: The bin is insulated and not refrigerated so the
ice form will change in the storage bin as it is normal for
the ice to melt.
POWER
ON/OFF
CLEAN
RESET
TIME TO
CLEAN
CHECK
WATER
ICE
MAKING
WARNING
Ice machine scale remover contains acids. Acids
can cause burns. If concentrated cleaner comes
LQFRQWDFWZLWKVNLQÀXVKZLWKZDWHU,IVZDOORZHG
do NOT induce vomiting. Give large amounts of
ZDWHURUPLON&DOO3K\VLFLDQLPPHGLDWHO\.HHS
out of the reach of children.
Pour scale remover
Care And Cleaning (Cont.)
CARE AND CLEANING

18 49-60745 Rev. 5
Problem Possible Causes What to Do
Ice cubes are incompletely
formed
Scale on the ice making system Clean the ice making system
Low capacity Restricted drain or standing water in
the bin
Clean the air cooled condenser fins.
Clean the ice making system.
Check the drain line for kinks
No ice 6ZLWFKLV2)) Press the ON/OFF button to turn the
power on.
Electric breaker has been tripped )OLSWKHHOHFWULFEUHDNHUEDFNRQ
Water supply is low If the Check Water light is flashing
Red, the water supply is low. The
control system checks for water every
PLQXWHV:KHQWKHZDWHUVXSSO\LV
restored, the machine will automatically
reset.
Time to Clean light is on Clean the ice making system following
directions in the Care and Cleaning
section.
Noise
The ice machine is designed for quiet operation but will
make some noise during the ice making cycle. During a
IUHH]LQJF\FOHLWLVQRUPDOWRKHDUWKHIDQPRYLQJDLUDQG
the water pump circulating water. Ice hitting the bin or ice
in the bin can be heard during harvest.
Troubleshooting Tips... Before you call for service
TROUBLESHOOTING TIPS
Save time and money! Review the charts on the following pages first and you may not need to call for service.

49-60745 Rev. 5 19
Ŷ Service trips to your home to teach you how to use the
product.
Ŷ Improper installation, delivery or maintenance.
Ŷ)DLOXUHRIWKHSURGXFWLILWLVDEXVHGPLVXVHGRU
used for other than the intended purpose or used
commercially.
Ŷ Replacement of house fuses or resetting of circuit
breakers.
Ŷ Damage caused after delivery.
Ŷ Replacement of the light bulbs, if included.
Ŷ Damage to the product caused by accident, fire, floods
or acts of God.
Ŷ Incidental or consequential damage caused by
possible defects with this appliance.
Ŷ Product not accessible to provide required service.
What GE Appliances Will Not Cover:
For the Period of: GE Appliances Will Replace
One Year
)URPWKHGDWHRIWKH
original purchase
Any part of the ice machine which fails due to a defect in materials or workmanship.
During the limited one-year warranty, GE Appliances will also provide, free of charge, all labor
and related service to replace the defective part.
)LYH<HDUV
)URPWKHGDWHRIWKH
original purchase
Any part of the sealed refrigeration systemWKHFRPSUHVVRUFRQGHQVHUHYDSRUDWRUDQGDOO
FRQQHFWLQJWXELQJZKLFKIDLOVGXHWRDGHIHFWLQPDWHULDOVRUZRUNPDQVKLS
During the limited five-year sealed refrigerating system warranty, GE Appliances will also
provide, free of charge, all labor and related service to replace the defective part in the sealed
refrigerating system.
Staple your receipt here. Proof of the original purchase
date is needed to obtain service under the warranty.
GEAppliances.com
$OOZDUUDQW\VHUYLFHLVSURYLGHGE\RXU)DFWRU\6HUYLFH&HQWHUVRUDQDXWKRUL]HG&XVWRPHU&DUH
®
technician. To schedule
service online, visit us at GEAppliances.comRUFDOO*($SSOLDQFHVDW*(&$5(63OHDVHKDYH
\RXUVHULDOQXPEHUDQG\RXUPRGHOQXPEHUDYDLODEOHZKHQFDOOLQJIRUVHUYLFH,Q&DQDGDFDOO
LIMITED WARRANTY
GE Appliances Ice Machine Limited Warranty
EXCLUSION OF IMPLIED WARRANTIES
<RXUVROHDQGH[FOXVLYHUHPHG\LVSURGXFWUHSDLUDVSURYLGHGLQWKLV/LPLWHG:DUUDQW\$Q\LPSOLHGZDUUDQWLHV
including the implied warranties of merchantability or fitness for a particular purpose, are limited to one year or
the shortest period allowed by law.
For US Customers: This limited warranty is extended to the original purchaser and any succeeding owner for products
SXUFKDVHGIRUKRPHXVHZLWKLQWKH86$,IWKHSURGXFWLVORFDWHGLQDQDUHDZKHUHVHUYLFHE\D*($SSOLDQFHV$XWKRUL]HG
Servicer is not available, you may be responsible for a trip charge or you may be required to bring the product to an
$XWKRUL]HG*($SSOLDQFHV6HUYLFHORFDWLRQIRUVHUYLFH,Q$ODVNDWKHOLPLWHGZDUUDQW\H[FOXGHVWKHFRVWRIVKLSSLQJRU
service calls to your home.
Some states do not allow the exclusion or limitation of incidental or consequential damages. This warranty gives you
specific legal rights, and you may also have other rights which vary from state to state. To know what your legal rights
are, consult your local or state consumer affairs office or your state’s Attorney General.
Warrantor: GE Appliances, a Haier company
Louisville, KY 40225
For Customers in Canada: This limited warranty is extended to the original purchaser and any succeeding owner
for products purchased in Canada for home use within Canada. In-home warrant service will be provided in areas
where it is available and deemed reasonable by Mabe to provide.
Warrantor Canada: MC Commercial, Burlington, Ontario, L7R 5B6

49-60745 Rev. 5
ACCESSORIES
Accessories
Looking For Something More?
)LQLVKHGVWDLQOHVVVWHHOGRRUSDQHOVZLWKKDQGOHVDUH
available from GE Appliances for attachment to the ice
machine.The panel kits are:
=,3666WDLQOHVVVWHHOGRRUZLWK(XUR6W\OH
Handles
3,3666WDLQOHVVVWHHOGRRUZLWK3URILOH6W\OH
Handles
• CIP75S1 - Stainless steel door with Café Style
Handles
• CIP75D1 - Matte black with Café style handle
• CIP75W2 - Matte white with Café style handle
In addition we also offer the following Café handle kits:
&;;1+31%7%ODFNKDQGOH
&;;1+31=%URQ]HKDQGOH
&;;1+31&8&RSSHUKDQGOH
&;;1+31666WDLQOHVVVWHHOKDQGOH
NOTE: These kits only work with the CIP family of door
kits.
To order,
go to GEApplianceParts.com or call
877-959-8688. In Canada visit
GEAppliances.ca/en/
products/parts-filter-accessories
RUFDOO
Kickplate Extension: In some situations the leg levelers
will be extended enough to become visible. A kit to extend
the kickplate over the legs is available. That kit number is
:5;To order, go to GEApplianceParts.com
or call 877-959-8688. In Canada visit
GEAppliances.ca/en/products/parts-filter-accessories
or call .
Cabinet Stability: In some free standing installations it
may be prudent to add an anti-tip bracket that secures
the back of the cabinet to a wall. That kit number is
:5;. To order, go to GEApplianceParts.com
or call 877-959-8688. In Canada visit
GEAppliances.ca/en/products/parts-filter-accessories
or call .
Drain Conversion: A gravity drain model can be
converted to a drain pump model by installing a drain
pump kit. The drain pump kit consists of a drain pump,
wiring harness and associated tubing. The part number
is 83. To order, go to GEApplianceParts.com or call
877-959-8688. In Canada visit
GEAppliances.ca/en/products/parts-filter-accessories
or call .

49-60745 Rev. 5 21
NOTES
Notes

22 49-60745 Rev. 5
Consumer Support
CONSUMER SUPPORT
GE Appliances Website
Have a question or need assistance with your appliance? Try the GE Appliances Website 24 hours a day, any day
of the year! You can also shop for more great GE Appliances products and take advantage of all our on-line support
VHUYLFHVGHVLJQHGIRU\RXUFRQYHQLHQFH,QWKH86GEAppliances.com In Canada: GEAppliances.ca
Register Your Appliance
Register your new appliance on-line at your convenience! Timely product registration will allow for enhanced
communication and prompt service under the terms of your warranty, should the need arise. You may also mail in
the pre-printed registration card included in the packing material.
,QWKH86GEAppliances.com/register
In Canada: Prodsupport.mabe.ca/crm/Products/ProductRegistration.aspx
Schedule Service
Expert GE Appliances repair service is only one step away from your door. Get on-line and schedule your service at
\RXUFRQYHQLHQFHDQ\GD\RIWKH\HDU,QWKH86GEAppliances.com/service
RUFDOOGXULQJQRUPDOEXVLQHVVKRXUV
In Canada: GEAppliances.ca/en/support/service-requestRUFDOO
Extended Warranties
Purchase a GE Appliances extended warranty and learn about special discounts that are available while your
warranty is still in effect. You can purchase it on-line anytime. GE Appliances Services will still be there after your
ZDUUDQW\H[SLUHV,QWKH86GEAppliances.com/extended-warranty
RUFDOOGXULQJQRUPDOEXVLQHVVKRXUV
In Canada: GEAppliances.ca/en/support/purchase-extended-warrantyRUFDOO
Parts and Accessories
Individuals qualified to service their own appliances can have parts or accessories sent directly to their homes
9,6$0DVWHU&DUGDQG'LVFRYHUFDUGVDUHDFFHSWHG2UGHURQOLQHWRGD\KRXUVHYHU\GD\
,QWKH86GEApplianceparts.com or by phone at 877.959.8688 during normal business hours.
Instructions contained in this manual cover procedures to be performed by any user. Other servicing
generally should be referred to qualified service personnel. Caution must be exercised, since improper
servicing may cause unsafe operation.
Customers in Canada should consult the yellow pages for the nearest Mabe service center, visit our website at
GEAppliances.ca/en/products/parts-filters-accessoriesRUFDOO
Contact Us
If you are not satisfied with the service you receive from GE Appliances, contact us on our Website with all the
details including your phone number, or write to:
,QWKH86*HQHUDO0DQDJHU&XVWRPHU5HODWLRQV_*($SSOLDQFHV$SSOLDQFH3DUN_/RXLVYLOOH.<
GEAppliances.com/contact
,Q&DQDGD'LUHFWRU&RQVXPHU5HODWLRQV0DEH&DQDGD,QF_6XLWH)DFWRU\/DQH_0RQFWRQ1%(&0
GEAppliances.ca/en/contact-us

Inscrivez les numéros de modèle
et de série ici :
No modèle ______________
No série ________________
Ces numéros figurent sur une
étiquette dans le haut de la
doublure interne vers le devant
de l’appareil.
GE est une marque déposée de General Electric Company. Fabriqué sous licence de marque.
MANUEL D’UTILISATION
ET INSTRUCTIONS
D’INSTALLATION
MACHINE À GLAÇONS
49-60745 Rev. 5 03-19 GEA
UCC15
INFORMATION DE SÉCURITÉ ...3
UTILISANT LA MACHINE
À GLAÇONS
Déballage .............................5
Commandes ..........................5
Fonctions .............................6
Démarrage de la machine à glaçons ......6
INSTALLATION INSTRUCTIONS
Mise à la terre de la machine à glaçons . . .7
Avant de commencer ..................7
Emplacement et préparation ............7
Planification préalable ..................9
Dimensions ..........................10
L’ouverture de porte .................. 11
Panneau de porte .....................12
Instructions relatives à l’inversion
de la poignée ........................14
Plomberie ...........................14
Placez la machine à glaçons ............15
ENTRETIEN ET NETTOYAGE ...16
CONSEILS DE DÉPANNAGE ....18
GARANTIE LIMITÉE .............19
ACCESSOIRES .................. 20
SERVICE À LA CLIENTÈLE .... 24

2 49-60745 Rev. 5
NOUS VOUS REMERCIONS D’ACCUEILLIR GE APPLIANCES CHEZ VOUS
Que vous ayez grandi avec GE Appliances ou qu’il s’agisse de votre première acquisition, nous
sommes heureux de vous accueillir dans notre famille.
Nous sommes fiers du savoir-faire, de l’innovation et de l’esthétique qui composent chaque appareil
GE Appliances, et nous pensons que vous le serez aussi. Dans cette optique, nous vous rappelons
que l’enregistrement de votre électroménager vous assure la communication de renseignements
importants sur le produit et la garantie lorsque vous en avez besoin.
Enregistrez votre électroménager GE en ligne dès maintenant. Des sites Web et des numéros de
téléphone utiles figurent dans la section Soutien au consommateur de ce manuel d’utilisation. Vous
pouvez aussi poster la fiche de garantie pré-imprimée incluse dans l’emballage.

49-60745 Rev. 5 3
ATTENTION
A fin de réduire le risque de blessure lors de l’utilisation de l’appareil, observez ces mesures de
sécurité élémentaires.
Ŷ *DUGH]OHVGRLJWVjO¶pFDUWGHVHQGURLWVRLOVULVTXHQW
d’être écrasés; les espaces entre les porte, et entre les
porte et les placard sont toujours étroits. Soyez prudent
lorsque vous fermez les porte en présence d’enfants.
Ŷ eYLWH]OHFRQWDFWDYHFOHVSLqFHVPRELOHVGXPpFDQLVPH
d’éjection, ou de l’élément chauffant qui produit les cubes.
Ne placez ni les doigts ni les mains sur le mécanisme
DXWRPDWLTXHGHSURGXFWLRQGHJODFHORUVTXHODPDFKLQHj
glaçons est branchée.
INFORMATION DE SÉCURITÉ
LIRE ET CONSERVER CES INSTRUCTIONS
AVERTISSEMENT
$¿QGHUpGXLUHOHULVTXHG¶LQFHQGLHG¶H[SORVLRQGHFKRFpOHFWULTXHRXGHEOHVVXUHORUV
GHO¶XWLOLVDWLRQGHYRWUHPDFKLQHjJODoRQVREVHUYH]FHVPHVXUHVGHVpFXULWpVXLYDQWHV
Ŷ &HPDFKLQHjJODoRQVGRLWrWUHFRUUHFWHPHQWLQVWDOOp
conformément aux Consignes d’Installation avant toute
utilisation.
Ŷ 'pEUDQFKH]OHDSSDUHLODYDQWG¶HIIHFWXHUXQHUpSDUDWLRQGH
remplacer une ampoule ou de le nettoyer.
REMARQUE : L’alimentation du réfrigérateur ne peut être
déconnectée par aucune des fonctions sur le panneau de
commande.
REMARQUE : Les réparations doivent être effectuées par
un professionnel qualifié.
Ŷ 5HPHWWH]WRXWHVOHVSLqFHVHWSDQQHDX[HQSODFHDYDQW
d’utiliser l’appareil.
Ŷ 1HVWRFNH]SDVRXQ¶XWLOLVH]SDVG¶HVVHQFHRXG¶DXWUHV
YDSHXUVHWOLTXLGHVLQIODPPDEOHVjSUR[LPLWpGHFHWDSSDUHLO
ou de tout autre appareil électroménager.
Ŷ 1RXVGpFRQVHLOORQVIRUWHPHQWO¶XWLOLVDWLRQG¶XQHUDOORQJH
jFDXVHGHVULVTXHVSRWHQWLHOVGDQVFHUWDLQHVFRQGLWLRQV
Cependant, si l’utilisation d’un cordon prolongateur est
nécessaire, ce dernier doit obligatoirement être homologué
8/DX[86$RX&6$DX&DQDGDjWURLVEULQVDYHF
PLVHjODWHUUHSRXUDSSDUHLOpOHFWURPpQDJHUHWGRLWrWUH
équipé d’une fiche et d’une prise femelle avec terre. Les
caractéristiques électriques du cordon prolongateur doivent
être de 15 ampères (minimum) et de 120 volts.
Ŷ $ILQGHSUpYHQLUOHULVTXHG¶DVSK\[LHHWG¶HQIHUPHPHQWGHV
enfants, enlevez la porte de tout appareil avant de le mettre
au rebut et d’en cesser l’utilisation.
Ŷ 1HODLVVH]SDVOHVHQIDQWVJULPSHUVHWHQLURXV¶DFFURFKHU
sur la poignée de porte de l’appareil. Ils pourraient se
blesser gravement.
Ŷ /HSURGXLWDQWLWDUWUHSRXUPDFKLQHjJODoRQVFRQWLHQW
des acides qui peuvent causer des brûlures.En cas
d’éclaboussement du produit concentré sur la peau,
ULQFH]jO¶HDX(QFDVG¶LQJHVWLRQQHSURYRTXH]3$6GH
vomissement. Faites boire de grandes quantités d’eau ou
GHODLW$SSHOH]XQPpGHFLQLPPpGLDWHPHQW*DUGH]j
l’écart des enfants.
INSTRUCTIONS IMPORTANTES DE SÉCURITÉ
LISEZ TOUTES LES INSTRUCTIONS AVANT UTILISANT LA MACHINE À GLAÇONS
INSTALLATION
AVERTISSEMENT
RISQUE D’EXPLOSION
&RQVHUYH]OHVPDWpULDX[HWYDSHXUVLQIODPPDEOHVWHOVTXHO¶HVVHQFHjO¶pFDUWGHYRWUHDSSDUHLO8QHH[SORVLRQXQLQFHQGLH
voire la mort pourrait en résulter.

4 49-60745 Rev. 5
AVERTISSEMENT
UN ENFANT RISQUE DE SUFFOQUER OU D’Y ÊTRE EMPRISONNÉ
Enlevez la porte de l’appareil avant de le mettre au rebut. Le non-respect de cette recommandation peut entraîner
l’enfermement d’un enfant qui peut entraîner la mort ou des lésions cérébrales.
IMPORTANT: Les enfants pris au piège ou morts d’asphyxie
sont toujours d’actualité. Les appareils jetés ou abandonnés
restent dangereux même si vous ne les laissez au rebut que
pour « quelques jours ». Si vous voulez jeter votre ancien
appareil, suivez les instructions suivantes pour empêcher les
accidents.
Avant de jeter votre ancien appareil:
Ŷ Enlevez les portes.
Ŷ Laissez les composants internes en place afin que les
enfants ne puissent s’y introduire facilement.
Fluides frigorigènes
Les appareils réfrigérants contiennent des fluides frigorigènes
TXLFRQIRUPpPHQWjODOpJLVODWLRQIpGpUDOHGRLYHQWrWUHUHWLUpV
avant la mise au rebut de l’appareil. Si vous mettez au rebut
un ancien réfrigérateur contenant des fluides frigorigènes,
YpULILH]ODSURFpGXUHjVXLYUHDXSUqVGHODFRPSDJQLH
responsable de l’élimination.
MISE AU REBUT APPROPRIÉE DE VOTRE ANCIEN APPAREIL
Ne coupez pas ou n’enlevez pas, sous aucun prétexte, la troisième broche de mise à la terre du cordon
d’alimentation. Pour des raisons de sécurité, cet appareil doit être correctement mis à la terre.
Le cordon d’alimentation de cet appareil est équipé d’une
ILFKHjWURLVEURFKHVSRXUXQHPLVHjODWHUUHTXLV¶DGDSWHj
ODSULVHGHFRXUDQWVWDQGDUGjEURFKHVSRXUXQHPLVHjOD
terre) pour minimiser les risques de chocs électriques par cet
appareil.
Faites vérifier la prise murale et le circuit électrique par
un électricien qualifié pour s’assurer que le système est
FRUUHFWHPHQWPLVjODWHUUH
Dans le cas d’une prise biphasée, l’installateur a la
responsabilité et l’obligation de la remplacer par une prise
WULSKDVpHFRUUHFWHPHQWPLVHjODWHUUH1¶XWLOLVH]SDV
d’adaptateur.
/DPDFKLQHjJODoRQVGRLWWRXMRXUVrWUHEUDQFKpHGDQV
son propre circuit de 115 volts, 60 Hz, 15 ampères. Cette
précaution procure le meilleur rendement et prévient aussi
la surcharge des circuits électriques du domicile qui peuvent
poser un risque d’incendie par surchauffe des fils.
1HGpEUDQFKH]MDPDLVODPDFKLQHjJODoRQVHQWLUDQWVXU
OHFRUGRQpOHFWULTXH3UHQH]WRXMRXUVIHUPHPHQWODILFKHHQ
main et tirez pour la sortir de la prise.
5pSDUH]RXUHPSODFH]LPPpGLDWHPHQWWRXWFRUGRQpOHFWULTXH
usé ou endommagé. N’utilisez pas un cordon fissuré ou
présentant des dommages dus aux frottements soit sur sa
longueur ou aux extrémités.
/RUVGXGpSODFHPHQWGHODPDFKLQHjJODoRQVYHLOOH]j
QHSDVURXOHUVXUOHFRUGRQpOHFWULTXHQLjO¶HQGRPPDJHU
autrement.
PROTÉGER DU GEL :'HVGRPPDJHVVpYqUHVjO¶DSSDUHLO
VXUYLHQGURQWV¶LOHVWVRXPLVjGHVWHPSpUDWXUHVLQWHUQHV
ou ambiantes qui excèdent les limites spécifiées dans ce
PDQXHO&HW\SHGHGRPPDJHQHVHUD3$6FRXYHUWSDUOD
garantie.
GARDER AU SEC : Ne placez pas l’appareil dans des
GpSUHVVLRQVRGHVIODTXHVSHXYHQWVHIRUPHU
PROTÉGER DU SOLEIL : La chaleur des rayons du soleil
UpGXLWODFDSDFLWpGHO¶DSSDUHLOjSURGXLUHHWHPPDJDVLQHU
de la glace, et les radiations ultraviolettes du soleil peuvent
endommager ses composants en plastique.
ALIMENTATION D’EAU : eYLWH]O¶H[SRVLWLRQDXVROHLOGH
longues sections de tuyau. Les tuyaux d’eau en plastique
doivent être conçus pour l’eau potable et comporter une
protection contre les rayons ultraviolets. Nous recommandons
l’usage de tuyaux en cuivre.
PRÉVENTION DES RETOURS D’EAU : L’appareil est doté
d’un dispositif de prévention des retours d’eau, aucun clapet
antiretour n’est requis.
VIDANGE : 1(9,'$1*(=3$6O¶HDXGHO¶DSSDUHLOGDQVXQH
piscine ni sur le sol.
BRANCHEMENTS ÉLECTRIQUES
AVIS CONCERNANT L’UTILISATION À L’EXTÉRIEUR
AVERTISSEMENT
RISQUE DE CHOC ÉLECTRIQUE
Branchez l’appareil dans une prise triple avec terre.
Ne retirez pas la broche de terre.
N’utilisez pas d’adaptateur.
Le non-respect de ces instructions peut entraîner des risques d’incendies, des chocs électriques ou la mort.
INFORMATION DE SÉCURITÉ
LIRE ET CONSERVER CES INSTRUCTIONS
INSTRUCTIONS IMPORTANTES DE SÉCURITÉ
LISEZ TOUTES LES INSTRUCTIONS AVANT UTILISANT LA MACHINE À GLAÇONS

49-60745 Rev. 5 5
Retirer l'emballage
IMPORTANT: N’enlevez aucune étiquette d’instructions
SHUPDQHQWHjO¶LQWpULHXUGHODPDFKLQHjJODoRQVQLILFKH
technique fixée derrière le panneau d’accès inférieur.
Ŷ5HWLUH]OHUXEDQDGKpVLIHWWRXWHpWLTXHWWHGHYRWUHPDFKLQH
jJODoRQVDYDQWO¶XWLOLVDWLRQVDXIO¶pWLTXHWWHGHVQXPpURVGH
modèle et de série).
3RXUHQOHYHUOHVUpVLGXVG¶DGKpVLIRXGHFROOHTXLVXEVLVWHQW
frottez la zone vigoureusement avec votre pouce. On peut
aussi faire partir aisément les résidus d’adhésif ou de colle
HQIURWWDQWDYHFOHVGRLJWVHWXQHSHWLWHTXDQWLWpGHVDYRQj
YDLVVHOOHOLTXLGH(VVX\H]jO¶HDXFKDXGHHWVpFKH]
Ŷ1¶XWLOLVH]SDVG¶LQVWUXPHQWVFRXSDQWVGHO¶DOFRROjIULFWLRQ
des fluides inflammables ni des nettoyants abrasifs
pour enlever l’adhésif ou la colle. Ces produits peuvent
HQGRPPDJHUODVXUIDFHGHODPDFKLQHjJODoRQV3RXUSOXV
d’informations, voir Consignes de sécurité importantes.
1. POWER ON/OFF -3UHVVWRWXUQWKHLFHPDFKLQHRQRURII
2. ICE MAKING (Production de glace) - Brille en blanc lorsque l’appareil est allumé.
3. CHECK WATER (Vérifier l’eau) - Brille en rouge lorsque la machine n’est plus alimentée en eau.
4. TIME TO CLEAN (Nettoyage requis) - Brille en jaune lorsqu’il est temps de nettoyer la machine. Ce voyant s’allumera au bout
GHPRLVG¶XWLOLVDWLRQ,OGHPHXUHUDDOOXPpMXVTX¶jFHTXHOHV\VWqPHGHODPDFKLQHj
glaçons soit nettoyé suivant la procédure décrite dans la section Entretien et nettoyage.
5. CLEAN RESET (Processus de nettoyage)3UHVVH]VLPXOWDQpPHQWFHERXWRQHWOHERXWRQ3RZHUGXUDQWVHFRQGHVSRXU
démarrer le processus de nettoyage (voir Entretien et nettoyage).
POWER
ON/OFF
CLEAN
RESET
TIME TO
CLEAN
CHECK
WATER
ICE
MAKING
Déballage
UTILISANT LA MACHINE À GLAÇONS: Déballage/ Commandes
1 2 3 4 5
Commandes

6 49-60745 Rev. 5
3HOOHjJODoRQV
Coup-de-pied
3DQQHDXGH
commande
Zone de production
de la glace
3DQQHDXGHVHUYLFHIURQWDO
Démarrage initial
1. Ouvrez l’alimentation d’eau.
2. Mettez l’appareil sous tension.
3UHVVH]HWUHOkFKH]O¶LQWHUUXSWHXU212))SRXUGpPDUUHU
O¶DSSDUHLO/HYR\DQW,&(0$.,1*3URGXFWLRQGHJODFHj
côté de l’interrupteur ON/OFF brillera en blanc.
/¶HDXFRPPHQFHUDjFLUFXOHUGDQVO¶DSSDUHLO8QHIRLVOH
UpVHUYRLUSOHLQO¶HDXFRPPHQFHjVHYLGDQJHUGHODPDFKLQH
$XERXWGHTXHOTXHVPLQXWHVOHFRPSUHVVHXUODSRPSHj
HDXHWOHPRWHXUGXYHQWLODWHXUFRPPHQFHQWjIRQFWLRQQHU
indiquant le lancement du premier cycle de production de
glace.
Aucun ajustement n’est nécessaire.
Au bout d’environ 30 minutes, la glace tombe dans le bac de
FRQVHUYDWLRQ/DPDFKLQHSURGXLWSpSLWHVjODIRLV,OHVW
normal que les premiers lots de glace fondent alors que le
EDFQ¶HVWSDVFRPSOqWHPHQWUHIURLGL,OIDXWjKHXUHVGH
fonctionnement pour remplir le bac. La machine s’arrête une fois
que le bac est plein et redémarre lorsque le niveau baisse, suite
jODFRQVRPPDWLRQRXjODIRQWHQRUPDOH
Jeter le premier lot de glace.
&HWWHPDFKLQHDVSLUHO¶DLUjWHPSpUDWXUHDPELDQWHGHSXLVVD
face frontale inférieure droite et expulse l’air chaud depuis sa
face frontale inférieure gauche. La restriction de la circulation
d’air ou l’utilisation de la machine dans un environnement très
chaud ou froid aura un effet négatif sur la production de glace.
Lorsque la porte est ouverte, le panneau de commande, la zone
de production de glace et le bac de conservation de la glace
VRQWYLVLEOHV/DSHOOHjJODFHHVWVLWXpHGDQVXQVXSSRUWOHORQJ
de la paroi du côté droit.
,OV¶DJLWG¶XQPRGqOHjYLGDQJHSDUJUDYLWpTXLGRLWrWUHUDFFRUGp
DXGUDLQGXEkWLPHQWVRXVOHQLYHDXGXWXEHGHYLGDQJHj
l’arrière de l’armoire. Une pompe peut être installée qui peut
IRUFHUO¶HDXGHYLGDQJHjPRQWHUXQPD[LPXPGHPqWUHV
SLSHUPHWWDQWGHVLWXHUODPDFKLQHOjRXQHYLGDQJHSDU
gravité n’est pas disponible. Voir la section Accessoires de la
page 20 pour plus d’informations sur la pompe de vidange.
Warm Air Out
$LU,QWDNH
Démarrage de la machine à glaçons
Fonctions
UTILISANT LA MACHINE À GLAÇONS:
)RQFWLRQV'pPDUUDJHGHODPDFKLQHjglaçons

49-60745 Rev. 5 7
MISE À LA TERRE DE LA MACHINE À
GLAÇONS
AVERTISSEMENT
Risque de choc
électrique.
Le non-respect de ces instructions peut entraîner des
risques d’incendies, des chocs électriques ou la mort.
Le cordon d’alimentation de cet appareil est équipé d’une
ILFKHjWURLVEURFKHVSRXUXQHPLVHjODWHUUHTXLV¶DGDSWH
jODSULVHGHFRXUDQWVWDQGDUGjEURFKHVSRXUXQHPLVHj
la terre) pour minimiser les risques de chocs électriques par
cet appareil.
Faites vérifier la prise murale et le circuit électrique par
un électricien qualifié pour s’assurer que le système est
FRUUHFWHPHQWPLVjODWHUUH
Dans le cas d’une prise biphasée, l’installateur a la
responsabilité et l’obligation de la remplacer par une prise
WULSKDVpHFRUUHFWHPHQWPLVHjODWHUUH
1(&283(=3$6281¶(1/(9(=3$66286$8&81
35e7(;7(/$752,6,Ê0(%52&+('(0,6(¬/$
7(55('8&25'21'¶$/,0(17$7,21
1¶87,/,6(=3$681(),&+('¶$'$37$7,213285
%5$1&+(5/¶$33$5(,/'$1681(35,6(¬'(8;
)(17(6
1¶87,/,6(=3$681(5$//21*($9(&&(7$33$5(,/
EMPLACEMENT ET PRÉPARATION
DE LA MACHINE À GLAÇONS
&HWWHPDFKLQHjJODoRQVHVWGHVWLQpHjXQXVDJHj
O¶LQWpULHXUGDQVXQHQYLURQQHPHQWFRQWU{OpRXjO¶H[WpULHXU
dans certaines limites.
(OOHHVWFRQVWLWXpHGHGHX[V\VWqPHVSULQFLSDX[OH
système de production de la glace et le système de
conservation de la glace. Le système de production produit
de la glace en continu lorsque le niveau de glace est faible
et il s’arrête lorsque plein.
Le système de conservation de la glace consiste en une
caisse isolée dont le fond comporte un drain pour évacuer la
glace fondue. Il n’est pas réfrigéré car le bac contient de la
glace fraîche.
IMPORTANT: Le bac de conservation ne doit contenir rien
d’autre que de la glace. Des objets tels que des bouteilles
de vin ou de bière ne sont pas seulement insalubres, mais
leurs étiquettes peuvent se détacher et obstruer le drain.
IMPORTANT: Ne laissez jamais la machine fonctionner
sans la nettoyer régulièrement. Celle-ci durera plus
longtemps si elle est tenue propre. Un nettoyage régulier
devrait être effectué au moins une fois l’an, préférablement
deux. Certaines conditions de l’eau pourront nécessiter
le nettoyage plus fréquent de la section de production de
glace, et du condensateur en présence de certains tapis ou
animaux domestiques.
Spécifications
/DPDFKLQHjJODoRQVIRQFWLRQQHUDDGpTXDWHPHQWGDQV
les limites de température spécifiées mais elle procure son
meilleur rendement entre 70 °F et 80 °F.
7HPSpUDWXUHG¶HDXPLQLPDOH)&
7HPSpUDWXUHG¶HDXPD[LPDOH)&
/DWHPSpUDWXUHPLQLPDOHGHOHDX)&
/DWHPSpUDWXUHPD[LPDOHGHOHDX)&
3UHVVLRQG¶HDXPLQLPDOHSVLEDU
3UHVVLRQG¶HDXPD[LPDOHSVLEDU
Limites de tension
9RLUODSODTXHVLJQDOpWLTXHjO¶LQWpULHXUGHODPDFKLQHj
glaçons.
Si vous avez des questions, appelez le 1.800.561.3344 RXYLVLWH]QRWUHVLWH:HEjO¶DGUHVVH
electromenagersge.ca
INSTRUCTIONS D’INSTALLATION
Instructions
d’installation
MACHINE À GLAÇONS
AVANT DE COMMENCER
Lisez ces instructions complètement et attentivement.
• IMPORTANT — 5HVSHFWH]WRXVOHVFRGHVHW
règlements officiels. Conservez ces instructions pour
utilisation éventuelle par un inspecteur local.
• Note à l’installateur – Assurez-vous de laisser ces
instructions au consommateur.
• Note au consommateur – Conservez ces instructions
pour référence future.
• Niveau de connaissances – L’installation de cet
appareil requiert des connaissances de base en
mécanique.
• Temps requis – IL’installation peut varie
,QVWDOODWLRQGHODFRQGXLWHG¶HDXPLQXWHV
• L’installateur est responsable de l’installation correcte
7RXWHSDQQHGHFHWDSSDUHLOFDXVpHSDUXQHLQVWDOODWLRQ
inadéquate n’est pas couverte par la garantie.

8 49-60745 Rev. 5
EMPLACEMENT ET PRÉPARATION DE LA MACHINE À GLAÇONS (SUITE)
Qualité de l’eau
7RXWHHDX\FRPSULVFHOOHIRXUQLHSDUOHVPXQLFLSDOLWpV
contient des impuretés ou des minéraux. L’eau absorbe les
impuretés de l’air lorsqu’elle tombe en pluie ou circule dans
le sol. Certaines impuretés sont des matières solides en
suspension qui peuvent être capturées par des filtres fins.
D’autres impuretés, les matières dissoutes, ne peuvent pas
être filtrées car elles sont liées chimiquement aux molécules
d’eau.
La glace produite par cette machine aura une teneur en
PLQpUDX[SOXVIDLEOHTXHO¶HDXTXLDVHUYLjODIDEULTXHU&HOD
HVWSRVVLEOHJUkFHjODPpWKRGHGHSURGXFWLRQGHODJODFH
Une eau plus pure gèlera en premier dans les moules de
glaçons, car toute matière dissoute dans l’eau abaisse la
température de congélation. Cela fait en sorte de concentrer
la plupart des impuretés dans le réservoir d’eau de la machine
RHOOHIRUPHQWOHWDUWUH/DPDFKLQHGLOXHODFRQFHQWUDWLRQ
des minéraux en faisant déborder le réservoir durant le cycle
de production (l’eau en excès est vidangée dans le drain).
L’utilisation de l’eau varie en fonction de la température de
l’air et de l’eau. Entre 1 litre et 2 litres d’eau circule dans
O¶DSSDUHLOORUVGHFKDTXHF\FOH(QWUHHWOLWUHVHUWj
rincer le réservoir pour être vidangé ensuite.
Cependant, certaines impuretés passent dans le système
et adhèrent aux pièces de la machine causant ainsi
ODGpIRUPDWLRQGHVSpSLWHVGHJODFHeYHQWXHOOHPHQW
l’accumulation du tartre pourra abréger la longévité de la
machine.
3RXUJDUDQWLUOHIRQFWLRQQHPHQWDGpTXDWGHODPDFKLQHOHV
impuretés ou les minéraux devront être dissous régulièrement
au moyen de nettoyant acide. Consultez la section Entretien
et nettoyage pour connaître la façon de procéder.
Filtres et traitement
En général, il est toujours judicieux de filtrer l’eau. Un filtre
jHDXDSSURSULpSHXWpOLPLQHUOHVJRWVHWOHVRGHXUVGH
même que les particules. Nous recommandons d’utiliser
XQILOWUHjHDX*($SSOLDQFHVWHOTXHOHPRGqOH*;5/4
sur votre conduite d’admission d’eau. Veuillez visiter le site
electromenagersge.ca pour lire les instructions d’installation
HWGpWHUPLQHUOHILOWUHTXLFRQYLHQWjYRWUHVLWXDWLRQ'¶DXWUHV
méthodes existent pour traiter les matières dissoutes telles
que l’osmose inverse et le traitement aux polyphosphates.
Eau traitée par osmose inverse
Cette machine peut recevoir de l’eau traitée par osmose
LQYHUVHjFRQGLWLRQTXHVDFRQGXFWLYLWpVRLWG¶DXPRLQV
microSiemens/cm. Un système d’osmose inverse doit inclure
un posttraitement pour réduire l’agressivité de l’eau générée
par cette méthode. L’eau désionisée n’est pas recommandée.
eWDQWGRQQpTXHOHVDGRXFLVVHXUVG¶HDXpFKDQJHQWXQ
minéral pour un autre, la qualité de l’eau résultante n’est pas
QpFHVVDLUHPHQWDPpOLRUpHGDQVODPDFKLQHjJODoRQV6L
l’eau est très dure, une eau adoucie peut générer une glace
blanche et spongieuse qui agglutine les glaçons.
En cas de doute concernant la qualité de l’eau, communiquez
avec un spécialiste qui pourra recommander un traitement.
Résumé de l’installation
/DPDFKLQHjJODoRQVGRLW
rWUHUDFFRUGpHjXQHDOLPHQWDWLRQG¶HDXIURLGHSRWDEOH
rWUHUDFFRUGpHjXQGUDLQ
- permettre la circulation d’air par les évents sur sa face
frontale.
- be able to circulate air through the vents at the front.
REMARQUE : La porte ne doit pas être renfoncée dans le
cas d’une installation encastrée.
Instructions d’installation
INSTRUCTIONS D’INSTALLATION

49-60745 Rev. 5 9
PLANIFICATION PRÉALABLE
ATTENTION
En raison du poids important, DEUX
PERSONNES SONT NÉCESSAIRES POUR DÉPLACER ET
INSTALLER cette machine à glaçons. L’omission d’agir
ainsi peut causer des blessures, notamment au dos.
Dimensions du produits et des découpes
Notes d’installation
8QHSRPSHGHYLGDQJHHVWRIIHUWHSRXUFHWWHPDFKLQHj
glaçons. On peut se procurer l’ensemble de pompe de
YLGDQJHQXPpUR83.VXUOHVLWHwww.GEApplianceparts.
com ou en composant le 877-959-8688. Au Canada, visitez
le site GEAppliances.ca ou composez le 800.661.1616.
,QVWDOODWLRQLQWpJUpH6LXQSODQFKHUGHILQLWLRQGRLWrWUHSRVp
GDQVOD]RQHRODPDFKLQHjJODoRQVVHUDLQVWDOOpHXQ
calage de l’épaisseur du plancher doit être prévu pour garder
la machine au niveau du plancher.
REMARQUE : Le raccordement d’eau s’effectue à
l’arrière et ajoute quelques centimètres à la profondeur
de l’armoire.
Installation sur dalle : Vous devez installer une pompe de
vidange sur l’appareil et pomper l’eau jusqu’au drain. Voir
la section Accessoires. La pompe pourra pomper sur une
hauteur d’un étage (3 m / 10 pi).
Installation au-dessus d’un vide sanitaire ou d’un sous-
sol : Il faut utiliser soit un drain par gravité, soit une pompe.
3RXUODSRPSHYRLUODVHFWLRQ$FFHVVRLUHV6LO¶HVSDFH
derrière la machine est insuffisant pour un orifice de vidange,
le drain devra se situer sous le plancher.
REMARQUE : Lorsque installée dans un coin, l’ouverture de
porte peut être limitée en raison du contact de la poignée sur
le mur ou la face de l’armoire.
Une alimentation d’eau est requise. Celle-ci peut varier
en contenu minéral. Une haute teneur en minéraux peut
augmenter la fréquence des entretiens. La filtration de l’eau
peut améliorer le goût de la glace et réduire l’accumulation
minérale.
Instructions d’installation
INSTRUCTIONS D’INSTALLATION

10 49-60745 Rev. 5
14-7/8 PO
ENTRÉE D’AIR
SORTIE D’AIR
FAÇADE DE PORTE EN TÔLE 0,75 PO
PORTE D’ARMOIRE MIN. 0,63 PO
29-7/8 PO
33-7/8 PO
22 PO
2-3/4 PO
4-3/8 PO
3-3/4 PO
1-1/2 PO
2-1/2
PO
3-1/4 PO
7-3/8 PO
RACCORD DE COMPRESSION 1/4 PO
POUR ENTRÉE D’EAU POTABLE
3-7/8 PO
2
0-3/8 PO
TROU D’ACCÈS AU DRAIN DE PLANCHER
AJUSTEMENT DE PIED 1 PO
4 ENDROITS
CORDON
ÉLECTRIQUE 115 V
ACCÈS AU DRAIN – TUYAU
FLEXIBLE 5/8 PO D.I. X 7/8 PO D.E.
DIMENSIONS
Instructions d’installation
INSTRUCTIONS D’INSTALLATION

49-60745 Rev. 5 11
DIRECTION DE L’OUVERTURE DE PORTE
La pose des charnières peut se faire d’un côté ou l’autre
SRXUSHUPHWWUHO¶RXYHUWXUHGHODSRUWHjGURLWHRXjJDXFKH
Décidez du côté de l’ouverture AVANT de fixer le panneau
de porte.
3RXUFKDQJHUGHF{Wp
2XYUH]ODSRUWH(QOHYH]OHVYLVHQDFLHULQR[\GDEOHj
l’opposé du côté charnière sur le devant de l’armoire.
(QOHYH]ODYLVVLWXpHODSOXVjO¶LQWpULHXUTXLIL[HOD
FKDUQLqUHjO¶DUPRLUH'HVVHUUH]O¶DXWUHYLV
3. Glissez la porte vers le côté de façon que la fente en trou
de serrure de la charnière dégage la vis, puis retirez la
porte de l’armoire.
4. Enlevez les vis qui ont été desserrées et conservez-les.
3RVH]OHVYLVHQDFLHULQR[\GDEOHHQOHYpHVjO¶pWDSH
dans les trous de l’armoire devenus libres par le retrait de
la charnière.
5. Enlevez le capuchon de trou et les couvercles de
charnière (s’il y a lieu).
6. Enlevez les capuchons de trou ou les vis au nouvel
emplacement de la charnière (s’il y a lieu). Mettez-les de
côté.
3RVH]OHVYLVGHFKDUQLqUHHQOHYpHVORUVGXUHWUDLWGH
ODSRUWHGHO¶DUPRLUHGDQVOHVWURXVOHVSOXVjO¶H[WpULHXU
sur le nouveau côté charnière de l’armoire. Vissez-les
MXVTX¶jPLFRXUVHHQYLURQ
8. Enlevez la charnière supérieure de la porte et déplacez-
ODVXUOHF{WpRSSRVpSRVLWLRQLQIpULHXUH)L[H]ODjO¶DLGH
des vis d’origine.
REMARQUE : Si le panneau de porte est fixé, il doit être
enlevé pour l’accès aux vis de charnière et pour inverser
la position de la poignée.
9. Enlevez la charnière inférieure d’origine et déplacez-la
jO¶HPSODFHPHQWRSSRVpSRVLWLRQVXSpULHXUH)L[H]ODj
l’aide des vis d’origine.
IMPORTANT : Si vous installez un panneau de porte en
DFLHULQR[\GDEOHRXXQSDQQHDXSHUVRQQDOLVpVDXWH]j
ODVHFWLRQ,167$//$7,21'83$11($8'(3257(
3RVH]OHVFRXYHUFOHVGHFKDUQLqUHHWOHVFDSXFKRQVGH
trou sur la porte.
3RVH]ODIHQWHHQWURXGHVHUUXUHVXUODFKDUQLqUH
DXGHVVXVGHODYLVODSOXVjO¶H[WpULHXUGDQVOHKDXWHW
dans le bas, puis glissez la porte sur l’armoire.
)L[H]ODSRUWHVXUO¶DUPRLUHjO¶DLGHGHVYLVG¶RULJLQH
Serrez les 4 vis.
IMPORTANT : Dans certaines situations, la porte
peut s’ouvrir trop largement et ainsi endommager
OHVDUPRLUHVDGMDFHQWHV3RXUO¶HPSrFKHULQVpUH]
une butée d’arrêt (trousse de quincaillerie) dans le
trou existant des charnières supérieure et inférieure.
(QIRQFH]ODEXWpHGDQVOHWURXMXVTX¶jFHTXHVDWrWH
VRLWjpJDOLWpDYHFODFKDUQLqUH
13. Glissez les couvercles de charnière (trousse de
quincaillerie) sur chaque charnière.
14 Fixez les couvercles latéraux (trousse de quincaillerie)
sur les côtés des charnières en retirant la pellicule de
l’adhésif.
REMARQUE : On peut se passer de couvercles latéraux
dans le cas d’une installation intégrée, l’appareil étant
IL[pjO¶DUPRLUHSDUXQHYLV
Capuchon
de trou
Hinge Opening Cover
Enlever
Desserrer
Butée d’arrêt
Couvercle
de chanière
Couvercle
latéral
Instructions d’installation
INSTRUCTIONS D’INSTALLATION

12 49-60745 Rev. 5
INSTALLATION DU PANNEAU DE PORTE
/DPDFKLQHjJODoRQVHVWOLYUpHVDQVUHFRXYUHPHQWGHSRUWH
conventionnel, permettant ainsi la fixation d’un panneau en
ou d’un panneau personnalisé.
REMARQUE : Si la direction d’ouverture de la porte doit être
changée, il faut procéder AVANT de fixer le panneau de
porte.
Panneau de porte
Des panneaux de porte avec poignée sont offerts par GE
$SSOLDQFHVSRXUIL[DWLRQVXUODPDFKLQHjJODoRQV9RLUOD
section AccessoiresjODSDJH
Un panneau personnalisé en bois ou une autre matière
Q¶H[FpGDQWSDVNJOESHXWrWUHXWLOLVpHQUHVSHFWDQW
OHVGLPHQVLRQVVXLYDQWHV
/DUJHXUSR
+DXWHXUHQWUHHWSR
eSDLVVHXUjôSR
Panneau personnalisé :
0HVXUH]ODKDXWHXUWRWDOHGHO¶RXYHUWXUHGHO¶DUPRLUHR
ODPDFKLQHjJODoRQVVHUDLQVWDOOpHSODQFKHUMXVTX¶DX
bas du bord du comptoire de cuisine).
2. Déterminez la hauteur du coup-de-pied (bas de la porte
MXVTX¶DXSODQFKHU(OOHSHXWrWUHpJDOHjODKDXWHXUGX
coup-de-pied de l’armoire adjacente.
3. Le dégagement entre le comptoir et le dessus de la
PDFKLQHjJODoRQVGRLWrWUHG¶DXPRLQVSR
4. Soustrayez la hauteur du coup-de-pied et le dégagement,
de la hauteur de l’ouverture pour déterminer la hauteur
de votre panneau de porte personnalisé.
&RXSHUOHSDQQHDXjODODUJHXUHWODKDXWHXUVSpFLILpHV
6. Déterminez la position du haut du panneau. Mesurez et
marquez les positions des trous.
3HUFH]GHVWURXVGHJXLGDJHVXUO¶DUULqUHGXSDQQHDX
aux endroits des marques. Utilisez une butée de perçage
SRXUpYLWHUGHSHUFHUjWUDYHUVOHSDQQHDX
Ouverture
de l’armoire
Dégagement
de 1/8 po ou plus
Hauteur du
coup-de-pied
13-9/16 po
8-1/4 po
6-25/32 po
4-1/8 po
1-1/16 po
14-15/16 po
14-7/8 po
Ligne de centre
13-31/64 po
30-5/8 po
29-5/8 po
13/32 po
SR
7<3(10)
13/32 po
Instructions d’installation
INSTRUCTIONS D’INSTALLATION

49-60745 Rev. 5 13
INSTALLATION DU PANNEAU DE PORTE (suite)
Si le sens de l’ouverture de porte doit être changé, veuillez procéder avant d’installer le panneau de porte. Voir la page 11.
Voir la page 11. Selon la trousse de porte installée, la poignée de porte peut devoir être inversée si le sens de l’ouverture de
SRUWHHVWFKDQJp3ULqUHGHVHUHSRUWHUDX[LQVWUXFWLRQVGHODSDJHSRXUVDYRLUFRPPHQWLQYHUVHUODSRLJQpH
Fixation du panneau de porte
/HSDQQHDXVHUDIL[pSDUYLVjW{OHHWYLVGHPpFDQLTXH
1. Enlevez le joint d’étanchéité depuis l’intérieur de la porte
et conservez-le pour plus tard.
2. Enlevez toute pellicule de plastique recouvrant le
panneau.
3ODFH]OHSDQQHDXGHSRUWHVXUO¶H[WpULHXUGHODSRUWHHW
fixez-le avec 2 vis de mécanique dans le centre gauche
et le centre droit de la porte.
)L[H]OHSDQQHDXVXUODSRUWHjO¶DLGHGHYLVjW{OH
'DQVOD]RQHG¶RXYHUWXUHGHODFKDUQLqUHjO¶RSSRVp
GXF{WpFKDUQLqUHXWLOLVH]OHVWURXVGHYLVOHVSOXVj
l’extérieur seulement.
3ODFH]OHVFRXYHUFOHVVXUOHV]RQHVG¶RXYHUWXUHGHV
FKDUQLqUHVHWIL[H]FKDTXHFRXYHUFOHVXUODSRUWHjO¶DLGH
GHYLVjW{OHHWOHXUVURQGHOOHV
,QVpUH]OHFDSXFKRQGHWURXVXUODYLVSRVpHjO¶pWDSH
5HPHWWH]OHMRLQWG¶pWDQFKpLWpjVDSRVLWLRQLQLWLDOH
)L[H]ODSRUWHjO¶DUPRLUHjO¶DLGHGHVYLVG¶RULJLQH
IMPORTANT: Dans certaines situations, la porte peut
s’ouvrir trop largement et ainsi endommager les armoires
DGMDFHQWHV3RXUO¶HPSrFKHULQVpUH]XQHEXWpHG¶DUUrW
(trousse de quincaillerie) dans le trou existant des charnières
supérieure et inférieure. Enfoncez la butée dans le trou
MXVTX¶jFHTXHVDWrWHVRLWjpJDOLWpDYHFODFKDUQLqUH
9. Glissez les couvercles de charnière (trousse de
quincaillerie) sur chaque charnière.
10. Fixez les couvercles latéraux (trousse de
quincaillerie) sur le côté des charnières en retirant
la pellicule qui recouvre l’adhésif.
Remarque : On peut se passer de couvercles
latéraux dans le cas d’une installation intégrée,
O¶DSSDUHLOpWDQWIL[pjO¶DUPRLUHSDUXQHYLV
5HPHWWH]OHFRXSGHSLHGHWOHSDQQHDXGHVHUYLFH
IURQWDOjOHXUSRVLWLRQLQLWLDOHHWIL[H]O¶DUPRLUHj
l’aide des vis d’origine.
Couvercle de
charnière
Couvercle latéral
Joint
d’étanchéité
Vis de
mécanique
3DQQHDX
de porte
Utiliser le trou
683e5,(85
dans le haut
Capuchon
de trou
Couvercle
Utiliser
le trou
,1)e5,(85
dans le bas
Butée
d’arrêt
Instructions d’installation
INSTRUCTIONS D’INSTALLATION

14 49-60745 Rev. 5
PLOMBERIE
Un tuyau en cuivre de ¼ po (D.E.) est recommandé pour
l’alimentation d’eau. On peut aussi utiliser des flexibles en
DFLHULQR[\GDEOHRXGHVWXEHVHQ39&UHQIRUFpV,QVWDOOH]
un robinet de sectionnement aisément accessible entre
l’alimentation d’eau et l’appareil. Ce robinet ne doit pas
être installé derrière l’appareil.
REMARQUE :
N’utilisez pas
de robinets
autotaraudeurs.
1. Enlevez le
panneau de
service frontal.
2. Acheminez le tube
jWUDYHUVOHWURXGURLWVXUO¶DUULqUHMXVTX¶jO¶HQWUpHGH
l’électrovalve de l’admission d’eau.
3RVH]XQUDFFRUGjFRPSUHVVLRQVXUOHWXEHHW
UDFFRUGH]OHjO¶HQWUpHGHO¶pOHFWURYDOYH
POMPE DE VIDANGE
Installation du système de vidange
8QHSRPSHGHYLGDQJHHVWRIIHUWHSRXUFHWWHPDFKLQHj
glaçons. On peut se procurer l’ensemble de pompe de
YLGDQJHQXPpUR83.VXUOHVLWHGEApplianceparts.
com ou en composant le 877-959-8688. Au Canada,
visitez le site electromenagersge.ca ou composez le
800.661.1616.
VIDANGE PAR GRAVITÉ
Installation du système de vidange
AVIS
Des limitations du système de vidange
peuvent causer un retour d’eau dans le bac de
conservation de la glace et faire fondre celle-ci. La
tubulure du système de vidange par gravité doit être
ventilée, être exempte de plis et pencher vers le drain
du bâtiment. Des coupures antirefoulement sont
généralement requises par les codes locaux.
3ODFH]ODPDFKLQHjJODoRQVGHYDQWO¶RXYHUWXUH$MXVWH]
OHVSLHGVGHQLYHOOHPHQWjODKDXWHXUDSSUR[LPDWLYH
On peut trouver dans la trousse de quincaillerie
des capuchons qui s’encliquettent sur les pieds de
nivellement si ceux-ci sont trop visibles une fois de
niveau.
2. Enlevez le panneau de service frontal et le panneau
noir supérieur.
REMARQUE : Si l’ouverture du drain est située dans le
plancher sous la tôle de base selon les spécifications de
SUpLQVWDOODWLRQVXLYH]OHVpWDSHVjSRXUYLGDQJHU
O¶DSSDUHLOSDUODEDVH6LQRQDOOH]jO¶pWDSH
3. Enlevez la bride et le coude cannelé puis retirez la
pellicule plastique sur la tôle basale sous le tuyau de
vidange.
Vis qui fixe le
panneau de
service frontal
Instructions d’installation
INSTRUCTIONS D’INSTALLATION
INSTRUCTIONS RELATIVES À
L’INVERSION DE LA POIGNÉE
1. 5HWLUHUODFOpKH[DJRQDOHGHO¶HQYHORSSHGHODWURXVVHGH
visserie pour installation du panneau.
2. 'HVVHUUHUODYLVGHVHUUDJHjO¶DLGHGHODFOpKH[DJRQDOH
Enlever la poignée et l’inverser de façon que le logo soit
IDFHjO¶DXWUHF{Wp
3. 3ODFHUOHVFDSXFKRQVGHSRLJQpHVXUOHVIL[DWLRQVGH
ODSRUWH9HLOOHUjVXSSRUWHUODSRLJQpHFDUHOOHSRXUUDLW
tomber et rayer le fini de l’électroménager. S’assurer que
les deux capuchons de poignée reposent sur la face de
la porte.
4. Verrouiller une extrémité de la poignée en position en
VHUUDQWODYLVGHVHUUDJHjO¶DLGHGHODFOpKH[DJRQDOH
IRXUQLH1(3$6VHUUHUH[FHVVLYHPHQW
5. Continuer de supporter la poignée pour verrouiller l’autre
extrémité de la poignée en serrant la vis de serrage dans
OHFDSXFKRQGHSRLJQpH1(3$6VHUUHUH[FHVVLYHPHQW
DESSERRER
Vis de serrage
Vis de serrage
Attache
Capuchon de poignée
Vis de serrage
Vis de serrage

49-60745 Rev. 5 15
PLACEZ LA MACHINE À GLAÇONS
/DPDFKLQHjJODoRQVHVWOLYUpHDYHFXQFRUGRQ
pOHFWULTXH1HUHWLUH]SDVODEURFKHGHPLVHjODWHUUHGH
la fiche du cordon. N’utilisez pas de rallonge. Observez
tous les codes d’électricité. Branchez la machine sur son
propre circuit de 115 V, 15 ampères.
%UDQFKH]ODPDFKLQHjJODoRQVGDQVODSULVHpOHFWULTXH
si celle-ci se situe derrière l’appareil.
3ODFH]O¶DSSDUHLOGDQVO¶RXYHUWXUHGHO¶LQVWDOODWLRQ
3. Ouvrez l’alimentation d’eau. Assurez-vous que la
PDFKLQHjJODoRQVHVWEUDQFKpHHWTX¶HOOHHVWVRXV
tensino (ON).
4. Glissez l’appareil dans l’ouverture, en portant une
DWWHQWLRQSDUWLFXOLqUHDX[UDFFRUGVjO¶DOLPHQWDWLRQ
d’eau et au drain. Attention aux plis.
5. Versez quelques litres d’eau dans le bac de
conservation de la glace; sur les machines qui en sont
équipées, la pompe devrait démarrer et l’eau devrait
se vidanger. Vérifiez l’absence de fuites.
5HSODFH]OHSDQQHDXG¶DFFqVGHVHUYLFH
7. Mettez l’appareil de niveau.
VIDANGE PAR GRAVITÉ (Cont.)
5DFFRUGH]XQFRQQHFWHXUFDQQHOpGURLWGHSRDX
WX\DXGHYLGDQJHOHIL[DQWjO¶DLGHGHODEULGHIRXUQLH
&RXSH]XQHORQJXHXUGHSRGHWX\DX7\JRQ
(plastique transparent) de 5/8 D.I. x 7/8 D.E. Glissez
un bout du tube dans la bride, laissant l’autre bout sur
OHIRQGGHODW{OHEDVDOHMXVTX¶jFHTXHO¶DSSDUHLOVRLW
placé au-dessus du drain de plancher.
6. Acheminez le tube de vidange. Soit a) insérez le tube
GHYLGDQJHjWUDYHUVODW{OHEDVLTXHGDQVOHGUDLQGH
SODQFKHURXVRLWEDFKHPLQH]OHWXEHGHYLGDQJHj
travers le trou du panneau inférieur arrière, raccordez-
le au coude cannelé et fixez-le avec une bride.
5pLQVWDOOHUOHSDQQHDXDUULqUHVXSpULHXU
5HSRVH]OHSDQQHDXGHVHUYLFH0HWWH]O¶DSSDUHLOGH
niveau. On peut trouver dans la trousse de quincaillerie
des capuchons qui s’encliquettent sur les pieds de
nivellement si ceux-ci sont trop visibles une fois de
niveau.
Alimentation d’eau
Un tube en cuivre de ¼ po (D.E.) est recommandé pour
l’alimentation d’eau. On peut aussi utiliser des flexibles en
DFLHULQR[\GDEOHRXGHVWXEHVHQ39&UHQIRUFpV,QVWDOOH]
un robinet de sectionnement aisément accessible entre
l’alimentation d’eau et l’appareil. Ce robinet ne doit pas
être installé derrière l’appareil.
/HUDFFRUGHPHQWG¶HDXVHVLWXHjO¶DUULqUHGHO¶DUPRLUH
8WLOLVH]OHUDFFRUGjFRPSUHVVLRQIRXUQLTXLHVWDWWDFKpDX
WXEHG¶DGPLVVLRQG¶HDXjO¶DUULqUHGHO¶DUPRLUH
Installation intégrée : Enroulez suffisamment de tube
derrière la machine afin que des plis ne se forment pas
lorsqu’elle sera poussée dans la cavité.
7X\DXGH
vidange
3DUFRXUVGX
tuyau de vidange
jusqu’au drain du
EkWLPHQW
Coude
cannelé
7XEHG¶DGPLVVLRQ
d’eau (fourni sur
le site)
Instructions d’installation
INSTRUCTIONS D’INSTALLATION

16 49-60745 Rev. 5
Nettoyage des surfaces extérieures
2QSHXWQHWWR\HUODSRUWHHWODSRLJQpHHQDFLHULQR[\GDEOHj
l’aide d’un nettoyant pour inox commercial. Les nettoyants qui
contiennent de l’acide oxalique tels que Bar Keepers Friend
Soft Cleanser™ vont éliminer la rouille, le ternissement et les
petites taches.
Utilisez seulement un nettoyant liquide exempt d’abrasif et
IURWWH]GDQVODGLUHFWLRQGHVOLJQHVGHEURVVDJHjO¶DLGHG¶XQH
pSRQJHKXPLGHGRXFH1¶HPSOR\H]SDVGHFLUHQLGHSURGXLWj
polir les électroménagers sur de l’acier inoxydable.
Nettoyage du condensateur
Le condensateur est constitué d’ailettes et de tubes que la
saleté et la charpie peuvent obstruer.
REMARQUE : 8QHXWLOLVDWLRQjO¶H[WpULHXUSHXWPHQHUjXQH
accumulation rapide de particules, telles que feuilles et autres
résidus de végétaux. Le condensateur devra être inspecté
fréquemment. Nettoyez-le dès que les ailettes deviennent
obstruées.
Pour nettoyer :
1. Enlevez le coup-de-pied et le panneau de service frontal.
5HSpUH]ODVXUIDFHGXFRQGHQVDWHXU
3DVVH]O¶DVSLUDWHXUVXUODVXUIDFHSRXUHQOHYHUWRXWHVDOHWp
et charpie.
AVIS
Ne cabossez pas les ailettes.
5HPHWWH]HQSODFHOHFRXSGHSLHGHWOHSDQQHDXGH
VHUYLFHIURQWDO)L[H]OHVVXUO¶DUPRLUHjO¶DLGHGHVYLVG¶RULJLQH
Surface du condensateur
Nettoyage du bac de conservation de la glace
/HEDFGHFRQVHUYDWLRQGHODJODFHGRLWrWUHGpVLQIHFWpj
l’occasion. Il est commode de le désinfecter après le nettoyage
du système de production de glace, lorsqu’il est vide.
On peut obtenir une solution désinfectante en mélangeant 1
oz (30 ml) de javellisant domestique dans 7,6 litres (2 gallons)
d’eau très chaude (95 °F – 115 °F). Utilisez un linge propre
et essuyez l’intérieur du bac avec la solution désinfectante.
Versez une quantité de solution dans le tuyau de vidange.
/DLVVH]VpFKHUjO¶DLU
Hivernage
1. Nettoyez le système de production de glace selon les
instructions ci-dessus.
2. Ouvrez la porte et pressez le bouton ON/OFF pour éteindre
ODPDFKLQHjJODoRQV
3. Fermez l’alimentation d’eau.
4. Vidangez le réservoir d’eau en retirant le bouchon en
caoutchouc sous le réservoir. Celui-ci est situé près de la
paroi arrière du bac de conservation de la glace.
5. Déconnectez la conduite d’eau d’admission au robinet
d’admission d’eau.
2XYUH]ODSRUWH3UHVVH]OHERXWRQ212))0DUFKH$UUrW
SRXUPHWWUHODPDFKLQHjJODoRQVVRXVWHQVLRQ
7. Soufflez de l’air dans le robinet d’admission d’eau. On peut
se servir d’une pompe de gonflage de pneus.
3RXUOHVPRGqOHVDYHFSRPSHGHYLGDQJHLOIDXWYHUVHU
environ 2 litres (1/2 gallon) d’antigel pour véhicule récréatif
(propylèneglycol) dans le drain du bac de conservation de
la glace.
REMARQUE : ,OQHIDXW3$6HPSOR\HUGHO¶DQWLJHOSRXU
automobile.
eWHLQGUHHWGpEUDQFKHUODPDFKLQHjJODoRQV
Bouche en caoutchouc
Entretien et nettoyage
ENTRETIEN ET NETTOYAGE

49-60745 Rev. 5 17
Nettoyage du tartre dans le système de la machine à glaçons
/HYR\DQW7,0(72&/($11HWWR\DJHUHTXLVV¶DOOXPHUDDX
ERXWGHPRLVG¶XWLOLVDWLRQ,OGHPHXUHUDDOOXPpMXVTX¶jFHTXH
le système de production de glace soit nettoyé.
Vous devez utiliser des gants en caoutchouc pour manipuler
OHSURGXLWDQWLWDUWUH3RXUFRPPDQGHUOHSURGXLWDQWLWDUWUH
consultez le site electromenagersge.ca ou composez le
&RPPDQGH]ODSLqFHQR:;;
1. Servez-vous de la pelle pour vider le bac. Jetez la glace
ou conservez-la dans une glacière.
3UHVVH]OHERXWRQ212))GXUDQWVHFRQGHVMXVTX¶jFH
que le voyant blanc s’éteigne.
3UHVVH]VLPXOWDQpPHQWOHVERXWRQV&/($15(6(7
1HWWR\HU5HGpPDUUHUHW212))GXUDQWVHFRQGHV/H
YR\DQW7,0(72&/($1YDVHPHWWUHFOLJQRWHU
4. Versez 237 ml (8 oz) de produit antitartre dans le réservoir
GHODPDFKLQHjJODoRQV
5. Faites fonctionner la machine pendant environ 30 minutes.
3UHVVH]SXLVUHOkFKH]O¶LQWHUUXSWHXU212))/DPDFKLQH
FRPPHQFHUDjpYDFXHUODVROXWLRQGHQHWWR\DJH
7. Faites fonctionner la machine pendant encore 30 minutes.
3UHVVH]SXLVUHOkFKH]O¶LQWHUUXSWHXU212))/DPDFKLQH
arrêtera le processus de nettoyage.
9. Versez 4 litres (1 gallon) d’eau très chaude dans le bac
pour rincer le tuyau de vidange.
10. Nettoyez la doublure du bac pour éliminer le tartre minéral
en mélangeant une quantité de produit antitartre dans
de l’eau très chaude, puis frottez la doublure avec cette
solution.
5LQFH]ODGRXEOHjO¶HDXWUqVFKDXGH
12. Désinfectez l’intérieur du bac.
5HPHWWH]GDQVOHEDFODJODFHYLGpHjO¶pWDSHV¶LO\D
lieu.
3UHVVH]SXLVUHOkFKH]O¶LQWHUUXSWHXU212))SRXU
redémarrer la production de glace.
/DSHOOHjJODFHGRLWrWUHODYpHUpJXOLqUHPHQWHWHOOHYDDX
lave-vaisselle.
Normalement, les pépites de glace sont en forme de cylindres
étirés. Des pépites irrégulières ou déformées sont le signe que
le tartre doit être nettoyé du système de production de glace.
REMARQUE: Le bac est isolé et non réfrigéré de sorte que la
IRUPHGHODJODFHYDFKDQJHUGDQVOHEDFGHVWRFNDJHFDULO
est normal que la fonte des glaces.
POWER
ON/OFF
CLEAN
RESET
TIME TO
CLEAN
CHECK
WATER
ICE
MAKING
AVERTISSEMENT
/HSURGXLWDQWLWDUWUHSRXUPDFKLQHjJODoRQVFRQWLHQW
des acides qui peuvent causer des brûlures. En cas
d’éclaboussement du produit concentré sur la peau,
ULQFH]jO¶HDX(QFDVG¶LQJHVWLRQQHSURYRTXH]3$6GH
vomissement. Faites boire de grandes quantités d’eau ou de
ODLW$SSHOH]XQPpGHFLQLPPpGLDWHPHQW*DUGH]jO¶pFDUW
des enfants.
Verser du produit
antitartre
Entretien et nettoyage
ENTRETIEN ET NETTOYAGE

18 49-60745 Rev. 5
Problème Causes possibles Causes possibles
Les glaçons ne sont pas totalement
formés
7DUWUHGDQVOHV\VWqPHGHSURGXFWLRQ
de glace
&OHDQWKHLFHPDNLQJV\VWHP
Faible capacité 7X\DXGHYLGDQJHUHVWUHLQWRXHDX
stagnante dans le bac
Nettoyez les ailettes du condensateur
UHIURLGLjO¶DLU
Nettoyez le système de production de
glace.
Vérifiez que le tuyau de vidange ne
comporte pas de plis.
Absence de glace /¶LQWHUUXSWHXUHVWjODSRVLWLRQ2))
(Arrêt)
3UHVVH]OHERXWRQ212))0DUFKH$UUrW
pour mettre l’appareil sous tension.
Le disjoncteur a été déclenché 5pDUPH]OHGLVMRQFWHXU
Le débit d’eau est faible 6LOHYR\DQW&KHFN:DWHU9pULILHUO¶HDX
clignote en rouge, alors le débit d’eau est
faible.
Le voyant Time to Clean (Nettoyage
requis) est allumé
1HWWR\H]OHV\VWqPHGHODPDFKLQHj
glaçons selon les instructions de la section
Entretien et nettoyage.
Bruit
/DPDFKLQHjJODoRQVHVWFRQoXHSRXUXQIRQFWLRQQHPHQW
silencieux mais elle pourra émettre des sons durant le cycle de
production de la glace. Au cours d'un cycle de congélation, il
est normal d'entendre le ventilateur déplaçant l'air et la pompe
jHDXGHOHDXHQFLUFXODWLRQ,FHIUDSSHUGDQVOHEDFRXGHOD
glace dans le bac peut être entendu lors de la récolte.
Conseils de dépannage... Avant de faire un appel de service
CONSEILS DE DÉPANNAGE
eFRQRPLVH]WHPSVHWDUJHQW&RQVXOWH]G¶DERUGOHVWDEOHDX[GHVSDJHVVXLYDQWHVHWYRXVSRXUULH]YRXVpYLWHUXQDSSHOGHVHUYLFH

49-60745 Rev. 5 19
$JUDIH]YRWUHIDFWXUHLFL3RXUEpQp¿FLHUGXVHUYLFHGHUpSDUDWLRQVRXV
garantie, une preuve de la date d’achat initial est nécessaire.
GARANTIE LIMITÉE
GE Appliances garantie limitée de la machine à glaçons
Ŷ/HVGpSODFHPHQWVjYRWUHGRPLFLOHSRXUYRXVH[SOLTXHU
l’utilisation de ce produit
Ŷ8QHLQVWDOODWLRQOLYUDLVRQRXPDLQWHQDQFHGpIHFWXHXVH
Ŷ8QHSDQQHGXSURGXLWSDUDEXVG¶XWLOLVDWLRQSDUPDXYDLVH
utilisation, par modification ou s’il a été utilisé dans un but
autre que celui pour lequel il a été fabriqué.
Ŷ/HUHPSODFHPHQWGHVIXVLEOHVRXOHUpHQFOHQFKHPHQWGX
disjoncteur du domicile.
Ŷ/HVGRPPDJHVFDXVpVDSUqVODOLYUDLVRQ
Ŷ/HUHPSODFHPHQWGHVDPSRXOHVVLLQFOXVHV
Ŷ7RXWGRPPDJHFDXVpSDUDFFLGHQWLQFHQGLHLQRQGDWLRQRX
une catastrophe naturelle.
Ŷ7RXWGRPPDJHIRUWXLWRXLQGLUHFWFDXVpSDUGHVGpIDXWV
éventuels de cet appareil.
Ŷ/HVHUYLFHV¶LOHVWLPSRVVLEOHG¶DYRLUDFFqVDXSURGXLW
Ce qui n’est pas couvert par GE Appliances :
Pendant la période de
garantie de :
GE Appliances remplacera :
Un An
A compter de la date d’achat
initial
Toute pièce du réfrigérateur qui s’avère défectueuse en raison d’un défaut de matériau ou de fabrication.
3HQGDQWODYDOLGLWpGHODprésente garantie limitée d’un an, GE Appliances fournira également
gratuitement la main d’œuvre et le service pour réparer la pièce défectueuse.
Cinq Ans
A compter de la date d’achat
initial
Toute pièce du système fermé du réfrigérateur (compresseur, condenseur, évaporateur et tous les tuyaux
GHUDFFRUGHPHQWTXLV¶DYqUHGpIHFWXHXVHHQUDLVRQG¶XQGpIDXWGHPDWpULDXRXGHIDEULFDWLRQ3HQGDQW
la validité de la présente garantie limitée de cinq an, GE Appliances fournira également gratuitement la
main d’œuvre et le service pour réparer la pièce défectueuse dans le système fermé du réfrigérateur.
electromenagersGE.ca
7RXWHVOHVUpSDUDWLRQVHQYHUWXGHODJDUDQWLHVRQWIRXUQLVSDUQRV&HQWUHGH6HUYLFHG¶8VLQHRXSDUXQWHFKQLFLHQDXWRULVp&XVWRPHU
Care
®
3RXUSUpYRLUXQHUpSDUDWLRQFRQVXOWH]QRWUHVLWHelectromenagersge.ca/fr/soutien/demande-de-service ou appelez le
800.661.16169HXLOOH]DYRLUYRWUHQXPpURGHVpULHHWYRWUHQXPpURGHPRGqOHjSRUWpHGHPDLQORUVTXHYRXVDSSHOH]SRXUREWHQLUXQ
service.
EXCLUSION DES GARANTIES TACITES
9RWUHUHFRXUVH[FOXVLIHVWO¶pFKDQJHGXSURGXLWVXLYDQWOHVPRGDOLWpVGHOD*DUDQWLH/LPLWpH7RXWHVJDUDQWLHV
WDFLWHV\FRPSULVOHVJDUDQWLHVGHYDOHXUVPDUFKDQGHVRXG¶DGpTXDWLRQjGHVILQVSDUWLFXOLqUHVVRQWOLPLWpHVj
XQHGXUpHG¶XQDQRXjODGXUpHODSOXVFRXUWHDXWRULVpHSDUODORL
Pour les clients des États-Unis :&HWWHJDUDQWLHOLPLWpHHVWpWHQGXHjO¶DFKHWHXUG¶RULJLQHHWDX[SURSULpWDLUHVVXLYDQWVSRXUWRXW
SURGXLWDFKHWpSRXUXQHXWLOLVDWLRQGRPHVWLTXHDX[eWDWV8QLV6LOHSURGXLWHVWLQVWDOOpGDQVXQHUpJLRQRQHVHWURXYHDXFXQ
UpSDUDWHXUDXWRULVp*($SSOLDQFHVYRXVGHYUH]SHXWrWUHDVVXPHUOHVIUDLVGHWUDQVSRUWRXDSSRUWHUO¶DSSDUHLOjXQFHQWUHGHVHUYLFH
DXWRULVp*($SSOLDQFHV(Q$ODVNDFHWWHJDUDQWLHOLPLWpHH[FOXWOHFRWG¶H[SpGLWLRQRXGHGpSDQQDJHjYRWUHGRPLFLOH
Certains états n’acceptent pas d’exclusion ou de limites aux dommages indirects consécutifs. Certains droits particuliers vous sont
dévolus en vertu de la présente garantie limitée et peuvent s’accompagner d’autres droits qui varient selon votre lieu de résidence.
3RXUFRQQDvWUHYRVGURLWVMXULGLTXHVYHXLOOH]FRQVXOWHUOHEXUHDXORFDORXOHEXUHDXG¶pWDWGHVDIIDLUHVDX[FRQVRPPDWHXUVRXOH
3URFXUHXU*pQpUDOGHYRWUHpWDW
Garant : GE Appliances, a Haier company
Louisville, KY 40225
Pour les clients des Canada:&HWWHJDUDQWLHOLPLWpHHVWpWHQGXHjO¶DFKHWHXUG¶RULJLQHHWDX[SURSULpWDLUHVVXLYDQWVSRXUWRXW
SURGXLWDFKHWpDX[&DQDGDSRXUXQHXWLOLVDWLRQGRPHVWLTXHDX[&DQDGD/HVHUYLFHjGRPLFLOHHQYHUWXGHODJDUDQWLHVHUDIRXUQL
GDQVOHVUpJLRQVRLOHVWGLVSRQLEOHHWR0DEHHVWLPHUDLVRQQDEOHGHOHIRXUQLU
Garant Canada: MC Commercial, Burlington, Ontario, L7R 5B6

20 49-60745 Rev. 5
ACCESSOIRES
Accessoires
À la Recherche de Quelque Chose de Plus?
Des panneaux de finition en acier inoxydable avec poignées
VRQWRIIHUWVSDUeOHFWURPpQDJHUV*(SRXUIL[DWLRQjODPDFKLQH
jJODoRQV/HVHQVHPEOHVGHSDQQHDXVRQWOHVVXLYDQWV
=,366±3RUWHHQDFLHULQR[\GDEOHDYHFSRLJQpHV
style Euro
3,3663RUWHHQDFLHULQR[\GDEOHDYHFSRLJQpHV
VW\OH3URILOH
&,363RUWHHQDFLHULQR[\GDEOHDYHFSRLJQpHV
style Café
&,3'1RLUPDWDYHFSRLJQpHVW\OH&DIp
&,3:&,3:±%ODQFPDWDYHFSRLJQpHVW\OH&DIp
Nous offrons aussi les ensembles de poignée de style Café
VXLYDQWV
&;;1+31%73RLJQpHQRLUH
&;;1+31=%URQ]HKDQGOH
&;;1+31&83RLJQpHFXLYUH
&;;1+31663RLJQpHDFLHULQR[\GDEOH
REMARQUE : Ces ensembles ne sont que pour la famille
G¶HQVHPEOHVGHSRUWHV&,3
3RXUFRPPDQGHUDOOH]VXUOHVLWHelectromenagersge.ca/fr/
produits/filtres-et-accessoires ou composez le 800.661.1616
Rallonge de coup-de-pied : Dans certaines situations, les
pieds de nivellement seront étendus au point d’être visibles.
Un ensemble de rallonge de coup-de-pied est offert pour
dissimuler les pieds de nivellement. Le numéro de l’ensemble
HVW:5;3RXUFRPPDQGHUDOOH]VXUOHVLWH
electromenagersge.ca ou composez le 800.661.1616
Stabilité de l’armoire : 3RXUFHUWDLQHVLQVWDOODWLRQVDXWRQRPHV
il peut être prudent d’ajouter une ferrure antibasculement qui
fixe le derrière de l’armoire au mur. Le numéro de l’ensemble
HVW:5;3RXUFRPPDQGHUDOOH]VXUOHVLWH
electromenagersge.ca ou composez le 800.661.1616
Conversion du drain : Un drain par gravité peut être
converti en pompe de vidange en installant un ensemble de
pompe de drainage. Cet ensemble consiste en un pompe de
vidange, un faisceau électrique et la tubulure associée. Le
QXPpURGHSLqFHHVW83.3RXUFRPPDQGHUDOOH]VXUOHVLWH
electromenagersge.ca ou composez le 800.661.1616

49-60745 Rev. 5 21
NOTES
Notes

22 49-60745 Rev. 5
NOTES
Notes

49-60745 Rev. 5 23
NOTES
Notes

24 49-60745 Rev. 5
SOUTIEN AU CONSOMMATEUR
Soutien au consommateur
Site Web de GE Appliances
Vous avez une question ou vous avez besoin d’aide pour votre appareil électroménager? Visitez le site Web de GE
$SSOLDQFHVKHXUHVSDUMRXUWRXVOHVMRXUVGHO¶DQQpH9RXVSRXYH]DXVVL\WURXYHUG¶DXWUHVIRUPLGDEOHVSURGXLWV
*($SSOLDQFHVHWWLUHUDYDQWDJHGHWRXVQRVVHUYLFHVG¶DVVLVWDQFHHQOLJQH$X[eWDWV8QLVGEAppliances.com
$X&DQDGDElectromenagersGE.ca
Enregistrez votre électroménager
(QUHJLVWUH]YRWUHQRXYHODSSDUHLOHQOLJQHDXPRPHQWTXLYRXVFRQYLHQWOHPLHX[/¶HQUHJLVWUHPHQWGHYRWUHSURGXLW
dans les délais prescrits permet une meilleure communication et un service rapide, selon les modalités de votre
garantie, si besoin est. Vous pouvez également envoyer par courrier la carte d’enregistrement pré-imprimée qui se
trouve dans l’emballage de votre appareil.
$X[eWDWV8QLVGEAppliances.com/register
$X&DQDGDProdsupport.mabe.ca/crm/Products/ProductRegistration.aspx
Service de réparation
8QVHUYLFHGHUpSDUDWLRQH[SHUW*($SSOLDQFHVVHWURXYHjTXHOTXHVSDVGHFKH]YRXV5HQGH]YRXVVXUQRWUHVLWH
HWSURJUDPPH]jYRWUHFRQYHQDQFHXQHYLVLWHGHUpSDUDWLRQjQ¶LPSRUWHTXHOMRXUGHO¶DQQpH
$X[eWDWV8QLVGEAppliances.com/service ou composez le 800.432.2737 durant les heures normales de bureau.
$X&DQDGDElectromenagersge.ca/fr/soutien/demande-de-service ou composez le 800.561.3344
Prolongation de garantie
3URFXUH]YRXVXQHSURORQJDWLRQGHJDUDQWLH*($SSOLDQFHVHWLQIRUPH]YRXVGHVUDEDLVVSpFLDX[HQYLJXHXU
pendant la durée de votre garantie. Vous pouvez vous la procurer en ligne en tout temps. Les services GE
$SSOLDQFHVVHURQWWRXMRXUVGLVSRQLEOHVDSUqVO¶H[SLUDWLRQGHODJDUDQWLH$X[eWDWV8QLV
GEAppliances.com/service ou composez le 800.626.2224 durant les heures normales de bureau.
$X&DQDGD Electromenagersge.ca/fr/soutien/achat-d-une-garantie-prolongee ou composez le 866.277.9842
Pièces et accessoires
Les personnes ayant les compétences requises pour réparer elles-mêmes leurs appareils peuvent recevoir
GLUHFWHPHQWjODPDLVRQGHVSLqFHVRXDFFHVVRLUHVOHVFDUWHV9,6$0DVWHU&DUGHW'LVFRYHUVRQWDFFHSWpHV
Commandez en ligne 24 heures par jour.
$X[eWDWV8QLVGEApplianceparts.com ou par téléphone au 877.959.8688 durant les heures normales de bureau.
Les instructions contenues dans le présent manuel comportent des procédures que tout utilisateur peut
effectuer. Les autres types de réparation doivent généralement être confiés à un technicien qualifié. Usez de
prudence : une réparation ou un entretien mal effectués peuvent rendre l’utilisation de l’appareil dangereuse.
Les consommateurs au Canada doivent consulter les pages jaunes pour connaître le centre de service Mabe le
plus proche, visiter notre site Web au Electromenagersge.ca/fr/produits/filtres-et-accessoires ou composer le
1.800.661.1616.
Communiquez avec nous
Si vous n’êtes pas satisfait du service après-vente de GE Appliances, communiquez avec nous depuis notre site Web
HQIRXUQLVVDQWWRXVOHVGpWDLOVGRQWYRWUHQXPpURGHWpOpSKRQHRXpFULYH]j
$X[eWDWV8QLV*HQHUDO0DQDJHU&XVWRPHU5HODWLRQV_*($SSOLDQFHV$SSOLDQFH3DUN_/RXLVYLOOH.<
GEAppliances.com/contact
$X&DQDGD'LUHFWRU&RQVXPHU5HODWLRQV0DEH&DQDGD,QF_6XLWH)DFWRU\/DQH_0RQFWRQ1%(&0
Electromenagersge.ca/fr/contactea-nous

Escriba los números de modelo
y de serie aquí:
Nº de Modelo ____________
Nº de Serie ______________
Busque estos números en una
etiqueta en el revestimiento de la
caja interna superior de la unidad
sobre el frente.
E es una marca registrada de General Electric Company. Fabricado bajo licencia de marca.
MANUAL DEL
PROPIETARIO E
INSTRUCCIONES DE
INSTALACIÓN
MÁQUINA DE HIELO
49-60745 Rev. 5 03-19 GEA
UCC15
INSTRUCIONES
DE SEGURIDAD
...................3
USO DE LA MÁQUINA
DE HIELO
Embalaje .............................5
Controles .............................5
Funciones ............................6
Activación de la Máquina de Hielo .......6
INSTRUCCIONES
DE INSTALACIÓN
Conexión a Tierra de la Máquina
de Hielo ............................7
Antes de Empezar .....................7
Ubicación y Preparación ................7
Planificación Avanzada .................9
Dimensiones .........................10
Apertura de la Puerta ................. 11
Panel de la Puerta ....................12
Plomería .............................14
Instrucciones para Invertir la Posición
de la Manija .........................14
Colocación de la Máquina de Hielo ......15
CUIDADO Y LIMPIEZA ..........16
SOLUCIONAR PROBLEMAS ....18
GARANTÍA LIMITADA ..........19
ACCESORIOS ................... 20
SERVICIO AL CONSUMIDOR ...22

2 49-60745 Rev. 5
GRACIAS POR HACER QUE GE APPLIANCES SEA PARTE DE SU HOGAR.
Ya sea que haya crecido usando GE Appliances, o que ésta es su primera vez, nos complace
tenerlo en la familia.
Sentimos orgullo por el nivel de arte, innovación y diseño de cada uno de los electrodomésticos de
GE Appliances, y creemos que usted también. Entre otras cosas, el registro de su electrodoméstico
asegura que podamos entregarle información importante del producto y detalles de la garantía
cuando los necesite.
Registre su electrodoméstico GE ahora a través de Internet. Sitios Web y números telefónicos útiles
están disponibles en la sección de Soporte para el Consumidor de este Manual del Propietario.
También puede enviar una carta en la tarjeta de inscripción preimpresa que se incluye con
el material embalado.

49-60745 Rev. 5 3
PRECAUCIÓN
A fin de reducir el riesgo de lesiones al usar el electrodoméstico, siga estas precauciones básicas
de seguridad.
Ŷ 0DQWHQJDORVGHGRVIXHUDGHORVHVSDFLRVGH³ULHVJRGH
lastimaduras”; los despejes entre las puertas y entre las
puertas y el gabinete son necesariamente pequeños.
Tenga el cuidado de cerrar las puertas cuando los niños
se encuentren en el área.
Ŷ (YLWHHOFRQWDFWRFRQODVSDUWHVPyYLOHVGHOPHFDQLVPR
eyector y/o con el elemento de calefacción que libera
los cubos. No coloque los dedos ni las manos en el
mecanismo de la máquina de hielo automática mientras la
misma esté enchufada.
INFORMACIÓN DE SEGURIDAD
LEA Y GUARDE ESTAS INSTRUCCIONES
ADVERTENCIA
$¿QGHUHGXFLUHOULHVJRGHLQFHQGLRH[SORVLyQGHVFDUJDVHOpFWULFDVROHVLRQHVDOXVDU
su refrigerador, siga estas precauciones básicas de seguridad:
Ŷ (VWDPiTXLQDGHKLHORVHGHEHUiLQVWDODU\XELFDU
adecuadamente de acuerdo con las Instrucciones de
Instalación antes de ser usado.
Ŷ 'HVHQFKXIHODPiTXLQDGHKLHORDQWHVGHKDFHU
reparaciones, reemplazar una lámpara de luz o hacer una
limpieza.
NOTA: La corriente que va al refrigerador no puede ser
desconectada por ninguna configuración del panel de
control.
NOTA: Las reparaciones deberán ser realizadas por un
Profesional del Servicio Técnico calificado.
Ŷ 5HHPSODFHWRGDVODVSLH]DV\SDQHOHVDQWHVGHOXVR
Ŷ 1RJXDUGHQLXVHJDVROLQDXRWURVYDSRUHVLQIODPDEOHV\
líquidos cerca de este u otros electrodomésticos.
Ŷ 'HELGRDORVSRVLEOHVULHVJRVVREUHODVHJXULGDGEDMR
ciertas condiciones, recomendamos enfáticamente no
usar prolongadores. Sin embargo, si se debe usar un
prolongador, es absolutamente necesario que sea un
prolongador para electrodoméstico de la lista UL (en
Estados Unidos) o uno certificado por CSA (en Canadá),
GHFDEOHVFRQFRQH[LyQDWLHUUDTXHFXHQWHFRQXQ
HQFKXIHFRQFRQH[LyQDWLHUUD\XQWRPDFRUULHQWHFRQXQD
graduación eléctrica del cable de 15 amperes (mínimo) y
120 volts.
Ŷ $ILQGHHYLWDUULHVJRVGHTXHORVQLxRVVXIUDQDVIL[LD
o queden atrapados, retire la tapa de cualquier
electrodoméstico antes de deshacerse o dejar de usar el
mismo.
Ŷ 1RSHUPLWDTXHORVQLxRVVHWUHSHQSDUHQRFXHOJXHQGH
la manija de la puerta del electrodoméstico. Podrían sufrir
lesiones graves.
Ŷ (OOLPSLDGRUGHVDUURGHODPiTXLQDGHKLHORFRQWLHQH
ácidos. Los ácidos pueden producir quemaduras. Si un
limpiador concentrado entra en contacto con la piel, limpie
el mismo con agua. Si se traga, NO induzca el vómito.
Tome grandes cantidades de agua o leche. Llame al
Médico de inmediato. Mantenga los mismos fuera del
alcance de los niños.
INFORMACIÓN IMPORTANTE DE SEGURIDAD
LEA TODAS LAS INSTRUCCIONES
ANTES DE USAR
INSTALACIÓN
ADVERTENCIA
RIESGO DE EXPLOSIÓN
Mantenga cualquier material y vapores inflamables, tales como gasolina, alejados del electrodoméstico. Si no se cumple con
HVWRVHSRGUiSURGXFLUXQDH[SORVLyQLQFHQGLRRODPXHUWH

4 49-60745 Rev. 5
ADVERTENCIA
RIESGO DE QUE LOS NIÑOS SUFRAN ASFIXIA O Y QUEDEN ATRAPADOS
Retire la puerta del electrodoméstico antes de descartar el mismo. Si esto no se realiza, los niños podrán quedar atrapados y
ocasionar la muerte o daño cerebral.
IMPORTANTE: Que un niño quede atrapado o que sufra
XQDDVIL[LDQRVRQSUREOHPDVGHOSDVDGR/RVUHIULJHUDGRUHV
antiguos o abandonados aún son peligrosos, incluso aunque
VHFRQVHUYHQSRU³VyORXQRVSRFRVGtDV´6LVHGHVKDUiGH
su antiguo refrigerador, siga las siguientes instrucciones a fin
de evitar accidentes.
Antes de Descartar su Antiguo Electrodoméstico:
Ŷ Retire las puertas.
Ŷ'HMHORVFRPSRQHQWHVLQWHUQRVHQVXOXJDUGHPRGRTXH
los niños no puedan trepar dentro con facilidad.
Refrigerantes
Todos los productos de refrigeración cuentan con
refrigerantes, que de acuerdo con la ley federal deberán ser
eliminados antes de descartar el producto. Si se deshará de
un producto de refrigeración antiguo, consulte a la compañía
a cargo sobre cómo deshacerse del mismo
FORMA ADECUADA DE DESCARTAR SU ANTIGUO ELECTRODOMÉSTICO
Nunca, bajo ninguna circunstancia, corte o elimine el tercer cable (tierra) del cable de corriente.
Para su seguridad personal, este electrodoméstico debe estar adecuadamente conectado a tierra.
El cable de corriente de este electrodoméstico contiene un
HQFKXIHGHFDEOHVFRQH[LyQDWLHUUDTXHVHFRQHFWDDXQ
WRPDFRUULHQWHGHSDUHGHVWiQGDUGHFDEOHVFRQH[LyQD
tierra) para minimizar la posibilidad de riesgos de descargas
eléctricas por parte del mismo.
Contrate a un electricista calificado para que controle el
tomacorriente y el circuito eléctrico, a fin de asegurar que el
enchufe esté correctamente conectado a tierra.
En caso de contar con un tomacorriente de pared de 2
cables, es su responsabilidad y obligación reemplazarlo
por un tomacorriente de pared de 3 cables correctamente
conectado a tierra. No use un adaptador.
La máquina de hielo siempre debe estar enchufada en su
propio circuito de 115 voltios, 60 Hz, 15 amp. Esto garantiza
el mejor funcionamiento y además previene la sobrecarga de
los circuitos del hogar, lo cual podría ocasionar riesgos de
incendio debido al recalentamiento de cables.
Nunca desenchufe la máquina de hielo tirando del cable de
corriente. Siempre tome su enchufe firmemente y empuje el
mismo hacia afuera para retirarlo.
Repare o reemplace de inmediato todos los cables de
corriente pelados o con cualquier tipo de daño. No use
XQFDEOHFRQFRUWDGXUDVRDEUDVLyQVREUHVXH[WHQVLyQR
H[WUHPRV
Al mover la máquina de hielo, se deberá tener cuidado de
que no ruede sobre ni dañe el cable de corriente.
EVITE EL CONGELAMIENTO: La unidad podrá sufrir daños
graves si se deja o utiliza a temperaturas que superan los
OtPLWHVTXHILJXUDQHQHVWHPDQXDO'LFKRdaño NO está
cubierto por la garantía.
MANTÉNGALA SECA: No la ubique en áreas bajas donde
se produzcan charcos.
CUENTE CON SOMBRA: El calor del sol reducirá la
capacidad de la unidad de fabricar y almacenar el hielo, y la
radiación ultravioleta del sol puede potencialmente dañar los
componentes plásticos de la unidad.
SUMINISTRO DE AGUA: Evite que la manguera o la tubería
TXHGHQH[SXHVWDVDOVROGXUDQWHPXFKRWLHPSR/DWXEHUtD
plástica de suministro de agua debe estar calificada para uso
con agua potable e incluir la protección contra los rayos UV.
Se recomienda el uso de tuberías de cobre.
PREVENCIÓN CONTRA EL REFLUJO: La unidad incluye
prevención contra el reflujo; no se requiere ningún control de
válvulas adicional.
'(6$*h(12UHDOLFHHOGHVDJHHQXQDSLVFLQDQLHQHO
suelo.
CONEXIÓN DE LA ELECTRICIDAD
AVISO DE USO EN ÁREAS EXTERIORES
ADVERTENCIA
RIESGO DE DESCARGA ELÉCTRICA.
(QFKXIHHQXQWRPDFRUULHQWHFRQFRQH[LyQDWLHUUDGHFDEOHV
1RHOLPLQHHOFDEOHGHFRQH[LyQDWLHUUD
No use un adaptador.
Si no se siguen estas instrucciones se podrá producir a muerte, incendios o descargas eléctricas.
INFORMACIÓN DE SEGURIDAD
INFORMACIÓN IMPORTANTE DE SEGURIDAD
LEA TODAS LAS INSTRUCCIONES ANTES DE USAR
LEA Y GUARDE ESTAS INSTRUCCIONES

49-60745 Rev. 5 5
Retire el embalaje
IMPORTANTE: No retire ninguna etiqueta de instrucciones
permanente dentro de la máquina de hielos ni la Ficha Técnica
colocada detrás del panel de acceso inferior.
Ŷ5HWLUHODFLQWD\FXDOTXLHUHWLTXHWDGHVXPiTXLQDGHKLHOR
DQWHVGHOXVRH[FHSWRODHWLTXHWDGHOPRGHOR\HOQ~PHURGH
serie).
Para retirar cualquier cinta o pegamento que haya quedado,
frote el área vivamente con su pulgar. Los residuos de cinta
o pegamento se pueden retirar fácilmente frotando con los
dedos una cantidad pequeña de jabón líquido para lavar
platos sobre el adhesivo. Limpie con agua caliente y seque.
Ŷ1RXVHLQVWUXPHQWRVSXQWLDJXGRVQRIURWHDOFRKROQRXVH
líquidos inflamables, ni limpiadores abrasivos para retirar
cinta o pegamento. Estos productos pueden dañar la
superficie de la máquina de hielo. Para más información, lea
la sección de Instrucciones Importantes de Seguridad.
1. POWER ON/OFF (Encender/ Apagar) – Active esta función para encender o apagar la máquina de hielo.
2. ICE MAKING (Producción de Hielo) – Brilla en blanco cuando la unidad está en ON (Encender).
3. CHECK WATER (Controlar el Agua) – Brilla en rojo cuando no hay suministro de agua a la máquina.
4. TIME TO CLEAN (Hacer la Limpieza) – Brilla en amarillo cuando es el momento de limpiar la máquina. La luz se encenderá
luego de 6 meses de uso. Permanecerá encendida hasta que el sistema de la
máquina de hielo sea limpiado utilizando el proceso de la sección de Cuidado y
Limpieza.
5. CLEAN RESET – Se presiona con el botón Power (Encender) durante 5 segundos para iniciar el proceso de limpieza (consulte
la sección de Cuidado y Limpieza).
POWER
ON/OFF
CLEAN
RESET
TIME TO
CLEAN
CHECK
WATER
ICE
MAKING
Embalaje
EL USO DE LA MÁQUINA DE HIELO: Embalaje/ Controles
1 2 3 4 5
Controles

6 49-60745 Rev. 5
Esta máquina hace entrar el aire de la temperatura ambiente
por la parte inferior derecha frontal y hace salir el aire caliente
por la parte inferior izquierda frontal. Restringir el flujo de aire
o utilizar la máquina en un ambiente caliente o frío afectará de
forma adversa la habilidad de la máquina de hielo para realizar
la producción.
Cuando la puerta es abierta, el panel de control, el área para
hacer hielo y la hielera están visibles. La cuchara está ubicada
en un recipiente junto a la pared derecha.
6HWUDWDGHXQPRGHORGHGHVDJHSRUJUDYHGDGTXHGHEH
FRQWDUFRQXQDFRQH[LyQGHGHVDJHGHOHGLILFLRSRUGHEDMRGHO
nivel del tubo de drenaje en la parte trasera del gabinete. Una
ERPEDSXHGHVHULQVWDODGDODFXDOSXHGHIRU]DUHOGHVDJH
KDVWDXQPi[LPRGHSLHVSHUPLWLHQGRVXFRORFDFLyQ
GRQGHHOGHVDJHSRUJUDYHGDGQRHVWiGLVSRQLEOH3DUDPiV
LQIRUPDFLyQVREUHODERPEDGHGHVDJHFRQVXOWHODVHFFLyQGH
Accesorios en la página 20.
Cuchara de hielo
Kickplate
Panel de control
Área de producción
de hielo
Panel frontal
de servicio
Inicio
1. Abra el suministro de agua.
2. Encienda la corriente eléctrica.
3. Presione y libere el botón ON/OFF (Encender/ Apagar)
para iniciar la máquina. La luz ICE MAKING (Producción de
Hielo) junto al interruptor de encendido/ apagado brillará en
blanco.
4. El agua comenzará a circular en la unidad. Cuando el
depósito esté lleno, el agua comenzará a ser drenada desde
la máquina. Luego de unos pocos minutos el compresor,
la bomba de agua y el motor del ventilador comenzarán a
funcionar a medida que el primer ciclo de producción de
hielo comience.
Ningún ajuste es necesario.
(QDSUR[LPDGDPHQWHPLQXWRVHOKLHORFDHUiHQODKLHOHUD/D
máquina produce 24 cubos gourmet por vez. Es normal que las
primeras tandas de hielo se derritan a medida que la hielera se
enfría. Llevará entre 8 y 10 horas de producción continua llenar
la hielera. Cuando la hielera esté llena, la máquina de hielo se
apagará. Se reiniciará automáticamente cuando el nivel de hielo
se vea reducido, ya sea por el uso o por el derretimiento normal.
'HVFDUWHODSULPHUDSURGXFFLyQGHKLHOR
Aire Caliente Hacia Fuera
Entrada de Aire
Activación de la máquina de hielo
Funciones
EL USO DE LA MÁQUINA DE HIELO: Funciones/ Activación de la máquina de hielo

49-60745 Rev. 5 7
Si tiene preguntas, llame al 1.800.GE.CARES o bien visite nuestra página Web: GEAppliances.com
Instrucciones de
Instalación
MÁQUINA DE HIELO
INSTRUCCIONES DE INSTALACIÓN
CONEXIÓN A TIERRA DE LA MÁQUINA
DE HIELO
ADVERTENCIA
Riesgo de Descarga
Eléctrica.
Si no se siguen estas instrucciones se podrá producir a
muerte, incendios o descargas eléctricas.
El cable de corriente de este electrodoméstico contiene un
HQFKXIHGHFDEOHVFRQH[LyQDWLHUUDTXHVHFRQHFWDDXQ
WRPDFRUULHQWHGHSDUHGHVWiQGDUGHFDEOHVFRQH[LyQD
tierra) para minimizar la posibilidad de riesgos de descargas
eléctricas por parte del mismo.
Contrate a un electricista calificado para que controle el
tomacorriente y el circuito eléctrico, a fin de asegurar que el
enchufe esté correctamente conectado a tierra.
En caso de contar con un tomacorriente de pared de 2
cables, es su responsabilidad y obligación reemplazarlo
por un tomacorriente de pared de 3 cables correctamente
conectado a tierra.
NUNCA, BAJO NINGUNA CIRCUNSTANCIA, CORTE O
(/,0,1((/7(5&(5&$%/(7,(55$'(/&$%/('(
CORRIENTE.
1286(81(1&+8)($'$37$'253$5$&21(&7$5
(/(/(&752'20e67,&2$81720$&255,(17('(
PATAS.
1286(81352/21*$'25&21(67(
(/(&752'20e67,&2
ANTES DE EMPEZAR
Lea estas instrucciones completa y cuidadosamente.
• IMPORTANTE — Observe todos los códigos y
órdenes de ley. Guarde estas instrucciones para uso del
inspector local.
• Nota al instalador – Asegúrese de dejar estas
instrucciones con el consumidor.
• Nota al consumidor – Conserve estas instrucciones
para referencia futura.
• Nivel de destreza – La instalación de este aparato
requiere de destrezas mecánicas básicas.
• Tiempo de ejecución – La instalación puede variar
30 minutos para la Instalación de
la Tubería de Agua
• La instalación apropiada es la responsabilidad del
instalador.
• La falla del producto debido a una instalación inadecuada
no está cubierta por la garantía.
UBICACIÓN Y PREPARACIÓN DE LA
MÁQUINA DE HIELO
Esta máquina de hielo fue diseñada para uso interior, en un
DPELHQWHFRQWURODGRRHQH[WHULRUGHQWURGHFLHUWRVOtPLWHV
Está compuesta por dos sistemas principales: el sistema
de producción de hielo y el sistema de almacenamiento de
hielo. El sistema de producción de hielo es un flujo continuo
que fabrica hielo cuando el nivel de hielo es bajo y se
detiene cuanto está completo.
El sistema de almacenamiento de hielo es un espacio
DLVODGRFRQXQGHVDJHHQVXSDUWHLQIHULRUSDUDGHUUHWLU
hielo. No está refrigerado, de modo que la hielera cuente
con hielo fresco.
IMPORTANT: Nunca guarde nada en la hielera que no sea
hielo. Los objetos como las botellas de vino o cerveza no
sólo son antihigiénicas, sino que también sus etiquetas se
SXHGHQVDOLU\EORTXHDUHOGHVDJH
IMPORTANT: Nunca permita que una máquina funcione
sin una limpieza regular. La máquina tendrá una mayor
durabilidad si se mantiene limpia. Se deberá realizar
una limpieza regular por lo menos cada un año, y
preferentemente dos. Algunas condiciones del agua harán
que sea necesaria incluso una frecuencia de limpieza mayor
de la sección de producción de hielo, y algunas alfombras
o mascotas harán que sea necesaria una frecuencia de
limpieza mayor del condensador.
Especificaciones
La máquina de hielo funcionará de forma adecuada dentro
de los límites, pero funciona mejor entre las temperaturas
de 60ºF y 80ºF
• Temperatura mínima del aire: 50°F (10°C)
7HPSHUDWXUDPi[LPDGHODLUH)&
• Temperatura mínima del agua: 40°F (4.5°C)
7HPSHUDWXUDPi[LPDGHODJXD)&
• Presión mínima del agua: 20 psi (1.4 bar)
3UHVLyQPi[LPDGHODJXDSVLEDU
Límites de voltaje eléctrico:
Lea la Etiqueta de Calificación dentro de la máquina
de hielos

8 49-60745 Rev. 5
Instrucciones de instalación
INSTRUCCIONES DE INSTALACIÓN
UBICACIÓN Y PREPARACIÓN DE LA MÁQUINA DE HIELO (CONT.)
Calidad del Agua
Toda el agua, incluyendo el agua potable suministrada por las
municipalidades, contiene algunas impurezas o minerales.
El agua absorbe impurezas del aire a través de la lluvia y/o
al fluir a través del suelo. Algunas de estas impurezas son
partículas sólidas. Las mismas son conocidas como sólidos
suspendidos, y un pequeño filtro de partícula los elimina.
Otras impurezas están químicamente relacionadas con
ODVPROpFXODVGHODJXD\QRSXHGHQVHUILOWUDGDVeVWDVVH
conocen como sólidos disueltos.
El hielo producido por esta máquina poseerá un contenido
mineral inferior que el agua de la cual se produjo. Esto se
debe al método de producción de hielo. Un agua más pura se
congelará primero en los moldes de producción de hielo. La
razón de esto es que cualquier cosa disuelta en agua reduce
la temperatura de congelamiento del agua. Esto concentra
la mayoría de las impurezas del depósito de agua de la
máquina de hielo, donde se pueden formar depósitos duros
conocidos como sarro. La máquina disuelve la concentración
GHPLQHUDOHVDOOOHQDUGHIRUPDH[FHVLYDHOGHSyVLWRGXUDQWH
HOFLFORGHFXOWLYRFRQHOH[FHVRGHDJXDFRUULHQGRDWUDYpV
GHOGHVDJH(OXVRGHODJXDYDUtDGHDFXHUGRFRQODV
temperaturas del aire y del agua. Entre 2 y 4 pintas de agua
fluyen hacia la unidad en cada ciclo. Entre 1 y 3.5 pintas de
HVWDHQMXDJDQHOGHSyVLWR\GHVFLHQGHQSRUHOGHVDJH
Algunas impurezas inevitablemente permanecerán, y se
adherirán a las piezas de la máquina. Esto hará que algunos
cubos de hielo queden mal formados. Finalmente, el sarro
mineral acumulado puede acortar la vida de la máquina.
Para que la máquina se mantenga funcionando
correctamente, estas impurezas o minerales deberán ser
disueltas de forma regular con limpiadores ácidos. Las
instrucciones para realizar esto pueden ser encontradas en la
sección de Cuidado y Limpieza.
Filtros y Tratamiento
En general, siempre es una buena idea filtrar el agua. Un
filtro de agua apropiado puede eliminar el gusto y los olores
como también las partículas. Recomendamos el uso de un
Filtro de Agua de GE en su tubería de entrada de agua tal
como el Modelo de GE Número GXRLQ. Para revisar las
instrucciones de instalación y determinar qué filtro será el
adecuado para su aplicación, visite GEAppliances.com. En
Canadá, visite GEAppliances.ca. Algunos otros métodos de
tratamiento del agua para sólidos disueltos incluyen ósmosis
inversa, y alimentadores de polifosfato.
Agua R.O.
Esta máquina puede ser suministrada con agua por ósmosis
inversa, pero la conductividad del agua no debe ser inferior
a 10 microSiemens/cm. Un sistema de ósmosis inversa debe
incluir un tratamiento posterior para satisfacer la potencial
agresividad del agua por ósmosis inversa. No se recomienda
el agua desionizada.
'HELGRDTXHORVDEODQGDGRUHVGHDJXDLQWHUFDPELDQXQ
mineral por otro, es posible que el agua ablandada no mejore
las condiciones del agua cuando se use con máquinas de
hielo. Cuando el agua sea muy dura, es posible que el agua
ablandada resulte en cubos blancos y blandos que queden
pegados.
Si tiene dudas sobre el agua, comuníquese con un
especialista local en uso de agua para acceder a
recomendaciones sobre el tratamiento del agua.
Información General de la Instalación
La máquina de hielo debe:
- estar conectada a agua fría y potable.
HVWDUFRQHFWDGDDXQGHVDJH
- estar conectada al suministro de corriente apropiado.
- poder hacer circular aire a través de las ventilaciones en el
frente
NOTA: No la empotre de modo que la puerta quede
encastrada.

49-60745 Rev. 5 9
PLANIFICACIÓN AVANZADA
PRECAUCIÓN
Debido a un peso excesivo, SE
REQUIERE QUE DOS PERSONAS MUEVAN E INSTALEN
ESTA máquina de hielo. Si esto no se cumple, se podrán
producir lesiones en la espalda u otras heridas.
DIMENSIONES DEL PRODUCTO Y ESPACIO
Notas de Instalación
Instalación Empotrada: Si un piso con terminación será
instalado en el área luego de haber empotrado la máquina
de hielo, se deberán instalar cuñas del grosor del piso que se
colocará debajo de la unidad, a fin de mantener la máquina
nivelada con el nivel del piso planificado.
NOTA: /DFRQH[LyQGHODJXDHVWiHQODSDUWHWUDVHUD\VXPD
unas pocas pulgadas a la profundidad del gabinete.
Instalación sobre una losa: Necesitará instalar una bomba
GHGHVDJHDOHOHFWURGRPpVWLFR\ERPEHDUHODJXDKDVWDHO
SXQWRGHGHVDJH&RQVXOWHODVHFFLyQGH$FFHVRULRV/DV
bombas bombearán hasta una altura de 1 piso (10 pies).
Instalación en un entrepiso o sótano: Se podrá usar el
GHVDJHSRUJUDYHGDGRXQDERPED3DUDXVDUXQDERPED
consulte la sección de Accesorios. Si no hay suficiente
espacio detrás de la máquina para un receptáculo de
GHVDJHGHVHFKRVHOGHVDJHGHEHUiHVWDUSRUGHEDMRGHO
piso.
NOTA: Cuando se instale en un rincón, es posible que la
apertura de la puerta se vea limitada debido al contacto de la
manija con la pared o la cara del gabinete.
Es necesario contar con un suministro de agua. Los
suministros de agua varían en el grado del contenido
mineral. El agua con alto nivel de contenido mineral requerirá
un mantenimiento más frecuente. La filtración del agua
puede mejorar el gusto del hielo y también reducir parte de la
acumulación de minerales.
34" a
35"
Mín. de
33-7/8"
ajustable
a 34-7/8"
22-3/4" hasta
el Frente
de la Puerta
de Acero Inoxidable
15"
14-7/8"
24"
Instrucciones de instalación
INSTRUCCIONES DE INSTALACIÓN

10 49-60745 Rev. 5
14 7/8"
29-7/8"
33-7/8
"
22"
2 3/4"
4-3/8"
3 3/4"
1 1/2"
2 1/2"
3 1/4"
7 3/8"
3 7/8"
2
0 3/8"
ENTRADA DE AIRE
SALIDA DE AIRE
AJUSTE DE LA PATA
DE 1" (4) LUGARES
CABLE DE
CORRIENTE
DE 115V
ORIFICIO DE ACCESO
AL DESAGÜE POR EL PISO
FRENTE DE LA PUERTA DE CHAPA METÁLICA
DE 3/4" – SI EL KIT DE LA PUERTA ESTÁ INSTALADO,
PUERTA DEL GABINETE DE UN MÍN. DE .63
UNIÓN DE COMPRENSIÓN
DE ENTRADA DE AGUA
DE COBRE DE 1/4"
DE DIÁM. EXT. PROVISTA
ACCESO AL DESAGÜE -
TUBERÍA FLEXIBLE DE DESAGÜE
DE 5/8" DE DIÁM. INT. x 7/8" DE DIÁM.
EXTACCESS - FLEXIBLE TUBING
DIMENSIONES
Instrucciones de instalación
INSTRUCCIONES DE INSTALACIÓN

49-60745 Rev. 5 11
Instrucciones de instalación
INSTRUCCIONES DE INSTALACIÓN
APERTURA DE LA PUERTA
Mover las bisagras permite que la puerta se abra ya sea
desde la izquierda o la derecha. Cambie la apertura ANTES
de adherir el panel de la puerta.
Para hacer un cambio:
$EUDODSXHUWD5HWLUHORVWRUQLOORVGHDFHURLQR[LGDEOH
del lado opuesto a las bisagras frente al gabinete.
2. Retire el tornillo que está más adentro sosteniendo cada
bisagra al gabinete. Afloje el otro tornillo.
'HVOLFHODSXHUWDKDFLDHOFRVWDGRGHPRGRTXHOD
cerradura en la bisagra deje el tornillo, y retire la misma
del gabinete.
4. Retire los tornillos que fueron aflojados y guarde los
PLVPRV,QVWDOHORVWRUQLOORVGHDFHURLQR[LGDEOHTXH
fueron retirados en el Paso 1 en los agujeros abiertos del
gabinete que se dejó, retirando la bisagra.
5. Retire el tapón del orificio y las tapas de las aberturas de
las bisagras de la puerta (si corresponde).
6. Retire los tapones de los orificios o los tornillos de las
nuevas ubicaciones de las bisagras de la unidad (si
FRUUHVSRQGH'HMHODVPLVPDVDXQFRVWDGR
7. Instale los 2 tornillos de la bisagra retirados una vez
que la puerta fue retirada del gabinete en los agujeros
más alejados del nuevo lado de la bisagra del gabinete.
Atornillo los mismos sólo media vuelta.
8. Retire la bisagra superior de la puerta y mueva la misma
hacia el lado opuesto de la puerta, en la ubicación
inferior. Asegure la misma usando los tornillos originales.
NOTA: Si el panel de la puerta está adherido, debe ser
retirado para acceder a los tornillos de la bisagra y para
invertir la posición de la manija.
9. Retire la bisagra inferior original y mueva la misma hacia
el lado opuesto de la puerta, en la ubicación superior.
Asegure la misma usando los tornillos originales.
IMPORTANTE: Si instalará un panel para puerta de
DFHURLQR[LGDEOHRXQSDQHOHVWiQGDUSDVHDODVHFFLyQ
GH,167$/$&,Ï1'(/3$1(/'(/$38(57$
10. Instale las tapas de los bolsillos y tapones de los orificios
en la puerta.
11. Instale la ranura de la cerradura en la bisagra sobre
el tornillo más alejado, superior e inferior, y deslice la
puerta en el gabinete.
12. Adhiera la puerta al gabinete usando los tornillos
originales. Ajuste los 4 tornillos.
IMPORTANTE: En algunas situaciones, la puerta
se puede abrir demasiado y dañar los gabinetes
adyacentes. A fin de evitar esto, inserte un Perno de
Bloqueo (incluido en el paquete de herramientas) en
el agujero provisto en las bisagras superior e inferior.
Coloque el perno en el agujero hasta que la cabeza
quede alineada con la bisagra.
'HVOLFHODVWDSDVGHODVELVDJUDVGHOSDTXHWHGH
herramientas sobre cada bisagra.
14. Adhiera las tapas laterales del paquete de herramientas
sobre la bisagra, retirando la tapa sobre el adhesivo y
colocando la misma sobre el costado de la bisagra.
NOTA: Si la unidad será empotrada, se podrá usar un
tornillo para asegurar la misma al gabinete en lugar de
instalar las tapas laterales.
Tapón del
orificio
Tapa de la Abertura de
la Bisagra
Retirar
Aflojar
Perno de bloqueo
de la puerta
Tapa de la
Bisagra
Tapa
Lateral

12 49-60745 Rev. 5
INSTALACIÓN DEL PANEL DE LA PUERTA
La máquina de hielo es provista sin una cobertura
convencional para puerta, permitiendo adherir un panel para
puerta o un panel personalizado.
NOTA: Si la dirección de la puerta puede ser modificada,
será necesario realizar la misma ANTES de adherir el panel
de la puerta.
Panel de la Puerta
Están disponibles paneles acabados para puertas con
manijas a través de GE Appliances, los cuales se pueden
adherir a la máquina de hielo. Consulte la sección de
Accesorios en la página 20.
Un panel estándar de madera u otro material que no supere
las 15 libras puede ser usado y se deberán seguir las
siguientes pautas:
ancho: 14 7/8”
alto: entre 29 5/8” y 30 5/8”
grosor: 5/8” a 3/4”
Para Panel Estándar:
1. Mida la altura general de la abertura del gabinete donde
la máquina de hielo será instalada (desde el piso hasta la
SDUWHLQIHULRUGHOH[WUHPRGHODPHVDGD
'HWHUPLQHODDOWXUDGHVHDGDGHO]yFDORSDUWHLQIHULRUGH
la puerta hasta el piso). Esto puede equivaler a la altura
del zócalo del gabinete adyacente.
3. El espacio entre la mesada y la parte superior de la
máquina de hielo debe ser de por lo menos 1/8”.
4. Reste la altura del zócalo y el espacio desde la altura
de la apertura para determinar la altura de su panel de
puerta estándar.
5. Corte el panel hasta el ancho y alto especificados.
'HWHUPLQHODSDUWHVXSHULRUGHOSDQHO0LGD\PDUTXHODV
ubicaciones de los orificios.
7. Haga agujeros pilotos en la parte trasera del panel sobre
sus marcas. Use un bloqueo para la perforadora, a fin de
evitar perforar el panel.
Abertura del
gabinete
1/8” o más espacio
Altura del
zócalo
13-9/16”
8-1/4”
6-25/32”
4-1/8”
1-1/16”
14-15/16”
14-7/8”
Línea central
13-31/64”
30-5/8”
29-5/8”
13/32”
´
TYP (10)
13/32”
Instrucciones de instalación
INSTRUCCIONES DE INSTALACIÓN

49-60745 Rev. 5 13
INSTALACIÓN DEL PANEL DE LA PUERTA (Cont)
Si se modificará la apertura de la puerta, complete este paso antes de instalar el panel de la puerta. Lea la página 11.
'HSHQGLHQGRGHONLWSDUDSXHUWDVTXHVHLQVWDODUiHVSRVLEOHTXHVHDQHFHVDULRGDUYXHOWDODPDQLMDGHODSXHUWDVLVH
modificará la posición de apertura de la misma. Por favor, consulte sobre cómo dar vuelta la manija de la puerta en las
instrucciones que figuran en la página 14.
Adherencia del Panel de la Puerta
El panel será sostenido por 6 tornillos para chapa metálica y
2 tornillos para metal.
1. Retire la junta del interior de la puerta o conserve la
misma para uso posterior.
2. Retire cualquier cobertura plástica que esté recubriendo
HOSDQHOGHDFHURLQR[LGDEOH
&RORTXHHOSDQHOGHODSXHUWDVREUHODSDUWHH[WHULRU
de la puerta y asegure el mismo con 2 tornillos para
metal en el centro izquierdo y en el centro derecho de la
puerta.
4. Ajuste el panel a la puerta usando 6 tornillos para chapa
metálica. En el área de apertura opuesta al lado donde
se encuentran las bisagras, use los agujeros para
tornillos más alejados únicamente.
5. Coloque las tapas sobre las áreas de apertura de las
bisagras y asegure cada tapa a la puerta usando un
tornillo para chapa metálica y una arandela.
6. Inserte el tapón del orificio sobre el tornillo instalado en
el paso 5.
7. Vuelva a colocar la junta en su posición original.
8. Adhiera la puerta al gabinete usando los tornillos
originales.
IMPORTANTE: En algunas situaciones, la puerta se puede
abrir demasiado y dañar los gabinetes adyacentes. A fin
de evitar esto, inserte un Perno de Bloqueo (incluido en
el paquete de herramientas) en el agujero provisto en las
bisagras superior e inferior. Coloque el perno en el agujero
hasta que la cabeza quede alineada con la bisagra.
'HVOLFHODVWDSDVGHODVELVDJUDVGHOSDTXHWHGH
herramientas sobre cada bisagra.
10. Adhiera las tapas laterales del paquete de herramientas
sobre la bisagra, retirando la tapa sobre el adhesivo y
colocando la misma sobre el costado de la bisagra.
NOTA: Si la unidad será empotrada, se podrá usar un
tornillo para asegurar la misma al gabinete en lugar de
instalar las tapas laterales.
11. Vuelva a colocar el zócalo y el panel de servicio frontal
a sus posiciones originales y adhiera los mismos al
gabinete usando los tornillos originales.
Tapa de la Bisagra
Tapa Lateral
Junta
Tornillo
para Metal
Panel de
la Puerta
Use el agujero
SUPERIOR
en la parte
más alta
Tapón del Orificio
Tapa
Use el
agujero
INFERIOR
en la parte
más baja
Perno de
Bloqueo
Instrucciones de instalación
INSTRUCCIONES DE INSTALACIÓN

14 49-60745 Rev. 5
PLOMERÍA
La tubería de suministro de agua recomendada es de ¼”
GHGLiPHWURH[WHUQRGHFREUH7DPELpQVHSXHGHXVDU
XQWXERGHDFHURLQR[LGDEOHIOH[LEOHRXQRUHIRU]DGRGH
PCV. Instale una válvula de cierre de fácil acceso entre el
suministro y la unidad. Esta válvula de cierre no debe ser
instalada detrás de la unidad
NOTA: No use
válvulas de tipo
autoperforante.
1. Retire el panel
de servicio
frontal.
2. Haga circular el
tubo a través del
agujero derecho en la parte trasera hacia la entrada de
la válvula solenoide de entrada de agua.
3. Instale una unión de compresión sobre la tubería y
conecte la misma a la entrada del solenoide.
BOMBA DE DESAGÜE
Instalación del Desagüe
8QDERPEDGHGHVDJHHVWiGLVSRQLEOHSDUDHVWD
máquina de hielo. El número del kit de la bomba de
GHVDJHHV83.\HVWiGLVSRQLEOH
en geapplianceparts.com o llamando al 877-959-8688.
En Canadá, visite GEApppliances.ca o comuníquese al
800-661.1616.
DESAGÜE POR GRAVEDAD
Drain Installation
AVISO
Restricciones en el sistema de
desagüe hasta la máquina harán que el agua
retroceda en la hielera y que derrita el hielo. La
tubería de desagüe por gravedad debe estar ventilada,
no poseer torceduras, y descender hasta el desagüe
del edificio. De forma típica, las brechas de aire son
requeridas por los códigos locales.
1. Coloque la máquina de hielo frente a la abertura de la
instalación. Ajuste las patas niveladoras hasta la altura
DSUR[LPDGD+D\7DSDVSDUD3DWDVHQHOSDTXHWH
de herramientas que se pueden calzar en las patas
niveladoras, si estas últimas quedan visibles una vez
nivelada la unidad.
2. Retire el panel de servicio frontal y el panel superior
negro.
NOTA: 6LFRQHFWDUiXQPRGHORGHGHVDJHSRU
JUDYHGDG\ODDEHUWXUDGHOGHVDJHIXHXELFDGDHQHO
piso debajo de la bandeja de la base de acuerdo con las
especificaciones de preinstalación, siga las pasos 3 a 6
SDUDGUHQDUODXQLGDGDWUDYpVGHODEDVH'HQRVHUDVt
proceda al paso 6.
3. Retire la abrazadera y el codo con púas y quite la
tapa plástica de la bandeja de la base, debajo de la
PDQJXHUDGHGHVDJH
Tornillo que
Asegura el Panel
de Servicio
Frontal
Instrucciones de instalación
INSTRUCCIONES DE INSTALACIÓN
INSTRUCCIONES PARA INVERTIR LA
POSICIÓN DE LA MANIJA
1. Retire la llave Allen del sobre del kit de tornillos del panel
de instalación.
2. Afloje el tornillo de ajuste utilizando la llave Allen. Retire
la manija y de vuelta la misma, de modo que el logo mire
hacia el lado contrario.
3. Coloque las tapas de la manija sobre los tensores de
la puerta. Asegúrese de sostener la manija de modo tal
que no caiga y raye el acabado del electrodoméstico.
Asegúrese de que ambas tapas de las manijas estén
apoyadas sobre la base de la puerta.
4. %ORTXHHXQH[WUHPRGHODPDQLMDHQVXSRVLFLyQ
ajustando el tornillo en la tapa de la manija con la llave
$OOHQSURYLVWD12DMXVWHHQH[FHVR
5. Continúe sosteniendo la manija mientras bloquea el otro
H[WUHPRGHODPDQLMDHQVXSRVLFLyQDMXVWDQGRHOWRUQLOOR
HQODWDSDGHODPDQLMD12DMXVWHHQH[FHVR
AFLOJAR
tornillo de ajuste
tornillo de ajuste
tensor
tapa de la manija
tornillo de ajuste
tornillo de ajuste

49-60745 Rev. 5 15
COLOCACIÓN DE LA MÁQUINA DE
HIELO
La máquina de hielo es suministrada con un cable de
FRUULHQWH1RUHWLUHHOSHUQRGHFRQH[LyQDWLHUUDGHO
enchufe del cable. No use prolongadores. Siga todos los
códigos. Conecte la máquina de modo que el circuito
posea 115v, 15 amp.
1. Si el tomacorriente eléctrico de la máquina de hielo
está detrás de la unidad, enchufe el mismo en la
unidad.
2. Posicione la unidad en la abertura de la instalación.
3. Abra el suministro de agua. Asegúrese de que la
máquina de hielo esté enchufada y encendida.
'HVOLFHODXQLGDGSRUODDEHUWXUDGHODLQVWDODFLyQ
prestando especial atención al suministro de agua y a
ODVFRQH[LRQHVGHOGHVDJH ¡Evite torceduras!
5. Vierta un par de cuartos de galón de agua en la hielera;
HQPiTXLQDVHTXLSDGDVFRQERPEDGHGHVDJHOD
ERPEDGHGHVDJHVHGHEHLQLFLDU\GHEHERPEHDU
agua. Controle que no haya pérdidas.
6. Vuelva a instalar el panel de acceso al servicio.
7. Nivele la unidad según sea necesario.
DESAGÜE POR GRAVEDAD
4. Conecte un conector con púas de 5/8” a la manguera
GHGHVDJHDVHJXUDQGRODPLVPDFRQODDEUD]DGHUD
para manguera provista.
5 Corte una pieza de 8” de un tubo tygon (plástico
WUDQVSDUHQWHGH´GH'LiP([W[´GH'LiP([W
'HVOLFHXQH[WUHPRGHOWXERSRUODDEUD]DGHUDGHMHHO
RWURH[WUHPRGHOWXERDSR\DGRHQHOSLVRGHODEDQGHMD
de la base hasta que la unidad esté posicionada sobre
HOGHVDJHGHOSLVR
+DJDFLUFXODUHOWXERGHGHVDJH3XHGHDLQVHUWDU
HOWXERGHGHVDJHDWUDYpVGHODEDQGHMDGHODEDVH
HQHOGHVDJHGHOSLVRREKDFHUFLUFXODUHOWXERGH
GHVDJHDWUDYpVGHORULILFLRGHOSDQHOLQIHULRUWUDVHUR
y conectar el codo con púas y asegurarlo con una
abrazadera.
7. Reinstale el panel superior trasero.
8. Vuelva a instalar el panel de acceso al servicio. Nivele
la unidad. Patas en el paquete de herramientas que
se pueden calzar en las patas niveladoras, si estas
últimas quedan visibles una vez nivelada la unidad.
Suministro de Agua
La tubería de suministro de agua recomendada es de ¼”
GHGLiPHWURH[WHUQRGHFREUH7DPELpQVHSXHGHXVDU
XQWXERGHDFHURLQR[LGDEOHIOH[LEOHRXQRUHIRU]DGRGH
PCV. Instale una válvula de cierre de fácil acceso entre el
suministro y la unidad. Esta válvula de cierre no debe ser
instalada detrás de la unidad.
/DFRQH[LyQGHDJXDHVWiHQODSDUWHWUDVHUDGHOJDELQHWH
5HDOLFHODFRQH[LyQXWLOL]DQGRXQDXQLyQGHFRPSUHVLyQ
una es provista adherida al tubo de entrada de agua en la
parte trasera del gabinete.
Al empotrar: Enrolle suficiente tubería detrás de la
máquina de modo que pueda ser empujada por la cavidad
sin retorcer la misma.
Manguera
GH'HVDJH
'UDLQ+RVH
Route to
building drain
Conector
de Púas
Tubería de
Entrada de
Agua (campo
provisto)
Instrucciones de instalación
INSTRUCCIONES DE INSTALACIÓN

16 49-60745 Rev. 5
Limpieza de la Parte Exterior
/DSXHUWD\ODPDQLMDGHODSXHUWDGHDFHURLQR[LGDEOHVH
SXHGHQOLPSLDUFRQXQOLPSLDGRUGHDFHURLQR[LGDEOHGLVSRQLEOH
FRPHUFLDOPHQWH/RVOLPSLDGRUHVFRQiFLGRR[iOLFRWDOHV
FRPR%DU.HHSHUV)ULHQG6RIW&OHDQVHUHOLPLQDUiQHOy[LGR
deslustres y pequeñas manchas sobre la superficie.
Use sólo un limpiador líquido libre de material abrasivo y frote
en la dirección de las líneas del cepillo con una esponja suave
y húmeda. No use cera para electrodomésticos ni pula sobre
HODFHURLQR[LGDEOH
Limpieza del Condensador
El condensador cuenta con alerones y tubos que pueden
atascarse con suciedad y pelusas.
NOTA: El funcionamiento al aire libre puede llevar a una
acumulación rápida de desechos, tales como hojas y otro tipo
GHYHJHWDFLyQ'HIRUPDIUHFXHQWHVHGHEHUiFRQWURODUTXHQR
haya desechos en el condensador. Limpie el mismo siempre
que los alerones estén obstruidos.
.
Para limpiarlo:
1. Retire el zócalo y el panel frontal de servicio.
2. Ubique la superficie del condensador.
3. Aspire la superficie a fin de eliminar todo el polvo y la
pelusa.
AVISO
No abolle los alerones.
4. Vuelva a colocar el zócalo y el panel frontal de servicio en
sus posiciones originales. Adhiera dichas partes al gabinete
usando los tornillos originales.
Superficie el condensador
Limpieza de la Hielera
La hielera debe ser higienizada de forma ocasional.
Normalmente es conveniente higienizar la misma luego de que
el sistema de producción de hielo haya sido limpiado y que la
hielera esté vacía.
Se puede hacer una solución de limpieza con 1 onza de
blanqueador hogareño y 2 galones de agua caliente (95°F -
115°F). Use una tela limpia y limpie el interior de la hielera
con la solución de limpieza. Vierta parte de la solución en el
GHVDJH
'HMHTXHVHVHTXHFRQHODLUH
Adaptación para el Invierno
1. Limpie el sistema de fabricación de hielo de acuerdo con
las instrucciones anteriores.
2. Abra la puerta y presione el botón ON/OFF (Encender/
Apagar) para apagar la máquina de hielo.
3. Cierre el suministro de agua.
'UHQHHOGHSyVLWRGHDJXDUHWLUDQGRHOEORTXHDGRUGHJRPD
debajo del depósito. Está ubicado cerca de la pared trasera
de la hielera.
'HVFRQHFWHODWXEHUtDGHDJXDHQWUDQWHDWUDYpVGHOD
válvula de entrada de agua.
6. Abra la puerta. Presione el botón ON/OFF (Encender/
Apagar) para encender la máquina de hielo.
7. Haga circular aire a través de la válvula de entrada de
agua. Puede ser usada una bomba para inflar llantas.
/RVPRGHORVFRQXQDERPEDGHGHVDJHLQVWDODGDGHEHUiQ
FRQWDUFRQDSUR[LPDGDPHQWHòJDOyQGHDQWLFRQJHODQWH
59SURSLOHQJOLFROGHQWURGHOGHVDJHGHODKLHOHUD
NOTA: NO se deberá usar anticongelante para autos.
7. Apague y desenchufe la máquina.
Bloqueador de goma
Cuidado y limpieza
CUIDADO Y LIMPIEZA

49-60745 Rev. 5 17
Superficie el condensador
La luz de TIME TO CLEAN (Hacer la Limpieza) se encenderá
luego de 6 meses de uso. Permanecerá encendida hasta que
el sistema de producción de hielo haya sido limpiado.
'HEHXVDUJXDQWHVGHJRPDDOXVDUHOOLPSLDGRUGHVDUUR3DUD
ordenar el limpiador de sarro, visite GEApplianceParts.com o
llame al 877-959-8688. Ordene la pieza número WX08X42873.
5HWLUHWRGRHOKLHORGHODKLHOHUD'HVFDUWHHOKLHOR\JXDUGH
el mismo en una heladera portátil o hielera portátil.
2. Mantenga presionado el botón ON/OFF (Encender/ Apagar)
durante 3 segundos hasta que la luz blanca se apague.
3. Mantenga presionados los botones CLEAN-RESET
(Borrar-Reiniciar) y ON/OFF (Encender/ Apagar) durante
5 segundos. La luz TIME TO CLEAN (Hacer la Limpieza)
titilará.
4. Vierta 8 onzas de limpiador de sarro de la máquina de hielo
en el depósito de esta última.
8WLOLFHODPiTXLQDGXUDQWHDSUR[LPDGDPHQWHòKRUD
6. Presione y libere el interruptor ON/OFF (Encender/
Apagar). La máquina comenzará a eliminar la solución de
limpieza.
8WLOLFHODPiTXLQDGXUDQWHRWUDòKRUD
8. Presione y libere el interruptor ON/OFF (Encender/
Apagar). La máquina detendrá el proceso de limpieza.
9. Vierta un galón de agua caliente en el cesto y deje correr el
GHVDJH
10. Elimine el sarro mineral del cobertor del cesto mezclando
limpiador de sarro de la máquina de hielo y agua caliente,
y usando dicha solución para eliminar el sarro frotando
sobre el cobertor.
11. Enjuague el cobertor con agua caliente.
12. Higienice el interior del cesto.
13. Reemplace el hielo eliminado en el paso 1, si corresponde.
14. Presione y libere el botón ON/OFF (Encender/ Apagar)
para reiniciar la producción de hielo.
15. La cuchara del hielo debe ser lavada de forma regular y es
de uso seguro en lavavajillas.
Los cubos gourmet normales son cilíndricos. Si los cubos
gourmet son irregulares o les falta forma, el sarro mineral debe
ser eliminado del sistema de producción de hielo.
NOTA: El cesto está aislado y no está refrigerado, de modo
que la forma del hielo cambiará en la hielera, ya que es normal
que el hielo se derrita.
POWER
ON/OFF
CLEAN
RESET
TIME TO
CLEAN
CHECK
WATER
ICE
MAKING
ADVERTENCIA
El limpiador de sarro de la máquina de hielo contiene ácidos.
Los ácidos pueden producir quemaduras.
Si un limpiador concentrado entra en contacto con la piel,
limpie el mismo con agua. Si se traga, NO induzca el vómito.
Tome grandes cantidades de agua o leche. Llame al Médico
de inmediato. Mantenga los mismos fuera del alcance de los
niños.
Vierta limpiador de sarro
Cuidado y limpieza (Cont.)
CUIDADO Y LIMPIEZA

18 49-60745 Rev. 5
Problema Causas Posibles Qué hacer
La forma de los cubos de agua está
incompleta.
Sarro en el sistema de producción de
hielo
Clean the ice making system
Baja capacidad 'HVDJHUHVWULQJLGRRDJXDUHVWDQWHHQ
el cesto
Limpie los alerones del condensador enfria-
dos por el aire.
Limpie el sistema de la máquina de hielo.
Controle que no haya torceduras en la
WXEHUtDGHGHVDJH
Sin hielo El interruptor está en OFF (Apagado). Presione el botón ON/OFF (ENCENDIDO/
APAGADO) para activar la corriente.
El disyuntor se desactivó. Vuelva a activar el disyuntor.
El suministro de agua es bajo. Si la luz de Control del Agua está titilando
en Rojo, el suministro de agua es bajo.
La luz de Time to Clean (Hacer la
Limpieza) está activada.
Limpie el sistema de la máquina de hielo
siguiendo las instrucciones de la sección de
Cuidado y Limpieza.
Ruido
La máquina de hielo fue diseñada para un funcionamiento
silencioso, pero hará cierto nivel de ruido durante el ciclo de
SURGXFFLyQGHKLHOR'XUDQWHXQFLFORGHFRQJHODPLHQWRHV
normal escuchar que el ventilador mueve aire y que la bomba
de agua hace circular agua. Se podrá oír el hielo golpear la
hielera o el hielo dentro de la hielera durante la producción.
CONSEJOS PARA LA SOLUCIÓN DE PROBLEMAS
Consejos para la Solución de Problemas... Antes de solicitar el servicio técnico
¡Ahorre tiempo y dinero! Primero revise los cuadros que aparecen en las siguientes páginas y es posible que no
necesite solicitar reparaciones.

49-60745 Rev. 5 19
Abroche su recibo aquí. Para acceder al servicio técnico de acuerdo con la
garantía deberá contar con la prueba de la fecha original de compra.
GARANTÍA LIMITADA
GE Appliances Garantía Limitada de la Máquina de Hielo
Ŷ Viajes del técnico del servicio a su hogar para enseñarle
sobre cómo usar el producto.
Ŷ,QVWDODFLyQHQWUHJDRPDQWHQLPLHQWRLQDGHFXDGRV
Ŷ)DOODVGHOSURGXFWRHQFDVRGHDEXVRPDOXVRRXVRSDUD
propósitos diferentes al original o uso comercial.
Ŷ5HHPSOD]RGHIXVLEOHVGHODFDVDRUHLQLFLRGHGLV\XQWRUHV
Ŷ'DxRFDXVDGRGHVSXpVGHODHQWUHJD
Ŷ5HHPSOD]RGHODVOiPSDUDVVLHVWiQLQFOXLGDV
Ŷ'DxRVRFDVLRQDGRVVREUHHOSURGXFWRSRUDFFLGHQWH
incendio, inundaciones o catástrofes naturales.
Ŷ'DxRVFRQVHFXHQWHVRLQFLGHQWDOHVFDXVDGRVSRUSRVLEOHV
defectos de este producto.
Ŷ3URGXFWRQRDFFHVLEOHSDUDEULQGDUHOVHUYLFLRUHTXHULGR
Qué No Cubrirá GE Appliances:
Por el Período de: GE Appliances Reemplazará
Un Año
'HVGHODIHFKDGHOD
compra original
Cualquier parte GHOUHIULJHUDGRUTXHIDOOHGHELGRDXQGHIHFWRHQORVPDWHULDOHVRODIDEULFDFLyQ'XUDQWH
esta garantía limitada de un año, GE Appliances también proveerá, sin costo, todo el trabajo y el servicio
relacionado con el reemplazo de la parte que presente defectos.
Cinco Años
'HVGHODIHFKDGHOD
compra original
Cualquier parte del sistema de refrigeración sellado (el compresor, condensador, evaporador y todas
ODVWXEHUtDVGHFRQH[LyQTXHIDOOHGHELGRDXQGHIHFWRHQORVPDWHULDOHVRODIDEULFDFLyQ
'XUDQWHHVWDgarantía de cinco años del sistema de refrigeración sellado, GE Appliances también
proveerá, sin costo, todo el trabajo y el servicio relacionado con el reemplazo de la parte que presente
defectos en el sistema de refrigeración sellado.
GEAppliances.com
Todo el servicio de garantía es provisto por nuestros Centros de Servicio de Fabricación, o un técnico autorizado de Servicio al
Cliente (Customer Care®). Para programar una visita del servicio técnico, visítenos en GEAppliances.com, o comuníquese al 800.
GE.CARES (800.432.2737). Cuando llame para solicitar el servicio, tenga los números de serie y modelo disponibles.
EXCLUSIÓN DE GARANTÍAS IMPLÍCITAS
6X~QLFD\H[FOXVLYDDOWHUQDWLYDHVODUHSDUDFLyQGHOSURGXFWRFRPRVHLQGLFDHQOD*DUDQWtD/LPLWDGD/DVJDUDQWtDV
implícitas, incluyendo garantías implícitas de comerciabilidad o conveniencia sobre un propósito particular, se limitan a un
año o al período más corto permitido por la ley.
(VWDJDUDQWtDOLPLWDGDVHH[WLHQGHDOFRPSUDGRURULJLQDO\DFXDOTXLHUGXHxRVXEVLJXLHQWHGHSURGXFWRVFRPSUDGRVSDUDXVRKRJDUHxR
dentro de EE.UU. Si el producto está en un área donde no se encuentra disponible un Proveedor Autorizado del Servicio Técnico de
GE Appliances, usted será responsable por el costo de un viaje o se podrá requerir que traiga el producto a una ubicación del Servicio
7pFQLFRGH*($SSOLDQFHV$XWRUL]DGRSDUDUHFLELUHOVHUYLFLR(Q$ODVNDODJDUDQWtDOLPLWDGDH[FOX\HHOFRVWRGHHQYtRROODPDGDVGHO
servicio a su hogar.
$OJXQRVHVWDGRVQRSHUPLWHQODH[FOXVLyQROLPLWDFLyQGHGDxRVIRUWXLWRVRFRQVHFXHQWHV(VWDJDUDQWtDOLPLWDGDOHGDGHUHFKRV
legales específicos y es posible que tenga otros derechos legales que varían entre un estado y otro. Para conocer cuáles son sus
derechos legales, consulte a la oficina de asuntos del consumidor local o estatal o al Fiscal de su estado.
Warrantor: GE Appliances, a Haier company
Louisville, KY 40225

20 49-60745 Rev. 5
ACCESORIOS
Accesorios
¿Busca Algo Más?
Están disponibles paneles acabados para puertas de
DFHURLQR[LGDEOHFRQPDQLMDVDWUDYpVGH*($SSOLDQFHV
los cuales se pueden adherir a la máquina de hielo. Los
kits de los paneles son:
=,3663XHUWDGHDFHURLQR[LGDEOHFRQ0DQLMDV(VWLOR
Euro
3,3663XHUWDGHDFHURLQR[LGDEOHFRQ0DQLMDV(VWLOR
3UR¿OH
&,363XHUWDGHDFHURLQR[LGDEOHFRQ0DQLMDV(VWLOR
Café
&,3'1HJURPDWHFRQPDQLMDHVWLOR&DIp
• CIP75W2 - Blanco mate con manija estilo Café
Además, también ofrecemos los siguientes kits de manijas
Café:
• CXXN1H1PNBT - Manija negra
• CXXN1H1PNZ - Manija bronce
• CXXN1H1PNCU - Manija cobre
&;;1+31660DQLMDDFHURLQR[LGDEOH
NOTA: Estos kits solo funcionan con la familia CIP de kits para
puertas.
Para ordenar, visite GEApplianceParts.com o comuníquese
al 877-959-8688. En Canadá, visite GEAppliances.ca o
comuníquese al 800.561.3344.
Extensión del Zócalo: En algunas situaciones, los niveladores
GHODVSDWDVVHH[WHQGHUiQORVX¿FLHQWHKDVWDHVWDUYLVLEOHV8Q
NLWSDUDH[WHQGHUHO]yFDORVREUHODVSDWDVHVWiGLVSRQLEOH(O
número de ese kit es WR02X25708. Para ordenar, visite
GEApplianceParts.com o comuníquese al 877-959-8688.
En Canadá, visite GEAppliances.ca o comuníquese al
800.661.1616.
Estabilidad del Gabinete: En algunas instalaciones con
pedestal, es prudente agregar un soporte antivolcaduras que
asegure la parte trasera del gabinete a una pared. El número
de ese kit es WR01X25709. Para ordenar, visite
GEApplianceParts.com o comuníquese al
877-959-8688. En Canadá, visite GEAppliances.ca o
comuníquese al 800.661.1616.
Conversión del Desagüe: 8QPRGHORGHGHVDJHSRU
gravedad puede ser convertido a un modelo con bomba
GHGHVDJHLQVWDODQGRXQNLWGHERPEDGHGHVDJH
(ONLWGHODERPEDGHGHVDJHHVWiFRPSXHVWRSRUXQD
ERPEDGHGHVDJHXQDUQpVFRQFDEOHV\XQDWXEHUtD
asociada. El número de pieza es UPK3. Para ordenar, visite
GEApplianceParts.com o comuníquese al 877 959-8688.
En Canadá, visite GEAppliances.ca o comuníquese al
800.661.1616.

49-60745 Rev. 5 21
NOTAS
Notas

22 49-60745 Rev. 5
Soporte para el Consumidor
SOPORTE PARA EL CONSUMIDOR
Sitio Web de GE Appliances
¢'HVHDUHDOL]DUXQDFRQVXOWDRQHFHVLWDD\XGDFRQVXHOHFWURGRPpVWLFR"£,QWHQWHDWUDYpVGHO6LWLR:HEGH*($SSOLDQFHVODV
24 horas del día, cualquier día del año! Usted también puede comprar más electrodomésticos maravillosos de GE Appliances y
aprovechar todos nuestros servicios de soporte a través de Internet, diseñados para su conveniencia.
En EE.UU.: GEAppliances.com
Registre su Electrodoméstico
¡Registre su electrodoméstico nuevo a través de Internet, según su conveniencia! Un registro puntual de su producto permitirá
una mejor comunicación y un servicio más puntual de acuerdo con los términos de su garantía, en caso de surgir la necesidad.
También puede enviar una carta en la tarjeta de inscripción preimpresa que se incluye con el material embalado.
En EE.UU.: GEAppliances.com/register
Servicio Programado
(OVHUYLFLRGHUHSDUDFLyQGHH[SHUWRVGH*($SSOLDQFHVHVWiDVyORXQSDVRGHVXSXHUWD&RQpFWHVHDWUDYpVGH,QWHUQHW\SURJUDPH
su servicio a su conveniencia cualquier día del año. En EE.UU.: GEAppliances.com/service o comuníquese al 800.432.2737
durante el horario de atención comercial.
Garantías Extendidas
$GTXLHUDXQDJDUDQWtDH[WHQGLGDGH*($SSOLDQFHV\FRQR]FDORVGHVFXHQWRVHVSHFLDOHVTXHHVWiQGLVSRQLEOHVPLHQWUDVVX
garantía aún está vigente. La puede adquirir en cualquier momento a través de Internet. Los servicios de GE Appliances aún
estarán allí cuando su garantía caduque.
En EE.UU.: GEAppliances.com/extended-warranty o comuníquese al 800.626.2224 durante el horario de atención comercial.
Piezas y Accesorios
Aquellos individuos calificados para realizar el servicio técnico de sus propios electrodomésticos podrán solicitar el envío de
SLH]DVRDFFHVRULRVGLUHFWDPHQWHDVXVKRJDUHVVHDFHSWDQODVWDUMHWDV9,6$0DVWHU&DUG\'LVFRYHU2UGHQHKR\DWUDYpVGH
Internet durante las 24 horas, todos los días. En EE.UU.: GEApplianceparts.com o de forma telefónica al 877.959.8688 durante
el horario de atención comercial.
Las instrucciones que figuran en este manual cubren los procedimientos que serán realizados por cualquier usuario.
Otros servicios técnicos generalmente deben ser derivados a personal calificado del servicio. Se deberá tener cuidado,
ya que una reparación indebida podrá hacer que el funcionamiento no sea seguro.
Contáctenos
Si no se encuentra satisfecho con el servicio que recibió de GE Appliances, comuníquese con nosotros a través de nuestro sitio
Web con todos los detalles, incluyendo su número telefónico, o escriba a:
En EE.UU.: General Manager, Customer Relations | GE Appliances, Appliance Park | Louisville, KY 40225
GEAppliances.com/contact.
-
 1
1
-
 2
2
-
 3
3
-
 4
4
-
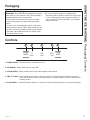 5
5
-
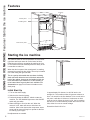 6
6
-
 7
7
-
 8
8
-
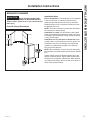 9
9
-
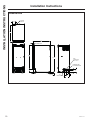 10
10
-
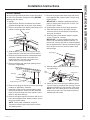 11
11
-
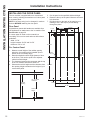 12
12
-
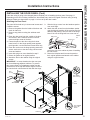 13
13
-
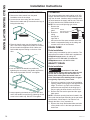 14
14
-
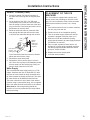 15
15
-
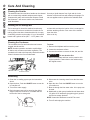 16
16
-
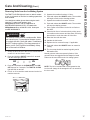 17
17
-
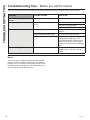 18
18
-
 19
19
-
 20
20
-
 21
21
-
 22
22
-
 23
23
-
 24
24
-
 25
25
-
 26
26
-
 27
27
-
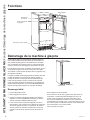 28
28
-
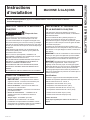 29
29
-
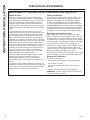 30
30
-
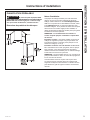 31
31
-
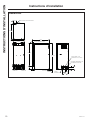 32
32
-
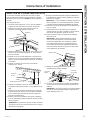 33
33
-
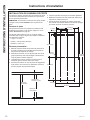 34
34
-
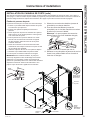 35
35
-
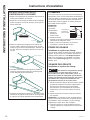 36
36
-
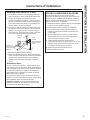 37
37
-
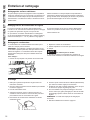 38
38
-
 39
39
-
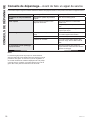 40
40
-
 41
41
-
 42
42
-
 43
43
-
 44
44
-
 45
45
-
 46
46
-
 47
47
-
 48
48
-
 49
49
-
 50
50
-
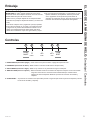 51
51
-
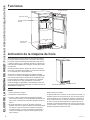 52
52
-
 53
53
-
 54
54
-
 55
55
-
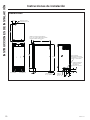 56
56
-
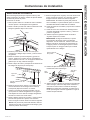 57
57
-
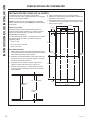 58
58
-
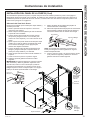 59
59
-
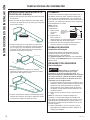 60
60
-
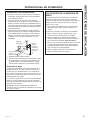 61
61
-
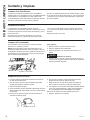 62
62
-
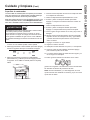 63
63
-
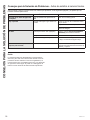 64
64
-
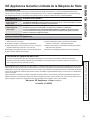 65
65
-
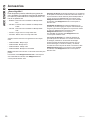 66
66
-
 67
67
-
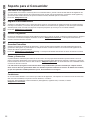 68
68


GE UCC15NJII Guía del usuario
- Categoría
- Fabricantes de cubitos de hielo
- Tipo
- Guía del usuario
en otros idiomas
- français: GE UCC15NJII Mode d'emploi
- English: GE UCC15NJII User guide
Artículos relacionados
-
GE UCC15NJBII El manual del propietario
-
GE Profile UNC15 Serie El manual del propietario
-
-
GE Appliances ZIP80SS Guía de instalación
-
GE UCC15NJII Guía del usuario
-
-
GE GLE12HSLSS Manual de usuario
-
Hotpoint GTS16DTHBB El manual del propietario
-
GE GTS18GTHWW Manual de usuario
-
GE Appliances GTS21FGKWW El manual del propietario