Dell H815dw Cloud MFP Printer Guía de inicio rápido
- Categoría
- Multifuncionales
- Tipo
- Guía de inicio rápido

Dell™ Cloud Multifunction Printer | H815dw
Dell™ Smart Multifunction Printer | S2815dn
Setup Guide
Guide d'installation
Guida di configurazione
Konfigurationshandbuch
Guía de configuración

2
Thank you
for choosing Dell
Merci d'avoir choisi Dell
Grazie per aver scelto Dell
Vielen Dank, dass Sie sich für Dell entschieden haben
Gracias por elegir Dell

3
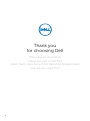
1 Verify the contents of the box
Vérifiez le contenu de l'emballage | Controllare il contenuto della confezione
Überprüfen des Lieferumfangs | Compruebe el contenido de la caja
CAUTION: Before you set up and operate your Dell printer, read and follow the safety instructions in the
Important Information that comes with your printer.
ATTENTION : Avant de configurer et d'utiliser votre imprimante Dell, lisez et respectez les consignes de
sécurité reprises dans le document Informations importantes fourni avec votre imprimante.
ATTENZIONE: Prima di configurare e utilizzare la stampante Dell, leggere e attenersi alle istruzioni di
sicurezza presenti in Informazioni importanti in dotazione con la stampante.
ACHTUNG: Bevor Sie den Dell-Drucker einrichten und bedienen, lesen und befolgen Sie die
Sicherheitshinweise in der Anleitung Wichtige Informationen im Lieferumfang des Druckers.
PRECAUCIÓN: Antes de configurar y utilizar su impresora Dell, lea y siga las instrucciones de seguridad en
la Información importante incluida con la impresora.
NOTE: The contents of the box vary depending on the country or region you purchased the printer from.
REMARQUE : Le contenu de l'emballage varie selon le pays ou la région où votre imprimante a été achetée.
NOTA: Il contenuto della confezione varia in funzione del paese o della regione dove la stampante è stata
acquistata.
HINWEIS: Der Inhalt des Kartons variiert abhängig von dem Land oder der Region, in der Sie den Drucker
gekauft haben.
NOTA: El contenido de la caja puede variar en función del país o de la región en la que compre la impresora.

4
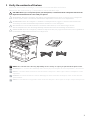
2 Remove the packing material
Retirez le matériau d'emballage | Eliminare il materiale di imballaggio
Entfernen des Verpackungsmaterials | Quite el embalaje
NOTE: The location of adhesive tapes and the shape of the packing material may vary.
REMARQUE : L'emplacement des rubans adhésifs et la forme du matériau d'emballage peuvent varier.
NOTA: Il posizionamento dei nastri adesivi e la forma del materiale di imballaggio può variare.
HINWEIS: Die Position der Klebebänder und die Form des Verpackungsmaterials können variieren.
NOTA: La ubicación de las cintas adhesivas y la forma del embalaje pueden variar.

5
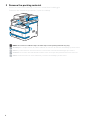
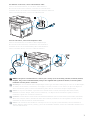
3 Prepare the tray and add paper
Préparez le bac et ajoutez du papier | Preparare il vassoio e aggiungere la carta
Vorbereiten des Papierfachs und Einlegen von Papier | Prepare la bandeja y añada papel

6
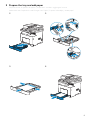
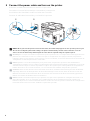
4 Connect the necessary cables
Raccordez les câbles nécessaires | Collegare i cavi necessari
Anschließen der notwendigen Kabel | Conecte los cables necesarios
NOTE: For wireless connection, do not connect the USB cable or Ethernet cable (Dell H815dw only).
REMARQUE : Pour la connexion sans fil, ne raccordez pas le câble USB ou le câble Ethernet (Dell H815dw
uniquement).
NOTA: Per la connessione wireless, non collegare il cavo USB o il cavo Ethernet (solo Dell H815dw).
HINWEIS: Wenn Sie eine WLAN-Verbindung herstellen möchten, trennen Sie das USB- und Ethernet-Kabel
(nur Dell H815dw).
NOTA: Para la conexión inalámbrica, no conecte el cable USB o el cable Ethernet (Dell H815dw solamente).
For USB connection, connect the USB cable
Pour la connexion USB, raccordez le câble USB
Nel caso di connessione USB, connettere il cavo USB
Schließen Sie bei einer USB-Verbindung das USB-Kabel an.
Para la conexión USB, conecte el cable USB

7
For Ethernet connection, connect the Ethernet cable
Pour la connexion Ethernet, raccordez le câble Ethernet
Nel caso di connessione ethernet, connettere il cavo Ethernet
Schließen Sie bei einer Ethernet-Verbindung das Ethernet-Kabel an.
Para la conexión Ethernet, conecte el cable Ethernet
For Fax connection, connect the telephone cable
Pour la connexion Fax, raccordez le câble téléphonique
Nel caso di connessione Fax, connettere il cavo telefonico
Schließen Sie bei einer Faxverbindung das Telefonkabel an.
Para la conexión de Fax, conecte el cable de teléfono
NOTE: If the phone communication is serial in your country (such as Germany, Sweden, Denmark, Austria,
Belgium, Italy, France and Switzerland), and you are supplied with a yellow terminator, insert the yellow
terminator into the phone connector.
REMARQUE : Si la communication téléphonique est de type série dans votre pays (c'est le cas en Allemagne,
en Suède, au Danemark, en Autriche, en Belgique, en Italie, en France et en Suisse) et que vous disposez
d'une terminaison jaune, insérez la terminaison jaune dans le connecteur de ligne téléphonique.
NOTA: Se nel paese di utilizzo è presente una comunicazione seriale (ad esempio Germania, Svezia,
Danimarca, Austria, Belgio, Italia, Francia e Svizzera), e si dispone di un terminatore giallo, inserire il
terminatore giallo nel connettore telefonico.
HINWEIS: Verwendet Ihr Land serielle Telefonkommunikation (wie in Deutschland, Schweden, Dänemark,
Österreich, Belgien, Italien, Frankreich und in der Schweiz), und haben Sie einen gelben Stecker erhalten,
verbinden Sie diesen mit dem Telefonanschluss.
NOTA: Si la comunicación telefónica es de tipo en serie en su país (como Alemania, Suecia, Dinamarca,
Austria, Bélgica, Italia, Francia y Suiza), y posee un terminador amarillo, inserte el terminador amarillo en el
conector del teléfono.

8
5 Connect the power cable and turn on the printer
Branchez le câble d'alimentation et allumez l'imprimante
Connettere il cavo di alimentazione e accendere la stampante
Anschließen des Netzkabels und Einschalten des Druckers
Conecte el cable de alimentación y encienda la impresora
NOTE: When you turn the printer on for the first time, the initial setup appears on the operator panel. If you
do not start configuring the initial settings, the printer automatically restarts in three minutes. You can
choose to run the initial setup wizard again at a later time if required using the operator panel.
REMARQUE : Lorsque vous allumez l'imprimante pour la première fois, la configuration initiale apparaît sur le
panneau de commande. Si vous ne commencez pas la configuration des réglages initiaux, l'imprimante
redémarre dans les trois minutes. Vous pouvez, si vous le souhaitez, réexécuter ultérieurement l'assistant de
configuration à l'aide du panneau de commande.
NOTA: Quando si accende la stampante per la prima volta, sul pannello operatore sarà visualizzata la
configurazione iniziale. Se non si avvia la configurazione delle impostazioni iniziali, la stampante si riaccende
automaticamente dopo tre minuti. È possibile scegliere di eseguire la procedura guidata di configurazione
iniziale di nuovo in un secondo momento, se necessario durante l'utilizzo del pannello operatore.
HINWEIS: Wenn Sie den Drucker zum ersten Mal einschalten, wird die Ersteinrichtung auf dem Bedienfeld
angezeigt. Wenn Sie die Konfiguration der Grundeinstellungen nicht starten, führt der Drucker nach drei
Minuten automatisch einen Neustart durch. Sie können den Assistenten für die Ersteinrichtung später bei
Bedarf erneut über die Bedienerkonsole ausführen.
NOTA: Cuando encienda la impresora por primera vez, aparecerá la pantalla de configuración inicial en el
panel del operador. Si no se comienza con el establecimiento de la configuración inicial, pasados tres
minutos la impresora se reinicia automáticamente. Puede seleccionar ejecutar el asistente de configuración
inicial más tarde si fuera necesario mediante el panel del operador.

9
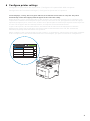
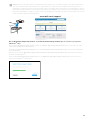
6 Configure printer settings
Configurez les paramètres de l'imprimante | Configurare le impostazioni della stampante
Konfigurieren der Druckereinstellungen | Configure los ajustes de la impresora
Set the language, country, time zone, date and time, then follow the instructions to setup fax. The printer
automatically restarts after tapping
OK
that appears at the end of the setting.
Réglez la langue, le pays, le fuseau horaire, la date et l'heure, puis suivez les instructions pour configurer le fax.
L'imprimante redémarre automatiquement après avoir tapé sur la touche
OK
, qui apparaît au terme du réglage.
Impostare la lingua, il paese, il fuso orario, la data e l'ora, quindi seguire le istruzioni per impostare il fax. Dopo aver
toccato
OK
che appare alla fine dell'impostazione, la stampante si avvia automaticamente.
Legen Sie die Sprache, das Land, die Zeitzone, das Datum und die Uhrzeit fest und befolgen Sie dann die
Anweisungen, um das Fax einzurichten. Der Drucker wird nach dem Berühren von
OK
, das am Ende der
Einstellung angezeigt wird, automatisch neu gestartet.
Ajuste el idioma, el país, la zona horaria, la fecha y la hora y, a continuación, siga las instrucciones para configurar
el fax. La impresora se reinicia automáticamente tras tocar
Aceptar
, que aparece al final de la configuración.
Next
English
Français
Italiano
Deutsch
Español
Dansk
Nederlands
Norsk
Select Your Language

10
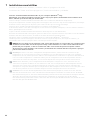
7 Install drivers and utilities
Installez les pilotes et les utilitaires | Installare i driver e i programmi di utilità
Installieren der Treiber und Dienstprogramme | Instale controladores y utilidades
Insert the
Software and Documentation
disc in your computer (Windows
®
only).
Alternatively, go to dell.com/support, enter the Service Tag of your printer, download the latest software and
driver, and then open the file that you downloaded.
Insérez le disque
Software and Documentation
dans votre ordinateur (Windows
®
uniquement).
Vous pouvez également consulter la page dell.com/support, saisir le Service Tag de votre imprimante, télécharger
la dernière version du logiciel et du pilote, puis ouvrir le fichier que vous avez téléchargé.
Inserire il disco
Software and Documentation
nel computer (solo Windows
®
).
In alternativa, visitare il sito dell.com/support, inserire il Service Tag della stampante, scaricare l'ultimo software e
driver, quindi aprire il file scaricato.
Legen Sie die CD
Software and Documentation
in den Computer ein (nur Windows
®
).
Besuchen Sie alternativ dell.com/support, geben Sie das Service-Tag Ihres Druckers ein, laden Sie sich die aktuelle
Software und den Treiber herunter, und öffnen Sie dann die heruntergeladene Datei.
Introduzca el disco
Software and Documentation
en el ordenador (Windows
®
solamente).
También puede ir a dell.com/support, introducir la Service Tag de la impresora, descargar el software y el
controlador más recientes y después abrir el archivo que ha descargado.
NOTE: Before you begin, for wired printer setup, ensure that the printer is connected to your computer using
an Ethernet or USB cable. For wireless printer setup, ensure that there is no cable connected between the
printer and your computer, or there is no Ethernet cable connected to the printer. Computer used for
wireless printer setup should be connected to a preferred wireless network that the new printer is going to
join the same wireless network.
REMARQUE : Dans le cas d'une configuration d'imprimante filaire, vérifiez avant de commencer que
l'imprimante est correctement raccordée à l'ordinateur avec un câble Ethernet ou USB. Pour configurer
l'imprimante sans fil, vérifiez qu'aucun câble ne relie l'imprimante à l'ordinateur ou qu'aucun câble Ethernet
n'est raccordé à l'imprimante. L'ordinateur utilisé pour la configuration sans fil de l'imprimante doit être
connecté à un réseau sans fil préféré, car la nouvelle imprimante va rejoindre le même réseau sans fil.
NOTA: Prima di iniziare, per la configurazione della stampante collegata con cavo, assicurarsi che sia
connessa al computer mediante un cavo Ethernet o USB. Per la configurazione della stampante wireless,
assicurarsi che nessun cavo colleghi la stampante al computer, né un cavo Ethernet sia collegato alla
stampante. Il computer utilizzato per la configurazione della stampante wireless deve essere collegato a una
rete wireless preferita nel caso si intenda collegare la nuova stampante alla stessa rete wireless.
HINWEIS: Bevor Sie mit der kabelgebundenen Druckereinrichtung beginnen, stellen Sie sicher, dass der
Drucker mit einem Ethernet- oder USB-Kabel mit dem Computer verbunden ist. Stellen Sie für die WLAN-
Druckereinrichtung sicher, dass keine Kabelverbindung zwischen dem Drucker und dem Computer besteht,
das heißt, dass kein Ethernet-Kabel mit dem Drucker verbunden ist. Computer, die für die WLAN-
Druckereinrichtung verwendet werden, sollten mit dem bevorzugten WLAN verbunden sein, damit der neue
Drucker dem gleichen WLAN beitritt.

11
NOTA: Antes de empezar, para la configuración de la impresora con cable, asegúrese de que la impresora
esté conectada al ordenador mediante un cable Ethernet o USB. Para la configuración de la impresora
inalámbrica, asegúrese de que no haya ningún cable conectado entre la impresora y su ordenador o que no
haya ningún cable Ethernet conectado a la impresora. El ordenador que se utiliza para la configuración de la
impresora inalámbrica se debe conectar a una red inalámbrica preferida a la que la nueva impresora se vaya
a unir, usando la misma red inalámbrica.
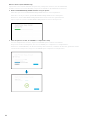
On the Dell Printer Easy Install window, click Next. Dell Printer Easy Install begins to search for your printer
(Windows
®
only).
Sur la fenêtre Dell Printer Easy Install, cliquez sur Suivant. Dell Printer Easy Install lance la recherche de cette
imprimante (Windows
®
uniquement).
Nella finestra Dell Printer Easy Install fare clic su Avanti. Dell Printer Easy Install avvia la ricerca della stampante
(solo Windows
®
).
Klicken Sie im Fenster Dell Printer Easy Install auf Weiter. Dell Printer Easy Install beginnt die Suche nach dem
Drucker (nur Windows
®
).
En la ventana Dell Printer Easy Install, haga clic en Siguiente. Dell Printer Easy Install empieza a buscar esta
impresora (Windows
®
solamente).
www.dell.com/support

12
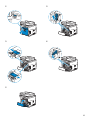
Wireless Printer (Dell H815dw only)
Imprimante sans fil (Dell H815dw uniquement) | Stampante wireless (solo Dell H815dw)
Drahtlos-Drucker (nur Dell H815dw) | Impresora inalámbrica (Dell H815dw solamente)
1 Wait for
Dell Printer Easy Install
wizard to find your printer.
Attendez que l'assistant Dell Printer Easy Install détecte votre imprimante.
Attendere che la procedura guidata Dell Printer Easy Install trovi la stampante.
Warten Sie, bis der Dell Printer Easy Install-Assistent den Drucker gefunden hat.
Espere a que el asistente de Dell Printer Easy Install encuentre la impresora.
2 After the printer is found, click
Install
to complete the setup.
Une fois l'imprimante trouvée, cliquez sur Installer pour terminer l'installation.
Dopo aver trovato la stampante, fare clic su Installa per completare la configurazione.
Klicken Sie auf Installieren, um die Einrichtung abzuschließen, nachdem der Drucker gefunden wurde.
Tras detectar la impresora, haga clic en Instalar para completar la configuración.

13
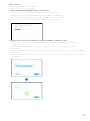
Ethernet Printer
Imprimante Ethernet | Stampante Ethernet
Ethernet-Drucker | Impresora Ethernet
1 Wait for
Dell Printer Easy Install
wizard to find your printer.
Attendez que l'assistant Dell Printer Easy Install détecte votre imprimante.
Attendere che la procedura guidata Dell Printer Easy Install trovi la stampante.
Warten Sie, bis der Dell Printer Easy Install-Assistent den Drucker gefunden hat.
Espere a que el asistente de Dell Printer Easy Install encuentre la impresora.
2 After the printer is found, select the printer, and then click
Next
to complete the setup.
Une fois l'imprimante trouvée, sélectionnez l'imprimante, puis cliquez sur Suivant pour terminer la
configuration.
Una volta trovata la stampante, selezionare la stampante, quindi fare clic su Avanti per completare
l’impostazione.
Nachdem der Drucker gefunden wurde, wählen Sie ihn aus und klicken Sie dann auf Weiter, um die Einrichtung
abzuschließen.
Cuando se haya detectado la impresora, selecciónela y, a continuación, haga clic en Siguiente para completar
la configuración.

14
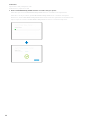
USB Printer
Imprimante USB | Stampante USB
USB-Drucker | Impresora USB
1 Wait for
Dell Printer Easy Install
wizard to find and install your printer.
Attendez que l'assistant Dell Printer Easy Install détecte et installe votre imprimante.
Attendere che la procedura guidata Dell Printer Easy Install trovi e installi la stampante.
Warten Sie, bis der Dell Printer Easy Install-Assistent den Drucker gefunden und installiert hat.
Espere a que el asistente de Dell Printer Easy Install encuentre e instale la impresora.

15
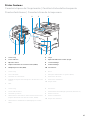
Printer Features
Caractéristiques de l'imprimante | Caratteristiche della stampante
Druckerfunktionen | Características de la impresora
1 Service Tag 6 Tray1
2 Front USB Port 7 Optional 550-Sheet Feeder (Tray2)
3 Operator Panel 8 Toner Cartridge
4 Duplex Automatic Document Feeder (DADF) 9 Drum Cartridge
5 Multipurpose Feeder (MPF) 10 Front Cover
1 Service Tag 6 Bac1
2 Port USB avant 7 Chargeur 550 feuilles en option (Bac2)
3 Panneau de commande 8 Cartouche de toner
4 CADRV (chargeur automatique de documents recto
verso)
9 Cartouche à tambour
10 Capot avant
5 MPF
1 Service Tag 6 Cassetto 1
2 Porta USB anteriore 7 Alimentatore da 550 fogli opzionale (Cassetto 2)
3 Pannello operatore 8 Cartuccia toner
4 Alimentatore automatico di documenti fronte/retro
(Duplex Automatic Document Feeder, DADF)
9 Cartuccia tamburo
10 Coperchio anteriore
5 Alimentatore multifunzione (Multipurpose Feeder,
MPF)
41 32
765
9 810

16
1 Service Tag 6 Fach 1
2 Vorderer USB-Anschluss 7 Optionale 550-Blatt-Zufuhr (Fach 2)
3 Bedienerkonsole 8 Tonerkassette
4 Duplex Automatischer Dokumenteneinzug (DADF) 9 Trommeleinheit
5 Universalzuführung (MPF) 10 Vordere Abdeckung
1 Service Tag 6 Bandeja 1
2 Puerto USB frontal 7 Alimentador de 550 hojas opcional (Bandeja2)
3 Panel del operador 8 Cartucho de tóner
4 Alimentador automático de documentos dúplex
(DADF)
9 Cartucho de tambor
10 Cubierta frontal
5 Alimentador multifunción (MPF)

17
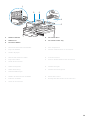
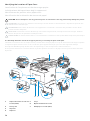
1 Power Switch 7 Power Connector
2 Ethernet Port 8 Chute
3 USB Port 9 Duplex Unit
4 Phone Connector 10 Transfer Unit
5 Wall Jack Connector 11 Fusing Unit
6 "Blue" Plug 12 Rear Cover
1 Interrupteur d'alimentation 7 Connecteur d'alimentation
2 Port Ethernet 8 Chute
3 Port USB 9 Unité recto verso
4 Connecteur de ligne téléphonique 10 Unité de transfert
5 Connecteur de prise murale 11 Module de fusion
6 Prise "bleue" 12 Capot arrière
1 Interruttore di alimentazione 7 Connettore di alimentazione
2 Porta Ethernet 8 Scivolo
3 Porta USB 9 Unità duplex
4 Connettore telefonico 10 Unità di trasferimento
5 Connettore per presa a muro 11 Fusore
6 Spinotto "blu" 12 Coperchio posteriore
2
1
3
4
6
5
7
9
10
11
12
8

18
1 Netzschalter 7 Netzanschluss
2 Ethernet-Anschluss 8 Schacht
3 USB-Anschluss 9 Duplex-Einheit
4 Telefonanschluss 10 Transfereinheit
5 Netzanschluss 11 Fixieranlage
6 "Blauer" Stopfen 12 Hintere Abdeckung
1 Interruptor principal 7 Conector de alimentación
2 Puerto Ethernet 8 Conducto
3 Puerto USB 9 Unidad de impresión a dos caras
4 Conector del teléfono 10 Unidad de transferencia
5 Conector de la pared 11 Unidad del fusor
6 Tapón "azul" 12 Cubierta trasera

19
1 DADF Feed Roller 4 Document Glass
2 DADF Cover 5 Document Feeder Tray
3 Document Guides
1 Rouleau d'alimentation du CADRV 4 Vitre d'exposition
2 Capot du CADRV 5 Plateau d'alimentation en documents
3 Guides du papier
1 Rullo di alimentazione DADF 4 Vetro documenti
2 Coperchio DADF 5 Vassoio di alimentazione dei documenti
3 Guide dei documenti
1 DADF-Einzugsrolle 4 Dokumentenglas
2 DADF-Abdeckung 5 Dokumenteneinzugsfach
3 Dokumentführungen
1 Rodillo de alimentación del DADF 4 Cristal del escáner
2 Cubierta del DADF 5 Bandeja del alimentador de documentos
3 Guías de documentos
2
3
4
5
1

20
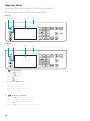
Operator Panel
Panneau de commande | Pannello operatore
Bedienerkonsole | Panel del operador
1 (Home) button
Bouton (Accueil)
Pulsante (Home)
Taste (Home)
Botón (Inicio)
Moves to the
Home
screen.
Renvoie à l'écran d'
Accueil
Passa alla schermata
Home
.
Wechselt zum
Home
-Bildschirm.
Lleva a la pantalla
Inicio
.
2 (Login/Logout) button
Bouton (Connexion/Déconnexion)
Pulsante (Accedi/Disconnetti)
Taste (Anmelden/Abmelden)
Botón (Inicio de sesión/Cierre de sesión)
431 2
H815dw
431 2
S2815dn

21
Allows the user to log out.
Permet à l'utilisateur de se décnecter.
Consente all'utente di scollegarsi.
Ermöglicht dem Benutzer das Abmelden.
Permite al usuario cerrar sesión.
3Touch Panel
Écran tactile
Touch Panel
Touchpanel
Panel táctil
Specifies the settings by directly tapping the screen.
Permet de spécifier les paramètres en tapant directement sur l'écran.
Consente di specificare le impostazioni toccando direttamente lo schermo.
Ermöglicht die Eingabe der Einstellungen durch Berühren des Bildschirms.
Especifica los ajustes si toca directamente la pantalla.
Displays various settings, instructions, and error messages.
Permet d'afficher divers réglages, instructions et messages d'erreur.
Visualizza varie impostazioni, istruzioni e messaggi di errore.
Zeigt verschiedene Einstellungen, Anweisungen und Fehlermeldungen an.
Muestra varios ajustes, instrucciones y mensajes de error.
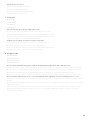
4 Ready/Error LED
DEL Prêt/Erreur
LED Pronto/Errore
Bereit-/Fehler-LED
LED de Listo/Error
Shows a green light when the printer is ready and a blinking green light when data is being received.
Une lumière verte s'allume lorsque l'imprimante est prête, et la lumière verte clignote lors de la réception de données.
Mostra una luce verde quando la stampante è pronta e una luce lampeggiante verde durante la fase di ricezione dati.
Wenn der Drucker bereit ist, leuchtet die Anzeige grün, diese blinkt grün, wenn Daten empfangen werden.
Muestra una luz verde cuando la impresora está lista, y una luz verde parpadeante cuando se están recibiendo datos.
Shows an amber light when an error occurs and a blinking amber light when an unrecoverable print error occurs.
Une lumière orange s'allume en cas d'erreur et la lumière orange clignote lorsqu'une erreur d'impression irréversible se
produit.
Mostra una luce color ambra quando si verifica un errore e una luce lampeggiante ambra quando si verifica un errore di
stampa irreversibile.
Wenn ein Fehler auftritt, leuchtet die Anzeige gelb, diese blinkt gelb, wenn ein nicht behebbarer Druckfehler auftritt.
Muestra una luz ámbar cuando se produce un error y una luz ámbar parpadeante cuando se produce un error de
impresión irrecuperable.

22
5Number Pad
Pavé numérique
Tastierino numerico
Ziffernblock
Teclado numérico
Enters numbers and characters.
Permet de saisir des caractères et des chiffres.
Consente di inserire caratteri e numeri.
Für die Eingabe von Ziffern und Zeichen.
Introduce números y caracteres.
678
H815dw
5
678
S2815dn
5

23
6 (Redial / Pause) button
Bouton (Compo/ Pause)
Pulsante (Ricomposizione/Pausa)
Taste (Wahlwiederholung / Pause)
Botón (Rellamada/Pausa)
Calls up the last called number.
Affiche le dernier numéro composé.
Richiama l'ultimo numero contattato.
Ruft die zuletzt gewählte Nummer auf.
Permite recuperar el número de la última llamada realizada.
Inserts a pause into a telephone number.
Permet d'insérer une pause dans un numéro de téléphone.
Inserisce una pausa in un numero telefonico.
Fügt eine Pause in eine Telefonnummer ein.
Introduce una pausa en un número de teléfono.
7 (Copy) button
Bouton (Copie)
Pulsante (Copia)
Taste (Kopieren)
Botón (Copiar)
Starts copying the document. Effective only from the
Home
screen while you are logged in to the printer.
Permet de démarrer la copie du document. Effectif uniquement à partir de l'écran d'
Accueil
lorsque vous êtes connecté à
l'imprimante.
Avvia la copia di un documento. È attivo solo dalla schermata
Home
e se l'utente ha effettuato l'accesso alla stampante.
Start das Kopieren des Dokuments. Diese Taste ist nur über den
Home
-Bildschirm effektiv, während Sie beim Drucker
angemeldet sind.
Inicia la copia del documento. Solamente resulta efectivo en la pantalla de
Inicio
mientras se encuentra conectado a la
impresora.
8 (Power Saver) button
Bouton (Economie d'énergie)
Pulsante (Risparmio energetico)
Taste (Energiesparfunktion)
Botón (Ahorro de energía)
Enters or exits the Power Saver mode. When the printer is not used for a while, it enters the Power Saver mode to reduce
the power consumption. When the Power Saver mode is active, the (Power Saver) button blinks.
Permet d'entrer ou de sortir du mode d'économie d'énergie. Si l'imprimante n'est pas utilisée pendant une longue durée,
elle entre en mode d'économie d'énergie pour réduire sa consommation d'énergie. Lorsque le mode d'économie
d'énergie est activé, le bouton (Economie d'énergie) clignote.
Consente di entrare e uscire dalla modalità di Risparmio energetico. Quando la stampante non viene utilizzata per un certo
tempo, il sistema entra automaticamente in modalità di Risparmio energetico per ridurre il consumo di energia. Quando è
attiva la modalità di Risparmio energetico, il pulsante (Risparmio energetico) lampeggia.
Aktiviert bzw. deaktiviert den Energiesparmodus. Wenn der Drucker über einen längeren Zeitraum nicht bedient wird, wird
der Energiesparmodus aktiviert, um den Stromverbrauch zu senken. Wenn der Energiesparmodus aktiviert ist, blinkt die
Taste (Energiesparfunktion).
Accede o sale del modo Ahorro de energía. Cuando la impresora no se ha usado durante un cierto tiempo, entra en modo
de Ahorro de energía para reducir el consumo energético. Cuando el modo de Ahorro de energía está activo, el botón
(Ahorro de energía) parpadea.

24
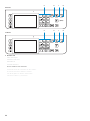
9 Wi-Fi | WPS (Dell Cloud Multifunction Printer | H815dw only) / (Information) button
Bouton Wi-Fi | WPS (Dell Cloud Multifunction Printer | H815dw uniquement) / (Information)
Pulsante Wi-Fi | WPS (solo Dell Cloud Multifunction Printer | H815dw) / (Informazioni)
Taste Wi-Fi | WPS (nur Dell Cloud Multifunction Printer | H815dw) / (Information)
Botón Wi-Fi | WPS (solo Dell Cloud Multifunction Printer | H815dw) / (Información)
Moves to the
Information
screen. You can access various information and settings menu, check consumable levels and
network status, and print various types of reports and lists.
Renvoie à l'écran d'
Information
. Permet d'accéder à diverses informations et menu de réglage, de vérifier les niveaux des
consommables et l'état du réseau, et d'imprimer plusieurs types de rapports et de listes.
Passa alla schermata
Informazioni
. È possibile accedere a vari menu impostazioni e informazioni, controllare i livelli dei
materiali di consumo e lo stato della rete e stampare vari tipi di rapporti ed elenchi.
Wechselt zum Bildschirm
Information
. Sie können auf verschiedene Informationen und Menüs zugreifen,
Verbrauchsstände und den Netzwerkstatus überprüfen und verschiedene Arten von Berichten und Listen ausdrucken.
Lleva a la pantalla
Información
. Puede acceder a diversos menús de configuración e información, comprobar el nivel de
los consumibles y el estado de la red e imprimir varios tipos de informes y listas.
10 (Job Status) button
Bouton (État du travail)
Pulsante (Stato lavori)
Taste (Auftragsstatus)
Botón (Estado de trabajo)
1312910 11
H815dw
12
S2815dn
910 11

25
Moves to the
Job Status
screen. From this screen, you can check or cancel active jobs.
Renvoie à l'écran d'
État du travail
. À partir de cet écran, vous pouvez vérifier ou annuler les travaux en cours.
Passa alla schermata
Stato lavori
. Da questa schermata è possibile controllare o annullare i lavori attivi.
Wechselt zum Bildschirm
Auftragsstatus
. Über diesen Bildschirm können Sie aktive Jobs überprüfen oder abbrechen.
Lleva a la pantalla
Estado de trabajo
. Desde esta pantalla, podrá comprobar o cancelar los trabajos activos.
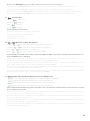
11 (Delete) button
Bouton (Supprimer)
Pulsante (Elimina)
Taste (Löschen)
Botón (Eliminar)
Deletes numbers and characters.
Permet de supprimer des caractères et des numéros.
Consente di cancellare caratteri e numeri.
Löscht Ziffern und Zeichen.
Elimina números y caracteres.
12 / (Quick Dial 1 / Quick Dial 2) button
Bouton / (Numérotation rapide 1 / Numérotation rapide 2)
Pulsante / (Connessione rapida 1/Connessione rapida 2)
Taste / (Schnellwahl 1 / Schnellwahl 2)
Botón / (Marcación rápida 1 / Marcación rápida 2)
Starts faxing the document to the number registered as "001" and "002" respectively of the FAX Speed Dial. Effective only
when the
Home
screen is displayed.
Démarre la télécopie du document vers le numéro enregistré sous les numéros "001" et "002" respectifs de la
Numérotation rapide FAX. Effectif uniquement lorsque l'écran d'
Accueil
est affiché.
Consente di inviare il documento tramite fax al numero della Velocità connessione FAX registrato rispettivamente come
"001" o "002". È attivo soltanto quando viene visualizzata la schermata
Home
.
Startet das Faxen des Dokuments an die als "001" bzw. "002" der FAX-Schnellwahl registrierte Nummer. Diese Funktion ist
nur effektiv, wenn der
Home
-Bildschirm angezeigt wird.
Inicia el envío del documento mediante fax al número registrado como "001" y "002" respectivamente del Marcado rápido
de FAX. Eficaz únicamente cuando se visualiza la pantalla de
Inicio
.
13 (NFC) reader (Dell Cloud Multifunction Printer | H815dw only)
Lecteur (NFC) (Dell Cloud Multifunction Printer | H815dw uniquement)
(NFC) lettore (Dell Cloud Multifunction Printer | H815dw only)
(NFC) Lesegerät (nur Dell Cloud Multifunction Printer | H815dw)
Lector (NFC) (solo Dell Cloud Multifunction Printer | H815dw)
Starts communication between the printer and an NFC card or a mobile device with the NFC function when the card or the
device is tapped to the reader.
Démarre la communication entre l'imprimante et la carte NFC ou un périphérique mobile doté de la fonction NFC lorsque
vous placez la carte ou le périphérique contre le lecteur.
Avvia la comunicazione tra la stampante e una scheda NFC o un dispositivo portatile con la funzione NFC quando si tocca
la scheda o il dispositivo per il lettore.
Startet die Kommunikation zwischen dem Drucker und einer NFC-Karte oder einem Mobilgerät mit NFC-Funktion, wenn
die Karte oder das Gerät das Lesegerät berührt.
Inicia la comunicación entre la impresora y una tarjeta NFC o un dispositivo móvil con la función NFC cuando se puntea la
tarjeta o el dispositivo en el lector.

26
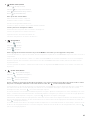
About the Home Screen
À propos de l'écran d'Accueil | Informazioni sulla schermata Home
Über den Home-Bildschirm | Acerca de la pantalla de inicio
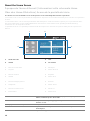
The Home screen is the default screen of the printer. See the following table for basic operations.
L'écran d'Accueil est l'écran par défaut de l'imprimante. Reportez-vous au tableau suivant pour connaître les opérations
de base.
La schermata Home è la schermata predefinita della stampante. Vedere la tabella seguente per le operazioni di base.
Der Home-Bildschirm ist der Standardbildschirm des Druckers. Informationen zur grundlegenden Bedienung
entnehmen Sie der folgenden Tabelle.
La pantalla de inicio es la pantalla predeterminada de la impresora. Consulte la siguiente tabla para las operaciones
básicas.
1 Notification Bar 3 Tiles
2 Handle 4 Dock Menu
1 Barre de notification 3 Mosaïque
2 Poignée 4 Menu du Dock
1 Barra di notifica 3 Riquadri
2 Handle 4 Menu dock
1 Benachrichtigungsleiste 3 Kacheln
2 Ziehpunkt 4 Menü "Dock"
1 Barra de notificaciones 3 Mosaicos
2 Controlador 4 Menú Dock
To select a tile Tap the button in the Dock Menu to display the tiles grouped under the
button, and then tap the desired tile.
To scroll the screen Swipe the screen by dragging your finger on the screen. To scroll faster,
flick the screen.
To display the status of the printer Drag down the handle of the Notification Bar.
To move a tile Tap and hold the tile you want to move, and then drag the tile to the
desired place.
To add a tile Tap the
Add App
tile.
Home
Guest
1 2
3
4

27
To delete a tile Tap and hold the tile you want to delete until appears, and then
drag the tile to . Tap
OK
to delete the tile.
Sélectionner une mosaïque Tapez sur le bouton se trouvant dans le menu Dock pour afficher les
mosaïques regroupées sous ce bouton, puis tapez sur la mosaïque
souhaitée.
Faire défiler l'écran Faites défiler l'écran en faisant glisser le doigt sur l'écran. Pour accélérer
le défilement, donnez un petit coup à l'écran.
Afficher l'état de l'imprimante Faites glisser la poignée de la barre de notification vers le bas.
Pour déplacer une mosaïque Tapez et restez appuyé sur la mosaïque que vous souhaitez déplacer,
puis faites-la glisser vers l'emplacement désiré.
Pour ajouter une mosaïque Tapez sur la mosaïque
Ajout App
.
Supprimer une mosaïque Tapez et restez appuyé sur la mosaïque que vous souhaitez supprimer
jusqu'à ce que apparaisse, puis faites-la glisser vers . Tapez sur
OK
pour effacer le pavé.
Per selezionare un riquadro Toccare il pulsante nel Menu Dock in modo da visualizzare i riquadri
raggruppati dal pulsante, quindi toccare il riquadro desiderato.
Per scorrere la schermata Scorrere lo schermo trascinandolo con un dito. Per scorrere più
rapidamente, toccare velocemente lo schermo.
Per visualizzare lo stato della stampante. Trascinare verso il basso l'handle della barra di notifica.
Per spostare un riquadro Toccare e tenere premuto il riquadro da spostare e trascinarlo nel punto
desiderato.
Per aggiungere un riquadro Toccare il riquadro
Aggiungi app
.
Per eliminare un riquadro Toccare il riquadro da eliminare per qualche secondo finché non appare
, quindi trascinarlo a . Toccare
OK
per eliminare il riquadro.
Zur Auswahl einer Kachel Tippen Sie auf die Schaltfläche im Dock-Menü, um die Kacheln
anzuzeigen, die unter der Schaltfläche zusammengefasst sind, und
tippen Sie dann auf die gewünschte Kachel.
Zum Blättern im Bildschirm Blättern Sie die Seiten, indem Sie den Finger über den Bildschirm ziehen.
Um schneller zu blätter, wischen Sie schnell über den Bildschirm.
Zum Anzeigen des Druckerstatus Ziehen Sie den Ziehpunkt der Benachrichtigungsleiste nach unten.
Zum Verschieben einer Kachel Tippen Sie die Kachel, die Sie verschieben möchten, an und halten Sie sie
fest und ziehen Sie sie an die gewünschte Position.
Zum Hinzufügen einer Kachel Tippen Sie auf die Kachel
App hinzufügen
.
Zum Löschen einer Kachel Tippen Sie auf die Kachel, die Sie löschen möchten, und halten Sie sie
fest, bis angezeigt wird. Ziehen Sie die Kachel dann auf . Tippen
Sie auf
OK
, um die Kachel zu löschen.
Para seleccionar un mosaico Toque el botón del Menú del Dock para mostrar los mosaicos agrupados
en el botón y después toque el mosaico que desee.
Para desplazar la pantalla Arrastre el dedo por la pantalla para pasar la pantalla. Para desplazarse
más rápidamente, dé un toque rápido a la pantalla.
Para mostrar el estado de la impresora Arrastre hacia abajo el controlador de la barra de notificaciones.
Para mover un mosaico Mantenga tocado el mosaico que desee mover y, a continuación,
arrástrelo hasta el lugar que desee.
Para añadir un mosaico Toque el mosaico
Agregar aplicación
.
Para eliminar un mosaico Toque y mantenga pulsado el mosaico que desee eliminar hasta que
aparezca y después arrastre el mosaico a . Toque
Aceptar
para
eliminar el mosaico.

28
Dell Printer Hub
(Dell™ Cloud Multifunction Printer | H815dw only)
Dell Printer Hub
(Dell™ Cloud Multifunction Printer | H815dw uniquement)
Dell Printer Hub
(solo Dell™ Cloud Multifunction Printer | H815dw)
Dell Printer Hub
(nur Dell™ Cloud Multifunction Printer | H815dw)
Dell Printer Hub
(Dell™ Cloud Multifunction Printer | H815dw solamente)
Dell Printer Hub is a program that monitors and informs you of the printer status and allows you to customize the printer
settings. The program also notifies you of the firmware/software updates. For convenient use, you can access the Dell
Document Hub from the Dell Printer Hub. The Dell Printer Hub is included on your Software and Documentation disc
and is installed with the manuals, drivers, and software for the printer. For more information, open the program and click
on the top right of the main window to see the FAQs.
Dell Printer Hub est un programme de surveillance qui vous informe de l'état de l'imprimante et vous permet de
personnaliser ses paramètres. Ce programme vous avertit également des mises à jour de logiciel/micrologiciel. Pour
plus de commodité, vous pouvez accéder à l'application Dell Document Hub depuis Dell Printer Hub. L'application Dell
Printer Hub figure sur votre disque Software and Documentation, et contient des manuels, des pilotes et des logiciels
destinés à votre imprimante. Pour plus d'informations, ouvrez le programme et cliquez sur en haut à droite de la
fenêtre principale pour afficher la FAQ.
Dell Printer Hub è un programma che monitora e informa sullo stato della stampante e consente di personalizzare le
impostazioni della stampante. Il programma informa anche sugli aggiornamenti del firmware/software. Per un uso
pratico, è possibile accedere a Dell Document Hub da Dell Printer Hub. Dell Printer Hub è incluso nel disco Software and
Documentation e viene installato insieme ai manuali, ai driver e al software della stampante. Per ulteriori informazioni,
aprire il programma e fare clic su in alto a destra nella finestra principale per vedere le domande frequenti.
Der Dell Printer Hub ist ein Programm, das den Druckerstatus überwacht und mitteilt und eine Anpassung der
Druckereinstellungen ermöglicht. Das Programm benachrichtigt Sie auch über Firmware-/Softwareaktualisierungen. Für
eine bequeme Verwendung können Sie über Dell Printer Hub auf Dell Document Hub zugreifen. Dell Printer Hub ist auf
der CD Software and Documentation enthalten und wird mit den Bedienungsanleitungen, Treibern und der Software für
den Drucker installiert. Für weitere Informationen öffnen Sie das Programm und klicken Sie oben rechts im Hauptfenster
auf , um die FAQs anzuzeigen.
Dell Printer Hub es un programa que monitorea y notifica el estado de la impresora y permite personalizar la
configuración de la impresora. El programa también le notifica actualizaciones de firmware/software. Para un uso
cómodo, puede acceder a Dell Document Hub desde Dell Printer Hub. Dell Printer Hub se incluye en el disco Software
and Documentation y se instala con los manuales, controladores y software para la impresora. Para obtener más
información, abra el programa y haga clic en en la parte superior derecha de la ventana principal para consultar las
preguntas más frecuentes.

29
Dell Printer Management Tool
(Dell™ Smart Multifunction Printer | S2815dn only)
Dell Printer Management Tool
(Dell™ Smart Multifunction Printer | S2815dn uniquement)
Dell Printer Management Tool
(solo Dell™ Smart Multifunction Printer | S2815dn)
Dell Printer Management Tool
(nur Dell™ Smart Multifunction Printer | S2815dn)
Dell Printer Management Tool
(Dell™ Smart Multifunction Printer | S2815dn solamente)
Dell Printer Management Tool is a program that monitors and informs you of the printer status and allows you to
customize the printer settings. The program also notifies you of the firmware/software updates. The Dell Printer
Management Tool is included on your Software and Documentation disc and is installed with the manuals, drivers, and
software for the printer. For more information, open the program and click on the top right of the main window to
see the FAQs.
Dell Printer Management Tool est un programme de surveillance qui vous informe de l'état de l'imprimante et vous
permet de personnaliser ses paramètres. Ce programme vous avertit également des mises à jour de logiciel/
micrologiciel. Le programme Dell Printer Management Tool figure sur votre disque Software and Documentation, et
contient des manuels, des pilotes et des logiciels destinés à votre imprimante. Pour plus d'informations, ouvrez le
programme et cliquez sur en haut à droite de la fenêtre principale pour afficher la FAQ.
Dell Printer Management Tool è un programma che monitora e informa sullo stato della stampante e consente di
personalizzare le impostazioni della stampante. Il programma informa anche sugli aggiornamenti del firmware/
software. Dell Printer Management Tool è incluso nel disco Software and Documentation e viene installato insieme ai
manuali, ai driver e al software della stampante. Per ulteriori informazioni, aprire il programma e fare clic su in alto a
destra nella finestra principale per vedere le domande frequenti.
Das Dell Printer Management Tool ist ein Programm, das den Druckerstatus überwacht und mitteilt und eine Anpassung
der Druckereinstellungen ermöglicht. Das Programm benachrichtigt Sie auch über Firmware-/
Softwareaktualisierungen. Dell Printer Management Tool ist auf der CD Software and Documentation enthalten und
wird mit den Bedienungsanleitungen, Treibern und der Software für den Drucker installiert. Für weitere Informationen
öffnen Sie das Programm und klicken Sie oben rechts im Hauptfenster auf , um die FAQs anzuzeigen.
Dell Printer Management Tool es un programa que monitorea y notifica el estado de la impresora y permite personalizar
la configuración de la impresora. El programa también le notifica actualizaciones de firmware/software. Dell Printer
Management Tool se incluye en el disco Software and Documentation y se instala con los manuales, controladores y
software para la impresora. Para obtener más información, abra el programa y haga clic en en la parte superior
derecha de la ventana principal para consultar las preguntas más frecuentes.

30
Dell Document Hub App
Application Dell Document Hub | Dell Document Hub App
Dell Document Hub-App | Aplicación Dell Document Hub
Easily access and share documents, images and digital content with the Dell Document Hub app. This innovative cloud
collaboration solution connects your printer and devices to popular cloud services, providing a flexible and secure way
to collaborate from virtually anywhere. Using your computer or mobile device, you can search file across multiple cloud
services simultaneously to print documents or you can scan documents directly to the cloud using the app. Visit
Windows Store, Google Play™ store, and App Store to download the apps. For more information about using the Dell
Document Hub, see the FAQs in Dell.com/documenthub.
Avec l'application Dell Document Hub, vous accédez aux documents, images et contenus numériques et les partagez
facilement. Cette solution de collaboration en nuage innovante connecte votre imprimante et vos périphériques aux
services cloud populaires, fournissant ainsi un moyen de collaboration flexible et sécurisé depuis pratiquement
n'importe où. Grâce à votre ordinateur ou périphérique mobile, vous pouvez rechercher des fichiers simultanément sur
plusieurs services cloud pour imprimer des documents ou encore numériser des documents directement vers le cloud
en utilisant l'application. Rendez-vous sur Windows Store, Google Play™ Store et App Store pour télécharger les
applications. Pour en savoir plus sur l'utilisation de Dell Document Hub, consultez la FAQ sur Dell.com/documenthub.
L'app Dell Document Hub consente di accedere e condividere con facilità documenti, immagini e contenuto digitale.
Questa innovativa soluzione di collaborazione nel cloud connette la stampante e i dispositivi ai servizi cloud più diffusi,
offrendo un mezzo flessibile e sicuro per collaborare da qualsiasi luogo. Utilizzando il computer o un dispositivo mobile
è possibile cercare file su molteplici servizi cloud contemporaneamente per stampare documenti, oppure è possibile
eseguire la scansione dei documenti direttamente nel cloud utilizzando l'app. Per scaricare le app visitare il Windows
Store, il negozio Google Play™ e l'App Store. Per ulteriori informazioni sull'uso di Dell Document Hub, vedere le
domande frequenti nel sito Dell.com/documenthub.
Greifen Sie einfach auf Dokumente zu und teilen Sie Dokumente, Bilder und digitale Inhalte mit der Dell Document Hub-
App. Diese innovative Cloud-Lösung für Zusammenarbeit verbindet Ihren Drucker und Ihre Geräte mit häufig
verwendeten Cloud-Diensten und stellt so eine flexible und sichere Möglichkeit bereit, von nahezu überall
zusammenzuarbeiten. Mit dem Computer oder einem mobilen Gerät können Sie nach Dateien in mehreren Cloud-
Diensten gleichzeitig suchen, um Dokumente mit der App zu drucken oder direkt in die Cloud zu scannen. Besuchen Sie
den Windows Store, Google Play™ Store oder den App Store, um die Apps herunterzuladen. Weitere Informationen zur
Verwendung von Dell Document Hub finden Sie in den FAQs unter Dell.com/documenthub.
Acceda a documentos, imágenes y contenido digital y compártalos fácilmente con la aplicación Dell Document Hub.
Esta innovadora solución de colaboración conecta su impresora y sus dispositivos con servicios de nube populares y
proporciona una forma segura y flexible de colaborar desde virtualmente cualquier lugar. Con su ordenador o
dispositivo móvil, puede buscar un archivo en varios servicios de nube simultáneamente para imprimir documentos o
bien puede escanear documentos directamente a la nube desde la aplicación. Visite Windows Store, Google Play™ store
y App Store para descargar las aplicaciones. Para obtener más información acerca del uso de Dell Document Hub,
consulte las preguntas frecuentes en Dell.com/documenthub.

31
Tips and Tricks
Trucs et astuces | Suggerimenti
Tipps und Tricks | Consejos y sugerencias
Setting up a wireless connection
Établissement d'une connexion sans fil | Impostazione di una connessione wireless
Einrichten einer Wireless-Verbindung | Configuración de una conexión inalámbrica
1 Insert the
Software and Documentation
disc that is provided with the printer into your computer.
The Dell Printer Easy Install program launches automatically.
2Click
Main Menu
.
3Click
Setup
.
4Click
Wireless
.
5 Follow the instructions on the screen, and configure the wireless setting of the printer.
1 Insérez dans l'ordinateur le disque
Software and Documentation
fourni avec l'imprimante.
Le programme Dell Printer Easy Install démarre automatiquement.
2Cliquez sur
Menu principal
.
3Cliquez sur
Configuration
.
4Cliquez sur
Sans fil
.
5 Suivez les instructions à l'écran, puis configurez le réglage sans fil de l'imprimante.
1 Inserire nel computer il disco
Software and Documentation
fornito con la stampante.
Il programma Dell Printer Easy Install viene avviato automaticamente.
2Fare clic su
Menu principale
.
3Fare clic su
Impostazione
.
4Fare clic su
Wireless
.
5 Seguire le istruzioni visualizzate a schermo e configurare le impostazioni wireless della stampante.
1 Legen Sie die mit dem Drucker gelieferte Disc
Software and Documentation
in Ihren Computer ein.
Das Programm Dell Printer Easy Install wird automatisch gestartet.
2 Klicken Sie auf
Hauptmenü
.
3 Klicken Sie auf
Einrichtung
.
4 Klicken Sie auf
Drahtlos
.
5 Befolgen Sie die Anweisungen auf dem Bildschirm und konfigurieren Sie die Wireless-Einstellungen des Druckers.
1 Introduzca el disco
Software and Documentarion
suministrado con la impresora en su ordenador.
El programa Dell Printer Easy Install se inicia automáticamente.
2 Haga clic en
Menú principal
.
3 Haga clic en
Configurar
.
4 Haga clic en
Conexión inalámbrica
.
5 Siga las instrucciones en pantalla y configure los ajustes inalámbricos de la impresora.

32
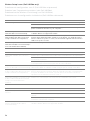
Wireless Setup Issues (Dell H815dw only)
Problèmes de configuration sans fil (Dell H815dw uniquement)
Problemi con l'impostazione wireless (solo Dell H815dw)
Probleme bei der Wireless-Einrichtung (nur Dell H815dw)
Problemas con la configuración inalámbrica (Dell H815dw solamente)
Problem Action
Cannot setup wireless connection. Ensure that the Ethernet cable and USB cable are disconnected from the printer.
Ensure that Wi-Fi is set to On. For more information, see the User's Guide.
The firewall on your computer may be blocking communication with your
printer. Disable the firewall on your computer.
Cannot setup wireless connection
with WPS (Wi-Fi Protected Setup).
Ensure that the security setting of the wireless LAN access point or router is WPA
or WPA2. WEP is not supported on WPS.
Cannot setup wireless connection
with the WPS-PBC (Wi-Fi Protected
Setup-Push Button Configuration).
Press the WPS button on the wireless LAN access point or router within two
minutes after starting the WPS operation on the printer. For details about the
wireless LAN access point or router, see the manual supplied with the wireless
LAN access point or router.
Cannot setup wireless connection
with WPS-PIN (Wi-Fi Protected Setup-
Personal Identification Number).
Check if the PIN you have entered on the computer is correct.
Problème Action
Impossible d'établir une connexion
sans fil.
Vérifiez que le câble Ethernet et le câble USB sont débranchés de l'imprimante.
Vérifiez que le Wi-Fi est réglé sur Activé. Pour plus d'informations, reportez-vous
au Guide de l'utilisateur.
Il est possible que le pare-feu de votre ordinateur bloque la communication avec
votre imprimante. Désactivez le pare-feu de votre ordinateur.
Impossible d'établir la connexion sans
fil avec le WPS (Wi-Fi Protected Setup).
Vérifiez que le paramètre de sécurité du routeur ou point d'accès au réseau local
sans fil est le WPA ou le WPA2. Le WEP n'est pas pris en charge sur le WPS.
Impossible d'établir la connexion sans
fil avec le WPS-PBC (Wi-Fi Protected
Setup-Push Button Configuration).
Appuyez sur le bouton WPS du routeur ou point d'accès au réseau local sans fil
dans les deux minutes suivant le début de l'utilisation du WPS sur l'imprimante.
Pour plus de détails sur le routeur ou point d'accès au réseau local sans fil,
reportez-vous au manuel fourni avec celui-ci.
Impossible d'établir la connexion sans
fil avec le WPS-PIN (Wi-Fi Protected
Setup-Personal Identification
Number).
Vérifiez si le code PIN que vous avez saisi sur l'ordinateur est correct.
Problema Operazioni da effettuare
Impossibile impostare la connessione
wireless.
Assicurarsi che il cavo Ethernet e il cavo USB siano scollegati dalla stampante.
Assicurarsi che Wi-Fi sia attivato. Per maggiori informazioni, vedere la Guida per
l'utente.
Il firewall del computer potrebbe bloccare la comunicazione con la stampante.
Disabilitare il firewall del computer.
Impossibile impostare la connessione
wireless utilizzando WPS (Wi-Fi
Protected Setup).
Verificare che l'impostazione di protezione del punto di accesso LAN o del router
sia WPA o WPA2. WEP non è supportato da WPS.

33
Impossibile impostare la connessione
wireless utilizzando WPS-PBC (Wi-Fi
Protected Setup-Push Button
Configuration).
Premere il pulsante WPS sul punto di accesso LAN wireless o sul router entro due
minuti dall'avvio dell'operazione WPS sulla stampante. Per ulteriori informazioni
sul punto di accesso LAN wireless o sul router, consultare la documentazione
fornita con il punto di accesso LAN wireless o con il router.
Impossibile impostare la connessione
wireless utilizzando WPS-PIN (Wi-Fi
Protected Setup-Personal
Identification Number).
Verificare che il PIN inserito nel computer sia corretto.
Problem Maßnahme
Die Wireless-Verbindung kann nicht
eingerichtet werden.
Stellen Sie sicher, dass das Ethernet-Kabel und das USB-Kabel vom Drucker
getrennt sind.
Stellen Sie sicher, dass Wi-Fi auf Ein gesetzt ist. Weitere Informationen finden Sie
in der Benutzerhandbuch.
Die Firewall des Computers blockiert möglicherweise die Kommunikation mit
dem Drucker. Deaktivieren Sie die Firewall des Computers.
Die Wireless-Verbindung kann nicht
mit WPS (Wi-Fi Protected Setup)
eingerichtet werden.
Stellen Sie sicher, dass die Sicherheitseinstellung des WLAN-Access Points oder
Routers auf WPA oder WPA2 eingestellt ist. WEP wird bei WPS nicht unterstützt.
Die Wireless-Verbindung kann nicht
mit WPS-PBC (Wi-Fi Protected Setup-
Push Button Configuration)
eingerichtet werden.
Drücken Sie die WPS-Taste am WLAN-Access Point oder Router innerhalb von
zwei Minuten, nachdem Sie den WPS-Vorgang beim Drucker gestartet haben.
Ausführliche Informationen zum WLAN-Access Point oder Router finden Sie in
der Bedienungsanleitung im Lieferumfang des WLAN-Access Points oder
Routers.
Die Wireless-Verbindung kann nicht
mit WPS-PIN (Wi-Fi Protected Setup-
Personal Identification Number)
eingerichtet werden.
Überprüfen Sie, ob die beim Computer eingegebene PIN korrekt ist.
Problema Acción
No se puede configurar la conexión
inalámbrica.
Asegúrese de que el cable Ethernet y el cable USB estén desconectados de la
impresora.
Asegúrese de que Wi-Fi está ajustado en Activado. Para obtener más
información, consulte la Guía del usuario.
El cortafuegos del ordenador puede estar bloqueando la comunicación con la
impresora. Deshabilite el cortafuegos del ordenador.
No se puede configurar la conexión
inalámbrica con WPS (Wi-Fi Protected
Setup).
Asegúrese de que la configuración de seguridad del punto de acceso inalámbrico
de la LAN sea WPA o WPA2. WEP no se admite en WPS.
No se puede configurar la conexión
inalámbrica con WPS-PBC (Wi-Fi
Protected Setup-Push Button
Configuration).
Pulse el botón WPS en el punto de acceso inalámbrico de la LAN o el router
antes de que transcurran dos minutos desde el inicio de la operación WPS en la
impresora. Si desea más información sobre el punto de acceso inalámbrico de la
LAN o el router, consulte el manual que se proporciona con el punto de acceso
inalámbrico de la LAN o el router.
No se puede configurar la conexión
inalámbrica con WPS-PIN (Wi-Fi
Protected Setup-Personal
Identification Number).
Compruebe si el PIN que ha introducido en el ordenador es correcto.
Problema Operazioni da effettuare

34
Identifying the Location of Paper Jams
Localisation de l'emplacement des bourrages papier
Individuazione della posizione degli inceppamenti
Identifizieren der position eines papierstaus
Identificación de la ubicación de atascos de papel
CAUTION: Do not attempt to clear any jams using tools or instruments. This may permanently damage the printer.
ATTENTION : N'essayez pas d'éliminer les bourrages à l'aide d'outils ou d'instruments. L'imprimante pourrait être
définitivement endommagée.
ATTENZIONE: Non tentare di rimuovere l'inceppamento con attrezzi o strumenti. Ciò potrebbe causare danni
permanenti alla stampante.
ACHTUNG: Verwenden Sie keine Werkzeuge oder andere Gegenstände, um Papierstaus zu beseitigen. Dadurch
könnte der Drucker irreparabel beschädigt werden.
PRECAUCIÓN:
No intente eliminar atascos con herramientas o instrumentos. Esto podría dañar la impresora para siempre.
The following illustration shows where paper jams may occur along the print media path.
L'illustration suivante montre les emplacements possibles des bourrages papier le long du cheminement du support imprimé.
La seguente figura mostra le aree in cui si verificano gli inceppamenti lungo il percorso dei supporti di stampa.
Die folgende Abbildung zeigt die Bereiche des Papierwegs, in denen Papierstaus auftreten können.
En la siguiente ilustración se muestra dónde se pueden producir los atascos de papel en la trayectoria del material de
impresión.
1 Duplex Automatic Document
Feeder (DADF)
5 Tray1
6 Optional 550-Sheet Feeder
2 Fusing Unit 7 Multipurpose Feeder (MPF)
3 Regi Roll
4 Duplexer
7
65
4
3
1
2

35
1 CADRV (chargeur
automatique de documents
recto verso)
5 Bac1
6 Chargeur 550 feuilles en
option
2 Module de fusion 7 MPF
3 Rouleau chauffant
4 Unité recto verso
1 Alimentatore automatico di
documenti fronte/retro
(Duplex Automatic
Document Feeder, DADF)
5 Cassetto 1
6 Alimentatore 550 fogli
opzionale
2 Fusore 7 Alimentatore multifunzione
(Multipurpose Feeder, MPF)
3 Regi Roll
4 Duplexer
1 Duplex Automatischer
Dokumenteneinzug (DADF)
5 Fach 1
6 Optionale 550-Blatt-Zufuhr
2 Fixieranlage 7 Universalzuführung (MPF)
3 Regi Roll
4 Duplexer
1 Alimentador automático de
documentos dúplex (DADF)
5 Bandeja 1
6 Alimentador de 550 hojas
opcional
2 Unidad del fusor 7 Alimentador multifunción
(MPF)
3 Regi Roll
4 Duplexer

36
Printing on Envelopes
Impression sur des enveloppes | Stampa su buste
Bedrucken von Umschlägen | Impresión en sobres
To print on envelopes with better print quality, set the printer to the envelope mode.
Pour garantir une qualité d'impression optimale sur des enveloppes, configurez l'imprimante en mode Enveloppe.
Per stampare su buste con una qualità di stampa migliore, impostare la stampante in modalità busta.
Um Umschläge mit besserer Druckqualität zu drucken, stellen Sie den Drucker auf den Umschlagmodus ein.
Para imprimir en sobres con la mejor calidad de impresión posible, seleccione el modo sobres en la impresora.
NOTE: Print jobs can be done on envelopes even when the printer is not set to the envelope mode. To get the
better print results, set the printer to the envelope mode.
REMARQUE : Il est possible d'imprimer des enveloppes même lorsque l'imprimante n'est pas configurée en mode
Enveloppe. Pour obtenir de meilleurs résultats, réglez l'imprimante sur le mode Enveloppe.
NOTA: I processi di stampa possono essere eseguiti su buste anche quando non è impostata la modalità busta per
la stampante. Per ottenere migliori risultati di stampa, impostare la modalità busta per la stampante.
HINWEIS: Druckaufträge können auf Umschlägen ausgeführt werden, auch wenn der Drucker nicht auf den
Umschlagmodus eingestellt ist. Um bessere Druckergebnisse zu erhalten, stellen Sie den Drucker auf den
Umschlagmodus ein.
NOTA: Es posible imprimir en sobres aunque el modo sobres no esté configurado en la impresora. Para obtener los
mejores resultados de impresión posibles, seleccione el modo sobres en la impresora.
NOTE: When the printer is in the envelope mode, print jobs cannot be done while the paper type is set to other
than envelopes.
REMARQUE : Lorsque l'imprimante est en mode Enveloppe, il est impossible de lancer des travaux d'impression
tant que vous ne choisissez pas le type de papier Enveloppe.
NOTA: Quando la stampante è in modalità busta, i processi di stampa non possono essere eseguiti mentre è
impostato un tipo di carta diverso dalle buste.
HINWEIS: Wenn sich der Drucker im Umschlagmodus befindet, können Druckaufträge nicht ausgeführt werden,
während die Papiersorte auf eine andere Sorte als Umschläge eingestellt ist.
NOTA: Cuando el modo sobres está seleccionado en la impresora, no pueden procesarse trabajos de impresión si
el tipo de papel configurado no es sobres.

37

38
Replacing the toner cartridge
Remplacement de la cartouche de toner | Sostituzione della cartuccia del toner
Ersetzen der Tonerkassette | Sustitución del cartucho de tóner
To replace the toner cartridge, see "Maintaining Your Printer" in the
User's Guide
.
Pour remplacer la cartouche de toner, reportez-vous à la section "Entretien de votre imprimante" du
Guide de
l'utilisateur
.
Per sostituire la cartuccia del toner, consultare "Manutenzione della stampante" nella
Guida per l'utente.
Um die Tonerkassette zu ersetzen, schlagen sie unter "Wartung des Druckers" in der
Benutzerhandbuch
nach.
Para sustituir el cartucho de tóner, consulte "Mantenimiento de la impresora" en la
Guía del usuario.
Cleaning the printer
Nettoyage de l'imprimante | Pulizia della stampante
Reinigen des Druckers | Limpieza de la impresora
To clean the printer, see "Maintaining Your Printer" in the
User's Guide
.
Pour nettoyer l'imprimante, reportez-vous à la section "Entretien de votre imprimante" du
Guide de l'utilisateur
.
Per pulire la stampante, consultare "Manutenzione della stampante" nella
Guida per l'utente.
Um den Drucker zu reinigen, schlagen Sie unter "Wartung des Druckers" in der
Benutzerhandbuch
nach.
Para limpiar la impresora, consulte "Mantenimiento de la impresora" en la
Guía del usuario.

39
Ordering Supplies
Commandes de fournitures | Ordinare i materiali di consumo
Bestellen von Verbrauchsmaterial | Pedido de suministros
You can order consumables such as toner cartridge and drum cartridge from Dell online when using a networked
printer. Type the IP address of your printer in your web browser, launch the Dell Printer Configuration Web Tool, and
click the Order Supplies at: to order consumables for your printer.
You can also order consumables by the following method on Windows
®
.
1 For Windows
®
7:
Click Start All Programs Dell Printers Dell Printer Hub or Dell Printer Management Tool.
For Windows
®
10:
Click the Start button Dell Printer Hub or Dell Printer Management Tool.
2 For Dell Printer Hub, select the printer from
My Printers
.
For Dell Printer Management Tool, select the printer displayed by default, or another printer from the drop-down list
on the upper-right corner of the screen.
3Click
Supplies
.
4 Order consumables either from the web or phone.
If ordering from the web:
a Select your printer type and printer name.
b Click Next.
If ordering by phone:
Call the number that appears on the top-left corner of the window, or click Contact Us.
To ensure that you get the best service, have your Dell printer's Service Tag ready.
See the Printer Features section of this document to locate the Service Tag of your printer.
Vous pouvez commander des fournitures telles qu'une cartouche de toner et une cartouche à tambour, sur le site
Internet Dell si vous utilisez une imprimante connectée en réseau. Saisissez l'adresse IP de votre imprimante dans votre
navigateur Internet, lancez le Dell Printer Configuration Web Tool, puis cliquez sur Commander des fournitures à : pour
commander les fournitures adaptées à votre imprimante.
Vous pouvez également commander des consommables de la manière suivante sous Windows
®
.
1 Pour Windows
®
7 :
Cliquez sur Démarrer Tous les programmes Imprimantes Dell Dell Printer Hub ou Dell Print Management
Tool.
Pour Windows
®
10 :
Cliquez sur le bouton Démarrer
Dell Printer Hub ou Dell Print Management Tool.
2 Pour Dell Printer Hub, sélectionnez l'imprimante dans
Mes imprimantes
.
Pour Dell Printer Management Tool, sélectionnez l'imprimante affichée par défaut ou une autre imprimante dans la
liste déroulante du coin supérieur droit de l'écran.
3Cliquez sur
Fournitures
.
4 Commandez des fournitures en ligne ou par téléphone.
Si vous commandez depuis Internet :
a Sélectionnez le type et le nom de l'imprimante.
b Cliquez sur Suivant.
Si vous commandez par téléphone :
Composez le numéro qui s'affiche dans le coin supérieur gauche de la fenêtre ou cliquez sur Nous contacter.
Pour vous assurer le meilleur service, préparez le Service Tag de votre imprimante Dell.
Reportez-vous a la section Caracteristiques de l'imprimante de ce document pour savoir ou trouver le Service Tag de
votre imprimante.

40
Utilizzando una stampante collegata in rete, è possibile ordinare materiali di consumo, come una cartuccia del toner e
una cartuccia a tamburo, direttamente da Dell online. Digitare l'indirizzo IP della stampante nel browser Web, avviare
Dell Printer Configuration Web Tool e fare clic su Ordinare i materiali consumabili a: per ordinare materiali consumabili
per la stampante.
È possibile inoltre ordinare i componenti di consumo in base al seguente metodo in Windows
®
.
1Per Windows
®
7:
Fare clic su Start Tutti i programmi Stampanti Dell Dell Printer Hub o Dell Print Management Tool.
Per Windows
®
10:
Fare clic sul pulsante Start Dell Printer Hub o Dell Print Management Tool.
2 Per Dell Printer Hub, selezionare la stampante in
Stampanti personali
.
Per Dell Printer Management Tool, selezionare la stampante visualizzata per impostazione predefinita, oppure
un'altra stampante dall'elenco a discesa nell'angolo in alto a destra della schermata.
3Fare clic su
Materiali di consumo
.
4 Ordinare i materiali di consumo dal web o telefonicamente.
Se si ordina da Web:
a Selezionare il tipo di stampante e il nome.
b Fare clic su Avanti.
Se si ordina per telefono:
Contattare il numero visualizzato nell'angolo in alto a sinistra della finestra oppure fare clic su Contatti.
Per garantirsi il migliore servizio, disporre prontamente del Service Tag della stampante Dell.
Consultare la sezione relativa alle caratteristiche della stampante di questo documento in modo da individuare il
Service Tag della stampante.
Sie können Verbrauchsmaterialien, wie Tonerkassetten und Trommeleinheiten, von Dell online bestellen, wenn Sie
einen vernetzten Drucker verwenden. Geben Sie die IP-Adresse Ihres Druckers in Ihren Webbrowser ein, starten Sie das
Dell Printer Configuration Web Tool, und klicken Sie auf Verbrauchsmaterialien bestellen bei:, um Verbrauchsmaterial
für Ihren Drucker zu bestellen.
Unter Windows
®
können Sie Verbrauchsmaterialien auch über das folgende Verfahren bestellen.
1Für Windows
®
7:
Klicken Sie auf Start Alle Programme Dell Printers Dell Printer Hub oder Dell Print Management Tool.
Für Windows
®
10:
Klicken Sie auf die Start-Taste
Dell Printer Hub oder Dell Print Management Tool.
2 Wählen Sie für Dell Printer Hub den Drucker und
Eigene Drucker
aus.
Wählen Sie für Dell Printer Management Tool den standardmäßig angezeigten Drucker oder einen anderen Drucker
aus dem Dropdown-Menü in der oberen rechten Ecke des Bildschirms aus.
3 Klicken Sie auf
Versorgungsmaterialien
.
4 Bestellen Sie Versorgungsmaterialien entweder über das Internet oder über das Telefon.
Für eine Bestellung per Internet:
a Wählen Sie Ihren Druckertyp und den Druckernamen aus.
b Klicken Sie auf Weiter.
Bei telefonischer Bestellung:
Rufen Sie die Telefonnummer an, die in der linken oberen Ecke des Fensters angezeigt wird, oder klicken Sie auf
Kontaktieren.
Um sicherzustellen, dass Sie den bestmöglichen Service erhalten, halten Sie das Serviceetikett Ihres Dell-Druckers
bereit.
Beachten Sie den Abschnitt Druckerfunktionen dieses Dokuments, um das Service Tag Ihres Druckers zu lokalisieren.

41
Si la impresora está conectada a la red, podrá solicitar consumibles, tales como cartuchos de tóner y cartuchos de
tambor a Dell en línea. Escriba la dirección IP de la impresora en el explorador web e inicie Dell Printer Configuration
Web Tool y haga clic en Realice el pedido de Suministros en: para realizar el pedido de suministros para la impresora.
También puede realizar el pedido de suministros mediante el siguiente método en Windows
®
.
1 Para Windows
®
7:
Haga clic en Inicio Todos los programas Impresoras Dell Dell Printer Hub o Dell Print Management Tool.
Para Windows
®
10:
Haga clic en el botón Inicio
Dell Printer Hub o Dell Print Management Tool.
2 Para Dell Printer Hub, seleccione la impresora de
Mis impresoras
.
Para Dell Printer Management Tool, seleccione la impresora que se muestra de forma predeterminada u otra
impresora de la lista desplegable en la esquina superior derecha de la pantalla.
3 Haga clic en
Suministros
.
4 Solicite consumibles desde la Web o por teléfono.
Si se solicita desde la Web:
a Seleccione el tipo y el nombre de impresora.
b Haga clic en Siguiente.
Si realiza el pedido por teléfono:
Llame al número que aparece en la esquina superior izquierda de la ventana o bien haga clic en Póngase en contacto
con nosotros.
Para asegurarse de obtener el mejor servicio, tenga la Etiqueta de servicio de la impresora Dell preparada.
Consulte la seccion Caracteristicas de la impresora para localizar la Service Tag de la impresora.

42
Finding Information
Où trouver les informations | Individuazione delle informazioni
Wo finde ich was | Búsqueda de Información
For additional information about printer components, printer setup, consumable replacement, available software, and
troubleshooting, see the
User's Guide
.
Pour en savoir plus sur les composants de l'imprimante, la configuration de l'imprimante, le remplacement des
fournitures, les logiciels disponibles et le dépannage, reportez-vous au
Guide de l'utilisateur
.
Per ulteriori informazioni su componenti della stampante, sulla sua configurazione, sul rifornimento dei materiali di
consumo, sul software disponibile e sulla risoluzione dei problemi, consultare la
Guida per l'utente
.
Weitere Informationen zu den Druckerkomponenten, zur Druckereinrichtung, zum Austausch von
Verbrauchsmaterialien, zur verfügbaren Software und zur Problemlösung finden Sie in der
Benutzerhandbuch
.
Si desea información adicional sobre componentes de la impresora, la configuración de la impresora, la sustitución de
suministros, el software disponible y la solución de problemas, consulte la
Guía del usuario
.

43

Product support and manuals
Assistance produit et manuels dell.com/support
Assistenza al prodotto e manuali dell.com/support/manuals
Produktsupport und -handbücher dell.com/printer
Asistencia del producto y manuales
Contact Dell
Prenez contact avec Dell. | Contattare Dell dell.com/contactdell
Wenden Sie sich an Dell. | Póngase en contacto con Dell
Regulatory and safety
Réglementation et sécurité | Regolamenti e sicurezza dell.com/regulatory_compliance
Richtlinien und Sicherheit | Regulaciones y seguridad
Regulatory model and type
Modèle et type réglementaire H815dw
Modello e tipo regolamentari S2815dn
Regulatives Modell und Typ
Modelo regulador y tipo
Printer model
Modèle d'imprimante | Modello di stampante H815dw
Druckermodell | Modelo de impresora S2815dn
Copyright © 2015 Dell Inc. All rights reserved. This product is protected by U.S. and international copyright and
intellectual property laws. Dell
™
and the Dell logo are trademarks of Dell Inc. in the United States and/or other
jurisdictions. All other marks and names mentioned herein may be trademarks of their respective companies.
Printed in Vietnam
604E 79191/086WWCA00 2015-10
KD3007X05-1
-
 1
1
-
 2
2
-
 3
3
-
 4
4
-
 5
5
-
 6
6
-
 7
7
-
 8
8
-
 9
9
-
 10
10
-
 11
11
-
 12
12
-
 13
13
-
 14
14
-
 15
15
-
 16
16
-
 17
17
-
 18
18
-
 19
19
-
 20
20
-
 21
21
-
 22
22
-
 23
23
-
 24
24
-
 25
25
-
 26
26
-
 27
27
-
 28
28
-
 29
29
-
 30
30
-
 31
31
-
 32
32
-
 33
33
-
 34
34
-
 35
35
-
 36
36
-
 37
37
-
 38
38
-
 39
39
-
 40
40
-
 41
41
-
 42
42
-
 43
43
-
 44
44


Dell H815dw Cloud MFP Printer Guía de inicio rápido
- Categoría
- Multifuncionales
- Tipo
- Guía de inicio rápido
En otros idiomas
Documentos relacionados
-
Dell S2815dn Smart MFP printer Guía de inicio rápido
-
Dell H815dw Cloud MFP Printer Guía de inicio rápido
-
-
-
Dell S2810dn Smart Printer Guía de inicio rápido
-
-
Dell S2810dn El manual del propietario
-
-
Dell H825cdw Cloud MFP Laser Printer Guía de inicio rápido
-
Dell E310dw Printer El manual del propietario