CLOSETS By LIBERTY HS1100-RW-24 Instrucciones de operación
- Tipo
- Instrucciones de operación

1
Size: 8.5”X11”
Get fast support at 1-866-264-1964 or
Support@closetsbyliberty.com
Thank you for your recent purchase.
If you’ve had a positive buying experience, we would be grateful if you would leave
us a positive product review.
If you are not entirely delighted with your overall experience, please call us at
1-866-264-1964 so we can discuss any issues you may have.
Review your installation instructions for troubleshooting tips. Find the latest version online
at https://www.libertyhardware.com.
Contact our customer care team by phone at 1-866-264-1964 Monday through Friday from
9:00AM until 5:00PM EST.
E-mail our customer care team at
Support@closetsbyliberty.com
If you need installation assistance, a new part, or have any questions please use the following product
support options:
STOP STOP
DO NOT RETURN TO THE STORE.
We are here to help!
Size: 8.5”X11”
Obtenga soporte rápido llamando al 1-866-264-1964
o en Support@closetsbyliberty.com
Si su experiencia de compra ha sido positiva, le agradeceremos que nos deje una
reseña de producto positiva.
Si su experiencia general no ha sido completamente satisfactoria, le rogamos nos
llame al 1-866-264-1964 para que hablemos sobre cualquier problema que pueda
tener.
ALTO ALTO
No devuelva el producto a la tienda.
¡Estamos para ayudar!
Revise las instrucciones de instalación donde encontrará consejos para solucionar prob-
lemas. Encuentre la última versión en internet en https://www.libertyhardware.com.
Póngase en contacto con nuestro equipo de atención al cliente llamando al
1-866-264-1964 de lunes a viernes de 9:00 a.m. hasta las 5:00 p.m. EST.
Envíe un correo electrónico a nuestro equipo de atención al cliente en
Support@closetsbyliberty.com
Si necesita ayuda para la instalación, un repuesto nuevo o tiene alguna pregunta, use las siguientes
opciones de soporte de producto:
Front Back
Gracias por su compra reciente.
CP5077361 (CP5077367)

2
Size: 8.5”X11”
Get fast support at 1-866-264-1964 or
Support@closetsbyliberty.com
Thank you for your recent purchase.
If you’ve had a positive buying experience, we would be grateful if you would leave
us a positive product review.
If you are not entirely delighted with your overall experience, please call us at
1-866-264-1964 so we can discuss any issues you may have.
Review your installation instructions for troubleshooting tips. Find the latest version online
at https://www.libertyhardware.com.
Contact our customer care team by phone at 1-866-264-1964 Monday through Friday from
9:00AM until 5:00PM EST.
E-mail our customer care team at
Support@closetsbyliberty.com
If you need installation assistance, a new part, or have any questions please use the following product
support options:
STOP STOP
DO NOT RETURN TO THE STORE.
We are here to help!
Size: 8.5”X11”
Obtenga soporte rápido llamando al 1-866-264-1964
o en Support@closetsbyliberty.com
Si su experiencia de compra ha sido positiva, le agradeceremos que nos deje una
reseña de producto positiva.
Si su experiencia general no ha sido completamente satisfactoria, le rogamos nos
llame al 1-866-264-1964 para que hablemos sobre cualquier problema que pueda
tener.
ALTO ALTO
No devuelva el producto a la tienda.
¡Estamos para ayudar!
Revise las instrucciones de instalación donde encontrará consejos para solucionar prob-
lemas. Encuentre la última versión en internet en https://www.libertyhardware.com.
Póngase en contacto con nuestro equipo de atención al cliente llamando al
1-866-264-1964 de lunes a viernes de 9:00 a.m. hasta las 5:00 p.m. EST.
Envíe un correo electrónico a nuestro equipo de atención al cliente en
Support@closetsbyliberty.com
Si necesita ayuda para la instalación, un repuesto nuevo o tiene alguna pregunta, use las siguientes
opciones de soporte de producto:
Front Back
Gracias por su compra reciente.

3
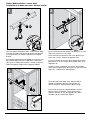
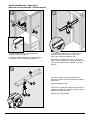
CLOTHES ROD – BARRA PARA ROPA
Clothes rod can be installed 2 ways:
1. Under the top shelf
2. Attached to shelf brackets and moved as needed
La barra para ropa se puede instalar de 2 maneras:
1. Debajo del estante superior
2. Fijada a los soportes del estante y movida según se necesite
1
1
Correct
Placement
Colocación correcta
2
LL
X
2
Y
X
To install clothes rod under top shelf, insert the screw (LL)
through the top of the frame using the front hole closest to
the middle of the tower. Use (LL) to screw the rod bracket (X)
in place. Repeat on opposite side.
Para instalar la barra para ropa debajo del estante superior,
inserte el tornillo (LL) a través de la parte superior del
armazón usando el agujero frontal más cercano a la mitad
de la torre. Use el tornillo (LL) para atornillar el soporte de la
barra (X) en su lugar. Repítalo en el lado opuesto.
Clothes Rod Installation – Top Shelf — Instalación de la barra para ropa - Estante superior
To install clothes rod under top shelf, slide the
rod (Y) straight in and down onto the side
brackets (X), with the rod holes aligning with the
bracket pegs.
Para instalar la barra para ropa debajo del estante
superior, deslice la barra (Y) derecho y hacia abajo
en los soportes laterales (X), con los agujeros de
la barra alineados con los estribos del soporte.
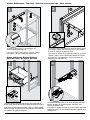
HARDWARE AND PARTS IDENTIFICATION
IDENTIFICACIÓN DE PIEZAS Y ADITAMENTOS
LL
MM
X
Y
x4
x2

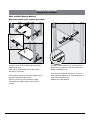
4
Install a shelf bracket with clothes rod bracket (L, X) into
side frame channels at a 45˚ angle.
Once inserted into side frame slots, twist bracket into
place until it 'clicks'. Repeat on opposite side.
Instale un soporte de estante con el soporte de la barra
para ropa (L, X) en los canales del armazón lateral en un
ángulo de 45°.
Cuando se haya instalado en las ranuras del armazón
lateral, gire el soporte para ubicarlo en su lugar hasta que
haga “clic”. Repítalo en el lado opuesto.
2
2
L
X
1
3
X
Y
To install clothes rod under shelf, slide the rod (Y)
straight in and down onto the side brackets (X),
with the rod holes aligning with the bracket pegs.
Para instalar la barra para ropa debajo del estante,
deslice la barra (Y) derecho y hacia abajo en los
soportes laterales (X), con los agujeros de la barra
alineados con los estribos del soporte.
1
1
2
MM
L
X
To install clothes rod below a shelf, use two screws (MM)
to attach the clothes rod bracket (X) onto a shelf bracket
(L) using the front set of holes. Repeat for the second
bracket.
Para instalar la barra para ropa debajo de un estante, use
dos tornillos (MM) para fijar el soporte de la barra para
ropa (X) en un soporte de estante (L) usando el conjunto
frontal de agujeros. Repita para el segundo soporte.
Clothes Rod Installation – Lower Shelf
Instalación de la barra para ropa - Estante inferior

5
Shelf and Shelf Bracket Removal
Retiro del estante y del soporte del estante
2
1
L
2
3
2
3
2
1
1
F
L
To remove shelf bracket (L), lift up on the front of
bracket to 45˚ to release it from side frame slots.
Repeat on opposite side.
Para retirar el soporte del estante (L), levante la
parte frontal del soporte a 45° para liberarlo de las
ranuras del armazón lateral.
Repítalo en el lado opuesto.
To release shelf (F), press both clips on the front
underside of shelf.
Slide shelf (F) forward and then lift off of shelf
brackets (L) to remove.
Para liberar el estante (F), presione ambos clips en
la parte inferior frontal del estante.
Deslice el estante (F) hacia adelante y luego
levántelo de los soportes del estante (L) para
retirarlo.
REMOVING ACCESSORIES
RETIRO DE ACCESORIOS

6
Clothes Rod Removal – Upper Shelf
Retiro de la barra para ropa - Estante superior
2
3
1
MM
L
X
To remove shelf bracket (L), lift up the front of
bracket to about 45˚ to release it from side
frame slots. Repeat on opposite side.
Para retirar el soporte del estante (L), levante la
parte frontal del soporte a 45° para liberarlo de las
ranuras del armazón lateral. Repítalo en el lado
opuesto.
To remove clothes rod bracket (X) from shelf
bracket (L), loosen two screws and remove clothes
rod bracket.
Repeat on opposite side.
Para retirar el soporte de la barra para ropa (X) del
soporte del estante (L), afloje dos tornillos y retire el
soporte de la barra para ropa.
Repítalo en el lado opuesto.
2
1
L
2
1
X
Y
To remove clothes rod (Y), lift rod up off the
bracket and bracket pegs (X).
Para retirar la barra para ropa (Y), levante la barra
del soporte y de los estribos del soporte (X).

7
Drawer and Drawer Bracket Removal
Retiro de cajón y de soporte de cajón
2
2
1
V
To remove drawer bracket (V), lift up on the front of drawer
bracket to about 45˚ to release it from side frame slots.
Repeat on opposite side.
Para retirar el soporte de cajón (V), levante la parte frontal del
soporte de cajón a 45° para liberarlo del lado. Repítalo en el
lado opuesto.
2
2
1
1
To release drawer, pull both clips on the front underside of
drawer. Slide drawer forward off of drawer brackets to remove.
Para liberar el cajón, presione ambos clips en la parte inferior
frontal del cajón. Deslice el cajón hacia adelante sacándolo de
los soportes del cajón para retirarlo.
2
2
1
LL
X
1
Y
X
To remove clothes rod bracket (X) from top panel, loosen
and remove clothes rod bracket screw (LL) and clothes
bracket (X). Repeat on opposite side.
Para retirar el soporte de la barra para ropa (X) del panel
superior, afloje y retire el tornillo del soporte de la barra
para ropa (LL) y el soporte de la barra para ropa (X).
Repítalo en el lado opuesto.
Clothes Rod Removal – Top Panel – Retiro de la barra para ropa - Panel superior
To remove clothes rod (Y), lift rod up off the
bracket and bracket pegs (X).
Para retirar la barra para ropa (Y), levante la barra
del soporte y de los estribos del soporte (X).
-
 1
1
-
 2
2
-
 3
3
-
 4
4
-
 5
5
-
 6
6
-
 7
7


CLOSETS By LIBERTY HS1100-RW-24 Instrucciones de operación
- Tipo
- Instrucciones de operación
en otros idiomas
Artículos relacionados


Otros documentos
-
 ESTATE by RSI CLDRK25SW Guía de instalación
-
 ClosetMaid Classic Corner Frame Guía de instalación
-
Sauder 413118 Instrucciones de operación
-
DeWalt DXST6000WB Manual de usuario
-
Kenmore 146.20163510 Manual de usuario
-
HyLoft 36" x 18" Heavy-Duty Wall Shelves Guía de instalación
-
Aeg-Electrolux S75428DT2 Manual de usuario

