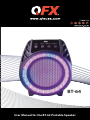
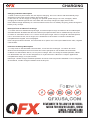
QFX BT-64 Manual de usuario
- Categoría
- Bocinas portables
- Tipo
- Manual de usuario

BT-64
User Manual for the BT-64 Portable Speaker

WARNING
WARNING
TO REDUCE THE RISK OF ELECTRIC SHOCK, DO NOT REMOVE THE COVER ON THIS SPEAKER.
THERE ARE NO USER-SERVICEABLE PARTS INSIDE. REFER ALL SERVICING TO A QUALIFIED
TECHNICIAN
To prevent fire or electric shock, do not expose this equipment to rain or moisture. Do not store or operate this
product near any liquids, heat sources such as radiators, heat registers. Clean only with a dry cloth. Users
should exhibit extra safety when this symbol appears in this instruction manual and follow all precautions as
they are stated.
ADVERTENCIA
PARA REDUCIR EL RIESGO DE DESCARGAS ELÉCTRICAS, NO RETIRE LA CUBIERTA DE ESTE
ALTAVOZ. NO HAY PARTES REPARABLES POR EL USUARIO ADENTRO. CONSULTE TODO EL SERVICIO
A UN TÉCNICO CALIFICADO
Para evitar incendios o descargas eléctricas, no exponga este equipo a la lluvia ni a la humedad. No almacene
ni opere este producto cerca de líquidos, fuentes de calor como radiadores, rejillas de calefacción. Limpiar
solamente con un paño seco. Los usuarios deben exhibir una seguridad adicional cuando este símbolo
aparezca en este manual de instrucciones y seguir todas las precauciones indicadas.
AVERTISSEMENT
POUR RÉDUIRE LE RISQUE DE CHOC ÉLECTRIQUE, N'ENLEVEZ PAS LE COUVERCLE DE CET
ENCEINTE. IL N'Y A AUCUNE PIÈCE RÉPARABLE PAR L'UTILISATEUR. RÉFÉREZ TOUTES LES
RÉPARATIONS À UN TECHNICIEN QUALIFIÉ
Pour éviter tout incendie ou choc électrique, n'exposez pas cet équipement à la pluie ou à l'humidité. Ne
stockez pas et n'utilisez pas ce produit à proximité de liquides, sources de chaleur telles que radiateurs,
registres de chaleur. Nettoyez uniquement avec un chiffon sec. Les utilisateurs doivent faire preuve d'une
sécurité supplémentaire lorsque ce symbole apparaît dans ce manuel d'instructions et suivre toutes les
précautions telles qu'elles sont énoncées.
USB/TF Function Description
1.Insert a USB device to playback
.mp3 music. The unit will automati-
cally start playing when inserted.
2. Insert a TF Card to playback
.mp3 music. The unit will automati-
cally start playing when inserted.
3. Play/Pause: Press to Play/Pause.
4. Track Previous / Next: Press for
previous/next song.
FM Function Description
1.Press the Mode button to enable
FM Mode.
2.PLAY/PAUSE: Press and hold to
automatic search local FM radio
stations. Press to mute audio.
3.Previous/Next Song Key: Short
press for upwards or downwards to
the searched broadcasting station.
4.Note: Please automatic search for
local FM radio stations when first
used.
Microphone Function Description
1. Plug in a microphone for use.
Connector type is a 6.35mm
TS/TRS (Microphone is not
included)
Note: Double click Mode button to
turn ON /OFF the Mic Echo
La Función USB / TF
1.Inserte un dispositivo USB para
reproducir música .mp3. La unidad
comenzará a reproducir automáti-
camente cuando se inserte.
2. Inserte una tarjeta TF para
reproducir música .mp3. La unidad
comenzará a reproducir automáti-
camente cuando se inserte.
3. Reproducir / Pausar: presione
para Reproducir / Pausar.
4. Pista anterior / siguiente:
presione para la canción anterior /
siguiente.
La Función FM
1.Presione el botón Mode para
habilitar el modo FM.
2. REPRODUCIR / PAUSA:
presione y mantenga presionado
para buscar automáticamente
estaciones de radio FM locales.
Presione para silenciar el audio.
3. Tecla de canción anterior /
siguiente: presiónela brevemente
hacia arriba o hacia abajo hasta la
estación de transmisión buscada.
4.Nota: busque automáticamente
estaciones de radio FM locales
cuando las utilice por primera vez.
Función del Micrófono
1. Conecte un micrófono para su
uso. El tipo de conector es un TS /
TRS de 6,35 mm (el micrófono no
está incluido)
Nota: haga doble clic en el botón
Modo para encender / apagar el
eco del micrófono
Fonction USB / TF
1.Insérez un périphérique USB
pour lire de la musique .mp3.
L'appareil commencera
automatiquement la lecture une
fois inséré.
2. Insérez une carte TF pour lire
de la musique .mp3. L'appareil
commencera automatiquement la
lecture une fois inséré.
3. Lecture / Pause: Appuyez pour
Lecture / Pause.
4. Piste précédente / suivante:
Appuyez pour la chanson
précédente / suivante.
Fonction FM
1.Appuyez sur le bouton Mode
pour activer le mode FM.
2.PLAY/PAUSE: Appuyez et
maintenez pour rechercher
automatiquement les stations de
radio FM locales. Appuyez pour
couper le son.
3. Touche de chanson
précédente / suivante: Appuyez
brièvement pour monter ou
descendre jusqu'à la station de
diffusion recherchée.
4.Remarque: Veuillez rechercher
automatiquement les stations de
radio FM locales lors de la
première utilisation.
Fonction du Microphone
1. Branchez un microphone pour
l'utiliser. Le type de connecteur
est un TS / TRS 6,35 mm (le
microphone n'est pas inclus)
Remarque: Double-cliquez sur le
bouton Mode pour activer /
désactiver l'écho du micro

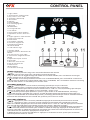
CONTROL PANEL
1. Light / Mode
2. Track Previous / Volume Down
3. Play / Pause / Scan / TWS
4. Track Next / Volume Up
5. TF Card Slot
6. USB slot
7. Power ON/OFF
8. DC 5V Charging Port
9. Mic Input
10. AUX IN Port
11. Charge Indicator
1. Luz / Modo
2. Pista anterior / Bajar volumen
3. Reproducir / Pausar / Escanear /
TWS
4. Seguir siguiente / Subir volumen
5. Ranura para tarjeta TF
6. Ranura USB
7. Encendido / apagado
8. Puerto de carga DC 5V
9. Entrada de micrófono
10. Puerto AUX IN
11. Indicador de carga
1. Lumière / Mode
2. Piste précédente / diminution du
volume
3. Lecture / Pause / Scan / TWS
4. Suivi suivant / Augmentation du
volume
5. Emplacement pour carte TF
6. Fente USB
7. Mise sous / hors tension
8. Port de charge DC 5V
9. Entrée micro
10. Port AUX IN
11. Indicateur de charge
1. : Press for previous song; Press and hold to decrease the volume.
2. : Press for next song; Press and hold to increase the volume
3. Light/Mode: Press to toggle through the mode: Aux In/USB/TF/FM/BT ; Press and hold to switch light
modes. Double click to turn the light ON/ OFF.
4. /Scan/TWS : Press to Play/Pause the current track. In Bluetooth Mode, press and hold for 5 seconds to
enter the pairing mode. Press and hold enter TWS status. In FM Mode, Press and hold to automatic searching
local FM radio stations. In Aux Mode, press to mute audio.
FUNCIONES GENERALES
1. : Presione para la canción anterior; Mantenga pulsado para bajar el volumen.
2. : Presione para la siguiente canción; Mantenga pulsado para subir el volumen
3. Luz / Modo: presione para alternar entre los modos: Aux In / USB / TF / FM / BT; Mantenga pulsado para
cambiar los modos de luz. Haga doble clic para encender / apagar la luz.
4. /Scan/TWS: presione para reproducir / pausar la pista actual. En el modo Bluetooth, mantenga
presionado durante 5 segundos para ingresar al modo de emparejamiento. Mantenga presionado para
ingresar al estado de TWS. En el modo FM, presione y mantenga presionado para buscar automáticamente
estaciones de radio FM locales. En el modo Aux, presione para silenciar el audio.
FONCTIONS GÉNÉRALES
1. : Appuyez sur pour la chanson précédente; Appuyez et maintenez pour diminuer le volume.
2. : Appuyez sur pour la chanson suivante; Appuyez et maintenez pour augmenter le volume
3. Lumière / Mode: Appuyez pour basculer entre le mode: Aux In / USB / TF / FM / BT; Appuyez et maintenez
pour changer de mode d'éclairage. Double-cliquez pour allumer / éteindre la lumière.
4. / Scan / TWS: Appuyez pour lire / mettre en pause la piste actuelle. En mode Bluetooth, maintenez la
touche enfoncée pendant 5 secondes pour accéder au mode de couplage. Appuyez et maintenez pour
entrer le statut TWS. En mode FM, appuyez et maintenez pour rechercher automatiquement les stations de
radio FM locales. En mode Aux, appuyez pour couper le son.
3. Mode FM: Tous les canaux FM s'achent ici. Appuyez sur le bouton "lecture / pause" pour rechercher
automatiquement toutes les chaînes.
GENERAL FUNCTIONS

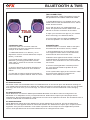
BLUETOOTH & TWS
➚
➚
TWS CONNECTION
TWS connection: TWS Connection is only for
two speakers of the same make and model.
1. Enable Bluetooth on one speaker and on your
mobile device under the Bluetooth menu, search
for BT-64 and connect.
2.Turn ON the other unit, enable Bluetooth
mode, and press and hold the TWS button. You
will hear a sound if connection is succesful.
3. Open your favorite music app on your mobile
device and enjoy True Wireless Stereo.
4.To Exit TWS press and hold the TWS button
on the first speaker. You will hear a sound.
TRUE WIRELESS STEREO
CONEXIÓN TWS
Conexión TWS: La conexión TWS es solo para
dos altavoces de la misma marca y modelo.
1. Activez Bluetooth sur un haut-parleur et sur
votre appareil mobile dans le menu Bluetooth,
recherchez BT-64 et connectez-vous.
2.Mettez l'autre appareil sous tension, activez le
mode Bluetooth et maintenez le bouton TWS
enfoncé. Vous entendrez un son si la connexion
est réussie.
3. Ouvrez votre application musicale préférée
sur votre appareil mobile et profitez de True
Wireless Stereo.
4.Pour quitter TWS, appuyez sur le bouton TWS
du premier haut-parleur et maintenez-le
enfoncé. Vous entendrez un son.
CONNEXION TWS
Connexion TWS: La connexion TWS est
uniquement pour deux enceintes de la même
marque et du même modèle.
1. Habilite Bluetooth en un altavoz y en su
dispositivo móvil en el menú Bluetooth, busque
BT-64 y conéctese.
2. Encienda la otra unidad, habilite el modo
Bluetooth y mantenga presionado el botón
TWS. Oirá un sonido si la conexión se realiza
correctamente.
3. Abra su aplicación de música favorita en su
dispositivo móvil y disfrute de True Wireless
Stereo.
4. Para salir de TWS, mantenga presionado el
botón TWS en el primer altavoz. Oirá un sonido.
BT-64 BLUETOOTH
Bluetooth mode: use the MODE button to enable Bluetooth on the BT-64 Open the Bluetooth settings on
your mobile device and search for QFX BT-64. Select the option to pair both devices. Now you can sit back
and enjoy the music from your favorite app. You will not need to reconnect Bluetooth when changing
modes.
BT-64 BLUETOOTH
Modo Bluetooth: use el botón MODE para habilitar Bluetooth en el BT-64. Abra la configuración de
Bluetooth en su dispositivo móvil y busque QFX BT-64. Seleccione la opción para emparejar ambos
dispositivos. Ahora puede sentarse y disfrutar de la música de su aplicación favorita. No necesitará volver a
conectar el Bluetooth al cambiar de modo.
BT-64 BLUETOOTH
Mode Bluetooth: utilisez le bouton MODE pour activer Bluetooth sur le BT-64. Ouvrez les paramètres
Bluetooth sur votre appareil mobile et recherchez QFX BT-64. Sélectionnez l'option pour coupler les deux
appareils. Vous pouvez maintenant vous asseoir et profiter de la musique de votre application préférée.
Vous n'aurez pas besoin de reconnecter Bluetooth lors du changement de mode.

REMEMBER TO FOLLOW US ON SOCIAL
MEDIA FOR NEW RELEASES, SHOW
VIDEOS, PICTURES AND
INSTRUCTIONAL VIDEOS
CHARGING
Charging Indication Description
1. When in the low power state, the unit requires charging. The unit’s volume will automatically drop
about 30% of the main volume while in low power state.
2.Use a DC 5V, 1A min supply for charging. For optimal speed charge use a 5V, 3A supply. When
charging the indicator light will turn ON. When the unit is fully charged, the light will turn OFF.
Note: Please charge the battery for 12 hours before its first use. For battery longevity, please charge the
battery every 30 days.
Descripción de la Indicación de Carga
1. Cuando está en el estado de baja energía, la unidad requiere carga. El volumen de la unidad bajará
automáticamente alrededor del 30% del volumen principal mientras esté en estado de bajo consumo.
2. Utilice un suministro de DC 5 V 1 A como mínimo para cargar. Para una carga de velocidad óptima,
use un suministro de 5V, 3A. Al cargar, la luz indicadora se encenderá. Cuando la unidad esté
completamente cargada, la luz se apagará.
Nota: Cargue la batería durante 12 horas antes de su primer uso. Para que la batería dure más, cárguela
cada 30 días.
Indication de Charge Description
1. Lorsqu'il est en état de faible consommation, l'unité doit être rechargée. Le volume de l’unité
diminuera automatiquement d’environ 30% du volume principal en cas de faible consommation.
2.Utilisez une alimentation DC 5V, 1A min pour la charge. Pour une charge à vitesse optimale, utilisez
une alimentation 5V, 3A. Lors du chargement, le voyant lumineux s'allumera. Lorsque l'appareil est
complètement chargé, le voyant s'éteint.
Remarque: veuillez charger la batterie pendant 12 heures avant sa première utilisation. Pour la longévité
de la batterie, veuillez charger la batterie tous les 30 jours.

LIMITED PRODUCT WARRANTY POLICY
Before returning your Product for service under this Warranty, please (i) read the instrucon manual carefully and visit our website at www.qfxusa.com for
Product updates and extended support documentaon (e.g., Common Troubleshoong Guides); (ii) if you are sll having trouble with your Product, please
contact the QFX Customer Support Department.
Subject to the terms and condions herein, QFX, Inc. (herein aer called “QFX”) warrants to the original purchaser of the Product
(”Customer”) that for the applicable Warranty Period listed below, the Product will be free from defects in material or workmanship under normal,
non-commercial use (”Defects”).
Warranty Period encompasses, as listed below, separate “Coverage Periods” for Parts and Labor, each Coverage Period to begin from the original date of
Customer purchase. If Customer returns a defecve Product (or any component thereof) during the applicable Warranty Period, QFX will, at its opon, during
the specified Coverage Periods for Parts and Labor (as applicable either: (i) repair the Product (or, as applicable, any component thereof) or (ii) replace the
Product (or, as applicable, any component thereof) with a new or refurbished Product (or, as applicable, any component thereof), in either case free of
charge to Customer for Parts and/or Labor (as applicable) during the specified Coverage Period only, and excluding applicable shipping charges (noted
below), for which the Customer is responsible. The foregoing states the Customer’s exclusive remedy and QFX sole liability for breach of the limited warranty
contained herein.
This warranty covers only normal use. This warranty is not transferable. QFX is not responsible for warranty replacement should the QFX label or logo be
removed or should the product fail to be properly maintained or fail to funcon properly as a result of misuse, abuse, immersion in liquids, improper
installaon, improper shipping, damage caused by disasters such as fire, flood, or service other than by QFX. In addion, this warranty excludes any Product
(or, as applicable, any component thereof) that has been subject to or Defects resulng from: (a) any neglect or misuse by a Customer, an accident, improper
applicaon, violaon of operang instrucons for the Product, any other Customer-induced damage, or the alteraon or removal of any Product serial
number; (b) any modificaon or repair to Product (or, as applicable, any component thereof) by any party other than QFX or a party authorized in wring by
QFX; (c) any damage to Product (or, as applicable, any component thereof) due to power surges, incorrect electrical voltage, misconnecon to any device, or
malfuncon of any device used with the Product (or, as applicable, any component thereof); (d) cosmec damage to the Product (or, as applicable, any
component thereof) caused by normal wear and tear; (e) shipping damage that occurs while the Product is in transit; (f) damage caused by heat sources,
sunlight, electromagnec condions, or other climac condions or (g) any acts of God.
Product is sold to Customer for personal, non-commercial use only. Product is not warranted for Customer’s commercial or rental use. In addion, Product is
not warranted against failure, and should not be used by Customer for any applicaon where (i) there is a risk that any data stored on Product will be
breached or otherwise compromised, or (ii) the date stored on Product is relied upon for medical or lifesaving applicaons. QFX disclaims any Warranty for
any of the foregoing uses to the fullest extent permied by law. Customer assumes any and all risks associated with such uses of Product, and agrees to
indemnify QFX for any damages claimed against QFX for such uses.
EXCEPT FOR EXPRESS WARRANTIES STATED ABOVE AND TO THE MAXIMUM EXTENT PERMITTED BY LAW, THE PRODUCTS ARE PROVIDED “AS IS” AND QFX
DISCLAIMS ALL OTHER WARRANTIES, INCLUDING WITHOUT LIMITATION ANY IMPLIED WARRANTY (i) OF MERCHANTABILITY, (ii) OF FITNESS FOR A
PARTICULAR PURPOSE, OR (iii) OF NON-INFRINGEMENT OF THIRD PARTY RIGHTS. TO THE MAXIMUM EXTENT PERMITTED BY APPLICABLE LAW, IN NO
EVENT WILL QFX BE LIABLE TO CUSTOMER OR ANY THIRD PARTY FOR ANY INDIRECT, SPECIAL, INCIDENTAL, CONSEQUENTIAL, EXEMPLARY OR PUNITIVE
DAMAGES, INCLUDING, WITHOUT LIMITATION, ANY LOST PROFITS OR REVENUES, LOSS OR INACCURACY OF ANY DATA OR COST OF SUBSTITUTE GOODS,
REGARDLESS OF THE THEORY OF LIABILITY (INCLUDING NEGLIGENCE) AND EVEN IF QFX HAS BEEN ADVISED OF THE POSSIBILITY OF SUCH DAMAGES, QFX
AGGREGATE LIABILITY TO CUSTOMER FOR ACTUAL DIRECT DAMAGES FOR ANY CAUSE WHATSOEVER SHALL BE LIMITED TO THE CUMULATIVE PRODUCT
FEES PAID BY THAT CUSTOMER FOR THE PRODUCTS CAUSING THE DAMAGES, IF ANY.
This Warranty gives Customer specific rights, and Customer may also have other rights that vary from jurisdicon to jurisdicon. Warning: Some Products
may contain components that are small enough to be swallowed. Please keep out of reach of children. In order for the return to be processed, you must send
the Product PREPAID to the address below in the original packaging or reasonable substute to prevent damage and include: (1) a dated sales receipt (which
must have a purchase date that falls in the Warranty Period specified in the table below) that indicates the place of purchase, model number of Product, and
amount paid, (2) a detailed descripon of Customer’s problem with Product, (3) Customer’s full name, phone number, and return address, (3) all of the
accessories that came with the Product package must be sent along with the main Product, (4) a cashier’s check or money order payable to QFX, Inc., in the
amount specified for the item in the product table below for return shipping and handling. If in the case you cannot provide a money order or cashier’s
check, you can contact The QFX Customer Support Representave to arrange payment via credit card. No returned Product will be shipped back to a PO BOX.
If a returned Product is found to have no problem and/or does not include ALL of the requirements indicated above, it may be returned back to the customer
and will not be processed.

QFX USA®, Inc.
RMA Processing
Customer Support Department
2957 E. 46th Street | Vernon, CA 90058
(800) 864-CLUB (2582) or (323) 864-6900
qfxusa.com
Hours of Operaon: Monday - Friday, 9am - 5pm PST
All prices and details below are for US Desnaons excluding, Hawaii, Alaska and Puerto Rico. For excluded desnaons and NON US desnaons, please
contact The QFX Customer Support Department directly for addional shipping fees and return instrucons.
If you do not find your Product below, your Product model conflicts with mulple categories, and/or are unsure of which category the Product you have
purchased will fall under, please contact our Customer Support Department for further instrucon.
In order to determine the exact shipping cost that must be included with your prouuct or paid for the product being returned, please refer to the table below.
Please find the product you wish to return by category or model number prefix. QFX will not provide any return or refund to any customer for merchandise
and will only honor the Limited Warranty restricons menoned in this document.
Please make sure to follow all direcons prior to shipping back your item. If you are not sure what the shipping cost for your item is, or if your item category
conflicts in the table below, please feel free to contact the QFX Support Department for further assistance.
THE WARRANTY AND REMEDY PROVIDED ABOVE ARE EXCLUSIVE AND IN LIEU OF ALL OTHER EXPRESSED OR IMPLIED WARRANTIES INCLUDING, BUT NOT
LIMITED TO, THE IMPLIED WARRANTIES OF MERCHANTABILITY, NON-INFRINGEMENT OR FITNESS FOR A PARTICULAR PURPOSE. SOME LAWS DO NOT
ALLOW THE EXCLUSION OF IMPLIED WARRANTIES. IF THESE LAWS APPLY, THEN ALL EXPRESSED OR IMPLIED WARRANTIES ARE LIMITED TO THE WARRANTY
PERIOD IDENTIFIED ABOVE. UNLESS STATED HEREIN, ANY STATEMENT OR REPRESENTATIONS MADE BY ANY OTHER PERSONS OR FIRM ARE VOID. EXCEPT
AS PROVIDED IN THIS WRITTEN WARRANTY, QFX SHALL NOT BE LIABLE FOR ANY LOSS, INCONVENIENCE, OR DAMAGE, INCLUDING DIRECT, SPECIAL,
INCIDENTAL OR CONSEQUENTIAL DAMAGES, RESULTING FROM THE USE OR INABILITY TO USE THE QFX PRODUCT, WHETHER RESULTING FROM BREACH OF
WARRANTY OR ANY OTHER LEGAL THEORY.
Some jurisdicons do not allow limitaons on how long an implied warranty lasts, and some jurisdicons do not allow the exclusion or limitaon of incidental
or consequenal damages, so the above limitaons and exclusions may not apply to you. This warranty gives you special legal rights and you may have other
rights which vary from jurisdicon to jurisdicon.
Copyright Protected 2021 ©
www.qfxusa.com
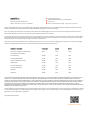
Earphones, Headphones, Pocket Radios,
& Small Bluetooth vSpeakers
Personal Stereos
Portable Radio/Cassee
Large Portable Radio Cassee
Mobile Audio
Pro Audio SBX Systems
Pro Audio PBX Systems
Televisions
Telephones
$5.00
$10.00
$15.00
$20.00
$10.00
$75.00
$75.00
$25.00
$10.00
1 Year
1 Year
1 Year
1 Year
1 Year
1 Year
1 Year
1 Year
1 Year
1 Year
1 Year
1 Year
1 Year
1 Year
1 Year
1 Year
1 Year
1 Year
PRODUCT CATEGORY HANDLING LABOR PARTS

THANK YOU.
Enjoy your speaker and make many memories with it because
QFX is Where the Party Begins!
We would love to hear about your BT-64 Journey!
Tag us @QFXUSA to share your stories.
-
 1
1
-
 2
2
-
 3
3
-
 4
4
-
 5
5
-
 6
6
-
 7
7
-
 8
8


QFX BT-64 Manual de usuario
- Categoría
- Bocinas portables
- Tipo
- Manual de usuario
en otros idiomas
- français: QFX BT-64 Manuel utilisateur
- English: QFX BT-64 User manual
Artículos relacionados
-
QFX LMS-28 Manual de usuario
-
QFX E-B5 Manual de usuario
-
QFX PBX-800TWS Manual de usuario
-
-
-
QFX MPX-1201 Instrucciones de operación
-
QFX E-B3 Manual de usuario
-
QFX CAM-3 Manual de usuario
-
QFX CAM-1 Manual de usuario