Infiniton FGC-BB193 El manual del propietario
- Categoría
- Frigoríficos combinados
- Tipo
- El manual del propietario

FGC-BB193
User's manual

v(VWHGLVSRVLWLYRSXHGHVHUXWLOL]DGRSRUQLxRVDSDUWLU
GHDxRV\SHUVRQDVFRQFDSDFLGDGHVItVLFDV
VHQVRULDOHVRPHQWDOHVUHGXFLGDVRSRUIDOWDGH
H[SHULHQFLD\FRQRFLPLHQWRVLVHOHVKDGDGRVXSHUYLVLyQ
RLQVWUXFFLRQHVVREUHHOXVRGHOGLVSRVLWLYRGHPDQHUD
VHJXUD\HQWLHQGHQHOSHOLJURLQYROXFUDGR
v/RVQLxRVGHDDxRVGHHGDGSXHGHQFDUJDU\
GHVFDUJDUHVWHDSDUDWR
v/RVQLxRVGHEHQVHUVXSHUYLVDGRVSDUDDVHJXUDUVHGH
TXHQRMXHJXHQFRQHODSDUDWR
v/RVQLxRVQRGHEHQUHDOL]DUODOLPSLH]D\HO
PDQWHQLPLHQWRGHOXVXDULRDPHQRVTXHWHQJDQXQD
HGDGGHDxRVRPiV\HVWpQVXSHUYLVDGRV
v0DQWHQJDWRGRVORVHQYDVHVOHMRVGHORVQLxRV([LVWH
ULHVJRGHDVIL[LD
*OGPSNBDJOEFTFHVSJEBE
3RUVXVHJXULGDG\SDUDJDUDQWL]DUHOXVRFRUUHFWRDQWHV
GHLQVWDODU\XWLOL]DUHOGLVSRVLWLYRSRUSULPHUDYH]OHD
DWHQWDPHQWHHVWHPDQXDOGHOXVXDULRLQFOXLGRVVXV
FRQVHMRV\DGYHUWHQFLDV3DUDHYLWDUHUURUHV\DFFLGHQWHV
LQQHFHVDULRVHVLPSRUWDQWHDVHJXUDUVHGHTXHWRGDVODV
SHUVRQDVTXHXVDQHODSDUDWRHVWpQFRPSOHWDPHQWH
IDPLOLDUL]DGDVFRQVXIXQFLRQDPLHQWR\FDUDFWHUtVWLFDVGH
VHJXULGDG*XDUGHHVWDVLQVWUXFFLRQHV\DVHJ~UHVHGHTXH
SHUPDQH]FDQFRQHOGLVSRVLWLYRVLVHPXHYHRVHYHQGH
SDUDTXHWRGRVORVTXHORXVHQGXUDQWHWRGDVXYLGD~WLO
HVWpQLQIRUPDGRVDGHFXDGDPHQWHVREUHHOXVR\OD
VHJXULGDGGHOGLVSRVLWLYR
3DUDODVHJXULGDGGHODYLGD\ODSURSLHGDGPDQWHQJDODV
SUHFDXFLRQHVGHHVWDVLQVWUXFFLRQHVGHOXVXDULR\DTXHHO
IDEULFDQWHQRHVUHVSRQVDEOHGHORVGDxRVFDXVDGRVSRUOD
RPLVLyQ
4FHVSJEBEEFOJ¯PTZQFSTPOBTWVMOFSBCMFT

v6LHVWiGHVHFKDQGRHODSDUDWRVDTXHHOHQFKXIH
GHODWRPDGHFRUULHQWHFRUWHHOFDEOHGHFRQH[LyQ
ORPiVFHUFDTXHSXHGDGHODSDUDWR\UHWLUHOD
SXHUWDSDUDHYLWDUTXHORVQLxRVVXIUDQXQDGHVFDUJD
HOpFWULFDVHFDLJDQRVHFLHUUHQ
v6LHVWHGLVSRVLWLYRFRQVHOORVPDJQpWLFRVSDUDSXHUWD
UHHPSOD]DXQGLVSRVLWLYRPiVDQWLJXRTXHWLHQHXQ
VHJXURGHUHVRUWHSHVWLOORHQODSXHUWDRWDSD
DVHJ~UHVHGHTXHQRVHSXHGDXVDUHVHUHVRUWHDQWHV
GHGHVHFKDUHOGLVSRVLWLYRYLHMR(VWRHYLWDUiTXHVH
FRQYLHUWDHQXQDWUDPSDPRUWDOSDUDXQQLxR
4FHVSJEBEHFOFSBM
£$'9(57(1&,$0DQWHQJDODVDEHUWXUDVGH
YHQWLODFLyQHQHOJDELQHWHGHODSDUDWRRHQOD
HVWUXFWXUDLQFRUSRUDGDVLQREVWUXFFLRQHV
£$'9(57(1&,$1RXWLOLFHGLVSRVLWLYRVPHFiQLFRVX
RWURVPHGLRVSDUDDFHOHUDUHOSURFHVRGHGHVFRQJHODFLyQ
TXHQRVHDQORVUHFRPHQGDGRVSRUHOIDEULFDQWH
£$'9(57(1&,$1RGDxHHOFLUFXLWRGHUHIULJHUDQWH
*OGPSNBDJOEFTFHVSJEBE
£$'9(57(1&,$1RXVHRWURVDSDUDWRVHOpFWULFRV
FRPRORVIDEULFDQWHVGHKHODGRVGHQWURGHDSDUDWRV
GHUHIULJHUDFLyQDPHQRVTXHHVWpQDSUREDGRVSDUD
HVWHSURSyVLWRSRUHOIDEULFDQWH
£$'9(57(1&,$1RWRTXHODERPELOODVLKDHVWDGR
HQFHQGLGDGXUDQWHXQODUJRSHUtRGRGHWLHPSRSRUTXH
SRGUtDHVWDUPX\FDOLHQWH
£$'9(57(1&,$$OFRORFDUHODSDUDWRDVHJ~UHVHGH
TXHHOFDEOHGHDOLPHQWDFLyQQRHVWpDWUDSDGRRGDxDGR
£$'9(57(1&,$1RXELTXHP~OWLSOHVHQFKXIHV
SRUWiWLOHVRSURYHHGRUHVGHHQHUJtDSRUWiWLOHVHQOD
SDUWHSRVWHULRUGHOGLVSRVLWLYR
*'
6LKD\XQDOX]HQHOFRPSDUWLPHQWR

v N!
v (OLVREXWDQRUHIULJHUDQWH5DHVWiFRQWHQLGRGHQWUR
GHOFLUFXLWRGHUHIULJHUDQWHGHODSDUDWRXQJDVQDWXUDOFRQ
XQDOWRQLYHOGHFRPSDWLELOLGDGDPELHQWDOTXHVLQHPEDUJR
HVLQIODPDEOH
v 'XUDQWHHOWUDQVSRUWH\ODLQVWDODFLyQGHODSDUDWR
DVHJ~UHVHGHTXHQLQJXQRGHORVFRPSRQHQWHVGHO
FLUFXLWRGHUHIULJHUDQWHVHGDxH
9DFLDUOODPDVDELHUWDV\IXHQWHVGHLJQLFLyQ
YHQWLOHELHQODKDELWDFLyQHQODTXHVHHQFXHQWUDHODSDUDWR
v (VSHOLJURVRDOWHUDUODVHVSHFLILFDFLRQHVRPRGLILFDUHVWH
SURGXFWRGHDOJXQDPDQHUD&XDOTXLHUGDxRDOFDEOHSXHGH
SURYRFDUXQFRUWRFLUFXLWRXQLQFHQGLRRXQDGHVFDUJD
HOpFWULFD
v (VWHDSDUDWRHVWiGLVHxDGRSDUDVHUXWLOL]DGRHQ
DSOLFDFLRQHVGRPpVWLFDV\VLPLODUHVFRPR
iUHDVGHFRFLQDGHWDIIHQWLHQGDVRILFLQDV\RWURV
HQWRUQRVGHWUDEDMR
DUPDUFDVDV\SRUFOLHQWHVHQKRWHOHVPRWHOHV\RWURV
HQWRUQRVGHWLSRUHVLGHQFLDO
(QWRUQRVGHVD\XQR
$SOLFDFLRQHVQRFRPHUFLDOHV\VLPLODUHV
`"%7&35&/$*"&XDOTXLHUFRPSRQHQWHHOpFWULFR
HQFKXIHFDEOHGHDOLPHQWDFLyQFRPSUHVRUHWF
GHEHVHUUHHPSOD]DGRSRUXQDJHQWHGHVHUYLFLR
FHUWLILFDGRRSHUVRQDOGHVHUYLFLRFDOLILFDGR
*OGPSNBDJOEFTFHVSJEBE

`"%7&35&/$*"/DERPELOODVXPLQLVWUDGDFRQHVWH
DSDUDWRHVXQD³ERPELOODGHOiPSDUDGHXVRHVSHFLDO´
TXHVRORVHSXHGHXWLOL]DUFRQHODSDUDWRVXPLQLVWUDGR
(VWD³OiPSDUDGHXVRHVSHFLDO´QRHVXWLOL]DEOHSDUD
LOXPLQDFLyQGRPpVWLFD*'
(OFDEOHGHDOLPHQWDFLyQQRGHEHDODUJDUVH
$VHJ~UHVHGHTXHODFODYLMDGHDOLPHQWDFLyQQRHVWp
DSODVWDGDRGDxDGDSRUODSDUWHSRVWHULRUGHODSDUDWR
8QHQFKXIHGHDOLPHQWDFLyQDSODVWDGRRGDxDGRSXHGH
VREUHFDOHQWDUVH\SURYRFDUXQLQFHQGLR
$VHJ~UHVHGHTXHSXHGHFRQHFWDUVHDODWRPDGHFRUULHQWH
GHODSDUDWR
1RWLUHGHOFDEOHGHUHG
6LODWRPDGHFRUULHQWHHVWiIORMDQRLQVHUWHHOHQFKXIHGH
DOLPHQWDFLyQ([LVWHULHVJRGHGHVFDUJDHOpFWULFDRLQFHQGLR
1RGHEHRSHUDUHODSDUDWRVLQODOiPSDUD
(VWHDSDUDWRHVSHVDGR6HGHEHWHQHUFXLGDGRDOPRYHUOR
1RUHWLUHQLWRTXHORVHOHPHQWRVGHOFRPSDUWLPLHQWRGHO
FRQJHODGRUVLWLHQHODVPDQRVK~PHGDVRPRMDGDV\DTXH
HVWRSRGUtDFDXVDUDEUDVLRQHVHQODSLHOR TXHPDGXUDVSRU
FRQJHODFLyQFRQJHODFLyQ
(YLWHODH[SRVLFLyQSURORQJDGDGHODSDUDWRDODOX]VRODU
GLUHFWD
*OGPSNBDJOEFTFHVSJEBE
v1RFDOLHQWHODVSLH]DVGHSOiVWLFRGHODSDUDWR
v1RFRORTXHSURGXFWRVDOLPHQWLFLRVGLUHFWDPHQWHFRQWUD
ODSDUHGSRVWHULRU
v/RVDOLPHQWRVFRQJHODGRVQRGHEHQYROYHUDFRQJHODUVH
XQDYH]TXHVHKD\DQGHVFRQJHODGR
6LKD\XQDOX]HQHOFRPSDUWLPHQWR

v$OPDFHQHORVDOLPHQWRVFRQJHODGRVSUHHQYDVDGRV
GHDFXHUGRFRQODVLQVWUXFFLRQHVGHOIDEULFDQWHGH
DOLPHQWRVFRQJHODGRV
v/DVUHFRPHQGDFLRQHVGHDOPDFHQDPLHQWRGHORV
IDEULFDQWHVGHHOHFWURGRPpVWLFRVGHEHQVHJXLUVH
HVWULFWDPHQWH&RQVXOWHODVLQVWUXFFLRQHVSHUWLQHQWHV
v1RFRORTXHEHELGDVJDVHRVDVFDUERQDWDGDVHQHO
FRPSDUWLPHQWRGHOFRQJHODGRU\DTXHFUHDSUHVLyQHQ
HOUHFLSLHQWHORTXHSRGUtDFDXVDUTXHH[SORWH\GDxH
HODSDUDWR
v/RVSRORVGHKLHORSXHGHQFDXVDUTXHPDGXUDVSRU
FRQJHODFLyQVLVHFRQVXPHQGLUHFWDPHQWHGHODSDUDWR
6LKD\XQFRPSDUWLPHQWRFRQJHODGRU
6LKD\XQFRPSDUWLPLHQWRGHDOPDFHQDPLHQWRGHDOLPHQWRVIUHVFRV
3DUDHYLWDUODFRQWDPLQDFLyQGHORVDOLPHQWRVUHVSHWH
ODVVLJXLHQWHVLQVWUXFFLRQHV
v$EULUODSXHUWDGXUDQWHSHUtRGRVSURORQJDGRVSXHGH
SURYRFDUXQDXPHQWRVLJQLILFDWLYRGHODWHPSHUDWXUD
HQORVFRPSDUWLPHQWRVGHODSDUDWR
v/LPSLHUHJXODUPHQWHODVVXSHUILFLHVTXHSXHGDQHQWUDU
HQFRQWDFWRFRQDOLPHQWRV\VLVWHPDVGHGUHQDMH
DFFHVLEOHV
v/LPSLDUORVWDQTXHVGHDJXDVLQRVHKDQXWLOL]DGR
GXUDQWHK(QMXDJXHHOVLVWHPDGHDJXDFRQHFWDGR
DXQVXPLQLVWURGHDJXDVLQRVHKDH[WUDtGRDJXD
GXUDQWHGtDV
v*XDUGHODFDUQH\HOSHVFDGRFUXGRVHQUHFLSLHQWHV
DGHFXDGRVHQHOUHIULJHUDGRUGHPRGRTXHQRHQWUHQHQ
FRQWDFWRFRQRWURVDOLPHQWRVQLVHGHUUDPHQVREUHHOORV
v/RVFRPSDUWLPLHQWRVGHDOLPHQWRVFRQJHODGRVGHGRV
HVWUHOODVVLVHSUHVHQWDQHQHODSDUDWRVRQDGHFXDGRV
SDUDDOPDFHQDUDOLPHQWRVSUHFRQJHODGRVDOPDFHQDUR
KDFHUKHODGRV\KDFHUFXELWRVGHKLHOR
*OGPSNBDJOEFTFHVSJEBE

*OTUBMBDJO
H3DUDODFRQH[LyQHOpFWULFDVLJD
FXLGDGRVDPHQWHODVLQVWUXFFLRQHVGDGDVHQSiUUDIRV
HVSHFtILFRV
v'HVHPEDOHHODSDUDWR\FRPSUXHEHVLKD\GDxRVHQpO
1RFRQHFWHHODSDUDWRVLHVWiGDxDGR5HSRUWHORV
SRVLEOHVGDxRVLQPHGLDWDPHQWHDOOXJDUGRQGHOR
FRPSUy (QHVHFDVRUHWHQHUHOHPEDODMH
v$QWHVGHOPDQWHQLPLHQWRDSDJXHHODSDUDWR\
GHVFRQHFWHHOHQFKXIHGHODWRPDGHFRUULHQWH
v1ROLPSLHHODSDUDWRFRQREMHWRVPHWiOLFRV
v1RXWLOLFHREMHWRVDILODGRVSDUDHOLPLQDUODVKHODGDVGHO
DSDUDWR8VHXQUDVSDGRUGHSOiVWLFR*'
v([DPLQHUHJXODUPHQWHHOGUHQDMHHQHOUHIULJHUDGRUHQ
EXVFDGHDJXDGHVFRQJHODGD6LHVQHFHVDULROLPSLDU
HOGHVDJH6LHOGHVDJHHVWiEORTXHDGR HODJXDVH
DFXPXODUiHQODSDUWHLQIHULRUGHODSDUDWR 2'
6LKD\XQFRPSDUWLPHQWRFRQJHODGRU
6LKD\XQFRPSDUWLPLHQWRGHDOPDFHQDPLHQWRGHDOLPHQWRVIUHVFRV
v/RVFRPSDUWLPHQWRVGHXQDGRV\WUHVHVWUHOODVVL
HVWiQ SUHVHQWDGRVHQHODSDUDWRQRVRQDGHFXDGRV
SDUDODFRQJHODFLyQGHDOLPHQWRVIUHVFRV
v6LVHGHMDHODSDUDWRYDFtRGXUDQWHODUJRVSHUtRGRVGH
WLHPSRDSDJXHGHVFRQJHOHOLPSLHVHTXH\GHMHOD
SXHUWDDELHUWDSDUDHYLWDUTXHHOPRQWDMHVHGHVDUUROOH
GHQWURGHODSDUDWR
*OGPSNBDJOEFTFHVSJEBE
v(VUHFRPHQGDEOHHVSHUDUDOPHQRVFXDWURKRUDVDQWHV
GHFRQHFWDUHODSDUDWRSDUDSHUPLWLUTXHHODFHLWH
UHJUHVHDOFRPSUHVRU
£

v'HEHUtDKDEHUXQDFLUFXODFLyQGHDLUHDGHFXDGD
DOUHGHGRUGHODSDUDWR\DTXHHVWRQRFRQGXFHDO
VREUHFDOHQWDPLHQWR3DUDORJUDUXQDYHQWLODFLyQ
VXILFLHQWHVLJDODVLQVWUXFFLRQHVUHOHYDQWHVSDUD
ODLQVWDODFLyQ
v6LHPSUHTXHVHDSRVLEOHORVVHSDUDGRUHVGHO
SURGXFWRGHEHQHVWDUFRQWUDXQDSDUHGSDUDHYLWDU
WRFDURDWUDSDUSDUWHVFDOLHQWHVFRPSUHVRU
FRQGHQVDGRUSDUDHYLWDUSRVLEOHVTXHPDGXUDV
v(ODSDUDWRQRGHEHXELFDUVHFHUFDGHUDGLDGRUHV
RFRFLQDV
v$VHJ~UHVHGHTXHVHSXHGDDFFHGHUDOHQFKXIH
GHDOLPHQWDFLyQGHVSXpVGHODLQVWDODFLyQGHO
DSDUDWR
v&XDOTXLHUWUDEDMRHOpFWULFRTXHVHUHTXLHUDSDUDUHDOL]DU
HOVHUYLFLRWpFQLFRGHODSDUDWRGHEHVHUUHDOL]DGRSRUXQ
HOHFWULFLVWDFDOLILFDGRRXQDSHUVRQDFRPSHWHQWH
v(VWHSURGXFWRGHEHVHUUHSDUDGRSRUXQ&HQWURGH6HUYLFLR
DXWRUL]DGR\VRORGHEHQXVDUVHUHSXHVWRVRULJLQDOHV
"IPSSPEFFOFSH¥B
v1RSRQJDFRPLGDFDOLHQWHHQHODSDUDWR
v1RHPSDTXHORVDOLPHQWRVMXQWRV\DTXHHVWRHYLWDTXHHO
DLUHFLUFXOH
v$VHJ~UHVHGHTXHODFRPLGDQRWRTXHODSDUWHSRVWHULRUGHO
FRPSDUWLPHQWRV
*OGPSNBDJOEFTFHVSJEBE
v6LODHOHFWULFLGDGVHDSDJDQRDEUDODVSXHUWDV
v1RDEUDODVSXHUWDVFRQIUHFXHQFLD
v1RPDQWHQJDODVSXHUWDVDELHUWDVSRUPXFKRWLHPSR
v1RFRORTXHHOWHUPRVWDWRHQWHPSHUDWXUDVPX\DOWDV
v$OJXQRVDFFHVRULRVFRPRORVFDMRQHVVHSXHGHQ
TXLWDUSDUDREWHQHUXQ PD\RUYROXPHQGH
DOPDFHQDPLHQWR\XQPHQRUFRQVXPRGHHQHUJtD

(VWHDSDUDWRQRFRQWLHQHJDVHVTXHSRGUtDQGDxDU
ODFDSDGHR]RQRQLHQVXFLUFXLWRGHUHIULJHUDQWHQLHQ
ORVPDWHULDOHVGHDLVODPLHQWR(ODSDUDWRQRGHEH
GHVHFKDUVHMXQWRFRQORVUHVLGXRVXUEDQRV\ODEDVXUD
/DHVSXPDGHDLVODPLHQWRFRQWLHQHJDVHVLQIODPDEOHV
HODSDUDWRGHEHGHVHFKDUVHGHDFXHUGRFRQODV
UHJXODFLRQHVGHODSDUDWRSDUDREWHQHUGHODVDXWRULGDGHV
ORFDOHV(YLWHGDxDUODXQLGDGGHUHIULJHUDFLyQ
HVSHFLDOPHQWHHOLQWHUFDPELDGRUGHFDORU/RVPDWHULDOHV
XWLOL]DGRVHQHVWHDSDUDWRPDUFDGRVFRQHOVtPEROR
VRQUHFLFODEOHV
$ODVHJXUDUVHGHTXHHVWHSURGXFWRVHHOLPLQH
FRUUHFWDPHQWHD\XGDUiDSUHYHQLUSRVLEOHVFRQVHFXHQFLDV
QHJDWLYDVSDUDHOPHGLRDPELHQWH\ODVDOXGKXPDQDTXH
GHRWURPRGRSRGUtDQVHUFDXVDGDVSRUHOPDQHMR
LQDGHFXDGRGHORVGHVHFKRVGHHVWHSURGXFWR3DUDREWHQHU
LQIRUPDFLyQPiVGHWDOODGDVREUHHOUHFLFODMHGHHVWHSURGXFWR
FRPXQtTXHVHFRQVXFRQVHMRORFDOHOVHUYLFLRGHHOLPLQDFLyQ
GHGHVHFKRVGRPpVWLFRVRODWLHQGDGRQGHDGTXLULyHO
SURGXFWR
(OVtPERORHQHOSURGXFWRRHQVXHPSDTXHLQGLFD
TXHHVWHSURGXFWRQRSXHGHVHUWUDWDGRFRPREDVXUD
GRPpVWLFD(QVXOXJDUGHEHOOHYDUVHDOSXQWRGH
UHFRJLGDDSURSLDGRSDUDHOUHFLFODMHGHHTXLSRV
HOpFWULFRV\HOHFWUyQLFRV
*OGPSNBDJOEFTFHVSJEBE
0DWHULDOHVGHHPEDODMH
/RVPDWHULDOHVFRQHOVtPERORVRQUHFLFODEOHV'HVHFKH
HOHPEDODMHHQXQUHFLSLHQWHGHUHFRJLGDDGHFXDGRSDUD
UHFLFODUOR
(OLPLQDFLyQGHODSDUDWR

'HVFRQHFWHHOHQFKXIHGHODWRPDGHFRUULHQWH
&RUWDUHOFDEOHGHDOLPHQWDFLyQ\GHVHFKDUOR
`"%7&35&/$*"'XUDQWHHOXVRVHUYLFLR\
HOLPLQDFLyQGHODSDUDWRSUHVWHDWHQFLyQDO similar
VtPERORTXHVHHQFXHQWUDHQHOODGRL]TXLHUGRTXH
VHHQFXHQWUDHQODSDUWHSRVWHULRUGHOPLVPRSDQHO
WUDVHURRFRPSUHVRU Dicho símbolo será de color
amarillo u orange.
(s símbolo de advertencia de riesgo de incendio
+D\PDWHULDOHVLQIODPDEOHVHQODVWXEHUtDVGH
UHIULJHUDQWH\FRPSUHVRU
(VWpDOHMDGRGHODIXHQWHGHIXHJRGXUDQWHHOXVR
VHUYLFLR\HOLPLQDFLyQ
*OGPSNBDJOEFTFHVSJEBE

2
Contenido:
3 Información importante
5 Notas importantes
5 Antes del primer uso
6 Notas importantes sobre el uso de la nevera.
7 Notas importantes sobre el uso del congelador.
8 Ajuste de humedad del cajón de verduras
9 Almacenamiento
10 Panel de control
11 Cuidado y Limpieza
12 Descongelar la nevera
12 Descongelar el congelador
13 Solución de problemas
15 Preparación de la instalación
15 Requisitos de ventilación
17 Instalación en el gabinete
18 Montaje de las puertas
20 Invertir las puertas del aparato

3
Importante
El fabricante no se hace responsable de las lesiones o pérdidas causadas por
el uso o la instalación incorrecta de este producto. Tenga en cuenta que nos
reservamos el derecho de invalidar la garantía suministrada con este
producto después de una instalación incorrecta o mal uso del aparato.
Este aparato no está diseñado para ser utilizado por personas (incluidos
niños) con capacidad física, sensorial o mental reducida, o que carezcan de
experiencia o conocimiento al respecto, a menos que hayan recibido
supervisión o instrucciones sobre cómo usar el aparato por parte de alguien
responsable por su seguridad.
Bajo ninguna circunstancia se deben quitar las cubiertas externas para
servicio o mantenimiento, excepto por personal debidamente calificado.
Información del aparato:
Ingrese los detalles en la placa de características del electrodoméstico a
continuación como referencia, para ayudar a la atención al cliente en caso
de un fallo en su electrodoméstico y para registrar su electrodoméstico con
fines de garantía.
Modelo de electrodoméstico
Número de serie
Declaraciones de conformidad de la UE:
Este aparato ha sido diseñado, construido y comercializado de acuerdo
con los requisitos de seguridad de la Directiva de la UE 2014/35 / UE (bajo
voltaje) y los requisitos de la Directiva de la UE 2014/30 / UE (EMC).

4
Este electrodoméstico ha sido fabricado con los estándares más estrictos y
cumple con toda la legislación aplicable, incluida la seguridad eléctrica
(LVD) y la compatibilidad con interferencias electromagnéticas (EMC). Las
piezas destinadas a entrar en contacto con alimentos cumplen con la norma
1935/2004 / CE.
INFORMACIÓN IMPORTANTE PARA LA ELIMINACIÓN
CORRECTA DEL PRODUCTO DE ACUERDO CON LA DIRECTIVA
CE 2012/19 / UE.
El producto no debe desecharse como basura urbana. El sistema de
refrigeración contiene gases aislantes y refrigerantes, que requieren la
eliminación de residuos especializados. Los valiosos materiales contenidos
en este aparato pueden reciclarse. Debe llevarse a un centro de recolección
de residuos diferenciado de la autoridad local especial oa un distribuidor
que brinde este servicio.
Antes de deshacerse de un electrodoméstico viejo, retire los sellos de la
puerta, etc. para reducir el riesgo de atrapamiento de niños.
La eliminación de un electrodoméstico por separado evita posibles
consecuencias negativas para el medio ambiente y la salud derivadas de la
eliminación inadecuada y permite recuperar los materiales constituyentes
para obtener ahorros significativos en energía y recursos. Como
recordatorio de la necesidad de deshacerse de los electrodomésticos por
separado, el producto está marcado con un cubo de basura con ruedas
tachado.

5
Importante
• Nunca almacene artículos inflamables o explosivos y ácidos corrosivos
fuertes o alcalinas en el aparato.
• Este es un electrodoméstico, que se produce de acuerdo con la norma
nacional. Está destinado únicamente al almacenamiento de alimentos, no
al almacenamiento de sangre, medicamentos y productos biológicos.
• Para evitar el riesgo de incendio, mantenga el aparato alejado de la
gasolina o de cualquier otro producto inflamable.
• Para evitar el riesgo de interferencia electromagnética u otros accidentes,
no coloque un horno de microondas encima del refrigerador ni use ningún
aparato eléctrico dentro del refrigerador.
• No permita que los niños jueguen con o cerca del aparato.
• La superficie interna del compartimento del congelador está muy fría
cuando el aparato está funcionando. No toque la superficie, especialmente
cuando las manos están mojadas.
• No salpique agua sobre el aparato. Manténgalo alejado de lugares de alta
humedad que puedan tener un efecto adverso en el rendimiento del
aislamiento eléctrico.
• Este electrodoméstico está diseñado para usarse a temperaturas ambiente
entre 10 y 32 ° C. El uso fuera de este rango puede hacer que el aparato
falle.
Antes del primer uso
Debe dejar que el refrigerador se asiente durante al menos veinticuatro
horas antes de encenderlo.
Se recomienda que limpie el interior del electrodoméstico antes del
primer uso, utilizando una solución de bicarbonato de sodio y agua tibia y
luego secando completamente el interior.

6
El refrigerador puede tener olor a primer uso. Esto desaparecerá a medida
que el aparato se enfríe.
Tenga en cuenta:
El electrodoméstico comenzará con la configuración de temperatura 3 y
funcionará continuamente hasta que alcance la temperatura correcta.
Si el aparato está apagado, debe esperar cinco minutos antes de volver a
encenderlo para evitar daños innecesarios al compresor.
Nunca almacene artículos inflamables o explosivos y ácidos corrosivos
fuertes o alcalinas en el aparato.
Este refrigerador enfría sus alimentos al enfriar el interior de la cavidad.
Es normal que se acumule escarcha en esta superficie; Luego se disipa y
drena a través de un pequeño drenaje en la parte inferior, donde se
evapora sin causar daño. La presencia de escarcha en la parte posterior no
es un mal funcionamiento del refrigerador.
Uso de la nevera
• Nunca ponga líquidos en el refrigerador sin cubrir.
• Nunca ponga alimentos calientes en el refrigerador. Los alimentos
calientes deben dejarse enfriar a temperatura ambiente antes de ponerlos
en el refrigerador.
• Nada debe descansar contra la pared posterior del refrigerador, ya que
esto causará escarcha y posibles problemas de condensación que serán
difíciles de eliminar.
• Asegúrese de que los alimentos estén limpios y que se elimine el agua
adicional antes de ponerlos en el refrigerador.
• Envuelva o cubra los alimentos antes de ponerlos en el refrigerador. Esto
ayudará a prevenir la pérdida de humedad, mantener los alimentos frescos
y evitar olores desagradables.

7
• Clasifique los alimentos antes de almacenarlos. Los alimentos que se
utilizarán pronto deben almacenarse en la parte delantera del estante para
evitar el deterioro causado por la puerta abierta durante períodos prolongados.
• No sobrellene la nevera. Debe haber suficiente espacio entre los alimentos
para permitir que circule el aire frío.
• Descongelar alimentos congelados en el compartimiento del refrigerador
ayudará a mantener baja la temperatura y a ahorrar energía.
• Nunca almacene carnes crudas en estantes sobre carnes cocidas u otros
productos. Esto ayudará a evitar que los jugos de la carne cruda contaminen
otros alimentos.
Uso del congelador
• Los compartimentos del congelador están diseñados para almacenar solo
alimentos congelados.
• Nunca coloque alimentos calientes o calientes en el congelador, deje que
se enfríen completamente antes de ponerlos en el congelador.
• Siga las instrucciones en el empaque de alimentos para el almacenamiento
de alimentos congelados. Si no se proporciona información, los alimentos
no deben almacenarse durante más de tres meses después de la fecha de
compra.
• Almacene los alimentos en paquetes pequeños (idealmente menos de 1
kg). Esto reduce el tiempo de congelación y mejora la calidad de los
alimentos después de la descongelación.
• Envuelva la comida antes de ponerla en el congelador. Para evitar que la
envoltura se pegue, asegúrese de que esté seca.
• Etiquete los alimentos antes de congelarlos con información que incluya
el tipo de alimentos y las fechas de almacenamiento y caducidad.

8
• Una vez que la comida se descongela, no se debe volver a congelar.
Descongele la cantidad de comida necesaria para evitar el desperdicio.
• Las bebidas embotelladas o enlatadas no deben almacenarse en los
compartimentos del congelador, ya que podrían explotar.
• La cantidad máxima de alimentos frescos que se pueden congelar en un
período de 24 horas es de 3.0 kg.
• No intente congelar más de la cantidad máxima.
Ajuste de humedad del cajón para vegetales
El cajón para vegetales dentro de este aparato cuenta con un control
deslizante de ajuste del nivel de humedad. Las verduras y productos
similares que están sujetos a la marchitez (por ejemplo, rúcula, hojas de
espinaca, hierbas como la albahaca, etc.) deben mantenerse en el cajón de
verduras y el control deslizante de ajuste debe mantenerse cerrado.
(totalmente a la izquierda - alto). Al mantener el control deslizante de
ajuste cerrado, el vapor de agua se mantiene en el cajón y, posteriormente,
las verduras se mantienen más frescas durante más tiempo.
Por el contrario, las frutas que son susceptibles de pudrirse deben
almacenarse en el cajón de verduras con el control deslizante de ajuste de
humedad completamente abierto (a la derecha - bajo). Esto permitirá que
los gases, emitidos por ciertos productos y que aceleren el proceso de
descomposición, salgan del cajón de verduras.
El cajón está marcado arriba y abajo con símbolos de vegetales y frutas para
ayudarle.

9
Almacenamiento
La sección del refrigerador es para el almacenamiento de alimentos a corto
plazo. Aunque se pueden mantener bajas temperaturas, no se
recomiendan períodos prolongados de almacenamiento de alimentos.
A medida que el aire frío circula dentro del refrigerador, la temperatura
puede variar entre las diferentes secciones. Como tal, los alimentos deben
almacenarse en diferentes secciones según el tipo. La sección 7 es la parte
más fría de la nevera.
1. Mantequilla, quesos, etc.
2. Comida en frascos y botellas.
3. Bebidas, por ejemplo leche
4. Comida cocinada
5. Yogures, conservas, etc.
6. botellas de 75 cl o comidas
preparadas, etc.
7. Carnes y pescados frescos.
8. frutas y verduras
Los estantes del refrigerador se pueden
mover de acuerdo con los requisitos de
almacenamiento dentro de la sección del
refrigerador. Para mover el estante,
levante la sección trasera y luego tire de
ella hacia afuera. Para reemplazar, deslice
el estante nuevamente dentro de la ranura
y luego baje la sección posterior.
Los bastidores de vino se pueden
desplegar o retirar según se desee.
Fig. 1
Fig. 2
6
7
8
4
5
1
3
2

10
Panel de control
A. sensor de ajuste de temperatura del refrigerador
Este botón se usa para ajustar la temperatura dentro del refrigerador.
Presione este sensor una vez para activar el ajuste, y luego tantas veces como
sea necesario hasta que se seleccione el nivel deseado. Los ajustes varían de
1 a 6, siendo 1 el más cálido y 6 el más frío.
Tenga en cuenta: Siempre que sea posible, evite que la temperatura se
ajuste a 6 todo el tiempo. Esto ayuda a aliviar la tensión en el compresor y el
sistema de refrigeración.
B. Pantalla de ajuste de temperatura del refrigerador
Esta pantalla iluminará la configuración de temperatura actual. El ajuste de
la temperatura pasará por esta pantalla.
Tenga en cuenta: No utiliza los números del 1 al 6 para cambiar la
temperatura. En su lugar, use el sensor de ajuste de temperatura del
refrigerador (A).
C. Botón de encendido
Use este sensor para encender y apagar el aparato (modo de espera). El
sensor se iluminará cuando el aparato esté apagado.
Fig. 3
A B C

11
Cuidado y Limpieza
Siempre desconecte el aparato de la
fuente de alimentación antes de realizar
cualquier limpieza o mantenimiento.
Las secciones del refrigerador y el
congelador se deben limpiar con una
solución de bicarbonato de sodio y agua
tibia. No utilice productos abrasivos o
detergentes. Después del lavado, enjuague
y seque completamente.
Limpiar los estantes y balcones.
por separado a mano con una solución suave de detergente líquido y agua.
No los pongas en el lavavajillas.
El orificio de drenaje de agua en la parte posterior del compartimiento del
refrigerador debe limpiarse periódicamente para evitar que el agua
descongelada se acumule dentro del compartimiento del refrigerador. El
tapón de drenaje se puede usar para limpiar el orificio de drenaje.
Si el aparato no se va a utilizar durante períodos prolongados,
desenchúfelo y límpielo. Las puertas deben dejarse entreabiertas para
evitar la formación de moho y olores desagradables.
Fig. 4
Drain hole
Drain Plug

12
Descongelar la nevera
La nevera se descongela automáticamente. Cualquier agua creada saldrá
del refrigerador a través del canal en la parte posterior del refrigerador, a
menos que el orificio de drenaje esté bloqueado (página 11). Es
importante mantener el canal despejado
en todo momento utilizando la herramienta de limpieza suministrada. El
agua descongelada se recoge en la bandeja de evaporación en la parte
posterior del aparato y se disipa por evaporación.
Descongelar el congelador
El congelador tiene un sistema antihielo diseñado para evitar la
acumulación de hielo. Bajo uso normal, no debería haber necesidad de
descongelar regularmente el sistema de congelación.
Para ayudar en tiempos de servicio o limpieza, el aparato tiene un modo
de descongelamiento forzado que puede activarse tocando y manteniendo
presionados los sensores A y C en la Fig. 3 durante aproximadamente 3
segundos. El sensor de ajuste de temperatura del refrigerador (A)
parpadeará para confirmar que la función de descongelamiento forzado
está activa. Esta función debería desactivarse automáticamente una vez
que la temperatura del congelador haya alcanzado entre 10 y 12 ° C.
Tenga en cuenta: Si encuentra regularmente una gran acumulación de
hielo, o charcos de agua, en la sección del congelador, entonces es
probable que la puerta no selle correctamente. Esto podría deberse a un
sello defectuoso de la puerta o una puerta decorada incorrectamente
instalada o demasiado pesada. Para obtener más información, consulte la
sección de solución de problemas sobre hielo en la página 14.

13
Solución de problemas
Si tiene algún problema con su dispositivo, debe verificar la solución de
problemas antes de llamar a Atención al Cliente.
Si el aparato no funciona, verifique:
• Que hay electricidad en el aparato.
• Los fusibles de la casa están intactos y el fusible del enchufe no se ha
fundido.
• La nevera no se ha apagado (página 10).
• El enchufe está funcionando bien. Para verificar esto, enchufe otro
aparato eléctrico para ver si el enchufe está defectuoso.
Si el aparato funciona, pero no muy bien, verifique:
• El aparato no está sobrecargado.
• El termostato está configurado a una temperatura adecuada.
• Las puertas se están cerrando correctamente.
• El sistema de enfriamiento en la parte posterior del aparato está limpio y
libre de polvo, y no toca la pared posterior.
• Hay suficiente ventilación en las paredes laterales y traseras.
Si el aparato hace ruido, verifique:
• El aparato está nivelado y estable.
• Las paredes laterales y traseras están despejadas y no hay nada sobre el
aparato.
• Nota: El gas de enfriamiento en el refrigerador puede hacer un ligero
burbujeo o gorgoteo, incluso cuando el compresor no está funcionando.
Si el aparato emite un pitido, verifique:
•Que las puertas están cerradas. Sonará una alarma después de 60
segundos de que se abra una puerta.

14
Si hay agua en la base del compartimiento del refrigerador, verifique:
•El orificio de drenaje en la parte posterior del compartimento está
despejado (página 11).
Si se ha formado hielo en la pared posterior de la nevera:
• Es normal que se formen algunas gotas de hielo en la pared posterior del
refrigerador. Esto no constituye una falla con el aparato.
• Asegúrese de que ningún artículo dentro del refrigerador esté en contacto
con la pared posterior.
• Compruebe que haya cierta resistencia al abrir la puerta del aparato. Si se
abre al menor contacto, puede significar que el sello de la puerta necesita
ser reemplazado.
• Revise el sello de la puerta en busca de torceduras, escombros o daños. Si
observa alguno y no puede resolver el problema usted mismo, comuníquese
con Atención al cliente para que se pueda reemplazar el sello.
• Esto puede deberse a que la (s) puerta (s) decorativa (s) no están bien
instaladas. Si no está seguro, pídale a su instalador que revise las puertas
decorativas.
Si se ha formado un exceso de hielo en el congelador:
Compruebe que haya cierta resistencia al abrir la puerta del aparato. Si se abre al
menor contacto, puede significar que el sello de la puerta necesita ser
reemplazado.
• Revise el sello de la puerta en busca de torceduras, escombros o daños. Si
observa alguno y no puede resolver el problema usted mismo, comuníquese con
Atención al cliente para que se pueda reemplazar el sello.
• Esto puede deberse a que la (s) puerta (s) decorativa (s) no están bien instaladas.
Si no está seguro, pídale a su instalador que revise las puertas decorativas.
Si una o más de las unidades LED del dispositivo no funcionan:
• Póngase en contacto con Atención al cliente para concertar una visita del
servicio técnico.

15
Preparación de la
instalación
Este aparato nunca debe instalarse cerca
de fuentes de calor, como por ejemplo
elementos calefactores o cocinas, ni en
lugares húmedos.
Busque la ayuda de otra persona, o dos,
cuando instale este dispositivo. Este
aparato puede tener bordes afilados.
Ventilación
La consideración principal al instalar cualquier unidad de refrigeración en
una cocina equipada es la ventilación. El calor retirado del compartimiento
de enfriamiento debe ser disipado a la atmósfera.
No inclinar más allá de 40 °
Fig. 5
• Para asegurarse de que el aparato esté nivelado, usted
debe usar los pies de altura ajustable
en la parte frontal del aparato.
• El sistema de enfriamiento en la parte trasera del
El aparato no debe tocar la pared posterior.
Cuanto mayor es la brecha, mejor.
• El aparato debe instalarse con
ventilación adecuada. Asegúrese de que hay
Hay espacio libre por encima del aparato para permitir que escape el
aire y que haya espacio entre la parte posterior del aparato y la
pared.
Fig. 6.

16
La ventilación incorrecta puede provocar fallos prematuros del compresor,
consumo excesivo de energía, fallo total del sistema y puede invalidar la
garantía provista con el aparato. Para los productos destinados a ser
instalados en una unidad de vivienda alta, se deben cumplir los siguientes
requisitos:
Esquema del refrigerador El canal abierto en la parte posterior se muestra
claramente. Para el correcto funcionamiento del aparato, es importante
que la parte superior de la unidad de alojamiento no esté bloqueada. Una
profundidad de canal de 40-50 mm es normal con la mayoría de las
unidades.
vista en planta del espacio de ventilación posterior
La parte superior del gabinete debe
ventilarse en la habitación.
Tamaño recomendado de abertura de
ventilación: 500 x 30 mm
Si los muebles no permiten que entre aire
libre en la habitación, se debe proporcionar
una ventilación de zócalo u otros medios de
ventilación para garantizar un flujo de aire
natural.
Debería haber espacio en la parte trasera del
gabinete para permitir que el aire frío sea
arrastrado sobre el condensador.
Recomendado:
500 x 35 mm
Se debe proporcionar
una toma de aire en
algún lugar del
gabinete para
permitir la entrada
de aire libre. En este
ejemplo, se muestra
un respiradero
debajo del
refrigerador.
Se debe hacer un
corte en el zócalo
debajo del
refrigerador /
congelador y esto
debe hacerse de
manera ordenada
utilizando la rejilla de
ventilación
suministrada.
Alternativamente, se
puede quitar una
sección delgada del
zócalo para permitir
que entre aire en la
unidad (recomendado
600 mm x 10 mm).
Esquema del
refrigerador
Min 30mm
Fig. 7

17
Se requiere un orificio de ventilación en el zócalo de la unidad; Esto
permite que el aire se extraiga sobre el compresor y el intercambio de
calor. Se suministra una rejilla decorativa con el aparato para terminar este
respiradero perfectamente. Alternativamente, el flujo de aire requerido se
puede lograr mediante la eliminación de una sección delgada del zócalo
(se recomienda un mínimo de 600 mm x 10 mm).
Como regla general, cuanto más aire entre y salga, mejor y más
eficiente será la operación del producto.
Instalación en el gabinete
Con la ayuda de otra persona, o dos, coloque el
aparato en el gabinete. Hay dos placas de metal en la
base del aparato. Ajuste los espaciadores blancos
suministrados (Fig. 8) a estas placas, como se
muestra en la Fig. 9.
Con la base del electrodoméstico alineada correctamente con el borde de la
base del gabinete, la moldura metálica en la parte superior del
electrodoméstico debe quedar al ras del borde del gabinete (si no lo hace,
asegúrese de que la base esté alineada según la Fig. 9 y que la moldura
metálica de la Fig. 10 no está dañada).
Fig. 9
Nevera / congelador
Base del gabinete
Suelo
x2
Fig. 8

18
Asegure la parte superior del aparato a la parte superior del gabinete a través de los
orificios para tornillos de moldura de metal marcados con una "T" en la figura 10.
Retire los separadores blancos de las placas base y asegure las placas a la
base del gabinete con cuatro de los tornillos suministrados. Reemplace los
espaciadores.
Montando las puertas
• Asegúrese de que haya un espacio de 3 a 4 mm entre el lado sin bisagras
y la pared del gabinete.
• Ubique el control deslizante en el soporte y fíjelo a la puerta de la placa
protectora de 20 a 22 mm del borde de la placa protectora como se
muestra en la figura 11, asegurándose de que el control deslizante esté
colocado central y horizontalmente dentro del soporte. Apriete bien con
la mano.
• Rellene el espacio en el lado sin bisagras con la junta / tira de sellado
provista, como se muestra en la Fig. 12.
• La apariencia final de los controles deslizantes de la puerta debe ser
similar a la que se muestra en la Fig. 14, que muestra 2 controles
deslizantes en su lugar.
• Asegúrese de que las puertas del aparato se abran, cierren y sellen
correctamente.
TT
Fig. 10

19
20 mm
x4
Fig. 11
Fig. 12 Fig. 14
Puerta decorativa
S
Fig. 13
Una vez completado, y si está satisfecho con el ajuste del
electrodoméstico en el gabinete, doble y encaje las partes de los
separadores blancos marcados con una "S" como se muestra en el
contorno punteado de la fig. 13. Deje el resto de la cubierta espaciadora
en su lugar sobre las placas de metal.
Junta
Importante: Después de completar la instalación, verifique que el
electrodoméstico esté asegurado dentro de la unidad y que las puertas
se cierren y se abran correctamente. Si no hay resistencia de los sellos
de la puerta al abrir las puertas, es probable que el electrodoméstico y /
o las puertas decorativas no estén colocadas correctamente.

20
Invertir las puertas del aparato
Le recomendamos que busque la ayuda de otra persona para sujetar las
puertas mientras realiza esta operación.
1. Retire con cuidado la tapa de la bisagra superior y desenrosque los tornillos
que fijan la bisagra superior al electrodoméstico, debe apoyar la puerta
superior mientras lo hace.
2. Retire con cuidado la puerta superior y colóquela en un lugar seguro.
Tenga en cuenta que hay separadores entre la puerta y la bisagra; tenga en
cuenta cuántos y su posición.
3. Retire la bisagra central quitando los tornillos que la fijan al aparato;
sostenga la puerta inferior mientras hace esto.
4. Retire la puerta inferior y colóquela en un lugar seguro, observando
nuevamente la posición de las piezas espaciadoras.
5. Cambie la bisagra superior anterior al lado opuesto en la parte inferior.
6. Vuelva a colocar la puerta inferior con espaciadores y coloque la bisagra
central en la puerta. Después de quitar las tapas, fije la bisagra de forma
segura al aparato.
7. Cambie la bisagra inferior anterior al lado opuesto en la parte superior.
Vuelva a colocar la puerta superior y la bisagra superior "nueva" y fíjela de
forma segura al aparato.
8. Coloque las tapas de la cubierta central y las piezas de la cubierta de la
bisagra superior en su lugar para completar el proceso.
9. Desatornille los cuatro soportes deslizantes de las puertas y cámbielos hacia
el lado más alejado de las nuevas posiciones de las bisagras, antes de colocar la
puerta decorativa.

21
Asegurar que la puerta se selle correctamente:
Es normal que el sello se comprima después de invertir la puerta. Con la
puerta cerrada, use un secador de pelo para expandir el sello y llenar el
espacio entre la puerta y el cuerpo del electrodoméstico.
Tenga cuidado de no usar el secador de pelo demasiado cerca del aparato,
ya que podría dañar el sello. Una distancia de aproximadamente 10 cm
debería ser adecuada.
Cuando esté terminado, permita que el sello y la puerta se enfríen antes de
tocarlos. Una vez hecho, el sello debe permanecer en su posición.

PROCEDIMIENTO EN CASO DE AVERÍA DE UN PRODUCTO INFINITON
Estimados clientes, para solicitar la asistencia técnica o reparación de su producto Infiniton,
disponen de nuestra página web, funcionando las 24 horas al día y 7 días a la semana:
https://www.infiniton.es/asistencia-tecnica/
•Gama Blanca: rmablanca.infiniton.es
•Gama Marrón: rma.infiniton.es
Alternativamente, si lo desean, pueden solicitar la asistencia técnica vía correo electrónico:
•Gama Blanca: rmablanca@infiniton.es
•Gama Marrón: rma@infiniton.es
Para agilizar todos los trámites, siempre se deben de indicar los siguientes datos:
•Nombre y apellidos
•Teléfono 1
•Teléfono 2
•Dirección completa
•Código postal
•Población
•Marca
•Modelo del producto
•Número de serie
•Avería que presenta el producto
Si lo desean, pueden solicitar la asistencia técnica a través del número 902 676 518 ó 958 087
169, disponible únicamente para los productos de gama blanca (a excepto microondas de
libre instalación).

FGC-BB193
User's manual

!
"
#$
#
#
%

&'
%
(
)
or
other
process,
)
&
'
)
&'
)
*)
*'

)!
&+(,--'
)
(
(
.
/
(
0
(
0
( 0
( (
5
)
(

. &
'
qualified
3 4
3
*'
4
6
7 1
.
1
7
)
8
#
) "
/
/"
. !
)
)
*'

("
" *'
.
recommendations
should be
+
) ""
"
!
*'
*'
*'"
2'(
9
#contact
systems.
#
: 0
;
( "( &
'
(" (
*'
" ("

= and
)>
)> the
< *'
+! for
2'
*'"
2'(
9(((& they
' suitable
"
door
the
<
)
+

.1
5
& ('
7
. 1 of
qualified
"
# must
)0
) air
0
7
&'0

"
?
.
!
as
taken
&'0
)&'10
)&'0
) !
0
1
=
1

)
6
)
* )
2 #
During using, service and
disposal the appliance, please pay attention to
symbol similar as left side, which is located on
rear of appliance (rear panel or compressor) and
with yellow or orange color.
It’s risk of fire warning symbol. There are
flammable materials in refrigerant pipes and
compressor.
Please be far away fire source during using,
service and
disposal.

2
Contents:
3 Important information
5 Important notes
5 Before first use
6 Important notes on use of the fridge
7 Important notes on use of the freezer
8 Crisper drawer humidity adjustment
9 Storage
10 Control panel
11 Care and cleaning
12 Defrosting the fridge
12 Defrosting the freezer
13 Troubleshooting
15 Installation preparation
15 Ventilation requirements
17 Installation into the cabinet
18 Mounting the fascia doors
20 Reversing the appliance doors

3
Important
The manufacturer cannot be held responsible for injuries or losses
caused by incorrect use or installation of this product. Please note
that we reserve the right to invalidate the guarantee supplied with this
product following incorrect installation or misuse of the appliance.
This appliance is not designed to be used by people (including
children) with reduced physical, sensorial or mental capacity, or
who lack experience or knowledge about it, unless they have had
supervision or instructions on how to use the appliance by someone
who is responsible for their safety.
Under no circumstances should any external covers be removed for
servicing or maintenance except by suitably qualified personnel.
Appliance information:
Please enter the details on the appliance rating plate below for
reference, to assist Customer Care in the event of a fault with your ap-
pliance and to register your appliance for guarantee purposes.
Appliance Model
Serial Number
EU Declarations of Conformity:
This appliance has been designed, constructed and marketed in
compliance with safety requirements of EU Directive 2014/35/EU (Low
voltage) and requirements of EU Directive 2014/30/EU (EMC).

4
This appliance has been manufactured to the strictest standards and
complies with all applicable legislation, including Electrical safety (LVD)
and Electromagnetic interference compatibility (EMC). Parts intended
to come into contact with food conform to 1935/2004/EC.
IMPORTANT INFORMATION FOR CORRECT DISPOSAL OF THE
PRODUCT IN ACCORDANCE WITH EC DIRECTIVE 2012/19/EU.
At the end of its working life, the product must not be disposed of as
urban waste. The refrigeration system contains insulating gases and
refrigerants, which require specialised waste disposal. The valuable
materials contained in this appliance can be recycle. It must be taken
to a special local authority dierentiated waste collection centre or to
a dealer providing this service.
Before disposing of an old appliance, remove the door seals etc. to
reduce the risk of child entrapment.
Disposing of a household appliance separately avoids possible
negative consequences for the environment and health deriving from
inappropriate disposal and enables the constituent materials to be
recovered to obtain significant savings in energy and resources. As a
reminder of the need to dispose of household appliances separately,
the product is marked with a crossed-out wheeled dustbin.

5
Important
•Never store inflammable or explosive items and strong corrosive
acids or alkalis in the appliance.
•This is a household appliance, which is produced in accordance
with the national standard. It is intended for food storage only, not
for storage of blood, medicine and biological products.
•To prevent risk of fire, keep the appliance away from petrol or any
other inflammables.
•To prevent risk of electromagnetic interference or other accidents,
do not place a microwave oven on top of the refrigerator or use
any electric appliance inside the refrigerator.
•Do not allow children to play with or near the appliance.
•The internal surface of freezer compartment is very cold when the
appliance is running. Do not touch the surface especially when
hands are wet.
•Do not splash water onto the appliance. Keep it away from places
of high humidity that may have adverse eect on the electric
insulation performance.
•This appliance is designed to be used in ambient temperatures
between 10 and 32˚C. Use outside of this range may cause the
appliance to fail.
Before first use
You must allow the fridge to settle for at least twenty four hours
prior to switching the power on.
It is recommended that you clean the interior of the appliance prior to
first use, using a solution of bicarbonate of soda and warm water and
then thoroughly drying the interior.

6
The fridge may have an odour to it at first use. This will disappear as
the appliance cools.
Please note:
The appliance will start on temperature setting 3 and work
continuously until it comes down to the correct temperature.
If the appliance is switched off, you should allow five minutes before
switching it on again to prevent unnecessary damage to the
compressor.
Never store inflammable or explosive items and strong corrosive
acids or alkalis in the appliance.
This fridge cools your food by making the inside back of the cavity
cold. It is normal for frost to build up on this surface; it then dissipates
and drains through a small drain at the bottom, where it evaporates
harmlessly. The presence of frosting at the back is not a malfunction
of the fridge.
Fridge use
•Never put liquids in the refrigerator uncovered.
•Never put hot foods in the refrigerator. Warm food should be
allowed to cool to room temperature before being put into the
refrigerator.
•Nothing should rest against the rear wall of the refrigerator, as this
will cause frost and possible condensation problems which will be
dicult to remove.
•Make sure food is clean and any extra water is wiped away before
putting into the fridge.
•Wrap or cover food before putting into the fridge. This will help

7
prevent the loss of moisture, keep food fresh and avoid
unpleasant odours.
• Sort foods prior to storing. Any foods to be used soon should be
stored at the front of the shelf to prevent deterioration caused by
the door being open for prolonged periods.
•Do not overfill the fridge. There should be sucient space
between the foods to allow the cool air to circulate.
•Thawing frozen foods in the fridge compartment will help to keep
the temperature low and save energy.
•Never store raw meats on shelves above cooked meats or other
produce. This will help to prevent juices from raw meat contaminating
other foodstus.
Freezer use
•The freezer compartments are designed to store only frozen food.
•Never put hot or warm foods in the freezer, allow them to cool fully
before putting them into the freezer.
• Follow the instructions on the food packaging for storage of frozen
food. If no information is provided, foods should not be stored for
more than three months after the purchase date.
•Store food in small packages (ideally less than 1kg). This reduces
the freezing time and improves the quality of the food after
thawing.
•Wrap food before putting into the freezer. To stop the wrapping
sticking together, ensure it is dry.
• Label the food before freezing with information including type of
food and dates of storage and expiry.

8
•Once food is thawed, it must not be refrozen. Only defrost as
much food as is required to prevent wastage.
• Bottled or canned drinks should not be stored in the freezer
compartments as they could explode.
•The maximum amount of fresh food that can be frozen within a 24
hour period is 3.0 kg.
•Do not attempt to freeze more than the maximum amount.
Crisper drawer humidity adjustment
The crisper drawer within this appliance features a humidity level
adjustment slider. Vegetables and similar produce that are subject to
wilting (e.g. arugula, spinach leaves, herbs such as basil etc.) should
be kept in the crisper drawer and the adjustment slider kept closed
(fully to the left - high). By keeping the adjustment slider closed, water
vapour is held in the drawer and subsequently greens are kept crisper
and fresher for longer.
By contrast, fruits that are susceptible to rotting should be stored in
the crisper drawer with the humidity adjustment slider fully open (to
the right - low). This will allow gases, emitted by certain produce and
that accelerate the rotting process, to exit the crisper drawer.
The drawer is marked high and low with vegetable and fruit symbols
to aid you.

9
Storage
The fridge section is for short term food storage. Although low
temperatures can be maintained, extended periods of food storage is
not recommended.
As the cold air circulates within the fridge, the temperature can vary
between the dierent sections. As such, foods should be stored in
dierent sections according to type. Section 7 is the coldest part of
the fridge.
1. Butter, cheeses etc.
2. Food in jars and bottles
3. Drinks, e.g. milk
4. Cooked food
5. Yogurts, preserves etc.
6. 75cl bottles or ready meals etc.
7. Fresh meat and fish
8. Fruit and vegetables
The fridge shelves can be moved
according to the storage requirements
within the fridge section. To move the
shelf, lift up the rear section and then
pull it outwards. To replace, slide the
shelf back into the slot, and then lower
the rear section.
The wine racks can be deployed or
withdrawn as desired.
Fig. 1
Fig. 2
6
7
8
4
5
1
3
2

10
Control Panel
A. Refrigerator temperature adjustment sensor
This button is used to adjust the temperature within the fridge. Press
this sensor once to activate adjustment, and then as many times as
necessary until the desired level is selected. The settings range from 1
to 6 with 1 being the warmest and 6 being the coldest.
Please note: Where possible, avoid having the temperature setting on
6 all of the time. This well help to alleviate strain on the compressor
and refrigeration system.
B. Refrigerator temperature setting display
This display will illuminate the current temperature setting. Adjusting
the temperature will cycle through this display.
Please note: You do not use numbers 1 to 6 to change the
temperature. Instead, use the refrigerator temperature adjustment
sensor (A).
C. Power button
Use this sensor to switch the appliance on and o (standby mode).
The sensor will be illuminated when the appliance is o.
Fig. 3
A B C

11
Care and cleaning
Always disconnect the appliance from
the power supply before any cleaning
or maintenance.
The fridge and freezer sections
should be cleaned using a solution
of bicarbonate of soda and lukewarm
water. Do not use abrasive products or
detergents. After washing, rinse and dry
thoroughly.
Clean the shelves and balconies
separately by hand with a mild solution of washing up liquid and
water. Do not put them in the dishwasher.
The water drain hole at the back of the fridge compartment should be
cleaned periodically to prevent the defrosted water from collecting
inside the fridge compartment. The drain plug can be used to clean
the drain hole.
If the appliance is not to be used for prolonged periods of time,
unplug and clean the appliance. The doors should be left slightly ajar
to prevent the formation of mildew and unpleasant odours.
Fig. 4
Drain hole
Drain Plug

12
Defrosting the fridge
The fridge is self-defrosting. Any water created will run out of the
fridge through the channel at the back of the fridge, unless the drain
hole is blocked (page 11). It is important to keep the channel clear
at all times using the cleaning tool supplied. The defrosted water is
collected in the evaporating tray at the back of the appliance and
dissipated by evaporation.
Defrosting the freezer
The freezer has a no frost system which is designed to prevent the
heavy build up of ice. Under normal use, there should be no need to
regularly defrost the freezer system.
To help in times of service or cleaning, the appliance has a forced
defrost mode which can be activated by touching and holding
sensors A and C in Fig. 3 for approximately 3 seconds. The
refrigerator temperature adjustment sensor (A) will flash to confirm
that the forced defrost function is active. This function should
automatically deactivate once the freezer temperature has reached
between 10 and 12°C.
Please note: If you are regularly finding a heavy build up of ice, or
pools of water, in the freezer section then it is likely that the door is
not sealing properly. This could be due to a defective door seal or an
incorrectly fitted, or overly heavy, decor door. For more information
see the troubleshooting section on ice on page 14.

13
Troubleshooting
If you have any problems with your appliance, you should check the
troubleshooting prior to calling Customer Care.
If the appliance is not working, check:
•That there is power to the appliance.
•The house fuses are intact and the fuse in the plug has not blown.
•The fridge has not been turned o (page 10).
• The plug socket is functioning fine. To check this, plug another
electrical appliance in to see if the socket is faulty.
If the appliance is working, but not very well, check:
•The appliance is not overloaded.
•The thermostat is set to an appropriate temperature.
•The doors are closing properly.
• The cooling system at the rear of the appliance is clean and free of
dust, and not touching the rear wall.
•There is enough ventilation at the side and rear walls.
If the appliance is noisy, check:
•The appliance is level and stable.
• The side and rear walls are clear, and there is nothing resting on the
appliance.
• Note: The cooling gas in the refrigerator may make a slight bubbling
or gurgling noise, even when the compressor is not running.
If the appliance is beeping, check:
•That the doors are closed. An alarm will sound after 60 seconds of
a door being open.

14
If there’s water in the base of the refrigerator compartment, check:
• The drain hole at the back of the compartment is clear (page 11).
If ice has formed on the back wall of the fridge:
• It is normal for some ice droplets to form on the back wall of the
fridge. This does not constitute a fault with the appliance.
• Ensure that no items inside the fridge are in contact with the back
wall.
• Check that there is some resistance when opening the door of the
appliance. If it opens at the slightest touch it may mean that the door
seal needs to be replaced.
•
Check the door seal for any kinks, debris or damage. If you notice
any, and are unable to resolve the issue yourself, contact Cus-
tomer Care so that the seal can be replaced.
• This can be due to the decor door(s) not being properly fitted. If you
are at all unsure, ask your fitter to check the decor doors.
If excessive ice has formed in the freezer:
• Check that there is some resistance when opening the door of the
appliance. If it opens at the slightest touch it may mean that the door
seal needs to be replaced.
•
Check the door seal for any kinks, debris or damage. If you notice
any, and are unable to resolve the issue yourself, contact Cus-
tomer Care so that the seal can be replaced.
• This can be due to the decor door(s) not being properly fitted. If you
are at all unsure, ask your fitter to check the decor doors.
If one or more of the LED units within the appliance is not working:
•Contact Customer Care to arrange a service visit.

15
Installation preparation
This appliance must never be installed
close to heat sources, e.g. heating
elements or cookers, nor in damp
places.
Seek the help of another individual,
or two, when installing this appliance.
This appliance may have sharp edges.
Wear adequate PPE for the task and
environment.
• To ensure the appliance is level, you
should use the height adjustable feet
at the front of the appliance.
• The cooling system at the rear of the
appliance must not touch the rear wall.
The greater the gap, the better.
• The appliance must be installed with
adequate ventilation. Ensure that there
is clearance above the appliance to allow air to escape and that
there is space between the rear of the appliance and the wall.
Ventilation
The main consideration when installing any refrigeration unit into
a fitted kitchen is ventilation. The heat removed from the cooling
compartment needs to be dissipated into the atmosphere. Incorrect
ventilation can lead to premature compressor failure, excessive power
Do not tilt beyond 40°
Fig. 5
Fig. 6

16
consumption, total system failure and may invalidate the warranty
provided with the appliance. For products intended to be installed into
a tall housing unit, the following requirements need to be met:
The open channel at the rear is clearly shown. For the correct
operation of the appliance it is important that the top of the housing
unit is not blocked o. A channel depth of 40-50mm is normal with
most units.
A ventilation hole is required in the plinth of the unit; this allows air to
plan view of rear ventilation gap
The top of the cabinet needs to be
vented into the room
Recommended size of vent opening:
500 x 30mm
If the furniture does not allow free air
into the room then a plinth vent, or other
means of ventilation needs to be pro-
vided to ensure a natural flow of air
There should be space at the rear of the
cabinet to allow cool air to be drawn over
the condenser.
Recommended:
500 x 35mm
An air intake
should be provided
somewhere in
the cabinet run to
allow free air in.
In this example, a
plinth vent is shown
underneath the
refrigerator .
A cutout should be
made in the plinth
below the fridge/
freezer and this
finished neatly using
the air vent grille
supplied.
Alternatively, a thin
section of the plinth
can be removed
to allow air into the
unit (recommended
600mm x 10mm).
Refrigerator
outline
Min 30mm
Fig. 7

17
be drawn over the compressor & heat exchange. A decorative grille
is supplied with the appliance to finish this vent neatly. Alternatively
the required air flow can be achieved by removal of a thin section of
plinth (recommended 600mm x 10mm minimum).
As a rule, the more air that can get in and out, the better and more
ecient the operation of the product.
Installation into the cabinet
With the help of another individual, or two,
manoeuvre the appliance into the cabinet. There
are two metal plates at the base of the appliance.
Fit the supplied white spacers (Fig. 8) to these
plates, as per Fig. 9.
Ensure that the lips of the spacers are level with the lip of the cabinet
base.
With the base of the appliance aligned correctly with the edge of the
cabinet base, the metal trim at the top of the appliance should sit flush
against the cabinet edge (if it does not, ensure the base is aligned as
per Fig. 9 and that the metal trim in Fig. 10 is not damaged).
Fig. 9
Fridge/freezer base
Cabinet base
Floor
x2
Fig. 8

18
Secure the top of the appliance to the top of the cabinet through the
metal trim screw holes marked ‘T’ in fig 10.
Remove the white spacers from the base plates and secure the
plates to the cabinet base using four of the supplied screws. Replace
the spacers.
Mounting the fascia doors
•Ensure that there is a gap of 3 to 4mm between the non-hinged
side and the cabinet wall.
•Locate the slider in the bracket and fix the slider to the fascia door
20 to 22mm from the edge of the fascia as shown in figure 11,
ensuring that the slider is positioned centrally and horizontally
within the bracket. Tighten securely by hand.
•Fill the gap on the non-hinged side with the gasket/seal strip
provided, as shown in Fig. 12.
•The finished look for the door sliders should be similar to those
shown in Fig. 14, which shows 2 sliders in place.
•Ensure the appliance doors open, close and seal properly.
TT
Fig. 10

19
20 mm
door gasket
x4
Fig. 11
Fig. 12 Fig. 14
Decor door
S
Fig. 13
Once complete, and if you are happy with the fit of the appliance in
the cabinet, bend and snap the parts of the white spacers marked ‘S’
as shown by the dotted outline in fig. 13. Leave the rest of the spacer
cover in place over the metal plates.
Gasket
Important: After completing the installation, check that the
appliance is secured within the unit and that the door(s) close and
open properly. If there is no resistance from the door seals when
opening the doors, then it is probable that the appliance and/or
decor doors are not fitted properly.

20
Reversing the appliance doors
We recommend you seek the help of another individual to support the
doors whilst performing this operation.
1. Carefully prise o the cover cap for the top hinge and unscrew the
screws fixing the top hinge to the appliance, you should support the
upper door whilst doing this.
2. Carefully remove the upper door and place it somewhere safe. Note
that there are spacers between the door and the hinge; note how
many and their position.
3. Remove the central hinge by removing the screws fixing it to the
appliance; support the lower door whilst doing this.
4. Remove the lower door and place it somewhere safe, again noting
the position of any spacer pieces.
5. Swap the previous top hinge to the opposite side at the bottom.
6. Refit the lower door using any spacers and position the central
hinge on the door. After removing the cover caps, fix the hinge
securely to the appliance.
7. Swap the previous bottom hinge to the opposite side at the top.
Refit the upper door and the “new” top hinge and fix securely to the
appliance.
8. Fit the central cover caps and top hinge cover pieces in place to
complete the process.
9. Unscrew all four slider brackets from the doors and swap them over
to the side furthest from the new hinge positions, before the decor
door is fitted.

21
Ensuring the door seals correctly:
It is normal for the seal to be compressed after the door has been
reversed. With the door closed, use a hair dryer to expand the seal
and fill the gap between the door and the body of the appliance.
Take care not to use the hair dryer too close to the appliance, which
could damage the seal. A distance of approximately 10cm should be
adequate.
When completed, allow the seal and door to cool before touching them.
Once done, the seal should remain in position.

PROCEDURE IN CASE OF FAILURE OF AN INFINITON PRODUCT
Dear customers, to request technical assistance or repair of your Infiniton product, you
have our website, operating 24 hours a day and 7 days a week:
https://www.infiniton.es/asistencia-tecnica/
•Gama Blanca: rmablanca.infiniton.es
•Gama Marrón: rma.infiniton.es
Alternatively, if they wish, they can request technical assistance via email:
•Gama Blanca: rmablanca@infiniton.es
•Gama Marrón: rma@infiniton.es
To streamline all procedures, the following information should always be indicated:
•Name and surname
•Telephone 1
• Telephone 2
•Full address
•Postal Code
•Population
•Brand
• Product model
•Serial number
• Failure presented by the product
If they wish, they can request technical assistance through the number 902 676 518 or 958
087 169, available only for white range products (except for free-standing microwaves).

FGC-BB193
User's manual

v(VWHGLVSRVLWLYRSRGHVHUXVDGRSRUFULDQoDVDSDUWLUGH
DQRVHSHVVRDVFRPFDSDFLGDGHVItVLFDVVHQVRULDLVRX
PHQWDLVUHGX]LGDVRXIDOWDGHH[SHULrQFLDHFRQKHFLPHQWR
VHWLYHUHPUHFHELGRVXSHUYLVmRRXLQVWUXo}HVVREUHRXVR
GRGLVSRVLWLYRFRPVHJXUDQoDHHQWHQGHUHPRSHULJR
HQYROYLGR
v&ULDQoDVGHDDQRVGHLGDGHSRGHPFDUUHJDUH
GHVFDUUHJDUHVWHGLVSRVLWLYR
v$VFULDQoDVGHYHPVHUVXSHUYLVLRQDGDVSDUDJDUDQWLUTXH
QmREULQTXHPFRPRDSDUHOKR
v$VFULDQoDVQmRGHYHPOLPSDUHPDQWHURXVXiULRDPHQRV
TXHWHQKDPDQRVGHLGDGHRXPDLVHVHMDP
VXSHUYLVLRQDGDV
v0DQWHQKDWRGRVRVUHFLSLHQWHVORQJHGDVFULDQoDV([LVWH
XPULVFRGHVXIRFDPHQWR
v6HHVWLYHUDHOLPLQDURDSDUHOKRUHWLUHDILFKDGDWRPDGD
FRUWHRFDERGHOLJDomRRPDLVSHUWRSRVVtYHOGRDSDUHOKR
HUHWLUHDSRUWDSDUDHYLWDUTXHDVFULDQoDVVRIUDPFKRTXHV
HOpFWULFRVDRFDLURXIHFKDU
*OGPSNBÁ¶FTEFTFHVSBOÁB
3DUDVXDVHJXUDQoDHSDUDJDUDQWLURXVRDGHTXDGR
DQWHVGHLQVWDODUHXVDURGLVSRVLWLYRSHODSULPHLUDYH]
OHLDDWHQWDPHQWHHVWHPDQXDOGRXVXiULRLQFOXLQGR
FRQVHOKRVHDYLVRV3DUDHYLWDUHUURVHDFLGHQWHV
GHVQHFHVViULRVpLPSRUWDQWHFHUWLILFDUVHGHTXHWRGRV
TXHXVDPRGLVSRVLWLYRHVWHMDPFRPSOHWDPHQWH
IDPLOLDUL]DGRVFRPVHXVUHFXUVRVGHRSHUDomRHVHJXUDQoD
*XDUGHHVWDVLQVWUXo}HVHFHUWLILTXHVHGHTXHHODV
SHUPDQHoDPFRPRGLVSRVLWLYRVHHOHIRUPRYLGRRX
YHQGLGRSDUDTXHWRGRVTXHRXWLOL]HPGXUDQWHWRGDDVXD
YLGDVHMDPGHYLGDPHQWHLQIRUPDGRVVREUHRXVRHD
VHJXUDQoDGRGLVSRVLWLYR
3DUDDVHJXUDQoDGDYLGDHGDSURSULHGDGHPDQWHQKDDV
SUHFDXo}HVGHVWDVLQVWUXo}HVGHXVRSRLVRIDEULFDQWHQmR
pUHVSRQViYHOSHORVGDQRVFDXVDGRVSHODRPLVVmR
4FHVSBOÁBEFDSJBOÁBTFQFTTPBTWVMOFS×WFJT

4FHVSBOÁBHFSBM
$7(1d®20DQWHQKDDVDEHUWXUDVGHYHQWLODomRQR
DUPiULRGRDSDUHOKRRXQDHVWUXWXUDHPEXWLGD
GHVREVWUXtGDV
$7(1d®21mRXWLOL]HGLVSRVLWLYRVPHFkQLFRVRXRXWURV
PHLRV SDUDDFHOHUDURSURFHVVRGHGHVFRQJHODomRDOpP
GRVUHFRPHQGDGRVSHORIDEULFDQWH
$7(1d®21mRGDQLILTXHRFLUFXLWRUHIULJHUDQWH
v6HHVWHGLVSRVLWLYRFRPYHGDo}HVGHSRUWDPDJQpWLFDV
VXEVWLWXLUXP GLVSRVLWLYRPDLVDQWLJRTXHWHQKDXPD
WUDYDGHPRODWUDYD QDSRUWDRX WDPSDFHUWLILTXHVH
GHTXHDPRODQmRSRVVDVHU XVDGDDQWHVGHGHVFDUWDU
RGLVSRVLWLYRDQWLJR,VVRHYLWDUiTXH VHWRUQHXPD
DUPDGLOKD PRUWDOSDUDXPDFULDQoD
*OGPSNBÁ¶FTEFTFHVSBOÁB
$7(1d®2
1mRXVHRXWURVDSDUHOKRVHOpWULFRVFRPRRV
IDEULFDQWHVGHVRUYHWHVGHQWURGHDSDUHOKRVGHUHIULJHUDomR
DPHQRVTXHVHMDPDSURYDGRVSDUDHVVHILPSHORIDEULFDQWH
$7(1d®2
1mRWRTXHQDOkPSDGDVHHODHVWLYHUOLJDGD
SRUXPORQJRSHUtRGRGHWHPSRSRLVHODSRGHHVWDUPXLWR
TXHQWH*'
$7(1d®2
$RFRORFDURDSDUHOKRFHUWLILTXHVHGHTXHR
FDERGHDOLPHQWDomRQmRHVWHMDSUHVRRXGDQLILFDGR
$7(1d®2
1mRORFDOL]HYiULRVSOXJXHVSRUWiWHLVRX
SURYHGRUHVGHHQHUJLDSRUWiWHLVQDSDUWHGHWUiVGR
GLVSRVLWLYR
1mRDUPD]HQHVXEVWkQFLDVH[SORVLYDVFRPRODWDVGH
DHURVVROFRPXPSURSHOHQWHLQIODPiYHOQHVWHDSDUHOKR
2UHIULJHUDQWHGHLVREXWDQR5DHVWiFRQWLGRQRFLUFXLWR
UHIULJHUDQWHGR DSDUHOKRXPJiVQDWXUDOFRPXPDOWRQtYHOGH
FRPSDWLELOLGDGHDPELHQWDO TXHQRHQWDQWRpLQIODPiYHO

'XUDQWHRWUDQVSRUWHHDLQVWDODomRGRGLVSRVLWLYRFHUWLILTXH
VHGHTXH QHQKXPGRVFRPSRQHQWHVGRFLUFXLWRUHIULJHUDQWH
HVWHMD
GDQLILFDGR
&KDPDVYD]LDVHIRQWHVGHLJQLomRYD]LDV
YHQWLOHDVDODHPTXHRDSDUHOKRHVWiORFDOL]DGR
eSHULJRVRDOWHUDUHVSHFLILFDo}HVRXPRGLILFDUHVWHSURGXWRGH
TXDOTXHU IRUPD4XDOTXHUGDQRQRFDERSRGHFDXVDUFXUWR
LQFrQGLRRXFKRTXH HOpWULFR
(VWHGLVSRVLWLYRIRLSURMHWDGRSDUDVHUXVDGRHPDSOLFDo}HV
GRPpVWLFDVH VLPLODUHVFRPR
iUHDVGHFR]LQKDHPORMDVHVFULWyULRVHRXWURVDPELHQWHVGH
WUDEDOKR
FRQVWUXLUFDVDVHFOLHQWHVHPKRWpLVPRWpLVHRXWURV
DPELHQWHVUHVLGHQFLDLV
FRQILJXUDo}HVGHFDIpGDPDQKm
$SOLFDo}HVQmRFRPHUFLDLVHVLPLODUHV
FLUFXLWR
*OGPSNBÁ¶FTEFTFHVSBOÁB
6HKRXYHUXPDOX]QRFRPSDUWLPHQWR
"5&/®«04XDOTXHUFRPSRQHQWHHOpWULFRSOXJXHFDER
GHDOLPHQWDomRFRPSUHVVRUHWFGHYHVHUVXEVWLWXtGR
SRUXPDJHQWHGHVHUYLoRFHUWLILFDGRRXSHVVRDOGHVHUYLoR
TXDOLILFDGR
"5&/®«0$OkPSDGDIRUQHFLGDFRPHVWHDSDUHOKRp
XPDOkPSDGDGHXVRHVSHFLDOTXHVySRGHVHUXWLOL]DGD
FRPRDSDUHOKRIRUQHFLGR(VWDOkPSDGDGHXVRHVSHFLDO
QmRpXWLOL]iYHOSDUDLOXPLQDomRGRPpVWLFD*'
v2FDERGHDOLPHQWDomRQmRGHYHVHUHVWHQGLGR
v&HUWLILTXHVHGHTXHRSOXJXHGHHQHUJLDQmRHVWHMD
DPDVVDGRRXGDQLILFDGR SHODSDUWHGHWUiVGRDSDUHOKR
8PSOXJXHGHHQHUJLDHVPDJDGRRXGDQLILFDGR SRGH
VXSHUDTXHFHUHFDXVDUXPLQFrQGLR

v&HUWLILTXHVHGHSRGHUFRQHFWDUVHjWRPDGDGHHQHUJLD
GRDSDUHOKR
v1mRSX[HRFDERGHUHGH
v6HDWRPDGDHVWLYHUVROWDQmRLQVLUDDILFKDGHDOLPHQWDomR
([LVWHRULVFRGH FKRTXHHOpWULFRRXLQFrQGLR
v9RFrQmRGHYHRSHUDURGLVSRVLWLYRVHPDOkPSDGD
v(VWHGLVSRVLWLYRpSHVDGReSUHFLVRWHUFXLGDGRDR
PRYrOR
v1mRUHPRYDRXWRTXHQRVLWHQVQRFRPSDUWLPHQWRGR
IUHH]HUVHVXDVPmRV HVWLYHUHP~PLGDVRX~PLGDV
SRLVLVVRSRGHFDXVDUHVFRULDo}HVQDSHOHRX
vFRQJHODPHQWRFRQJHODPHQWRGHTXHLPDGXUDV
v(YLWHDH[SRVLomRSURORQJDGDGRGLVSRVLWLYRjOX]VRODU
GLUHWD
6TPEJ×SJP
1mRDTXHoDDVSDUWHVSOiVWLFDVGRDSDUHOKR
1mRFRORTXHSURGXWRVDOLPHQWtFLRVGLUHWDPHQWHFRQWUDD
SDUHGHGRIXQGR
*OGPSNBÁ¶FTEFTFHVSBOÁB
2VDOLPHQWRVFRQJHODGRVQmRGHYHPVHUFRQJHODGRV
QRYDPHQWHGHSRLVGH GHVFRQJHODGRV
*XDUGHRVDOLPHQWRVFRQJHODGRVSUpHPEDODGRVGH
DFRUGRFRPDVLQVWUXo}HVdo IDEULFDQWHGHDOLPHQWRV
FRQJHODGRV
$VUHFRPHQGDo}HVGHDUPD]HQDPHQWRGRVIDEULFDQWHV
GHHOHWURGRPpVWLFRVdevem VHUVHJXLGDVULJRURVDPHQWH
9HMDDVLQVWUXo}HVUHOHYDQWHV
1mRFRORTXHUHIULJHUDQWHVFRPJiVQRFRPSDUWLPHQWRGR
FRQJHODGRUSRLVLVVRcria SUHVVmRQRUHFLSLHQWHRTXH
SRGHULDID]HUFRPTXHRDSDUHOKRH[SORGLVVHe GDQLILFDVVH
RDSDUHOKR
6HKRXYHUXPFRPSDUWLPHQWRFRQJHODGRU

2VSRVWHVGHJHORSRGHPFDXVDUTXHLPDGXUDVSRU
FRQJHODPHQWRVHFRQVXPLGRV GLUHWDPHQWHGRDSDUHOKR
6HKRXYHUXPFRPSDUWLPHQWRFRQJHODGRU
6HKRXYHUXPFRPSDUWLPHQWRGHDUPD]HQDPHQWRSDUDDOLPHQWRVIUHVFRV
3DUDHYLWDUDFRQWDPLQDomRGRVDOLPHQWRVUHVSHLWHDV
VHJXLQWHVLQVWUXo}HV
v$EULUDSRUWDSRUSHUtRGRVSURORQJDGRVSRGHFDXVDU
XPDXPHQWR VLJQLILFDWLYRGDWHPSHUDWXUDQRV
FRPSDUWLPHQWRVGRDSDUHOKR
v/LPSHUHJXODUPHQWHDVVXSHUItFLHVTXHSRVVDPHQWUDU
HPFRQWDWRFRP DOLPHQWRVHVLVWHPDVGHGUHQDJHP
DFHVVtYHLV
v/LPSHRVWDQTXHVGHiJXDVHHOHVQmRIRUDPXVDGRV
SRUK/DYHR VLVWHPDGHiJXDOLJDGRDXPDIRQWHGH
iJXDVHQmRKRXYHUiJXDGXUDQWH GLDV
v$UPD]HQHDFDUQHFUXDHRSHL[HHPUHFLSLHQWHV
DGHTXDGRVQDJHODGHLUD SDUDTXHQmRHQWUHPHPFRQWDWR
FRPRXWURVDOLPHQWRVRXYD]HP
v2VFRPSDUWLPHQWRVGHDOLPHQWRVFRQJHODGRVGHGXDV
HVWUHODVVHSUHVHQWHV QRDSDUHOKRVmRDGHTXDGRVSDUD
DUPD]HQDUDOLPHQWRVSUpFRQJHODGRV DUPD]HQDURX
ID]HUVRUYHWHVHID]HUFXERVGHJHOR
*OGPSNBÁ¶FTEFTFHVSBOÁB
v2VFRPSDUWLPHQWRVGHXPDGXDVHWUrVHVWUHODVVH
DSUHVHQWDGRV QRDSDUHOKRQmRVmRDGHTXDGRVSDUD
congelar DOLPHQWRVIUHVFRV
v6HRDSDUHOKRIRUGHL[DGRYD]LRSRUORQJRVSHUtRGRVGH
WHPSRGHVOLJXHGHVFRQJHOHOLPSHVHTXHHGHL[HDSRUWD
DEHUWDSDUDHYLWDUTXHRFRQMXQWRVHGHVHQYROYDGHQWURGR
DSDUHOKR

*OTUBMBÁãP
H3DUDDFRQH[mRHOpWULFDVLJDFXLGDGRVDPHQWH
as LQVWUXo}HVGDGDVHPSDUiJUDIRVHVSHFtILFRV
v'HVHPEDOHRDSDUHOKRHYHULILTXHVHKiGDQRV1mROLJXHR
DSDUHOKRVHHVWLYHUGDQLILFDGR5HODWHSRVVtYHLVGDQRV
LPHGLDWDPHQWHDRORFDORQGHYRFrFRPSURX1HVVHFDVR
v$QWHVGDPDQXWHQomRGHVOLJXHRDSDUHOKRHGHVFRQHFWHR
SOXJXHGDWRPDGD
v1mROLPSHRGLVSRVLWLYRFRPREMHWRVGHPHWDO
v1mRXVHREMHWRVSRQWLDJXGRVSDUDUHPRYHURJHOR do
aparelho. 8VHXPUDVSDGRUGHSOiVWLFR
*'
v([DPLQHUHJXODUPHQWHRGUHQRQRUHIULJHUDGRUSDUDiJXD
GHVFRQJHODGD6HQHFHVViULROLPSHRGUHQR6HRGUHQR
estiver EORTXHDGRDiJXDVHDFXPXODUiQDSDUWHLQIHULRU do
6HKRXYHUXPFRPSDUWLPHQWRFRQJHODGRU
6HKRXYHUXPFRPSDUWLPHQWRGHDUPD]HQDPHQWRSDUD
DOLPHQWRVIUHVFRV
2'
JXDUGHDHPEDODJHP
veDFRQVHOKiYHOHVSHUDUSHORPHQRVTXDWURKRUDVDQWHV
GHOLJDURDSDUHOKRSDUDSHUPLWLUTXHRyOHRUHWRUQHDR
FRPSUHVVRU
v'HYHKDYHUFLUFXODomRGHDUDGHTXDGDDRUHGRUGR
DSDUHOKRSRLVLVVRQmROHYDDRVXSHUDTXHFLPHQWR
3DUDREWHUYHQWLODomRVXILFLHQWHVLJDDVLQVWUXo}HV
UHOHYDQWHVSDUDD LQVWDODomR
dispositivo.
*OGPSNBÁ¶FTEFTFHVSBOÁB
v6HPSUHTXHSRVVtYHORVVHSDUDGRUHVGRSURGXWRGHYHP
HVWDUFRQWUDXPDSDUHGHSDUDHYLWDUWRFDURXSUHQGHUDV
SDUWHVTXHQWHVFRPSUHVVRUFRQGHQVDGRUSDUDHYLWDU
SRVVtYHLVTXHLPDGXUDV
v2DSDUHOKRQmRGHYHHVWDUORFDOL]DGRSHUWRGHUDGLDGRUHV
RXIRJ}HV

v&HUWLILTXHVHGHTXHRSOXJXHGHHQHUJLDSRVVDVHU
DFHVVDGRDSyVDLQVWDODomRGRGLVSRVLWLYR
4FSWJÁP
v4XDOTXHUWUDEDOKRHOpWULFRQHFHVViULRSDUDH[HFXWDURVHUYLoR
WpFQLFRGRDSDUHOKRGHYHVHUUHDOL]DGRSRUXPHOHWULFLVWD
TXDOLILFDGRRXSRUXPDSHVVRDFRPSHWHQWH
v(VWHSURGXWRGHYHVHUUHSDUDGRSRUXPFHQWURGHVHUYLoR
DXWRUL]DGRHVRPHQWHSHoDVVREUHVVDOHQWHVRULJLQDLVGHYHP
VHUXVDGDV
&DPOPNJBEFFOFSHJB
v1mRFRORTXHDOLPHQWRVTXHQWHVQRDSDUHOKR
v1mRFRORTXHDOLPHQWRVMXQWRVSRLVLVVRLPSHGHTXHRDUFLUFXOH
v&HUWLILTXHVHGHTXHRVDOLPHQWRVQmRWRTXHPDSDUWHGHWUiV
GRVFRPSDUWLPHQWRV
1SPUFÁãP"NCJFOUBM
(VWHGLVSRVLWLYRQmRFRQWpPJDVHVTXHSRVVDPGDQLILFDU
DFDPDGDGHR]{QLRQHPHPVHXFLUFXLWRUHIULJHUDQWHQHP
QRVPDWHULDLVGHLVRODPHQWR2DSDUHOKRQmRGHYHVHU
GHVFDUWDGRMXQWDPHQWHFRPROL[RHROL[RPXQLFLSDLV$
HVSXPDGHLVRODPHQWRFRQWpPJDVHVLQIODPiYHLVRDSDUHOKR
GHYHVHUHOLPLQDGRGHDFRUGRFRPRVUHJXODPHQWRVGR
DSDUHOKRDVHUREWLGRMXQWRGDVDXWRULGDGHVORFDLV
v6HDHOHWULFLGDGHVDLUQmRDEUDDVSRUWDV
v1mRDEUDDVSRUWDVFRPIUHTrQFLD
v1mRPDQWHQKDDVSRUWDVDEHUWDVSRUPXLWRWHPSR
v1mRFRORTXHRWHUPRVWDWRHPWHPSHUDWXUDVPXLWRDOWDV
v$OJXQVDFHVVyULRVFRPRJDYHWDVSRGHPVHUUHPRYLGRV
SDUDREWHUXPPDLRUYROXPHGHDUPD]HQDPHQWRHPHQRU
FRQVXPRGHHQHUJLD
*OGPSNBÁ¶FTEFTFHVSBOÁB
DXQLGDGHGHUHVIULDPHQWRHVSHFLDOPHQWHR
WURFDGRUGHFDORU2VPDWHULDLVXWLOL]DGRVQHVWHGLVSRVLWLYR
PDUFDGRFRPRVtPERORVmRUHFLFOiYHLV
(YLWHGDQLILFDU

$RJDUDQWLUTXHHVWHSURGXWRVHMDGHVFDUWDGRFRUUHWDPHQWH
HOHDMXGDUiDHYLWDUSRVVtYHLVFRQVHTrQFLDVQHJDWLYDVSDUD
RPHLRDPELHQWHHDVD~GHKXPDQDTXHSRGHULDPVHU
FDXVDGDVSHORPDQXVHLRLQDGHTXDGRGRVUHVtGXRVGHVWH
SURGXWR3DUDREWHULQIRUPDo}HVPDLVGHWDOKDGDVVREUH
FRPRUHFLFODUHVWHSURGXWRHQWUHHPFRQWDWRFRPRFRQVHOKR
ORFDORVHUYLoRGHGHVFDUWHGHOL[RGRPpVWLFRRXDORMDRQGH
DGTXLULXRSURGXWR
0DWHULDLVGHHPEDODJHP
2VPDWHULDLVFRPRVtPERORVmRUHFLFOiYHLV'HVFDUWHD
HPEDODJHPHPXPUHFLSLHQWHDGHTXDGRSDUDUHFLFODJHP
(OLPLQDomRGRGLVSRVLWLYR
1. 'HVFRQHFWHRSOXJXHGRVRTXHWH
2. &RUWHRFDERGHDOLPHQWDomRHGHVFDUWHR
2VtPERORQRSURGXWRRXQDHPEDODJHPLQGLFDTXH
HVWHSURGXWRQmRSRGHVHUWUDWDGRFRPROL[RGRPpVWLFR
(PYH]GLVVRHOHGHYHVHUOHYDGRDRSRQWRGHFROHWD
DSURSULDGRSDUDDUHFLFODJHPGHHTXLSDPHQWRVHOpWULFRV
HHOHWU{QLFRV
"5&/®«0'XUDQWHDXWLOL]DomRPDQXWHQomRH
HOLPLQDomRGRDSDUHOKRSUHVWHDWHQomRDRVtPEROR
semelhanteQRODGRHVTXHUGRTXHVHHQFRQWUDQD
SDUWHGHWUiVGRDSDUHOKRSDLQHOWUDVHLURRX
FRPSUHVVRU O dito símbolo será amarelo ou laranja.
e símbolo de aviso de risco de incêndio([LVWHP
PDWHULDLVLQIODPiYHLVQRVWXERVGRUHIULJHUDQWHHGR
FRPSUHVVRU )LTXHORQJHGDIRQWHGHIRJRGXUDQWHR
XVRVHUYLoRHGHVFDUWH
*OGPSNBÁ¶FTEFTFHVSBOÁB

2
Conteúdo:
3 Informação importante
5 Anotações importantes
5 Antes da primeira utilização
6 Notas importantes sobre o uso da geladeira
7 Notas importantes sobre o uso do freezer
8 Ajuste de umidade da gaveta mais nítido
9 Armazenamento
10 Painel de controle
11 Cuidados e limpeza
12 Descongelar a geladeira
12 Descongelar a geladeira
13 Solução de problemas
15 Preparação da instalação
15 Requisitos de ventilação
17 Instalação no armário
18 Montagem das portas do painel
20 Invertendo as portas do aparelho

3
Importante
TO fabricante não pode ser responsabilizado por lesões ou perdas causadas
pelo uso ou instalação incorreta deste produto. Observe que nos
reservamos o direito de invalidar a garantia fornecida com este produto
após a instalação incorreta ou uso incorreto do aparelho.
Este aparelho não foi projetado para ser usado por pessoas (incluindo
crianças) com capacidade física, sensorial ou mental reduzida, ou
que não tenham experiência ou conhecimento a respeito, a menos que
tenham supervisão ou instruções sobre como usar o aparelho por alguém
responsável por sua segurança.
Sob nenhuma circunstância as tampas externas devem ser removidas para
reparos ou manutenção, exceto por pessoal qualificado.
Informações do aparelho:
Digite os detalhes na placa de identificação do aparelho abaixo para
referência, para ajudar o Atendimento ao Cliente no caso de uma falha no
seu aparelho e para registrar o seu aparelho para fins de garantia.
Appliance Model
Serial Number
Declarações de conformidade da UE:
Este aparelho foi projetado, construído e comercializado em conformidade
com os requisitos de segurança da Diretiva da UE 2014/35 / UE (baixa
tensão) e os requisitos da Diretiva da UE 2014/30 / UE (EMC).

4
Este aparelho foi fabricado com os mais estritos padrões e está em
conformidade com toda a legislação aplicável, incluindo segurança elétrica
(LVD) e compatibilidade com interferência eletromagnética (EMC). As
peças destinadas a entrar em contato com os alimentos estão em
conformidade com 1935/2004 / EC.
INFORMAÇÕES IMPORTANTES PARA A ELIMINAÇÃO CORRETA
DO PRODUTO DE ACORDO COM A DIRETIVA 2012/19 / UE DA CE.
No final de sua vida útil, o produto não deve ser descartado como lixo
urbano. O sistema de refrigeração contém gases isolantes e refrigerantes,
que requerem descarte especializado. Os materiais valiosos contidos neste
aparelho podem ser reciclados. Deve ser levado a um centro diferenciado de
coleta de lixo da autoridade local ou a um revendedor que presta esse
serviço.
Antes de descartar um aparelho antigo, remova as vedações da porta etc.
para reduzir o risco de aprisionamento de crianças.
O descarte de um eletrodoméstico separadamente evita possíveis
consequências negativas para o meio ambiente e a saúde decorrentes do
descarte inadequado e permite a recuperação dos materiais constituintes
para obter economias significativas em energia e recursos. Como um
lembrete da necessidade de descartar os eletrodomésticos separadamente, o
produto é marcado com um caixote do lixo com rodas riscado.

5
Importante
• Nunca guarde itens inflamáveis ou explosivos e ácidos ou álcalis
corrosivos fortes no aparelho.
• Este é um aparelho doméstico, produzido de acordo com a norma
nacional. Destina-se apenas ao armazenamento de alimentos, não ao
armazenamento de sangue, medicamentos e produtos biológicos.
• Para evitar risco de incêndio, mantenha o aparelho longe de gasolina ou
qualquer outro produto inflamável.
• Para evitar o risco de interferência eletromagnética ou outros acidentes,
não coloque um forno de microondas em cima da geladeira ou use
qualquer aparelho elétrico dentro da geladeira.
• Não permita que crianças brinquem com ou próximo ao aparelho.
• A superfície interna do compartimento do congelador está muito fria
quando o aparelho está funcionando. Não toque na superfície,
especialmente quando as mãos estiverem molhadas.
• Não jogue água no aparelho. Mantenha-o longe de locais de alta umidade
que possam ter um efeito adverso no desempenho do isolamento elétrico.
• Este aparelho foi projetado para ser usado em temperaturas ambientes
entre 10 e 32 ° C. O uso fora deste intervalo pode causar falhas no
dispositivo.
Antes da primeira utilização
Você deve deixar a geladeira descansar por pelo menos vinte e quatro
horas antes de ligar a alimentação.
É recomendável limpar o interior do aparelho antes da primeira
utilização, usando uma solução de bicarbonato de sódio e água morna e
depois secar completamente o interior.

6
A geladeira pode ter um odor na primeira utilização. Isso desaparecerá
quando o aparelho esfriar.
Observe:
O aparelho inicia com o ajuste de temperatura 3 e trabalha
continuamente até atingir a temperatura correta.
Se o aparelho estiver desligado, aguarde cinco minutos antes de ligá-lo
novamente para evitar danos desnecessários ao compressor.
Nunca guarde itens inflamáveis ou explosivos e ácidos ou álcalis
corrosivos fortes no aparelho.
Este refrigerador esfria sua comida, deixando a parte traseira interna da
cavidade fria. É normal que geada se acumule nesta superfície; depois se
dissipa e drena através de um pequeno dreno no fundo, onde evapora
inofensivamente. A presença de geada na parte traseira não é um mau
funcionamento da geladeira.
Uso da geladeira
• Nunca coloque líquidos na geladeira descobertos.
• Nunca coloque alimentos quentes na geladeira. Alimentos quentes devem
esfriar à temperatura ambiente antes de serem colocados na geladeira.
• Nada deve descansar contra a parede traseira do refrigerador, pois isso
causará gelo e possíveis problemas de condensação que serão difíceis de
remover.
• Certifique-se de que os alimentos estejam limpos e que a água extra seja
limpa antes de colocar na geladeira.
• Enrole ou cubra os alimentos antes de colocá-los na geladeira. Isso
ajudará a evitar a perda de umidade, manter os alimentos frescos e evitar
odores desagradáveis.

7
Classifique os alimentos antes de guardar. Quaisquer alimentos a serem
utilizados em breve devem ser armazenados na frente da prateleira para evitar
a deterioração causada pela abertura da porta por períodos prolongados.
• Não encha demais a geladeira. Deve haver espaço suficiente entre os
alimentos para permitir a circulação do ar frio.
• Descongelar os alimentos congelados no compartimento da geladeira
ajudará a manter a temperatura baixa e economizar energia.
• Nunca guarde carnes cruas nas prateleiras acima de carnes cozidas ou outros
produtos. Isso ajudará a evitar que os sucos de carne crua contaminem outros
alimentos.
Uso do freezer
• Os compartimentos do congelador foram projetados para armazenar
apenas alimentos congelados.
• Nunca coloque alimentos quentes ou quentes no freezer, deixe esfriar
completamente antes de colocá-los no freezer.
• Siga as instruções na embalagem dos alimentos para armazenamento de
alimentos congelados. Se nenhuma informação for fornecida, os alimentos
não devem ser armazenados por mais de três meses após a data da compra.
• Armazene os alimentos em embalagens pequenas (de preferência menos
de 1 kg). Isso reduz o tempo de congelamento e melhora a qualidade dos
alimentos após o descongelamento.
• Enrole os alimentos antes de colocá-los no freezer. Para parar a
embalagem, verifique se está seca.
• Abandone os alimentos antes de congelar com informações, incluindo
tipo de alimento e datas de armazenamento e validade.

8
• Depois que os alimentos são descongelados, eles não devem ser
recongelados. Descongele apenas a quantidade necessária de alimentos
para evitar desperdícios.
• Bebidas engarrafadas ou enlatadas não devem ser armazenadas nos
compartimentos do freezer, pois podem explodir.
• A quantidade máxima de alimentos frescos que podem ser congelados
dentro de um período de 24 horas é de 3,0 kg.
• Não tente congelar mais do que a quantidade máxima.
Ajuste de umidade da gaveta
A gaveta mais nítida deste aparelho possui um controle deslizante de nível
de umidade. Legumes e produtos similares sujeitos a murchidão (por
exemplo, rúcula, folhas de espinafre, ervas como manjericão etc.) devem
ser mantidos na gaveta mais nítida e o controle deslizante mantido fechado
(totalmente para a esquerda - alto). Ao manter o controle deslizante
fechado, o vapor de água é mantido na gaveta e, posteriormente, os verdes
são mantidos mais nítidos e frescos por mais tempo.
Por outro lado, as frutas suscetíveis à podridão devem ser armazenadas na
gaveta mais nítida com o controle deslizante de ajuste de umidade
totalmente aberto (à direita - baixo). Isso permitirá que os gases emitidos
por certos produtos e que aceleram o processo de apodrecimento saiam da
gaveta mais nítida.
A gaveta é marcada alta e baixa com símbolos de frutas e vegetais para
ajudá-lo.

9
Armazenamento
A seção da geladeira é para armazenamento de alimentos a curto prazo.
Embora seja possível manter baixas temperaturas, períodos prolongados
de armazenamento de alimentos não são recomendados.
À medida que o ar frio circula dentro da geladeira, a temperatura pode
variar entre as diferentes seções. Como tal, os alimentos devem ser
armazenados em diferentes seções, de acordo com o tipo. A seção 7 é a
parte mais fria da geladeira.
1. Manteiga, queijos etc.
2. Alimentos em potes e garrafas
3. Bebidas, por exemplo leite
4. Alimentos cozidos
5. Iogurtes, conservas, etc.
6. garrafas de 75cl ou refeições prontas
etc.
7. Carne e peixe frescos
8. Frutas e verduras
As prateleiras da geladeira podem ser
movidas de acordo com os requisitos de
armazenamento na seção da geladeira.
Para mover a prateleira, levante a seção
traseira e puxe-a para fora. Para
substituir, deslize a prateleira de volta no
slot e abaixe a seção traseira.
As prateleiras para vinho podem ser
implantadas ou retiradas conforme
desejado.
Fig. 1
Fig. 2
6
7
8
4
5
1
3
2

10
Painel de controle
A. Sensor de ajuste de temperatura do refrigerador
Este botão é usado para ajustar a temperatura dentro da geladeira. Pressione
este sensor uma vez para ativar o ajuste e depois quantas vezes forem
necessárias até que o nível desejado seja selecionado. As configurações
variam de 1 a 6, sendo 1 a mais quente e 6 a mais fria.
Observação: sempre que possível, evite ajustar a temperatura 6 o tempo
todo. Isso ajuda a aliviar a tensão no compressor e no sistema de
refrigeração.
B. Indicador de ajuste da temperatura do refrigerador
Este visor iluminará a configuração atual de temperatura. O ajuste da
temperatura percorrerá esse visor.
Observação: você não usa os números de 1 a 6 para alterar a temperatura.
Em vez disso, use o sensor de ajuste de temperatura do refrigerador (A).
C. botão liga / desliga
Utilize este sensor para ligar e desligar o aparelho (modo de espera). O
sensor acenderá quando o aparelho estiver desligado.
Fig. 3
A B C

11
Cuidados e limpeza
Sempre desconecte o aparelho da fonte de
alimentação antes de qualquer limpeza ou
manutenção.
As seções de geladeira e freezer devem ser
limpas com uma solução
de bicarbonato de sódio e água morna.
Não use produtos abrasivos ou
detergentes. Após a lavagem, enxágue e
seque bem.
Limpe as prateleiras e varandas
separadamente à mão com uma solução suave de detergente e água. Não
os coloque na máquina de lavar louça.
O orifício de drenagem de água na parte traseira do compartimento da
geladeira deve ser limpo periodicamente para evitar que a água
descongelada se acumule dentro do compartimento da geladeira. O bujão
de drenagem pode ser usado para limpar o orifício de drenagem.
Se o aparelho não for utilizado por períodos prolongados, desconecte e
limpe o aparelho. As portas devem ficar ligeiramente entreabertas para
evitar a formação de mofo e odores desagradáveis.
Fig. 4
Drain hole
Drain Plug

12
Descongelar a geladeira
A geladeira está se descongelando. Qualquer água criada sairá da
geladeira pelo canal na parte traseira da geladeira, a menos que o orifício
de drenagem esteja bloqueado (página 11). É importante manter o canal
limpo
sempre usando a ferramenta de limpeza fornecida. A água descongelada é
coletada na bandeja de evaporação na parte traseira do aparelho e
dissipada por evaporação.
Descongelar o congelador
O freezer possui um sistema sem gelo que foi projetado para impedir a
acumulação pesada de gelo. Sob uso normal, não há necessidade de
descongelar regularmente o sistema de congelação.
Para ajudar nos momentos de manutenção ou limpeza, o aparelho possui
um modo de degelo forçado, que pode ser ativado ao tocar e segurar os
sensores A e C na Fig. 3 por aproximadamente 3 segundos. O sensor de
ajuste de temperatura do refrigerador (A) pisca para confirmar que a
função de degelo forçado está ativa. Esta função deve ser desativada
automaticamente assim que a temperatura do freezer atingir entre 10 e 12
° C.
Observação: se você encontrar regularmente um forte acúmulo de gelo ou
poças de água na seção do freezer, é provável que a porta não esteja bem
fechada. Isso pode ser devido a uma vedação da porta com defeito ou a
uma porta de decoração incorreta ou excessivamente pesada. Para obter
mais informações, consulte a seção de solução de problemas no gelo na
página 14.

13
Solução de problemas
Se você tiver algum problema com o seu aparelho, verifique a solução de
problemas antes de ligar para o Atendimento ao cliente.
Se o aparelho não estiver funcionando, verifique:
• Que há energia no aparelho.
• Os fusíveis domésticos estão intactos e o fusível no plugue não explodiu.
• O frigorífico não foi desligado (página 10).
• A tomada está funcionando bem. Para verificar isso, conecte outro aparelho
elétrico para verificar se o soquete está com defeito.
Se o aparelho estiver funcionando, mas não muito bem, verifique:
• O aparelho não está sobrecarregado.
• O termostato está ajustado para uma temperatura apropriada.
• As portas estão fechando corretamente.
• O sistema de refrigeração na parte traseira do aparelho está limpo e livre
de poeira e não toca na parede traseira.
• Existe ventilação suficiente nas paredes laterais e traseiras.
Se o aparelho estiver barulhento, verifique:
• O aparelho está nivelado e estável.
• As paredes laterais e traseiras são claras e não há nada repousando sobre o
aparelho.
• Nota: o gás de resfriamento no refrigerador pode emitir um leve ruído de
bolhas ou borbulhas, mesmo quando o compressor não está funcionando.
Se o aparelho estiver apitando, verifique: Se o aparelho estiver apitando,
verifique:
•Que as portas estão fechadas. Um alarme soará após 60 segundos de
uma porta sendo aberta.

14
Se houver água na base do compartimento da geladeira, verifique:
•O orifício de drenagem na parte traseira do compartimento está
livre (página 11).
Se houver formação de gelo na parede traseira da geladeira:
• É normal que algumas gotas de gelo se formem na parede traseira da
geladeira. Isso não constitui uma falha no aparelho.
• Verifique se nenhum item dentro da geladeira está em contato com a
parede traseira.
• Verifique se há alguma resistência ao abrir a porta do aparelho. Se abrir ao
menor toque, pode significar que a vedação da porta precise ser substituída.
• Verifique a vedação da porta quanto a dobras, detritos ou danos. Se você
notar algum e não conseguir resolver o problema sozinho, entre em contato
com o Atendimento ao cliente para que o selo possa ser substituído.
• Isso pode ocorrer porque as portas decorativas não estão sendo
encaixadas corretamente. Se você não tiver certeza, peça ao seu instalador
que verifique as portas da decoração.
Se gelo excessivo se formar no freezer:
Verifique se há alguma resistência ao abrir a porta do aparelho. Se abrir ao
menor toque, pode significar que a vedação da porta precise ser substituída.
• Verifique a vedação da porta quanto a dobras, detritos ou danos. Se você
notar algum e não conseguir resolver o problema sozinho, entre em contato
com o Atendimento ao cliente para que o selo possa ser substituído.
• Isso pode ocorrer porque as portas decorativas não estão sendo encaixadas
corretamente. Se você não tiver certeza, peça ao seu instalador que verifique
as portas da decoração.
Se uma ou mais unidades de LEDs do dispositivo não estiverem funcionando:
•Entre em contato com o Atendimento ao cliente para agendar uma visita
de serviço.

15
Preparação da instalação
Este aparelho nunca deve ser instalado
perto de fontes de calor, por exemplo
elementos de aquecimento ou fogões, nem
em locais úmidos.
Procure a ajuda de outra pessoa, ou duas,
ao instalar este dispositivo. Este aparelho
pode ter bordas afiadas. Use EPI adequado
para a tarefa e o ambiente.
Ventilação
A principal consideração ao instalar qualquer unidade de refrigeração em uma
cozinha equipada é ventilação. O calor removido do compartimento de
resfriamento precisa ser dissipado na atmosfera. A ventilação incorreta pode
levar à falha prematura do compressor, excesso de energia
Do not tilt beyond 40°
Fig. 5
• Para garantir que o aparelho esteja nivelado, você
deve usar os pés ajustáveis em altura
na frente do aparelho.
• O sistema de refrigeração na parte traseira do
o aparelho não deve tocar na parede traseira.
Quanto maior a diferença, melhor.
• O aparelho deve ser instalado com
ventilação adequada. Verifique se há
é uma folga acima do aparelho para permitir a saída de ar e que há
espaço entre a parte traseira do aparelho e a parede.

16
consumo total, falha total do sistema e pode invalidar a garantia fornecida
com o dispositivo. Para produtos destinados a serem instalados em uma
unidade de alojamento alta, os seguintes requisitos precisam ser atendidos:
O canal aberto na parte traseira é claramente mostrado. Para o correto
funcionamento do aparelho, é importante que a parte superior da
unidade da caixa não esteja bloqueada. Uma profundidade de canal de 40
a 50 mm é normal na maioria das unidades.
É necessário um orifício de ventilação no rodapé da unidade; isso permite
que o ar
plan view of rear ventilation gap
Refrigerator
outline
Min 30mm
Fig. 7
A parte superior do gabinete deve ser
ventilada na habitação.
Tamaño recomendado de abertura de
ventilação: 500 x 30 mm
Se os muebles não permitirem que entre o
ar livre seja habitável, verifique se ele
fornece uma ventilação de zócalo ou outros
medidores de ventilação para garantir um
fluxo natural de ar.
Debería haber espaco na parte trasera do
gabinete para permitir que o ar frio sea sea
infrastructure over the condensador.
Recomendado:
500 x 35 mm
Se você fornecer um
arquivo de ar em um
local do gabinete para
permitir a entrada de
ar livre. Neste
exemplo, você deve
ouvir um respirador
debajo do
refrigerador.
Se você tiver um
corte no zinco
debochado do
refrigerador /
congelador e estiver
com uma senha de
manobra ordenada,
use a rejeição da
ventilação
administrada.
Como alternativa,
consulte uma seção
delgada do código
para permitir que
entre na cidade
(recomendado 600
mm x 10 mm).

17
ser desenhado sobre o compressor e a troca de calor. Uma grade
decorativa é fornecida com o aparelho para finalizar bem essa abertura.
Como alternativa, o fluxo de ar necessário pode ser alcançado pela
remoção de uma seção fina do rodapé (recomendado 600 mm x 10 mm no
mínimo).
Como regra, quanto mais ar entrar e sair, melhor e mais eficiente será a
operação do produto.
Instalação no armário
Com a ajuda de outra pessoa, ou duas, manobre o
aparelho no armário. Existem duas placas de metal
na base do aparelho. Encaixe os espaçadores brancos
fornecidos (Fig. 8) nessas placas, conforme Fig. 9.
Verifique se os lábios dos espaçadores estão nivelados com o lábio da base
do gabinete.
Com a base do aparelho alinhada corretamente com a borda da base do
gabinete, a guarnição de metal na parte superior do aparelho deve ficar
nivelada com a borda do gabinete (se não houver, verifique se a base está
alinhada conforme a Fig. 9 e se a guarnição de metal na Fig. 10 não está
danificada).
Fig. 9
Fridge/freezer base
Cabinet base
Floor
x2
Fig. 8

18
Prenda a parte superior do aparelho na parte superior do gabinete pelos
orifícios dos parafusos de acabamento de metal marcados com 'T' na fig
10.
Remova os espaçadores brancos das placas da base e prenda as placas na
base do gabinete usando quatro dos parafusos fornecidos. Substitua os
espaçadores.
Montagem das portas do painel
• Verifique se há um espaço de 3 a 4 mm entre o lado não articulado e a
parede do gabinete.
• Localize o controle deslizante no suporte e fixe o controle deslizante à
porta do painel 20 a 22 mm a partir da borda do painel, conforme
mostrado na figura 11, garantindo que o controle deslizante esteja
posicionado central e horizontalmente dentro do suporte. Aperte
firmemente à mão.
• Preencha o espaço no lado não articulado com a tira de gaxeta /
vedação fornecida, conforme mostrado na Fig. 12.
• A aparência final dos controles deslizantes da porta deve ser semelhante
à mostrada na Fig. 14, que mostra dois controles deslizantes no lugar.
• Verifique se as portas do aparelho abrem, fecham e selam
adequadamente.
TT
Fig. 10

19
20 mm
door gasket
x4
Fig. 11
Fig. 12 Fig. 14
Decor door
S
Fig. 13
Depois de concluir, e se você estiver satisfeito com o encaixe do aparelho
no gabinete, dobre e encaixe as peças dos espaçadores brancos marcados
com 'S', conforme mostrado no contorno pontilhado na fig. 13. Deixe o
restante da tampa do espaçador sobre as placas de metal.
Gasket
Importante: Após concluir a instalação, verifique se o aparelho está
preso dentro da unidade e se as portas se fecham e se abrem
corretamente. Se não houver resistência das vedações da porta ao abrir
as portas, é provável que o aparelho e / ou as portas decorativas não
estejam encaixadas corretamente.

20
Reversing the appliance doors
Recomendamos que você procure a ajuda de outra pessoa para apoiar as
portas durante a execução desta operação.
1. Retire cuidadosamente a tampa da dobradiça superior e desaparafuse os
parafusos que prendem a dobradiça superior ao aparelho; você deve apoiar a
porta superior enquanto faz isso.
2. Remova cuidadosamente a porta superior e coloque-a em algum lugar
seguro. Observe que existem espaçadores entre a porta e a dobradiça; observe
quantos e sua posição.
3. Remova a dobradiça central, removendo os parafusos que a prendem ao
aparelho; apoie a porta inferior enquanto faz isso.
4. Remova a porta inferior e coloque-a em algum lugar seguro, observando
novamente a posição de qualquer peça espaçadora.
5. Troque a dobradiça superior anterior para o lado oposto na parte inferior.
6. Recoloque a porta inferior usando espaçadores e posicione a dobradiça
central na porta. Depois de remover as tampas da tampa, prenda a dobradiça
firmemente no aparelho.
7. Troque a dobradiça inferior anterior para o lado oposto na parte superior.
Volte a colocar a porta superior e a dobradiça superior "nova" e fixe-a
firmemente ao aparelho.
8. Coloque as tampas da tampa central e as peças da tampa da dobradiça
superior no lugar para concluir o processo.
9. Desaparafuse os quatro suportes deslizantes das portas e troque-os para o
lado mais distante das novas posições das dobradiças, antes de instalar a porta
decorativa.

21
Garantindo as vedações da porta corretamente:
É normal que a vedação seja comprimida após a porta ser revertida. Com a
porta fechada, use um secador de cabelo para expandir a vedação e
preencher a lacuna entre a porta e o corpo do aparelho.
Tome cuidado para não usar o secador de cabelo muito próximo ao
aparelho, pois isso pode danificar o lacre. Uma distância de
aproximadamente 10 cm deve ser adequada.
Quando terminar, deixe o lacre e a porta esfriarem antes de tocá-los. Uma
vez feito, o selo deve permanecer na posição.

PROCEDIMENTO EM CASO DE FALHA DE UM PRODUTO INFINITON
Caros clientes, para solicitar assistência técnica ou conserto do seu produto Infiniton, você
tem nosso site, funcionando 24 horas por dia e 7 dias por semana:
https://www.infiniton.es/asistencia-tecnica/
•Linha Branca: rmablanca.infiniton.es
•Linha Marrom: rma.infiniton.es
Alternativamente, se desejarem, podem solicitar assistência técnica por e-mail:
•Linha Branca: rmablanca.infiniton.es
•Linha Marrom: rma.infiniton.es
Para agilizar todos os procedimentos, as seguintes informações devem ser sempre indicadas:
•Nomes e sobrenomes
•Telefone 1
•Telefone 2
•Endereço completo
•Código postal
•População
•Marca
•Modelo de produto
•Número de série
•Falha do produto
Se desejarem, podem solicitar assistência técnica através dos números 902 676 518 ou 958
087 169, disponíveis apenas para produtos da linha branca (exceto micro-ondas autônomo).

CERTIFICACION CE
Se ha determinado que este producto cumple con la Directiva de Baja Tension (2014/35/EU), la Directiva
de Compatibilidad Electromagnetica (2014/30/EU) y la Directiva RoHS (2011/65/EU).
Para más información relacionada con las declaraciones y certificados de conformidad, póngase
con nosotros a través del correo: [email protected]
INFORMACIÓN SOBRE EL PRODUCTO
Si tiene alguna pregunta o duda relacionada con su dispositivo, póngase en contacto con nosotros:
SERVICIO TÉCNICO
También puede ponerse en contacto con nuestro servicio técnico oficial:
tel.:(+34) 958 087 169
e-mail reparaciones: info@infiniton.es
www.infiniton.es
Recuerda que en nuestra web tenemos un apartado de preguntas frecuentes y un formulario de
dudas para resolver cualquier consulta relacionada con tu producto Infiniton.

Síguenos en nuestras
redes sociales y accede a
contenido exclusivo
Copyright ©202
1
Todos los derechos reservados


Para mas información sobre nuestra política de RMA y Reparaciones,
visite: www.infiniton.es/rma/politica-rma-infiniton.pdf
INFINITON WORLD ELECTRONIC S.L.
WORLD ELECTRONIC
-
 1
1
-
 2
2
-
 3
3
-
 4
4
-
 5
5
-
 6
6
-
 7
7
-
 8
8
-
 9
9
-
 10
10
-
 11
11
-
 12
12
-
 13
13
-
 14
14
-
 15
15
-
 16
16
-
 17
17
-
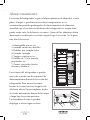 18
18
-
 19
19
-
 20
20
-
 21
21
-
 22
22
-
 23
23
-
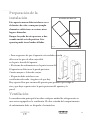 24
24
-
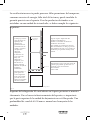 25
25
-
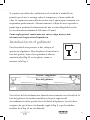 26
26
-
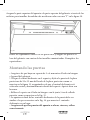 27
27
-
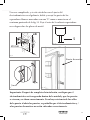 28
28
-
 29
29
-
 30
30
-
 31
31
-
 32
32
-
 33
33
-
 34
34
-
 35
35
-
 36
36
-
 37
37
-
 38
38
-
 39
39
-
 40
40
-
 41
41
-
 42
42
-
 43
43
-
 44
44
-
 45
45
-
 46
46
-
 47
47
-
 48
48
-
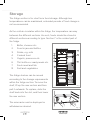 49
49
-
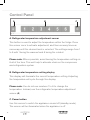 50
50
-
 51
51
-
 52
52
-
 53
53
-
 54
54
-
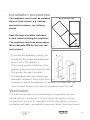 55
55
-
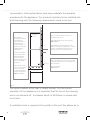 56
56
-
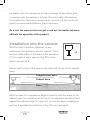 57
57
-
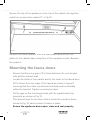 58
58
-
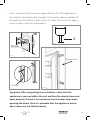 59
59
-
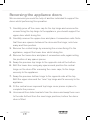 60
60
-
 61
61
-
 62
62
-
 63
63
-
 64
64
-
 65
65
-
 66
66
-
 67
67
-
 68
68
-
 69
69
-
 70
70
-
 71
71
-
 72
72
-
 73
73
-
 74
74
-
 75
75
-
 76
76
-
 77
77
-
 78
78
-
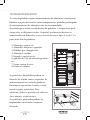 79
79
-
 80
80
-
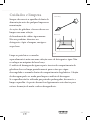 81
81
-
 82
82
-
 83
83
-
 84
84
-
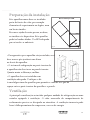 85
85
-
 86
86
-
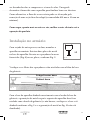 87
87
-
 88
88
-
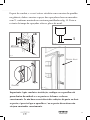 89
89
-
 90
90
-
 91
91
-
 92
92
-
 93
93
-
 94
94
-
 95
95
-
 96
96


Infiniton FGC-BB193 El manual del propietario
- Categoría
- Frigoríficos combinados
- Tipo
- El manual del propietario
En otros idiomas
- English: Infiniton FGC-BB193 Owner's manual
- português: Infiniton FGC-BB193 Manual do proprietário