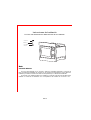
Aspes AMWI2800DGX El manual del propietario
- Categoría
- Microondas
- Tipo
- El manual del propietario

Horno microondas
MANUAL DE INSTRUCCIONES
MODELO:
Lea atentamente estas instrucciones antes de utilizar el horno
microondas y guárdelas para futuras consultas.
Siguiendo estas instrucciones el horno le proporcionará muchos años
de buen funcionamiento.
GUARDE ESTAS INSTRUCCIONES EN UN LUGAR ADECUADO
AMWI2800DGX


PRECAUCIONES PARA EVITAR UNA POSIBLE
EXPOSICIÓN A UNA ENERGÍA DE MICROONDAS
EXCESIVA
(a) No intente utilizar el microondas con la puerta abierta,
ya que puede resultar en una exposición nociva a la
energía de microondas. Es importante no romper ni tratar
de forzar los elementos de cierre de seguridad de la
puerta.
(b) No coloque ningún objeto entre la cara frontal y la
puerta del horno ni permita que se acumule suciedad o
restos de limpiador en las superficies de cierre hermético.
(c) ATENCIÓN: Si la puerta del horno o las superficies de
cierre están dañadas, no deberá utilizarse el horno hasta
que haya sido reparado por un técnico especializado.
Si el electrodoméstico no se mantiene en un buen estado
de limpieza, podría degradarse su superficie, lo cual
afectaría su vida útil y crear situaciones de peligro.
ES-2
230V~
50Hz
Consumo de energía 1250
W
Potencia de salida 0
W
capacidad
20L
Diámetro del plato giratorio
2
mm
Dimensiones externas(lxanxal)
Peso Neto
Aprox.15.0 kg
Entrada de potencia nominal
(grill) 0
W
100
Modelo:
Alimentación elé
ctrica
80
45
ESPECIFICACIONES
AMWI2800DGX
595mmX343.5mmX382mm

AVISOS E INSTRUCCIONES DE SEGURIDAD
IMPORTANTES
Para evitar una exposición excesiva a la energía de
microondas y reducir así el riesgo de incendio, descarga
eléctrica y lesiones durante el uso del aparato, siga las
precauciones básicas incluidas las siguientes:
1. Atención: No calentar líquidos y determinados alimentos
en recipientes cerrados herméticamente, ya que podrían
explotar.
2. Atención: Es peligroso que personas que no sean
técnicos especializados realicen tareas de reparación que
implique retirar alguna cubierta protectora contra la
exposición a la energía de microondas.
3. Este horno puede ser utilizado por niños de 8 años o
más o por personas con facultades físicas, sensoriales o
mentales reducidas, o con falta de experiencia y
conocimientos, siempre que sea bajo supervisión o
siguiendo indicaciones sobre su uso de forma segura y de
que comprendan los peligros relacionados.
Deberá asegurarse de que los niños no jueguen con el
horno. Los niños no deberán realizar tareas de limpieza o
mantenimiento del horno, a no ser que sean mayores de 8
años y estén supervisados por un adulto.
4. Mantener el aparato y su cable eléctrico fuera del
alcance de menores de 8 años.
5. Utilizar sólo utensilios aptos para hornos microondas.
6. Retirar los posibles restos de comida y limpiar el horno
de forma regular.
7. Lea y siga las medidas de precaución indicadas en el
apartado: "PRECAUCIONES PARA EVITAR UNA
POSIBLE EXPOSICIÓN A UNA ENERGÍA DE
MICROONDAS EXCESIVA".
ES-3

9. Si saliera humo del horno, apáguelo o desenchúfelo y
no abra su puerta para sofocar así cualquier posible llama
en el interior.
10. No cocinar en exceso los alimentos.
11. No utilice el interior del horno para almacenar objetos.
No almacene elementos como pan, galletas, etc. en el
interior del horno.
12. Retire cualquier atadura de alambre o asas de metal
de cualquier recipiente o bolsa antes de introducirlo en el
microondas.
13. Instale o ubique el microondas sólo en los lugares
adecuados descritos en las instrucciones de instalación.
14. No deberán calentarse o cocinarse huevos con
cáscara en el microondas, ya que podrían explotar incluso
después de que haya terminado de calentarlos.
15. Este aparato ha sido diseñado para uso domestico solo
16. Si el cable de alimentación resulta dañado, éste
deberá ser sustituido por el fabricante o por su servicio
técnico autorizado para evitar cualquier riesgo.
17. No almacene ni utilice este aparato en exteriores.
18. No utilice el horno cerca de agua, piscinas o zonas con
el suelo mojado.
8. Cuando caliente alimentos en recipientes o envases de
plástico o papel, mantenga vigilado el horno para evitar
cualquier posible ignición.
19. Las superficies accesibles del microondas pueden
alcanzar altas temperaturas durante su funcionamiento. Es
probable que las superficies se calienten durante su uso.
Mantener el cable eléctrico alejado de las superficies
calientes y no tapar las aberturas de ventilación.
20. Evitar que el cable eléctrico quede colgando por
encima del borde de una mesa o una encimera.
y exclusivamente.
ES-4

21. Si el microondas no se mantiene en un buen estado de
limpieza, podría degradarse su superficie, lo cual podría
afectar su vida útil y crear situaciones de peligro.
22. Remover bien el contenido de biberones o potitos y
comprobar su temperatura antes de administrarlos para
evitar quemaduras.
23. Al calentar bebidas en el microondas puede producirse
ebullición repentina retardada, por lo que habrá que
manipular con cuidado el recipiente.
24. Este dispositivo no está diseñado para que lo usen
personas (incluidos niños) con facultades físicas,
sensoriales o mentales reducidas, o con falta de
experiencia y conocimientos, a menos que sea bajo
supervisión o siguiendo indicaciones sobre su uso por
parte de la persona responsable de su seguridad.
25. Los niños deberán estar bajo supervisión para
asegurarse de que no jueguen con el horno.
26. Este aparato no ha sido pensado para ser utilizado con
temporizador externo ni ningún sistema de control remoto
aparte.
27. Los componentes accesibles pueden calentarse
durante el uso del microondas. Mantener alejados a los
niños.
28. No utilizar un limpiador a vapor.
29. Durante su uso, el horno se vuelve muy caliente.
Tomar precauciones para evitar tocar las resistencias del
interior del horno.
30. Utilizar sólo la sonda de temperatura recomendada
para este microondas (para modelos equipados con sonda
de temperatura).
31. ATENCIÓN: El horno y sus zonas accesibles se
calentarán durante su uso. Tomar precauciones para
evitar tocar las resistencias del horno. Mantener alejados
del horno a los niños menores de 8 años a no ser que
estén bajo la vigilancia constante de un adulto.
ES-5

33. La superficie trasera del aparato deberá ser colocada
contra una pared.
34. El microondas no deberá colocarse en un
compartimiento a no ser que se haya probado en
compartimentos.
LEA LAS INSTRUCCIONES Y CONSÉRVELAS PARA
FUTURAS CONSULTAS
32. Los modelos de microondas que dispongan de puerta
decorativa, deberán utilizarse con esa puerta abierta.
ES-6

Instalación de conexión a tierra para reducir el riesgo
de lesiones
PELIGRO
Riesgo de descarga eléctrica: Al tocar determinados
componentes internos pueden producirse lesiones graves
o incluso la muerte. No desmonte este aparato.
ATENCIÓN
Riesgo de descarga eléctrica: Una conexión a tierra
defectuosa puede causar descargas eléctricas. No
enchufe el aparato hasta que haya sido debidamente
instalado y conectado a tierra.
Este aparato tiene que estar conectado a tierra. En caso
de que se produjera un cortocircuito, la conexión a tierra
reduciría el riesgo de descarga eléctrica proporcionando
una vía de escape a la corriente eléctrica. Este aparato
está equipado con un cable eléctrico que incluye una
clavija de conexión a tierra en el enchufe. Su enchufe
debe conectarse a una toma de corriente debidamente
instalada y conectada a tierra.
Consulte a un electricista o reparador en caso de que no
se comprendan totalmente las instrucciones de conexión a
tierra o de duda sobre si está correctamente conectado a
tierra.
En caso de tener que utilizar un alargador, asegúrese de
que sea uno de 3 cables.
1. El microondas incorpora un cable eléctrico corto para
reducir el riesgo de enredarse o tropezar con un cable
más largo.
2. En caso de utilizar otro cable más largo o un alargador:
1) La capacidad de corriente indicada del alargador debe
ser por lo menos la misma que la del aparato.
2) El alargador utilizado tiene que ser de 3 cables (con
conexión a tierra).
3) El cable más largo deberá ser dispuesto de forma que
no quede colgando por delante de la encimera o mesa
donde esté colocado, ya que los niños podrían tirar de él o
tropezar con él sin querer.
ES-7

LIMPIEZA
Asegúrese de desconectar primero el aparato de la
corriente.
1. Después de utilizarlo, limpie el interior del microondas
con un paño ligeramente húmedo.
2. Lavar los accesorios de la forma habitual, con agua y
jabón.
3. Limpiar bien el marco de la puerta, las superficies de
cierre hermético y las zonas adyacentes cuando se
ensucien.
4. No utilice limpiadores abrasivos o rascadores metálicos
afilados para limpiar el cristal del horno, ya que podrían
rallar la superficie y dañar el cristal.
5. Consejo de limpieza: Para una fácil limpieza de las
paredes del interior del microondas que pueden entrar en
contacto con los alimentos: Coloque medio limón en un bol,
añada 300 ml de agua y caliéntelo al 100% de potencia
durante 10 minutos. A continuación pase un trapo seco y
suave por las superficies interiores para que queden
limpias.
PRECAUCIONES RELACIONADAS CON LOS
UTENSILIOS
Peligro de lesiones: Es peligroso que personas que no
sean técnicos especializados realicen tareas de
reparación que impliquen retirar alguna cubierta protectora
contra la exposición a la energía de microondas.
Consulte las instrucciones de los apartados siguientes sobre materiales que
pueden usarse o no en un microondas.
Puede haber algunos utensilios no metálicos que no sean aptos para
utilizarlos en el microondas por motivos de seguridad. En caso de duda,
puede comprobar la idoneidad del utensilio con el procedimiento que se
explica a continuación.
ES-8

Cómo comprobar los utensilios:
1. En un recipiente apto para microondas, añadir un vaso de agua fría 250
(ml) y el utensilio que se desea comprobar.
2. Calentarlo a máxima potencia durante 1 minuto.
3. Tocar con cuidado el utensilio. Si el utensilio vacío está caliente, no lo
utilice para preparar alimentos en el microondas.
4. No calentarlo durante más de 1 minuto.
Materiales que pueden usarse en un microondas
Utensilios
Observaciones
Plato para dorar
Seguir las instrucciones del fabricante. La base del
plato para dorar debe quedar al menos 5 mm por
encima del plato giratorio del microondas. Un uso
incorrecto puede producir la rotura del plato
giratorio.
Vajilla
Utilizar sólo vajilla apta para microondas. Seguir
las instrucciones del fabricante. No utilice platos
agrietados o astillados.
Botes de cristal
Quitar siempre la tapa. Utilizarlos sólo para
calentar ligeramente su contenido. La mayoría de
botes y tarros de cristal no son resistentes a las
altas temperaturas y podrían romperse.
Cristalería
Utilizar sólo cristalería resistente a las altas
temperaturas apta para hornos. Asegurarse de que
no tienen bordes metálicos. No utilice platos
agrietados o astillados.
Bolsas de cocción en
microondas
Seguir las instrucciones del fabricante. No cerrarlas
con alambres plastificados. Hacer
algunos agujeros en la bolsa para permitir la salida
de vapor.
Platos y vasos de
cartón
Utilizarlos sólo para cocinar o calentar brevemente.
No deje el microondas desatendido durante la
cocción de alimentos.
Servilletas de papel
Utilizarlas para cubrir los alimentos al recalentarlos
y para absorber la grasa excesiva. Utilizarlas sólo
para cocinar o calentar brevemente y bajo
supervisión.
ES-9

Plástico
Utilizar sólo utensilios aptos para microondas.
Seguir las instrucciones del fabricante. Deberán
tener impresa la marca "Apto para microondas".
Algunos recipientes de plástico se ablandan a
medida que se calientan los alimentos que
contienen. En las "bolsas de hervir" y las bolsas de
plástico cerradas herméticamente deberán
realizarse pequeños orificios o las medidas de
ventilación indicadas en el envase.
Film plástico
Utilizar sólo los que sean aptos para microondas.
Utilizarlo para cubrir alimentos durante su cocción
para retener la humedad. Impedir que el film
plástico esté en contacto con los alimentos.
Termómetros
Utilizar sólo los que sean aptos para microondas
(termómetros para carne y dulces).
Papel resistente a la
grasa
Utilizarlo para cubrir alimentos para evitar
salpicaduras, retener la humedad o como
envoltorio para cocinar al vapor.
Materiales que no pueden usarse en un microondas
Utensilios
Observaciones
Bandejas de aluminio
Pueden producir arcos eléctricos. Transferir los
alimentos a un plato apto para microondas.
Envases de cartón con
asas metálicas
Pueden producir arcos eléctricos. Transferir los
alimentos a un plato apto para microondas.
Utensilios de metal o
con adornos de metal
El metal impide que la energía de microondas
llegue a los alimentos. Los adornos de metal
pueden causar arcos eléctricos.
Alambres de cierre
plastificados
Pueden producir arcos eléctricos y causar un
incendio en el horno.
Bolsas de papel
Pueden causar un incendio en el horno.
Espuma plástica
La espuma plástica puede fundirse o contaminar el
líquido que contenga al ser expuesta a altas
temperaturas.
Madera
La madera se secará cuando se use en el
microondas y puede agrietarse o partirse.
ES-10

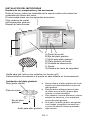
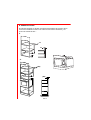
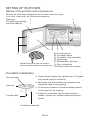
INSTALACIÓN DEL MICROONDAS
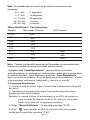
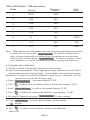
Nombre de los componentes y los accesorios
Retire el horno y todos los materiales de la caja de cartón; retire todos los
materiales del interior del horno.
El microondas viene con los siguientes accesorios:
Plato giratorio de cristal: 1
Anillo para plato giratorio: 1
Manual de instrucciones: 1
A) Panel de control
B) Eje del plato giratorio
C) Anillo para plato giratorio
D) Plato giratorio de cristal
E) Ventana de observación
F) Puerta
G) Sistema de cierre de seguridad
F
G
A
C B
ED
~
Rejilla para grill (sólo en los modelos con función grill)
Desconectar el microondas si la puerta se abre durante su funcionamiento.
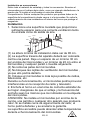
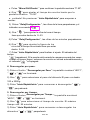
Instalación del plato giratorio
Buje (parte inferior)
Plato de cristal
Eje del plato
Anillo para plato giratorio
giratorio
a. Nunca coloque el plato giratorio del revés.
Impedir que nada obstaculice el giro del
plato giratorio.
b. Siempre deben utilizarse tanto el plato
de cristal como el anillo giratorio para
calentar o cocinar alimentos.
c. Para calentar o cocinar alimentos, colocar
siempre los alimentos y los recipientes
encima del plato giratorio.
d. Si el plato o el anillo giratorio se agrietan
o se rompen, póngase en contacto con
el centro de servicio técnico autorizado
más cercano.
ES-11

Instalación en una encimera
Retire todo el material de embalaje y todos los accesorios. Examine el
microondas por si hubiera algún daño, como por ejemplo abolladuras o la
puerta rota. Ni instale el microondas si estuviera dañado.
Compartimento: Retirar cualquier film protector que pudiera haber en la
superficie del compartimento donde vaya a ir el microondas. No retire la
cubierta marrón de mica instalada en el interior del horno que protege el
magnetrón.
Instalación
1. Seleccione una superficie nivelada que proporcione
suficiente espacio para una correcta ventilación tanto
de entrada como de salida de aire.
(1) La altura mínima de instalación debe ser de 85 cm.
(2) La superficie trasera del aparato deberá ser colocada
contra una pared. Deje un espacio de un mínimo 30 cm
por encima del microondas y un mínimo de 20 cm entre el
microondas y cualquier pared o mueble adyacente.
(3) No retire las patas del microondas.
(4) No bloquee las rejillas de ventilación del microondas ,
ya que ello podría dañarlo.
(5) Coloque el microondas lo más lejos posible de radios,
televisores, etc.
Durante su funcionamiento, el microondas podría provocar
interferencias en la recepción de radio y televisión.
2. Enchufe el horno en una toma de corriente estándar de
su hogar. Asegúrese de que el voltaje y la frecuencia del
enchufe sean los mismos que los indicados en la etiqueta
del microondas.
ATENCIÓN: No instale el microondas por encima de la
cocina, una parrilla o cualquier otro aparato que produzca
calor. Si se instala cerca de alguna fuente de calor, el
horno podría dañarse y se anularía la garantía.
La superficie accesible puede alcanzar altas temperaturas
durante el funcionamiento del microondas.
20cm
30cm
20cm
min85cm
0cm
ES-12

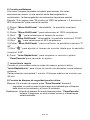
Instrucciones de Instalación
Por favor lea atentamente el Manual antes de su instalación
TORNILLO A
TORNILLO B
SET CUBIIERTA
PLASTIC
O
Nota
Conexión Eléctrica
El horno está equipado con un enchufe y debe ser conectado solamente a una toma de
tierra correctamente instalada. De acuerdo con la normativa correspondiente, la toma debe ser
instalada y el cable de conexión sólo debe ser reemplazado por un electricista cualificado .
El enchufe ya no estará accesible a la instalación y todos los polos del enchufe deben estar
aislados en el lado de la instalación con una separación de contacto de al menos 3 mm .
ES-13

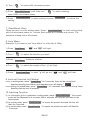
A. Mueble de encastre
El cabinete integrado no tendrá una pared trasera detrás del aparato. Altura
mínima de instalación es 85cm .No cubra las ranuras de ventilación y los
puntos de entrada de aire .
1.
2.
362
600
560+8
18
18
+3
min
600
560+8
(45)
(45)
500
362+3
min
340
ES-14

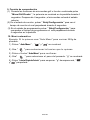
B. Instalacion del Horno Microondas
1. Fijar el Tornillo A en el Túnel de Aire superior del horno microondas, y
después i ns t al a r el h or n o mi cr oo n da s e n e l c a bi n et e d el
mue bl e d e e n c a s t re
.
Ajuste la altura del Tornillo A para que mantenga 1mm d e d i s t a n c i a
e n r t r e e l t o r n i l l o y l a p a r t e s u p e r i o r d e l m u e b l e . No atrape
o tire del cable.
Asegúrese que el horno microondas está instalado en el centro del cabinete
2. Abra la puerta; Fije el horno micrrondas con el Tornillo B al Agujero de
Instalacion del Set De Cubierta de plástico. Luego fije el set de cubierta de
plástico en el Agujero de Instalacion.
TORNIKLO B AGUJERO INSTALACION
SET CUBIERTA PLASTICO
AGUJERO DE INSTALACION
AJUSTE TORNILLO A
TUNEL AIRE SUPERIOR
SET CUBIERTA PLASTICO
AJUSTE ALTURA
AJUSTE TORNILLO A
SET CUBIERTA PLASTICO
ES-15

Instrucciones de Funcionamiento
1. ajuste del reloj
Cuando se conecte el microondas a la toma de corriente, la pantalla
mostrara 0 00 .El avisador sonará una vez. :
1) pulse " Reloj/Configuración ", las cifras de la hora
parpadearán, y el indicador del reloj " " se iluminará.
2) Gire la ruedecilla " " para ajustar los dígitos de las horas; el tiempo
introducido deberá estar entre 0 - 23.
3) Pulse " Reloj/Configuración ", las cifras de los minut s
parpadearán.
o
4) Gire la ruedecilla " " para ajustar los dígitos de los minutos; el tiempo
introducido deberá estar entre 0 - 59.
5) pulse " Reloj/Configuración " para fionalizar el ajuste del reloj. El
indicador para el reloj " " se apagara, ":" parpadeará y el tiempo se
encenderá..
2. Cocinar con el microondas.
Pulse " Micro./Grill/Combi. " y gire "
que desee.
pulse" Micro./Grill/Combi. " para confirmar. Gire " " para seleccionar
el tiempo de coción.pulse " Inicio Rápido/Inicio" para
empezar a cocinar.
" para seleccionar la function
Ejemplo: Si quiere usar el 80% de potencia para cocinar alimentos
durante 20 minutos, se puede hacer funcionar el
microondas siguiendo los siguientes pasos:
1) Pulse " Micro./Grill/Combi. ", la pantalla mostrará "P100".
2) ire " " para ajustar el 80% de potencia hasta que la pantalla G
muestre " P 80".
3) Pulse " Micro./Grill/Combi. " para confirmas, la pantalla mostrará
"P 80".
4) Gire " " para ajustar el tiempo de coción hasta que la
pantalla muestre"20:00".
5) pulse " Inicio Rápido/Inicio" para empezara a cocinar o pulse
"Parar/Cancelar" Para cancelar los ajustes.
"P100", "P80" ... "P10", "G", "C-1" y "C-2" se mostrarán en orden.
ES-16

Nota: La medidad para el tiempo de ajuste del interruptor son las
siguientes:
0---1 min : 5 segundos.
1---5 min : 10 segundos.
5---10 min : 30 segundos
10---30 min : 1 minuto
30---95 min : 5 minutos.
“Micro./Grill/Combi." Pad instructions
Pantalla Microondas Potencia Grill Potencia
100%
80%
50%
30%
10%
0% 100%
55% 45%
36% 64%
Nota: Cuando la mitad del tiempo del grill ha pasado el microondas hará
una pausa y emitirá un sonido dos veces esto es normal.
Tu puedes pulsar " Inicio Rápido/Inicio" para continuar cocinando,
pero para obtener un gratinado por ambas partes, podrá abrir la puerta darle
la vuelta al alimento , cerrar la puerta y presionar " Inicio Rápido/Inicio"
para continuar cocinando. Si no se opera con el microondas en 1 minut ,
el microondas continuara trabajando y emitirá un sonido.
o
3. Programa establecido
1) Ajuste el reloj en primer lugar (Consulte las instrucciones de ajuste
del reloj.)
2) Introduzca el programa de cocina.Tres niveles de potencia se
pueden ajustar como máximo.
Ejemplo: si desea utilizar el microondas a un 80% de potencia
para cocinar la comida durante 15 minutos, se puede
hacer funcionar de la siguiente manera:
a. Pulse " Micro./Grill/Combi. " , la pantalla mostrara "P100".
b. Gire " " para ajustar al 80% la potencia del microondas
hasta que la pantalla muestre "P 80".
P100
P80
P50
P30
P10
G
C-1
C-2
ES-17

c. Pulse " Micro./Grill/Combi. " para confirmer la pantalla mostrara "P 80".
d. Gire " " para ajustar el tiempo de cocción hasta que la
pantalla muestre "15:00".
e. ¡cuidado! No presionar " Inicio Rápido/Inicio" para empezar a
cocinar.
3) Pulsar " Reloj/Configuración ", las cifras de la hora parpadearan y el
indicador se encenderá .
4) Gira " "para ajustar la cifra de hora el tiempo
tiene que estar dentro de 0--23.
5) Pulsa " Reloj/Configuración ", las cifras de los minutos parpadearan.
6) Gira " " para ajustar la figura de los
minutos,el tiempo de entrada tiene que estar
dentro 0--59.
7) Pulsa " Inicio Rápido/Inicio" para finalizar el ajuste. El indicador del
tiempo
" "parpadeará. Si la puerta está cerrada la campana sonará dos veces
cuando el tiempo llegue, entonces la cocción se iniciará automáticamente y
el indicador" " se apagará.
4. Descongelar por peso.
1) Pulse el botón " Descongelar por Peso " la pantallá mostrará "dEF1",
" " y " " se iluminará.
2) Gire " " para seleccionar el peso del alimento.El peso va desde
100 a 2000g.
3) Pulse "
Inicio Rápido/Inicio" para comenzar a descongelar " " y
" " parpadeará.
5. Descongelar por tiempo.
1) Pulse el boton " " la pantalla mostrará
"dEF2", "
"
y " " se iluminará.
2) Gire " " para seleccionar el tiempo de cocción. El máximo
tiempo son 95 minut s. o
3) Pulse " Inicio Rápido/Inicio" para comenzar a descongelar los
alimentos " " y " " parpadeará.
Descongelar por Tiempo
ES-18

6. Cocción multietapas.
A lo sumo 3 etapas se pueden introducir para cocinar. En varias
secciones de cocción ,si una sección es de descongelación a
continuación , la descongelación se colocará en la primera sección.
Ejemplo: Si tu quieres usar "20 minutos al 100% de potencia + 5 minutos al
80% de potencia " para cocinar la comida.
1) Pulsar " Micro./Grill/Combi. " almohadilla , la pantalla mostrará
"P100".
2) Pulsar " Micro./Grill/Combi. " para seleccionar el 100% de potencia.
3) Gira" " para seleccionar el tiempo de cocción.
4) Pular " Micro./Grill/Combi. " almohadilla , la pantalla mostrará "P100".
5) Gire" " para seleccionar el 80% de potencia.
6) Pulsar " Micro./Grill/Combi. " para confirmar, la pantalla mostrará "P
80".
7) Gira " " para ajustar el tiempo de cocción hasta que la pantalla
muestre" 5:00".
8) Pulse
" Inicio Rápido/Inicio" para empezar a cocinar o pulsar
"Parar/Cancelar"para cancelar el ajuste.
7. Inicio/Inicio rápido
Cuando el microondas este en modo de espera, pulse el botón
potencia.
, para iniciar la cocción de alimentos a una máxima
Cada pulsación aumentará 1 minuto. El tiempo máximo de cocción son
95 min.
8. Función de bloqueo de seguridad para los niños.
Bloqueo: En el modo de espera, pulse "Parar/Cancelar" durante 3
segundos; se oirá un aviso sonoro largo que indicará que el bloqueo
para niños se ha activado y el horno lo mostrará.
Desbloqueo: Cuando el aparato En modo bloqueo pulsar "Parar/Cancelar"
durante 3 segundos, se oirá un aviso sonoro y el desbloqueo
estará realizado.
" Inicio Rápido/Inicio"
ES-19

9. Función de comprobación
(1) Durante las funciones de microondas,grill o función combinada pulse
" Micro./Grill/Combi. ", la potencia se mostrará en la pantalla durante 4
segundos. Despues de 4 segundos ,el microondas volverá al estado
anterior;
(2) En el estado de cocción, pulsar " Reloj/Configuración " para ver el
tiempo de cocción el cual parpadeará durante 4 segundos.
(3) En el estado de programación,pulsar
"
Reloj/Configuración
"para
comprobar el tiempo de programacion el cual parpadeará durante
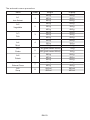
10. Menú automatico
Ejemplo: Si tu quieres usar "Auto Menu" para cocinar 250g de
pescado.
1) Pulsar " Auto Menu " , " " y " "
se mostrará
2) Gira " " para seleccionar la funcion que tu quieras.
3) Pulsa el boton" Auto Menu" para confirmar.
4) Gira" " para seleccionar el peso del pescado. "g" se mostrará.
5) Pulsa " Inicio Rápido/Inicio" para empezar. "g" desaparecerá, " "
y" " parpaderá.
4 segundos en la pantalla.
ES-20

Procedimiento menú automático:
Menu
orden
peso
pantall
a
A-1
Calentar
1
200 g
400 g
600 g
200 g
400 g
600 g
A-2
Verdura
2
200 g
300 g
400 g
200 g
300 g
400 g
A-3
Pescado
3
250 g
350 g
450 g
250 g
350 g
450 g
A-4
Carne
4
250 g
350 g
250 g
350 g
450 g 450 g
A-5
Pasta
A-6
Patata
5
6
50 g(con agua 450ml)
100 g(con agua 800ml)
200 g
400 g
600 g
50 g
100 g
200 g
400 g
600 g
A- 7
Pizza
A-8
Sopa
7
8
200 g
400 g
200 ml
400 ml
200 g
400 g
200 ml
400 ml
ES-21

Resolución de problemas
Normales
El microondas interfiere en
la recepción de TV
La recepción de radio y televisión pueden
verse interferidas durante el
funcionamiento del microondas. Es similar
a las interferencias producidas por
pequeños aparatos, como una batidora, un
aspirador o un ventilador eléctrico. Se trata
de algo normal.
La luz del interior
microondas es leve
Al cocinar con el microondas a poca
potencia, la luz puede bajar de intensidad.
Se trata de algo normal.
Se acumula vapor en la
puerta y sale aire caliente
por las rejillas de
ventilación
Al cocinar, puede producirse vapor
procedente de la comida. La mayor parte
saldrá por las rejillas de ventilación. No
obstante, puede acumularse algo de vapor
en la puerta del horno, que estará más fría.
Se trata de algo normal.
Se ha puesto sin querer en
marcha el microondas sin
comida en su interior
No debe ponerse en marcha el microondas
sin comida en su interior. Es algo muy
peligroso.
Problema
Posible causa
Solución
El microondas
no empieza a
funcionar.
(1) No está
correctamente
enchufado a la
corriente.
Desenchúfelo. Vuelva a
enchufarlo pasados 10
segundos.
(2) Ha saltado el
diferencial o se han
fundido los plomos.
Vuelva a conectar el
diferencial o sustituya los
plomos (la reparación deberá
ser efectuada por nuestro
personal especializado)
(3) Problemas con el
enchufe.
Pruebe el enchufe con otros
aparatos eléctricos.
El horno no
calienta.
(4) La puesta está
mal cerrada.
Cierre bien la puerta.
Según la Directiva europea sobre Residuos de Aparatos
Eléctricos y Electrónicos, dichos aparatos deben ser recogidos
y tratados de forma separada. Si en algún momento debe
deshacerse de este producto, NO lo deseche como el resto de
residuos domésticos. Lleve este producto a un punto de
recogida de residuos especiales.
ES-22

INSTRUCTION MANUAL
Microwave Oven
Read these instructions carefully before using your
microwave oven, and keep it carefully.
If you follow the instructions, your oven will provide you with
many years of good service.
SAVE THESE INSTRUCTIONS CAREFULLY
MODELO: AMWI2800DGX

(a) Do not attempt to operate this oven with the door
open since this can result in harmful exposure to
microwave energy. It is important not to break or tamper
with the safety interlocks.
(b) Do not place any object between the oven front face
and the door or allow soil or cleaner residue to accumulate
on sealing surfaces.
(c) WARNING: If the door or door seals are damaged, the
oven must not be operated until it has been repaired by
a competent person.
ADDENDUM
If the apparatus is not maintained in a good state of
cleanliness, its surface could be degraded and affect the
lifespan of the apparatus and lead to a dangerous situation.
PRECAUTIONS TO AVOID POSSIBLE EXPOSURE
TO EXCESSIVE MICROWAVE ENERGY
EN-2
Specifications
230V~
50Hz
1250
W
0
W
20L
2
mm
Aprox.15.0 kg
0
W
100
Model:
Rated Voltage:
Rated Input Power(Microwave):
Oven Capacity:
Turntable Diameter:
External Dimensions:
Net Weight:
Rated Output Power(Microwave):
Rated Input Power(Grill):
80
45
AMWI2800DGX
595mmX343.5mmX382mm

IMPORTANT SAFETY INSTRUCTIONS
WARNING
To reduce the risk of fire, electric shock, injury to
persons or exposure to excessive microwave oven
energy when using your appliance, follow basic
precautions, including the following:
the manufacturer, its service agent or similarly qualified
persons in order to avoid a hazard.( For appliance with
type Y attachment)
AVOID POSSIBLE EXPOSURE TO EXCESSIVE
MICROWAVE ENERGY".
4. If the supply cord is damaged, it must be replaced by
before replacing the lamp to avoid the possibility of
electric shock.
5. WARNING: Ensure that the appliance is switched off
1. Read and follow the specific:"PRECAUTIONS TO
3. Keep the appliance and its cord out of reach of children
less than 8 years.
years and above and persons with reduced physical,
sensory or mental capabilities or lack of experience
and knowledge if they have been given supervision or
instruction concerning use of the appliance in a safe way
and understand the hazards involved. Children shall not
play with the appliance. Cleaning and user maintenance
shall not be made by children unless they are older than 8
2. This appliance can be used by children aged from 8
and supervised. Children less than 8 years of age shall be
kept away unless continuously supervised.
EN-3

.ovens
and keep the door closed in order to stifle any flames.
delayed eruptive boiling, therefore care must be taken
when handling the container.
shall be stirred or shaken and the temperature checked
before consumption, in order to avoid burns.
12.The contents of feeding bottles and baby food jars
13. Eggs in their shell and whole hard-boiled eggs should
not be heated in microwave ovens since they may
explode, even after microwave heating has ended.
deposits removed.
14. The oven should be cleaned regularly and any food
11. Microwave heating of beverages can result in
keep an eye on the oven due to the possibility of ignition.
in sealed containers since they are liable to explode.
could lead to deterioration of the surface that could
15. Failure to maintain the oven in a clean condition
7. WARNING: Liquids and other foods must not be heated
10. If smoke is emitted, switch off or unplug the appliance
competent person to carry out any service or repair
operation that involves the removal of a cover which
gives protection against exposure to microwave energy.
6. WARNING: It is hazardous for anyone other than a
8. When heating food in plastic or paper containers,
9. Only use utensils that are suitable for use in microwave
adversely affect the life of the appliance and possibly
result in a hazardous situation.
EN-4

beverages. Drying of food or clothing and heating of
warming pads, slippers, sponges, damp cloth and similar
may lead to risk of injury, ignition or fire.
allowed during microwave cooking.
cleaner.
20. Metallic containers for food and beverages are not
21. The appliance shall not be cleaned with a steam
16.Only use the temperature probe recommended for
this oven.(for ovens provided with a facility to use a
temperature-sensing probe.)
17.The microwave oven must be operated with the
decorative door open. (for ovens with a decorative door.)
18.This appliance is intended to be used in household
applications.
19.The microwave oven is intended for heating food and
22. Care should be taken not to displace the turntable
when removing containers from the appliance. (For fixed
appliances and built-in appliances being used equal or
higher than 900mm above the floor and having detacha le
turntables. But this is not applicable for appliances with
horizontal bottom hinged door.)
b
EN-5

READ CAREFULLY AND KEEP FOR FUTURE
REFERENCE
be taken to avoid touching heating elements inside the
oven.
27. During use the appliance becomes hot. Care should
24. Steam cleaner is not to be used.
25. Surface of a storage drawer can get hot.
28. WARNING: Accessible parts may become hot during
use. Young children should be kept away.
29. The appliance must not be installed behind a
decorative door in order to avoid overheating. (This is not
applicable for appliances with decorative door.)
become hot during use. Care should be taken to avoid
touching heating elements. Children less than 8 years
of age shall be kept away unless continuously supervised.
26. WARNING: The appliance and its accessible parts
adult supervision due to the temperatures generated.
combination mode, children should only use the oven under
23. The microwave oven is intended to be used built-in.
30. WARNING: When the appliance is operated in the
to clean the oven door glass since they can scratch
which may result in shattering of the glass.
scrapers
the surface,
31. Do not use harsh abrasive cleaners or sharp metal
EN-6

To Reduce the Risk of Injury to Persons
Grounding Installation
DANGER
Electric Shock Hazard
Touching some of the
internal components can
cause serious personal
injury or death. Do not
disassemble this
appliance.
WARNING
Electric Shock Hazard
Improper use of the grounding
can
result in electric shock.
Do not plug into an outlet
until appliance is properly
installed and grounded.
This appliance must be
grounded. In the event of
an electrical short circuit,
grounding reduces the
risk of electric shock by
providing an escape wire
for the electric current.
This appliance is equipped
with a cord having a
grounding wire with
a grounding plug. The
plug must be plugged into
an outlet that is properly
installed and grounded.
Consult a qualified
electrician or serviceman
if the grounding instructions
are not completely
understood or if doubt exists
as to whether the appliance
is properly grounded.
If it is necessary to use an
extension cord, use only
a 3-wire
1. A short power-supply cord
is provided to reduce the risks
resulting from becoming
entangled in or tripping over a
longer cord.
2. If a long cord set or extension
cord is used:
1)The marked electrical rating
of the cord set or extension cord
should be at least as great as
the electrical rating of the
appliance.
2)The extension cord must be
a grounding-type 3-wire cord.
3)The long cord should be
arranged so that it will not drape
over the counter top or tabletop
where it can be pulled on
by children or tripped over
unintentionally.
extension cord.
EN-7

CLEANING
Be sure to unplug the appliance from the power supply.
1. Clean the cavity of the oven after using with a slightly damp
cloth.
2. Clean the accessories in the usual way in soapy water.
3. The door frame and seal and neighbouring parts must be
cleaned carefully with a damp cloth when they are dirty.
4. Do not use harsh abrasive cleaners or sharp metal scrapers
to clean the oven door glass since they can scratch the surface,
which may result in shattering of the glass.
5. Cleaning Tip---For easier cleaning of the cavity walls that the
food cooked can touch: Place half a lemon in a bowl, add 300ml
(1/2 pint) water and heat on 100% microwave power for 10
minutes. Wipe the oven clean using a soft, dry cloth.
UTENSILS
CAUTION
Personal Injury Hazard
It is hazardous for
anyone other than a
competent person to
carry out any service
or repair operation that
involves the removal of
a cover which gives
protection against
exposure to microwave
energy.
Utensil Test:
1. Fill a microwave-safe container with 1 cup of cold
water (250ml) along with the utensil in question.
2. Cook on maximum power for 1 minute.
3. Carefully feel the utensil. If the empty utensil is
warm, do not use it for microwave cooking.
4. Do not exceed 1 minute cooking time.
See the instructions on "Materials you can use in
microwave oven or to be avoided in microwave oven."
There may be certain non-metallic utensils that are not
safe to use for microwaving. If in doubt, you can test the
utensil in question following the procedure below.
EN-8

Materials you can use in microwave oven
Utensils Remarks
Follow manufacturer’s instructions. The bottom of browning dish must be
at least 3/16 inch (5mm) above the turntable. Incorrect usage may cause
the turntable to break.
Microwave-safe only. Follow manufacturer's instructions. Do not use
cracked or chipped dishes.
Always remove lid. Use only to heat food until just warm. Most glass jars
are not heat resistant and may break.
Heat-resistant oven glassware only. Make sure there is no metallic trim.
Do not use cracked or chipped dishes.
Follow manufacturer’s instructions. Do not close with metal tie. Make
slits to allow steam to escape.
Use for short–term cooking/warming only. Do not leave oven unattended
while cooking.
Use to cover food for reheating and absorbing fat. Use with supervision
for a short-term cooking only.
Use as a cover to prevent splattering or a wrap for steaming.
Microwave-safe only. Follow the manufacturer’s instructions. Should be
labeled "Microwave Safe". Some plastic containers soften, as the food
inside gets hot. "Boiling bags" and tightly closed plastic bags should be
slit, pierced or vented as directed by package.
Microwave-safe only. Use to cover food during cooking to retain
moisture. Do not allow plastic wrap to touch food.
Thermometers Microwave-safe only (meat and candy thermometers).
Wax paper Use as a cover to prevent splattering and retain moisture.
Browning dish
Glass jars
Glassware
Oven cooking
bags
Paper plates
and cups
Paper towels
Parchment
paper
Plastic
Plastic wrap
Dinnerware
Materials to be avoided in microwave oven
Utensils Remarks
Aluminum tray
Food carton with
metal handle
Metal or metal-
trimmed utensils
Metal twist ties
Paper bags
Plastic foam
Wood
Metal shields the food from microwave energy. Metal trim may
cause arcing.
May cause a fire in the oven.
Plastic foam may melt or contaminate the liquid inside when exposed
to high temperature.
Wood will dry out when used in the microwave oven and may split
or crack.
May cause arcing. Transfer food into microwave-safe dish.
May cause arcing. Transfer food into microwave-safe dish.
May cause arcing and could cause a fire in the oven.
EN-9

A) Control panel
B) Turntable shaft
C) Turntable ring assembly
D) Glass tray
E) Observation window
F) Door assembly
G) Safety interlock system
F
G
A
C B
ED
SETTING UP YOUR OVEN
Names of Oven Parts and Accessories
Remove the oven and all materials from the carton and oven cavity.
Your oven comes with the following accessories:
Glass tray 1
Turntable ring assembly 1
Instruction Manual 1
Hub (underside)
Glass tray
Turntable ring assembly
a. Never place the
glass tray
upside down. The glass
tray should never be restricted.
b. Both
glass tray
and
turntable ring assembly
must
always be used during cooking.
c. All food and containers of food are always placed
on the
glass tray
for cooking.
d. If
glass tray
or
turntable ring assembly
cracks or
breaks, contact your nearest authorized service
center.
Turntable Installation
Turntable shaft
Grill Rack( Can not be used in microwave
function and must be placed on the glass tray )
EN-10

Installation and connection
1.This appliance is only intended for domestic use.
2.This oven is intended for built-in use only. It is not intended
for counter-top use or for use inside a cupboard.
3. Please observe the special installation instructions.
4.The appliance can be installed in a 60cm wide wall-
mounted cupboard.
5.The appliance is fitted with a plug and must only be
connected to a properly installed earthed socket.
6.The mains voltage must correspond to the voltage
specified on the rating plate.
7.The socket must be installed and connecting cable must
only be replaced by a qualified electrician. If the plug is no
longer to accessible following installation, an all-pole
disconnecting device must be present on the installation
side with a contact gap of at least 3mm.
8.Adapters, multi-way strips and extension leads must not
be used. Overloading can result in a risk of fire.
The accessible surface may
be hot during operation.
EN-11

Installation Instructions
Please Read the Manual Carefully Before Installation
Please Note
Electrical connection
The oven is fitted with a plug and must be only connected to a properly installed earthed
socket. In accordance with the appropriate regulations, the socket must only be installed and
the connecting cable must only be replaced by a qualified electrician.
If the plug is no longer accessible following installation and all-pole isolating switch must
be present on the installation side with a contact gap of at least 3mm.
EN-12
ADJUST SCREW
TRIM-KIT PLASTIC
COVER
SCREW B

A. Built-in furniture
The built-in cabinet shall not have a rear wall behind the appliance.
Minimum installation height is 85cm.
Do not cover ventilation slots and air intake points.
1.
2.
3
362
600
560+8
18
18
+3
min
600
560+8
(45)
(45)
362+3
min
500
0
4
EN-13

B. Install the Oven
1. Fix ADJSUT SCREW on the UPPER AIR TUNNEL of the oven, and then
install the oven into the cabinet.
Adjust the height of ADJUST SCREW to keep 1mm gap between the
ADJUST SCREW and the top plane of cabinet.
Do not trap or kink the power cord.
Make sure that the oven is installed in the center of the cabinet.
2. Open the door; fix the oven to the cabinet with SCREW at the
INSTALLATION HOLE of TRIM KIT. Then fix the TRIM-KIT PLASTIC COVER
to the INSTALLATION HOLE.
TRIM-KIT
UPPER AIR TUNNEL
ADJUST SCREW
ADJUST HEIGHT
ADJUST SCREW
TRIM KIT
SCREW B
TRIM-KIT PLASTIC COVER
INSTALLATION HOLE
EN-14
B

Operation Instructions
1) Press " ", the screen display "P100".
2) Turn " " to adjust the hour figures, the input time should be
within 0--23.
3) Press " ", the minute figures will flash.
2) Turn " " to adjust 80% microwave power until the oven displays
"P 80".
3) Press " " to confirm, the screen displays "P 80".
4) Turn " " to adjust the cooking time untill the oven displays
"20:00".
5) Press " " to start cooking or press " "
to cancel the settings.
1. Clock Setting
When the microwave oven is electrified, the oven will display "0:00", buzzer will rings once.
1) Press " ", the hour figures will flash, and the indicator for
clock " " will light.
4) Turn " " to adjust the minute figures, the input time should
be within 0--59.
5) Press " " to finish clock setting. The indicator for clock
" " will go out, ":" will flash, and the time will light.
Note: the step quantities for the adjustment time of the coding switch are as follow:
0---1 min : 5 seconds
1---5 min : 10 seconds
5---10 min : 30 seconds
10---30 min : 1 minute
30---95 min : 5 minutes
2. Cooking food
Press " " , "P100" will flash. Then turn " " to select the function ,
" " to confirm, and then turn " " to select the cooking time.
to start cooking.
Example: If you want to use 80% microwave to cook food for 20 minutes, you can
operate the oven as the following steps.
Clock/ Pre-Set
Clock/ Pre-Set
Clock/ Pre-Set
Micro./Grill/Combi.
Micro./Grill/Combi.
Micro./Grill/Combi.
Micro./Grill/Combi.
Quick Start/Start
Cancel/Stop
Quick Start/Start
Press " "
"P100", "P80"..."P10", "G", "C-1" and "C-2" will display in order. Press
EN-15

Order Microwave
Power Grill
Power
1
2
3
4
5
6
7
8
100%
80%
50%
30%
10%
0%
55%
36%
100%
45%
64%
4) Turn " " to adjust the hour figures, the input time should be
within 0--23.
3) Press " ", the hour figures will flash, and the indicator
" " will light.
a. Press " ", the screen display "P100".
b. Turn " " to adjust 80% microwave power until the oven displays "P 80".
c. Press " " to confirm, the screen displays "P 80".
d. Turn " " to adjust the cooking time untill the oven displays "15:00".
e. Be careful! Please do not press " " to start cooking.
"Micro./Grill/Combi." Pad instructions
Note: When half the grill time passes, the oven will pause and beep twice, and this
is normal. You can just press" "to continue cooking. But In
order to have a better effect of grilling food, you should turn the food over,
close the door, and then press" " to continue cooking. If there
is no operation in 1 minute, the oven will continue working and beep once.
3. Program set in Advance
1) Set the clock first. (Consult the instruction of clock setting.)
2) Input the cooking program. Three stage power levels can be set at most. Defrost
should always be set as the first stage, if it is included in the multi-level program.
Clock/ Pre-Set
Quick Start/Start
Quick Start/Start
Example: If you want to use 80% microwave to cook food for 15minutes, you can
operate the oven as the following steps.
Micro./Grill/Combi.
Micro./Grill/Combi.
Quick Start/Start
Display
P100
P 80
P 50
P 30
P 10
G
C-1
C-2
EN-16

1) Press " " pad , the screen display "P100".
2) Press " " to confirm the microwave power.
3) Turn " " to select cooking time.
1) Press " " button. The screen will display "dEF1", " "
and " " will light.
2) Turn " " to select the weight of food.The weight is from 100
to 2000g.
3) Press " " to start defrosting food. " " and " " will flash.
1) Press " " button. The screen will display "dEF2", " "
and " " will light.
2) Turn " " to select the cooking time. The MAX.time is 95 minutes.
3) Press " " to start defrosting food. " " and " " will flash.
4) Press " " pad , the screen display "P100".
5) Press " ", the minute figures will flash.
6) Turn " " to adjust the minute figures, the input time should
be within 0--59.
7) Press " " to finish setting. The indicator for clock " "
will flash. If the door is closed, buzzer will ring twice when the time
arrives, then cooking will start automatically and the indicator for clock
" " will go out.
6. Multi-section cooking
At most 3 sections can be input for cooking. In multi-section cooking, if one section is
defrosting, then defrosting shall be placed in the first section.
4. Defrost By W.T.
5. Defrost By Time
Example: If you want to use "20 minutes of 100% microwave power + 5 minutes of 80%
microwave power " to cook food.
Defrost By Time
Micro./Grill/Combi.
Micro./Grill/Combi.
Micro./Grill/Combi.
Defrost By W.T.
Clock/ Pre-Set
Quick Start/Start
Quick Start/Start
Quick Start/Start
EN-17

1) Press " " , " " and " " will light.
Example: If you want to use "Auto Menu" to cook fish of 250g.
2) Turn " " to select the function you want.
3) Press " " button to confirm.
4) Turn " " to select the weight of fish. "g" will light.
5) Press " " to start. "g" will go out, " " and " " will flash.
9. Lock-out Function for Children
Lock: In waiting state, press " " for 3 seconds, there will be a long beep
denoting entering the children-lock state and oven will display " ".
Lock quitting: In locked state, press " " for 3 seconds, there will be a long "beep"
denoting that the lock is released.
7) Press " " to start cooking or press " " to cancel the
setting.
10. Inquiring Function
(1) In microwave, grill or combination cooking state, press " ", the current
power will be displayed for 4 seconds. After 4 seconds, the oven will turn back to the
former state;
(2) In cooking state, press " " to inquire the present time and the time will
flash for 4 seconds.
(3) In preset state, press " " to inquire the preset time and it will flash for
4 seconds.
6) Press " " pad, then turn " " to select cooking
time of 80% microwave power.
5) Turn " " to select 80% microwave power.
When the oven is in the waiting state, Press " " to start cooking food
with full microwave power for 1 minute. Each press will increase one minute. The
maximum cooking time is 95 minutes.
8. Auto Menu
Clock/ Pre-Set
Micro./Grill/Combi.
Auto Menu
Auto Menu
Cancel/Stop
Clock/ Pre-Set
7. Start/Quick Start Quick Start/Start
Quick Start/Start
Quick Start/Start
Cancel/Stop
Cancel/Stop
Micro./Grill/Combi.
EN-18

The automatic menu procedure:
Menu Weight Display
A-1
Auto Reheat
A-2
Vegetable
A-3
Fish
A-4
Meat
A-5
Pasta
A-6
Potato
A-7
Reheat Pizza
A-8
Soup
200 g
400 g
600 g
200 g
300 g
400 g
250 g
350 g
450 g
250 g
350 g
450 g
50 g(with water 450ml)
100 g(with water 800ml)
200 g
400 g
600 g
200 g
400 g
200 ml
400 ml
Order
1
2
3
4
5
6
7
8
200 g
400 g
600 g
200 g
300 g
400 g
250 g
350 g
450 g
250 g
350 g
450 g
50 g
100 g
200 g
400 g
600 g
200 g
400 g
200 ml
400 ml
EN-19

According to Waste of Electrical and Electronic Equipment
(WEEE) directive, WEEE should be separately collected and
treated. If at any time in future you need to dispose of this
product please do NOT dispose of this product with household
waste. Please send this product to WEEE collecting points
where available.
It is forbidden to run the unit without any food inside.
It is very dangerous.
Trouble shooting
EN-20
PN:16170000A96069

-
 1
1
-
 2
2
-
 3
3
-
 4
4
-
 5
5
-
 6
6
-
 7
7
-
 8
8
-
 9
9
-
 10
10
-
 11
11
-
 12
12
-
 13
13
-
 14
14
-
 15
15
-
 16
16
-
 17
17
-
 18
18
-
 19
19
-
 20
20
-
 21
21
-
 22
22
-
 23
23
-
 24
24
-
 25
25
-
 26
26
-
 27
27
-
 28
28
-
 29
29
-
 30
30
-
 31
31
-
 32
32
-
 33
33
-
 34
34
-
 35
35
-
 36
36
-
 37
37
-
 38
38
-
 39
39
-
 40
40
-
 41
41
-
 42
42
-
 43
43
-
 44
44


Aspes AMWI2800DGX El manual del propietario
- Categoría
- Microondas
- Tipo
- El manual del propietario
en otros idiomas
- English: Aspes AMWI2800DGX Owner's manual
Artículos relacionados
Otros documentos
-
Svan SMWI2800DGX El manual del propietario
-
Haier HWO38MG2BHXBD Manual de usuario
-
Hoover HMG201X Manual de usuario
-
Candy MIG1730DX Manual de usuario
-
Infiniton IMW-20BTN El manual del propietario
-
-
Teka ML 825 TFL Manual de usuario
-
-
-
EAS ELECTRIC EMBG28LSS Manual de usuario