
RECEIVE-ONLY
EARPIECE
PMLN7397
ACCESSORIES
de-DE
fr-FR es-ES
it-IT
pt-PT
nl-NL
ru-RU
en-US

MN002332A01.book Page 2 Wednesday, October 30, 2019 3:32 PM

1
English
Foreword
RF Energy Exposure and Product Safety Guide
for Portable Two-Way Radios
Attention!
These Earpieces, when attached to the radio, are
restricted to occupational use only to satisfy FCC/ICNIRP
RF energy exposure requirements. Before using this
product, read the RF Energy Exposure and Product Safety
Guide that ships with the radio which contains instructions
for safe usage and RF energy awareness and control for
compliance with applicable standards and regulation.
Acoustic Safety
Exposure to loud noises from any source for extended
periods of time may temporarily or permanently affect your
hearing. The louder the volume, the less time is required
before your hearing could be affected. Hearing damage
from loud noise is sometimes undetectable at first and can
have a cumulative effect. To protect your hearing:
• Use the lowest volume necessary to do your job.
• Turn up the volume only if you are in noisy
surroundings.
• Turn down the volume before connecting headset or
earpiece.
• Limit the amount of time you use headsets or
earpieces at high volume.
• When using the radio without a headset or earpiece,
do not place the radio’s speaker directly against your
ear.
MN002332A01.book Page 1 Wednesday, October 30, 2019 3:32 PM

2
English
• If you experience hearing discomfort, ringing in your
ears, or speeches that are muffled, you should stop
listening to your radio through your headset or
earpiece, and have your hearing checked by your
doctor.
Description
The PMLN7397 Earpiece comes with a 1 Cord Quick
Disconnect adapter that allows the user to quickly
disconnect the earpiece from the surveillance kit. This
feature will enable multiple users to swap earpieces easily.
This earpiece also consists of exchangeable rubber ear tip
for low noise conditions and foam ear tube plug for
extreme noise conditions.
Operation
Attaching the Accessory to the Radio
1. Turn the radio off.
2. Attach the kit connector to the radio, and secure the
connector.
3. Turn the radio on and adjust the audio volume to a
comfortable listening level.
Receiving
When the accessory is connected to the radio side
connector, the radio’s speaker is muted, and the audio is
only heard from the earpiece speaker.
Removing the Accessory
Turn the radio off before removing the accessory from the
radio side connector.
MN002332A01.book Page 2 Wednesday, October 30, 2019 3:32 PM

3
English
Disconnecting the Transparent Audio Tube
Rotate the Quick Disconnect about 90º and release it from
the audio tube adapter. Refer to
Figure 1.
Figure 1: Disconnecting the audio tube
Care and Maintenance
Clean the accessory, especially the ear tube and ear tip
by:
• washing periodically with a mild liquid soap and rinsing
with water.
• wiping off each used part that touched the ear with a
tissue.
• keeping canal free and clear of wax.
Important: For hygienic reasons, do not return any items
once the package seal is broken.
QUICK DISCONNECT
MN002332A01.book Page 3 Wednesday, October 30, 2019 3:32 PM

4
English
Service
The following replacement parts and alternate
configurations are available for the kits.
Installation
Removing the rubber ear tip
Remove the rubber ear tip by pulling it out and away from
the elbow. Refer to
Figure 2
.
Attaching the foam ear tube plug
1. Slip the end of the black tube over the elbow.
2. Use your fingertips to squeeze the foam ear tube plug
fairly tight around the center of the black tube.
Table 1: Replacement Parts/Options
Part Description Quantity Part Number
Quick disconnect acoustic tube 1 RLN6242_
Noise attenuating plugs 25 5080384F72
Ear tip, clear 25 5080370E97
MN002332A01.book Page 4 Wednesday, October 30, 2019 3:32 PM

5
English
Figure 2: Removing the rubber ear tip
3. While the ear tube plug foam is compressed, insert it
into your ear canal far enough to be worn comfortably.
Within a few seconds after the ear tube insertion, the
compressed foam will conform to the shape of your ear
canal.
4. To further reduce the noise level, replace the ear tip to
the noise attenuating foam earplug. While the foam
earplug is compressed, insert it into the other (open)
ear canal far enough to be worn comfortably. Within a
few seconds after the earplug insertion, the
compressed foam will conform to the shape of your ear
canal.
EAR TIP
ELBOW
MN002332A01.book Page 5 Wednesday, October 30, 2019 3:32 PM

6
English
MOTOROLA, MOTO, MOTOROLA SOLUTIONS and the Stylized M
logo are trademarks or registered trademarks of Motorola
Trademark Holdings, LLC and are used under license. All other
trademarks are the property of their respective owners.
© 2015 and 2019 Motorola Solutions, Inc. All rights reserved.
MN002332A01.book Page 6 Wednesday, October 30, 2019 3:32 PM

1
Deutsch
Vorwort
Handbuch zur HF-Energiestrahlung und
Produktsicherheit für tragbare Funkgeräte
Achtung!
Diese Ohrmuscheln sind nach dem Anschließen an das
Funkgerät nur auf die berufliche Verwendung beschränkt,
um die FCC/ICNIRP-Anforderungen für die HF-
Energiebelastung zu erfüllen. Bevor Sie dieses Produkt
verwenden, lesen Sie das Handbuch zur HF-
Energiestrahlung und Produktsicherheit, das im
Lieferumfang des Funkgeräts enthalten ist. Das Handbuch
enthält Anweisungen für die sichere Verwendung sowie
Informationen zum Gefahrenbewusstsein und zur
Risikovermeidung gemäß anwendbaren Normen und
Vorschriften.
Schutz vor akustischer Belastung
Längere Belastung durch laute Geräusche und Lärm jeder
Art können das Gehör zeitweilig oder bleibend
beeinträchtigen. Je höher der Lautstärkepegel des
Funkgeräts, desto schneller kann es zu einer Schädigung
Ihres Gehörs kommen. Durch Lärm verursachte
Gehörschäden sind zunächst oft nicht feststellbar, können
aber mit der Zeit durch kumulative Wirkung entstehen.
Zum Schutz Ihres Gehörs wird Folgendes empfohlen:
• Verwenden Sie stets den niedrigsten notwendigen
Lautstärkepegel.
• Erhöhen Sie die Lautstärke nur, wenn Sie sich in einer
geräuschvollen Umgebung befinden.
• Stellen Sie die Lautstärke niedrig ein, bevor Sie
Kopfhörer bzw. Ohrhörer anschließen.
• Begrenzen Sie, wie lange Sie Kopfhörer bzw. Ohrhörer
jeweils mit hoher Lautstärke verwenden.
MN002332A01.book Page 1 Wednesday, October 30, 2019 3:32 PM

2
Deutsch
• Halten Sie den Lautsprecher Ihres Funkgeräts nicht
direkt an Ihr Ohr, wenn Sie das Funkgerät ohne
Kopfhörer bzw. Ohrhörer benutzen.
• Sollten bei Ihnen irgendwelche Hörbeschwerden
auftreten, einschließlich Druck- oder Spannungsgefühl
in den Ohren, Ohrenklingeln oder dumpfes
Hörempfinden, sollten Sie Ihr Headset bzw. Ihren
Kopfhörer nicht mehr benutzen und Ihr Gehör von
einem Arzt untersuchen lassen.
Beschreibung
Im Lieferumfang des Ohrhörers PMLN7397 ist ein Adapter
mit Kabel-Schnelltrennung enthalten, der es dem
Benutzer ermöglicht, den Ohrhörer schnell vom
Überwachungsset zu trennen. Mithilfe dieser Funktion
können Ohrhörer leicht zwischen mehreren Benutzern
ausgetauscht werden. Der Ohrhörer verfügt außerdem
über austauschbare Gummiohrstücke für niedrige
Geräuschbelastung und Akustikschlauchstöpsel aus
Schaumstoff für extreme Geräuschbelastung.
Betrieb
Anbringen des Zubehörs am Funkgerät
1. Schalten Sie das Funkgerät aus.
2. Befestigen Sie den Setanschluss am Funkgerät, und
sichern Sie den Anschluss.
3. Schalten Sie das Funkgerät ein, und stellen Sie die
Lautstärke auf einen angenehmen Pegel ein.
Empfangen
Wenn das Zubehör an den Seitenanschluss des Funkgeräts
angeschlossen ist, werden die Lautsprecher des Funkgeräts
stumm geschaltet, sodass die Audiosignale nur über die
Ohrhörer-Lautsprecher wiedergegeben werden.
MN002332A01.book Page 2 Wednesday, October 30, 2019 3:32 PM

3
Deutsch
Entfernen des Zubehörs
Schalten Sie das Funkgerät vor dem Entfernen des
Zubehörs vom Seitenanschluss des Funkgeräts aus.
Entfernen des durchsichtigen Hörschlauchs
Drehen Sie die Schnelltrennung um ca. 90 Grad, und
entfernen Sie sie vom Hörschlauchadapter. Siehe
Abbildung 1
.
Abbildung 1: Trennen des Hörschlauchs
Pflege und Wartung
Halten Sie das Zubehör, insbesondere das Ohrröhrchen
und den Ohreinsatz, wie folgt sauber:
• regelmäßig mit einer milden Flüssigseife waschen und
gut mit Wasser abspülen.
• jedes mit dem Ohr in Berührung gekommene Teil mit
einem Tuch abwischen.
• Gehörkanal von Ohrenschmalz freihalten.
Wichtigt: Aus hygienischen Gründen einmal ausgepackte
Teile nicht zurücksenden.
QUICK DISCONNECT
SCHNELLTRENNUNG
MN002332A01.book Page 3 Wednesday, October 30, 2019 3:32 PM

4
Deutsch
Service/Wartung
Die folgenden Ersatzteile und Alternativkonfigurationen
sind für die Sets verfügbar.
Installation
Entfernen des Gummiohrstück
Entfernen Sie das Gummiohrstück, indem Sie es aus dem
Winkel-Steckverbinder ziehen. Siehe
Abbildung 2.
Anbringen des röhrchenförmigen
Schaumstoffeinsatzes
1. Schieben Sie das Ende des schwarzen Röhrchens
über den Winkel-Steckverbinder.
2. Drücken Sie den Schaumstoffeinsatz zwischen
Daumen und Zeigefinger um die Mitte des schwarzen
Röhrchens fest zusammen.
Tabelle 1: Ersatzteile/Zubehör
Beschreibung des Ersatzteils Anzahl Teile-Nr.
Hörschlauch mit Schnelltrennung 1 RLN6242_
Lärmdämpfeinsätze 25 5080384F72
Ohreinsatz, durchsichtig 25 5080370E97
MN002332A01.book Page 4 Wednesday, October 30, 2019 3:32 PM

5
Deutsch
Abbildung 2: Entfernen des Gummiohrstücks
3. Schieben Sie den zusammengedrückten
Schaumstoffeinsatz in den äußeren Gehörgang, bis er
gut sitzt und angenehm zu tragen ist. Einige Sekunden
nach dem Einsetzen des Schaumstoffeinsatzes ins
Ohr passt er sich der Form Ihres Gehörgangs an.
4. Verwenden Sie anstatt der Ohrstücke die
geräuschdämmenden Ohrstöpsel aus Schaumstoff,
um den Geräuschpegel noch weiter zu senken.
Schieben Sie den zusammengedrückten
Schaumstoffeinsatz in den anderen (offenen)
Gehörgang, bis er gut sitzt und angenehm zu tragen
ist. Einige Sekunden nach dem Einsetzen des
Schaumstoffeinsatzes ins Ohr passt er sich der Form
Ihres Gehörgangs an.
EAR TIP
ELBOW
EINSATZ
WINKEL-STECKVERBINDER
MN002332A01.book Page 5 Wednesday, October 30, 2019 3:32 PM

6
Deutsch
MOTOROLA, MOTO, MOTOROLA SOLUTIONS und das stilisierte
M-Logo sind Marken oder eingetragene Marken der Motorola
Trademark Holdings, LLC, ihre Benutzung ist lizenzpflichtig. Alle
anderen Marken sind Eigentum ihrer jeweiligen Inhaber.
© 2015 und 2019 Motorola Solutions, Inc. Alle Rechte vorbehalten.
MN002332A01.book Page 6 Wednesday, October 30, 2019 3:32 PM

1
Français
Avant-propos
Sécurité des produits et exposition RF pour les
radios professionnelles portatives
Attention !
Lorsqu'elles sont connectées à la radio, ces oreillettes
sont réservées à un usage professionnel pour des raisons
de conformité avec la réglementation FCC/ICNIRP sur
l’exposition aux fréquences radioélectriques. Avant d'utiliser
ce produit, lisez le guide Sécurité des produits et exposition
RF fourni avec la radio. Il contient des instructions de
fonctionnement relatives à la sécurité et à l'exposition aux
RF, ainsi que des informations sur le contrôle de conformité
aux normes et réglementations applicables.
Sécurité Acoustique
L’exposition à des niveaux sonores excessifs pendant de
longues périodes peut, quelle que soit la source,
temporairement ou définitivement provoquer une perte de
la capacité auditive. Plus le volume de votre radio est
élevé, plus rapidement la capacité auditive est affectée.
De telles détériorations peuvent parfois rester
imperceptibles et s’accumuler avant de devenir évidentes.
Pour protéger votre capacité auditive :
• Choisissez le volume sonore le plus bas nécessaire
pour votre travail.
• Augmentez uniquement le volume sonore lorsque
l’environnement est bruyant.
• Réduisez le volume sonore avant de brancher un
casque / une oreillette sur votre radio.
• Limitez la durée d’utilisation d’un casque / d’une
oreillette si le niveau de volume est élevé.
MN002332A01.book Page 1 Wednesday, October 30, 2019 3:32 PM

2
Français
• Lorsque vous utilisez la radio sans casque / oreillette, ne
placez pas le haut-parleur contre votre oreille.
• Si vous ressentez une gêne auditive, entendez des
acouphènes tels que bourdonnement ou sifflement, si
vous avez des difficultés à comprendre des paroles,
vous devez cesser d’utiliser un casque / une oreillette
et demander à un médecin d’examiner votre audition.
Description
L'oreillette PMLN7397 est accompagnée d'un raccord de
déconnexion rapide à 1 câble qui permet à l'utilisateur de
débrancher rapidement l'oreillette du kit de surveillance.
Cette fonctionnalité permet à plusieurs utilisateurs de
changer facilement d'oreillette. Cette oreillette comprend
également un embout auriculaire en caoutchouc
interchangeable pour une utilisation en conditions peu
bruyantes et un bouchon intra-auriculaire en mousse pour
les environnements très bruyants.
Fonctionnement
Connexion de l'accessoire à la radio
1. Éteignez la radio.
2. Branchez le connecteur du kit sur la radio et fixez le
connecteur.
3. Allumez la radio et réglez le volume à un niveau
d’écoute confortable.
Réception
Lorsque l'accessoire est branché au connecteur latéral de
la radio, le haut-parleur de la radio est désactivé. Le son
peut être uniquement entendu via l'oreillette.
MN002332A01.book Page 2 Wednesday, October 30, 2019 3:32 PM

3
Français
Retrait de l'accessoire
Éteignez la radio avant de retirer l'accessoire du
connecteur latéral de la radio.
Déconnexion du tube acoustique transparent
Faites pivoter de 90º l'élément de déconnexion rapide et
sortez-le de l’adaptateur du tube. Voir
Figure 1
.
Figure 1 : Débranchement du canal audio
Entretien et Maintenance
Pour nettoyer l’accessoire et en particulier le tube et son
adaptateur :
• Utilisez régulièrement un savon liquide doux et rincez
avec de l’eau.
• Essuyez avec un mouchoir en papier chaque partie qui
est en contact avec l’oreille.
• Vérifiez régulièrement que le canal auditif est propre et
sans cérumen.
QUICK DISCONNECT
DÉCONNECTEUR
RAPIDE
MN002332A01.book Page 3 Wednesday, October 30, 2019 3:32 PM

4
Français
Important : pour des raisons d’hygiène, veuillez ne pas
renvoyer les produits dont le sceau
d’emballage est rompu.
Entretien
Les pièces de rechange et configurations suivantes sont
également disponibles pour les kits.
Installation
Pour retirer le protège-oreillette en caoutchouc
Retirez l'embout auriculaire en caoutchouc en tirant
dessus pour l'extraire du coude. Reportez-vous à la
Figure 2.
Pour fixer l’adaptateur en mousse du tube
acoustique
1. Engagez l’extrémité du tube noir sur le coude.
2. Du bout des doigts, comprimez assez fermement
l’adaptateur en mousse du tube acoustique autour du
centre du tube noir.
Tableau 1 : Options / pièces de rechange
Description Qté Référence
Tube acoustique à déconnexion
rapide
1 RLN6242_
Adaptateurs réducteurs de bruit 25 5080384F72
Protège-oreillettes transparents 25 5080370E97
MN002332A01.book Page 4 Wednesday, October 30, 2019 3:32 PM

5
Français
Figure 2 : Retrait de l'embout auriculaire en caoutchouc
3. Pendant que la mousse est comprimée, insérez-la dans
votre canal auditif, assez profondément pour assurer un
port stable et confortable. Après quelques secondes, la
mousse se détend et prend la forme de votre canal
auditif.
4. Pour réduire davantage le niveau de bruit, remplacez
l'embout auriculaire par le bouchon d'atténuation du
bruit en mousse. Pendant que la mousse est comprimée,
insérez-le protège-oreillette dans l’autre canal auditif,
assez profondément pour assurer un port stable et
confortable. Après quelques secondes, la mousse se
détend et prend la forme de votre canal auditif.
EAR TIP
ELBOW
PROTÈGE-OREILLETTE
COUDE
MN002332A01.book Page 5 Wednesday, October 30, 2019 3:32 PM

6
Français
MOTOROLA, MOTO, MOTOROLA SOLUTIONS et le logo stylisé M
sont des marques de commerce ou des marques déposées de
Motorola Trademark Holdings, LLC et sont utilisées sous licence.
Les droits des propriétaires de toutes les autres marques déposées
mentionnées sont reconnus.
© 2015 et 2019 Motorola Solutions, Inc. Tous droits réservés.
MN002332A01.book Page 6 Wednesday, October 30, 2019 3:32 PM

1
Español
Prólogo
Guía de exposición a radiofrecuencia y
seguridad del producto para radios
bidireccionales portátiles
Atención
Estos auriculares, cuando se conectan a la radio, están
limitados exclusivamente al uso profesional para cumplir
con los requisitos de exposición a radiofrecuencia de
FCC/ICNIRP. Antes de utilizar este producto, lea la Guía
de exposición a radiofrecuencia y seguridad del producto
para radios bidireccionales portátiles (incluida con la
radio). En este documento encontrará información
referente a un uso seguro de la energía de
radiofrecuencia y al control del cumplimiento de los
estándares y normativas correspondientes.
Seguridad auditiva
La exposición a sonidos altos de cualquier tipo durante
periodos prolongados puede afectar a su capacidad
auditiva de forma temporal o permanente. Cuanto más
alto esté el volumen del transceptor, menos tardarán en
aparecer los problemas auditivos. Los daños en el aparato
auditivo provocados por sonidos altos a veces no se
pueden detectar al principio y pueden presentar un efecto
acumulativo. Para proteger sus oídos:
• Utilice el volumen más bajo con el que pueda realizar
su trabajo.
• Suba el volumen únicamente si está en entornos
ruidosos.
• Baje el volumen antes de conectar los auriculares.
MN002332A01.book Page 1 Wednesday, October 30, 2019 3:32 PM

2
Español
• Limite la cantidad de tiempo de uso de los auriculares
a un volumen elevado.
• Al utilizar la radio sin auriculares, no se ponga el
altavoz directamente pegado a la oreja.
• Si nota molestias auditivas, un volumen más bajo en
las conversaciones o le pitan los oídos, debería dejar
de utilizar la radio con auriculares y acudir al médico
para que le realice un examen auditivo.
Descripción
Los auriculares PMLN7397 incluyen un cable adaptador
de desconexión rápida que permite al usuario desconectar
rápidamente el auricular del kit de vigilancia. Esta función
permite a varios usuarios intercambiar los auriculares con
facilidad. Estos auriculares también constan de audífonos
de goma intercambiables para usar con ruido reducido y
tapones con tubo de espuma para entornos muy ruidosos.
Funcionamiento
Conexión del accesorio a la radio
1. Apague la radio.
2. Conecte el conector del kit a la radio y fíjelo.
3. Encienda el transceptor y ajuste el volumen del sonido
al nivel de escucha deseado.
Recepción
Cuando el accesorio está conectado al conector lateral de
la radio, el altavoz de la radio se silencia y el audio solo se
oye a través del altavoz del auricular.
MN002332A01.book Page 2 Wednesday, October 30, 2019 3:32 PM

3
Español
Extracción del accesorio
Apague la radio antes de desconectar el accesorio del
conector lateral de la radio.
Desconexión del tubo de audio transparente
Gire el dispositivo de desconexión rápida
aproximadamente 90º y libérelo del adaptador del tubo de
audio. Consulte la
Figura 1
.
Figura 1: Desconexión del tubo acústico
Cuidado y mantenimiento
Limpie el accesorio; en especial, el tubo para el oído y el
audífono. Para ello:
• Lávelo periódicamente con un jabón líquido suave y
aclárelo con agua.
• Limpie cada una de las piezas en contacto con el oído
con un paño.
• Mantenga el canal libre y sin cera.
QUICK DISCONNECT
DESCONEXIÓN
RÁPIDA
MN002332A01.book Page 3 Wednesday, October 30, 2019 3:32 PM

4
Español
Importante: Por razones higiénicas, no se admitirá la
devolución de ningún artículo si el envoltorio
está abierto.
Mantenimiento
Las siguientes piezas de repuesto y configuraciones
alternativas están disponibles para el kit.
Instalación
Extracción del auricular de goma
Para retirar el audífono de goma, extráigalo del codo.
Consulte la
Figura 2
.
Colocación del conector tubular de espuma
1. Deslice el extremo del tubo negro por el codo.
2. Utilice las yemas de los dedos para apretar el conector
tubular de espuma alrededor del centro del tubo negro.
Tabla 1: Recambios/componentes opcionales
Descripción de la pieza Cantidad
Número de
referencia
Tubo acústico de desconexión
rápida
1 RLN6242_
Conexiones de atenuación del
ruido
25 5080384F72
Audífono claro 25 5080370E97
MN002332A01.book Page 4 Wednesday, October 30, 2019 3:32 PM

5
Español
Figura 2: Extracción del audífono de goma
3. Cuando esté comprimido, introdúzcalo
suficientemente lejos del canal auditivo para llevarlo
cómodamente. Segundos después de insertar el tubo,
la espuma se adaptará a la forma del canal auditivo.
4. Para reducir aún más el nivel de ruido, sustituya las
almohadillas por auriculares de espuma para la
atenuación de ruido. Cuando esté comprimido,
introdúzcalo lo suficientemente lejos del otro canal
auditivo (libre) para llevarlo cómodamente. Unos
segundos después, la espuma comprimida se
adaptará a la forma del canal auditivo.
EAR TIP
ELBOW
AURICULAR
CODO
MN002332A01.book Page 5 Wednesday, October 30, 2019 3:32 PM

6
Español
MOTOROLA, MOTO, MOTOROLA SOLUTIONS y el logotipo de
la M estilizada son marcas comerciales o marcas registradas de
Motorola Trademark Holdings, LLC, y se utilizan con los permisos
correspondientes. Las demás marcas comerciales son propiedad
de sus respectivos titulares.
© 2015 y 2019 Motorola Solutions, Inc. Todos los derechos
MN002332A01.book Page 6 Wednesday, October 30, 2019 3:32 PM

1
Italiano
Introduzione
Guida sull'esposizione a sorgenti di
energia RF e sulla sicurezza del prodotto
per ricetrasmittenti portatili
Attenzione!
L'uso di questi auricolari, collegati alla radio, è limitato solo
a scopi professionali al fine di soddisfare i requisiti di
esposizione all'energia di radiofrequenza (RF) dell'FCC/
ICNIRP. Prima di utilizzare questo prodotto, leggere la
Guida sull'esposizione a sorgenti di energia RF e sulla
sicurezza del prodotto fornita con la radio, che contiene le
istruzioni per un utilizzo sicuro e informazioni sull'energia
RF e su come controllarla in conformità agli standard e le
normative vigenti.
Sicurezza acustica
L’esposizione protratta al rumore ad alta intensità
proveniente da qualsiasi fonte può compromettere
temporaneamente o permanentemente l’udito. Più alto è il
volume della radio, minore è il tempo che intercorre prima
che si manifestino effetti sull'udito. Il danno all’udito
causato da rumore ad alta intensità è, a volte, non
rilevabile immediatamente e può avere un effetto
cumulativo. Per proteggere l’udito:
• Selezionare il volume più basso che consenta di
svolgere il proprio lavoro.
• Aumentare il volume solo in ambienti rumorosi.
• Ridurre il volume prima di collegare cuffie o auricolari.
• Limitare il tempo di utilizzo ad alto volume di cuffie ed
auricolari.
MN002332A01.book Page 1 Wednesday, October 30, 2019 3:32 PM

2
Italiano
• Se si utilizza la radio senza cuffia o auricolare, non
appoggiare l'altoparlante della radio a contatto diretto
con l’orecchio.
• Se si nota la comparsa di fastidio e ronzii auricolari o
se il suono delle parole è smorzato, non utilizzare la
radio con cuffie ed auricolari e rivolgersi al medico per
controllare l’udito.
Descrizione
Gli auricolari di sorveglianza PMLN7397 sono dotati di un
adattatore di sganciamento rapido a 1 cavo adattatore che
consente all'utente di scollegare rapidamente gli auricolari
dal kit di sorveglianza. Questa funzione consente a più
utenti di sostituire facilmente gli auricolari. Questi
auricolari includono anche punte in gomma intercambiabili
per ridurre la rumorosità e tubi in gomma per rumori molto
elevati.
Funzionamento
Collegamento dell'accessorio alla radio
1. Spegnere la radio.
2. Collegare il connettore del kit alla radio e fissarlo.
3. Accendere la radio e regolare il volume dell’audio al
livello d’ascolto voluto.
Ricezione
Dopo aver collegato l'accessorio al connettore laterale
della radio, l'altoparlante della radio sarà disattivato e
l'audio in ricezione verrà instradato solo attraverso
l'altoparlante dell'auricolare.
MN002332A01.book Page 2 Wednesday, October 30, 2019 3:32 PM

3
Italiano
Rimozione dell'accessorio
Spegnere la radio prima di staccare l'accessorio dal
connettore laterale della radio.
Scollegamento del tubo auricolare trasparente
Ruotare il dispositivo di scollegamento rapido di circa
90 gradi ed estrarlo dall'adattatore del tubo audio.
Vedere la
Figura 1
.
Figura 1: Scollegamento del tubo audio
Pulizia e manutenzione
Pulire l’accessorio, in particolare il tubo acustico e il
puntale
• lavandolo regolarmente con sapone liquido delicato e
sciacquandolo con acqua;
• pulendo con una velina ogni parte che è venuta a
contatto con l’orecchio;
• tenendo il canale libero dal cerume.
QUICK DISCONNECT
CONNETTORE A
SCOLLEGAMENTO RAPIDO
MN002332A01.book Page 3 Wednesday, October 30, 2019 3:32 PM

4
Italiano
Importante: per motivi d'igiene, non restituire gli articoli
dopo aver aperto la confezione sigillata.
Manutenzione
Le seguenti parti di ricambio e configurazioni alternative
sono disponibili per i kit.
Installazione
Rimozione del puntale di gomma
Rimuovere l'auricolare in gomma tirandolo verso l'esterno
lontano dalla struttura a gomito. Fare riferimento alla
Figura 2
.
Montaggio del tubo acustico con tappo in
schiuma
1. Far scivolare l’estremità del tubo auricolare nero sul
gomito.
2. Stringere con le dita il tappo di schiuma, facendolo ben
aderire attorno alla porzione centrale del tubo nero.
Tabella 1: Parti di ricambio e opzioni
Descrizione parte Quantità Codice parte
Tubo acustico a scollegamento
rapido
1 RLN6242_
Tappi per la riduzione del
rumore
25 5080384F72
Puntale, trasparente 25 5080370E97
MN002332A01.book Page 4 Wednesday, October 30, 2019 3:32 PM

5
Italiano
Figura 2: Rimozione degli auricolari in gomma
3. Quando la schiuma è ancora compressa, inserire il
tappo nel canale auricolare, facendolo penetrare fino a
sentirlo confortevole. Entro pochi secondi
dall'inserimento del tubo acustico, la schiuma
compressa si espande, modellandosi al canale
auricolare.
4. Per ridurre ulteriormente il livello di rumore, sostituire
l'auricolare in gomma per l'attenuazione del rumore.
Quando la schiuma è ancora compressa, inserire il
tappo nel canale auricolare dell’altro orecchio,
facendolo penetrare fino a sentirlo confortevole. Entro
pochi secondi dall'inserimento del tubo acustico, la
schiuma compressa si espande, modellandosi al
canale auricolare.
EAR TIP
ELBOW
PUNTALE
GOMITO
MN002332A01.book Page 5 Wednesday, October 30, 2019 3:32 PM

6
Italiano
MOTOROLA, MOTO, MOTOROLA SOLUTIONS e la M stilizzata
sono marchi commerciali o marchi registrati di Motorola Trademark
Holdings, LLC e vengono utilizzati in concessione. Tutti gli altri
prodotti o servizi appartengono ai rispettivi titolari.
© 2015 e 2019 Motorola Solutions, Inc. Tutti i diritti riservati.
MN002332A01.book Page 6 Wednesday, October 30, 2019 3:32 PM

1
Português
Prefácio
Guia de Segurança do Produto e de Exposição
a Energia de RF para rádios bidirecionais
Atenção!
Estes auriculares, quando ligados ao rádio, destinam-se
somente ao uso ocupacional para atender aos requisitos
de exposição à energia RF recomendados pela FCC/
ICNIRP. Antes de utilizar este produto, leia o Guia de
Segurança do Produto e de Exposição a Energia de RF
fornecido com o rádio, que contém instruções para uma
utilização segura e para tomar conhecimento e controlar a
sua exposição a energia de RF, a fim de respeitar as
normas e os regulamentos aplicáveis.
Segurança de Exposição ao Ruído
A exposição a qualquer tipo de ruído alto por períodos
prolongados pode afetar a sua audição temporária ou
permanentemente. Quanto mais alto o volume do rádio,
menor será o tempo necessário para que a sua audição
fique afetada. Por vezes, as lesões auditivas provocadas
por ruídos altos não são imediatamente detetadas e
podem ter um efeito cumulativo. Para proteger a sua
audição:
• Use o volume mínimo necessário para desempenhar o
seu trabalho.
• Só deve aumentar o volume se estiver em ambientes
ruidosos.
• Diminua o volume antes de ligar um auscultador ou
auricular.
• Limite a quantidade de tempo de utilização de
auscultadores ou auriculares com o volume alto.
MN002332A01.book Page 1 Wednesday, October 30, 2019 3:32 PM

2
Português
• Quando usar o rádio sem um auscultador ou auricular,
não encoste o altifalante do rádio diretamente ao
ouvido.
• Se sentir desconforto auditivo, zumbido nos ouvidos
ou sons abafados, deve interromper a utilização do
auscultador ou auricular e consultar o seu
otorrinolaringologista.
Descrição
Os auriculares PMLN7397 incluem um adaptador de
desengate rápido com 1 cabo, o qual permite ao utilizador
desligar rapidamente o auricular do kit de vigilância. Esta
funcionalidade permitirá que vários utilizadores troquem
facilmente de auriculares. Este auricular inclui ainda uma
extremidade do auricular em borracha descartável para
condições de ruído reduzido e um tampão do tubo do
auricular em espuma para condições de ruído elevado.
Operação
Ligação do acessório ao rádio
1. Desligue o rádio.
2. Ligue o conetor do kit ao rádio e fixe o conetor.
3. Ligue o rádio e regule o volume do áudio para um nível
de audição confortável.
Receção
Quando o acessório estiver ligado ao conetor lateral do
rádio, o altifalante do rádio está silencioso e o som é
escutado apenas a partir dos altifalantes do auricular.
MN002332A01.book Page 2 Wednesday, October 30, 2019 3:32 PM

3
Português
Remoção do acessório
Desligue o rádio antes de retirar o acessório do conetor
lateral do rádio.
Desligar o tubo de áudio transparente
Rode a ligação de desengate rápido cerca de 90º e
liberte-a do adaptador do tubo de áudio. Consulte a
Figura 1.
Figure 1: Desligar o tubo de áudio
Cuidados e Manutenção
Limpe o acessório, especialmente o tubo acústico e o
auscultador, assegurando os seguintes procedimentos:
• lavar periodicamente com um sabão líquido suave e
enxaguar com água;
• limpar todas as peças usadas que estiveram em
contacto com o ouvido com um pano;
• manter o canal auditivo desobstruído e sem cera.
QUICK DISCONNECT
DESACOPLAMENTO
RÁPIDO
MN002332A01.book Page 3 Wednesday, October 30, 2019 3:32 PM

4
Português
Important: por motivos de higiene, não devolva nenhuma
peça se a proteção da embalagem já tiver sido
retirada.
Assistência
Encontram-se disponíveis, para os kits, as seguintes
peças de substituição e configurações alternativas.
Instalação
Remoção do auscultador de borracha
Remova a extremidade do auricular em borracha
puxando-a e separando-a da secção angular. Consulte a
Figura 2.
Ligação do auscultador de esponja de tubo
acústico
1. Introduza a extremidade do tubo preto por fora do
cotovelo.
2. Use as pontas dos dedos para apertar o auscultador
de esponja de tubo acústico em torno do centro do
tubo preto.
Table 1: Peças Sobressalentes/Opções
Descrição da Peça Qtd Referência
Tubo acústico de desacoplamento
rápido
1 RLN6242_
Auscultadores de atenuação de ruído 25 5080384F72
Auscultador, transparente 25 5080370E97
MN002332A01.book Page 4 Wednesday, October 30, 2019 3:32 PM

5
Português
Figure 2: Remover a extremidade do auricular em
borracha
3. Enquanto a espuma do auscultador de tubo acústico
está comprimida, insira-o no canal auditivo a uma
profundidade suficiente para uma utilização
confortável. Após alguns segundos depois da inserção
do tubo acústico, a espuma comprimida adapta-se à
forma do canal auditivo do utilizador.
4. Para reduzir mais o nível de ruído, substitua a
extremidade do auricular por um tampão em espuma
de atenuação de ruído. Enquanto o auscultador de
espuma está comprimido, insira-o no outro canal
auditivo (livre) a uma profundidade suficiente para uma
utilização confortável. Após alguns segundos depois
da inserção do auscultador, a espuma comprimida
adapta-se à forma do canal auditivo do utilizador.
EAR TIP
ELBOW
AUSCULTADOR
COTOVELO
MN002332A01.book Page 5 Wednesday, October 30, 2019 3:32 PM

6
Português
MOTOROLA, MOTO, MOTOROLA SOLUTIONS e o logótipo M
Estilizado são marcas comerciais ou marcas comerciais registadas
da Motorola Trademark Holdings, LLC e são usadas mediante
licença. As restantes marcas comerciais são propriedade dos
respetivos proprietários.
© 2015 e 2019 Motorola Solutions, Inc. Todos os direitos
MN002332A01.book Page 6 Wednesday, October 30, 2019 3:32 PM

1
Nederlands
Voorwoord
Blootstelling aan radiogolven en
productveiligheid voor draagbare
tweerichtingsradio's
Let op!
Wanneer deze oortelefoons op de portofoon zijn
aangesloten, mogen deze alleen beroepsmatig worden
gebruikt om te voldoen aan de FCC/ICNIRP RF-vereisten
voor blootstelling aan radiogolven. Lees voordat u dit
product gebruikt de gids Blootstelling aan radiogolven en
productveiligheid die wordt meegeleverd met de portofoon.
Deze bevat belangrijke bedieningsinstructies voor veilig
gebruik, beperking van blootstelling aan radiogolven en
naleving van de relevante normen en regelgeving.
Bescherming van uw gehoor
Langdurige blootstelling aan luid lawaai, ongeacht uit
welke bron, kan het gehoor tijdelijk of permanent
beschadigen. Hoe luider het volume van de portofoon,
hoe sneller uw gehoor daar nadelige gevolgen aan kan
ondervinden. Beschadiging van het gehoor wordt vaak
niet meteen opgemerkt en kan een cumulatieve invloed
hebben. Om uw gehoor te beschermen:
• Gebruik het laagst mogelijke volume voor uw
werkzaamheden.
• Stel het volume alleen hoger in wanneer u zich in een
rumoerige omgeving bevindt.
• Stel het volume altijd lager in voordat u een
hoofdtelefoon of oortelefoon aansluit.
• Gebruik hoofdtelefoons en oortelefoons zo kort
mogelijk op hoog volume.
MN002332A01.book Page 1 Wednesday, October 30, 2019 3:32 PM

2
Nederlands
• Houd de luidspreker van de portofoon nooit direct
tegen uw oor wanneer u de portofoon zonder
hoofdtelefoon of oortelefoon gebruikt.
• Als het geluid onprettig klinkt, uw oren suizen of de
spraak gedempt klinkt, staak het gebruik van de
hoofdtelefoon of oortelefoon dan en laat uw gehoor
door een arts onderzoeken.
Omschrijving
De PMLN7397-oortelefoon wordt geleverd met een
adapter met snelsluiting en één snoer waarmee de
gebruiker de oortelefoon in een handomdraai van de
bewakingskit kan verwijderen. Dankzij deze functie
kunnen meerdere gebruikers eenvoudig van oortelefoon
wisselen. Deze oortelefoon bevat ook verwisselbare
rubberen oordopjes voor omstandigheden met weinig
geluid en schuimrubberen oorbuisjes voor extreme
geluidsomstandigheden.
Bediening
Het accessoire aan de portofoon bevestigen
1. Zet de portofoon uit.
2. Sluit de kitaansluiting aan op de portofoon en bevestig
de connector.
3. Zet de portofoon aan en stel het volume op een
comfortabele luistersterkte af.
Ontvangen
Als u het accessoire op de zijaansluiting van de
portofoon hebt aangesloten, wordt de luidspreker
van de portofoon uitgeschakeld en is audio alleen
via de oortelefoonluidspreker te horen.
MN002332A01.book Page 2 Wednesday, October 30, 2019 3:32 PM

3
Nederlands
Het accessoire verwijderen
Schakel de portofoon uit voordat u het accessoire
loskoppelt van de zijaansluiting van de portofoon.
Het doorzichtige akoestische buisje loskoppelen
Draai de snelsluiting ongeveer 90º en verwijder deze uit
de audiobuisadapter. Zie
Afbeelding 1
.
Afbeelding 1: De audiobuis losmaken
Verzorging en onderhoud
Reinig het accessoire, vooral het oordopje en het
oorbuisje, als volgt:
• regelmatig met een zachte vloeibare zeep wassen en
grondig afspoelen.
• elk deel dat in aanraking met het oor is gekomen, met
een tissue afvegen.
• de oorholte schoon en vrij van oorsmeer houden.
QUICK DISCONNECT
MN002332A01.book Page 3 Wednesday, October 30, 2019 3:32 PM

4
Nederlands
Belangrijk: om hygiënische redenen nooit artikelen
retourneren nadat de verzegeling van de
verpakking is verbroken.
Onderhoud
De volgende vervangende onderdelen en alternatieve
configuraties zijn beschikbaar voor de kits.
Installatie
Het rubberen oordopje verwijderen
Verwijder het rubberen oordopje door het uit de bochtpijp
te trekken. Zie
Afbeelding 2
.
Het schuimrubber oorbuisje bevestigen
1. Schuif het uiteinde van het zwarte buisje over de elleboog.
2. Knijp het schuimrubber oorbuisje met uw vingertoppen
samen en breng het tamelijk strak om het midden van
het zwarte buisje aan.
Tabel 1: Reserveonderdelen/Toebehoren
Omschrijving Aantal
Onderdeel-
nummer
Quick Disconnect akoestisch
buisje
1 RLN6242_
Lawaaidempende oordopjes 25 5080384F72
Oordopje, doorzichtig 25 5080370E97
MN002332A01.book Page 4 Wednesday, October 30, 2019 3:32 PM

5
Nederlands
Afbeelding 2: Het rubberen oordopje verwijderen
3. Steek het oorbuisje in de oorholte terwijl het
schuimrubber nog is samengeknepen. Steek het er ver
genoeg in, zodat het comfortabel past. Een paar
seconden nadat u het oorbuisje in uw oor hebt
gestoken, vormt het samengeperste schuimrubber zich
naar uw oorholte.
4. Als u het geluidsniveau verder wilt beperken, vervangt
u de oordopjes met de geluiddempende schuimrubberen
oordopjes. Steek het oordopje in de andere (open)
oorholte terwijl het schuimrubber nog is samengeknepen.
Steek het er ver genoeg in, zodat het comfortabel past.
Een paar seconden nadat u het oordopje in uw oor
hebt gestoken, vormt het samengeperste
schuimrubber zich naar uw oorholte.
EAR TIP
ELBOW
OORDOPJE
ELLEBOOG
MN002332A01.book Page 5 Wednesday, October 30, 2019 3:32 PM

6
Nederlands
MOTOROLA, MOTO, MOTOROLA SOLUTIONS en het gestileerde
M logo zijn handelsmerken of gedeponeerde handelsmerken van
Motorola Trademark Holdings, LLC en worden onder licentie
gebruikt. Alle andere handelsmerken zijn het eigendom van hun
respectieve eigenaars.
© 2015 en 2019 Motorola Solutions, Inc. Alle rechten
MN002332A01.book Page 6 Wednesday, October 30, 2019 3:32 PM

1
Русский
Предисловие
Сведения о безопасности и воздействии
излучаемой радиочастотной энергии для
портативных приемопередающих
радиостанций
Внимание!
При подключении к радиостанции эти наушники
предназначены для профессиональной эксплуатации.
Только при этом условии будет обеспечено выполнение
требований FCC/ICNIRP в отношении воздействия
излучаемых радиоволн. Перед использованием этого
продукта ознакомьтесь с прилагаемым к радиостанции
буклетом "Сведения о безопасности и воздействии
излучаемой радиочастотной энергии", в котором
содержатся инструкции по технике безопасности и
информация
по воздействию радиочастотной энергии,
а также сведения о соответствии применимым
стандартам и нормативам.
Акустическая безопасность
Длительное воздействие громкого звука из любого
источника может привести к временному или
постоянному нарушению слуха. Чем больше громкость
радиостанции, тем быстрее может пострадать слух.
Поначалу нарушение слуха в результате воздействия
громкого звука может быть незаметным, но оно
обладает кумулятивным эффектом.
Чтобы защитить свой слух:
• Устанавливайте минимальную громкость звука,
необходимую для
работы.
MN002332A01.book Page 1 Wednesday, October 30, 2019 3:32 PM

2
Русский
• Увеличивайте громкость, только когда находитесь в
шумной обстановке.
• Уменьшайте громкость звука перед тем, как
подключать гарнитуру или ушной вкладыш.
• Ограничивайте продолжительность использования
гарнитур и ушных вкладышей с большой
громкостью звука.
• Применяя радиостанцию без гарнитуры или ушного
вкладыша, не прикладывайте динамик
радиостанции к уху.
• Если испытываете дискомфорт, звон в
ушах,
слышите речь приглушенно, вы должны прекратить
слушать радиостанцию через гарнитуру или ушной
вкладыш и обратиться к врачу, чтобы проверить
слух.
Описание
В комплект наушника PMLN7397 входит 1 проводной
адаптер для разъема быстрого отключения. С его
помощью можно быстро отключить наушник от
комплекта для скрытого использования. Данная
функция позволит нескольким пользователям легко
заменять наушники. В комплект наушника также
входит сменный резиновый вкладыш для низкого
уровня шума и поролоновый вкладыш для
чрезвычайно высокого уровня шума.
Эксплуатация
Подключение аксессуара к радиостанции
1. Выключите радиостанцию.
2. Подключите разъем комплекта к радиостанции и
зафиксируйте его.
MN002332A01.book Page 2 Wednesday, October 30, 2019 3:32 PM

3
Русский
3. Включите радиостанцию и отрегулируйте
громкость
.
Прием
При подключении аксессуара к боковому разъему
радиостанции динамик радиостанции отключается,
и звук передается только на динамик наушника.
Отключение аксессуара от радиостанции
Выключите радиостанцию, прежде чем отсоединить
аксессуар от бокового разъема.
Отсоединение прозрачной акустической
трубки
Поверните разъем быстрого отключения на 90º и
выньте его из адаптера акустической трубки. См.
Рис.1
.
Рис. 1: Отключение акустической трубки
QUICK DISCONNECT
БЫСТРОЕ
ОТКЛЮЧЕНИЕ
MN002332A01.book Page 3 Wednesday, October 30, 2019 3:32 PM

4
Русский
УХОД
Аксессуар, особенно ушные вставки, следует
содержать в чистоте. Для этого:
• периодически мойте аксессуар водой с мягким
жидким мылом;
• после контакта с ухом вытирайте соответствующие
части мягкой тканью или салфеткой;
• не допускайте накопления серы в ушном канале.
Внимание! По гигиеническим соображениям после
распечатывания упаковки изделия
возврату не подлежат.
Сервисное обслуживание
Для комплектов доступны следующие сменные детали
и альтернативные конфигурации.
Другие действия
Снятие резиновой ушной вставки
Потяните за вкладыш и снимите его с углового
элемента. См.
Рис.2
.
Таблица 1: Сменные/дополнительные части
Описание изделия
Кол-во
Номер по
каталогу
Быстроотсоединяемая
акустическая трубка
1 RLN6242_
Шумозащитные вставки 25 5080384F72
Прозрачные ушные вставки 25 5080370E97
MN002332A01.book Page 4 Wednesday, October 30, 2019 3:32 PM

5
Русский
Надевание губчатой ушной вставки
1. Наденьте конец черной трубки на загнутый конец
акустической трубки.
2. Плотно сожмите губчатую ушную вставку кончиками
пальцев вокруг центральной черной трубки.
Рис. 2: Снятие резинового вкладыша
3. Вставьте сжатую вставку в канал уха на глубину,
достаточную для удобного ношения. В течение
нескольких секунд после введения в ухо сжатая
губчатая вставка примет форму
ушного канала.
4. Чтобы еще больше снизить уровень шума,
замените резиновый вкладыш на поролоновый
вкладыш с шумоподавлением. Сожмите вставку
и вставьте ее в канал второго (свободного) уха на
глубину, достаточную для удобного ношения.
В течение нескольких секунд после введения
в ухо сжатая губчатая вставка примет форму
ушного канала.
EAR TIP
ELBOW
УШНАЯ ВСТАВКА
КОНЕЦ ТРУБКИ
MN002332A01.book Page 5 Wednesday, October 30, 2019 3:32 PM

6
Русский
MOTOROLA, MOTO, MOTOROLA SOLUTIONS и логотип в виде
стилизованной буквы M являются товарными знаками или
зарегистрированными товарными знаками Motorola Trademark
Holdings, LLC и используются по лицензии. Все прочие
товарные знаки являются собственностью соответственных
владельцев.
© 2015 и 2019 Motorola Solutions, Inc. Все права защищены.
MN002332A01.book Page 6 Wednesday, October 30, 2019 3:32 PM

MN002332A01.book Page 1 Wednesday, October 30, 2019 3:32 PM

m
*MN002332A01*
MN002332A01-AB
MN002332A01.book Page 2 Wednesday, October 30, 2019 3:32 PM
Transcripción de documentos
RECEIVE-ONLY EARPIECE PMLN7397 ACCESSORIES en-US de-DE fr-FR es-ES it-IT pt-PT nl-NL ru-RU MN002332A01.book Page 2 Wednesday, October 30, 2019 3:32 PM MN002332A01.book Page 1 Wednesday, October 30, 2019 3:32 PM Foreword Attention! These Earpieces, when attached to the radio, are restricted to occupational use only to satisfy FCC/ICNIRP RF energy exposure requirements. Before using this product, read the RF Energy Exposure and Product Safety Guide that ships with the radio which contains instructions for safe usage and RF energy awareness and control for compliance with applicable standards and regulation. Acoustic Safety Exposure to loud noises from any source for extended periods of time may temporarily or permanently affect your hearing. The louder the volume, the less time is required before your hearing could be affected. Hearing damage from loud noise is sometimes undetectable at first and can have a cumulative effect. To protect your hearing: • Use the lowest volume necessary to do your job. • Turn up the volume only if you are in noisy surroundings. • Turn down the volume before connecting headset or earpiece. • Limit the amount of time you use headsets or earpieces at high volume. • When using the radio without a headset or earpiece, do not place the radio’s speaker directly against your ear. 1 English RF Energy Exposure and Product Safety Guide for Portable Two-Way Radios MN002332A01.book Page 2 Wednesday, October 30, 2019 3:32 PM English • If you experience hearing discomfort, ringing in your ears, or speeches that are muffled, you should stop listening to your radio through your headset or earpiece, and have your hearing checked by your doctor. Description The PMLN7397 Earpiece comes with a 1 Cord Quick Disconnect adapter that allows the user to quickly disconnect the earpiece from the surveillance kit. This feature will enable multiple users to swap earpieces easily. This earpiece also consists of exchangeable rubber ear tip for low noise conditions and foam ear tube plug for extreme noise conditions. Operation Attaching the Accessory to the Radio 1. Turn the radio off. 2. Attach the kit connector to the radio, and secure the connector. 3. Turn the radio on and adjust the audio volume to a comfortable listening level. Receiving When the accessory is connected to the radio side connector, the radio’s speaker is muted, and the audio is only heard from the earpiece speaker. Removing the Accessory Turn the radio off before removing the accessory from the radio side connector. 2 MN002332A01.book Page 3 Wednesday, October 30, 2019 3:32 PM Disconnecting the Transparent Audio Tube QUICK DISCONNECT Figure 1: Disconnecting the audio tube Care and Maintenance Clean the accessory, especially the ear tube and ear tip by: • washing periodically with a mild liquid soap and rinsing with water. • wiping off each used part that touched the ear with a tissue. • keeping canal free and clear of wax. Important: For hygienic reasons, do not return any items once the package seal is broken. 3 English Rotate the Quick Disconnect about 90º and release it from the audio tube adapter. Refer to Figure 1. MN002332A01.book Page 4 Wednesday, October 30, 2019 3:32 PM English Service The following replacement parts and alternate configurations are available for the kits. Table 1: Replacement Parts/Options Part Description Quantity Part Number Quick disconnect acoustic tube 1 RLN6242_ Noise attenuating plugs 25 5080384F72 Ear tip, clear 25 5080370E97 Installation Removing the rubber ear tip Remove the rubber ear tip by pulling it out and away from the elbow. Refer to Figure 2. Attaching the foam ear tube plug 1. Slip the end of the black tube over the elbow. 2. Use your fingertips to squeeze the foam ear tube plug fairly tight around the center of the black tube. 4 MN002332A01.book Page 5 Wednesday, October 30, 2019 3:32 PM English EAR TIP ELBOW Figure 2: Removing the rubber ear tip 3. While the ear tube plug foam is compressed, insert it into your ear canal far enough to be worn comfortably. Within a few seconds after the ear tube insertion, the compressed foam will conform to the shape of your ear canal. 4. To further reduce the noise level, replace the ear tip to the noise attenuating foam earplug. While the foam earplug is compressed, insert it into the other (open) ear canal far enough to be worn comfortably. Within a few seconds after the earplug insertion, the compressed foam will conform to the shape of your ear canal. 5 English MN002332A01.book Page 6 Wednesday, October 30, 2019 3:32 PM MOTOROLA, MOTO, MOTOROLA SOLUTIONS and the Stylized M logo are trademarks or registered trademarks of Motorola Trademark Holdings, LLC and are used under license. All other trademarks are the property of their respective owners. © 2015 and 2019 Motorola Solutions, Inc. All rights reserved. 6 MN002332A01.book Page 1 Wednesday, October 30, 2019 3:32 PM Vorwort Handbuch zur HF-Energiestrahlung und Produktsicherheit für tragbare Funkgeräte Achtung! Schutz vor akustischer Belastung Längere Belastung durch laute Geräusche und Lärm jeder Art können das Gehör zeitweilig oder bleibend beeinträchtigen. Je höher der Lautstärkepegel des Funkgeräts, desto schneller kann es zu einer Schädigung Ihres Gehörs kommen. Durch Lärm verursachte Gehörschäden sind zunächst oft nicht feststellbar, können aber mit der Zeit durch kumulative Wirkung entstehen. Zum Schutz Ihres Gehörs wird Folgendes empfohlen: • Verwenden Sie stets den niedrigsten notwendigen Lautstärkepegel. • Erhöhen Sie die Lautstärke nur, wenn Sie sich in einer geräuschvollen Umgebung befinden. • Stellen Sie die Lautstärke niedrig ein, bevor Sie Kopfhörer bzw. Ohrhörer anschließen. • Begrenzen Sie, wie lange Sie Kopfhörer bzw. Ohrhörer jeweils mit hoher Lautstärke verwenden. 1 Deutsch Diese Ohrmuscheln sind nach dem Anschließen an das Funkgerät nur auf die berufliche Verwendung beschränkt, um die FCC/ICNIRP-Anforderungen für die HFEnergiebelastung zu erfüllen. Bevor Sie dieses Produkt verwenden, lesen Sie das Handbuch zur HFEnergiestrahlung und Produktsicherheit, das im Lieferumfang des Funkgeräts enthalten ist. Das Handbuch enthält Anweisungen für die sichere Verwendung sowie Informationen zum Gefahrenbewusstsein und zur Risikovermeidung gemäß anwendbaren Normen und Vorschriften. MN002332A01.book Page 2 Wednesday, October 30, 2019 3:32 PM • • Halten Sie den Lautsprecher Ihres Funkgeräts nicht direkt an Ihr Ohr, wenn Sie das Funkgerät ohne Kopfhörer bzw. Ohrhörer benutzen. Sollten bei Ihnen irgendwelche Hörbeschwerden auftreten, einschließlich Druck- oder Spannungsgefühl in den Ohren, Ohrenklingeln oder dumpfes Hörempfinden, sollten Sie Ihr Headset bzw. Ihren Kopfhörer nicht mehr benutzen und Ihr Gehör von einem Arzt untersuchen lassen. Deutsch Beschreibung Im Lieferumfang des Ohrhörers PMLN7397 ist ein Adapter mit Kabel-Schnelltrennung enthalten, der es dem Benutzer ermöglicht, den Ohrhörer schnell vom Überwachungsset zu trennen. Mithilfe dieser Funktion können Ohrhörer leicht zwischen mehreren Benutzern ausgetauscht werden. Der Ohrhörer verfügt außerdem über austauschbare Gummiohrstücke für niedrige Geräuschbelastung und Akustikschlauchstöpsel aus Schaumstoff für extreme Geräuschbelastung. Betrieb Anbringen des Zubehörs am Funkgerät 1. Schalten Sie das Funkgerät aus. 2. Befestigen Sie den Setanschluss am Funkgerät, und sichern Sie den Anschluss. 3. Schalten Sie das Funkgerät ein, und stellen Sie die Lautstärke auf einen angenehmen Pegel ein. Empfangen Wenn das Zubehör an den Seitenanschluss des Funkgeräts angeschlossen ist, werden die Lautsprecher des Funkgeräts stumm geschaltet, sodass die Audiosignale nur über die Ohrhörer-Lautsprecher wiedergegeben werden. 2 MN002332A01.book Page 3 Wednesday, October 30, 2019 3:32 PM Entfernen des Zubehörs Schalten Sie das Funkgerät vor dem Entfernen des Zubehörs vom Seitenanschluss des Funkgeräts aus. Entfernen des durchsichtigen Hörschlauchs Drehen Sie die Schnelltrennung um ca. 90 Grad, und entfernen Sie sie vom Hörschlauchadapter. Siehe Abbildung 1. Deutsch QUICK DISCONNECT SCHNELLTRENNUNG Abbildung 1: Trennen des Hörschlauchs Pflege und Wartung Halten Sie das Zubehör, insbesondere das Ohrröhrchen und den Ohreinsatz, wie folgt sauber: • regelmäßig mit einer milden Flüssigseife waschen und gut mit Wasser abspülen. • jedes mit dem Ohr in Berührung gekommene Teil mit einem Tuch abwischen. • Gehörkanal von Ohrenschmalz freihalten. Wichtigt: Aus hygienischen Gründen einmal ausgepackte Teile nicht zurücksenden. 3 MN002332A01.book Page 4 Wednesday, October 30, 2019 3:32 PM Service/Wartung Die folgenden Ersatzteile und Alternativkonfigurationen sind für die Sets verfügbar. Tabelle 1: Ersatzteile/Zubehör Deutsch Beschreibung des Ersatzteils Anzahl Teile-Nr. Hörschlauch mit Schnelltrennung 1 RLN6242_ Lärmdämpfeinsätze 25 5080384F72 Ohreinsatz, durchsichtig 25 5080370E97 Installation Entfernen des Gummiohrstück Entfernen Sie das Gummiohrstück, indem Sie es aus dem Winkel-Steckverbinder ziehen. Siehe Abbildung 2. Anbringen des röhrchenförmigen Schaumstoffeinsatzes 1. Schieben Sie das Ende des schwarzen Röhrchens über den Winkel-Steckverbinder. 2. Drücken Sie den Schaumstoffeinsatz zwischen Daumen und Zeigefinger um die Mitte des schwarzen Röhrchens fest zusammen. 4 MN002332A01.book Page 5 Wednesday, October 30, 2019 3:32 PM EINSATZ EAR TIP ELBOW WINKEL-STECKVERBINDER Deutsch Abbildung 2: Entfernen des Gummiohrstücks 3. Schieben Sie den zusammengedrückten Schaumstoffeinsatz in den äußeren Gehörgang, bis er gut sitzt und angenehm zu tragen ist. Einige Sekunden nach dem Einsetzen des Schaumstoffeinsatzes ins Ohr passt er sich der Form Ihres Gehörgangs an. 4. Verwenden Sie anstatt der Ohrstücke die geräuschdämmenden Ohrstöpsel aus Schaumstoff, um den Geräuschpegel noch weiter zu senken. Schieben Sie den zusammengedrückten Schaumstoffeinsatz in den anderen (offenen) Gehörgang, bis er gut sitzt und angenehm zu tragen ist. Einige Sekunden nach dem Einsetzen des Schaumstoffeinsatzes ins Ohr passt er sich der Form Ihres Gehörgangs an. 5 Deutsch MN002332A01.book Page 6 Wednesday, October 30, 2019 3:32 PM MOTOROLA, MOTO, MOTOROLA SOLUTIONS und das stilisierte M-Logo sind Marken oder eingetragene Marken der Motorola Trademark Holdings, LLC, ihre Benutzung ist lizenzpflichtig. Alle anderen Marken sind Eigentum ihrer jeweiligen Inhaber. © 2015 und 2019 Motorola Solutions, Inc. Alle Rechte vorbehalten. 6 MN002332A01.book Page 1 Wednesday, October 30, 2019 3:32 PM Avant-propos Sécurité des produits et exposition RF pour les radios professionnelles portatives Attention ! Lorsqu'elles sont connectées à la radio, ces oreillettes sont réservées à un usage professionnel pour des raisons de conformité avec la réglementation FCC/ICNIRP sur l’exposition aux fréquences radioélectriques. Avant d'utiliser ce produit, lisez le guide Sécurité des produits et exposition RF fourni avec la radio. Il contient des instructions de fonctionnement relatives à la sécurité et à l'exposition aux RF, ainsi que des informations sur le contrôle de conformité aux normes et réglementations applicables. Sécurité Acoustique 1 Français L’exposition à des niveaux sonores excessifs pendant de longues périodes peut, quelle que soit la source, temporairement ou définitivement provoquer une perte de la capacité auditive. Plus le volume de votre radio est élevé, plus rapidement la capacité auditive est affectée. De telles détériorations peuvent parfois rester imperceptibles et s’accumuler avant de devenir évidentes. Pour protéger votre capacité auditive : • Choisissez le volume sonore le plus bas nécessaire pour votre travail. • Augmentez uniquement le volume sonore lorsque l’environnement est bruyant. • Réduisez le volume sonore avant de brancher un casque / une oreillette sur votre radio. • Limitez la durée d’utilisation d’un casque / d’une oreillette si le niveau de volume est élevé. MN002332A01.book Page 2 Wednesday, October 30, 2019 3:32 PM • • Lorsque vous utilisez la radio sans casque / oreillette, ne placez pas le haut-parleur contre votre oreille. Si vous ressentez une gêne auditive, entendez des acouphènes tels que bourdonnement ou sifflement, si vous avez des difficultés à comprendre des paroles, vous devez cesser d’utiliser un casque / une oreillette et demander à un médecin d’examiner votre audition. Description Français L'oreillette PMLN7397 est accompagnée d'un raccord de déconnexion rapide à 1 câble qui permet à l'utilisateur de débrancher rapidement l'oreillette du kit de surveillance. Cette fonctionnalité permet à plusieurs utilisateurs de changer facilement d'oreillette. Cette oreillette comprend également un embout auriculaire en caoutchouc interchangeable pour une utilisation en conditions peu bruyantes et un bouchon intra-auriculaire en mousse pour les environnements très bruyants. Fonctionnement Connexion de l'accessoire à la radio 1. Éteignez la radio. 2. Branchez le connecteur du kit sur la radio et fixez le connecteur. 3. Allumez la radio et réglez le volume à un niveau d’écoute confortable. Réception Lorsque l'accessoire est branché au connecteur latéral de la radio, le haut-parleur de la radio est désactivé. Le son peut être uniquement entendu via l'oreillette. 2 MN002332A01.book Page 3 Wednesday, October 30, 2019 3:32 PM Retrait de l'accessoire Éteignez la radio avant de retirer l'accessoire du connecteur latéral de la radio. Déconnexion du tube acoustique transparent Faites pivoter de 90º l'élément de déconnexion rapide et sortez-le de l’adaptateur du tube. Voir Figure 1. Français QUICK DISCONNECT DÉCONNECTEUR RAPIDE Figure 1 : Débranchement du canal audio Entretien et Maintenance Pour nettoyer l’accessoire et en particulier le tube et son adaptateur : • Utilisez régulièrement un savon liquide doux et rincez avec de l’eau. • Essuyez avec un mouchoir en papier chaque partie qui est en contact avec l’oreille. • Vérifiez régulièrement que le canal auditif est propre et sans cérumen. 3 MN002332A01.book Page 4 Wednesday, October 30, 2019 3:32 PM Important : pour des raisons d’hygiène, veuillez ne pas renvoyer les produits dont le sceau d’emballage est rompu. Entretien Les pièces de rechange et configurations suivantes sont également disponibles pour les kits. Tableau 1 : Options / pièces de rechange Description Tube acoustique à déconnexion rapide Adaptateurs réducteurs de bruit Protège-oreillettes transparents Qté Référence 1 RLN6242_ 25 5080384F72 25 5080370E97 Français Installation Pour retirer le protège-oreillette en caoutchouc Retirez l'embout auriculaire en caoutchouc en tirant dessus pour l'extraire du coude. Reportez-vous à la Figure 2. Pour fixer l’adaptateur en mousse du tube acoustique 1. Engagez l’extrémité du tube noir sur le coude. 2. Du bout des doigts, comprimez assez fermement l’adaptateur en mousse du tube acoustique autour du centre du tube noir. 4 MN002332A01.book Page 5 Wednesday, October 30, 2019 3:32 PM PROTÈGE-OREILLETTE EAR TIP COUDE ELBOW Figure 2 : Retrait de l'embout auriculaire en caoutchouc 5 Français 3. Pendant que la mousse est comprimée, insérez-la dans votre canal auditif, assez profondément pour assurer un port stable et confortable. Après quelques secondes, la mousse se détend et prend la forme de votre canal auditif. 4. Pour réduire davantage le niveau de bruit, remplacez l'embout auriculaire par le bouchon d'atténuation du bruit en mousse. Pendant que la mousse est comprimée, insérez-le protège-oreillette dans l’autre canal auditif, assez profondément pour assurer un port stable et confortable. Après quelques secondes, la mousse se détend et prend la forme de votre canal auditif. Français MN002332A01.book Page 6 Wednesday, October 30, 2019 3:32 PM MOTOROLA, MOTO, MOTOROLA SOLUTIONS et le logo stylisé M sont des marques de commerce ou des marques déposées de Motorola Trademark Holdings, LLC et sont utilisées sous licence. Les droits des propriétaires de toutes les autres marques déposées mentionnées sont reconnus. © 2015 et 2019 Motorola Solutions, Inc. Tous droits réservés. 6 MN002332A01.book Page 1 Wednesday, October 30, 2019 3:32 PM Prólogo Guía de exposición a radiofrecuencia y seguridad del producto para radios bidireccionales portátiles Atención Estos auriculares, cuando se conectan a la radio, están limitados exclusivamente al uso profesional para cumplir con los requisitos de exposición a radiofrecuencia de FCC/ICNIRP. Antes de utilizar este producto, lea la Guía de exposición a radiofrecuencia y seguridad del producto para radios bidireccionales portátiles (incluida con la radio). En este documento encontrará información referente a un uso seguro de la energía de radiofrecuencia y al control del cumplimiento de los estándares y normativas correspondientes. Seguridad auditiva 1 Español La exposición a sonidos altos de cualquier tipo durante periodos prolongados puede afectar a su capacidad auditiva de forma temporal o permanente. Cuanto más alto esté el volumen del transceptor, menos tardarán en aparecer los problemas auditivos. Los daños en el aparato auditivo provocados por sonidos altos a veces no se pueden detectar al principio y pueden presentar un efecto acumulativo. Para proteger sus oídos: • Utilice el volumen más bajo con el que pueda realizar su trabajo. • Suba el volumen únicamente si está en entornos ruidosos. • Baje el volumen antes de conectar los auriculares. MN002332A01.book Page 2 Wednesday, October 30, 2019 3:32 PM • • • Limite la cantidad de tiempo de uso de los auriculares a un volumen elevado. Al utilizar la radio sin auriculares, no se ponga el altavoz directamente pegado a la oreja. Si nota molestias auditivas, un volumen más bajo en las conversaciones o le pitan los oídos, debería dejar de utilizar la radio con auriculares y acudir al médico para que le realice un examen auditivo. Descripción Los auriculares PMLN7397 incluyen un cable adaptador de desconexión rápida que permite al usuario desconectar rápidamente el auricular del kit de vigilancia. Esta función permite a varios usuarios intercambiar los auriculares con facilidad. Estos auriculares también constan de audífonos de goma intercambiables para usar con ruido reducido y tapones con tubo de espuma para entornos muy ruidosos. Funcionamiento Conexión del accesorio a la radio Español 1. Apague la radio. 2. Conecte el conector del kit a la radio y fíjelo. 3. Encienda el transceptor y ajuste el volumen del sonido al nivel de escucha deseado. Recepción Cuando el accesorio está conectado al conector lateral de la radio, el altavoz de la radio se silencia y el audio solo se oye a través del altavoz del auricular. 2 MN002332A01.book Page 3 Wednesday, October 30, 2019 3:32 PM Extracción del accesorio Apague la radio antes de desconectar el accesorio del conector lateral de la radio. Desconexión del tubo de audio transparente Gire el dispositivo de desconexión rápida aproximadamente 90º y libérelo del adaptador del tubo de audio. Consulte la Figura 1. QUICK DISCONNECT DESCONEXIÓN RÁPIDA Figura 1: Desconexión del tubo acústico Cuidado y mantenimiento 3 Español Limpie el accesorio; en especial, el tubo para el oído y el audífono. Para ello: • Lávelo periódicamente con un jabón líquido suave y aclárelo con agua. • Limpie cada una de las piezas en contacto con el oído con un paño. • Mantenga el canal libre y sin cera. MN002332A01.book Page 4 Wednesday, October 30, 2019 3:32 PM Importante: Por razones higiénicas, no se admitirá la devolución de ningún artículo si el envoltorio está abierto. Mantenimiento Las siguientes piezas de repuesto y configuraciones alternativas están disponibles para el kit. Tabla 1: Recambios/componentes opcionales Descripción de la pieza Tubo acústico de desconexión rápida Conexiones de atenuación del ruido Audífono claro Cantidad Número de referencia 1 RLN6242_ 25 5080384F72 25 5080370E97 Instalación Extracción del auricular de goma Para retirar el audífono de goma, extráigalo del codo. Consulte la Figura 2. Español Colocación del conector tubular de espuma 1. Deslice el extremo del tubo negro por el codo. 2. Utilice las yemas de los dedos para apretar el conector tubular de espuma alrededor del centro del tubo negro. 4 MN002332A01.book Page 5 Wednesday, October 30, 2019 3:32 PM AURICULAR EAR TIP ELBOW CODO Figura 2: Extracción del audífono de goma 5 Español 3. Cuando esté comprimido, introdúzcalo suficientemente lejos del canal auditivo para llevarlo cómodamente. Segundos después de insertar el tubo, la espuma se adaptará a la forma del canal auditivo. 4. Para reducir aún más el nivel de ruido, sustituya las almohadillas por auriculares de espuma para la atenuación de ruido. Cuando esté comprimido, introdúzcalo lo suficientemente lejos del otro canal auditivo (libre) para llevarlo cómodamente. Unos segundos después, la espuma comprimida se adaptará a la forma del canal auditivo. Español MN002332A01.book Page 6 Wednesday, October 30, 2019 3:32 PM MOTOROLA, MOTO, MOTOROLA SOLUTIONS y el logotipo de la M estilizada son marcas comerciales o marcas registradas de Motorola Trademark Holdings, LLC, y se utilizan con los permisos correspondientes. Las demás marcas comerciales son propiedad de sus respectivos titulares. © 2015 y 2019 Motorola Solutions, Inc. Todos los derechos 6 MN002332A01.book Page 1 Wednesday, October 30, 2019 3:32 PM Introduzione Italiano Guida sull'esposizione a sorgenti di energia RF e sulla sicurezza del prodotto per ricetrasmittenti portatili Attenzione! L'uso di questi auricolari, collegati alla radio, è limitato solo a scopi professionali al fine di soddisfare i requisiti di esposizione all'energia di radiofrequenza (RF) dell'FCC/ ICNIRP. Prima di utilizzare questo prodotto, leggere la Guida sull'esposizione a sorgenti di energia RF e sulla sicurezza del prodotto fornita con la radio, che contiene le istruzioni per un utilizzo sicuro e informazioni sull'energia RF e su come controllarla in conformità agli standard e le normative vigenti. Sicurezza acustica L’esposizione protratta al rumore ad alta intensità proveniente da qualsiasi fonte può compromettere temporaneamente o permanentemente l’udito. Più alto è il volume della radio, minore è il tempo che intercorre prima che si manifestino effetti sull'udito. Il danno all’udito causato da rumore ad alta intensità è, a volte, non rilevabile immediatamente e può avere un effetto cumulativo. Per proteggere l’udito: • Selezionare il volume più basso che consenta di svolgere il proprio lavoro. • Aumentare il volume solo in ambienti rumorosi. • Ridurre il volume prima di collegare cuffie o auricolari. • Limitare il tempo di utilizzo ad alto volume di cuffie ed auricolari. 1 MN002332A01.book Page 2 Wednesday, October 30, 2019 3:32 PM Italiano • • Se si utilizza la radio senza cuffia o auricolare, non appoggiare l'altoparlante della radio a contatto diretto con l’orecchio. Se si nota la comparsa di fastidio e ronzii auricolari o se il suono delle parole è smorzato, non utilizzare la radio con cuffie ed auricolari e rivolgersi al medico per controllare l’udito. Descrizione Gli auricolari di sorveglianza PMLN7397 sono dotati di un adattatore di sganciamento rapido a 1 cavo adattatore che consente all'utente di scollegare rapidamente gli auricolari dal kit di sorveglianza. Questa funzione consente a più utenti di sostituire facilmente gli auricolari. Questi auricolari includono anche punte in gomma intercambiabili per ridurre la rumorosità e tubi in gomma per rumori molto elevati. Funzionamento Collegamento dell'accessorio alla radio 1. Spegnere la radio. 2. Collegare il connettore del kit alla radio e fissarlo. 3. Accendere la radio e regolare il volume dell’audio al livello d’ascolto voluto. Ricezione Dopo aver collegato l'accessorio al connettore laterale della radio, l'altoparlante della radio sarà disattivato e l'audio in ricezione verrà instradato solo attraverso l'altoparlante dell'auricolare. 2 MN002332A01.book Page 3 Wednesday, October 30, 2019 3:32 PM Rimozione dell'accessorio Italiano Spegnere la radio prima di staccare l'accessorio dal connettore laterale della radio. Scollegamento del tubo auricolare trasparente Ruotare il dispositivo di scollegamento rapido di circa 90 gradi ed estrarlo dall'adattatore del tubo audio. Vedere la Figura 1. CONNETTORE A QUICK DISCONNECT SCOLLEGAMENTO RAPIDO Figura 1: Scollegamento del tubo audio Pulizia e manutenzione Pulire l’accessorio, in particolare il tubo acustico e il puntale • lavandolo regolarmente con sapone liquido delicato e sciacquandolo con acqua; • pulendo con una velina ogni parte che è venuta a contatto con l’orecchio; • tenendo il canale libero dal cerume. 3 MN002332A01.book Page 4 Wednesday, October 30, 2019 3:32 PM Italiano Importante: per motivi d'igiene, non restituire gli articoli dopo aver aperto la confezione sigillata. Manutenzione Le seguenti parti di ricambio e configurazioni alternative sono disponibili per i kit. Tabella 1: Parti di ricambio e opzioni Descrizione parte Quantità Codice parte Tubo acustico a scollegamento 1 RLN6242_ rapido Tappi per la riduzione del 25 5080384F72 rumore Puntale, trasparente 25 5080370E97 Installazione Rimozione del puntale di gomma Rimuovere l'auricolare in gomma tirandolo verso l'esterno lontano dalla struttura a gomito. Fare riferimento alla Figura 2. Montaggio del tubo acustico con tappo in schiuma 1. Far scivolare l’estremità del tubo auricolare nero sul gomito. 2. Stringere con le dita il tappo di schiuma, facendolo ben aderire attorno alla porzione centrale del tubo nero. 4 MN002332A01.book Page 5 Wednesday, October 30, 2019 3:32 PM Italiano PUNTALE EAR TIP GOMITO ELBOW Figura 2: Rimozione degli auricolari in gomma 3. Quando la schiuma è ancora compressa, inserire il tappo nel canale auricolare, facendolo penetrare fino a sentirlo confortevole. Entro pochi secondi dall'inserimento del tubo acustico, la schiuma compressa si espande, modellandosi al canale auricolare. 4. Per ridurre ulteriormente il livello di rumore, sostituire l'auricolare in gomma per l'attenuazione del rumore. Quando la schiuma è ancora compressa, inserire il tappo nel canale auricolare dell’altro orecchio, facendolo penetrare fino a sentirlo confortevole. Entro pochi secondi dall'inserimento del tubo acustico, la schiuma compressa si espande, modellandosi al canale auricolare. 5 Italiano MN002332A01.book Page 6 Wednesday, October 30, 2019 3:32 PM MOTOROLA, MOTO, MOTOROLA SOLUTIONS e la M stilizzata sono marchi commerciali o marchi registrati di Motorola Trademark Holdings, LLC e vengono utilizzati in concessione. Tutti gli altri prodotti o servizi appartengono ai rispettivi titolari. © 2015 e 2019 Motorola Solutions, Inc. Tutti i diritti riservati. 6 MN002332A01.book Page 1 Wednesday, October 30, 2019 3:32 PM Prefácio Guia de Segurança do Produto e de Exposição a Energia de RF para rádios bidirecionais Atenção! Segurança de Exposição ao Ruído A exposição a qualquer tipo de ruído alto por períodos prolongados pode afetar a sua audição temporária ou permanentemente. Quanto mais alto o volume do rádio, menor será o tempo necessário para que a sua audição fique afetada. Por vezes, as lesões auditivas provocadas por ruídos altos não são imediatamente detetadas e podem ter um efeito cumulativo. Para proteger a sua audição: • Use o volume mínimo necessário para desempenhar o seu trabalho. • Só deve aumentar o volume se estiver em ambientes ruidosos. • Diminua o volume antes de ligar um auscultador ou auricular. • Limite a quantidade de tempo de utilização de auscultadores ou auriculares com o volume alto. 1 Português Estes auriculares, quando ligados ao rádio, destinam-se somente ao uso ocupacional para atender aos requisitos de exposição à energia RF recomendados pela FCC/ ICNIRP. Antes de utilizar este produto, leia o Guia de Segurança do Produto e de Exposição a Energia de RF fornecido com o rádio, que contém instruções para uma utilização segura e para tomar conhecimento e controlar a sua exposição a energia de RF, a fim de respeitar as normas e os regulamentos aplicáveis. MN002332A01.book Page 2 Wednesday, October 30, 2019 3:32 PM • • Quando usar o rádio sem um auscultador ou auricular, não encoste o altifalante do rádio diretamente ao ouvido. Se sentir desconforto auditivo, zumbido nos ouvidos ou sons abafados, deve interromper a utilização do auscultador ou auricular e consultar o seu otorrinolaringologista. Português Descrição Os auriculares PMLN7397 incluem um adaptador de desengate rápido com 1 cabo, o qual permite ao utilizador desligar rapidamente o auricular do kit de vigilância. Esta funcionalidade permitirá que vários utilizadores troquem facilmente de auriculares. Este auricular inclui ainda uma extremidade do auricular em borracha descartável para condições de ruído reduzido e um tampão do tubo do auricular em espuma para condições de ruído elevado. Operação Ligação do acessório ao rádio 1. Desligue o rádio. 2. Ligue o conetor do kit ao rádio e fixe o conetor. 3. Ligue o rádio e regule o volume do áudio para um nível de audição confortável. Receção Quando o acessório estiver ligado ao conetor lateral do rádio, o altifalante do rádio está silencioso e o som é escutado apenas a partir dos altifalantes do auricular. 2 MN002332A01.book Page 3 Wednesday, October 30, 2019 3:32 PM Remoção do acessório Desligue o rádio antes de retirar o acessório do conetor lateral do rádio. Desligar o tubo de áudio transparente Rode a ligação de desengate rápido cerca de 90º e liberte-a do adaptador do tubo de áudio. Consulte a Figura 1. Português DESACOPLAMENTO QUICK DISCONNECT RÁPIDO Figure 1: Desligar o tubo de áudio Cuidados e Manutenção Limpe o acessório, especialmente o tubo acústico e o auscultador, assegurando os seguintes procedimentos: • lavar periodicamente com um sabão líquido suave e enxaguar com água; • limpar todas as peças usadas que estiveram em contacto com o ouvido com um pano; • manter o canal auditivo desobstruído e sem cera. 3 MN002332A01.book Page 4 Wednesday, October 30, 2019 3:32 PM Important: por motivos de higiene, não devolva nenhuma peça se a proteção da embalagem já tiver sido retirada. Assistência Português Encontram-se disponíveis, para os kits, as seguintes peças de substituição e configurações alternativas. Table 1: Peças Sobressalentes/Opções Descrição da Peça Qtd Referência Tubo acústico de desacoplamento 1 RLN6242_ rápido Auscultadores de atenuação de ruído 25 5080384F72 Auscultador, transparente 25 5080370E97 Instalação Remoção do auscultador de borracha Remova a extremidade do auricular em borracha puxando-a e separando-a da secção angular. Consulte a Figura 2. Ligação do auscultador de esponja de tubo acústico 1. Introduza a extremidade do tubo preto por fora do cotovelo. 2. Use as pontas dos dedos para apertar o auscultador de esponja de tubo acústico em torno do centro do tubo preto. 4 MN002332A01.book Page 5 Wednesday, October 30, 2019 3:32 PM AUSCULTADOR EAR TIP COTOVELO ELBOW Português Figure 2: Remover a extremidade do auricular em borracha 3. Enquanto a espuma do auscultador de tubo acústico está comprimida, insira-o no canal auditivo a uma profundidade suficiente para uma utilização confortável. Após alguns segundos depois da inserção do tubo acústico, a espuma comprimida adapta-se à forma do canal auditivo do utilizador. 4. Para reduzir mais o nível de ruído, substitua a extremidade do auricular por um tampão em espuma de atenuação de ruído. Enquanto o auscultador de espuma está comprimido, insira-o no outro canal auditivo (livre) a uma profundidade suficiente para uma utilização confortável. Após alguns segundos depois da inserção do auscultador, a espuma comprimida adapta-se à forma do canal auditivo do utilizador. 5 Português MN002332A01.book Page 6 Wednesday, October 30, 2019 3:32 PM MOTOROLA, MOTO, MOTOROLA SOLUTIONS e o logótipo M Estilizado são marcas comerciais ou marcas comerciais registadas da Motorola Trademark Holdings, LLC e são usadas mediante licença. As restantes marcas comerciais são propriedade dos respetivos proprietários. © 2015 e 2019 Motorola Solutions, Inc. Todos os direitos 6 MN002332A01.book Page 1 Wednesday, October 30, 2019 3:32 PM Voorwoord Blootstelling aan radiogolven en productveiligheid voor draagbare tweerichtingsradio's Let op! Wanneer deze oortelefoons op de portofoon zijn aangesloten, mogen deze alleen beroepsmatig worden gebruikt om te voldoen aan de FCC/ICNIRP RF-vereisten voor blootstelling aan radiogolven. Lees voordat u dit product gebruikt de gids Blootstelling aan radiogolven en productveiligheid die wordt meegeleverd met de portofoon. Deze bevat belangrijke bedieningsinstructies voor veilig gebruik, beperking van blootstelling aan radiogolven en naleving van de relevante normen en regelgeving. Bescherming van uw gehoor 1 Nederlands Langdurige blootstelling aan luid lawaai, ongeacht uit welke bron, kan het gehoor tijdelijk of permanent beschadigen. Hoe luider het volume van de portofoon, hoe sneller uw gehoor daar nadelige gevolgen aan kan ondervinden. Beschadiging van het gehoor wordt vaak niet meteen opgemerkt en kan een cumulatieve invloed hebben. Om uw gehoor te beschermen: • Gebruik het laagst mogelijke volume voor uw werkzaamheden. • Stel het volume alleen hoger in wanneer u zich in een rumoerige omgeving bevindt. • Stel het volume altijd lager in voordat u een hoofdtelefoon of oortelefoon aansluit. • Gebruik hoofdtelefoons en oortelefoons zo kort mogelijk op hoog volume. MN002332A01.book Page 2 Wednesday, October 30, 2019 3:32 PM • • Houd de luidspreker van de portofoon nooit direct tegen uw oor wanneer u de portofoon zonder hoofdtelefoon of oortelefoon gebruikt. Als het geluid onprettig klinkt, uw oren suizen of de spraak gedempt klinkt, staak het gebruik van de hoofdtelefoon of oortelefoon dan en laat uw gehoor door een arts onderzoeken. Nederlands Omschrijving De PMLN7397-oortelefoon wordt geleverd met een adapter met snelsluiting en één snoer waarmee de gebruiker de oortelefoon in een handomdraai van de bewakingskit kan verwijderen. Dankzij deze functie kunnen meerdere gebruikers eenvoudig van oortelefoon wisselen. Deze oortelefoon bevat ook verwisselbare rubberen oordopjes voor omstandigheden met weinig geluid en schuimrubberen oorbuisjes voor extreme geluidsomstandigheden. Bediening Het accessoire aan de portofoon bevestigen 1. Zet de portofoon uit. 2. Sluit de kitaansluiting aan op de portofoon en bevestig de connector. 3. Zet de portofoon aan en stel het volume op een comfortabele luistersterkte af. Ontvangen Als u het accessoire op de zijaansluiting van de portofoon hebt aangesloten, wordt de luidspreker van de portofoon uitgeschakeld en is audio alleen via de oortelefoonluidspreker te horen. 2 MN002332A01.book Page 3 Wednesday, October 30, 2019 3:32 PM Het accessoire verwijderen Schakel de portofoon uit voordat u het accessoire loskoppelt van de zijaansluiting van de portofoon. Het doorzichtige akoestische buisje loskoppelen Draai de snelsluiting ongeveer 90º en verwijder deze uit de audiobuisadapter. Zie Afbeelding 1. Nederlands QUICK DISCONNECT Afbeelding 1: De audiobuis losmaken Verzorging en onderhoud Reinig het accessoire, vooral het oordopje en het oorbuisje, als volgt: • regelmatig met een zachte vloeibare zeep wassen en grondig afspoelen. • elk deel dat in aanraking met het oor is gekomen, met een tissue afvegen. • de oorholte schoon en vrij van oorsmeer houden. 3 MN002332A01.book Page 4 Wednesday, October 30, 2019 3:32 PM Belangrijk: om hygiënische redenen nooit artikelen retourneren nadat de verzegeling van de verpakking is verbroken. Onderhoud Nederlands De volgende vervangende onderdelen en alternatieve configuraties zijn beschikbaar voor de kits. Tabel 1: Reserveonderdelen/Toebehoren Onderdeelnummer Omschrijving Aantal Quick Disconnect akoestisch buisje Lawaaidempende oordopjes Oordopje, doorzichtig 1 RLN6242_ 25 25 5080384F72 5080370E97 Installatie Het rubberen oordopje verwijderen Verwijder het rubberen oordopje door het uit de bochtpijp te trekken. Zie Afbeelding 2. Het schuimrubber oorbuisje bevestigen 1. Schuif het uiteinde van het zwarte buisje over de elleboog. 2. Knijp het schuimrubber oorbuisje met uw vingertoppen samen en breng het tamelijk strak om het midden van het zwarte buisje aan. 4 MN002332A01.book Page 5 Wednesday, October 30, 2019 3:32 PM OORDOPJE EAR TIP ELLEBOOG ELBOW Afbeelding 2: Het rubberen oordopje verwijderen 5 Nederlands 3. Steek het oorbuisje in de oorholte terwijl het schuimrubber nog is samengeknepen. Steek het er ver genoeg in, zodat het comfortabel past. Een paar seconden nadat u het oorbuisje in uw oor hebt gestoken, vormt het samengeperste schuimrubber zich naar uw oorholte. 4. Als u het geluidsniveau verder wilt beperken, vervangt u de oordopjes met de geluiddempende schuimrubberen oordopjes. Steek het oordopje in de andere (open) oorholte terwijl het schuimrubber nog is samengeknepen. Steek het er ver genoeg in, zodat het comfortabel past. Een paar seconden nadat u het oordopje in uw oor hebt gestoken, vormt het samengeperste schuimrubber zich naar uw oorholte. Nederlands MN002332A01.book Page 6 Wednesday, October 30, 2019 3:32 PM MOTOROLA, MOTO, MOTOROLA SOLUTIONS en het gestileerde M logo zijn handelsmerken of gedeponeerde handelsmerken van Motorola Trademark Holdings, LLC en worden onder licentie gebruikt. Alle andere handelsmerken zijn het eigendom van hun respectieve eigenaars. © 2015 en 2019 Motorola Solutions, Inc. Alle rechten 6 MN002332A01.book Page 1 Wednesday, October 30, 2019 3:32 PM Предисловие Сведения о безопасности и воздействии излучаемой радиочастотной энергии для портативных приемопередающих радиостанций Внимание! При подключении к радиостанции эти наушники предназначены для профессиональной эксплуатации. Только при этом условии будет обеспечено выполнение требований FCC/ICNIRP в отношении воздействия излучаемых радиоволн. Перед использованием этого продукта ознакомьтесь с прилагаемым к радиостанции буклетом "Сведения о безопасности и воздействии излучаемой радиочастотной энергии", в котором содержатся инструкции по технике безопасности и информация по воздействию радиочастотной энергии, а также сведения о соответствии применимым стандартам и нормативам. Акустическая безопасность 1 Русский Длительное воздействие громкого звука из любого источника может привести к временному или постоянному нарушению слуха. Чем больше громкость радиостанции, тем быстрее может пострадать слух. Поначалу нарушение слуха в результате воздействия громкого звука может быть незаметным, но оно обладает кумулятивным эффектом. Чтобы защитить свой слух: • Устанавливайте минимальную громкость звука, необходимую для работы. MN002332A01.book Page 2 Wednesday, October 30, 2019 3:32 PM • • • • • Увеличивайте громкость, только когда находитесь в шумной обстановке. Уменьшайте громкость звука перед тем, как подключать гарнитуру или ушной вкладыш. Ограничивайте продолжительность использования гарнитур и ушных вкладышей с большой громкостью звука. Применяя радиостанцию без гарнитуры или ушного вкладыша, не прикладывайте динамик радиостанции к уху. Если испытываете дискомфорт, звон в ушах, слышите речь приглушенно, вы должны прекратить слушать радиостанцию через гарнитуру или ушной вкладыш и обратиться к врачу, чтобы проверить слух. Описание Русский В комплект наушника PMLN7397 входит 1 проводной адаптер для разъема быстрого отключения. С его помощью можно быстро отключить наушник от комплекта для скрытого использования. Данная функция позволит нескольким пользователям легко заменять наушники. В комплект наушника также входит сменный резиновый вкладыш для низкого уровня шума и поролоновый вкладыш для чрезвычайно высокого уровня шума. Эксплуатация Подключение аксессуара к радиостанции 1. Выключите радиостанцию. 2. Подключите разъем комплекта к радиостанции и зафиксируйте его. 2 MN002332A01.book Page 3 Wednesday, October 30, 2019 3:32 PM 3. Включите радиостанцию и отрегулируйте громкость. Прием При подключении аксессуара к боковому разъему радиостанции динамик радиостанции отключается, и звук передается только на динамик наушника. Отключение аксессуара от радиостанции Выключите радиостанцию, прежде чем отсоединить аксессуар от бокового разъема. Отсоединение прозрачной акустической трубки Поверните разъем быстрого отключения на 90º и выньте его из адаптера акустической трубки. См. Рис. 1. Русский БЫСТРОЕ QUICK DISCONNECT ОТКЛЮЧЕНИЕ Рис. 1: Отключение акустической трубки 3 MN002332A01.book Page 4 Wednesday, October 30, 2019 3:32 PM УХОД Аксессуар, особенно ушные вставки, следует содержать в чистоте. Для этого: • периодически мойте аксессуар водой с мягким жидким мылом; • после контакта с ухом вытирайте соответствующие части мягкой тканью или салфеткой; • не допускайте накопления серы в ушном канале. Внимание! По гигиеническим соображениям после распечатывания упаковки изделия возврату не подлежат. Сервисное обслуживание Для комплектов доступны следующие сменные детали и альтернативные конфигурации. Таблица 1: Сменные/дополнительные части Описание изделия Русский Быстроотсоединяемая акустическая трубка Шумозащитные вставки Прозрачные ушные вставки Кол-во Номер по каталогу 1 RLN6242_ 25 25 5080384F72 5080370E97 Другие действия Снятие резиновой ушной вставки Потяните за вкладыш и снимите его с углового элемента. См. Рис. 2. 4 MN002332A01.book Page 5 Wednesday, October 30, 2019 3:32 PM Надевание губчатой ушной вставки 1. Наденьте конец черной трубки на загнутый конец акустической трубки. 2. Плотно сожмите губчатую ушную вставку кончиками пальцев вокруг центральной черной трубки. УШНАЯ ВСТАВКА EAR TIP ELBOW КОНЕЦ ТРУБКИ Рис. 2: Снятие резинового вкладыша Русский 3. Вставьте сжатую вставку в канал уха на глубину, достаточную для удобного ношения. В течение нескольких секунд после введения в ухо сжатая губчатая вставка примет форму ушного канала. 4. Чтобы еще больше снизить уровень шума, замените резиновый вкладыш на поролоновый вкладыш с шумоподавлением. Сожмите вставку и вставьте ее в канал второго (свободного) уха на глубину, достаточную для удобного ношения. В течение нескольких секунд после введения в ухо сжатая губчатая вставка примет форму ушного канала. 5 Русский MN002332A01.book Page 6 Wednesday, October 30, 2019 3:32 PM MOTOROLA, MOTO, MOTOROLA SOLUTIONS и логотип в виде стилизованной буквы M являются товарными знаками или зарегистрированными товарными знаками Motorola Trademark Holdings, LLC и используются по лицензии. Все прочие товарные знаки являются собственностью соответственных владельцев. © 2015 и 2019 Motorola Solutions, Inc. Все права защищены. 6 MN002332A01.book Page 1 Wednesday, October 30, 2019 3:32 PM MN002332A01.book Page 2 Wednesday, October 30, 2019 3:32 PM m *MN002332A01* MN002332A01-AB-
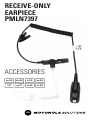 1
1
-
 2
2
-
 3
3
-
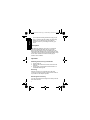 4
4
-
 5
5
-
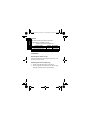 6
6
-
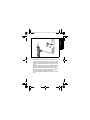 7
7
-
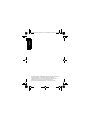 8
8
-
 9
9
-
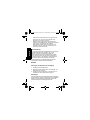 10
10
-
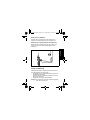 11
11
-
 12
12
-
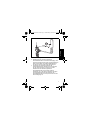 13
13
-
 14
14
-
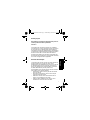 15
15
-
 16
16
-
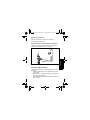 17
17
-
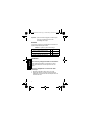 18
18
-
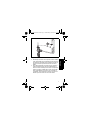 19
19
-
 20
20
-
 21
21
-
 22
22
-
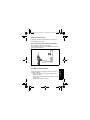 23
23
-
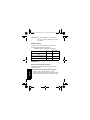 24
24
-
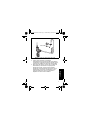 25
25
-
 26
26
-
 27
27
-
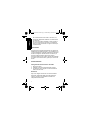 28
28
-
 29
29
-
 30
30
-
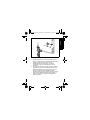 31
31
-
 32
32
-
 33
33
-
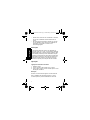 34
34
-
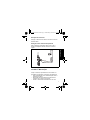 35
35
-
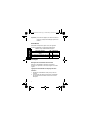 36
36
-
 37
37
-
 38
38
-
 39
39
-
 40
40
-
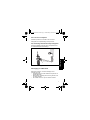 41
41
-
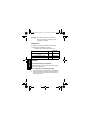 42
42
-
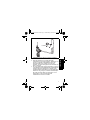 43
43
-
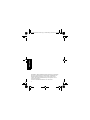 44
44
-
 45
45
-
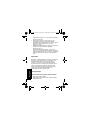 46
46
-
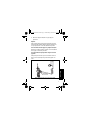 47
47
-
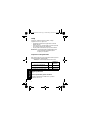 48
48
-
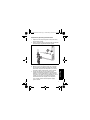 49
49
-
 50
50
-
 51
51
-
 52
52


en otros idiomas
- français: Motorola PMLN7397 Manuel utilisateur
- italiano: Motorola PMLN7397 Manuale utente
- English: Motorola PMLN7397 User manual
- Deutsch: Motorola PMLN7397 Benutzerhandbuch
- русский: Motorola PMLN7397 Руководство пользователя
- Nederlands: Motorola PMLN7397 Handleiding
- português: Motorola PMLN7397 Manual do usuário
Artículos relacionados
-
Motorola PMLN6533 Manual de usuario
-
-
-
-
-
-
-
Motorola CP180 Basic User's Manual
-
-