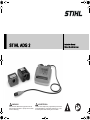
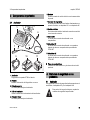
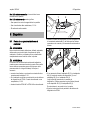
El STIHL ADG 2 es un analizador que sirve para diagnosticar productos a batería STIHL. Con este dispositivo podrás revisar el estado de funcionamiento de tus herramientas y prevenir posibles fallos. El analizador es compatible con todos los productos a batería STIHL y es muy fácil de usar. Solo tienes que conectar el analizador al producto y seguir las instrucciones que aparecen en su pantalla. El STIHL ADG 2 te indicará si el producto funciona correctamente o si necesita reparación. De esta forma, podrás ahorrar tiempo y dinero en reparaciones innecesarias.
El STIHL ADG 2 es un analizador que sirve para diagnosticar productos a batería STIHL. Con este dispositivo podrás revisar el estado de funcionamiento de tus herramientas y prevenir posibles fallos. El analizador es compatible con todos los productos a batería STIHL y es muy fácil de usar. Solo tienes que conectar el analizador al producto y seguir las instrucciones que aparecen en su pantalla. El STIHL ADG 2 te indicará si el producto funciona correctamente o si necesita reparación. De esta forma, podrás ahorrar tiempo y dinero en reparaciones innecesarias.


-
 1
1
-
 2
2
-
 3
3
-
 4
4
-
 5
5
-
 6
6
-
 7
7
-
 8
8
-
 9
9
-
 10
10
-
 11
11
-
 12
12
-
 13
13
-
 14
14
-
 15
15
-
 16
16
-
 17
17
-
 18
18
-
 19
19
-
 20
20
-
 21
21
-
 22
22
-
 23
23
-
 24
24


El STIHL ADG 2 es un analizador que sirve para diagnosticar productos a batería STIHL. Con este dispositivo podrás revisar el estado de funcionamiento de tus herramientas y prevenir posibles fallos. El analizador es compatible con todos los productos a batería STIHL y es muy fácil de usar. Solo tienes que conectar el analizador al producto y seguir las instrucciones que aparecen en su pantalla. El STIHL ADG 2 te indicará si el producto funciona correctamente o si necesita reparación. De esta forma, podrás ahorrar tiempo y dinero en reparaciones innecesarias.
en otros idiomas
- English: STIHL ADG 2 User manual
Artículos relacionados
-
STIHL ADG 2 El manual del propietario
-
STIHL ADG 1 Manual de usuario
-
STIHL connected Box, connected mobile Box Manual de usuario
-
-
-
STIHL BGA 86 Manual de usuario
-
STIHL BGA 200 Manual de usuario
-
-
-
STIHL AR 3000 L Manual de usuario