STIHL connected Box, connected mobile Box Manual de usuario
- Tipo
- Manual de usuario

STIHL connected Hub,
STIHL connected mobile Hub
Instruction Manual
Manual de instrucciones
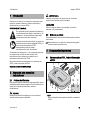
WARNING
Read Instruction Manual thoroughly before use and
follow all safety precautions – improper use can cause
serious or fatal injury.
ADVERTENCIA
Antes de usar la máquina lea y siga todas las precauciones
de seguridad dadas en el manual de instrucciones – el uso
incorrecto puede causar lesiones graves o mortales.


Original Instruction ManualPrinted on chlorine-free paper
Printing inks contain vegetable oils, paper can be recycled.
© ANDREAS STIHL AG & Co. KG 2021
0458-199-8621-A. VA2.C21.
0000009281_002_GB
0458-199-8621-A
English
1
This instruction manual is protected by copyright. All rights reserved, especially the rights to reproduce, translate and process
with electronic systems.
Contents
1 Introduction
. . . . . . . . . . . . . . . . . . . . . . . . . . . . . . . . . . . . . . . . .
2
2 Guide to Using this Manual
. . . . . . . . . . . . . . . . . . . . . . . . . .
2
2.1 Signal Words
. . . . . . . . . . . . . . . . . . . . . . . . . . . . . . . . . . . . . . . .
2
2.2 Symbols in Text
. . . . . . . . . . . . . . . . . . . . . . . . . . . . . . . . . . . . .
2
3 Main Parts
. . . . . . . . . . . . . . . . . . . . . . . . . . . . . . . . . . . . . . . . . .
2
3.1 STIHL connected Hub, STIHL connected mobile
Hub
. . . . . . . . . . . . . . . . . . . . . . . . . . . . . . . . . . . . . . . . . . . . . . . . .
2
3.2 STIHL connected Hub Status
. . . . . . . . . . . . . . . . . . . . . . . .
3
4 IMPORTANT SAFETY INSTRUCTIONS
. . . . . . . . . . . . .
4
4.1 Intended Use
. . . . . . . . . . . . . . . . . . . . . . . . . . . . . . . . . . . . . . . .
4
4.2 STIHL connected Hub
. . . . . . . . . . . . . . . . . . . . . . . . . . . . . . .
4
5 Maintenance, Repair and Storage
. . . . . . . . . . . . . . . . . . .
5
5.1 Warnings and Instructions
. . . . . . . . . . . . . . . . . . . . . . . . . . .
5
6 Setting up the STIHL connected Hub
. . . . . . . . . . . . . . . .
6
6.1 Preparing the STIHL connected Hub for
Operation
. . . . . . . . . . . . . . . . . . . . . . . . . . . . . . . . . . . . . . . . . . .
6
6.2 Setting up the STIHL connected Hub
. . . . . . . . . . . . . . . .
6
6.3 Changing the Settings
. . . . . . . . . . . . . . . . . . . . . . . . . . . . . . .
7
6.4 Mounting the STIHL connected Hub
. . . . . . . . . . . . . . . . .
7
7 Troubleshooting Guide
. . . . . . . . . . . . . . . . . . . . . . . . . . . . . .
8
7.1 Resetting the STIHL connected Hub
. . . . . . . . . . . . . . . . .
8
8 Specifications
. . . . . . . . . . . . . . . . . . . . . . . . . . . . . . . . . . . . . . .
8
8.1 STIHL connected Hub, STIHL connected mobile
Hub
. . . . . . . . . . . . . . . . . . . . . . . . . . . . . . . . . . . . . . . . . . . . . . . . .
8
8.2 Power Supply
. . . . . . . . . . . . . . . . . . . . . . . . . . . . . . . . . . . . . . .
9
8.3 Symbols on the STIHL connected Hub
. . . . . . . . . . . . . .
9
8.4 Engineering Improvements
. . . . . . . . . . . . . . . . . . . . . . . . . .
9
8.5 FCC 15 Compliance Statement
. . . . . . . . . . . . . . . . . . . . . .
9
9 Replacement Parts and Equipment
. . . . . . . . . . . . . . . . .
10
9.1 Genuine STIHL Replacement Parts
. . . . . . . . . . . . . . . . .
10
10 Disposal
. . . . . . . . . . . . . . . . . . . . . . . . . . . . . . . . . . . . . . . . . . .
10
10.1 Disposal of the STIHL connected Hub
. . . . . . . . . . . . . .
10
11 Limited Warranty
. . . . . . . . . . . . . . . . . . . . . . . . . . . . . . . . . . .
10
11.1 STIHL Incorporated Limited Warranty Policy
. . . . . . .
10
12 Trademarks
. . . . . . . . . . . . . . . . . . . . . . . . . . . . . . . . . . . . . . . .
10
12.1 Registered Trademarks
. . . . . . . . . . . . . . . . . . . . . . . . . . . .
10
12.2 Common Law Trademarks
. . . . . . . . . . . . . . . . . . . . . . . . .
11
13 Addresses
. . . . . . . . . . . . . . . . . . . . . . . . . . . . . . . . . . . . . . . . .
11
13.1 STIHL Incorporated
. . . . . . . . . . . . . . . . . . . . . . . . . . . . . . . .
11

0458-199-8621-A
2
English
1 Introduction
Thank you for your purchase. The information contained in
this manual will help you receive maximum performance and
satisfaction from your STIHL product.
SAVE THIS MANUAL!
For further information, or if you do not understand any of
the instructions in this manual, please go to
www.stihlusa.com or contact your authorized STIHL
servicing dealer.
Additional assistance can be found on the STIHL connected
App and inside the STIHL connected Portal.
SAVE THESE INSTRUCTIONS!
2.1 Signal Words
This manual contains safety information that requires your
special attention. Such information is introduced with the
following symbols and signal words:
DANGER
Indicates a hazardous situation that, if not avoided, will
result in death or serious injury.
WARNING
Indicates a hazardous situation that, if not avoided, could
result in death or serious injury.
NOTICE
Indicates a risk of property damage, including damage to the
unit or its individual components.
2.2 Symbols in Text
The following symbol is included to assist you with the use
of the manual:
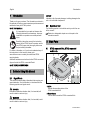
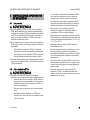
3.1 STIHL connected Hub, STIHL connected
mobile Hub
1LEDs
Indicate the operating status of the
STIHL connected Hub.
2 Reset-Button
Can be used to reset the STIHL connected Hub.
1Introduction
It is important that you read and observe the
following information and warnings. Improper
installation or operation can cause personal
injury.
Read this instruction manual, the instruction
manual of the STIHL Smart Connector and for
your STIHL power tool thoroughly before use
and periodically thereafter.
2 Guide to Using this Manual
Refers to a designated chapter or sub-chapter in this
instruction manual.
3 Main Parts
XXXXXXXXXX
2
6
8
5
3
4
10
SSID:
PW:
11
12
9
#
1
7
scb.01C8
wIZAOYzB
0000098824_001

0458-199-8621-A
3
English
3 Main Parts
3 Socket
Socket for connecting the power supply to the
STIHL connected Hub.
4LAN Port
Port for connecting an Ethernet cable to the
STIHL connected Hub.
5 USB Port
The USB port is currently deactivated and offers options
for future add-ons.
6 Slot for SIM Card
Slot for inserting a SIM card. Only usable with the
STIHL connected mobile Hub.
7 Power Supply Cord
Connects the power supply to the STIHL connected
Hub's socket.
8 Power Plug Adapter
Electrical contacts of the power supply.
9 Power Supply
Connects the power supply cord to an electrical outlet.
10 Serial Number
Serial number of the STIHL connected Hub.
11 QR-Code
Code for scanning. Contains the access data for the
access point created by the STIHL connected Hub.
12 Access Data for Access Point
Name of the access point (SSID) and password (PW).
# Rating Plate
Contains electrical information, the product's serial
number and wireless network access data.
3.2 STIHL connected Hub Status
LEDs show the status of the STIHL connected Hub.
Operating Status
Connection Status
Update
– LED flashes white: the STIHL connected Hub
is starting up.
– LED glows white: the STIHL connected Hub is
ready for setup.
– LED glows green: the STIHL connected Hub
has been set up and is ready for use.
– LED glows red: there is a malfunction.
– LED flashes red: the STIHL connected Hub is
resetting.
– LED glows white: the access point is active.
The STIHL connected Hub is ready for setup.
– LED glows yellow: the STIHL connected Hub
is connected with the Internet. But there is no
connection to the STIHL Cloud.
– LED glows red: connection with the Internet
cannot be established.
– LED glows green: the STIHL connected Hub
is connected with the Internet and with the
STIHL Cloud.
– LED flashes green: ongoing data transfer for
an update of the STIHL connected Hub or the
connected STIHL products.

0458-199-8621-A
4
English
4 IMPORTANT SAFETY INSTRUCTIONS
4.1 Intended Use
WARNING
■ The STIHL connected Hub and STIHL connected mobile
Hub are designed to automatically collect STIHL
connected data from compatible STIHL products using
Bluetooth
®
technology. The data is uploaded to the STIHL
connected Portal over the user's Internet connection.
■ Improper or unauthorized use of the STIHL connected
Hub could result in personal injury or property damage.
– Use the STIHL connected Hub and power supply
only as described in this manual.
– Never use a STIHL connected Hub that has been
modified or altered from its original design.
■ The power supply is designed for use with the STIHL
connected Hub and STIHL connected mobile Hub only.
4.2 STIHL connected Hub
WARNING
■ To reduce the risk of fire, electric shock and other
personal injury or property damage:
– Before using the STIHL connected Hub, read this
instruction manual and all instructions and warnings
on the STIHL connected Hub and power supply.
– For use only indoors or in an enclosed, dry area.
– Keep the STIHL connected Hub dry. Protect it from
rain, water, liquids and damp conditions.
– If mounting or operating the STIHL connected Hub in
a vehicle, ensure that the area is enclosed, dry and
free of combustible vapors.
– Do not handle the STIHL connected Hub, including
power supply and power supply cord, with wet
hands.
– Never use a damaged STIHL connected Hub, power
supply or power supply cord.
– Operate the STIHL connected Hub only indoors, in
dry rooms and within an ambient temperature range
of - 4 °F to 140 °F (- 20 °C to + 60 °C).
– Keep the STIHL connected Hub out of the reach of
children.
– Always plug the power supply into a properly
installed electrical outlet / power source matching
the voltage and electrical frequency stated on the
power supply.
– Do not operate a STIHL connected Hub or power
supply that has received a sharp or heavy blow, has
been dropped or is otherwise damaged in any way.
– Do not attempt to repair, open or disassemble the
STIHL connected Hub or power supply. There are no
user-serviceable parts inside.
■ If the wrong power supply is used, the STIHL connected
Hub may be destroyed by overvoltage.
– Use only the original power supply included with the
STIHL connected Hub, or an identical replacement
authorized by STIHL.
■ To reduce the risk of electric shock or fire from a short
circuit:
– Never bridge the contacts with wires or other
metallic objects.
– Do not insert any objects into the STIHL connected
Hub’s cooling slots or other openings.
4 IMPORTANT SAFETY
INSTRUCTIONS

0458-199-8621-A
5
English
5 Maintenance, Repair and Storage
■ The STIHL connected Hub heats up during operation. To
reduce the risk of fire:
– Do not cover it.
■ The STIHL connected Hub can produce sparks which may
ignite combustible gases, liquids, vapors, dusts or other
combustible materials. To reduce the risk of fire and
explosion:
– Do not operate in a location where combustible
gases, liquids, vapors, dusts or other combustible
materials are present.
■ Using a damaged power supply cord or plug may result in
fire, electric shock and other personal injury or property
damage. To reduce these risks:
– Check the STIHL connected Hub’s power supply
cord and power supply regularly for damage. If
damaged, immediately disconnect the plug from the
electrical outlet.
– Never jerk the power supply cord to disconnect it
from the electrical outlet. To unplug, grasp the plug,
not the power supply cord.
– Do not use the power supply cord for carrying or
hanging up the STIHL connected Hub.
– Make sure the power supply cord is located or
marked so that it will not be stepped on, tripped over,
come in contact with sharp objects or moving parts,
or otherwise be subjected to damage or stress.
■ To reduce the risk of electric shock and other personal
injury or property damage when mounting the STIHL
connected Hub:
– Ensure that no electrical cables, pipes or other
service lines run behind the wall where the STIHL
connected Hub is to be mounted.
– Mount the STIHL connected Hub only as described
in this manual.
– If the STIHL connected Hub is mounted in a vehicle,
observe the mounting guidelines of the vehicle
manufacturer.
5.1 Warnings and Instructions
WARNING
■ There are no user-authorized repairs for the STIHL
connected Hub. To reduce the risk of fire, electric shock or
other personal injury and property damage:
– Do not attempt to repair, open or disassemble the
STIHL connected Hub. There are no user-
serviceable parts inside.
– Keep the STIHL connected Hub free of foreign
matter.
– Clean the STIHL connected Hub's polymer
components with a dry cloth or soft, dry brush. Do
not use detergents or solvents. They may damage
the polymer components.
– Never spray with a pressure washer or otherwise
spray with water or other liquids.
■ To reduce the risk of electric shock:
– Unplug the power supply from the electrical outlet
before inspecting, cleaning or storing the STIHL
connected Hub.
– Regularly check the STIHL connected Hub and
ensure that the insulation of the power supply cord
and plug are in good condition and show no signs of
aging (brittleness), wear or damage.
– Replace the power supply cord or plug when it is
damaged.
5 Maintenance, Repair and Storage

0458-199-8621-A
6
English
6 Setting up the STIHL connected Hub
6.1 Preparing the STIHL connected Hub for
Operation
The STIHL connected Hub connects to the Internet over
your LAN, wireless network, or cellular data plan
1
(STIHL
connected mobile Hub).
Network-related requirements:
– Static IP addresses are not supported. IP addresses must
be assigned dynamically by the router.
– Wireless network connections must be password
protected. Open networks are not supported.
– SIM cards (for the STIHL connected mobile Hub) must be
password protected.
Before setting up the STIHL connected Hub, the user must
be registered in the STIHL connected Portal and have the
personal access data and serial number from the rating plate
of the STIHL connected Hub.
6.2 Setting up the STIHL connected Hub
Before you can use the STIHL connected Hub, it must be
properly configured.
This symbol refers to the illustrations inside the
packaging.
Preparing the STIHL connected Hub 1
► If you wish to use mobile Internet access (only available
with the STIHL connected mobile Hub): Insert a SIM card
in the designated sim card slot.
► If you wish to use your LAN to access the Internet:
Connect an Ethernet cable from the network to the LAN
socket.
Connecting the STIHL connected Hub to the power
supply 2
► Connect the power supply cord and power plug adapter to
the power supply. Ensure the power plug adapter matches
your local electrical outlet.
► Plug the power supply cord into the socket of the STIHL
connected Hub.
► Insert the power supply / power plug adapter into a
properly installed electrical outlet.
The "Operating Status" LED will initially flash white while
the STIHL connected Hub prepares the access point. As
soon as the "Operating Status" and "Connection Status"
LEDs both glow white, the STIHL connected Hub is ready
for setup.
Connecting to the access point of the STIHL
connected Hub 3
► Scan the QR-Code on the STIHL connected Hub rating
plate with a smartphone.
The connection to the STIHL connected Hub will be
established automatically.
► Alternatively, connect manually to the STIHL connected
Hub using the access data on the rating plate.
► If the configuration page does not open automatically
inside the Internet browser: Navigate to the configuration
page http://stihl.connectedbox:80 in your browser.
Setting up Internet access via the configuration page 4
► Follow the instructions on the configuration page to set up
Internet access.
As soon as the STIHL connected Hub connects to the
Internet, the system checks for software updates and the
STIHL connected Hub will restart.
Reconnect to the STIHL connected Hub 5
As soon as the "Operating Status" and "Connection Status"
LEDs glow white again:
► Scan the QR-Code again.
► Alternatively, connect manually to the STIHL connected
Hub using the access data on the rating plate.
6 Setting up the STIHL connected Hub
1
The STIHL connected mobile Hub requires a permanent connection
to the Internet while it is running, resulting in the continuous
transmission of data. Check with your cellular data provider for data
pricing and availability.

0458-199-8621-A
7
English
6 Setting up the STIHL connected Hub
► If the configuration page does not open automatically
inside the Internet browser: Navigate to the configuration
page http://stihl.connectedbox:80 in your browser.
Enter the STIHL connected user account 6
► Follow the instructions on the configuration page to enter
the STIHL connected user account.
► Finish the setup of the STIHL connected Hub.
The configuration of the STIHL connected Hub is finished
as soon as the "Operating Status" and "Connection
Status" LEDs glow green.
Adding the STIHL connected Hub to the STIHL connected
Portal 7
► Navigate to the STIHL connected Portal at
https://connect.stihl.com, log in with your personal access
data and add the STIHL connected Hub.
6.3 Changing the Settings
The configuration of the STIHL connected Hub can be
changed after the initial setup. It's possible to change the
wireless network or Internet access settings, for example.
► Press the reset button.
As soon as the "Operating Status" and "Connection
Status" LEDs glow white, the STIHL connected Hub is
ready for setup.
► Scan the QR-Code on the rating plate with a smartphone.
The connection to the STIHL connected Hub will be
established automatically.
► Alternatively, connect manually to the STIHL connected
Hub using the access data on the rating plate.
► If the configuration page does not open automatically
inside the Internet browser: Navigate to the configuration
page http://stihl.connectedbox:80 in your browser.
► Adjust the settings and confirm the desired changes to
complete.
The STIHL connected Hub will return to operating mode.
6.4 Mounting the STIHL connected Hub
Mounting the STIHL connected Hub to a wall
WARNING
To reduce the risk of electric shock and other personal injury
or property damage when mounting the STIHL connected
Hub, ensure that no electrical cables, pipes or other service
lines run behind the wall where the STIHL connected Hub is
to be mounted, @ 4.
WARNING
To reduce the risk of eye injury, always wear close-fitting
protective eyewear when mounting the STIHL connected
Hub.
WARNING
To reduce the risk of fire and electric shock, install the STIHL
connected Hub at least one (1) foot off the ground and
ensure that there is no risk that it may be immersed in water
or other liquids. Always install the STIHL connected Hub on
a stable surface.
WARNING
Do not mount the STIHL connected Hub on a combustible
surface or in a location where combustible gases, liquids,
vapors, dusts or other materials and substances are
present, @ 4.
To mount the STIHL connected Hub to a wall:
► Disconnect the STIHL connected Hub from the electrical
outlet.
► Select a mounting location near the compatible STIHL
products, within 5 ft. (1.5 m) of an electrical outlet that
also receives a strong signal from your wireless network
or mobile Internet connection or is in reach of an Ethernet
connection.
► Always install the STIHL connected Hub at least one foot
off the ground and never in any location where it could be
immersed in water or other liquids.

0458-199-8621-A
8
English
7 Troubleshooting Guide
► Mount the STIHL connected Hub to a wall by using two
screws.
► Use appropriate screw-in wall anchors or other similar
mounting devices if an appropriate wall stud is not
available.
► Mount to a wall with the following dimensions:
– Distance off the ground = min. 1 ft. (30 cm)
– Distance between all sides of the STIHL connected Hub
to other objects and surfaces = min. 4 in. (100 mm)
– Distance of the bare holes = 4 in. (100 mm)
– Diameter of the screw head = 0.25 in. (6.5 mm)
– Diameter of the screw shaft = 0.12 in. (3 mm)
– Distance of the screw head bottom to the wall = 0.08 in.
(2 mm)
► Before mounting the STIHL connected Hub, check that the
screws are securely mounted in the wall.
Installing the STIHL connected Hub to a top hat rail
► Fasten the STIHL connected Hub to a top hat rail with
1.4 in. (35 mm) width and 0.06 in. (1.5 mm) material
strength.
Installing the STIHL connected Hub in a vehicle
► Fasten the STIHL connected Hub to a top hat rail with
1.4 in. (35 mm) width and 0.06 in. (1.5 mm) material
strength.
► Follow all mounting instructions and precautions
recommended by the vehicle manufacturer.
► Make sure the line voltage and frequency of the socket in
the vehicle are compatible with the data on the rating plate
of the STIHL connected Hub.
7.1 Resetting the STIHL connected Hub
► Press and hold the reset-button for about 5 seconds.
The "Operating Status" LED will flash red and all settings
will be reset. The STIHL connected Hub will then restart.
8.1 STIHL connected Hub, STIHL connected
mobile Hub
Specifications
– Input voltage: 5 V d.c.
– Rated power: 10 W
– IP protection rating: IP21 (protection against solid foreign
matter with a diameter ≥ 4.9 in. (12.5 mm); protection
against dripping water)
– Ambient temperature range for use and storage: - 4 °F to
140 °F (- 20 °C to + 60 °C)
Bluetooth
®
– Data transmission protocol: Bluetooth
®
5.0
– Frequency band: ISM band 2.4 GHz
– Radiated maximum transmission power: 100 mW
– Bluetooth
®
signal range: maximum 33 ft. (10 m). The
signal range may vary depending on ambient conditions.
The Bluetooth
®
range may be limited when the signal is
transmitted through metallic barriers (e.g., walls, shelving
units, etc.) or near strong electromagnetic fields.
– Collection of STIHL connected data in the range:
continuous
– Transmission of the data via the Internet connection to the
STIHL connected Portal: every 5 minutes
Wireless Network / Access Point
– Network standard: IEEE 802.11b/g/n
– Frequency band: 2.4 GHz
– Radiated maximum transmission power: 100 mW
7 Troubleshooting Guide
8 Specifications

0458-199-8621-A
9
English
8 Specifications
Mobile Internet Access (STIHL connected mobile Hub)
– Format of the SIM card: Mini-SIM
– Frequency bands:
– LTE-FDD: B2, B4, B5, B12, B13, B25, B26, B66
– LTE-TDD: B41
– Radiated maximum transmission power: 0.25 W
– Estimated monthly data volume: see FAQs under
https://support.stihl.com/
Bluetooth
®
Trademark
The Bluetooth
®
word mark and logos are registered
trademarks owned by Bluetooth SIG, Inc. These word
mark/logos are used by STIHL under license.
The STIHL connected Hub and STIHL connected mobile
Hub are equipped with a Bluetooth
®
and a wireless network
interface. The STIHL connected mobile Hub is additionally
equipped with a cellular data interface. Local operating
restrictions (in aircraft or hospitals, for example) must be
observed.
QR-Code Trademark
The word mark "QR-Code" is a registered trademark of
DENSO WAVE INCORPORATED.
8.2 Power Supply
– Mains voltage: 100 V to 240 V
– Frequency: 50/60 Hz
– Output voltage: 5 V d.c.
– Rated power: 10 W
– Permissible ambient temperature range during use and
storage: - 4 °F to 140 °F (- 20 °C to + 60 °C)
8.3 Symbols on the STIHL connected Hub
8.4 Engineering Improvements
STIHL's philosophy is to continually improve all of its
products. As a result, engineering changes and
improvements are made from time to time. Therefore, some
changes, modifications and improvements may not be
covered in this manual. If the operating characteristics or the
appearance of your unit differs from those described in this
manual, please contact your STIHL dealer or the STIHL
distributor for your area for assistance.
8.5 FCC 15 Compliance Statement
STIHL connected Hub: This device (contains FCC ID:
VPYLB1DX) complies with part 15 of the FCC Rules.
STIHL connected mobile Hub: This device (contains FCC
ID: VPYLB1DX and 2AJYU-8PYA008) complies with part 15
of the FCC Rules.
Operation is subject to the following two conditions:
– this device may not cause harmful interference.
– this device must accept any interference received,
including interference that may cause undesired
operation.
Note: This equipment has been tested and found to comply
with the limits for a Class B digital device, pursuant to part
15 of the FCC Rules. These limits are designed to provide
reasonable protection against harmful interference in a
residential installation. This equipment generates, uses and
can radiate radio frequency energy and, if not installed and
used in accordance with the instructions, may cause harmful
Symbol Explanation
VVolt
WWatt
d.c. Direct current
STIHL products must not be disposed of in the
household trash, but only in accordance with local,
state and federal laws and regulations and as
provided in this manual, @ 10.1.

0458-199-8621-A
10
English
9 Replacement Parts and Equipment
interference to radio communications. However, there is no
guarantee that interference will not occur in a particular
installation.
If this equipment does cause harmful interference to radio or
television reception, which can be determined by turning the
equipment off and on, the user is encouraged to try to
correct the interference by one or more of the following
measures:
– reorient or relocate the receiving antenna,
– increase the separation between the equipment and
receiver,
– connect the equipment to an outlet on a circuit different
from that to which the receiver is connected,
– consult an authorized STIHL servicing dealer or an
experienced radio/TV technician for help.
Do not change or modify this product in any way unless
specifically allowed in this manual, since this could void your
authority to operate it.
This equipment complies with FCC radiation exposure limits
set forth for an uncontrolled environment and meets the FCC
radio frequency (RF) Exposure Guidelines. This equipment
should be installed and operated keeping the radiator at
least 8 in. (20 cm) or more away from person’s body.
9.1 Genuine STIHL Replacement Parts
STIHL recommends the use of genuine STIHL replacement
parts. Genuine STIHL parts can be identified by the STIHL
part number, the logo and, in some cases, by the
STIHL parts symbol . The symbol may appear alone on
small parts.
10.1 Disposal of the STIHL connected Hub
STIHL products must not be thrown in household trash or
disposed of except as outlined in this manual.
► Take the STIHL connected Hub, accessories and
packaging to an approved disposal site for
environmentally friendly recycling.
► Contact your authorized STIHL
servicing dealer for the
latest information on disposal and recycling.
11.1 STIHL Incorporated Limited Warranty Policy
This product is sold subject to the STIHL Incorporated
Limited Warranty Policy, available at
www.stihlusa.com/warranty.html. It can also be obtained
from your authorized STIHL dealer or by calling
1-800-GO-STIHL (1-800-467-8445).
12.1 Registered Trademarks
9 Replacement Parts and Equipment
10 Disposal
11 Limited Warranty
12 Trademarks
STIHL
®
FARM BOSS
®
iCademy
®
MAGNUM
®
The color combination
orange-grey (U.S.
Registrations #2,821,860;
#3,010,057, #3,010,058,
#3,400,477; and
#3,400,476)
MasterWrench Service
®
MotoMix
®
OILOMATIC
®
ROCK BOSS
®
STIHL Cutquik
®
AutoCut
®
STIHL DUROMATIC
®
YARD BOSS
®
STIHL Quickstop
®

0458-199-8621-A
11
English
13 Addresses
12.2 Common Law Trademarks
This listing of trademarks is subject to change.
Any unauthorized use of these trademarks without the
express written consent of ANDREAS STIHL AG & Co. KG,
Waiblingen is strictly prohibited.
13.1 STIHL Incorporated
STIHL Incorporated
536 Viking Drive
P.O. Box 2015
Virginia Beach, VA
23452-2015
STIHL ROLLOMATIC
®
STIHL WOOD BOSS
®
WOOD BOSS
®
TIMBERSPORTS
®
4-MIX™ HT Plus™
BioPlus™ STIHL PowerSweep™
Easy2Start™ STIHL Protech™
EasySpool™ STIHL MiniBoss™
ElastoStart™ STIHL MotoPlus 4™
Ematic™ Master Control Lever™
STIHL Precision Series™ STIHL OUTFITTERS™
FixCut™ STIHL PICCO™
Micro™ TrimCut™
Pro Mark™ STIHL M-Tronic™
Quad Power™ STIHL HomeScaper Series™
Quiet Line™ STIHL PolyCut™
STIHL Arctic™ STIHL RAPID™
STIHL Compact™ STIHL SuperCut™
STIHL Interchangeable
Attachment Series™
STIHL Multi-Cut HomeScaper
Series™
TapAction™ STIHL Territory™
TM
STIHL
Injection
13 Addresses

Manual de instrucciones original Impreso en papel libre de cloro.
Las tintas contienen aceites vegetales, el papel es reciclable.
© ANDREAS STIHL AG & Co. KG 2021
0458-199-8621-A. VA2.C21.
0000009281_002_EA
0458-199-8621-A
español / EE.UU
12
Este manual de instrucciones está protegido por derechos de propiedad intelectual. Todos los derechos reservados, especial-
mente los derechos de reproducción, traducción y procesamiento con sistemas electrónicos.
Contenido
1 Introducción
. . . . . . . . . . . . . . . . . . . . . . . . . . . . . . . . . . . . . . . .
13
2 Acerca de este manual de instrucciones
. . . . . . . . . . . .
13
2.1 Palabras identificadoras
. . . . . . . . . . . . . . . . . . . . . . . . . . . .
13
2.2 Símbolos en el texto
. . . . . . . . . . . . . . . . . . . . . . . . . . . . . . .
13
3 Componentes importantes
. . . . . . . . . . . . . . . . . . . . . . . . .
13
3.1 Hub conectado a STIHL, Hub móvil conectado a
STIHL
. . . . . . . . . . . . . . . . . . . . . . . . . . . . . . . . . . . . . . . . . . . . . .
13
3.2 Estado del Hub conectado a STIHL
. . . . . . . . . . . . . . . . .
14
4 INSTRUCCIONES IMPORTANTES DE
SEGURIDAD
. . . . . . . . . . . . . . . . . . . . . . . . . . . . . . . . . . . . . . .
15
4.1 Uso previsto
. . . . . . . . . . . . . . . . . . . . . . . . . . . . . . . . . . . . . . .
15
4.2 Hub conectado a STIHL
. . . . . . . . . . . . . . . . . . . . . . . . . . . .
15
5 Mantenimiento, reparación y almacenamiento
. . . . . .
16
5.1 Advertencias e instrucciones
. . . . . . . . . . . . . . . . . . . . . . .
16
6 Instalando el Hub conectado a STIHL
. . . . . . . . . . . . . .
17
6.1 Preparando el Hub conectado a STIHL para su
operación
. . . . . . . . . . . . . . . . . . . . . . . . . . . . . . . . . . . . . . . . . .
17
6.2 Instalando el Hub conectado a STIHL
. . . . . . . . . . . . . .
17
6.3 Cambiar la configuración
. . . . . . . . . . . . . . . . . . . . . . . . . . .
18
6.4 El montaje del Hub conectado a STIHL
. . . . . . . . . . . . .
18
7 Guía de solución de problemas
. . . . . . . . . . . . . . . . . . . . .
19
7.1 Reiniciando el Hub conectado a STIHL
. . . . . . . . . . . . .
19
8 Especificaciones
. . . . . . . . . . . . . . . . . . . . . . . . . . . . . . . . . . .
20
8.1 Hub conectado a STIHL, Hub móvil conectado a
STIHL
. . . . . . . . . . . . . . . . . . . . . . . . . . . . . . . . . . . . . . . . . . . . . .
20
8.2 Fuente de alimentación eléctrica
. . . . . . . . . . . . . . . . . . .
20
8.3 Los símbolos en el Hub conectado al STIHL
. . . . . . . .
21
8.4 Mejoramientos técnicos
. . . . . . . . . . . . . . . . . . . . . . . . . . . .
21
8.5 FCC 15 Declaración de cumplimiento
. . . . . . . . . . . . . .
21
9 Piezas y equipos de repuesto
. . . . . . . . . . . . . . . . . . . . . .
21
9.1 Piezas de repuesto originales de STIHL
. . . . . . . . . . . .
21
10 Eliminación
. . . . . . . . . . . . . . . . . . . . . . . . . . . . . . . . . . . . . . . .
22
10.1 La eliminación del Hub conectado a la STIHL
. . . . . .
22
11 Garantía limitada
. . . . . . . . . . . . . . . . . . . . . . . . . . . . . . . . . . .
22
11.1 Política de garantía limitada de STIHL
Incorporated
. . . . . . . . . . . . . . . . . . . . . . . . . . . . . . . . . . . . . . .
22
12 Marcas comerciales
. . . . . . . . . . . . . . . . . . . . . . . . . . . . . . . .
22
12.1 Marcas comerciales registradas
. . . . . . . . . . . . . . . . . . . .
22
12.2 Marcas comerciales por ley común
. . . . . . . . . . . . . . . . .
22
13 Direcciones
. . . . . . . . . . . . . . . . . . . . . . . . . . . . . . . . . . . . . . . .
23
13.1 STIHL Incorporated
. . . . . . . . . . . . . . . . . . . . . . . . . . . . . . . .
23

0458-199-8621-A
13
español / EE.UU
1 Introducción
Gracias por su compra. La información contenida en este
manual le ayudará a obtener el máximo rendimiento y
satisfacción de su producto STIHL.
CONSERVE ESTE MANUAL
Si necesita más información, o si no comprende alguna de
las instrucciones incluidas en este manual, visite
www.stihlusa.com o póngase en contacto con su
concesionario de servicio de STIHL.
Se puede encontrar ayuda adicional en la aplicación de
STIHL y dentro del portal de STIHL.
GUARDE ESTAS INSTRUCCIONES
2.1 Palabras identificadoras
Este manual contiene información sobre seguridad a la que
usted debe prestar atención especial. Dicha información se
indica con los siguientes símbolos y palabras
identificadoras:
PELIGRO
Identifica una situación de peligro que, de no evitarse,
causará lesiones graves o mortales.
ADVERTENCIA
Identifica una situación de peligro que, de no evitarse,
podría causar lesiones graves o mortales.
INDICACIÓN
Indica el riesgo de daños a la propiedad, incluidos la
máquina o sus componentes.
2.2 Símbolos en el texto
El siguiente símbolo tiene como finalidad ayudarlo a utilizar
este manual.
3.1 Hub conectado a STIHL, Hub móvil conectado
a STIHL
1LED
Indica el estado de funcionamiento del Hub conectado al
STIHL.
1Introducción
Es importante que lea y respete la información y
las advertencias que figuran a continuación. La
instalación o el funcionamiento inadecuados
pueden causar lesiones corporales.
Lea este manual de instrucciones, el manual de
instrucciones del conector inteligente STIHL y el
de su herramienta eléctrica STIHL
detenidamente antes de usarla y
periódicamente a partir de entonces.
2 Acerca de este manual de
instrucciones
Hace referencia a un capítulo o subcapítulo designado
en este manual de instrucciones.
3 Componentes importantes
XXXXXXXXXX
2
6
8
5
3
4
10
SSID:
PW:
11
12
9
#
1
7
scb.01C8
wIZAOYzB
0000098824_001

0458-199-8621-A
14
español / EE.UU
3 Componentes importantes
2 Botón de reinicio
Puede ser usado para reiniciar el Hub conectado a
STIHL.
3 Tomacorriente
Enchufe para conectar la fuente de alimentación al Hub
conectado a STIHL.
4 Puerto LAN
Puerto para conectar un cable Ethernet al Hub
conectado a STIHL.
5Puerto USB
El puerto USB está actualmente desactivado y ofrece
opciones para futuros complementos.
6 Ranura para la tarjeta SIM
Ranura para insertar una tarjeta SIM. Sólo se puede usar
con el Hub móvil conectado a STIHL.
7 Cordón eléctrico
Conecta la fuente de alimentación al enchufe del Hub
conectado al STIHL.
8 Adaptador del enchufe de alimentación eléctrica
Contactos eléctricos de la fuente de alimentación.
9 Fuente de alimentación eléctrica
Permite conectar el cordón eléctrico a un tomacorriente
de pared.
10 Número de serie
Número de serie del Hub conectado al STIHL.
11 QR-Code
Código para el escaneo. Contiene los datos de acceso
para el punto de acceso creado por el Hub conectado a
STIHL.
12 Datos de acceso para el punto de acceso
Nombre del punto de acceso (SSID) y contraseña (PW).
# Placa de características
Contiene información eléctrica, el número de serie del
producto y datos de acceso a la red inalámbrica.
3.2 Estado del Hub conectado a STIHL
Los LEDs muestran el estado del Hub conectado al STIHL.
Estado operativo
Estado de la conexión
Actualización
– El LED parpadea en blanco: el Hub conectado
a STIHL se está poniendo en marcha.
– El LED brilla en blanco: el Hub conectado a
STIHL está listo para ser configurado.
– El LED se enciende en verde: el Hub
conectado a STIHL ha sido configurado y está
listo para su uso.
– El LED brilla en rojo: hay un mal
funcionamiento.
– El LED parpadea en rojo: el Hub conectado a
STIHL se está restableciendo.
– El LED brilla en blanco: el punto de acceso
está activo. El Hub conectado a STIHL está
listo para su configuración.
– El LED brilla en amarillo: el Hub conectado a
STIHL está conectado a Internet. Pero no hay
ninguna conexión con la nube de STIHL.
– El LED brilla en rojo: no se puede establecer
la conexión con Internet.
– El LED se ilumina en verde: el Hub conectado
a STIHL está conectado a Internet y a la Nube
de STIHL.
– LED parpadea en verde: transferencia de
datos en curso para una actualización del Hub
conectado a STIHL o de los productos de
STIHL conectados.

0458-199-8621-A
15
español / EE.UU
4 INSTRUCCIONES IMPORTANTES DE SEGURIDAD
4.1 Uso previsto
ADVERTENCIA
■ El Hub conectado a STIHL y el Hub móvil conectado a
STIHL están diseñados para recoger automáticamente
los datos conectados a STIHL de productos compatibles
con STIHL usando Bluetooth
®
tecnología. Los datos se
cargan en el Portal conectado a STIHL a través de la
conexión a Internet del usuario.
■ El uso inapropiado o no autorizado del Hub conectado a
STIHL podría resultar en lesiones corporales o daños en
la propiedad.
– Utilice el Hub conectado a STIHL y la fuente de
alimentación sólo como se describe en este manual.
– Nunca utilice un Hub conectado a STIHL que haya
sido modificado o alterado de su diseño original.
■ La fuente de alimentación está diseñada para ser usada
con el Hub conectado a STIHL y el Hub móvil conectado
a STIHL solamente.
4.2 Hub conectado a STIHL
ADVERTENCIA
■ Para reducir el riesgo de incendios y descargas
eléctricas, así como de otras lesiones o daños materiales:
– Antes de usar el Hub conectado a STIHL, lea este
manual de instrucciones y todas sus instrucciones y
advertencias sobre el Hub conectado a STIHL y la
fuente de alimentación.
– Sólo para uso en interiores o en un área cerrada y
seca.
– Mantenga el Hub conectado a un STIHL seco.
Protéjalo de la lluvia, del agua, de cualquier líquido
y de la humedad.
– Si se monta o se utiliza el Hub conectado a STIHL
en un vehículo, asegúrese de que el área esté
cerrada, seca y libre de vapores combustibles.
– No manipule el concentrador conectado a STIHL,
incluyendo la fuente de alimentación y el cable de
alimentación eléctrica, con las manos húmedas.
– Nunca utilice un concentrador, fuente de
alimentación o cable de alimentación eléctrica
conectados a STIHL que estén dañados.
– Haga funcionar el concentrador conectado a STIHL
sólo en interiores, en habitaciones secas y dentro de
un rango de temperatura ambiente de - 20 °C a + 60
°C (- 4 °F a 140 °F).
– Mantenga el Hub conectado a STIHL fuera del
alcance de los niños.
– Enchufe siempre la fuente de alimentación en una
toma de corriente / fuente de energía eléctrica
correctamente instalada que coincida con el voltaje
y la frecuencia eléctrica indicados en la fuente de
alimentación.
– No utilice un Hub conectado a STIHL o una fuente
de alimentación que haya recibido un golpe brusco
o fuerte, que se haya caído o que esté dañada de
alguna manera.
– No intente reparar, abrir o desmontar el Hub
conectado a STIHL o la fuente de alimentación
eléctrica. No contiene ninguna pieza que el usuario
pueda reparar sin ayuda.
4 INSTRUCCIONES IMPORTANTES
DE SEGURIDAD

0458-199-8621-A
16
español / EE.UU
5 Mantenimiento, reparación y almacenamiento
■ Si se utiliza una fuente de alimentación incorrecta, el Hub
conectado a STIHL puede ser destruido por un exceso de
voltaje.
– Use sólo la fuente de alimentación original incluida
con el Hub conectado a STIHL, o un reemplazo
idéntico autorizado por STIHL.
■ Para reducir el riesgo de descarga eléctrica o de incendio
a consecuencia de un cortocircuito:
– Nunca hagas un puente en los contactos con cables
u otros objetos metálicos.
– No inserte ningún objeto en las ranuras de
ventilación u otras aberturas del Hub conectado al
STIHL.
■ El Hub conectado al STIHL se calienta durante su
operación. Para reducir el riesgo de incendio:
– No lo cubra.
■ El Hub conectado a STIHL puede producir chispas que
pueden inflamar gases, líquidos, vapores, polvos u otros
materiales inflamables. Para reducir el riesgo de
incendios y explosiones:
– No utilice la máquina en un lugar en el que haya
gases, líquidos, vapores, polvos u otros materiales
combustibles.
■ El uso de un cordón eléctrico o de un enchufe que estén
dañados puede provocar incendios, descargas eléctricas
y otras lesiones personales, así como daños materiales.
Para reducir estos riesgos:
– Revise el cable de alimentación eléctrica del Hub
conectado a STIHL y la fuente de alimentación
regularmente para ver si hay daños. Si está dañado,
desconecte inmediatamente el enchufe de la toma
de corriente.
– Nunca tire del cable eléctrico para sacar el enchufe
del tomacorriente. Para desenchufar la máquina,
agarre el enchufe, y no el cordón.
– No utilice el cable de alimentación eléctrica para
transportar o colgar el Hub conectado a STIHL.
– Asegúrese de que el cordón eléctrico está colocado
o marcado de modo que nadie pueda pisarlo ni
tropezarse con él; compruebe que no está en
contacto con objetos cortantes ni con partes móviles
ni expuesto a ningún otro daño o esfuerzo.
■ Para reducir el riesgo de descargas eléctricas y otras
lesiones corporales o daños en la propiedad al montar el
Hub conectado a STIHL:
– Asegúrese de que no haya cables eléctricos,
tuberías u otras líneas de servicio detrás de la pared
donde se va a montar el Hub conectado a STIHL.
– Monte el concentrador conectado a STIHL sólo
como se describe en este manual.
– Si el concentrador conectado a STIHL se monta en
un vehículo, observe las guías de montaje del
fabricante del vehículo.
5.1 Advertencias e instrucciones
ADVERTENCIA
■ No hay reparaciones autorizadas al usuario para el Hub
conectado a STIHL. Para reducir el riesgo de incendios,
descargas eléctricas o lesiones de otro tipo, así como de
años materiales:
– No intente reparar, abrir o desmontar el Hub
conectado a STIHL. No contiene ninguna pieza que
el usuario pueda reparar sin ayuda.
– Mantenga el Hub conectado a STIHL libre de
materias extrañas.
– Limpie los componentes de polímero del Hub
conectados a la STIHL con un paño seco o un cepillo
suave y seco. No use detergentes ni disolventes.
Estos productos pueden dañar los componentes de
polímero.
– Nunca utilice una hidrolavadora para limpiar la
unidad, ni la rocíe con agua ni otros líquidos.
5 Mantenimiento, reparación y
almacenamiento

0458-199-8621-A
17
español / EE.UU
6 Instalando el Hub conectado a STIHL
■ Para reducir el riesgo de descarga eléctrica:
– Desconecta la fuente de alimentación de la toma de
corriente eléctrica antes de inspeccionar, limpiar o
almacenar el Hub conectado al STIHL.
– Revise regularmente el Hub conectado a STIHL y
asegúrese de que el aislamiento del cable de
alimentación y el enchufe eléctrico estén en buenas
condiciones y no presenten signos de deterioro (
quebradizo), desgaste o daño.
– Sustituya el cable de alimentación o el enchufe
eléctrico cuando esté dañado.
6.1 Preparando el Hub conectado a STIHL para su
operación
El Hub conectado a STIHL se conecta a Internet a través de
su LAN, red inalámbrica o plan de datos celular
1
(Hub móvil
conectado a STIHL).
Requisitos relacionados con la red:
– No se soportan las direcciones IP estáticas. Las
direcciones IP deben ser asignadas dinámicamente por el
enrutador.
– Las conexiones de red inalámbrica deben estar
protegidas por una contraseña. No se admiten las redes
abiertas.
– Las tarjetas SIM (para el Hub móvil conectado a STIHL)
deben estar protegidas por contraseña.
Antes de configurar el Hub conectado a STIHL, el usuario
debe estar registrado en el Portal conectado a STIHL y tener
los datos personales de acceso y el número de serie de la
placa de características del Hub conectado a STIHL.
6.2 Instalando el Hub conectado a STIHL
Antes de poder usar el Hub conectado a STIHL, debe estar
correctamente configurado.
Este símbolo , se refiere a las ilustraciones dentro del
empaque.
Preparando el Hub conectado a STIHL 1
► Si desea utilizar el acceso a Internet móvil (sólo
disponible con el Hub móvil conectado a la STIHL):
Inserte una tarjeta SIM en la ranura designada para ello.
► Si desea utilizar su LAN para acceder a Internet: Conecte
un cable Ethernet de la red a la toma LAN.
Conectando el Hub conectado a STIHL a la fuente de
alimentación eléctrica 2
► Conecte el cable de alimentación y el adaptador de
enchufe a la fuente de alimentación eléctrica. Asegúrese
de que el adaptador de enchufe eléctrico coincide con su
toma de corriente eléctrica local.
► Enchufe el cable de alimentación eléctrica en el enchufe
del Hub conectado a STIHL.
► Inserte el adaptador de alimentación / enchufe en una
toma de corriente eléctrica correctamente instalada.
El LED de "Estado Operativo" inicialmente parpadeará en
blanco mientras el Hub conectado al STIHL prepara el
punto de acceso. Tan pronto como los LEDs de "Estado
de Operación" y "Estado de Conexión" se iluminen en
blanco, el Hub conectado a STIHL estará listo para la
configuración.
Conectando al punto de acceso del Hub conectado a
STIHL 3
► Escanea el QR-Code de la placa de características del
Hub conectado a STIHL con un smartphone.
La conexión con el Hub conectado al STIHL se
establecerá automáticamente.
► Alternativamente, conéctese manualmente al Hub
conectado al STIHL usando los datos de acceso de la
placa de características.
► Si la página de configuración no se abre automáticamente
dentro del navegador de Internet: Vaya a la página de
configuración http://stihl.connectedbox:80 en su
navegador.
6 Instalando el Hub conectado a STIHL
1
El Hub móvil conectado a la STIHL requiere una conexión
permanente a la Internet mientras está funcionando, lo que resulta
en la transmisión continua de datos. Consulte con su proveedor de
datos celulares para conocer los precios de los datos y su
disponibilidad.

0458-199-8621-A
18
español / EE.UU
6 Instalando el Hub conectado a STIHL
Configurar el acceso a Internet a través de la página de
configuración 4
► Siga las instrucciones de la página de configuración para
configurar el acceso a Internet.
Tan pronto como el Hub conectado a STIHL se conecta a
Internet, el sistema comprueba si hay actualizaciones de
software y el Hub conectado a STIHL se reiniciará.
Reconectar con el Hub conectado a la STIHL 5
Tan pronto como los LEDs de "Estado de funcionamiento" y
"Estado de conexión" se encienden de nuevo en blanco:
► Escanea el código QR de nuevo.
► Alternativamente, conéctese manualmente al Hub
conectado al STIHL usando los datos de acceso de la
placa de características.
► Si la página de configuración no se abre automáticamente
dentro del navegador de Internet: Vaya a la página de
configuración http://stihl.connectedbox:80 en su
navegador.
Entre en la cuenta de usuario conectada a STIHL 6
► Siga las instrucciones de la página de configuración para
entrar en la cuenta de usuario conectada a STIHL.
► Termine la configuración del Hub conectado a STIHL.
La configuración del Hub conectado a STIHL se termina
tan pronto como los LEDs de "Estado de Operación" y
"Estado de Conexión" se encienden en verde.
Añadiendo el Hub conectado a STIHL al Portal conectado a
STIHL 7
► Vaya al Portal conectado a STIHL en
https://connect.stihl.com, ingrese con sus datos de
acceso personales y agregue el Hub conectado a STIHL.
6.3 Cambiar la configuración
La configuración del Hub conectado al STIHL puede ser
cambiada después de la configuración inicial. Es posible
cambiar la configuración de la red inalámbrica o del acceso
a Internet, por ejemplo.
► Presione el botón de reinicio.
Tan pronto como los LEDs de "Estado de Operación" y
"Estado de Conexión" se enciendan en blanco, el Hub
conectado al STIHL estará listo para ser configurado.
► Escanea el QR-Code de la placa de características con un
smartphone.
La conexión con el Hub conectado al STIHL se
establecerá automáticamente.
► Alternativamente, conéctese manualmente al Hub
conectado al STIHL usando los datos de acceso de la
placa de características.
► Si la página de configuración no se abre automáticamente
dentro del navegador de Internet: Vaya a la página de
configuración http://stihl.connectedbox:80 en su
navegador.
► Ajuste la configuración y confirme los cambios deseados
para completarlos.
El Hub conectado a STIHL volverá al modo de
funcionamiento.
6.4 El montaje del Hub conectado a STIHL
El montaje del Hub conectado a la STIHL en una pared
ADVERTENCIA
Para reducir el riesgo de descargas eléctricas y otras
lesiones corporales o daños en la propiedad, al montar el
Hub conectado a STIHL, asegúrese de que no haya cables
eléctricos, tuberías u otras líneas de servicio detrás de la
pared donde se va a montar el Hub conectado a
STIHL,@ 4.
ADVERTENCIA
Para reducir el riesgo de lesiones oculares, use siempre
gafas protectoras ajustadas cuando monte el Hub
conectado a STIHL.

0458-199-8621-A
19
español / EE.UU
7 Guía de solución de problemas
ADVERTENCIA
Para reducir el riesgo de incendio y descarga eléctrica,
instale el Hub conectado a STIHL al menos a un (1) pie del
suelo y asegúrese de que no haya riesgo de que se sumerja
en agua u otros líquidos. Siempre instale el Hub conectado
a STIHL en una superficie estable.
ADVERTENCIA
No monte el Hub conectado a STIHL en una superficie
inflamable o en un lugar donde haya gases, líquidos,
vapores, polvos u otros materiales y sustancias
inflamables,@ 4.
Para montar el STIHL conectó el Hub a una pared:
► Desconecte el STIHL conectado al HUB del enchufe de la
toma de corriente eléctrica.
► Seleccione una ubicación de montaje cerca de los
productos compatibles de STIHL, a menos de 5 ft. (1,5 m)
de una toma de corriente eléctrica que también reciba una
señal fuerte de su red inalámbrica o conexión de Internet
móvil o que esté al alcance de una conexión Ethernet.
► Siempre instale el Hub conectado a STIHL al menos a un
pie del suelo y nunca en un lugar donde pueda ser
sumergido en agua u otros líquidos.
► Monte el Hub conectado a STIHL en la pared con dos
tornillos.
► Utilice anclajes de pared roscados adecuados u otros
elementos de montaje similares si no hay montantes
disponibles.
► Haga la instalación en una pared que tenga las siguientes
dimensiones:
– Distancia del suelo = min. 1 pie (30 cm)
– Distancia entre todos los lados del Hub conectado a
STIHL a otros objetos y superficies = min. 4 pulgadas.
(100 mm)
– Distancia de los agujeros expuestos = 4 pulg. (100 mm)
– Diámetro de la cabeza del tornillo = 0,25 pulgadas.
(6,5 mm)
– Diámetro del eje del tornillo = 0,12 pulgadas. (3 mm)
– Distancia de la parte inferior de la cabeza del tornillo a
la pared = 0,08 pulgadas. (2 mm)
► Antes de montar el Hub conectado a STIHL, compruebe
que los tornillos están bien montados en la pared.
Instalando el Hub conectado a STIHL a un riel canaleta
superior
► Fijar el Hub conectado a STIHL a un riel canaleta superior
con 1,4 in. (35 mm) de ancho y 0,06 in. (1,5 mm) de
resistencia del material.
Instalar el Hub conectado a STIHL en un vehículo
► Fijar el Hub conectado a STIHL a un riel canaleta superior
con 1,4 in. (35 mm) de ancho y 0,06 in. (1,5 mm) de
resistencia del material.
► Siga todas las instrucciones y precauciones de montaje
recomendadas por el fabricante del vehículo.
► Asegúrese de que el voltaje de línea y la frecuencia del
enchufe eléctrico del vehículo sean compatibles con los
datos de la placa de características del Hub conectado a
STIHL.
7.1 Reiniciando el Hub conectado a STIHL
► Mantenga pulsado el botón de reinicio durante unos 5
segundos.
El LED de "Estado de operación" parpadeará en rojo y se
restituirán todos los valores predeterminados. El Hub
conectado a la STIHL se reiniciará entonces.
7 Guía de solución de problemas

0458-199-8621-A
20
español / EE.UU
8 Especificaciones
8.1 Hub conectado a STIHL, Hub móvil conectado
a STIHL
Especificaciones
– Voltaje de entrada: 5 V d.c.
– Potencia nominal: 10 W
– Grado de protección de la IP: IP21 (protección contra
materias extrañas sólidas con un diámetro ≥ 4,9 pulg.
(12,5 mm); protección contra el escurrimiento de agua)
– Rango de temperatura ambiente para su uso y
almacenamiento: - 4 °F a 140 °F (- 20 °C a + 60 °C)
Bluetooth
®
– Protocolo de transmisión de datos: Bluetooth
®
5,0
– Banda de frecuencia: Banda ISM 2,4 GHz
– Potencia de transmisión máxima irradiada: 100 mW
– Alcance de la señal Bluetooth
®
: como máximo, 33 ft (10
m). El alcance de la señal puede variar dependiendo de
las condiciones ambientales. El alcance de Bluetooth
®
puede verse limitado cuando la señal se transmite a
través de barreras metálicas (p. ej., paredes, estanterías,
etc.) o en las cercanías de campos electromagnéticos
fuertes.
– Recopilación de datos conectados a STIHL en el rango:
continuo
– Transmisión de los datos a través de la conexión de
Internet al Portal de la STIHL: cada 5 minutos
Red inalámbrica / Punto de acceso
– Estándar de la red: IEEE 802.11b/g/n
– Banda de frecuencia: 2,4 GHz
– Potencia de transmisión máxima irradiada: 100 mW
Acceso a Internet móvil (Hub móvil conectado a STIHL)
– Formato de la tarjeta SIM: Mini-SIM
– Bandas de frecuencia:
– LTE-FDD: B2, B4, B5, B12, B13, B25, B26, B66
–LTE-TDD: B41
– Potencia máxima de transmisión radiada: 0,25 W
– Volumen de datos mensuales estimados: véase la
sección de preguntas frecuentes en
https://support.stihl.com/
Bluetooth
®
Trademark
La marca y logotipo de Bluetooth
®
son marcas comerciales
registradas de Bluetooth SIG, Inc. Estas marcas/logotipos
son utilizados por STIHL bajo licencia.
El Hub conectado a STIHL y el Hub móvil conectado a
STIHL están equipados con un Bluetooth
®
y una interfaz de
red inalámbrica. El Hub móvil conectado a STIHL está
equipado adicionalmente con una interfaz para datos en
celulares. Se deben respetar las restricciones de uso
locales (en aviones o en hospitales, por ejemplo).
Marca registrada de código QR
La marca denominativa "QR-Code" es una marca registrada
de DENSO WAVE INCORPORATED.
8.2 Fuente de alimentación eléctrica
– El voltaje principal de la red eléctrica: 100 V a 240 V
– Frecuencia: 50/60 Hz
– Voltaje de salida: 5 V d.c.
– Potencia nominal: 10 W
– Rango de temperatura ambiente permisible durante el uso
y el almacenamiento: - 4 °F a 140 °F (- 20 °C a + 60 °C)
8 Especificaciones

0458-199-8621-A
21
español / EE.UU
9 Piezas y equipos de repuesto
8.3 Los símbolos en el Hub conectado al STIHL
8.4 Mejoramientos técnicos
STIHL tiene la filosofía de mejorar continuamente todos sus
productos. Como resultado de ello, periódicamente se
introducen cambios de diseño y mejoras. Por lo tanto, es
posible que algunos cambios, modificaciones y mejoras no
se describan en este manual. Si las características de
funcionamiento o la apariencia de su máquina difieren de las
descritas en este manual, comuníquese con el
concesionario STIHL para obtener la ayuda que requiera.
8.5 FCC 15 Declaración de cumplimiento
El STIHL conectado al Hub: Este dispositivo (contiene la
identificación de la FCC: VPYLB1DX) cumple con la parte
15 de las normas de la FCC.
STIHL conectado al Hub móvil: Este dispositivo (contiene la
identificación de la FCC: VPYLB1DX y 2AJYU-8PYA008)
cumple con la parte 15 de las normas de la FCC.
El funcionamiento está sujeto a las siguientes dos
condiciones:
– Este dispositivo no debe causar interferencias nocivas.
– Este dispositivo debe aceptar cualquier interferencia que
reciba, incluidas las interferencias que pudieran causar
un funcionamiento no deseado.
Nota: este equipo se ha sometido a pruebas, y se ha
determinado que cumple los límites de los dispositivos
digitales Categoría B, según la parte 15 del Reglamento de
la FCC. Estos límites están diseñados para ofrecer
protección razonable contra las interferencias nocivas en
una instalación residencial. Este equipo genera, utiliza y
puede irradiar energía de radiofrecuencia y, si no se instala
y utiliza conforme a las presentes instrucciones, podría
causar interferencias nocivas para las comunicaciones por
radio. No obstante, no se ofrece garantía alguna de que la
interferencia no ocurrirá en una instalación concreta.
Si este equipo llegara a causar interferencias perjudiciales
a la recepción de radio o televisión (se puede comprobar
encendiendo y apagando el equipo), se le indica al usuario
que intente corregir la interferencia tomando una o más de
las medidas siguientes:
– Reorientar o cambiar la ubicación de la antena de
recepción.
– Aumentar la separación entre el equipo y el receptor.
– Conectar el equipo a un tomacorriente ubicado en un
circuito diferente del circuito al que está conectado el
receptor.
– consulte a un concesionario de servicio STIHL autorizado
o a un técnico de radio/TV experto para recibir ayuda.
No cambie ni modifique este producto en modo alguno a
menos que se le indique específicamente hacerlo en este
manual, puesto que al hacerlo podría anular la autoridad de
usarlo.
Este equipo cumple con los límites de exposición a la
radiación establecidos por la FCC para un entorno no
controlado y cumple con las directrices de exposición a la
radiofrecuencia (RF) de la FCC. Este equipo debe ser
instalado y operado manteniendo el radiador al menos a 8
pulgadas. (20 cm) o más de distancia del cuerpo de una
persona.
9.1 Piezas de repuesto originales de STIHL
STIHL recomienda el uso de piezas de repuesto originales
de STIHL. Es posible identificar las piezas originales de
STIHL por el número de pieza STIHL, el logotipo de
Símbolo Significado
VVoltio
WVatio
d.c. Corriente continua
Los productos STIHL no se deben eliminar junto con
la basura doméstica, sino de acuerdo con las leyes y
normas locales, estatales y federales y como se
especifica en este manual, @ 10.1.
9 Piezas y equipos de repuesto

0458-199-8621-A
22
español / EE.UU
10 Eliminación
y, en ciertos casos, el símbolo de piezas
STIHL. En las piezas pequeñas el símbolo puede aparecer
solo.
10.1 La eliminación del Hub conectado a la STIHL
Los productos de STIHL no deben tirarse a la basura
doméstica ni desecharse excepto como se indica en este
manual.
► Lleve el concentrador, los accesorios y el empaque
conectados a STIHL a un sitio de desecho aprobado para
un reciclaje ecológico.
► Comuníquese con un concesionario de servicio STIHL
autorizado para obtener la información más actualizada
sobre eliminación y reciclado.
11.1 Política de garantía limitada de STIHL
Incorporated
Este producto se vende sujeto a la Política de garantía
limitada de STIHL Incorporated, disponible en
www.stihlusa.com/warranty.html. También puede obtenerlo
de un concesionario de servicio STIHL autorizado o
llamando al 1-800-GO-STIHL (1-800-467-8445).
12.1 Marcas comerciales registradas
12.2 Marcas comerciales por ley común
Esta lista de marcas comerciales está sujeta a cambios.
10 Eliminación
11 Garantía limitada
12 Marcas comerciales
STIHL
®
FARM BOSS
®
iCademy
®
MAGNUM
®
La combinación de colores
anaranjado-gris (Registros
en EE. UU. #2,821,860;
#3,010,057, #3,010,058,
#3,400,477; y #3,400,476)
MasterWrench Service
®
MotoMix
®
OILOMATIC
®
ROCK BOSS
®
STIHL Cutquik
®
AutoCut
®
STIHL DUROMATIC
®
YARD BOSS
®
STIHL Quickstop
®
STIHL ROLLOMATIC
®
STIHL WOOD BOSS
®
WOOD BOSS
®
TIMBERSPORTS
®
4-MIX™ HT Plus™
BioPlus™ STIHL PowerSweep™
Easy2Start™ STIHL Protech™
EasySpool™ STIHL MiniBoss™
ElastoStart™ STIHL MotoPlus 4™
Ematic™ Master Control Lever™
STIHL Precision Series™ STIHL OUTFITTERS™
FixCut™ STIHL PICCO™
Micro™ TrimCut™
Pro Mark™ STIHL M-Tronic™
Quad Power™ STIHL HomeScaper Series™
Quiet Line™ STIHL PolyCut™
STIHL Arctic™ STIHL RAPID™
STIHL Compact™ STIHL SuperCut™
STIHL Interchangeable
Attachment Series™
STIHL Multi-Cut HomeScaper
Series™
TapAction™ STIHL Territory™
TM
STIHL
Injection

0458-199-8621-A
23
español / EE.UU
13 Direcciones
Queda terminantemente prohibido todo uso de estas
marcas comerciales sin el consentimiento expreso por
escrito de ANDREAS STIHL AG & Co. KG, Waiblingen.
13.1 STIHL Incorporated
STIHL Incorporated
536 Viking Drive
P.O. Box 2015
Virginia Beach, VA
23452-2015
13 Direcciones

0458-199-8621-A
24
español / EE.UU
13 Direcciones


www.stihl.com
*04581998621A*
0458-199-8621-A
0458-199-8621-A
englisch / spanisch USA
U
This product contains chemicals known to
the State of California to cause cancer, birth
defects or other reproductive harm.
WARNING
Este producto contiene productos químicos
considerados por el Estado de California
como causantes de cáncer, defectos de
nacimiento u otra toxicidad reproductora.
ADVERTENCIA
-
 1
1
-
 2
2
-
 3
3
-
 4
4
-
 5
5
-
 6
6
-
 7
7
-
 8
8
-
 9
9
-
 10
10
-
 11
11
-
 12
12
-
 13
13
-
 14
14
-
 15
15
-
 16
16
-
 17
17
-
 18
18
-
 19
19
-
 20
20
-
 21
21
-
 22
22
-
 23
23
-
 24
24
-
 25
25
-
 26
26
-
 27
27
-
 28
28


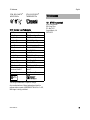
STIHL connected Box, connected mobile Box Manual de usuario
- Tipo
- Manual de usuario
en otros idiomas
Artículos relacionados
-
STIHL GCI 100 Manual de usuario
-
-
STIHL AR 3000 L Manual de usuario
-
STIHL ADG 2 Manual de usuario
-
STIHL AL 1 Manual de usuario
-
-
-
STIHL AL 101 El manual del propietario
-
-
STIHL HSA 94 T Manual de usuario