
www.bagster.com
www.bagster.com
Ref. : 7702ZIP
PEUGEOT-METROPOLIS 2013
WIN’ZIP
FR notice de montage
GB Fitting instructions
D Montageanleitung
ES Instrucciones de montaje
IT Consigli di manutenzione
FR - Nous vous rappelons que votre tablier peut modifier votre façon de piloter ainsi que votre tenue de
route. Nous vous conseillons donc de réduire votre vitesse.
GB - We remind to you that your apron can modify your way of controlling like your handling. We thus advise
you to reduce your speed.
DE - Wir erinnern Sie daran, daß Ihre Schürze Ihre Art und Weise zu steuern sowie Ihre Straßenlage ändern
kann. Wir raten Ihnen also, Ihre Geschwindigkeit zu reduzieren.
ES - Les recordamos que su delantal puede modificar su manera de controlar así como su comportamiento de
carretera. Les aconsejamos pues reducir su velocidad.
IT - Vi ricordiamo che il vostro ponte può modificare il vostro modo di controllare e la vostra tuta di strada. Vi
consigliamo dunque di ridurre la vostra velocità.

A
B
E
C D
FRANÇAIS
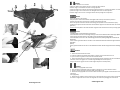
1 positionner le tablier sur le scooter
2 glisser le tablier sous le guidon et serrer a l’aide du velcro photo A
3 fixer la sangle a crochet dans l’ouie du carenage photo B
4 placer le tablier vers l’interieur du carenage (trappe d’aeration a l’exterieur du tablier. vue d’ensemble
5 placer la sangle a trou du bas avec la vis d'origine située sous le scooter photo C
6 fixer la sangle a trou avec la vis d'origine située dans le passage de roue photo D
ESPAÑOL
1 - Colocar el delantal sobre el scooter
2 - Deslizar el delantal por debajo del manillar y apretar con ayuda del velcro foto A
3 - Fijar la cincha con gancho en el hueco del carenado foto B
4 - Colocar el delantal hacia el interior del carenado (trampa de ventilación por fuera del delantal)
5 Pasar la cincha con agujero con el tornillo original debajo del scooter (Foto C)
6 Fijar la cincha con agujero con el tornillo original del paso de rueda (Foto D)
ENGLISH
1 Place the apron on the scooter.
2 Slip the apron under the handlebars and tighten with the help of the Velcro picture A.
3 Attach the strap with a hook in the air outlet of the fairing picture B.
4 Place the apron towards the inside of the fairing (air trap door at the outside of the apron) .
5 -Place the strap with a hole of the base with the bike’s original screw situated under the scooter
(picture C)
6 -Attach the strap with a hole with the bike’s original screw situated in the
wheel passage
(picture D
ITALIANO
1 - Posizionare il coprigambe sullo scooter
2 - Fare scivolare il coprigambe sotto il manubrio e stringere con l’aiuto del velcro foto A
3 - Fissare la cinghia ha uncino nell’udito della carenatura foto B.
4 - Posizionare il coprigambe verso l’interno della carenatura (la trappola di aerazione deve essere
all’esterno
del coprigambe)
5 - Posizionare la cinghia ha uncino inferiore con la vite originale che si trova sotto lo scooter foto C
6- Fissare la cinghia ha uncino con la vite originale che si trova nel passaggio da ruota foto D
www.bagster.com
www.bagster.com
deutsch
1-Die Beindecke auf der Motoroller positionieren
2- Die Beindecke unter der Lenkstange anbringen und mit dem Klettverschluss befestigen (Bild A)
3- Den Riemen mit dem Haken in der Höffnung der Verkleidung befestigen (Bild B)
4- Die Beindecke zum Inneren der Verkleidung positionieren (Lüftungsfallgrube ausserhalb der
Beindecke)
5. Den unteren gelochten Riemen mit dem unter dem Motoroller befi ndlichen Originalschrauben
befestigen
(Bild C)
6- Den gelochten Riemen mit dem in dem Radabschnitt befi ndlichen Originalschrauben befestigen (Bild
D)
C
D
D
B
B
A
C
Transcripción de documentos
WIN’ZIP FR GB D ES IT notice de montage Fitting instructions Montageanleitung Instrucciones de montaje Consigli di manutenzione Ref. : 7702ZIP PEUGEOT-METROPOLIS 2013 FR - Nous vous rappelons que votre tablier peut modifier votre façon de piloter ainsi que votre tenue de route. Nous vous conseillons donc de réduire votre vitesse. GB - We remind to you that your apron can modify your way of controlling like your handling. We thus advise you to reduce your speed. DE - Wir erinnern Sie daran, daß Ihre Schürze Ihre Art und Weise zu steuern sowie Ihre Straßenlage ändern kann. Wir raten Ihnen also, Ihre Geschwindigkeit zu reduzieren. ES - Les recordamos que su delantal puede modificar su manera de controlar así como su comportamiento de carretera. Les aconsejamos pues reducir su velocidad. IT - Vi ricordiamo che il vostro ponte può modificare il vostro modo di controllare e la vostra tuta di strada. Vi consigliamo dunque di ridurre la vostra velocità. www.bagster.com www.bagster.com A B B C C D D FRANÇAIS 1 positionner le tablier sur le scooter 2 glisser le tablier sous le guidon et serrer a l’aide du velcro photo A 3 fixer la sangle a crochet dans l’ouie du carenage photo B 4 placer le tablier vers l’interieur du carenage (trappe d’aeration a l’exterieur du tablier. vue d’ensemble 5 placer la sangle a trou du bas avec la vis d'origine située sous le scooter photo C 6 fixer la sangle a trou avec la vis d'origine située dans le passage de roue photo D ENGLISH 1 Place the apron on the scooter. 2 Slip the apron under the handlebars and tighten with the help of the Velcro picture A. 3 Attach the strap with a hook in the air outlet of the fairing picture B. 4 Place the apron towards the inside of the fairing (air trap door at the outside of the apron) . 5 -Place the strap with a hole of the base with the bike’s original screw situated under the scooter (picture C) 6 -Attach the strap with a hole with the bike’s original screw situated in the wheel passage (picture D deutsch 1-Die Beindecke auf der Motoroller positionieren 2- Die Beindecke unter der Lenkstange anbringen und mit dem Klettverschluss befestigen (Bild A) 3- Den Riemen mit dem Haken in der Höffnung der Verkleidung befestigen (Bild B) 4- Die Beindecke zum Inneren der Verkleidung positionieren (Lüftungsfallgrube ausserhalb der Beindecke) 5. Den unteren gelochten Riemen mit dem unter dem Motoroller befi ndlichen Originalschrauben befestigen (Bild C) 6- Den gelochten Riemen mit dem in dem Radabschnitt befi ndlichen Originalschrauben befestigen (Bild D) A B ESPAÑOL 1 - Colocar el delantal sobre el scooter 2 - Deslizar el delantal por debajo del manillar y apretar con ayuda del velcro foto A 3 - Fijar la cincha con gancho en el hueco del carenado foto B 4 - Colocar el delantal hacia el interior del carenado (trampa de ventilación por fuera del delantal) 5 Pasar la cincha con agujero con el tornillo original debajo del scooter (Foto C) 6 Fijar la cincha con agujero con el tornillo original del paso de rueda (Foto D) E CD www.bagster.com ITALIANO 1 - Posizionare il coprigambe sullo scooter 2 - Fare scivolare il coprigambe sotto il manubrio e stringere con l’aiuto del velcro foto A 3 - Fissare la cinghia ha uncino nell’udito della carenatura foto B. 4 - Posizionare il coprigambe verso l’interno della carenatura (la trappola di aerazione deve essere all’esterno del coprigambe) 5 - Posizionare la cinghia ha uncino inferiore con la vite originale che si trova sotto lo scooter foto C 6- Fissare la cinghia ha uncino con la vite originale che si trova nel passaggio da ruota foto D www.bagster.com-
 1
1
-
 2
2


en otros idiomas
- français: Bagster WIN'ZIP
- italiano: Bagster WIN'ZIP
- English: Bagster WIN'ZIP
- Deutsch: Bagster WIN'ZIP


