Silvercrest 294837 El manual del propietario
- Categoría
- Cortapelos
- Tipo
- El manual del propietario

Lidl US LLC.
Arlington, VA22202
Status of information · Estado de las informaciones:
HAIR AND BEARD TRIMMER SHBS 500 B3
RECORTADOR DE PELO Y BARBA SHBS 500 B3
IAN 294837 IAN 294837
RECORTADOR DE PELO Y
BARBA
Manual de instrucciones
US-ES
HAIR AND BEARD TRIMMER
Copy of the operating instructions
US-EN
08/2017 ID: SHBS 500 B3_17_V1.3
US-EN US-ES
__294837_B9.book Seite 1 Dienstag, 22. August 2017 4:17 16

English..................................................................................... 2
Español.................................................................................. 18
__294837_B9.book Seite 2 Montag, 21. August 2017 5:47 17

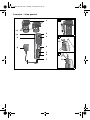
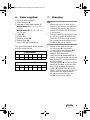
Overview / Vista|general
1
2
4
5
6
7
3
8
B
A
C
9
10
11
1
10
10
__294837_B9.book Seite 3 Montag, 21. August 2017 5:47 17

2 US-EN
Contents
1. Overview ............................................................................ 3
2. Thank you for your trust! .................................................... 4
3. Intended purpose ................................................................4
4. IMPORTANT SAFEGUARDS .................................................... 5
5. IMPORTANT SAFETY INSTRUCTIONS .....................................6
6. Items supplied ..................................................................... 9
7. Charging ............................................................................. 9
8. Operation .......................................................................... 10
8.1 Pushing on/removing the comb attachments ................................ 10
8.2 Cutting hair ............................................................................. 10
8.3 Thinning hair ........................................................................... 11
8.4 Cutting hairlines and beard ....................................................... 11
9. Cleaning and care ............................................................. 12
10. Storage ............................................................................. 12
11. Disposal ............................................................................ 13
12. Troubleshooting .................................................................13
13. Technical specifications ...................................................... 14
14. FCC hint ............................................................................. 14
15. 3 year limited warranty ....................................................15
__294837_B9.book Seite 2 Montag, 21. August 2017 5:47 17

3
US-EN
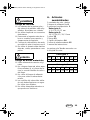
1. Overview
1Comb attachment, adjustable
2Blades, part of the shaving head
3Slider for thinning function
|: without thinning function
: thinning function activated
4 On/off switch
5 Battery symbol
is lit blue: device in battery mode without power adapter
flashing blue during charging: battery is fully charged
6 Plug symbol
Flashing red: battery almost empty
is lit red during charging: the battery is being charged
7Connection for power adapter
8Power adapter
9Comb attachment fastener
10 Shaving head
11 Marking for the cutting length in mm
not shown:
12 Comb
13 Scissors
14 Cleaning brush
15 Storage bag
__294837_B9.book Seite 3 Dienstag, 22. August 2017 4:18 16

4 US-EN
2. Thank you for your
trust!
Congratulations on your new hair and
beard trimmer.
For safe handling of the device and in
order to get to know the entire range of
features:
Thoroughly read these operating
instructions prior to initial use.
Above all, observe the safety in-
structions!
The device should only be used
as described in these operating
instructions.
Keep these operating instruc-
tions for reference.
If you pass the device on to
someone else, please include
these operating instructions.
We hope you enjoy your new hair and
beard trimmer!
3. Intended purpose
The hair and beard trimmer is intended
solely for trimming human hair. Only
use the device on dry hair.
The device is designed for private home
use and must not be used for commer-
cial purposes. The device must only be
used indoors.
Foreseeable misuse
Risk of material damage
~Do not use the device to cut artifi-
cial hair or animal hair.
CAUTION
__294837_B9.book Seite 4 Montag, 21. August 2017 5:47 17

5
US-EN
4. IMPORTANT SAFEGUARDS
When using electrical appliances, basic safety precautions should always be fol-
lowed including the following:
READ ALL INSTRUCTIONS BEFORE USING
1. Close supervision is necessary when this appliance is used by, on, or near
children or individuals with certain disabilities.
2. Use this appliance only for its intended use as described in this manual. Do
not use attachments not recommended by the manufacturer.
3. Never operate this appliance if it is not working properly or if it has been
dropped or damaged. Return the appliance to a service center for examina-
tion and repair.
4. Do not use outdoors or operate where aerosol (spray) products are being
used or where oxygen is being administered.
5. Do not use this appliance with a damaged or broken comb, as it has the
potential to result in facial injury.
6. This appliance is not intended for use by persons (including children) with
reduced physical, sensory or mental capabilities, or lack of experience and
knowledge, unless they have been given supervision or instruction concern-
ing use of the appliance by a person responsible for their safety. Children
should be supervised to ensure that they do not play with the appliance.
7. Only use the included original power adapter for AC power.
8. This appliance has a polarized plug (one blade is wider than the other). To
reduce the risk of electric shock, this plug will fit in a polarized outlet only one
way. If the plug does not fit fully in the outlet, reverse the plug. If it still does
not fit, contact a qualified electrician. Do not modify the plug in any way.
SAVE THESE INSTRUCTIONS
WARNING
__294837_B9.book Seite 5 Montag, 21. August 2017 5:47 17

6 US-EN
5. IMPORTANT SAFETY INSTRUC-
TIONS
If necessary, the following symbols and
warnings will be used in this copy of the
user instructions:
Safety Alert Symbol
This is the safety alert symbol.
It is used to alert you to poten-
tial personal injury hazards.
Obey all safety messages that
follow this symbol to avoid
possible injury and death.
Meaning of the signal words
DANGER indicates a hazardous situa-
tion that, if not avoided, will result in
death or serious injury.
WARNING indicates a hazardous situ-
ation that, if not avoided, could result in
death or serious injury.
CAUTION indicates a hazardous situa-
tion that, if not avoided, could result in
minor or moderate injury
NOTICE
indicates a situation which could lead to
property damage.
TIP
indicates circumstances and specifics that
should be observed when handling the de-
vice.
Terminology
As used in this instruction manual in
general and with regard to safety infor-
mation, safety messages and warnings,
in particular, the following words have
the following meanings:
- May: this word is understood to be
permissive.
- Shall: this word is understood to be
mandatory.
- Should: this word is understood to
be advisory.
DANGER
WARNING
CAUTION
__294837_B9.book Seite 6 Montag, 21. August 2017 5:47 17

7
US-EN
Risk for babies and children
~To avoid danger of suffocation,
keep this plastic bag away from
babies and children. Do not use
this bag in cribs, beds, carriages,
or playpens. This bag is not a toy.
~Keep the device out of the reach of
children.
Risk to or from pets and
livestock
~Electrical devices can represent a
hazard to pets and livestock. In ad-
dition, animals can also cause
damage to the device. For this rea-
son you should keep animals away
from electrical devices at all times.
Risk of electric shock due to
moisture
~Do not use this device in the vicinity
of bathtubs, showers, sinks or other
containers holding water.
~Protect the device from moisture,
water drops and water spray.
~Never touch the device with wet
hands.
~The device, the cord and the power
adapter must not fall into water or
other liquids and must not be
rinsed under running water.
~If the device has fallen into water,
pull out the power adapter immedi-
ately, and only then remove the de-
vice from the water. Do not use the
device again unless it has been
checked by a professional.
~Should liquid enter the device,
have it checked before starting up
the device again.
~If the device is used in a bathroom,
the power adapter must be pulled
out after use, as the proximity of
water represents a hazard, even
when the device is switched off.
~
Installation of a Ground Fault Circuit
Interrupter (GFCI) with a rated resid-
ual operating current of no more
than 30 mA is recommended to pro-
vide additional protection. Ask your
electrician for advice. The installa-
tion should only be carried out by a
qualified electrician.
Risk of electric shock
~Never operate the device if there is
visible damage to the device, the
power adapter or the cord or if the
device has been dropped before.
~Connect the cord to the device be-
fore plugging the power adapter
into an outlet.
~Only connect the power adapter to
a properly installed, easily accessi-
ble outlet, the voltage of which cor-
responds to the specifications on
the rating plate. The outlet must
continue to be easily accessible af-
ter the device is plugged in.
~Ensure that the cord cannot be
damaged by sharp edges or hot
surfaces.
WARNING
WARNING
WARNING
WARNING
__294837_B9.book Seite 7 Montag, 21. August 2017 5:47 17

8 US-EN
~Ensure that the cord is not caught
or squeezed.
~When removing the power adapter
from the outlet, always pull the
power adapter and never the cord.
~Pull the power adapter out of the
outlet …
…after every use,
…after each charging,
…if there is a glitch,
…before connecting the device to
the cord,
…before you clean the device and
…during thunderstorms.
~To avoid any risk, do not make
modifications to the device. Repairs
must be carried out by a specialist
workshop or the Service Center.
Risk from battery
~If the safety instructions are not fol-
lowed, batteries can cause the fol-
lowing hazards: batteries can...
-explode,
- become very hot (danger of burns),
- leak (risk of injury and property
damage).
~Protect the battery against mechan-
ical damage. Fire hazard!
~Do not expose the device to direct
sunlight or heat. The ambient tem-
perature should not be lower than
14 °F or higher than +104 °F.
~The charging contacts on the de-
vice must not come into contact
with metallic objects.
~The battery may only be charged
with the original accessory (power
adapter).
~Should the electrolyte solution leak
out of the battery, avoid contact
with eyes, mucous membranes and
skin. Rinse immediately with plenty
of clean water and consult a doc-
tor. The electrolyte solution can
cause irritation.
Risk of injury
~The tips of the comb attachments
and shaving head are sharp. Han-
dle with care.
~Do not use the device if the attach-
ment appears damaged.
~Switch off the device before fasten-
ing or changing the attachments
and prior to every cleaning.
~Arrange the cord in such a way
that no one trips over it or steps on
it.
~Do not use the device on open
wounds, cuts, sunburn or blisters.
Risk of material damage
~Use the original accessories only.
~Never place the device on hot sur-
faces (e.g. stovetops) or near heat
sources or open fires.
~Do not cover the power adapter to
prevent overheating.
~The blades of the shaving head
may be cleaned with water. Do not
use any other liquids.
~Do not use any astringent or abra-
sive cleaning agents.
WARNING
WARNING
CAUTION
__294837_B9.book Seite 8 Montag, 21. August 2017 5:47 17

9
US-EN
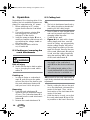
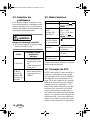
6. Items supplied
1 hair and beard trimmer
1 power adapter|8
2 adjustable comb attachments|1:
Attachment 1: 1/3/6/9/12/
15 mm
Attachment 2: 18/21/24/27/
30/33 mm
1comb|12
1scissors|13
1 cleaning brush|14
1 storage bag|15
1 copy of the user instructions
The comb attachments|1 are marked
with the cutting length:
7. Charging
TIP:
• Before the device is used for the
first time, and during the following
charging procedures, the device
should be charged for 90 minutes
in each case.
• When the batteries are almost emp-
ty, the plug symbol|6 flashes red.
The device can then only be used
for a short time without being con-
nected to the power supply.
1. Switch off the device with the
on/off switch|4 if necessary.
2. Connect the power adapter|8 to
the connection for the power
adapter|7 of the device.
3. Insert the power adapter|8 into a
readily accessible outlet whose volt-
age matches the voltage stated on
the rating plate.
4. The plug symbol|6 is lit red and the
battery is charged. When the bat-
tery is fully charged, the battery
symbol|5 flashes blue. When the
battery is fully charged, the device
can be used for approximately
60 minutes without being con-
nected to the power supply.
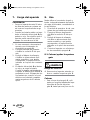
Attachment 1
mm
13691215
inch 0.06 0.12 0.24 0.35 0.47 0.6
Attachment 2
mm
18 21 24 27 30 33
inch 0.7 0.83 0.94 1.06 1.18 1.23
__294837_B9.book Seite 9 Dienstag, 22. August 2017 4:19 16

10 US-EN
8. Operation
Regardless of the charging state of the
battery, the hair and beard trimmer can
always be operated using AC power.
1. Before switching to AC power,
ensure that the device is switched
off.
2. Connect the power adapter|8 to
the connection for the power
adapter|7 of the device.
3. Insert the power adapter|8 into a
readily accessible outlet whose volt-
age matches the voltage stated on
the rating plate.
4. Switch on the device with the
on/off switch|4.
8.1 Pushing on/removing the
comb attachments
Risk of injury
~Switch off the device before replac-
ing or changing the comb attach-
ments|1.
Pushing on
• In order to fasten a comb attach-
ment|1, push this over the guide
rails on the side of the device onto
the comb attachment fastener|9,
until you hear it click into place.
Removing
1. Push the comb attachment|1
upwards using a moderate amount
of force. The comb attachment|1 is
released from the comb attachment
fastener|9.
2. Remove the comb attachment|1.
8.2 Cutting hair
TIP:
• The hair to be trimmed must be dry.
• The cutting length may deviate de-
pending on the cutting angle.
• Place a sheet or cape around throat
and neck to prevent cut-off hair from
dropping inside the collar.
• Comb the hair well.
•Figure A: first, start with a longer
cutting length and then, over the
course of cutting, use progressively
shorter cutting lengths. Adjust the
cutting length according to the de-
sired hair length. Press on the rear
of the comb attachment|1 to adjust
it, and read the cutting lengths by
using the marking|11 on the side
of the comb attachment|1.
TIP: ensure that the comb attachment|1
is still firmly attached to the device after
adjustment.
• Start by cutting the hair on the neck
or on the sides and cut toward the
center of the head. Then, cut the
front section of the hair toward the
center of the head.
• Hold the device in such a way that
the comb attachment|1 lies as flat
as possible on the head. Move the
WARNING
• It is only possible to adjust the cut-
ting length of the comb attach-
ment|
1
when the device is switched
off.
• The cutting length setting of the
comb attachment|1 is only locked
when the device is switched on.
__294837_B9.book Seite 10 Montag, 21. August 2017 5:47 17

11
US-EN
device through your hair smoothly
and in only one direction so as to
avoid tangling.
• If possible, cut against the direction
of hair growth.
• In order to catch all the hair, move
the device several times through
each section of the hair.
• Comb the hair repeatedly and com-
pletely.
• In order to achieve a straight cut-
ting line for cutting lengths over
20 mm, the device should be
passed through the hair several
times from different directions.
8.3 Thinning hair
Use the thinning function to reduce the
volume of the hair without changing its
length.
• Push the slider|3 upwards toward
the shaving head|10. The thinning
function integrated into the shaving
head|10 is extended upwards.
8.4 Cutting hairlines and
beard
Risk of injury
~The points of the shaving head|10
are sharp. Handle with care.
•Figure A: adjust the cutting length
according to the desired hair
length. Press on the rear of the
comb attachment|1 to adjust it,
and read the cutting lengths by us-
ing the marking|11 on the side of
the comb attachment|1. Now,
shorten your beard step by step.
TIP: ensure that the comb attachment|1
is still firmly attached to the device after
adjustment.
• Use the device with the shaving
head|10 only and without comb at-
tachment|1, to cut hair very short
or to cut beard and hairline. In this
way you can cut hair lengths of 1-
2 mm evenly.
• It is only possible to adjust the cut-
ting length of the comb attach-
ment|
1
when the device is switched
off.
• The cutting length setting of the
comb attachment|1 is only locked
when the device is switched on.
WARNING
__294837_B9.book Seite 11 Montag, 21. August 2017 5:47 17

12 US-EN
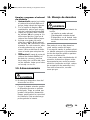
9. Cleaning and care
Risk of electric shock
~Pull the power adapter|8 out of the
outlet before you clean the device.
Risk of injury
~Always switch off the device before
cleaning it.
Risk of material damage
~The blades|2 of the shaving
head|10 may be cleaned with wa-
ter. Do not use any other liquids.
Oil the blades as described in the
following chapter.
~Do not use any astringent or abra-
sive cleaning agents.
NOTE:
clean the device after every use.
• Remove the comb attachment|1.
Rinse the comb attachment|1 with
water and let it dry before reattach-
ing it to the device.
• Wipe down the housing of the de-
vice with a damp cloth.
Cleaning and oiling the shaving
head
1. Figure B: remove the shaving
head|10 from the device by press-
ing it toward the rear with your
thumb.
2. Remove the hair remnants from the
shaving head|10 by using the
cleaning brush|14 included in the
package.
3. Clean the blades|2 of the shaving
head|10 with water. Do not use
any other liquids. Let the shaving
head|10 dry.
4. Apply a few drops of oil to the
blades|2 of the shaving head|10
and spread it out evenly. Using a
soft cloth, wipe off the excess oil, if
necessary. Only use acid-free oil,
such as sewing machine oil.
5. Figure C: guide the rim of the
shaving head|10 under the edge
of the housing and press the shav-
ing head downwards onto the
blades until you hear it lock into
place.
10. Storage
~Keep the device out of the reach of
children.
• Charge the battery before storing
the device for a prolonged period.
Please note that if the device is
stored for too long, this may reduce
the capacity of the battery. Avoid
any extended discharge of the bat-
tery.
WARNING
WARNING
CAUTION
WARNING
__294837_B9.book Seite 12 Dienstag, 22. August 2017 4:20 16

13
US-EN
11. Disposal
~The device is provided with a lithi-
um-ion battery.
- The battery cannot be removed!
- This device must not be opened!
- The device with the installed bat-
tery must be disposed of proper-
ly.
This appliance must not be disposed of as
household garbage.
If the electrical appliance is no longer
needed, it must be handed over to the
relevant local public waste authorities
for disposal.
As a rule, these waste disposal authori-
ties run special collection units for elec-
trical appliances (recycling centers,
materials recovery centers, etc.).
For further information, see:
www.epa.gov
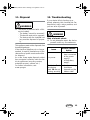
12. Troubleshooting
If your device fails to function as re-
quired, please try this checklist first. Per-
haps there is only a minor problem, and
you can solve it yourself.
Risk of electric shock
~Do not attempt to repair the device
yourself under any circumstances.
WARNING
Issue Possible causes /
Action
No power
• Has the device
been connected
to the power
supply?
• Is the battery
empty?
The blades|
2
of
the shaving
head|
10
are not
running smoothly
• Has the shaving
head been
cleaned and the
blades oiled?
WARNING
__294837_B9.book Seite 13 Montag, 21. August 2017 5:47 17

14 US-EN
13. Technical
specifications
Subject to technical modification.
14. FCC hint
NOTE: This equipment has been tested
and found to comply with the limits for a
Class B digital device, pursuant to
part 15 of the FCC Rules. These limits are
designed to provide reasonable protec-
tion against harmful interference in a res-
idential installation. This equipment
generates, uses and can radiate radio
frequency energy and, if not installed
and used in accordance with the instruc-
tions, may cause harmful interference to
radio communications. However, there is
no guarantee that interference will not oc-
cur in a particular installation. If this
equipment does cause harmful interfer-
ence to radio or television reception,
which can be determined by turning the
equipment off and on, the user is encour-
aged to try to correct the interference by
one or more of the following measures:
- Reorient or relocate the receiving
antenna.
- Increase the separation between
the equipment and receiver.
- Connect the equipment into an out-
let on a circuit different from that to
which the receiver is connected.
- Consult the dealer or an experi-
enced radio/TV technician for
help.
CAUTION: To comply with the limits of
the Class B digital device, pursuant to
Part 15 of the FCC Rules, this device is
to comply with Class B limits. All periph-
erals must be shielded and grounded.
Operation with non-certified peripher-
als or non-shielded cables may result in
interference to radio or reception.
MODIFICATION: Any changes or mod-
ifications not expressly approved by the
grantee of this device could void the us-
er‘s authority to operate the device.
Model: SHBS 500 B3
Device: Input: 5 V ,
, 1000 mA
Power adapter
(Model SW-
050100AL):
Input: 100-240 V ~
50/60 Hz,
0.2 A max.
Output: 5 V ,
, 1000 mA
Protection class
of the power
adapter: II
Ambient
conditions: only approved
for indoor use
Battery: 1x 3.7 V Li-ion,
500 mAh
Operating
temperature: 14 °F to +104 °F
__294837_B9.book Seite 14 Montag, 21. August 2017 5:47 17

15
US-EN
15. 3 year limited
warranty
What does this warranty
cover?
The warranty covers:
- Damage, breakage, or inoperabili-
ty due to defect.
- Damage not caused by normal
wear and tear or failure to follow
the safety and maintenance instruc-
tions provided in the user manual.
What is not covered by the
warranty?
The warranty does not cover damage
caused by:
- Normal wear and tear of the prod-
uct, including fragile parts (such as
switches, glass, etc.);
- Improper use or transport;
- Disregarding safety and mainte-
nance instructions;
- Accidents or acts of nature (e.g.,
lightening, fire, water, etc.);
- Tampering with the product (such as
removing cover, unscrewing screws
etc.).
Consequential and incidental damages
are also not covered under this warran-
ty. However, some states do not allow
the exclusion or limitation of incidental
or consequential damages, so this limi-
tation or exclusion may not apply to
you.
What is the period of
coverage and warranty
resolution?
The warranty is for 3 years from the date
of purchase. At our discretion, product
will either be refunded or replaced.
What will we not do?
We will not:
- Start a new warranty period upon
product exchange;
- Repair product.
How to process the
warranty?
To initiate, please:
- Call customer service at
1 (844) 543-5872
- Visit the Website Customer Service
Platform at www.lidl.com/contact-us
or
- Visit a LIDL store for further assistance
To ensure the quickest warranty return
process, please have the following avail-
able:
- The original sales receipt that in-
cludes the date purchased;
- The product and manual in the orig-
inal package;
- A statement of the problem.
What must you do to keep the
warranty in effect?
- Retain the original receipt;
- Follow all product instructions;
- Do not repair or modify the product.
__294837_B9.book Seite 15 Montag, 21. August 2017 5:47 17

16 US-EN
How does state law relate to
this warranty?
This warranty gives you specific legal
rights, and you may also have other
rights which vary from state to state. All
implied warranties are limited by the du-
ration and terms of this warranty. Some
states do not allow limitations on how
long an implied warranty lasts, so the
above limitation may not apply to you.
Distributor: Lidl US LLC.
Arlington,
VA22202
Country of origin: China
Customer Service:
Service hotline:
(free of charge in
USA) 1-844-543-5872
Contact page:
www.lidl.com/contact-us
__294837_B9.book Seite 16 Montag, 21. August 2017 5:47 17

17
US-EN
__294837_B9.book Seite 17 Montag, 21. August 2017 5:47 17

18 US-ES
Indice
1. Vista general....................................................................19
2. ¡Muchas gracias por su confianza!....................................20
3. Uso adecuado ..................................................................20
4. MEDIDAS DE SEGURIDAD IMPORTANTES .......................... 21
5. INSTRUCCIONES IMPORTANTES DE SEGURIDAD ............... 22
6. Artículos suministrados.....................................................25
7. Carga del aparato............................................................26
8. Uso ..................................................................................26
8.1 Colocar/quitar los peines guìa.................................................26
8.2 Cortar el cabello ....................................................................27
8.3 Rebajar el cabello ..................................................................27
8.4 Cortar la barba y los contornos................................................28
9. Limpieza y mantenimiento................................................28
10. Almacenamiento ..............................................................29
11. Manejo de desechos .........................................................29
12. Solución de problemas .....................................................30
13. Datos técnicos ..................................................................30
14. Consejos de FCC ...............................................................30
15. Garantía limitada de 3 años.............................................31
__294837_B9.book Seite 18 Montag, 21. August 2017 5:47 17

19
US-ES
1. Vista general
1Peine guìa multiposición
2Cuchilla, componente del cabezal de afeitado
3Regulador para la función de rebajado de cabello
|: sin función de rebajado de cabello
: función de rebajado de cabello encendida
4 Interruptor de encendido/apagado
5 Símbolo de la batería
se ilumina en azul: aparato con baterías sin bloque de alimentación
parpadea en azul durante el proceso de carga: batería cargada
6 Símbolo del enchufe
parpadea en rojo: batería prácticamente descargada
se ilumina en rojo durante el proceso de carga: la batería se carga
7Conexión para el bloque de alimentación
8Bloque de alimentación
9Fijación del peine guìa
10 Cabezal de afeitado
11 Marca de la longitud de corte en mm
Sin ilustración:
12 Peine
13 Tijeras
14 Cepillo de limpieza
15 Bolsa de almacenamiento
__294837_B9.book Seite 19 Dienstag, 22. August 2017 4:21 16

20 US-ES
2. ¡Muchas gracias por
su confianza!
Lo felicitamos por haber adquirido este
recortador de pelo y barba.
Para un manejo seguro del aparato y
para conocer todas sus funciones:
• Antes de poner en marcha el
aparato por primera vez, lea
este manual de instrucciones
detenidamente.
• ¡Sobre todo, siga las instruc-
ciones de seguridad!
• El aparato solo se debe em-
plear de la manera descrita
en este manual de instruccio-
nes.
• Conserve este manual de ins-
trucciones.
• En caso de que entregue este
aparato a otras personas,
adjunte el manual de instruc-
ciones. El manual de instruc-
ciones forma parte del
producto.
¡Esperamos que disfrute su nuevo recor-
tador de pelo y barba!
3. Uso adecuado
El recortador de pelo y barba está dise-
ñado exclusivamente para cortar pelo
humano. Utilícelo únicamente sobre el
pelo seco.
El aparato está concebido para el uso
doméstico y no debe utilizarse para fi-
nes comerciales. El aparato solo debe-
rá utilizarse en el interior del hogar.
Posible uso incorrecto
Riesgo de daños materiales
~No utilice el aparato para cortar
pelo artificial ni pelo de animales.
ATENCIÓN
__294837_B9.book Seite 20 Montag, 21. August 2017 5:47 17

21
US-ES
4. MEDIDAS DE SEGURIDAD IMPOR-
TANTES
Cuando use aparatos eléctricos, siempre deben tomarse precauciones de seguri-
dad básicas como las siguientes:
LEA TODAS LAS INSTRUCCIONES ANTES DE USAR EL APARATO
1. Es necesario que se supervise atentamente cuando los niños o las personas
con algunas discapacidades usen este aparato, o cuando este se ponga en
funcionamiento sobre o cerca de ellos.
2. Use este aparato solo para su uso previsto tal como se describe en este
manual. No use accesorios que el fabricante no recomiende.
3. Nunca use este aparato si no funciona adecuadamente o si se cayó o se ave-
rió. Devuelva el aparato a un centro de servicio para que lo revisen y lo
reparen.
4. No lo use en exteriores ni donde se estén usando productos aerosoles (rocia-
dores) o se esté suministrando oxígeno.
5. No use este aparato, si el peine está dañado o roto puesto que puede resul-
tar en lesiones faciales.
6. Este aparato está diseñado para que lo usen personas (niños incluidos) con
discapacidad física, sensorial o intelectual, o que carezcan de experiencia o
conocimientos; a menos que una persona responsable de su seguridad las
supervise o las haya capacitado con respecto al uso del aparato. Es reco-
mendable supervisar a los niños para asegurarse de que no jueguen con el
aparato.
7. Use únicamente el adaptador de corriente original incluido para corriente
alterna.
8. Este aparato tiene un enchufe polarizado (una clavija es más ancha que la
otra). Para reducir el riesgo de descarga eléctrica, este enchufe debe encajar
en un tomacorriente polarizado solo de una forma. Si el enchufe no encaja
por completo en el tomacorriente, voltéelo. Si aun así no encaja, comuní-
quese con un electricista calificado. No modifique el enchufe de ningún
modo.
CONSERVE ESTAS INSTRUCCIONES
ADVERTENCIA
__294837_B9.book Seite 21 Montag, 21. August 2017 5:47 17

22 US-ES
5. INSTRUCCIONES IMPORTANTES
DE SEGURIDAD
De ser necesario, se utilizarán los si-
guientes símbolos y advertencias en
esta copia del manual de instrucciones
de uso:
Símbolo de alerta de
seguridad
Este es el símbolo de adver-
tencia de seguridad. Se usa
para advertirle de posibles
riesgos de lesiones persona-
les. Acate todos los mensajes
de seguridad que acompa-
ñen a este símbolo para evi-
tar posibles lesiones o la
muerte.
Significado de las palabras
de advertencia
PELIGRO indica una situación de riesgo
que, si no se evita, puede ocasionar la
muerte o heridas graves.
ADVERTENCIA indica una situación de
riesgo que, si no se evita, podría oca-
sionar la muerte o heridas graves.
ATENCIÓN indica una situación de
riesgo que, si no se evita, podría oca-
sionar heridas leves o moderadas.
AVISO
Indica una situación que podría ocasio-
nar daños materiales.
SUGERENCIA
Indica circunstancias y detalles que de-
ben vigilarse cuando use el dispositivo.
Terminología
Las siguientes palabras, de la forma en
que se utilizan en este manual de ins-
trucciones en general y en particular
con respecto a la información de segu-
ridad, los mensajes de seguridad y las
advertencias, tienen los siguientes signi-
ficados:
- Puede: se entiende que esta pala-
bra es de permiso.
- Debe: se entiende que esta palabra
es de obligación.
- Debería: se entiende que esta pala-
bra es de consejo.
PELIGRO
ADVERTENCIA
ATENCIÓN
__294837_B9.book Seite 22 Montag, 21. August 2017 5:47 17

23
US-ES
Cuide a los bebés y niños
~Para evitar el peligro de asfixia,
mantenga esta bolsa plástica fuera
del alcance de bebés y niños. No
use esta bolsa en cunas, camas,
coches ni corrales de juego. La bol-
sa no es un juguete.
~Coloque el aparato fuera del alcan-
ce de los niños.
Cuide a los animales de
compañía y de granja
~Los aparatos eléctricos pueden pre-
sentar peligros para los animales
de compañía y de granja. Además,
los animales también pueden oca-
sionar daños en el aparato. Por
ello, como regla general, mantenga
a los animales alejados de los apa-
ratos eléctricos.
Riesgo de descarga eléctrica
debido a la humedad
~No utilice este aparato cerca de ba-
ñeras, duchas, lavamanos u otros
recipientes que contengan agua.
~Proteja el aparato de la humedad y
de las gotas o las salpicaduras de
agua.
~No utilice el aparato con las manos
mojadas.
~El aparato, el cable eléctrico y el
bloque de alimentación no se pue-
den sumergir en agua ni en ningún
otro líquido ni pueden limpiarse
bajo el grifo.
~No obstante, si el aparato cae al
agua, desenchufe inmediatamente
el bloque de alimentación y ense-
guida saque el aparato del agua.
En este caso no utilice el aparato
hasta que lo haya revisado un taller
especializado.
~Si penetra líquido en el aparato,
hágalo revisar antes de volver a uti-
lizarlo.
~En caso de utilizar el aparato en el
baño, debe desenchufarse el blo-
que de alimentación después del
uso, dado que la proximidad de
agua supone un peligro incluso
aunque el aparato esté desconecta-
do.
~
Se recomienda que la instalación de
un interruptor diferencial (Ground
Fault Circuit Interrupter, GFCI) con
una intensidad residual nominal de
disparo no mayor a 30 mA propor-
ciona protección adicional. Pida con-
sejo a su electricista. Solo un
electricista calificado debe hacer la
instalación.
Riesgo de descarga eléctrica
~No ponga en funcionamiento el
aparato si este, el bloque de ali-
mentación o el cable eléctrico pre-
sentan daños visibles o si el
aparato se ha caído antes al suelo.
~Enchufe el bloque de alimentación
al tomacorriente solo cuando el ca-
ble esté conectado al aparato.
ADVERTENCIA
ADVERTENCIA
ADVERTENCIA
ADVERTENCIA
__294837_B9.book Seite 23 Montag, 21. August 2017 5:47 17

24 US-ES
~Conecte el bloque de alimentación
solo a un tomacorriente correcta-
mente instalado y fácilmente accesi-
ble y cuya tensión corresponda a la
especificación indicada en la placa
de características. El enchufe debe
seguir siendo fácilmente accesible
tras la conexión.
~Asegúrese de que el cable eléctrico
no resulte dañado por bordes afila-
dos o superficies calientes.
~Procure que el cable eléctrico no se
presione ni se aplaste.
~Para sacar el bloque de alimenta-
ción del tomacorriente, hale siem-
pre del bloque de alimentación,
nunca del cable eléctrico.
~Desenchufe el bloque de alimenta-
ción del tomacorriente, …
…después de cada uso,
…después de cada proceso de car-
ga,
…si hay una falla,
…antes de conectar el cable al
aparato,
…antes de limpiar el aparato y
…en caso de tormenta.
~Para evitar peligros, no realice nin-
guna modificación en el artículo.
Las reparaciones solo las debe rea-
lizar un taller especializado o el
servicio técnico.
Riesgo de la batería
~Si no se obedecen las instrucciones
de seguridad, las baterías pueden
ocasionar los siguientes riesgos: las
baterías pueden...
-explotar,
- calentarse mucho (peligro de que-
maduras),
- presentar fugas (riesgo de lesiones y
daños materiales).
~Proteja la batería de daños mecáni-
cos. ¡Peligro de incendio!
~No exponga el aparato al sol direc-
to ni al calor. La temperatura am-
biente deberá estar comprendida
entre los 14 °F y los +104 °F.
~Los contactos de carga del aparato
no deben quedar conectados por
objetos metálicos.
~Cargue la batería únicamente con
el accesorio original (el bloque de
alimentación).
~En caso de fugas de solución de
electrolitos de la batería, evite el
contacto con la piel, los ojos y las
mucosas. Lave la zona afectada in-
mediatamente con abundante agua
limpia y acuda al médico. La solu-
ción de electrolitos puede provocar
irritaciones.
ADVERTENCIA
__294837_B9.book Seite 24 Montag, 21. August 2017 5:47 17

25
US-ES
Riesgo de lesiones
~Los extremos de los peines guìa y
del cabezal de afeitado están muy
afilados. Manéjelas con cuidado.
~No utilice el aparato con accesorios
defectuosos.
~Desconecte el aparato antes de co-
locar o cambiar los accesorios y
siempre antes de limpiarlo.
~Coloque el cable eléctrico de modo
que nadie lo pise ni tropiece con él.
~No utilice el aparato sobre heridas
abiertas, cortes, quemaduras o am-
pollas.
Riesgo de daños materiales
~Utilice solamente accesorios origi-
nales.
~No coloque el aparato sobre super-
ficies calientes (p. ej. placas de co-
cina) o cerca de fuentes de calor o
del fuego.
~No cubra el bloque de alimenta-
ción para evitar el sobrecalenta-
miento.
~Las cuchillas del cabezal de afeita-
do solo deben limpiarse con agua.
No utilice otros líquidos.
~No utilice detergentes abrasivos o
que produzcan arañazos.
6. Artículos
suministrados
1 recortador de pelo y barba
1 bloque de alimentación|8
2 peines guìa multiposición|1:
Peine guìa 1:
1/3/6/9/12/15 mm
Peine guìa 2:
18/21/24/27/30/33 mm
1 peine|12
1 tijeras|13
1 cepillo de limpieza|14
1 bolsa de almacenamiento|15
1 manual de instrucciones
Los peines guía|1 están marcados con
la longitud de corte:
ADVERTENCIA
ATENCIÓN
Peine guìa 1
mm
13691215
in. 0.06 0.12 0.24 0.35 0.47 0.6
Peine guìa 2
mm
18 21 24 27 30 33
in. 0.7 0.83 0.94 1.06 1.18 1.23
__294837_B9.book Seite 25 Dienstag, 22. August 2017 4:21 16

26 US-ES
7. Carga del aparato
SUGERENCIA:
• Cargue el aparato durante 90 minu-
tos antes de usarlo por primera vez
así como en los procesos de carga
sucesivos.
• Cuando las baterías estén casi ago-
tadas, el símbolo del enchufe|6 par-
padea en rojo. Eso significa que el
aparato puede usarse muy poco
tiempo sin conectarse a la red.
1. En caso necesario, desconecte el
aparato con el interruptor de
encendido/apagado|4.
2. Conecte el bloque de alimenta-
ción|8 a la conexión|7 del apa-
rato.
3. Enchufe el bloque de alimenta-
ción|8 a un tomacorriente fácil-
mente accesible y cuya tensión
corresponda a la especificación
indicada en la placa de caracterís-
ticas.
4. El símbolo del enchufe|
6
se ilumina
en rojo y se carga la batería.
Cuando la batería esté totalmente
cargada, el símbolo de la batería|
5
parpadea en azul. El tiempo de fun-
cionamiento sin conexión a la red
eléctrica con la batería completa-
mente cargada es de 60 minutos
aprox.
8. Uso
Puede utilizar el recortador de pelo y
barba, independientemente del estado
de carga de la batería, conectándolo a
la red eléctrica.
1. Si enchufa el aparato a la red, ase-
gúrese de que esté desconectado.
2. Conecte el bloque de alimenta-
ción|8 a la conexión|7 del apa-
rato.
3. Enchufe el bloque de alimenta-
ción|8 a un tomacorriente fácil-
mente accesible y cuya tensión
corresponda a la especificación
indicada en la placa de caracterís-
ticas.
4. Conecte el aparato con el interrup-
tor de encendido/apagado|4.
8.1 Colocar/quitar los peines
guìa
Riesgo de lesiones
~Desconecte el aparato antes de co-
locar o cambiar los peines guìa|1.
Colocar
• Para colocar el peine guìa|
1
, coló-
quelo por las guías laterales del apa-
rato sobre la fijación del peine
guìa|
9
, hasta que encaje con un clic.
ADVERTENCIA
__294837_B9.book Seite 26 Montag, 21. August 2017 5:47 17

27
US-ES
Quitar
1. Deslice el peine guìa|
1
hacia arriba
empleando una fuerza moderada.
El peine guìa|
1
se suelta de la fija-
ción|
9
.
2. Retire el peine guìa|1.
8.2 Cortar el cabello
SUGERENCIA:
• El pelo a cortar deberá estar seco.
• La longitud de corte puede variar
en función del ángulo de corte.
• Ponga un pañuelo o una capa pro-
tectora alrededor del cuello y la nu-
ca, para evitar que caigan restos
de pelo en el cuello.
• Peine bien el cabello.
•Ilustración A: utilice primero una
longitud de corte más larga y, du-
rante el proceso de corte, vaya utili-
zando longitudes cada vez más
cortas. Seleccione las longitudes de
corte según la longitud de cabello
deseada. Presione el peine guía|1
por la parte de atrás para despla-
zarlo y compruebe las longitudes
de corte en el lateral del peine
guía|1 en la marca|11 correspon-
diente.
SUGERENCIA: asegúrese de que el
peine guía|1 siga estando bien fijado
al aparato después de ajustar.
• Empiece cortando desde la nuca o
los laterales hacia el centro de la
cabeza. Corte después desde la
zona frontal hacia el centro de la
cabeza.
• Tome el aparato de modo que el
peine guìa|1 se apoye lo más pla-
no posible sobre la cabeza. Despla-
ce el aparato de manera uniforme y
en una sola dirección a través del
cabello para evitar que se engan-
che.
• Siempre que sea posible, corte a
contrapelo.
• Para cortar todos los cabellos, pase
el aparato varias veces por cada
zona.
• Peine bien el cabello una y otra
vez.
• Para conseguir una línea de corte
recta en longitudes de corte de más
de 20 mm, el aparato debe pasar-
se por el pelo en diferentes direccio-
nes.
8.3 Rebajar el cabello
Utilice la función de rebajado de cabe-
llo para reducir el volumen de este, sin
modificar su longitud.
• Desplace el regulador|3 hacia arri-
ba en dirección al cabezal de afei-
tado|10. La función de rebajado
de cabello integrada en el cabezal
de afeitado|10 se extenderá hacia
arriba.
• Las longitudes de corte del peine
guía|1 solo se pueden ajustar con
el aparato desconectado.
• El ajuste de la longitud de corte del
peine guía|1 no se bloquea hasta
que se conecta el aparato.
__294837_B9.book Seite 27 Montag, 21. August 2017 5:47 17

28 US-ES
8.4 Cortar la barba y los
contornos
Riesgo de lesiones
~Los extremos del cabezal de afeita-
do|10 están muy afilados. Manéje-
los con cuidado.
•Ilustración A: seleccione las lon-
gitudes de corte según la longitud
de cabello deseada. Presione el
peine guía|1 por la parte de atrás
para desplazarlo y compruebe las
longitudes de corte en el lateral del
peine guía|1 en la marca|11 co-
rrespondiente. Corte entonces la
barba poco a poco.
SUGERENCIA: asegúrese de que el
peine guía|1 siga estando bien fijado
al aparato después de ajustar.
• Utilice el aparato sin el peine
guìa|1, solo con el cabezal de afei-
tado|10, para cortar el pelo muy
corto o para la barba o los contor-
nos. De este modo podrá obtener
longitudes uniformes de corte de 1-
2 mm.
9. Limpieza y
mantenimiento
Riesgo de descarga eléctrica
~Desenchufe el bloque de alimenta-
ción|8 del tomacorriente antes de
limpiar el aparato.
Riesgo de lesiones
~Desconecte el aparato antes de lim-
piarlo.
Riesgo de daños materiales
~Las cuchillas|2 del cabezal de afeita-
do|10 solo deben limpiarse con agua.
No utilice otros líquidos. Engrase las cu-
chillas tal y como se indica en el si-
guiente apartado.
~No utilice detergentes abrasivos o que
produzcan arañazos.
AVISO:
limpie y engrase el aparato
después de cada uso.
• Retire el peine guìa|1. Limpie el pei-
ne guìa|1 con agua y déjelo secar,
antes de colocarlo de nuevo en el
aparato.
• Limpie la carcasa del aparato con
un paño ligeramente humedecido.
• Las longitudes de corte del peine
guía|1 solo se pueden ajustar con
el aparato desconectado.
• El ajuste de la longitud de corte del
peine guía|1 no se bloquea hasta
que se conecta el aparato.
ADVERTENCIA
ADVERTENCIA
ADVERTENCIA
CAUTION
__294837_B9.book Seite 28 Montag, 21. August 2017 5:47 17

29
US-ES
Limpiar y engrasar el cabezal
de afeitado
1. Ilustración B: empuje hacia atrás
el cabezal de afeitado|10 con el
pulgar, hasta retirarlo del aparato.
2. Con el cepillo de limpieza|14
suministrado, quite el pelo acumu-
lado del cabezal de afeitado|10.
3. Limpie las cuchillas|2 del cabezal
de afeitado|10 solo con agua. No
utilice otros líquidos. Deje que el
cabezal de afeitado|10 se seque.
4. Aplique unas gotas del aceite
sobre las cuchillas|2 del cabezal
de afeitado|10 y extiéndalo unifor-
memente. En caso necesario, retire
el aceite sobrante con un paño
suave. Utilice aceite libre de ácido,
como el aceite para máquinas de
coser.
5. Ilustración C: inserte la punta del
cabezal de afeitado|10 bajo el
borde de la carcasa y presione
hacia abajo las cuchillas del cabe-
zal de afeitado, hasta que el cabe-
zal encaje con un clic.
10. Almacenamiento
~Mantenga el dispositivo fuera del
alcance de los niños.
• Cargue la batería antes de guardar
el dispositivo durante un periodo
prolongado. Tenga en cuenta que
guardar el dispositivo demasiado
tiempo, puede reducir la capacidad
de la batería. Evite una descarga
prolongada de la batería.
11. Manejo de desechos
~El dispositivo posee una batería de
ion-litio.
- ¡La batería no puede retirarse!
- ¡Este dispositivo no debe abrirse!
- El dispositivo con la batería insta-
lada debe desecharse adecuada-
mente.
Este producto no se debe desechar
como residuo común del hogar.
Si no seguirá usando el aparato eléctri-
co, deberá entregarlo a las autoridades
locales de desechos públicos pertinen-
tes para su eliminación.
Como norma, estas autoridades de eli-
minación de desechos dirigen unida-
des especiales para recibir aparatos
eléctricos (centros de reciclaje, centros
de recuperación de materiales, etc.).
Para más información, consulte:
www.epa.gov.
ADVERTENCIA
ADVERTENCIA
__294837_B9.book Seite 29 Dienstag, 22. August 2017 4:22 16

30 US-ES
12. Solución de
problemas
Si en algún momento el aparato no fun-
ciona como es debido, consulte en primer
lugar la siguiente lista. Es posible que se
trate de un problema sin importancia que
usted mismo puede solucionar.
Riesgo de descarga eléctrica
~No intente reparar el aparato usted
mismo en ningún caso.
13. Datos técnicos
Queda reservado el derecho a realizar
modificaciones técnicas.
14. Consejos de FCC
AVISO: este equipo ha sido sometido a
pruebas, y se determinó que cumple
con los límites de Clase B de dispositi-
vos digitales, de conformidad con la
parte 15 de las normas de la Comisión
Federal de Comunicaciones, (Federal
Communications Commission, FCC).
Estos límites están diseñados para pro-
porcionar una protección razonable
contra interferencias perjudiciales en
una instalación residencial. Este equipo
genera, usa y puede radiar energía de
radiofrecuencia y, de no ser instalado y
usado de acuerdo con las instrucciones,
puede causar interferencias perjudicia-
Falla Posibles causas /
medidas a
adoptar
No funciona
• ¿El suministro de
electricidad funcio-
na?
• ¿Está descargada
la batería?
Las cuchi-
llas|
2
del
cabezal de
afeitado|
10
funcionan con
dificultad
• ¿Ha limpiado el ca-
bezal de afeitado y
engrasado las cu-
chillas?
ADVERTENCIA
Modelo: SHBS 500 B3
Dispositivo: Entrada: 5 V ,
, 1000 mA
Adaptador de co-
rriente
(Modelo SW-
050100AL):
Entrada: 100-
240 V ~ 50/
60 Hz, 0,2 A máx.
Salida: 5 V ,
, 1000 mA
Clase de protec-
ción del adapta-
dor de corriente:
II
Condiciones am-
bientales: aprobado única-
mente para su uso
en interiores
Batería: 1x 3,7 V Li-ion,
500 mAh
Temperatura de
funcionamiento: 14 °F a +104 °F
__294837_B9.book Seite 30 Montag, 21. August 2017 5:47 17

31
US-ES
les a las radiocomunicaciones. Sin em-
bargo, no se puede garantizar que no
habrá interferencia en una instalación
en particular. Si este equipo causa inter-
ferencias perjudiciales a la recepción
de radio o televisión, lo que puede com-
probarse encendiendo y apagando el
equipo, se anima al usuario a que trate
de corregir la interferencia con una o
varias de las siguientes medidas:
- Reoriente o reubique la antena re-
ceptora.
- Aumente la distancia entre el equi-
po y el receptor.
- Conecte el equipo en un tomaco-
rriente de un circuito distinto al que
esté conectado el receptor.
- Solicite ayuda al distribuidor o a un
técnico experto de radio/TV.
ATENCIÓN: para cumplir con los lími-
tes de la Clase B de dispositivos digita-
les, de conformidad con la parte 15 de
las normas de la FCC, este dispositivo
debe cumplir con los límites de la
Clase B. Todos los accesorios deben es-
tar protegidos y anclados. El funciona-
miento con accesorios no certificados o
cables no protegidos puede ocasionar
interferencia con la radio o con la re-
cepción.
MODIFICACIÓN: cualquier cambio o
modificación que no esté expresamente
aprobada por el cedente de este dispo-
sitivo puede anular el derecho del usua-
rio para utilizar el dispositivo.
15. Garantía limitada de
3 años
Lo que cubre la presente
garantía
La garantía incluye:
- Daños, quebraduras o incapacidad
para funcionar debido a defectos.
- Daños que no hayan sido causados
por el desgaste propio del uso o
por no seguir las instrucciones de
seguridad y mantención incluidas
en el manual para el usuario.
Lo que no cubre esta garantía
La garantía no cubre daños causados por:
- El desgaste propio del uso del pro-
ducto, incluidas las partes frágiles
(como interruptores, piezas de vi-
drio, etc.).
- Uso o transporte no indicado del
producto.
- Desatención a las instrucciones de
seguridad y mantención.
- Accidentes o causas de fuerza ma-
yor (e.g. relámpagos, incendio,
inundación, etc.).
- Manipulación mal intencionada del
producto (retirar la cubierta, tornillos,
etc.).
La presente garantía tampoco cubre da-
ños indirectos o emergentes. Sin embar-
go algunos estados no permiten la
exclusión o limitación de daños indirec-
tos o emergentes, por lo que dicha ex-
clusión o limitación pudiera no
aplicarse en su caso.
Período de cobertura y
resolución de la garantía
La garantía es válida por 3 años a par-
tir de la fecha de compra. La empresa,
según lo estime conveniente, devolverá
el dinero o repondrá el producto.
__294837_B9.book Seite 31 Montag, 21. August 2017 5:47 17

32 US-ES
La empresa no:
- Dará inicio a un nuevo período de
garantía al hacerse el cambio del
producto.
- Reparará el producto.
¿Cómo se tramita la
garantía?
Recomendamos que primero usted:
- Llame al Servicio de atención al
cliente al 1 (844) 543-5872.
- Visite el Portal de atención al cliente
en www.lidl.com/contact-us
- Visite una de nuestras tiendas LIDL
en caso de cualquier inquietud.
A fin de acelerar el trámite de la garan-
tía, tenga a bien contar con lo siguiente:
- Recibo de venta original que inclu-
ya la fecha de compra.
- Producto y manual en su empaque
original.
- Descripción del problema.
¿Qué debe hacer usted para
mantener la garantía vigente?
- Guardar el recibo original.
- Seguir todas las instrucciones para
el uso del producto.
- No realizar ninguna reparación ni
alteración al producto.
¿De qué manera influyen las
leyes estatales con esta
garantía?
La presente garantía le otorga derechos
legales específicos, y pudiera usted
contar con otros derechos los cuales va-
rían de un estado a otro. Todas las ga-
rantías implícitas se encuentran
limitadas a la duración y términos de la
presente garantía. Algunos estados no
permiten limitaciones al período de
tiempo y términos de la garantía implí-
cita, por lo que dichas limitaciones pu-
dieran no aplicarse en su caso.
Distribuidor: Lidl US LLC.
Arlington,
VA22202
País de origen: China
Atención al cliente:
Línea directa de
atención: (gratuita
en Estados Unidos) 1-844-543-5872
Página de contacto:
www.lidl.com/contact-us
__294837_B9.book Seite 32 Montag, 21. August 2017 5:47 17

33
US-ES
__294837_B9.book Seite 33 Montag, 21. August 2017 5:47 17

__294837_B9.book Seite 34 Montag, 21. August 2017 5:47 17

__294837_B9.book Seite 35 Montag, 21. August 2017 5:47 17
-
 1
1
-
 2
2
-
 3
3
-
 4
4
-
 5
5
-
 6
6
-
 7
7
-
 8
8
-
 9
9
-
 10
10
-
 11
11
-
 12
12
-
 13
13
-
 14
14
-
 15
15
-
 16
16
-
 17
17
-
 18
18
-
 19
19
-
 20
20
-
 21
21
-
 22
22
-
 23
23
-
 24
24
-
 25
25
-
 26
26
-
 27
27
-
 28
28
-
 29
29
-
 30
30
-
 31
31
-
 32
32
-
 33
33
-
 34
34
-
 35
35
-
 36
36
-
 37
37


Silvercrest 294837 El manual del propietario
- Categoría
- Cortapelos
- Tipo
- El manual del propietario
en otros idiomas
- English: Silvercrest 294837 Owner's manual
Artículos relacionados
-
Silvercrest 338841 El manual del propietario
-
Silvercrest SHBS 3.7 B1 Operating Instructions Manual
-
-
Silvercrest SHBSP 800 A1 Operating Instructions Manual
-
-
-
Silvercrest SHBS 600 A1 Operating Instructions Manual
-
Silvercrest SUL 1000 A1 Ficha de datos