Panasonic KXTGMA44 Instrucciones de operación
- Categoría
- Telefonos
- Tipo
- Instrucciones de operación
Este manual también es adecuado para

Installation Manual
Additional Digital Cordless Handset
Model No. KX-TGMA44
KX-TGMA45
Thank you for purchasing a Panasonic product.
You must register this handset with your base unit before it can be used. This
installation manual describes only the steps needed to register and begin using
the
handset. Please read the base unit’s operating instructions for further details.
Please read this installation manual before using the unit and save it for future
reference.
For assistance, visit our Web site: http://shop.panasonic.com/support
for customers in the U.S.A.
Printed in Malaysia
PNQX7795XA
PP0316KT2027
TGMA44_45US(en)_0221_ver201.pdf 1 2017/02/21 16:09:39

Installation
Accessory information ...............3
Important Information
For your safety ...........................
4
Important safety instructions ......5
Other information .......................6
Getting Started
Setting up ..................................7
Controls ...................................10
Accessibility
Accessibility .............................14
Tone control .............................14
Volume booster .......................15
Speech booster (making your
voice louder) ............................17
Key tones .................................18
Message indicator ...................18
Using assistive listening
devices ....................................19
One-touch ringer off .................20
Memory dial .............................20
Appendix
FCC and other information ......22
Customer services ...................25
Limited Warranty (ONLY FOR
U.S.A.) .....................................26
2
Table of Contents
TGMA44_45(en)_0606_ver101.pdf 2 2016/06/06 16:11:27

Accessory information
Supplied accessories
Accessory item/Part number Quantity
Charger
*
1
1
AC adaptor
*
2
/PNLV226X
1
Rechargeable batteries
*
3
/HHR-4DPA
2
Handset cover
*
4,
*5
1
Belt clip
*
6
1
*1 PNLC1071ZW (White), PNLC1071ZS (Silver), PNLC1071ZB (Black)
*
2 The AC adaptor comes connected to the charger at the of shipment.
*3 The supplied rechargeable batteries in the handset are installed with yellow
insulation sheet inserted between battery ends and terminals at the time of
shipment. Remove the yellow insulation sheet before use.
*4 The handset cover comes attached to the handset at the time of shipment.
*5 PNYNTGMA44WR (White), PNYNTGMA44BR (Black)
*6 PNKE2076Z1 (White), PNKE2076Z2 (Black)
Note:
R Please read the base unit’s operating instructions for additional/replacement
accessories.
– Optional headsets: KX-TCA60, KX-TCA400, KX-TCA430
For a
ssistance, please visit http://shop.panasonic.com/support
3
Installation
TGMA44_45(en)_0606_ver101.pdf 3 2016/06/06 16:11:27

For your safety
T
o prevent severe injury and loss of life/property, read this section
carefully before using the product to ensure proper and safe operation of
your product.
WARNING
Power connection
R C
ompletely insert the AC adaptor/power plug into the power outlet.
Failure to do so may cause electric shock and/or excessive heat
resulting in a fire.
R Regularly remove any dust, etc. from the AC adaptor/power plug by
pulling it from the power outlet, then wiping with a dry cloth.
Accumulated dust may cause an insulation defect from moisture, etc.
resulting in a fire.
R Unplug the product from power outlets if it emits smoke, an abnormal
smell, or makes an unusual noise. These conditions can cause fire or
electric shock. Confirm that smoke has stopped emitting and contact
us at
http://shop.panasonic.com/support
Installation
R T
o prevent the risk of fire or electrical shock, do not expose the
product to rain or any type of moisture.
R Do not place or use this product near automatically controlled devices
such as automatic doors and fire alarms. Radio waves emitted from
this product may cause such devices to malfunction resulting in an
accident.
CAUTION
Installation and location
R T
he AC adaptor is used as the main disconnect device. Ensure that
the AC outlet is installed near the product and is easily accessible.
4
For a
ssistance, please visit http://shop.panasonic.com/support
Important Information
TGMA44_45US(en)_0221_ver201.pdf 4 2017/02/28 12:45:39

Ni-MH rechargeable batteries (supplied)
R W
e recommend using the supplied batteries or additional/replacement
batteries noted on page 3 for replacement battery information. USE
ONLY rechargeable Ni-MH batteries AAA (R03) size.
R Do not mix old and new batteries.
R Do not open or mutilate the batteries. Released electrolyte from the
batteries is corrosive and may cause burns or injury to the eyes or
skin. The electrolyte is toxic and may be harmful if swallowed.
R Exercise care when handling the batteries. Do not allow conductive
materials such as rings, bracelets, or keys to touch the batteries,
otherwise a short circuit may cause the batteries and/or the
conductive material to overheat and cause burns.
R Charge the batteries provided with or identified for use with this
product only, in accordance with the instructions and limitations
specified in this manual.
R Only use a compatible base unit (or charger) to charge the batteries.
Do not tamper with the base unit (or charger). Failure to follow these
instructions may cause the batteries to swell or explode.
Attention:
A nickel metal hydride battery that is
r
ecyclable powers the product you
have purchased.
Please call 1-800-8-BATTERY
(1-800-822-8837) for information on
how to recycle this battery.
Important safety instructions
W
hen using your product, basic safety precautions should always be
followed to reduce the risk of fire, electric shock, and injury to persons,
including the following:
1. Do not use this product near water for example, near a bathtub,
washbowl, kitchen sink, or laundry tub, in a wet basement or near a
swimming pool.
For a
ssistance, please visit http://shop.panasonic.com/support
5
Important Information
TGMA44_45(en)_0606_ver101.pdf 5 2016/06/06 16:11:27

2. Do not use the telephone to report a gas leak in the vicinity of the
leak.
3. Use only the power cord and batteries indicated in this manual. Do
not dispose of batteries in a fire. They may explode. Check with local
codes for possible special disposal instructions.
SAVE THESE INSTRUCTIONS
Other information
R Operating the product near electrical appliances may cause
interference. Move away from the electrical appliances.
CAUTION: Risk of explosion if battery is replaced by an incorrect type.
Dispose of used batteries according to the instructions.
Routine care
R W
ipe the outer surface of the product with a soft moist cloth.
R Do not use benzine, thinner, or any abrasive powder.
Notice for product disposal, transfer, or return
R T
his product can store your private/confidential information. To protect
your privacy/confidentiality, we recommend that you erase information
such as phonebook or caller list entries from the memory before you
dispose of, transfer, or return the product.
6
For a
ssistance, please visit http://shop.panasonic.com/support
Important Information
TGMA44_45(en)_0606_ver101.pdf 6 2016/06/06 16:11:27

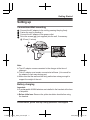
Setting up
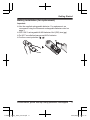
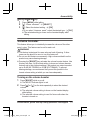
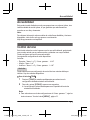
Connections/Wall mounting
Connect the AC adaptor to the unit by pressing the plug firmly.
Fasten the cord by hooking it.
Connect the AC adaptor to the power outlet.
Drive the screws (
1
) (not supplied) into the wall, if necessary.
2
25 mm (1 inches)
2
1
4
2
3
1
Note:
R T
he AC adaptor comes connected to the charger at the time of
shipment.
R The AC adaptor must remain connected at all times. (It is normal for
the adaptor to feel warm during use.)
R Make sure that the wall and the fixing method are strong enough to
support the weight of the unit.
Battery charging
I
mportant:
R 2 rechargeable Ni-MH batteries are installed in the handset at the time
of shipment.
R Before initial use: Remove the yellow insulation sheet before using
the handset.
For a
ssistance, please visit http://shop.panasonic.com/support
7
Getting Started
TGMA44_45(en)_0606_ver101.pdf 7 2016/06/06 16:11:27

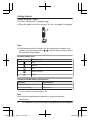
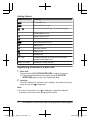
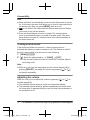
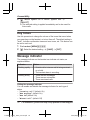
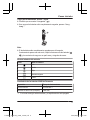
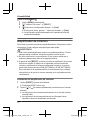
Charge for about 7 hours.
R Confirm “Charging” is displayed (
1
).
R When the batteries are fully charged, “Fully charged” is displayed.
1
Note:
R I
f the batteries are fully charged, but the operating time seems to be
shorter, clean the battery ends (
, ) and the charge contacts with a
d
ry cloth and charge again.
Handset battery level
Icon Battery level
High
Medium
Low
Needs charging.
Empty
Panasonic Ni-MH battery performance
Operation Operating time
In continuous use
13 hours max.
*
1
Not in use (standby)
9 days max.
*
1
*1 If eco mode is on and booster is off.
N
ote:
R Actual battery performance depends on usage and ambient
environment.
8
For assistance, please visit http://shop.panasonic.com/support
Getting Started
TGMA44_45(en)_0606_ver101.pdf 8 2016/06/06 16:11:27

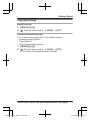
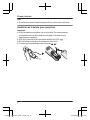
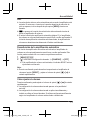
Battery installation (for replacement)
I
mportant:
R Use the supplied rechargeable batteries. For replacement, we
recommend using the Panasonic rechargeable batteries noted on
page 3.
R USE ONLY rechargeable Ni-MH batteries AAA (R03) size (
1
).
R D
o NOT use alkaline/manganese/Ni-Cd batteries.
R Confirm correct polarities (
, ).
1
For a
ssistance, please visit http://shop.panasonic.com/support
9
Getting Started
TGMA44_45(en)_0606_ver101.pdf 9 2016/06/06 16:11:27

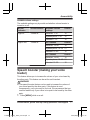
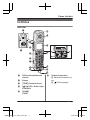
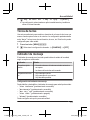
Controls
Handset
B
A
I
K
L
H
M
O
P
F
E
G
C
D
J
A
B
A
N
A Belt clip holes
B Speaker
C MT
ONEN (Tone control)
D MjN/MkN (
VOL.: Volume
up/down)
E MF
LASHN
MTALKN
F Dial keypad
*:
Temporary tone dialing
0: (
) Ringer off
G Headset jack
R T
his jack is used to
connect an optional
headset or a
user-supplied neckloop to
the handset. You must set
the “Headset type”
setting to match the type
of device connected.
H MZN (
SP-PHONE:
Speakerphone)
10
For a
ssistance, please visit http://shop.panasonic.com/support
Getting Started
TGMA44_45US(en)_0221_ver201.pdf 10 2017/02/28 12:45:40

I Microphone
J Message indicator
K Receiver
L Display
M MO
FFN
N MS
LOWN (SLOW TALK)
SLOW TALK indicator
O MB
OOSTN
BOOST indicator
R Light off: Volume booster
is turned off.
Light in red: Volume
booster is turned on.
Note that when the
BOOST indicator is lit in
red, the volume booster
feature is enabled and the
product may emit sounds
at very high volume.
P Charge contacts
n Control type
S
oft keys
By pressing a soft key, you can
select the feature shown
directly above it on the display.
N
avigator key
– MDN, MCN, MFN, or MEN: Scroll
through various lists and
items.
– VOL. (Volume: MDN or MCN):
Adjust the receiver or
speaker volume while talking.
– MFN W: View the phonebook
entry.
– MEN REDIAL: View the redial
list.
– MCN CID (Caller ID): View the
caller list.
Display icons
Handset display items
Item Meaning
Within base unit range
Out of base unit range
Sound enhancer is on.
The line is in use.
R W
hen flashing: The call is put on hold.
R When flashing rapidly: An incoming call is now
being received.
Speech booster is on.
For a
ssistance, please visit http://shop.panasonic.com/support
11
Getting Started
TGMA44_45(en)_0606_ver101.pdf 11 2016/06/06 16:11:27

Item Meaning
Eco mode is on.
Noise reduction is set.
–
Tone control level (Tone 1-6 or Custom tone)
Z Speakerphone is on.
Ringer volume is off.
Silent mode is on.
Call sharing mode is off.
Alarm is on.
Handset number
Battery level
Blocked call
In use
Answering system is being used by another
h
andset or the base unit.
Line in use
Someone is using the line.
Registering a handset to a base unit
1 B
ase unit:
Press and hold MLOCATOR/INTERCOMN for about 5 seconds.
R If all registered handsets start ringing, press MLOCATOR/
INTERCOMN again to stop, then repeat this step.
2 Handset:
Place the handset on the base unit or charger, then wait until a long
beep sounds and
is displayed.
N
ote:
R If an error tone sounds, or if
is displayed, register the handset
a
ccording to the base unit’s operating instructions.
12
For a
ssistance, please visit http://shop.panasonic.com/support
Getting Started
TGMA44_45(en)_0606_ver101.pdf 12 2016/06/06 16:11:27

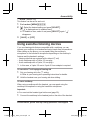
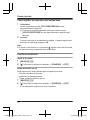
Language settings
Display language
1 MM
ENUN#110
2 MbN: Select the desired setting. a MSAVEN a MOFFN
Voice announcement language
Y
ou can select the language used for the following features.
– Answering system guidance
– Talking Caller ID
– Talking keypad and phonebook
1 MMENUN#112
2 MbN: Select the desired setting. a MSAVEN a MOFFN
R The setting will be applied in about 5 seconds.
For a
ssistance, please visit http://shop.panasonic.com/support
13
Getting Started
TGMA44_45(en)_0606_ver101.pdf 13 2016/06/06 16:11:27

Accessibility
T
his product is designed to provide not only optimal volume, but optimal
sound quality as well, ensuring that every call is heard loud and clear.
Note:
For information about the addible base unit models and the available
features, visit the website below.
http://shop.panasonic.com/amplified
Tone control
T
his feature clarifies the voice of the person you are talking to, producing
a more natural-sounding voice that is easier to hear and understand.
This feature can be set for each unit.
The following settings are available.
Handset:
– Receiver: “Tone 1-6” and “Custom tone 1-20”
– Speakerphone: “Tone 1-4”
– Headset: “Tone 1-4” and “Custom tone 1-20”
Handset
Y
ou can select a tone control setting while talking on the phone. There
are two methods available.
n Using the MTONEN key
1 Press MTONEN on the side repeatedly to select the desired setting
while talking.
2 To exit, press MBACKN or wait for a few seconds.
R The selected setting is shown on the handset display while
talking.
Note:
R To select one of the “Custom tone” settings, follow the
instructions in “Using the MMENUN key”, page 15.
14
For a
ssistance, please visit http://shop.panasonic.com/support
Accessibility
TGMA44_45(en)_0606_ver101.pdf 14 2016/06/06 16:11:27

n Using the MMENUN key
1 Press MMENUN while talking.
2 MbN: “Tone control” a MSELECTN
3 MbN: Select the desired setting. a MOKN
R If you select “Custom tone”, select the desired type. a MOKN
R The selected setting is shown on the handset display while
talking.
Volume booster
T
his feature allows you to drastically increase the volume of the other
party’s voice. This feature can be set for each unit.
WARNING
R T
his feature is designed for users who are hard of hearing. If other
users use the phone, be sure to turn this feature off.
R Do not use this feature unnecessarily. High volume emitted from the
product may cause hearing damage.
R Pressing the MBOOSTN key activates the volume booster feature. Use
this key with care. At its loudest setting (volume and volume booster
features set to their highest settings), the product can output sound at
up to 40 dB (KX-TGMA44) or 50 dB (KX-TGMA45). To prevent
hearing damage, we recommend that you set this product to the
lowest volume setting at which you can hear adequately.
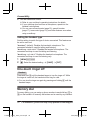
Turning on the volume booster
1 P
ress MBOOSTN while on a call.
R The BOOST indicator lights in red.
2 Press MjN or MkN on the side repeatedly to select the desired
volume.
R The selected volume setting is shown on the handset display
while talking.
R The selected volume setting is used for future calls when the
booster is turned on.
For a
ssistance, please visit http://shop.panasonic.com/support
15
Accessibility
TGMA44_45(en)_0606_ver101.pdf 15 2016/06/06 16:11:27

Note:
R Noise reduction is automatically turned on when the booster is turned
on. In this case, the menu that allows you to turn off noise reduction is
not shown even after you press MMENUN while on a call.
R is not shown if the noise reduction feature was turned off before
y
ou turned on the volume booster.
R If the auto boost feature is turned on (page 16), volume booster
turns on automatically when you make or answer a call. If the auto
boost feature is turned off, volume booster turns off automatically at
the end of each call.
Turning on auto boost
I
f the auto boost feature is turned on, volume booster turns on
automatically when you make or answer a call. This feature is useful if
the unit is used mainly by a user who is hard of hearing.
1 MMENUN#782
2 MbN: Select the desired setting. a MSAVEN a MOFFN
R If the volume booster is turned on, the BOOST indicator lights in
red during a call.
Note:
R While on a call, you can temporarily turn the volume booster off by
pressing MBOOSTN, and adjust the volume by pressing MjN or MkN
on the side repeatedly.
Adjusting the volume
W
hile on a call, you can adjust the volume by pressing MjN or MkN on
the side repeatedly.
R The selected volume setting is shown on the handset display.
R The selected volume setting is applied immediately and is also used
for future calls. A separate setting is used for when volume booster is
on and when it is off.
16
For a
ssistance, please visit http://shop.panasonic.com/support
Accessibility
TGMA44_45(en)_0606_ver101.pdf 16 2016/06/06 16:11:27

Available volume settings
T
he available settings vary by model and whether volume booster is
turned on or off.
BOOST
i
ndicator
Volume booster Available volume
s
ettings
Default
Light off Turned off Receiver: 1–15 15
Speakerphone: 1–21 15
Headset: 1–15 15
Light in red Turned on
KX-TGMA44 Default
Receiver: 12–40 15
Speakerphone: 18–30 21
Headset: 12–40 15
KX-TGMA45 Default
Receiver: 12–50 15
Speakerphone: 18–40 21
Headset: 12–50 15
Speech booster (making your voice
l
ouder)
This feature allows you to increase the volume of your voice heard by
the other party. This feature can be set for each handset.
WARNING
R T
he speech booster feature can be used to increase the volume of
your voice heard by the other party. If this feature is used
unnecessarily, your voice may be too loud. We recommend that you
use this feature only if your voice is too quiet to be heard by the other
party.
1 Press MMENUN while on a call.
For a
ssistance, please visit http://shop.panasonic.com/support
17
Accessibility
TGMA44_45(en)_0606_ver101.pdf 17 2016/06/06 16:11:27

2 MbN:
“Boost speech on” or “Boost speech off” a
MSELECTN
R The selected setting is applied immediately and is also used for
future calls.
Key tones
U
se this procedure to change the volume of the tones that sound when
you press keys on the handset, or to turn them off. The default setting is
“Low”. Includes confirmation tones and error tones, etc. This feature can
be set for each unit.
1 For handset: MMENUN#165
2 MbN: Select the desired setting. a MSAVEN a MOFFN
Message indicator
T
he message indicator on the handset can indicate unit status, as
explained below.
Indicator Status
Flashing rapidly – Outside call or intercom call is being received
o
r on hold.
– The handset alarm is sounding.
Flashing slowly – There are new messages.
–
There are new voicemails.
– There are missed calls.
Setting the message indicator
Y
ou can enable and disable the message indicator for each type of
status.
– “Incoming call” (default: On)
– “New message” (default: On)
– “New VM” (default: On)
– “Missed call” (default: Off)
18
For a
ssistance, please visit http://shop.panasonic.com/support
Accessibility
TGMA44_45(en)_0606_ver101.pdf 18 2016/06/06 16:11:27

– “Alarm” (default: On)
This feature can be set for each unit.
1 For handset: MMENUN#278
2 MbN: Select the desired setting and press MSELECTN.
R “ ”
is displayed next to enabled items.
R To disable an item, select it and press MSELECTN again. “
”
d
isappears.
3 MSAVEN a MOFFN
Using assistive listening devices
I
f you use hearing aids that are compatible with a neckloop, you can
connect your neckloop to a handset and enjoy hands-free conversations.
When talking on the phone, you can speak using the neckloop’s
microphone or the handset’s microphone depending on the neckloop’s
features and the handset’s settings.
– Hearing aids that are equipped with a telecoil (T-coil)
– Audio neckloops with a 3-pole, 2.5 mm plug
– Audio neckloops with a 3-pole, 3.5 mm plug
*1
*1 In this case, a 3-pole 3.5 mm to 3-pole 2.5 mm adaptor is required.
To use with a T-coil-equipped hearing aid
1 S
et your hearing aid to the "T" setting.
R Refer to your hearing aid’s operating instructions for details.
2 Hold the handset near your hearing aid when talking.
To use a neckloop
W
hen using a neckloop with the handset, you can speak using the
neckloop’s microphone or using the handset’s microphone.
Important:
R You must set the headset type before use (page 20).
1 Connect the neckloop to the headset jack on the side of the handset.
For a
ssistance, please visit http://shop.panasonic.com/support
19
Accessibility
TGMA44_45(en)_0606_ver101.pdf 19 2016/06/06 16:11:27

2 U
se the handset as normal.
R Refer to your neckloop’s operating instructions for details.
R If your neckloop does not have a microphone, speak into the
handset’s microphone.
R You can use volume booster (page 15), speech booster
(page 17), tone control (page 14), and other features even when
using a neckloop.
Setting the headset type
S
et this setting to match the type of device connected. This feature can
be set for each unit.
“Headset” (default): Disables the handset’s microphone. The
connected headset is used for talking and listening.
“Neckloop with Mic”: Disables the handset’s microphone. The
connected neckloop is used for talking and listening.
“Neckloop w/o Mic”: Enables the handset’s microphone. The
connected neckloop is used for listening only.
1 MMENUN#786
2 MbN: Select the desired setting. a MSAVEN a MOFFN
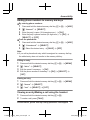
One-touch ringer off
Handset
P
ress and hold 0 until the handset beeps to turn the ringer off. While
the ringer is turned off, the handset will not ring for calls.
R You can turn the ringer on again by pressing and holding 0 until the
handset beeps.
Memory dial
F
or easy dialing, you can assign a phone number to each dial key (1 to
9) on the handset. All memory dial entries can be used by any handset.
20
For a
ssistance, please visit http://shop.panasonic.com/support
Accessibility
TGMA44_45(en)_0606_ver101.pdf 20 2016/06/06 16:11:27

Adding phone numbers to memory dial keys
n B
y entering phone numbers:
1 Press and hold the desired memory dial key (1 to 9). a MADDN
2 MbN: “Manual” a MSELECTN
3 Enter the party’s name (16 characters max.). a MOKN
4 Enter the party’s phone number (24 digits max.). a MOKN a
MSELECTN a MOFFN
n From the phonebook:
1 Press and hold the desired memory dial key (1 to 9). a MADDN
2 MbN: “Phonebook” a MSELECTN
3 MbN: Select the desired entry. a MSAVEN a MOFFN
Note:
R If you edit a phonebook entry which is assigned to a memory dial key,
the edited entry does not transfer to the memory dial key.
Editing an entry
1 P
ress and hold the desired memory dial key (1 to 9). a MMENUN
2 MbN: “Edit” a MSELECTN
3 Edit the name if necessary. a MOKN
4 Edit the phone number if necessary. a MOKN a MSELECTN a
MOFFN
Erasing an entry
1 P
ress and hold the desired memory dial key (1 to 9). a MMENUN
2 MbN: “Erase” a MSELECTN
3 MbN: “Yes” a MSELECTN a MOFFN
Viewing an entry/Making a call using the handset
1 P
ress and hold the desired memory dial key (1 to 9).
2 To make a call, press MTALKN.
For a
ssistance, please visit http://shop.panasonic.com/support
21
Accessibility
TGMA44_45(en)_0606_ver101.pdf 21 2016/06/06 16:11:27

FCC and other information
T
his equipment is hearing aid compatible as defined by the FCC in 47
CFR Section 68.316.
When you hold the phone to your ear, noise might be heard in your
Hearing Aid. Some Hearing Aids are not adequately shielded from
external RF (radio frequency) energy. If noise occurs, use an optional
headset accessory or the speakerphone option (if applicable) when
using this phone. Consult with your audiologist or Hearing Aid
manufacturer about the availability of Hearing Aids which provide
adequate shielding to RF energy commonly emitted by digital devices.
WHEN PROGRAMMING EMERGENCY NUMBERS AND(OR) MAKING
TEST CALLS TO EMERGENCY NUMBERS:
1) Remain on the line and briefly explain to the dispatcher the reason for
the call.
2) Perform such activities in the off-peak hours, such as early morning or
late evenings.
This device complies with Part 15 of the FCC Rules. Operation is subject
to the following two conditions:
(1) This device may not cause harmful interference, and (2) this device
must accept any interference received, including interference that may
cause undesired operation.
Privacy of communications may not be ensured when using this phone.
CAUTION:
Any changes or modifications not expressly approved by the party
responsible for compliance could void the user’s authority to operate this
device.
NOTE:
This equipment has been tested and found to comply with the limits for a
Class B digital device, pursuant to Part 15 of the FCC Rules. These
limits are designed to provide reasonable protection against harmful
interference in a residential installation. This equipment generates, uses,
22
For a
ssistance, please visit http://shop.panasonic.com/support
Appendix
TGMA44_45(en)_0606_ver101.pdf 22 2016/06/06 16:11:28

and can radiate radio frequency energy and, if not installed and used in
accordance with the instructions, may cause harmful interference to
radio communications. However, there is no guarantee that interference
will not occur in a particular installation. If this equipment does cause
harmful interference to radio or television reception, which can be
determined by turning the equipment off and on, the user is encouraged
to try to correct the interference by one or more of the following
measures:
– Reorient or relocate the receiving antenna.
– Increase the separation between the equipment and receiver.
– Connect the equipment into an outlet on a circuit different from that to
which the receiver is connected.
– Consult the dealer or an experienced radio/TV technician for help.
FCC RF Exposure Warning:
R This product complies with FCC radiation exposure limits set forth for
an uncontrolled environment.
R This handset may not be collocated or operated in conjunction with
any other antenna or transmitter.
R For body-worn operation, the handset must be used only with a
non-metallic accessory. Use of other accessories may not ensure
compliance with FCC RF exposure requirements.
Notice:
R FCC ID can be found inside the battery compartment or on the bottom
of the unit.
Compliance with TIA-1083 standard
T
Compatible with
Hearing Aid T-
Coil
TIA-1083
Telephone handsets identified with this logo have
r
educed noise and interference when used with T-Coil
equipped hearing aids and cochlear implants.
For a
ssistance, please visit http://shop.panasonic.com/support
23
Appendix
TGMA44_45(en)_0606_ver101.pdf 23 2016/06/06 16:11:28

Notice:
LThis product is designed for use in the United States of
America. Sale or use
of this product in other countries may violate local laws.
LCet appareil est conçu pour être utilisé aux États-Unis d’Amérique. La vente
ou l’emploi de cet appareil dans certains autres pays peut constituer une
infraction à la législation locale.
LEste producto está diseñado para usarse en los Estados Unidos de América.
La venta o el empleo de este producto en ciertos países puede constituir
violación de la legislación local.
Lҁౢࠔࣁऍ୯٬ҔԶǶऩӧځд୯ৎᎍ୧܈٬ҔǴёૈၴϸӦݤٯǶ
Lࡇࡢ〇ရࡣࠊ᪥ᮏᅜእ࡛ࡢ⏝ࢆ┠ⓗࡋ࡚タィࡉࢀ࡚࠾ࡾࠊ᪥ᮏᅜෆ࡛ࡢ
⏝ࡣἲᚊ㐪࡞ࡾࡲࡍࠋᚑࡗ࡚ࠊᙜ♫࡛ࡣ᪥ᮏᅜෆ࠾࠸࡚ࡣཎ๎ࡋ
࡚ಟ⌮࡞ࡢࢧ࣮ࣅࢫࡣ⮴ࡋࡡࡲࡍࠋ
24
For a
ssistance, please visit http://shop.panasonic.com/support
Appendix
TGMA44_45(en)_0606_ver101.pdf 24 2016/06/06 16:11:28

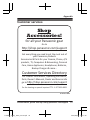
Customer services
Accessories!
hp://shop.panasonic.com/support
Customer Services Directory
Shop
for all your Panasonic gear
Go to
Get everything you need to get the most out of
your Panasonic products
Accessories & Parts for your Camera, Phone, A/V
products, TV, Computers & Networking, Personal
Care, Home Appliances, Headphones, Baeries,
Backup Chargers & more…
For Product Informa!on, Opera!ng Assistance,
Parts, Owner’s Manuals, Dealer and Service info
go to hp://shop.panasonic.com/support
For the hearing or speech impaired TTY: 1- 877-833-8855
As of June 2015
For a
ssistance, please visit http://shop.panasonic.com/support
25
Appendix
TGMA44_45(en)_0606_ver101.pdf 25 2016/06/06 16:11:28

Limited Warranty (ONLY FOR U.S.A.)
Limited Warranty Coverage (For USA Only)
Labor
One (1) Year
Parts
One (1) Year
To submit a new repair request and for quick repair status visit our Web Site at
http://shop.panasonic.com/support
Panasonic Products Limited Warranty
Online Repair Request
Mail-In Service--Online Repair Request
If your product does not work properly because of a defect in materials or workmanship,
Panasonic Corporation of North America (referred to as “the warrantor”) will, for the length
of the period indicated on the chart below, which starts with the date of original purchase
(“warranty period”), at its option either (a) repair your product with new or refurbished parts,
(b) replace it with a new or a refurbished equivalent value product, or (c) refund your
purchase price. The decision to repair, replace or refund will be made by the warrantor.
During the “Labor” warranty period there will be no charge for labor. During the “Parts”
warranty period, there will be no charge for parts. This Limited Warranty excludes both
parts and labor for non-rechargeable batteries, antennas, and cosmetic parts (cabinet).
This warranty only applies to products purchased and serviced in the United States.
This warranty is extended only to the original purchaser of a new product which was
not sold “as is”.
Telephone
When shipping the unit, carefully pack, include all supplied accessories listed in the
Owner’s Manual, and send it prepaid, adequately insured and packed well in a carton box.
When shipping Lithium Ion batteries please visit our Web Site at
http://shop.panasonic.com/support as Panasonic is committed to providing the most up to
date information. Include a letter detailing the complaint, a return address and provide a
daytime phone number where you can be reached. A valid registered receipt is required
under the Limited Warranty.
IF REPAIR IS NEEDED DURING THE WARRANTY PERIOD, THE PURCHASER WILL
BE REQUIRED TO FURNISH A SALES RECEIPT/PROOF OF PURCHASE INDICATING
DATE OF PURCHASE, AMOUNT PAID AND PLACE OF PURCHASE. CUSTOMER WILL
BE CHARGED FOR THE REPAIR OF ANY UNIT RECEIVED WITHOUT SUCH PROOF
OF PURCHASE.
Product or Part Name
26
For a
ssistance, please visit http://shop.panasonic.com/support
Appendix
TGMA44_45(en)_0606_ver101.pdf 26 2016/06/06 16:11:28

Limited Warranty Limits and Exclusions
(As examples, this excludes damages for lost time, travel to and from the servicer,
loss of or damage to media or images, data or other memory or recorded content.
The items listed are not exclusive, but for illustration only.)
This warranty ONLY COVERS failures due to defects in materials or workmanship,
and DOES NOT COVER normal wear and tear or cosmetic damage. The warranty
ALSO DOES NOT COVER damages which occurred in shipment, or failures which
are caused by products not supplied by the warrantor, or failures which result from
accidents, misuse, abuse, neglect, mishandling, misapplication, alteration, faulty
installation, set-up adjustments, misadjustment of consumer controls, improper
maintenance, power line surge, lightning damage, modification, introduction of sand,
humidity or liquids, commercial use such as hotel, office, restaurant, or other business
or rental use of the product, or service by anyone other than a Factory Service Center
or other Authorized Servicer, or damage that is attributable to acts of God.
THERE ARE NO EXPRESS WARRANTIES EXCEPT AS LISTED UNDER
“LIMITED WARRANTY COVERAGE”.
THE WARRANTOR IS NOT LIABLE FOR INCIDENTAL OR CONSEQUENTIAL
DAMAGES RESULTING FROM THE USE OF THIS PRODUCT, OR ARISING OUT
OF ANY BREACH OF THIS WARRANTY.
ALL EXPRESS AND IMPLIED WARRANTIES, INCLUDING THE WARRANTY OF
MERCHANTABILITY, ARE LIMITED TO THE PERIOD OF THE LIMITED WARRANTY.
PARTS AND SERVICE, WHICH ARE NOT COVERED BY THIS LIMITED WARRANTY,
ARE YOUR RESPONSIBILITY.
Some states do not allow the exclusion or limitation of incidental or consequential damages,
or limitations on how long an implied warranty lasts, so the exclusions may not apply to you.
This warranty gives you specific legal rights and you may also have other rights which vary
from state to state. If a problem with this product develops during or after the warranty period,
you may contact your dealer or Service Center. If the problem is not handled to your
satisfaction, then write to:
Consumer Affairs Department
Panasonic Corporation of North America
661 Independence Pkwy
Chesapeake, VA 23320
As of June 2015
For a
ssistance, please visit http://shop.panasonic.com/support
27
Appendix
TGMA44_45(en)_0606_ver101.pdf 27 2016/06/06 16:11:28

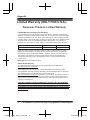
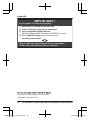
1 Reconnect AC adaptor to the base unit.
2 Check if telephone line cord is connected.
3 Use rechargeable Ni-MH batteries.
(Alkaline/Manganese/Ni-Cd batteries CANNOT be used.)
4 Read troubleshooting page in the base unit’s
Operating Instructions.
IMPORTANT!
If your product is not working properly. . .
Visit our Web site: http://shop.panasonic.com/support
LFAQ and troubleshooting hints are available.
Two Riverfront Plaza, Newark, NJ 07102-5490
© Panasonic Corporation 2016
28
For a
ssistance, please visit http://shop.panasonic.com/support
Appendix
TGMA44_45US(en)_0221_ver201.pdf 28 2017/02/28 12:45:40

29
Notes
TGMA44_45(en)_0606_ver101.pdf 29 2016/06/06 16:11:28

Manual de instalación
Auricular Inalámbrico Digital Adicional
Modelo n° KX-TGMA44
KX-TGMA45
Gracias por adquirir un producto Panasonic.
Debe registrar este auricular en su unidad base antes de poder usarlo. Este manual de
instalación solo describe los pasos necesarios para registrar y comenzar a usar el auri-
cular. Lea las instrucciones de operación de la unidad base para obtener más detalles.
Lea este manual de instalación antes de usar la unidad y guárdelo para consultarlo en el
futuro.
Para obtener ayuda, visite nuestro sitio web: http://shop.panasonic.com/support
para clientes en los EE. UU. (solo en inglés).
TGMA44_45(es-es)_0606_ver101.pdf 1 2016/06/06 16:13:05

Instalación
Información de los accesorios .........3
Pasos iniciales
Instalación .......................................4
Controles .........................................7
Accesibilidad
Accesibilidad ..................................11
Control de tono ..............................11
Amplificador de volumen ...............12
Amplificador de voz (sube el tono de
su voz) ...........................................14
Tonos de teclas .............................15
Indicador de mensaje ....................15
Uso de dispositivos de dispositivos de
asistencia auditiva .........................16
Apagar el timbre de un solo
toque ..............................................17
Marcación memorizada .................18
2
Tabla de Contenido
TGMA44_45(es-es)_0606_ver101.pdf 2 2016/06/06 16:13:06

Información de los accesorios
Accesorios que se suministran
Accesorio/Pieza número Cantidad
Cargador
*1
1
Adaptador de corriente
*2
/PNLV226X
1
Baterías recargables
*3
/HHR-4DPA
2
Cubierta del auricular
*4,
*5
1
Sujetador para cinturón
*6
1
*1 PNLC1071ZW (blanco), PNLC1071ZS (plateado), PNLC1071ZB (negro)
*2 El adaptador de corriente está conectado con el cargador en el momento del envío.
*3 Las baterías recargables proporcionadas en el auricular están instaladas con una
lámina de aislamiento amarillo insertada entre los extremos de las baterías y los
terminales en el momento del envío. Quite la lámina de aislamiento amarillo antes de
utilizar el dispositivo.
*4 La tapa viene unida al auricular en el momento del envío.
*5 PNYNTGMA44WR (blanco), PNYNTGMA44BR (negro)
*6 PNKE2076Z1 (blanco), PNKE2076Z2 (negro)
Nota:
R Lea las instrucciones de operación de la unidad base para obtener información sobre
accesorios adicionales o de repuesto.
– Audífonos opcionales: KX-TCA60, KX-TCA400 y KX-TCA430
3
Instalación
TGMA44_45(es-es)_0606_ver101.pdf 3 2016/06/06 16:13:06

Instalación
Conexiones/Montaje en la pared
Conecte el cable del adaptador de corriente oprimiendo firmemente el
enchufe.
Enganche el cable para sujetarlo.
Conecte el adaptador de corriente a la toma de corriente.
Si lo requiere, inserte los tornillos (
1
) (no se suministran) en la pared.
2
25 mm (1 in)
2
1
4
2
3
1
Nota:
R El adaptador de corriente está conectado con el cargador en el momento del
envío.
R El adaptador de corriente debe permanecer conectado en todo momento (es
normal que el adaptador se caliente durante su uso).
R Asegúrese de que la pared y el método de colocación sean lo suficientemente
resistentes para soportar el peso de la unidad.
Carga de las baterías
Importante:
R Hay 2 baterías Ni-MH recargables instaladas en el auricular en el momento
del envío.
R Antes del uso inicial: Quite la lámina de aislamiento amarillo antes de utilizar
el auricular.
4
Pasos iniciales
TGMA44_45(es-es)_0606_ver101.pdf 4 2016/06/06 16:13:06

Cargue aproximadamente durante 7 horas.
R Confirme que se muestre “Cargando” (
1
).
R Una vez que las baterías están completamente cargadas, aparece “Carg.
Comp.”.
1
Nota:
R Si las baterías están completamente cargadas pero el tiempo de
funcionamiento parece ser más corto, limpie los extremos de las baterías (
,
) y los contactos de carga con un paño seco y cárguelas de nuevo.
Nivel de la batería del auricular
Icono Nivel de la batería
Alta
Media
Baja
Necesita cargarse.
Vacía
Rendimiento de las baterías Ni-MH de Panasonic
Operación Tiempo de funcionamiento
En uso continuo
13 horas máx.
*1
Mientras no esté en uso (en espera)
9 días máx.
*1
*1 Si el modo ecológico está encendido y el amplificador de está apagado.
5
Pasos iniciales
TGMA44_45(es-es)_0606_ver101.pdf 5 2016/06/06 16:13:06

Nota:
R El rendimiento real de la batería depende del uso y del entorno ambiental.
Instalación de la batería (para reemplazo)
Importante:
R Utilice las baterías recargables que se suministran. Para reemplazarlas,
recomendamos el uso de las baterías recargables Panasonic que se
especifican en la página 3.
R USE SOLO baterías Ni-MH recargables tamaño AAA (R03) (
1
).
R NO utilice baterías alcalinas, de manganeso ni de Ni-Cd.
R Confirme que las polaridades estén correctas (
, ).
1
6
Pasos iniciales
TGMA44_45(es-es)_0606_ver101.pdf 6 2016/06/06 16:13:06

Controles
Auricular
B
A
I
K
L
H
M
O
P
F
E
G
C
D
J
A
B
A
N
A Orificios de sujetador para
cinturón
B Altavoz
C MTONEN (Control de tonos)
D MjN/MkN (VOL.: Subir o bajar
el volumen)
E MFLASHN
MTALKN
F Teclado de marcación
*: Marcación temporal por to-
nos
0: (
) Timbre apagado
7
Pasos iniciales
TGMA44_45US(es-es)_0223_ver201.pdf 7 2017/02/23 18:42:21

G Toma para audífono
R Esta toma se utiliza para co-
nectar un audífono opcional
o un micrófono de collar al
auricular. Debe configurar la
opción “Tipo de
auricular” para que coin-
cida con el dispositivo conec-
tado.
H MZN (SP-PHONE: Altavoz)
I Micrófono
J Indicador de mensaje
K Receptor
L Pantalla
M MOFFN
N MSLOWN (SLOW TALK)
Indicador SLOW TALK
O MBOOSTN
Indicador BOOST
R Luz apagada: el amplificador
de volumen está apagado.
Luz
roja: el amplificador de
volumen está activado.
Tenga en cuenta que cuan-
do el indicador BOOST está
en rojo, la función de amplifi-
cador de volumen está habili-
tada y el producto puede emi-
tir sonidos a un volumen
muy alto.
P Contactos de carga
n Tipos de controles
Teclas de función
Al oprimir una tecla de función, pue-
de seleccionar la función que apa-
rece directamente encima de ella
en la pantalla.
Tecla navegadora
– MDN, MCN, MFN o MEN: Navegar
por diversas listas y elementos.
– VOL. (Volumen: MDN o MCN): ajus-
tar el volumen del receptor o el
altavoz mientras habla.
– MFN W: ver la entrada del direc-
torio telefónico.
– MEN REDIAL: ver la lista de re-
marcación.
– MCN CID (identificador de llama-
das): ver la lista de personas
que llamaron.
8
Pasos iniciales
TGMA44_45(es-es)_0606_ver101.pdf 8 2016/06/06 16:13:06

Iconos de la pantalla
Elementos de la pantalla del auricular
Artículos Significado
Dentro del alcance de la unidad base
Fuera del alcance de la unidad base
El potenciador de sonido está encendido.
La línea se está usando.
R Cuando parpadea lentamente: la llamada se ha pues-
to en espera.
R Cuando parpadea rápidamente: se está recibiendo
una llamada entrante.
El amplificador de voz está encendido.
El modo ecológico está encendido.
La reducción de ruido está configurada.
–
Nivel de control de tono (tonos 1 a 6 o tono personaliza-
do)
Z El altavoz está encendido.
El volumen del timbre está apagado.
El modo silencioso está encendido.
El modo de llamadas compartidas está apagado.
La alarma está encendida.
Número del auricular
Nivel de la batería
Llamada bloqueada
En uso
Otro auricular o la unidad base están usando el contes-
tador de llamadas.
Línea en uso
Alguien está usando la línea.
9
Pasos iniciales
TGMA44_45(es-es)_0606_ver101.pdf 9 2016/06/06 16:13:06

Cómo registrar un auricular a una unidad base
1 Unidad base:
Oprima y mantenga oprimido MLOCATOR/INTERCOMN durante
aproximadamente 5 segundos.
R Si todos los auriculares registrados comienzan a timbrar, oprima
MLOCATOR/INTERCOMN de nuevo para detenerlos y después repita
este paso.
2 Auricular:
Coloque el auricular en la unidad base o cargador, y después espere hasta
que suene un pitido largo y aparezca
.
Nota:
R Si suena un tono de error, o si se muestra
, registre el auricular de acuerdo
con las instrucciones de operación de la unidad base.
Funciones de idiomas
Idioma de la pantalla
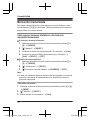
1 MMENUN#110
2 MbN: Seleccione la configuración deseada. a MGUARDARN a MOFFN
Idioma del anuncio por voz
Puede seleccionar el idioma utilizado para las siguiente funciones:
– Guía del contestador de llamadas
– Identificador de llamadas parlante
– Teclado y directorio telefónico por voz
1 MMENUN#112
2 MbN: Seleccione la configuración deseada. a MGUARDARN a MOFFN
R La configuración se aplicará en unos 5 segundos.
10
Pasos iniciales
TGMA44_45(es-es)_0606_ver101.pdf 10 2016/06/06 16:13:06

Accesibilidad
Este producto está diseñado no solo para proporcionar un volumen óptimo, sino
también calidad de sonido óptima, lo que garantiza que cada llamada se
escuche en voz alta y claramente.
Nota:
Para obtener información sobre modelos de unidad base añadibles y funciones
disponibles, visite el sitio web que aparece a continuación.
http://shop.panasonic.com/amplified
Control de tono
Esta función aclara la voz de la persona con la que está hablando, produciendo
una voz más natural que se puede escuchar y entender con mayor facilidad.
Puede configurar esta opción para cada unidad.
Las siguientes configuraciones están disponibles.
Auricular:
– Receptor: “Tono 1-6” y “Tono person. 1-20”
– Altavoz: “Tono 1-4”
– Audífono: “Tono 1-4” y “Tono person. 1-20”
Auricular
Puede seleccionar una configuración de control de tono mientras habla por
teléfono. Hay dos métodos disponibles.
n Uso de la tecla MTONEN
1 Presione MTONEN al costado repetidamente para seleccionar la
configuración deseada mientras está hablando.
2 Para salir, oprima MATRASN o espere unos segundos.
R La configuración seleccionada aparece en la pantalla del auricular
mientras está hablando.
Nota:
R Para
seleccionar una de las configuraciones de “Tono person.”, siga las
instrucciones en “Uso de la tecla MMENUN”, página 12.
11
Accesibilidad
TGMA44_45(es-es)_0606_ver101.pdf 11 2016/06/06 16:13:06

n Uso de la tecla MMENUN
1 Oprima MMENUN mientras habla.
2 MbN: “Control de tono” a MSELEC.N
3 MbN: Seleccione la configuración deseada. a MListoN
R Si selecciona “Tono person.”, elija el tipo deseado. a MListoN
R La configuración seleccionada aparece en la pantalla del auricular
mientras está hablando.
Amplificador de volumen
Esta función le permite incrementar considerablemente el volumen de voz de la
otra persona. Puede configurar esta opción para cada unidad.
ADVERTENCIA
R Esta función está diseñada para usuarios con problemas auditivos. Si otras
personas utilizan el teléfono, asegúrese de desactivar esta función.
R No utilice esta función si no es necesario. El alto volumen emitido por el
producto puede provocar daño en la capacidad auditiva.
R Al oprimir la tecla MBOOSTN, se activa la función de amplificación de volumen.
Utilícela con cuidado. Al máximo de su
capacidad (con las funciones de
volumen y amplificación de volumen configuradas al máximo), el producto
puede emitir sonidos de hasta 40 dB (KX-TGMA44) o 50 dB (KX-TGMA45).
Para evitar daño en la capacidad auditiva, le recomendamos que configure
este producto en la opción de volumen más bajo en el cual pueda escuchar
correctamente.
Activación del amplificador de volumen
1 Oprima MBOOSTN mientras está hablando.
R El indicador BOOST está en rojo.
2 Oprima MjN o MkN al costado repetidamente para seleccionar el volumen
deseado.
R La configuración de volumen deseada aparece en el visor del auricular
mientras habla.
R La configuración de volumen seleccionada se utiliza para futuras
llamadas en las que el amplificador está activado.
12
Accesibilidad
TGMA44_45(es-es)_0606_ver101.pdf 12 2016/06/06 16:13:06

Nota:
R La reducción de ruido se activa automáticamente cuando el amplificador está
activado. En este caso, el menú que le permite desactivar la reducción de
ruido no aparece, incluso después de que oprime MMENUN durante una
llamada.
R
no aparece si la opción de reducción de ruido se desactivó antes de
activar el amplificador de volumen.
R Si activa la función de amplificación automática (página 13), el amplificador
de volumen se activa automáticamente cuando hace o recibe una llamada. Si
la función de amplificación automática está desactivada, el amplificador de
volumen se desactiva automáticamente al finalizar cada llamada.
Desactivación de la amplificación automática
Si la función de amplificación automática está activada, el amplificador de
volumen se activa automáticamente cuando hace o recibe una llamada. Esta
función puede resultarle útil a un usuario con problemas auditivos.
1 MMENUN#782
2 MbN: Seleccione la configuración deseada. a MGUARDARN a MOFFN
R Si el amplificador de volumen está activado, el indicador BOOST está
en
rojo durante una llamada.
Nota:
R Durante una llamada, puede desactivar temporalmente el amplificador de
volumen al oprimir MBOOSTN, y ajustar el volumen al oprimir MjN o MkN al
costado repetidamente.
Cómo ajustar el volumen
Durante una llamada, puede ajustar el volumen al oprimir MjN o MkN al costado
repetidamente.
R La configuración de volumen seleccionada aparece en la pantalla del
auricular.
R La configuración de volumen seleccionada se aplica inmediatamente y
también se utiliza en futuras llamadas. Se utilizan configuraciones diferentes
según si el amplificador de volumen está activado o desactivad
o.
13
Accesibilidad
TGMA44_45(es-es)_0606_ver101.pdf 13 2016/06/06 16:13:06

Configuraciones de volumen disponibles
Las configuraciones disponibles según el modelo y según si el amplificador de
volumen está activado o desactivado.
Indicador
BOOST
Amplificador de
volumen
Configuraciones de vo-
lumen disponibles
Predeter-
minado
Luz apagada Apagado Receptor: 1–15 15
Altavoz: 1–21 15
Audífono: 1–15 15
Luz roja Encendido
KX-TGMA44 Predeter-
minado
Receptor: 12–40 15
Altavoz: 18–30 21
Audífono: 12–40 15
KX-TGMA45 Predeter-
minado
Receptor: 12–50 15
Altavoz: 18–40 21
Audífono: 12–50 15
Amplificador de voz (sube el tono de su voz)
Esta función le permite que la otra persona escuche su voz más alta. Esta
función se puede configurar para cada auricular.
ADVERTENCIA
R La función de amplificación de voz puede utilizarse para que su interlocutor
escuche su voz más alta. Si utiliza esta función innecesariamente, su voz
puede escucharse demasiado alta. Le recomendamos utilizar esta función
solo si la otra persona escucha su voz demasiado baja.
1 Oprima MMENUN mientras está hablando.
14
Accesibilidad
TGMA44_45(es-es)_0606_ver101.pdf 14 2016/06/06 16:13:06

2 MbN: “Amp. de Trans. Enc.” o “Amp. Tr. Apag.” a MSELEC.N
R La configuración seleccionada se aplica inmediatamente y también se
utiliza en futuras llamadas.
Tonos de teclas
Use este procedimiento para cambiar o desactivar el volumen de los tonos que
suenan cuando oprime teclas en el auricular. La configuración predeterminada
es de “Baja”. Incluye tonos de confirmación, de error, etc. Esta función puede
configurarse para cada unidad.
1 Para el auricular: MMENUN#165
2 MbN: Seleccione la configuración deseada. a MGUARDARN a MOFFN
Indicador de mensaje
El indicador de mensaje en el auricular puede indicar el estado de la unidad,
según se explica a continuación.
Indicador Estado
Parpadea rápida-
mente
– Llamada externa o de intercomunicador entrante o
en espera.
– La alarma del auricular está sonando.
Parpadea lentamen-
te
– Hay mensajes nuevos.
– Hay mensajes de voz nuevos.
– Hay llamadas perdidas.
Configuración del indicador de mensaje
Puede habilitar y deshabilitar el indicador de mensaje para cada tipo de estado.
– “Llam. Entrante” (predeterminado: encendido)
– “Nvo Mensaje” (predeterminado: encendido)
– “Nvo. Msj. voz” (predeterminado: encendido)
– “Llam. Perd.” (predeterminado: apagado)
– “Alarma” (predeterminado: encendido)
Puede configurar esta opción para cada unidad.
15
Accesibilidad
TGMA44_45(es-es)_0606_ver101.pdf 15 2016/06/06 16:13:06

1 Para el auricular: MMENUN#278
2 MbN: Seleccione la configuración deseada y oprima MSELEC.N.
R “
” aparece junto a los elementos habilitados.
R Para deshabilitar un elemento, selecciónelo y oprima MSELEC.N
nuevamente. “
” desaparece.
3 MGUARDARN a MOFFN
Uso de dispositivos de dispositivos de
asistencia auditiva
Si usa dispositivos de asistencia auditiva compatibles con un micrófono de
collar, puede conectar el micrófono de collar a un auricular y disfrutar de
conversaciones con manos libres. Al hablar por teléfono, puede hacerlo con el
micrófono de collar o con el micrófono del auricular, dependiendo de las
funciones del micrófono de collar y la config
uración del auricular.
– Dispositivos de asistencia auditiva equipados con una telebobina (T-coil)
– Micrófonos de collar con un enchufe de 3 polos de 2.5 mm
– Micrófonos de collar con un enchufe de 3 polos de 3.5 mm
*1
*1 En este caso, se requiere un adaptador de 3 polos 3.5 mm a 3-polos
2.5 mm.
Para utilizar un dispositivo de asistencia auditiva equipado con telebobina
1 Configure su dispositivo de asistencia auditiva en la opción “T”.
R Consulte el manual de instrucciones del dispositivo de asistencia auditiva
para obtener más detalles.
2 Al hablar, mantenga el auricular cerca de su dispositivo de asistencia
auditiva.
Para usar un micrófono de collar
Al utilizar un micrófono de collar con el auricular, puede hablar usando tanto el
micrófono de collar como el micrófono del auricular.
Importante:
R Debe configurar el tipo de audífono antes de usar el dispositivo (página 17).
16
Accesibilidad
TGMA44_45(es-es)_0606_ver101.pdf 16 2016/06/06 16:13:06

1 Conecte el micrófono de collar al conector del audífono al costado del
auricular.
2 Utilice el auricular normalmente.
R Consulte el manual de instrucciones del micrófono de collar para obtener
más detalles.
R Si el micrófono de collar no tiene un micrófono, hable al micrófono del
auricular.
R Puede usar las funciones amplificador de volumen (página 12),
amplificador de voz (página 14), control de tonos (página
11) y otras
incluso mientras utiliza un micrófono de collar.
Configuración del tipo de audífono
Configure esta opción para que coincida con el tipo de dispositivo conectado.
Puede configurar esta opción para cada unidad.
“Auricular” (predeterminado): deshabilita el micrófono del auricular. El
audífono conectado se utiliza para hablar y escuchar.
“Collar inductivo con Mic”: deshabilita el micrófono del auricular. El
micrófono de collar conectado se utiliza para ha
blar y escuchar.
“Collar inductivo sin Mic”: habilita el auricular del micrófono. El
micrófono de collar conectado se utiliza solamente para escuchar.
1 MMENUN#786
2 MbN: Seleccione la configuración deseada. a MGUARDARN a MOFFN
Apagar el timbre de un solo toque
Auricular
Mantenga oprimido 0 hasta que el auricular emita un pitido para apagar el
timbre. Mientras el timbre esté apagado, el auricular no sonará si recibe una
llamada.
R Puede encender el timbre de nuevo al mantener oprimido 0 hasta que el
auricular emita un pitido.
17
Accesibilidad
TGMA44_45(es-es)_0606_ver101.pdf 17 2016/06/06 16:13:06

Marcación memorizada
Para marcar números fácilmente, puede asignar un número telefónico a cada
tecla de llamada (1 a 9) en el auricular. Todas las entradas de la memoria se
pueden utilizar en cualquier auricular.
Cómo agregar números telefónicos a las teclas de
marcación memorizada
n Al introducir números telefónicos:
1 Mantenga oprimida la tecla de marcación memorizada que desee (1 a
9). a MAÑADIRN
2 MbN: “Manual” a MSELEC.N
3 Introduzca el nombre de una persona (máx. 16 caracteres). a MListoN
4 Introduzca el número telefónico de la persona (máx. 24 dígitos). a
MListoN a MSELEC.N a MOFFN
n Desde el directorio telefónico
:
1 Mantenga oprimida la tecla de marcación memorizada que desee (1 a
9). a MAÑADIRN
2 MbN: “Directorio” a MSELEC.N
3 MbN: Seleccione la entrada deseada. a MGUARDARN a MOFFN
Nota:
R Si edita una entrada del directorio telefónico que está asignada a una tecla de
marcación memorizada, la entrada editada no se transferirá a la tecla de
marcación memorizada.
Cómo editar una entrada
1 Mantenga oprimida la tecla de marcación memorizada que desee (1 a 9).
a MMENUN
2 MbN: “Editar” a MSELEC.N
3 Edite el nombre de ser necesario. a MListoN
18
Accesibilidad
TGMA44_45(es-es)_0606_ver101.pdf 18 2016/06/06 16:13:06

4 Edite el número telefónico si es necesario. a MListoN a MSELEC.N a
MOFFN
Cómo borrar una entrada
1 Mantenga oprimida la tecla de marcación memorizada que desee (1 a 9).
a MMENUN
2 MbN: “Borrar” a MSELEC.N
3 MbN: “Sí” a MSELEC.N a MOFFN
Cómo ver una entrada y hacer una llamada con el auricular
1 Mantenga oprimida la tecla de marcación memorizada deseada (1 a 9).
2 Para hacer una llamada, oprima MTALKN.
19
Accesibilidad
TGMA44_45(es-es)_0606_ver101.pdf 19 2016/06/06 16:13:06
-
 1
1
-
 2
2
-
 3
3
-
 4
4
-
 5
5
-
 6
6
-
 7
7
-
 8
8
-
 9
9
-
 10
10
-
 11
11
-
 12
12
-
 13
13
-
 14
14
-
 15
15
-
 16
16
-
 17
17
-
 18
18
-
 19
19
-
 20
20
-
 21
21
-
 22
22
-
 23
23
-
 24
24
-
 25
25
-
 26
26
-
 27
27
-
 28
28
-
 29
29
-
 30
30
-
 31
31
-
 32
32
-
 33
33
-
 34
34
-
 35
35
-
 36
36
-
 37
37
-
 38
38
-
 39
39
-
 40
40
-
 41
41
-
 42
42
-
 43
43
-
 44
44
-
 45
45
-
 46
46
-
 47
47
-
 48
48


Panasonic KXTGMA44 Instrucciones de operación
- Categoría
- Telefonos
- Tipo
- Instrucciones de operación
- Este manual también es adecuado para
en otros idiomas
Artículos relacionados
-
Panasonic KXTGF743 Instrucciones de operación
-
-
-
-
-
Panasonic KXTGA760 Instrucciones de operación
-
-
-
-
Panasonic KXTGFA61 Manual de usuario