Craftsman 18A-182-799 El manual del propietario
- Categoría
- Cortadoras de césped
- Tipo
- El manual del propietario
Este manual también es adecuado para

Operator's Manual
CRRF[SM ®
19=inch Electric
Rotary Mower
Model No. 247.370160
CAUTION: Before using
this product, read this
manual and follow all
safety rules and operating
instructions.
,, SAFETY
oASSEMBLY
o OPERATION
o MAINTENANCE
o PARTS LIST
o ESPANOL R 24
o his symbol onthe product's nameplatemeansit islistedby
LISTEDUNDERWRITERSLABORATORIESINC,
Sears, Roebuck and Co., Hoffman Estates, IL 60179, U.S.A.
Visit our web site: www.craftsman.com FORMNO.769-04643A
November17,2009

ServiceandMaintenance..............................................15
Off-SeasonStorage........................................................18
Troubleshooting..............................................................19
PartsList.........................................................................20
Espa_ol............................................................................24
ServiceNumbers.............................................BackCover
Craftsman TwoYearLimited Warranty
If thisCraftsmanproductfailsduetoa defectinmaterialor workmanshipwithintwoyearsfromthedateofpurchase,returnittoanySearsstore,
SearsServiceCenter,orotherCraftsmanoutletintheUnitedStatesforfreerepair.
Thiswarrantydoesnotinclude:
• Expendableitemswhichcanwearoutfromnormalusewithinthewarrantyperiod,suchasthegrassbagandrotarymowerblade.
Repairsnecessarybecauseofoperatorabuseor negligence,includingbentmotorshaftsandthefailuretooperateor maintainthe
equipmentaccordingtoall suppliedinstructions.
Thiswarrantyappliesforonly90daysifthis productiseverusedforcommercialorrentalpurposes.
ThiswarrantyappliesonlywhilethisproductisusedintheUnitedStates.
Thiswarrantygivesyouspecificlegalrights,andyoumayalsohaveotherrightswhichvaryfromstatetostate.
Sears, Roebuckand Co.,Hoffman Estates,IL 60179
Motor: 12Amperes
ModelNumber
SerM Number
Dateof Purchase
Recordthemodelnumber,serialnumber,
anddateof purchaseabove.
©SearsBrands,LLC 2

Thissymbolpointsout importantsafetyinstructions
which,ifnotfollowed,couldendangerthepersonal
safetyand/orpropertyofyourselfandothers.Read
andfollowall instructionsin thismanualbefore
attemptingtooperatethismachine.Failuretocomplywiththese
instructionsmayresultinpersonalinjury.Whenyouseethissymbol,
HEEDITSWARNING!
Your Responsibility: Restricttheuseofthis powermachineto
personswhoread,understand,andfollowthewarningsand instruc-
tionsinthis manualandonthemachine.
Thismachinewasbuilttobeoperatedaccordingtothe rulesfor
safeoperationinthis manual.Aswithanytype ofpowerequipment,
carelessnessorerroronthepartoftheoperatorcanresultin serious
injury.Thismachineiscapableofamputatinghandsandfeetand
throwingobjects.Failuretoobservethefollowingsafetyinstructions
couldresultin seriousinjuryor death.
Whenusingelectriclawnmowers,basicsafetyprecautionsshould
alwaysbe followedto reducetheriskoffire,electricshock,and
personalinjury.Thesebasicprecautionsincludethefollowing:
Double Insulated Lawn Mower
Doubleinsulationisa conceptinthesafetyofelectriclawnmowers,whicheliminatestheneedfortheusualthree-wire
groundedpowercordand groundedpowersupplysystem.Whereverthereiselectriccurrentin themower,therearetwo
completesetsof insulationtoprotecttheuser.All exposedmetalpartsareisolatedfromtheinternalmetalmotorcompo-
nentswithprotectinginsulation.
Servicingofa lawnmowerwithdoubleinsulationrequiresextremecareandknowledgeofthesystemandshouldbe
performedonlybyaqualifiedservicetechnician.Forrepairservicewesuggestyoutakethelawnmowertoyournearest
authorizedservicedealer.Alwaysuseoriginalequipmentmanufacturer's(OEM)replacementpartswhenservicing.
CHILDREN
Tragicaccidentscanoccuriftheoperatoris notalerttothepresence
ofchildren.Childrenare oftenattractedtothemowerandthe mowing
activity.Theydo notunderstandthedangers.Neverassumethat
childrenwillremainwhereyoulastsawthem.
• Keepchildrenoutofthemowingareaand underwatchfulcareof
a responsibleadultotherthantheoperator.
Bealertandturnmoweroff ifa childentersthearea.
o
o
Beforeandwhilemovingbackwards,lookbehindanddownfor
smallchildren.
• Useextremecarewhenapproachingblindcorners,doorways,
shrubs,trees,or otherobjectsthat mayobscureyourvisionof a
childwhomayrunintothemower.
Neverallowchildrenunder14yearsofagetooperatethis machine.
Children14andovershouldreadandunderstandtheinstructionsand
safeoperationpracticesin thismanualandon themachineandbe
trainedand supervisedbyanadult.
OPERATION
General Operation:
• Readthisoperator'smanualcarefullyin itsentiretybefore
attemptingtoassemblethismachine.Read,understand,and
followall instructionsonthemachineandinthemanual(s) before
operation.Keepthis manualina safeplaceforfutureand regular
referenceandfororderingreplacementparts.
• Becompletelyfamiliarwiththecontrolsandtheproperuseof this
machinebeforeoperatingit.
• Thismachineisa precisionpieceofpowerequipment,nota
plaything.Therefore,exerciseextremecautionatalltimes.This
machinehasbeendesignedtoperformonejob: tomowgrass.
Donotuseitforanyotherpurpose.
• Neverallowchildrenunder14yearsofagetooperatethis
machine.Children14andovershouldreadand understandthe
instructionsandsafeoperationpracticesinthis manualandon
themachineandbetrainedandsupervisedbyan adult.
• Onlyresponsibleindividualswhoarefamiliarwiththeserulesof
safeoperationshouldbeallowedtousethismachine.
• Thoroughlyinspecttheareawheretheequipmentistobe used.
Removeall stones,sticks,wire,bones,toysand otherforeign
objectswhichcouldbetrippedoveror pickedupandthrownby
theblade.Thrownobjectscancauseseriouspersonalinjury.
• Planyourmowingpatterntoavoiddischargeofmaterialtoward
roads,sidewalks,bystandersand thelike.Also,avoiddischarg-
ing materialagainsta wallor obstructionwhichmaycause
dischargedmaterialtoricochetbacktowardtheoperator.
• Tohelpavoidbladecontactora thrownobjectinjury,stayin
operatorzonebehindhandlesandkeepchildren,bystanders,
helpersandpetsatleast75feetfrommowerwhileit isin opera-
tion.Stopmachineifanyoneentersarea.
• Alwayswearsafetyglassesor safetygogglesduringoperation
andwhileperformingan adjustmentor repairtoprotectyoureyes.
Thrownobjectswhichricochetcancauseseriousinjurytothe
eyes.
3

• Wearsturdy,rough-soledworkshoesandclose-fittingslacks
andshirts.Shirtsandpantsthatcoverthearmsand legsand
steel-toedshoesarerecommended.Neveroperatethismachine
in barefeet,sandals,slipperyorlightweight(e.g.canvas)shoes.
Donotputhandsor feetnearrotatingpartsorundercuttingdeck.
Contactwithbladecanamputatehandsandfeet.
A missingordamageddischargechutecancausebladecontact
orthrownobjectinjuries.
Manyinjuriesoccurasa resultof themowerbeingpulledoverthe
footduringa fallcausedbyslippingor tripping.Donotholdonto
themowerifyouarefalling;releasethehandleimmediately.
• Neverpullthemowerbacktowardyouwhileyouarewalking.If
youmustbackthemowerawayfroma wallorobstructionfirst
lookdownand behindto avoidtrippingandthenfollowthese
steps:
• Stepbackfrommowertofullyextendyourarms.
• Besureyouarewellbalancedwithsurefooting.
• Pullthemowerbackslowly,nomorethanhalfwaytowardyou.
• Repeatthesestepsasneeded.
• Donotoperatethemowerwhileundertheinfluenceof alcoholor
drugs.
• Stayalert-- Watchwhatyouaredoing.Usecommonsense.Do
notoperatelawnmowerwhenyouaretired.
• Themotor/bladecontrolhandleisa safetydevice.Neverattempt
tobypassitsoperation.Doingsomakesthesafetydevice
inoperativeand mayresultinpersonalinjurythroughcontact
withtherotatingblade.Themotor/bladecontrolhandlemust
operateeasilyinbothdirectionsandautomaticallyreturnto the
disengagedpositionwhenreleased.
• Neveroperatethemowerintherainor indampor wetgrass.
Alwaysbesureof yourfooting. Aslipandfallcancauseserious
personalinjury.If youfeelyouarelosingyourfooting,releasethe
motor/bladecontrolhandleimmediatelyandthebladewillstop
rotatingwithinthreeseconds.
• Mowonlyindaylightor goodartificiallight.Walk,neverrun.
• Stopthemotor/bladewhencrossinggraveldrives,walksor roads.
• If theequipmentshouldstartto vibrateabnormally,stopthe
engineandcheckimmediatelyforthecause.Vibrationisgener-
allyawarningof trouble.
Shutthemotoroff andwaituntilthebladecomestoa complete
stopbeforeremovingthegrasscatcheror uncloggingthechute.
Thecuttingbladecontinuesto rotatefora few secondsafterthe
motoris shutoff.Neverplaceanypartofthebodyin theblade
areauntilyouare surethebladehasstoppedrotating.
• Neveroperatemowerwithoutpropertrail shield,discharge
chute,grasscatcher,motor/bladecontrolhandleorothersafety
protectivedevicesin placeandworking.Neveroperatemower
withdamagedsafetydevices.Failuretodo so,can resultin
personalinjury.
GroundFaultCircuitInterrupter(GFCI)protectionshouldbe
providedon thecircuit(s)oroutlet(s)to beusedforthelawn
mower.Receptaclesareavailablehavingbuilt-inGFCIprotection
and maybe usedforthis measureofsafety.
Topreventelectricshockuseonlywitha ULlistedextension
cordsetsuitableforoutdooruse,suchasTypeSW-A,SOW-A,
STW-A,STOW-A,SJW-A,SJOW-A,SJTW-A,orSJTOW-A.
ExtensionCord--Makesureyourextensioncordsetisin good
conditionandisheavyenoughtocarrythecurrentloadyourlawn
mowerwilldraw.If indoubt,usethenextheaviergaugecord.The
smallerthegaugenumber,theheavierthecord.Anundersized
cordwillcauseadrop inlinevoltageresultinginlossof powerand
overheating.
MINIMUMWIRESIZEFOREXTENSIONCORDS
FOR120VOLTAPPLIANCESUSING10- 12AMPS
CordLength(ft.) 25 50 100 150
WireSize(AWG) 16 16 14 12
• Toreducethelikelihoodofdisconnectionoftheextensioncordset
fromthemower,besuretousethecordrestraintprovidedaswell
asa modern,tightlyfittingextensioncord.
• Toreducetheriskofelectricshock,this lawnmowerhasa
polarizedplug(onebladeiswiderthantheother)andwillrequire
theuseofa polarizedextensioncord.Themowerplugwillonly
fit intothepolarizedextensioncordoneway.Iftheplugdoesnot
fit fullyintotheextensioncord,reversetheplug.Iftheplugstill
doesnotfit,obtaina correctpolarizedextensioncord.A polarized
extensioncordwill requiretheuseofa polarizedwalloutlet.This
plugwillfit intothepolarizedoutletonlyoneway.Iftheplugdoes
notfit fullyintothewalloutlet,reversetheplug.Iftheplugstill
doesnotfit,contactaqualifiedelectricianto installtheproper
walloutlet.Donotchangetheequipmentplug,extensioncord
receptacle,or extensioncordpluginanyway.
• Ifextensioncordisdamagedinanymannerduringuse,discon-
nectextensioncordfromhousereceptaclebeforeunplugging
mower.
CircuitBreaker/Fuses--Themowershouldbeoperatedon a 15
AMPor 20AMPcircuit.If difficultyinstartingisexperiencedwith
a standard15AMPfuseorcircuitbreakeror themower'sbuilt-in
overloadprotectionswitchfrequentlytrips,contactyournearest
authorizedservicedealer.Donotusea higherratedcircuit
breakeror fusewithoutconsultingyourpowercompany.
Donotabusethecordbypullingthemowerbythecordoryank-
ingittodisconnectit fromthereceptacle.Keepcordfromheat,
oil,andsharpedges.
Onlyusepartsandaccessoriesmadeforthismachineby
manufacturer.Failuretodo socanresultin personalinjury.
Ifsituationsoccurwhicharenotcoveredinthis manual,usecare
andgoodjudgment.ContactCustomerSupportforassistanceor
thenameofthenearestservicedealer.
4

SRope Operation:
Slopesare amajorfactorrelatedto slipandfallaccidentswhichcan
resultinsevereinjury.Operationon slopesrequiresextracaution.If
youfeeluneasyona slope,do notmowit. Foryoursafety,usethe
slopegaugeincludedas partofthis manualtomeasureslopesbefore
operatingthis machineon a slopedor hillyarea.Iftheslopeisgreater
than15degrees,donotmowit.
Do:
1. Mowacrossthefaceofslopes;neverup anddown.Exercise
extremecautionwhenchangingdirectionon slopes.
2. Watchforholes,ruts,rocks,hiddenobjects,or bumpswhichcan
causeyoutoslipor trip.Tallgrasscan hideobstacles.
3. Alwaysbe sureofyourfooting.A slipandfallcancauseserious
personalinjury.If youfeelyouare losingyourbalance,release
themotor/bladecontrolhandleimmediately,andthebladewill
stoprotatingwithinthree(3) seconds.
DoNot:
1. Donotmowneardrop-offs,ditchesorembankments,youcould
loseyourfootingor balance.
2. Donotmowslopesgreaterthan 15degreesasshownonthe
slopegauge.
3. Donotmowonwetgrass.Unstablefootingcouldcauseslipping.
SERVICE
• Whenservicingmower,useoriginalequipmentmanufacturer
(OEM)replacementpartslistedinthis manual."Useofparts
whichdonotmeettheoriginalequipmentspecificationsmaylead
to improperperformanceandcompromisesafety!"
• Beforecleaning,repairing,or inspecting,makecertaintheblade
andall movingpartshavestopped.Disconnectthepowercord
whennotin useandto preventunintendedstarting.
• Followinstructionsforlubricatingandchangingaccessories.
• Inspectlawnmowercordandextensioncordsperiodicallyand
replaceimmediately,ifdamaged.Lawnmowercordshouldbe
repairedbyanauthorizedservicedealeronly.
• Keephandlesdry,cleanandfreefromoil andgrease.
• Toreducea firehazard,keepthemotorfreeofgrass,leavesand
debrisbuild-up.
• Checkthebladeand motormountingboltsatfrequentintervals
forpropertightness.Also,visuallyinspectbladefordamage
(e.g.,bent,cracked,andworn)Replacebladewiththeoriginal
equipmentmanufacturer's(OEM)bladeonly,listedin thismanual.
• Maintainyourmowerwithcare-- Keepmowerbladesharpand
cleanforbestandsafestperformance.Mowerbladesaresharp
andcancut,wrapthebladeor wearglovesanduseextracaution
whenservicingthem.
• Keepallnuts,bolts,and screwstightto besuretheequipmentis
in safeworkingcondition.
• Nevertamperwith safetydevices.Checktheirproperoperation
regularly.
• Afterstrikingaforeignobject,stopthemotoranddisconnect
thepowercord.Thoroughlyinspectthemowerforanydamage.
Repairthedamagebeforeoperatingthemower.
• Grasscatchercomponents,dischargecover,andtrailshieldare
subjecttowearanddamagewhichcouldexposemovingpartsor
allowobjectstobe thrown.Forsafetyprotection,frequentlycheck
componentsandreplaceimmediatelywithoriginalequipment
manufacturer's(OEM)partsonly,listedinthis manual.
• Whennotin use,storelawnmowerindoorsina dryarea,locked-
up and/oroutofthereachofchildren.
• Maintainor replacesafetyandinstructionallabels,asnecessary.
• Accordingtothe ConsumerProductsSafetyCommission(CPSC)
andthe U.S.EnvironmentalProtectionAgency(EPA),this product
hasanAverage UsefulLifeof seven(7)years,or 140hoursof
operation.AttheendoftheAverage UsefulLifehavethemachine
inspectedannuallybyanauthorizedservicedealertoensurethat
all mechanicalandsafetysystemsareworkingproperlyandnot
wornexcessively.Failuretodosocanresultinaccidents,injuries
or death
SAVE THESE INSTRUCTIONS!
5

SAFETY SYMBOLS
Thispagedepictsanddescribessafetysymbolsthatmayappearonthis product.Read,understand,andfollowallinstructionson themachine
beforeattemptingtoassembleandoperate.
A
• ®
READ THE OPERATOR'S MANUAL(S)
Read,understand,andfollowall instructionsinthemanual(s)beforeattemptingtoassembleand
operate.
DANGER m ROTATING BLADES
Toreducetheriskofinjury,keephandsandfeetaway.Donotoperateunlessdischargecoveror grass
catcherisin itsproperplace.Ifdamaged,replaceimmediately.
DANGER m BYSTANDERS
Donotmowwhenchildrenorothersarearound.
DANGER = HAND/FOOT CUT
Keephandsandfeetawayfromrotatingparts.
DANGER = THROWN DEBRIS
Removeobjectsthatcanbethrownbythebladein anydirection.Wearsafetyglasses.
DANGER = SLOPES
Useextracautiononslopes.Donotmowslopesgreaterthan 15°.
WARNING= ELECTRICAL SHOCK
Donotoperatethemowerintherain.

e TOREDUCETHERiSKOF ELECTRICSHOCK,DONOTEXPOSEe REMOVEOBJECTSTI-_TCANBETHROWNBYTHEBLADEiN
UNiTTOWATEROR OPERATEUNiTONWETGROUND, ANYDiRECTiON,WEARSAFETYGLASSES,
REPLACEDAMAGEDCORDiMMEDiATELY.
e USE EXTRACAUTIONONSLOPES. DONOTMOW SLOPES
e DISCONNECTFROM SUPPLYCiRCUiTBEFORESERViCiNGOR GREATERTHAN15°. MOWACROSS,NEVERUP ANDDOWN,
REMOVINGBLADE, NEVERPULLMOWERCLOSETO YOURFEET.LOOKDOWN
e KEEPHANDSAND FEETAWAYFROM ROTATINGPARTS, AND BEHINDBEFOREANDWHILE MOVINGBACKWARDS,
e DO NOT MOW WHEN CHILDREN OR OTHERS ARE AROUND.
7

05
g3
O
._c
o
o
E
q3
O
"5
O
g3
o
o5
E
o
cb
o
m
Go
q3
E
CD
.£o
q3
O5
(D
O5
I
Donotmowoninclineswitha slopein excessof 15degrees(a riseof approximately2-1/2feetevery10feet).
OperateWALK-BEHINDmowersacrossthefaceofslopes,neverup anddownslopes.
Sight and h01dthis levelwith averticaltree...
or afence post
15°
|
15°
¢0

This pageleft intentionallyblank.
9

NOTE:Standbehindthemowerasif youweregoingtooperateit. Your
righthandcorrespondstotherightsideofthemower;yourleft hand
correspondstotheleftsideofthemower.
LOOSE PARTS IN CARTON
Thefollowingitemsarepackagedloosein thecarton:
Operator'sManual,GrassCatcher
REMOVING THE UNIT FROM THE CARTON
1. Cutthecornersof thecartonandlaythesidesflaton theground.
Removeallpackinginserts.
2. Movethemowerandgrasscatcheroutofthecarton.
3. Makecertainthecartonhasbeencompletelyemptiedbefore
discardingit.
ASSEMBLING THE HANDLE
NOTE:Removeanypackingmaterialwhichmaybe betweenupper
andlowerhandles.
1. Looseneachhandknobfoundon theinsideoftheupperhandle.
2. Gentlylift andpivottheupperhandleintotheoperatingposition
asshownin Figure1.Makecertainthelowerhandleis seated
securelyintothehandlemountingbrackets.
3. Tightenstarknobssecuringlowerhandletohandlebrackets.See
Figure2. Makecertainthelowerhandleisseatedsecurelyinto
thehandlemountingbrackets.
J
Figure2
CORD GUIDE BAR
Attachthecordguidebarwithextensioncordretainertotheupper
handleas shownin Figure3.
f
Figure1
/
Figure3
10

NOTE:Donotplugyourextensioncordintothepowersourcerecep-
tacle(outlet)priortoroutingitthroughthecordretainerandconnecting
theextensioncordtothemower'scordoutletreceptacle.
Toproperlyrouteyourextensioncordthroughthecordretainer:
1. Approximately14to 16-inchesfromits end,creaseyourextension
cordtoforma tightloop.
2. Pushtheloopthroughthebottomholein thecordretainer.See
Figure4-A.
3. Positiontheloopovertheclipfoundon thecordretainerand pull
downuntilthecordfitssnuglyintotheclip.SeeFigure4-B.
A
B
GRASS CATCHER
Followstepsbelowtoassemblethegrasscatcher(ifneeded).
Makecertainbagisturnedrightsideoutbeforeassembling
(warninglabelwillbeon theoutside).
a. Placebagoverframesothat itsblackplasticsideisatthe
bottom.
b. Slip plasticchannelof grassbagoverframerods.See Figure
5.All theplasticchannelsexceptcentertopof bagattach
fromoutsideofbag.
c. Attachcentertopofbagfrominsideofbag.
Figure5
Figure4
NOTE:Usea Ubapprovedextensioncord.A 100-foot,14-gaugecord
isrecommended.A50-foot,16-gaugecordisacceptable.Referto the
smallchartfoundin SafeOperationPractices.
Thecordretainerandtheguidebarworktogethertosecureyour
extensioncordandsafelylimititsmovement.Thecordretainer(with
theextensioncord)willslidealongtheguidebarasthemoweris
movedtotheleftorto theright.
11

,
Followstepsbelowto attachgrasscatcher:
a, Lift reardischargedoor,
b, Removerearmulchingbaffle,
Placegrasscatcheronthepivotrod.Letgoofdischarge
doorsothat itrestson thegrasscatcher.See Figure6.
X zS _',,
"_'L'4 /
(
Figure6
Toremovegrasscatcher,lift reardischargedooronthemower.Lift
grasscatcherupandout,off ofthepivotrod.Releasereardischarge
doortoallowittocloserearopeningofmower.
Neveroperatemowerunlessthehookson thegrasscatcherare
firmlyseatedonthepivotrodandthereardischargedoorrestsfirmly
againsttopofthegrasscatcher.
CONVERTING TO SIDE DISCHARGE
Toconverttosidedischarge,makesuregrasscatcheris offoftheunit,
therearmulchingbaffleis installed,and reardischargedoor isclosed.
1. Onthesideofthemower,liftthemulchingplug.
2. Slidechutehooksunderhingepinon mulchingplugassembly.
SeeFigure7.
NOTE:Donotremovesidemulchingplugatanytime,evenwhen
youarenotmulching.
f ......
\
"\
\
Figure7
CUTTING HEIGHT ADJUSTMENT
Thecuttingheightadjustmentleveris locatedabovetherearleft
wheel.SeeFigure8.
f
//
/
J
Figure8
1. Pulltheleveroutandawayfromthemower.
2. Movethe leverforwardor backfordesiredcuttingheight.
3. Releaselevertowardsmowerdeck.
12

f
Motor/BladeControlHandle
CordRestraint
\\
OverloadProtectionSwitch
CuttingHeight
AdjustmentLever
MOTOR/BLADE CONTROL HANDLE
Themotor/ bladecontrolhandleisa safetydevice.Neverattemptto
bypassits operations.
Themotor/bladecontrolhandleislocatedon theupperhandleofthe
mower.SeeFigure9.Themotor/bladecontrolhandleengagesand
disengagesthemotorand blade.
OVERLOAD PROTECTION SWITCH
Themowerisequippedwithanoverloadprotectionswitch,locatedon
themotor/bladecontrol.Thisoverloadprotectionswitchmaypopout
whentoomuchstrainisplacedon themotor.Referto Maintenance&
AdjustmentsSectiontoresetthis switch.
CORD RESTRAINT
STARTING MOTOR
Avoidaccidentalstarting.Makesureyouarein theoperatingposition
behindthemowerwhenusingit.Toavoidseriousinjury,theoperator
andunitshouldbe ina stablepositionwhilestarting.
Connecting to an Electrical Power Source
This mowershouldbeoperatedon a 15or 20 AMPcircuit.If you
experiencedifficultyin startingwitha standard15AMPfuseorcircuit
breaker,contactyournearestSearsor otherqualifiedservicedealer.
Donotusea higherratedfuseorbreakerwithoutconsultingyour
powercompany.
Thecordrestraintislocatedonthebackoftheupperhandle,and
whenusedproperly,helpstoprotectthemotor/bladecontroland
extensioncordpoweringthe unit.
CUTTING HEIGHT ADJUSTMENT LEVER
Thecuttingheightadjustmentleverislocatedabovetheleft rear
wheel.Toadjustthecuttingheight,refertotheAssemblySection.
13

NOTE:Connectyourextensioncordtothemoweras instructed
in theSetUpsectionpriortopluggingyourextensioncordintoan
electricaloutlet.Referto Figure10.
f
Figure10
1. Plugyourextensioncordintoanyconvenient(indoororoutdoor)
120-volt,60-cycleACoutletor receptacle.Yourmowerwilloper-
atesatisfactorilyon acircuitwitha 15amperebreaker.
NOTE:Toavoidtrippingcircuitbreakers,selectan outleton a
circuitthatisnotoverloaded.DoNOTselectan outletthatison a
circuithostingappliancessuchasa refrigerator.
2. Standbehindthemowerintheoperatingposition.
3. Depressthe(red)starterbuttonandholdit in.SeeFigure11.
NOTE:Startingthemower'smotoralsoengagesthe blade.
4. Whileholdingthestarterbuttonin,pivotthemotor/bladecontrol
handleupwardagainsttheupperhandleto startthemotorand
engagetheblade.See Figure11.
f
_, ,J
Figure11
NOTE:Themower'smotorwillNOTstartifyoufailtoholdthe
starterbuttonin whilepivotingthemotor/bladecontrolhandle
upward.
5. Releasethe(red)starterbutton.
STOPPING THE MOTOR
Thebladecontinuesto rotatefora fewsecondsafterthemotoris
shutoff.If motordoesnotcometo a stopwhenthemotor/blade
controlhandleisreleased,contactaSearsorotherauthorized
servicedealer.
Releasetheblade/motorcontrolhandleto stopthemotorandblade.
USING YOUR LAWN MOWER
Besurethatlawnisclearof stones,sticks,wires,orotherobjects
whichcoulddamagethelawnmoweror motor.Suchobjectscouldbe
accidentallythrownbythemowerinanydirectionandcauseserious
personalinjuryto theoperatorandothers.
Ifyoustrikea foreignobject,stopthemotor,and unplugfromthe
powersupplycircuit.Thoroughlyinspectthemowerforanydamage,
and repairthedamagebeforerestartingandoperatingthemower.
Excessivevibrationofthemowerduringoperationisan indicationof
damage.Theunitshouldbepromptlyinspectedandrepaired.
Topreventelectricshock,do notoperatethemowerin dampor
wetconditions.
• Alwaysstartfromthepointclosesttothepowersourcewherethe
cordisconnected.Nevermowaroundthelawnincircles;travel
backandforthacrossthelawn,startingfromthepointclosestto
theoutletandthenmovingawayfromtheoutletsothecordliesin
thecut portionofthelawn,outoftheway.
• Donotallowtheextensioncordtowraparoundtrees,shrubs
or otherobstacles.Whenpickinguptheextensioncord,wind
thecordina seriesofequalloopson eachsideofyourhandto
preventsnarling.
USING AS MULCHER
Formulchinggrass,removethegrasscatcheror sidedischargechute
fromthemower.Foreffectivemulching,donotcutwetgrass.Ifthe
grasshasbeenallowedtogrowinexcessoffourinches,mulchingis
notrecommended.Usethegrasscatcherto bagclippingsinstead.
USING GRASS CATCHER
Youcanusethegrasscatchertocollectclippingswhileyouare
operatingthemower.
1. AttachgrasscatcherfollowinginstructionsintheAssembly
section.Grassclippingswillautomaticallycollectinbagasyou
runmower.Operatemowertillgrassbagisfull.
2. Stopmotorcompletelybyreleasingtheblade/motorcontrol
handle.Makesurethattheunithascometoa completestop.
3. Liftdischargedoorandpullgrassbagupandawayfromthe
mowerto removethebag.Disposeofthegrassclippingsand
reinstallthebagwhencomplete.
14

MAINTENANCE
General Recommendations
o
o
Alwaysobservesafetyruleswhenperforminganymaintenance.
Thewarrantyon thislawnmowerdoesnotcoveritemsthathave
beensubjectedtooperatorabuseor negligence.Toreceivefull
valuefromwarranty,operatormustmaintainthelawnmoweras
instructedhere.
• Alladjustmentsshouldbecheckedatleastonceeachseason.
• Periodicallycheckall fastenersand makesurethesearetight.
Alwaysstopthemotoranddisconnectfromthepowersourcebefore
cleaning,lubricatingor performinganyrepairsor maintenanceonthe
lawnmower.
Lubrication
Lubricatethewheelsatleastoncea seasonwithlightoil (ormotor
oil).If wheelsareremovedforanyreason,lubricatesurfaceofthe
pivotarmandinnersurfaceofthewheelwithlightoil.See
Figure12.
Figure12
2. Lubricatethetorsionspringandpivotpointonthereardischarge
doorandsidemulchplugperiodicallywith lightoilto preventrust.
SeeFigure12.
Deck Care
Toreducethe riskofelectricshock,do notexposethemowerto
water.
Theundersideofmowerdeckshouldbecleanedaftereachuseas
grassclippings,leaves,dirt andotherdebriswillaccumulate.This
accumulationofgrassclippings,etc.,isundesirableas itwillpromote
rustandcorrosion.
1. Removeanybuildupof grassandleavesonor aroundthemotor
cover(donotusewater).Wipethemowercleanwitha drycloth
occasionally.
2. Ifdebrishasbuiltup ontheundersideoftheunit,tilt themower
forwardor onits sideandscrapeitcleanwitha suitabletool.
IMPORTANT:Donotusea pressurewasheror gardenhose
tocleanyourunit.Thesemaycausedamagetoelectric
components,ortheelectricmotor.Theuseofwaterwillresultin
shortenedlifeand reduceserviceability.
Resetting Overload Protection Switch
Thismowerisequippedwithanoverloadprotectionswitchtoprevent
overheatingdamageto themotor.
Iftheoverloadprotectionswitchpopsout:
1. Releasethemotor/bladecontrolhandleanddo NOTrestartthe
mowerforatleastoneminute,allowingtheelectricmotortimeto
cool.
2. Presstheoverloadprotectionswitchinwardto reset.See
Figure13.
f-
/
Overload
Protection
Switch
Figure13
Iftheoverloadprotectionswitchpopsoutshortlyafter resetting:
1. Releasethemotor/bladecontrolhandleanddo NOTrestartthe
mowerforatleast15minutestoallowtheelectricmotorextra
timetocool.
2. Presstheoverloadprotectionswitchinwardto reset.
3. Restartunit.
NOTE:Iftheoverloadprotectionswitchpopsoutrepeatedly
duringoperationor willnotremainin whenattemptingto reset,
contactSearsor anotherqualifiedservicedealerforrepair.
15

Replacing Trail Shield
Neveroperatemowerunlessthetrailshieldisinplaceandworking.
Neveroperatemowerwithdamagedsafetydevices.Failuretodo so
canresultin personalinjury.
BLADE CARE
Periodicallyinspectthebladeadapterforcracks,especiallyifyou
strikea foreignobject.Replacewhennecessary.Followthesteps
belowforbladeservice.
Blade Removal
Thetrailshieldissubjectto wearanddamagewhichcouldexpose
movingpartsor allowobjectstobethrown.Forsafetyprotection,
frequentlycheckthetrailshieldandreplaceimmediatelywithoriginal
equipmentmanufacturer's(OEM)partonly,931-05686.
1. Toremovetrailshield,lift reardoorandremovescrewsholding
trailshieldin place.
2. Pressshieldin oneithersideto removefromhole.SeeFigure14.
f
J
Figure14
Removeshieldfromoppositeholeandreplacewithnewshieldin
theoppositeorderandmannerofremoval.
Whenremovingthecuttingbladeforsharpeningor replacement,
protectyourhandswitha pairofheavyglovesor usea heavyragto
holdtheblade.Becertainto stopmotorandunplugmower.
.
2.
f
Stopthemotorand unplugthemower.Turnthemoweron itsside.
Placea 2x4blockofwoodapproximately8.5"longbetweenthe
deckhousingandthecuttingbladetoact asa stabilizer.See
Figure15.
.
Figure15
,J
Loosenandremovethebladebolt,lockingplate,andblade.See
Figure15.
16

Blade Sharpening
Toproperlysharpenthecuttingblades,removeequalamountsof
metalfrombothendsd thebladesalongthecuttingedges,parallelto
thetrailingedge,ata 250to300angle.See Figure16.
Figure16
J
NOTE:Itisimportantthateachcuttingbladeedgebegroundequally
tomaintainproperbladebalance.Apoorlybalancedbladewillcause
excessivevibrationandmaycausedamagetothemowerand result
in personalinjury.Thebladecanbe testedbybalancingiton a round
shaftscrewdriver.Grindmetalfromtheheavysideuntilit balances
evenly.
Blade Installation
An unbalancedbladewillcauseexcessivevibrationwhenrotating
at highspeeds.It maycausedamageto mowerandcouldbreak,
causingpersonalinjury.
1. Placethecuttingblade,lockingplate,andbladebolton themotor
shaftandthreadthebladeboltin fingertight.
NOTE:Makecertainto replacethepartsintheexactorderin
whichtheywereremoved.Wheninstallingthecuttingblade,
be sureit isinstalledwiththecurvedendspointingtowardsthe
mowerdeckandnottowardstheground.
2. Torquethebladeboltdownusinga torquewrenchto assurethe
boltistightenedproperly.Therecommendedtorquefortheblade
boltis 170-220in.Ibs.
Toensuresafeoperationofyourmower,periodicallychecktheblade
boltforcorrecttorque.
MAINTENANCE SCHEDULE
Alwaysstopthemotorandunplugmowerbeforecleaning,lubricating
or performinganyrepairsor maintenanceonthelawnmower.Always
wearsafetyglassesduringoperationorwhileperforminganyadjust-
mentsorrepairs.
Followthemaintenanceschedulegivenbelow.Thischartdescribes
serviceguidelinesonly.UsetheServiceLogcolumntokeeptrackof
completedmaintenancetasks.Tolocate the nearest SearsService
Centeror to scheduleservice,simplycontactSearsat
1-800-4-MY-HOME®,
EachUse
Annuallyor 25 hours
1. Mowerblades
2. Looseormissinghardware
3. Controls
4. Motor
5. Deck
1. Wheels
2. Reardischargedoorand
sidemulchplug
3. Mowerblades
1. Sharpenasrequired
2. Tightenor replace
3. Checkforproperoperation
4. Removeanybuildupofgrassand
leaveson oraroundthemotorcover
(donotusewater).
5. Cleanundersideofdeckwitha
suitabletool(do notusewater).
1. Lubewithlightoil
2. Lubetorsionspringandpivotpoint
withlightoil.
3. Sharpenandbalance
17

OFF-SEASON STORAGE
Thefollowingstepsshouldbe takentoprepareyourlawnmowerfor
storage:
• Cleanandlubricatemowerthoroughlyasdescribedin thelubrica-
tioninstructions.
• Removeanybuildupofgrassandleaveson oraroundthemotor
cover(do notusewater).Wipethemowercleanwitha drycloth.
Wedo notrecommendtheuseofa pressurewasherorgarden
hosetocleanyourunit.
Makecertainthepowersupplyisdisconnected.
Coatmower'scuttingbladewithchassisgreasetoprevent
rusting.
Storemowerina dry,cleanarea.Donotstorenexttocorrosive
materials,suchas fertilizer.
Wipeextensioncordto removeanyforeignsubstancesuchas
oilor stains.Replaceextensioncordifcut ordamagedin anyway.
Windcordin a seriesofequalloopsoneachsideofyourhandto
preventsnarling.
18

Alwaysstopthemotorandunplugmowerbeforecleaning,lubricatingor performinganyrepairsor maintenanceon thelawnmower.Alwayswear
safetyglassesduringoperationorwhileperforminganyadjustmentsorrepairs.
Motorfailsto start 1. Corddisconnectedfromthemotor/blade
control.
2. Motor/bladecontroldefective.
Circuitbreakeron the
mowertripping
3. Extensioncordnotconnectedtotheplugon
themower.
4. Extensioncordnotconnectedtoa source
of power.
5. Overloadprotectionswitchonthemoweror
circuitbreakerinthehousereceptacletripped.
1. Toomuchworkloadonthemower.
2. Fuseblown;outletoverloaded.
1. Reconnectthecord,keepingthecordrestraintcloseto
themotor/bladecontrol.
2. TakemowertoSearsorotherqualifiedservicedealerto
havemotor/bladecontrolreplacedwithoriginalequipment
manufacturer's(OEM)partonly,931-05686.
3. Connecttheextensioncordto theplugon themower.
Mowercuttinggrass 1. Lawnroughor uneven.
unevenly
Mowernotmulching 1. Wetgrassclippingssticktotheundersideof 1. Waittillthegrassdriesbeforemowing.
properly thedeck.
Hardto push 1. Highgrassor cuttingheighttoolow. 1. Raisecuttingheight.
2. Rearof mowerhousingandbladedragging 2. Raisecuttingheight.
inheavygrass.
1. Bentmotorshaft. 1.
Mowervibratingathigher
speed
Corddisconnectsfre-
quently
2. Cuttingbladeisunbalanced.
3. Bladeisloose.
1. Extensioncordisnotproperlyattachedto
thecordrestraint.
2. Old,worn,or looseextensioncord.
1. Carriageboltsnotseatedinthehandle
insulators.
Handlenotinposition
4. Connecttheextensioncordto a 110-120volt60 hertz
A.C.receptacle.
5. Resettheoverloadprotectionswitchfollowinginstructions
intheServiceAndMaintenancesectionofthismanual.
1. Raisethecuttingheight,resetthecircuitbreakeronthe
mower,takea smallerwidthofcut,andwalkslowly.
2. Connecttoanoutletthatisfusedfor 15amperes.Reset
thecircuitbreakerandstartthemoweragain.
1. Movethewheelstoa highercuttingheightposition.
Stopthemotor,disconnectthepowersourceand
inspectfordamage.Repairbeforerestarting.Ifvibration
persists,takeittoa servicedealer.
2. Balancethebladebygrindingeachcuttingedgeequally.
3. Tightenbladeboltto 170-220in.Ibs.
1. Reconnecttheextensioncordtothecordrestrainton
theguiderod.
2. Replaceextensioncord.
1. Adjusttheheightofthehandleand makesurethat
thecarriageboltsare seatedproperlyintothehandle
insulators.Tightenthehandknobs.
NEED MORE HELP?
You'll find the a_lswer and race ot_ _]_al_age_T_yl]o_T_e co_T_ -Io[ Ilee!
= Find this and all your other product manuals online,
Get answers from our team of home experts.
= Get a personalized maintenance plan for your home.
Find information and tools to help with home projects.
maHage_home
b_:oug_t _e ye_a hy Sears
19

19=inch Electric Rotary Mower B Model No. 247.370160
44
\\
%
9 /
35
3O
2O

19-inch Electric Rotary Mower B Model No. 247.370160
m
1
2
3
4
5
6
7
8
9
10
11
12
13
14
15
16
17
18
19
2O
21
22
23
24
25
26
27
28
29
30
31
32
787-01649-0721
731-05727
710-0895
924-04010
749-04312
731-05749
631-04228
731-05832
942-04152
782-7051
624-0078
731-05639A
731-05746
731-04177
987-02055
732-1014
747-0710
17032A
736-0270
710-0599
931-05686
931-05634
687-02325-0637
687-02324-0637
964-04077
647-04107-0637
68_02225-0637
938-0148
68_02228-0637
710-3025
710-1242
712-04063
712-04065
m = O O
19"Deck
MotorBracket
Screw,1/4-15x .750
ElectricMotor,120V(incl.Ref.63)
LowerHandle
MotorShroud
BladeHub
ElectricFan
MulchingBlade
BladeLockingPlate
BladeBoltAssembly
TrailShield
RearMulchPlug
SideDischargeChute
MulchPlug(Incl.16-18)
TorsionSpring
HingePin
ChuteDeflectorAdapter
Washer,Bell,.265x .75x .062
Screw
RearDoor
FrontCover
HandleBracket-RH
HandleBracket-LH
GrassBag
GrassBagFrame
FrontBracketAssembly
Screw,Shoulder,.50x .66
RearBracketAssembly
Screw,5/16-18x .625
Screw,5/16-14x .750
Nut,FlangeLock,5/16-18
Nut,FlangeLock,3/8-16
m
33
34
35
36
37
38
39
4O
41
42
43
44
45
46
47
48
49
50
51
52
53
54
55
56
57
58
59
60
61
62
63
734-1988
734-1987
720-0230
712-0324
749-04353
925-04035
753-04430
74_04672
726-0368-0637
731-05186
731-05178
747-04663A
710-0572
720-04072A
731-05710A
732-04534
732-04535
732-04377C
710-0726
710-0779A
938-0507B
741-0492A
747-04589
749-04356-0637
738-04278
731-2422
710-1241
731-05880
936-0255
736-04413
726-0201
725-1715
D = O O
FrontWheel
RearWheel
FoamGrip
Nut,HexLock,1/4-20
UpperHandle
Motor/BladeControl
Screw,Fiat,1/4-20x 1.75
GuideRod
CordRetainer
LowerHandleInsulator
UpperHandleInsulator
Motor/BladeControlHandle
BoltCarriage,5/16-18x 2.50
StarKnob
RearBaffle
DoorTorsionSpring- RH
DoorTorsionSpring- LH
SpringLever
Screw,5/16-12x.750
Screw,#10-16x .500
Screw,Shoulder,.500Dia.x .434
Bushing,Lock,.505Dia.x.62
RearDoorPivotRod
CrossBracket
Screw,Shoulder,1/4-20x.50
CableGuide
Screw,1/4-15x 1.000
Spacer,.515x 1.00x .310
Washer,Bell,.510x1.14x .040
Washer,Wave,.390x .825x .016
Nut,Speed,.3125ID
Rectifier
21

777S32911
777Dl1051
777122747
TO START
TO STOP
777D13261
777122946
777122813
777S32816
• TO REDUCETHERISK OF ELECTRICSHOCK, DONOT EXPOSE • REMOVEOBJECTSTHATCANBETHROWNBYTHEBLADEIN
UNIT TO WATER OROPERATEUNIT ONWET GROUND. ANYDIRECTION. WEARSAFETYGLASSES.
REPLACEDAMAGEDCORD IMMEDIATELY.
• USE EXTRA CAUTION ONSLOPES. DO NOT MOW SLOPES
• DISCONNECT FROM SUPPLY CIRCUIT BEFORESERVICING OR GREATERTHAN 15°. MOW ACROSS, NEVER UP AND DOWN.
REMOVING BLADE. NEVER PULL MOWER CLOSETO YOUR FEET.LOOK DOWN
• KEEP HANDS AND FEETAWAYFROM ROTATINGPARTS. AND BEHIND BEFOREAND WHILE MOVING BACKWARDS.
• DONOT MOW WHEN CHILDREN OROTHERS ARE AROUND.
SERVICE CENTER.
22

Congratulationsonmakinga smartpurchase.YournewCraftsman®
productisdesignedandmanufacturedforyearsofdependableopera-
tion.Butlikeall products,itmayrequirerepairfromtimetotime.That's
whenhavinga RepairProtectionAgreementcansaveyoumoneyand
aggravation.
Here'swhattheRepairProtectionAgreement*includes:
* Expert service byour 10,000professionalrepairspecialists
* Unlimited service and no charge forpartsandlaboronall
coveredrepairs
* Product replacementupto$1500ifyourcoveredproductcan'tbe
fixed
* Discountof 10%from regularpriceof serviceand relatedinstalled
partsnotcoveredbytheagreement;also,10%off regularpriceof
preventivemaintenancecheck
* Fasthelp by phone- wecallitRapidResolution- phonesupport
froma Searsrepresentative.Thinkofusasa "talkingowner's
manual."
OnceyoupurchasetheAgreement,a simplephonecallisall thatit
takesforyouto scheduleservice.Youcancallanytimedayor night,or
schedulea serviceappointmentonline.
TheRepairProtectionAgreementisa risk-freepurchase.If youcancel
foranyreasonduringtheproductwarrantyperiod,wewillprovideafull
refund.Or,a proratedrefundanytimeaftertheproductwarrantyperiod
expires.PurchaseyourRepairProtectionAgreementtoday!
Somelimitations and exclusions apply. Forpricesand additional
informationin the U.S.A.call 1-800-827-6655.
*CoverageinCanadavarieson someitems.Forfull details call
SearsCanadaat 1-800-361-6665.
SearsinstallationService
ForSearsprofessionalinstallationofhomeappliances,garagedoor
openers,waterheaters,andothermajorhomeitems,in theU.S.A.or
Canadacall 1-800-4-MY-HOME®.
23

Declaraci6n de garantia .................................................. 24
Instrucciones de seguridad ............................................. 25
Guia de cuesta ................................................................ 29
Montaje ........................................................................... 32
Operaci6n ........................................................................ 35
Servicio y Mantenimiento ............................................... 38
Almacenamiento fuera de temporada ............................ 41
Soluci6n de problemas ................................................... 42
Piezas de Reemplazo ............................. 20 (Manual ingles)
NOmero de servicio ............................... Cubierta posterior
Garantia de dos ahos de Craftsman
Si esteproductoCraftsmanfalladebidoa undefectoen losrnaterialeso larnanodeobradentrode losdosaSosde lafechadecornpra,sirvase
devolverloacualquiertiendaSears,Centrode servicioSears,u ottopuntodeventaCraftsmanen losEstadosUnidosparasureparaci6nsin
cargo.
Estagarantiano cubre:
• Arficulosdeduraci6nlirnitadaquepuedendesgastarsebajocondicionesnorrnalesdeusoduranteelperiododegarantia,talescorno
correasycuchillasde cortadorarotativas.
• Lasreparacionesrequeridasdebidoaabusoo negligenciadel operador,induiyendoabolladurasdelcig(JeSaly nooperaro rnantenerel
equipode acuerdoconlasinstruccionessurninistradas.
Estagarantias61otendr&validezdurante90diassiesteproductoseutilizaencualquierrnornentoparafinescornercialesodealquiler.
Estagarantias61otendrAvalidezrnientrasel productoseutiliceen losEstadosUnidos.
Estagarantiale otorgaderechoslegalesespecificos,peroustedpodriagozardeotrosderechosen raz6nde sulugarde residencia.
Sears,Roebuckand Co.,Hoffman Estates,IL 60179
Motor: 12Amperes
N_rnerode rnodelo
N_rnerode serie
Fechade cornpra
Registreel nQrnerode rnodelo,nQrnerodeseriey fechade cornpra
rn_sarriba.
© SearsBrands,LLC 24

La presenciade estesfrnboloindicaquesetrata
de instruccionesde seguridadirnportantesque
deberespetarparaevitarponerenriesgosu
seguridadpersonaly/omaterialyla de losdern_.s.
Leaysigatodaslasinstruccionesdeestemanualantesdeponer
enfuncionarnientoestarn_.quina.Si norespetaestasinstrucciones
puedeprovocarlesionespersonales.Cuandoveaestesirnbolo,
_JENTA LAADVERTENCIA!
Su responsabilidad:Restrinjael usodeesta rn_.quinarnotorizada
alas personasquelean,cornprendany respetenlasadvertenciase
instruccionesquefiguranen estemanualysobrela rn_.quina.
Estarn_.quinaest,.dise_adaparaserutilizadarespetandolasreglas
de seguridadcontenidasen estemanual.AIigualqueconcualquier
tipodeequipornotorizado,undescuidooerrorporpartedeloperadol
puedeproducirlesionesgraves.Estarn_.quinaescapazdearnputar
rnanosy piesyde arrojarobjetoscongranfuerza.Deno respetarlas
instruccionesde seguridadsiguientessepuedenproducirlesiones
graveso la rnuerte.
Cuandose utilizancortadorasdecespedel_ctricas,sedebencurnpli_
siernprelasprecaucionesb_.sicasdeseguridadparareducirla
posibilidaddeincendios,descargasel_ctricasylesionespersonales._
Estasprecaucionesb_.sicasincluyen: j
Cortadora de cesped con aislarniento doble
Eldobleaislarnientoes unconceptodeseguridadde lascortadorasdec_sped,queelirninala necesidaddetenet uncable
de alirnentaci6ndetreshilosconconexi6na tierray unsisternadealirnentaci6nconconexi6natierra.Encualquierlugar
de lacortadoradondeIlegacorrienteel_ctrica,haydosjuegoscornpletosde aislarnientoparaprotegeral usuario.Todaslas
piezasrnet_.licasexpuestasest_.naisladasdeloscornponentesrnet_.licosinternosdel motorconaislarnientoprotector.
Elrnantenirnientode unacortadorade c_spedcondobleaislarnientorequierernuchocuidadoyconocirnientodelsisterna
y s61odeberiaserefectuadopotunt_cnicocapacitado.SugerirnosqueIlevelacortadoraa sudistribuidorde servicio
autorizadorn_.scercanoparacualquierreparaci6n.CuandoefectOeel rnantenirniento,utilicesiernprepiezasde reernplazo
del fabricanteoriginaldel equipo(OEM).
Funcionamiento
Funcionarniento general:
• Leay sigatodaslasinstruccionescontenidasen estemanualantes
deintentararrnarestarn_.quina.Lea,cornprenday respetetodas
lasinstruccionesquefiguranenla rn_.quinayen elo losrnanuales
antesdehacerlafuncionar.Guardeestemanualenunlugar
seguroparaconsultasfuturasyperi6dicas,asicornoparasolicitar
repuestos.
• Antesde hacerfuncionarestarn_.quina,farniliaricesetotalrnente
conloscontrolesy elusocorrectode larnisrna.
• Estarn_.quinaesunequipornotorizadodeprecisi6n,noun
juguete.PorIotanto,tengarnuchocuidadoentodornornento.
Estarn_.quinaruediseSadapararealizarunatarea:cortarel
cesped.Nola utiliceparaningOnotrofin.
• NoperrnitanuncaquelosniSosrnenoresde 14aSosutilicenesta
rn_.quina.LosniSosde 14aSosenadelantedebenleeryentender
lasinstruccionesdeoperaci6nynorrnasdeseguridadcontenidas
enestemanualyen la rn_.quinaydebenserentrenadosy
supervisadosporunadulto.
• S61osedebeperrnitirusaresta rn_.quinaa individuosrespons-
ablesyfarniliarizadosconsusreglasdeseguridad.
• Inspeccioneminuciosarnenteel _.readondeutilizar_,el equipo.
Retiretodaslaspiedras,palos,alarnbre,huesos,juguetesy otros
objetosextraSosquepodrianhacertropezaro serrecogidosy
arrojadospotlaacci6ndela cuchilla.Losobjetosarrojadosporla
rn_.quinapuedenproducirlesionesgraves.
• Planifiqueel patr6nde cortehaseguirparaevitardescargarel
materialenloscarninos,lasveredas,losobservadores,etc.Evite
adern_.sdescargarmaterialcontraunaparedu obstrucci6n.Io
que podriahacerqueel materialdescargadorebotecontrael
operador.
• Paraprevenirelcontactoconlacuchillao unalesi6nporun
objetoarrojado,rnant_ngaseen lazonadeloperadordetr_.sde
lasrnanijasyrnantengaa losniSos,observadores,ayudantesy
rnascotasapartadosal rnenos25 metrosde lacortadorarnientras
est,.funcionando.Detengala rn_.quinasialguienentraen el_.rea.
• Paraprotegerselosojosutilicesiernpreanteojoso antiparrasde
seguridadrnientrasoperala rn_.quinay rnientrashaceajustes
o la repara.Losobjetosarrojadosque rebotanpuedenproducir
lesionesocularesgraves.
• Utilicezapatosde trabajoresistentes,consuelarugosay
pantalonesycarnisasajustados.Se recorniendavestircarnisas
y pantalonesquecubranbrazosy piernasyusarzapatoscon
punterareforzada.Nuncaopereesta rn_.quinadescalzo,con
sandalias,zapatosresbalososo livianos(porej.de Iona).
• Nopongalasrnanoso lospiescercade laspiezasgiratoriasni
debajode la plataforrnadecorte.Elcontactoconlascuchillas
puedeproducirlaarnputaci6ndernanosy pies.
• UncanaldedescargafaltanteodaSadopuedeprovocarlesiones
porcontactoconla cuchillaoconobjetosarrojados.
• Muchaslesionesocurrencornoresultadodepasarla cortadora
sobrelospiesduranteunacaidaluegode resbalaro tropezar.No
sesostengade lacortadorasiseest,.cayendo;sueltela rnanija
inrnediatarnente.
25

• Nuncatiredela cortadorahaciasirnientrascarnina.Sidebe
retrocederconlacortadoraparaevitarunapareduobst_.culo,
mireprirnerohaciaabajoyatr_.sparaevitartropezarsey luego
sigaestospasos:
a. Ap_.rtesede la cortadorahastaestirarcornpletarnentelos
brazos.
b. AsegOresequeest,. bienequilibradoy bienparado.
c. Jalela cortadoralentarnentehaciasi, norn_.sdela rnitadde
la distanciaentreustedy lacortadora.
d. Repitaestospasostantasvecescornoseanecesario.
• Nohagafuncionarestacortadorabajolosefectosdelalcoholo
lasdrogas.
• Mant_ngasealerta: MireIoqueest,. haciendo.Utiliceel sentido
cornOn.Nohagafuncionarla cortadorasiest,.cansado.
• La rnanijadecontroldel rnotor/lacuchillaesundispositivode
seguridad.Nuncaintenteevitarsufuncionarniento.Dehacerlo,
dejariandeoperarlosdispositivosde seguridady podrian
producirselesionespersonalesporel contactoconlacuchilla
giratoria.Larnanijade controldelrnotor/lacuchilladebefuncio-
narf_.cilrnenteenarnbasdireccionesyregresarautorn_.ticarnente
a laposici6ndesenganchadacuandosela suelta.
• Nuncahagafuncionarla cortadoraen la Iluviao sobreel c_sped
hQrnedoo rnojadoAsegQresesiernprede estarbienparado.Si
resbalay caepuedelesionarseseriarnente.Si sientequepierde
el equilibrio,suelteinrnediatarnentelarnanijadecontroldel
rnotor/lacuchillay lacuchilladejar_,de rotaren tressegundos.
• Corteel cespedsolarnenteconluzdedia o conunabuenaluz
artificial.Carnine,nuncacorra.
• Detengael rnotor/lacuchillacuandocrucesendas,senderoso
carninosdegrava.
• Sila rn_.quinacornenzaraavibrardernaneraanorrnal,detenga
el motor,ybusqueinrnediatarnentelacausa.PorIogeneralla
vibraci6nesunaadvertenciadealgQnproblerna.
• Apagueelmotoryesperehastaquela cuchillasedetenga
cornpletarnenteantesde retirarel colectorde cespedo destapar
el canal.LacuchillacontinQarotandoporunoscuantossegundos
despu_squeel motorse haapagado.Nuncacoloqueninguna
partedelcuerpoenel _.readela cuchillahastaqueest_ seguro
dequela rnisrnahadetenidosurnovirnientogiratorio.
• Nuncahagafuncionarla cortadorasinel correspondienteescudo
posterior,el canaldedescarga,el colectorde c_sped,la rnanija
decontroldel rnotor/lacuchillay otrosdispositivosde seguridad
yprotecci6ncolocadosyfuncionando.Nuncaoperela cortadora
silosdispositivosde seguridadest_.nda_ados.DeIocontrario,
puedenproducirselesionespersonales.
• Sedebenprotegercontrafugasa tierraconun Interruptordiferen-
cial(GFCI)loscircuitoso tornasquese usar_.nparalacortadora
dec_sped.Hayen existenciarecept_.culosconprotecci6nGFCI
incorporadaysepuedenutilizarparaestarnedidadeseguridad.
• Paraprevenirlasdescargasel_ctricasutilice[3nicarnenteun
prolongadorcertificadopotULadecuadoparausoenexteriores,
cornopot ejernplotipoSW-A,SOW-A,STW-A,STOW-A,SJW-A,
SJOW-A,SJTW-A,o SJTOW-A.
Prolongador--AsegQresede quesuprolongadorest,.en buen
estadoy tienesuficienteresistenciaparatransportarlacargade
corrientequeconsurnir_,sucortadoradec_sped.Sitienedudas,
utiliceuncabledel siguientecalibrern_.sresistente.Cuanto
rnenoresel nOrnerodecalibre,rn_.sresistenteesel cable.Un
cablede calibreinsuficienteprovocar_,unacafdaenla tensi6nde
lalineaq_uecausar_,p_rdidadealirnentaci6n_trecalentarniento.
CALIBREMfNIMODECABLEPROLONGADOR
PARAARTEFACTOSDE120V QUEUTILIZAN10- 12AMP
Longituddelcable(pies) 25 50 100 150
Calibredel hilo(AWG) 16 16 14 12
• Parareducirlaposibilidaddedesconexi6ndelprolongadordesde
lacortadora,asegQresedeutilizarel lirnitadordecablesurninis-
tradojuntoconun prolongadorrnodernoy bienajustado.
• Parareducirlaposibilidaddedescargaelectrica,estacortadorade
c_spedtieneunenchufepolarizado(unacuchillaesrn_.sanchaque
laotra)yexigir_,el usode unprolongadorpolarizado.Elenchufe
delacortadoras61ocalzar_,de unarnaneraenel prolongador
polarizado.Sielenchufenocalzatotalrnenteenelprolongador,
invi_rtalo.SicontinOasincalzarbien,obtengaelprolongador
polarizadoquecorresponde.Elprolongadorpolarizadorequiereel
usodeuntornacorrientedeparedpolarizado.Esteenchuf_calzar_.
eneltornacorrientepolarizadode unasolarnanera.Sielenchufe
nocalzatotalrnenteeneltornacorriente,invi_rtalo.SicontinOasin
calzarbien,p6ngaseencontactoconunelectricistacapacitadopara
instalarel tornacorrientedeparedadecuado.NohaganingQncarnbio
enelenchufedelequipo,elrecept_.culodelprolongadoroel enchufe
delprolongador.
• Siel prolongadorsufrealgOnda_oduranteel uso,desconecteel
prolongadordeltornacorrientedorn_sticoantesde desenchufarla
cortadora.
• Disyuntores/Fusibles--Lacortadorasedebeutilizaren uncircu-
itode 15620 AMRSi seexperirnentandificultadesalarrancar
conunfusibleo disyuntorde 15AMPest_.ndar,o siel interruptor
de protecci6ncontrasobrecargaincorporadosedesconectacon
frecuencia,p6ngaseen contactoconsudistribuidorde servicio
autorizadorn_.scercano.Noutiliceundisyuntoro fusiblecon
mayorpotencianominalsinconsultarantesconsucornpa_ia
el_ctrica.
• Noabusedelcablearrastrandolacortadoraporel cableo
tironeandoparadesconectarlodelrecept_.culo.Mantengael
cableprotegidodel calor,aceitey hordesfilosos.
• Utilicesolarnentepartesyaccesoriosrnanufacturadosespecial-
rnenteparaestarn_.quinaporel fabricante.Si noIohace,pueden
producirselesionespersonales.
• Sisepresentansituacionesquenoest_.nprevistaseneste
manual,tengacuidadoy useel sentidocornQn.P6ngaseen
contactoconAsistenciaalClienteparasolicitarayudao el
nornbredeldistribuidordeserviciorn_.scercano.
26

Funcionamiento en pendientes
Laspendientessonunfactorirnportantequeserelacionaconlos
accidentesproducidosporderrapesycaidasyquepuedenproducir
lesionesgraves.Laoperaci6nenpendientesrequierernucha
precauci6n.Si nosesienteseguroenunapendiente,nocorteel
cesped.Parasuseguridad,useel indicadordependientesquese
incluyecornopartedeestemanualpararnedirlapendienteantesde
operarlarn&quinaenunazonainclinada.Sila pendientesuperalos
15grados,nocorteel c_sped.
Haga Io siguiente:
• Corteen sentidotransversala lacarade lapendiente,nunca
haciaarribay abajo.Tengarnuchocuidadoalcarnbiarde direc-
ci6nen unapendiente.
• Est_atentoa losagujeros,raices,rocas,objetosocultoso
abultarnientosquepuedanhacerloresbalaro tropezar.Elcesped
altopuedeocultarobst_.culos.
• AsegQresesiernpredeestarbienparado.Siresbalaycaepuede
lesionarseseriarnente.Sisientequepierdeel equilibrio,suelte
inrnediatarnentelarnanijadecontroldelrnotor/lacuchillaylacuchilla
dejar_,degirarentres(3)segundos.
No haga Io siguiente:
• Nocorteel cespedcercadecaidas,zanjaso terraplenes,puede
perderel equilibrio.
• Nocorteen pendientesrnayoresde 15gradoscornoilustrael
indicadorde pendientes.
• Nocorteel cespedrnojado.Si noest,.firrnernenteparado,puede
resbalarse.
Ni5os
Puedenocurriraccidentestr_.gicossieloperadornoest,.atentoa la
presenciade niSos.PorIogenerala losniSoslesatraenlascorta-
dorasylaactividaddecortarel cesped.Noentiendenlosriesgosni
lospeligros.NuncasupongaquelosniSosperrnanecer_.nen el lugar
dondelosvioporOltirnavez.
• Mantengaa losniSosfueradel_.reaqueest,.cortandoy bajo
estrictavigilanciadeunadultoresponsableadern_.sdeloperador.
• Est_alertayapaguelacortadorasiun niSoingresaal _.rea.
Antesy rnientrasseest,.rnoviendohaciaatr_.s,mirehaciaatr_.sy
haciaabajoy cuidequeno hayaniSos.
• Tengarnuchocuidadocuandoseaproxirnea esquinasciegas,
entradasde puertas,arbustos,_.rbolesyotrosobjetosque
puedanobstaculizarlelavistadeun niSoque pudiesecorrer
hacialacortadora.
Noperrnitanuncaque losniSosrnenoresde 14aSosutilicenesta
rn_.quina.LosniSosde 14aSosen adelantedebenleeryentenderlas
instruccionesdeoperaci6nynorrnasde seguridadcontenidasen este
manualyen larn_.quinaydebenserentrenadosysupervisadospor
unadulto.
Servicio
AIefectuarel mantenirnientodelacortadora,utilicelaspiezasde
reernplazodelfabricantedelequipooriginal(OEM)queaparecen
enestemanual."Elusode piezasquenocurnplenconlas
especificacionesdelequipooriginalpodriatenercornoresultadoun
rendirnientoincorrectoyadern_.sponerenriesgolaseguridad".
• Antesde lirnpiar,repararo inspeccionarlarn_.quina,cornpruebe
que lacuchillaytodaslaspartesrn6vilessehayandetenido.
Desconecteel cablede alirnentaci6ncuandono Iousepara
irnpedirelarranqueaccidental.
• Sigalasinstruccionesparalubricaryreernplazarlosaccesorios.
• Inspeccioneelcableylosprolongadoresde lacortadoraperi6dica-
rnentey,siest_.ndaSados,reernpl_.celosinrnediatarnente.Elcable
de lacortadoradebeserreparadoOnicarnenteporundistribuidor
de servicioautorizado.
• Mantengalasrnanijassecas,lirnpiasy sinaceiteograsa.
• Parareducirlaposibilidaddeincendiornantengael motorsin
pasto,hojasyotrosdesechosacurnulados.
• Reviselospernosde rnontajede lacuchillaydelmotora intervalos
frecuentesparaverificarqueest_nbienapretados.Adern_.s,
inspeccionevisualrnentelacuchillaparaversiest,.daSada
(porejernplo,doblada,rajada,gastada).Reernplacelacuchilla
Onicarnenteporotradelfabricantedelequipooriginal(OEM)que
apareceenestemanual.
• Conservelacortadoraen buenascondiciones:Mantengala
cuchillaafiladay lirnpiaparaun rnejory rn_.ssegurorendirniento.
Lascuchillasde lacortadorasonafiladasy puedencortar,
envuelvalacuchillao useguantesy extremelasprecaucionesal
efectuarel rnantenirniento.
• Mantengatodoslospernos,tuercasytornillosbienajustados
paraasegurarsedequelarn_.quinaseencuentraencondiciones
segurasdefuncionarniento.
• Nuncaalterelosdispositivosdeseguridad.Controleperi6dica-
rnentequefuncionencorrectarnente.
• Si golpeaunobjetoextraSo,detengaelmotorydesconecteel
cabledealirnentaci6n.Inspeccionerninuciosarnentelarn_.quina
paradeterrninarsiest,.daSada.Repareel daSoantesdehacer
funcionarlacortadora.
• Loscornponentesdelcolectordec_sped,lacubiertadedescargay
el escudoposterior,est_.nsujetosadesgasteydaSosquepodrian
dejarexpuestaslaspartesrn6vileso perrnitirquesearrojen
objetos.Paraprotegersuseguridad,verifiquefrecuenternente
todosloscornponentesy reernpl_.celosinrnediatarnentes61opot
piezasdelfabricantedelequipooriginal(OEM)queaparecenen
estemanual.
• Cuandonoest,.enuso,alrnacenela cortadoraen unlugarseco,
altoy bajoIlavey/o fueradelalcancede losni_os.
• Mantengao reernplacelasetiquetasdeseguridade instrucciones
segQncorresponda.
Vida til media
Seg_nla Cornisi6ndeSeguridadde Productosparael Consurnidorde
losEstadosUnidos(CPSC)ylaAgenciadeProtecci6nArnbientaldelos
EstadosUnidos(EPA),esteproductotieneunavidedtilmediedesiete
(7)aSos6 140horasdefuncionarniento.AIfinalizarlavidedtilmedie,
adquieraunarn_.quinanuevaohagainspeccionaranualrnenteestaunidad
potundistribuidordeservicioautorizadoparacerciorarsedequetodos
lossisternasrnec_.nicosydeseguridadfuncionancorrectarnentey no
tienenexcesivodesgaste.DeIocontrario,puedenproducirseaccidentes,
lesioneso larnuerte.
GUARDE ESTAS INSTRUCCIONES
27

Simbolos De Seguridad
Estap_.ginarepresentay describelaseguridadlossirnbolosquepuedenpareceren esteproducto.Lea,cornprenda,y sigatodasinstrucciones
enla rn_.quinaantesprocurarparareuniry operar.
® =
LEA EL MANUAL(S) DEL OPERADOR
Lea,cornprenda,ysigatodasinstruccionesenel manual(rnanuales)antesprocurarparareuniry
operar.
PELIGRO m GIRANDO HOJAS
Parareducirel riesgode herida,guardernanosy pieslejos.Nofuncionea rnenosquela tapade des-
cargao el receptordehierbaest_nensulugarapropiado.Deserda_ado,sustituyainrnediatarnente.
PELIGROm ESPECTADORES
Nosieguecuandolosni_oso losotrosest&nalrededor.
PELIGRO= DIe EL CORTE DE PiE
Guardernanosy pieslejosde hacergirarpartes.
PELIGRO= ESCOMBROS LANZADOS
Quiteobjetosquepuedenserianzadospor iai&rninaencuaiquierdirecci6n.Lievegafasde seguridad.
PELiGRO= CUESTAS
Useextrala precauci6nen cuestas.Nosieguecuestasrnayoresque 15o.
ADVERTENCiA = ELECTROCHOQUE
NouseeljuezdesaiidaeBctricodelmotoren lalluvia.
28

¢d
(1)
o
o
Z
"O
O
(D
O
O
-O
O
(D
(D
(D
(D
(D
O
E
(D
(D
,__ .__
2x
..c
¥o-o
o
Nopodeen inclinacionesmayoresa 15grados(elevaci6naproximadade2 1/2piesporcada10pies). Unapodadoraen .}
movimientopodriavoltearsey causarlesionesseveras.Sien unapendienteoperaunapodadoraubicadodetr_sdela misma,es
$
extremadamentedificilmantenerel equilibrioy podriaresbalarseysufrirlesionesgraves.
03
i .... .... ....... .... .......... b::
_ _. Alineey sostengaestenivelcon un_rbolvertical... -_
b/oaIn• i_-.-- o la esquinadeunaconstruccidn...
_u, _zea,v,,_, ! unacerca.
|
_Pe'-- _-
15
o
==8
CD u)
_ (1)
O _
"_ O
-,_
._ o_
co 0
o-_
co (1)
t_ _ Z
_cc
".__ _
_'_Z
O (D
_ O t--u
"__ _<
_::_ "_ Z
03 _
R
o _ (D

• TO REDUCE THE RISK OF ELECTRIC SHOCK, DO NOT EXPOSE • REMOVE OB3ECTS THAT CAN BE THROWN BY THE BLADE IN
UNIT TO WATER OR OPERATE UNIT ON WET GROUND. ANY DIRECTION. WEAR SAFETY GLASSES.
REPLACE DAMAGED CORD IMMEDIATELY.
• USE EXTRA CAUTION ON SLOPES. DO NOT MOW SLOPES
• DISCONNECT FROM SUPPLY CIRCUIT BEFORE SERVICING OR GREATER THAN 15'. MOW ACROSS, NEVER UP AND DOWN.
REMOVING BLADE. NEVER PULL MOWER CLOSE TO YOUR FEET. LOOK DOWN
• KEEP HANDS AND FEET AWAY FROM ROTATING PARTS. AND BEHIND BEFORE AND WHILE MOVING BACKWARDS.
• DO NOT MOW WHEN CHILDREN OR OTHERS ARE AROUND.
3O

Estapgtginase march6 intencionadamenteen blanco.
31

iVlANIJA
BARRA DE GUiA DEL CABLE
f
Retireel materialde empaqueque pudieraestarentrelasmanijas
superiore inferior.
a. Aflojecadaperillade manoqueseencuentraenel lado
internode la manijasuperior.
b. Levanteconcuidadoygire lamanijasuperiora la posici6n
defuncionamientocomosemuestraen la Figura1.
Fijela barradegala delcableconei retenedordel prolongadora la
rnanijasuperiorcornosernuestraenla Figura3.
.
f
Figura1
c. Retirelasperillasen estreiladelossoportesde montaje
dela manijay sujetela manijainferiora lossoportesde la
manijacolocandoelorificioinferiorde la manijainferioren
lospasadoresde lossoportes.
d. Asegurela manijasuperiory la manijainferiorapretandolas
perillasde mano.Esnecesarioasentarcadapernodel carro
adecuadamenteen elorificiocuadradodelconectorpB.stico.
Aprietelasperillasen estrellaajustandola manijainferiora los
soportesde lamanija.Veala Figura2.Compruebequela manija
inferiorest_firmementeasentadaenlossoportesde montaje.
Figura3
NOTA:Noenchufeel prolongadoral recept_.culode lafuentede
alimentaci6n(toma)antesde pasarloa travesdel retenedordelcable
y conectarel prolongadoral recept_.culodelcablede la cortadora.
Figura2

Parapasarcorrectarnenteelprolongadoratravesdelretenedordel
cable:
.
.
f
Aaproxirnadarnente14-16pulgadasdel extrerno,done el
prolongadorparaforrnarun lazoajustado.
Ernpujeel lazoa travesdel orificioinferiordelretenedordel cable.
VealaFigura4a.
Coloqueel lazosobreel brocheque hayenel retenedordel cable
yestirehaciaabajohastaqueelcablecalcec6rnodarnenteenel
broche.Veala Figura4b.
COLECTOR DE CI=SPED
Sigalospasossiguientesparaarrnarel colectorde c_sped(de
sernecesario).AsegQreseque labolsapara recortesest,.con
el ladoderechohaciaafueraantesde ensarnblar(laetiquetade
advertenciaestate,haciaafuera).
a. Coloquelabolsasobreel marcode rnodoqueel ladode
pl_.sticonegroquedeen el rondo.
b. Desliceelcanalpl_.sticode la bolsasobrelosganchosdel
marco.Veala Figura5. Todosloscanalespl_.sticosexcepto
en la partecentralsuperiorde labolsase unendesdeafuera
de la bolsa.
c. Unala partecentralsuperiorde labolsadesdeadentrode la
rnisrna.
J
Figura4
NOTA:Utiliceun prolongadoraprobadopor UL.Serecorniendaun
cabledecalibre14y 100pies.Esaceptableuncabledecalibre16y
50 pies.Consultela tablitaqueapareceen Medidasde Seguridad.
El retenedordelcabley la barradeguiajuntosajustanelprolongador
ylirnitande forrnasegurasurnovirniento.Elretenedordel cable(junto
conel prolongador)sedeslizaa Iolargodela barrade guiaa rnedida
quelacortadorasernuevehaciaizquierdao derecha.
Figura5
33

.
f
Sigalospasossiguientesparaarmarel colectordecesped:
a. Levantela puertadedescargatrasera.
b. Quitela tolvade abonoposterior.
c. Coloqueel colectordecespedsobrelavarillade pivote.
Sueltelapuertade descargade modoque descansesobre
el colectordec_sped.Veala Figura6.
J
Figura6
Parasacarel colectordec_sped,levantelapuertatraserade
descargade lacortadoradec_sped.Levanteel colectordecesped,
sac_.ndolode lavarillade pivote.Sueltela puertadedescargatrasera
parapermitirque lamismacierrelaaberturaposteriordelacortadora.
Nuncaoperelacortadoraa menosquelosganchosdel colectorde
c_spedest_nfirmementeasentadosen lavarillade pivoteyla puerta
dedescargatraseradescansefirmementecontralapartesuperior
delcolectordec_sped.
TOLVA DE DESCARGA LATERAL
Si hacelaconversi6nadescargalateral,aseg[3resede queel colector
dec_spedest_fuerade la unidad,latolvade abonosehayaretiradoy
la puertade descargatraseraest_cerrada.
1. Desdeel costadode lacortadora,levanteeladaptadorpara
abono.
Deslicelosganchosdelcanaldebajodelpasadorde bisagraen
el montajedela clavijade abono.Bajelaclavijadeabono.Vea
laFigura7.Noextraigalaclavijaparaabonolateralencualquier
momento,aQncuandonoest_abonando.
Figura7
AJUSTES
Lapalancade ajustedealturade corteseubicaporenclmade la
ruedaizquierdatrasera.Veala Figura8.
Figura8
// //
J
1. Tiredela palancahaciaafuerade lacortadora.
2. Muevala palancahaciaadelanteo haciaatr_.sparaobtenerla
alturade cortedeseada.
3. Sueltela palancahaciala plataformade lacortadora.
34

Manijadecontroldelrnotor/lacuchilla
Lirnitadordecable
ptorde protecci6ncontrasobrecarga
Palancade ajustede
la alturadecorte
MANIJA DE CONTROL DEL iVIOTOR/LA
CUCHILLA
La rnanijadecontroldelrnotor/lacuchiNaest,. ubicadaenla rnanija
superiorde lacortadoradec_sped.Veala Figura9. Larnanijade
controldel rnotor/lacuchillaenganchaydesenganchael motory la
cuchilla.
La rnanijade controldelrnotor/lacuchillaesundispositivode
seguridad.Nuncaintenteanularsufuncionarniento.
INTERRUPTOR DE PROTECCION CONTRA
SOBRECARGA
Lacortadoratieneun interruptorde protecci6nde sobrecargaubicado
enel controldel rnotor/lacuchilla.Elinterruptorde protecci6ndeso-
brecargapuedesaltarcuandoseexigedernasiadoal motor.Rernftase
a la secci6nMantenirnientoyAjustesparareponeresteinterruptor.
Figura9
LllVIITADOR DE CABLE
Ellirnitadorde cableseencuentraen lapartede atr_.sde la rnanija
superiory siseIoutilizacorrectarnente,ayudaa protejerel controldel
rnotor/lacuchillayel prolongadorquealirnentala unidad.
PALANCA DE AJUSTE DE LA ALTURA DE
CORTE
Lapalancade ajustedealturade corteseubicaporencirnade la
ruedaposteriorizquierda.Paraajustarlaalturade corte,consultela
Secci6nMontajey Configuraci6n.
35

Arranquedei motor
Evitearranquesaccidentales.Aseg_resede estaren la posici6ndel
operadordetr_.sde la cortadorarnientrasla usa.Paraevitarlesiones
graves,tantoel operadorcornola unidaddebenestaren posici6n
estableduranteel encendido.
Conexi6n a una fuente de alimentaci6n el_ctrica
Estacortadorasedebeutilizaren uncircuitode 156 20AMP.Si
tienedificultadparaarrancarconunfusibleo disyuntorde 15AMP,
p6ngaseencontactoconSearso el centrode servicioautorizado
rn_.scercano.Noutiliceunfusibleo disyuntorconmayorpotencia
nominalsinconsultarantesconsucornpaSiael_ctrica.
Oprirnael bot6narrancador(rojo)yrnant_ngalooprirnido.Veala
Figura11.
NOTA:AIarrancarel motorde lacortadoratarnbi_nseengancha
lacuchilla.
NOTA:Conecteel prolongadoralacortadoratalycornoseindicaen la
secci6nConfiguraci6nantesdeenchufarelprolongadora untornacor-
rienteel_ctrico.ConsultelaFigura10.
Figura10
1. Enchufeel prolongadora cualquiertorna(interioro exterior)
convenienteconconexi6natierrade 120volt.y60 ciclosCA.
Sucortadorafuncionar_,correctarnenteen uncircuitoconun
disyuntorde 15amp.
NOTA:Paraevitarquesedisparenlosdisyuntores,seleccione
untornaen uncircuitoqueno est_sobrecargado.NOseleccione
untornaqueest_dentrode uncircuitoconartefactoscornoun
refrigerador.
2. Perrnanezcadetr_.sde lacortadora,en la posici6ndel operador.
Figura11
Mientrarnantieneoprirnidoel bot6narrancador,gire larnanijade
controldel rnotor/lacuchillahaciaarribacontrala rnanijasuperior
paraarrancarel motoryengancharlacuchilla.Veala Figura11.
NOTA:Elmotorde lacortadoraNOarrancarasi nosernantiene
oprirnidoel bot6narrancadorrnientrasgirala rnanijadecontrol
del rnotor/lacuchillahaciaarriba.
5. Suelteelbot6narrancador(rojo).
36

Apagadodei motor
Lacuchillacontinuagirandoporunoscuantossegundosdespu_s
queel motorsehaapagado.Sielmotorno sedefienecuandose
sueltala manijade controldel motor/lacucNla, p6ngaseen contacto
[cone dstrbudorde servco autorzadom&scercano.
Sueltelamanijadecontroldel motor/lacuchillaparadetenerel motor
yla cuchilla.
Uso de la cortadora de c_sped
AsegOresequeelc_spedest,. librede piedras,palos,cablesu otros
objetosquepudiesendaSarla cortadorao el motor.Dichosobjetos
puedenserarrojadosaccidentalmenteencualquierdirecci6nporla
cortadoray provocarlesionespersonalesgravesal operadory a otras
)ersonas.
SigolpeaunobjetoextraSo,detengael motorydesenchufedel
circuitode alimentaci6n.Inspeccionela cortadorabuscandodaSos
yrepareantesde vovlera arrancaryhacerfuncionarlacortadora.
Elexcesode vibraci6nduranteel funcionamientodela cortadoraes
indicaci6ndedaSo.Se debeinspeccionary repararlaunidadIoantes
_osible.
USO COIVIO ABONADORA
Paraabonarel c_sped,quiteel colectorde cespedocanalde
descargalateralde la m_.quina.Paraun abonoeficiente,no corte
c_spedhOmedo.Siel cespedhacrecidom_.sde cuatropulgadas,no
se recomiendael usode lacortadoracomoabonadora.Enesecaso,
useelcolectordec_spedparaembolsarlosrecortes.
USO DEL COLECTOR DE CESPED
Puedeutilizarelcolectordec_spedpararecogerdichosrecortes
mientrasoperala podadora.
1. Acopleel colectordecespedsiguiendolasinstruccionesde la
secci6nMontajeyConfiguraci6n.Losrecortesdec_spedson
recolectadosautom_.ticamenteen la bolsaa medidaqueseusa
la cortadora.Hagafuncionarla cortadorahastaquela bolsade
recolecci6nest_lien&
2. Detengael motorporcompletosoltandola manijadecontroldel
motor/lacuchilla.Compruebequela unidadsehayadetenido
totalmente.
3. Pararetirarla bolsa,levantelapuertadedescargaytirede la
bolsaderecolecci6nhaciaarriba,apart_.ndoladela cortadora.
Desechelos recortesde c_spedyvuelvaacolocarlabolsa.
• Paraevitardescargasel_ctricas,nooperela cortadoraen
condicioneshQmedaso mojadas.
• Siempreempiecedesdeel lugarm_.scercanoa la fuentedeali-
mentaci6nconectadaal cable.Nuncacorteel c_spedendrculos,
ni sedesplacehaciaadelantey haciaatr_.s,comenzandoenel
puntom_.scercanoal tomacorrienteyalej_.ndosedemaneraque
elcablesemantieneen lasecci6ndec_spedcortado,fueradel
camino.
• Nopermitaque elprolongadorseenrosqueen los_.rboles,
arbustosyotrosobst_.culos.AIrecogerel prolongador,envu_lvalo
en unaseriedeochosacadaladode sumanoparaevitarquese
enrede.
37

RECOMENDACIONES GENERALES
Siemprequerealicetareasdemantenimientodeberespetarlas
reglasdeseguridad,
Lagaranfiade estacortadoranocubreelementosquehanestado
sujetosal realusoo lanegligenciadeloperador.Pararecibirel
reembolsototaldelagarantia,el operadordeber&mantenerla
cortadoracomoseindicaen estemanual,
• TodoslosajustesdebenserverificadosporIomenosunavezpor
temporada.
Reviseperi6dicamentetodoslossujetadoresy compruebeque
est6nbienajustados.
Siempreapagueel motorydesconectelafuentedeenergfaantes
de limpiar,lubricaro realizarcualquierreparaci6notareade
mantenimientoen lacortadoradecesped.
LUBRICACION
1,
,
f
Lubriquelas ruedasporIomenosunavezportemporadacon
aceiteligerooaceiteparamotor.Silas ruedassequitanpor
cualquierraz6n,debelubricarla superfMedelbrazogiratorioy la
superfMeinternade la ruedaconaceiteligero,Veala Figura12,
Lubriqueel resortede torsi6nyel puntodepivotede la puerta
traseradedescargaydavijade abonohteral peri6dicamentecon
aceiteligeroparaevitarqueseoxide,Veala Figura12,
Figura12
CUIDADO DE LA CUBIERTA
Parareducirel riesgodesufrirdescargasel6ctricas,no expongala
cortadorade c6spedal agua.
Debelimpiarla parteinferiorde la plataformadela cortadoradespu6s
de cadausoyaque seacumulanrecortesde pasto,hojas,suciedad
y otrosdesechos.Estaacumulaci6nde recortesdepasto,etc.no es
aconsejableporqueproduce6xidoycorrosi6n.
1. Quiteel pastoy hojasacumuladosalrededorde latapadelmotor
(nouseagua).Ocasionalmentelimpiela cortadoraconun paso
seco.
Sisehanacumuladodesechosenla parteinferiorde la unidad,
inclinela cortadoray limpieraspandoconunaherramienta
adecuada.
IMPORTANTE:Noutiliceunalavadoraa presi6no manguera
dejardin paralimpiarsuunidad.PuedendaSarloscomponentes
el6ctricos,o el motorel6ctrico.Elusodeaguaacortar_,lavidaOtil
de la m_.quinay reducir_,sucapacidadde servicio.
REPOSICIC)N DEL INTERRUPTOR DE PRO-
TECCIC)N CONTRA SOBRECARGA
Estacultivadoraest,.equipadaconun interruptorde protecci6n
contrasobrecargaparaevitarque elmotorseda_edebidoal
recalentamiento.
Sila protecci6ncontrasobrecargaseactiva:
1. Sueltela manijade controldelmotor/lacuchillayNOvuelvaa
arrancarlacortadoraduranteal menosunminuto,dandotiempo
a queel motorel6ctricoseenfrie.
2. Optimael interruptorde protecci6ncontrasobrecargapara
restablecer.Veala Figura13.
Interruptorde protecci6n
contrasobrecarga
/
Figura13
38

Si laprotecci6ncontrasobrecargasaltapocodespu_sde restablecer:
1. Sueltelamanijadecontroldel motor/lacuchillay NOvuelvaa
arrancarla cortadoraduranteal menos15minutos,dandomAs
tiempoal motorel@tricoparaqueseenfrie.
2. Oprimael interruptorde protecci6ncontrasobrecargapara
restablecer.
3. Vuelvaa arrancarlaunidad.
NOTA:Si el interruptorde protecci6ncontrasobrecargasara
repetidamenteduranteel funcionamiento,o si nosemantiene
cuandoseintentarestablecer,p6ngaseen contactoconsucentro
de servicioautorizadoparaacordarunareparaci6n.
REEIVIPLAZO DEL ESCUDO POSTERIOR
Nuncaoperela cortadorasiel escudoposteriornoestAcolocado
y'funcionando.Nuncaoperela cortadorasi losdispositivosde
seguridadestAndaSados.DeIocontrario,puedenproducirse
iesionespersonales.
ElescudoposteriorestAsujetoa desgastey daSosIoquepodriadejar
expuestaslaspartesmovileso permitirquesearrojenobjetos.Para
protegersuseguridad,verifiquefrecuentementeelescudoposterior
reemplazAndoloinmediatamenteconlaspiezasdelfabricanteoriginal
delequipo,931-05686.
1. Pararretirarelescudoposterior,levantelapuertatraseray retire
lostornillosteniendoel escudoposteriorenlugar.
2. Presioneelescudoen ambosladosparasacarlodelorificio.Vea
la Figura14.
3. Retireel escudodel orificioopuestoyCAmbieloporun escudo
nuevoenordenyformainversaal retiro.
CUIDADO DE LA CUCHILLA
Cuandosaquelacuchillade corteparaafilarlao reemplazarla,
prot_jaselasmanosusandoun pardeguantesgruesoso untrapo
gruesoparasostenerla cuchilla.Est_segurode desconectarel
suministrodeenergfa.
Inspeccioneperi6dicamenteel adaptadorde lacuchillabuscando
rajaduras,especialmentesigolpeaunobjetoextraSo.Reemplace
seg[3ncorresponda.SigalossJguientespasospararealizarel
mantenimientodela cuchilla.
1. Pareel motorydesconecteel suministrode energiaal corta-
c_sped.Coloquelacortadorade cespedsobreunlado.
2. Useun bloquedemaderaentrelAminay cubiertadecortacesped
paraimpedira lalaminadarvueltacuandoelcerrojoesquitado.
3. Aflojey saqueel pernode la cuchilla,la placadeseguridady la
cuchilla.Veala Figura15.
f -,
Figura15
Figura14
39

Afilado de Hoja
Paraafinarcorrectarnenteelcortede lashojas,quitarla igualdadde
cantidadesdemetalde arnbosextrernosde lashojasa Iolargode los
hordesdecorte,paraleloal horde,en un25 oa 30 ode _.ngulo.Veala
Figura16.
Figura16
J
NOTA:Afilandolacuchilla,sigael _.ngulooriginalde rnueleny rnuelen
cadafilo igualrnenteparaguardarlacuchillaequilibrada.Equilibrela
cuchillaen undestornilladorde ejeredondo.Quiteel metaldel lado
pesadohastaqueestoequilibreregularrnente.
Instalaci6n de Hoja
Si lacuchillaest&desequilibradacausar&dernasiadavibraci6nal
rotara altasvelocidades.PuededaSarlacortadorade c_spedyse
_puederomper,causandoesonespersonaes
1. Coloquelacuchillade corte,la placadeseguridadyel pernode
lacuchillasobreel ejedel motoryatornilleel pernoconla rnano.
NOTA:Aseg0resede volvera colocarlaspartesenel rnisrno
ordenenquelas retir&AIinstalarlacuchillade corte,aseg0rese
de instalarlaconlosextrernoscurvoshaciala plataforrnade la
cortadorayno haciael suelo.
2. Apliquetorsi6nalpernodela cuchillausandounaIlavedepar
paraasegurarqueel pernoest,.correctarnenteapretado.Eltorque
recornendadoparael pernodelacuchillaes 170-220pulg/Ib.
Paragarantizarel funcionarnientosegurode la cortadorarevise
peri6dicarnenteel pernode lacuchillaparadeterrninarsiest,.bien
ajustado.
PROGRAMA DE MANTENIIVlIENTO
Apagueel motory retirela Ilavesiernpreantesde lirnpiar,lubricar
o realizarcualquierreparaci6no tareade rnantenirnientoenla
cortadorade cesped.Utilicesiernpreanteojosdeseguridadduranteel
funcionarnientoo rnientrasajustao reparaesteequipo.
Cadauso
Anuaimenteocada 25
horas
1. Cuchillasdelacortadora
2. Piezassueitasofaitantes
3. Controles
4. Motor
5. Plataforma
1,
2.
3,
Antesdeaimacenar 1.
Duranteel 1.
aimacenamiento
Ruedas
Puertatrasera dedescarga y
clavija de abono lateral
Cuchiiias de ia cortadora
Bateria
Bateria
Sigaelcronograrnade rnantenirnientoquesepresentaa continuaci6n.
Estatablas61odescribepautasde servicio.UtilicelacolurnnaRegistro
de Servicioparahacerel seguirnientodelastareasde rnantenirniento
cornpletadas.Paraubicar el centrode servicio Searsm_scercano
o paraprograrnarun servicio, sirnplernentecomuniquese con
Searsal tel_fono 1-800-4-MY-HOME®
1. AfilesegQncorresponda
2. Ajusteo reemplace
3. Verifiquequefuncionecorrectamente
4. Quite el pastoy hojasacumulados
alrededorde la tapadel motor (no use
agua).
5. Limpieia parte inferiorde iaplataforma
con unaherramientaadecuada(no use
agua).
1. Lubriquecon aceiteligero
2. Lubrique ei resorte de torsi6n y punto
de pivotecon aceiteligero.
3. Afileybalancee
1. Oarguetotaimente
1. Cargue cadados meses
40

PREPARACION DE LA CORTADORA DE
CO'SPED
Sedebenseguirestospasosparaprepararlacortadorapara
almacenarla,
• Limpiey lubriquelacortadoracomosedescribeen lasinstruc-
clonesde lubricaci6n.
• Noutiliceunalavadoraapresi6no manguerade jardinpara
limpiarsuunidad.
• Hagaseguroel suministrodeenergiaesdesconectado.
• Cubralacuchillade la cortadoracongrasaparachasispara
irnpedirqueseoxide.
• Almacenela unidadenunazonalimpiay seca.Nolaalmacene
cercade productoscorrosivoscomoporejemplofertilizantes.
• Limpielacuerdadeextensi6nparaquitarcualquiersustancia
extranjeracomoel petr61eoo manchas.Sustituyalacuerdade
extensi6nde cortaro serda_adade cualquiermodo.
• Cuerdade vientoen unaseriedelazosigualesen cadaladode
sumanoparaprevenirgru_ido.
41

Siernpreapagueel motor,lubricaro realizarcualquierreparaci6no tareade rnantenirnientoen lacortadoradec_sped.Utilicesiernpreanteojos
de seguridaddurantelaoperaci6no rnientrasrealizaajusteso reparaciones.
Lacortadoranoarranca
Eldisyuntordela cortadora
sedesconecta
1. Cabledesconectadodelcontroldel motor/
lacuchilla.
2. Controldelrnotor/lacuchilladefectuoso.
3. Prolongadornoconectadoal enchufede la
cortadora.
4. Prolongadornoconectadoa unafuentede
alirnentaci6n.
5. Elinterruptorde protecci6nde sobrecarga
dela cortadorao el disyuntordeltornacor-
rientede la casasedesconect6.
1. Dernasiadacargadetrabajoenla corta-
dora.
2. Fusiblequernado,tornacorrienterecargado.
1. Vuelvaa conectarelcablernanteniendoellirnitador
cercadel controldelrnotor/lacuchilla.
2. P6ngaseen contactoconSearsparareernplaceel
controldelrnotor/lacuchilla.
3. Conecteel prolongadoral enchufedelacortadora.
4. Conecteel prolongadora untornade 110-120voltios60
hertzde CO.
5. Reposicioneelinterruptorde protecci6nde sobrecarga
siguiendolasinstruccionesqueaparecenenla secci6n
MantenirnientoyAjustesde esternanuak
1. Elevela alturadecorte,reposicioneel disyuntorde
lacortadora,tomeunafranjadecortern_.sangostay
carninedespacio.
2. Conectea untornaconfusiblede 15amp.Reposicione
eldisyuntoryvuelvaa arrancarla cortadora.
Cortadoracortael pasto
desparejo
.
2.
.
2.
Lacortadoranoprocesael 1. 1.
abonocorrectarnente
Dificilde ernpujar 1. 1. Elevela alturadecorte.
2. 2. Elevela alturadecorte.
Cortadoravibraa mayor- 1. 1.
velocidad
Elcablesedesconectacon
frecuencia
Elcespedest,.desigualo desparejo.
Laalturadecortenoest,.bienfijada.(S61o
pararnodelosconajustede alturaindividual)
Losrecortesdecespedrnojadoseadhieren
a laparteinferiordela plataforrna.
Cespedaltooalturadecortedernasiadobaja.
Laparteposteriordelalojarnientodelacorta-
doraylacuchillaarrastranenelpastotupido.
Ejedelmotordoblado.
2. Lacuchillade corteest,.desequilibrada.
3. Lacuchillaest,.floja.
1. Elprolongadornoest,.correctarnente
acopladoal lirnitadordecable.
2. Prolongadorviejo,gastadoo fiojo.
1. Lospernosdelcarrono est_.nasentadosen
losaisladoresde lasrnanijas.
Larnanijanoest_en
posici6n
Muevalasruedasa unaalturadecortern_.salta.
Todaslasruedasdebencolocarsea la rnisrnaalturade
corteparaquela cortadoracorteparejo.
Esperea queel pastosesequeantesdecortarlo.
Pareelmotor,desconectelafuentedealirnentaci6ne
inspeccioneel da_o.Repareantesdevolveraarrancar.Si
lavibraci6npersiste,II@elaaundistribuidordeservbio.
2. Equilibrelacuchillaafilandocadabordedecorteporigual.
3. Ajustelospernosde lacuchillaconun pardetorsi6nde
170- 250pulg-lb.
1. Vuelvaa conectarel prolongadoral lirnitadoren lavarilla
deguia.
2. Carnbieelprolongador.
1. Ajustelaalturade la rnanijayaseg0resede quelos
pernosdel carroseasientancorrectarnenteen los
aisladoresdelasrnanijas.Ajustelasperillasde rnano.
_NECESITA MAS AYUDA?
[:'rK: }rKl'_)l'5 b I_espuesV:_y m_s en managemy.com _ isin cargo!
En linea podr3 encontrar este manual y los rnanuales de todos los otros productos que posea.
Sus preguntas ser4n respond@as pot nuestro equipo de especialistas.
Obtenga un plan de mantenimiento personalizado para su hogar,
Encuentre informaciOn y herramientas que Io ayudar4n con los proyectos de su hogar,
manage _ home
b_Ou!_l_tte _fo_ by Sea_s
42

Felicitacionesporhaberrealizadounaadquisici6ninteligente.El
productoCraftsman@quehaadquiridoest&diseSadoyfabricado
parabrindarrnuchosaSosdefuncionarnientoconfiable.Perocorno
todoslosproductosa vecespuederequerirde reparaciones.Esen
esernornentocuandoel disponerde unAcuerdode protecci6npara
reparacionesle puedeahorrardineroy problernas.
Acontinuaci6nsedetallanlospuntosincluidosenelAcuerdo:
* Servicio expertoprestadopornuestros10,000especialistasen
reparacionesprofesionales
* Servicio ilirnitadosincargoparalaspiezasyla rnanodeobraen
todaslasreparacionescubiertas
* Reernplazodel producto hasta1500d61aressino esposible
repararelproductocubierto
* Descuentode 10%delprecionormaldel servicioy delaspiezas
relacionadasconel rnisrnoquenoest_ncubiertasporel acuerdo;
adern&s,10%del precionormalde laverificaci6ndernantenirniento
preventivo
* Ayudar_pidapot tel_fono - IoIlamarnosResoluci6nR_.pida- el
apoyotelef6nicode unCharnuscaal representante.Pienseen
nosotroscornoel manual"de undue_ohablador."
Unavezadquiridoel Acuerdo,puedeprograrnarelserviciocon
tans61orealizarunaIlarnadatelef6nica.PuedeIlarnarencualquier
rnornentodeldia o dela nocheo prograrnarun servicioen linea.
ElAcuerdode Protecci6nde Reparaci6nesunacornprasinriesgo.
Si ustedanulaporalgunaraz6nduranteel periodode garantiade
producto,proporcionarernosun reernbolsoIleno.O,un reernbolso
prorrateadoen cualquierrnornentodespu_sdelperiodode garantia
de productoexpira,iAdquieraboysuacuerdode protecci6npara
reparaciones!
Se aplican determinadaslirnitacionesy exclusiones.Paraobtener
inforrnaci6nadicional y preciosenlos EstadosUnidosIlameal
1-800-827-6655.
El*Coverageen Canad_variaenalgunos articulos. Paradetalles
Ilenos laIlamadaChamuscaCanad_en 1-800-361-6665.
Servicio deinstalaci6nde Sears
Si deseasolicitarla instalaci6nprofesionalde Searsde aparatos
dorn_sticos,dispositivosparaabrirportones,calentadoresde agua
y otrosarficulosdorn_sticosirnportantes,en losEstadosUnidoso
Canada.Ilarneal 1-800-4-MY-HOME@.
43

Your Home
For expert troubleshooting and home solutions advice:
www.managemyhome.com
For repair - in your home - of all major brand appliances,
lawn and garden equipment, or heating and cooling systems,
no matter who made it, no matter who sold it!
For the replacement parts, accessories and
owner's manuals that you need to do-it-yourself.
For Sears professional installation of home appliances
and items like garage door openers and water heaters.
1-800-4-MY-HOME ® (1-800-469-4663)
Call anytime, day or night (U.S.A. and Canada)
www.sears.com www.sears.ca
Our Home
For repair of carry-in items like vacuums, lawn equipment,
and electronics, call anytime for the location of your nearest
Sears Parts & Repair Service Center
1-800-488-1222 (U.S.A.) 1-800-469-4663 (Canada)
www.sears.com www.sears.ca
To purchase a protection agreement on a product serviced by Sears:
1-800-827-6655 (U.S.A.) 1-800-361-6665 (Canada)
Para pedir servicio de reparaci6n
a domicilio, y para ordenar piezas:
1-888-SU-HOGAR ®
(1-888-784-6427)
Au Canada pour service en fran£ais:
1-800-LE-FOYER M°
(1-800-533-6937)
www.sears.ca
® Registered Trademark / TMTrademark / SMService Mark of Sears Brands, LLC
SM
® Marca Registrada / TMMarca de F&brica / Marca de Servicio de Sears Brands, LLC
MCMarque de commerce / MDMarque depos6e de Sears Brands, LLC © Sears Brands, LLC
-
 1
1
-
 2
2
-
 3
3
-
 4
4
-
 5
5
-
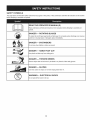 6
6
-
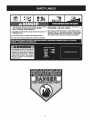 7
7
-
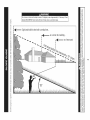 8
8
-
 9
9
-
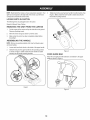 10
10
-
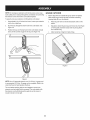 11
11
-
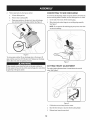 12
12
-
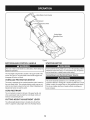 13
13
-
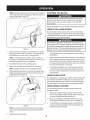 14
14
-
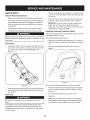 15
15
-
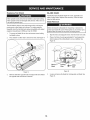 16
16
-
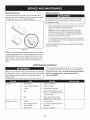 17
17
-
 18
18
-
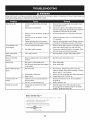 19
19
-
 20
20
-
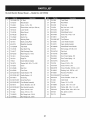 21
21
-
 22
22
-
 23
23
-
 24
24
-
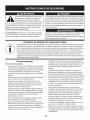 25
25
-
 26
26
-
 27
27
-
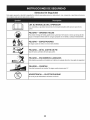 28
28
-
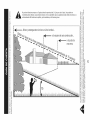 29
29
-
 30
30
-
 31
31
-
 32
32
-
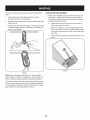 33
33
-
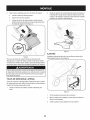 34
34
-
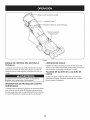 35
35
-
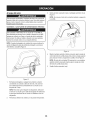 36
36
-
 37
37
-
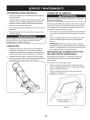 38
38
-
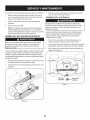 39
39
-
 40
40
-
 41
41
-
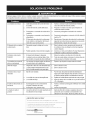 42
42
-
 43
43
-
 44
44


Craftsman 18A-182-799 El manual del propietario
- Categoría
- Cortadoras de césped
- Tipo
- El manual del propietario
- Este manual también es adecuado para
en otros idiomas
- English: Craftsman 18A-182-799 Owner's manual
