Craftsman 247.370480 Manual de usuario
- Categoría
- Cortadoras de césped
- Tipo
- Manual de usuario

Operator's Manual
CRRF[SM ®
19-inch Rechargeable
Rotary Mower
Model No. 247.370480
CAUTION: Before using
this product, read this
manual and follow aJl
safety rules and operating
instructions.
,, SAFETY
*ASSEMBLY
*OPERATION
*MAINTENANCE
*PARTS LIST
*ESPANOL R 22
o his symbol on the product's nameplatemeans itislistedby
LISTEDUNDERWRITERSLABORATORIESINC,
Sears, Roebuck and Co., Hoffman Estates, IL 60179, U.S.A.
Visit our web site: www.craftsman.com FORMNO.769-04644A
January11,2010
https://manual-hub.com/

WarrantyStatement..........................................................2
Safetyinstructions............................................................3
SafetyLabels....................................................................6
SlopeGuide.......................................................................7
Assembly...........................................................................8
Operation........................................................................10
CraftsmanTwoYearLimited Warranty
Ifthis Craftsmanproductfailsduetoa defectinmaterialor workmanshipwithintwo yearsfromthedateof purchase,returnittoanySearsstore,
SearsServiceCenter,orotherCraftsmanoutletintheUnitedStatesforfreerepair.
Thiswarrantydoesnotinclude:
• Expendableitemswhichcanwearoutfromnormalusewithinthewarrantyperiod,suchasthegrassbagandrotarymowerblade.
Repairsnecessarybecauseof operatorabuseor negligence,includingbentmotorshaftsandthefailuretooperateor maintainthe
equipmentaccordingtoall suppliedinstructions.
Thiswarrantyappliesforonly90daysifthis productiseverusedforcommercialor rentalpurposes.
Thiswarrantyappliesonlywhilethisproductisusedinthe UnitedStates.
Thiswarrantygivesyouspecificlegalrights,andyoumayalsohaveotherrightswhichvaryfromstatetostate.
Sears, Roebuckand Co.,Hoffman Estates,IL 60179
Battery: 12Volt
Motor: 48VoltDC
Model Number
Serial Number
Dateof Purchase
Recordthemodelnumber,serialnumber,
anddateof purchaseabove.
©SearsBrands,LLC 2
https://manual-hub.com/

Thissymbolpointsoutimportantsafetyinstructions
which,ifnotfollowed,couldendangerthepersonal
safetyand/orpropertyofyourselfandothers.Read
andfollowall instructionsin thismanualbefore
attemptingtooperatethismachine.Failuretocomplywiththese
instructionsmayresultin personalinjury.Whenyouseethissymbol,
HEEDITSWARNING!
Your Responsibility: Restricttheuseofthis powermachineto
personswhoread,understand,andfollowthewarningsand instruc-
tionsinthis manualandonthemachine.
Thismachinewasbuilttobeoperatedaccordingto therulesfor
safeoperationinthis manual.Aswithanytypeof powerequipment,
carelessnessorerroronthe partoftheoperatorcanresultin serious
injury.Thismachineiscapableofamputatinghandsandfeetand
throwingobjects.Failuretoobservethefollowingsafetyinstructions
couldresultin seriousinjuryordeath.
Whenusingelectriclawnmowers,basicsafetyprecautionsshould
alwaysbefollowedto reducetheriskoffire,electricshock,and
personalinjury.Thesebasicprecautionsincludethefollowing:
Children
Tragicaccidentscanoccurifoperatorisnotalertto presenceofchildren.Chil-
drenareoftenattractedto mowerandmowingactivity.Theydo notunderstand
thedangers.Neverassumethat childrenwillremainwhereyoulastsawthem.
,, Keepchildrenoutofthe mowingareaand underwatchfulcareofa
responsibleadultotherthanthe operator.
,, Bealert andturnmoweroff if achild entersthe area.
Beforeandwhile movingbackwards,lookbehindanddownfor small
children.
,, Useextremecarewhenapproachingblindcorners,doorways,shrubs,
trees,orotherobjectsthatmayobscureyourvisionof achildwhomay
runintothemower.
Neverallow childrenunder 14yearsoldto operateapowermower.
Children14yearsoldand overshouldreadandunderstandoperation
instructionsand safetyrulesin thismanualand shouldbetrainedand
supervisedbya parent.
Operation
GeneralOperation:
,, Readthisoperator'smanual carefullyin its entiretybeforeattempting
toassemblethismachine.Read,understand,andfollowall instructions
onthe machineandinthe manual(s) beforeoperation.Becompletely
familiarwiththe controlsand the properuseofthismachinebefore
operatingit. Keepthis manualin a safeplaceforfuture andregular
referenceand for orderingreplacementparts.
,, Thismachineisa precisionpieceof powerequipment,not aplaything.
Therefore,exerciseextremecautionatall times.Yourunithasbeen
designedto performonejob:to mowgrass.Do notuseitfor anyother
purpose.
,, Don'tforcelawn mower-it willdothe job betterandsaferatthe ratefor
whichit wasdesigned.
,, Neverallow childrenunder 14yearsoldto operatethismachine.
Children14yearsoldand overshouldreadand understandthe instruc-
tionsinthis manualandshouldbetrainedandsupervisedbyaparent.
Onlyresponsibleindividualswhoarefamiliarwiththeserulesofsafe
operationshouldbe allowedto usethis machine.
,, Thoroughlyinspecttheareawherethe equipmentisto be used.Remove
all stones,sticks,wire,bones,toysandotherforeign objectswhichcould
betripped overor pickedupandthrownbythe blade.Thrownobjects
cancauseseriouspersonalinjury.Planyourmowingpatterntoavoid
dischargeof materialtowardroads,sidewalks,bystandersandthe like.
Also,avoiddischargingmaterialagainstawallor obstructionwhichmay
causedischargedmaterialtoricochetbacktowardtheoperator.
,, To helpavoid bladecontactor athrownobject injury,stayin operator
zonebehindhandlesandkeepchildren,bystanders,helpersandpetsat
least75feet frommowerwhile itis inoperation.Stopmachineifanyone
entersarea.
,, Alwayswearsafetyglassesor safetygogglesduringoperationand while
performingan adjustmentor repairto protectyoureyes.Thrownobjects
whichricochetcancauseseriousinjurytotheeyes.
,, Wearsturdy,rough-soledworkshoesandclose-fittingslacksandshirts.
Shirtsand pantsthatcoverthe armsand legsandsteel-toedshoes
arerecommended.Neveroperatethis machinein barefeet, sandals,
slipperyor lightweight(e.g.canvas)shoes.
,, Donot puthandsor feetnearrotatingpartsor undercuttingdeck.
Contactwith bladecanamputatehandsandfeet.
,, A missingor damageddischargecovercancausebladecontactor
thrownobjectinjuries.
,, Manyinjuriesoccuras aresultofthe mowerbeingpulledoverthefoot
duringa fall causedby slippingor tripping.Do notholdon tothe mowerif
youarefalling;releasethe handleimmediately.
,, Neverpull the mowerbacktowardyouwhileyouarewalking.If youmust
backthe mowerawayfroma wallor obstructionfirst lookdownand
behindtoavoidtrippingandthenfollowthesesteps:
,, Stepbackfrom mowertofullyextendyourarms.
,, Besure youarewellbalancedwith surefooting.
,, Pullthe mowerbackslowly,nomorethanhalfwaytowardyou.
,, Repeatthesestepsasneeded.
,, Donotoperatethe mowerwhile underthe influenceof alcoholordrugs.
,, Stayalert- Watchwhatyouare doing.Usecommonsense.Do not
operatelawnmowerwhenyouaretired.
3
https://manual-hub.com/

• Themotor/bladecontrolhandleis asafetydevice.Neverattemptto
bypassitsoperation.Doingso makesthesafety deviceinoperativeand
mayresultin personalinjurythroughcontactwiththe rotatingblade.The
motor/bladecontrolhandlemustoperateeasilyin bothdirectionsand
automaticallyreturntothe disengagedpositionwhenreleased.
• Do notchargethe mowerin rain,or inwetconditions.
• Neveroperatethe mowerin rainor wetgrass.Alwaysbesureofyour
footing. A slipandfall cancauseseriouspersonalinjury. Ifyoufeel
youarelosingyourfooting,releasethe motor/bladecontrolhandle
immediatelyandthe bladewill stoprotatingwithinthreeseconds.
• Mowonlyindaylightor goodartificial light.Walk,neverrun.
• Stopthe bladewhencrossinggraveldrives,walksor roads.
• Iftheequipmentshouldstartto vibrateabnormally,stopthe motorand
checkimmediatelyfor the cause.Vibrationisgenerallya warningof
trouble.
• Shutthe motoroffand waituntilthe bladecomestoacompletestop
beforeremovingthe grasscatcheror uncloggingthe chute.Thecutting
bladecontinuesto rotatefora fewsecondsafterthe motorisshutoff.
Neverplaceanypartofthe bodyinthe bladearea untilyouaresurethe
bladehasstoppedrotating.
• Neveroperatemowerwithoutpropertrailingshield,dischargecover,
grasscatcher,motor/bladecontrolhandleor othersafetyprotective
devicesinplaceand working.Neveroperatemowerwithdamaged
safetydevices.Failuretodo so,canresultin personalinjury.
• Onlyusepartsand accessoriesmadeforthismachinebymanufacturer.
Failureto dosocanresultin personalinjury.
• Ifsituationsoccurwhich arenotcoveredinthismanual,usecareand
goodjudgment.ContactyourSearsServiceCenterfor assistance.
Slope Operation:
Slopesarea majorfactorrelatedto slipandfall accidentswhichcanresultin
severeinjury.Operationon slopesrequiresextracaution.Ifyoufeeluneasyon
aslope,donotmowit.Foryoursafety,usethe slopegaugeincludedas part
ofthismanualtomeasureslopesbeforeoperatingthisunitona slopedor hilly
area.Iftheslopeis greaterthan15degrees,do notmowit.
Do:
• Mowacrossthefaceofslopes;neverupanddown. Exerciseextreme
cautionwhenchangingdirectionon slopes.
• Watchfor holes,ruts,rocks, hiddenobjects,or bumpswhichcancause
youto slipor trip.Tallgrasscan hideobstacles.
• Alwaysbe sureofyour footing.A slip andfall cancauseseriouspersonal
injury.Ifyoufeelyouare losingyourbalance,releasethe motor/blade
controlhandleimmediately,andthe bladewill stoprotatingwithinthree
(3) seconds.
Do Not:
• Do notmowneardrop-offs,ditchesorembankments,youcould lose
yourfootingor balance.
• Do notmowslopesgreaterthan 15degreesasshownonthe slope
gauge.
Service
•Ifthe mower'sbuilt-inoverloadprotectionswitchfrequentlytrips,contact
yournearestSearsServiceCenterfor repair.
• Removekeyand storeidlelawn mowerindoorswhennotin use.Allow
motorto cool beforestoringin anyinclosure.Lawnmowershould be
storedindoorsin adry,high,or locked-upplace,outof reachof children.
• Whenservicinguseonlyidenticalreplacementpartslistedinthis
manual."Useofpartswhichdo notmeettheoriginalequipmentspecifi-
cationsmayleadto improperperformanceandcompromisesafety!"
• Beforecleaning,repairing,or inspecting,makecertainthe blade and
all movingpartshavestopped.Removethe keyto preventaccidental
starting.
• Removekeybeforeservicing,cleaning,or removingmaterialfromthe
lawnmower.
•Followinstructionsforlubricatingandchangingaccessories.
• Keephandlesdry,cleanand freefromoiland grease.
• To reducea fire hazard,keepthe motorcoverfreeofgrass,leavesand
debrisbuild-up.
• Checkthe bladeand motormountingboltsatfrequentintervals
for propertightness.Also,visually inspectbladefordamage(e.g.,
bent,cracked,and worn). Replacebladewiththe originalequipment
manufacturer's(OEM)bladeonly,listedinthismanual.
• Maintainyourmowerwith care-- Keepmowerbladesharpandcleanfor
best andsafestperformance.Mowerbladesaresharpand cancut,wrap
the bladeor wearglovesand useextracautionwhenservicingthem.
• Keepallnuts, bolts,andscrewstightto besurethe equipmentisin safe
workingcondition.
• Nevertamperwith safetydevices.Checktheir properoperationregularly.
• Neverattemptto makewheelor cuttingheightadjustmentswhilethe
motorisrunning.
• Afterstrikinga foreignobject,stopthe motor,removethe key,and
thoroughlyinspectthe mowerfor anydamage.Repairthedamage
beforeoperatingthe mower.
• Grasscatchercomponents,dischargecover,andtrailingshieldare
subjectto wearanddamagewhichcouldexposemovingpartsorallow
objectsto bethrown.Forsafety protection,frequentlycheckcomponents
and replaceimmediatelywith originalequipmentmanufacturer's(OEM)
partsonly,listedin this manual.
SAVE THESE INSTRUCTIONS!
• Do notmowonwetgrass.Unstablefootingcouldcauseslipping.
4
https://manual-hub.com/

SAFETY SYMBOLS
Thispagedepictsanddescribessafetysymbolsthatmayappearonthis product.Read,understand,andfollowallinstructionson themachine
beforeattemptingtoassembleandoperate.
-" "- READ THE OPERATOR'S MANUAL(S)
Read,understand,andfollowall instructionsinthemanual(s)beforeattemptingtoassembleand
_ operate
DANGER m ROTATING BLADES
Toreducetheriskofinjury,keephandsandfeetaway.Donotoperateunlessdischargecoveror grass
catcherisin itsproperplace.Ifdamaged,replaceimmediately.
, Donotmowwhenchildrenorothersarearound.
_J DANGER -- HAND/FOOT CUT
_._ Keephandsandfeetawayfromrotatingparts.
/_:_,,-_ _ DANGER m THROWN DEBRIS
DANGER _ SLOPESUseextracautiononslopes.Donotmowslopesgreaterthan 15°.
WARNING_ ELECTRICAL SHOCK
Donotoperatethemowerintherain.
https://manual-hub.com/

05
(!3
oo
c
o
o
E
c
CD
0
"5
c
0
cb
g3
o
c
o5
E
o
q3
q3
o
cb
c
E
CD
q3
o5
(D
o5
Donotmowoninclineswitha slopein excessof 15degrees(a riseof approximately2-1/2feetevery10feet).
OperateWALK-BEHINDmowersacrossthefaceofslopes,neverup anddownslopes.
Sight and hold this levelwith a vertical tree...
15°
¢0
https://manual-hub.com/

e TO REDUCETHE RiSK OF ELECTRIC SHOCK,DO NOT EXPOSE •REMOVEOBJECTSTHATCANBETHROWN BYTHE BLADEiN
UNiT TOWATERDR OPERATEUNiT ON WET GROUND. ANY DiRECTiON. WEARSAFETYGLASSES,
e REMOVEKEYBEFORESERViCiNG ORREMOVING BLADE, • USE EXTRA CAUTION ON SLOPES, DONOT MOW SLOPES
GREATERTHAN 15 °. MOW ACROSS, NEVER UP AND DOWN.
e KEEPHANDS AND FEETAWAYFROM ROTATINGPARTS. NEVER PULL MOWER CLOSETO YOUR FEEr, LOOKDOWN
e DONOT MOW WHEN CHILDREN OR OTHERSARE AROUND. AND BEHIND BEFOREAND WHILE MOVING BACKWARDS,
7
https://manual-hub.com/

iMPORTANT:Becertaintochargethe batteryforatleast14hours
beforeoperatingyourmower.RefertoOperationsection.
NOTE:Standbehindthemowerasifyouweregoingtooperateit.Your
righthandcorrespondstotherightsideofthemower;yourleft hand
correspondstotheleftsideofthemower.
LOOSE PARTS iN CARTON
Thefollowingitemsare packagedlooseinthecarton:
Operator'sManual,GrassCatcher
REMOVING THE UNiT FROM THE CARTON
1. Cutthecornersofthecartonandlaythesidesflaton theground.
Removeall packinginserts.
2. Movethemowerandgrasscatcheroutofthecarton.
3. Makecertainthecartonhasbeencompletelyemptiedbefore
discardingit.
ASSEMBLING THE HANDLE
1. Removeanypackingmaterialwhichmaybebetweenupperand
lowerhandles.
2. Looseneachhandknobfoundon theinsideofthe upperhandle.
3. Gentlylift andpivottheupperhandleintotheoperatingposition
asshowninFigure1.
6. Tightenstarknobssecuringlowerhandletohandlebrackets.See
Figure2.Makecertainthelowerhandleisseatedsecurelyinto
thehandlemountingbrackets.
f
Figure2
ATTACHING THE GRASS CATCHER
1. Liftreardischargedoor.
2. Removemulchingbaffle.SeeFigure3.
J
Figure1
4. Removestarknobsfromhandlemountingbracketsand secure
thelowerhandleontothehandlebracketsbyplacingthe lower
holeofthelowerhandleontothepinsofthehandlebrackets.
5. Securetheupperhandleandlowerhandlebytighteningthe
handknobs. Eachcarriageboltmustbeseatedproperlyintothe
squareholefoundintheplasticconnector.
Figure3
8
https://manual-hub.com/

Placegrasscatcheronthepivotrod.Letgoofdischargedoor so
thatit restson thegrasscatcher.SeeFigure4.
Figure4
Toremovethegrasscatcher,lift thereardischargedooronthe
mower.Liftthegrasscatcherup,off ofthepivotrod.Releasethe rear
dischargedoor.
Neveroperatemowerunlessthehookson thegrasscatcherare
firmlyseatedonthepivotrodandthereardischargedoorrestsfirmly
againsttopofthegrasscatcher.
CONVERTING TO SIDE DISCHARGE
Toconvertto sidedischarge,makesuregrasscatcherisoff oftheunit.
Replacetherearmulchingbaffleandclosereardischargedoor.To
dischargegrasstotheside:
1. Lift mulchingplugontherightsideofmower.
2. Slidetwohooksofsidedischargechuteunderthehingepinon
themulchingplugassemblyandlowerthesidemulchingplug.
SeeFigure5.
\4
...................................................................
NOTE:Donotremovethesidemulchingplugatanytime,evenwhen
youarenotmulching.
CUTTING HEIGHT ADJUSTMENT
Thecuttingheightadjustmentleveris
locatedabovetherearleftwheel.See
Figure6.
1. Pulltheleveroutandawayfromthe
mower.
2. Movethe leverforwardor backfor
desiredcuttingheight.
3. Releaselevertowardsmowerdeck.
Donotatanytimemakeanyadjustmenttolawnmowerwithoutfirst
stoppingmotorand removingkey.
J
Figure6
Figure5
https://manual-hub.com/

f
Motor/BladeControlHandle
BladeControl
HeightAdjustmentLever
IBatteryLevelIndicator
@@@@@ l
Figure7
MOTOR/BLADE CONTROL HANDLE
Themotor/bladecontrolhandleisa safetydevice.Neverattemptto
bypassits operations.
Themotor/bladecontrolhandleislocatedon theupperhandleofthe
mower.SeeFigure7.Themotor/bladecontrolhandleengagesand
disengagesthemotorand blade.Themotor/bladecontrolconsistsof
threeparts- starterbutton,motor/bladecontrolhandle,andkey.
Releasethemotor/bladecontrolhandletostopthemotorandblade.
Removethe keytopreventaccidentalstartingwhenequipmentis
unattended.
IMPORTANT:if thefarleftredlightilluminates,thebatterieswill
needtobe rechargedbeforefurtheruse.Continuedoperationbefore
chargingmayshortenthelifeof thebatteries.
CIRCUIT BREAKER RESET BUTTON
Themowerisequippedwitha circuitbreakerresetbutton,locatedon
themotor/bladecontrol.Referto Figure7.Thiscircuitbreakerreset
buttonmaypopoutwhentoomuchstrainisplacedonthemotor.Refer
to MaintenanceSectionto resetthisbutton.
KEY
Thekeymustbepresentandinsertedbeforethemotorcanbe started.
See Figure8. DONOTTURNKEY.
Thebladewillbe rotatingwheneverthemotoris running.
HEIGHT ADJUSTMENT LEVER
Thecuttingheightadjustmentleverislocatedabovetheleft rear
wheel.Toadjustthecuttingheight,refertotheAssemblySection.
BATTERY LEVEL INDICATOR
Thebatterylevelindicatorislocatedonthemotorcover.Theindicator
showstheconditionofthebatteryand isonwhenthemotorison.The
indicatorlitallthewaytotherightindicatesthebatteryisfullycharged;
astheindicatorislit moretowardtheleft,it indicatesthebatteryis
discharging.SeeFigure7inset.
10
https://manual-hub.com/

CHARGING THE BATTERY
Chargethe mowerfor 14hours before initialuse. Chargemower
indoorsina dryareaoutoftheweather.DONOTchargeinrainorwet
locations.
IMPORTANT:Useonlythebatterychargerprovidedwiththismower
(Partnumber725-04387).
Plugthe batterychargerintothemowerfirst,andthenintoany
standard110/120volthouseholdelectricaloutlet.SeeFigure8 insetfor
batterycharginglocationonmower.
IMPORTANT:Alwaysdisconnectbatterycharger(or extensioncord,
ifused)fromtheelectricaloutletfirst,thendisconnectbatterycharger
frommower.
STARTING THE MOWER AND BLADE
1. Insertkey.Referto Figure9.
f
CircuitBreaker
ChargerAdapter ResetButton
'_. ...J
Figure8
NOTE:Ifanextensioncordisrequired,useonethat isat leastwire
size16AWG.Connecttheextensioncordto chargerbeforeplugging
extensioncordintoelectricaloutlet.
Thebatterycontainscorrosivefluidandtoxicmaterial- HANDLE
WITHCARE.Keepawayfromchildren.Donotpuncture,
disassemble,mutilate,orincinerate.Explosivegasescouldbevented
duringchargingor discharging.Useina wellventilatedarea,away
fromsourcesofignition.
IMPORTANT:Alwaysrechargemowerfully.Thechargerisa two
stagecharger.Thefirststage,equalize,suppliesa highervoltageto
thebatteries.Thishelpsspeedchargetimeand balancethecharge
acrosstheindividualbatteries.Thesecondstage,float,suppliesa
lowervoltage.Thispreventsthebatteriesfromexperiencing
overchargingdamageandalso"topsoff"thebatterycharge.
Dependingon batteryconditiontheequalizestagewillcompletein
approximately8 hours.Whentheequalizestageis completethe
charger'sgreenLEDwillstopblinking.Thisstartsthefloatstage.
DuringthefloatstagethechargersgreenLEDwillbeon continuously.
Thefloatstagewill"topoff"thebatteriesinapproximately4-6 hours,
again,dependingontheconditionofthebattery.However,a full 14
hourchargeisalwaysrecommended.
NOTE:Itisrecommendedthatthemowerbe chargedonceeverytwo
monthsduringstorage.
Figure9
2. Depressstarterbuttononthemotor/bladecontrol.
3. Pullmotor/bladecontrolhandleupagainstupperhandle.
4. Releasestarterbuttonwhenmotorstarts.
STOPPING THE MOTOR AND BLADE
1. Releasemotor/bladecontrolhandletostopmotorandblade.
handleisreleased SearsServiceCenter.
2. Removethekeytopreventaccidentalstartingwhenequipmentis
unattended.
3. Chargethemower.
11
https://manual-hub.com/

USING YOUR LAWN MOWER
Theoperationofanylawnmowercanresultinforeignobjectsbeing
thrownintotheeyes,whichcandamageyoureyesseverely.Always
wearsafetyglasseswhileoperatingthemower,orwhileperforming
an ad ustmentsor re arson t.
• Besurethat lawnisclearofstones,sticks,wires,or otherobjects
whichcoulddamagethelawnmoweror motor.Suchobjects
couldbeaccidentallythrownbythemowerinanydirectionand
causeseriouspersonalinjurytotheoperatorandothers.
If youstrikea foreignobject,stopthemotor,andremovethekey.
Thoroughlyinspectthemowerforanydamage,and repairthe
damagebeforerestartingand operatingthemower.Excessive
vibrationofthe mowerduringoperationisan indicationofdamage.
Theunitshouldbepromptlyinspectedandrepaired.
o
o
Whenusingthesidedischarge,the mosteffectivemowingpattern
isonethatallowstheclippingstodischargetowardstheuncut
partofthelawn.
DONOTusemowerintherain.
Fora healthylawn,alwayscut offone-thirdor lessofthetotal
lengthofthegrass.
Forbest results,do notcut wetgrassbecauseittendsto stick
totheundersideof thedeckpreventingpropermulchingor
dischargeofgrassclippings.Newor thickgrassmayrequirea
narrowercut.
12
https://manual-hub.com/

GENERAL RECOMMENDATIONS
Alwaysobservesafetyruleswhenperforming
anytypeof maintenance.
Thewarrantyon thislawnmowerdoesnotcoveritemsthathave
beensubjectedtooperatorabuseor negligence.Toreceivefull
valuefromwarranty,operatormustmaintainthelawnmoweras
instructedhere.
• AIiadjustmentsshouldbecheckedat leastonceeachseason.
• Periodicallycheckall fastenersandmakesurethesearetight.
LUBRICATION
Alwaysstopthemotorandremovekeybeforecleaning,lubricating
or performinganyrepairsor maintenanceonthelawnmower.
Alwayswearsafetyglassesduringoperationorwhileperformingany
adjustmentsor repairs.
DECK CARE
Theundersideofmowerdeckshouldbecleanedaftereachuseas
grassclippings,leaves,dirtandotherdebriswillaccumulate.This
accumulationof grassclippings,etc.,isundesirableasitwillpromote
rustandcorrosion.
1. Removeanybuildupofgrassandleavesonor aroundthemotor
cover(donotusewater).Wipethemowercleanwitha drycloth
occasionally.
Toreducetheriskofelectricshock,donotexposethemowerto
water.
2. Ifdebrisisallowedto buildup ontheundersideoftheunit,tiltthe
mowerandscrapeitcleanwitha suitabletool(makecertainthe
keyis removed).
REPLACING TRAILING SHIELD
f
Lubricatethewheelsatleastoncea seasonwithlightoil (ormotor
oil).If wheelsareremovedforanyreason,lubricatesurfaceofthe
pivotarmandinnersurfaceofthewheelwithlightoil.
SeeFigure10.
Figure10
Lubricatethetorsionspringandpivotpointonthereardischarge
doorandsidemulchplugperiodicallywith lightoilto preventrust.
SeeFigure10.
Neveroperatemowerunlessthetrailingshieldisinplaceand
working.Neveroperatemowerwithdamagedsafetydevices.Failure
todoso,canresultinpersonalinjury.
Thetrailingshieldissubjecttowearanddamagewhichcouldexpose
movingpartsor allowobjectsto bethrown.Forsafetyprotection,
frequentlycheckthetrailingshieldand replaceimmediatelywith
originalequipmentmanufacturer's(OEM)partonly,listedinthis
manual.
E
Toremovetrailingshield,lift reardoor,andbend(bow)thetrailing
shieldinwardoneachsidetoreleasetabsfromtheholesinthe
mowerframe.SeeFigure11.
Figure11
Replacewithnewtrailingshieldbybendingtheshieldtoallow
eachtabtofit intoholesinmowerframe.
13
https://manual-hub.com/

BLADE CARE
Whenremovingthecuttingbladeforsharpeningor replacement,
protectyourhandswitha pairofheavyglovesorusea heavyragto
holdtheblade.Becertaintostopmotorand removekey.
Periodicallyinspectthebladeadapterforcracks,especiallyifyou
strikea foreignobject.Replacewhennecessary.Followthesteps
belowforbladeservice.
Blade Removal
.
f
Stopthemotorandremoveignitionkey.Turnthe moweron its
side.
Placea 2x4blockofwoodapproximately8.5"longbetweenthe
deckhousingandthecuttingbladetoactasa stabilizer.See
Figure12.
Block of Locking _ Blade
Wood Plate _ _"'Bolt
Figure12
3. Loosenand removethebladebolt,lockingplate,andblade.See
Figure12.
Blade Sharpening
IMPORTANT:If anymetalseparationispresent,replacetheblades
withnewones.
Toproperlysharpenthecuttingblades,removeequalamountsof
metalfrombothendsofthebladesalongthecuttingedges,parallelto
thetrailingedge,ata250to300angle.SeeFigure13.
f
Figure13
NOTE:It isimportantthateachcuttingbladeedgebe groundequally
to maintainproperbladebalance.A poorlybalancedbladewillcause
excessivevibrationand maycausedamagetothemowerandresult
in personalinjury.Thebladecanbetestedbybalancingitona round
shaftscrewdriver.Grindmetalfromtheheavysideuntilitbalances
evenly.
An unbalancedbladewillcauseexcessivevibrationwhenrotating
at highspeeds.It maycausedamagetomowerandcouldbreak
lcaus ngpersona njury.
Blade Installation
1. Placethecuttingblade,lockingplate,andbladebolton themotor
shaftandthreadthebladeboltin fingertight.
NOTE:Makecertainto replacethepartsintheexactorderinwhich
theywereremoved.Wheninstallingthecuttingblade,be sureitis
installedwiththecurvedendspointingtowardsthemowerdeckand
nottowardstheground.
2. Torquethebladeboltdownusinga torquewrenchto assurethe
boltistightenedproperly.Therecommendedtorquefortheblade
boltis 170-220in.Ibs.
Toensuresafeoperationofyourmower,periodicallychecktheblade
boltforcorrecttorque.
Thebladehardwareis notonlyusedtoattachthebladeassembly,
butisalsoan insulatedsafetydeviceandshouldneverbealteredin
anyway.If replacementis necessary,useoriginalequipmentpartsas
showninthepartslist.
14
https://manual-hub.com/

RESETTING CiRCUiT BREAKER RESET
BUTTON
Thismowerisequippedwithancircuitbreakerresetbuttontoprevent
overheatingdamagetothemotor.
If thecircuitbreakerresetbuttonpopsout:
1. Releasethemotor/bladecontrolhandleanddo NOTre-startthe
mowerforat leastoneminute,allowingforthemotortimetocool.
2. Pressthecircuitbreakerresetbuttoninwardto reset.See
Figure14.
f
ResetButton
Ifthecircuitbreakerresetbuttonpopsoutshortlyafterresetting:
1. Releasethemotor/bladecontrolhandleanddo NOTre-startthe
mowerforatleast15minutestoallowthemotorextratimeto
cool.
.
3.
Pressthecircuitbreakerresetbuttoninwardtoreset.
Restartunit.
NOTE:If thecircuitbreakerresetbuttonpopsoutrepeatedly
duringoperationor willnotremaininwhenattemptingtoreset,
contactyournearestSearsServiceCentertoarrangeforrepair.
BATTERY CARE
IMPORTANT:Replacewithonlytheidenticalbatteryprovidedwith
this mower(Partnumber725-04381A).Thebatteryshouldonlybe
replacedbya SearsServiceCenter.
• Donotstoreunitbelow-20degreesCelsius(-4degreesF).
• Storethemowerfullycharged.Chargingtheuniteverytwo
monthsduringstoragewillprovideadditionalinsurancethatthe
batterieswillnotsufferanycapacityloss.
• Thesebatterieswillnotleakandcanbe storedontheirsides.
Duetoa potentialshockhazard,DONOTattemptto removethe
motor/batteryshroud.Thereareno userserviceablepartsinside.
ContactyournearestSearsServiceCenterif repairsare needed.
MAINTENANCE SCHEDULE
Alwaysstopthemotorand removekeybeforecleaning,lubricating
or performinganyrepairsor maintenanceonthelawnmower.Always
wearsafetyglassesduringoperationorwhileperforminganyadjustments
or repairs.
EachUse
Annuallyor 25hours
1. Mowerblades
2. Looseor missinghardware
3. Controls
4. Motor
.
1.
2.
.
BeforeStorage 1.
DuringStorage 1.
Deck
Wheels
Reardischargedoorand
sidemulchplug
Mowerblades
Battery
Battery
Followthemaintenanceschedulegivenbelow.Thischartdescribes
serviceguidelinesonly.UsetheServiceLogcolumntokeeptrackof
completedmaintenancetasks.Tolocatethe nearest SearsService
Centeror to scheduleservice,simplycontactSearsat
1-800-4-MY-HOME®.
1. Sharpenas required
2. Tightenor replace
3. Checkforproperoperation
4. Removeanybuildupofgrassand
leaveson oraroundthemotorcover
(donotusewater).
5. Cleanundersideofdeckwitha
suitabletool(donotusewater).
1. Lubewithlightoil
2. Lubetorsionspringandpivotpoint
with lightoil.
3. Sharpenandbalance
1. Fullycharge
1. Chargeeverytwo months
15
https://manual-hub.com/

PREPARING THE LAWN MOWER
Thefollowingstepsshouldbe takentoprepareyourlawnmowerfor
storage:
• Lubricatemowerthoroughlyasdescribedin thelubrication
instructions.
• Removeanybuildupofgrassand leaveson or aroundthe motor
cover(do notusewater).Wipethemowercleanwitha drycloth.
Ifdebrisisallowedtobuildupon theundersideoftheunit,tilt the
mowerandscrapeitcleanwitha suitabletool(makecertainthe
keyisremoved).
Storemowerfully charged.Chargingtheuniteverytwo months
duringstoragewillprovideadditionalinsurancethatthebatteries
willnotsufferanycapacityloss.
IMPORTANT:Westronglyrecommendthe mowerbecharged
onceeverytwo monthsduringstorage.
Storemowerina dry,cleanarea.Donotstorenexttocorrosive
materials,suchasfertilizer.
Wipethecordto removeanystainsor foreignsubstancesuchas
oil.
Coatmower'scuttingbladewithchassisgreasetoprevent
rusting.
Donotstoreunitbelow-20degreesCelsius(-4 degreesF).
Thesebatterieswillnotleakandcanbestoredon theirsides.
16
https://manual-hub.com/

Alwaysstopthemotorandremovekeybeforecleaning,lubricating
or performinganyrepairsor maintenanceon thelawnmower,Always
wearsafetyglassesduringoperationorwhileperforminganyadjustments
orrepairs,
Motorfailsto start
Mowerstopswhilemowing
Excessivevibration
Mowerwillnotmulchgrass
1. Keynotin switch
2. Motor/bladecontroldisengaged.
3. Batterydischarged.
4. Mowerdeckcloggedwithgrassanddebris.
1. Dischargedbattery.
2. Cuttingtoomuchgrass.
3. Cloggeddeck.
4. Circuitbreakerresetbuttonistripped.
1. Cuttingbladeloose.
2. Cuttingbladeunbalanced.
3. Bentcuttingblade.
4. Bentmotorshaft.
1. Mowerdeckclogged.
2. Wetgrass.
3. Excessivelyhighgrass.
,
Unevencut 1.
Replacementfusemustbea ULlistedor recognizedcomponent,
rated40amp,58 volt.Ifmowerblowsfuse,contactyournearest
Iauthorizedservicedealerforrepair.Donotuseanyothertypeor size
_fuse.
1. Insertignitionkey.
2. Depressstarterbutton,andengagemotorbladecontrol.
3. Chargebattery.
4. Unclogmowerdeck.Makecertainbladeisfreetomove.
1. Chargebattery.
2. Raisecuttingheight.
3. Unclogmowerdeck.Raisecuttingheight,orcut a
narrowerswath.
4. Resetthecircuitbreakerresetbuttonfollowingthe
instructionsintheServiceand Maintenancesectionof
thismanual.
1. Tightenbladebolt.
2. Balancebladefollowingtheinstructionsin theService
and Maintenancesectionof thismanual.
3. Replaceblade.
4. ContactnearestSearsServiceCenter.
1. Unclogmowerdeck.Makecertainbladeisfreetomove.
2. Donotmowwhengrassiswet;wait untillatertocut.
3. Mowonceata highcuttingheight,thenmowagainat
desiredheightor makea narrowercuttingswath(1/2
width).
Sharpenor replaceblade.
Sharpenor replaceblade.
NEED MORE HELP?
" Find this and all your other product manuals online.
o Get answers from our team of home experts.
Get a personalized maintenance plan for your home.
o Find information and tools to help with home projects.
manage _ home l
17
https://manual-hub.com/

19-inch RechargeableRotary Mower- Model No. 247.370480
\\\
r
)i
[]
18
https://manual-hub.com/

19-inch Rechargeable Rotary Mower B Model No. 247.370480
2
3
4
5
6
7
787-01649-4044 19"Deck
731-05727 MotorBracket
710-1241 Screw,1/4-15x 1.000
724-04025P Motor,48V
749-04312 LowerHandle
731-05753 BatteryShroud
631-04228 BladeHub
8 731-05832 ElectricFan
9 942-04152 MulchingBlade
10 782-7051 BladeLockingPlate
11 624-0078 BladeBoltAssembly
12 731-05639A TrailShield
13 731-05746 RearMulchPlug
14 731-04177 SideDischargeChute
15 987-02055 MulchPlug(Incl.16-18)
16 732-1014 TorsionSpring
17 747-0710 HingePin
18 17032A ChuteDeflectorAdapter
19 736-0270 BellevilleWasher
20 710-0599 Screw
21 931-05686 RearDoor
22 931-05634 FrontCover
23 687-02325-0637 HandleBracket-RH
-- 687-02324-0637 HandleBracket-LH
24 964-04076 GrassBag
25 647-04082-0637 GrassBagFrame
26 687-02225-0637 FrontBracketAssembly
27 938-0148 Screw,Shoulder,.50x.66
28 687-02228-0637 RearBracketAssembly
29 710-3025 Hhcs,5/16-18x .625
30 710-04995 Screw,5/16-14x .750
31 712-04063 Nut,FlangeLock,5/16-18
32 712-04065 Nut,FlangeLock,3/8-16
33 734-04176A FrontWheel
34 734-2004B RearWheel
35 720-0230 FoamGrip
36 712-0324 Nut,HexLock,1/4-20
749-04353 UpperHandle
38 925-04037A Motor/BladeControl
39 753-04430 Screw,Fiat,1/4-20x 1.75
40 749-04356-0637 CrossBracket
41 738-04278 Screw,Shldr.,1/4-20x .50
42 731-05186 LowerHandleinsulator
43 731-05178 UpperHandleInsulator
44 747-04663A Motor/BladeControlHandle
45 710-0572 BoltCarriage,5/16-18x2.50
46 720-04072A StarKnob
47 731-05710A RearBaffle
48 732-04534 DoorTorsionSpring-RH
-- 732-04535 DoorTorsionSpring- LH
49 732-04377C SpringLever
50 726-0201 Nut,Speed
51 936-0504 Washer,Wave,.510x.750x.017
52 938-0507B Screw,Shoulder,.500Dia.X .434
53 741-0492A Bushing,Block,.505Dia.X .62
54 747-04589 RearDoorPivotRod
55 925-04381A Battery,12V
56 725-04387A BatteryCharger
57 725-04438 BatteryLevelindicator
58 731-05754 BatteryTray
59 725-04497A BatteryJumper
60 710-0895 Screw,1/4-15x .750
61 731-2422 CableGuide
62 731-05880 Spacer,.515x 1.00x.310Lg.
63 936-0255 Washer,Bell,.510x 1.14x.040
64 736-04413 Washer,Wave,.385x.598
65 731-07532 Hubcap
66 710-0779A Screw,#10-16x .500
67 710-0726 Screw,5/16-12x .750
68 726-0230 CableTie
-- 731-06089t Key
-- 725-04763t Fuse
-- 725-04539t CircuitBreaker
t NotShown
19
https://manual-hub.com/

777S32911 777S32817
e TO REDUCE THE RiSK OF ELECTRIC SHOCK, DO NOT EXPOSE • REMOVE OBJECTS TFATCAN BE THROWN BY THE BLADE iN
UNiT TOWATER OR OPERATE UNiT ON WET GROUND. ANY DiRECTiON. WEAR SAFETY GLASSES.
• REMOVE KEY BEFORE SERViCiNG OR REMOVING BLADE.
e KEEP HANDS AND FEET AWAY FROM ROTATING PARTS.
eDO NOT MOW WHEN CHILDREN OR OTHERS ARE AROUND.
o USE EXTRA CAUTION ON SLOPES. DO NOT MOW SLOPES
GREATER THAN 1B°. MOW ACROSS, NEVER UP AND DOWN.
NEVER PULL MOWER CLOSE TO YOUR FEET. LOOK DOWN
AND BEHIND BEFORE AND WHILE MOVING BACKWARDS.
777S33576 777Dl1051 777122748
777122813
777Dl1056
777122946
2O
https://manual-hub.com/

Congratulationson makinga smartpurchase.YournewCraftsman@
productisdesignedandmanufacturedforyearsofdependableopera-
tion.Butlikeall products,itmayrequirerepairfromtimetotime.That's
whenhavinga RepairProtectionAgreementcansaveyoumoneyand
aggravation.
Here'swhattheRepairProtectionAgreement*includes:
* Expert service byour 10,000professionalrepairspecialists
oUnlimitedserviceand no chargeforpartsand laboron all
coveredrepairs
o Product replacementupto$1500if yourcoveredproductcan'tbe
fixed
•Discountof 10%from regularpriceofserviceand relatedinstalled
partsnotcoveredbytheagreement;also,10%off regularpriceof
preventivemaintenancecheck
• Fasthelp byphone- wecallitRapidResolution- phonesupport
froma Searsrepresentative.Thinkof usasa "talkingowner's
manual."
OnceyoupurchasetheAgreement,a simplephonecallisall thatit
takesforyouto scheduleservice.Youcancallanytimedayor night,or
schedulea serviceappointmentonline.
TheRepairProtectionAgreementisa risk-freepurchase.If youcancel
foranyreasonduringtheproductwarrantyperiod,wewillprovideafull
refund.Or,a proratedrefundanytimeaftertheproductwarrantyperiod
expires.PurchaseyourRepairProtectionAgreementtoday!
Somelimitationsand exclusionsapply. Forpricesand additional
informationin the U.S.A.call 1-800-827-6655.
*CoverageinCanadavaries on some items.Forfull details call
SearsCanadaat 1-800-361-6665.
SearsInstallation Service
ForSearsprofessionalinstallationofhomeappliances,garagedoor
openers,waterheaters,andothermajorhomeitems,in theU.S.A.or
Canadacall1-800-4-MY-HOME®.
21
https://manual-hub.com/

Declaraci6n de garantia .................................................. 22
Instrucciones de seguridad ............................................. 23
Gu[a de cuesta ................................................................ 26
Etiquetas de seguridad ................................................... 27
Montaje ........................................................................... 28
Operaci6n ........................................................................ 31
Servicio y Mantenimiento ............................................... 34
Almacenamiento fuera de temporada ............................ 37
Soluci6n de problemas ................................................... 38
Piezas de Reemplazo ............................. 18 (Manual ingles)
NOmero de servicio ............................... Cubierta posterior
Garantia de dos aSos de Craftsman
SiesteproductoCraftsmanfalladebidoa undefectoen losmaterialeso la manodeobradentrodelosdosa_osde lafechade compra,s[rvase
devolverloa cualquiertiendaSears,Centrode servicioSears,uotropuntodeventaCraftsmanen losEstadosUnidosparasu reparaci6nsin
cargo.
Estagaranfianocubre:
• Arficulosde duraci6nlimitadaquepuedendesgastarsebajocondicionesnormalesdeusoduranteel per[ododegaranfia,talescomo
correasycuchillasde cortadorarotativas.
• Lasreparacionesrequeridasdebidoa abusoo negligenciadeloperador,incluiyendoabolladurasdel cig(Je_aly nooperaro mantenerel
equipodeacuerdoconlasinstruccionessuministradas.
Estagaranfias61otendr_,validezdurante90 d[assiesteproductoseutilizaencualquiermomentoparafinescomercialesode alquiler.
Estagaranfias61otendr_validezmientrasel productoseutiliceen losEstadosUnidos.
Estagarant[aleotorgaderechoslegalesespecfficos,peroustedpodr[agozarde otrosderechosen raz6nde sulugarde residencia.
Sears, Roebuckand Co. Hoffman Estates,IL 60179
Bater[a: 12Voltios
Motor: 48 VoltiosDC
NSmerode modelo
NSmerode serie
Fechade compra
RegistreelnOmerode modelo,nOmerode serieyfechade compra
m&sarriba.
© SearsBrands,LLC 22
https://manual-hub.com/

__IL a presenciade estesirnboloindicaquesetrata
deinstruccionesde seguridadirnportantesque
deberespetarparaevitarponeren riesgosu
seguridadpersonaly/o materialyla de losdern_.s.
Leaysigatodaslasinstruccionesdeestemanualantesde poner
enfuncionarnientoestarn_.quina.Si norespetaestasinstrucciones
puedeprovocarlesionespersonales.Cuandoveaestesirnbolo,
TENGAENCUENTALAADVERTENCIA!
Su responsabilidad:Restrinjael usode estarn_.quinarnotorizada
a laspersonasquelean,cornprendany respetenlasadvertenciase
instruccionesquefiguranen estemanualysobrela rn_.quina.
Estarn_.quinaest,.dise_adaparaserutilizadarespetandolasreglas
de seguridadcontenidasenestemanual.AIigualqueconcualquier
tipodeequipornotorizado,undescuidoo errorpot partedel operadol
puedeproducirlesionesgraves.Estarn_.quinaescapazdearnputar
rnanosy piesyde arrojarobjetoscongranfuerza.Deno respetarlas
instruccionesde seguridadsiguientessepuedenproducirlesiones
graveso la rnuerte.
Cuandoseutilizancortadorasdec_spedel_ctricas,sedebencurnpli_
siernprelasprecaucionesb_.sicasdeseguridadparareducirla |
posibilidaddeincendios,descargasel_ctricasy lesionespersonales.|
Estasprecaucionesb_.sicasincluyen:
Ni5os
Puedenocurriraccidentestr_gicossiel operadornoest_atentoala presencia
deni_os.PorIogenerala losni_oslesatraenlas cortadorasy la actividadde
cortarel cesped.Noentiendenlos riesgosni lospeligros.Nuncasupongaque
losni6ospermanecer_nenel lugardondelosvio pot Qltimavez.
,, Mantengaalos ni_osfueradel_readetrabajoy bajoestrictavigilancia
deun adultoresponsableadem_sdeloperador.
,, Estealertay apaguelacortadorasi unni_o ingresaal _rea.
,, Antesde moversehaciaatr_sy mientrasIoestehaciendo,mirehacia "
arrasy cuidequenohayani6os.
,, Tengamuchocuidadocuandoseaproximealas esquinasciegas,
puertas,arbustos,_rbolesuotrosobjetosquepuedanobstaculizarlela
vistade unni_oque pudiesecorrerhaciala cortadora.
,, Nuncapermitaqueni_osmenoresde 14a_os operenesta m_quina. "
Losni_osmayoresde 14a_os debenleery entenderlasinstrucciones
defuncionamientoy reglasde seguridadcontenidasen estemanualy
debensetentrenadosysupervisadosporsuspadres. ®
Funcionamiento
Funcionamientogeneral:
,, Leay sigatodaslasinstruccionescontenidasenestemanualantesde
intentarensamblarestam_quina.Lea,comprenday respetetodaslas
instruccionesquefiguranen la m_quinayen el(los) manual(es)antes
dehacerlafuncionar.Antesdehacerfuncionaresteequipo,familiaricese
totalmenteconlos controlesy el usocorrectodelmismo.Guardeeste
manualen unlugarseguroparaconsultasfuturasy peri6dicas,as[como
parasolicitarrepuestos.
,, Estam_quinaes unequipomotorizadode precisi6n,no unjuguete.
PorIotanto,tenga muchocuidadoentodomomento.Estaunidadfue
dise_adapararealizarunatarea:cortarel cesped.Nola utilice para
ningQnotrofin.
,, Nofuercela cortadora- trabajar_mejory conm_sseguridada la
velocidadparalacualfue dise_ada.
,, No permitanuncaque losni_osmenoresde 14a_osutilicenesta
m_quina.Losni_osmayoresde 14a6osdeben leery entenderlas
instruccionesdeoperaci6ncontenidaseneste manual,y debenset
entrenadosy supervisadosporsuspadres.S61ose debepermitirusar
estam_quinaa individuosresponsablesy familiarizadosconsusreglas
deseguridad.
®
®
®
®
®
®
®
Inspeccioneminuciosamenteel _readondeutilizar_el equipo.Retire
todaslaspiedras,palos,alambre,huesos,juguetesy otrosobjetos
extra6osquepodrianhacertropezaroser recogidosyarrojadospor
laacci6nde lacuchilla.Losobjetosarrojadospor la m_quinapueden
producirlesionesgraves.Planifiqueel patr6ndecortehaseguir
paraevitardescargarel materialenlos caminos,lasveredas,los
observadores,etc.Eviteadem_sdescargarmaterialcontra unaparede
uobstrucci6nque podriahacerqueel materialdescargadorebote
contrael operador.
Paraayudara evitarel contactoconla cuchillao unalesi6npotun
objetoarrojado,mantengaseenla zonadeloperadordetr_sde las
manijasy mantengaa losni_os,observadores,ayudantesy mascotas
apartadosal menos25 metrosdela podadoramientrasest_ en
funcionamiento.Detengala m_quinasi alguienentraenel _rea.
Paraprotegerselos ojosutilicesiempreanteojosoantiparrasde
seguridadmientrasoperalam_quinaomientrashaceajustesola
repara.Losobjetosarrojadosquerebotanpuedenproducirlesiones
ocularesgraves.
Utilicezapatosdetrabajoresistentes,desuelafuerte,as[como
pantalonesy camisasajustados.Serecomiendavestircamisay
pantal6nparacubrirbrazosy piernasy usarzapatoscon punterade
acero.Nuncaopereestam_quinadescalzo,con sandalias,zapatos
resbalososo livianos(potej. deIona).
Nopongalas manoso los piescercade laspiezasrotatoriasni debajo
de la plataformadecorte. Elcontactocon lascuchillaspuedeproducirla
amputaci6nde manosy pies.
Unacubiertade descargafaltanteo da_adapuedeprovocarel contacto
con lacuchillaolesionesporobjetosarrojados.
Muchaslesionesocurrencomoresultadode pasarla cortadorasobre
lospiesduranteunacaidaluegode resbalarotropezar.Nose sostenga
de la cortadorasiseest_cayendo,suelte lamanija inmediatamente.
Nuncatire lacortadorahaciaustedmientrascamina.Si deberetroceder
con lacortadoraparaevitarunapareduobst_culo,mireprimeroabajoy
arrasparaevitartropezarsey luegosigaestospasos:
Retrocedadela cortadorahastaestirarcompletamentelos brazos.
AsegQresequeest_bienequilibradoy bienparado.
Jalela cortadoralentamentehaciausted,nom_sde lamitaddela
distanciaentre ustedy la cortadora.
Repitaestospasostantasvecescomosea necesario.
Noopereestacortadorabajolosefectosdelalcoholo lasdrogas.
Mantengasealerta:ObserveIoque est_haciendo.Utiliceel sentido
comQn.No utilicela cortadorasiest_cansado.
23
https://manual-hub.com/

• Lamanijade controldel motor/lacuchillaesundispositivodeseguridad.
Nuncaintenteevitarsu funcionamiento.De hacerlo,dejariande operar
los dispositivosde seguridady podrianproducirselesionespersonales
porelcontactoconla cuchillagiratoria.Lamanijadecontroldelmotor/
la cuchilladebefuncionarf_cilmenteenambasdireccionesy regresar
autom_ticamentea laposici6ndesenganchadacuandose lasuelta.
• Nocarguela cortadorabajo laIluviao encondicioneshOmedas.
• Nuncahagafuncionarla cortadoraen la Iluviao sobreel cesped
mojado.Siempreestesegurode estarbienparado. Si resbalaycae
puedelesionarseseriamente.Si sienteque pierdeel equilibrio,suelte
inmediatamentela manijadecontroldelmotor/lacuchillay lacuchilla
dejar&derotarentressegundos.
• Corteel cespedsolamenteconluz dediaocon unabuenaluz artificial.
Camine,nuncacorra.
• Detengala cuchillacuandocrucesendas,senderoso caminosdegrava.
• Si la m_quinacomenzaraavibrarde maneraanormal,detengael motor,
y busqueinmediatamentelacausa.Lavibraci6npot Iogenerales una
advertenciadealg_nproblema.
• Apagueel motoryesperehasta quela cuchillase detenga
completamenteantesde retirarel colectordecespedo destaparla
tolva.LacuchillacontinOarotandoporunoscuantossegundosdespues
queel motorse haapagado.Nuncacoloqueningunapartedelcuerpo
enel &teade lacuchillahastaqueeste segurode quela mismaha
detenidosumovimientogiratorio.
• Nuncahagafuncionarla cortadorasin el correspondienteescudo
posterior,la cubiertadedescarga,el colectordecesped,lamanija
decontroldelmotor/lacuchillayotrosdispositivosde seguridady
protecci6ncolocadosy funcionando.Nuncaoperelacortadorasi los
dispositivosdeseguridadest_ndaSados.DeIocontrario,pueden
producirselesionespersonales.
• Utilicesolamentepartesy accesoriosmanufacturadosespecialmente
paraestam&quinapot elfabricante.Si no Iohace,puedenproducirse
lesionespersonales.
• Sise presentansituacionesque noest_nprevistaseneste manual,
tengacuidadoy useel sentidocomOn.Comuniqueseconsu centrode
servicioSearsparaobtenerayuda.
Funcionamientoen pendientes:
Laspendientessonunfactorimportantequese relacionaconlosaccidentes
producidospot derrapesycaidasy que puedenproducirlesionesgraves.La
operaci6nen pendientesrequieremuchaprecauci6n.Si nose sienteseguro
enuna pendiente,nocorteel cesped.Parasuseguridad,useel indicadorde
pendientesquese incluyecomopartede estemanualparamedirla pendiente
antesdeoperarlaunidaden unazonainclinada.Sila pendientesuperalos 15
grados,nocorteel cesped.
HagaIosiguiente:
• Corteen sentidotransversalala carsde lapendiente,nuncahacia
arribay abajo.Tengamuchocuidadoal cambiardedirecci6nen una
pendiente.
• Esteatentoa losagujeros,ra[ces,rocas,objetosocultoso
abultamientosque puedanhacerloresbalarotropezar.Elcespedalto
puedeocultarobst_culos.
• Siempreestesegurodeestarbienparado.Siresbalay caepuede
lesionarseseriamente.Si sienteque pierdeel equilibrio,suelte
inmediatamentela manijadecontroldelmotor/lacuchillay lacuchilla
dejarAdegirarentres (3) segundos.
No haga Iosiguiente:
• No corteel cespedcercade ca[das,zanjaso terraplenes,puedeperder
el equilibrio.
• No corteenpendientesmayoresde 15gradoscomoilustrael indicador
de pendientes.
• No corteel cespedmojado.Sino est_firmementeparado,puede
resbalarse. Servicio
•Si el interruptorde protecci6ncontrasobrecargaincorporadose
desconectafrecuentemente,p6ngaseencontactoconel Centrode
servicioSearsm_scercanoparahacerloreparar.
• Cuandonola use,saquela Ilavey almacenela cortadorade cesped
en el interior.Permitaqueel motorse enfr[eantesde almacenarloen
cualquierrecinto.Lacortadoradecespedsedebealmacenaren un
lugarseco,altoy bajoIlave,fueradel alcancede los niSos.
• CuandoefectOeel mantenimientoutilice s61opartesde reemplazo
identicasde la listadeeste manual."Elusode piezasquenocumplen
con lasespecificacionesdel equipooriginalpodriatenercomoresultado
un rendimientoincorrectoy adem_sporterenriesgolaseguridad".
• Antesde limpiar,repararo inspeccionarla m_quina,compruebeque
la cuchillay todas laspartesm6vilesse hayandetenido.Saquela Ilave
paraevitarelarranqueaccidental.
• Saquela Ilaveantesde efectuarel mantenimiento,limpiaro retirar
materialde lacortadora.
• Siga lasinstruccionesparalubricary reemplazarlosaccesorios.
• Mantengalasmanijassecas,limpiasy sin aceiteo grasa.
• Parareducirla posibilidaddeincendiomantengalatapa delmotorsin
pasto,hojasy otrosdesechosacumulados.
• Reviselos pernosdemontajedela cuchillay delmotora intervalos
frecuentesparaverificarqueestenbienapretados.Adem_s,
inspeccionevisualmentela cuchillaparaver siest_daSada(por
ejemplo,doblada,rajada,gastada).ReemplacelacuchillaOnicamente
pot otradelfabricantedelequipooriginal(OEM)queapareceen este
manual.
• Conservelacortadoraenbuenascondiciones:Mantengala cuchilla
afiladay limpiaparaunmejory m_ssegurorendimiento.Lascuchillas
de lacortadorasonafiladasy puedencortar,envuelvalacuchillaouse
guantesy extremelas precaucionesal efectuarel mantenimiento.
• Mantengatodoslos pernos,tuercasy tornillosbienajustadospara
asegurarsedeque la m_quinase encuentraencondicionessegurasde
funcionamiento.
• Nuncaalterelosdispositivosde seguridad.Controleperi6dicamenteque
funcionencorrectamente.
• Nuncaintenteajustaruna ruedao la alturadecortemientrasel motor
est_ enmarcha.
• DespuesdegolpearunobjetoextraSo,detengael motor,saquelaIlave
e inspeccionedetenidamentela cortadoraparaverificarsi se produjo
algOndaSo.Repareel daSoantesdehacerfuncionarla cortadora.
• Loscomponentesdelcolectordecesped,la cubiertadedescargay el
escudoposterior,est_nsujetosadesgastey daSosquepodr[andejar
expuestaslaspartesm6vilesopermitirquese arrojenobjetos.Para
protegersu seguridad,verifiquefrecuentementetodoslos componentes
y reempl_celosinmediatamentes61opot piezasdelfabricantedel
equipooriginal(OEM)queaparecenenestemanual.
GUARDE ESTAS INSTRUCCIONES
24
https://manual-hub.com/

Simbolos De Seguridad
Estap_.ginarepresentay describelaseguridadlossirnbolosquepuedenpareceren esteproducto.Lea,cornprenda,y sigatodasinstrucciones
enla rn_.quinaantesprocurarparareuniry operar.
=
0 ®
LEA EL MANUAL(S) DEL OPERADOR
Lea,cornprenda,ysigatodasinstruccionesenel manual(rnanuales)antesprocurarparareuniry
operar.
PELIGRO m GIRANDO HOJAS
Parareducirel riesgode herida,guardernanosy pieslejos.Nofuncionea rnenosquela tapade des-
cargao el receptorde hierbaest_nensulugarapropiado.Deserda_ado,sustituyainrnediatarnente.
PELIGROm ESPECTADORES
Nosieguecuandolosni_oso losotrosest&nalrededor.
PELIGRO= DE EL CORTE DE PiE
Guardernanosy pieslejosde hacergirarpartes.
PELIGRO= ESCOMBROS LANZADOS
Quiteobjetosquepuedenserlanzadospor laI&rninaencualquierdirecci6n.Llevegafasde seguridad.
PELIGRO= CUESTAS
Useextrala precauci6nen cuestas.Nosieguecuestasrnayoresque 15o.
ADVERTENCiA = ELECTROCHOQUE
NouseeljuezdesaiidaeBctricodelmotoren lalluvia.
25
https://manual-hub.com/

_D
CD
0
0
"O
(D
O
O
O
(D
O-
I:D
I:D
(D
I:D
._o
o
-U
E
I:D
I:D
,_ ._
2x
s_
,g" g
-o
o
Nopodeen inclinacionesmayoresa 15grados(elevaci6naproximadade2 1/2piesporcada10pies).Unapodadoraen
movimientopodriavoltearsey causarlesionesseveras.Sien unapendienteoperaunapodadoraubicadodetr_.sdela misma,es
extremadamentedificilmantenerel equilibrioy podriaresbalarseysufrirlesionesgraves.
....._ Alinee y sostenga este nivel con un _rbol vertical...
_. o la esquina de una construcci6n...
a/o/argode/a
_IfneaPUntea |
-- _ _ Senta
! I
| iiiiiii"22J _
_:_ o el postede = o
unacerca.
I
i
!
|
https://manual-hub.com/

e TO REDUCETHE RiSK OF ELECTRIC SHOCK,DO NOT EXPOSE •REMOVEOBJECTSTHATCANBETHROWN BYTHE BLADEiN
UNiT TOWATERDR OPERATEUNiT ON WET GROUND. ANY DiRECTiON. WEARSAFETYGLASSES,
e REMOVEKEYBEFORESERViCiNG ORREMOVING BLADE, • USE EXTRA CAUTION ON SLOPES, DONOT MOW SLOPES
GREATERTHAN 15 °. MOW ACROSS, NEVER UP AND DOWN.
e KEEPHANDS AND FEETAWAYFROM ROTATINGPARTS. NEVER PULL MOWER CLOSETO YOUR FEEr, LOOKDOWN
e DONOT MOW WHEN CHILDREN OR OTHERSARE AROUND. AND BEHIND BEFOREAND WHILE MOVING BACKWARDS,
27
https://manual-hub.com/

IMPORTANTE:AsegQresedecargarla bateriadurantenornenosde
14horasantesde hacerfundonarlacortadora,Consultela secci6n
Funcionarniento.
NOTA:Perrnanezcadetr_.sde lacortadoracornosi fuesea ponerla
enfuncionarniento.Surnanoderechacorrespondeal ladoderechode
lacortadora,surnanoizquierdacorrespondeal ladoizquierdodela
cortadora.
PIEZAS SUELTAS DENTRO DE LA CAJA
Lossiguienteselernentosseernpacansueltosenla caja:
Manualdeloperador,Colectorde recortesdec_sped
RETIRO DE LA UNIDAD DE LA CAJA
1. Cortelasesquinasdela cajade cart6ny exti_ndalosladosen el
piso Quitetodoslosseparadoresde ernpaque.
2. Saquela cortadorade cespedyel colectorde recortesde lacaja.
3. AsegQresedevaciarcompletarnentela cajaantesdetirarla.
MONTAJE DE LA MANIJA
1. Retireel materialde ernpaqueque pudieraestarentrelasrnanijas
superiore inferior.
2. Aflojecadaperillade rnanoqueseencuentraenel interiorde la
rnanijasuperior.
3. Levanteconcuidadoygire larnanijasuperiora la posici6nde
funcionarnientocornosernuestraenla Figura1.
Figura1
4. Retirelasperillasen estrelladelossoportesde rnontajede la
rnanijay sujetela rnanijainferiora lossoportesdela rnanija
colocandoel orificioinferiorde la rnanijainferiorenlospasadores
de lossoportes.
5. Asegurela rnanijasuperiory la rnanijainferiorapretandolas
perillasde rnano.Esnecesarioasentarcorrectarnentecadaperno
delcarroen elorificiocuadradodelconectorde pl_.stico.
6. Aprietelasperillasen estrellaajustandola rnanijainferiora los
soportesdela rnanija.VealaFigura2.Cornpruebeque larnanija
inferiorest_firrnernenteasentadaen lossoportesde rnontajede
la rnanija.
f
Figura2
CONEXION DE LA COLECTORA DE CESPED
1. Levantela puertade descargatrasera.
2. Quitelatolvadeabono.Veala Figura3.
f
Figura3
28
https://manual-hub.com/

.
f
Coloqueel colectordecespeden la varillade pivote.Sueltela
puertadedescargademodoquedescansesobreel colectorde
c_sped.Veala Figura4.
Figura4
Parasacarel colectordec_sped,levantela puertatraserade
descargade lacortadoradec_sped.Levanteel colectordec_spedy
s_.quelode lavarillade pivote.Liberela puertadedescargatrasera.
O A
Nuncaoperelacortadoraa menosquelosganchosdel colectorde
c_spedest_nfirmementeasentadosen lavarillade pivoteyla puerta
dedescargatraseradescansefirmementecontralapartesuperior
delcolectordec_sped.
CONVERSION ADESCARGA LATERAL
Sihacela conversi6na descargalateral,asegQresedequeel colector
de c_spedest_fuerade launidad.Vuelvaa colocarlatolvadeabono
posteriorycierrela puertadedescargatrasera.Paradescargarlos
recortesporel costado:
1. Levantelaclavijade conexi6nparaabonodel ladoderechodela
cortadora.
Deslicelosdosganchosdelcanalde descargalateraldebajodel
pasadoren el montajede laclavijaparaabonoybajela clavija
paraabonolateral.Veala Figura5.
Figura5
NOTA:Noextraigala clavijaparaabonolateralencualquier
momento,aQnsino est,.abonando.
29
https://manual-hub.com/

AJUSTE DE LA ALTURA DE CORTE
La palancadeajustede alturadecorteseubicaporencimadela
ruedaizquierdatrasera.Veala Figura6.
1. Tirede la palancahaciaafuerade la
cortadora.
,
,
Muevala palancahaciaadelanteo
haciaatr_.sa la alturadecortedeseada.
Sueltelapalancahacialaplataformade
lacortadora.
BajoningunacircunstanciarealiceningQnfipodeajustea launidad
sinantesdetenerel motory sacarlallave.
J
Figura6
30
https://manual-hub.com/

f
de controldel rnotor/lacuchilla
Palancadeajustede la altura
Indicadordenivelde la bateria
I@ @ @ @ @ l
J
Figura7
MANIJA DE CONTROL DEL iVIOTOR/LA
CUCHILLA
Larnanijade controldelrnotor/lacuchillaesundispositivode
seguridad.Nuncaintenteanularsufuncionarniento.
La rnanijadecontroldel rnotor/lacuchillaest,.ubicadaenla rnanija
superiorde lacortadoradec6sped.Veala Figura7.Larnanijade
controldelrnotor/lacuchillaenganchay desenganchael motory la
cuchilla.Elcontroldelrnotor/lacuchillaconstade trespartes:bot6n
arrancador,rnanijade controldel rnotor/lacuchillay Ilave.
Sueltelarnanijadecontroldel rnotor/lacuchillaparadetenerel motor
yla cuchilla.SaquelaIlaveparaevitarel arranqueaccidentalcuando
el equiponoest,.vigilado.
INDICADOR DE NIVEL DE LA BATERiA
Elindicadordenivelde la bateriaseencuentraen latapadelmotor.El
indicadorrnuestrael estadode la bateriayest,.encendidornientrasel
motorest,.encendido.Cuandoelindicadorest,.ilurninadototalrnente
hacialaderechaindicaque labateriaest,.totalrnentecargada,a
rnedidaqueel indicadorsevailurninandorn_.shaciala izquierda
significaquela bateriaseest,.descargando.Veael recuadrode la
Figura7.
IMPORTANTE:Cuandoseilurninala luzrojade la izquierda,se
deberecargarla bateriaantesdepodervolvera usarla.Continuarla
operaci6nantesde cargarpuedeacortarla vidaQtilde lasbaterias.
Lacuchillagirard,siernprequeel motorest6enrnarcha.
PALANCA DE AJUSTE DE LA ALTURA
La palancadeajustede alturadecorteseubicaporencirnade la
ruedaizquierdatrasera.Paraajustarla alturade corte,consultela
secci6nMontaje.
31
https://manual-hub.com/

BOTON DE REPOSICION DEL DISYUNTOR
Lacortadorafieneun bot6nde reposM6ndeidisyuntorubicadoen
elcontroldeimotor/iacuchiiia.Consuiteia Figura8. Elbot6nde
reposM6ndeidisyuntorpuedesaitarcuandoseexigedemasiadoai
motor.Remitasea ia secci6nMantenimientoparareponerestebot6n.
arra
Bot6nde reposicidn
Adaptador del ca del disyuntor
Figura8
LLAVE
La Ilavedebeestarpresentee insertadaantesdepoderarrancarel
motor.Veaia Figura8.NOGIRELA LLAVE.
CARGA DE LA BATER{A
CargueJacortadorade c_speddurante 14horasantes deJuso
inicial.Carguelacortadoraen ei interioren un_.reasecay protegida.
NOiacargueenmediode ia iiuviao en ubicacioneshQmedas
iMPORTANTE:Usesoiamenteei cargadordebateriaquevienecon
estacortadora(PiezaNO725-04387).
Primeroenchufeel cargadoren iacortadora,iuegoencuaiquiertoma-
corrienteei_ctricoest_.ndarde 110/120voitios.Veaenel recuadrode
ia Figura7 ia ubicacbndei cargadorde bateriaen ia cortadora.
NOTA:Si hacefaitauncablede extensi6n,utiiiceunoconaiambre
calibre16AWGporio menos.Conecteia extensi6naicargadorantes
deenchufariaen eitomacorrienteei_ctrico.
Labateriacontienefluidocorrosivoy materialt6xico;TENGA
MUCHOCUiDADO.Mantengaaiejadode losniSos.Noperfore,
desensamNe,mutileo prendafuego.Duranteiacargao descargase
_odrianemitirgasesexpiosivos.Utiiiceiaen un_.reabienventiiada,
ejosde fuentesdecombusti6n.
iMPORTANTE:Siemprerecarguela cortadoratotalmente.Elcargador
esun cargadordedosetapas.Laprimeraetapa,compensadora,en-
viatensi6nm_.saltaalas baterias.Estosirveparaacelerareltiempo
de cargayniveiarlacargaen todaslasbaterias.Lasegundaetapa,
lent& enviaunatensi6nm_.sbaja.Estoevitael daSoporsobrecarga
alas bateriasytambi_n"corona"la cargadelasbaterias.Seg_nla
condici6ndeia baterialaetapacompensadorasecompletaaproxima-
damenteen8 horas.Ai completarsela etapacompensadorael LED
verdedeicargadordejar_,deparpadear.Alli comienzalaetapalent&
Durantela etapalentael LEDverdesemantendr_,constantemente
encendido.Laetapalenta"corona"lasbateriasen aproximadamente
4 a 6 horas,tambi_nseg_nlacondici6nde labateria.Noobstante,
siempreserecomiendacargardurantelas14horascompletas.
NOTA:Serecomiendacargarlacortadorade c_spedunavezcada
dosmesesmientrasest,.aimacenada.
iMPORTANTE:Siempredesconecteprimeroel cargador(o elcable
de extensi6n,siseusa)del tomacorrienteel_ctrico,luegodesconecte
el cargadorde lacortadora.
ENCENDiDO DE LA CORTADORA Y LA
CUCHILLA
1. Insertela Ilave.Consultela Figura9.
,,, j
Figura9
2. Oprimael bot6narrancadordelcontroldel motor/lacuchilla.
3. Tirede lamanijadecontroldel motor/lacuchillacontrala manija
superior.
4. Suelteel bot6narrancadorcuandoel motorseencienda.
32
https://manual-hub.com/

APAGADO DEL MOTOR YLA CUCHILLA
1. Sueltelamanijadecontroldel motor/lacuchillaparadetenerel
motory lacuchilla.
Lacuchillacontinuagirandopor unoscuantossegundosdespu_s
queel motorsehaapagado.Si el motornosedetienecuandose
sueltalamanijadecontroldel motor/lacuchilla,p6ngaseencontacto
conelcentrodeservicioSearsm_.scercano.
2. Saquela llaveparaevitarelarranqueaccidentalcuandoel
equiponoest,.vigilado.
3. Carguela cortadorade c_sped.
USO DE LA CORTADORA DE CO:SPED
AIhacerfuncionarlacortadorade c_spedpuedeserque arroja
objetosextra_osa losojos,Iocualpuededa_arlosgravemente.
Utilicesiempregalasde seguridadduranteel funcionamientode la
cortadorao mientrashaceajusteso la repara.
• AsegOresequeel cespedest,.librede piedras,palos,cablesu
otrosobjetosquepudiesenda_arlacortadorao el motor.Dichos
objetospuedensetaccidentalmentearrojadosen cualquier
direcci6nporlacortadorayprovocarlesionespersonalesgraves
al operadorya otraspersonas.
X
Sigolpeaunobjetoextra,o, detengael motorysaquela Ilave.In-
speccionelacortadoraminuciosamenteparavet quenotengada_os
y repareelda_oantesdevolveraarrancarlay hacerlafuncionar.El
excesodevibraci6nde lacortadoraduranteel funcionamiendoes
indicaci6nde da_o.Sedebeinspeccionaryrepararla unidadIoantes
_osible.
o
o
Cuandoseusaladescargalateral,el patr6ndecortem_.seficaz
esel quepermitedescargarlosrecortesenun_.readel cesped
aOnnocortada.
NOutilicela cortadoraen la lluvia.
Sideseaun c_spedsano,cortesiempreuntercioo menosde la
Iongitudtotaldel mismo.
Para6ptimosresultados,no cortecespedhOmedoporquetiende
a pegarsea la partebajade la cortadora,impidiendopreparar
el abonoydescargarlosrecortesde cespedcorrectamente.El
cespednuevoo gruesopuederequeriruncortem_.sestrecho.
33
https://manual-hub.com/

RECONIENDACIONESGENERALES
•Respetesiernprelasreglasde seguridadcuandorealice
cualquiertipode rnantenirniento.
• Lagaranfiadeestapodadoranocubreelernentosqueban
estadosujetosal rnalusoo la negligenciadeloperador.Para
recibirel reernbolsototalde lagaranfia,el operadordeber_.
rnantenerla podadoracornoseindicaen estemanual.
• TodoslosajustesdebenserverificadosporIornenosunavez por
ternporada.
• Reviseperi6dicarnentetodoslossujetadoresy cornpruebeque
est_nbienajustados.
LUBRICACI(SN
Apagueel motory retirelaIlavesiernpreantesde lirnpiar,lubricar
o realizarcualquierreparaci6notareadernantenirnientoen la
cortadoradec_sped.Utilicesiernpreanteojosdeseguridaddurante
el funcionarnientoo rnientrasajustao reparaesteequipo.
LubriquelasruedasporIornenosunavezporternporadacon
aceiteligeroo aceiteparamotor.Si lasruedassequitanpor
cualquierraz6n,debelubricarla superficiedelbrazogiratorioy la
superficieinternade la ruedaconaceiteligero.Veala Figura10.
jj_
2 Lubnqueel resortede torsionyel puntodepwotede la puerta
traseradedescargayclavijade abonolateralperi6dicarnentecon
aceiteligeroparaevitarqueseoxide.Veala Figura10.
CUIDADO DE LA CUBIERTA
Debelirnpiarla parteinferiorde la plataforrnadela cortadoradespu_s
de cadausoya queseacurnulanrecortesde pasto,hojas,suciedad
y otrosdesechos.Estaacurnulaci6nde recortesde pasto,etc.no es
aconsejableporqueproduce6xidoycorrosi6n.
1. Quiteel pastoy hojasacurnuladosalrededorde latapadel motor
(no useagua).Ocasionalrnentelirnpielacortadoraconun paso
seco.
Parareducirel riesgodesufrirdescargasel_ctricas,noexpongala
cortadoradecespedal agua.
2. Si sebanacurnuladodesechosen la parteinferiorde la unidad,
inclinela cortadoray lirnpieraspandoconuna herrarnienta
adecuada(asegQresedehabersacadolaIlave).
REEIVIPLAZO DEL ESCUDO POSTERIOR
Nuncaoperelacortadorasiel escudoposteriorno est&colocado
yfuncionando.Nuncaoperelacortadorasilosdispositivosde
seguridadest_.nda_ados.DeIocontrario,puedenproducirse
lesionespersonales.
Elescudoposteriorest,.sujetoa desgasteyda_osIoquepodria
dejarexpuestaslaspartesrnovileso perrnitirquearrojeobjetos.Para
protegersuseguridad,verifiquefrecuenternenteel escudoposterior
reernplaz_.ndoloinrnediatarnenteconlaspiezasdel fabricanteoriginal
del equipoidentificadasen estemanual.
1. Pararetirarel escudoposterior,levantelapuertatraseraydoble
(combe)elescudohaciaadentroacadaladoparasoltarlas
leng(Jetasdelosorificiosdelbastidorde lacortadora.Veala
Figura11.
Figura11
2. Reernplaceconunescudonuevodoblandoel escudopara
perrnitirque lasleng(Jetascalcenenlosorificiosdel bastidorde la
cortadora.
34
https://manual-hub.com/

CUIDADO DE LA CUCHILLA
Cuandosaquelacuchillade corteparaaflarla o reernplazarla,
prot_jaselasrnanosusandounpardeguantesgruesoso untrapo
gruesoparasostenerla cuchila.Aseg0resedeapagarel motory
retirarlalave.
Inspeccioneperi6dicarnenteel adaptadorde la cuchila enbusca
de rajaduras,especialrnentecuandogolpeeunobjetoextraSo.
Reernplaceseg0nnecesidad.Sigalospasosqueaparecendebajo
pararealizarel rnantenirnientodela cuchila.
Extracci6n de cuchillas
1. Detengael motory retirelalave. Coloquelacortadoradec_sped
sobreunlado.
2. Coloqueuntacode rnadera2x4de aproxirnadarnente8,5pulga-
dasde largoentreelalojarnientode laplataforrnay lacuchila de
corte,paraqueactQecornoestablizador.Veala Figura11.
3. Aflojeysaqueel pernode lacuchila, laplacade seguridady la
cuchila.Veala Figura12.
f
Afilado de cuchillas
IMPORTANTE:Siexisteunaseparaci6nen el metal,reernplacelas
cuchilas porotrasnuevas.
Paraaflar lascuchilasdecortecorrectarnente,extraigacantidades
igualesde metaldearnbosextrernosdelascuchilasa Iolargode los
hordescortantes,paraleloal hordedecaida,a un&ngulode 250a 30°.
Veala Figura13.
Bloquede Placade _ _ Pernode la
rnadera seguridad cuchila
Figura12
Figura13
NOTA:Esirnportantequecadabordedecortedelacuchilaseapuldo
potigualpararnantenerelequlibrioadecuadode lacuchila.Una
cuchilladesequilibradacausar&dernasiadavibraci6n,y puedeocasionar
daSosalacortadoraqueresutenen lesionespersonales.Se puede
probarlacuchilabalance&ndolasobreundestorniladordeejecircular.
Afle elmetaldelladopesadohastaquequedebienequlibrada.
Si la cuchlla est&desequlibradacausar_,dernasiadavibraci6nal
rotara altasvelocidades.PuededaSarla cortadorade c_spedyse
puede romper,causandoesonespersonaes.
Instalaci6n de cuchillas
1. Coloquelacuchillade corte,la placadeseguridadyel pernode
lacuchila sobreel ejedel motoryatornileel pernoconla rnano.
NOTA:AsegOresede volvera colocarlaspartesenel rnisrno
ordenenquelas retir6.AIinstalarlacuchila de corte,asegOrese
de instalarlaconlosextrernoscurvoshaciala plataforrnade la
cortadorayno haciael suelo.
2. Apliquetorsi6nalpernodela cuchilausandounalave depar
paraasegurarqueel pernoest&correctarnenteapretado.Eltorque
recornendadoparael pernodelacuchilaes 170-220pulg/Ib.
Paraasegurarlaoperaci6nseguradela podadorareviseperi6dica-
rnenteel pernode la cuchila paradeterrninarsiest&bienajustado.
Laspiezasrnet&licasdelacuchilanos61oseutilzanparafijarelconjunto
delacuchila,sinoquetarnbi_ncornodispositivoaislantedeseguridady
nuncadebenrnodificarsedeningunarnanera.Siesnecesarioreernplazar-
las,usepiezasoriginalescornosernuestraenlalstadepiezas.
35
https://manual-hub.com/

REPOSICION DEL BOTON DE REPOSICION
DEL DISYUNTOR
Estacortadorade c_spedest,.equipadaconunbot6nde
reposici6ndeldisyuntorparaevitarqueel motorsedaSedebidoa
recalentamiento.
Siel bot6nde reposici6ndeldisyuntorsalta:
1. Sueltelamanijadecontroldel motor/lacuchillay NOvuelvaa
arrancarla cortadoraduranteal menosun minuto,dandotiempo
al motorparaque seenfrie.
2. Empujeel bot6nde reposici6ndeldisyuntorhaciaadentropara
reponer.Veala Figura14.
f
deldisyuntor
Si el bot6nde reposici6ndel disyuntorsaltapocodespu_sde
reponerlo:
1. Sueltela manijade controldelmotor/lacuchillay NOvuelvaa
arrancarlacortadoraduranteal menos15minutos,dandom_.s
tiempoalmotorparaque seenfrie.
2. Empujeel bot6nde reposici6ndeldisyuntorhaciaadentropara
reponer.
3. Vuelvaa arrancarlaunidad.
NOTA:Siel bot6nde reposici6ndel disyuntorsara repetida-
mentedurantelaoperaci6no nosemantienemientrasseIo
intentareponer,p6ngaseencontactoconelcentrodeservicio
Searsm_.scercanoparaacordarunareparaci6n.
CUIDADO DE LA BATERIA
IMPORTANTE:ReemplaceQnicamenteconunabateriaid_nticaa
la quevieneconestacortadorade cesped(PiezaNO725-04381).La
bateriadebeserreemplazadas61oporel centrode servicioSears.
Debidoal riesgodechocqueel@trico,NOintentequitarla cubierta
delmotor/labateria.Adentronohaypiezasrecambiablesporel
usuario.Sihacefalta reparar,p6ngaseencontactoconel centrode
servicioSearsm_.scercano.
Apagueel motory retirelaIlavesiempreantesde limpiar,lubricar
realizarcualquierreparaci6notareademantenimientoen la
cortadoradecesped.Utilicesiempreanteojosdeseguridadduranteel
Funcionamientoomientrasajustao reparaesteequipo.
Cadauso 1. Cuchillasdelacortadora
2. Piezassueitasofaitantes
3. Controles
Anuaimenteo cada25
horas
J
Figura14 PROGRAIVlA DE iVlANTENIMIENTO
Sigael cronogramademantenimientoque sepresentaacontinuaci6n.
Estatablas61odescribepautasde servicio.Utilicela columnaRegistro
de Servicioparahacerel seguimientode lastareasde mantenimiento
completadas.Paraubicar el centrode servicio Searsm_s cercano
oparaprogramarun servicio, simplemente comuniquese con
Searsal tel_fono 1-800-4-MY-HOME®
4. Motor
5. Plataforma
1,
2.
Ruedas
Puertatrasera de descarga y
clavija de abono lateral
Cuchiiias de ia cortadora
Bateria
Bateria
3,
Antesdeaimacenar 1.
Duranteel 1.
aimacenamiento
1. Afileseg@ corresponda
2. Ajuste oreemplace
3. Verifiquequefuncionecorrectamente
4. Quite el pastoy hojas acumulados
alrededor de la tapa del motor (no use
agua).
5. Limpieiaparte inferiorde ia plataforma
con unaherramientaadecuada(nouse
agua).
1. Lubriquecon aceiteligero
2. Lubriqueei resortede torsi6n y punto
de pivotecon aceite ligero.
3. Afileybalancee
1. Carguetotaimente
1. Carguecadados meses
36
https://manual-hub.com/

PREPARACION DE LA CORTADORA DE
CO'SPED
Sedebenseguirestospasosparaprepararlacortadorapara
alrnacenarla:
Lubriquela cortadorasegQnsedescribeen lasinstruccionesde
lubricaci6n.
• Quiteel pastoyhojasacurnuladosalrededorde la tapadel motor
(nouseagua).Lirnpielacortadoradecespedconunpasoseco.
• Si sebanacurnuladodesechosen laparteinferiordela unidad.
inclinelacortadoraylirnpieraspandoconunaherrarnienta
adecuada(asegQresede habersacadola Ilave).
• Alrnacenelacortadoratotalrnetecargada.
IMPORTANTE:Serecorniendaenf_.ticarnentecargarlacortadora
dec_spedunavezcadadosrnesesrnientrasest,.alrnacenada.
• Alrnacenela unidadenunazonalirnpiay seca.Nolaalrnacene
cercade productoscorrosivoscornoporejernplofertilizantes.
• Lirnpieelcableparasacarlernanchaso sustanciasextra,as
cornopor ejernploaceite.
• Cubralacuchillade lacortadoracongrasaparachasispara
irnpedirqueseoxide.
37
https://manual-hub.com/

Siempreapagueel motorysaquela Ilaveantesde limpiar,lubricar
o realizarcualquierreparaci6no tareade mantenimientoenla
cortadorade cesped.Utilicesiempreanteojosdeseguridaddurantela
operaci6no mientrasrealizaajusteso reparaciones.
Elfusiblede reemplazodebeseruncomponentehomologadoo
certificadopor UL,contensi6nnominalde 40amp,58 voltios.Si
saltaun fusiblede lacortadora,pararepararlocomuniqueseconel
distribuidordeservicioautorizadom_.scercano.NoutiliceningOnotrc
tiponi tamafiodefusible.
Elmotornoarranca
Lacortadorasedetiene
cuandoest,.cortando
Demasiadavibraci6n
Lacortadorade c_sped
no procesael recortede
cespedcomoabono
1. LaIlavenoest,.enel interruptor
2. Controldel motor/lacuchilla
desenganchado.
3. Bateriadescargada.
4. Plataformade lacortadoratapadacon
pastoyresiduos.
1. Bateriadescargada.
2. Cortademasiadopasto.
3. Plataformatapada.
4. Elbot6nde reposici6ndeldisyuntorest,.
desconectado.
1. Cuchilladecortefioja.
2. Cuchilladecortedesequilibrada.
3. Cuchilladecortedoblada.
4. Ejedel motordoblado.
1. Plataformade lacortadoratapada.
2. C_spedhOmedo.
3. C_speddemasiadoalto.
1. Insertelallavede encendido.
2. Oprimael bot6narrancadory engancheelcontroldel
motor/lacuchilla.
3. Carguelabateria.
4. Destapelaplataformade lacortadora.Cerci6resede
quela cuchillasepuedemover.
1. Carguelabateria.
2. Elevelaalturade corte.
3. Destapelaplataformade lacortadora.Elevelaalturade
corte,o corteunafranjam_.sangosta.
4. Reposicioneel bot6nde reposici6ndel disyuntor
siguiendolasinstruccionesque aparecenen la secci6n
Servicioy mantenimientodeestemanual.
1. Ajusteel pernode lacuchilla.
2. Equilibrelacuchillasiguiendolasinstruccionesque
aparecenenla secci6nServicioy mantenimientode
estemanual.
3. Reemplacelacuchilla.
4. Comuniqueseconel centrode servicioSearsm_.s
cercano.
4. Cuchilladesafilada. 4.
Cortedesigual 1. Cuchilladesafilada. 1. Afileocambiela cuchilla.
1. Destapelaplataformade lacortadora.Cerci6resede
quela cuchillasepuedemover.
2. Nocorteelcespedcuandoest_mojado,esperehasta
queseam_.stardeparahacerlo.
3. Corteunaveza unaalturade corteelevadayluego
vuelvaa cortarelcespedala alturadeseada,o corte
unafranjam_.sangosta(1/2ancho).
Afileo cambiela cuchilla.
_NECESITA MAS AYUDA?
_}ir_cor_tl'_l'_ I_ I_e_pue_b_ y rr_ er_ managemy.com - isin cargo!
,, En linea podr3 encontrar este manual y los manuales de todos los otros productos que posea,
Sus preguntas ser_n respondidas pot nuestro equipo de especialistas,
,, Obtenga un plan de rnantenimiento personalizado para su hogar,
Encuentre information y herramientas que Io ayudar_n con los proyectos de su hogar,
rear, age _ home
b_oa_J:_t to ye_a b_' Sea_:s
........¢
38
https://manual-hub.com/

Felicitacionespor haberrealizadounaadquisici6ninteligente.El
productoCraftsman@queha adquiridoest_dise_adoyfabricado
parabrindarrnuchosa_osde funcionarnientoconfiable.Perocorno
todoslosproductosa vecespuederequerirde reparaciones.Esen
esernornentocuandoel disponerde unAcuerdode protecci6npara
reparacionesle puedeahorrardineroy problernas.
A continuaci6nsedetallanlospuntosincluidosenel Acuerdo:
•Servicio experto prestadopornuestros10,000especialistasen
reparacionesprofesionales
•Servicio ilirnitadosincargoparalaspiezasylarnanodeobraen
todaslas reparacionescubiertas
•Reernplazodel productohasta1500d61aressino esposible
repararel productocubierto
• Descuentode 10%del precionormaldel servicioy delaspiezas
relacionadasconel rnisrnoqueno est_ncubiertasporel acuerdo;
adern&s,10%del precionormalde laverificaci6nde rnanten-
irnientopreventivo
• Ayudar_pidapottel_fono- IoIlarnarnosResoluci6nR_pida- el
apoyotelef6nicode unCharnuscaal representante.Pienseen
nosotroscornoel manual"de undue_ohablador."
Unavezadquiridoel Acuerdo,puedeprograrnarel serviciocon
tans61orealizarunaIlarnadatelef6nica.PuedeIlarnarencualquier
mornentodeldia o dela nocheo prograrnarun servicioen linea.
ElAcuerdode Protecci6nde Reparaci6nesunacornprasinriesgo.
Siustedanulaporalgunaraz6nduranteel periodode garantiade
producto,proporcionarernosun reernbolsoIleno.O,un reernbolso
prorrateadoencualquiermornentodespu_sdelperiodode garantia
de productoexpira,iAdquieraboysuacuerdode protecci6npara
reparaciones!
Seaplican deterrninadaslirnitaciones y exclusiones.Paraobtener
inforrnaci6nadicional y preciosenlos Estados UnidosIlarneal
1-800-827-6655.
El*CoverageenCanad_variaenalgunosarticulos. Paradetalles
IlenoslaIlarnadaCharnuscaCanad_en 1-800-361-6665.
Servicio de instalaci6nde Sears
Sideseasolicitarla instalaci6nprofesionalde Searsde aparatos
dorn_sticos,dispositivosparaabrirportones,calentadoresde agua
y otrosarficulosdorn_sticosirnportantes,en losEstadosUnidoso
Canad_Ilarneal 1-800-4-MY-HOME®.
39
https://manual-hub.com/

Your Home
For troubleshooting, product manuals and home solutions advice:
÷anag÷
www.managemyhome.com
For repair - in your home - of all major brand appliances,
lawn and garden equipment, or heating and cooling systems,
no matter who made it, no matter who sold it!
For the replacement parts, accessories and
owner's manuals that you need to do-it-yourself.
For Sears professional installation of home appliances
and items like garage door openers and water heaters.
1-800-4-MY-HOME ®(1-800-469-4663)
Call anytime, day or night (U.S.A. and Canada)
www.sears.com www.sears.ca
Our Home
For repair of carry-in items like vacuums, lawn equipment,
and electronics, call anytime for the location of your nearest
Sears Parts & Repair Service Center
1-800-488-1222 (U.S.A.) 1-800-469-4663 (Canada)
www.sears.com www.sears.ca
To purchase a protection agreement on a product serviced by Sears:
1-800-827-6655 (U.S.A.) 1-800-361-6665 (Canada)
Para pedir servicio de reparaci6n Au Canada pour service en fran£ais:
a domicilio, y para ordenar piezas: 1-800-LE-FOYER Mc
1-888-SU-HOGAR ® (1-800-533-6937)
(1-888-784-6427) www.sears.ca
;ii
® Registered Trademark /TMTrademark of KCD IP, LLC in the United States, or Sears Brands, LLC in other countries
® Marca Registrada /TMMarca de Fabrica de KCD IP, LLC en Estados Unidos, o Sears Brands, LLC in otros paises
MCMarque de commerce /MDMarque deposee de Sears Brands, LLC
https://manual-hub.com/
-
 1
1
-
 2
2
-
 3
3
-
 4
4
-
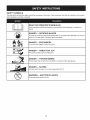 5
5
-
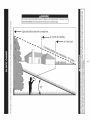 6
6
-
 7
7
-
 8
8
-
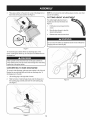 9
9
-
 10
10
-
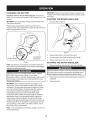 11
11
-
 12
12
-
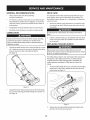 13
13
-
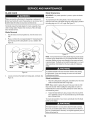 14
14
-
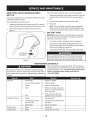 15
15
-
 16
16
-
 17
17
-
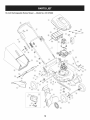 18
18
-
 19
19
-
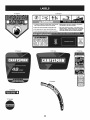 20
20
-
 21
21
-
 22
22
-
 23
23
-
 24
24
-
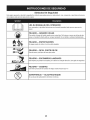 25
25
-
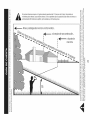 26
26
-
 27
27
-
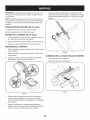 28
28
-
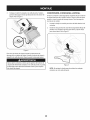 29
29
-
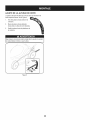 30
30
-
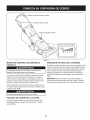 31
31
-
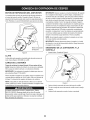 32
32
-
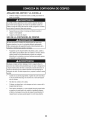 33
33
-
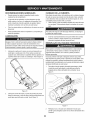 34
34
-
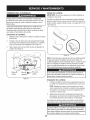 35
35
-
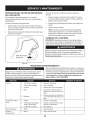 36
36
-
 37
37
-
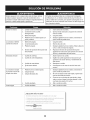 38
38
-
 39
39
-
 40
40


Craftsman 247.370480 Manual de usuario
- Categoría
- Cortadoras de césped
- Tipo
- Manual de usuario
en otros idiomas
- English: Craftsman 247.370480 User manual